Photographic vision: Motion
Posted on July 6, 2015
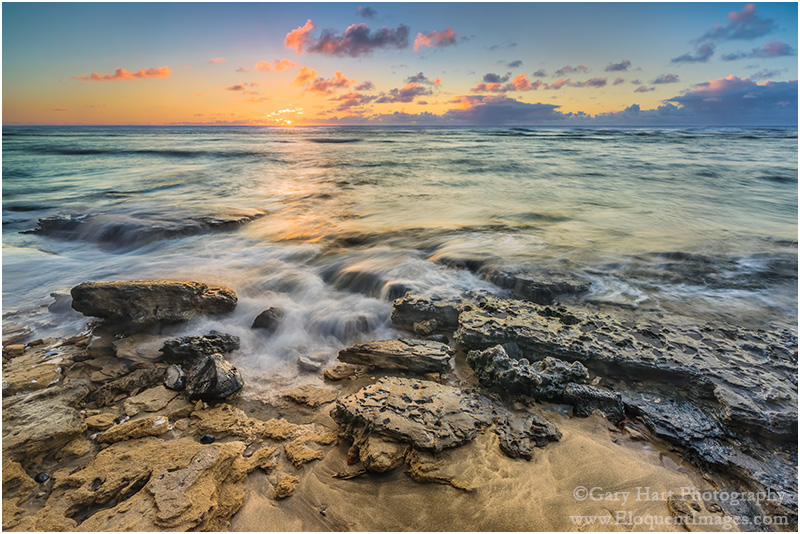
Sunset on the Rocks, Ke’e Beach, Kauai
Sony a7R
Sony/Zeiss 16-35
1 second
F/18
ISO 50
True story
I once had a photographer tell me that he didn’t like blurred water images because they’re “not natural.” The conversation continued something like this:
Me: “So how would you photograph that waterfall?”
Misguided Photographer: “I’d use a fast shutter speed to freeze the water.”
Me: “And you think that’s more natural than blurred water?”
Misguided Photographer: “Of course.”
Me: “And how many times have you seen water droplets frozen in midair?”
Misguided Photographer: “Uhhh….”
Photographic reality
The truth is, “natural” is a target that moves with the perspective. Humans experience the world as a 360 degree, three-dimentional, multi-sensory reel that unfolds in an infinite series of connected instants that our brain seamlessly processes as quickly as it comes in. But the camera discards 80 percent of the sensory input, limits the view a rectangular box, and compresses those connected instants into a single, static frame. In other words, it’s impossible for a camera to duplicate human reality—the sooner photographers get that, the sooner they can get to work on expressing the world using their camera’s very different but quite compelling reality.
Despite the creative opportunities in their hands (or on their tripod), many photographers expend a great deal of effort trying to force their cameras closer to human reality (HDR, focus blending, and so on)—not inherently wrong, but in so doing they miss opportunities to reveal overlooked aspects of our complex natural world. Subtracting the distractions from the non-visual senses, controlling depth of focus, and banishing unwanted elements to the world outside the frame, a camera can distill a scene to its overlooked essentials, offering perspectives that are impossible in person.
Motion
While a still image can’t display actual motion, it can convey an illusion of motion that, among other things, frees the viewer’s imagination and establishes the scene’s mood. Nothing like our experience of the world, a camera can freeze the extreme chaos of a single instant, or combine a series of instants to convey a pattern of motion.
Combining creative vision and technical skill, a photographer chooses where on the continuum that connects these extremes of motion will fall: The sudden drama of a crashing wave, or the soothing calm of soft surf; the explosive power of a plunging river, or the silky curves of tumbling cascades. Or perhaps someplace in the midrange of the motion continuum, stopping the action enough that discrete elements stand out, but not so much that a sense of flow is lost.
Blurred water
One question I’m quite frequently asked is, “How do I blur water?” And while there’s no magic formula, no shutter speed threshold beyond which all water blurs, blurring water isn’t that hard (as long as you use a tripod). In fact, when you photograph in the full shade or cloudy sky conditions I prefer, it’s usually more difficult to freeze moving water than to blur it (which is why I have very few images of water drops suspended in midair).
In addition to freezing motion or revealing a pattern of motion, an often overlooked opportunity is the smoothing effect a long exposure has on choppy water. I photograph at a lot of locations known for their reflections, but sometimes I arrive to find a wind has stirred the water into a disorganized, reflection thwarting frenzy. In these situations a long exposure can often smooth the chop, allowing the reflection to come through. Rather than the mirror reflection I came for, I get an ethereal, gauzy effect still captures the reflection’s color and shape.
The amount of water motion blur you get depends on several variables:
- The water’s speed—the faster the water, and the (especially) the more whitewater (green water, no matter how fast it’s moving, doesn’t usually display obvious motion blur), the greater the blur
- Your focal length—the longer the focal length, the greater the blur
- Your distance from the water—the closer the water, the greater the blur
- And of course, the shutter speed—the longer your shutter is open, the greater the blur
Of these variables, it’s shutter speed that gets the most attention. That’s because focal length and subject distance are compositional considerations, and we usually don’t start thinking about blurring the water until after we have our composition. (This is as it should be—when composition doesn’t trump motion, the result is often a gimmicky image without much soul.)
You have several tools at your disposal for reducing the light reaching your sensor (and thereby lengthening your shutter speed), each with its advantages and disadvantages:
- Reducing ISO: Since you’re probably already at your camera’s native ISO (usually 100), this option usually isn’t available. Some cameras allow you to expand the ISO below the native value, usually down to ISO 50. That extra stop of shutter duration you gain comes with a (very) slight decrease in image quality—most obvious to me is about 1/3 stop of dynamic range lost.
- Shrinking your aperture (larger f-stop value): A smaller aperture also buys you more depth of field, but it also increases diffraction. Also, lenses tend to be less sharp at their most extreme apertures. As a general rule, I resist going with an aperture smaller than f11 unless it’s absolutely necessary. That said, I often find myself shooting at f16 (and only very rarely smaller), but it’s always a conscious choice after eliminating all other options (or a mistake).
- Adding a polarizing filter: In addition to reducing reflections, a polarizer will subtract 1 to 2 stops of light (depending on its orientation). When using a polarizer you need to be vigilant about orienting it each time you recompose (especially if you change your camera’s orientation), and monitoring its effect on the rest of your scene.
- Adding a neutral density filter: A neutral density filter is, as its name implies, both neutral and dense. Neutral in that it doesn’t alter the color of your image; dense in that it cuts the amount of light reaching your sensor. While a dark enough ND filter might allow you to blur water on even the brightest of days, it does nothing for the other problems inherent in midday, full sunlight shooting. ND filters come in variable and fixed-stop versions—because I prefer the flexibility of variable NDs (the ability to dial the amount of light up and down), I live with the vignetting they add to my wide angle images.

Before Sunrise, South Tufa, Mono Lake
Here a 3-second exposure smoothed a wind-induced chop and restored the reflection.
Because blurring water depends so much on the amount of light reaching your sensor, I can’t emphasize too much the importance of actually understanding metering and exposure, and how to manage the zero-sum relationship between shutter speed, aperture (f-stop), and ISO.
Read my Exposure basics Photo Tips article
I use Singh-Ray filters
Bracketing for motion
Back in the film days, we used to bracket (multiple clicks of the same scene with minor adjustments) for exposure. But in today’s world of improved dynamic range and pre- and post-capture histograms, exposure bracketing is (or at least should be) limited to photographers who blend multiple exposures. Today I only bracket for scene changes that will give me a variety of images to choose between later.
Often my scene bracketing is for depth of field, as I run a series of clicks with a range of f-stops, then decide later whether I want a little or a lot of DOF. But my most frequent use of scene bracketing is to capture a variety of water motion effects. I start by finding a composition I like, then adjust my shutter speed (compensating for the exposure change with ISO and/or f-stop changes) to get different motion blur.
River and stream whitewater is usually (but not always) fairly constant, so my adjustments are usually just to vary the amount of motion blur. But when I’m photographing waves, the timing of the waves is as important as the motion blur. It helps to stand back and observe the waves for a while to get a sense for any patterns. Watching the direction of the waves and the size of the approaching swells not only allows me to time my exposures more efficiently, it also keeps me safe (and dry).
Star motion
Few images validate the power of the camera’s unique vision better than a scene etched with the parallel arcs of rotating stars (yes, I know it’s actually not the stars that are rotating). Nothing like human reality, the camera’s view of the night sky is equal parts beautiful and revealing. (Can you think of a faster, more effective way to demonstrate Earth’s rotation than a star trail image?)
Here are the factors that determine the amount of stellar motion:
- Exposure duration: The longer your shutter is open, the more motion your sensor captures.
- Focal length: Just as it is with terrestrial subjects, a longer focal length shrinks the range of view and magnifies the stars that remain.
- Direction of composition: Compositions aimed toward the North or South Poles will display less star motion than compositions aimed toward the celestial equator. That’s because, due to Earth’s rotation on its axis (an imaginary, infinite line skewering our North and South Poles), everything in the sky rotates 360 degrees, around the Poles, in 24 hours. But the farther a star is from a Pole, the greater the visual distance it needs to cover to complete its circuit (it appears to move faster).
As with water motion, you can choose between a long exposure that exaggerates stellar motion, or a shorter exposure that freezes the stars in place to display a more conventional night sky (albeit with more stars than our eyes can discern).
Read more in my Starlight photography Photo Tips article
So what’s the point?
In the static world of a photograph, it’s up to the photographer to to create a sense of motion. Sometimes we achieve this with lines that lead the eyes through the scene, but even more powerful is an image that uses motion to tap its viewers imagination. Your handling of the motion in your scene is a creative choice that’s enabled by your technical skill.
For example
I captured this beach sunset at Ke’e Beach on Kauai last month while co-teaching a workshop with Don Smith. I’ve photographed enough at Ke’e to know there are a couple of very different options there. One option is to follow a short trail west, toward the Na Pali Cliffs, to a rocky section of coast where the waves crash and large, rounded boulders predominate. But I’ve always preferred the calmer scene to the east, along the smooth beach, where the water is shallow and the surf laps gently at wave-carved sand and basalt.
So while Don led most of the group toward the rocky shore, I guided a small handful of outliers about a quarter mile in the other direction, up the beach, beyond the activity and around a bend until we had the pristine beach to ourselves. After a little time spent trying assemble the scene’s variables into a cohesive composition, we settled down and went to work. I finished with several dozen clicks of this composition, or something quite similar, each with different wave action—approaching, breaking, receding—and motion ranging from still to extreme blur.
A gallery of motion
Click an image for a closer look, and a slide show. Refresh the screen to reorder the display.


Are you a photographer or a tourist?
Posted on June 30, 2015

Warm Light, El Capitan Clearing Storm, Yosemite (2007)
Canon EOS-1Ds Mark II
17 mm
1/6 second
F/11
ISO 100
Years of leading photo workshops and reviewing the work of others has convinced me that to capture great images and maintain domestic bliss, you need to decide before the trip whether you’ll be a tourist or a photographer. You just can’t have it both ways. (I say this completely without judgement—there are times when I opt for tourist mode myself, and on a recent Mexico cruise I didn’t even take my camera.)
I see many well composed images taken at the wrong times—harsh shadows, cloudless skies, and poorly aligned light are all signs that the photographer was sightseeing with his or her camera. Not that there’s anything wrong with that—if your priority was simply to record the scene, the image was a success.
But to get the pictures serious photographers covet, you need to be out there at the most inconvenient times. These are sacrifices a photographer is willing to make, but others? Not so much. Many family vacations and intimate getaways have been ruined by the photographer who thinks it’ll no problem sneaking out for sunrise (“I’ll be quiet—you won’t even know I left”), or waiting just a few minutes longer after sunset (“Denny’s will still be open when we get back”).
When I’m a photographer, my decisions put me outside when the conditions are most conducive to finding the images I want, with no consideration of comfort or convenience: Sunrise, sunset, overcast skies, wild weather, and after dark are all great times for photography, but not necessarily the most comfortable times to be in the elements. Face it—few people without a camera are thrilled to be outdoors when they’re sleepy, hungry, cold, or wet.
That’s why, when I’m a tourist, my goal is to relax and and enjoy the sights with the people I love—I leave my camera home and simply take in nature’s splendor. My lights-out and rise times are based on comfort and enjoyment, and my forays into nature are timed for convenience and to coincide with the most pleasant weather for being outside. This approach keeps my body and mind fresh, my loved ones happy, and gives me a perspective that I think ultimately benefits my photography (try it sometime).
Of course doing nature photography for a living makes it easier for me to . But what about the photographers who are so busy that their only opportunity to take pictures is when they’re on vacation? My suggestion is to get buy-ins on your objectives before the trip, and be as specific as possible: “I’d like to shoot sunrise on our second morning at the Grand Canyon,” “I’d really like to do a moonrise shoot in Yosemite on Wednesday evening,” and so on. The rest of the trip? Bring a point-and-shoot, store your serious camera gear out of sight, and don’t let anyone so much as see a longing glimpse in its direction for the rest of the trip.
For today’s image I pretty much hung out (alone) in miserable snow and wind waiting for the storm to break. On this stormy evening, I chose the bridge just east of El Capitan Meadow. Though there were no guarantees, I knew if I went inside to warm up, I’d be out of position if something special happened. Shortly before sunset the snow stopped and soon thereafter I was treated to about 20 minutes of beautiful warm light dancing with the retreating clouds swirling atop El Capitan. Of course there are many times when nothing happens and all I get is soggy clothes and frigid limbs for my trouble, but those times only make the successes like this that much more special.
A gallery of solitary sacrifices
(Images that required discomfort and inconvenience that I wouldn’t subject a non-photographer to)
Click an image for a closer look, and a slide show. Refresh the screen to reorder the display.


2015 Grand Canyon Raft Trip: Mishaps
Posted on June 22, 2015
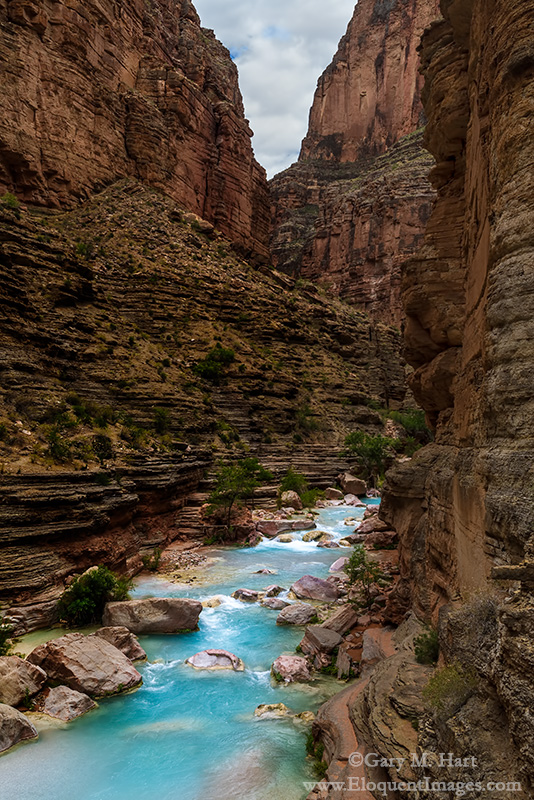
Blue Ribbon, Havasu Creek, Inner Grand Canyon
Sony a7S
Sony/Zeiss 24-70
1/20 second
F/11
ISO 50
May 2014
After a short but strenuous hike in 90-plus degree heat, I wasn’t thinking about much more than cooling off. And what better way to cool off than a plunge into the cerulean chill of Havasu Creek? Rushing toward its imminent liaison with the Colorado River, Havasu Creek’s disorientingly blue water plunges through gaps in the red sandstone, pauses and widens into inviting pools, then departs rapidly downstream.
Beckoning me forward was one of a series of these glistening pools, connected like sapphires on a necklace by the creek’s cascading strand. Wading in to my knees, I watched my feet disappear in mineralized water that obscured everything in an azure haze. A few steps later I was submerged to my shoulders, feet planted firmly to brace against a deceptively strong current, basking in the coolness. Refreshed from the neck down, I took a deep breath and completed my immersion.
Coinciding with my sudden dunking came the insight that I was still wearing my (new) glasses. Oops. Unfortunately, my cat-like reflexes were no match for the light-speed enthusiasm the brisk current demonstrated for my glasses and just like that they were whisked away to who knows where.
Given the water’s speed and opacity, I knew chances of recovery were remote. Nevertheless, I quickly drafted a handful of nearby rafters to scan the shallow water near the pool’s outlet; meanwhile, I plunged the nearby depths. After ten minutes of fruitless diving and blindly groping the creek bed, I was ready to give up the glasses as lost when a passing hiker offered to give it a try with his diving mask. And try he did, with relish. Disappearing beneath the surface for extended periods, bobbing up just long enough to refill his lungs, then disappearing again, the hiker must have repeated his dive a dozen or more times before emerging fist-first, glasses in hand.
I was surprised, ecstatic, and appropriately effusive. To say I was lucky to be spared the consequences of my own stupidity would be an understatement. I mean, seriously, who swims wearing $500 glasses? Grateful for the reprieve, I vowed I’d never do that again. (Duh.)
May 2015
The first evening of this year’s Grand Canyon raft trip was markedly different from anything we experienced last year. Gone were the warm temperatures and relentless sunshine, replaced by a cool breeze and heavy clouds. Last year the 50-degree water of the Colorado River was a bracing relief; this year it was a bone-chilling nemesis.
Which of course explains why, while rallying the willpower for my first full-immersion bath in the chilly river (a required raft trip ritual that’s always as satisfying in retrospect as it is daunting in anticipation), I was thinking about nothing more than getting the ordeal over with. And not at all about the (very same) glasses perched on my face.
To my credit, I immediately realized my mistake, but the river gods frown on stupidity. This year I was unable to rally an army of hardy rafters willing to brave the chill (and neither was Yours Truly brave enough to do any more than peer into the frigid depths from the relative warmth of the riverbank), nor did a magic diving hiker materialize to save the day.
After surviving last year’s trip relatively unscathed, it turns out that the lost glasses were just the first of a series of mishaps that made this trip memorable. For example (in no particular order):
- At 4 a.m. on our second morning, the group was wakened by large raindrops that quickly turned into a thunder and lightning infused downpour that sent 28 rafters scurrying to assemble, in the dark, tents they’d never assembled before (insert Keystone Cops music here).
- Cold and rain dogged us all week. Air temperatures never climbed above the mid-70s, not too bad until you factor in the rain, persistent wind, and continual drenchings by 50-degree river water. There was one day in particular when it just seemed that we couldn’t get dry, and several times I felt like we were navigating a gale on a North Sea fishing trawler. (That was also the day when I made the mistake of asking one shivering rafter if she’d do this again, and she replied, “That’s like asking a mother in labor if she’d like to have another baby.” Point taken.)
- Pushing off from camp on our final morning, I realized that in the confusion of organizing 28 rafters and 4 guides for the group photo, I’d left my insulated rain pants and camping pillow back at the campsite.
- Midway through the trip I dropped my primary camera (Sony a7R) on a slab of sandstone and damaged its electronic viewfinder. I then compounded the problem by using the still functioning LCD to go into the menu system and manually turn on the viewfinder (reasoning that maybe that would correct the problem). Not only did that not fix the viewfinder, it turned off the LCD, which of course left me with no more access to the menu system necessary to turn the LCD back on. (I never claimed to be smart—refer to glasses story above.)
- Last year we managed to keep all 28 rafters on the rafts through every one of 60-plus rapids. This year we did almost as well, keeping 27 of 28 rafters out of the river. The one mishap occurred when a rafter was launched mid-rapid and sent cartwheeling into the Colorado River with one hand still fused by a death grip to his safety rope. He was quickly pulled back in, soaking wet but otherwise unscathed. Said rafter learned later that, while he was indeed hanging on with both hands as instructed, his handholds were reversed from the prescribed arrangement, thereby creating a hinge effect that swung him right into the water when one hand was torn free. The rapid: Unkar. The rafter: uh, Anonymous.
Did all this difficulty ruin my trip? Not even close. I had an extra pair of glasses and a backup camera body, so those losses were barely an inconvenience. And while the cost of a new pair of glasses and camera repair are quickly forgotten, the stories surrounding those losses will always bring a smile. The misery of a river soaking fades as soon the clothing dries (or so I’ve been told), but the story will last forever. The chilly weather? I’ll gladly trade a few days of discomfort for the incredible photography our rainy weather brought.
More than anything, I cite this litany of mishaps to underscore a truth I’ve learned in ten years of leading photo workshops: the greater the hardship, the better the memories. And true to form, this year’s raft trip group bonded with a wonderful spirit of cooperation and humor, largely because of our mishaps and shared discomfort. I’m already looking forward to next year.
Inside Out at Grand Canyon
Click an image for a closer look, and a slide show. Refresh the screen to reorder the display.


2015 Grand Canyon Raft Trip: Unexpected gems
Posted on June 14, 2015

Emerald Pool, Elves Chasm, Grand Canyon
Sony a7R
Sony/Zeiss 24-70
.4 seconds
F/11
ISO 50
Before my first raft trip last year, I couldn’t help wondering about the experience of being at the bottom of Grand Canyon. My mind’s eye visualized the canyon’s immensity, the experience of being dwarfed in the shadow of mile-high walls, a towering vertical tapestry of Earth’s history. I knew I’d be overwhelmed, but I also knew there’d be aspects I hadn’t expected, the surprises that make photography so rewarding—I just had no idea of the magnitude of those surprises.
I returned this year, and continued to be surprised by what we encountered. On both trips I most certainly got my share of the large scale, overwhelming awe I expected—the best comparable I can think of is the experience of reclining beneath a dark sky and trying to comprehend the age and distance traveled contained in each pinpoint of starlight. But as is usually the when we look more closely at something (or someone), I found complexity and intricacy far beyond what I’d imagined. And so it was inside the walls of Grand Canyon, a location known for its size, that I was most awed by the small stuff I found there.
Return to Grand Canyon over many years and from the rim you’ll see little change in the walls. From a distance it’s easy to perceive these walls as a permanent, impermeable fortress, and to picture the Colorado River as an uncut ribbon that starts in Marble Canyon and terminates in Lake Mead. Pretty simple.
But get down inside Grand Canyon and you’ll soon see that it’s all about change. Navigating around house-size rocks, rafters can look up to the scar where the rock separated from the wall above and plunged into the river (just picture that!). And it doesn’t take long to recognize that virtually every rapid is the river’s reaction to rocky debris washed down from a narrow side canyon—some of the rapids predating John Wesley Powell by unknown centuries, others forming or changing in our lifetime.
The majority of these side canyons are dry most of the year, coming to life only when monsoon rain falls faster than the rock can absorb it. But what happens to the rainfall that gets absorbed? It percolates downward into an immense aquifer, a natural underwater storage tank that slowly releases its contents as springs that contribute small tributary creeks that follow a circuitous path of least resistance to etch a route down to the Colorado River. Their moist path forms green oases that stand out in complementary contrast to the arid, red surroundings.
Elves Chasm, Matkamamiba Canyon, Deer Creek Fall, Blacktail Canyon, Stone Creek Fall: Each has its own look and feel depending on the amount of water, the distance and speed at which it traveled, and the underlying geology it must work around and through. Most of these features would have been easily overlooked by anyone floating downstream, but I soon came to realize that these little treats were just a sampler of the rewards to be bestowed on anyone taking the time to look more closely. I left the canyon with the distinct impression that for every exquisite location like these we explored, we left ten comparable locations untouched.
Elves Chasm, pictured here, requires a bit of rock scrambling to reach. There’s a trail of sorts, but in several places the trail is interrupted by an inconvenient rock or ledge. Fortunately, there’s plenty to photograph along the way (it’s only a couple of hundred yards from the river), so even those who can’t make it all the way to where the waterfall tumbles into an emerald pool will find plenty to see and photograph.
Inside out at Grand Canyon
Click an image for a closer look, and a slide show. Refresh the screen to reorder the display.


Lucky strike
Posted on June 10, 2015

Half Dome Lightning Strike, Glacier Point, Yosemite
Sony a7S
Sony/Zeiss 24-70
.4 seconds
F/11
ISO 50
A Lightning Trigger in California is usually about as useful as a fishing pole in the Sahara. But every once in a while a little sub-tropical moisture sneaks up the Sierra crest and blossoms into afternoon thunderstorms. I monitor the weather daily (okay, that’s probably understating it a bit) for just these opportunities, rooting for Yosemite thunderstorms the way a Cubs fan roots for a World Series. And until last weekend, with just about as much success.
Last week the moist vestiges of Hurricane Blanca were sucked into an unstable airmass above the Sierra, just the thunderstorm recipe I’d been looking for. While each day’s Yosemite forecast called for at least a slight chance of afternoon thunderstorms, the Saturday forecast looked particularly promising. Nevertheless, several days out, the Saturday thunderstorm probability from the National Weather Service varied widely, fluctuating with each report between 40 and 70 percent. But as Saturday approached, the chances settled in at around 60 percent and I made plans to be there.
Saturday morning my brother Jay and I left Sacramento a little after 8 a.m., and were pulling into Yosemite Valley before noon. Blue sky prevailed upon our arrival, but by the time we finished our sandwiches at Tunnel View, cumulus puffs were sprouting along the crest, a very good sign. Stomachs full, we continued up the road toward Glacier Point. In the forty or so minutes it took to reach Washburn Point, just up the road from Glacier Point, the cumulus puffs had congealed into roiling gray mass that was already delivering coin-size raindrops to my windshield.
The best way to photograph lightning is from a distance (the greater the better), not impossible at the Grand Canyon, where I can stand on one rim and photograph strikes pounding the opposite rim a dozen or more miles away. But my Yosemite lightning target is more specific: Half Dome, which towers above Yosemite Valley like a granite lightning rod, no more than 2 1/2 miles from any vantage point on the Glacier Point road—well within the Margin of Death of even a moderate thunderstorm. (The Margin of Death, or MOD, is my term for the radius surrounding the last lighting strike within which the next bolt could strike.)
In addition to the dramatic profile of Half Dome above Vernal and Nevada Falls, Washburn Point has the advantage of nearby, elevated parking lot that would allow us to set up a Lightning-Trigger-armed camera on a tripod and wait from the safety of the car with a view of the cameras. So, rather than risk trying the more exposed and more remote (much longer sprint to the car) Glacier Point vistas, we started at Washburn Point.
Setting up, we saw lightning firing on the most distant peaks beyond Cloud’s Rest, and safely behind Half Dome. This being my first real attempt with the Lightning Trigger on my Sony bodies (with the exception of one rushed, impromptu, and unexpectedly successful attempt at White Sands last week), I was looking forward to comparing the response of the Sony bodies to my Canon 5D Mark III (shutter lag is a major body-to-body variable that can make or break a lightning shoot). But since Jay didn’t have a Lightning Trigger, and his body is an older Canon 5DII, good brother that I am (plus, he threatened to tell Mom if I didn’t share), I let him use my Lightning Trigger (I have two) and 5DIII.
Soon the rain and wind intensified, the flashes came more frequently, and the thunder grew louder, but rather than retreat to safety, we stayed with our cameras. The activity continued to approach until it seemed to be centered just down the hill in the general direction of Glacier Point, visible to us not as discrete bolts but rather as general flashes in the clouds. Still, we knew the lightning was close because of the relatively short gap separating flash and bang, yet it wasn’t until Jay said he felt the hair standing up on his head and arms that we got smart. Or rather, less stupid.
Back in the car we watched the show at Washburn Point until it abated, then decided to move down the road a bit, to another view closer to Glacier Point. Here we couldn’t see our cameras from the car, but we were able to park within 50 feet or so of their vantage point. Despite the continued dangerously close proximity of the lightning, we again stayed out a little longer than we should have, finally being driven back to shelter not by lightning but by the wet and cold conditions.
This was my first attempt at lightning since my switch to Sony; I was using the a7S because the a7R wasn’t fast enough for lightning (a problem completely cured on the a7RII). The a7S caught all three of the Half Dome hits I saw, with the twin-branched bolt you see here being the most spectacular. My composition was fairly wide for a couple of reasons: first, because the wider I go, the greater my odds of capturing something; second, with Nevada and Vernal Falls on the right, and Tenaya Canyon and Mt. Watkins on the left, the scene justified it.
To say I was lucky this afternoon would be an understatement. Not only did a lightning bolt hit my intended target, my camera captured it (never a sure thing, no matter how fast the camera), and I actually lived to share the shot with you. Here in the comfort of my recliner, I’m kind of at a loss to explain why I thought it was a good idea to stay out with lightning landing well within the MOD. While there are definitely things to tend to while waiting for lightning—shielding the camera from rain, wiping raindrops from the lens, adjusting exposure as the light changes, monitoring that the camera does indeed fire with a visible strike, and simply answering questions from curious onlookers (and preempting their urge to touch the equipment)—none is important enough to risk my life. In my defense, I am much more cautious when I’m guiding a group, which of course will be small consolation to my wife and kids at my funeral.
Photographing daylight lightning
Here are my tips for photographing daylight lightning:
- You need a lightning sensor that detects the lightning and fires your shutter much faster than your reflexes can react. The only sensor that I’ve found to work reliably is the Lightning Trigger by Stepping Stone Products (I get no kickback, I swear). Of course have brands many to choose from, some much cheaper than the Lightning Trigger. While I have no direct experience with many of the other sensors, I do lead lightning workshops and have witnessed some major fails by other brands.
- Your camera must be fast, the faster the better. The speed you’re looking for is the time from the shutter-button press until shutter release: shutter lag. Unfortunately, shutter lag is a difficult number to find, and it’s rarely (never?) provided by the manufacturer. The best resource I’ve found is the Performance tab of the Imaging Resource camera reviews. Even they can’t provide a simple value because there are multiple variables, and you can’t simply assume that your camera is automatically working at the fastest. To ensure the fastest shutter lag possible, turn off autofocus (this is important) and shoot in manual exposure (on some cameras this might not make much difference, but there’s no way of knowing for sure so I think it’s best to just turn it off). The pre-focused time (shutter button pressed halfway) is what you’re going for, but some (most?) triggers don’t do this—the Lightning Trigger does.
- The shutter-speed “sweet spot” is 1/8 to 1/4 second, but anywhere between 1/15 and 1/2 second should work pretty well. If you’re too fast, you risk missing some of the secondary strikes that often accompany the initial strike; if you’re too slow, the lighting tends to get washed out. Keeping the shutter open long enough to get into the sweet spot in broad daylight often requires the lowest ISO possible (it helps if your camera goes down to ISO 50), and a polarizer (I use Singh-Ray). A neutral density filter will work too, but make sure you don’t go too slow with the shutter speed or the lightning you capture might faint or not even visible.
- Come with a strategy for keeping you and (especially) your gear dry. I never go out to photograph in the rain without my waterproof gear, which keeps me dry from head-to-toe: rain hat, parka, waterproof over-pants, waterproof shoes—a stylish ensemble that frees my umbrella for my camera. This strategy works great when there’s no lightning, but—well, let’s just say that an umbrella might not be the best choice when lightning’s in the area. When photographing lightning, I use a waterproof rain cover for my camera (which I won’t recommend because it’s a pain and I’m looking for something I like better—stay tuned). And as much as I hate lens hoods (they just get in the way), I have to admit that they can help keep raindrops off your front lens element. I also make sure to carry multiple lens cloths in my pockets (because there are too many pockets in photography, so it’s just easier to have a cloth in each pocket than it is to remember which pocket I put it in) and check my front element for raindrops frequently. Also handy is a bath towel to dry all of your equipment before you put it away. A chamois (check your local auto parts store) also works great for this. And a garbage or plastic grocery bag (there’s always one in my camera bag) is great for tossing over your camera any time you’re caught in a sudden downpour.
Some links
- Before attempting to photograph lightning, visit the NOAA lightning safety page
- Read my “Outdoor Photographer” article on Grand Canyon monsoon photography (lots of lightning tips)
- Photo Tip: Lightning Photography
- Sign up for a Grand Canyon monsoon photo workshop, where Don Smith and I do our best to get you lightning captures in one of the most beautiful places on Earth (unfortunately, Yosemite doesn’t offer the frequency of thunderstorms necessary to support a lightning workshop)
Upcoming workshops
A stormy weather gallery
Click an image for a closer look, and a slide show. Refresh the screen to reorder the display.


2015 Grand Canyon Raft Trip: The Little Colorado
Posted on June 8, 2015

Red, White, and Blue | Little Colorado River | Grand Canyon
Sony a7R
Sony/Zeiss 16-35
1/50 second
F/11
ISO 100
“Uh, we’re going to need more time here”
Before last year’s raft trip, my relationship with the Little Colorado River was limited to the view from the Cameron Suspension Bridge on US 89: Rarely more than a muddy trickle, the Little Colorado seemed better suited as an indicator of recent precipitation than a photo destination. So last year, when Wiley (my raft trip’s lead guide) said we’d be stopping at the Little Colorado River confluence, I shrugged.
The day had been a mix of clouds and sun, great for photography. The sun was behind the clouds when we tied up on the rocks at the confluence; as I hopped off the raft, camera bags in tow, Wiley told us to be back on the raft in 45 minutes. I remember thinking, Really? Surely we can find a better spot to take advantage of this great light, but I kept my mouth shut. Expectations low, I rounded the corner and stopped like I’d slammed into a brick wall. Unable at first to process what I was seeing, I finally turned and called back to Wiley, “Uh, we’re going to need more time here.” And it was so.
So what happened?
Clearly, somewhere between Cameron and the canyon, the Little Colorado had gotten an infusion. And not just an infusion of regular old greenish-brown river water, but an infusion of mineral-laced, other-worldly turquoise water. It turns out that, after leaving Cameron, the Little Colorado carves a deep (and quite scenic) canyon, a canyon so deep that it cuts into a travertine- and limestone-laced aquifer that recharges and colors its flow. The limestone also paints the river’s bed a reflective white, further enhancing the turquoise hue. (It’s the same color, for the same reason, as the more heralded Havasu Creek.)
Do-over
Unfortunately, on that first visit, the photogenic clouds and light that had been with us all day took our arrival as its cue to move on, forcing us photograph this beautiful scene in ordinary, harsh, mid-afternoon light. On that visit, despite the extra time, I wasn’t able to capture anything that would do this magnificent spot justice. But I made plans to return, and strategized with Wiley the best way to maximize our chances for good light the next time.
Our original plan for the Little Colorado this year was a late afternoon stop on day 2, but after a windy morning, Wiley suggested stopping early at a more sheltered campsite. Though that meant not getting to the Little Colorado until the morning of day 3, the weather forecast before we departed (to the land of no weather forecasts) had called for lots of clouds and a slight chance of showers for most of the week; the clouds had been with us so far, so I crossed my fingers that they’d hang in there for us.
And hang in they did. For the hour-and-half we had there, the sun made cameo appearances but largely remained offstage. In place of the typical horizon-to-horizon blue sky, we got patches of blue mixing with rapid changing cumulus. When the sun did appear, it spotlighted individual features rather than illuminate the entire scene.
The biggest problem I had was deciding where to point my camera. Usually I identify where the best shot is and concentrate my attention there. In this case, because I couldn’t decide, I shot both upstream and down, hedging my bets with wide and tight, horizontal and vertical compositions. I know I left a lot of shots farther upstream, so I guess I’ll just need to go back next year.
Inside out at Grand Canyon
Click an image for a closer look, and a slide show. Refresh the screen to reorder the display.


2015 Grand Canyon raft trip: Getting started
Posted on June 3, 2015

Marble Canyon Rapids, Grand Canyon
Sony a7R
Sony/Zeiss 16-35
1/6 second
F/11
ISO 50
Rafting Grand Canyon last year was a bucket list item, a one-time opportunity to do something I’d dreamed about my entire life. I came into that trip with ridiculously high expectations, all of which were exceeded enough that I scheduled another, then waited a year to find out whether the first one was just lightning in a bottle.
After departing our Las Vegas hotel at 4:45 a.m. and flying to a small airstrip near Lee’s Ferry, we met our guides, absorbed a thorough orientation from Wiley, our experienced, knowledgable, talented, hard working lead guide (this would describe all of our guides), and were on the water before 10:00. We were 2 rafts packed with 28 rafters, 4 guides, equipment, camera gear, and food to sustain the entire operation for six days.
Most in the group were first-timers, excited for sure, but also a little anxious about what lay ahead. Fortunately, starting from Lee’s Ferry, the first day on the river is relatively benign, a gentle float that allows neophyte rafters to ease into the experience and get to know each other. Bobbing downstream at a leisurely pace, we were sprinkled by a few riffles (mini-rapids, unworthy of a name), enjoyed a delicious lunch in the shadow of Navajo Bridge, listened to a couple more brief, on-raft orientation talks, before pulling onshore for the day at around 4:00 p.m.
Our first campsite was at Upper North Canyon in the Marble Canyon section of Grand Canyon (yes, that’s a lot of Canyons). We stumbled through our first “fire-line”—the raft trip equivalent of a bucket-brigade (you know, for when you’re barn’s on fire) that unloads pretty much the entire contents of the raft in about 5 minutes. (By the end of the trip we’d become a well oiled, fire line machine.) After claiming a campsite (picture a 19th century style land rush) and setting up my camp (basically picking a campsite, assembling a cot, and tossing out my sleeping bag), I grabbed my camera and went down to the river in search of an image that would do the view justice.
Though our campsite was chosen for its convenience (location, size, topography), its beauty was pretty representative of Grand Canyon’s entire length. Regrettably, pictures and words cannot display the relentless, humbling awe that engulfs all who venture between the Grand Canyon’s vertical walls. But of course that won’t prevent me from trying.
In this scene I was most struck by the color: the white-on-blue sky, red sandstone walls, and deep green of the Colorado River. Bisecting all this color was a set of white, rock-wrapping rapids. I dropped low and compose wide with my 16-35 to emphasize the foreground rocks and rapids; a vertical orientation included the sky and created the sense that the river was flowing into my frame (and eliminated our campsite, which was just out of the frame to the left).
In refreshing contrast to last year’s trip, the clouds cooperated wonderfully, defusing the late afternoon light to subdue the potentially extreme dynamic range. To convey the water’s motion, I experimented with different shutter speeds, ultimately dropping to ISO 50 to maximize the blur.
The clouds gracing this scene were a harbinger of exciting weather ahead. And while that weather made a good deal more discomfort than the previous year’s trip, it also gave us a corresponding increase in the number of photo opportunities. Stay tuned….
Looking up at Grand Canyon
Click an image for a closer look, and a slide show. Refresh the screen to reorder the display.


Light fantastic: A photographer’s guide to our most essential subject
Posted on May 27, 2015
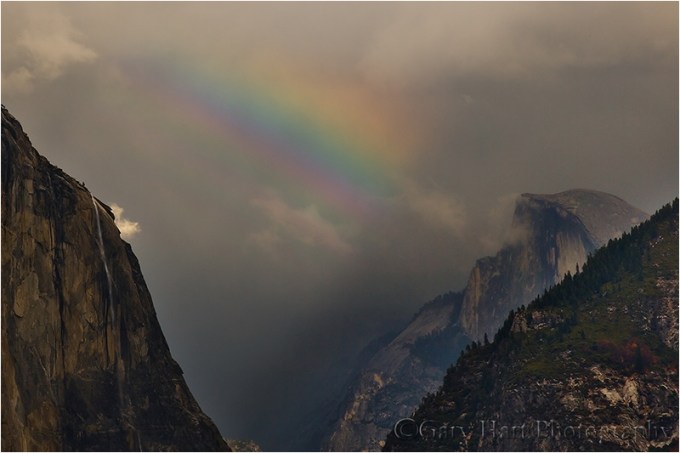
Half Dome and Rainbow, Yosemite (October 2007)
Canon EOS-1Ds Mark II
168 mm
1/40 seconds
F/11
ISO 100
Photograph: “Photo” comes from phos, the Greek word for light; “graph” is from graphos, the Greek word for write. And that’s pretty much what photographers do: Write with light.
Good light, bad light
Because we have no control over the sun, nature photographers spend a lot of time hoping for “good” light and cursing “bad” light (despite the fact that there is no universal definition of “good” and “bad” light). Before embracing someone else’s good/bad light labels, let me offer that I (and most other professional photographers) could probably show you an image that defies any label you’ve heard. The best definition of good light is light that allows us to do what we want to do; bad light is light that prevents us from doing what we want to do.
Studio photographers’ complete control of the light that illuminates (an art in itself) their subjects allows them to create their own “good” light. Nature photographers, on the other hand, rely on sunlight and don’t have that luxury. But knowledge is power: The better we understand light—what it is, what it does, and why it does it—the better we can anticipate the light we seek, and deal with the light we encounter.
The qualities of light

Focused Beam, Upper Antelope Canyon, Arizona
Energy generated by the sun bathes Earth in continuous electromagnetic radiation, its wavelengths ranging from extremely short to extremely long (how’s that for specific?). Among the broad spectrum of electromagnetic solar energy we receive are ultraviolet rays that burn our skin (10-400 nanometers), infrared waves that warm our atmosphere (700 nanometers to 1 millimeter), and the visible spectrum—the very narrow range of wavelengths between ultraviolet and infrared that the human eye sees, in the wavelength range between 400 and 700 nanometers.
When all visible wavelengths are present, we perceive the light as white (colorless). But when light interacts with an object, the object reflects, absorbs, and scatters the light’s wavelengths. When light strikes an opaque (solid) object such as a tree or rock, characteristics of the object determine which of its wavelengths are absorbed; the wavelengths not absorbed are scattered. Our eyes capture this scattered light, send the information to our brains, which translates it into a color.
When light strikes water, some is absorbed and scattered by the surface, enabling us to see the water; some light passes through the water’s surface, enabling us to see what’s in the water; and some light bounces off the surface, enabling us to see reflections.
Let’s get specific
Rainbows
For evidence of light’s colors, look no farther than the rainbow. When light enters a raindrop (or any other drop of water), characteristics of the water cause the light to bend slightly. Because different wavelengths bend different amounts, a single beam of white light is separated into its component colors as it passes through the raindrop. When the separated light strikes the back of the raindrop, it reflects, with different wavelengths (colors) returning at slightly different angles: a rainbow!

Double Rainbow, Yosemite Valley
Canon EOS-1Ds Mark III
1/5 second
F/16.0
ISO 100
38 mm
Blue sky

Poppy Hillside, California Gold Country
White sunlight reaches Earth, the relatively small nitrogen and oxygen molecules that are most prevalent in our atmosphere scatter the shorter wavelengths (violet and blue) first, turning the sky blue. The longer wavelengths (orange and red) continue on to color the sunset sky of someone farther away.
The more direct the sunlight’s path to our eyes (the less atmosphere it passes through), the less chance the longer wavelengths have to scatter and the more pure the blue wavelengths. So when the sun is high in our sky, its light takes the most direct path through the atmosphere and our sky is most blue (all other things equal). In the mountains sunlight has passed through even less atmosphere and the sky appears even more blue than it does at sea level.
On the other hand, when relatively large pollution and dust molecules are present, all the wavelengths (colors) scatter, resulting in a murky, less colorful sky (picture what happens when your toddler mixes all the paints in her watercolor set).
Most photographers (myself included) find homogeneous blue sky boring. Additionally, when the sun is overhead, bright highlights and deep shadows create contrast that cameras struggle to handle.
Sunrise, sunset

Half Dome and Trees at Sunset, Sentinel Dome, Yosemite
Remember the blue light that scattered to color our midday sky? The longer orange and red wavelengths that didn’t scatter overhead, continued on. As the Earth rotates, eventually our location reaches the point where the sun is low and the sunlight that reaches us has had to fight its way through so much atmosphere that it’s been stripped of all blueness, leaving only its longest wavelengths to paint our sunrise/sunset sky shades of orange and red.
When I evaluate a scene for sunrise/sunset color potential, I look for an opening on the horizon for the sunlight to pass through, pristine air (such as the clean air immediately after a rain) that won’t muddy the color, and clouds overhead and opposite the sun, to catch the color.
Overcast and shade
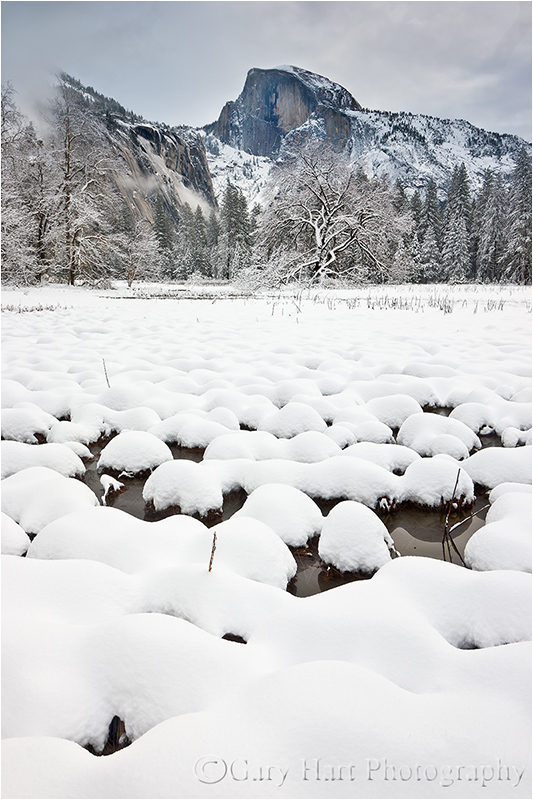
Fresh Snow, Cook’s Meadow, Yosemite
Sunny days are generally no fun for nature photographers. In full sunlight, direct light mixed with dark shadows often force nature photographers to choose between exposing for the highlights or the shadows (or to resort to multi-image blending). So when the sun is high, I hope for clouds or look for shade.
Clouds diffuse the omni-directional sunlight—instead of originating from a single point, overcast light is spread evenly across the sky, filling shadows and painting the entire landscape in diffuse light. Similarly, whether caused by a single tree or a towering mountain, all shadow light is indirect. While the entire scene may be darker, the contrast range in shadow is easily handled by a camera.
Flat gray sky or deep shade may appear dull and boring, but it’s usually the best light for midday photography. When skies are overcast, I can photograph all day—rather than seeking sweeping landscapes, in this light I tend to look for more intimate scenes that don’t include the sky. And when the midday sun shines bright, I try to find subjects in full shade. Overcast and shade is also the best light for blurring water.
Leveraging light
Whether I’m traveling to a photo shoot, or looking for something near home, my decisions are always based on getting myself there when the conditions are best. For example, in Yosemite I generally prefer sunset because that’s when Yosemite Valley’s most photogenic features get late, warm light; Mt. Whitney, on the other side of the Sierra, gets its best light at sunrise; and I’ll only the lush redwood forests along the California coast in rain or fog.
Though I plan obsessively to get myself in the right place at the right time, sometimes Nature throws a curve, just to remind me (it seems) not to get so locked in on my subject and the general tendencies of its light that I fail to recognize the best light at that moment. If I drive to Yosemite for sunset light on Half Dome and am met with thick overcast, I don’t insist on photographing Half Dome. Instead, I detour some of my favorite deep forest spots, like Fern Spring or Bridalveil Creek.
Other times finding the best light is simply a matter of turning around and looking the other direction. Mono Lake is one of those places that reminds me to keep my head on a constant swivel, or risk getting so caught up on the sunrise in front of me that I miss the rainbow behind me.
About this image

Half Dome and Rainbow, Yosemite
On a rainy October afternoon in Yosemite, I did what I often do on rainy afternoons in Yosemite: hang out at Tunnel View, waiting (hoping) for the storm to clear. I’d circled Yosemite Valley in my car several times, but the clouds had dropped well below rim-level and obscured all of Yosemite’s recognizable features.
Yosemite’s clearing usually starts at Tunnel View, and when it happens in the afternoon, a rainbow is possible. But with sunset approaching and the rain showing no sign of relenting, I was losing hope. Anxious for something to do besides wiping the fog from my windshield and listing to rain pelt my roof, I decided to drive through the tunnel for a view to the west (toward the source of any clearing). Seeing nothing promising on the other side, I flipped a quick u-turn and headed back.
The roundtrip was less than five minutes, but I exited the tunnel to see that Half Dome had emerged from the gray muck sporting a vivid rainbow. I screeched to a stop and bolted from the car, changing lenses and wresting my tripod all the way to the vista. I got off just two frames before the light was snuffed, ending up with this image and a valuable lesson: You can’t predict what Yosemite’s weather will be in five minutes based on its weather right now.
(BTW, see that little white cascade trickling down El Capitan’s flank? That’s Horsetail Fall.)
Workshop schedule
Celebrating light
Click an image for a closer look, and a slide show. Refresh the screen to reorder the display.


2015 Grand Canyon Raft Trip: River of Light
Posted on May 20, 2015

River of Light, Grand Canyon, Arizona
Sony a7S
Zeiss 28mm
20 seconds
F/2
ISO 25,600
Last week I took 27 photographers on a 6-day raft trip through the Grand Canyon. It’s the second year I’ve done this (and I have no plans to stop). This year’s conditions were significantly different from last year’s: colder, wetter (it rained all but our first and last days), and windier. But with the miserable weather came much better photography, as we enjoyed beautiful light and skies throughout the trip. And I don’t think the conditions dampened anyone’s spirits.
At the post-trip pizza party, I asked everyone to share something that made the trip special for them. And as great as the photography was (it was), most of the answers centered on the fun we had, the friendships that formed, and the one-for-all and all-for-one spirit that bound our group. I couldn’t have agreed more, but left the gathering (we could have gone on all night) without expressing a personal highlight: the night sky.
As someone who grew up camping, and later backpacking, I was especially looking forward to falling asleep beneath the sky of my childhood. On clear nights far from city lights, I love nothing more than lying on my back and basking in the light of millions of distant stars (fewer than 5,000 individual stars are visible in the darkest, flat-horizon skies, but factor in the Milky Way and, well, the sky’s the limit).
I scheduled this trip specifically to avoid moonlight, but hadn’t counted on clouds. It wasn’t until our final night that I got my wish for a bedtime ceiling of starlight. That night my camera stayed in the bag as I indulged my celestial addiction until sleep finally prevailed (if I’d have had duct tape, I’d have pinned my eyelids to my forehead).
Just because there were no stars at bedtime didn’t mean I gave up hope of photographing them. Spend enough time outside and you learn that showery weather often abates overnight, so I went to bed each night with my camera and a plan. Twice during the trip I woke find the bedtime clouds replaced by stars, and both times opted for photography over sleep.
The image here was from the trip’s first night. My bedtime routine started with determining the cardinal directions relative to the campsite’s best views, and whether/when the brightest part of the Milky Way would appear. This requires an open sky to the south, not the easiest thing in the Grand Canyon, which trends east/west over most of its length. But the trip’s first couple of days are in the canyon’s north/south Marble Canyon section, which allowed a wonderfully open view of the southern sky on our first night.
Near the river were lots of view-blocking shrubs, but I found an elevated spot, with a view of the river, against a shear wall about 20 feet above my cot. With a composition in mind, I fell asleep beside my tripod-mounted, Sony a7S and and Zeiss 28 f2, which were pre-set and focused for dark sky photography.
I woke at around 2:30 a.m. to find the Milky Way perfectly framed by the Canyon walls. With the help of the soft light from my iPhone screen (to avoid disturbing my night vision), I stumbled up to my vantage point and went to work. A 39% waning crescent moon had just risen somewhere behind the canyon wall to the east to illuminate the top of the western canyon wall, an unplanned bonus. Since I’m still familiarizing myself with the a7S, I tried a variety of exposure combinations for each of the three compositions I tried.
Grand Canyon Photo Workshops
A night sky gallery
Click an image for a closer look, and a slide show. Refresh the screen to reorder the display.


More love for the Sony a7S
Posted on May 10, 2015

El Capitan and the Big Dipper, El Capitan Meadow, Yosemite
Sony a7S
Sony/Zeiss 16-35
8 seconds
F/8
ISO 6400
In my previous blog I wrote about the flexibility of carrying three mirrorless (compact) bodies, each with its own strengths: the Sony a7R, a7S, and a6000. The a7S is my low-light body; it enables me to freeze motion and extract detail in conditions the were previously impossible. But more than that, I’ve discovered the a7S also makes photography that I’ve been doing for years, noticeably better.
Once upon a time
I got the a7S largely for its ability to pull light out of moonless night scenes, but the more I use it, the more I appreciate the way my a7S eliminates shortcomings I’ve wrestled with in my ten years of moonlight photography. As bright as a full moon is, the sun is nearly 500,000 times brighter (look it up), so achieving adequate moonlight exposure has always required pushing my camera’s light gathering settings to their quality threatening extremes, combining my lens’s widest, poorest quality aperture with star streaking 30-second exposures.
Mitigating these shortcomings meant increasing ISO, but with more sensitivity comes more noise. As high ISO and noise reduction software capabilities improve, so does the quality of my moonlight images, but the improvement has been slow and steady, only marginally perceptible. And it’s not been enough to push me out of the compromised exposure settings zone.
A new paradigm
Enter the a7S. With its spacious sensor and large photosites, the a7S offers ridiculous low light capabilities and I no longer think twice about shooting at 3200, 6400, or 12,800 ISO. And if I need to go higher than that, I know I have at least two more stops of ISO that usually cleans up quite nicely. Suddenly, I’m free to select an aperture I know will ensure the best quality, and a shutter speed that will freeze the stars, then just crank my ISO to a value that delivers the amount of light I want.
But wait, there’s more
Since I’m always on a tripod, most of my lenses are f4—I just can’t justify the bulk and expense of faster glass. But one downside of f4 glass is a less bright viewfinder, making composition and focus difficult in low light. Composition is often by trial and error, but it’s not too bad (and certainly easier than moonless scenes). My moonlight focus solution has always been to compose my shot on the tripod, detach the camera, turn and autofocus on the moon, then return my camera to the tripod—adequate, but a pain.
My a7S sucks so much light into my electronic viewfinder that composition and manual focus in moonlight are a fast, single-step process (I’m guessing moonlight autofocus works too, but I haven’t tried it). Whether I want to focus on the stars, or a particular foreground subject, I simply compose and dial in the sharpness.
For example
I’ve learned that teaching people moonlight photography in the moonbow chaos on the bridge beneath Lower Yosemite Fall is a recipe for disaster, so I usually take my groups out to El Capitan Meadow the night before our moonbow shoot. This spot is easy to get to, it has lots of room, an iconic Yosemite subject, and not too much light pollution (we can just shoot over the headlights). But I go here so much with my groups, I rarely get my camera out anymore.
This month’s group seemed to be doing fine, and I couldn’t resist the sight of the Big Dipper hanging above El Capitan, so I set up my camera and tried a couple of frames with the a7S. Rather than using my standard moonlight recipe (that I’ve been teaching for years)—ISO 800, f4, 20 seconds—I went to a fast shutter speed and mid-range aperture I’ve always longed for (8 seconds, f8) , and compensated with ISO 6400. In my viewfinder El Capitan throbbed with moonlight, and the stars of the Big Dipper stood out like a glow-in-the-dark star chart, making composition and focus effortless.
On my computer back in the hotel I magnified the image to 100 percent in steps, scrutinizing each magnification for noise. I saw none until I got to 100 percent, when I could detect a fine texture in the void between the stars. This cleaned up easily with very low-level noise reduction (Topaz). Examining the image for sharpness and star motion was pure joy as I realized I’d just captured my sharpest, cleanest moonlight image ever.
Learn more about moonlight photography
Join next year’s Yosemite Moonbow photo workshop
A moonlight gallery
Click an image for a closer look, and a slide show. Refresh the screen to reorder the display.


