Eloquent Images by Gary Hart
Insight, information, and inspiration for the inquisitive nature photographer
What’s the Story?
Posted on June 9, 2019
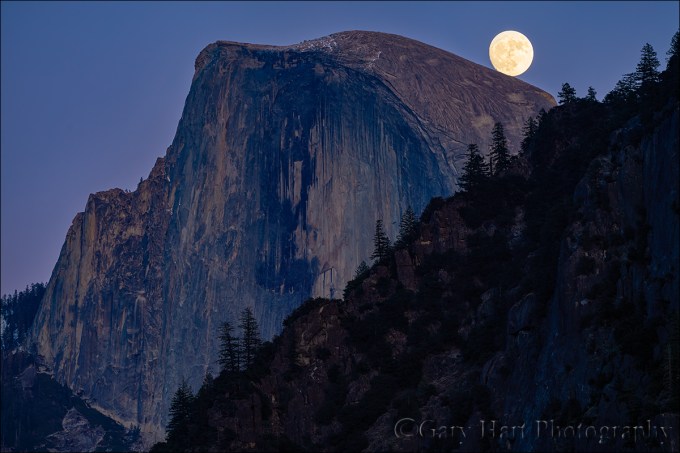
Moonrise Through the Trees, Yosemite
Sony a6300
Sony 100-400 GM
Sony 2x teleconverter
Breakthrough neutral polarizer
ISO 400
f/16
1/200 second
Let’s have a show of hands: How many of you have been advised at some point in the course of your photographic journey to “tell a story with your images”? Okay, now how many of you actually have a clue as to what that actually means? That’s what I thought. Many photographers, with the best of intentions, parrot the “tell a story” advice simply because it sounded good when they heard it, but when pressed further, are unable tell you what they mean.
Telling a story with a photo is easier when photographers can physically stage subjects and light to suit their objective (an art in itself), or in journalistic photography intended to distill the the essence of an instant with a connection to an easily inferred chronology: a homeless man feeding his dog, dead fish floating in the shadow of belching smokestacks, or a wide-receiver spiking a football in the end zone.
This isn’t to say that we landscape photographers can’t tell stories with our images, or that we shouldn’t try. Nor does it mean that one photographic form is inherently more or less creative than another. It just means that the rules, objectives, advantages, and limitations differ from form to form. Nevertheless, simply advising a landscape photographer to tell a story with her images is kind of like a coach telling a pitcher to throw strikes, or a teacher instructing a student to spell better. Okay, fine—now what?
Finding the narrative
First, let’s agree on a definition of “story.” A quick dictionary check reveals that a story is “a narrative, either true or fictitious … designed to interest, amuse, or instruct….” Okay, that works.
The narrative part is motion. Your pictures need it. Narrative motion isn’t simply the motion of the eyes through the frame (also important), it’s a connection that pulls a viewer into and through a frame, and compels him to stay. While narrative motion happens organically in media consumed over time, such as a song, novel, movie, or even a YouTube video, it can only be implied in a still photograph. And unlike the arranged or journalistic photography mentioned above, landscape photographers are tasked with reproducing a static world as we find it—another straightjacket on our narrative options. But without some form of narrative motion, we’re at a dead end story-wise. What’s a photographer to do?
Photography as art
Every art form succeeds more for what happens in the mind of its consumer’s (the viewer or listener) than for the literal experience it delivers to the consumer’s five senses. Again: Every art form succeeds more for what happens in the mind of its consumer’s (the viewer or listener) than for the literal experience it delivers to the consumer’s five senses. A song that doesn’t evoke emotion, or a novel that doesn’t paint mental pictures, it’s soon forgotten. And just as readers of fiction unconsciously fill-in the visual blanks with their own interpretation of a scene, viewers of a landscape image will fill-in the narrative blanks with the personal stories the image inspires. In other words, an image should offer a place for the viewer’s own story to unfold.
Of course the story we’re creating isn’t a literal, “Once upon a time” or “It was a dark and stormy night” (much more appealing in photography than literature, I might add) story. Instead, the image we make must connect with our viewers’ stories to touch an aspect of their world (real or imagined): revive a fond memory; generate fresh insight into a familiar subject; vicarious living—to name just a few possible connections. If we offer images that complete these connections, we’ve given our image’s viewers a reason to enter, a reason to stay, and a reason to return. And most important, we’ve given them a catalyst for their internal narrative.
Shoot what you love (not what you think your audience will love)
Think about your favorite novels. While they might be quite different, I suspect one common denominator is a protagonist with whom you relate. I’m not suggesting that immediately upon finishing that book you hopped on a raft down the Mississippi River, or ran downtown to have a dragon tattooed on your back, but in some way you likely found some personal connection to Huck Finn or Lisbeth Salander that kept you engaged. And the better that connection, the faster the pages turned.
And so it is with photography: Our viewers are looking for a connection, a sense that there’s a piece of the photographer in the frame. Because we can’t possibly know what personal strings our images might tug in others, and because those strings will vary from viewer to viewer, our best opportunity for igniting their story comes when we share our own relationship with a scene and let viewers find their own connection.
What? Didn’t I just say that it’s the viewer’s story we’re after? Well, yes—but really what needs to happen is the viewers’ sense of connection between our story and theirs. If you focus on photographing the scenes that most move you, those scenes (large or small) that might prompt you to nudge a loved-one and say, “Oooh, look at that!,” the more you’ll see and the greater your chance of establishing each viewer’s feeling of connection. Whether you’re drawn to towering mountains, crashing surf, delicate wildflowers, or prickly cactus, that’s where you’ll find your best images.
Where did you get those shoes?
The cool thing is that your viewer doesn’t need to understand your story; she just needs to be confident that there is indeed a story. That’s usually accomplished by avoiding cliché and offering something fresh (I know, easier said than done). For some reason this makes me think of Steely Dan lyrics, which rarely made sense to me, but always felt fresh and I never for a second doubted that they did indeed (somehow) make sense to Donald Fagen and Walter Becker. In other words, rather than becoming a distraction, Steely Dan’s lyrics were a source of intrigue that pulled me in and held me. So when I hear:
I stepped up on the platform
The man gave me the news
He said, You must be joking son
Where did you get those shoes?
I’m not bewildered, I’m intrigued. Steely Dan’s lyrics aren’t trying to tap my truth, they simply reflect their truth (whatever it might be). And even though I have no idea what he’s talking about, the vivid mental picture those lyrics conjure (which may be entirely different, though no more or less valid, than your or his mental picture) allows me to feel a connection. You, on the other hand, may feel absolutely nothing listening to “Pretzel Logic,” while “I Want To Put On My My My My My Boogie Shoes” gives you goosebumps for KC and the Sunshine Band. Different strokes….
Returning from the abstract to put all this into photographic terms, the more your images are true to the world as it resonates with you, and the less you pander to what you think others want to see, the greater the chance your viewer’s story will connect with yours.
For example

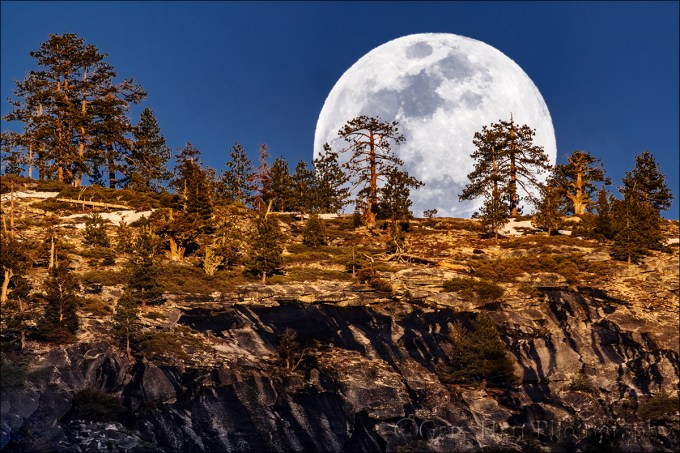
Moonrise Through the Trees, Yosemite
Few things in Nature get my heart racing more than the first sliver of silver light heralding the moon’s arrival. With the moon’s appearance comes a sudden release of building anticipation and the frantic
On this evening last March I knew about where the moon would appear, and about when that would be, but with the time approaching and my eyes locked on the anticipated spot, the doubts started to rise. Did I get the angle right? Is that ridgeline higher than I figured? Where did those clouds come from? (It goes like this every time.)
And then there it was. I’d pointed my Sony a6300 (1.5 crop sensor for extra magnification), mounted my Sony 100-400 GM lens and Sony 2x teleconverter, at the spot on the ridge I thought most likely for the moon to appear. I was pretty close, but this was not time for self congratulation. To juxtapose the moon with the two trees I’d picked for my foreground I had to shift about 20. My favorite big moon shots are when some part of the moon still touches some part of the horizon, so my window of opportunity was shrinking fast. And you ever want to appreciate how fast the moon moves across the sky, try photographing it with an extreme telephoto lens. By the time I was moved and recomposed, the moon was already half exposed and rising fast. I managed just a handful of frames before it crested the trees and I switched to a wider lens for a completely different shot.

About 15 minutes later, after the clouds had moved in

Tree at Sunset, McGee Creek Canyon, Eastern Sierra
My own story of this solitary, ridge-top tree involved a frantic rush to capture a beautiful but rapidly fading sunset. I was with my brother on a dirt road in the Eastern Sierra. I’d been on this road many times and knew this tree well. Despite its rather ordinary appearance, the tree’s solitary perch atop a barren, rocky ridge had always intrigued me. For as long as I can remember, I’ve dreamed of a home with a sweeping view, and envied this tree’s perpetual 360 view of the Sierra crest to the west, the White Mountains to the east, and Crowley Lake below.
As the sunset started to materialize that evening, I realized that we were close enough that I might be able to include the tree in the sunset shoot. We hustled my truck back down the road, pulling into to a wide spot beneath the ridge several minutes after the best color had faded. Jay, who had no personal connection to “my” tree, stayed in the truck while I sprinted along the road with my camera and tripod until my position aligned the tree with the final, rippled vestiges of sunset. I only clicked a couple of frames, slightly underexposed to hold the color. (The slight blue cast is the color of the twilight light.)

Sunset, McWay Fall, Big Sur
The humorous events leading up to this sunset at McWay Fall in Big Sur are nowhere to be found in the frame. Nevertheless, even after visiting this spot more times than I can count, I have a very personal connection to this moment in particular. There’s power in a plunging waterfall and crashing surf, and promise in the sun’s appearance above an infinite horizon.
An early arrival allowed lots of time to connect with the scene, enabling me to anticipate the moment the sun burst from the clouds and balance it in the frame with McWay Fall. The position of the leading wave is no accident either—had I allowed it to reach the bottom of the frame before I clicked my shutter, it would have created a white line exiting the frame, taking your eyes right with it. That small strip of sand at the bottom of the image becomes a virtual frame that holds you in the scene. The rest is up to you.
* * * *
Those are my stories, and while they’re personally satisfying, I have no illusions that all of that comes across to the viewer. I’ve displayed these prints in many shows and watched people walk right by without breaking stride. But I’ve also been delighted each time someone stops, peers closer, lingers, and ersometimes returns lat. While I have no idea what “story” my images tap in those people, I don’t believe it really matters.
Workshop Schedule || Purchase Prints
A gallery of personal favorites (each with its own story)
Click an image for a closer look, and a slide show. Refresh the screen to reorder the display.


Get Out of the Way
Posted on March 3, 2019
(And Let the Scene Speak for Itself)
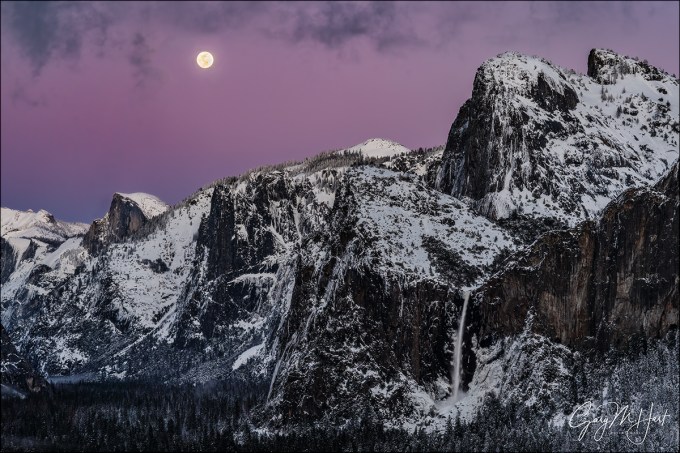
Nightfall, Full Moon and Yosemite Valley, Yosemite
Sony a7R III
Sony 24-105 f/4 G
1/6 second
F/10
ISO 100
As aggressively as I seek creative ways to express nature with my camera, and as important as I think that is, sometimes a scene is so beautiful that it’s best to just get out of the way and let the scene speak for itself. I had one of those experiences last month at Tunnel View in Yosemite.
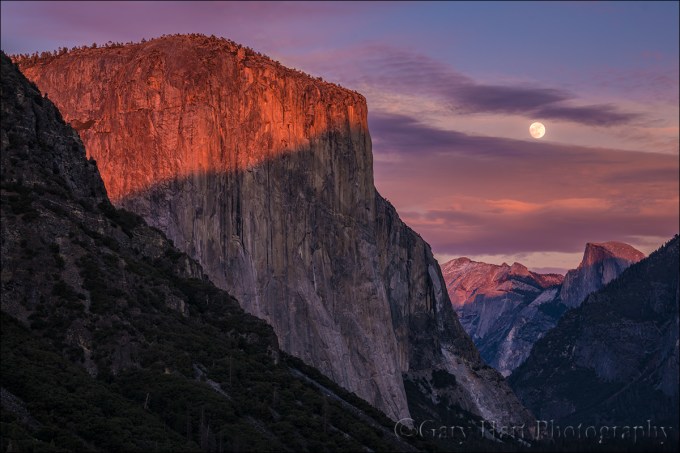
There’s a reason Tunnel View is one of the most photographed vistas in the world: El Capitan, Half Dome, Cathedral Rocks, Bridalveil Fall—each would be a landscape icon by itself; put them all together in one view and, well…. But the view this evening was truly transcendent, even by Yosemite standards. In Yosemite Valley below, trees and granite still glazed with the snowy vestiges of a departing storm seemed to throb with their own luminance. And above Half Dome a full moon rose through a sky that had been cleansed of all impurities by the departing storm, an otherworldly canvas of indigo, violet, and magenta.
On these crystal-clear, winter-twilight moonrises, the beauty rises with the moon, reaching a crescendo about 20 minutes after sunset, after which the color quickly fades and the landscape darkens. Unfortunately, a some point before the crescendo, the dynamic range becomes so extreme that no camera (not even the dynamic range monster Sony a7RIII) can simultaneously extract usable detail from a daylight-bright moon and dark landscape.
I’d driven to Yosemite solely to photograph this moonrise, an eight hour roundtrip for 40-minutes of photography. Starting with the moon’s arrival about 20 minutes before sunset, I’d juggled three camera bodies and two tripods, first shooting ultra long, then gradually widening to include more of the snowy landscape. Already my captures had more than justified the time and miles the trip would cost me, but watching the moon traverse the deepening hues of Earth’s shadow, I wasn’t ready to stop.
I’ve learned that with a scene this spectacular, conveying the majesty doesn’t require me to pursue the ideal foreground, or do creative things with motion, light, or depth of field. In fact, I’ve come to realize that sometimes a scene can be so beautiful that creative interpretations can dilute or distract from the very beauty that moves me. On this evening in particular, I didn’t want to inject myself into that breathtaking moment, I just wanted to share it.
To simply my images, I opted for a series of frames that used tried-and-true compositions that I’d accumulated after years (decades) of photographing here, the compositions I suggest as “starters” for people who are new to Yosemite, or use myself to jump-start my inspiration: relatively tight horizontal and vertical frames of El Capitan, Half Dome, Bridalveil Fall; El Capitan and Half Dome; or Half Dome and Bridalveil Fall. In the image I share above I concentrated on Half Dome and Bridalveil Fall, capping my frame with the wispy fringes of a large cloud that hovered above Yosemite Valley.
Simplifying my compositions had the added benefit of freeing all of my (limited) brain cells to concentrate on the very difficult exposure. The margin for error when photographing a moon this far after sunset is minuscule—if you don’t get the exposure just right, there’s no fixing it in Photoshop later: too dark and there’s too much noise in the shadows; too bright and lunar detail is permanently erased. The problem starts with the understandable inclination to expose the scene to make the landscape look good on the LCD, pretty much guaranteeing that the moon will be toast. Compounding this problem is the histogram, which most of us have justifiably come to trust as the final arbiter for all exposures. But when a twilight moon (bright moon, dark sky) is involved, even the histogram will fail you because the moon is such a small part of the scene, it barely (if at all) registers on the histogram.
Rather than the histogram, for these dark sky moon images I monitor my LCD’s highlight alert (“blinking highlights”), which is usually the only way to to tell that the moon has been overexposed. If the moon is flashing, I know I’ve given the scene too much light and need to back off until the flashing stops—no matter how dark the foreground looks. This is where it’s essential to know your camera, and how far you can push its exposure beyond where the histogram and highlight alert warn you that you’ve gone too far.
When I’m photographing a full moon rising into a darkening sky, I push the exposure to the point where my highlight alert just starts blinking (only the brightest parts of the moon, not the entire disk, are flashing), then I give it just a little more exposure. I know my Sony a7RIII well enough to know that I can still give it a full stop of light beyond this initial flash point and still recover the highlights later. The shadows? In a scene like this they’ll look nearly black, a reality my histogram will confirm, but I never cease to be amazed by how much detail I can pull out of my a7RIII’s shadows in Lightroom and Photoshop.
I continued shooting for several minutes after this frame, and discovered later that even my final capture contained usable highlights and shadows. I chose this image, captured nearly five minutes before I quit, because it contained the best combination of color, lunar detail, and clean (relatively noise-free) Yosemite Valley.
Photograph the full moon above Half Dome with me this December
Workshop Schedule || Purchase Prints
Letting Nature Speak for Itself
Click an image for a closer look, and a slide show


Thinking Inside the Box
Posted on February 24, 2019

Winter Moonrise, Full Moon and Half Dome, Yosemite
Sony a6300
Sony 100-400 GM
Sony 2x teleconverter
ISO 200
f/11
1/400 second
Roll over, Ansel
Several years ago, while thumbing through an old issue of “Outdoor Photographer” magazine, I came across an article on Lightroom processing. It started with the words:
“Being able to affect one part of the image compared to another, such as balancing the brightness of a photograph so the scene looks more like the way we saw it rather than being restricted by the artificial limitations of the camera and film is the major reason why photographers like Ansel Adams and LIFE photographer W. Eugene Smith spent so much time in the darkroom.”
While it’s true that Ansel Adams and W. Eugene Smith were indeed darkroom masters, statements like this only perpetuate the myth that the photographer’s job is to reproduce the scene “the way we saw it.” And because I imagine that using Ansel Adams himself to peddle this notion must send Ansel rolling in his grave, I’ll start by quoting the Master himself:
- “When I’m ready to make a photograph, I think I quite obviously see in my mind’s eye something that is not literally there in the true meaning of the word.”
- “Photography is more than a medium for factual communication of ideas. It is a creative art.”
- “Dodging and burning are steps to take care of mistakes God made in establishing tonal relationships!”
Do these sound like the thoughts of someone lamenting the camera’s “artificial limitations” and photography’s inability to duplicate the world the “way we saw it”? Take a look at just a few of Ansel Adams’ images and ask yourself how many duplicate the world as we see it: nearly black skies, exaggerated shadows and/or highlights, and skewed perspectives that intentionally emphasize one subject over another, and on and on. And no color! (Not to mention the fact that every image is a two-dimensional rendering of a three-dimensional world.) Ansel Adams wasn’t trying to replicate scenes more like he saw them, he was trying to use his camera’s unique (not “artificial”) vision to show us aspects of the world he wanted us to see, qualities we might otherwise miss or fail to appreciate.
The rest of the OP article contained solid, practical information for anyone wanting to come closer to replicating Ansel Adams’ traditional darkroom techniques in the contemporary digital darkroom. But the assertion that photographers are obligated to photograph the world as they saw it baffles me.
You’ve heard me say this before
The camera’s vision isn’t artificial, it’s different. Dynamic range, focus, motion, and depth are all rendered differently in a camera than they are to the human eye. And while the human experience of any scene is 360 degrees, a still images is constrained by a rectangular box. Forcing images to be more human-like doesn’t just deny the camera’s unique ability to expand viewers’ perception of the world, it’s literally impossible. Which is why I’ve always felt that the best photographers are the ones who embrace their camera’s vision rather than trying to “fix” it.
For example, limiting dynamic range allows us to emphasize color and shapes that get lost in the clutter of human vision; a narrow range of focus can guide the eye and draw attention to particular elements of interest and away from distractions; and the ability to accumulate light over a photographer-controlled interval exposes color and detail hidden by darkness, and conveys motion in an otherwise static medium.
The box
But what about that rectangular box that constrains the world of a still image? I can think of no better way to excise distractions and laser-focus viewers’ attention on the target subject than taking advantage of the camera’s finite world. While many nature photographers default to their wide angle lenses to expand the visual box surrounding their landscape images and save their long lenses for wildlife, a telephoto lens is an essential landscape tool. The world can be a busy place—in even the most spectacular of vistas, so much is happening visually that going wide in a still photo to include as much beauty as possible introduces many extraneous features, and risks shrinking the scene’s most compelling elements to virtual insignificance.
The best way to overcome wide angle scene dilution is to forego the conventional view (the first thing everyone sees), identify the aspects of the scene that make it special, and isolate them with a telephoto lens. Whether it’s a striking mountain or tree, backlit poppy, or rising moon, isolation enlarges the target subject and removes any ambiguity about what the image is about. And an intimate, up-close perspective of a subject more commonly seen from a distance can be truly mesmerizing.
About this image

Winter Moonrise, Half Dome, Yosemite
I stood atop two feet of packed snow at Tunnel View, more than eight miles from Half Dome, and ten miles from the ridge that would be ground zero for the moonrise that had drawn me in the first place. Along with two other photographers who also seemed aware of the moon’s plans, I had the best (least obstructed) Tunnel View vantage point to myself. Rising full moon or not, before me the table was set for a spectacular Yosemite feast: Brand new snow glazed every exposed surface, and in the pristine winter air, Tunnel View’s veritable who’s who of Yosemite landmarks—El Capitan, Cloud’s Rest, Half Dome, Sentinel Rock, Sentinel Dome, Cathedral Rocks, and Bridalveil Fall—seemed etched into the scene. Above, dark clouds boiled atop El Capitan, while wispy fog radiated from the valley floor.
Occasionally a tourist would wander up and request help identifying Horsetail’s microscopic filament on El Capitan’s vast granite; one or two even pointed at Bridalveil Fall and asked if that was Horsetail Fall. A couple of people, blissfully oblivious to the Horsetail Fall phenomenon, simply wanted their picture taken with this iconic Yosemite backdrop.
About 150 feet down the wall to my right, at least two-dozen photographers on tripods were inexplicably crammed into a significantly less desirable view. While that vantage point gave them an acceptable sightline to Horsetail Fall (as did my own), the rest of the magnificent Tunnel View vista was partially obscured by trees. The only explanation I could muster for their odd choice was that the first to arrive for some reason set up there, and each subsequent photographer assumed that since others have set up here, this must be the spot.
While Horsetail Fall was irrelevant to my objective this evening, the overnight snow still clinging to the trees was undeniable bonus. Getting to Tunnel View had been an adventure, worse even than I’d expected, and I was glad that I’d allowed ample time. The difficulty started with a 30-minute (Horsetail Fall gawker infused) queue at the Arch Rock entrance station. My suspicion that these were mostly inexperienced photographers and tourists (who’d just read an article or seen a news segment and decided to check it out) was confirmed when I was forced to navigate a slalom course of slipping, sliding, spinning cars that had ignored the very clearly communicated chain controls. The serious photographers, those who had photographed Horsetail Fall before, or who had the sense to research the phenomenon well in advance, had been in position for the five-minute show for hours.
With the moon’s imminent arrival upon a scene that already bordered on visual overload, my plan to ensure that the main purpose of my visit didn’t get swallowed by Tunnel View’s conventional post-storm majesty was to start, while the moon was still right on the horizon, with extremely tight compositions. As the moon rose, I planned to widen my focal length, gradually including more scene and turning the moon into more of an accent.
To achieve this, I was flanked by two tripods, and had three camera bodies fired up and ready for action: my Sony a7RIII, a7RII, and a6300. Atop my Really Right Stuff TVC-24L tripod was my a6300 loaded with my Sony 100-400 GM and Sony 2X teleconverter. This combination gave me a 600-1200mm full-frame equivalent focal range (because the a6300 is a 1.5-crop APS-C sensor). When including the rising moon required reducing my focal length below 800mm, I’d switch to my higher resolution, full frame Sony a7RII. And because the moon would rise just about 20 minutes before sunset, I also had to be aware of the possibility that Horsetail Fall would fire up. To handle that possibility, and to cover all my general wide composition needs, mounted on my RRS TQC-14 tripod was my Sony a7RIII and Sony 24-105 f/4 lens.
I pointed my a6300/100-400 at the point where I expected the moon to appear about 20 minutes before sunset, zoomed all the way out to 800mm (1200mm full-frame equivalent), metered, focused, and waited. I started clicking almost immediately after seeing the moon’s leading edge nudge through the trees, refining my composition slightly after each click until I had the right balance of moon and Half Dome. It always surprises me how quickly the moon moves, speed that’s magnified tremendously at such an extreme focal length. Spending the next 40 minutes frantically changing focal lengths, switching lenses and camera bodies, re-metering and re-focusing, and bouncing between tripods, I felt like the percussionist in a jazz band.
When the moon climbed far above Yosemite Valley and the dynamic range between the daylight-bright moon and nighttime landscape made photography impossible, I paused before packing up my gear and just marveled at the beauty. Horsetail Fall had caught a few late rays of sunlight but never did completely light up. I thought about the disappointment of frigid photographers who had waited patiently in the valley below for a show that didn’t happen, and counted my blessings.
Photograph next year’s February full moon in my Yosemite Winter Moon photo workshop
Isolation Sensation
Click an image for a closer look and slide show. Refresh the window to reorder the display.


Winter Moonrise
Posted on December 23, 2018
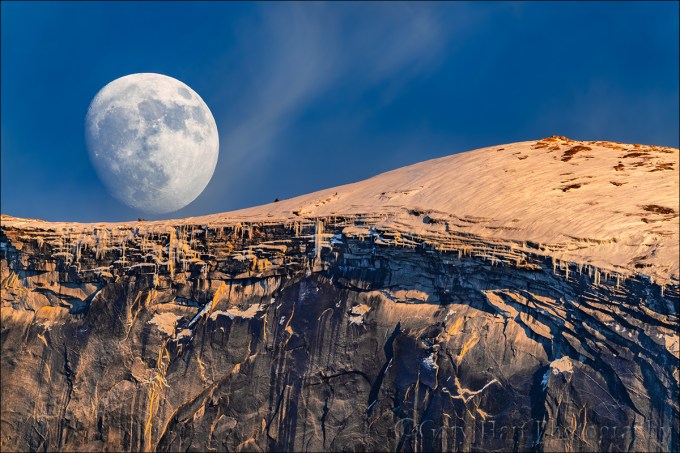
Winter Moonrise, Half Dome, Yosemite
Sony a7RIII
Sony 100-400 GM
Sony 2x teleconverter
ISO 100
f/11
1/25 second
With a wide variety of spectacular and diverse east-facing views, I can think of no better place to photograph a moonrise than Yosemite. I especially like the December full moon because it aligns so well with Half Dome, not just on the night it’s full, but on the nights leading up to the full moon.
When I realized that this year’s December full moon was so close to Christmas, I almost didn’t schedule my annual Yosemite Winter Moon workshop, but then I figured that since I’ll be there anyway, I may as well. I’m so glad I did—the workshop filled, and the skies were clear enough (never a sure thing in December) that we photographed the moon on three of the workshop’s four nights, culminating in a very special moonrise to wrap up the workshop (a topic for a future blog post).
The closer it is to full, the closer to sunset the moon rises, arriving several hours before sunset a few days before it’s full, then a little later each evening before rising right around sunset on the full moon day. Since a waxing (increasing in fullness) moon is always higher at sunset than it will be the next day, with a little planning, it’s possible to time several consecutive days’ shoots to coincide with the moon rising right around sunset. For this year’s workshop I’d planned three sunset moonrises for my group, each (more or less) aligning the moon and Half Dome, getting farther from Half Dome each day.
About this image
While the first of my planned moonrise shoots was Wednesday, when the moon rose above the flat horizon about two hours before sunset, the horizon in Yosemite is anything but flat. I took my group to a favorite location beside the Merced River on Yosemite Valley’s east side, less than three miles from Half Dome, where the relatively steep view angle to the top of Half Dome means that it takes the moon a couple of hours to climb into view here.
Though not labeled on the map, this spot isn’t a secret to photographers, so I arrived about 45 minutes early, partly to allow everyone time to prepare, but also to ensure that we wouldn’t need to battle anyone else for position. I told everyone that the moon would appear at around 4:30 from directly above the top of Half Dome, and suggested that they be ready with their compositions beforehand.
My own composition had been planned long in advance—having photographed more than my share of moonrises from this wide angle location, I decided on an extreme telephoto approach this time. I added my Sony 2X teleconverter to my Sony 100-400 GM lens, mounted the pair on my tripod, and attached my (full frame) Sony a7RIII. I pointed my 800mm of focal length at Half Dome’s summit and waited. <Continues below>
Prior Moonrises From This Location
I never tire of seeing the glow of the moon’s leading edge peak above the horizon, and this evening was no exception. When the moon nudged into view, the sounds of chatter and laughter were instantly replaced by clicking shutters. Watching the moon grow in my viewfinder, I adjusted my composition slightly before each click. When the moon gained separation from the granite to become fully visible, I panned slowly to the right and saw that with the right framing it would appear nestled into a subtle bowl-shaped curve atop Half Dome and locked in a composition that would last for a few minutes as the moon continued its ascent. A thin wisp of cloud scooted through the scene as I clicked this frame, lit by the day’s final rays.
One more thing
Looking at the distant world at 800mm reveals previous invisible detail. So once I’d settled on a composition that I could stick with for a few clicks, I allowed my eye wander the frame and noticed dangling icicles lining Half Dome’s rim. I continue to be blown away by the sharpness of the Sony 100-400; not only is this lens unbelievably sharp, I literally cannot tell a difference when I pair it with the Sony 2X teleconverter.
Join me in the next Yosemite Winter Moon workshop
Workshop Schedule || Purchase Prints
Yosemite Moons


Dynamic Juxtaposition
Posted on February 4, 2018

Moonset Eclipse, Zabriskie Point, Death Valley
Sony a7RII
Sony 100-400 GM
ISO 800
f/11
1/4 seconds
Much of my photography is about juxtaposition of elements with the landscape. Sometimes that’s simply combining static terrestrial features, but when possible I try to add something more dynamic, such as meteorological subjects like lightning or a rainbow, or celestial objects like the Milky Way or the Moon. The challenge with dynamic juxtapositions is timing—while the meteorological juxtapositions are usually a matter of playing the odds, celestial juxtapositions are gloriously precise.
Lunar choreography
Just as the Earth revolves around the Sun, the Moon revolves around Earth; at any point in this celestial dance, half of Earth is daylight and half is night, while half of the Moon is lit and half is dark. The amount of the Moon we see (its phase) depends on the relative position of the Sun, Moon, and Earth in this dance, and once each month all of the sunlit side of the Moon faces the dark side of Earth, and we Earthlings enjoy a full Moon.
This alignment of three or more orbiting celestial bodies necessary for a full (and new) Moon is called ‘syzygy.’ Due to the Moon’s orbit around Earth, the Sun, Earth, and Moon achieve syzygy twice each lunar month: once when the Moon is between the Sun and Earth (a new Moon), and again when Earth is between the Sun and Moon (a full Moon).
The Moon completes its trip around Earth every 27.3 days, but it takes 29.5 days to cycle through all its phases, from new to full and back to new again. The Moon’s phases need that extra 2+ days because as the Moon circles Earth, Earth also circles the Sun, taking the syzygy point with it—imagine a race with a moving finish line.
Viewed from Earth, the Sun and Moon are on opposite sides of the sky when the Moon is full, so a full Moon rises in the east at sunset and sets in the west at sunrise. We rarely see a full Moon rising exactly as the Sun sets (or setting as the Sun rises) because: 1) the point of maximum fullness (when the Sun, Earth, and Moon align perfectly) only happens at one instant on the full Moon day—at every other instant of each month’s full Moon day, the Moon is merely almost full (but still full enough to appear full); 2) published Sun/Moon rise/set times assume a flat horizon—if you have mountains between you and the horizon, your view of the true Sun/Moon rise/set is blocked; and 3) The more extreme your latitude (angular distance from the equator), the more skewed the Sun/Moon alignment appears.
Knowing this, it should make sense that the closer the Moon is to full, the longer it’s in the night sky, and a full Moon is in the sky all night long. Less intuitive but very important for lunar photographers to know, each day the Moon rises an average of 50 minutes later (between 30-70 minutes) than it rose the previous day—I usually mentally round to an hour for quick figuring.
Lunar Eclipse
If the Moon orbited Earth on the same plane Earth orbits the Sun, we’d have an eclipse with each syzygy: every new Moon, Earth would pass through the Moon’s shadow and somewhere on Earth would experience a solar eclipse; every full Moon the night side of Earth would witness a lunar eclipse as the Moon passes into Earth’s shadow. But the Moon’s orbit is tilted about 5 degrees from Earth’s orbit, making the perfect alignment an eclipse requires relatively rare.
It turns out that the alignment of the Sun, Earth, and Moon necessary for a lunar eclipse happens from two to four times each year. Of these, about one-third are total eclipses, when Earth’s shadow completely covers the Moon. At totality, most of the sunlight illuminating the Moon is blocked by Earth, and the only light to reach the Moon has passed through Earth’s atmosphere, which filters out all but the long, red wavelengths. For the same reason sunsets are red, during a total lunar eclipse we see a red or “blood” Moon.
Putting it all together
As frequent and familiar as the rise and set of the Moon is, the opportunity to witness the beauty of an eclipse is rare. But in the last six months, after being shut out by schedule or weather for many years, I’ve managed to photograph my first total solar and lunar eclipses. I wasn’t able to juxtapose the August solar eclipse with a favorite landscape, but I wasn’t going to let that happen again for last week’s lunar eclipse.
Viewed from Death Valley’s Zabriskie Point in winter, the setting full Moon’s azimuth aligns nicely with Manly Beacon, one of the park’s most recognizable features. Though this year’s alignment was particularly good, the morning of the eclipse was a day earlier than I’d normally photograph the Zabriskie Point moonset—the next day the Moon would be setting about 45 minutes later, providing ample time to photograph the landscape in the warm early light before the Moon descended behind the Panamints. Nevertheless, I decided that a total lunar eclipse trumps everything, and since Zabriskie was the best place for the eclipse, that’s where we were.
We started with telephoto compositions of the beautiful “blood Moon” phase because there wasn’t enough light to include the eclipsed Moon with the landscape without compositing two exposures. Composites are fine, but I prefer capturing scenes with one click. For wider images that included the landscape I waited until totality had passed, shortly before the Moon set, and switched to the Sony/Zeiss 24-70 with my Sony a7RIII, moving my Sony 100-400 GM to my Sony a7RII.
I captured this image about 25 minutes before sunrise, normally too early to capture landscape detail without over exposing the Moon. But this morning, following the total eclipse, the lit portion of the moon was still darkened by Earth’s penumbral shadow, which reduced the dynamic range to something my cameras could handle.
To enlarge the Moon and emphasize its juxtaposition with Manly Beacon, I went with the 100-400. With my composition and focus set, I slowly dialed up the shutter speed until I saw my a7RII’s pre-capture “zebra” highlight alert. After clicking I magnified my image preview and examined the moon to confirm that I did indeed still have detail. The foreground was quite dark on my LCD, but my histogram indicated the shadows were recoverable, something I later confirmed in Lightroom.
A Gallery of Dynamic Juxtapositions
Click an image for a closer look and slide show. Refresh the window to reorder the display.


Are you tired of eclipse photos yet?
Posted on February 1, 2018

Blood Moon, Death Valley, California
Sony a7RIII
Sony 100-400 GM
Sony 2x teleconverter
ISO 3200
f/11
2 seconds
Since everyone else seems to be doing it, I thought I’d join the party….
I always schedule my Death Valley workshop to coincide with the January (or early February) full Moon, so it was just a coincidence that North America’s first super (a full Moon that’s within 90 percent of its closest approach to Earth), blue (the second full moon of a given month), blood (a lunar eclipse: a full Moon that passes into the Earth’s shadow and is bathed in light stripped of all but its red wavelengths by Earth’s atmosphere) Moon in 150 years coincided with my workshop. But since we were already there….
I got my group up to Zabriskie Point at around 4:30, well into the eclipse but before totality. Unlike most group photo events I’ve experienced, this morning’s crowd at Zabriskie was a little subdued—I suspect due to the early hour. Compared to the solar eclipse I photographed last August, a lunar eclipse moves with the speed of a glacier. While it was underway, I was able to assist my workshop students, set up my own equipment, switch lenses and camera bodies, experiment with exposure, gawk at the spectacle, and still had plenty of time to chat, laugh, and marvel with the rest of my group.
Starting with my Sony a7RIII, Sony 100-400 f/4 GM, and Sony 2x teleconverter, I cranked my focal length all the way out to 800mm and started clicking. After a while I pulled out my Sony/Zeiss 24-70 f/4, putting it on the a7RIII and switching the telephoto setup to my a7RII. Since time wasn’t a concern, I only used one tripod, switching the two bodies back and forth as my needs dictated.
Throughout the eclipse the Moon was softened by a thin layer of cirrus clouds. This image is among my first of the morning, before the Moon reached a band of denser clouds close to the horizon. I ended up with more creative captures, but those will need to wait for another day.
Workshop Schedule || Purchase Prints
The Moon In All Shapes And Sizes


A few words about the “supermoon”
Posted on January 7, 2018
Sunset Moonrise, Yosemite Valley, Yosemite
Sony a7R II
Sony 70-200 f/4
1/10 second
F/8
ISO 200
I used to resist using the supermoon label because it’s more of a media event than an astronomical event, and it creates unrealistic expectations. But since the phenomenon appears to be with us to stay, I’ve changed my approach and decided to take advantage of the opportunity to educate and encourage.
What’s the big deal?
So just what is so “super” about a “supermoon?” Maybe another way of asking the question would be, if I hadn’t told you that the moon in this image is in fact a supermoon, would you be able to tell? Probably not. So what’s the big deal? And why do we see so many huge moon images every time there’s a supermoon? So many questions….
Celestial choreography: Supermoon explained
To understand what a supermoon is, you first have to understand that all orbiting celestial bodies travel in an ellipse, not a circle. That’s because, for two (or more) objects to have the gravitational relationship an orbit requires, each must have mass. And if they have mass, each has a gravitational influence on the other. Without getting too deep into the gravitational weeds, let’s just say that the mutual influence the earth and moon have on each other causes the moon’s orbit to deviate ever so slightly from the circle it seems to be (without precise measurement): an ellipse. And because an ellipse isn’t perfectly round, as it orbits earth, the moon’s distance from us depends its position in its orbit.
An orbiting object’s closest approach to the center of its ellipse (and the object it orbits) is at “perigee”; its greatest distance from the ellipse’s center is “apogee.” And the time it takes an object to complete one revolution of its orbit is its “period.” For example, earth’s period is one year (365.25-ish days), while the moon’s period is a little more than 27 days.
But if the moon reaches perigee every 27 days, why don’t we have a supermoon every month? That’s because we’ve also added “syzygy” to the supermoon definition. In addition to being a great Scrabble word, syzygy is the alignment of celestial bodies—in this case it’s the alignment of the sun, moon, and earth (not necessarily in that order). Not only does a supermoon need to be at perigee, it must also be syzygy.
Syzygy happens twice each month, once when the moon is new (sun-moon-earth), and again when it’s full (sun-earth-moon). (While technically a supermoon can also be a new moon, the full moon that gets all the press because a new moon isn’t visible.) Since the earth revolves around the sun as the moon revolves around earth, the moon has to travel a couple extra days each month to achieve syzygy. That’s why the moon reaches perigee ever 27 days, but syzygy comes every 29.5 days, and the moon’s distance from earth is different each time syzygy is achieved.
The view from earth: Supermoon observed
While perigee, apogee, and period are precise terms that can be measured to the microsecond, a supermoon is a non-scientific, media-fueled phenomenon loosely defined a moon that happens to be at or near perigee when it’s full. To you, the viewer, a full moon at perigee (the largest possible supermoon) will appear about 14% larger and 30% brighter than a full moon at the average distance. The rather arbitrary consensus definition of the distance that qualifies a moon as a supermoon is a full moon that is within 90 percent of its closest approach to earth.
I really doubt that the average viewer could look up at even the largest possible supermoon and be certain that it’s different from an average moon. And all those mega-moon photos that confuse people into expecting a spectacular sight when there’s a supermoon? They’re either composites—a picture of a large moon inserted into a different scene—or long telephoto images. I don’t do composites, but they’re a creative choice that I’m fine with others doing as long as they’re clearly identified as composites.
For an image that’s not a composite, the moon’s size in the frame is almost entirely a function of the focal length used. I have no idea whether most of the moons the full moon gallery below were super, average, or small. The images in this and my previous blog post were indeed super, taken within minutes of each other last Sunday evening, at completely different focal lengths.


Every full moon is super
A rising or setting full moon is one of the most beautiful things in nature. But because a full moon rises around sunset and sets around sunrise, most people are eating dinner or sleeping, and seeing it is usually an accident. So maybe the best thing to come of the recent supermoon hype is that it’s gotten people out, cameras or not, to appreciate the beauty of a full moon. If you like what you saw (or photographed), mark your calendar for every full moon and make it a regular part of your life—you won’t be sorry.
Learn more
A full moon gallery (super and otherwise)
Click an image for a closer look and slide show. Refresh the window to reorder the display.


The first rule of photography: Just show up
Posted on January 4, 2018

Magenta Moonrise, Yosemite Valley, Yosemite
Sony a7R III
Sony/Zeiss 24-70 f4
.8 seconds
F/18
ISO 100
A man with a plan
It was New Year’s Eve and I was perched on a cliff overlooking Yosemite Valley, two feet from certain death and ten minutes from the rise of the largest full moon of 2018. While the death thing would have only been a problem if I’d have lost my mind, the moon’s appearance was entirely subject to the whims of Nature. And at that moment, she wasn’t cooperating.
The vast majority of my images are the result of a plan. But planning in nature requires both flexibility and resolve—an ability to adjust and persevere rather than quit when things don’t unfold as expected.
The master plan for this trip was to photograph 2018’s largest moon twice, on opposite sides of the Sierra. I’d start with super-telephoto shots of the moon’s appearance above Yosemite Valley at sunset on December 31, then drive to Lone Pine (just 100 or so miles as the drone flies, but more than 350 miles as the car drives) to capture its disappearance behind Mt. Whitney at sunrise on January 2. Unfortunately, it seemed that each day leading up to my trip, the weather forecast for both locations trended worse. But moon or not, can you think of a better way to celebrate the New Year than circumnavigating the Sierra? Me neither.
Assembling the parts
A beautiful scene is one part landscape and one part conditions (light, weather, and so on). We generally know where the great landscapes are, but finding them in the right conditions requires research, planning, and execution (plus a little luck). I try to time my trips, workshops and personal, to coincide with these special moments, usually some weather or celestial event. Whether it’s lightning at the Grand Canyon, the Milky Way above Kilauea or the bristlecone pines, or a moon rising or setting behind Half Dome or Mt. Whitney, I want to be there.
The problem is, nothing in nature is guaranteed. We know to the microsecond where the sun, moon, and stars will be at any given time, but have no way of knowing what weather we’ll encounter. I’ve lost many a shoot to inconveniently placed clouds, and I’ll never forget the time I scheduled an entire Yosemite workshop based on the anticipated arrival of Comet ISON, only to have the comet go all Icarus on me just days before the workshop.

Three Strikes, Bright Angel Point, North Rim, Grand Canyon
But experience has taught me that regardless of the score you don’t leave the game until the last out, and you don’t cancel just because the odds are against you. Sometime the odds are wrong, and sometimes I end up getting an unexpected gift that feels like a reward for my persistence. One of the most memorable shoots of my life happened on a morning with clear skies forecast, but we ignored the forecast and went out for sunrise anyway. And I ended up getting the last laugh on the ISON workshop when Yosemite Valley became the beneficiary of a snowstorm and sudden cold that coated every exposed surface in sparkling ice crystals.
Meanwhile, back on the ledge…
It turns out that my Sierra circumnavigation didn’t yield the big moon images I’d planned, but it definitely delivered in many ways. Ignoring the clouds, I arrived in Yosemite Valley on New Year’s Eve afternoon and ended up at my chosen location at around 4:00 p.m. The sky was mostly clouds, but a few patches of blue in the east gave me reason to hope.
The spot I’d chosen was indeed on a cliff 300 vertical feet above Yosemite Valley, but it was only dangerous if I wasn’t paying attention to what I was doing, and given my relationship with heights, there was little chance of that. Flanked by two tripods, I kept one eye on the horizon and the other on void at my feet. On my big tripod (RRS TVC-24LS) was my Sony a7RIII and 100-400 GM with a 2x teleconverter; on my compact tripod (RRS TQC-14) was my Sony a7RII and 70-200 f/4. Each tripod had one leg about two inches from the edge and two legs in the shrubs at my back. Me? I had two legs firmly planted on the narrow granite shelf, with my backside hugging the shrubs.
Sunset was at 4:50. With a cloudless sky the moon would appear from behind Cloud’s Rest at around 4:30, a location similar to last month’s full moon but closer to El Capitan. I’d hoped to start the moonrise with a long telephoto, then transition wider as it rose, but by 4:20 the persistent clouds made it pretty likely that if I saw the moon at all, it would be well above Cloud’s Rest and too high for a telephoto shot. At around 4:30 I waved a white flag at the big moon idea and replaced the 100-400 lens with my Sony/Zeiss 24-70 f/4, hopeful that the moon would make its way into a gap in the clouds before the sky became too dark. At around 4:45 the moon teased with a brief appearance between the clouds, but they scissored shut before the moon had an opportunity to shine.
While waiting I worked on my revised composition, which was complicated by my desire to include with the distant moon and Yosemite Valley, a dead tree in my immediate foreground. With very little margin for depth of field error, I opened my hyperfocal app and plugged in the numbers to determine the f-stop and focus point that would ensure front-to-back sharpness. With that out of the way, I bided my time photographing beautiful warm light on El Capitan and Half Dome.
The moon finally peeked above the clouds for good at 4:48. Ascending the darkening sky, the moon was enhanced by a sheer film of nearly transparent clouds that started out pink that intensified to fuchsia on their way to a vivid magenta that colored all of Yosemite Valley. I kept clicking as the foreground darkened, magnifying my image periodically to be sure I wasn’t losing detail in the moon. The image I share here was captured fifteen minutes after sunset.
You win some and you lose some
The Lone Pine segment of my trip was a photographic flop, but photography really shouldn’t be all about the photography. I arrived in Lone Pine mid-afternoon on New Year’s Day and spent the remaining daylight doing reconnaissance for the next day’s sunrise moonset. This was going to be another super-telephoto opportunity, this time at a location I’d driven past but never photographed from, so I wanted to ensure no surprises. That afternoon I enjoyed nice clouds and light above the Sierra’s east face, but to have photographed it would have compromised my scouting objective so I was just content to enjoy.
I rose before 6:00 a.m. on January 2 and drove out to my planned location with a pretty good idea that the clouds would shut me down. When I parked, the moon penetrated the clouds as an indistinct glowing sphere. As I waited, it descended into more-dense clouds and disappeared for good, but I stayed, quite content to simply watch Mt. Whitney and its towering neighbors emerge beneath the brightening sky.
The drive home took my beneath the serrated Sierra crest, past Mono Lake, through the Hope Valley, over Echo Summit and back down into Sacramento, completing the circuit with at least one successful image and many memories of a great trip. A very Happy New Year indeed.
I always have at least one Yosemite moon workshop on my schedule
Because I Showed Up
(Planned shoots that followed the plan…, or not)
Click an image for a closer look and slide show. Refresh the window to reorder the display.


Three Moons
Posted on December 19, 2017
Balanced Moon, Half Dome, Yosemite
Sony a7RIII
Sony 100-400 GM
ISO 100
f/8
1/10 second
This month’s Yosemite Winter Moon photo workshop group got the rare opportunity to photograph a full (or nearly full) moon rising above Half Dome at sunset on three consecutive nights. One reason it’s rare is that, as viewed from Yosemite Valley, the full moon and Half Dome only align in winter. But the real tricky part is making it happen three times when sunset happens at pretty much the same time each evening, but the moon rises about 45 minutes later.
-

- Sunset Moonrise, Half Dome, Yosemite (11/30/17)
-

- Balanced Moon, Half Dome, Yosemite (12/1/17)
-

- Winter Supermoon, Half Dome, Yosemite
My goal for photographing a rising full moon is to get the moon on the horizon in the window from 15 minutes before to 15 minutes after the “official” (flat horizon) sunset. Earlier and there’s not enough contrast and the moon looks bland; later and there’s too much dynamic range to capture detail in the dark landscape and daylight-bright moon.
The key to making this work starts with understanding that when you see a sunset or moonrise time published for a location, that time is always based on a flat horizon. So unless you’re atop a mountain or on a ship at sea, you’ll probably see the sun disappear behind the terrain in the west before sunset, and you’ll probably need to wait for the moon to rise above the terrain in the east.
Since the sun is at my back when a full moon rises, I’m not too concerned about the precise timing of the sun’s disappearance. But I need to be pretty dead-on for the moon’s arrival. Knowing the moon will rise an 40-60 minutes (or so) later each day, it’s easy to infer that the more days until the full moon, the higher the moon will be at sunset. Sadly, I have no control over the timing of the absolute sunset/moonrise, but I can control the elevation of the horizon, and therefore the moon’s appearance on a given day, by choosing my position relative to the horizon above which the moon will rise.
To make this workshop’s consecutive moonrises work, each evening I picked a view that was farther from Half Dome than the previous evening. On our first evening I chose a spot on the east side of Yosemite Valley; the next evening we were closer to the middle of the valley; on our the third evening our vantage point was near Tunnel View, at the opposite side of Yosemite Valley from Half Dome. The moon rose later above the flat horizon each evening, but by moving farther away, we reduced the distance the moon had to travel before it appeared.
Big moon, small moon
The other thing this little exercise illustrates is how to make the moon big in your frame. Notice that in each image, Half Dome is more or less the same size, but the moon gets progressively bigger. That’s because on any given day, no matter where I am on Earth, the moon is so far away that its apparent size doesn’t change. But the size of earthbound features, like Half Dome, changes a lot with proximity. When I was on Yosemite Valley’s east side for the first moonrise, filling my frame with Half Dome required just a little more than 100mm; the next night I was far enough back to require about 250mm to fill the frame; and on the final night, from eight miles away I needed more than 500mm. And as my focal length increased, so did the moon’s size in my frame.
Join me as I do this all over again next December
A Full Moon Gallery


Moon Over Yosemite
Posted on December 5, 2017

Winter Supermoon, Half Dome, Yosemite
Sony a7RIII
Sony 100-400 GM
Sony 2x teleconverter
ISO 400
f/11
1/8 second
Large or small, crescent or full, I love photographing the moon rising above Half Dome. The alignment doesn’t work most months, so those months when the alignment is right, I do my best to be there.
For last week’s Yosemite Winter Moon photo workshop I’d planned three moonrises: Thursday and Friday we got lucky with the never reliable December skies, but Saturday night concerned me. Not only was this moonrise the “main event,” the forecast was less than promising. And while the first two moonrises were absolutely beautiful, the moon was less full and we were on the valley floor, much closer to Half Dome. Our location required a wider focal length that meant a relatively small moon. But on Saturday (it would rise too late to photograph on Sunday) the moon would be 99 percent full and rise shortly after sunset, just left of Half Dome when viewed from Tunnel View. Tunnel View is eight miles west of Half Dome, a distance, when combined with the moon’s proximity to Half Dome, that would allow a long telephoto that would fill the frame with the moon and all of Half Dome.
Saturday started clear, but soon a thin layer of clouds moved in, bathing Yosemite Valley in diffuse light that was wonderful for photographing pretty much anything that didn’t involve the sky. These clouds weren’t dense enough to completely obscure the sun, but with a chance of rain coming overnight, I knew they’d be thickening at some point.
I got my group in position near Tunnel View about a half hour before sunset. I’ve attempted moonrises that were completely obscured by clouds, and some where we could see the moon’s glow through the clouds, but no detail. I tried to stay positive but the fading light made it impossible to tell exactly how thick the clouds were. Fearing the worst, I rationalized that we’d already had two nice moonrises and maybe wishing for a third was just greedy. But still….
Hoping for the best, I pointed out where the moon should appear about ten minutes after sunset, advising everyone to continue shooting normally until then, but to have an idea of their moonrise compositions. Practicing what I preach, I got out my Sony 100-400 GM, added my 2x teleconverter, and framed up the scene. Because I wasn’t going to shoot anything else (as you may have noticed, I already have a couple of Tunnel View images in my portfolio), I focused and waited.
About five minutes after sunset an amber glow in the clouds next to Half Dome signaled the moon’s imminent arrival. That we could even see any sign of the moon gave me hope and I held my breath as the glow intensified, still unsure whether we’d see lunar detail or just a white blob. The glow was actually unique and very beautiful in its own way and I started clicking. The instant the moon’s brilliant leading edge nudged into view, silhouetting the trees, I knew we were in luck. The landscape was already fairly dark by then, but because this was the group’s third moonrise, they’d become old pros at dealing with the scene’s extreme dynamic range—at that point the workshop’s mantra had become: “Push the exposure until the moon’s highlights start blinking, and fix the shadows in Photoshop.”
The experience that evening was even more spectacular than I had dared hope, a perfect storm of conditions I might never see repeated: the moon’s alignment with Half Dome, the telephoto distance, the timing of the moon’s arrival that put it on the horizon with just enough twilight remaining, and (especially) the translucent clouds that enveloped the moon in a golden halo and eased the scene’s dynamic range.
Some thoughts on the Sony a7RIII
A couple of weeks ago, at a Sony sponsored event in Sedona, I got the opportunity to do some night photography with the new Sony a7RIII. But this Yosemite trip was my first time using the new camera on my own. It’s too soon for any final proclamations, but my general sense is that this camera has even more dynamic range than the a7RII (which is pretty incredible). The other significant takeaway from this weekend is that I used the same battery for three-and-half days and came home with more than 25 percent remaining. Anyone who shot with the a7RII, knows how significant this is.
I’m still getting used to the new camera’s interface—while similar to the a7RII, there are definite differences. I do like the new button layout and improved menu interface, but am still getting used to the joystick and touchscreen—pretty sure I’ll learn to love them too. And the dual card slots are a necessary and most welcome improvement.
My biggest complaint with the new camera is that the back-button focus that I loved so much on the a7rII is broken on the a7RIII. Every camera I’ve ever used (Canon and Sony) has allowed me, after tweaking some settings, to switch seamlessly between auto and manual focus without requiring me to change the focus mode. So the first thing I do when I get a new camera is disengage autofocus from the shutter button and assign autofocus to a button on the back of the camera. With back-button focus enabled, my workflow has always been manually focus by default, but always with the ability to autofocus with the simple push of a button—no focus mode change required. Doing this with the a7RII was the easiest of any camera I’ve ever used, but for some reason Sony changed the focus behavior of the a7RIII, so now I have to deal with the added step of switching focus modes on the camera before focusing. This might not sound like a big deal, but I don’t want to have to think about my camera when I’m composing a scene, so this behavior is extremely frustrating. That said, I’ve already communicated my frustration to Sony’s engineers and am hopeful (confident?) this is a firmware fix that will come soon. Sony’s responsiveness to things like this is one of the reasons I’m so happy I made the switch from Canon.
I’m happily retracting those words after Sony found a solution for the a7RIII back-button focus problem. At last month’s Sony media event Sedona, I was surrounded by Sony’s best and brightest engineers; when I brought the BBF problem to their attention, we all scratched our heads over how to make it work, and they finally asked me to send them a detailed write-up. They promised to address it ASAP, but I didn’t think it would happen without a firmware update.
To enable back-button focus on a Sony a7RIII or a9, simply assign any custom button (Tab 2, Screen 8) to the AF/MF Control Hold option (AF1 screen). To use BBF, keep the camera in Manual Focus mode—this allows you to manually focus with the focus ring, or to autofocus by pressing whatever button you assigned AF/MF Control Hold.
Bottom line
I’m pretty sure this is the best camera I’ve ever had my hands on. In fact, the dynamic range improvement was obvious as soon as I started processing this moonrise shoot—we continued shooting about 25 minutes after sunset, and just a little processing reveals useable detail in my highlights and shadows, even in my final image. Ridiculous.
A couple of full moon photography tips
Sun and moon rise/set times always assume a flat horizon, which means the sun usually disappears behind the local terrain before the “official” sunset, while the moon appears after moonrise. When that happens, there’s usually not enough light to capture landscape detail in the moon and landscape, always my goal. To capture the entire scene with a single click (no image blending), I usually try to photograph the rising full moon on the day before it’s full, when the nearly full (99 or so percent illuminated) moon rises before the landscape has darkened significantly.
The moon’s size in an image is determined by my focal length—the longer the lens, the larger the moon appears. Photographing a large moon above a particular subject requires not only the correct alignment, it also requires distance from the subject—the farther back your position, the longer the lens you can use without cutting of some of the subject.
This moonrise image is a perfect example. Tunnel View in Yosemite is one of my favorite locations to photograph a moonrise because it’s about eight miles from Half Dome. At this distance I can use 500+ mm (250mm plus a 2x teleconverter) to fill my frame with Half Dome—with the moon nearby, I get an image that includes all of Half Dome and a very large moon.
Moon Over Yosemite
Click an image for a closer look and slide show. Refresh the window to reorder the display.


