Eloquent Images by Gary Hart
Insight, information, and inspiration for the inquisitive nature photographer
Motion in Nature
Posted on November 7, 2021

Autumn Swirl, Half Dome, Yosemite
Sony a7RIV
Sony 24-105 G
20 seconds
F/16
ISO 50
As a landscape photographer, I often joke that I don’t photograph anything that moves—no wildlife, no pets, no portraits, no sports. And don’t even think about asking me to do your wedding. I’ve always been a deliberate shooter who likes to anticipate and prepare my frame with the confidence my shot will still be there when I’m ready—landscape photography suits me just fine (thankyouverymuch).
But as much as I appreciate the comfortable pace of a static landscape, the reality is that nature is in constant motion. Earth’s rotation spins the moon and stars across our night sky, and continuously changes the direction, intensity, and color of the sunlight that rules our day. Rivers cascade toward sea level, clouds scoot and transform overhead, ocean waves curl and explode against sand and rock, then vanish and repeat. And even a moderate breeze can send the most firmly rooted plants into a dancing frenzy.
Photographing motion is frustrating because a still image can’t duplicate the human experience (not to mention the technical skill required to subdue it without compromising exposure and depth). But motion also presents a creative opportunity for the photographer who knows how to create a motion-implying illusion that conveys power, flow, pattern, and direction.
While a camera can’t do what the human eye/brain do, it can accumulate seconds, minutes, or hours of light, recording a scene’s complete history in a single image. Or, a camera can freeze an instant, an ephemeral splash of water or bolt of lightning that’s gone so fast it’s merely a memory by the time a viewer’s conscious mind processes it. This is powerful stuff—accumulating motion in a long frame reveals hidden patterns; freezing motion saves an instant for eternal scrutiny.
For example
-

- Starry Night, Lake Wanaka, New Zealand
-

- Bristlecone Star Trails, Schulman Grove, White Mountains, California
When I photograph the night sky, I have to decide how to handle the motion of the stars (yes, I know it’s not really the stars that are moving). Freezing celestial motion is a balancing act that combines a high ISO and large aperture with a shutter speed long enough to squeeze every possible photon from a dark sky, but that stops before discernible streaks form. Or, I can emphasize celestial motion by holding my shutter open for many minutes, stretching the stars into parallel arcs.
-

- Electric Night, Grand Canyon Lodge, North Rim, Grand Canyon
-

- Lightning Explosion, Oza Butte, Grand Canyon North Rim
Lightning comes and goes faster than human reflexes can respond. At night, a long exposure can be initiated when and where lighting might strike, recording any bolt that occurs during the exposure. But in daylight I need a lightning sensing device like a Lightning Trigger, that detects the lightning and fires the shutter faster than I can. If I succeed, I can reveal intricate filaments of electricity my eyes missed.
Moving water is probably the most frequently photographed example of motion in nature, with options that range from suspended water droplets to an ethereal gauze. I’m always amused when I hear someone say they don’t like blurred water images because they’re not “natural.”
Ignoring the fact that it’s usually impossible to achieve a shutter speed fast enough to freeze airborne water in the best light for photographing it (shade or overcast), I don’t find blurred water any less natural than a water drop suspended in midair (when was the last time you saw that in the real world). Blurred water isn’t unnatural, it’s different.
Sometimes a long exposure can smooth distracting ripples to enhance a reflection. I often add a neutral density filter and employ this technique when I arrived at a lake or river hoping for a reflection, only to find my plan thwarted by a waves or a wind-whipped surface.

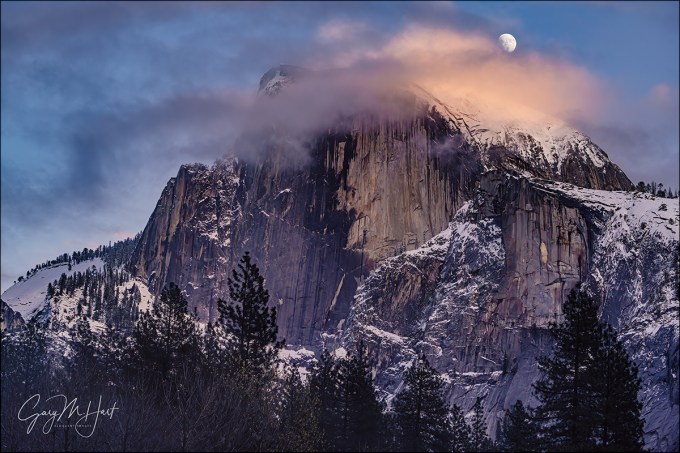
Autumn Swirl, Half Dome, Yosemite
A long exposure can also reveal patterns of motion that are too slow to discern. Which brings me to today’s image from the penultimate night of last week’s Yosemite Fall Color photo workshop
I’d guided my group through the woods to bend in the Merced River that’s usually a glassy reflection in the still autumn flow. But just a week before the workshop, a 6-inch rainfall filled the waterfalls and accelerated the normally languid Merced into a more spring-like flow. Great conditions for most of our photography, but not so much for reflections.
This Half Dome view, known to photographers but just far enough off the beaten path to discourage most tourists, is always a highlight of my Yosemite workshops. I especially like it autumn, for the colorful cottonwood just upstream, and the (usually reliable) glassy surface. This year the cottonwood delivered, but the rapid flow disturbed the mirror reflection I’m accustomed to.
No problem. I suggested to my group that an ND filter would enable an exposure long enough to flatten the water—the result wouldn’t be a mirror reflection, but the gauzy effect would create an ethereal reflection that would be both striking and distinctive.
Working individually with photographers in my group, I soon noticed small patches of foam drifting by in the flow—not just occasionally, but pretty much continuously. I knew from experience that a long exposure would blur them into parallel streaks (like star trails), especially in the darker water, and got a few people started adding this effect to their images.
Then I noticed a collection of foam patches trapped in a small zone of sheltered, (apparently) static water just a few feet upstream. While helping one of the members of the group find a composition here, it soon became obvious that this water was in fact moving, albeit too slow to see.
Once I was confident that everyone was successfully engaged with the scene, I went upstream about 20 feet and looked downstream, searching for something different than the standard view here. I ended up having a blast photographing the slow motion swirl patterns in the foam (and occasional leaf) that clearly wasn’t static, using a few trees and their reflections downstream as my background.
Finally, after shooting that scene to within an inch of its life (each frame was completely different from the previous), I returned to the more conventional upstream composition to see if I could use these swirls to create something a little different.
This was probably 10 minutes after sunset, just possibly my favorite light for photography, and now dark enough to forego the ND filter. The biggest trick here was finding a position with a view of Half Dome, the fall color, the reflection, and with enough swirls to occupy a significant part of the frame.
First, I moved upstream as far as I could move without losing Half Dome and the golden cottonwood behind the nearby trees. Next, to maximize the foreground swirls, I dropped my tripod as near to the ground as I could.
But, from this new perspective, dialing my polarizer to maximize the reflection also enhanced the sky reflection enough to nearly obliterate the foam swirls. So, with my eye on the Half Dome reflection in my viewfinder, I dialed my polarizer just far enough for Half Dome to stand out, but not so much that the water with the swirling foam and leaves lost its blackness.
Setting my Sony a7RIV to ISO 50, and dialing my Sony 24-105 G lens to f/16, enable me to keep my shutter open for 20 seconds—plenty of time to reveal the patterns of motion. A bonus was the leaves and foam flowing much faster in the main river channel, creating linear streaks that I didn’t notice until I processed the image.
Read more about photographing motion
Workshop Schedule || Purchase Prints || Instagram
Motion in Nature
Click an image for a closer look, and to view a slide show.


Sleep is Overrated
Posted on June 13, 2021

Summer Night, Milky Way Over Yosemite, Olmsted Point
Sony a7SIII
Sony 14mm f/1.8 GM
ISO 8000
f/1.8
15 seconds
It’s a Saturday afternoon (Sunday evening by the time you read this) and I’m working on less than 4 hours sleep. I’m not complaining, but before I pass out, I want to share the story of my latest shoot, and the reason I’m so sleep deprived.
If you follow my blog, you might know that in April Don Smith and I got an unexpected opportunity to preview Sony’s brand new 14mm f/1.8 GM lens in Oregon, before its announcement a week or so later. (Read more here.) But that experience was just a tease, because just as I started to fully appreciate the new lens’s potential for night photography (and other stuff, but I’m especially excited by night photography), we had to send it back.
When I finally got my own copy of the lens early this month, I couldn’t wait to try it out on the Milky Way (which wasn’t possible in Oregon because of the direction the Bandon views faced, and a waning moon). June is primetime for Milky Way photography because the brilliant galactic core is up all night—all you need is a dark sky far from city lights, and without the moon.
With a waxing moon invading the sky starting this week, the June dark sky window was quickly closing when I accepted an invitation to join a couple of photographer friends on their night photography trip to Joshua Tree NP this weekend. Then, just two days before we were supposed to leave, my friends decided to go to Denmark instead (a likely story—who else remembers the “Friends” episode where Chandler ditched Janice by telling her he was going to Yemen? Oh. My. God.), leaving me to fend for myself.
I could have stuck with the Joshua Tree plan, but a solo, 16+ hour roundtrip to spend a couple of nights photographing a spot I don’t really know didn’t sound like the best use of my time. Instead, I decided to recruit my brother Jay for a quick trip to more familiar environs.
Yosemite Valley’s towering walls and east/west orientation make it less than ideal for Milky Way photography. And while Yosemite’s high country has potential, accessibility (no roads, backcountry permit requirements) make it next to impossible for a last-minute trip. But…, at 8000 feet, Olmsted Point certainly qualifies as Yosemite high country. And because it’s right on Tioga Road (Highway 120), no backcountry permit is required. There’s still the problem of this summer’s COVID-induced Yosemite reservation system, but photo workshop permit gives me an exemption from (I do still have to get approval first).
Another nice thing about Olmsted Point is that it offers a view of Half Dome that’s quite a bit different than what we’re used to seeing from Yosemite Valley. While the Yosemite Valley views of Half Dome face east, from Olmsted Point Half Dome rises in the southwest, at the end of Tenaya Canyon.
Jay and I pulled into the Olmsted Point parking area at about 8:30 Friday night. The sun had just set, but we still had at least an hour until the sky darkened enough for the Milky Way to appear. With time to kill, after bundling into my cold weather clothes and organizing my gear, I twisted my Sony 100-400 onto my Sony a7RIV and scaled a nearby granite ridge to photograph the thin sliver of new moon disappearing in the west. An impromptu bonus that set the tone for the night.
We made the 5-minute walk out to Olmsted Point’s granite dome at around 9 p.m. I’ve been up here more times than I can count, so even in the dwindling light I was able to quickly identify the scene I wanted to start with, set up my camera (Sony a7SIII and Sony 14mm f/1.8 GM), and frame up a composition. Then I just kicked back on the granite and watched the stars pop out.
Viewed from the Northern Hemisphere, in June the Milky Way’s core rises nearly horizontal in the southeast sky shortly after sunset. As our planetary viewing platform rotates, the glowing core appears to pivot on an unseen point below the south-southwest horizon, moving up and southward (to the right) until it stands vertical in the southwest. The northern hemisphere nights are so short in June that the Milky Way fades from view before setting.
By 9:30 we could see the Milky Way peeking just above the granite ridge that leads to Clouds Rest. It was well east of Half Dome, so for these early frames I was very thankful to have a 14mm lens that allowed me to include the Milky Way in the same frame as Half Dome. I spent those early moments tweaking my exposure, refining my composition, and verifying that my focus was good.
Once I’d gotten everything just as I wanted it, I told myself that there was no reason to rush because with each passing minute, the Milky Way was a little higher in the sky and closer to Half Dome—that meant every click I took would be just a little better than the one preceding it. So after the initial exhilaration passed, I just sat on a nearby rock and appreciated the view. Few things are more humbling than reclining beneath a dark sky on a still night (especially when you’re sufficiently bundled against the high elevation chill).
We stayed until nearly 1:00 a.m. As I photographed (and gazed), I kept mentally pushing back our planned departure time, mentally subtracting hours of sleep by rationalizing that sometimes sleep is overrated. This was definitely one of those times.
A few words about my night photography
All of the night scenes you see on my website, in my blog, or anywhere else my images appear, were captured with one click. I don’t blend, composite, or in any other way combine multiple captures to create a single image. I’m not saying I think there’s anything wrong with blending images (there isn’t)—I just don’t get any pleasure from that kind of photography. So, while my night images may not look as dazzling as some of the other (truly beautiful) night composites being created today, you can at least be confident that you’re looking only at the photons that struck my sensor in one contiguous span of time.
Workshop Schedule || Purchase Prints || Instagram
A Night Sky Gallery
Click an image for a closer look, and to view a slide show.


")


Making Your Own Luck
Posted on April 4, 2021
Moonrise Through the Clouds, Half Dome, Yosemite
Sony a7RIV
Sony 100-400 GM
1/30 second
F/10
ISO 200
“Chance favors only the prepared mind.” ~ Louis Pasteur
Successful nature photography requires the convergence of physical objects, position (relative to those objects), light, weather conditions, the right equipment, and mastery of craft (did I miss anything?). Though we can control many of these factors, the overriding element that trumps everything else is plain old luck. But despite the undeniable luck factor in photography, most photographers bristle at the suggestion that a particular capture was “lucky.” For good reason.
No one denies that photography involves a great deal of luck, but each of us chooses our relationship with the fickle whims of chance, and we have more control than you might imagine. Which is why, like Ansel Adams, Galen Rowell, and a host of other photographers, I embrace Louis Pasteur’s belief that chance does indeed favor the prepared mind. In other words, the more prepared we are, the less luck will effect our outcomes.
As photographers, job-1 is subtracting as much luck as possible from the image capture equation: we hone our craft, get the best gear our budget allows (including backups), painstakingly research our locations, study the science behind the conditions we want to photograph, then sacrifice comfort and convenience (and sleep!) to be in the right place at the right time. Though we definitely appreciate our good fortune when the magic does happen, much of photography’s joy comes from the special effort it took to be there. Yes, it was fortunate that a lightning bolt struck right there, or the clouds parted just as the moon appeared, but it was no accident that we were there when it happened, fully prepared to capture the moment.
All photographers, in one way or another, work to manufacture their own luck. Because I’m particularly drawn to capturing nature’s ephemeral phenomena above its terrestrial wonders, that’s where my efforts are spent. Whether it’s lightning at the Grand Canyon, the Milky Way over Tasman Lake in New Zealand, or a moonrise above Half Dome in Yosemite, I schedule most of my photo trips (both personal and workshops) to maximize my chances for something special. While there’s never a guarantee that it will actually happen, and I’ve been disappointed more times than I can count, that doesn’t stop me from planning and getting out there just in case.
Which is how I happened to be in Yosemite in December 2019 for this moonrise. I’d plotted this alignment more than a year in advance. When I scheduled a workshop to capture it (fingers crossed), I knew full well that December is the wet season in Yosemite, making it entirely possible, maybe even likely, that my much anticipated moonrise could happen entirely behind a curtain of clouds.
Since this was a workshop, my first job is to reduce the luck factor for my entire group. That started with letting everyone know what gear they needed (nothing special: camera, lenses covering 24mm to 200mm, and a tripod), and (more important) getting them up to speed on the surprisingly tricky exposure idiosyncrasies of sunset moonrises. Meanwhile, behind the scenes I obsessively refreshed the NWS Yosemite forecast page every five minutes, trying will the forecast into promising something more definitive than the annoyingly ambiguous “partly cloudy.” No such luck.
The day of the event proceeded as advertised, teasing us with skies that alternated between mostly clear to mostly cloudy. Fickle skies notwithstanding, there was no thought of abandoning Plan A—I’ve been surprised enough by Nature (especially in Yosemite) to know that, no matter what the forecast promised, I’d have my group out there. Another thing I try to do to improve my group’s odds of success is get them on location early enough to familiarize themselves with the scene and its variety of composition options. Even though I’ve photographed this spot countless times, experience has taught me that first time need time to get comfortable with a scene.
Even without the moon, this location is very photo-worthy. So by the time moonrise approached, they’d all had plenty of photos under their belt and were pretty comfortable with the possibilities here. Clouds came and went as we waited, but the moon’s appearance coincided with one of the more clear moments. We started clicking wildly when the moon peeked out from behind Half Dome, then held our collective breaths as Half Dome’s cloud-making machine churned into action, completely erasing the moon within minutes of its arrival. But instead of getting discouraged, we just hung tight and hoped the moon would punch through. Punch through it did, delighting us with a moon/cloud dance that lasted until it became too dark to photograph.
We all felt very lucky walking back to the cars that evening, but we felt so much more than that. Exiting Safeway to see a rainbow arcing over the parking lot is lucky. Period. But when you see an image of one of nature’s ephemeral gifts matched with a beautiful landscape, try to appreciate that its creation, as lucky as the moment might have felt to the photographer, was probably much more than simple good luck.
Fortunately, anticipating these special moments in nature doesn’t require any real gifts—just a basic understanding of the natural phenomena you’d like to photograph, and a little effort to match your anticipated natural event (a rainbow, lightning, a moonrise, or whatever) with your location of choice. Mix in the right gear, the resolve to get out there, and the perseverance not to give up when nature appears to have other ideas, and voila: You’re a photographer! And that’s about as lucky as you can be.
Workshop Schedule || Purchase Prints || Instagram
More Self-Made “Luck”
Click an image for a closer look, and to view a slide show.


")


COVID Reflections
Posted on March 14, 2021

Autumn Snow and Reflection, Half Dome, Yosemite
Sony a7RIV
Sony 16-35 f/2.8 GM
2 seconds
F/16
ISO 50
Last week marked the one year anniversary of the COVID shutdown. WOW. One year.
In hindsight I realize that I might have been a little naive when this thing started because of the way I’d spent the two weeks prior to the shutdown: first in Scottsdale, Arizona for my annual MLB Spring Training trip (go Giants!), followed immediately by a week in Anchorage, Alaska to visit my daughter. In Arizona at the beginning of March I noticed very little difference in people’s behavior (though I did have to search long and hard for hand sanitizer), but winging my way to Alaska, I was struck by how empty the airports and flights were. Hmmm….
Alaska is where I was when it started to dawn on me that a couple of my upcoming workshops might be threatened. When that realization hit, I remember thinking I’ll be fine as long as I don’t lose the New Zealand trip at the end of June. Ha! I ended up losing 12 workshops, including New Zealand in both 2020 and 2021. And the workshops I have managed to pull off (three so far since last March) have been impacted as well, both in terms of group size and COVID protocol.
But this isn’t a woe is me post, I promise. I have so much to be grateful for, starting with the flexibility of being self-employed and working from home. And of course continued good health of my family and me. Oh, and the fact that I’m still in business.
And just like that, here’s 2021, I’m fully vaccinated, with two workshops in the mirror and six queued up over the next eight weeks (maybe I should be careful what I wish for). Life’s good.
But anyway…
I started this blog with the idea of a sentence or two reflecting on the COVID anniversary before diving into some thoughts on this just-processed image from last November. But here I am, nearly 500 words later….
I don’t need to gush any more about this day, a highlight of my pandemic year—you can just go back through the many blogs I’ve already posted about it (7—I counted). What I wanted to say about this image is how it underscores the importance of not merely settling for a beautiful scene, no matter how beautiful it is (something this one irrefutably was). Creating an image that stands out from all the other pictures of inherently beautiful scenes requires understanding the difference between the way your camera sees a scene and the way you see it. Unlike your experience of the world, a still image is devoid of motion and depth, has limited dynamic range and depth of field, and is constrained by a rectangular box. Managing these differences requires the ability to control your camera’s exposure variables (f-stop, shutter speed, ISO, focal length) to create the illusion of depth and motion.
The clouds had just started to part when I arrived at this reflective bend in the Merced River. It’s easy to get walloped by the beauty of a scene like this, frame up something nice, and click. But after indulging the creative side of my brain (camera or not, this scene really was gorgeous), I forced myself to set my awe aside for a few beats to work out the best way to convey the beauty.
My first step in most scenes is to identify the most important thing—what I want the scene to be “about.” If that important thing is in the foreground, I look for a complementary background; if my subject is in the background, I try to identify a complementary foreground.
In this case my “most important thing” was the entire scene across the river, anchored of course by Half Dome, but supported by the snow-covered trees and the reflection. I wandered the riverbank and found a few things to put in my foreground. I started with a mini cove rimmed with leaves that I used to frame a horizontal composition. Then, looking for something that would be better for a vertical composition, I moved on to these floating leaves and partially submerged log just a few feet upstream. Framing everything up at eye-level, I didn’t like the empty gap between the leaves/log and Half Dome’s reflection, so I dropped my tripod as low as it would go and went to work.
While there was a fair amount of dynamic range, I knew it was well within the capabilities of my Sony a7RIV—if I exposed carefully. But exposing carefully means more than just getting the light right—it means getting the light right with a shutter speed that handles the motion, and with an f-stop that handles the depth.
With a few ripples disturbing the reflection, I wanted shutter speed long enough to smooth the water and twisted my Breakthrough 6-stop Dark Circular Polarizer onto my Sony 16-35 f/2.8 GM lens. And since sharpness from the closest leaf to Half Dome’s summit was important, I selected f/16 and focused on the log. (My hyperfocal app assured me that this would give me more than enough depth-of-field for front-to-back sharpness.) Next, with my eye on the viewfinder, I slowly turned my polarizer far enough to remove the reflection from the leaves, but not so much that I erased the primary reflection.
Finally, I was ready to meter and select the shutter speed the gave me a good histogram. At my a7RIV’s native ISO (100), the shutter speed I needed was 1-second. To double that and ensure better smoothing of the ripples, I dialed down to ISO 50. Click.
A COVID Compilation
(Images from the last 12 months)
Click an image for a closer look, and to view a slide show.


Good Things Come to Those Who Wait
Posted on February 28, 2021

Nightfall, Yosemite Valley Moonrise
Sony a7RIV
Sony 24-105 G
.8 second
F/10
ISO 400
So much to do after two workshops in the last two weeks (and all the planning and recovery that goes with them). I had ambitious plans to return home late Friday night and hit the ground running first thing Saturday morning, so imagine my frustration to walk into my chilly house (I’d turned off the heat before I left), equal parts hungry and tired, at about 11 p.m. to find my internet down. When I discovered no dial tone on my landline (yes, I still have a landline), I realized this was a Comcast problem. Uh-oh. Having dealt with Comcast problems in the past (don’t get me started on their automated phone support system), I set aside food, warmth, and sleep to immediately call Comcast tech support. (Cold, hungry, tired, and no internet—suddenly I knew how the Donner Party must have felt.)
After about two hours on the phone (no, I do not want to reset my modem for the eighth time!), the best I could do was arrange for a Sunday house call—not bad for Comcast, but certainly not great for someone with a business to run, especially given all I had to do. I went to bed strategizing my Saturday, figuring I could at least load and process my images, and handle my basic internet needs by turning my phone into a wifi hot spot. But Saturday morning when I tried to connect my computer to my phone and load a page, my computer just stared back dumbly. I checked my reception and saw it bouncing between one and zero bars. I found a corner by the window that at least seemed to stay at one bar and called T-Mobile. Turns out a tower was down, but at least they were sorry. (I actually think T-Mobile’s tech support is very good, especially after dealing with Comcast.) And for some reason my Adobe Creative Suite wouldn’t load either (usually it works fine without connectivity, but I didn’t have the bandwidth to debug the problem without internet).
The additional technical frustration between then and now included multiple support calls with Comcast and T-Mobile and a trip to the Comcast store to swap out my modem, all culminating with a visit from a very nice Comcast technician who fixed the problem and told me the support rep I talked to yesterday could have fixed it over the phone. Sigh.
So here I am, it’s Sunday night and have a blog to write. I loaded my images, grabbed one from Friday night, processed it, and here you go. Now for something to say….
I’d scheduled my Yosemite Winter Moon workshop around this grand finale, a full moon rising from directly behind Half Dome right at sunset on Friday evening. The rest of the workshop had already been really nice—multiple rainbows on Yosemite Falls (Upper and Lower), a warmup moonrise on Thursday night, and even a bonus Horsetail Fall shoot (I’d made it clear that the moon, not Horsetail Fall, was the priority for this workshop) when it became clear the conditions would be perfect, and I had cracked this year’s NPS Horsetail Fall restrictions code—but this moonrise is what we’d all been looking forward to.
Because of the crowds in the park and the fact that the moonrise was apparently not a secret (how I long for the good old days), we got to our moonrise spot above the Tunnel View vista about two hours early. After not seeing a single cloud for the entire workshop, the first thing we saw as we unpacked and set up our gear was a bank of thin clouds that had set up camp low on the horizon, directly behind Half Dome. At first they appeared to be moving on and I was pretty optimistic about our moonrise, but as the appointed hour approached I grew increasingly pessimistic—not only were clouds thickening, they were expanding.
Sure enough, zero hour arrived with no sign of the moon, but we did get some nice color in the clouds and the group, while disappointed, seemed happy enough with what did get. The scene was so nice in fact that we were in no rush to leave despite the darkening landscape. Which is why we were still primed and ready for action when I noticed a faint glow in the clouds above Sentinel Rock. Could it be?
Yes it could. What started as a glow quickly revealed itself to be the lunar disk we’d been waiting for. And though it wasn’t apparent to our eyes, it was clear that the moon had edged into a patch of thinner clouds, because as we frantically clicked, actual lunar detail started to emerge. In fact, the clouds that originally thwarted our moonrise turned out to be a benefit when they moderated the moon’s brightness enough to allow us to photograph long after it have been too bright.
In my prior blog post I wrote about the joy of unexpected gifts from nature, events that seem to come out of nowhere, just when you’ve about given up hope. Now it had happened in consecutive workshops. I realize that moments like this are the exception, but they really do more than make up for all the disappointment nature likes to deal.
Workshop Schedule || Purchase Prints || Instagram
Worth Waiting For


Natural Tension
Posted on January 3, 2021

Clearing Storm, Half Dome Reflection from Sentinel Bridge, Yosemite
Sony a7RIV
Sony 24-105 G
Breakthrough 6-stop dark polarizer
2.5 seconds
F/16
ISO 50
Since the start of the pandemic, many (most?) of us have have found lots of time to catch up on books and movies (among other things). Of course that also includes me, and as a photographer I find it hard not to find parallels between my chosen creative medium and these others. The tension in books and movies, whether dramatic, comedic, or some combination of both, originates from the interaction of characters with each other and/or their surroundings, and the change that interaction spawns over time. Which of course got me thinking about whether it’s possible to create tension in a still photograph, and if so, how?
Relationships
Though we might not be conscious of it, the best photographic images do indeed convey a form of tension. It’s human nature to seek relationships, not just in our lives, but in our art as well. Every relationship has inherent tension, an invisible connecting thread that pulls tighter as the relationship strengthens.
Lacking the passing of time and the change it brings, still-photographers must create tension by setting up relationships between disparate elements in our frame. We signal these relationships, thereby dialing up the tension, through careful positioning of compositional elements (Google “rule of thirds” and “golden ratio”).
The most obvious relationships available to landscape photographers is the juxtaposing independent physical elements in the scene. For example, pairing a foreground tree or flower with a distant peak permanently creates a relationship between two formerly unrelated subjects. Reflections are an easy way to connect a nearby water feature to a distant subject. And then there are the dynamic celestial elements like the moon and stars, and ephemeral weather phenomena such as lightning and rainbows, that make powerful connections with terrestrial subjects.
But wait, there’s more…
Even though no time passes in a still frame, landscape photographers can and do signal time’s advance. Whether conscious of it or not, when we photograph the color and light of the natural boundaries separating day and night, the broken clouds and rainbows of a clearing a storm, or the juxtaposition of elements distinctive to two seasons, we signal the passage of time and the tension inherent in its inexorable march.
Lacking other features to set them apart, the cliched nature of sunrises and sunset images diminishes their power to generate tension—in other words, sunrises and sunsets are a dime a dozen, so if you’re going to photograph one, you’d better make an effort to put it with a strong scene. On the other hand, though it’s always important to seek a strong composition regardless of the conditions, the more rare the change, the better it can overcome an otherwise ordinary scene.
A clearing storm can feel like catching lightning in a bottle (a nice rainbow can elevate nearly any scene), but an even rarer opportunity to capture change is a scene with clear signs of two seasons. That’s especially true in my home state of California, where seasons tend to be more of an afterthought. But that doesn’t mean opportunities to photograph seasonal change here are nonexistent. California does get spectacular spring wildflower blooms, and our autumn color display (though maybe not as spectacular as some other places), can be very nice.
Bracketing spring and autumn on one side is summer, hands-down California’s least photographically compelling season. But on the other side of spring and autumn is winter. While most of the state doesn’t get snow, our mountains do (and lots of it)—capturing late snow on wildflowers and dogwood (an extremely rare event), and early snow on fall color, are real treats.
So maybe I should have warned you that there’d be math…
Which brings me to this image from my visit to Yosemite during an early November snowstorm. I really don’t need to go on any more about this day—if you’ve been reading my blog for the last couple of months, you’re probably well beyond sick of hearing about it. But it does illustrate the synergy of combining two seasons in one image. No one can deny that fall color is beautiful, and fresh snow is beautiful too (which of these is more beautiful is in the eye of the beholder, and a debate for another day). But if we were somehow able to quantify beauty, I suspect that we’d find the total amount of beauty (“beauty-units,” “beauty-bucks”?) in a fresh snow on fall color image would exceed the sum of the beauty derived from an image with fall color plus the beauty of an image with fresh snow.
You could attribute this synergy to the relative rarity of snow on fall color, but I think the power goes deeper than that. There’s just something about change the ups the stakes, so even though this is nothing more than a (totally unprovable) mental exercise (maybe I’ve been locked up too long), I’m sticking with the theory that the synergistic power of an image that combines the distinctive best of two seasons is the tension of change it conveys.
The Tension of Change


To the Pain
Posted on December 20, 2020

White Gold, Half Dome Reflection, Yosemite
Sony a7RIV
Sony 24-105 G
Breakthrough 6-stop dark polarizer
4 seconds
F/16
ISO 50
When you stop to consider all the components that have to fit into place to make a successful landscape image, it’s a wonder we don’t all just stay inside and watch TV. First there’s mastery of photography’s creative side, which requires the ability to distill our dynamic, multi-sensory, three-dimensional world into a coherent two-dimensional image. Then there’s the technical side, where we juggle our camera’s aperture, shutter speed, and ISO settings to control the scene’s depth, light, and motion. And as if meshing all these moving parts into something visually appealing weren’t daunting enough, don’t forget to factor in photography’s mental component: knowing where to be and when to be there; the foresight to recognize what might happen next and the patience to wait for for it; and finally, the fortitude to endure hunger, sleep depravation, and whatever elements Mother Nature throws our way.
Yet somehow photography happens. And like most things in life, I’ve always thought photography’s greatest joy comes from doing the hard work and overcoming difficulty. Sometimes spectacular just falls in our lap, but most of my favorite images simply those images I feel like I earned.
Nature photography’s 3 P’s
To remind myself (and others) of the photography’s mental side, many years ago I identified what I call, “The 3 P’s of nature photography.” These sacrifices, large and small, a nature photographer must make to consistently create successful images.
- Preparation is your foundation, the research that gets you in the right place at the right time, plus the vision and mastery of your camera that allows you to wring the most from the moment. It’s controlling exposure and focus, knowing your equipment, and understanding the subject. Preparation is also just having the right equipment for the moment, from the lenses in your bad to weather-appropriate clothing.
- Persistence is patience with a dash of stubbornness. It’s what keeps you going back when the first, second, or hundredth attempt has been thwarted by unexpected light, weather, or a host of other frustrations, and keeps you out there long after any sane person would have given up. And just as important, persistence is a willingness to wait as long as necessary for the moment to be right, and not just settling for “good enough.”
- Pain is suffering for your craft. I’m not suggesting that you risk your life for the sake of a coveted capture, but you do need to be able to ignore the tug of a warm fire, full stomach, sound sleep, and dry clothes, because the unfortunate truth is that the best photographs almost always seem to happen when most of the world would rather be inside.
An assignment
The truth is, you almost certainly already do it. Pick some of your favorite captures, pop them onto the screen, and try to put yourself back at that time and place. Ask yourself which of the 3 P’s you employed, and be generous with yourself and not too quick to write an image off to blind luck.
Practicing what I preach, here’s my stab at the assignment for this image:
- Preparation: Some would argue that I was lucky to be in Yosemite last month just as several inches of snow fell on peak fall color. And while my good fortune that day isn’t lost on me, the fact that I was there was no accident. I monitored the weather forecast for snow in Yosemite Valley, adjusted my schedule, and packed the right clothes for the conditions. Of course I also had an intimate familiarity of my subject, from the locations themselves to the best time to be there for the current conditions.
- Persistence: I can’t tell you the number trips I’ve taken to Yosemite and elsewhere that didn’t amount to anything. In 2013 I scheduled an entire workshop around the arrival of Comet ISON, only to have the comet disintegrate just a couple of days before the workshop. Many times I’ve made the long drive to Yosemite to photograph snow that turned out to be rain. But no matter how many times Mother Nature throws me a curve, I keep coming back and sometimes it pays off. Like this time.
- Pain: It’s not like I trekked solo across the arctic, or summited Everest without oxygen, for this image. Though this day was cold and wet, and getting to Yosemite required an 8-hour roundtrip drive in less than ideal conditions, I didn’t do anything most other people couldn’t do—I just pried myself from the recliner and hit the road. The drive was sometimes boring (I’ve done it hundreds of times), sometimes stressful (turns out my Outback needed new tires—uhhh, reference Preparation section above), and standing in the snowy cold was less comfortable than lounging inside by a fire. It’s insidious the way these small inconveniences and discomforts try to lure us into staying home, but the payoff happens enough to justify the sacrifice.
A few words about this image

Autumn Snowfall, Half Dome Reflection, Yosemite
Sentinel Bridge is such an iconic view of Half Dome that it would be photographic malpractice not to share it with a workshop group, but when I’m in Yosemite by myself I rarely stop here because it lacks compositional variety (it’s hard to find something I don’t already have). But because the conditions on this day were spectacularly unique, I actually stopped here twice. This image was from my first stop, when a light snow still fell and storm clouds ruled the scene.
Half Dome had been swallowed by clouds for a while, but crossing the bridge I saw that it had just emerged so I whipped into the adjacent parking lot. Rather than mess with my entire kit, I just grabbed my tripod, Sony a7RIV, and Sony 24-105 f/4 G lens and jogged up to the rail (maybe 100 feet from the car).
I always do my best to position myself so the trees frame Half Dome without obscuring any of its face, not always easy at this extremely popular spot. I was lucky this time that there were only a couple of other photographers set up so I didn’t have any trouble finding a spot that worked. With the scene so perfect, I didn’t want to get too fancy and risk losing Half Dome to the clouds. I quickly identified the elements I wanted to feature—Half Dome, the upstream trees, and of course the gorgeous reflection—and went to work.
I often start with a vertical composition on Sentinel Bridge, but surveying the scene, when my eyes were drawn to the serpentine ribbon of autumn leaves clinging to the south riverbank I opted to start with a horizontal frame. That left me with a decision about what to about the trees on both sides of the river—how many to include, and whether to cut them off at the top. I finally decided that not cutting them off would give me more sky than I wanted.
With the frame’s top/bottom established, I panned left and right until I was satisfied: enough of the floating leaves—check; Half Dome properly centered (Half Dome has so much visual weight, putting it too far left or right can throw off the balance)—check; the diagonal trunk and snow-capped rock far enough from the left edge that they create compositional balancing elements for that side of the frame—check.
With a few gentle ripples ruffling the reflection, I added my Breakthrough 6-stop dark polarizer, stopped down to f/16, and dialed my ISO to 50. This gave me a 4-second exposure that smoothed the water just enough to allow the reflection to stand out nicely. Once I was satisfied that this composition was a success, I went on to shoot the scene in a variety of other ways as well: wider, tighter, and vertical. (You can see the vertical version in the gallery below.)
Returning to Sentinel Bridge a few hours later, the sun had broken through to light up Half Dome and the tops of the trees, creating a completely different, but no less beautiful, scene (that I haven’t had a chance to process yet).
Many of you no doubt recognize the reference in this post’s title; for those who don’t (inconceivable!), treat yourself to this scene from the best movie ever.
Preparation, Persistence, and Pain
Click an image for a closer look, and to view a slide show.
")


Photography With Friends
Posted on December 6, 2020
Twilight Moonrise, Half Dome and Bridalveil Fall, Yosemite
Sony a7RIV
Sony 70-200 f/4 G
ISO 200
f/10
1/8 second
One of my favorite things about landscape photography is the opportunity to experience nature in complete solitude. But since COVID has forced us all to socially distance, I’ve realized that another one of my favorite things about landscape photography is the opportunity to experience nature in the company of others.
There’s a lot of waiting in landscape photography: for the light to be right, the lightning to fire, the sky to darken, the clouds to part, or the moon moon to arrive. But it wasn’t until I started leading photo workshops that I fully appreciated how much I miss sharing that waiting with people who appreciate nature’s beauty as much as I do. Whether it’s actively engaging in conversation, or just watching my workshop students enjoy the company of friends new and old. And then there are the many lasting friendships that formed in workshops.
So about a week before the late November full moon (that I’d circled on my calendar over a year ago), I got the bright idea to invite a half-dozen or so of my favorite photography friends to join me for one of my favorite things in nature: a full moon rising above Yosemite Valley. I sent an e-mail invitation detailing what was going to happen, where I was going to photograph it, and when I’d be there.
My brother Jay and I left for Yosemite late that morning, arriving at Tunnel View about four hours later. After about ten minutes circling and waiting for a place to park (I’ve never seen Yosemite more crowded in November), we made it up to the designated spot right around 4 p.m. I was thrilled to see nearly everyone I’d invited, some who had driven as long as six hours to get there. A couple of them had brought their wives, and one brought a friend.
The standard Tunnel View vista was crowded enough to qualify as a super-spreader event, but since I’d chosen a broad, unmarked slab of granite above the parking lot, we were able to socialize while remaining safely socially distant. The moon would arrive at 4:25, so after enthusiastic greetings and a few elbow-bumps, I opened my bag and went to work.
For this event I set up two tripods: one with a Sony a7RIV and Sony 200-600 with a Sony 2X Teleconverter; one with my other a7RIV and Sony 70-200 f/4. (Normally I’d have used my Sony 24-105 f/4 G, but I’ve shot this moonrise wide so many times that I decided before leaving that I was going to go all telephoto.)
Equipment ready and compositions set, I checked my watch and saw that we still had 15 minutes until the moon arrived. Perfect. Because this shoot was as much about reconnecting with friends as it was about photography, before leaving I’d filled two large thermoses with boiling water, and brought enough cocoa mix for each of us to warm our insides with two steaming cups of chocolate goodness. Sipping cocoa, we enjoyed the view and waited for the moon, chatting, laughing, and simply catching up—just like the good old days.
The moon arrived just as the last sunlight bathed Half Dome in warm hues that started amber and transitioned to soft pink before finally fading. As the moon rose through the darkening sky, the conversation was replaced by clicking shutters.
The image below is one of my first clicks; at the top of the post is one of my final images, captured shortly before the foreground became too dark to capture (with one click) without overexposing the moon.
Lunar Arrival, Half Dome, Yosemite
Sony a7RIV
Sony 200-600 G
Sony 2x teleconverter
ISO 800
f/18
1/60 second
Down in the parking lot we chatted more in the darkness, reluctant to acknowledge that our gathering was over so fast. I’ve always thought that there are few experiences in nature better than watching the moon rise above Yosemite Valley, but as far as I’m concerned, the highlight of this evening was reconnecting with friends.
Read how I plan my moon shoots
Workshop Schedule || Purchase Prints || Instagram
A Tunnel View Moonrise Gallery


Snow Falling on Autumn
Posted on November 22, 2020

Autumn Snow, Half Dome Reflection, Yosemite
Sony a7RIV
Sony 12-24 f/2.8 GM
1/100 second
F/16
ISO 200
Between peak fall color dancing on reflections everywhere, and a sky that oscillated all day between heavy snowfall and dramatic clearing, this November day was just one of those days when it was best to keep moving. In these conditions that’s easier said than done because whatever I’m photographing is so beautiful, it’s hard to leave. The result is a memory card full of spectacular, but similar, images. So, after a lifetime of photographing Yosemite in spectacular conditions, I’ve learned not to forget that it’s just as beautiful somewhere else.
By the time I made it out to this Half Dome view just a couple of Merced River bends upstream from Sentinel Bridge, I’d circled the valley so many times I was almost dizzy. My usual lens here is my Sony 24-105 f/4 G because I don’t usually think the surrounding scenery justifies shrinking Half Dome and its reflection with a wide lens. But with snow draping towering evergreens and golden cottonwoods, and a mosaic of autumn leaves lining the riverbank, this was no ordinary day.
Though I’d just gotten the Sony 12-24 f/2.8 GM in August, this was only the second time I’d gotten to use it (thank-you-very-much coronavirus), so I figured what the heck and twisted it onto my Sony a7RIV. Then I moved up and down the riverbank looking for the best foreground to put with the rest of this glorious scene. I eventually settled on this spot, drawn by the way the colorful leaves arced and seemed to frame Half Dome’s reflection.
To shrink the empty area between the leaves and reflection, I splayed my tripod legs and dropped it as low as possible, then plopped down in the snow to compose (grateful for my camera’s articulating LCD). The closest leaves were just a couple of feet away, but I really, really wanted the scene to be completely sharp throughout my frame. I was pretty sure that at 12mm and f/11 I had enough depth of field to safely focus anywhere, but why take a chance? I opened my hyperfocal app and confirmed that my hyperfocal distance was just one foot. Nevertheless, since the databases these apps use don’t take into account the extreme resolving power of a GM lens on 61 megapixel sensor, I bumped to f/16 (diffraction be damned) and went to work.
At first I was annoyed by the constant drips from overhead branches that kept disturbing my reflection, but quickly discovered that by timing my clicks, I could use the concentric waves as an accent, without losing the reflection. The single leaf that floated in just below (above?) Half Dome’s reflection was a bonus.
I just updated the Reflections article in my Photo Tips section, but am sharing it below as well
(and check out the Reflections Around the World gallery at the bottom)
Reflections
-

- Spring Reflection, El Capitan and Three Brothers, Yosemite
-
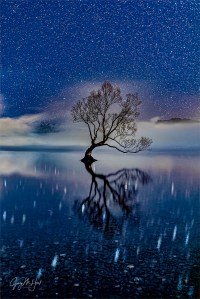
- Starry Night, Lake Wanaka, New Zealand
-
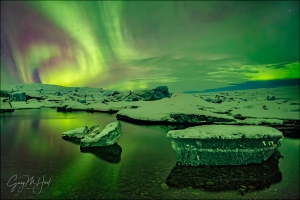
- Aurora Reflection, Glacier Lagoon, Iceland
Reflection
Dictionary.com: The return of light, heat, sound, etc., after striking a surface.
Okay, so that’s pretty basic. How about this one?
Wikipedia: The change in direction of a wavefront at an interface between two different media so that the wavefront returns into the medium from which it originated
Whoa, I hope that’s not on the test.
Who doesn’t love the soothing tranquility of a crisp reflection? And like a metaphor in writing, a reflection is an indirect representation that can be more powerful than its literal double thanks to its ability to engage the brain in different ways than we’re accustomed. Rather than processing the scene directly, we first must mentally reassemble the reflection’s reverse world, and in the process perhaps see the scene a little differently.
Reflections are a powerful photographic tool as well. Water’s universal familiarity makes it an ideal subject for photographers frustrated by their camera’s static representation of our dynamic world. Just as we freeze or blur a waterfall to express turbulent motion, we can include a reflection to convey serenity.
Water reflections come in many forms, from a mirror-sharp inverted mountain shimmering atop a still pool, to an abstract shuffle of color and texture on an undulating lake. Without getting too far into the physics of light, it’s important to understand that every object we see and photograph (that doesn’t generate its own light) comes to us courtesy of reflected light. For example, when sunlight strikes Half Dome in Yosemite, some of the sun’s photons bounce straight back into our eyes, and there it is.
But other photons head off in different directions—some are captured by other sets of eyes, while others land on the surface of the Merced River. Some of these photons penetrate the water to reveal the submerged riverbed, while others carom off at the same angle at which they struck the water, like a pool ball striking the cushion, or a hockey puck off the boards. The ricocheting photons that travel from Half Dome and bounce off the river, reach our eyes as a reflection. In other words, what we call a reflection is in fact re-reflected light (reflected first from El Capitan, then by the river).
Mirror reflection recipe

Autumn Reflection, El Capitan and Three Brothers, Yosemite
The ingredients for a crisp, mirror reflection is pretty simple: still water, a sunlit subject that’s much brighter than the water’s surface (the greater the contrast the better), and a view angle that matches the angle from the water’s surface to the reflection subject. (The best reflections are usually found on shaded water because there are fewer photons to compete with the photons bouncing from the reflected subject.)
In the image on the left, with El Capitan in direct sunlight but the slow moving Merced River still shaded, my biggest challenge was finding floating fall leaves to include with my reflection. Once I found this spot, my only option was to use my Sony 12-24 f/2.8 GM lens (on my Sony a7RIV body), which gave me a field of view just wide enough to fit El Capitan, Three Brothers, the reflection, and the floating leaves into my frame.

Sunset Palette, Half Dome from Sentinel Dome, Yosemite
Playing the angles
Understanding that reflected photons leave the water’s surface at the same angle at which they arrive—imagine the way a tennis ball bounces (if it weren’t affected by spin, wind resistance, or gravity)—helps us get in position for the reflection we want.
A few years ago I found myself atop Sentinel Dome right after an intense rain shower had turned indentations in the granite into small, glistening pools. Rather than simply settle for the vivid sunset coloring the clouds above, I decided to include the sunset reflected in the pools as well. At eye-level the pools reflected blue sky, so I dropped my tripod as low as it would go, almost to granite level, positioning my lens at the same angle to the pools that the red light leaving the clouds struck the water.
When the water’s in motion

Red Sunset, Lake Wanaka, New Zealand
As spectacular as a crisp, mirror reflection in still water is, it’s easy to overlook the visual potential of a reflection that’s not crisp, or to forget your camera’s ability to render a soft or abstract reflection much better than your eyes view it. While a crisp reflection often dominates the primary subject in an image, a splash of reflected color or shape can provide a striking accent to a dominant primary subject. And a reflection that’s lost to the continuously varying angles of rippled or choppy water, magically appears when a long exposure smoothes the water’s surface.
In this image from Lake Wanaka on the South Island of New Zealand, all the ingredients were in place for a special sunset reflection until a light breeze disturbed the lake’s surface with gentle undulations. By attaching a Breakthrough 6-stop neutral density filter to my Sony 24-105 f/4 G lens (Sony a7RIII camera), I was able to achieve a 30-second exposure that complete smoothed the lake’s surface. While not a perfect mirror, the resulting reflection has a very pleasing soft, gauzy look. The long exposure smoothed the distant clouds as well.
Where to focus

Autumn Reflection, El Capitan, Yosemite
An often misunderstood aspect of reflection photography is where to focus. Though it seems counterintuitive, the focus point of a reflection is the reflection subject, not the reflection surface. This isn’t such a big deal in a scene like the Half Dome reflection at the top of the post, where the focus point of everything of visual significance is infinity, but it’s a very big deal when you want both your reflection and rocks or leaves on the nearby water surface sharp.
The El Capitan reflection on the right is very different from the Half Dome reflection above, where the extreme depth of field ensured sharpness whether I’d focused on anything in the scene or on the reflection. But here the leaves that were my scene’s primary emphasis were just a couple of feet from my camera, while El Capitan was several thousand feet distant. Even though the leaves floated atop the El Capitan reflection, focusing on El Capitan would have softened the leaves. To increase my depth of field, I stopped down to f/18 and focused several feet into the foreground leaves, then magnified the image on my LCD to verify that all of the leaves were sharp. Though El Capitan is slightly soft, a soft reflection is far more forgivable than a soft foreground.
Think ahead
It seems that reflections often feel like a fortuitous gift that we just stumbled upon. But given that reflections are entirely beholden to the laws of physics, they’re far more predictable than many of the natural elements we photograph. Taking a little time to understand the nature of reflections, and how they’re revealed by a camera, enables photographers to anticipate their appearance.
Workshop Schedule || Purchase Prints || Instagram
Reflections Around the World
Click an image for a closer look, and to view a slide show.


Starstruck
Posted on November 1, 2020

Autumn Morning, Half Dome and Sunstar from Sentinel Bridge, Yosemite
Sony a7RIV
Sony 24-105 G
1/15 seconds
F/20
ISO 100
I just wrapped up my Yosemite Fall Color and Reflections photo workshop, my first workshop since February. And as you can see from this image taken on our final morning, this year’s workshop absolutely lived up to its name. We enjoyed lots of fall color, and reflections at virtually every twist and turn of the Merced River. We also got to photograph a nearly full moon rising above Yosemite Valley at sunset, and saw more bears than I’ve seen in years (maybe even since my childhood).
All the great photography more than compensated for COVID-related and other difficulties that tried to mess with our mojo. We started with the threat of a fire-danger-induced PG&E power outage and a missing (essential) computer cable. The power shutoff never manifested (phew), but I have no one to blame but myself for the missing HDMI cable that allows me to connect my computer to a TV or projector, and that always lives in my computer bag, I swear (I’ll use the 8-month hiatus as an excuse). Apparently HDMI technology hasn’t made it to Yosemite yet, but a 90-minute round-trip drive to a hardware store Mariposa set things right and we were off and running. Everyone was onboard with the COVID protocol that included masks for group gatherings, outdoor meetings (which worked surprisingly well once I ditched my not-quite-bright-enough projector and moved the TV outside), and suspension of ride-sharing. The no ride-sharing thing is what concerned me most, but a few people volunteered to partner up (completely optional—anyone who wanted to drive alone, could), and we ended up with “only” six cars in our caravan. By pulling over regularly to reassemble, and proactively coordinating our parking strategy, not a single car got separated or missed a shoot.
One of the workshop’s highlights came on our final morning, when we photographed Half Dome from Sentinel Bridge. Because Half Dome’s face stays shaded until late in the day, Sentinel Bridge is normally a late afternoon to sunset location, but in autumn the first sunlight to reach the valley floor pours down the river to illuminate cottonwoods lining the far riverbank. I’d taken very few pictures during this workshop (I’ve been to Yosemite once or twice before), but when I saw the opportunity to add a sunstar to this already beautiful scene, I raced back to my car and grabbed my tripod, Sony a7RIV, and Sony 24-105.
Sunstars have become ubiquitous to the point of cliché, but they can be cool when done right. And sometimes they create a lemonade-from-lemons opportunity to add visual interest to a blank sky, high-contrast scene that has little else going for it. In this case the backlit trees made the Half Dome reflection scene pretty nice anyway, but I thought the sunstar gave it a little punch that took it to the next level. And getting a second sunstar from the reflection was a bonus.
Sunstars happen when light spreads out as it passes through the intersection of the lens’s aperture blades, with the number of blades determining the number of points in the star effect. The lens opening (a.k.a., the aperture, which we measure in f-stops), that is made larger or smaller to allow more or less light to reach the sensor, is not a perfect circle that expands and shrinks uniformly. Rather, it’s a circular(-ish), symetrical polygon of overlapping blades that expands or contracts depending on the f-stop setting. While never a perfect circle, the larger the aperture is, the closer to round the opening becomes, and the less the light is spread out by the blades and the less pronounced the sunstar will be. Conversely, the smaller the aperture, the more the blades are closed down, and the more extreme the angles at the intersection of each overlapping blade. Therefore, the general rule for photographing a sunstar is to stop down to a small aperture (high f-stop number). I resist closing all the way down because that can create other problems, like diffraction and soft edges, and find f/16-f/20 to be absolutely fine.
As appealing as a sunstar can be, adding one also creates problems that include lens flare and extreme dynamic range, not to mention a brilliant sunstar can be a distracting eye magnet that risks overpowering the rest of the scene. The good news is, despite the difficulties, creating a sunstar is relatively straightforward, and most of the potential problems can be minimized if you’re careful. Here’s a quick recipe:
- Start with a brilliant, fine point of light: The sun is the most logical, and easiest, candidate, but you can do it with the moon, stars, and pretty much any bright artificial light (lighthouse, headlights, and so on). The smaller the light source, the smaller and more precise the star effect will be, and the less lens flare and blown highlights you’ll have—but also the smaller the sunstar will be. If you use the sun, rather than include the entire sun ( which will work, albeit often to the point of overpowering the scene), it’s usually best to only expose only a small sliver of sun. The most common way to achieve this is to wait until the sun is just barely above the horizon, but you can also also use any terrestrial object: a rock, a tree, a building, and so on. If you use a relatively nearby object rather than the horizon, just position yourself directly on the shadow line—often you can move as the sun moves, staying on the shadow line to extend the sunstar time-window and control the size of the sunstar.
- The smaller your aperture, the better your sunstar will look: I generally use f16 or smaller (larger f-number).
- Remove any filters: I usually have a polarizer on each of my lenses, but I take mine off when photographing a sunstar. A polarizer doesn’t make a difference when you’re pointing into the sun, and the extra glass just adds to the lens flare potential by creating more reflections.
- Watch the highlights: When the sun is actually in your frame, you have highlights that are much brighter than the much of the scene, requiring care to avoid hopelessly white highlights or black shadows. If you have a distinctive foreground shape against the sky, you could turn it into a silhouette, but usually I want more than that in my image. In my Canon days (10D through 5DIII), I used a graduated neutral density filter to subdue the brilliant sun; since switching to Sony, I just monitor my histogram and push the highlights as far to the right as possible without clipping anything more than the center of the sun itself. The result is an image that, except for the sun, looks very dark to almost black on my LCD. But I take comfort in the histogram, which, while bunched up on the left (with a thin spike on the right edge), confirms that most of the shadows are intact. The very first thing I do after importing the image into Lightroom is drag the Highlights slider all the way to the left, and the Shadows slider all the way to the right, and voilà, there’s my scene.
- Different lenses will yield different results: Experiment with your lenses to see which one gives the most pleasing sunstar effect. Generally wider focal lengths render the best sunstars, as do the higher quality lenses.
- Practice: You can practice sunstars any time the sun’s out. Just go outside with your camera, dial in a small aperture, and hide the sun behind whatever object is convenient (a tree, your house, etc.).
Armed with this knowledge, I planted myself in an opening along the Sentinel Bridge rail, dialed my lens to f/20, framed up my composition, and waited for the sun to peek from behind a tree. Sunstars with a mirrorless camera are easy because you can see exactly what you’ll get before clicking—with my eye shifting between the sunstar and my histogram, I started clicking, adjusting my shutter speed by 1/3 to 2/3 of a stop with each click to maximize my options later (more/less light, larger/smaller sunstar). When the sun disappeared behind another tree I stopped shooting, pretty pleased with my initial results. But standing there, waiting for the sun, I realized that when it rose enough for its reflection to bounce off the river, we’d have a chance for a double sunstar—one through the trees, the other off of the reflection. (Technically this isn’t a sunstar reflection because the sunstar happens in the lens, not on the water.)
Since we were all standing in a slightly different spot, the sun appeared and disappeared at a different time for each of us, but I alerted everyone of the double sunstar opportunity so they wouldn’t stop as soon as the sun disappeared behind a tree. While waiting for the sun to return to my position, I enjoyed the reactions as others in the group started having success. I gotta say, as much as I missed my workshop locations during the pandemic “break” (I did!), it’s this group experience that I missed the most. It’s great to be back.
Join me in Yosemite
Workshop Schedule || Purchase Prints || Instagram
A Galaxy of Sunstars
Click an image for a closer look, and to view a slide show.


")


