Eloquent Images by Gary Hart
Insight, information, and inspiration for the inquisitive nature photographer
Where in the World is Gary?
Posted on March 23, 2026
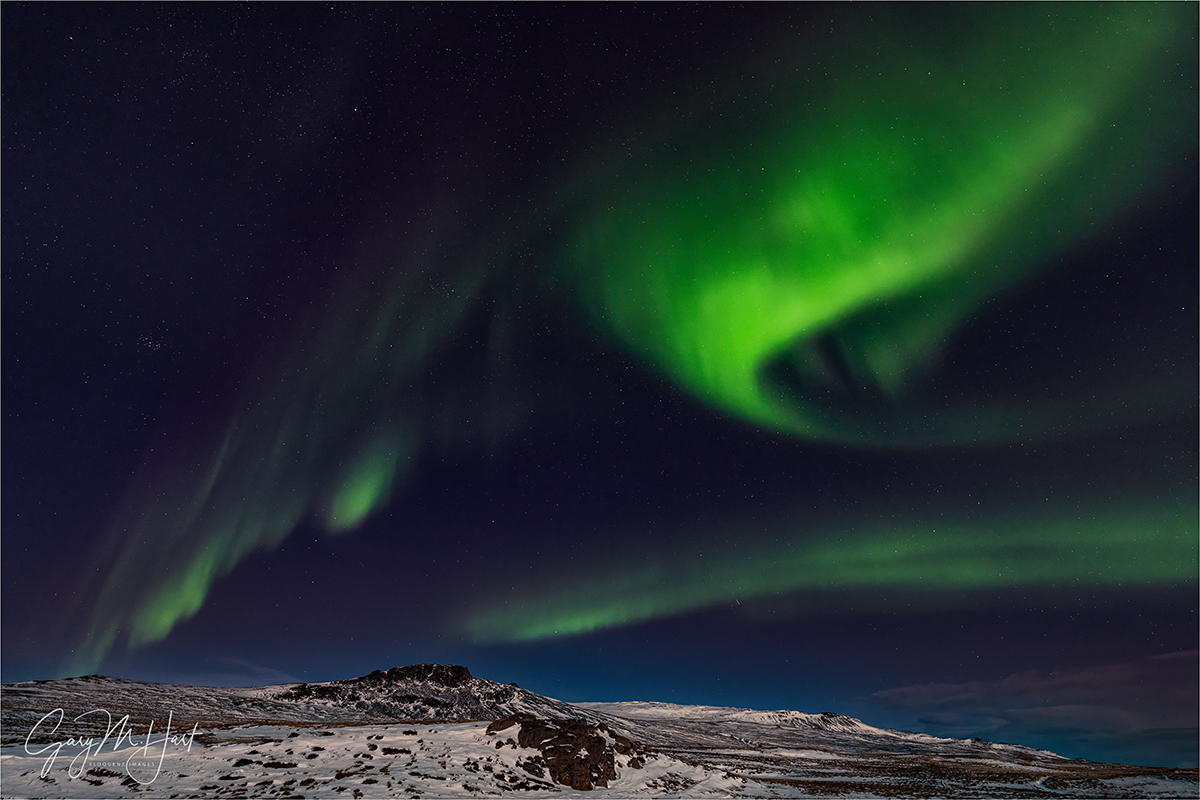
Winter Night, Aurora Over Vatnsnes Peninsula, Iceland
Sony α1
Sony 12-24 GM
3.2 seconds
F/2.8
ISO 3200
You may (or may not) have noticed that my “weekly” blog posts have slowed somewhat in the last month or two. I haven’t gone anywhere—or more precisely, I’m still going the same places and doing the same things I always have, I’m just prioritizing my time differently. After 15 years of stressing, staying up late, missing meals, and in many other ways pushing myself too hard to meet that once-a-week blog goal, I simply decided not to let myself be ruled by arbitrary, self-imposed commitments (I’m a slow learner). I still love writing this blog and have no plans to quit—I’m just going to adjust my time management a bit to emphasize other priorities, especially when my travel schedule starts to take its toll. But anyway…
So exactly where in the world have I been in the last two months? I thought you’d never ask. At the end of January and into early February, I was in Death Valley and the Alabama Hills for my (final) Death Valley workshop; a couple of weeks later I was off to (snowy!) Yosemite for my Horsetail Fall workshop. A storm that dropped record snowfall meant no Horsetail Fall, but seeing Yosemite smothered in white was more than sufficient compensation. A week after that, I jetted off to (snowy and icy) Iceland for Don Smith’s and my annual aurora workshop. Don and I have been doing this trip for many years now, but this year we mixed things up a bit by following a more northerly itinerary. I was home from Iceland for less than 36 hours before making a 13-hour drive to Phoenix for my annual MLB Spring Training trip (go Giants!). Phoenix had record-shattering (for March) highs in the 90s—going from multiple layers of wool and down to shorts, tank tops, and flip-flops was probably the most extreme weather whiplash I’ve ever experienced. And though my Spring Training trip isn’t for photography, I did pack my camera bag because on my drive home I added a day so I could detour through Death Valley to check out the super-bloom (nice, but nothing like the one I witnessed in 2005). I made it home to Sacramento (where our highs are only in the 80s) last Wednesday night, and am looking forward to a 5-week break from the travel.
Thanks to all this recent travel, the only thing in my life accumulating faster than unprocessed images seems to be the dull but essential tasks associated with running a business. Sigh. But I had to process something, so today I’m sharing a northern lights image from the first of two beautiful aurora shows this year’s group enjoyed. The aurora forecast for this night wasn’t great, but the sky was clear (-ish), so despite the late hour, temps in the low 20s (upper teens?), and no specific location in mind, we piled into our spacious Sprinter van decided to go aurora hunting. Why? Because that’s what photographers do.
We were in northern Iceland’s inherently remote Vatnsnes Peninsula, but somehow found an even more remote road and just drove until we liked the view. How remote? We were out there more than two hours and didn’t see a single other car. (I’m pretty sure our guide knew where we were, but no on else had a clue.)
For the first hour or so we had enough green glow to get the aurora newbies excited, but nothing exciting enough to make this grizzled aurora veteran take his camera out. Had I been by myself I might have clicked a frame or two, but I was content to spend my time making sure everyone was ready in the event the activity ramped up. It actually worked out nicely to have a dedicated practice session to get everyone up to speed with the challenges of night photography.
Not long after we told the group we’d give it another 20 or so minutes, a rising, nearly full moon poked through clouds behind us and bathed the snow and rock in moonlight. That was nice, but couple of minutes after the moon’s appearance, almost like magic a green shaft materialized on the northeast horizon and within seconds stretched above our heads to touch the opposite horizon—the real show was on. Soon we were all oooo-ing and ahhhh-ing, spinning around and trying to monitor the ever-changing overhead display—one minute the best show would be in the northeast, the next it would be due west. For the first-timers the priority was the best aurora, regardless of the foreground; those of us with prior aurora successes could afford to be more selective about our foregrounds. Though nothing on the ground out here was spectacular, I liked the view across the road, facing more west and northwest. Wanting to avoid including any road in my frame, I walked to the other side and framed up a small moonlit mountain.
My go-to night photography lens in my 14mm f/1.8—so imagine my surprise after arriving in Iceland to discover that its slot in my camera bag was empty—oh yeah, I took it out right before my Yosemite workshop because we wouldn’t be doing any night photography, then never thought about it again. Oops. If this had been a Milky Way shoot, where every photon counts, I’d have been pretty bummed (understatement). But for a good aurora display, especially one above a moonlight-augmented landscape, f/2.8 is plenty fast. And even though I don’t use my 12-24 f/2.8 a lot, when I do need it I really need it (especially in Yosemite), so it’s a fulltime resident of my camera bag. Which is how I ended up shooting this entire scene at 12mm and f/2.8. It didn’t take long to realize that I appreciated being able to include a little more sky much more than I missed that 1.3 stops of light.
This aurora show was memorable less for its spectacular nature—it was very nice, but didn’t compare to many other northern lights shows Don and I have shared with prior workshop groups—than it was for the fact that it enabled Don and me to breathe a collective sigh of relief, knowing that everyone in our group got to see and photograph the prime reason they signed up for an Iceland winter photo workshop: a legitimate northern lights display.
The next day we traveled to another region farther east, trying for the aurora again that night at a location with a much better foreground. That night we saw a little bit of green, but by then everyone had seen firsthand that it could be much better. What Don and I hadn’t told them after our first aurora success was how much better it could. But before we were done, they learned that for themselves. But that’s a story for a different blog post…
Workshop Schedule || Purchase Prints || Instagram
Celestial Wonders
Click any image to scroll through the gallery LARGE


")


")

, Yosemite")


")


")


Too Much of a Good Thing
Posted on March 10, 2026

Snowfall, Upper Cascade Fall, Yosemite
Sony a7R V
Sony 24-105 G
2.5 seconds
F/11
ISO 100
Greetings from Iceland! And no, despite appearances to the contrary, this image is not Iceland (or even Snowland), it’s Yosemite. (Actually, if you know Iceland, the “not Iceland” giveaway would be all the trees.)
People ask me all the time, what’s the best season to be in Yosemite? While I honestly can’t pick a “best” Yosemite season, I can say that each season in Yosemite offers its own set of good things that distinguish it from the other seasons. Even my least favorite season—yes, I can give you a least favorite Yosemite season—has many good things that I feel fortunate to have witnessed.
My least favorite is easy: summer. Summer is when the crowds swarm every square inch of Yosemite Valley, the waterfalls and meadows dry up, and the sky is chronically blank. But summer is also the only time Yosemite’s high country—Tuolumne Meadows, Olmsted Point, Glacier Point, Sentinel Dome, Taft Point, and the breathtaking High Sierra backcountry—is easily accessible.
While spring is when the tourists start returning to the park after their winter hiatus, it has enough booming waterfalls, fresh green meadows, reflective vernal pools, and ubiquitous dogwood blooms to make the increasing crowds (more than) tolerable. Spring is the Yosemite of postcards and calendar pictures, and probably the best season for first-timers.
In autumn, the now depleted snowpack has completely dried, or at least slowed to a trickle, Yosemite’s heralded waterfalls. But that diminished flow means the low and slow Merced River splits the length of Yosemite Valley like a twisting, reflective ribbon. Adding to these reflections a surprising abundance and variety of fall reds and golds elevates autumn to my personal favorite Yosemite season for creative photography.
That brings me to Yosemite’s most variable of seasons: winter. Come to Yosemite during a dry winter and you’ll find lots of dirt, bare deciduous trees, dry meadows, and unimpressive to nonexistent waterfalls. On the other hand, with the exception of the last couple of weeks in February, Yosemite in winter is refreshingly serene—and even late February’s Horsetail Fall mayhem doesn’t compare to the summer swarms. And even at its worst, winter reflections are quite nice, and it’s still Yosemite (El Capitan, Half Dome, et al haven’t gone anywhere), so I’ll take even the driest Yosemite winter without people over the nicest summer day.
But a Yosemite winter at its best is a sight to behold. Winter is Yosemite’s wet season, making it the best season for capturing a clearing storm. Most of the precipitation in Yosemite Valley falls as rain, but if you’re fortunate enough for your Yosemite visit to coincide with a cold storm that smothers Yosemite Valley in white, you’ll see it at its hands-down most beautiful. And while you may find yourself sharing this beauty with other ecstatic photographers, even the slightest threat of inclement weather seems to repel virtually all tourists.
Falling snow does introduce a host of difficulties that include: limited to impossible access to certain locations, treacherous driving, the potential for chain requirements (usually limited to vehicles without 4WD/AWD), and clouds temporarily shrouding Yosemite’s soaring monoliths and waterfalls. Not to mention the difficulties inherent to photographing in snowy conditions. But if you can overcome these hardships, the payoff is worth it.
The thing is, to witness Yosemite’s fresh-snow majesty, you need to be present among the falling flakes, no matter how cold the temperature or poor the photography. That’s because swirling clouds of a clearing storm vanish so quickly, and the trees start shedding their white coats almost the instant the sun comes out—if you wait until you hear it snowed in Yosemite Valley before rushing to the park, you’re too late. In fact, even if you’re actually present in the park and simply retreat to the shelter of your hotel room or a valley restaurant until the clearing starts, you risk missing some or all of the best stuff.
Living less than four hours from Yosemite Valley, monitoring the Yosemite forecast gives me enough advance notice to get to the park while the snow is still falling. In other words, it’s not by accident that my galleries are filled with so many Yosemite snow images.
But sometimes I just get lucky. Scheduling workshops a year or more in advance means no clue what the conditions will be—the best I can do is try to maximize the chances for something. Horsetail Fall happens in mid to late February, but all the tumblers clicking into place is never guaranteed. Similarly, while I know February is one of the most likely months for snow in Yosemite Valley, no snow is always more likely—but that doesn’t keep me from wishing. (As much as I hope for ideal Horsetail Fall conditions for my workshop—lots of water in the fall and unobstructed sunlight at sunset—I’ll take snow any day.)
This year’s Yosemite Horsetail Fall workshop, which wrapped up just a week before I departed for Iceland, fulfilled those snow dreams many times over. How much snow did we get? Look at the picture above, and consider that it came on our first day, at our second photo location, and that at least two more feet above what you see here fell before the workshop finished.
The compactness of Yosemite Valley, combined with lifetime of Yosemite visits, enables me to adjust my plans on the fly in rapidly changing conditions. On that first afternoon, with a moderate snow falling in the valley I expected poor visibility, so my original plan was to start at Bridalveil Creek, where we could photograph nearby scenes. But when I saw that Bridalveil Fall and El Capitan were still visible despite the falling snow, I headed straight to Valley View.
We enjoyed about 30 minutes of quality photography there before the ceiling dropped and erased everything more than a few hundred yards away. I quickly collected the troops and we beelined up Big Oak Flat Road to Upper Cascade Fall, which I was confident would provide the best combination of photogenic scene that was close enough to still be visible.
I was actually a little surprised to find the top segment of this multitiered waterfall (upper left corner of the image) slightly obscured by the falling snow—fortunately it was visible enough to still be worth photographing. Our biggest challenge turned out to be a strong breeze blowing snow straight down the mountainside and directly onto the front element of any lens trained on the scene.
Normally I shield my camera with an umbrella in rain and snow, but the wind made using an umbrella problematic, so I switched to Plan B and pulled out the large microfiber cloth that lives in my camera bag. While composing, metering, and focusing, I just ignored the snowflakes accumulating on the front of my lens. When everything was ready, I wiped the lens clean, then draped the cloth over it while waiting for my 2-second timer to count down (have I mentioned lately how much I hate Sony’s cable and Bluetooth remotes?), whipping the cloth away at the latest possible instant before the shutter clicked. I continued this way through a series of compositions, until I was confident I’d captured something worthy of processing.
Turns out, this was just the first of many spectacular shoots my group enjoyed. As the workshop continued and we handled every single discomfort and inconvenience the storms served up, all while watching the photography just keep getting better and better, I became more and more convinced that there was no such thing as too much snow in Yosemite, and just kept hoping for more. And more, and more, and more…
On the afternoon before our final day, just as I started believing nothing could go wrong, the National Park Service said, “That’s enough,” and closed the park. I was stunned, and for some reason recalled the time my college baseball team, while on a roadtrip to a distant city, was gorging at an “all you can eat” buffet—until the manager came out and informed us, “That’s all you can eat.”
Even though we were shut out of the park for the workshop’s final day, we still gathered for one last image review on that final day. Based on the images shared, and the excitement everyone had with all of their captures, no one was too disappointed. It was almost as if we all felt that, given what we’d seen so far, to expecting more might just be a little greedy.
I couldn’t agree more. And honestly, despite missing a day and not having access to every location, I have to say this turned out to be one of the most photographically successful workshops in my 20 years leading photo workshops.
Workshop Schedule || Purchase Prints || Instagram
Yosemite Snow
Click any image to scroll through the gallery LARGE


In the Pink
Posted on February 14, 2026
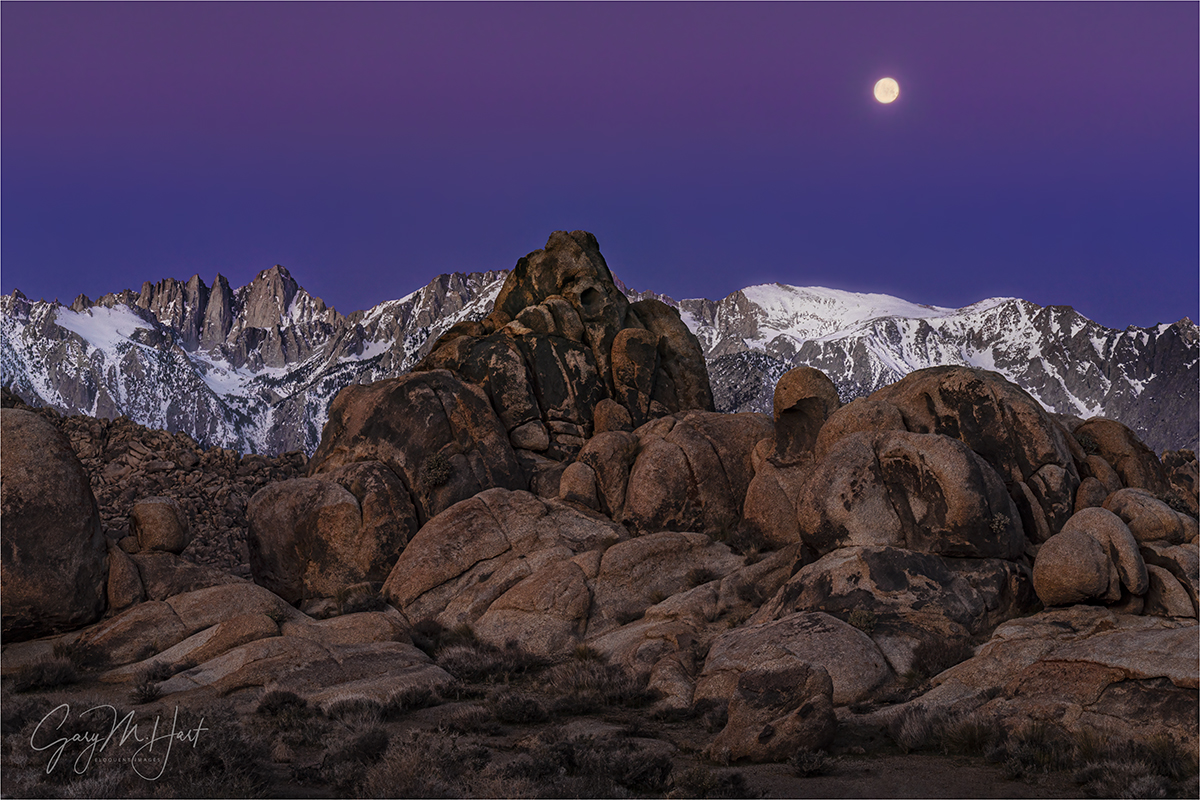
Twilight Wedge and Setting Moon, Mt. Whitney and the Alabama Hills, Eastern Sierra
Sony a7R V
Sony 24-105 G
1/5 second
F/16
ISO 100
The rewards of rising before the sun are many. For me, the opportunity to witness twilight’s soft, cool light slowly warmed by the approaching sun, to breathe in the cleanest air of the day, and to simply be alone with the purest sounds and smells of nature, are ample compensation for whatever chill and sleep deprivation I might experience. And on mornings when the sky is cloudless and the air especially pure, there might just be a bonus.
To collect that bonus, about 20 minutes before sunrise, look for parallel bands of vivid pink and steely blue hugging the horizon opposite the rising sun. Many photographers, myself included, call this early display the “twilight wedge,” but it has other similarly non-scientific names. Closer to the horizon, the dark blue band is actually Earth’s shadow—the final section of sky not receiving any direct light from the soon to appear sun; just above, the pink band is the the day’s first rays of direct sunlight. It’s pink because the sun is just far enough below the eastern horizon that the only its longest, red wavelengths manage to battle through the atmosphere all the way to the other side of the sky. The cleaner the air, the more vivid the twilight wedge’s color. (This color is also possible after sunset, but by day’s end there are usually more color-robbing particles in the air, and Nature’s quiet is often disturbed so much by human activity that some of the magic is lost.) And when towering peaks soar far enough above the viewer’s vantage point that they jut into this pink twilight wedge band, we call it alpenglow.
I love finding beautiful scenes to go with the gorgeous pre-sunrise sky opposite the sun. Near the top of my list is the Alabama Hills, in the shadow of the highest Sierra Nevada peaks. The Alabama Hills are a disorganized jumble of massive, weathered boulders covering many square miles, making an ideal foregrounds for the assortment of serrated peaks looming to the west. A more perfect arrangement for nature photographers couldn’t be assembled—and, as if that’s not enough, the Alabama Hills are also among the best places on Earth to photograph alpenglow.
Of course all this is no secret, and the Alabama Hills has become one of the most popular photography spots in California. To improve my chances of capturing unique images here, I love adding the moon to my Alabama Hills / Sierra Crest scenes. (And when I say “add,” I mean the honorable, old-fashioned way, not with AI or other digital shenanigans.) For years, I’ve timed my Death Valley winter workshop to allow me to take my group to the Alabama Hills, just a 90 minute drive from Death Valley, for the workshop’s final sunset, followed by the moon setting behind the Sierra Crest at sunrise the final morning.
Of course, because there’s only one “best” day in each lunar cycle to photograph a full (-ish) moon setting behind the Sierra Crest, I have no wiggle room when scheduling this workshop—a day early, and the moon is gone before the landscape is light enough to photograph; a day late, and the sky is much too bright by the time the moon drops close to the mountains.
But even nailing the day doesn’t ensure success. Clouds are of course a concern, especially in winter. And each year the timing and position of the moon’s disappearance behind the crest is a little different. In January and early February (when I always schedule this workshop), viewed from my preferred location, the moon sets somewhere between Mt. Whitney and Mt. Williamson (California’s two highest peaks), usually closer to Williamson.

Before Sunrise, Mt. Whitney and the Alabama Hills, California (30 minutes before sunrise)
I like to get my groups out to the Alabama Hills about 30 minutes before we can start photographing the moon. The foreground will still be quite dark to our eyes, and the moon will at least 10 degrees above the crest, but I tell my students to start shooting as soon as we arrive.
Using a long exposure in a frame that doesn’t include the moon (the top of the frame is below the moon), captures much more (mostly shadowless) foreground detail than our eyes see, while juxtaposing the mountains’ light gray granite against a sky that’s darker than the peaks—a magnificently striking sight indeed, especially when there’s snow on the peaks. We’ll keep shooting versions of this until it’s time to include the moon in the festivities.
For any moon photography, the darker the sky, the better the moon stands out. But too early and it’s impossible to capture foreground detail without completely blowing out the moon. For me, the time to photograph any setting full moon starts about 20 minutes before sunrise—basically, as soon as the landscape has brightened enough foreground and lunar detail with one click. And if we’re especially lucky, when that time arrives, we’ll find the moon in the midst of a vivid pink twilight wedge.
This opportunity only lasts a few minutes, because as the sky brightens and the foreground exposure gets easier, the color fades and the essential contrast between the sky and moon decreases. The twilight wedge lasts less than 10 minutes, and is followed by slowly warming sky. By maybe five minutes after sunrise, the good color is long gone and the moon/sky contrast has decreased enough for me to put my camera away.
This year’s Alabama Hills moonset was especially nice. One of my favorite things about my Death Valley / Alabama Hills workshop is that we get two “ideal” (moon setting as the color and light are at their best) sunrise moonsets for the price of one. On our last day in Death Valley, from Zabriskie Point we photograph the moon setting behind Manly Beacon, one of Death Valley’s most striking and recognizable features. Because the mountains behind which the moon sets from Zabriskie rise only about 3 degrees above a flat horizon, this moonset happens much closer to the “official” (flat horizon) sunrise that’s universally used for any celestial rise and set. The next morning we’re in the Alabama Hills—even though the moon sets about an hour later than it did the day before, because the Sierra Crest towers about 10 degrees above the horizon when viewed from the Alabama Hills, the actual moonset we see happens at just about the same time as the prior day’s moonset.
Which is exactly things unfolded for this year’s workshop group. We followed up a beautiful Death Valley Zabriskie Point sunrise moonset, with a similarly outstanding Alabama Hills sunrise moonset the next morning. The vivid hues of the twilight wedge had just peaked when I clicked this image. To my eyes, this entire scene (except the moon), and especially the foreground, was much darker than this image shows. But my camera’s ridiculous dynamic range, combined with Lightroom’s masking that allows me to process the sky and foreground independently from each other, enabled me to expose the scene dark enough to capture essential lunar detail, yet remain confident I had enough recoverable detail in the foreground.
Workshop Schedule || Purchase Prints || Instagram
Alabama Hills Gallery
Click any image to scroll through the gallery LARGE


")


A Photographer’s Vision
Posted on February 9, 2026

Day’s End, Hell’s Gate, Death Valley NP
Sony α1
Sony 16-35 GM II
1/80 second
F/20
ISO 100
I just returned from a spectacular workshop in Death Valley, one of the most fascinatingly unique locations on Earth. After missing Death Valley last year, it was especially nice to return. (Of course it didn’t hurt that I had a great group that enjoyed fantastic conditions from beginning to end.)
I first got to know Death Valley as a kid, when my family camped there several times over the Christmas school break. We’d spend a most of the week between Christmas and New Year’s Day exploring all kinds of cool stuff that would thrill any young boy: Scotty’s Castle, Rhyolite (a ghost town), and collections of abandoned mining equipment scattered about the desert. We also went to all the standard vistas like Zabriskie Point and Dante’s View, and hiked some of the shorter, most popular trails (Golden Canyon, Mosaic Canyon, Natural Bridge). But with all the cool old stuff, I was much less interested in the scenery and hiking part of those trips, and never really registered Death Valley’s spectacular natural beauty.
About 20 years ago I returned with a camera and saw Death Valley in a completely different way. Suddenly, beauty was everywhere. It would have been easy to—and I probably did—think to myself some version of, “Gee, I don’t remember Death Valley being this beautiful.”
When traveling more with my camera to other childhood family vacation destinations kept eliciting similar epiphanies, I started noticing the way photography was enhancing my overall view of the world. Suddenly, I was seeing the world as a photographer and finding beauty everywhere.
Today, camera or not, my eyes naturally scan my surroundings for scenes, large and small, that resonate personally. Even without a camera, I now seem to unconsciously create compositions in my brain, mentally identifying striking features and their relationships to one another, and figuring out the best way to position myself and frame the scene.
This photographer’s vision isn’t limited to a scene’s physical objects, it also extends to weather and light, both current and potential. What conditions will complement this scene best, and how do I get here to enjoy them? Warm early/late light, moonrise or moonset, fall color, overcast, the Milky Way, a reflection, sunstar—anything that might elevate the scene.
I don’t think this makes me especially unique—in fact I’d venture to guess that many (most?) serious nature photographers view the natural world similarly. And for those who don’t, I believe it’s a quality that can be cultivated with a little conscious practice until it comes naturally.
A great example of putting this mindset to use came the day before this year’s Death Valley workshop, while checking out the conditions at Hell’s Gate on Daylight Pass Road. At the end of an 8-hour drive that started a 7:00 a.m. (to ensure I could get here before dark), I pulled up to Hell’s Gate about 15 minutes before sunset.
I’ve been taking my groups here on my workshop’s first night for many years, but despite that familiarity, there are a few variables I always like to check out for their current status. And with heavy rain earlier this winter washing out many Death Valley roads and locations, I was especially keen to make sure there would be no surprises here.
What I like about Hell’s Gate is that it’s not commonly shot view, and it has a variety of photography options in multiple directions. Directly across the road from the Hell’s Gate parking area is a small mound dotted with photogenic rocks and shrubs that all make nice foregrounds for the long view down the valley toward Telescope Peak and beyond, and west toward pyramid-shaped Death Valley Buttes. There’s even a mini-canyon—7-foot vertical walls and no more than 30-feet long—that can be used to frame the view of the Funeral Mountains to the east and south.
Uphill from this little canyon is a short (100 yards or so) but steep (-ish) trail to an elevated prominence with a similar view. Foreground options up here include more striking rocks, plus an assortment of very photogenic cacti. My favorites are the many clumps of barrel cactus sprinkled around the surrounding slopes. Depending on the year, the condition of the barrel cacti can range from fresh pink with small flowers, to a dried out brown-gray. Though there were no flowers this year, I was happy to see that they were all beautifully pink and alive.
Walking up the trail on this visit, my eyes picked out the best cacti and I started making mental pictures without really realizing it. A little later, visualizing a potential sunstar I took note of exactly when and where the sun would drop behind the nearby buttes and distant Cottonwood Mountains.
Satisfied all was well, I hopped in my car and, instead of making the 30-minute drive to my hotel in Furnace Creek, I added 2 hours to my already long day by detouring to Pahrump so I purchase essential grocery items I’d foolishly left at home. (This is actually an improvement over my prior Death Valley workshop, when I forgot to bring my computer. And in my defense, that’s the only time in my 20 years of leading workshops I’ve done that, and I now triple-check to ensure it never happens again.)
But anyway… When I returned to Hell’s Gate with my group the following evening, I was able to point out all the possibilities and describe exactly what the light would do as the sun dropped. I encouraged everyone to identify the views they like best, as well as foregrounds to put with them, so they wouldn’t be scrambling around looking for shots when the light was at its best. (I’ve noticed that this kind of anticipation doesn’t happen naturally for some people at the start of a workshop, so it’s become a particular point of emphasis.)
On the first shoot of any workshop I try to get around to everyone and therefore rarely shoot, but as the sun dropped and I saw that everyone was quite content, I returned to a composition that I’d identified the prior evening.
Earlier I’d pointed out to my group the very large barrel cactus clump perched on the hillside about 20 feet above the trail, but I think the steep slope covered with loose rock, not to mention lots of easier access compositions nearby, had discouraged them from scaling the hill. So up I went. Reaching my target cactus, I checked out the even larger barrel cactus clump farther up the hill and maybe 20 feet away.
My vision on the first visit was to frame Death Valley Buttes and the sunstar (if the clouds permitted it) with these two cacti; once I was actually in position in front of the closest barrel cactus, I was pleased to confirm that what I’d visualized would in fact work. I just had to tweak my composition to account for the rocks at my feet and clouds near the horizon. The other thing I had to be careful about was my camera bag, which could very easily tumble down the hillside if I didn’t plant it firmly braces and balanced on the rocks.
To deemphasize the (ugly) brown foreground, I dropped my tripod to about a foot above the ground, which made the foreground all about the beautiful cactus and interesting rocks. And though scenes rarely fully cooperate with my goal for clean borders, I took special care to find the best place to cut the rocks at the bottom and sides of the frame, and the clouds at the top.
When I was satisfied with my composition, I picked my focus point—with the closest rocks about 18 inches away, it helped that I already needed to stop way down for the sunstar. Since I wanted everything in this frame sharp, I applied my tried-and-true seat-of-the-pants focus point technique: pick the closest thing that must be sharp (the rocks), then focus a little bit behind it—because focusing on the closest thing gives me sharpness in front I don’t need. (“A little bit” varies with the scene, focal length, f-stop, and subject distance, but the more you do this, the better you get at deciding what “a little bit” is.) I chose f/20 and focused on the close cactus, about 2 feet away.
When the sun reached the horizon, I started with a shutter speed that the balanced black shadows and white highlights as much as possible (knowing I’d be able to recover some of each in processing), and started clicking. After each click, I adjusted my exposure in 2/3 stop increments—first up about 3 stops above my starting point, then back down to 3 stops to below, continuing until the sun disappeared. This gave me a broad range of exposures to choose between on my computer later.
When we were finished, everyone seemed pretty happy with our start. Though I didn’t get a chance to process my own images until after the workshop, from what I saw in the image review, I’d say their excitement was justified.
Workshop Schedule || Purchase Prints || Instagram
A Death Valley Gallery


, Death Valley")


Happy Anniversaries to Me
Posted on January 26, 2026
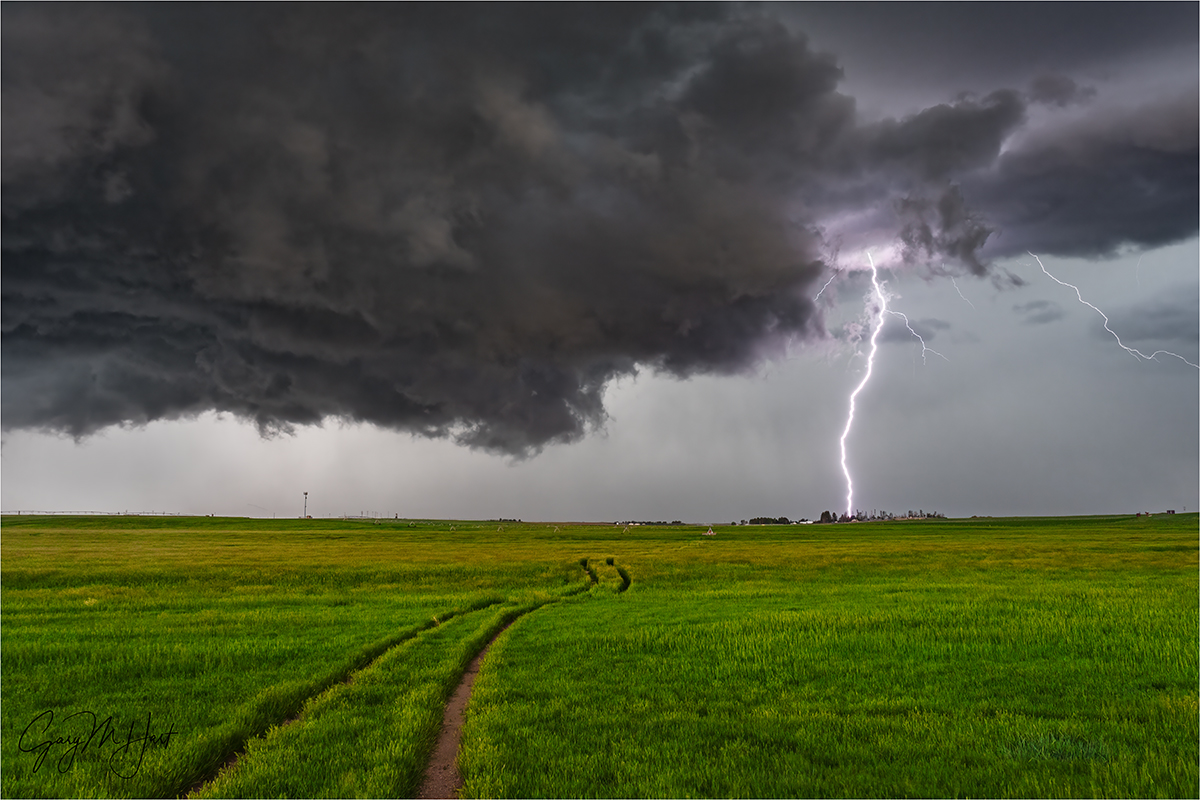
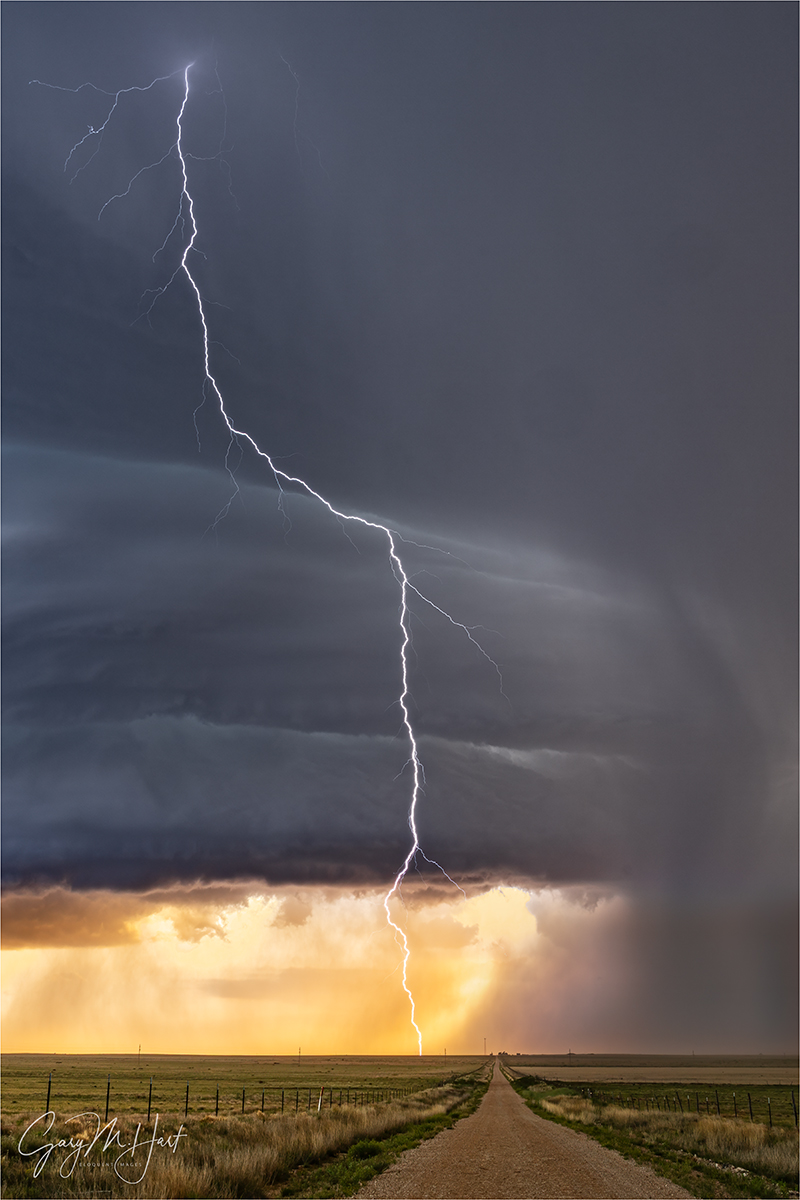
Rural Lightning Strike, Southeastern Wyoming
Sony a7R V
Sony 24-105 G
.6 seconds
F/8
ISO 800
I just realized that January 2026 marks a couple of milestones for me. Twenty years ago this month, I left my “real” job at Intel (good company, lousy manager) to pursue my dream of becoming a landscape photographer. And 15 years ago this month, I started writing this blog.
Leaving Intel was a leap of faith that, I now know, was far riskier than I believed at the time. That it worked out I attribute more to fortuitous timing than some kind of genius master plan. By the time I left Intel, I’d accumulated a pretty good portfolio of images that I’d printed and sold in weekend art shows. I also had prints in a few local galleries, but print sales alone didn’t generate anywhere near enough money to justify leaving a good job (or for that matter, even leaving a bad job).
My first post-Intel step was to ramp up my art show schedule and upgrade my art show booth lighting and display panels; despite decent art show success ($1000-$4000/weekend, doing the math told me that the time, effort, and relentless (intrastate) travel necessary to earn a fulltime income on the art show circuit would soon suck the joy from photography, and leave precious little time for actual photography. So I concentrated on a handful of quality shows within a 100 mile radius of my Sacramento home, and started looking for other ways to support myself with landscape photography.
I knew that many landscape photographers made a good living selling stock images, but by 2006 it was clear to me that digital photography was taking a toll on stock photography income, and there no end to the decline in sight. A couple of years earlier, just a few months after purchasing my first DSLR (a Canon 10D), I’d taken a weekend photography workshop to explore Point Reyes (thanks, Brenda Tharp!) and it occurred to me that I was qualified for something like that in Yosemite: I know photography well enough to teach it, I have a lifetime of Yosemite knowledge, my 20 years in the tech world had focused almost entirely on technical communications (training, writing, tech support), and (not insignificant) I like people. That this insight happened a few years before the photo workshop wave flooded the photography world was a fortunate fluke.
Pivoting to the photo workshop plan, I did a little teaching and guiding as 2006 progressed, but most of that first year was spent setting my workshop business up: building a website, scheduling workshops for the best times to photograph Yosemite, and getting the word out. I also stuck with my modest weekend art show schedule, doing one every two or three months.
Looking back now, I realize the I never would have succeeded had I not spent money I didn’t really have to hire a professional web designer to create a professional website (this was before website templates made web design easy for the masses), and display a monthly ad in “Outdoor Photographer” magazine. By the time my full workshop schedule kicked off in early 2007, every 2007 workshop had filled, and subsequent workshops started filling almost as soon as I posted them.
That first year was all Yosemite, but I soon expanded to include the Eastern Sierra and Death Valley, then Hawaii, Grand Canyon, and beyond. I owe a huge debt of gratitude to my friend Don Smith, who’d already had a very successful career as a professional sports photographer, but was hoping to transition to landscape photography. Don assisted virtually all of my early workshops, and within a year or two was doing his own workshops too, which I in turn assisted. (Over the years our workshop schedules became so packed that we’re no longer able to assist each other much, but Don and I still partner on the New Zealand and Iceland workshops, and stay in pretty close contact throughout the year.)
Between arranging lodging, applying for location permits (not to mention meeting all the criteria each permit requires), answering e-mails from workshop students and potential workshop students, preparing workshop material, and actually conducting the workshops, my plate became pretty full. As much as I enjoyed doing the art shows (I really did), I felt like I was running two businesses. When the Great Recession took and obvious bite from my art show sales, while my workshops attendance didn’t even flinch, dropping the art shows became a no-brainer.
To further increase my exposure, I started writing a blog on a small photoblog site in early 2009. I say this was to increase my exposure, but it was just as much in satisfy my insatiable urge to write. I’ve been a writer all the way back to first grade, when each Monday we were assigned a list of spelling words to learn before the Friday spelling test (am I dating myself, or do they still do that?). The week’s homework assignment was to a create a “spelling sentence” for each word. But instead of spelling sentences, I always wrote spelling stories that used all of that week’s words. I can’t explain why I gave myself that extra assignment for no tangible benefit, except that I thought it was fun.
Ever since, I’ve always had to be writing something. For many years it was short stories (plus a novel that has lived in my head, but so far hasn’t made it to the page). At Intel I was a tech writer, which helped me refine my technical communication skills while feeding my internal writing monster. (One reason I left was resistance from “above” to my attempts to make inherently dull writing more readable.)
While I enjoyed the small community of photographers on that original photoblog site, I quickly found its interface limiting, and soon realized my page wasn’t attracting the eyeballs I’d hoped for. So I started looking for a blogging site that addressed those concerns, and in January 2011 landed on WordPress. What started as a weekly (-ish) blog of a few hundred words, grew to include posts with word counts in the thousands, photo galleries, and a Photo Tips section. By my estimation, I’ve probably written close to two-million words—and counting….
As much I’d love to attribute that volume to my own herculean work ethic, I don’t think I, or anyone for that matter, could sustain a weekly blog, week-in and week-out, for 15 years on guts and willpower alone. This anniversary says less about my dedication and discipline than it does about the fact that I simply love to write.
According to WordPress, I have nearly 40,000 subscribers. But because this blog is as much (more?) for me as it is for my readers, I’ve never tried to monetize those numbers by displaying ads or intrusive affiliate links. It’s satisfying to know that it has led to many workshop signups—probably not enough to justify all the time I spend on it, but that’s okay. And I never tire of hearing that people actually read and benefit from what I’ve written.
Though it wasn’t my conscious intent at the beginning, this blog has become an integral part of my photography. That’s because the subjects I choose, and the way I choose to capture them, are very much a reflection of my relationship with the natural world. To me, much of the beauty in my subjects transcends the visual and resides in the underlying natural laws. Augmenting my images with descriptions and explanations of those natural processes, makes my subjects even more beautiful to me, and (I hope) through my words, to my readers.
For example, lightning. I will freely admit that lightning’s appeal might be much greater to a life-long Californian like me, than it is to, say, a Floridian, to whom lightning is at best a nuisance, and at worst a persistent source of danger. But I do love everything about lightning—not just the way it looks, but the processes that cause it. Along with enabling me to share my images of lightning, my blog gives me an excuse to learn more about lightning, and to share that knowledge. Whether it’s the fascinating science that causes lightning, how to read the sky to understand where lightning might strike next, staying safe when lightning threatens, or the even best way to capture lightning with a camera, I’ve learned so much and am grateful to have a platform for sharing it.
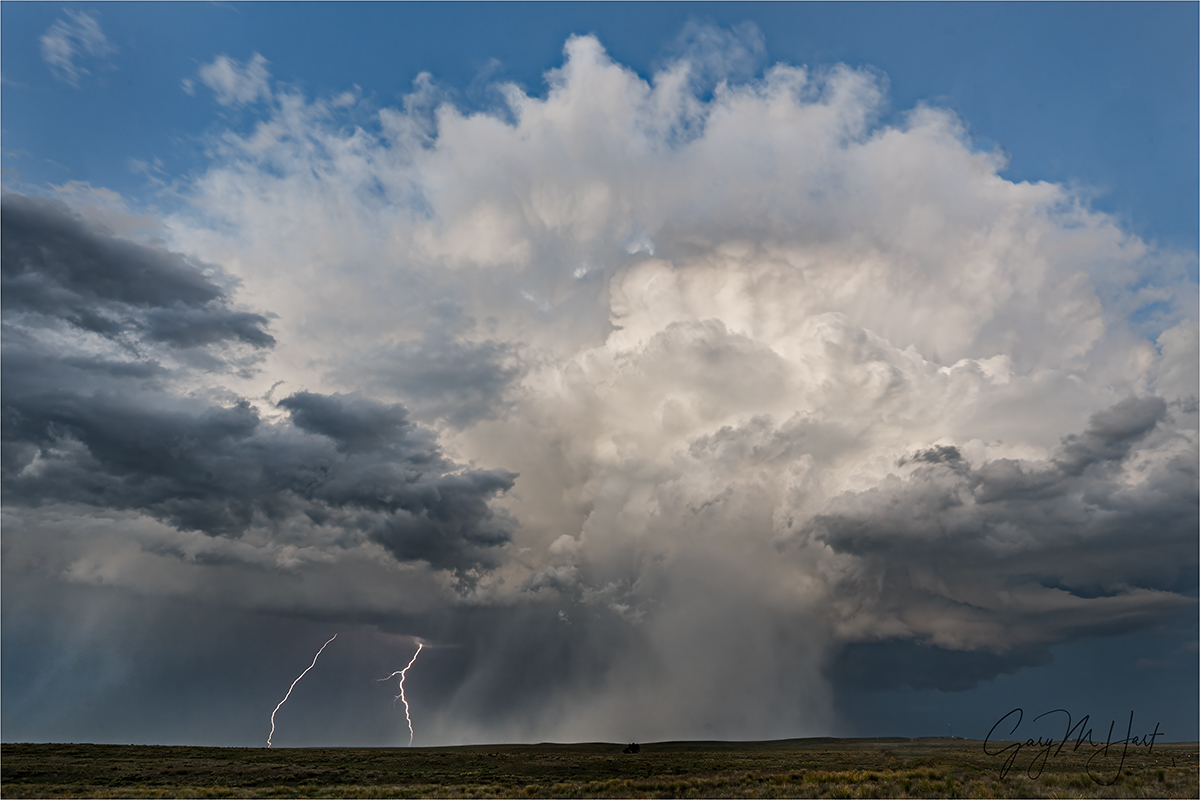
Even though I’ve photographed lightning at Grand Canyon every year since 2012, it took last June’s Midwest storm chasing trip to show me how much I don’t know. At Grand Canyon, we’re usually photographing distant thunderstorms across the canyon. But not only does storm chasing put you in much closer proximity to the electrical storms generating the lightning, these storms, whether rotating supercells or “merely” towering thunderheads, are on a totally different scale.
These insights came on the trip’s very first afternoon, when we hightailed it from our Denver hotel up through the plains of northeastern Colorado and into southeastern Wyoming. The image I share today I captured on the workshop’s second stop. It was my introduction to both the power and proximity of Midwest electrical storms, and with it the realization that unlike Grand Canyon storm chasing, where we generally set up a safe distance and then just wait for the lightning, Midwest storm chasing is actual get-in-the-van!-step-on-it-screech-grab-your-gear-sprint-shoot-retreat!-step-on-it-repeat STORM chasing.
Later this afternoon I got my first look at an actual supercell. And a few days after that, my first (and second, and third, and fourth, and…) tornado. A couple of days later we witnessed a supercell and lightning display that was one of the most breathtaking experiences of my life. And nearly every day of this nearly 2 week trip we saw lightning.
Calling this storm chasing experience life-changing might sound hyperbolic, and maybe even a little cliché, but I can think of few things in my photography life that have left me more awestruck. It certainly rivals other photography firsts, like rafting Grand Canyon, and viewing the northern lights and a total solar eclipse. To think that I’ve been able to earn my living witnessing these sights, and to share it all here, Is a blessing I never want to take for granted.
Workshop Schedule || Purchase Prints || Instagram
Storm Chasing Memories
Click any image to scroll through the gallery LARGE


Going Out a Winner
Posted on January 17, 2026
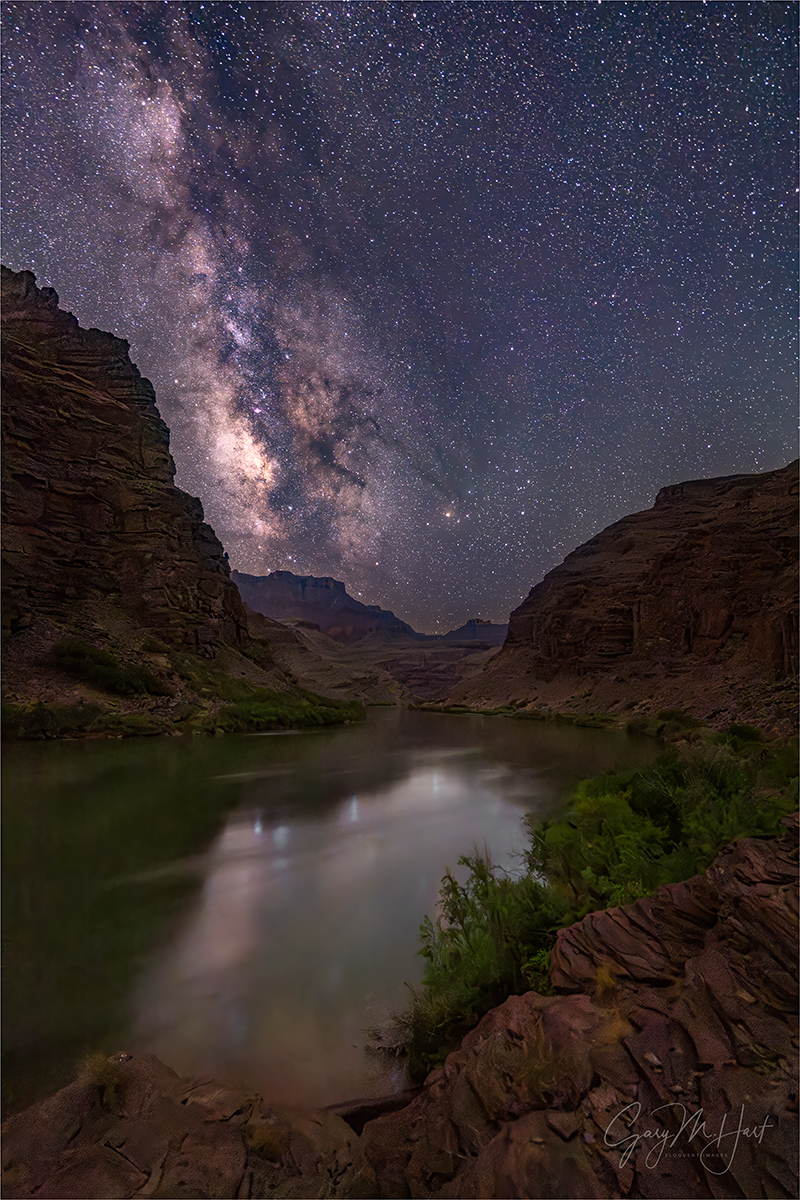
Milky Way Reflection, Colorado River, Grand Canyon
Sony α1
Sony 14mm f/1.8 GM
ISO 6400
f/1.8
20 seconds
There was nothing easy about this picture. Milky Way photography in general is a challenge, but trying it at the bottom of Grand Canyon is especially harrowing. In addition to the standard Milky Way photography difficulties, like insufficient light essential for composition and focus, any kind of night photography at the bottom of a mile-deep hole adds another level of dark.
In this extreme darkness, some locations are worse than others, and navigating to this one in particular was difficult enough to put it on the fringe of my safety comfort zone. Not only did getting here require a longer than usual walk on uneven and sometimes trailless (is that a word?) terrain, the last section was along a series of narrow ledges where a single misstep might result in a sudden plunge into the Colorado River. Oh, and as if all that wasn’t enough to test me, on the entire walk out here this night, I couldn’t push down the thought that the name of this particular camp is Rattlesnake.
But I was especially motivated to make this shoot work, because…
I knew before the trip started that this, my tenth Grand Canyon raft trip, would be my last one. Rafting Grand Canyon had been a bucket-list item for as long as I could remember, but when I scheduled my first trip way back in 2014, I had no plan to continue once it was it off my list. But, for many reasons, that initial experience so far exceeded expectations, I vowed to continue doing it until people stopped showing up. Fast forward nine more trips: turns out, I’m the person who will stop showing up…
Let me explain. The trip still fills, but not nearly as quickly as it did those first few years, when I already had a waiting list for the next year before the current year’s trip even pushed off. And with costs rising faster than I’ve been able increase the price (see slowing enrollment reference in the previous sentence), and understanding that I’m on the financial hook for a full trip whether or not it fills, somehow my Grand Canyon raft trip had become the most stress-inducing offering on my schedule. So, while I still love the whole rafting experience as much as ever, when I decided to pare a few workshops from that schedule, it seemed like ten (!) Grand Canyon raft trips was a nice round number to go out on.
But I will miss it. Between the sights, the rapids, the guides, and the fantastic people I got to share it all with, it’s pretty difficult to single out one thing I’ll miss most about rafting Grand Canyon. But hold a gun to my head, and I’d have to say it will be the night sky filled with more stars than I’ve ever seen, and so dark the Milky Way actually casts a shadow.
As desperately as I craved a good Milky Way experience (and when I say Milky Way, I refer specifically to our galactic core) on this farewell trip, I always go in knowing that, for many reasons, Milky Way success is far from a sure thing. Even though it’s always a priority, before this one, I’d had trips that had two nice Milky Way shoots, one nice Milky way shoot, and zero nice Milky Way shoots.
First obstacle is that, despite Grand Canyon’s typically clear skies, clouds do happen—I had two trips with so many clouds we never even saw the Milky Way. But even when the sky is clear every night, we still need a little luck to even see the galactic center because, from most campsites, the Colorado River’s general east/west orientation through the canyon puts views of the southern horizon (where the Milky Way hovers in May) behind the looming south wall. It helps that over the years I’ve been able to identify a handful of campsites that are either on the north/south trending Marble Canyon section of the canyon (where we spend our first two nights), or (more rarely) on a south-facing bend in the river. But they’re few and far between.
Since all Colorado River campsites in Grand Canyon are first-come, first-served, my trips can never count on getting one with a Milky Way view. And the Colorado River is unforgivingly one-way—if your first choice campsite is taken, there’s no way to return to that wide open second choice campsite you passed two miles back. This fact sometimes forces us to settle for whatever campsite is available. And with a schedule to maintain, even coming upon an empty ideally oriented campsite is of no value if we’re floating past it at 11 a.m. because we don’t have enough wiggle room in our schedule to lose a half day of rafting.
With all this in mind, at the start of each trip I powwow with the guides to explain (emphasize) my Milky Way and other photography priorities (for example, if it’s sunny, there are several key locations I only want to photograph in the full shade of early morning or late afternoon). We come up with the framework of a plan that by Day-2 is usually out the window, or at least is significantly renegotiated, as things invariably don’t go exactly as planned. And each plan change factors in downstream Milky Way possibilities.
The first thing I do after arriving at a new camp is check its Milky Way opportunities—specifically, I identify south and whether it’s behind a canyon wall (bad), or between the two walls (good). But even an open southern exposure isn’t enough—I know of at least one campsite with a great view of the southern sky, but it’s so overgrown along the river that all we get for a foreground is a bunch of scruffy shrubs. And my groups have also had several campsites where the only place to park the boats is smack in the middle of the only open view of the southern sky. So all the tumblers need to click into place for the Milky Way to work at the bottom of Grand Canyon.
If I determine that tonight’s campsite does have a good view of the Milky Way, at some point (usually at dinner) I give group the night’s Milky Way plan: where it will appear, when it will appear, and the best place to photograph it. I also give a basic Milky Way photography primer (focus, composition, and exposure tips), lecture them about the damage flashlights will do to everyone’s shots (especially red lights!), then make myself available for the inevitable, “Which lens…?,” “How do I get my camera to do…?” questions. By bedtime, most people who hope to photograph the Milky Way are ready (-ish). And of course they know where I’ll be set up if they have problems (but they’ll need to come me, because it’s too dark to safely move around to everyone).
All of my Grand Canyon night shoots are no-host: I tell people where I’ll be and roughly when I’ll be there. In May the earliest the Milky Way rises into view is around 1:30, but to avoid disturbing people who value their sleep more than I do, I never set an alarm because that might disturb those nearby who would rather sleep. Fortunately, I have no problem waking myself up at a specific time, give or take 15 minutes.
There are six nights on this trip. The way the trip usually unfolds, our best chances for the Milky Way are the first two nights, and (if we’re very lucky) the fourth night. On our first night of this trip, we ended up at a spot beneath a wall that blocked the lower half of the Milky Way, but the few of us went for it and did okay—but I knew we could do much better.
Not wanting to hang all our hopes on getting the very nice but difficult to secure campsite on night four, I felt very motivated to make the second night work. But as the afternoon wore on and we continued to encounter good campsites that were already taken, we just floated on. And there comes a point where you just have to take whatever is available so we can start the business of setting up camp and making dinner before it gets too dark. Which is why the guides were actually relieved as we floated up to Rattlesnake camp and found it open, Milky Way be damned. The first thing I did when we landed was pull out my phone and check the compass to find south, and as feared, the S-needle pointed right at a towering wall. Oh well…
But after setting up my campsite, I got my (iPhone) compass out and went exploring. My eye was on a bend in the river a few hundred yards downstream, and I wondered if it might bend far enough to the south to provide a view to the southern sky, and whether it was even possible to get down that far.
As I moved downstream, the route along the river got rockier, eventually turning into a series of sandstone ledges with a steep drop straight to the water. Each time it looked like I couldn’t go any farther downstream, I found a I found a route that got me a little farther. I was at least a quarter mile downstream before reaching a spot where I could go no farther without climbing. (A quarter mile doesn’t sound very far, but in total darkness and without a trail, it feels like forever.) Looking downstream, I saw that this vantage point still didn’t face due south as I’d hoped, but it did provide a clear view southwest. Hmmm—not ideal, but… maybe?
Checking (and re-checking) my astronomy app, I guessed (crossed my fingers) that we might have about a 45-minute window from the time the Milky Way rotated out from behind the canyon wall, until the sky started to brighten enough that we’d start losing essential contrast. And the longer I took in the entire view, the more I liked the river scene we’d be able to put with the Milky Way. If it worked.
Walking back, I took special note of the route, identifying distinctive rocks and shrubs I might be able to use as landmarks in the dark. At camp, I told my group what I’d found, and that the window of opportunity is very small (even the slightest miscalculation on my part could make a difference). I also warned the that the route out there, while only slightly treacherous in daylight, would be exponentially more-so in virtually total darkness. I also told them I’d be going for it. I finished by encouraging anyone even considering going out there in the dark to scout it and make a route plan now.
Before crawling into my sleeping bag, I got my camera and lens combo set up on my tripod and stood it next to my cot. The last thing I did before closing my eyes was set my mental alarm clock for 3 a.m.
I woke up a little before 3:00, grabbed my tripod, and made my way out. Because other people might be either shooting or sleeping, I try not to use any kind of flashlight or headlamp when walking around at night, but using only my cell phone screen to illuminate my next step, I didn’t really have much trouble finding the way, one step (as far as I could see) at time until I was there.
I was surprised and pleased to see how many people were already out there—on this trip I have a lot of non-photographers who join photographer friends and loved-ones, but I’d guess close to a third of the group was there already, and a few more joined shortly after I arrived. With no light, I poked around on the sandstone until my eyes to completely adjusted, and eventually edged my way out to the farthest ledge. Then I went to work.
I did my usual vertical (first) and horizontal composition mix, trying different ISO and shutter speed settings to give myself more processing options. I also moved around a little, eventually photographing from three different positions within about a 30-foot radius. From my first frame to my last was only 25 minutes, but by the time I’d finished, I knew I’d had a Milky Way success I so wanted on my final trip.


Hidden Treasures
Posted on January 8, 2026
Clinging Tree, Upper Yosemite Fall, Yosemite
Sony a7R V
Sony 100-400 GM and 1.4X teleconverter (560mm)
ISO 800
f/11
1/1600 second
I’m aware that most of the images I share feature familiar subjects and eye-grabbing vistas that (justifiably) attract thousands of daily visitors and inspire millions of photographs—Nature’s celebrities. But that’s not a complete reflection of my personal photographic instincts. There are several reasons the subjects I share skew toward more acclaimed beauty: for example, the relatively close proximity of that beauty to my home in Northern California; and the obvious fact that I make my living leading photography workshops that I need to fill.
Though celebrated subjects are coveted by the vast majority of nature photographers, today I’d like to issue a shout-out to “ordinary” beauty that doesn’t jump out and grab the eye of everyone present (and doesn’t necessarily inspire people to sign up for workshops). I’m talking specifically about Nature’s hidden treasures that require the photographer to look closer and work harder to uncover. These little scenes may not garner the acclaim of their more spectacular counterparts, but I’ve come to realize that I’m never more content than I am when I photograph them.
Given Yosemite’s proximity, and the fact that I lead 4 to 6 Yosemite photo workshops each year, I probably spend more of my photography time there than anyplace else. But as the years click past, I find that I take my camera out in Yosemite far less than I once did—not because I find it less beautiful, or that I’ve tired of photographing it, but simply because it’s become harder and harder to find the unique scenes I covet. And of course when leading a workshop, my priority is never my own photography. I have to honor the fact that most of my workshop students want to photograph the beautiful Yosemite they’ve seen in pictures, not a leaf, or flower, or tree they could probably find at home.
That said, one of the points I emphasize to my students is trying to make the iconic shots that drew them their starting point, not their goal. So we spend a lot of time, both in the field and in the daily image reviews, on how to see and use the less obvious elements in a scene, with the goal of creating images that are uniquely their own. It’s a mindset that once established, starts becoming automatic.
To jumpstart that mindset, I have certain subtle features I point out at many of the locations I take my groups to—hidden treasures I’ve uncovered over the years that are potentially powerful but easily missed. One of my favorites is this little tree in front of Upper Yosemite Fall, only visible from a certain location on the trail to the bridge beneath Lower Yosemite Fall. It’s been on my radar for decades, though I rarely photograph it anymore. In fact, I hardly ever take my camera on my groups’ walks to Lower Yosemite Fall anymore. But in April of last year, with the fall booming and thin clouds diffusing the morning sunlight, I grabbed my camera bag with the sole purpose of shooting this tree again.
For me this is a telephoto shot, the longer the better. So on the walk back down from the bridge (where we photographed a rainbow at the base of Lower Yosemite Fall), I pulled out my 100-400 lens, added my 1.4X teleconverter, and went right to work. To avoid losing the tree against the dark, wet granite, the key here is waiting until the wind blows the water behind the tree. There was so much water on this spring morning that I rarely had to wait long.
I’m sure I clicked more than 50 frames, repositioning the tree from time to time in both horizontal and vertical orientation. Each time I recomposed, I shot at least a half dozen frames just to get different background water patterns—it’s amazing how much it changes from one second to the next. Pretty soon others in the group joined me, and it was fun watching them get excited about this anonymous little tree that’s so easily overlooked.
Of course the moral of this story is that there are hidden treasures like this everywhere, just waiting to be discovered—and hunting for them is half the fun.
Workshop Schedule || Purchase Prints || Instagram
Hidden Treasures
Click any image to scroll through the gallery LARGE (best viewed on a computer)


")


A Moving Experience
Posted on December 18, 2025

Fire on High, Kilauea Eruption 33, Hawaii
Sony α1
Sony 16-35 GM II
1/50 seconds
F/8
ISO 200
I’ve been photographing Kilauea’s eruptions, in many forms, for 15 years, but never anything close to the spectacular display my workshop group and I witnessed in September. It wouldn’t be hyperbole to say that this was one of the most memorable experiences of my life. (I’ve said that about Kilauea eruptions before, but each time I say it, Kilauea seems to say, “Oh yeah? Hold my Mai Tai.”)
As a photographer who obsesses about controlling every pixel in my frame, and who (semi-) jokingly asserts that I don’t photograph anything that moves, there was a lot going on atop Kilauea this morning. Anybody up there with a camera could have snapped a few frames and captured something worthy of sharing, but whether it’s a vivid sunset, dancing aurora, or fountaining lava, serious photographers need to separate themselves from the “anybodys” and pay attention to the little things easily overlooked in the thrill of the moment. This morning on Kilauea, with an obvious focal point and empty foreground, the biggest (and most easily overlooked) challenge was the constant motion in the scene.
Let’s review: Photography is the futile attempt to convey a dynamic world using a static medium. Though that’s literally impossible, what is possible is conveying the illusion of motion—that is, capturing the scene in a way that enables viewers to infer its motion. Finding the shutter speed that freezes a moving subject in place or renders it with some degree of motion blur, while getting the light perfect, is a basic photography skill that simply requires mastery of the three exposure variables.
Motion in a landscape image can take many forms, some easier to address than others. Though waterfalls and whitewater rapids may move fast, at least they stay in one place while the water moves within. But other natural subjects move more unpredictably. Lightning, for example, comes and goes so suddenly, I never even consider using my own reflex/reaction skills to freeze its transient existence—I simply connect my Lightning Trigger, aim my camera, and wait for my trigger and camera to do the work. Ocean waves, while less organized than whitewater, are at least predictable enough to anticipate and time—that said, I generally prefer to simply shoot a series of wave images with varied timing and motion effects, then pick my favorite later.
Somewhere between lightning and waves on the predictable/random continuum are atmospheric phenomena like the northern lights, and regular old clouds. Though they’re in constant (seemingly) random motion, that motion is usually more my speed—slow enough to anticipate and adjust my composition and exposure without feeling too rushed.
But it’s not just about how you render the motion—another complicating factor is paying attention to subjects that don’t stay put: a composition that was perfect seconds ago could be completely out of whack right now. Which happens to be the biggest challenge this memorable morning in Hawaii.
Now might be a good time to mention that part of my desire to control my entire frame makes me especially obsessive about both the borders of my images, as well as the relationships of the elements in my frame that draw the eye. That means trying to avoid cutting strong elements on the edges of my frame, creating a sense of connection and balance between strong visual elements, and avoiding (or minimizing) visual elements that compete with my subject or subjects. So when my subjects are in motion, as they were on Kilauea this morning, I need to monitor and adjust continuously.
Arriving with my workshop group several hours before sunrise, the total darkness meant I only had to contend with 800-foot explosive lava fountains and the lava rivers surrounded by a sea of black. The lava fountains, while exploding violently and pretty much non-stop, were far enough away that they seemed to be moving in slow motion. The lava rivers, though constantly ebbing, flowing, and changing course, moved slowly enough to be relatively manageable too.

Fountain of Fire, Kilauea Eruption, Hawaii
My goal was to freeze the lava’s motion in place, and soon I settled on a shutter speed I was confident would do that even at my longest focal length. With the unchanging light (dark) and a shutter speed I knew was fine, it wasn’t long before I found a rhythm, complementing compositions centered on the “stationary” lava fountain (the lava was moving, but the fountain stayed in one place) with the current position of the flowing lava rivers, then timing my shutter click for when the latest fountain peaked or spread most dramatically. I worked this way for a couple of hours, mostly using my 100-400 and 1.4X teleconverter, zooming in and out and switching between horizontal and vertical compositions.
Things changed when sunrise started painting the sky pink and revealing a previously unseen plume of billowing smoke, vapor, and tephra. Suddenly, my priorities switched to wide angle to capture all the additional beauty brought by the increasing light. And just as suddenly, I had to adjust the compositional imperatives underlying my prior rhythm, now factoring into the mix the wind-whipped smoky plume tower that expanded and shifted by the second, the pink clouds, and even new detail on the caldera floor. And with the rapidly brightening sky, an exposure that worked 30 seconds ago, now blew out the sunlit highlights. Not only that, I knew the plume’s gorgeous warm light was peaking and would only last for another minute or two, further ratcheting up my urgency.
Switching to my 16-35 lens, I framed up a completely new composition and adjusted to a new combination of motion considerations. In this case, including the lava and rising plume were no-brainers, but the goal should be more than simply taking a picture that includes both—everything needs to work together to create something that stands out from the thousands of other images captured at the caldera that morning.
Managing all of a scene’s moving parts is what good photographers are supposed to do. That said, I notice—both in my workshops and online—that many photographers seem so focused on their scene’s one or two most prominent features that they lose track of still important secondary and tertiary elements. And when one or more of those less essential elements is moving, for example waves or clouds, their new position is easily overlooked, leading to random and often less than ideal results.
In this case, while keeping an eye on the active lava as I’d done all morning, I suddenly also needed to keep track of an expanding smoke plume that was in constant motion, illuminated by ever-changing sunlight. While not especially difficult if you’re paying attention, this doesn’t just happen automatically (and I have the pictures to prove it).
Keeping my borders as clean as possible became a prime concern, so I kept a constant eye on the shifting smoke plume to avoid cutting it off. On the left and top I just needed to keep the plume off the borders of my frame; since the wind had stretched the smoke far beyond any reasonable frame on the right side, I also needed to find the best place to cut that side with the right border. And as with my rapidly changing exposure, a composition that worked one second might need to be completely adjusted the next.
I tried to go just wide enough on the right to include all of the main (and most dramatic!) vertical section of the sunlit plume, and on the right went just a little wider than that to include that one small splash light—any farther right would have shrunk my subjects while adding nothing more than a homogenous horizontal band of brownish-gray smoke.
The result of all these machinations is this wide vertical frame that includes the fountaining and flowing lava that was the star of the show that morning, plus all of the sunlit portion of the beautiful smoke plume. Accomplishing this was not rocket science, and I’m not pretending to be special for achieving it. But I do think photographers often fall down when they get so caught up in the majesty of the moment that they fail to take that one extra step to account for the scene’s motion, and the importance of those subtle changes from one frame to the next.
Workshop Schedule || Purchase Prints || Instagram
World in Motion
Click any image to scroll through the gallery LARGE


A Diamond in the Surf
Posted on December 11, 2025
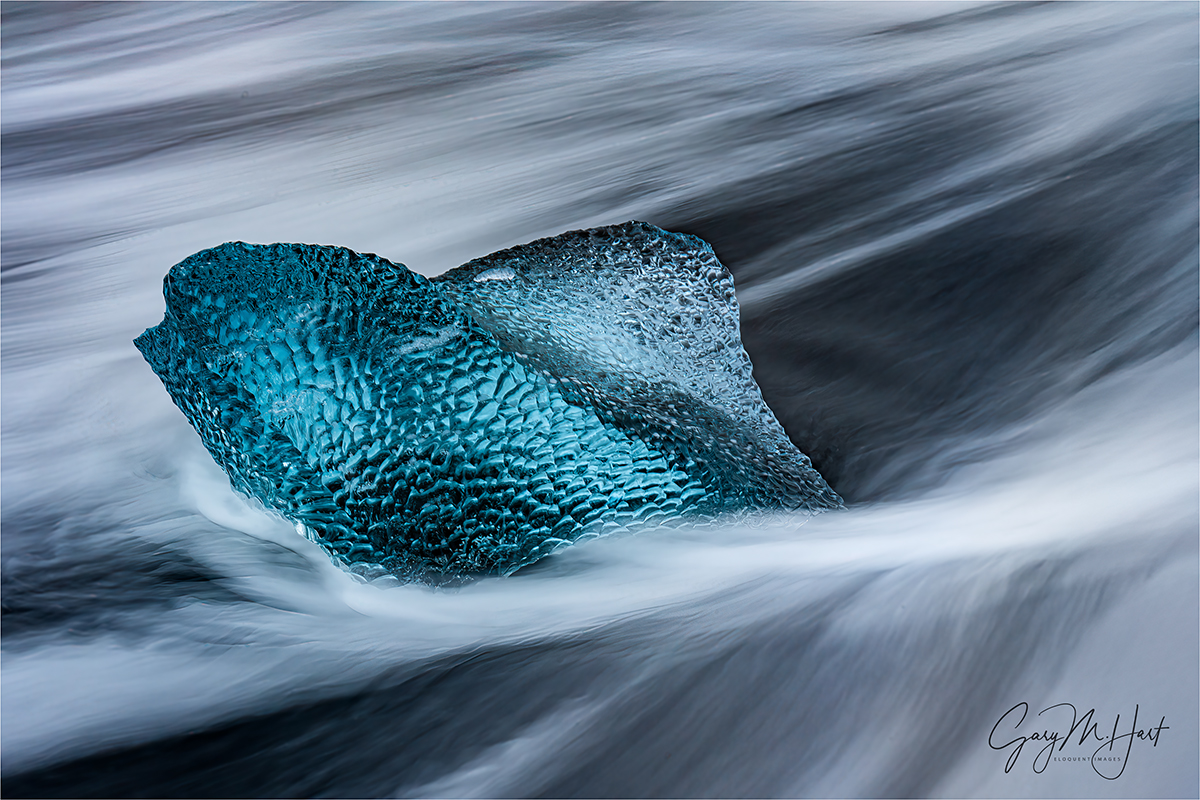
A Diamond in the Surf, Diamond Beach, Iceland
Sony a7R V
Sony 24-105 G
2 1/2 seconds
F/16
ISO 400
With a break in my workshop schedule (and to prepare for my upcoming 2025 Highlights post), I’m working hard to catch up on this year’s unprocessed images. Moving more or less chronologically, I’m really having a blast—such a blast that balancing this processing with family Holiday priorities and the endless demands of running a business, my weekly blog schedule has slipped a bit. But be patient, because I’m pretty excited about some of the images I have queued up to share, and am hoping I can crank out the blog posts to do them justice….
In addition to finding new images to get excited about, I never tire of revisiting locations (in general) and specific shoots (in particular) through my raw images. For example, returning to Iceland and remembering the sights and people Don Smith and I shared it all with really has me itching for our return in March. This year’s highlight was probably our exceptional and unexpected(!) Iceland northern lights experience on the workshop’s second night, a display that fostered a group-wide buzz that persisted throughout the workshop. So of course as soon as I returned home, I went straight to work processing those aurora images, then moved on to a handful of other new Iceland locations that had excited me, before my Yosemite winter workshop force me to focus on other priorities. After all that, Diamond Beach was just one of many Iceland locations that remained unprocessed, shrinking in my memory to the point where my first thought upon revisiting them was, Oh yeah…
Diamond beach is a long stretch of black sand spanning Glacier Lagoon’s narrow outlet to the Atlantic. As spectacular as all that black sand is, given the island’s volcanic origins, it’s simply standard equipment the Iceland coast. But garnish that black sand with large chunks of translucent blue ice, then stir it all up every few seconds with vigorous surf, and you have the recipe for a special visual treat.
The Diamond Beach ice you photograph today could very well be the Glacier Lagoon ice you photographed yesterday. Its origins are Jokulsarlon Glacier, which drains into Glacier Lagoon year-round. When conditions are right, in addition to continuous runoff, much larger ice chunks calve from the glacier and bob across the lagoon, slowly melting as they go. Eventually these icebergs have shrunk enough to fit into the channel that splits Diamond Beach as it drains into the ocean (each time we visit, we eyeball the beach from the highway and decide whether we want to be east or west of the channel). Once the ice makes it out to the sea, tides and active surf push it up onto the beach.
The prime goal at Diamond Beach is capturing motion blur in waving wash around the ice. I can tell you from experience that this is much easier said than done (and I have the images to prove it), because many variables need to align for success.
For starters, the light needs to be right. Ideal is the soft light beneath clouds or twilight, anabling the multi-second exposures these sweeping wave shots require (a neutral density filter can enable these shots in sunlight, but I’m not crazy about mixing harsh light with soft water). By arriving at Diamond Beach well before sunrise, even when the sky is clear we enjoy a half hour or more of gentle light before the sun arrives. (Another great thing about sunrise at Diamond Beach is that there aren’t a ton of tourists yet—it’s definitely far from empty, but once the tourists start swarming, photography becomes much more difficult.) When the sun comes out, I usually forgo the blurred water in favor of sunstar images that feature beautifully backlit ice. And if we’re lucky enough to get overcast, we can spend the entire morning making the intimate ice and flowing surf images everyone covets.
But even when the light is perfect, Diamond Beach can be a challenge. At the risk of stating the obvious, without ice, it’s just another beach (Diamond Beach without “diamonds” is just Beach), and the amount of ice varies a lot from year-to-year. Sometimes there’s hardly an ice cube to be seen. Other times, high tide and big waves have pushed all the ice to a high-and-dry, elevated flat platform just above the beach. One year we (the trip leaders) had to lug a few chunks from up there down to the surf just so our group had a chance to photograph ice with waves.
And ample ice on the beach by itself still isn’t enough when the tide’s and the waves don’t reach the ice. This is why I used to hope for high tide at Diamond Beach, the higher the better—that is, until one January morning when we arrived at high tide and found the surf so big and violent that we didn’t dare venture anywhere near the water. Instead, not wishing to be swept into the frigid North Atlantic, the group set up at an elevated “safe” vantage point and used moderate telephoto lenses (like a 24-105 or 70-200), only to be forced to completely reset our understanding of the term “rogue wave.”
And just when I believed I’d run out of obstacles to hinder the shot at Diamond Beach, our bus hit a reindeer on the way to our sunrise shoot, forcing us to turn around and limp back to the hotel (though we did make it for sunset that evening). So yeah, lots of stars need to align for Diamond Beach success.
But honestly, I’ve been shooting here long enough to know that there’s no substitute for just plain experience. Simply getting shots of ice and blurred water isn’t that hard, but finding the right ice subject, framing it perfectly, choosing the ideal shutter speed for the desired motion effect, timing the shutter-click for the best flow pattern around the ice, and avoiding wave-induced motion blur in the ice, is all a lot of balls to keep in the air simultaneously. Oh yeah—try keeping all those photography balls airborne while keeping one eye on aggressive and relentless surf that can soak you and your gear with little warning. Fortunately, as with most things, this all gets easier with each attempt.
This year, after more than a dozen Diamond Beach visits, reviewing my images, I remembered feelings of finally being in control and working proactively (instead of reacting and trying to adjust to continual failures) out there returned.
Because Diamond Beach stretches quite some distance, a workshop group becomes quite spread out almost immediately. So on the drive to the beach before each visit, Don and I share our own experience-based insights and answer questions while we’re all still together. While there’s no substitute for firsthand experience, this little jump-start does seem to increase the group’s success rate. This year’s mini training session continued as everyone bundled up and prepared for their assault on the beach, but pretty soon the bus was empty and I started getting myself ready (a rather time consuming process in Iceland in winter). I intentionally took my time so I could be the last one out there, slowly advancing along the beach and checking on everyone as I went. (Don and I don’t stick together out there, but I know he does the same thing.)
At the beach it was instantly clear that we had plenty of ice, the tide was high enough, and the surf just about right. For the first hour or so, between students I stopped to fire off a frame or two a handful of times, but my prime focus was making sure everyone was doing okay. Once satisfied that people we comfortable with what they were doing and content with what they’d found, I got a little more serious about finding subjects of my own. Even though I’d taken very few pictures to that point, the overcast sky gave me confidence that I had plenty of quality time remaining.
With ideal conditions like this, I look for ice that’s planted firmly in the sand, but close enough to the water for waves to reach it from time to time. Too far inland and there’s no water around the ice to blur; too far into the surf and the ice doesn’t stay put through an exposure.
In size terms we can all relate to, most of the ice we photograph tends to range from small microwave oven to full-size refrigerator—much smaller that and they move around too much; much larger and they can’t make it in close enough.
The mini-iceberg I share today was a little smaller than a small coffee table—not huge, but enough mass to resist shifting or rocking with the slightest wave pressure. After identifying it as a potential subject, I circled (not completely—I’d never put my back to the ocean) until I found the perspective I liked best, set up my tripod 20 or so feet away, trained my 24-105 lens on it, then framed up a composition. I found the exposure-setting combination that gave me a good histogram with ample depth of field at a shutter speed around 2 seconds (sometimes a little long, sometimes a little shorter). Then I stood and waited for the waves to arrive.
In the simplest possible terms, there are two opportunities when photographing waves sweeping around fixed ice: washing in, and washing back out. I usually prefer waiting until a wave is on its way out—not only does this provide a better (in my opinion) motion effect, the water has a little less force, making it less likely to introduce any motion blur in my subject. And after years of trying this, I’ve decided that exposures in the 1 – 3 second range seem to work best.
But anything with moving water is never a one-and-done thing. After each click I check the image on my LCD to identify motion effect and its timing, then do my best to avoid the effects I don’t like, and duplicate the effects I do like. I almost always, as I did with this subject, take at least a dozen shots (unless waves sweep my subject away, always a possibility). Every single frame is different, but it’s better to have too many choices than not enough. On the other hand (and this is a particular problem for me), unless I’m waiting for specific event (like a wave of a certain size or direction), I have to remind myself not to lock in on one subject so long that I miss out on opportunities elsewhere.
The image I chose to process and share today is of a wave on its way back out. And though almost a year later I have no specific memory of its capture, I can tell by the time of its capture (after sunrise) and my exposure settings that I used my Breakthrough 6-stop dark polarizer to enable the longer shutter speed necessary for wave effect I sought—in this case, 2 1/2 seconds.
As this image makes abundantly clear, perhaps the most striking feature of glacial ice is its not-so-subtle blue. Contrary to popular opinion, this blueness is not reflected color from the sky (the sky this morning was cloud-gray), it’s a quality of the ice’s glacial origins. If you paid attention during high school (or earlier?) science class, you know glaciers form from snow accumulated over hundreds or thousands of years. While air trapped in fallen snow makes it opaque, subjecting this snow to centuries of pressure from the accumulated weight above compresses it and forces out virtually all the air, leaving nothing but translucent ice crystals. This glacial ice is so dense, it absorbs all but the shortest wavelengths of visible light that enter. The only wavelengths not absorbed are the blue ones, which instead are scattered back to our eyes: blue ice. (Of course as you can see in some pictures in my Diamond Beach gallery below, ice infused with direct sunlight will take on the sun’s yellow/gold hue).
Diamonds in the Surf


Let’s Get Vertical (Again)
Posted on November 16, 2025

New Day, Tunnel View, Yosemite
iPhone 17 Pro
(This seed of today’s blog is a post from many years ago—but the image and its story are brand new.)
What’s your orientation?
I’ve always questioned the reasoning behind labeling horizontally oriented images, “landscape,” and vertically oriented images, “portrait.” Despite my profession as a landscape (-only) photographer, nearly half of my images use “portrait” orientation. So it concerns me that this arbitrary naming bias might subconsciously encourage photographers to default to a horizontal orientation for their landscape images, even when a vertical orientation might be best.
The orientation of an image imparts implicit visual motion that’s independent of the eyes’ movement between an image’s visual elements. Photographers who understand that viewers’ eyes tend to move along the frame’s long side have an extra tool for guiding those eyes, and even to convey a mood.
For example, when orienting an image of a sunset on the coast, it’s easy to default without thinking to the same horizontal orientation that the distant horizon follows. And a waterfall image that’s oriented vertically certainly encourages the viewers’ eyes to move in the same direction as the water’s motion, so orienting the frame to match certainly seems reasonable. But, despite the natural instinct to match the frame’s orientation to the scene’s dominant flow, there is no absolute best way to orient an ocean, waterfall, or any other scene—there’s always a choice, and that choice matters. While matching the image’s orientation to the scene’s natural movement in this manner can instill a calmness to the image, a vertical ocean sunset, or horizontal waterfall, can create visual tension that can also be quite compelling.
Since I don’t need to convince most landscape photographers to take more horizontal pictures, I’m going to concentrate on the benefits of a vertical frame. One thing I especially like about orienting my landscape scenes vertically is the way it moves my viewer’s eyes through the scene from front to back, enhancing the illusion of depth that’s so important in a two-dimensional photo. And because of a vertical frame’s relative narrowness, a foreground element (that might get lost in a wider horizontal frame) instantly becomes the focal starting point that starts my viewer’s visual journey through the frame to whatever striking background I want to feature.
More than just guiding the eye through the frame, vertical orientation narrows the frame, enabling me to eliminate distractions or less compelling objects left and right of the scene’s prime subject(s). This makes vertical my preferred orientation when I want to emphasize an especially striking foreground from above (like Tunnel View), or a sky brimming with colorful clouds or a host of stars.
While a horizontally oriented scene is often the best way to convey the sweeping majesty of a broad landscape, I sometimes enjoy guiding my viewers’ eyes with vertical compositions of traditionally horizontal scenes. Tunnel View in Yosemite, where I think many photographers tend to compose too wide, is a great example. The scene to the left of El Capitan and the right of Cathedral Rocks just can’t compete with the El Capitan, Half Dome, Bridalveil Fall triumvirate, yet the world is full of Tunnel View images that shrink this trio to include (relatively) nondescript granite.
That’s why, when the foreground and sky aren’t particularly interesting, I often go for fairly tight horizontal compositions at Tunnel View. And while Tunnel View is among the most spectacular views on Earth, the foreground beneath the vista is usually quite bland, and overhead California’s chronic blue skies are frustratingly boring. So I’m afraid many of my Tunnel View images are horizontal, and rarely stray far left of El Capitan, or right of Cathedral Rocks.
Fortunately, there are exceptions. One of my favorite exceptions is those rare times when fresh snow smothers the evergreen valley floor. Another favorite is dramatic clouds, whether in the valley below or sky above. Faced with visual treats like this, vertical frames are wide enough to feature the foreground and/or sky without diluting the Tunnel View drama by including extraneous granite.
More specifically…
In Yosemite, one thing I never count on when there’s no weather in the forecast is a nice sunrise. That’s because Yosemite’s (default) blank skies, coupled with Tunnel View’s east-facing view, forces sunrise shooters to photograph fully shaded subjects (El Capitan, Half Dome, Cathedral Rocks, and Bridalveil Fall) against the brightest part of the sky. That’ why, without clouds, Tunnel View is much better late afternoon to sunset. For me, on a typical (empty sky) Yosemite morning, the real show is the first light on El Capitan, which arrives about 15 to 20 minutes after sunrise. On mornings with no clouds forecast, I usually start my groups with an El Capitan reflection of that first light—not only is this a reliably beautiful sight, everyone gets to sleep an hour longer (since going for the actual sunrise means being on location at least 30 minutes before sunrise instead of 20 minutes after).
But for whatever reason, and despite a promise of clear skies all morning (until a storm was forecast to start moving in that afternoon), I decided to hedge my bets on the final sunrise shoot of this month’s Yosemite Autumn Moon photo workshop. Normally we spend this final morning at Bridalveil Creek, arriving as soon as it’s light enough to start shooting in the dense shade there. Instead, I got everyone out about 30 minutes earlier and headed straight to Tunnel View. While this wouldn’t be early enough to shoot sunrise from start to finish, it would get us there in time for the best color in the remote chance the clouds arrived earlier than forecast. And that’s exactly what happened.
We were pulling in just as the cirrus precursors to the evening rain started lighting up. Since my group had already been up here twice, everyone was out of the cars and grabbing their gear before my seatbelt was off. Half the group beelined to the standard view with my brother (who was assisting me in this workshop), while the rest joined me on a granite ledge above the TV parking lot (a similar view, but with fewer people—also a little more physically challenging, and not the favorite spot of anyone bothered by heights).
As beautiful as the sky was, since I rarely photograph at Tunnel View anymore, my camera stayed in the car and I was content to just enjoy the show. Or so I believed. But as I stood there watching the color keep getting better and better, I started to second guess my decision to forego my camera. I knew I could be down to my car any back in less than 5 minutes, but the color was changing so rapidly, I also knew that would mean missing the best stuff. So I whipped out my iPhone 17 Pro, put it into RAW mode, and quickly framed up the scene.
With the great sky and bland foreground, I didn’t consider anything but vertical compositions. At first I went wide enough to include Bridalveil Fall, and though it was flowing nicely for autumn, it really wasn’t impressive enough to justify going that wide. So I quickly tightened my framing to include only El Capitan and Half Dome, putting in only the minimum amount of foreground so I could maximize the spectacular sky. I’d love to tell you what focal length, f-stop, and shutter speed I used, but my iPhone made all those decisions for me, and clearly did a pretty great job. What a time to be alive!
A few thoughts on iPhone image quality
Okay, seriously, as great as the iPhone (or any other current smartphone) camera is, let me remind you that smartphone image quality is nowhere near the quality of today’s full frame sensors and lenses. And I actually got a firsthand reminder of this fact while processing this image. Though I was truly blown away by the detail my iPhone captured, on the day I processed today’s image, I also prepared three large prints that had been ordered by an interior designer for the home of one of her customers. Though two of these images were captured more than 15 years ago with my Canon 1DS III (21 megapixels); the other was about 10 years old, from my Sony a7R II (42 megapixels), I was pretty confident the quality and detail this job required was all there.
-

- Stillness, South Tufa, Mono Lake
-

- First Light, Yosemite Valley
-

- Yosemite Sky, Tunnel View, Yosemite (2016)
And because maximizing this quality was the highest priority for her customer, she opted for custom prints rather than just going through my standard (much cheaper) SmugMug prints website (www.garyhartprints.com), where the images are pre-uploaded, medium resolution jpegs waiting for anyone to order (full disclosure: I’ve never had a single complaint about one of these prints). To prepare the images for printing, I returned to the original files and did extensive prep (using the latest processing technology) to ensure that the noise reduction, up-res, and sharpening got the most out of every single pixel.
I am absolutely certain I could print an iPhone image as large as these custom orders were (24×36) without apologizing. But getting up-close and personal with these three full-frame sensor prints at the same time I was processing an iPhone image, the detail captured left little doubt that, for anything much larger or more demanding than computer/web display, smartphone capture has a long way to go to catch “real” cameras. (But I’m still pretty thrilled to know that I can get useable quality any time Nature catches me without my real camera.)
Join me in Yosemite
Workshop Schedule || Purchase Prints || Instagram
Let’s Get Vertical
Click any image to scroll through the gallery LARGE
, Yosemite")


