Eloquent Images by Gary Hart
Insight, information, and inspiration for the inquisitive nature photographer
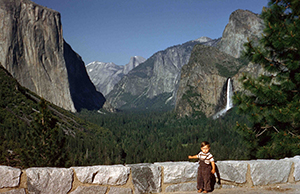
Tunnel Vision
Posted on April 24, 2023

Spring Rainbow, Bridalveil Fall, Yosemite
Sony a7R V
Sony 24-105 f/4 G
ISO 100
f/10
1/250 second
For everyone who woke up today thinking, “Gee, I sure wish there were more Yosemite pictures from Tunnel View,” you’ve come to the right place. Okay, seriously, the world probably doesn’t actually need any more Tunnel View pictures, but that’s not going to stop me.
Visitors who burst from the darkness of the Wawona Tunnel like Dorothy stepping from her monochrome farmhouse into the color of Oz, are greeted by a veritable who’s who of Yosemite icons: El Capitan, Cloud’s Rest, Half Dome, Sentinel Rock, Sentinel Dome, Cathedral Rocks, Bridalveil Fall, and Leaning Tower.

Yosemite Tunnel View subjects
Camera or not, that’s a lot to take in. First-time visitors might just just snap a picture of the whole thing and call it good. For more seasoned visitors like me, the challenge at Tunnel View is creating unique (or at least less common) images. But that’s not enough to keep me from returning, over and over.
Many people’s mental image of Yosemite was formed by the numerous Ansel Adams prints of this view. And while it’s quite possible those images were indeed captured at Tunnel View, many Adams prints assumed to be Tunnel View were actually captured from nearby Inspiration Point, 1,000 feet higher.
Before Wawona Tunnel’s opening in 1933 completed the current Wawona Road into Yosemite Valley, the vista we now know as Tunnel View was just an anonymous granite slope on the side of a mountain. Before 1933, visitors entering Yosemite from the south navigated Old Wawona Road, a steep, winding track more suited to horses and wagons than motorized vehicles. Inspiration Point was the Tunnel View equivalent on this old road.
To complicate matters further, there are actually three Inspiration Points in Yosemite. The original Inspiration Point is the location where the first non-Native eyes feasted on Yosemite Valley in the mid-19th century. Decades later, Old Wawona Road was carved into the forest and granite to provide an “easier” (relatively speaking) route between Wawona and Yosemite Valley. The valley vista that was established on this route and labeled Inspiration Point is the one popularized by Ansel Adams. But today that version of Inspiration Point has become so overgrown that hikers hardy enough to complete the steep climb up to the Ansel Adams Inspiration Point, must make their way a short distance down the slope to a spot where the view opens up, forming the New Inspiration Point. But I digress…
Almost certainly not my first visit
My total visits to Tunnel View, which predate my oldest memories, by now have to exceed 1,000. At first I had no say in the matter, having simply been a passenger on family trips since infancy. But when I became old enough to drive myself, my Tunnel View visits increased—most Yosemite trips included multiple visits.
The Tunnel View counter started clicking even faster as my interest in photography grew. More than just a one-of-a-kind scene to photograph, Tunnel View is also the best place in Yosemite to survey Yosemite Valley for a read on the current conditions elsewhere in the valley.
And as I’ve mentioned (ad nauseam), the view at Tunnel View is beautiful by any standard. And as it turns out, beauty is a pretty essential quality for a landscape image. Unfortunately, another essential landscape image criterion, especially for landscape photographers who pay the bills with their photography, is a unique image—ideally (aspirationally), but not necessarily, a one-of-a-kind image. So Tunnel View’s combination of unparalleled beauty and easy access means million of visitors each year, which makes finding something literally unique (one-of-a-kind) here virtually impossible.
But there are a few things I do to increase my chances of capturing something special enough to at least stand out—things you can do at any popular photo spot. Here are three:
- Experiment with focal length — At Tunnel View usually means using a telephoto to isolate individual elements, or combinations of elements: just El Capitan, or El Capitan and Half Dome; just Half Dome, or Half Dome and Bridalveil Fall; and so on. And an extreme telephoto allows me to zero in on just one aspect of a Tunnel View icon: Half Dome’s summit draped by clouds, El Capitan’s bold diagonals, the mist explosion at Bridalveil’s base, to name just three.
- Look behind you — Even though the granite walls outside Tunnel View’s classic view can’t compete with the money shot, failure to keep an eye on the surrounding walls risks missing light and clouds that can at times be spectacular. And even though I don’t photograph manmade objects, I’ve seen some great images by others using Wawona Tunnel to frame Yosemite Valley, or with the tunnel itself as the subject.
- Include special conditions — My favorite Tunnel View approach is to pair this already beautiful scene with one of the many ephemeral natural events possible here. Not only does the east-facing view mean warm late light on all the granite features, it also makes Tunnel View ideally situated for rising crescent (sunrise) and full (sunset) moons, and afternoon rainbows. And its position on Yosemite Valley’s west end means it’s usually the first place in Yosemite Valley that storms clear. Few sights in Nature more spectacular than a Tunnel View clearing storm, and no two are exactly the same.
The image I’m sharing today combines a couple of these approaches: a tighter than typical focal length, and special conditions. Though the Bridalveil Fall rainbow isn’t exactly unique, its combination of beauty and relative rarity keeps me coming back. And because the sun’s angle at any given moment, as well as the angle of view to Bridalveil Fall, are precisely known, I can predict the rainbow’s appearance each spring afternoon to within a few minutes (it varies slightly with the amount of water in the fall).
This rainbow makes a fantastic first shoot for my spring workshops. Usually I’m content to just stand and watch—and listen to the exclamations from my workshop students—but sometimes it’s to beautiful to resist. This year, with beautiful clouds overhead, dappled sunlight below, and a strong breeze to spread the rainbow’s palette, was one of those times.
Workshop Schedule || Purchase Prints || Instagram
A Tunnel View Gallery


Relationship Building
Posted on April 17, 2023
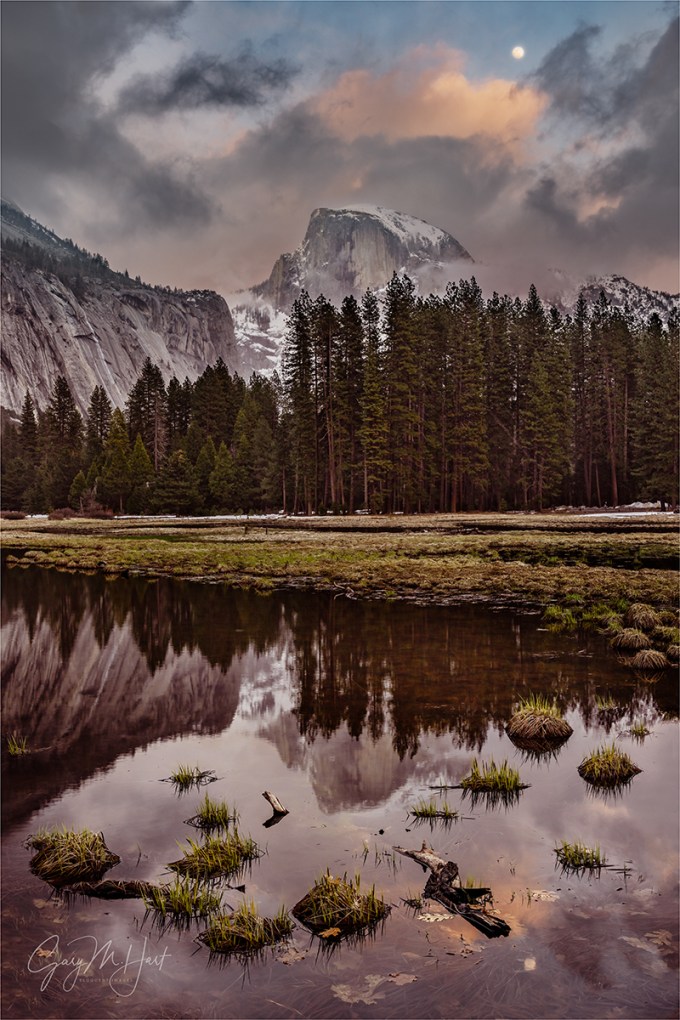
Lunar Reflection, Half Dome and Cook’s Meadow, Yosemite
Sony a7R V
Sony 24-105 f/4 G
ISO 100
f/10
1/8 second
It’s all about relationships
I write a lot about relationships in photography. Often I’m referring relationships with my subjects, which could mean gaining better understanding of a location—not just the where and when of its photo opportunities, but its weather and geology (especially), as well as its flora, fauna, and history. (Of course I love visiting new places too, but I’ve never felt particularly driven to expand my portfolio through relentless pursuit of new locations.)
As important as location relationships are my relationships with the natural phenomena that inspire me understand the science behind the ephemeral phenomena that fascinate me enough to photograph them. Things like lightning, rainbows, reflections, sunrise/sunset color, fall color, and anything celestial simply fascinate me and it never feels like work to study them.
But there’s another side to photography’s relationship coin that takes place within the frame of an image. I’m talking about the visual relationships between disparate subjects—juxtaposing one subject with another physical subject (nearby or distant), or elevating a favorite location by photographing it under the spell of a favorite natural phenomenon.
However these relationships happen, it’s only logical that the best photography takes place when intimate knowledge of location and natural phenomena are combined to create the intra-image relationships that make an image sing.
Sometimes this seems so obvious the we make these connections without realizing we’re doing it. when we visit a vista that includes multiple features, or travel to a favorite location to photograph it with sunset light or fall color. Other times we’re beneficiaries of happy accidents, when something unexpected just happens to manifest while we’re there. And while I love happy accidents as much as anyone, we should never count on them.
In general, the more deliberate we can be about consciously combining the things we love in our photography, the better our images will be. Of course some of my favorite images are happy accidents—something unexpected that just happened to take place while I was there to witness it—but the vast majority were more strategic.
So I guess in a way that would make me a photographic matchmaker, aggressively seeking to create relationships, not just with, but for the things I love most. Whether it’s fresh snow in Yosemite, lightning at Grand Canyon, the northern lights in Iceland, or the Milky Way in New Zealand, it’s usually not an accident that I was there. Of course there are no guarantee any of these things will happen as planned, but I always do my best to maximize my odds.
As much as I’d love to claim that creating these matches makes me some kind of photographic savant, I’m afraid it’s far simpler than that. (Like most people) I can read a weather report and get a few days advance notice of snow in Yosemite Valley; I know that the ingredients for a rainbow are sunlight and airborne water droplets (like rain and waterfall mist), and that my shadow always points in the direction of the rainbow’s center; the time window for any location’s fall color peak is generally common knowledge; and the moon and Milky Way follow precise schedules, and there are plenty of resources that reveal their position in the sky at any time, from any location. All I need to do is act on this information.
Tying it all together
Usually all you need to do to understand the relationships I’m seeking in a workshop is to look at the workshop’s name. The image I’m sharing in this blog post was captured during my Yosemite Moonbow and Wildflowers photo workshop earlier this month—but, as you can see, there is in fact (and fortunately) more to Yosemite in spring than moonbows and wildflowers.
When I scheduled this workshop more than a year ago, I knew for a fact that it would take place during the full moon that’s necessary for the Lower Yosemite Fall moonbow, and that the angle of the rising moon relative to the fall would be just right. And I knew from experience that the odds of wildflowers in April were extremely high. What I didn’t know was whether we’d have clear or cloudy skies, nor could I have anticipated California’s unprecedented wet and cold winter and how it might threaten to throw a wrench in my plans.
This is where the location familiarity part of relationship building comes in handy, as I was able to adjust enough that we ended up with some wonderful photography, albeit something that was much closer to a winter workshop than a spring workshop. This group had chilly temperatures, clouds, a little rain, and lots of snow (mostly on the ground, but a few flakes as well). Nevertheless, as you no doubt know if you read my previous blog post, we were able to catch the very beginning of what has turned out to be a very late (but potentially spectacular) wildflower bloom, so I was able to deliver something as advertised.
The moonbow part of my plan was a little more problematic. While Yosemite Falls is fed entirely by snowmelt, and the Sierra received record snowfall this winter boded well for our chances, the temperatures hadn’t warmed enough yet for the fall to deliver the explosion of mist at its base necessary for the moonbow. (There was nice flow in the fall, just not enough for the moonbow.) We tried, but ended up with a moonlight shoot sans moonbow.
On to Plan B
From the moon to the Milky Way, regular readers of my blog know of my fascination with all things celestial. Orbital geometry aligns Yosemite’s moon with different features as the seasons change, and I try to be there for as many moonrises as possible. Since the full moon happens during this workshop, photographing it is always part of my plan. On the other hand, because the moon doesn’t align as perfectly with Half Dome or El Capitan as it does in winter, it’s more of a bonus than it is something I advertise.
The first night clouds that threatened my moonrise made for great photography, and we kicked off with a nice Tunnel View shoot. Since the wet winter also meant reflective vernal pools in Yosemite Valley’s meadows, to create a sunset match for my workshop students on that cloudy first evening, I opted for the vernal pool in Cook’s Meadow. (For good reason, Cook’s Meadow itself is closed to visitors to allow the meadow to recover from years of pedestrian abuse—we approached the pool from behind, via the trail from the Sentinel Bridge parking lot, and never actually entered the meadow.)
I was actually thinking about multiple matches this evening: not only does this location have a great view of Half Dome, the vernal pool is ideally positioned for a Half Dome reflection. And I knew (but kept to myself for fear of jinxing us) that in the off-chance that the clouds parted, this would be the best location to add the moon to our Half Dome reflection scene.
Between Half Dome, the reflection, and clouds kissed by warm light, I almost forgot about the moon. But about 20 minutes before sunset the clouds opened and there it was. I’d already been strategically moving about to manage the reflection’s relationship to the various features dotting the water’s surface, taking care to frame Half Dome rather than obscure it. So the biggest obstacle I had to overcome was making sure that everyone else had their shot before I got mine.
Since most of us were set up within a few feet of each other, I was able to provide impromptu coaching on how to expose bright enough to capture the shadows without blowing out the moon (read more here). Another (counterintuitive) learning point was to point out that the focus point for a reflection is the same as the focus point for the reflective subject, not the reflective surface (read more here).
One more thing
People ask me if I ever tire of Yosemite, and I can honestly answer, no. Part of keeping Yosemite fresh for me is the infectious excitement that happens when the people I’m with witness something like what we saw this evening. Even without the moon, this Half Dome scene provided a great Yosemite introduction for everyone. But when the clouds lit up and the moon popped out, it elevated to one of those truly special Yosemite moments that I’ll never tire of sharing.
Photographic Matchmaking
Click any image to scroll through the gallery LARGE


")


Leveraging Light
Posted on April 11, 2023

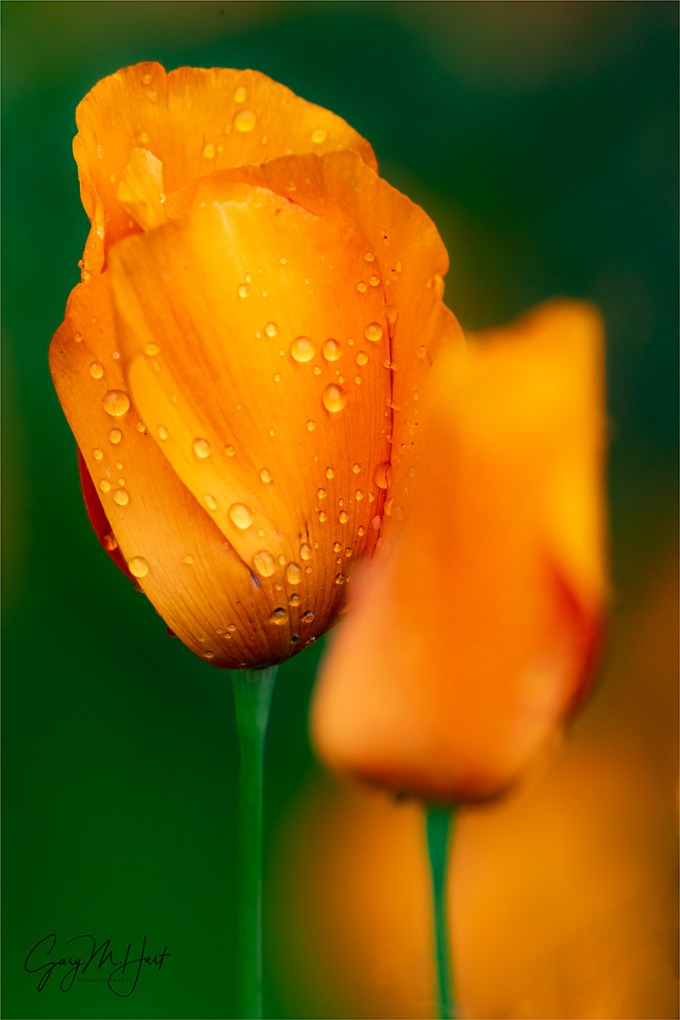
Glow, California Golden Poppy, Merced River Canyon
Sony a7R V
Sony 100-400 GM
2 extension tubes (26mm total)
ISO 100
f/5.6
1/400 second
In last week’s post I wrote about the importance of distilling a scene to its essence. I suggested that the best way to achieve this is to eliminate all but the scene’s most essential elements, and emphasized using precise cropping to banish unwanted objects to the world outside the frame. And while it could be argued that this careful cropping might be the most essential part of the scene-distilling process (or at least the foundation upon which to build), it’s often not enough.
Many (most?) scenes, even after the most surgical cropping, can remain filled with distractions that dilute the image’s impact. Areas of brightness, distinctive but irrelevant features, and objects cut off or intruding at the sides of the frame are just a few examples of visual elements that can distract the eye and confuse viewers looking for clues about the image’s purpose.
But take heart, all is not lost for photographers able to jettison the urge to “reproduce the world just the way I saw it.” The truth is, reproducing the world as we see it is literally impossible, and the sooner you come to terms with that truth, the better off you’ll be.
Setting aside our own reality to leverage our camera’s reality starts with understanding that “reality” is in fact a moving target defined by the medium interpreting it. Humans’ definition of “real” is founded on the three-dimensional, 360 degree, continuous-motion, multi-sense input delivered to our eye/brain collaboration. A camera, on the other hand, captures a two-dimensional, static, mono-sensory version of our very dynamic world.
But before lamenting your camera’s limitations, pause to consider that, in the grand scheme of perpetual electromagnetic energy that surrounds us, what you and I see is an tiny fraction of the infinite continuum of electromagnetic wavelengths continuously (and ubiquitously) careening about the Universe.
For example, X-ray machines peer into the world of electromagnetic waves in the one nanometer (one billionth of a meter); TVs and radios “see” waves that are measured in centimeters; humans, on the other hand, see only the waves in a very narrow band between (about) 400 and 750 nanometers. Understanding all allows doctors to expose subcutaneous secrets, astronomers to explore our galaxy and beyond, and the military and law enforcement to view “invisible” (to us) infrared signatures that reveal people and objects in complete darkness. In other words, there’s no single absolute visual standard—it’s all relative to the frame of reference.
The photographer’s job is to embrace his or her camera’s unique frame of reference, and to understand the power they possess to convey aspects of the world missed by the human experience. That “instant” a still photo is limited to can actually be stretched with a long exposure that compresses a potentially infinite number of instants to reveal, in a single frame, patterns of motion and flow. And the information a camera can’t see gives photographers incredible power to hide or minimize distractions, to control the world inside their frame, and to emphasize select elements over other elements.
All this might explain why I’ve always considered myself a film photographer with a digital camera. That doesn’t mean I don’t appreciate and use the incredible processing power digital photography brings, but it does mean that the images I process are limited to the photons captured in a single click. I just find no joy in adding information through focus or exposure blending of multiple images. Rather, I prefer leaning into my camera’s visual shortcomings by subtracting the aspects of the scene that don’t serve the image. (There’s nothing wrong with honest image blending, it just doesn’t give me joy.)
The image I share today, a brand new one from last week’s Yosemite Moonbow and Wildflowers photo workshop, got me thinking about the importance of subtracting distractions, and the power of my camera’s relatively narrow (compared to human vision) dynamic range to emphasize the most important qualities my subject. I’ve always loved the way sunlit poppies seem to radiate from within, as if illuminated by their own internal light source, and am always looking for ways to highlight it.
Based on my observations last month (normally a reliable start to the poppy season in Northern California), and the persistence of California’s incredibly chilly spring (by our standards), I wasn’t even sure I’d have a chance do any poppy photography this year. But scouting my poppy spots near Yosemite for last week’s workshop, I was thrilled to see that the poppies were just starting to erupt. They were still quite small, and rather thinly distributed, but were already plentiful enough to photograph. I reasoned (hoped) that a few days of sun might really kick them into gear, so I planned the workshop wildflower shoot for our final afternoon. It turns out I’d reasoned right, and a few days of sunlight was indeed exactly what the doctor ordered.
I found this solitary poppy jutting from a rocky wall in the Merced River Canyon, about 10 miles west of Yosemite Valley. I was especially drawn to the flower’s warm glow, but no matter how I framed it, the rest of the scene was ugly rock, brown dirt, and scraggly weeds.
I’d armed myself this afternoon with my Sony a7R V camera and Sony 100-400 GM lens; to focus closer, I’d also added two extension tubes totaling 26mm. Though it was only mid-afternoon, with the sun well into its daily descent, the shadows were already stretching deep into nearby nooks and crannies.
After studying the scene, I lowered my tripod and positioned my camera beneath the flower for the best view of its backlit, glowing petals. Instead of trying to make the scene look the way I saw it, I took advantage of my camera’s “limited” dynamic range and underexposed enough to blacken the superfluous background detail. The result is this simple image (which required very little processing, BTW) that, while nothing like what my eyes saw, contains only the elements of the scene I was interested in: the glowing poppy and its softly lit stem on a canvas of black shadow.
Workshop Schedule || Purchase Prints || Instagram
Leveraging Light


")


")


Distilling the Essence
Posted on April 2, 2023

Frozen, Skógafoss, Iceland
Sony a7R V
Sony 100-400 GM
ISO 100
f/10
1/13 second
The art of subtraction
Presented with a complex world, the nature photographer’s job is to identify a scene’s visually interesting elements and figure out how to use them in an image. While most photographers have no problem seeing what to include in their images, many struggle with what to leave out. But the best pictures usually work at least as much for what’s not in them as for what’s in them.
That’s because, as much as we seek beauty to add to our images, photography is ultimately an art of subtraction. Our ability to ruthlessly subtract elements that, despite their inherent visual appeal, don’t serve the image is an important skill that’s worth cultivating.
When I look back at old images that somehow ended up pleasing me less than the scene excited me when I photographed it (we’ve all been there, right?), I see now that often the problem was that I included too much. The product of my failure was an image with visual busyness that distracted from the main point, or that completely lacked a point, and confused viewers: “What am I supposed to be looking at here?”
As my photography evolved, I started identifying ways to distill complex scenes. One approach is through careful use of exposure variables to manage what I call photography’s “creative triad”: motion, depth, and light—motion blur to smooth turbulent or choppy water; focus blur to soften background and foreground distractions; and silhouette or high key exposure to erase unwanted elements and simplify the scene to just color and shape.
But even before working the creative triad, distilling a scene to its essence requires ruthless (there’s that word again) cropping—simply knowing what to put in, what to leave out, and the confidence (courage) to do it. Start by identifying the elements in the scene that draw the eye. Think in terms of implicit connecting lines that define their relationship to each other. Move around—forward/backward, left/right, up/down—until your prime elements feel organized.
If you’re still not feeling a connection between all of your prime elements, it’s time to start eliminating things—you can always return to that beautiful subject you composed out and feature it in another composition. And if you’re still not finding visual coherence, don’t be afraid to just click an image, stand back and evaluate it on your camera’s LCD screen, and adjust. Then repeat as necessary.
Try this
One simple way to exercise this skill is with the Crop tool in Photoshop or Lightroom. Start with any image (your own or someone else’s—the goal is to train your eye, not to create an image you’ll use), open it in your image processing software of choice (I use Photoshop for this exercise), set the Crop tool to 2/3 aspect ratio (or whatever your camera uses), and see how many new images you can find in the original. Whether the source image was horizontal or vertical, use both orientations of the Crop tool. Again, this is an exercise to train your eye, not to create a usable image, but I’m confident that you’ll find this new vision translates to your viewfinder when you’re in the field.
You can do the same thing on location with a telephoto lens. After you feel like you’ve exhausted all of a scene’s wide options, remove the camera from the tripod, increase your focal length by zooming tighter or switching to a longer lens, and slowly pan with your eye to the viewfinder. Closely monitor your reaction to what you see and honor any urge to stop. The goal isn’t to forgo wide angle compositions, it’s to help identify the scene’s essence, those visual aspects of the scene that matter most. I think you’ll be surprised by what you find (what your eyes originally missed).
For example

Winter Rainbow, Skógafoss, Iceland
Too often we get so caught up in a scene’s grandeur and miss the details that make it special. Most nature photographers when presented with a grand scene go straight to a wide angle lens—a perfectly valid way to start. The problem is, once we feel like we’ve nailed the wide shot, we move on—even if not physically, then at least mentally.
After a long drive from Iceland’s Snæfellsnes Peninsula, still basking in the thrill of the previous night’s aurora show (and oblivious to the show we’d enjoy that night), the Iceland workshop group wasn’t really thinking about much but getting comfortable at our hotel in Vik. But anyone arriving at Skógafoss near Iceland’s South Coast on this January afternoon couldn’t help being excited by the scene’s beauty.
Always an impressive waterfall for the massive amounts of water it dispenses, recent extreme cold (even for Iceland) had turned the abundant mist saturating the surrounding rocks into an icicle convention. But the real eye candy that grabbed everyone’s instant attention was the rainbow ebbing and flowing with the wind above the fall—one second it was there, the next it was gone.
Reinvigorated, we all charged from the bus and “rushed” as fast as our crampons could navigate the frozen path. Wanting to capture all this scene’s beauty, I instantly reached for my Sony α1 which was preloaded with my Sony 16 – 35 f/2.8 GM lens. Each time the rainbow appeared I clicked like crazy, trying a variety of wide compositions and continuing until shadow overtook the fall and the rainbow disappeared for good.
It would have been so easy to be satisfied with my bounty and retreat to the comfortable warmth of the bus. But before leaving I took a few seconds to scrutinize the surrounding ice more closely. And the longer I looked, the more I realized that I was seeing something truly special. I grabbed my Sony a7R V, attached my Sony 100-400 GM lens, and started panning the scene, finally stopping on this beautiful natural ice sculpture.
After attaching my camera to my tripod, I spent the next 20 minutes repositioning, then deliberately clicking and refining, until I was satisfied that I’d found the right location and framing. In the wider image with the rainbow, this section of ice was still illuminated by low, warm sunlight that created deep shadows and bright highlights. But by the time I landed on this composition, the sunlight was gone and all the ice was bathed in cool, soft shadow with minimal contrast.
This is another one of those simple images that probably won’t generate a swarm of social media attention, but it makes me happy because it taps one of the prime reasons I’m a photographer: to reveal Nature’s exquisite intricacies that are often overlooked in favor of more in-your-face beauty.
Workshop Schedule || Purchase Prints || Instagram
Essence Distilled
Click any image to scroll through the gallery LARGE


, California")


Spring is a State of Mind
Posted on March 20, 2023
Rainy Day Poppy, Sierra Foothills, California
Sony a7R III
Sony 100-400 GM
Sony 2X Teleconverter + extension tubes
ISO 1600
f/11
1/125 second
According to the calendar, today is the first day of spring—so…, Happy Spring! On the other hand, here in Northern California Mother Nature is delivering very mixed signals. A few trees are blooming, and every few days the sun pops out long enough to forgo a jacket or sweater—but the rain still seems to be coming several times a week, which means (lots of) snow is still falling in the mountains. And the temperatures remain chilly enough that I’ve only dared a short-sleeve shirt once, and my shorts and sandals are still buried in the closet.
Attempting to jumpstart spring, on Saturday my wife and I took advantage of a brief break between storms to drive up into the foothills to check out some of my favorite poppy spots. Usually by mid-March I’ve made this foothills trip several times and am deep into processing the year’s poppy bounty. But on Saturday’s drive we didn’t see a single poppy. Not. One. Poppy. While I was a little disappointed, I certainly wasn’t surprised.
Despite the wildflower shutout, it was a nice drive, and with definite hints of spring. We saw some blue sky, lots of water in the creeks, and hills covered with that happy emerald green that’s only possible in spring (Californians know what I’m talking about).

Poppy Hillside, Highway 49, California Gold Country
Our first stop was the site of what remains one of my favorite, and most successful, poppy images. We found the hillside blanketed with peak green, but no poppies. We stayed long enough for me to pull up the picture on my phone and try to figure out where I’d stood for this shot. The fence persists in a similar state of skewed dilapidation, and as my eyes followed its line I mentally relived scaling the deceptively steep hillside. So steep, in fact, that I jettisoned gear to make it up the steepest spot.
A short distance down the hill from this spot is a road that has been the source of many of my favorite poppy images. Sadly, when we got there we found it gated with a “Road Closed” sign, an all too common site this year. This was the final nail in this year’s poppy photography coffin.
But I wasn’t going to go down easy because all this nostalgia really got my poppy juices flowing. So, with no new poppy images to work on, the next day I decided to dig into the archives and try to uncover some I’d missed in previous years. Since I often don’t have time to process everything from any given shoot, I was hopeful that I wouldn’t need to look too long. Starting with a search of processed poppy images, I quickly identified a rainy day shoot from a few years ago that had potential for untapped opportunities.
It actually rained lightly the entire time I was out there, but some of my favorite photography has happened in the rain. And even though poppies don’t usually open when it rains, I found the raindrops more than enough compensation. And with rain gear in my car for just these situations, I stayed warm and dry. My camera? Not so much. I tried working with an umbrella, but after a few minutes realized I was one arm short and just decided to test the water resistance of my Sony a7RIII. I’m happy to say that it passed with flying colors.
A couple of years ago I wrote an article for “Outdoor Photographer” magazine on what I call creative selective focus. (You can read my blog version of this article here.) In it I write about using minimal depth of field to emphasize very select aspects of a scene, and letting the surrounding scene retreat to a complimentary blur.
If you read the article, you know the 3 primary factors for minimizing depth of field: large aperture (small f-number), long focal length, and close focus point. While I could have used my Sony 90mm f/2.8 macro, for close focus photography I really like the compositional flexibility of a zoom lens, so this afternoon I went with my Sony 100-400 GM lens. To increase my focal length (and shrink my depth of field) further, I added my 2X teleconverter (which, I might add, handled the rain perfectly as well). And to focus even closer, I added 26mm of extension. My original plan was try a few lens/extension-tube/teleconverter configurations (including my macro), but I was having so much fun that I ended up shooting with this setup the entire time.
There’s no free lunch in photography—the downside of adding a teleconverter and extension tubes is significantly reduced light. A 2x teleconverter cuts two stops of light, which means my 100-400 that’s normally wide upon f/5.6 at 400mm, wide open becomes f/11. To compensate for light lost to the smaller aperture, added extension, and a cloudy sky, I shot everything this afternoon at either ISO 1600 or ISO 3200 (grateful that there was no wind).
One of the cool things about this kind of photography is how different the world looks through the viewfinder. I love putting my eye to my camera, moving the lens around, and changing focus slowly to see what snaps into view. In this case I was looking for poppies to isolate from their surroundings, as well as nearby features (like other poppies) that I could soften enough to complement my primary subject without competing. Sometimes I had a general idea of a subject before looking through my camera, other times I’d just explore with my eye to my viewfinder until something stopped me.
Because depth of field shrinks not only with focal length, but also with focus distance, every frame I clicked this afternoon had a paper-thin range of sharpness. With such a shallow depth of field, none of these images would have been possible without a tripod. With my composition set on my tripod, I’d pick a focus point (usually, but not always, a prominent raindrop), focus in my viewfinder until I was pretty certain it was sharp, then magnify the focus point in my viewfinder to confirm and tweak the focus.
I finally called it quits when the rain picked up and the approaching twilight forced too much shutter speed compromise.
Workshop Schedule || Purchase Prints || Instagram
My Favorite Poppies


Perfect Timing
Posted on March 14, 2023

Big Moon, Mt. Williamson, California
Sony α1
Sony 200-600 G
Sony 2x teleconverter
ISO 800
f/13
1/500 second
In the Alabama Hills to photograph sunrise in neck-craning proximity to the Sierra Crest, I knew precisely what time, on this date, the sun’s first rays would color the towering granite, and exactly when a 98% moon would would disappear behind the left flank of Mt. Williamson, California’s second highest peak.
Clocks and calendars enable us to time some aspects of our lives, like sunrises and moonsets, to within microseconds. But when I scheduled this sunrise moonset more than a year ago, I had no idea whether the sky would be clear, perhaps feature a few clouds that would catch the sunrise hues, or be completely filled with overcast that would block sunlight and hide the moon. I didn’t know how much snow would drape the peaks, or whether the peaks even would be visible at all.
Clocks and calendars are essential, but as a self-employed landscape photographer, I’m beholden to far more fundamental constructs than the bustling majority is. I work when there’s work to be worked, and play when (fingers crossed) there’s play to be played. The business side of my life sometimes requires a clock and calendar, but the actual photography part is governed by fundamental laws of nature that transcend the rest of the world’s clocks and calendars.
The irrelevance of conventional time measurement is never more clear than immediately following a time change. On the second Sunday of each March, when “normal” people moan about lost sleep and having to rise an hour earlier, the sun thumbs its nose at Daylight Saving Time and rises a mere minute (or so) earlier than it did the day before. So do I. And on the first Sunday of November, as others bask in their extra hour of sleep, I’ll get to sleep an entire minute longer. Yippee.
The immutable natural laws that are the foundation of our clocks and calendars, that keep the world on schedule and enable us to precisely predict events like sunrise/sunset, the moon’s phase and position, as well as countless other celestial phenomena, are also solely responsible for the uncertainty that torments the lives of landscape photographers. While I can’t tell you what thrills me more, the impeccably punctual appearance (or disappearance) of a full moon, or the unpredictable explosion of a lightning bolt, I find it ironic that the precision of a moonset and the (apparent) randomness of a lightning strike are ultimately the product of the same celestial choreography.
Earth’s rotation on its inclined axis and revolution about the Sun, the Moon’s monthly journey around Earth, are are timed to microseconds. But this celestial dance also drives the atmospheric and tidal machinations that generate weather, stir oceans, and make every day unique and unpredictable.
This year the mercurial photography gods smiled on me and my Death Valley workshop group. For our 3 days in Death Valley, instead of the blank blue sky that often greets me here, we had a wonderful mix of clouds and sky—enough clouds to make the sky interesting, but enough sky to allow the sun to color the clouds at sunrise and sunset.
On the workshop’s penultimate day we drove to Lone Pine to wrap up with a sunset and sunrise shoot in the Alabama Hills. The highlight of this trip is always the Alabama Hills sunrise that I try to accent with the moon, just a day past full, setting behind the Sierra Crest. But this is winter, and these are the Sierra Mountains, so success is far from guaranteed.
A few years ago I drove to Yosemite on New Year’s Eve (because what else is there to do on New Year’s Eve?) to photograph a full moon rising between El Capitan and Half Dome. After a successful shoot (nearly thwarted by clouds), I hopped in my car and made the 6 1/2 hour drive to Lone Pine to photograph the moon setting behind Mt. Whitney.
I’d picked out a location along Highway 136 where I could align the moon and Mt. Whitney, and far enough back to allow an extreme telephoto big moon while still including all of Whitney. I went to bed really looking forward to this opportunity to get an image I’d thought about for years, and woke to clouds that completely obscured the moon and Sierra Crest. With nothing better to do, I still drove out to my spot, and even caught a very brief glimpse of the moon about 1/2 hour before zero-hour, but ended up not clicking a single frame. Such are the travails of anyone who pins their hopes on Nature’s fickle whims.
My plan this morning was far less grand. Since I was leading a workshop group, the goal was to get everyone in place for the best possible photography, not to assuage my own failed moonset wounds. And the good fortune that blessed us in Death Valley followed us to Lone Pine. (You can read more about this morning here.) In addition to a clear view of the moon and mountains, I was especially grateful to find the entire Sierra Crest frosted top-to-bottom with snow.
My photography day began in near darkness with my Sony a7R V and Sony 100-400 GM lens, photographing the descending moon throughout the morning’s many stages of advancing light. My starting focal length was 100mm, wide enough to include some of the Alabama Hills, then went progressively tighter as the moon dropped.
My favorite big moon images don’t usually happen until the moon is within a moon-width of the horizon, but I like to give myself a little wiggle room to get the composition balanced and focus just right. So when the moon got about 3 diameters from Mt. Williamson, I turned to my Sony α1, which was standing by with my Sony 200-600 G lens and Sony 2X Teleconverter already attached. And while 3 moon diameters might sound like a reasonable cushion, if you want to appreciate the speed at which the moon transits the sky, try pointing 1200mm at it and keeping it in your frame.
I love my Really Right Stuff Ascend tripod, but because the camera-shake margin of error is microscopic at 1200mm, I had the α1 pre-mounted on my (much more robust) RRS 24L Tripod with the RRS BH-55 ball head (carrying 2 tripods is a luxury I allow myself when I don’t have to fly to my location). I bumped to ISO 800 for a 1/500 second shutter speed, and switched from my standard 2-second timer (beep, beep, beep, BEEEEEEP—the Sony mating call) to a 5-second timer (I’m not crazy about any of Sony’s remote options, wired or wireless), to give the whole setup plenty of time to settle down—probably overkill, but I was taking no chances.
With my composition ready and focused, I just let the moon slide through my frame and started clicking. The alpenglow on Mt. Williamson was just about peaking when to moon first touched it. Perfect timing.
Workshop Schedule || Purchase Prints|| Instagram
More Massive Moons
Click any image to scroll through the gallery LARGE


")

It’s All About the People
Posted on March 6, 2023

Swoosh, Northern Lights Over Kirkjufell, Iceland
Sony a7R V
Sony 12-24 GM
5 seconds
F/2.8
ISO 6400
As I’ve made abundantly clear in earlier blog posts, 2023 started with my busiest ever workshop stretch. But I’ve finally reached enough of a lull in my schedule to start processing the fruits of all this labor—not nonstop, but maybe one or two images a day if I’m lucky. Part of me feels a little overwhelmed by how how long it could take at that rate, especially since I’m just two months into the year with many more trips ahead. But another part of me looks at the things I’ve seen and photographed and remembers how uncertain I was when I turned my stable life upside-down to start leading photo workshops. If you’d have told me that in 17 years I’d have more images than I have time to process, I’d have taken it with no questions asked, so no complaints.
To say that leading photo workshops has exceeded my expectations would be a vast understatement. I came into it with 20 years of technical communications experience (teaching a programming language, tech writing, and tech support), and thirty years as a serious amateur photographer. And as a California native who grew up camping, backpacking, and (later) photographing all of my initial workshop locations (Yosemite, Eastern Sierra, Death Valley), I was intimately familiar with my subjects. Piece of cake, right?
That said, since photo workshops weren’t really much of a thing 17 years ago, I was totally winging it when I started. Having never actually taken a photo workshop myself, I didn’t even have a template for how it should be done, so I just structured mine the way I thought I’d like a workshop to be run if I were to attend one. Since then I’ve learned so much—and of course much of what I’ve learned is stuff I didn’t even know that I didn’t know. (For example, walkie-talkies seemed like a good idea, so I invested in 15 of them and now have a box of 15 once-used walkie-talkies somewhere in my garage.)
A big unknown for me was the people part of the equation—I like people, but (perhaps you’ve noticed) people can be difficult. Would every group have a difficult person (or two, or three, or…), and how would I handle them? I mean, no longer would I be lecturing programmers and IT geeks in an air conditioned training room, delivering a canned presentation I’d offered countless times before. Leading photo workshops would mean herding a group of individuals with a broad range of fitness, skill, equipment, expectations, and needs, through remote areas in extreme, unpredictable conditions. What could possibly go wrong?
It turns out, not too much. First, I’ve always felt that my best photography memories often come in the most extreme conditions. And guess what—it turns out most other photographers feel the same way, and will gladly endure extreme conditions in exchange for great photography. They’ll also forgive difficult conditions that prevent potentially great photography: a downpour that makes photography impossible, clear skies that bathe beautiful scenery in harsh light, clouds that block a much anticipated moonrise, and so on.
But what about basic human diversity? Surely attempting to integrate a bunch of people with so many differences would be a recipe for disaster. Concerned about mixing struggling beginners with impatient experts, I originally toyed with the idea of minimum equipment and experience requirements. What a mistake that would have been. While most of my workshops include photography skills ranging from enthusiastic beginner to experienced pro or semi-pro, rather than generating tension, these differences have created a synergy, as it turns out most experts love sharing their knowledge and experience with those who need it.
Of course diversity encompasses more than photography skill. I’ve had workshop participants from nearly every continent (no penguins so far), and (I’m pretty sure) every state in the U.S. My workshop participants have been, in no particular order, musicians, computer professionals, artists, physicians, writers, lawyers, corporate executives, electricians, accountants, bond traders, active and retired military, other professional photographers, real estate agents, clergy, stay-at-home dads and moms, a classical composer, a Hollywood graphic artist, and a Hooters girl (a very sweet young lady who would completely dash any preconceived impression of what that might mean). In one workshop I had a rocket scientist and a brain surgeon. I’ve gotten to know a woman who biked across America, and a man who hiked the entire Pacific Crest trail. I’ve had (many) gay and lesbian couples, outspoken liberals and conservatives, a couple of people in a wheelchair, a man in the final stages of cancer, the patriarch of a family that endured one of America’s most public (and irrational) scandals, and a 9/11 survivor. So it’s not hyperbole to say that I’ve learned as much from my students as they’ve learned from me.
The common denominator connecting all this disparity? A passion for photography that unites strangers long enough to overcome superficial differences and appreciate deeper similarities: a love of family, friendship, nature, sharing, and laughter.
Of course it hasn’t all been a Disney movie. One question that comes up from time to time is whether I’ve ever had anyone attend a workshop who I would not allow in a future workshop. For a long time my answer was an immediate and emphatic, No, everyone’s been great. About 8 years ago one person changed that answer, but fortunately that turned out to be a one-off situation that hasn’t been repeated. (And thankfully that person has not attempted to sign up for another workshop.)
The bottom line is that a successful photo workshop is more about its people than it is about the location and conditions. My job is to create an environment that fosters connection, guide them to the best photography possible, then step back and let the participants themselves enjoy each other.
About this image

Swoosh, Northern Lights Over Kirkjufell, Iceland
Of course great locations and conditions can certainly contribute to the happiness factor, and nothing makes a group happier than photographing the spectacular sights they signed up for in the first place.
I’ve already shared a couple of northern lights images from the first of the two Iceland workshops Don Smith and I did in January. Both of those images came from the workshop’s third night of photography, which I called the most spectacular aurora display I’ve ever witnessed. But after spending more time with my images from the previous night, I’m thinking maybe that proclamation was a little too hasty. But anyway, it’s not a competition, so who cares?
On our first night the group was completely shutout by an overcast sky. It didn’t help that later that night I got a text from an Icelandic friend congratulating me on getting the northern lights on the workshop’s first night, and I had to reply that unlike his vantage point in Reykjavik, we had wall-to-wall clouds up on the Snæfellsnes Peninsula.
While the aurora forecast was also good for our second night, the clouds persisted all day. But with clearing forecast that night, we ate dinner at a restaurant just a few minutes from Kirkjufell, then kept an eye on the sky. While waiting for the clouds to part after dinner, we got to watch Iceland’s handball team compete in the handball equivalent of the World Cup. I played a little handball in high school, this is a completely different sport (something like a soccer/basketball hybrid) that is clearly a huge deal in Iceland because half the town was crowded into this little pizza place to watch it. (It’s really a lot of fun to watch and many of us in the group got into it enough that we watched Iceland’s remaining tournament games as well.) But anyway…
The sky was just starting to clear when the game ended; by the time our bus parked at Kirkjufell the lights were dancing in all directions and we raced to the view as fast as our crampons would take us. Since this was most of the group’s first northern lights experience, I spent a few minutes getting people situated with exposure and focus. It was nice that we were the only ones out there (when we started), so everyone was free to spread out and make their own compositions.
Looking up at the variety of colors and ever-shifting forms felt like standing inside a celestial lava lamp. I started with my Sony a1 and Sony 20mm f/1.8 G lens, but the lights covered so much sky that I soon switched to my Sony a7R V, which I’d pre-loaded with my Sony 12 – 24 f/2.8 GM lens.
I moved around based on where the display was best at the moment, most of the time trying to align the aurora with Kirkjufell, but at one point I dropped down to the bottom of the slope and shot in the other direction to capture fanning shafts in the sky above Kirkjufellsfoss (the waterfall). When a magnificent arcing beam stretched across the northern sky, starting in the northeast and continuing out toward the western horizon, I was extremely grateful to have a wide enough focal length to capture the entire arc with Kirkjufell.
Though the temperature was about 10 degrees, with a 20+ MPH wind (and gusts closer to 40 MPH), I hardly noticed the cold. And I suspect no one else did either, because I didn’t hear a single complaint.
Join Don Smith and me for our next aurora chasing adventure
Workshop Schedule || Purchase Prints || Instagram
2023 So Far
Click any image to scroll through the gallery LARGE


Blessings
Posted on February 20, 2023

Aurora Ribbons, Dyrhólaey Coastline, Iceland
Sony α1
Sony 12-24 GM
10 seconds
F/2.8
ISO 3200
I just wrapped up what was no doubt the most intense work/travel stretch of my 17 years leading photo workshops. It started the second week of January with 3 weeks in Iceland leading 2 workshops with Don Smith (with no break in between). After the long flight home (that’s a story for different day), I had just one day to recover before driving nine hours to Death Valley (still very much jet lagged) for another workshop that started the next day. Returning from Death Valley, I actually had a few days to lick my wounds before heading off to Yosemite for my Horsetail Fall workshop (with crowds that make it pretty intense by itself).
I have no one to blame but myself for this schedule (it seemed like such a good idea at the time). And I won’t say that I’m not looking forward to a few weeks off before my next workshop. But honestly, I’d do it all again in a heartbeat. And I should also say that despite appearances to the contrary, I’m actually home far more than I’m on the road, and when I’m home, I’m really home (unless I’m at Starbucks, without a lot of places I’m expected to be. So don’t feel too sorry for me.
The people I get to share my workshops with are constant source of energy and joy that sustains me through these difficult stretches. But today I’m (selfishly) thinking about the bucket-list worthy sights and locations my frequently nomadic life has afforded me. It’s an exercise I try to go through regularly to avoid taking my many blessings for granted.
I’m thinking about this right now because I returned just a few days ago from another Horsetail Fall workshop, where I could be at serious risk of taking for granted a truly beautiful and unique spectacle that I’ve seen literally dozens of times, but that is a genuine bucket list experience for so many others.
One way I try to avoid taking my blessing for granted is to revisit my annual Highlights galleries: 2016, 2017, 2018, 2019, 2020, 2021, 2022. I love creating these galleries not only because the process reminds me of the sights I’ve seen over the past year, but also because it gets me excited for the still unknown sights in the upcoming year. And each time I revisit them, I’m reminded of how lucky I was to have been witness to such beauty. Invariably, after opening a gallery, I’ll find myself thinking, oh wow, surely this was my best year (not necessarily my best photographs—just my best year for the things I got to see), then I go on to another year and have exactly the same thought.
Another thing this exercise makes pretty clear is the things in Nature that excite me most. I’ve always believed that we each make our best pictures when we follow our heart to the subjects we love most. For me that’s locations to which I feel a personal connection, like Yosemite and Grand Canyon, and natural phenomena like weather and all things celestial. Not so coincidently, these are also the subjects I most love studying and understanding.
For the longest time I would say the most beautiful sight I’d ever witnessed was a comet—I just couldn’t imagine anything matching it. Then in 2017 I witnessed a total solar eclipse and that list became two. Then (I bet you know where I’m going here) I saw the northern lights. So now my most-beautiful list is three.
I’ve seen the northern lights many times since that first experience, but that first one always stood out as the best. But Nature always seems to be trying to top itself, and this year it finally managed. The first Iceland workshop group got two consecutive nights with spectacular northern lights shows—the first night at least matching my previous “best,” the second night topping it.
Because I blogged about that night a few weeks ago, I won’t go into all the details. The image I shared in that earlier post was more of a spontaneous capture away from the best scene, simply because the display was so spectacular. The image I’m sharing today is the scene I spent most of the night pointing at because it had the best combination of foreground and aurora display. The dancing lights changed so much from one minute to the next that I could pluck any one of dozens of images from this scene, label it “best,” and get no argument.
Workshop Schedule || Purchase Prints || Instagram
A Few of My Many Blessings


, Yosemite")


Transcending the Trophy
Posted on February 7, 2023
 Wonderland, Golden Circle, Iceland
Sony a7R V
Sony 12-24 GM
1/40 second
F/11
ISO 200
With the digital-fueled photography renaissance, it seems that the number of trophy destinations has grown proportionally. For example, once no more than an anonymous trickle on El Capitan’s southeast flank, Horsetail Fall now draws thousands of photographers to Yosemite at sunset each February. And long gone are the days of a peaceful midday walk in the quiet coolness of Antelope Canyon.
Because I’ve photographed all of these scenes, and no doubt will continue doing so, I completely understand the urge to bag the trophy shot. They’re trophies because they’re beautiful, and (usually) relatively easy to access. But what puzzles me is why so many photographers pursue trophies to the exclusion of opportunities to create something uniquely their own. To me, the greatest joy of photography isn’t duplicating what others have already done, it’s the search for something new—especially at frequently photographed locations.
That said, I can’t deny that the opportunity to capture a trophy draws many photographers to my workshops. But while I do love helping my workshop students land their trophy, my job doesn’t end there—a significant part of my responsibility is challenging them to not make the trophy shot their goal, make it their starting point. Chances are, I tell them, if a shot is special enough to achieve trophy status, there are lots of other special views and subjects nearby.
Transcending the trophy is a mindset. Once you’ve bagged your trophy, see if you can identify a unique foreground or background, or approach the scene from a different angle. And if the standard view is horizontal, look for something vertical; if it’s wide, try a telephoto—and vice-versa.
And don’t forget that there might be great stuff happening behind you—you’ll never know if you don’t turn around. I try to make a point of checking behind me, but sometimes I need a reminder. For example…
Don Smith and I wrapped up the last day of this year’s back-to-back Iceland photo workshops with an afternoon in the Golden Circle. A recent storm had dumped loads of fresh snow everywhere, a great way to wrap up two fantastic workshops. After spending a couple of hours at massive Gullfoss waterfall, we took the group to Strokkur geyser for our final sunset.
Strokkur is a towering geyser in a beautiful setting. Erupting up to 125 feet every 5 to 10 minutes, Strokkur’s frequency allows many do-overs if you don’t get it right the first (or second, or…) time. This year fast-changing clouds and fresh snow added a new visual dimension I was especially excited to take advantage of.
I think the best shot here is getting the geyser backlit by the setting sun, so I positioned myself accordingly and waited, adjusting my position and composition after each eruption. As the sun set and I prepared for the next eruption, I noticed that our guide Albert Dros was on the other side of the geyser, pointing the exact opposite direction my camera pointed. Normally when I see another photographer not taking what I think is the best shot, I don’t think much of it. But since Albert is such a fantastic photographer, I glanced over my shoulder to see what I was missing. Yikes.
I instantly forgot the geyser, grabbed my gear, and “raced” toward the snow-glazed trees that were now framed by electric pink clouds, and garnished with a dollop of moon. Much to my frustration, the trail was completely coated with ice—since I’d decided to forego the crampons, to avoid falling I could only move about as fast as I do in those dreams when I’m trying to run for my life in a normal speed world, but find I can only move in slow motion (I’m not the only one who has those dreams, right?).
Fortunately, Iceland twilight is slower than any slow-motion dream, and I covered the 50 feet over to this scene with plenty of time to work the composition. I already had my Sony 12 – 24 f/2.8 GM lens mounted on my Sony a7R V, which turned out to be perfect for emphasizing the snowy scene in my immediate foreground, while still maximizing the colorful clouds. Of course this shrunk the moon to almost microscopic proportions—some may disagree, but I kind of love the small moon as a delicate accent to this already magic scene.
Workshop Schedule || Purchase Prints || Instagram
Transcending the Trophy


A River Runs Through It
Posted on January 31, 2023

Sapphire Cathedral, Vatnajökull Glacier Ice Cave, Iceland (vertical)
Sony a7R V
Sony 12-24 GM
.8 seconds
F/18
ISO 50
Among the greatest joys of my photographer’s life is the opportunity to witness rare and exotic beauty I might otherwise have missed. An erupting volcano? Check. The dancing colors of the northern lights? Check. Shafting light in a Southwest slot canyon? Check. Southern Hemisphere night sky? Check. The view from the bottom of the Grand Canyon? Check.
In my California-born-and-raised world, glaciers certainly qualify as beauty both rare and exotic. Fortunately, this photography life takes me to New Zealand, where I get to walk on a glacier, and most recently, to Iceland, where I actually get to walk in a glacier. How cool is that? (Very, actually—no pun intended.)

Sapphire Cathedral, Vatnajökull Glacier, Iceland (horizontal)
Sony a7R V
Sony 12-24 GM
1.3 seconds
F/18
ISO 50
Vatnajökull is the largest glacier in Iceland, and the second largest in Europe. As recently as the 19th Century, Vatnajökull extended all the way to the Atlantic, but thanks to our warming planet, in most places it is now a few miles inland.
As alarming as that is, a consolation prize is the beauty Vatnajökull’s shrinking has produced. Glacier Lagoon is filled with Vatnajökull’s meltwater and decked out in large chunks of calved glacial ice; nearby Diamond Beach is bejeweled with the remnants of the lagoon’s ice; and Sapphire Ice Cave (and its predecessors) was formed in the wake of Vatnajökull’s retreat.
Ice caves are dynamic phenomena that can change noticeably from week-to-week, and over a span of many weeks or months will eventually become unrecognizable. They form when glacial runoff finds, or makes its own, path through glacial ice. Since flowing water is always warmer than the surrounding ice, these voids and channels continue expanding as more ice melts. When the runoff finds a different path, or diminishes in the freezing winter months, the spaces in the ice remain and an ice cave is born (or reborn).
Perhaps the most striking feature of an ice cave is its color. Contrary to popular opinion, this blueness is not reflected color from the sky, but from an inherent quality of the ice itself. Snow is opaque, but centuries of pressure from snow accumulating above compresses the older underlying snow, forcing out air and leaving only translucent ice crystals. As sunlight passes through these ice crystals, all but the shortest visible wavelengths are absorbed, allowing only the blue wavelengths to pass through to bless our fortunate eyes.
Each year Don Smith and I take an Iceland photo workshop group to visit the current incarnation of the Vatnajökull ice cave, and each year it’s completely different. So far it has been in more or less the same location for every visit, but this time, using a bridge across a small creek near the entrance as a reference point, I noticed it had retreated at least 100 yards in the last year. The glacier guides say that within a year or two this cave could be inaccessible or completely gone, requiring them to find another ice cave to blaze a tourist path to. (They’re only open to visitors in winter, one more reason winter is my favorite time to visit Iceland.)
With two Iceland workshops this year (still playing COVID catch-up), Don and I visited the Vatnajökull ice cave twice, 9 days apart. This version is dubbed Sapphire Ice Cave by the guides (earlier versions have been Crystal and Diamond), about 9 days apart. This created a great opportunity to compare, contrast, and witness firsthand the gradual changes that accumulate with time to completely end the cave, or transform it into something brand new.
Iceland’s ice caves can be extremely crowded, making photography difficult. In previous years we’ve started well before sunrise to be the first out there, but this year the morning weather didn’t look good, so we switched to late afternoon to be the last people to leave. To lighten my load for the one-mile walk, I pared my camera bag to nothing but my (brand new) Sony a7R V body, Sony 24 – 105 f/4 G lens, Sony 12 – 24 f/2.8 GM lens, and Really Right Stuff Ascend tripod.
Upon arriving with our second group, rather than start shooting immediately, I took a couple of minutes to survey my surroundings and get a handle on what had changed in the last 9 days. The most obvious difference was the river running through the cave. Recent rain, augmented by warmer temperatures, had created mini (and not-so-mini) springs and even a couple small waterfalls that poured in from intra-glacier reservoirs and streams. And then there were the seemingly ubiquitous and aggressive ceiling drips that (given my many layers) were surprisingly adept at targeting my neck and sliding down my spine. All this water united on the cave’s floor to form the shallow but swift river splitting the length of the main chamber before exiting through the main entrance. (This new river made instantly clear the puzzling presence of a makeshift metal bridge spanning nothing but dry rock and dirt on our first visit.)
Soon other differences came into focus: in addition to the flowing water, I noticed subtly altered curves, a few missing or blunted outcrops, and a handful of overhead portals that provided new views to the sky above. At one point during our visit a small rockslide sent several dozen softball-size rocks crashing about 10 feet from an elevated ice shelf, an instant reminder of an ice cave’s perpetual dynamics (and of why visitors are required to wear helmets at all times in the cave).
Our guide, provided by our Iceland guiding service to assist both workshop groups, was fellow Sony Ambassador Albert Dros (Albert is from the Netherlands; Ambassadors in the US are called Sony Artisans), whose energy is matched only by his creativity (check him out). Albert had most of the group occupied photographing Artie, our ice cave driver/guide (yes, there were 4 guides for 12 workshop participants in the ice cave portion of the workshop: Don, Albert, Artie, and me), whom he had drafted as a model to establish scale for everyone’s images.
With a few minutes to myself, I was both ready and able to begin taking actual pictures. I warmed up by attempting to reprise compositions remembered from the earlier visit. But once I became comfortable with the ice cave’s changes, I moved on to new compositions that emphasized those differences.
I started by concentrating on the waterfalls with my 24 – 105 lens, using long-exposure motion blur to help them stand out. But when I noticed that the view beyond the cave entrance was filled with a nice mix of clouds and sky, I saw an opportunity to highlight the ephemeral river (and to test the dynamic range of the a7R V). Time for my 12 – 24 lens.
Setting up shop on the bridge, I started composing versions of the scene you see here, first horizontal, then vertical. It took a few frames, but I eventually found the combination of position on the bridge, tripod height, and left/right framing (at 12mm) that allowed me to include the new natural skylights on the left (with enough distance from the edge), all of the cave’s entrance (and the sky beyond), plus the ideal balance of river and ceiling.
I wanted to smooth the water enough to eliminate distracting (in my opinion) texture freezing the motion would create. Lacking a neutral density filter for the 12 – 24 lens, I stopped down to f/18 and dropped to ISO 50, which allowed a nearly 1-second shutter speed—just slow enough.
The river was in shadow, but the water’s blueness really came out with the extra light my camera was able to capture. As with the ice cave’s color, the color of glacial water also is not simply reflected sky—or in this case, the ice’s blue. Rather, the water’s color is actually determined by the glacial silt it carries.
To understand this, now might be a good time to mention the counterintuitive truth that even receding glaciers move forward. Gravity carries a glacier downhill, but the glacier can still be retreating despite this downhill motion if it melts faster than it advances. As a glacier moves, embedded rock fragments at its base behave like sandpaper, grinding the rock over which it slides into finer and finer particles, the finest of which is called glacial flour. As the glacial meltwater carries all this scoured rock downhill, the heavier particles soon sink, while the finer glacial flour remains suspended in the runoff.
Most of the light striking water infused with glacial flour is absorbed by the fine suspended particles, but the green and blue wavelengths aren’t absorbed; instead they scatter back to our eyes and we are treated to blue, green, or turquoise water. The exact hue of flowing glacial meltwater is determined by the size of the suspended particles and the wavelengths (color) they scatter.
The product of these glacial machinations is the overwhelming blueness you see here.
BTW
I continue to be blown away by the dynamic range of the Sony sensors. As you may know, I never blend images, so the ability to capture with one click the entire range of tones in a scene like this is extremely important to me. On my LCD (jpeg) preview, the shadows in this image looked nearly black, while the highlights appeared hopelessly bright. But I trusted my histogram and the Sony raw file, and a couple of tugs of Lightroom’s Highlights and Shadows sliders validated that trust.
Join Don Smith and Me in Iceland
Workshop Schedule || Purchase Prints || Instagram
Rare and Exotic Beauty (I Might Otherwise Have Missed)
Click any image to scroll through the gallery LARGE


")


