Eloquent Images by Gary Hart
Insight, information, and inspiration for the inquisitive nature photographer
Anchor Management
Posted on August 5, 2018
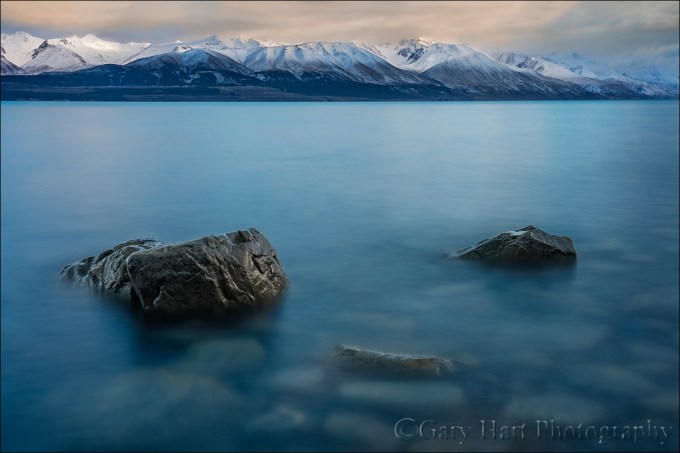
Dawn on the Rocks, Lake Pukaki, New Zealand
Sony a7R III
Sony 24-105 f/4 G
15 seconds
F/18
ISO 50
Virtually every scene I approach with a camera is beautiful, but a beautiful scene is rarely enough for a great image. Human experience of the world differs greatly from what the camera captures—the photographer’s job is to understand and use those differences.
I’ve always felt that viewers of an image are more comfortable exploring the frame—and therefore tend to linger longer with the image—when they have a starting and return place. So the first thing I do when trying to turn a beautiful scene into a beautiful picture is create that place by finding something to anchor my frame. Sometimes this anchor is an object that’s beautiful in its own right (such as a reflection, a flower, or the moon), but often it’s just a grounding element that aligns with the scene’s more striking features.
When I approached this scene on the shore of Lake Pukaki in New Zealand, I was struck first by the rich glacial turquoise water (I’ve seen a few lakes with similar color, but none that were nearly as big as Lake Pukaki), and second by the snowcapped peaks lining the distant shore. And in the pre-sunrise gloaming I could see that the sky was very nice too—maybe not spectacular, but with lots of character in the clouds plus the potential for soft, warm light when the sun finally arrived. Given all the scene had going for it, I probably could have raised my camera and composed something decent from any spot with a view of the lake, but a scene like this deserves something more than decent.
So before advancing any further, I performed my standard scan for something to anchor my frame, a visual element to surround with the scene’s inherent beauty. I was instantly drawn to an area of the beach where a few rocks protruded from the lake and quickly made my way down to the water. At the shore, in addition to the rocks that drew me I found a striking mosaic of rocks submerged beneath the clear water. A bonus for sure, but as beautiful as these submerged rocks were, as I tried to get all the visual pieces to fit together I quickly realized that they introduced a layer of complication as well.
For the next 10 or 15 minutes I wandered the lakeshore experimenting with compositions that used a variety of foreground rock combinations, but couldn’t really find anything that thrilled me. I’d click a frame or two, evaluate the result, but just couldn’t seem to organize all the foreground rocks with the mountains and sky to form something coherent.
But this wasn’t the time to become discouraged. I knew something was here and continued experimenting, hoping to find it before the light changed. As the sky brightened, I settled on the trio of rocks you see in this image. They aligned nicely with the mountains, better than anything else I’d found so far. But they were also orbited by a disorganized arrangement of satellite rocks that competed with the simple foreground I sought. I moved closer, extending my tripod as far into the water as I could, then dropped low and composed a fairly tight frame.
Eliminating the superfluous rocks made my foreground all about the rock trio, and with a few tweaks (preliminary frames followed by adjustments) arrived at the composition you see here. At this point the rocks were just a few feet from my camera, making depth of field a concern. Assisted by my hyperfocal app, I stopped down to f/18 and focused at the back of the farthest rock, taking only a couple of frames before I was confident my hyperfocal distance was dialed in.
The final piece of the puzzle was dealing with the chop in the water. Sometimes water motion can be a feature and I try to find a middle ground that softens it while retaining a bit of shape or texture. In this case I wanted simplicity, and felt that anything that wasn’t mountains, rocks, or color would be a distraction. The solution was to smooth the water as much as possible with a 15-second shutter speed.
There’s nothing inherently special about the rocks I used to anchor this image. The scene’s true beauty lies in the water and mountains, but if I’d have settled for an image that was just water and mountains, there would have been nowhere for your eye to land. Adding a simple foreground element to anchor my frame serves as a visual launching pad from which you’re free to explore the rest of this beautiful scene.
Join Don Smith and Me in New Zealand
Visual Anchors
Click an image for a closer look and slide show. Refresh the window to reorder the display.


Off to a great start
Posted on July 10, 2018
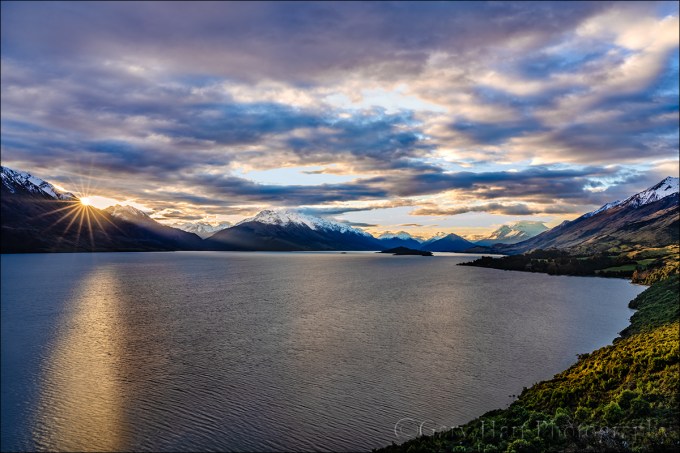
Last Light, Lake Wakatipu, New Zealand
Sony a7R III
Sony 24-105 f/4 G
.8 seconds
F/18
ISO 50
It’s a little ironic that on my first day back from New Zealand, I’m (finally) starting a blog post about the start of my winter workshops there. When I departed for New Zealand about a month ago, I had the best intentions to post several times per week, but soon realized there was going to be precious little time for that. I’ve processed a few images from the trip, but have only just scratched the surface of what I’m certain will turn out to be the most photographically rewarding four weeks of my life. But the rewards of this trip turned out to be so much more than photographic, and I have some great stories to share.
First, a little background
I’ve been leading photo workshops for a dozen years. From the outset my friend and fellow pro photographer Don Smith and I have had a reciprocal workshop relationship: he assists a few of my workshops, and I assist a like number of his workshops. In 2013 Don and I added a collaborative workshop at the Grand Canyon during the monsoon season (lightning photography)—instead of the workshop being owned by one and assisted by the other, we share the planning, marketing, and leading responsibilities 50/50. The Grand Canyon workshop became so successful (and enjoyable for both of us) that we’ve since added collaborative workshops at the Columbia River Gorge and on the Oregon Coast.
The next frontier
The New Zealand workshops take our collaborative workshop model to a new level. Not only are they our first international workshops, they’re much longer and more immersive. We’ve always provided lodging, but for New Zealand we added transportation (including a driver) and many meals.
Organizing a 10-day, 5 town workshop half-way around the world adds unprecedented layers of complications. Not just finding the best photo locations with good backups for weather closures, but also arranging lodging, meals, and permits. Though we’d scouted our locations thoroughly, had the permits, lodging, meals, and transportation arranged, we had no idea what it would be like photographing, eating, and traveling with a group for many consecutive hours, every day for 10 days. It turns out that our anxiety was completely unfounded.
It’s a sign
After the workshop orientation we hit Glenorchy Road on the shores of Lake Wakatipu for our first sunset shoot. Following a preliminary stop at Wilson Bay, where we were treated to beautiful light on the peaks across the lake, we headed farther down the road to our sunset destination—a spectacular view of the Humboldt Mountains (among others) above the lake. The sky looked especially promising for something special, so as we drove I gave everyone a quick primer on photographing a sunstar.
We pulled up to the vista just before the sun dropped out of the clouds. With just a few minutes until it disappeared behind the mountains, everyone scrambled out of the Sprinter (the 16-passenger Mercedes van that would be our chariot for the next 10 days) and set up. The sunstar window opened and closed quickly, but it was followed by a show of color and light that turned out to be a harbinger of upcoming good fortune.
I haven’t processed those images yet, so I’m sharing this one from the previous sunset, when I photographed a sunstar from the same location. (Honestly, the group got a much better sunset than this one.)
Why winter?
Ever since Don and I scheduled this workshop, I’ve had to answer the “Why winter?” question. Most photographers get it—not only does the lower sun angle make the light better, the mountains are covered with snow, and I’ve always felt that winter weather makes great skies. And a New Zealand South Island winter isn’t much different from the kinds of winters we get in Northern California and Oregon. During the four weeks we were in New Zealand, we dealt with lows in the 20s and 30s, and highs in the 40s and 50s—cold, but unlike the summer heat most of you endured while I was in New Zealand, nothing that couldn’t be easily handled with the right clothing.
Over the next few weeks I hope to share enough New Zealand winter images that I hope will further prove my point. Until then, below you’ll find a collection of winter images, from a variety of locations, for a little vicarious cooling on a hot summer day.
New Zealand 2019
A Winter Gallery
Click an image for a closer look and slide show. Refresh the window to reorder the display.


Escaping Summer
Posted on July 2, 2018

Dawn on the Rocks, Lake Wakatipu, New Zealand
Sony a7R III
Sony 16-35 f/2.8 GM
Breakthrough 6-stop ND filter
15 seconds
F/16
ISO 50
(If you subscribe to my Image of the Month e-mail and this post seems familiar, it’s because I borrowed the text from my June message.)
I just checked the date of my last post, I couldn’t believe how long it’s been. But I have a good excuse, I swear: I’ve been busy. Busy taking pictures, busy leading workshops, busy checking in and out of hotels, busy staying warm (really)….
But I’m not complaining—not even close. For the last three weeks I’ve been in New Zealand. The day I left home, the high temperature in Sacramento was 100 degrees. Less than twenty-four hours later I deplaned in Queenstown, New Zealand to a refreshing 40 degrees (or, as we say Down Under, 5 degrees). While this winter chill is a nice bonus, I’m here on New Zealand’s South Island mostly because winter is hands-down the best time to photograph this spectacular country. Last Thursday (or, as you say Up Over, Wednesday) Don Smith and I wrapped up our first ever New Zealand Winter workshop, but after two weeks of down jackets and wool hats, I’m not ready to return to summer, not even close.
It’s impossible to pick my favorite thing about this trip. I could cite the all-day cruises on Doubtful Sound (though we learned it should really be named Doubtful Fjord), plowing through glassy water framed by towering cliffs and plunging waterfalls, and shadowed by leaping dolphins. Or the breathtaking helicopter ride onto Fox Glacier, where we explored blue ice-caves, climbed through gaping crevices, and observed firsthand that a glacier is so much more than a featureless sheet of ice.
But it’s not just about the big stuff here in “Lord of the Rings” land. Something else that’s starting to sink in about New Zealand is the routine beauty that’s pretty much everywhere I look. Snow-capped peaks in all directions, daily sunrises and sunsets that become almost monotonous in their beauty, and pristine glacial lakes and streams with blues and greens that rival anything in the Canadian Rockies.
This image is from last Thursday’s sunrise, our first workshop’s final shoot. Carved thousands of years ago by massive glaciers, Lake Wakatipu is one of New Zealand’s largest lakes. Arriving just as the first hints of dawn touched the clouds, we watched the scene slowly materialize out of the darkness like a developing Polaroid. The snowy peaks appeared first, followed soon by textured clouds above the turquoise lake. As the sky brightened further, the opaque lakebed transformed into an intricate mosaic of colorful stones.
I moved along the lakeshore until I found a group of protruding rocks to anchor my frame. To emphasize the foreground, I dropped low and framed the scene with a wide lens. I used a neutral density filter to enable an exposure long enough to smooth the gentle waves rippling the lake surface. The long exposure also gave me the opportunity to savor the sublime scene and say a small prayer of gratitude that my trip is not over yet…
Join Don Smith and Me in New Zealand in 2019
New Zealand So Far (believe me, I’m just scratching the surface)
Click an image for a closer look and slide show. Refresh the window to reorder the display.


Search and Rescue
Posted on June 23, 2018

Winter Sun, Lake Tasman, New Zealand
Sony a7R III
Sony 12-24 f/4 G
1/250 second
F/20
ISO 100
I’m five days into the first of two New Zealand winter photo workshops with my friend Don Smith. With such full days down under, it’s hard to find time to post, but I’m doing my best to keep up (and to keep warm). Today I’m in Fox Glacier watching a spectacular electrical storm from the fireside confines of our hotel’s lounge. Yesterday we enjoyed sunrise at the Wanaka Tree, the waterfalls and Blue Pools of Haast Pass, and a short hike through the Lake Matheson rain forest; tomorrow we’ll helicopter onto Fox Glacier….
Don and I arrived in New Zealand last Friday, and spent several days pre-workshop scouting in the Mt. Cook National Park area. Before going on, I should probably clarify what I mean by “pre-workshop scouting”—or more specifically, what I don’t mean. I don’t mean that I show up for a workshop a few days early and hope to find enough shooting locations to keep the group busy. All that work starts years in advance—I never schedule a new workshop until I’m completely comfortable with the destination. For me, comfortable means backup photo spots and backup-backup photo spots. I’m kind of obsessive that way. My worst workshop fear is losing a location to weather or road closures or erupting volcanoes (hmmm, I wonder what made me think of that…), I sleep easier knowing that if a spot were to go down, I have a quality replacement.
But plugging in a viable backup spot also requires a little last-minute knowledge that can often be gained with feet on the ground just a day or two before the workshop. So I always arrive early and run as many (all, if possible) of my workshop locations in advance.
For New Zealand, hitting every one of ten days worth of locations isn’t practical, but in this case Don and I have an advantage because we’ve hired a local driver whose business it is to know every nook and cranny of the South Island. Nevertheless, we came over early to see what the current winter has done (specifically, how much snow and water there is), to add to our bank of potential photo locations, and to get our eyes on a few spots in the Twizel area that were inaccessible on previous visits due to conditions. (Plus, it was a great excuse to spend quality photo time with spectacular scenery.)
But anyway…
Last Saturday Don and I were in Mt. Cook National Park. One photo spot that was inaccessible last year was Lake Tasman, a pristine glacial lake often dotted with floating icebergs. We found the trail to Lake Tasman short but steep, immaculately maintained in typical New Zealand fashion. The hike ends at a vista above the lake, with a visual payoff that’s more than worth any oxygen depravation. As I sized up the scene at trail’s end, a park ranger (or whatever they’re called in New Zealand) trudged up behind me and asked if I could help him out. He explained that he was searching for a missing young woman, but had just been notified via walkie-talkie that the woman’s boyfriend was having a severe panic attack back at the trailhead.
Since David (the ranger) was a search party of one at this point, he had to continue the search. He told me the man’s name was Julian, gave me a brief description, and asked me to check on him and reassure him that an ambulance is on the way. So before clicking a single frame, I found myself hoisting my camera bag back onto my shoulders and beelining back to the trailhead, about a half mile down the hill.
About 100 yards from the bottom, a young woman on her way up stopped me and asked if I’d seen the ranger. When I asked if this had anything to do with the missing person, she told me she was in fact the missing person, and that she’d just reunited with Julian and was trying to catch the ranger to let him know she was no longer lost. I told her what I knew, including where I’d seen David last, and that I would continue down the trail to check on her friend and let him know help was on the way if he still needed it.
I found Julian resting in a shelter at the trailhead and confirmed that he was doing better now that he’d reunited with Sophie. Soon another search and rescue person showed up—when I relayed the status to him, he was able to contact David and tell him to stand down, all is well.
But now Sophie was wandering around who-knows-where trying to locate David. So back up the trail I went to catch her. I briefly considered leaving my camera bag but decided if I was going to go all the way back up there, I at least wanted the option to reward myself with pictures.
On the trail’s final switchback I ran into Sophie and David descending the trail, all smiles. We chatted briefly and I got a quick summary of how Julian and Sophie became separated, Sophie’s wanderings, and how she had taken a minor fall but was uninjured (though she would need a new pair of pants). They learned that Julian was fine and the ambulance had arrived and been turned around. I’m not sure the outcome would have been much different without my contribution, both were nevertheless very appreciative (and I have a story to tell).
Time for a little photography
Crisis resolved, I soon found myself back at the Tasman Lake vista. Unfortunately, the sun had come out and chased away the great light that had greeted my initial arrival, but I decided I wasn’t going to let that stop me. Since it was impossible to create a shot that included as much of the scene as I thought was necessary without also including the sun, I decided to make the sun part of my composition by turning it into a sunstar.
I started with my Sony 16-35 f/2.8 GM on my Sony a7RIII, but soon switched to the 12-24 f/4 G so I could include more of the lake and nearby foreground rocks. I stopped down to f/20 to enhance the sunstar, and since I rarely shoot with the sun smack in the middle of my frame, I bracketed a few exposures to give me options at processing time. Like all my images, this is a single click—no HDR or other blending of multiple images.
Typical of most extreme dynamic range images, this one looked pretty awful on my LCD (nearly black shadows, nearly white sky). The bipolar histogram reflected these extremes, but based on what I saw I was pretty sure I’d be able to recover enough usable detail to save the image. Nevertheless, just to be safe (since I don’t usually feature a the midday sun prominently in my frame), I bracketed a few exposures and chose the one that worked best.
I suppose the lesson here is that rather passing on difficult conditions, sometimes it pays to make the best of the hand you’re dealt. My standard response to a scene like this is to enjoy the view and vow to shoot it again another day. But being (literally) halfway around the world with no other day guaranteed, I decided to search for something I could use. Armed with my great Sony a7RIII sensor, a reliable histogram, and the knowledge to read it, I was able to rescue my image in post and come up with something that works.
Stay tuned for an announcement of the 2019 New Zealand Winter photo workshop….
Workshop Schedule || Purchase Prints
A Sunstar Gallery


(Sometimes) I’d Rather Be Lucky Than Good
Posted on June 3, 2018

Big Dipper Reflection, Colorado River, Grand Canyon
Sony a7S II
Sony 16-35 f/2.8 GM
20 seconds
F/2.8
ISO 12800

Grand Night, Milky Way Above the Colorado River, Grand Canyon Sony a7S II Rokinon 24mm f/1.4 20 seconds F/1.4 ISO 6400
It was 4:00 a.m. and I’d spent the last two hours photographing the Milky Way’s brilliant core above the Colorado River. In about 75 minutes the guides would be ringing the “coffee’s ready” gong, signaling the start of another day at the bottom of the Grand Canyon. Collapsing my tripod, I performed a little mental math and found slight relief in the knowledge that I might be able to squeeze in one more hour of sleep. That relief vanished in the time it took to turn and glance toward the northern sky and see the Big Dipper, suspended like a celestial mobile in the notch separating the canyon walls.
My Milky Way position had been chosen for its unobstructed view of the southern sky; the best view of the Big Dipper was clear across the campsite, at a sheltered pool just beyond our rafts. The moonless night sky at the bottom of the Grand Canyon is so dark that the Milky Way casts a slight shadow, but once your eyes adjust, it’s surprisingly easy to navigate without adding light. Trudging across through the sand, I passed a handful of other solitary photographers, anonymous shapes enjoying the darkness as much as I was. I stopped few times to answer questions and point out the Big Dipper, then moved on.
Setting up on the steep, sandy slope above the river, I gazed at the Big Dipper and privately chuckled at my good fortune—this prime photo opportunity hadn’t manifest because I proactively made myself seek a scene away from my original subject (as I encourage my students to do), it was a chance glance after I’d mentally put myself to bed. When we landed at that spot the prior afternoon, I’d been so focused on the southern exposure and the Milky Way opportunity in that direction that I hadn’t even considered that there might be something facing north too. Shame on me, but sometimes it’s better to be lucky than good.
Checking my first Big Dipper frame, a couple of things became instantly obvious: though sunrise was still an hour away, and my eyes could detect no sign of its approach, with the same exposure I’d been using for most of the night, the sky was noticeably brighter on my LCD; more significantly, the Big Dipper was reflecting in the river. I realized that pool below me, while not flowing, was sloshing enough that the reflection didn’t stand out to my eyes, but it was smoothed enough by a multi-second exposure that the water mirrored a blurred but clearly visible reflection of the bright Dipper stars.
From my elevated vantage point, part of the handle’s reflection was lost to the sandy beach—I needed to move closer to the river to include the entire reflection. Remember when I said it’s surprisingly easy to navigate in the moonless darkness? On my first step toward the river I learned that functional night vision applies to avoiding objects, not to depth perception. So, as that first step dropped earthward and I waited for it to touch down, where I expected sand I found only air. The rest of me followed quickly and I was in free-fall. Fortunately the fall was not far, just a couple of feet, but it’s amazing how the disorientation of a blind fall slowed time enough for me to curse the darkness before my graceless splat onto the damp beach.
The beach was damp because the place I landed had been river when I went to bed. I popped up almost as quickly as I landed, the unwitting beneficiary of artificial tides induced by upstream releases from the Glen Canyon Dam, timed to meet the power needs of Las Vegas and the rest of the Southwest sprawl. Had I fallen a few hours earlier, I’d have splashed in chilly river water—not enough river to sweep me to my death, but definitely enough to soak me and my camera. So I found myself sandy but otherwise unscathed—glancing about to see if anyone had seen my fall, I instantly forgave the darkness that had made me more or less invisible. The Rokinon lens I’d had on my camera was caked with sand; since it was too dark to clean it, I switched to my Sony 16-35 f/2.8 GM.
The rest of the shoot was fairly uneventful, at least until my final frame. Over the next few minutes I inched even closer to the river, which I discovered had receded enough to add about six feet of soggy shore. With each frame I verified my focus, tweaked my composition, and experimented with different exposures.
On my final few frames I was comfortable enough with all of the photography variables that I wasn’t even thinking about the next shot, and instead simply stood and took in the night sky. As I waited for my last frame of the night to complete, a brilliant meteor sprung from the darkness and split the Dipper’s handle. It came and went in a heartbeat, and I held my breath until the image popped up on my LCD and I confirmed that I’d captured it. The perfect cap to a spectacular night.
Celestial Wonders


Star Struck
Posted on May 27, 2018
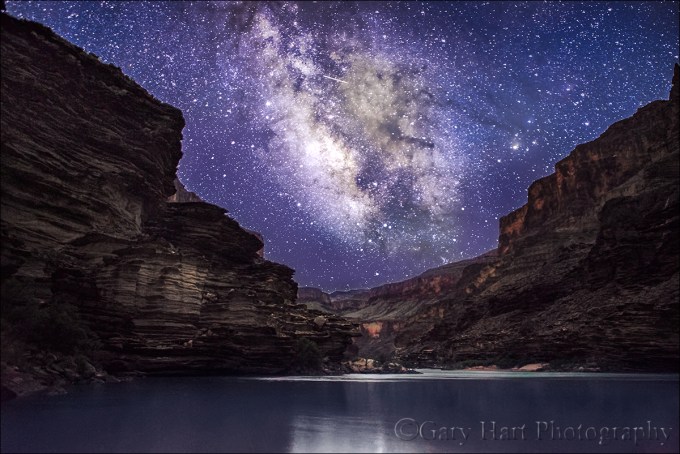
Grand Night, Milky Way Above the Colorado River, Grand Canyon
Sony a7S II
Rokinon 24mm f/1.4
20 seconds
F/1.4
ISO 6400
Nothing in my life delivers a more potent dose of perspective than viewing the world from the bottom of the Grand Canyon. Days are spent at the mercy of the Colorado River, alternately drifting and hurtling beneath mile-high rock layers that tell more than a billion years of Earth story. And when the sun goes down, the ceiling becomes a cosmological light show, each pinpoint representing a different instant in our galaxy’s past.
More than any of my five trips through the Grand Canyon, I’ll remember this year’s for its night skies. The wall-to-wall blue that dogged our daylight photography darkened to just what the night-photography doctor ordered, and we took full advantage. Excited about the potential for stars, each day I powwowed with our lead guide, the amazing Lindsay, to identify potential campsites with the best views of the night sky in general, and the best views of our Milky Way’s brilliant galactic core in particular.
But targeting a Milky Way campsite is easier in theory than execution. In the Northern Hemisphere, even when the galactic core reaches its highest point, it’s still fairly low in the southern sky. So given the Grand Canyon’s general east/west orientation, the best Milky Way views are usually blocked by the canyon’s towering walls. Even identifying a potential campsite on a north/south oriented stretch of the river doesn’t ensure success because Colorado River campsites in the Grand Canyon are first-come, first-served. So even though the other groups on the river don’t usually think strategically about photographing the night sky like I do, each campsite has its own appealing qualities and there’s never a guarantee that any given one will be free when we get there.
In general, my raft trips’ first night or (maybe) two usually provide our best Milky Way opportunities because the first 75 miles of the Colorado River downstream from our put-in at Lee’s Ferry runs pretty much north/south. With the river running north/south, the canyon walls are to the east and west and we usually get a pretty clear view of the north and south horizons. Just downstream from the confluence of the Colorado and Little Colorado Rivers, the canyon bends more or less permanently east/west and Milky Way core views are few and far between.
This year, our day-one campsite got us a decent but not quite perfect view of the southern sky. Nevertheless, many rafters rose and gave it a try, with varying degrees of success—at the very least, it was good practice, and much was learned. On day two we had a magnificently open sky, but the southern horizon was behind us as we faced the river, so the Milky Way’s center rose above lots of shrubs and rocks. That night I and a few others photographed the view across the river toward the Big Dipper, North Star, and fainter part of the Milky Way in Cassiopeia, but a handful had some success photographing the brighter Milky Way from a hill facing south.
I knew days four and five would be long shots for Milky Way photography because Lindsay and I had in mind an east/west trending day-4 site directly across the river from Deer Creek Fall (fingers crossed), one of the trip’s photographic highlights. And there were no good candidates for day 5 (we ended up camping beneath Toroweap). But Lindsay had an ace up her sleeve for day 3, our first day on the east/west portion of the river, if we could pull it off.
In addition to being the day we bend west, day three is the much anticipated “rapid day.” After warming up with a couple of days of fairly infrequent mild to medium rapids, the action on day three ramps up considerably, both in rapid frequency and intensity. Rapid day is always so much fun, for most of the rafters the thoughts of night photography take backseat thrills and laughter.
While everyone else’s attention was on the river, in the back of my mind I was crossing my virtual fingers for the prosaically named Camp 118 (for the number of miles downstream from our starting point at Lee’s Ferry). Camp 118 had been on my radar since Lindsay had told me about it on our first day, citing a bend in the river that gives the spot a view of the southern sky that’s very rare on this part of the river. But she warned me that Camp 118 has other benefits that make it popular among all the trips on the river, and gave us a no better than 50 percent chance of scoring it.
Equal parts exhausted and exhilarated, late in the afternoon of day three we rounded a bend and found Camp 118 free and clear. Phew. As soon as we landed I did a quick check with my compass app and confirmed that the river here pointed due south. Camp 118 also had a long south-facing sandy beach that would give everyone ample room to setup and move around in the dark without getting in anyone else’s way. Once the boat was off-loaded I gathered the troops and told them to prepare for some the best Milky Way photography of the trip.
One more Grand Canyon Milky Way obstacle I forgot to mention is that even in the most favorable locations, the galactic core doesn’t rotate into the slot between the canyon walls until 2:00 a.m. or later. Often rafters go to bed with every intention of rising to photograph it, but when the time comes, their resolve has burrowed deep into the cozy folds of their sleeping bag. The best antidote is to be as prepared as possible before going to bed. At the very least, I prescribe the following: identify your composition, set up your camera, lens, and tripod, set your exposure, focus at infinity, and have your camera ready atop the tripod beside your cot. Better still, if it can be done without risk of someone stumbling over it in the dark, leave the camera composed and focused at your predetermined shooting spot.
I woke at 2:00 a.m. and found many already at work on the Milky Way, which was just making its way into view above the canyon wall in the east. During the next two-and-a-quarter hours I worked the scene while the galactic core slid from left to right, first above the river and finally down toward the wall on the west side of the river. I used both my Sony a7SII and a7RIII bodies, and my Rokinon 24mm f/1.4, Sony 12-24 f/4 G, and Sony 16-35 f/2.8 GM lenses.
Since getting my 42 megapixel a7RIII, I’ve been happy enough with its night photography results that I’d almost forgotten about my 12 megapixel a7SII. In fact, I seriously considered leaving my a7SII at home for this trip. I’m so glad I didn’t. Using the two side-by-side like this, offered an instant reminder why the a7SII is the night photography king. Combined with the light gathering ability of an f/1.4 lens, with my a7SII I can look through my viewfinder and focus perfectly in about three seconds. I can also get crazy-bright images in crazy-dark conditions like this.
I usually feel like the “star” of night images is the sky; because vertical orientation gives me the most sky and least foreground, most of my night images are oriented vertically, especially when the more or less vertically oriented Milky Way is present. But one of my goals for this trip was more horizontal Milky Way images, so I made a point of setting aside my vertical bias and shooting a lot of horizontal frames. This image (like all of my images) is a single click (no composite of multiple frames) with no artificial light added (no light painting or any other light besides stars and skylight). I saw several meteors that night, but have no specific memories of the small one darting across the upper middle of this frame.
I wrapped up with this scene a little before 4:00 a.m., but heading back to bed I saw the Big Dipper cradled between the two canyon walls, just above the north horizon, too beautiful to resist. I ended up photographing another 20 minutes or so on the other side of camp, ending up with one of my favorite images of the trip, including a meteor I very much remember. But that’s a story for another day….
Join me on next year’s Grand Canyon Raft Trip for Photographers
A few tips for photographing the Milky Way
I have an entire article that spells out Milky Way photography, but here’s the CliffsNotes (is that still a thing?) version:
- The galactic core is in Sagittarius (a summer constellation), low in the Northern Hemisphere’s southern sky.
- Learn to control your camera in the dark. (!)
- I prefer a lens that’s 24mm (full frame) or wider, but speed trumps focal length as long as the faster lens is 28mm or wider.
- Red lights are death to night photography and should be banned from any night shoot (this my new crusade). Yes, they’re great for maintaining night vision, so if you want to use one to get to and from your location, fine. But once the shutters start opening, they should be off, off, off. I’ve seen so many images ruined by red lights that I’ve started banning them entirely at all night shoots I lead. I much prefer compromising night vision with a white light for a few minutes if it means no one will accidentally turn on a red light while we’re shooting. During a shoot, no flashlight of any kind or color. My preferred night-shoot light source is a cell phone screen (not the cell phone’s flashlight, just the illuminated screen), which is sufficient for seeing camera controls and about a 3-foot radius, but won’t leak into anyone’s frame.
- Night photography is about the sky, so you’ll want at least half, and usually more of your frame to be sky. Most of my night images are at least 2/3 sky.
- Focus will be your most difficult task. Never assume you can just dial your lens to “infinity”—zoom lenses don’t have a reliable fixed infinity point, and a prime’s infinity point is often not where you expect it to be. Instead, pre-focus before it gets dark whenever possible (then don’t touch anything!). If you need to focus in the dark, it will probably need to be manually.
- Center a bright star or planet in your viewfinder and magnify it on your LCD. Slowly dial the focus ring until the star/planet is the smallest possible point.
- Sony and other mirrorless shooters can use focus peaking (red works best) and dial the focus ring until the number of highlighted stars is maximized.
- Autofocus on a bright light at least 50 feet away.
- After you think you’ve achieved focus, regardless of the method, always (!) magnify the first image on your LCD to verify focus.
- Exposure is all about compromise. Basically, unless you’re satisfied with silhouettes, you want to give your scene as much light as you can without ruining the image: widest aperture, highest ISO, longest shutter speed you can get away with. This is where it’s essential to know your camera’s capabilities—how far can you push the ISO and get usable results. And just because you get relatively noise-free images at 6400 (or whatever) ISO when you’re shooting 1/5 second exposures at the Counting Crows concert (one of the few bands that actually allows anyone to bring in a camera and telephoto lens, I might add), doesn’t mean an image will be clean for a 30-second exposure (trust me on this). You’ll want at least an f/2.8 lens, but faster is better. And because light is so essential, if I really need the light, I usually prefer a little star motion from a 30-second exposure to the extra noise a higher ISO gives (but I don’t go longer than 30 seconds).
Read more about photographing the Milky Way
A Milky Way Gallery
Click an image for a closer look and slide show. Refresh the window to reorder the display.


Grand from Top to Bottom
Posted on May 15, 2018
In spring of 2014 I fulfilled a life-long dream to raft the Grand Canyon. My plan was to do it once, but the trip so exceeded my (already quite high) expectations, and those of all the photographers who joined me, that I just decided to keep doing it until people stopped showing up. Tomorrow I hit the river for the fifth year in a row. With next year’s trip nearly full already, there’s no end in sight.
Combined with my annual Grand Canyon Monsoon trip in August, rafting the Grand Canyon has helped me establish a relationship with the Grand Canyon surpassed only by my relationship with Yosemite. When I return late next week, I’m sure I’ll have many more stories and images to share. In the meantime, I’m sharing a gallery of images from past visits (top and bottom). Stay tuned….
Join me on a future Grand Canyon trip
A Grand Gallery
Click an image for a closer look and slide show. Refresh the window to reorder the display.


Making Mountains
Posted on May 5, 2018

Night Fire, Halemaumau Crater, Kilauea, Hawaii
Sony a7RII
Tamron 150-600 (Canon-mount with Metabones IV adapter)
1/100 second
F/8
ISO 400
A couple of years ago I was blessed to witness one of our planet’s most spectacular phenomena: an erupting volcano. Kilauea on Hawaii’s Big Island has been in near constant eruption for centuries (millennia?), slowly elevating Hawaii’s slopes and expanding its shoreline with lava that cools and hardens to form the newest rock on Earth. This island building process has been ongoing for the last five-million or so years, as the Pacific Plate slowly slides northwest over a hot spot in Earth’s mantle, building the northwest/southeast-trending Hawaiian chain of islands. The Hawaiian Islands get successively older moving northwest up the chain, with the island of Hawaii currently on the hot-seat, making it the youngest of the chain’s exposed islands (though there is a newer, still submerged island rising south of Hawaii).
As active as Kilauea is, much of its volcanic activity occurs out of the view of the average visitor. But on my annual visit in September of 2016, my workshop group and I got a firsthand look at Kilauea’s island-building furnace when the lava lake inside Halemaumau Crater rose high enough to be seen from the safety of the caldera’s rim. (Read more about this experience in my 2016 blog post, Nature’s Transcendent Moments.)
This week Kilauea is back in the news with an eruption far more significant (and destructive) than the event I captured in this 2016 image. The 2016 experience resulted from the good fortune of catching an elevated phase of the normal summit crater activity that started in 2008. The Kilauea activity that started this week, complete with earthquakes and lava flows, is a new eruption in Kilauea’s east rift zone. It could be over in hours or days, or could continue for decades.
The relatively fluid nature of Hawaiian lava makes its eruptions less “run for your life!” crises and more, “Well, I guess I better start packing up,” events that range from inconvenience to financial disasters, but are rarely life threatening. Local residents know the risk and are generally philosophical and positive when Pele points her fiery finger in their direction.
On the other hand, a volcanic eruption in the Cascade mountains of the Pacific Northwest is potentially far more dangerous than a typical Hawaiian eruption. We only need to look back on the eruption of Mount St. Helens in 1980, a relatively minor event on the continuum of possible Cascade eruptions, to see the extreme power of an explosive eruption. The viscous lava of the Cascade volcanoes makes their eruptions far more dangerous than Hawaii’s eruptions. While Hawaii’s basalt lava flows easily when internal forces push it to the surface, the Cascade lava resists, setting up an irresistible force versus immovable object standoff that is resolved suddenly and explosively (in favor of the irresistible force) as a cataclysmic explosion.
The undeniable aesthetic appeal of the Cascades is actually a byproduct of the the viscous lava that makes them so explosive. As it emerges and flows down the mountain’s side, Cascade lava doesn’t spread too far before cooling in place. The result is a strato-volcano that builds more vertically to form the towering symmetrical cone that photographers love to photograph. The more fluid Hawaiian basalt spreads rather than builds, wreaking slow-motion havoc on the countryside and accumulating over thousands of years to form massive, but visually unimpressive, flat, shield volcanoes.
Having just returned from a couple of weeks photographing in the Pacific Northwest, the beauty of the Cascade volcanoes is fresh in my mind. But nothing compares to witnessing the actual mountain making process in action.
Workshop Schedule || Purchase Prints
A Volcano Gallery


Reckless at Bandon
Posted on April 26, 2018

Sunset Reflection, Bandon Beach, Oregon
Sony a7R III
Sony 16-35 f/2.8 GM
.8 seconds
F/18
ISO 50
January
In January Don Smith and I flew to Oregon to get eyes on the damage caused by the Eagle Creek fire in advance of our (now just completed) annual Columbia River Gorge photo workshops. Not knowing what we’d find there, we allowed lots of time to scout new locations to replace the ones we lost. Fortunately the fire damage, while tragic and extensive, was limited to a very small part of our workshop area and we were easily able to find suitable substitutes for the two waterfalls we lost.
With a few extra days on our hands, Don and I beelined to the Oregon Coast to see for ourselves what we’d been seeing in beautiful images for years. And in the back of both of our minds was the opportunity to check out the area’s potential for a photo workshop. The scenery didn’t disappoint, and workshop plans began to take shape.
After a great, albeit wet (waves to my waist), sunset shoot at Cannon Beach, we headed down the coast the following morning, photographing in a light, intermittent rain along the way. As the day progressed, so did the rain. By the time we made it to Face Rock Beach, an hour or so before sunset, visibility was just a couple hundred yards in sideways rain. Rain and wind is not usually enough to deter us (wind is worse), but everyone we ran into in Bandon urged us to head inland before the incoming storm hit, or risk being stuck there. Not knowing the area and with a flight to catch the next day, we heeded the advice and evacuated to Eugene without a single Bandon image. But by then we had a workshop framework in mind and knew that we’d be back to Bandon for multiple scouting trips.
April
We returned to the Oregon Coast a few weeks ago, about a week before this year’s Columbia River Gorge workshops. In addition to general feet-on-the ground quality time on and near the coast, we were especially anxious for a second shot at the spectacular sea stacks of Bandon. This time we took a couple of days to make the trip from Cannon Beach to Bandon, encountering occasional rain that diffused the light and made for wonderful photography along the way. (It’s easy to see why the Oregon Coast is so lush.) But pulling into Bandon, the sideways rain was (still?) falling—does the sun ever shine here?
Despite the conditions, Don and I were so determined to photograph Bandon that nothing short of a tsunami would have kept us off the beach. Donning our rain gear, we trekked out to a strip of sand separating the violent surf from the rocky cliffs and set up, thankful for low tide. The rain and wind made photography difficult, but it gave me time to familiarize myself with this spectacular beach. At one point it started hailing, but brightness near the western horizon gave me hope that conditions would improve before the sun set. The rain stopped about 30 minutes before sunset. Benefiting from my newly gained insights, I was prepared to take full advantage of the remaining light and went right to work.
The photography was spectacular, but I hadn’t fully accounted for ramifications of the incoming tide—shots that had looked so promising earlier were now a bit more dicey. I found that I could make tenuous positions work most of the time, but every dozen or so waves included at least one that sent me scurrying for higher ground. So far none had made it all the way up to the cliffs, but as a native Californian, I’ve been around the beach enough to know that you should always anticipate a wave that’s at least twice the size of the biggest wave you’ve seen so far. So while I knew even the biggest waves to that point would have at worst soaked me, I knew the potential existed for a life-threatening “sneaker” wave.
Photographing Cannon Beach in January, I’d been quickly soaked to my ankles by an unexpected wave, and figured what the heck and just stayed out until the surf regularly washed up to my waist. But the surf there was more gentle, and behind me was gently sloping sand—and I only felt cold there, never in danger. But pinned by cliffs at Bandon, prudent decision making would have driven me to more open sand with an easy exit to high ground. But that’s not where the pictures were. So I continued photographing with a wary eye on the surf.
It soon became clear that the frequency of my wave dodging was increasing with time. At one point I left my tripod and camera to rescue my camera bag, once believed to be safely stashed atop a rock. I return to find my tripod on its side and my camera face down in the sand. There was no water damage, and the landing was soft enough to avoid impact damage, but a veneer of sand rendered it unusable until I could clean it off.
With my 16-35 and a renewed vow to be more careful, I went back to work. Every two or three waves forced me to race to higher ground (I’d ruined a pair of shoes at Cannon Beach in January, and didn’t want to double my loss with their replacements), but as the sky started to color, I soon realized that these big waves also left a reflective sheen in their wake. I captured this image just as the sunset color peaked. Just a few minutes later the advancing ocean took over the beach and drove Don and me to higher ground.
Brand New Oregon Coast Photo Workshop
Workshop Schedule || Purchase Prints
A Coastal Gallery


Happy Earth Day to You
Posted on April 22, 2018
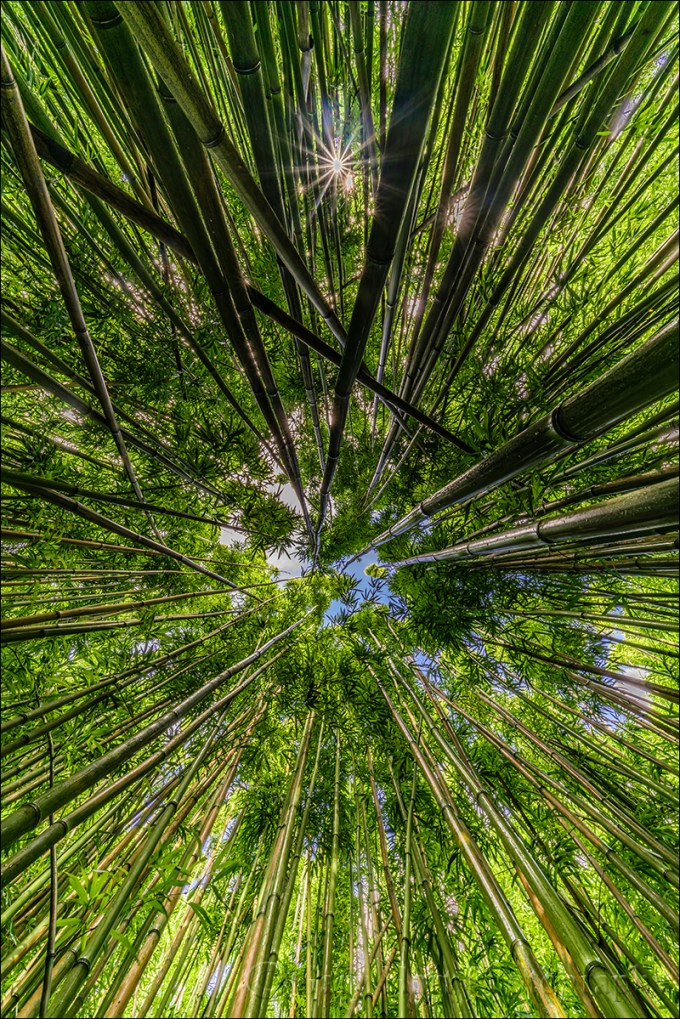
Bamboo Sunstar, Maui, Hawaii
Sony a7R II
Sony 12-24 f/4 G
.4 seconds
F/18
ISO 100
I have many “favorite” photo locations—many are known to all; others aren’t exactly secrets, but they’re far enough off the beaten path to be overlooked by the vacationing masses. And while I always like to have a spot or two at my favorite photo destinations where I can count on being alone, I’m usually happy to share prime photographic real estate with a kindred spirit.
But. In recent years I’ve noticed more photographers abusing nature in ways that at best betrays their ignorance, and at worst reveals their indifference to the fragility of the very subjects that inspire them to click their shutters in the first place. Of course it’s impossible to have zero impact on the natural world: Starting from the time we leave home we consume energy that directly or indirectly pollutes the atmosphere and contributes greenhouse gases that precipitate climate change. And once we arrive at our destination, every footfall alters the world in ways ranging from subtle to dramatic–not only do our shoes crush rocks, plants, and small creatures, our noise clashes with the natural sounds that comfort humans and communicate to animals, and our vehicles and clothing scatter microscopic, non-indiginous flora and fauna.
FOR EXAMPLE
A certain amount of damage is an unavoidable consequence of keeping the natural world accessible to all who would like to appreciate it, a tightrope our National Park Service (to name just one public caretaker) does an excellent job navigating. It’s even easy to believe that I’m not the problem–I mean, who’d have thought merely walking on “dirt” could impact the ecosystem for tens or hundreds of years? But, for example, before straying off the trail for that unique perspective of Delicate Arch, check out this admonition from Arches National Park.
Hawaii’s black sand beaches may appear unique and enduring, but the next time you consider scooping a sample to share with friends back on the mainland, know that Hawaii’s black sand is a finite, ephemeral phenomenon that will be replaced with “conventional” white sand as soon as its volcanic source is tapped–as evidenced by the direct correlation between the islands with the most black sands beaches and the islands with the most recent volcanic activity.
While Yosemite’s durable granite may lull photographers into environmental complacency, its meadows and wetlands are quite fragile, hosting many plants and insects that are an integral part of the natural balance that makes Yosemite special (and photogenic!). Despite all this, I can’t tell you how often I see people in Yosemite (photographers in particular, I’m afraid) trampling meadows, either to get in position for a shot or simply as a shortcut.
DON’T BE THIS PERSON
Still not convinced? If I can’t appeal to your environmental conscience, consider that simply wandering about with a camera and/or tripod labels you, “Photographer.” In that role you represent the entire photography community: when you do harm as Photographer, most observers (the general public and decision makers) go no farther than applying the Photographer label to anyone with a tripod or big camera, and lumping all of us into the same offending group.
Like it or not, one photographer’s indiscretion affects the way every photographer is perceived, potentially bringing restrictions that directly or indirectly impact all of us. So if you like fences, permits, and rules, just keep going wherever you want to go, whenever you want to go there. But if you’re like me and would prefer unrestricted access to nature’s beauty, please respect your surroundings and consider the ramifications of your actions.
IT’S NOT THAT DIFFICULT
Environmental responsibility doesn’t require joining Greenpeace or dropping off the grid (not that there’s anything wrong with that). Simply taking a few minutes to understand natural concerns specific to whatever area you visit is a good place to start. Most public lands have websites with information they’d love you to read before visiting. And most park officials are more than happy to share literature on the topic (you might in fact find useful information right there in that stack of papers you jammed into the center console as you drove away from the entrance station).
When you’re in the field, think before advancing. Train yourself to anticipate each future step with the understanding of its impact–believe it or not, this isn’t a particularly difficult habit to form. Whenever you see trash, just pick it up even if it isn’t yours. And don’t be shy about reminding other photographers whose actions risk soiling the reputation for all of us.
DEVELOP A “LEAVE NO TRACE” MINDSET
A few years ago, as a condition of my Death Valley workshop permit, I was guided to The Center for Outdoor Ethics and their “Leave No Trace” initiative. There’s great information here–much of it is just plain common sense, but I guarantee you’ll learn things too.
Now go out and enjoy nature–and please save it for the rest of us.
About this image
My favorite places to visit (and photograph) are the usually ones that are different from any place I’ve seen. Near the top of that list is the bamboo forest near Ohe’o Gulch on Maui. Conditions permitting, I make it a point to get my Maui workshop group here during our two-day stay in Hana, and it never disappoints.
On last year’s visit it rained for most of the walk up to the forest, and well into our stay there—not a torrential downpour, but enough to make photography tricky. Since overcast sky provides the best light for photographing in this incredibly dense, dark environment, so I welcomed the challenge. The rain stopped and patches of blue sky appeared just as it was time to leave. Despite the extreme dynamic range, before packing up I couldn’t resist trying a few frames to see if I could capture the diaphanous glow of the backlit bamboo leaves.
To emphasize the backlit leaves, I attached my Sony 12-24G to my Sony a7RII and pointed straight up. I moved around a bit until I found a couple of leaning bamboo stalks to add a little visual tension to my frame. I was so focused on my immediate surroundings that it wasn’t until a sunstar appeared in my viewfinder that I realized the sun had popped out. Positioning myself to place a bamboo stalk between the sun and my camera, I composed this scene, stopped down to f/18, and waited for the sun to pop out.
Join Me In Hawaii
Favorite Scenes From My Favorite Planet
Click an image for a closer look and slide show. Refresh the window to reorder the display.


