Eloquent Images by Gary Hart
Insight, information, and inspiration for the inquisitive nature photographer
The grass is greener
Posted on March 18, 2015

Under the Weather, Sierra Foothills, California
Sony a7R
Sony/Zeiss 16-35
1/8 second
F/11
ISO 100
“You’re so lucky to live so close to <fill in the blank>”: Yosemite, Lake Tahoe, Big Sur, San Francisco, Muir Woods (and countless other coastal redwood sites), Point Reyes, the Napa Valley wine country, Mt. Shasta, Mono Lake. I hear it all the time. Okay, I’ll concede that—I’m lucky.
But…
Their implicit message is, “If only I lived closer to such-and-such, my photography would be so much better.” But you know what? We all have our grass-is-greener longings. When someone tells me how lucky I am to live where I live (I am), I can usually counter with, “Yeah, but I’d love to have the skies that you get.” Because the sad truth is, for someone who loves dramatic weather and interesting skies as much as I do, California is definitely not the place to be.
My advice to anyone who lives in Nebraska, or Texas, or Illinois, or pretty much anywhere else that lacks California’s dramatic scenery, is to emphasize your skies (which are almost certainly more interesting than mine). Keep a mental database of interesting foregrounds (they don’t even need to be particularly photo-worthy by themselves)—a single tree, reflective lake, cascading stream, whatever—that you can get to fairly quickly when the sky shows potential.
When photographing your subject beneath an interesting sky, place it at the bottom of your frame, compose wide, and give 2/3 or more of the frame to the sky (the better the sky, the more real estate it deserves). Vertical compositions often work great when you want to emphasize the sky. Is it Yosemite or the Grand Canyon? No, but I could be a very happy photographer shooting nothing but great skies for the rest of my life.
I digress
So. As you might guess, on the rare occasion when it looks like something special might happen overhead, I’m all over it. Unfortunately, and despite my proximity to so many world-class locations, there’s not a lot I like to photograph within a few minutes of my home.
I got a frustrating reminder of that a few years ago when, during a heavy (for California), persistent rain, I looked out the west-facing window of my home on Sacramento’s west side and saw nothing but clear sky on the horizon. Hmmm. Knowing three things: 1) the sun sets in the west 2) weather in Northern California moves from west to east 3) a rainbow needs low sunlight and airborne water, inferring an imminent rainbow wasn’t rocket science. All I needed was an east-facing scene.
And therein lay the rub: It’s at least a 30 minute drive to any scene that would do the rainbow justice. Of course with more than an hour until sunset, I figured there was time if I hurried, so I tossed my gear in the car and headed east, toward a small tree that stands by itself atop a hill east of town. And sure enough, within ten minutes of my departure, the rainbow did indeed manifest as expected. What also manifested was rush hour traffic.
For the next hour, I (along with what seemed like ten million commuters) were treated to a vivid double rainbow framing all six lanes of US 50. Poking along at less than 10 miles per hour, we were also beneficiaries of ample opportunity to appreciate the spectral splendor. On the positive side, this rainbow was so beautiful that I couldn’t even muster much impatience—I just sat there in traffic and marveled. And as if its beauty weren’t enough, this rainbow persisted longer than any rainbow I’ve ever seen, lasting at least an hour—all the way up until I pulled my car to a stop in front of the tree. True story.
Deja vu
Fast-forward four years. A couple of months ago I looked out the very same window during on a rainy afternoon and saw the same clear horizon I’d seen four years earlier. Within minutes I was in my car and heading toward the same tree. This time the traffic cooperated and I made good time, arriving at “my” tree about 30 minutes before sunset.
Sadly, despite all the signs pointing in the right direction, the rainbow never happened. Waiting for the sun to appear, I photographed saturated clouds in a steady rain, at no point not believing its appearance was imminent. Just about the time the sun appeared, the rain stopped. And then, about the time the rain returned, the sun set. Oh well.
Am I complaining? Of course not. I didn’t get my rainbow, but I did get a rare opportunity to photograph Midwest skies right here in Northern California. And I hope this image illustrates my point—wasting energy longing for what’s over there obscures the beauty at your feet. Good photography doesn’t need a towering monolith or double rainbow, it just needs a creative eye and a little persistence.
A Gallery of Skies
Click an image for a closer look, and a slide show. Refresh the screen to reorder the display.


Chased by rainbows
Posted on March 16, 2015

Rainbow and Surf, Wai’anapanapa Black Sand Beach, Maui
Sony a7R
Sony/Zeiss 16-35
1/5 second
F/11
ISO 50
Okay, you might guess that as a nature photographer I spend a lot of time chasing rainbows. True, but I swear that in Hawaii it feels like rainbows are chasing me. Hawaii is the only place I’ve ever been where rainbows just appear with no warning, where I can be standing in full sun beneath a handful of puffy clouds, glance toward the horizon, and do a double-take—where’d that come from?
Because of Hawaiian rainbow’s seemingly spontaneous inclinations, the first thing do after landing at a photo site on the Islands is run through my rainbow checklist:
- What’s the elevation of the sun? If the sun is lower than 42 degrees above the horizon, a rainbow is possible—the lower the sun, the higher and more complete (greater arc) the rainbow will be. If the sun’s near the horizon, a towering, nearly half-circle rainbow is possible; if the sun is higher, closer to 42 degrees, only a horizon-hugging, flatter rainbow is possible.
- What’s the direction of the sun? A rainbow always appears directly opposite the sun—the best way to determine where it will appear is to find your shadow, which will point directly toward the rainbow’s center (and its apex).
- If a rainbow does appear, where do I want to be? Armed with the answers from the first two questions, I know whether a rainbow is possible and exactly where it will appear. Now all I need is a composition for it. Pre-planning my rainbow composition prevents the Keystone Cops panic that typically ensues when a photographer looks skyward and spots a rainbow, but has nothing to put with it.
- (Notice there’s no mention of rain here—I realize a rainbow requires rain, but in Hawaii the randomness of rainbows is a function of the rain’s fickle nature. Rain can be far enough away to be invisible, or it can sneak up on you with no warning. In other words, if I used the presence of rain as a criterion, I’d be defeating the entire purpose of the checklist.)
This simple exercise served me well a couple of weeks ago on Maui when, while photographing a wave-swept rock on the Wai’anapanapa Black Sand Beach near Hana, a vivid rainbow segment materialized above the eastern horizon. There had been no hint of rain, so I was pretty focused on my subject and not really thinking about rainbows. But since I’d run through my routine rainbow checklist earlier, I knew exactly where I wanted to be and what I wanted to do. In this case it was a simple matter of shifting to the other side of the rock I’d already been photographing and back up the beach a little bit.
A horizontal composition allowed me to balance the rainbow with “my” rock while including enough of the lush, palm tree studded peninsula to infuse a tropical feel. The next (easily forgotten) step was to ensure that my polarizer was properly oriented (a mis-oriented polarizer will erase a rainbow). Finally, timing my click before the waves swept too far ashore allowed the black sand beach play a prominent role in the bottom third of my frame.
Want to learn the how, when, and where of rainbow photography? My Rainbows Demystified article in my photo tips section is a good place to start.
Join me on Maui in 2016

A Gallery of Rainbows
Click an image for a closer look, and a slide show. Refresh the screen to reorder the display.


Going with the flow
Posted on March 14, 2015

Sand and Foam, Wai’anapanapa Black Sand Beach, Maui
Sony a7R
Sony/Zeiss 16-35
1/3 second
F/11
ISO 100
One bad apple
Believe it or not, one of the questions I’m asked most frequently is whether I’ve ever had anyone attend a workshop who I would not allow in a future workshop. My answer has always been an immediate and emphatic, No. That changed in a recent workshop, which got me thinking that a successful photo workshop is as much about the people as it is about the location and conditions. And while one bad apple can indeed spoil the whole bunch, it won’t if I do my job.
In the (unnamed) workshop in question, it soon became clear to everyone that my problem participant (who I’ll call PP) was just an unhappy person who wasn’t going to be satisfied no matter what I did. When PP’s complaints started, my first reaction was that I needed to fix something I must be doing wrong, but when I started getting complaints about PP from other workshop participants, my focus had to change—it’s one thing to have an isolated disgruntled customer, but when that customer affects the experience of the entire group, my priority has to be the group.
For example
A successful photo workshop requires flexibility. Certainly in the timing and location of the shoots (which vary with conditions), but also flexibility of standard operating procedure as circumstances dictate. For example, over the years I’ve observed that much of the group connection happens in the vehicles, on the way to and from a shoot, and I’ve found that nothing enhances group chemistry better than getting everyone to ride with different people each day. But after watching participants pretty much trample each other to avoid riding with PP, I relaxed my switch vehicles “rule.” It seemed PP had found a comfort zone with two other participants who seemed satisfied with the arrangement, and I was quite content to not disturb that.
On the other hand, I can’t allow someone’s unhappiness to affect my role as a teacher and leader. I’ve learned that it’s never productive to take these things personally—I’m sure this person was struggling with things far more important than photography, and I just happened to get caught in the crossfire. Looking at it that way, I was actually able to feel compassion for my antagonist, and continue giving her the assistance she needed. We achieved a civil detente during our shooting and training time that allowed PP to get questions answered, and the rest of the group to shoot and learn without distraction.
It didn’t hurt that the rest of the group was relaxed and positive (as most groups are). We ended up with lots of truly special photography, many memorable moments, and tons of laughs—great images were made, new friendships formed, and old friendships recharged. (That several from this group are already signed up for future workshops is an endorsement that speaks even more clearly than the “Thanks for a great workshop” kudos I always appreciate.)
The big picture
One bad customer experience notwithstanding, to say that leading photo workshops has exceeded my expectations would be a vast understatement. I came into it with nearly 20 years of technical communications experience (training programmers, tech writing, tech support), and thirty years of photography experience. And as a California native who grew up camping, backpacking, and (later) photographing all of my initial workshop locations (Yosemite, Eastern Sierra, Death Valley), I was intimately familiar with my subjects. Piece of cake, right?
The big unknown for me was the people—I like people, but would every group feature a PP (or two)? (I also underestimated the business side of things, but that’s a different story that at least has a happy ending.) I mean, no longer would I be lecturing programmers and IT geeks in an air conditioned training room, delivering a canned presentation I’d offered countless times before. Leading photo workshops meant herding a group of individuals possessing a broad range of fitness, skill, equipment, expectations, and needs, through remote areas in extreme, unpredictable conditions. What could possibly go wrong?
It turns out, not too much. First, I’ve always felt that my best photography memories often come in the most extreme conditions. And guess what—most other photographers feel the same way, and will gladly endure extreme conditions in exchange for great photography. They’ll also forgive difficult conditions that prevent potentially great photography: a downpour that makes photography impossible, clear skies that bathe beautiful scenery in harsh light, clouds that block a much anticipated moonrise, and so on. The key for dealing with difficult conditions is to always have a backup plan (or two).
But what about simple human diversity? Surely combining a bunch of people with so many differences would be a recipe for disaster. Concerned about mixing struggling beginners with impatient experts, I originally toyed with the idea of minimum equipment and experience requirements. What a mistake that would have been. While most of my workshops include photography skills ranging from enthusiastic beginner to experienced pro or semi-pro, rather than create tension, these differences create a synergy as the experts love sharing their knowledge and experience with anyone who will listen.
Of course diversity encompasses more than photography skill. I’ve had workshop participants from every continent except Antarctica, and (I’m pretty sure) every state in the U.S. I’ve had doctors, lawyers, programmers, accountants, veterinarians, athletes, dentists, clergy, CEOs, writers, actors, musicians, stay-at-home moms, stay-at-home dads, and on and on. In one workshop I had a rocket scientist and a brain surgeon. I’ve had a woman who biked across America, and a man who hiked the entire Pacific Crest trail. I’ve had gays and lesbians, outspoken liberals and conservatives, a woman in a wheelchair, a man in the final stages of cancer, and a 9/11 survivor.
The common denominator transcending all this disparity? A passion for photography that unites strangers long enough to overcome superficial differences and appreciate deeper similarities: a love of family, friendship, nature, sharing, laughter.
Going with the flow (about this image)
I often joke that I don’t photograph anything that moves. Clearly that’s not true, as people love to point out all my flowing water, lightning, and star trail images. But adding motion to a static landscape does introduce a new layer of complication. How we deal with that motion is equal parts aesthetic instinct to convey the illusion of motion in a compelling fashion, and the technical skill to simultaneously expose properly and freeze the motion at the right time, or blur it the desired amount.
When dealing with surf I usually start with finding the right composition. When I’m satisfied with my composition, I move on to my depth of field decisions (f-stop and focus point), then meter the scene. Only when my composition and exposure are ready and waiting atop my tripod, do I start think about clicking my shutter.
Rather than one or two clicks and done, when I really like my composition I sometimes (often) click several dozen times before recomposing, varying the wave action and shutter speed with each click. (Since my exposure is set, changing my shutter speed requires a compensating ISO and/or f-stop adjustment.) Despite the fixed composition, this approach uses the motion of the waves to make each frame different from the others, often significantly different.
Following each click, I evaluate the image on my LCD for small composition and exposure refinements, and to better understand my camera’s translation of the waves’ motion. It’s not long before I have an idea of what type of wave to look for, when to time my click, and the shutter speed that creates the effect I want.
On Maui’s Wai’anapanapa Black Sand Beach (near Hana) a couple of weeks ago, I used a rock protruding from the black sand to anchor my foreground. I chose a vertical composition to give the rock more of my foreground than a horizontal frame would have, and to allow me to include more of the sky, which I thought had appealing clouds.
Most of the waves petered out far short of the rock, but I soon realized that the waves that worked best were those that came far enough up the beach reach or even encircle the rock. I also decided that the waves that advanced farthest created their nicest effect on their way back out. With these insights in place, there was nothing more to do watch, wait, and click. Every once in a while a wave would slide just far enough up the beach to tickle my (bare) toes and I’d click a couple of times.
Perhaps mesmerized by the rhythm of the surf, I completely misjudged the incoming wave captured here. While no earlier wave had even reached my ankles, this one soaked me well above my knees and drenched most of my shorts. By the time I realized I was going to get wet it was too late to retreat, so I just rode it out, managing this click as the wave washed back out to sea (without me or my camera, thank-you-very-much).
(And I wish I could take creative credit for the wave exploding against the rocks in the background, but that was just fortunate timing.)
Join me on Maui in 2016

A Gallery of Sand and Surf
Click an image for a closer look, and a slide show. Refresh the screen to reorder the display.


Channeling Wile E. Coyote
Posted on March 6, 2015
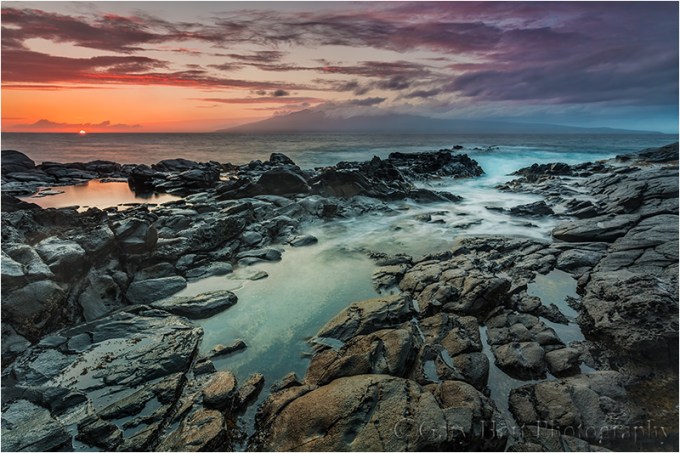
Maui Reflection, West Maui, Hawaii
Sony a7R
Sony/Zeiss 16-35
1/5 second
F/11
ISO 100
“When you want something badly enough, a few mishaps are no deterrent.” Wile E. Coyote
Discovery (September 2012)
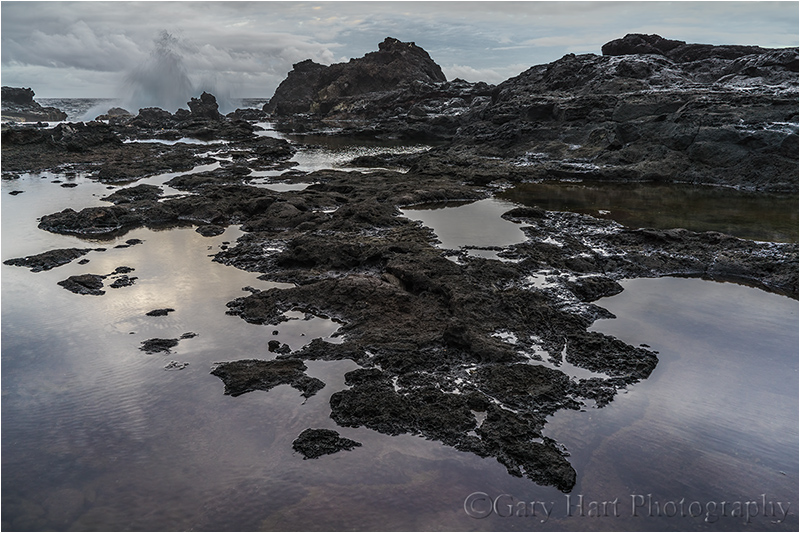
Scouting locations for my Maui workshop, I scrambled cross-country down the rugged flank of West Maui’s north side, trying to make my way to a series of lava-rock, reflective tide pools. Once I’d descended to ocean level, reaching the pools still required hopscotching across wet basalt that was a disconcerting hybrid of banana peel slippery and razor sharp. As beautiful as the scene was, I decided access was far too dangerous for a group.
Rather than return the way I came, I continued picking my way along the rugged shoreline, eventually finding another group of connected pools elevated above the surf on a lava shelf. Even more varied and beautiful than the original location, I initially thought this spot wouldn’t be suitable for a group either. But climbing back to my car I stumbled upon an overgrown, unpaved “road” (maybe once upon a time used by vehicles) through the jungle and in the general direction of the main road (up).
After hiking a couple of hundred yards, I parted a branch blocking my progress and found myself back at the highway (“highway” in this case is the one to one-and-a-half lane, mostly-paved Highway 340 circling West Maui), not too far from my car. So, maybe these tide pools could be accessed by a group. Fearing I’d miss this obscure spur from the highway, I saved its position on my GPS and made a mental note to return.
Fool on a hill (March 2013)
The day before my next Maui workshop started, I picked up my friend and fellow photographer Don Smith at the airport. I was particularly excited to share the West Maui tide pools I’d “discovered” (it’s not as if I’m the Edmund Hillary of landscape photography—there are signs down there that indicate the spot is known to locals) and off we went.
Highway 340 circling West Maui will void most rental contracts, even on the best of days. This day the steady rain that had been falling all afternoon seemed to increase with the road’s remoteness, and I found myself wishing for another speed on the windshield wipers as we slalomed around boulders dislodged from the surrounding cliffs by the downpour—at one point we passed a car waylaid by a grapefruit-size rock embedded in its windshield.
Undeterred, we soldiered on. This was Don’s first Maui visit, so I narrated the tour with vigor, enthusiastically pointing out the island’s scenic highlights as we sloshed past, occasionally pausing my narrative long enough to reassure him that the highway was indeed navigable despite increasing evidence to the contrary, promising a worthy payoff at the promised destination.
Closely monitoring my GPS (almost as if I had a brain), at the point of the hidden intersection I veered left into a gap in the trees with surgical precision. Between rapidly oscillating wipers the narrow track at first unfolded just as I’d remembered it, before suddenly narrowing, dropping, and twisting to the right. Dense foliage scraped both sides of the car, which by now was clearly losing purchase in the mud—before Don could finish a sentence that started, “Are you sure…,” it dawned on me that I’d never intended to actually drive this road, that my plan when I marked it six months earlier had been to park at the top and walk down. Oops.
Propelled by momentum, and without the benefit of traction, gravity was now in charge (remember the jungle slide scene from “Romancing the Stone“?). Steering seemed to have less influence on our direction of travel than it did on the direction we faced, so I quickly gave that up. If it weren’t for the road’s deep ruts, I’m sure we’d have careened into the jungle. I held my breath as we approached a bowling ball size boulder and exhaled when the undercarriage passed above unscathed. After the longest hundred yards of my life, the slope moderated somewhat and the car slid to a stop.
After a few seconds of cathartic expletives, Don and I scanned our surroundings. With the car pointing in the the wrong direction (down), I knew getting out started with somehow turning around. A little farther down the slope I spotted a flat, clear space with a short Y-spur that, if we could reach it, might enable us to backup and turn around. I scrutinized the dash for the switch that would engage the 4-wheel drive (I swear the guy at rental agency promised my SUV had 4WD). When we didn’t find it, Don dug the manual from the glovebox—apparently 4WD is an option the powers-that-be at Alamo deem unnecessary on Maui SUVs.
With crossed fingers I gave the car some gas and felt the tires spin with no effect. More expletives. Don and I exited into the rain to evaluate our predicament—we were stuck on a road that was soon to become a creek, supported by four mud disks where the tires used to be. Hmmm—that would explain the whole no traction thing. Scraping the tires clean would have been of little value because the next revolution would simply reapply a new layer.
With Don pushing, I found that cranking the wheels 90 degrees gained just enough traction to free us and I gingerly rolled the car further downhill and into the open space and down into the Y’s left spur. Yay! With only a little bit of slip/slide drama, I backed slowly and pivoted into the Y’s other spur until the car was turned around and pointed back up the slope we’d just descended.
Now for the hard part. Looking for the first time in the direction of freedom, we came to grips with the chute that had deposited us: Not only was it steep, at the steepest point it curved hard-left but banked steep-right—not exactly a design that would be embraced at Daytona.
I inhaled and goosed the gas and we shot upward, fishtailing like a hooked marlin before losing momentum and coming to a stop no more than fifty feet up the road. This time the car was skewed 45-degrees, its left-front fender in the shrubs on one side, its right-rear fender in the shrubs on the other. When I gave the car gas, the tires spun hopelessly.
More stuck than ever, we started strategizing Plan B—with an hour of daylight remaining and no cell service, we’d need to walk up to the highway and hope to flag down, in the rain, a good samaritan willing to drive two disheveled, mud-caked strangers back to civilization (about 45 minutes away), then hope to summon a tow truck that would extricate us.
While Don trudged up the road to implement that plan, I stayed with the waylaid car, licking my wounds and feeling pretty foolish. Surveying things more closely, it occurred to me that since the road was quite narrow, and the distance and tight curve would make winching difficult, even a tow truck wouldn’t guarantee freedom. If I’d only remembered my Acme Rocket Skates….
With nothing else to do, I decided to take rescue into my hands one last time. Rather than apply the brute force, gas pedal to the floor approach, I put the car in reverse, gave it just a little gas, and cranked the steering wheel back and forth violently until the tires broke free and returned more or less back in the ruts. I applied a little more gas to get it rolling, then let gravity and the rutted road roll me back to the level clearing. Without allowing it to lose momentum, I added a little more gas and rolled all the way to the far back end of the clearing, where I found a small section that was less mud and more gravel.
I’d given myself about 30 feet of relative flat for momentum before reaching the hill. With a small prayer I slipped the transmission into in first and eased the accelerator down, adding gas just slowly enough to avoid losing traction. By the time I reached the hill the pedal was all the way to the floor and I had enough forward speed to avoid much of the fishtailing I’d experienced earlier. Past the crumpled shrubs and protruding rock I shot—as the road steepened my speed dropped and I could feel the wheels spinning but I just kept my foot to the floor. Approaching the curve I felt the car start to tilt right and slow almost to zero but somehow the tires maintained just enough grip to avoid a complete stop. I rounded the curve and surprised Don, who sprinted ahead and turned to cheer me forward.
By now the fishtailing exceeded the forward motion but I didn’t care as long as there was still forward motion. About 20 yards beyond the curve the road leveled and I felt the tires grip rock—freedom! Not wanting to stop until my tires kissed actual pavement, I lowered my window and high-fived Don as I rocketed past and onto the highway. At the top we just couldn’t stop laughing, both at the foolish predicament I’d created, and our utter disbelief that we’d made it out.
If at first you don’t succeed (March 2015)
Despite the traumatic memories, I’ve added this location to my Maui workshop rotation (but now we walk down, thank-you-very-much). Nevertheless, for various reasons this location has managed to thwart me—I’d never captured an image that completely satisfied me. The first year our shoot here was washed out by a deluge that made the road impassible even on foot. Last year we were inhibited by persistent showers that were compounded by camera problems.
But this year I gave it another shot, leading the group here at the end of a long day that started with a 3:30 a.m. departure for Haleakala. Dark gray clouds hung low and delivered tangible flecks of moisture, and I feared they’d let loose before the group had a chance to get established. The road was muddy and a little slippery, not like it was for my misadventure, but enough that a few people bailed and called it a day.
The handful who stayed were rewarded with mirror-calm tide pools surrounded by exploding surf. The clouds didn’t permit enough sunlight to color sky, but they retained enough definition and texture to be photogenic. As I moved around to work with each of the workshop participants, I fired a few frames of my own, eventually landing in the spot you see here.
I decided to go with my 16-35 lens to exaggerate the pool at my feet. Following my general policy to place the horizon line separating foreground and sky on the part of the scene with the most visual interest, I gave almost all my frame to the foreground. I rotated my polarizer to a midway point that reflected the sky but still revealed the submerged basalt. Satisfied with my composition, I stood back and watched the surf, timing each click with the most violent collisions.
I captured several more “keeper” images—enough, I think, to more than make up for previous failures (and mishaps) here. Sleep was no problem that night.
A Maui Gallery


Aloha from the top of the world
Posted on March 4, 2015
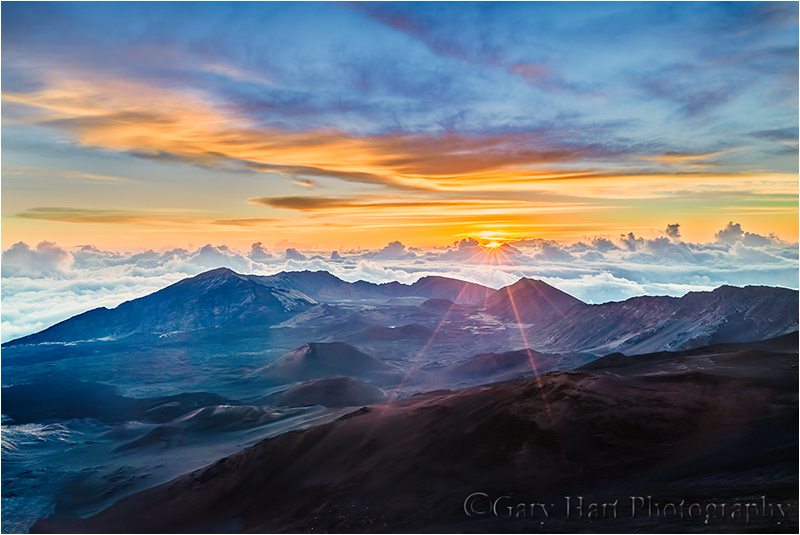
Top of the World, Haleakala Volcano, Maui
Sony a7S
Sony/Zeiss 16-35
.4 seconds
F/20
ISO 100
March 4, 2015
Just a quick update from Maui, where I’m in the midst of my annual Maui workshop (and because there’s nothing better to do when you wake up at 4 a.m. than post a blog). Before the workshop started I held my breath as I warned my group that on our first morning we’d need to leave at 3:30 to photograph sunrise from the 10,000 foot summit of Haleakala. Not only that, they should pack for temperatures in the 30s and wind. Oh yeah, and there’s a chance that the summit would be engulfed in clouds and we’d see absolutely nothing. The only defense I could offer the insane start time was that everyone needs to watch the sun rise from Haleakala at least once in their life.
Yesterday was the day. To ensure that we’d all be able to find a place for our tripods, we arrived an hour before the 6:45 sunrise. Exiting the car at the Haleakala Visitor Center vista, I looked upward, found a sky filled with stars, and immediately whispered a quick thank you to the photography gods. In addition to clear skies, relatively calm wind made the 35 degree temperature feel downright balmy.
It seems that each time I do this, Haleakala’s a little more crowded. Some in the group stayed with the masses lined along the rail at the primary view; those who didn’t mind a short but steep climb in thin air followed me a few hundred yards up a nearby trail to an elevated, less crowded view.
By the time the sun rose, I’d been playing with compositions long enough to have a pretty good idea what I wanted to do. Because of the scene’s extreme dynamic range, I decided to use my new Sony a7S, adding a Singh-Ray 3-stop reverse graduated neutral density filter, a combination that allowed me to capture this shot with a single click. I’ve never been able to capture so much foreground detail, while retaining color in the sun, in a single frame. To get the sunstar, I stopped down to f20 and clicked just as the sun peeked above the horizon.
Our sunrise success was a great start to what proved to be a wonderful (albeit long) day of photography. We descended the mountain shortly thereafter, and after a quick Starbucks recharge in Kahului, wrapped up our morning with a nice shoot in the lush Iao Valley. The afternoon included a sensor cleaning seminar, a blowhole (accented with a few whale sightings), and a cloudy but beautiful sunset on a hidden volcanic beach.
Today it’s the Road to Hana….
A Maui Gallery
Click an image for a closer look, and a slide show. Refresh the screen to reorder the display.


Announcing my 2016 Maui Tropical Paradise photo workshop
Being a better fisherman
Posted on February 28, 2015
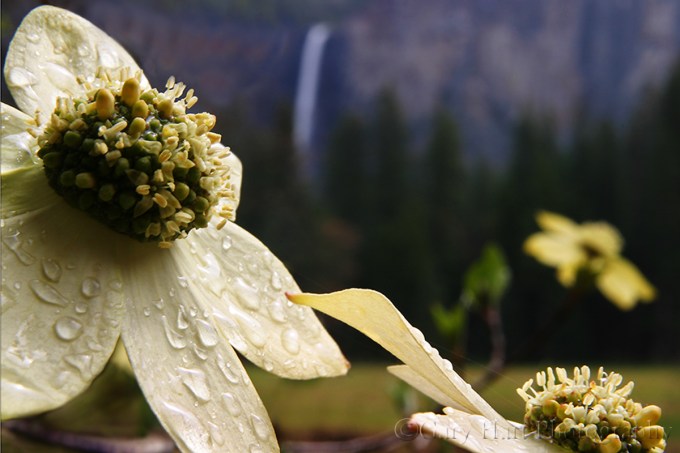
Bridalveil Dogwood, Valley View, Yosemite
Canon EOS 10D
1/15 second
F22
ISO 100
48 mm
“Many of us would probably be better fishermen if we did not spend so much time watching and waiting for the world to become perfect.”
― Norman Maclean, A River Runs Through It
I don’t fish. But then, Norman Maclean’s words really aren’t about fishing anyway. I’m reminded of his quote every time I see photographers frozen by minutia, mired in the moment by small distractions that matter very little on the path to their grand objectives (better pictures). Do any of these sound familiar?: “There’s dust on my sensor”; “This lens is soft”; “The light was better yesterday”; “The light will be better tomorrow”; “It’s too cold”; “It’s too hot”; “It’s too wet”; and so on.
Near the top of photographers’ list of self-imposed obstacles seems to be an insecurity about their gear. Instead of doing what photographers do (photograph), many spend far too much time reading reviews, scouring specifications, checking prices, and abusing the social media of other photographers. Whether their goal is to justify the expense of new equipment, or to rationalize the status of their current equipment, all these machinations make me wonder how much they enjoy the actual act of photography.
There’s nothing wrong with your camera (or mine)
A related behavior I’ve observed since my switch from a Canon SLR system to Sony mirrorless is an irrational obsession with the photo equipment of other photographers (for example, mine). I’m always happy to answer questions about my photo gear (okay, almost always), but I’ve detected an underlying tone of insecurity in some (not all) of the queries, as if my camera choice somehow invalidates theirs. Some have wanted reassurance that their camera is still okay (it is), and others have actually tried to “suggest” that I’ve made a mistake (I haven’t).
I know I haven’t made a mistake because my needs are my own, I’m quite happy with Sony Alpha gear, and I’m getting pictures I couldn’t have gotten before. End of debate. And for those who fear that my choice means their camera may be less than perfect, let me just say that there are many good reasons to get a new camera, to switch entire systems even, but seeing another photographer do it is not one of them.
A blast from the past
If you have a working DSLR or mirrorless camera of pretty much any vintage, you can get nice captures. To illustrate this point in my workshops and training, I sometimes go all the way back to 2003 and my Canon 10D, my first DSLR.
Shooting with my 10D today, I’d probably be crazy-frustrated with the 6 megapixel, 1.6 crop sensor, its postage-stamp LCD, poor low-light performance, and narrow dynamic range—but that doesn’t change the fact that I got great images from that now ancient beast, images that I’ve enlarged and sold as prints up to 24×36, in person, to people who walked right up and scrutinized each pixel. Images that people still buy. In other words, if the images I got from that prehistoric DSLR are still usable, there’s no reason the images from whatever ancient camera you might have won’t be usable.
Time is on your side
So how long should you wait before replacing your camera? That’s an individual decision based on many personal factors. My general recommendation is to hold off on a new camera until you’ve upgraded all your primary glass (the lenses you might use on any shoot) and your support system (tripod and head) to the best possible.
These things will serve you far longer than whatever the latest and greatest camera might be. In fact, the longer you can postpone that new camera purchase, the better the technology will be when you finally pull the trigger on a new camera.
I digress
That doesn’t mean there won’t be temptations. For example, like an ex-girlfriend trying to lure me back with triple-D implants, Canon is now (January 2020) promising an 80-megapixel sensor. Yikes. But if she really understood me, she’d have known I’m not impressed.
But anyway….
Once you have all your lens and support ducks in a row, maybe it’s time to think about upgrading your body. Maybe. Start by asking yourself what’s important to you.
The Canon 5D Mark III filled most of the basic camera criteria for me: full frame, 100 percent viewfinder, pretty good weather sealing, functional live-view (much better than my 1DS Mark III had), and multiple card slots. I ignore many oft-touted features that might be important to others but mean little to me, such as: frame rate, autofocus speed, video, in-body image stabilization, and touch-screen LCD.
Landing the metaphor
I guess the point is that buying a new camera is never an emergency unless you dropped your only camera in a creek (been there… twice). Take your time, set your budget, and be honest with yourself about what you need and don’t need. In the meantime, get off the computer, grab whatever camera you have, and get out and shoot. You can’t land fish without putting a line in the water, and you can’t take pictures without putting the world in your viewfinder.
Visit my website to see my photo workshop schedule
A Canon 10D Gallery
Click an image for a closer look, and a slide show. Refresh the screen to reorder the display.


Seeing the light
Posted on February 16, 2015

Sunset Reflection, El Capitan, Yosemite
Sony a7R
Sony/Zeiss 24-70
2.5 seconds
F/11
ISO 100
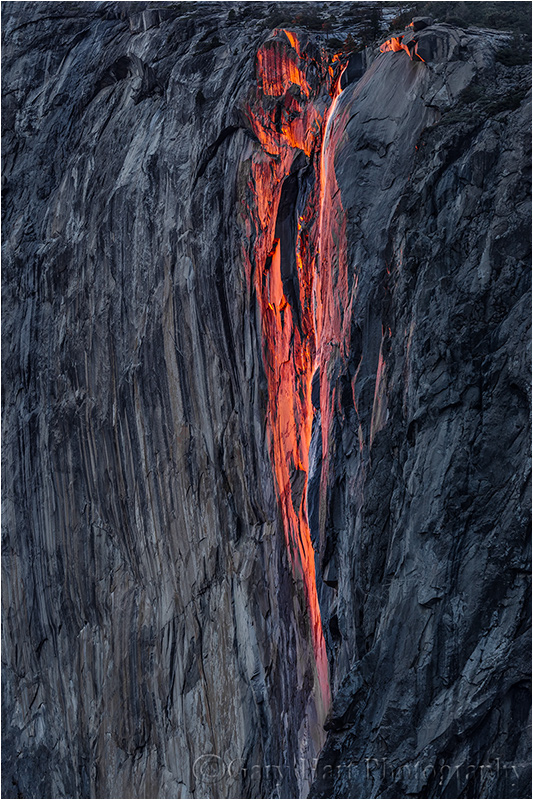
On the first night of this year’s Yosemite Horsetail Fall photo workshop I’m pretty confident that my group got to photograph what will turn out to be Horsetail’s only truly red display of the year. I’d love to say that this was due to particular genius on my part, but mostly it was just plain good luck (with maybe just a little bit of experience tossed in). But for me the evening’s highlight was the sunset that followed (above), and particularly the ease with which my new Sony a7R captured the scene’s tremendous dynamic range.
But first, a few words about Horsetail Fall…
I generally schedule my Yosemite Horsetail Fall photo workshop early in the window for capturing the red sunset light that (when all the stars align) kisses the narrow strip of El Capitan granite occupied by Horsetail Fall. Later in February the stripe of color is even thinner and more precisely focused on the fall, but I prefer avoiding the crowds and all the drama they bring (especially important when leading a group), and sacrifice a small iota of perfection for a significant chunk of flexibility and peace of mind.
But in addition to a clear western horizon and very specific angle of sunset light, getting The shot also requires water in the fall—no sure thing even in the wettest of years, but especially problematic in a drought year. This year Horsetail Fall was completely dry until the weekend before my workshop. Then, miracle of miracles, a drenching rain recharged all of Yosemite’s falls and Horsetail Fall suddenly sprang to life.
The flow was best on Monday, the day before my workshop started and the first day the clearing storm allowed the sunlight to reach El Capitan, but while Horsetail received nice light that evening, it was more amber than the red that photographers covet. By my group’s first shoot on Tuesday evening, the water had diminished significantly, but still flowed enough to etch a discernible white stripe on the gray granite, and send occasional wisps of mist swirling skyward.
Of the two prime Horsetail Fall locations, the picnic area on Northside Drive is usually a better place for a group because there’s more parking, and room for hundreds of photographers to work without getting in anyone’s way. But because the Horsetail throng was still a week or so away, I was able to squeeze my entire group into my favorite Horsetail location, the much less accommodating Southside Drive vantage point that provides a better angle and more compositional variety.
We arrived to find the waterfall fully lit—a good sign. I made sure everyone had a good vantage point, and while we waited (fingers crossed) for the show I suggested a variety of wide and tight compositions, and emphasized the importance of capturing the extreme highlights.
Watching the shadow’s slow advance toward the fall, we endured the standard fickle light that always seems to torment Horsetail Fall photographers: “Looking good so far… Here come the clouds—not a chance tonight…. Oh wait, it’s going to happen!… No, there it goes… Look! It’s coming back!” About five minutes before sunset, with no light on the fall and a thin layer of clouds dulling most of the visible sky, a few nearby photographers packed up and headed to dinner. But I know better and told my group sit tight. Sure enough, just two minutes after the exodus a faint pink glow appeared on Horsetail, and within 30 seconds the fall was throbbing red. The show lasted about three minutes, long enough for everyone to get their Horsetail Fall shot, and for me to breathe a sigh of relief. The rest of my workshop just became a lot easier.
With a Horsetail success in our pocket, I was able to concentrate the remainder of our workshop evenings on Yosemite’s other sunset marvels, but that didn’t keep me from checking the fall each time it was within eyeshot. The next day it was no more than a wet stain on El Capitan, and by Friday it was bone dry. And with no storms forecast for at least a week (and probably through the end of February), I think this year’s Horsetail Fall window has already slammed shut.
Horsetail Fall, El Capitan, Yosemite (February 2015)
The rest of the story
As someone who has photographed Horsetail Fall many times, and as nice as the fall was, my personal highlight this evening was the sunset that followed, when the clouds on the western horizon glowed bright red and spread their color in the Merced River. The first hint that something nice was in store was a soft pink glow above Yosemite Falls up-river and behind us. Many turned their cameras in that direction, but I kept my eye on the deepening red behind El Capitan. Beautiful, but a difficult capture. With the sky still quite bright but the entire foreground in full shade, the dynamic range would have been nearly unmanageable for my Canon cameras (without using a graduated neutral density filter or HDR blending). To be safe I could have tried a GND, but darkening the sky would have also meant darkening El Capitan (and more work in Photoshop). So I decided to give the scene a try without aid to see how the Sony a7R would handle the extreme contrast.
Exposing to make the highlights as bright as possible without clipping them, the shadowed foreground appeared nearly black on my LCD. But remembering that I constantly admonish my workshop students to trust their histogram and never make exposure decisions based on the picture in the LCD, I found hope in a histogram that skewed dark but still indicated detail in the shadows.
In my room that night I uploaded my card to my laptop and immediately went to the sunset images. Not only did the Shadows slider bring out the detail my histogram had promised, the shadow detail was unbelievably noise free. The rest of the processing was refreshingly straightforward. The result was this El Capitan image from a perspective I’ve never attempted without emphasizing Horsetail Fall.
I’m still getting used to the extra dynamic range of the a7R, and have yet to find its limit (but I’m pretty sure it’s less than infinity). Having this much dynamic range opens so many doors to landscape photographers, who have no control over the light Mother Nature delivers. In addition to the sunrise/sunset possibilities, I’m particularly excited about the opportunities extra dynamic range opens for my full moonrise and moonset image. I’ve always felt that the window for capturing usable detail in both the moon and foreground opened no more than fifteen minutes before sunrise, and closed no more than fifteen minutes after sunset.
As much as I embrace the creative possibilities brought by limited dynamic range (silhouettes, hiding distractions the shadows, high-key backgrounds), I guess the point is that more dynamic range means greater creative flexibility. With the processing control available from Lightroom and Photoshop, it’s much easier to return an extreme dynamic range capture to the kind of limited dynamic range image we’ve learned to deal with in camera, than it is to stretch more dynamic range from a camera that isn’t inherently capable of it. It’s a whole new world….
An El Capitan Gallery
Click an image for a closer look, and a slide show. Refresh your screen to reorder the display.


Yosemite Horsetail Fall Photo Workshop

Learn the when, where, and how of photographing Horsetail Fall
Mirrorless and my telephoto renaissance
Posted on February 7, 2015

Dawn Portrait, Mt. Whitney, Alabama Hills, California
Sony a6000
Tamron 150-600 @256 mm (384 mm full-frame equivalent)
Metabones Canon EF to Sony NEX Mark IV adapter
.4 seconds
f/11
ISO 200
Going smaller
Like most people, my original expectation for my nascent mirrorless world was a significantly lighter backpack, and indeed, I haven’t been disappointed. In my Canon days my primary pack was an F-Stop Tilopa with a medium ICU (F-Stop’s interchangeable internal module for storing and organizing gear), which held my 5D Mark III, Canon 16-35 f/2.8, 24-105 f/4, and 70-200 L lenses, plus a Zeiss 28 f/2 (for night photography). Unless I specifically planned a shoot that required it, my Canon 100-400L and 100 macro lenses traveled with my backup Canon body in a separate bag—not a big deal when I’m driving to a destination, but pretty much a non-starter when I have to fly (which I’m doing more and more).
After moving to the mirrorless Sony a7R, I immediately started using my smaller F-Stop Guru backpack, which easily handled the new body and the Sony equivalent of my primary Canon glass: Sony/Zeiss 16-35 F/4 and 24-70 f/4, Sony 70-200 f/4 G, plus the (Canon mount) Zeiss 28 f/2 and a Metabones adapter that allows me to use my Canon glass on a Sony EF mount body. This configuration gave me essentially the same focal range I had with Canon, in a significantly smaller, lighter package. Not only that, I can use a lighter tripod and head. Score.
But, since I hate shooting without a backup body and had heard fantastic things about the camera, I soon purchased a Sony a6000. This amazing little mirrorless camera’s 1.5 crop sensor makes it an ideal complement to my full-frame a7R, has (slightly) more resolution than the 5DIII, and (so far) appears to offer (at least) comparable image quality, with better dynamic range than the Canon. And with a little bit of rearranging, I found I could fit the a6000 into my Guru bag without jettisoning anything else.
The result of this downsizing is a camera pack that’s light enough for hiking without feeling like a backpacker, and and for cycling without feeling like I’m about to tip over.
Going bigger
For my ultra-telephoto needs, my plan all along had been to to use the Canon 100-400 with the Metabones adapter. But since the 100-400 had always been my least favorite lens—awkward to use, and not particularly sharp—I had no real plans to add it to my regular lens rotation. But my ears perked up when I started hearing my friend and similarly recent Sony convert (and fellow pro photographer) Don Smith raving about the Tamron 150-600 lens. Hmmmm….
The Tamron 150-600 arrived shortly before I departed for last week’s Death Valley / Mt. Whitney Winter Moon photo workshop. Because the Tamron lens isn’t available with a Sony FE mount, it would require an adapter as well. Don had been shooting the Sony A-mount version of the Tamron paired with Sony’s converter; I opted for the Canon mount version, reasoning that I could use it on my remaining Canon bodies should the need ever arise, and I already have the Metabones adapter. (Word on the street is that the Sony A-mount Tamron with the Sony adapter has much better autofocus than the Canon/Metabones combination, but I don’t need autofocus.)
First reaction? This is not a small or light lens. But as soon as I started using it, two things became clear: it’s much easier to use than my Canon 100-400, and it’s noticeably sharper. Suddenly, size notwithstanding, I had a lens that I could see myself using regularly.
If I’d still been lugging my Canon gear, I’d have had to sacrifice essential lenses each time I planned to use the 150-600. But with the mirrorless system and a little reconfiguring of the compartments in the Tilopa ICU (moving around the padded, Velcro-attached partitions), I can now carry in a single camera backpack (that fits in every overhead bin I’ve ever encountered, including the puddle-jumpers): three Sony bodies (a7R, my brand new a7S, and the a6000), plus lenses that give me a focal length range from 16 to 900 mm (the 150-600 lens is a full-frame equivalent of 225-900 mm on the 1.5-crop a6000). Life’s good.
In the field
So, what does a photographer do with all this new imaging power? Use it, of course. Visiting familiar locations as much as I do, I can’t tell you how refreshing it is to find a completely new way to see these landscapes.
The image at the top of this post was from my first time using the Sony a6000 and Tamron 150-600. To get a better handle on the conditions, I left home two days before the workshop, spending the first night in Lone Pine, near the Alabama Hills just beneath Mt. Whitney. After a moonlight shoot in the Alabama Hills, the next morning I rose before sunrise, strolled from my hotel room across the highway, and set up my tripod with the Tamron 150-600 mounted and a6000 attached.
The first time I aimed this combination at Mt. Whitney (the highest peak in the 48 contiguous United States), zoomed all the way out to 900mm (600mm x 1.5), and dialed in the focus, was an epiphany. Previously unseen rocks and trees snapped into view, and vortices of wind-swept snow spun on the summit. Amazing to my eye, but at 900 mm actually too close to find a composition I liked. So I pulled all the way back to a little less than 400 mm (256 x 1.5), framed up the mountain, and waited for the pink that always kicks off a Mt. Whitney clear-sky sunrise.
I captured this frame about ten minutes before sunrise. Being a little concerned about such a long focal length in low light, I hedged my bets slightly by using ISO 200 to halve my shutter speed. Since I notice little difference between ISO 100 and 200 on the a6000, I think 200 will be my standard ISO when I use the 150-600 on this body. But we’ll see.
The rest of the week was a rediscovery of ultra-telephoto photography. When I first switched to digital about twelve years ago, I started with a 1.6 crop Canon 10D, and my only telephoto lens was a 70-300, making images up to 480 mm a routine part of my capture paradigm. Isolating distant subjects, magnifying closer subjects, compressing foreground and background subjects—it was all a simple matter of reaching into my camera bag. But since switching to full-frame, and replacing the 70-300 with the (faster, optically better) 70-200, ultra-telephoto photography took backseat to more conventional landscapes, and I eventually forgot how much I enjoyed it when it was more convenient. Ultra-telephoto became something I had to plan, rather than a creative option available whenever the inspiration struck.

Moonset, Wildrose Peak, Death Valley
This is a 563 mm equivalent (375 mm X 1.5) sunrise moonset capture from Dante’s View
Don was assisting my Death Valley workshop (Don and I trade off assisting many of each other’s workshops), and I’m sure by the end of the week the group had grown weary of hearing Don and I gush about the fun we were having with our new toys. Sand dunes, moonrise, moonset, distant peaks—no natural feature was safe from our magnifying eye. A particular highlight came dark and early one morning at Dante’s View, when I turned the a6000 and 150-600 to Jupiter, low on the horizon near Telescope Peak, gathered the group around my LCD, zoomed to 600mm, and shared the glowing disk of our solar system’s largest planet surrounded by the four Galilean moons.
The bottom line
Mirrorless has definitely meant a significantly smaller, lighter bag to handle my “meat and potatoes” 16-200 mm focal length range (that I never leave home without) when mobility is paramount—hiking or biking, I hardly know there’s anything on my back.
But equally significant is the way compact mirrorless gear also allows me expand my creative options without hiring a Sherpa. Now, in the same backpack that once maxed out with a single Canon body (most recently a 5D Mark III) and Canon lenses covering 16-200 mm, I can travel with three mirrorless bodies, plus lenses covering an effective focal range from 16-900 mm (including my 28 mm f/2 Canon-mount Zeiss for night photography). Life’s good.
Visit my website to purchase prints and see my photo workshop schedule
An ultra-telephoto gallery (>200 mm)
Click an image for a closer look, and a slide show. Refresh your screen to reorder the display.


Links
Death Valley Winter Moon Photo Workshop

Moonrise Silhouette, Death Valley
Exceeding the sum of the parts
Posted on February 1, 2015
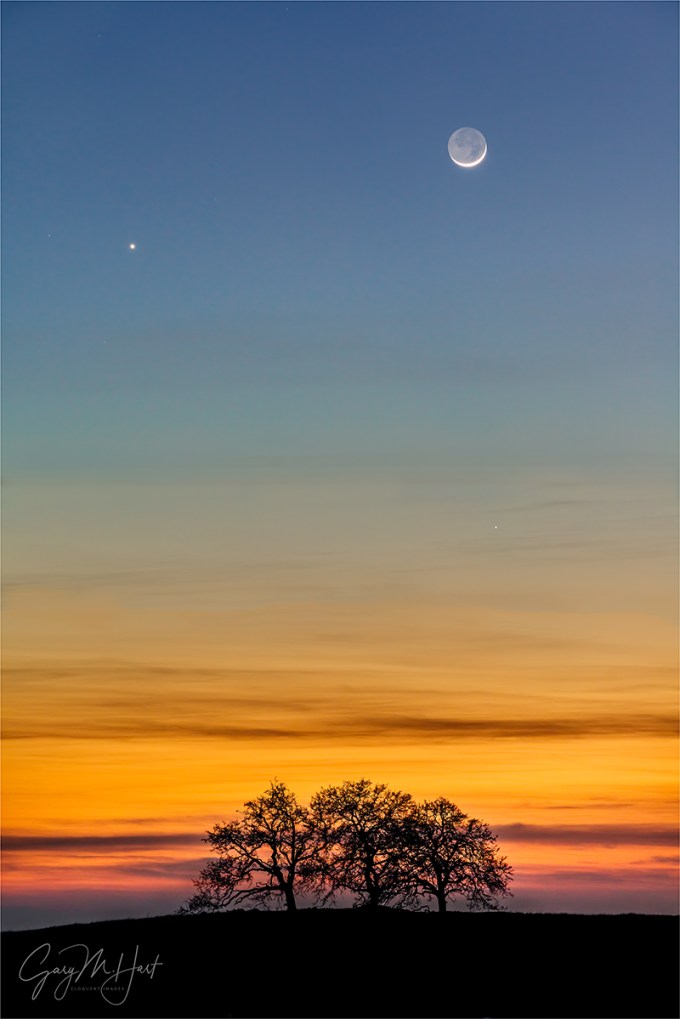
Heaven and Earth, New Moon and Venus, Sierra Foothills
Sony a7R
Sony 70-200 f4 G
2 seconds
F/8
ISO 400
When I decided to make photography my career, I promised myself I’d only photograph what I love. Not because I believed that’s where I’d find my best images (I wasn’t that calculating), but simply because the only good reason I could come up with for leaving an excellent job with a great company was to do something that made me truly happy. And lucky me—today most of my time behind a camera is spent pursuing subjects that touch a special place in my heart, subjects I’m naturally drawn to, camera or not.
For example…
There’s Yosemite, for sure. And pretty much anything celestial. Dramatic weather, dogwood, poppies, oak trees, reflections all thrill me. I could go on…. And as much as I enjoy these subjects individually, I love combining more than one to create (what at least feels to me like) a natural synergy. I mean, photographing Yosemite Valley is always great. And who doesn’t like to see a rainbow? But finding a rainbow arcing above Yosemite Valley? Well, you get the point….
While Yosemite Valley is a bit of a drive, and rainbows are unpredictable, ephemeral phenomena, the oak trees I love so much are deeply rooted less than an hour from home. And the moon is nothing if not predictable. So combining these favorites simply requires mixing a small amount of effort with a little cooperation from the weather.
Over the years, I’ve accumulated a number of candidate views in both directions: east for a full moon at sunset, west for a new moon at sunset; the other way around for sunrise. The east views will work for late afternoon rainbows too, but I’ve yet to capture one of those (it’ll happen).
Marking my calendar
Anxious for something to photograph between my Death Valley and Yosemite winter workshops, I made a point of highlighting the evening of this January’s full moon in my calendar. And rather than return to one of my tried-and-true foothill oak views, I left early enough to explore. After a great afternoon and many discoveries, I finally landed at the end of a new, graded but unbuilt cul-de-sac with a clear view of a distant trio of hilltop oaks.

While waiting for the moon to appear, I fired a few frames, silhouetting the trees against the sun descending through the orange sky, an unplanned and special juxtaposition in its own right. When the moon finally emerged above the darkening horizon, it was flanked by Venus. And when Mercury appeared a few minutes later (center-right, beneath the moon), I had a celestial triangle balanced above the terrestrial oaks. Synergy.
Workshop Schedule || Purchase Prints || Instagram
A gallery of natural synergy
Click any image to scroll through the gallery LARGE


The real California
Posted on January 26, 2015
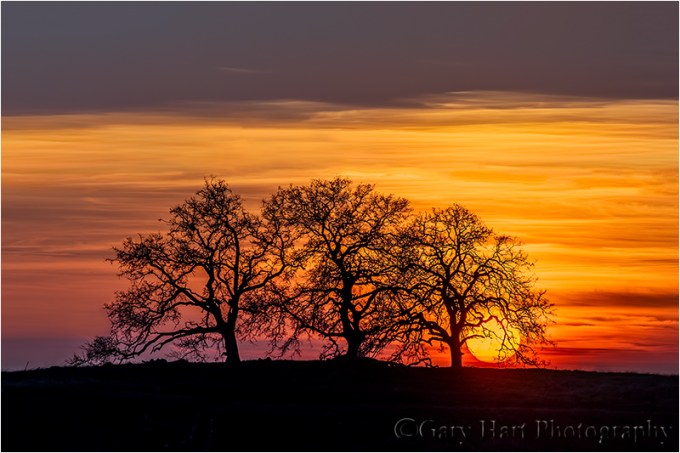
California Sunset, Sierra Foothills
Sony a7R
Sony 70-200 f4 G
1/200 seconds
F/8
ISO 100
I love driving the Sierra foothills east of my home in Sacramento, one eye on the road, the other scanning for gnarled oaks I can photograph against the sky. To my very California eyes, these are the scenes of home—not the palm trees and surf boards most people picture when they think of my home state.
California’s oak trees’ inherent beauty stands out when they’re silhouetted against a sunset horizon. I’ve accumulated many go-to locations for just this kind of scene, but because much of the joy of photography is the seeking, one afternoon last week I left home with no agenda but to explore some of the many untried foothill roads south of Highway 50.
My first detour took me into one of many new subdivisions that threaten the very foothills I love so much. Soon these wide open spaces will be smothered by homes, but right now they’re simply etched with a varicose pattern of fresh pavement. As sad as this “progress” makes me, on this afternoon the new roads gave me access to some views I’ve never had.
I wound as far back into the hills as the asphalt allowed, eventually ending up at the end of a cul-de-sac with a straight-shot view of three hilltop oaks. Because the afternoon was still young, I continued exploring, but as sunset approached, I knew this view was the one that would give me what I wanted—not just a sunset, but a sunset with a two-percent crescent moon flanked by Venus.
I arrived about fifteen minutes before sunset, surveyed the scene to find the best place align the moon with the trees, then watched the sun drop to the horizon. My original thought was to simply wait for the moon to appear, but when a the sun dropped into a translucent film of thin clouds gave that gave it yellow-orange cast, it occurred to me this would be a good opportunity to further test the dynamic range of my new Sony a7R. So out came my 3-stop Singh-Ray reverse graduated neutral density filter and my Sony 70-200 lens (sadly, the Canon 100-400 and Metabones adapter were at home), and I went to work.
Not only was I able to get a usable silhouette that still retained the color in the sun, the 36 megapixel resolution of the a7R allowed me to crop my result to more closely match the 400mm focal length I wished I had. Life’s good.
Workshop Schedule || Purchase Prints
A Sierra Foothills Gallery
Click an image for a closer look, and a slide show. Refresh your screen to reorder the display.


