Eloquent Images by Gary Hart
Insight, information, and inspiration for the inquisitive nature photographer
Exceeding the sum of the parts
Posted on February 1, 2015
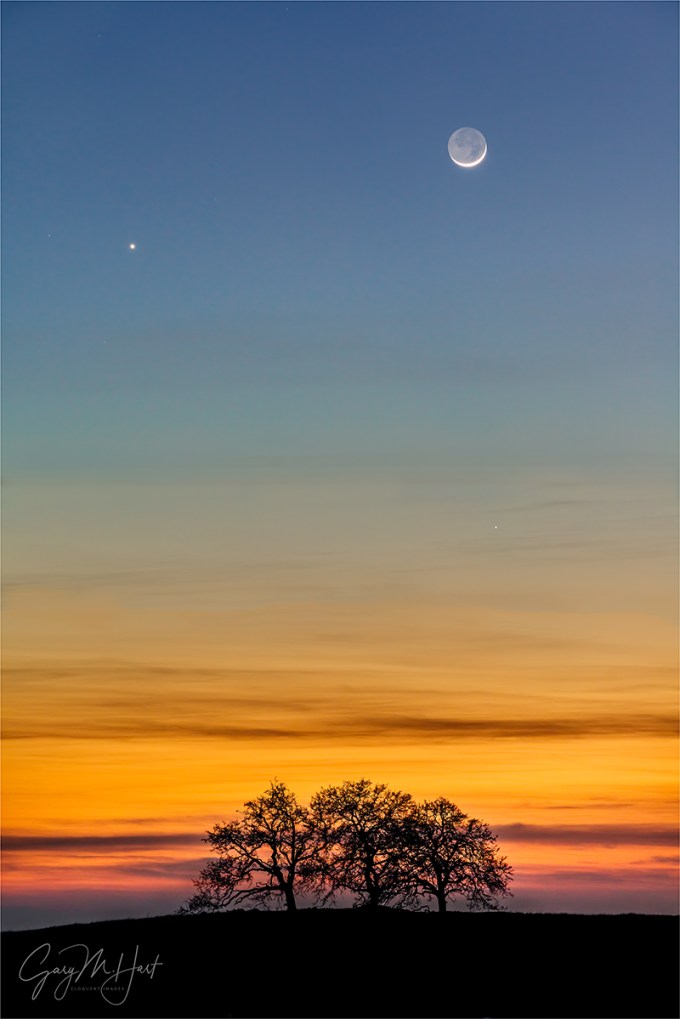
Heaven and Earth, New Moon and Venus, Sierra Foothills
Sony a7R
Sony 70-200 f4 G
2 seconds
F/8
ISO 400
When I decided to make photography my career, I promised myself I’d only photograph what I love. Not because I believed that’s where I’d find my best images (I wasn’t that calculating), but simply because the only good reason I could come up with for leaving an excellent job with a great company was to do something that made me truly happy. And lucky me—today most of my time behind a camera is spent pursuing subjects that touch a special place in my heart, subjects I’m naturally drawn to, camera or not.
For example…
There’s Yosemite, for sure. And pretty much anything celestial. Dramatic weather, dogwood, poppies, oak trees, reflections all thrill me. I could go on…. And as much as I enjoy these subjects individually, I love combining more than one to create (what at least feels to me like) a natural synergy. I mean, photographing Yosemite Valley is always great. And who doesn’t like to see a rainbow? But finding a rainbow arcing above Yosemite Valley? Well, you get the point….
While Yosemite Valley is a bit of a drive, and rainbows are unpredictable, ephemeral phenomena, the oak trees I love so much are deeply rooted less than an hour from home. And the moon is nothing if not predictable. So combining these favorites simply requires mixing a small amount of effort with a little cooperation from the weather.
Over the years, I’ve accumulated a number of candidate views in both directions: east for a full moon at sunset, west for a new moon at sunset; the other way around for sunrise. The east views will work for late afternoon rainbows too, but I’ve yet to capture one of those (it’ll happen).
Marking my calendar
Anxious for something to photograph between my Death Valley and Yosemite winter workshops, I made a point of highlighting the evening of this January’s full moon in my calendar. And rather than return to one of my tried-and-true foothill oak views, I left early enough to explore. After a great afternoon and many discoveries, I finally landed at the end of a new, graded but unbuilt cul-de-sac with a clear view of a distant trio of hilltop oaks.

While waiting for the moon to appear, I fired a few frames, silhouetting the trees against the sun descending through the orange sky, an unplanned and special juxtaposition in its own right. When the moon finally emerged above the darkening horizon, it was flanked by Venus. And when Mercury appeared a few minutes later (center-right, beneath the moon), I had a celestial triangle balanced above the terrestrial oaks. Synergy.
Workshop Schedule || Purchase Prints || Instagram
A gallery of natural synergy
Click any image to scroll through the gallery LARGE


The real California
Posted on January 26, 2015
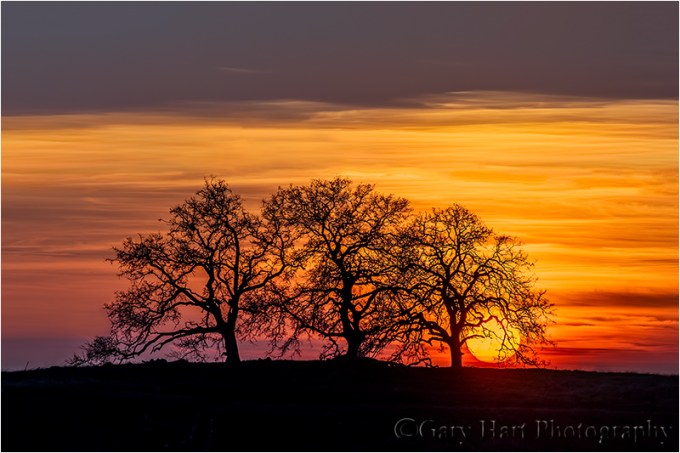
California Sunset, Sierra Foothills
Sony a7R
Sony 70-200 f4 G
1/200 seconds
F/8
ISO 100
I love driving the Sierra foothills east of my home in Sacramento, one eye on the road, the other scanning for gnarled oaks I can photograph against the sky. To my very California eyes, these are the scenes of home—not the palm trees and surf boards most people picture when they think of my home state.
California’s oak trees’ inherent beauty stands out when they’re silhouetted against a sunset horizon. I’ve accumulated many go-to locations for just this kind of scene, but because much of the joy of photography is the seeking, one afternoon last week I left home with no agenda but to explore some of the many untried foothill roads south of Highway 50.
My first detour took me into one of many new subdivisions that threaten the very foothills I love so much. Soon these wide open spaces will be smothered by homes, but right now they’re simply etched with a varicose pattern of fresh pavement. As sad as this “progress” makes me, on this afternoon the new roads gave me access to some views I’ve never had.
I wound as far back into the hills as the asphalt allowed, eventually ending up at the end of a cul-de-sac with a straight-shot view of three hilltop oaks. Because the afternoon was still young, I continued exploring, but as sunset approached, I knew this view was the one that would give me what I wanted—not just a sunset, but a sunset with a two-percent crescent moon flanked by Venus.
I arrived about fifteen minutes before sunset, surveyed the scene to find the best place align the moon with the trees, then watched the sun drop to the horizon. My original thought was to simply wait for the moon to appear, but when a the sun dropped into a translucent film of thin clouds gave that gave it yellow-orange cast, it occurred to me this would be a good opportunity to further test the dynamic range of my new Sony a7R. So out came my 3-stop Singh-Ray reverse graduated neutral density filter and my Sony 70-200 lens (sadly, the Canon 100-400 and Metabones adapter were at home), and I went to work.
Not only was I able to get a usable silhouette that still retained the color in the sun, the 36 megapixel resolution of the a7R allowed me to crop my result to more closely match the 400mm focal length I wished I had. Life’s good.
Workshop Schedule || Purchase Prints
A Sierra Foothills Gallery
Click an image for a closer look, and a slide show. Refresh your screen to reorder the display.


More thoughts on the Sony a7R
Posted on January 20, 2015

Rocks at Sunset, Garrapata Beach, Big Sur
Sony a7R
Sony/Zeiss 16-35
1/15 seconds
F/20
ISO 100
Read my original thoughts on the Sony a7R in my November 25 post, “New trick, old dog.“
It’s been about two months since I switched my primary camera from a Canon 5D Mark III to a Sony a7R. After a lifetime of seeing the “actual” world through my viewfinder, (for me at least) there has been some adjustment to trusting a digital facsimile of the world. I’m actually surprised by how long the adjustment is taking, but I’m getting there (and your results may vary). And this is really more my problem than the camera’s—I have no significant complaints with the camera’s interface or handling.
Another thing to prepare for is a lot more sensor dust. Unlike and SLR, which has a mirror and shutter to protect the sensor, a mirrorless sensor is pretty much exposed to the elements when the lens is removed. At the very least you’ll want to blow the sensor after each use, and do more aggressive cleaning very regularly.
On the positive side of the ledger, I appreciate the a7R’s extreme customizability. And I’m finding focus-peaking and (especially) the focus magnifier to be a godsend for my shooting style—I obsessively seek subjects from near to far in my frame, and am more than happy to forego the speed of autofocus for the precision of manual focus. As my trust in the a7R’s electronic focus aids grows, I find manual focusing so effortless that I never even attempt autofocus (nor do I miss using it).
But more important than interface and usability pluses and minuses, I continue to be blown away by the quality of the images I get from this camera. The a7R’s dynamic range is the stuff of dreams, and the sharpness and resolution continue to thrill me. I’m admittedly not a pixel-peeper, but I’ve not encountered any of the lens concerns some have reported online—my Sony/Zeiss 16-35, 24-70, and Sony 70-200 lenses are sharper than my Canon L glass. Period. I purchased the Metabones Canon-to-Sony adapter fully expecting to use my Canon lenses a lot, but so far have only used the Metabones once (it works fine).
I do have a concern about the sturdiness of the the a7R lens mount—all my lenses wobble too much where they connect to the body, and with minimal pressure can be removed without pressing the unlock button (some more easily than others). Conducting workshops gives me unique exposure to other cameras, and I can say that I’ve seen several a7Rs and they all exhibit this problem. But in a refreshing change of pace from my Canon experience, it appears that Sony has quickly (albeit tacitly) recognized the problem and improved the mount in its newer a7S and a7II bodies. While I’ve heard nothing about a lens mount recall of the first generation Sony a7 bodies (a recall that I feel would be justified), I won’t stress it too much because I found a simple and inexpensive solution: The Fotodiox TOUGH E-Mount completely fixed the problem on my a7R. I consider the Fotodiox mount a must for any Sony E-mount body the preceded the a7S. Installation is quite simple, but here’s a word to the wise: Before attempt the replacement, watch the video on the Fotodiox page; also note that you’ll need a Phillips #000 screwdriver (despite the picture on the website, one isn’t included with the mount).
And since we’re talking about things you might want to purchase, the a7R does not come with a battery charger. Instead, Sony gives you a USB cable that plugs into your camera and connects to the provided adapter (or any other USB adapter—I can plug their cable with my iPhone, Kindle charger, or computer). The problem with this is that the battery needs to be in the camera while you charge, making it impossible to charge a battery while you use the camera, not a great scenario for such a power-thirsty camera. You could spend another $50 or on Sony’s charger, or you could do what I did and buy a third-party charger. For about $27 on Amazon I got a Wasabi charger that includes two batteries (haven’t tested them, but at the very least they can be backups that hold me until I can get a primary battery charged), a car charger, and European adapter. I also ordered one more Sony battery as my primary backup (but I’m kind of obsessive about having backups).
And speaking of backups, perhaps the best indication of my level of commitment to the new Sony is that I just ordered a Sony a6000 (and the Fotodiox TOUGH E-mount). I can’t afford not to have a backup body, and the a6000 is a perfect complement to the a7R—in addition to its rave reviews, the a6000 is quite compact, is only around $700 (even cheaper if you shop around), takes all my EF mount lens, and with a 1.5 crop sensor, gives me extra focal length when I need it (in other words, it’s more than a backup). So it looks like I’m all-in with Sony. Stay tuned….
A few words about this image
The image at the top of today’s post is from my Big Sur visit early this month. I share it here because it’s a great example of why I’m so excited about the dynamic range of the a7R. Since I don’t blend images (just my personal style), I needed to capture this scene with one click. Even with the great dynamic range, I used a Singh-Ray 3-stop graduated neutral density filter to hold back the sky, had to pull the highlights down and shadows up the shadows a little in Lightroom, and do a little dodging and burning in Photoshop. But all things considered, this was a remarkably straightforward capture with the a7R (not much work to expose and process).
If you’re thinking about purchasing filters (like the graduated neutral density filter I used here), you can’t to better than Singh-Ray. For a 10 percent discount on the Singh-Ray site, use the discount code gary10.
A (growing) gallery of Sony a7R captures
Click an image for a closer look, and a slide show. Refresh your screen to reorder the display.


World in motion
Posted on January 9, 2015

Moon on the Rocks, Soberanes Point, Big Sur
Sony a7R
Sony/Zeiss 16-35
5 seconds
F/11
ISO 200
As a full-time landscape photographer, I often joke that I don’t photograph anything that moves—no wildlife, no pets, no portraits, no sports. And don’t even think about asking me to do your wedding. I’ve always been a deliberate shooter who likes to anticipate and prepare my frame with the confidence my shot will still be there when I’m ready—landscape photography suits me just fine (thank-you-very-much).
But as much as I appreciate the comfortable pace of a static landscape, the reality is that nature is in constant motion. Earth’s rotation spins the moon and stars across our night sky, and continuously changes the direction, intensity, and color of the sunlight that rules our day. Rivers cascade toward sea level, clouds scoot and change shape overhead, ocean waves curl and explode against sand and rock, then vanish and repeat. And even a moderate breeze can send the most firmly rooted plants into a dancing frenzy.
Photographing motion is frustrating because a single image can’t duplicate the human experience (not to mention the technical skill required to subdue it without compromising exposure and depth). But motion also presents a creative opportunity for the photographer who knows how to create a motion-implying illusion that conveys power, flow, pattern, and direction.
While a camera can’t do what the human eye/brain do, it can accumulate seconds, minutes, or hours of activity with one “look,” recording a scene’s complete history in a single image. Or, a camera can document an instant, an ephemeral splash of water or bolt of lightning that’s gone so fast it’s merely a memory by the time a viewer’s conscious mind processes it. This is powerful stuff—accumulating motion in a long frame reveals hidden patterns; freezing motion saves an instant for eternal scrutiny.
For example
-

- Fire on High, Kilauea and Milky Way, Hawaii
-
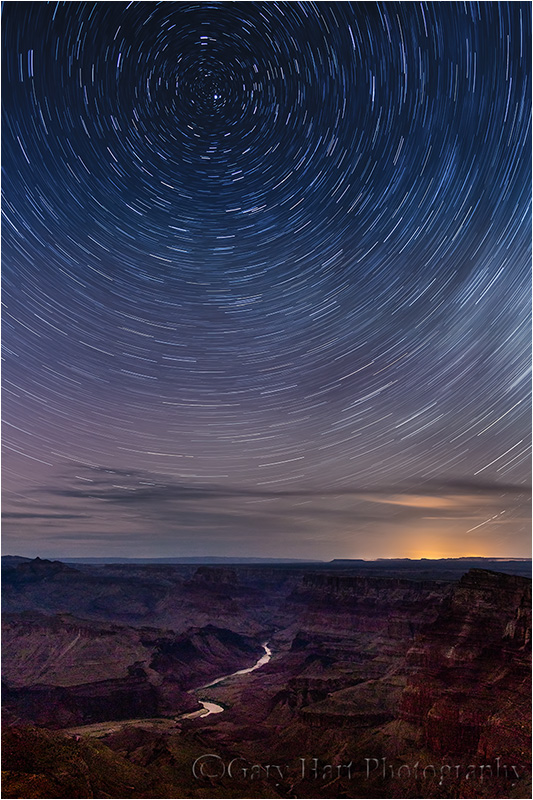
- Star Trails, Desert View, Grand Canyon
When I photograph the night sky, I have to decide how to handle the motion of the stars (insert obligatory, “It’s not the stars that are moving” comment here). Freezing celestial motion is a balancing act that combines a high ISO and large aperture with a shutter speed to maximize the amount of light captured, while concluding before discernable streaks form. My goal is to hold the stars in one spot long enough to reveal many too faint for the eye to register. Or, I can emphasize celestial motion by holding my shutter open for many minutes.
-

- Electric Night, Grand Canyon Lodge, North Rim, Grand Canyon
-
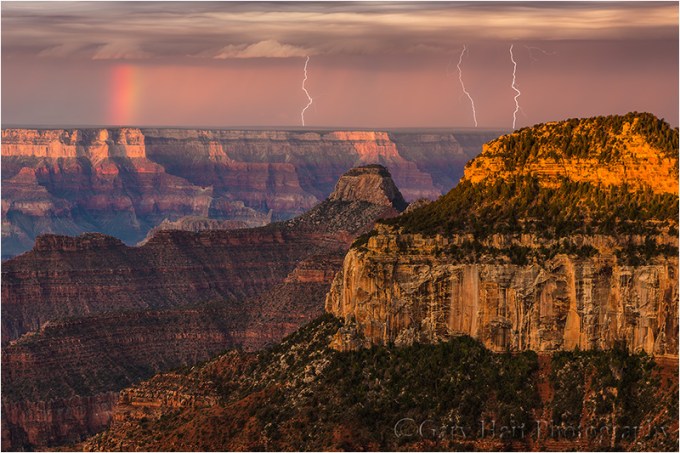
- Three Strikes, Bright Angel Point, Grand Canyon
Lightning comes and goes faster than human reflexes can respond. At night, a long exposure can be initiated when and where lighting might strike, recording any bolt that occurs during the exposure. But in daylight I need a lightning sensing device like a Lightning Trigger, that detects the lightning and fires the shutter faster than I can.
Moving water is probably the most frequently photographed example of motion in nature, with options that range from suspended water droplets to an ethereal gauze. I’m always amused when I hear someone say they don’t like blurred water images because they’re not “natural.”
Ignoring the fact that it’s usually impossible to achieve a shutter speed fast enough to freeze airborne water in the best (shade or overcast) light, I don’t find blurred water any less natural than a water drop suspended in midair (when was the last time you saw that). Blurred water isn’t unnatural, it’s different.
Which brings me to the image at the top of the frame, of the waves and rocks at Big Sur’s of Soberanes Point, and a (nearly) full moon dropping through the twilight on the distant horizon. I could have increased my aperture and ISO until my shutter speed stopped the motion of the waves, and timing the exposure just right, might have recorded an explosive collision of wave and rock—dramatic, but understating turbulence of the ocean/land interface. Instead, I opted for an exposure long enough to convey the action and extent of the agitated surf, but fast enough to hold the setting moon in place.
A gallery of motion in nature
Click an image for a closer look, and a slide show. Refresh your screen to reorder the display.


The shot less taken
Posted on January 5, 2015
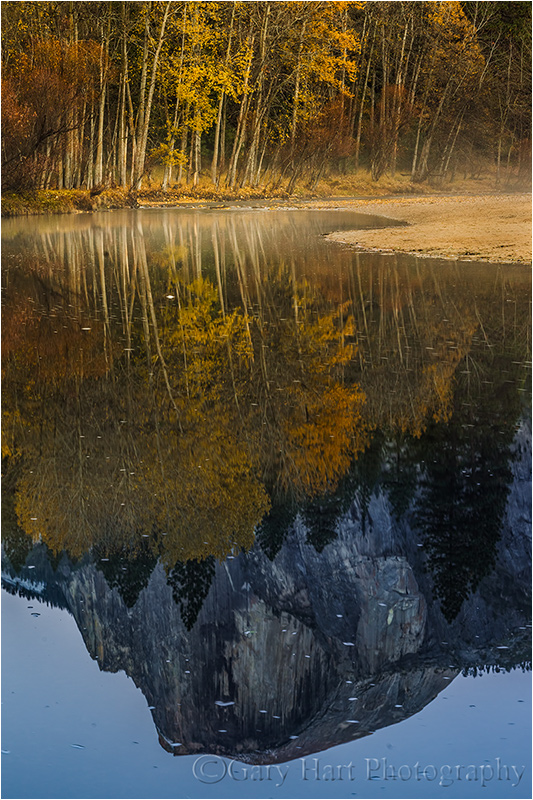
Autumn Reflection, Half Dome, Yosemite
Sony a7R
Sony/Zeiss 24-70
2 seconds
F/16
ISO 200
I’ve never been much of a New Year’s resolution person, but the start of a new year is an opportunity to take stock and regroup. This year I’ve been thinking about the proliferation of derivative images online and in magazines, images that are, no matter how beautiful, simply reproductions of thousands of previous image. Photographers see something they like and go out try to get it themselves.
I understand the urge to impress rather than create (for starters, it’s easier), and confess that I catch myself doing it too. As with pop music and formula fiction, the images that seem to sell best (not to mention garner the most Facebook Likes and “Stunning!” comments), are often facsimiles of preceding material. So photographers who make a living with their images are forced to subvert their creative instincts in favor of putting food on the table; and photographers who do it for pleasure are lured by the attention a well-executed duplicate generates.
The problem is compounded for workshop leaders, who are paid to guide their customers to the iconic spots (why do you think you see so many Yosemite Tunnel View images in my gallery?). My solution is to follow the advice I give my workshop students: Rather than make the “classic” Tunnel View clearing storm or molten Horsetail Fall image your goal, make that image the starting point, before moving on to less conventional ways to capture the scene.
Of course spending lots of time at iconic locations, in the best conditions (or simply getting out anywhere in good conditions), leaves me with a ton of really nice but less creative captures. I share them occasionally, but for the most part I opt for quality over quantity, and usually try to share only the images that stimulated my creative juices. (Another way of putting this would be that I choose to share images that make me happy, rather than images I think will make you happy—sorry.)
Which brings me to the Half Dome reflection image at the top of this post. The first instinct for most at this bend in the Merced River is to capture the wider scene (below), which I certainly did. But most of my clicks this evening were zoomed closer, concentrating on compositions that emphasize the reflection.
I won’t pretend that I’m the first to photograph this scene this way—I share it here to illustrate the way I try to distill a scene to its most essential components. I was leading a group this evening and didn’t take a lot of pictures, but if I’d been by myself I’d have zoomed even tighter on the tree reflection, and certainly would have played with long exposures that would have turned the drifting foam into parallel white streaks.
Even if finding the unique view is already part of your capture paradigm, challenge yourself to do it more. And because it’s only fair to hold myself to the same standard I ask of others, I’m also challenging myself to create more and settle less—it will be my mantra for 2015.

Autumn Twilight, Half Dome and the Merced River, Yosemite
This is a more conventional composition from this location. I captured it about ten minutes after the isolated reflection image above, for no other reason than I thought the twilight tones were pretty (knowing full well I’d probably not do anything with it). And that’s okay too. In fact, if it’s your first visit to a spot, starting with the conventional compositions is more than okay, is a great warm-up to familiarize yourself with the scene.
Photo Workshop Schedule
A gallery of alternate views
Click an image for a closer look, and a slide show. Refresh your screen to reorder the display.


Looking back, looking forward
Posted on December 29, 2014
For the final shoot of my final 2014 workshop, I guided my group up the rain-slick granite behind Yosemite’s Tunnel View for a slightly different perspective than they’d seen earlier in the workshop. I warned everyone that slippery rock and the steepness of the slope could make the footing treacherous (and offered a safer alternative), but promised the view would be worth it. Then I crossed my fingers.
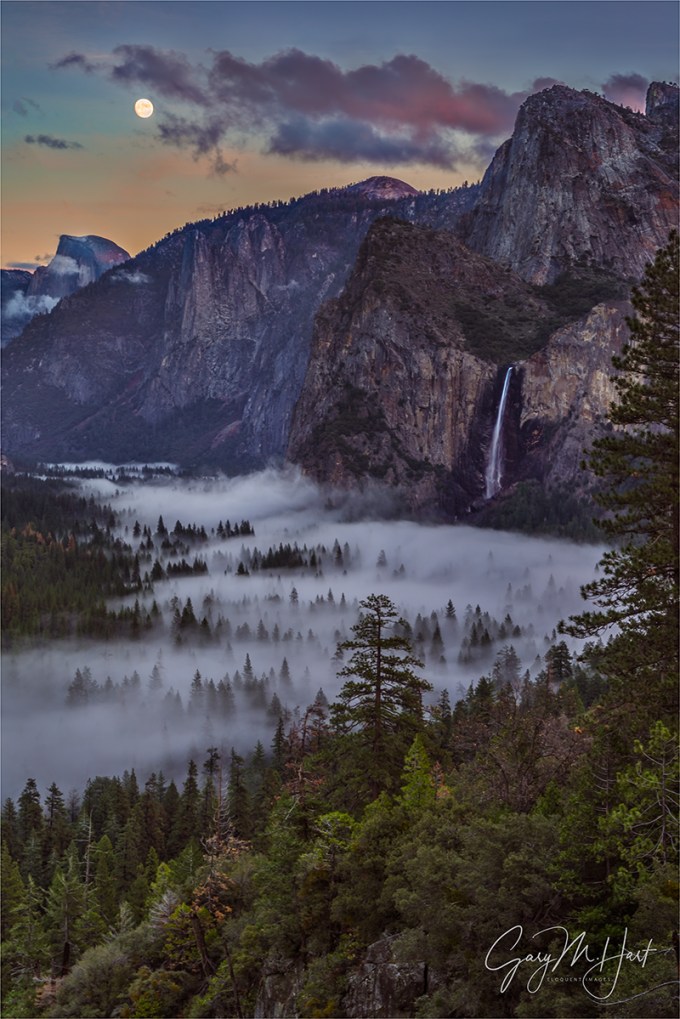
While sunset at Tunnel View is often special, the rare sunset event I’d been pointing to for over a year, a nearly full (96%) moon rising into the twilight hues above Half Dome, is a particular highlight, one of my favorite things in the world to witness. But after an autumn dominated by clear skies that would have been perfect for our moonrise, a much needed storm landed just as our workshop started, engulfing Yosemite Valley in dense clouds, recharging the waterfalls, and painting the surrounding peaks white. Rain clouds make great photography, but they’re not so great for viewing the moon.
As you can see from this image, the clouds this evening cooperated, glazing the valley floor, but parting above Half Dome enough to reveal the moon. The moon was already high above Half Dome when it peeked out, and shortly thereafter the retreating storm’s vestiges were fringed with sunset pink. As I often do at these moments, I encouraged everyone to forget their cameras for a minute and just appreciate that they may be viewing the most beautiful thing happening on Earth at this moment. Together we enjoyed what was a once-in-a-lifetime moment for them, and a fitting conclusion to another wonderful year of photography for me.
Like any other photographer who makes an effort to get out in difficult, unpredictable conditions, I had many of these “most beautiful thing on Earth” moments in 2014—they’re what keep me going. The last couple of weeks I’ve been browsing my 2014 captures and re-appreciating my blessings. Among other things, in 2014 I rafted the Colorado River through the Grand Canyon, was humbled by the Milky Way’s glow above the Kilauea Caldera, shivered beneath starlit bristlecone pines, and was electrified by the Grand Canyon monsoon’s pyrotechnics.
Most of my trips start with a plan, and while a lot of my 2o14 experiences followed the script, many deviated from my expectations, often in wonderful ways. My original vision of the moonrise on this December evening was clear skies that would allow the moon to shine; an alternate vision was a sky-obscuring storm that provided photogenic clouds. We ended up with the best of both, a hybrid of clouds and sky that I dared not hope for.
While I have a general plan in place for 2015, some places I’ll be returning to, others I’ll photograph for the first time, I know from experience that my plans won’t always go as planned. Clouds will hide the moon and stars, clear skies will cast harsh light, rivers will flood, waterfalls will wither, rivers will flood. But I also know that many of those thwarted plans will lead to unexpected rewards like this.
Here’s to a great 2015!

2014 in Review
Click an image for a closer look, and a slide show. Refresh your screen to reorder the display.


Building a scene
Posted on December 21, 2014

Clearing Storm Reflection, El Capitan and Bridalveil Fall, Valley View, Yosemite
Sony a7R
16 mm
.8 seconds
F/11
ISO 100
Lots of variables go into creating a successful landscape image. Many people struggle with the scene variables—light, depth, and motion—that are managed by your camera’s exposure settings: shutter speed, f-stop, ISO. Others struggle more with the composition variables: identifying, isolating, and framing a subject. (I’m not denying that there’s overlap between the exposure and composition sides of image creation, but leveraging that overlap requires independent mastery of both sides.)
Getting the exposure variables out of the way
Because I want to write more about the composition decisions that went into this image, I’ll only touch briefly on my exposure choices for the above image. I approach every scene with at my camera’s best ISO (100) and lens’s “ideal” f-stop (generally f11, where lenses tend to be sharpest, the depth of field is good, and diffraction is minimal).
Given that motion wasn’t a factor (I was on a tripod, the wind was calm, and the river’s motion didn’t concern me), I stuck with ISO 100. And even though the submerged rocks provided lots of visual interest in the immediate foreground, my 16mm focal length provided more than enough depth of field at f11—focusing about four feet into the scene would give me sharpness from around two feet to infinity. That was easy.
With those two variables established, I spot-metered on the brightest part of the scene and set dialed my shutter speed until the exposure was as bright as felt I could get away with without hopelessly blowing the highlights. This ensured that my scene (shadows included) was as bright as I could safely make it.
Here’s what I was thinking
Reflections of El Capitan, Cathedral Rocks, and Bridalveil Fall make Valley View one of the most photographed locations in Yosemite Valley. I usually I try to find something a little different than the standard view here, but the cloudy vestiges of a passing storm reflecting in the Merced River provide an irresistible opportunity to take advantage of everything that makes Valley View so special.
Some scenes you can walk up to and plant your tripod pretty much anywhere without much difference in your background subjects (though that’s rarely the case with foreground/background relationships). That’s not the case at Valley View, where the difficulty starts with distracting, non-photogenic shrubs on the near riverbank—to keep them out of the frame, you need to hop the rocks all the way down to the river.
The bigger problem at Valley View is getting all the primary elements into the image—too far to the left, and El Capitan disappears behind a stand of evergreens; too far to the right and another stand of evergreens occludes most or all of Bridalveil Fall. I moved into the fifteen-foot section of riverbank that gives me what I consider an adequate view of both, and started studying the submerged and protruding rocks right in front of me, looking for a workable foreground.
I’ll often move around quite a bit to control foreground/background subject relationships; in this case I found little benefit from shifting and stayed more or less in the same place. But that doesn’t mean I didn’t vary my shots—I tried a variety of compositions, but wide and tight, horizontal (above) and vertical (below). Some used lots of sky, while others (like this one) minimized the sky to emphasize the foreground. Still others were of the reflection only, or of the reflections with just a thin stripe of the opposite riverbank. The other variable I played with was my polarizer, which I turned to maximize and minimize the reflection, plus a combination (like both images here).

As with many images, composition at the top of the page required some compromises. I liked the way the vertical version leads the eye through the scene, and frames it with the two most striking elements—El Capitan and Bridalveil Fall. But I also wanted a horizontal rendering that would open up the scene and express its broad grandeur.
An often forgotten component of successful photography is what gets left out—an image’s perimeter are frequently home to distractions overlooked by photographers too drawn to their primary subjects. So the problem making a Valley View horizontal composition that’s wide enough to include the reflection and river rocks, is the introduction of potentially distracting elements on the far left and right.
In this case my greatest problem was the scene’s left side, with its bare trees, brown riverbank, and exposed rocks, it was rife with potential distractions to deal with. Shifting the entire composition to the right would have thrown the frame off balance, and added a lot of real estate that wasn’t worthy of the scene. Going tighter would have sacrificed too much river rock and reflection, an essential feature in my mind. I could have removed my shoes and socks, rolled up my pants, and walked forward through the (frigid) water—that move would have solved all my problems, but probably wouldn’t have been appreciated by all the other nearby photographers.
I ended up using the trees and rocks to frame the left side of the image, taking care to allow the entire arc of the riverbank to complete so it didn’t look like the nearby rocks (on the left) belonged a different scene. The vertical version doesn’t have these problems, and though it sacrifices the breadth of the horizontal composition, hold a gun to my head and I might tell you it’s the vertical version I prefer. (But it’s nice to have a choice.)
A Valley View Gallery


Revisiting Photography’s 3 P’s
Posted on December 15, 2014

Parting the Clouds, Yosemite Valley Moonrise, Tunnel View
Sony a7R
72 mm
1/15 second
F/11
ISO 100
Let’s review
I often speak and write about “The 3 P’s of nature photography,” sacrifices a nature photographer must make to consistently create successful images.
- Preparation is your foundation, the research you do that gets you in the right place at the right time, and the vision and mastery of your camera that allows you to wring the most from the moment.
- Persistence is patience with a dash of stubbornness. It’s what keeps you going back when the first, second, or hundredth attempt has been thwarted by unexpected light, weather, or a host of other frustrations, and keeps you out there long after any sane person would have given up.
- Pain is the willingness to suffer for your craft. I’m not suggesting that you risk your life for the sake of a coveted capture, but you do need to be able to ignore the tug of a warm fire, full stomach, sound sleep, and dry clothes, because the unfortunate truth is that the best photographs almost always seem to happen when most of the world would rather be inside.
Picking an image and trying to assign one or more of the 3 P’s to it is a fun little exercise I sometimes use to remind myself to keep doing the extra work. Take a few minutes to scan your favorite captures; ask yourself how many didn’t require at least one of the 3 P’s. (I’ll wait.) …….. See what I mean?
So which of my 3 P’s do I credit for this one? Well, there was the Persistence to continue going out in the rain all week, with no guarantee we’d see anything beyond 100 yards (because in Yosemite, if you stay inside until the rain stops, you’re too late). And of course photographing in the rain is nothing if not a Pain. But more than anything else, this one was about…
Preparation
(If you discount the unavoidable knowledge gained by a lifetime of Yosemite visits and and decades of plain old picture clicking) the preparation for this image started when I plotted the 2014 December moon and determined that it would rise at sunset, nearly full, above Half Dome in the month’s first week. So of course I scheduled a workshop for that week.
But there was more to the preparation than just figuring out where the moon would be. Of course as the workshop approached, I monitored the weather forecast and arrived in Yosemite prepared for rain. (Duh.) And throughout the workshop I monitored the weather obsessively, scouring each National Weather Service forecast update (every six hours), monitoring radar, not to mention the good old fashioned walk-outside-and-look-up technique.
Before going out for our penultimate afternoon shoot, I determined exactly what time the moon would appear above Half Dome, though I had little hope that the clouds would part enough to reveal it. Nevertheless, I wanted to to keep the group within striking distance of Tunnel View, just in case. When the latest weather forecast indicated a possible break in the rain late that afternoon, I started watching the sky closely—a clearing storm plus the moon would be pretty cool for everyone (including this life-long Yosemite photographer). The instant the clouds showed a hint of brightening (a subtle precursor to an imminent break that every photographer should be able to read), I raced everyone back up to Tunnel View.
As we pulled into the Tunnel View lot, not only was the storm starting to clear, a small patch of the first blue sky we’d seen in two days was widening above Half Dome. I held my breath and crossed my fingers for the blue to expand just a little more, because I knew exactly where the moon was and it was oh so close.
We didn’t need to wait long—within five minutes a thin piece of moon poked through, then a little more, and soon there it was, floating in that small blue patch between Half Dome and Sentinel Dome. It hung in there for less than five minutes before the clouds regrouped and swallowed the sky.
Epilogue
With more rain in the forecast, driving down from Tunnel View that night I felt certain that this unexpected, brief convergence of moon and sky was a one-time gift, that the planned moonrise for our final sunset would surely be lost to the clouds. And given what we’d just seen, I was okay with that. But Nature had a different idea….
A Gallery of Extreme Weather Rewards
Click any image to scroll through the gallery LARGE


Dialing it in
Posted on December 10, 2014

Rocks and Reflection, Valley View, Yosemite
Sony a7R
16 mm
1/3 second
F/11
ISO 200
I’m a big fan of the polarizer, so much so that each of my lenses wears a polarizer that never comes off in daylight. A couple of years ago “Outdoor Photographer” magazine published my article on using a polarizer, a slightly modified version of a blog post that appears in the Photo Tips section of this blog.
If you read that article, or pay much attention to what I write here, you know that while a polarizer can really crank up the blue in your sky, I’m not generally a fan of what the polarizer does to the sky. I find blue sky boring—making it more blue just distracts from my primary subject. And worse still, because polarization varies with the angle of view (maximum polarization occurs when composing perpendicular to the sunlight’s direction, minimum when you’re parallel to the sunlight), wide shots (in particular) display “differential polarization” that manifests as unnatural sky-color variation across the frame.
Where I find a polarizer most indispensable is terrestrial reflections. With a simple twist of a polarizer, a mirror reflection on still water is magically erased to reveal submerged rocks and leaves. More than the reflections we see on still water, a properly oriented polarizer removes distracting, color-robbing glare that jumps off of rocks and foliage. And you don’t need direct sunlight to enjoy a polarizer’s benefits—because reflections and glare exist in overcast and full shade conditions, a polarizer can significantly enhance those images as well.
But back to this differential polarization thing. As most know, a polarizer isn’t a filter that you simply slap on a lens and forget about. A rotates in its frame, changing the amount of polarization on the way—if you’re not orienting (rotating) your polarizer with each composition, you’re better off keeping it in your bag. Watching through your viewfinder as you rotate, you’ll see the scene darken and brighten—maximum polarization occurs when the scene is darkest. These changes may appear subtle at first, and in some cases will be barely visible, but the more you train your eye, the easier it becomes to detect even the most subtle polarization.
Since polarization varies with the angle of view, and any image encompasses a broad angle of view, the amount of polarization you see in any given image varies. While differential polarization is a real pain in images with a uniform surface (like a blue sky), understanding that a polarizer isn’t an all or nothing tool allows you to dial the reflection up in some parts of the scene, and down in others. Rather than automatically dialing the polarizer until the scene darkens (maximum polarization), or until the reflection pops out (minimum polarization), turn the polarizer slowly and watch the reflection advance and retreat as you turn.
That’s exactly what I did with the above image from last week’s Yosemite trip. The sunlit vestiges of a day-long rain swirled above Valley View and reflected in the drought-starved Merced River (one storm does not a drought break). Here I opted for a wide, vertical composition that left room for both foreground and sky tightly framed by El Capitan on the left and Cathedral Rocks and Bridalveil Fall on the right.
Faced with a crisp reflection and a submerged jigsaw of river-worn granite, I refused to choose one or the other. Instead, I composed my scene with a group of exposed rocks to anchor my immediate foreground, then carefully dialed away enough reflection to reveal the rounded rocks, while saving the portion of the reflection that duplicated the Yosemite icons.
I use Singh-Ray filters (polarizers and graduated neutral density)
A selective polarization gallery
Click an image for a closer look, and to enjoy the slide show


Classic Yosemite
Posted on December 3, 2014

Clearing Storm, Yosemite Valley, Yosemite
Sony a7R
33 mm
1.6 seconds
F/11
ISO 125
December 3, 2014: A brief post to share my workshop group’s good fortune this morning
I’m in Yosemite this week for my Winter Moon photo workshop. Scheduling a December workshop in Yosemite is one of those high risk/reward propositions—I know full well we could get some serious weather that could make things quite uncomfortable for photography, but winter (okay, so technically it won’t be winter for another two-a-half weeks, but it’s December for heaven’s sake, so don’t quibble) is also the best time to get the kind of conditions that make Yosemite special. In the days leading up to the workshop I’d warned everyone about the impending weather, but I’d also promised them that they were in store for something special at some point during their visit. Then I crossed my fingers….
We started Monday afternoon to blue skies and dry waterfalls, but by Tuesday morning the first major storm of California’s (usually) wet season rolled in and everything changed (literally overnight). A warm system of tropical origin, what this storm lacked in snow, it more than made up for in rain, copious rain. Starting before sunrise, we got a little shooting in before the serious stuff started, but the rest of the day was wet, wet, wet. When weather settles in like this, the ceiling drops and Yosemite’s granite features disappear behind a dense, gray curtain. Nevertheless, we found some nice photography and everyone finished the day saturated but satisfied.
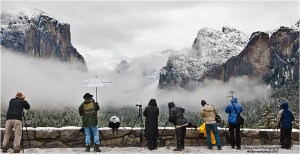
This morning (Wednesday) I got the group up to Tunnel View for sunrise, where were met with more of the same—opaque clouds and lots of rain, but little else. Since Tunnel View is usually the best place to wait out a Yosemite storm (thanks to the panoramic view, and the fact that the weather almost aways clears on Yosemite Valley’s west side first), I told everyone we’d just sit tight and see what happens. A few huddled in the cars, but most of the group donned our head-to-toe rain gear and stood out in the rain, waiting (hoping) for the show to begin.
As if on cue, at just about the advertised sunrise time (there was no actual sunrise to witness), the sky brightened and the curtain parted: El Capitan was first on stage, followed closely by a rejuvenated Bridalveil Fall, and soon thereafter the star of the show, Half Dome, appeared center-stage. Radiating from the valley floor, a thick fog rolled across the scene like a viscous liquid, changing the view by the minute—for nearly an hour everyone got to experience a classic Yosemite clearing storm.
As many times as I’ve witnessed a clearing storm from Tunnel View, the experience never fails to thrill me. Overlaying one of the most beautiful scenes on Earth, infinite combinations of cloud, sky, color, and light make each one unique. And as if that’s not enough, sometimes fresh snow, a rainbow, or rising moon are added to the mix. On this morning the clearing was only temporary, with no direct light or hint of blue sky, and the rain soon returned. Not that this was a problem—with more weather in store, this morning just turned out to be the opening act.
Check out my schedule of upcoming photo workshops
A Tunnel View Clearing Storm Gallery
Click an image for a closer look, and to enjoy the slide show


