Eloquent Images by Gary Hart
Insight, information, and inspiration for the inquisitive nature photographer
Too close for comfort
Posted on August 22, 2013
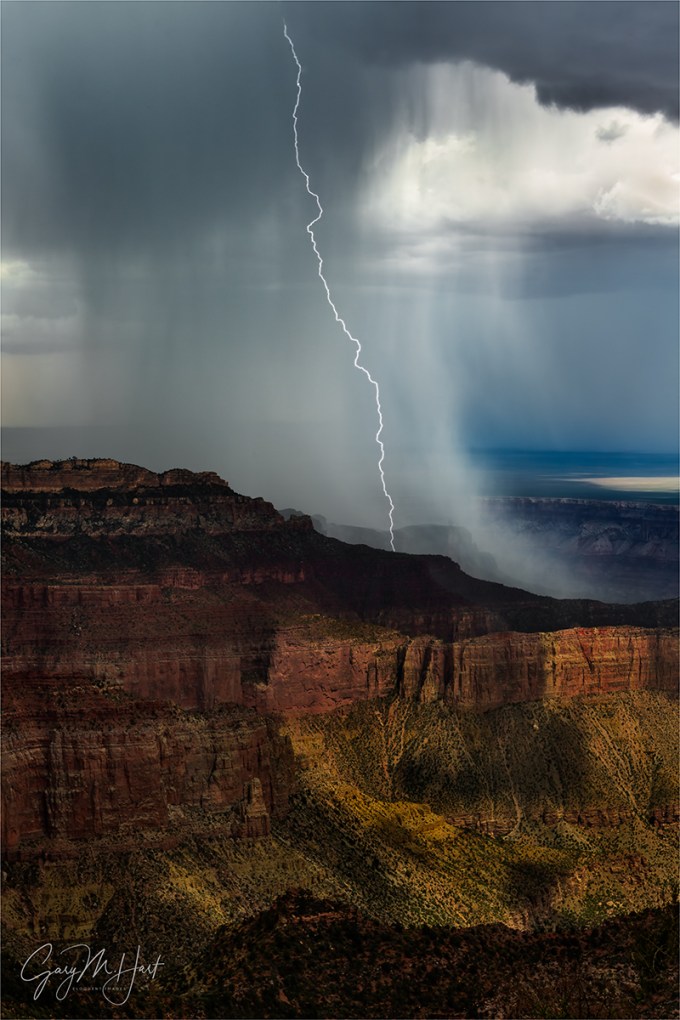
Electric Downpour, Point Imperial, North Rim, Grand Canyon
Canon EOS 5D Mark III
Canon 16-35 f/2.8L
1/8 second
F/16
ISO 50
After wrapping up our first Grand Canyon Monsoon workshop, Don Smith and I stayed a couple of extra nights on the North Rim to check-out potential locations for the second workshop. Saturday morning Don and I left our cabin with every intention of scouting (I swear) some remote, west-facing vista points, but black clouds and rolling thunder in the east (which we already knew quite well) gave us pause. The farther we drove, the blacker the clouds became, and the weaker our resolve to go scouting. A jagged bolt on the ridge north and east of the highway (a sign?) was more than enough to convince us to scuttle the scouting plan and beeline to Point Imperial.
With a 200 degree-plus east-facing panorama that includes the Vermillion Cliffs, the Painted Desert, the sheer walls of the Mosaic Canyon, and many named and unnamed red ridges and monuments, Point Imperial is one of my favorite North Rim vistas. By the time we arrived, the lightning was firing every thirty seconds north of us, well beyond the closest ridge. Gear in hand, I scrambled quickly down onto the rocks beneath the designated vista point for a better view—nobody moves faster than a photographer who feels like he’s missing the show (or so I thought). Don, a month out from knee replacement surgery, stayed up above, near the railed vista area.
Soon my Lightning Trigger had my camera firing away, usually at unseen bolts (it detects flashes obscured by clouds, or too distant for the eye), but occasionally at photogenic strikes too distant for the thunder to reach me. For the first thirty minutes the sky overhead was mostly blue and I watched with very little anxiety as the rain curtain with the most activity drifted slowly eastward. But when a thunder clap rolled across my exposed vantage point I glanced upward and saw nothing but angry clouds. So caught up in the awe of the moment, I’d failed to realize that the lightning frequency had intensified, and now some of the ridges I’d been photographing had disappeared behind an advancing downpour that looked that someone had opened a drain in the sky and released all the water in Heaven. Somewhat uncertain of my safety, I found comfort in the knowledge that the vista point above me still teamed with gaping tourists who surely knew better than this life-long California resident.
My comfort turned to concern when a rapid series of pulses drilled all the way down to the canyon floor just off to my right: One-thousand-one, one-thou… Boom! Hmmm. Maybe just a couple more frames…. Then I got the idea that, since it wasn’t raining on the point, I would leave my camera out to capture the action while waited in the car for the lightning to pass. About two steps into my controlled retreat the sky exploded. While I was pretty sure I’d broken land speed records descending the rocks when I arrived, that feat didn’t come close to the speed with which I flew back up to the car. Phew. Then the rain arrived, and suddenly my idea of leaving the camera out didn’t seem quite so brilliant. So, with rain (mixed with marble-size hail) falling, for the second year in a row, I performed a heroic rescue. Once again, with no regard for my personal safety, I dodged raindrops, hailstones, and lightning bolts (well, two out of three) to liberate my camera from the jaws of death.
Shortly thereafter the advancing column of water marched over us and set up camp. We eventually decided to move on to other locations, and while we saw lots of lightning, some of it too close to even start counting the seconds, we weren’t able to find a vantage point far enough removed from the action for photography. But for nearly an hour on Point Imperial, we had it as good as I could have imagined.
Join me in a Grand Canyon workshop
Workshop Schedule || Purchase Prints
Lightning
Click an image for a closer look, and to view a slide show.


Last Light
Posted on August 16, 2013

Advancing Squall at Dusk, Desert View, Grand Canyon
Canon EOS 5D Mark III
30 seconds
F/14
ISO 200
29 mm
It occurred to me while processing this image that, just like the lightning strike image in my previous post, this was my next-to-last image of the day. Which got me thinking about why I like these late-light images, and also about the similarities and differences between the two images.
Both images were captured in conditions much darker than the final image indicates. In this scene from Desert View on the Grand Canyon’s South Rim, the sunset’s fading vestiges clung to the northeast horizon, while a rain squall swept across the opposite rim. The workshop group had just wrapped up a glorious sunset shoot that included a double rainbow in the east, and fully illuminated, golden curtains of rain in the west. While I have many far more spectacular images from that evening (that I’ll no doubt get to eventually), there was something about the quiet of the rim after most of the photographers and sunset gawkers had vacated, that caused me to keep shooting in the gathering darkness.
As with Saturday night’s lightning image, the canyon’s color this evening was no longer visible, but it was still light enough to make out definition in the walls all the way down to the twisting Colorado River. And unlike the lightning shoot, when I was tense with anticipation of the next strike, my feeling this evening at Desert View was one of utter calm. I’d found my scene, the light was fading gradually, and all I had to do was wait for the advancing rain squall to move into my frame. Sublime.
Grand Canyon monsoon
Posted on August 12, 2013

Twilight Lightning, Roosevelt Point, Grand Canyon North Rim
Canon EOS 5D Mark III
8.6 minutes
F/8.0
ISO 200
85 mm
After a marathon drive (that included four states and one unscheduled visit with a Utah Highway Patrol officer) from Northern California to St. George, Utah, Don Smith and I arrived at the North Rim of the Grand Canyon on Saturday afternoon. Our goal was advance scouting for our back-to-back Grand Canyon Monsoon workshops, which start this afternoon (Monday). Though we’re both pretty familiar with the North Rim, we wanted to check the conditions there (the wildflowers are gorgeous right now), and since these would be our first workshops at the North Rim, we also wanted to get a better handle on the drive times to our various locations.
Another motive was to scrape the rust on our lightning triggers, which hadn’t been used since last summer. Unfortunately, the Grand Canyon weather reports were less than promising, so when we headed out to shoot sunset Saturday night, lightning wasn’t on our mind. But shortly after arriving at our sunset destination, Walhalla Point, we saw a bolt strike across the canyon, above the Painted Desert. So out came the lightning triggers, and we spent the entire shoot bouncing between the (occasional) lightning in the east and truly gorgeous sunset color and sidelight along the rim to the south.
Don and I had much better luck with the sunset than we did with the lightning triggers (it turns out the rust was more on the photographers than the triggers). Our lightning attempts targeted one area in particular, but as the light faded, so did the lightning our target zone, and we became resigned to chalking this first night up to experience. But about the time we were ready to wrap up (ever notice how many stories of successful images start with those words?), we started seeing more lightning strikes farther north. Though it was getting cold up there at 9,000 feet, we thought we’d give it one more shot and move a few miles north to Roosevelt Point.
Twilight was in full bloom by the time we arrived at Roosevelt Point; fortunately, so was the lightning. I started with my lightning trigger, but soon switched it off in favor of long exposures. It seemed that one out of every two or three 30-second exposures seemed to capture a bolt, but with the light fading quickly, I needed to adjust my exposure after each frame. Soon I found myself in bulb mode, with exposures measured in minutes. The image here is my penultimate frame, a nearly nine-minute exposure captured forty-five minutes after sunset. The long exposure was able to wring out just enough light to reveal detail in the canyon. (The final frame, though exposed 2 1/3 stops brighter, was even darker than this one.)
This image perfectly illustrates the difference between the camera’s reality and ours. The scene my eyes saw was dark: not only was the Grand Canyon’s rich red completely lost to my eyes, its ridges and chasms were reduced to barely perceptible dark shapes. And the bolts you see here were not simultaneous—the one on the right fired early in the exposure, the two on the left came together toward the end. But through my camera’s unique vision, I was able to reveal the Grand Canyon in a way we human’s can only imagine.
Favorite: The Big Dipper
Posted on August 6, 2013
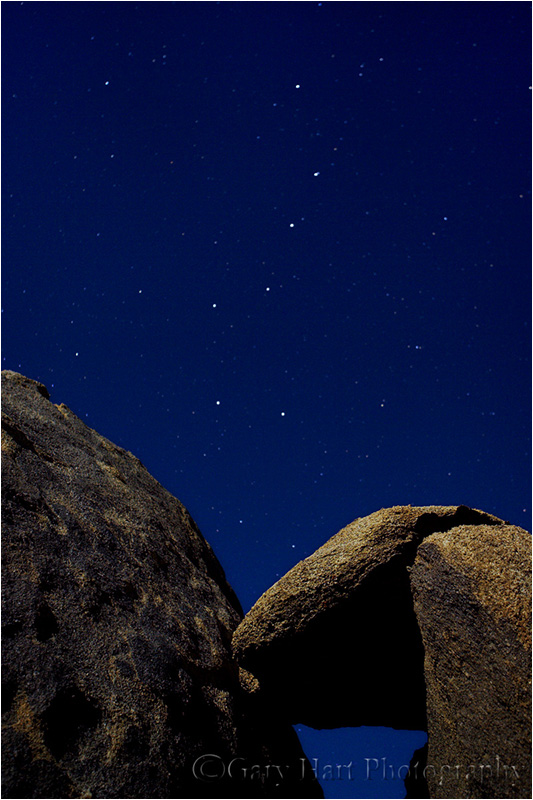
Big Dipper, Alabama Hills, California
Canon EOS-1D Mark II
20 seconds
F/2.8
ISO 200
25 mm
I’ve decided to turn my new Favorites gallery into an irregular series on each of the images there.
* * * *
This image of the Big Dipper above moonlit granite boulders in the Alabama Hills will always have a special place in my heart because it was my first moonlight “success.” I was still coming to terms with the low light capabilities of digital photography, and figured that a full moon over the Alabama Hills might be a good opportunity to play. I was in Lone Pine with my brother to explore the endless daylight possibilities among the weather granite boulders just west of town.
Jay and I started that night by simply photographing the Sierra crest, anchored by Lone Pine Peak and Mt. Whitney, from the side of the road. It wasn’t long before I was confident that I had the exposure settings right (arriving through trial and error at the moonlight exposure recipe I still use), and we soon set out for less prosaic surroundings, ending up in a box canyon at the end of an obscure spur off (unpaved) Movie Road. All of my attention was on Lone Pine Peak and Mt. Whitney in the west, but while waiting for an exposure to complete, I noticed the Big Dipper suspended above the northern horizon.
I wish I could say this composition was divine inspiration fueled by my innate artistic instincts, but it was more of a casual click using a couple of anonymous boulders whose prime attraction was their convenience. Focus was tricky, and while I don’t specifically remember all my decisions, I know I must have realized that sharp foreground rocks trumped sharp stars (that would be moving slightly anyway). I’ve done enough moonlight photography since to know that while manual focus in the dark is difficult, it’s not impossible. Finding focus involves rapidly twisting the focus ring in decreasing concentric arcs around the point where the target “feels” sharp—subsequent experience has taught me that (for me at least) the results are usually better than I fear they are. And of course it doesn’t hurt that even at f2.8, 25mm gives me quite a bit of depth of field.
I remember thinking when the image popped up on the postage-stamp LCD of my 1D Mark II, “That’s pretty cool.” But I couldn’t have been too impressed because I only took two frames before returning to the (ultimately forgettable) Sierra compositions. The next memory I have is looking at my images on my laptop later that night—it was quite clear that this image was my favorite, by a long-shot, and I wished I’d have tried more. I’ve tried unsuccessfully to find these boulders on subsequent visits, but I haven’t given up. I can’t even say that I’d photograph them again, but I’d at least love to see them once more.

We photograph the Alabama Hills in my Eastern Sierra photo workshop—click for details
Picking favorites
Posted on August 1, 2013
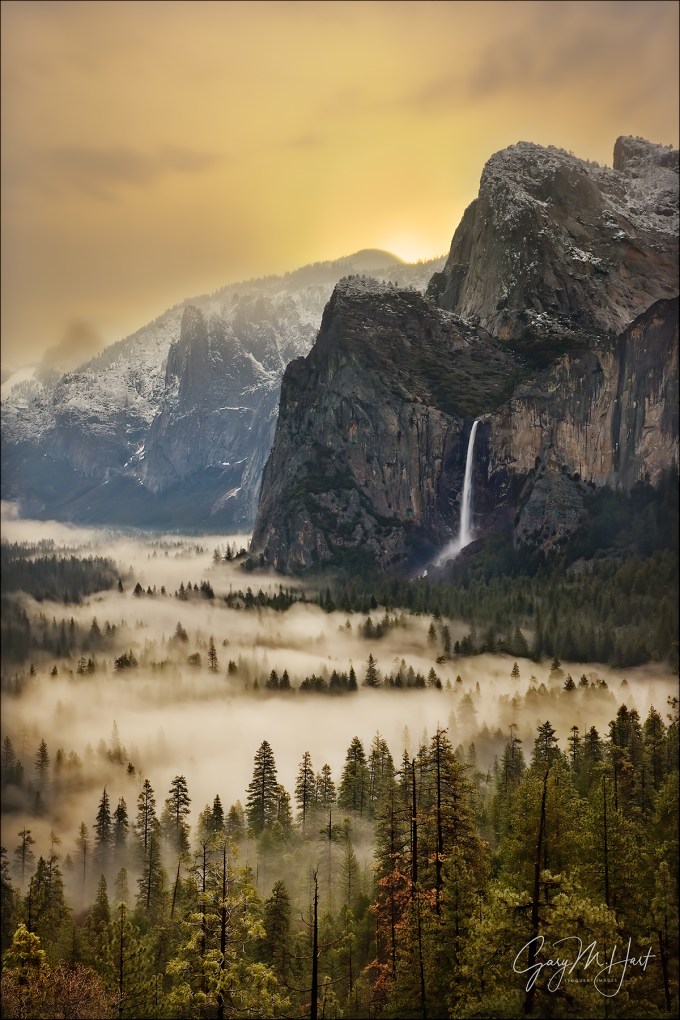
First Light, Yosemite Valley
Canon EOS-1Ds Mark III
3/10 second
F/16.0
ISO 100
65 mm
A few weeks ago I added a Favorites gallery to my website, which of course forced me to make all kinds of difficult choices. First I had to figure out what “favorite” means. Is the gallery going to represent my favorites, or will it be the images that sell best (often not the same thing)? My mercenary instincts told me that, since this is page allows people to click to purchase ($$$), I should go with the bestsellers. But when I decided to make my living with photography, I vowed to only photograph what I want to photograph, and to never base my decisions on what will sell.
While things became easier once I decided to go with my personal favorites, that decision put me in something of a Sophie’s Choice quandary. I really never select any image to display unless I like it a lot, but if I want to keep my Favorites gallery down to a manageable number, I need to choose my favorite “children.” (It occurs to me in hindsight that choosing a favorite image by what sells best would be kind of like choosing a favorite child based on who gives the best presents. Hmmm….)
Once I hardened myself to the process (sorry kids), it became an enlightening exercise that, among other things, showed me how my style has evolved. Disabling the analytical side of my brain and going with “feel” enabled me to revisit my entire portfolio with new eyes, to shed old biases and reject images that had become default favorites, in favor of images for which I discovered a new affinity.
It also became clear to me that “favorite” is a moving target—what I choose today isn’t necessarily what I’ll choose tomorrow. (I’ve even made a few changes as I work on this post.) I plan to make this a pretty dynamic gallery, so please feel free to visit often (no purchase necessary).
First Light, Yosemite Valley
Labeling the image in this post a “favorite” was a no-brainer—it’s always been a personal favorite, and it has become one of my top sellers (not to mention my WordPress avatar). And even though Tunnel View images are a dime a dozen, this was a special, one-of-a-kind spring morning that I never tire of revisiting.
I was there with a workshop group, and if memory serves, we’d had a nice sunrise shoot, but nothing truly unique. The air was crystal clear and quite cold for April, still enough to allow the moist valley air to condense into a radiant fog that hugged the floor, ebbing and flowing like liquid. As the sky brightened we photographed a pink veneer of translucent clouds, a particular treat for those who’d never been to Yosemite.
When the color started to fade, I was about to move the group on to our next location when a brightness behind Sentinel Dome caught my attention. So I waited. And as we watched, the light intensified, expanding before our eyes into a diaphanous film that spread a buttery glow that turned our world into an amber light box. I captured several frames; this is my favorite.

Join me in an upcoming photo workshop
A gallery of favorites


, California")
Moon over wherever
Posted on July 26, 2013
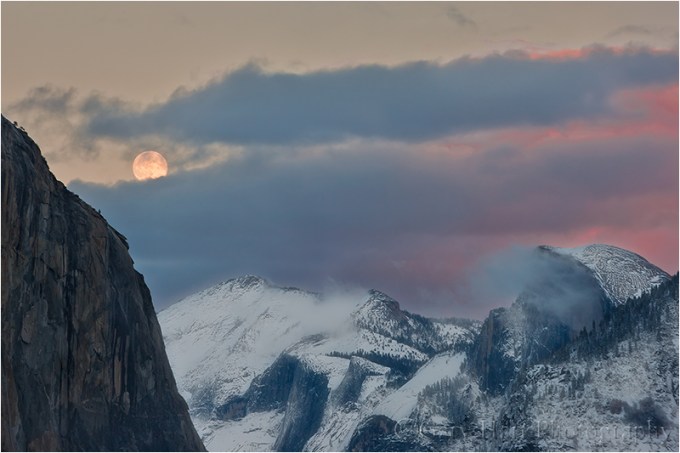
Winter Moonrise, Half Dome, Yosemite
Canon EOS-1Ds Mark III
1/6 second
F/11.0
ISO 100
188 mm
Often, including a rising or setting moon will turn an ordinary landscape into something special. Of course, like most things worth doing, moon photography adds a couple of layers of complication: First, there’s the matter of getting there at the right time, with the moon in the right place (it does little good to arrive as the moon rises if it’s skewed 90 degrees from the scene you came to photograph); and once you have everything lined up, you still have to contend with the almost always tricky exposure issues.
A little lunar geometry (you can skip this section of you’re more interested in “how” than “why”)
Many factors, some within our control, some completely beyond our control, determine the time, location, and phase of the moon at any time. The factors beyond our control are things like the earth’s rotation and the moon’s orbit, which determine the moon’s phase and its absolute position in the sky. On the other hand, we can control our location, and take the steps necessary to get us in the right place at the right time.
A full moon always rises and sets directly opposite the sun, rising in the east at sunset and setting in the west at sunrise. This actually makes perfect sense when you take a little time to understand the monthly choreography of the earth, moon, and sun. Just as the earth revolves around the sun, the moon revolves around the earth; at any point in this dance, half of the earth is lit (daytime) and half of the earth is dark (nighttime), half of the moon is lit and half of the moon is dark.
What we on earth see as a full moon is simply that one day each month that the moon’s entire lit side faces the earth’s dark side—that is, when the earth is directly between the sun and the moon (picture a beam of light that follows a straight line that starts at the sun, passes through earth, and ends on the moon). On that day only, as the point of your location on earth rotates from day to night, you’ll see the sun disappear in the west and the moon rise in the east. As the earth keeps rotating away from daylight and into night, the full moon rises higher and higher, reaching its highest point around midnight, then dropping as your location rotates back toward the sunlit side (and sunrise).
So then why do we rarely see a full moon rising exactly as the sun sets? That’s because: 1) the point of maximum fullness (when the sun, earth, and moon align perfectly) only happens at one instant each month—at every other instant of each month’s full moon day, the moon is only almost full (but still full enough to appear completely full); and 2) sun/moon rise/set times we see published always assume a flat horizon—if you have mountains between you and the horizon, your view of the actual sun/moon rise/set will be blocked.
Due to its monthly orbit about the earth, each day (or night) the moon rises a little later and gains or loses a little bit of its disk (the farther it has revolved from that sun->earth->moon line, the less of the moon’s lit side we see). So the night after the moon is full, it rises after sunset and is a little less full. The next night it rises a little later still, and is even less full, and so on. Eventually (in a little more than two weeks after it was full) the moon has revolved all the way around the earth until it lies between the earth and sun (now our imaginary line goes sun->moon->earth); all of its sunlit side faces away from the earth and we have a new (invisible) moon.
We call the moon “new” because the night before it disappears into the sun, all that was left of the shrinking moon (that was completely full about two weeks ago) was a small sliver that shined briefly on the eastern horizon just before sunrise, then disappeared as soon as the sky brightened (it’s still up there, but completely overpowered by the sun’s brightness). The next day the moon won’t appear at all because seeing it would require looking directly into the sun; but the following day, there it is, this time as a thin sliver on the western horizon immediately after sunset (again, it was up there most of the day, we just can’t see it until the sun sets and the sky darkens). This brand new crescent slips below the horizon shortly after it appears. And for the next two-plus weeks it will rise a little later, and grow a little larger, each night, until it’s full again and rising at sunset. Cycle complete.
If we do the math (this won’t be on the test), we can infer that if the moon takes 29.5 days to complete its cycle (from full to new and back to full), and there are 24 hours in a day, the moon must be rising about 50 minutes later each day (29.5/24=48.8). This rough approximation varies with many factors; for simplicity I usually round it to an hour when I do rough calculations in my head. And I always rely on much more precise software or astronomical charts for my critical calculations.
Locating the moon
Those who don’t do a lot of moon photography are amazed at how much the moon shifts above the landscape throughout the year—you can sight a full moon rising between Half Dome and El Capitan one month, and a few months later it’ll be rising above Leaning Tower (far to the south). Fortunately, like many things in nature that appear random to the uninformed, there is actually nothing random about the moon’s location once you take the time to figure it out.
If the idea of figuring anything saps the pleasure from your photography (or sends you into a panic), you’ll be happy to know that sometimes it’s enough to simply know that the moon will be rising in the east a little before sunset (this info is available in many places, in many forms, but the most complete source I’ve found is the US Naval Observatory website). Armed with that knowledge, you can go out to a location with a view of the western horizon, wait for the moon to appear, and start shooting.
On the other hand, juxtaposing the moon with a specific landmark requires more planning. And because its position is so not random, many others have done the heavy lifting for the rest of us. There are far too many moon phase/position resources to name even a small percentage of them, so rather than even try, I’ll just give you a couple of techniques, and the tools that enable them:
- My old fashioned way (old trick for an old dog): I figured out my technique for locating the moon long before computer software and smartphone apps took away most of the effort. Nevertheless, I continue to do it this way because I’ve already done all the hard work (figuring out how to do it), and I can do it in the field, with zero connectivity (no wifi or cell signal required). After relying for years on a the US Naval Observatory website for the info I need (moon phase and moon/sun rise, set, altitude, and azimuth), I now get all the pertinent data from my Focalware iPhone app (I never said I’m opposed to new technology), plugging it into my National Geographic Topo! (that’s NG’s exclamation point, not mine) mapping software (discontinued) to plot the direction of the moon’s rise/set. To determine when the moon will appear above (or disappear behind) the surrounding terrain, I plug distance and elevation information from Topo! into the trigonometric functions of my HP 11C scientific calculator (originally an actual calculator, but now also an iPhone 11C emulation app) to compute the elevation in of my horizon.
- Software (the better way for 99.999 percent of you): The Photographer’s Ephemeris (a free computer download or fairly inexpensive smartphone app) is the most complete solution that I know of (though I’m sure there are others I don’t know of)—I probably would have never taken the time to figure out my technique if TPE had been available. Not only does TPE give you the sun and moon’s location and elevation above the flat horizon, it also figures out the the actual (terrain included) horizon. The downside is that because it uses Google Maps, TPE requires connectivity and is better used in advance of your shoot (usually not a problem). Recent TPE versions also allow you to download the maps to your device for offline access—if I were a TPE user, I’d be doing this before every trip.
Exposure
My rule for photographing a rising/setting full moon is that I must capture detail in the landscape and the moon. If my landscape is black (or just too dark), or my moon is a white disk (or blob), my image has failed. But since the post-sunset landscape is in full shade, and the moon is as bright as a sunlit landscape (because it is a sunlit landscape), the dynamic range of a full moon scene is pretty extreme, often too extreme for a camera to handle with a single click (always my goal).
But here’s the great part—if you figure that the moon rises about an hour later each day, and the full moon rises at sunset, then it stands to reason that the day before it’s full the moon will rise about an hour before the sun sets. Factoring in the terrain on the horizon (and assuming you’re not at the base of a mountain), that means that the day before the moon is full is the best opportunity to photograph a nearly full (say 97%, give or take a percent or two) moon rising in the east above a landscape painted with the warm sunlight of the golden hour. Conversely, if your view is to the west, you can photograph a nearly full moon setting in warm sunrise light the day after it’s full. Either way, the day before or after the full moon gives you everything you need to capture your scene in nice, photographable light that’s still sufficient to hold the moon’s highlights at bay.
I’ve found that if I’m really careful with my exposure, I can usually capture enough foreground and lunar detail until five or ten minutes after sunset. Shooting after sunset usually requires raw capture, then massaging the dark foreground brighter, and bright moon darker, in the raw processor. A graduated neutral density filter can increase this threshold to maybe fifteen or twenty minutes after sunset—after that my foreground is unusably dark (or my moon is recoverably bright).
Another technique that works when the light gets too extreme is a composite—two images, one exposed for the landscape and the other exposed for the moon, combined in Photoshop. In the “Rules According to Gary,” this isn’t cheating if you don’t change the size or position of the moon. (Though it doesn’t break my rules, I no longer do composites because I have this weird compulsion to get everything with one click.)
The final piece of exposure advice I’ll add is to make sure your camera’s blinking highlights (also called highlight alert) are set (as far as I’m concerned, they should be set anyway because I see no downside to highlight alert). The moon is usually so small in your frame that it won’t register in the histogram, which means blinking highlights are usually the only way to know that you’re blowing out the moon. I monitor my highlights closely after each exposure and have found that, when shooting raw (jpeg shooters don’t have as much margin for error), I can usually recover enough detail with an exposure 2/3 to 1 stop brighter than the exposure that first showed blinking.
Just do it
Like most things photographic, don’t expect resounding success the first time you try adding a full moon to your landscape. But each time you go out, not only will you improve, you’ll probably come away with ideas for how to do it differently the next time.
Read more about moon photography


The Moon: (Sometimes) Size doesn’t matter
Posted on July 21, 2013

Goodnight Moon, Sierra Foothills, California
Canon EOS SL1
8/5 seconds
F/5.6
ISO 100
300 mm
A few years ago I proposed an article to “Outdoor Photographer” magazine on photographing the moon. The editor at the time (not the current OP editor) replied that moon photographs don’t work because the moon appears so much smaller in a photograph than people remember it. I couldn’t argue—the moon does indeed look smaller in a photograph than we perceive it in person. But I’ve never thought the moon needs to appear large to be an effective subject because its emotional power gives even the smallest moon enough visual weight to grab the eye and hold a disproportional segment of the frame. Ansel Adams certainly had this figured out, making a small moon the prime focal point of many images, including the image that’s arguably his most famous, “Moonrise, Hernandez, New Mexico.” Nevertheless, it took a new editor to finally get OP to acknowledge that size doesn’t matter and publish my “Shoot the Moon” article.
Today, more photographers than ever are using a small moon to accent familiar landscapes. But as nice as these images can be, sometimes it’s nice to make the moon BIG. I’m afraid the vast majority of images displaying a BIG moon looming over an iconic scene are composites, wide compositions with a telephoto moon superimposed on top. My feeling about these moon composites ranges from “Ugh,” when the photographer has at least had the integrity to label it a composite, to “Foul!,” when the photographer pretends that the entire scene was captured with a single click.
Your ability to enlarge the moon naturally (with a single click) is determined by the amount of telephoto you use: The longer your focal length, the larger your moon. But increasing the focal length shrinks the field of view, so matching a large moon with a particular scene requires positioning yourself a long way from the scene. For example, if I want to photograph the moon rising above Lake Tahoe, Tahoe’s size means I’m pretty much stuck with a wide angle (small moon) scene. In the Emerald Bay sunrise scene below, I was about a half mile from the lake, but even at 40mm I’m unable to fit all of the bay, and the moon is quite small.

Moonrise, Emerald Bay, Lake Tahoe
On the other hand, Yosemite Valley offers many distant vantage points that allow me to isolate Half Dome or El Capitan with a telephoto lens. I make a point of knowing when I can align a crescent or full moon with Half Dome and do my best to get myself (or a workshop group) there to photograph it. The image here is a 400mm (full frame) shot that completely isolates Half Dome from the rest of the scene.

New Day, Half Dome and Crescent Moon, Yosemite
Compare it to the image taken from the same location—at 105mm, Half Dome shrinks and the moon becomes an accent in a much larger scene.

Rising Crescent, Yosemite Valley
The image at the top of this frame perfectly illustrates my approach to moon photography. Because I can’t always get to Yosemite (and I like some variety in my images), I keep a mental database of nearby locations that align with a subject I can silhouette against the east or west horizon (the general direction of the moon’s rise and set) when viewed from a distant vantage point. Near the top of my list is a pair of trees topping a hill in the foothills east of Sacramento (the same trees featured in my July 12 post). Not only can I photograph these trees against the sky, from a distance, the ability to shift a fairly good distance north or south without losing my view of the trees allows me to juxtapose them against the moon, which shifts a significant amount from month to month.
The July 12 image was photographed the same night at 330mm with my full frame 5D Mark III; today’s image was photographed at 300mm with a 1.6 crop camera, for an effective focal length of 480mm. I plan to return to this spot a few more times for even tighter (larger moon) captures. I’d also like to try some with the full moon—since the view here is to the west, I’ll need to photograph the full moon when it sets at sunrise. Stay tuned….
* * *
About my new camera
Some photographers may be mortified to see that I shot this with a Canon Rebel SL1. For those who don’t know, the Rebel line is Canon’s entry level, consumer camera (by inference, something no self-respecting pro would ever be caught dead using). But, while the Rebel cameras have some limitations, image quality isn’t one of them. So here’s my reasoning.
For about a year my primary camera has been my 5D Mark III. While the 5DIII gives me more dynamic range and better high ISO performance than my five year old 1DSIII, rather than sell the 1DSIII (still a great camera), I decided to keep it as a backup. Unfortunately, it’s also a brick, an absolute pain to lug around in the remote chance my 5DIII goes down. And its an even bigger pain to fly with.
Another problem with my 1DSIII as my prime backup is, like my 5DIII, it has a full frame sensor. I prefer having a “crop” (smaller sensor) body as my backup, because it gives me something I don’t have with a full frame (60% more reach from my lenses). So when I heard about Canon’s SL1, I checked it out and learned: It takes all my lenses; has an 18mp sensor; and is incredibly compact, hands down the tiniest SLR I’ve ever seen (if I didn’t shoot everything on a tripod, I might find it almost too small to shoot). It’s also only $650. So I bought one.
Now my 1DSIII will still travel with me wherever I drive (as will my 5DIII and my SL1), because I’ll have room. And if my 5dIII ever goes down for an extended period, my 1DSIII will become my primary body until the 5DIII returns to health. But when I fly anywhere, it’ll just be my 5DIII and my SL1. And in those situations where I want to carry two cameras in the field—for example, when I photograph the moon and want both wide and long shots—the tiny SL1 will always be the second camera. (So I guess size also matters when I’m choosing a backup camera.)
Epilogue: The image in this post was captured on my very first shoot with the SL1, and I’m happy to report that it performed wonderfully.
Watch out for that tree…
Posted on July 15, 2013
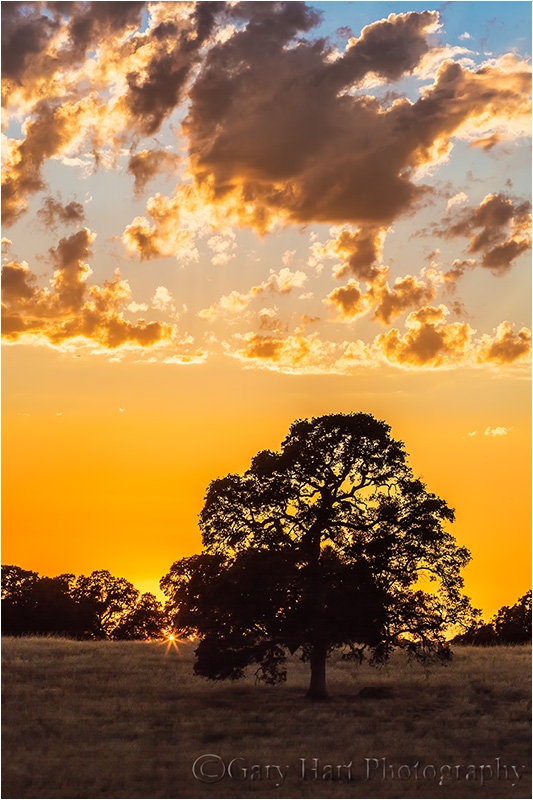
Sunburst, California Oak, Sierra Foothills
Canon EOS-1Ds Mark III
1/40 second
F/16.0
ISO 100
140 mm
I have a story that doesn’t really have anything to do with photography, except maybe that the experience got me thinking about my relationship with trees, and the number of images I have where a tree or trees are the primary subject. That connection was made because my story, in which a tree stars prominently, happened on the morning that I photographed this oak tree (and the crescent moon and oak trees image in my previous post).
Here goes (not for the faint of heart)
I’ve been a daily runner for nearly 22 years. For many years it was 50 miles per week, no days off; in recent years I’ve toned it down to a more sane 3 to 5 miles per day, with an occasional day off. I run on city streets, sometimes in the dark, dodging vehicles often guided by chatting, texting, speeding, angry, and/or drowsy drivers. I’ve stampeded sheep in New Zealand, breathed textured air in India, and have been chased by dogs, soaked by rain, and pelted by hail. Once, a squirrel ran up my leg.
But, while there are clearly many dangers to worry about while running, trees are pretty far down the list. They’re large, stationary, with no reputation for aggressive behavior. Which might explain why, until last Wednesday, (like most runners) I’d never actually run into a tree. Not even close.
Wednesday morning was hot, much hotter than I prefer, but I’d gotten out early enough that the houses and trees on the east side of my route cast occasionally useful shade. While I normally run in the street (believe it or not, asphalt is quite a bit softer than cement), on this morning I spent lots of time on the sidewalk when it meant the difference between shade and sunlight. By about 2 1/2 miles into my planned 3-miles the shade was rapidly shrinking, forcing me to stray even farther onto the sidewalk for relief. And so it happened that I found myself just close enough to the yard side of the sidewalk that a deceptively aggressive palm tree was able take a swipe at me as I flashed by. (That’s my story and I’m sticking to it.)
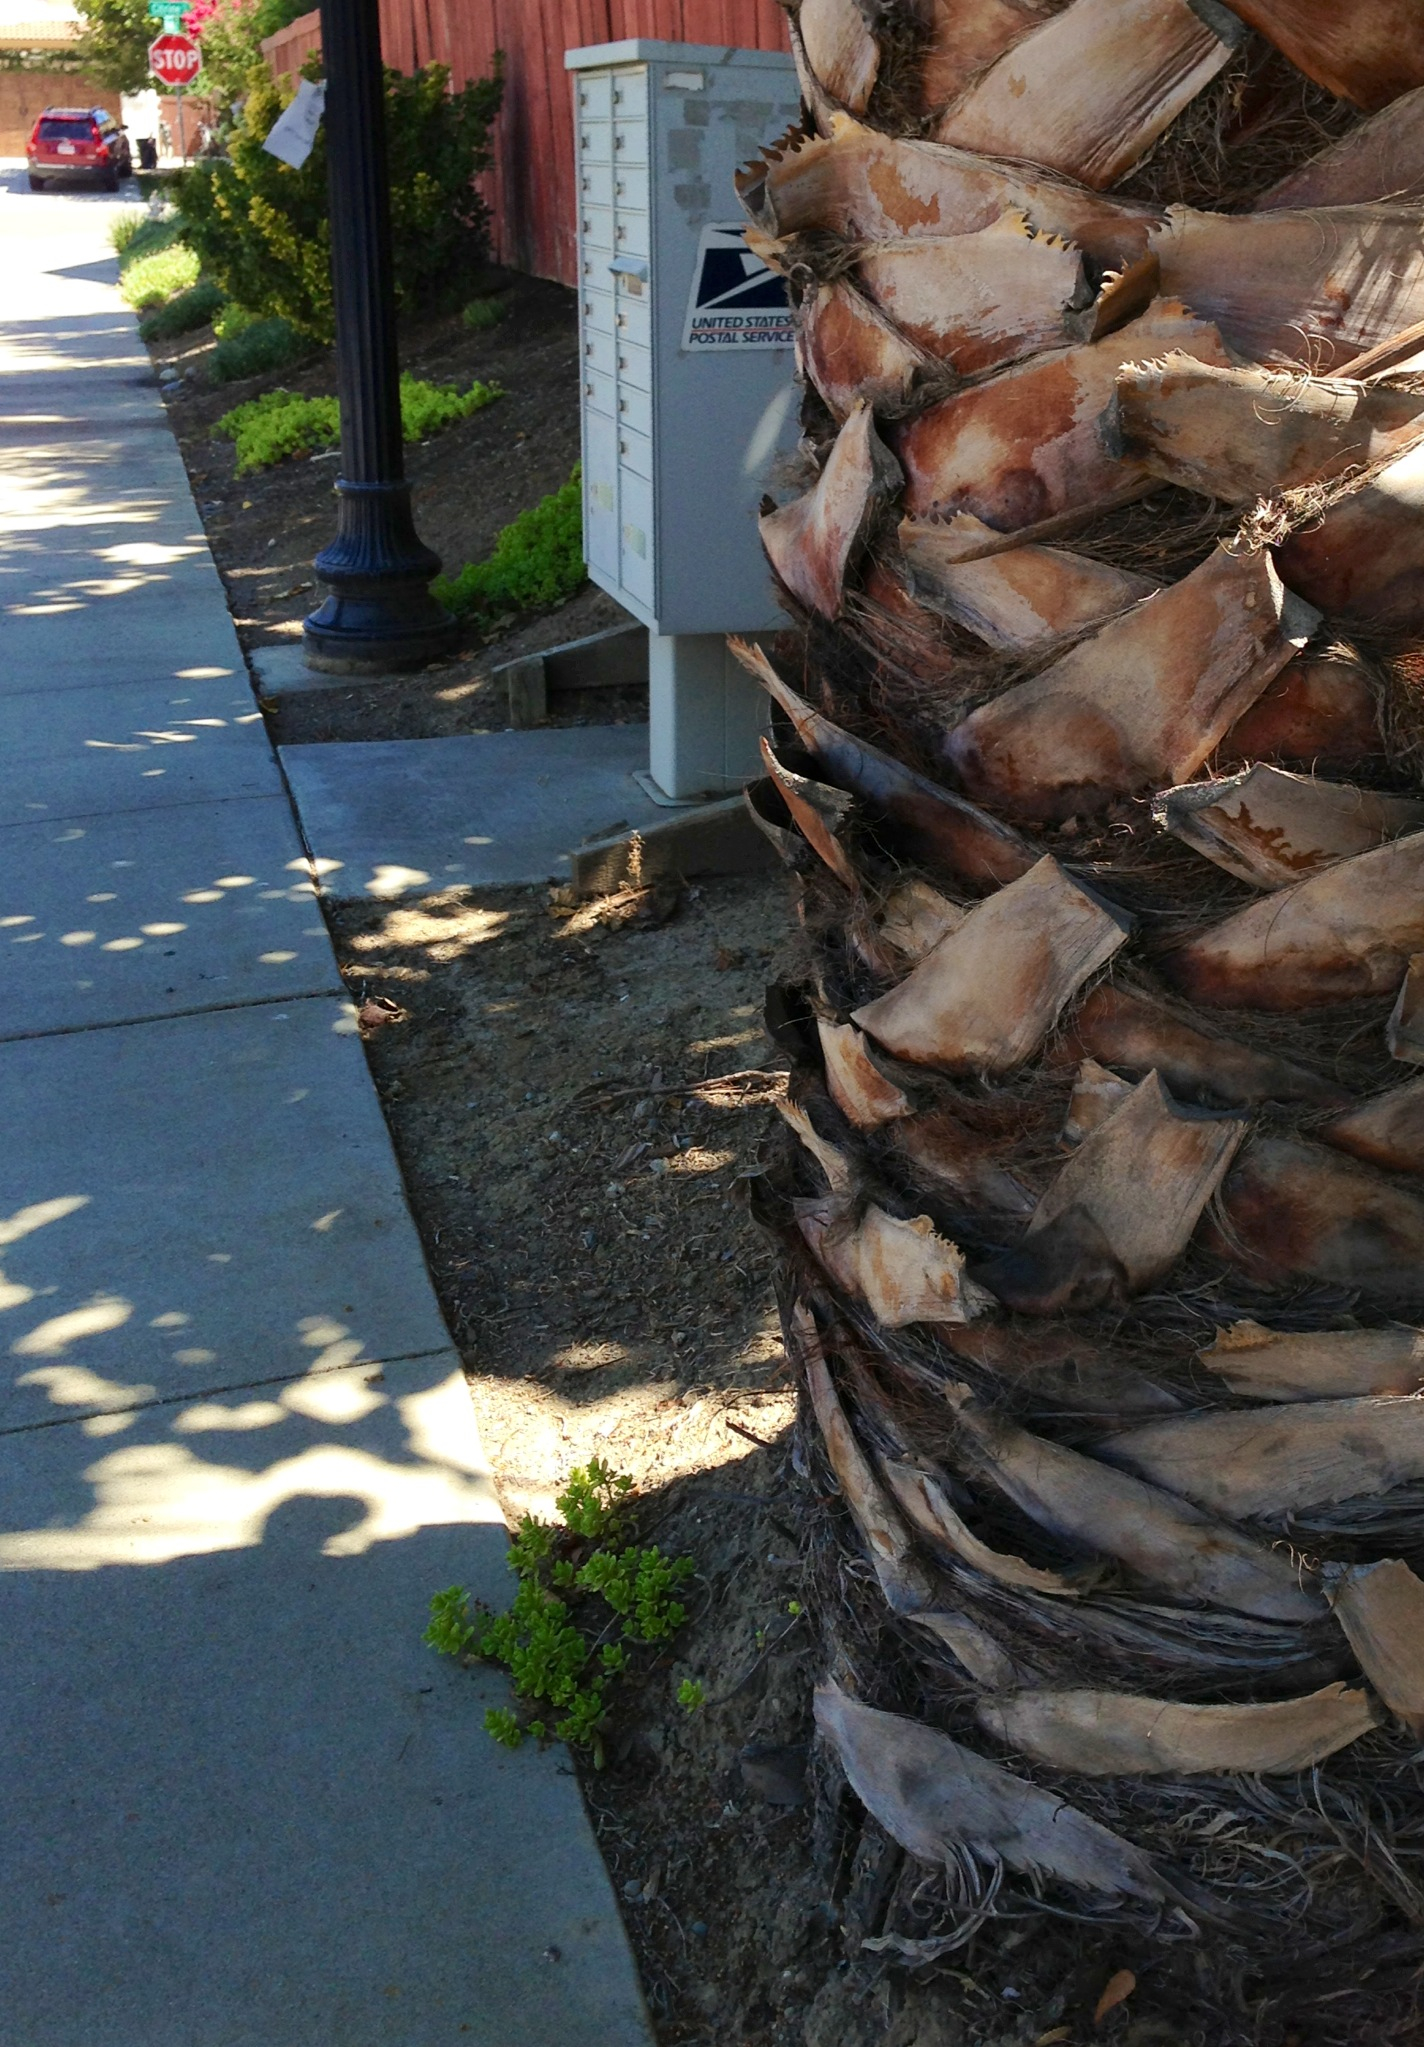
Mean Palm Tree, Sacramento
In my defense, my arborous encounter was not a George of the Jungle face-plant; rather, the collision was more of a glancing blow, something a ninja might incur after deftly eluding an enemy’s death swipe. Nevertheless, it left my upper forearm with a gaping wound that pretty much stunned me with sudden pain and flowing blood.
While my first impulse to any injury has always been to pretend that nothing happened in the hope that nobody will notice whatever foolish thing I did to cause the injury, the blood dripping down my arm and trailing me on the sidewalk made that pretty much impossible. By the the time I reached the next intersection I was bleeding so much that I prayed there’d be no cars who might call 911 to report a crime (what would you do if you saw a bleeding man running down the street?). At home I had to warn my wife to prepare for something gruesome before I entered the room. Once we got it cleaned up, it was clear that what I had was not so much a cut as it was an excavation—somewhere on that palm tree is an almond-size chunk of my flesh.
Today, nearly a week later, this stupid thing is still bleeding (I probably should have gotten stitches), though it’s down to just a few drops on the dressing each time I change it. As with all my running injuries, I tend to ignore them and hope they’ll go away. (And I must confess to kind of relish the coolness factor associated with running down the street with a slight limp.) Unfortunately, in this case, despite the ugliness of the wound, nobody can see it when I’m running and there’s really nothing cool about my answer when I’m asked what happened. I suppose I could have claimed to gotten it in a knife fight with a competing photographer (say, contesting a small patch of prime Yosemite real estate); instead I opt for the high road and just fess up: I, uh, ran into a tree. In broad daylight. Sigh.
But anyway….
As I mentioned in my July 12 post, my plan for this night had been to photograph a pair of oak trees in the foothills beneath a crescent moon. But my buddy and I arrived early, so we drove a few miles down the road to another group of trees that I like to photograph. The throbbing in my arm, while chasing trees, that got me thinking that evening about the morning’s mishap in the context of my “regular” relationship with trees. I chuckled about how I can be hyper-aware of some trees, yet so oblivious to others. Maybe not life changing insight, but food for thought at least.
The sun just disappearing as we pulled up to this second group of trees. Hoping hoping to catch a sunburst, I jumped out of the car, set up my tripod, pulled out my graduated neutral density filter (two-stop hard), metered, focused, and clicked in maybe fifteen seconds. Fortunately I nailed the first click, because by the time I recomposed a horizontal frame, the sun was gone.
One part plan, one part serendipity, one part impulse
Posted on July 12, 2013

Dusk, Crescent Moon and Oaks, Sierra Foothills, California
Canon EOS-1Ds Mark III
1.6 seconds
F/11.0
ISO 400
330 mm
Nature photography is a particularly serendipitous art form. We do our best to get ourselves in the right place at the right time, but it’s ultimately up to Mother Nature to deliver. Fortunately, some things in nature are more certain than others. Among them is the phase, location, and timing of the moon, each of which can be anticipated with near absolute precision. Another certainty I’ve grown to depend on is clear skies in California in July. Armed with those two truths, Wednesday night a friend and I headed to the foothills to photograph a thin crescent moon in the western twilight.
My criteria for photographing any twilight scene include finding a striking shape to silhouette against the sky. And like a portrait photographer who can’t get enough of a particular model, there a number of “go-to” trees scattered about the foothills that I return to whenever I get the urge to photograph a sunset near home. For a long time I’ve known the hilltop perch of one pair would allow me to juxtapose them with a setting moon. I’d already photographed this pair many times with good success (one of these images was on a magazine cover), and one time got them with a crescent moon. But that success only made me greedy for a tight shot with the moon large, among the trees. I check the moon info each month to see if its phases and position align with my schedule (for obvious reasons, I’m often away from home when the moon is at its photographic best), and Wednesday night looked like everything might just fit into place, so out we went.
By about two hours before sunset it became pretty clear that clouds would be part of our sky that evening. While not unprecedented, this unexpected intrusion could be: A) Good, if the clouds added sunset color while parting enough to reveal the moon; or B) Bad, if the clouds thickened to obscure the moon and block the color. Serendipity.
Mark and I pulled up to “my” trees about fifteen minutes before sunset, but with the clouds starting to look like they might deliver a colorful sunset, and since we didn’t need to be in position for the moon until 25 or 30 minutes after sunset, I made the snap decision to continue about five miles down the road to another group of trees that I thought would be particularly nice for a colorful sunset. The sunset was indeed worth the detour, but that’s a story for another day. When it was over, we hightailed it back to the hilltop tree spot to find the moon playing hide and seek with the clouds above and just a little south of the trees. Definitely photo-worthy, but not aligned so perfectly that I could get the tight telephoto shot I’d envisioned.
While photographing from the narrow shoulder here is fairly easy (though a bit unnerving), the angle we needed to align the trees and moon required scaling a small hill. Behind a barbed wire fence. Hmmm. But wait—what’s this? A gate! And it’s unlocked! So, all with about as much restraint as two ten-year olds at the all-you-can-eat dessert bar, up the hill we traipsed, dodging cow patties and listening for rattlesnakes. As expected, the new vantage point provided exactly the angle we needed, but I have to say that in the growing darkness my impulsiveness enthusiasm was soon replaced by visions of tomorrow’s headlines:
- LOCAL PHOTOGRAPHERS ARRESTED FOR TRESPASSING
- PHOTOGRAPHERS SHOT BY FRIGHTENED FARMER
- ANGRY BULL GORES DISTRACTED PHOTOGRAPHERS
Fortunately, none of that stuff happened, and Mark and I made it back to my car, undetected and intact. Impulsive urges notwithstanding, I ended up with several “keeper” images, thanks in no small part to the convergence of my plan with the fortuitous appearance of clouds to color our summer sky. Sometimes things just work out.
Later, I had to admit that going up there like that violated one of my personal rules: Get permission before entering private property (I’ll often offer a print as thanks). But this time I rationalized that since we’d do no harm, and because time was absolutely of the essence, it would be okay to maybe go just a little bit beyond the fence. And while it worked out this time, that’s the kind of decision that inspires hindsight (and I have the stories to prove it).
Read more about photographing a crescent moon
A Crescent Moon Gallery
Click an image for a closer look and slide show. Refresh the window to reorder the display.


Literally breathtaking
Posted on July 6, 2013

Under the Milky Way, Kilauea Caldera, Hawaii
Canon EOS-1Ds Mark III
30 seconds
F/2.0
ISO 800
28 mm
Even with the number beautiful things I get to photograph, certain natural wonders will forever thrill me. Near the top of that list is the view into the Kilauea Caldera on Hawaii’s Big Island. I thought I knew what to expect, but even after a lifetime of National Geographic specials and an occasional “Breaking News!” disaster video, I was little prepared for the in-person experience of peering into an active volcano.
Approaching Kilauea from Hilo, the first sign that something unusual is in store is the plume of thick smoke and vapor rising in the distance and spreading with the wind. If you didn’t know a volcano was nearby, you might mistake the smoke for a forest fire. The billowing plume becomes more prominent as you draw closer to the volcano, and once in Hawaii Volcanoes National Park you’re soon surrounded by white puffs of steam rising from the ground on both sides of the road.
On the drive to the caldera you’ll be tempted by several vista opportunities, but the best perspective is from the Jaggar Museum at the end of the road (the loop road that once circumnavigated the caldera is now closed at the museum due to the risk of noxious fumes beyond). For first-time visitors I recommend foregoing the preliminary views in favor of the Jaggar view, which makes the most impactful first impression—you can return to the other views on the drive out.
When visiting during the day you’ll see white smoke pouring from a large hole on the caldera’s floor, but no sign of orange flame—the sunlight simply overpowers the volcano’s fire. While any view of a volcano is memorable (trust me), nothing compares to the experience of seeing the caldera after dark. I usually arrive at the caldera in time for sunset, go to dinner, then return once darkness is complete. Not only does this break allow time for darkness, I also find that the clouds that frequently obscure the sunset sky dissipate once the sun is down (in other words, don’t forego a night visit simply because your daytime visit was cloudy).
Even if you do find clouds after dark, the clouds beautifully radiate the caldera’s glow to bathe the entire scene in orange, a subtle effect to the naked eye that comes alive in a long exposure. If you’re lucky enough to visit on a night with few or no clouds, you’ll be treated to the churning lava’s orange fire, reflected by belching white smoke, beneath a sea of stars. My first time seeing the caldera beneath the Milky Way I literally gasped, and it was several seconds before I realized I was holding my breath. Breathtaking indeed.
* * * *
Let me add that finding the Milky Way above the caldera isn’t without its difficulties. Even if the clouds cooperate, simply showing up at the Jaggar Museum after dark isn’t enough because the properly aligned vantage point varies with the date and time of night you visit. In the Northern Hemisphere the best views of the Milky Way are moonless summer nights (moonlight washes out the sky as much as city lights). If you find yourself there with the Milky Way visible, aligning it with the caldera is usually a matter of driving or walking the rim until you find the spot.
We’ll be photographing the Milky Way above Kilauea in my upcoming Hawaii Big Island workshop is September 2-6. While it filled several months ago, a recent cancellation leaves me with one opening. And I still have lots of openings in my 2014 Hawaii workshop, September 15-19.
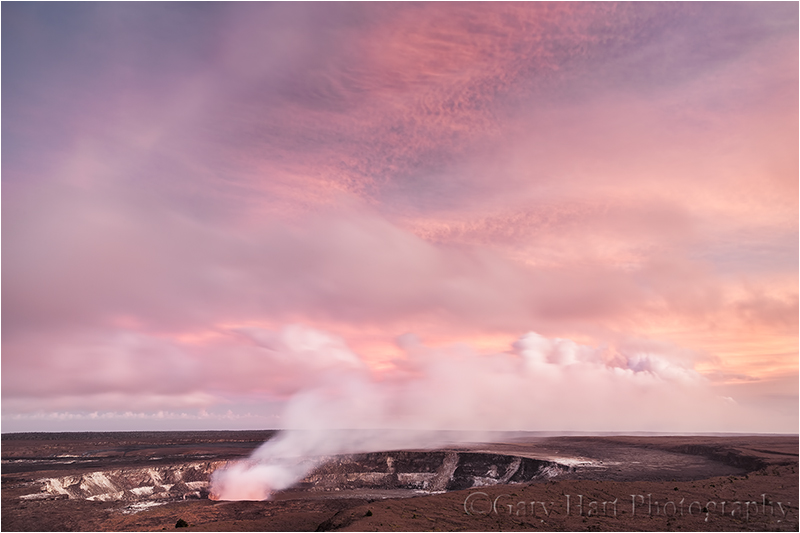
Earth on Fire, Kilauea Caldera, Hawaii :: The sunset light had dimmed just enough that the lava lake’s fiery orange is just visible. Even just few minutes earlier the scene was too bright to see any color in the caldera.
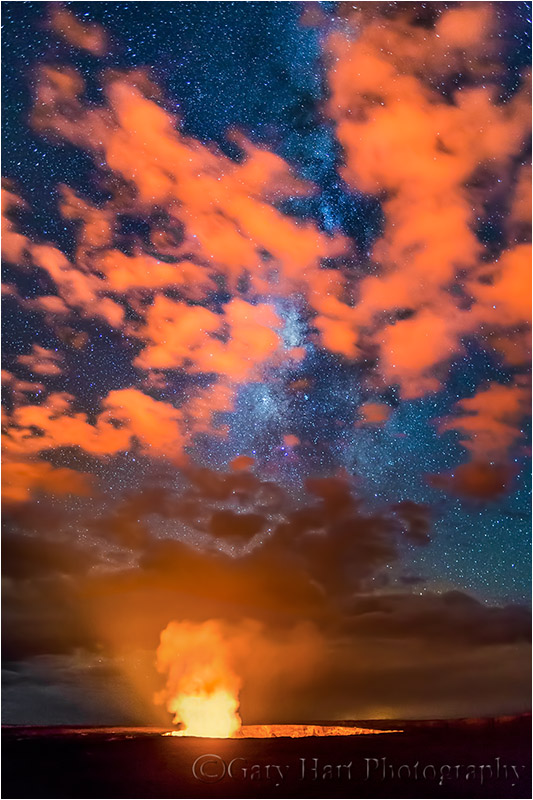
Milky Way and Clouds, Kilauea Caldera, Hawaii :: Here the clouds reflect the lava’s glow, but part just enough to reveal the Milky Way behind.

