Eloquent Images by Gary Hart
Insight, information, and inspiration for the inquisitive nature photographer
Some Advice for Nikon Shooters (from a Sony Shooter)
Posted on August 24, 2018

Spring Reflection, El Capitan and Three Brothers, Yosemite
Sony a7R II
Canon 11-24 f/4L with Metabones IV adapter @11mm
1/60 second
F/8
ISO 100
Yesterday Nikon finally jumped into the mirrorless game with its Z6 and Z7 announcement, a welcome development that can only keep pushing everyone’s mirrorless technology forward.
I made the switch to mirrorless about four years ago and haven’t looked back. At the beginning mirrorless was touted for its compactness, and while mirrorless bodies (and to a lesser extent, lenses) are more compact, it turns out that, for me at least, it’s the mirrorless viewfinder that has hooked me: with real-time exposure simulation, focus assist (peaking), highlight alert (zebras), and a pre-capture histogram, I don’t think I could go back to a DSLR.
While I shoot with the Sony a7RIII and am very much committed to the Sony mirrorless universe, I’m not going to get into the “my camera can beat up your camera” debate—Nikon makes great cameras and I’m sure their mirrorless bodies will be no exception. In fact, the Z7 looks like it compares very closely to the Sony a7RII, which is a fantastic camera that I still carry as a backup and don’t hesitate to use when the situation calls for it.
As happy as I am with my mirrorless conversion, I do have some insights that might spare Nikon shooters of some of the transition pains I went through when I switched from Canon DSLRs (1DSIII and 5DIII) to the Sony a7R series of mirrorless bodies.
- The mirrorless viewfinder is different than a DSLR viewfinder and it will take some getting used to. I don’t know what the Nikon viewfinder will be like, but I’m sure it will be quite good—large, bright, and everything you’d want in an electronic viewfinder (EVF). Even so, you might be surprised at how long it takes you to get used to it (but you will). It just feels different to view a video of the world. The cool thing is, EVF technology is relatively new and will only continue to improve, while there’s not a lot more that can be done for a conventional DSLR viewfinder.
- Beware of lens adapter hype. My original conversion plan was to use the Sony mirrorless body to supplement my Canon system, to continue using my Canon glass on the Sony body with a Metabones adapter, and gradually convert my lenses as my budget allowed. And while my adapted Canon lenses did indeed do the job, the experience was far from painless (not all that was advertised) and I wasn’t really satisfied until I was using 100% native Sony glass. Some of the problems are a function of the lens—generally the better (and newer) the lens, the closer to native performance it delivers. But as a landscape shooter, autofocus speed isn’t as big a deal to me as it is to anyone whose subjects are in motion, so sluggishness might even be a bigger problem for others. On the other hand, I suspect that since it’s Nikon making an adapter for their lenses to work with their bodies, it will be pretty good from the get-go—but I wouldn’t bet my house on it. And adapter performance likely won’t be as good as using native glass—best case scenario will be that some won’t notice a difference, but those for whom focus responsiveness and autofocus speed is essential should prepare for some frustration. (And I won’t begin to speculate about worst-case.)
- You’ll miss that second card slot more than you might imagine. Making my living from my images, having two memory card slots for instant image backups saved me a couple of times, and gave me tremendous peace of mind all the time. If your DSLR doesn’t have a second slot, the missing slot might not be a big deal to you, but if you’re as failsafe-obsessed as I am, you might be surprised by how much you’ll long for that second slot. All it takes is one corrupted, damaged, or lost card to make you a convert to the second card slot paradigm.
- The battery life will drive you crazy. Looking at the specs, the Z7 battery life is about the same as the a7R and a7RII, and nowhere near the Nikon full frame and Sony a7RIII (or the a7III or a9) battery life. I was willing to live with burning through multiple batteries in a single day because of all the other mirrorless benefits, and because the Sony batteries were small enough that carrying four or five at all times (I mean on my person, not just in the car or hotel) wasn’t a big deal. But it looks like the Nikon batteries are twice the size of the original Sony batteries, so there goes your size/weight benefit. I predict this will be the biggest complaint we hear about these cameras (as it was with the early a7 bodies)—that is, assuming the adapter is good.
- Learn how to clean your sensor. Without a mirror to protect it, your naked mirrorless sensor will be exposed to the elements each time you change a lens. Fortunately, sensor cleaning is simple and not nearly as dangerous is many try to make you believe.
None of these points is a reason to not get a Nikon Z6 or Z7, but for me it would be a reason not to pre-order. Instead, if it were me, I’d wait and let others discover the frustrations so I could go into the non-trivial transition from DSLR to mirrorless with realistic expectations.
I’m guessing that current Nikon shooters will probably endure fewer frustrations than I had with my first mirrorless body, the Sony a7R—Sony was still trying to figure out the whole interface thing that Nikon has nailed (I’ve never been a fan of Nikon’s interface, but Nikon shooters like it and that’s what matters). On the other hand, I was probably more forgiving than Nikon shooters might be because the a7R image quality was so much better for my needs than the Canon 5DIII it replaced. Dynamic range is king in the landscape world, and the a7R gave me 2-3 stops more dynamic range than my 5DIII—slow transition plan notwithstanding, I literally didn’t click another frame after my first a7R shoot.
While I expect the Z6/Z7 bodies will be ergonomically more mature than my original a7R, Nikon’s full frame bodies already deliver exceptional image quality, so most Nikon full-frame DSLR shooters transitioning from the D800/810/850 won’t have the euphoria of much better image quality that sustained me until the release of Sony’s a7RII and (especially) a7RIII.
On the other hand…
(Full disclosure: I’m a Sony Artisan of Imagery)
These Nikon mirrorless cameras are great for committed Nikon shooters who are completely invested in the Nikon ecosystem and have no plans to completely replace their lens lineup. But for any photographer planning to make the full jump to mirrorless that includes all native lenses, I think Sony is (at least) several years ahead of Nikon, and given their resources and commitment, will remain at least that far ahead for many years.
One of the early complaints about the Sony mirrorless system was its lack of lenses compared to Nikon and Canon, but valid as that criticism was, that disadvantage has shrunk to virtually the point of irrelevance, and Sony is already very far along on many more native Sony FE-mount lenses. Sony is several laps ahead of everyone else in the mirrorless world—with deep pockets and its foot hard on the mirrorless pedal, I don’t see that lead shrinking muchsoon.
As good as it is for a first generation offering, the Nikon Z7 is much closer to the 3-year old Sony a7RII than it is to the (already 1-year old) a7RIII, and for sports and wildlife (and anything else that moves), it isn’t even in the same league as the (more than 1-year old) Sony a9.
I have no idea how or when Sony will respond to the mirrorless offerings from Nikon and (soon) Canon, but I’m guessing it won’t be long, and am pretty confident that will be a great day to be a Sony shooter. Competition is great for all of us, and Nikon just gave the mirrorless wave a huge boost that I’m looking forward to riding as far as it takes me.
A few words about this image
I can’t tell you that this is my favorite Sony mirrorless image, but it would definitely be on the list. I chose it for this post because it’s one of the few Sony images I have that used a Canon lens with the Metabones adapter.
Leading a workshop in Yosemite a few years ago, I guided the group to a meadow flooded by the Merced River during a particularly extreme spring runoff year. My widest lens at the time was my Sony/Zeiss 16-35 f/4 (which I love, BTW), but the scene called for something wider. When he photographer assisting me offered to let me use his Canon 11-24 f/4 with my Metabones adapter, I snatched it before he could change his mind. Given that everything in the scene was stationary, I was able to bypass any adapter-induced autofocus frustration and take the time to manually focus (it didn’t hurt that depth of field at 11mm is extremely forgiving).
I’d never used a lens that wide and was so excited by the extra field of view that I returned from Yosemite fully prepared to purchase the Canon lens, adapter or not. Fortunate for my budget (and my back), I let the lens sit in my shopping cart long enough for sanity to prevail. Not only was the Canon lens quite expensive, it weighed a ton, and I had a feeling it wouldn’t be long before Sony offered something similar. Those instincts were rewarded a year later when Sony released a 12-24 f/4 G lens that is just as sharp and half the size (and much less money).
A Sony Mirrorless Gallery
Click an image for a closer look and slide show. Refresh the window to reorder the display.


That’s so fake…
Posted on July 24, 2018
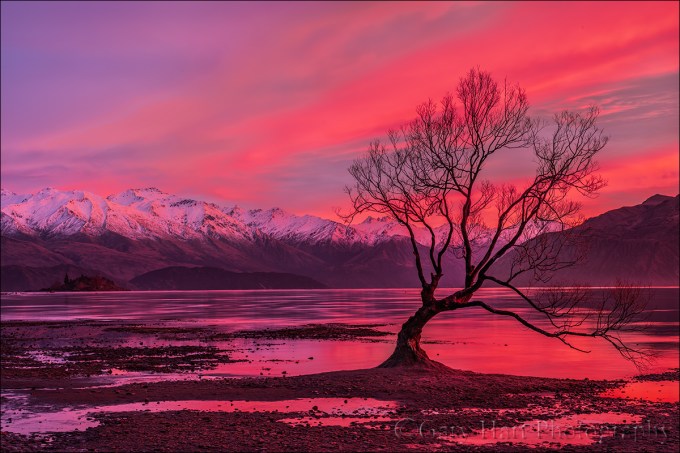
Crimson Morning, Lake Wanaka, New Zealand
Sony a7R III
Sony 24-105 f/4 G
4 seconds
F/16
ISO 50
We’ve all heard it: “That’s so fake,” or “You Photoshopped that,” or some other derisive barb implying that an image is trying to be something it isn’t. But before you say that about this image, let me say that I processed it five times, each time dialing down the saturation, attempting to create something that would appear credible to the dubious masses. And with each pass, the color looked a little less like what we saw this unforgettable New Zealand morning. So finally I just said, enough is enough—you’ll just have trust me when I tell you that for the sake of credibility, you’re already being cheated of that morning’s full spectacle.
Don Smith and I got our New Zealand winter workshop group up early to photograph sunrise at the famous Wanaka willow tree. The tree was just a short walk from our hotel, and even though we still had 45 minutes until sunrise, it was apparent the second we stepped outside that something special was in store. Though it was still dark enough to require flashlights, already the entire sky radiated a rich ruby red. Since we’d shown the group the tree the prior afternoon, a few rushed ahead, but Don and I held back with the stragglers. Nevertheless, even the stragglers pace quickened as the red deepened, and by the time we reached the tree we were pretty much jogging.
Turns out we needn’t have rushed. For the next 30 minutes the red intensified until everything in sight seemed to buzz with color. I’ve experienced color like this a few times in my life, and the best way to describe is that it feels like the light possesses a physical component that penetrates my skin and everything else it touches. And with the sky throbbing in all directions, I felt like I might get dizzy whirling about to avoid missing something. Soon we all just started laughing at how unbelievable the show was, knowing that every picture we shared would be met with the obligatory “That’s so fake” skepticism.
All this got me thinking again about what causes color in the sky, so I dusted off a post I wrote a few years ago, tweaked a few things, and…
A sunset myth
If your goal is a colorful sunset/sunrise and you have to choose between pristine or polluted air, which would you choose? If you said clean air, you’re in the minority. You’re also right. But despite some pretty obvious evidence to the contrary, it seems that the myth that a colorful sunset requires lots of particles in the air persists. If particles in the air were necessary for sunset color, Los Angeles would be known for its incredible sunsets and Hawaii would only be known for its beaches.
But what is the secret to a great sunrise or sunset? Granted, a cool breeze, warm surf, and a Mai Tai are a great start, but I’m thinking more photographically than recreationally (sorry). I look for a mix of sky (to pass the sunlight) and clouds (to catch the color), with a particular emphasis on a clear horizon in the direction of the sun. But even with a nice mix of clouds and sky, sometimes the color fizzles. Often the missing ingredient, contrary to common belief, is clean air, the cleaner the better. And like most things, it all makes sense when you understand what’s going on.
Light and color
Understanding sunset color starts with understanding how sunlight and the atmosphere interact to make the sky blue. As you probably know, visible light reaches our eyes in waves of varying length, with each wavelength perceived as a different color. Starting with the shortest wavelengths and moving toward the longest, visible light goes from violet, indigo, blue, green, yellow, orange, and red. (These color names are arbitrary labels we’ve assigned to the colors we perceive at various points along the visible portion of the electromagnetic spectrum—there are an infinite number of colors in between each of these colors.) When a beam of light passes through a vacuum (such as space), it moves in a straight line, without interference, so all its wavelengths reach our eyes simultaneously and we perceive the light as white.
Why is the sky blue?
When light interacts with a foreign object—for example, when a beam of sunlight enters our atmosphere—different wavelengths respond differently depending on the size of the molecules they encounter. If sunlight encounters molecules that are larger than its wavelengths, such as atmospheric impurities like dust or smoke, all of the wavelengths bounce off (reflect). Because these large molecules are of varying sizes, a variety of wavelengths (colors) get blended into a murky sky with a gray or brown cast. If all the wavelengths get bounced equally, the sky will appear white(ish).
When a beam of sunlight hits the much smaller molecules of the gases that comprise our atmosphere (such as nitrogen and oxygen), some of its wavelengths are absorbed while others are reflected and scattered in all directions. Because the shorter wavelengths (violet and blue) scatter most easily; the longer wavelengths (orange and red) continue on to color the sky of someone farther away. The more direct the sunlight’s path to our eyes, the less atmosphere it passes through and the more we see the first (blue) wavelengths to scatter. When the sun is high in our sky, its light takes the most direct path through the atmosphere and our sky is most blue (assuming no pollutants have altered the scattering). In the mountains, sunlight has passed through even less atmosphere and the sky appears even more blue than it does at sea level.
Sunrise/sunset color
When the sun is on the horizon, the light that reaches us has traveled through so much atmosphere that at the very least it has been stripped of its blueness because the blue wavelengths are the first to scatter (those wavelengths are coloring the sky of someone whose sun is high overhead). And if that sunrise/sunset light hasn’t encountered larger dust and smoke molecules on its journey, only the red wavelengths will have survived unscathed, and everyone enjoys the show.
The cleaner the air, the more vivid the sunrise/sunset color. To understand the mixing effect that happens when a variety of wavelengths are bounced around by large airborne particles, think about blending a smoothie consisting of a variety of brightly colored ingredients (such as strawberries, blueberries, and spinach—yum). Your smoothie’s color won’t be nearly as vivid as any of its ingredients, not even close. Instead you’ll end up with a brownish or grayish muck that might at best be slightly tinted with the color of the predominant ingredient. That’s what happens to the color when the light has to interact with large airborne particles like dust, smoke, and smog. Because these particles aren’t of uniform size, they each reflect a slightly different color rather than allowing one vivid color to dominate. In the middle of the day pollution means less blue; at sunrise/sunset, it’s less pink, red, and orange.
Clouds can enhance sunrise/sunset color by catching the red wavelengths and reflecting them back to our eyes, but only if there’s an opening on the horizon for the light pass through. Without clouds, the red wavelengths continue on to color the horizon opposite the sun—a “twilight wedge” when the color is in the sky, and “alpenglow” when mountains jut into the colored region of the sky and take on the color themselves.
………………………………………
So. To the skeptics who reflexively dismiss pictures like this, you might want to suggest that they spend more time out in nature. Whether it’s a tropical bird, a fluttering butterfly, a field of wildflowers, or a New Zealand sunrise, there really is nothing subtle about color in nature.
New Zealand Photo Workshops
Sunrise, Sunset


Oh, What a Night…
Posted on July 17, 2018

Dark Sky, Lake Matheson, New Zealand
Sony a7S II
Rokinon 24mm f/1.4
30 seconds
F/1.4
ISO 12800
(Jump to the bottom for a “how-to” and my starlight photography exposure recipe)
Five photographers followed bouncing headlamps through the chilly dark. Even in midday the trail through the dense rainforest surrounding Lake Matheson has a twilight feel; on a moonless winter night like this, the path becomes downright cave-like. Soon our footsteps were in sync, each tap broken by a beat of eerie silence. For me, the solitary experience at the front of the line was simultaneously serene and disconcerting, a feeling enhanced by occasional rustling and primal cries from the primitive world outside radius of my light.
We were midway through the second of the back-to-back New Zealand Winter photo workshops Don Smith and I did in 2018. Just a couple of hours earlier the entire group had completed the nearly 3-mile loop in daylight. So striking was the sunset reflection of Mt. Tasman and Mt. Cook on that hike, that when we looked up after dinner and saw stars, a few of us hardcore night shooters couldn’t resist returning to the lake to photograph the Milky Way above the peaks.
Rather than hike all the way out there, we reasoned that we could satisfy our objective with a relatively short walk to Jetty Viewpoint, the closest view of the lake and mountains, less than a quarter of the way along the loop. Given the spur-of-the-moment nature of our adventure, I hadn’t done my usual (obsessive) plotting of the Milky Way’s position before bundling up and heading our to the lake. I knew only that it would be more or less vertical, in the general direction of the peaks.
What I hadn’t fully accounted for is how much higher in the sky as the Milky Way is in New Zealand. So unfortunately, by the time the five of us arrived at Jetty Viewpoint, we found the Milky Way was so high that capturing the bright galactic core and its reflection required a vertical composition. And it had rotated so far north that including the Milky Way and the peaks required a horizontal composition. After trying a few versions of those either/or compositions, we decided that since the reflection was the real star of the show, we may as well just continue another 20 minutes to the Lake Matheson’s best view, Reflection Island.
The shear volume of stars in the pure New Zealand darkness is mesmerizing, but it’s disorienting to look up at night and not see a single familiar constellation . Once we’d settled in at Reflection Island, I spent the time waiting exposures to complete just wandering my gaze about the foreign sky.
A camera can “see” much better in the dark than we can, a capability that only continues to improve. For many years my night photography was limited by technology to moonlight only, but the low-light capability of the newest cameras has opened the door to a world that’s been invisible to the naked eye. Combining a modern camera that captures clean high ISO images with a fast lens not only enables moonless night photography, it pulls unseen wonders from the darkness.
I only use my Sony a7SII and Rokinon 24mm f/1.4 lens when photographing extreme dark skies, but when I do, I never cease to be blown away by what they “see.” Packing for four weeks in winter without exceeding the airline’s weight limits is difficult. But anticipating the opportunity to photograph the Southern Hemisphere night sky, I bit the bullet and added my dedicated night photography gear to my camera bag. Every time an exposure completed, I couldn’t take my eyes off the image on my LCD. As saturated with stars as the sky appeared, each image revealed far more stars than were visible to my eyes, and the brightest stars stood out like an approaching locomotive.
A quick check of my astronomy app told me that the bright star burning a hole in the sky above the trees on the right is Achernar, well known Down Under but new to me. Slightly brighter than magnitiude .5 (the lower the number, the brighter the star), it’s the ninth brightest star in the night sky—the Achernar photons that landed on my sensor started their Earthward journey nearly 140 years ago.
The Magellanic Clouds (satellite galaxies gravitationally bound to the Milky Way but not visible in the Northern Hemisphere) that were faint fuzzy blurs to my eyes took on actual shapes. And while I couldn’t fit the mountains and both of the Magellanic Clouds in my frame, I was able to included the Small Magellanic Cloud in this image.
More exciting than the volume of stars revealed by my camera was the spectacular reflection it pulled from the seemingly black void of the lake’s surface. This ability to view beauty hidden from my eyes by darkness is the best part of night photography.
Starlight exposure made simple
Based on many years experience teaching starlight photography (not to be confused with moonlight photography), I’ve come up with what I think is the simplest approach to the most frequently asked night photography question: “What exposure settings should I use?”
The problem is, there isn’t a single set of ISO, f-stop, and shutter speed settings you can plug in for great results because the setting you use (and the results you get) depend on your equipment. Starlight photography is all about capturing light, the more the better. But as good as today’s camera technology is, successful night photography is still about making compromises. As you try to maximize the light reaching your sensor, you’ll need to manage these exposure compromises:
- Shutter speed: Star motion is a function of the time the shutter is open, the focal length, and the direction your lens points—the faster the shutter speed, wider the lens, and closer to the poles (due north or south) you’re composed, the less star motion you’ll record. As much as we like pinpoint stars, I’ve always felt that getting enough light is more important than perfect pinpoints. Your compromise comes as you try to decide how much motion you can live with. My drop-dead shutter speed that I won’t exceed is 30 seconds.
- F-stop: Sharpness and distortion, especially on the edges, becomes a concern when any lens is wide open. With some lenses it’s a livable problem, with others you’ll probably want to stop-down a stop or two. A starlight f-stop rule of thumb I follow is that (assuming a current camera with good high ISO capability) at f/4, the best you’ll be able to hope for is silhouettes; at f/2.8, you can probably get decent but dark landscape detail; making the scene significantly brighter than your eyes see (like this image) usually requires f/2 or faster. Given that, I like to shoot starlight at f/1.4 (hence my dedicated night lenses), and just live with slightly less than perfect quality in the corners.
- ISO: Noise is the threshold that most limits our night efforts. If we didn’t have to deal with noise, we could push our ISO as far as necessary to eliminate star motion and lens flaws. High ISO noise varies a lot with the camera—some cameras struggle mightily beyond ISO 1600, others deliver very usable results at ISO 12800 or even higher. As a general rule, the larger the sensor, and the fewer the megapixels, the better the high ISO performance (larger, farther apart photosites mean more light gathering and less heat). So an APS-C sensor will usually yield cleaner high ISO images than a 4/3 sensor (Olympus and Panasonic), and a full frame sensor will yield cleaner high ISO images than an APS-C sensor. This is by no means an absolute—today’s 40+ megapixel sensors are much better at high ISOs than yesterday’s 12 megapixel sensors, and some of today’s high resolution sensors (for example, the Sony a7RIII) are far superior to contemporary sensors with lower resolution. My night camera is the 12 megapixel Sony a7SII. Regardless of the camera, and I can’t emphasize this too much, is to know your camera and how far you can push your ISO and still yield usable results. One more thing: because high ISO performance decreases significantly with shutter speed, base your high ISO evaluations on long shutter speeds, 15-30 seconds.
Understanding these compromises, you’re ready for my starlight-exposure-made-simple axiom: Give the scene as much light as you can without ruining the image. In other words, for the most light possible, use the longest shutter speed, widest aperture, and highest ISO that gives you results you can live with.
Taking this approach doesn’t mean that I don’t vary my exposure settings. Once I’ve settled on a composition, I use a variety exposure-setting combinations. Not only does this give me as many options as possible at processing time, it’s also an opportunity better understand my cameras’ and lenses’ limitations to learn how far I can push the exposure threshold next time.
Experience the New Zealand Night Sky for Yourself
Workshop Schedule || Purchase Prints
New Zealand After Dark
Click any image to scroll through the gallery LARGE


(Sometimes) I’d Rather Be Lucky Than Good
Posted on June 3, 2018

Big Dipper Reflection, Colorado River, Grand Canyon
Sony a7S II
Sony 16-35 f/2.8 GM
20 seconds
F/2.8
ISO 12800

Grand Night, Milky Way Above the Colorado River, Grand Canyon Sony a7S II Rokinon 24mm f/1.4 20 seconds F/1.4 ISO 6400
It was 4:00 a.m. and I’d spent the last two hours photographing the Milky Way’s brilliant core above the Colorado River. In about 75 minutes the guides would be ringing the “coffee’s ready” gong, signaling the start of another day at the bottom of the Grand Canyon. Collapsing my tripod, I performed a little mental math and found slight relief in the knowledge that I might be able to squeeze in one more hour of sleep. That relief vanished in the time it took to turn and glance toward the northern sky and see the Big Dipper, suspended like a celestial mobile in the notch separating the canyon walls.
My Milky Way position had been chosen for its unobstructed view of the southern sky; the best view of the Big Dipper was clear across the campsite, at a sheltered pool just beyond our rafts. The moonless night sky at the bottom of the Grand Canyon is so dark that the Milky Way casts a slight shadow, but once your eyes adjust, it’s surprisingly easy to navigate without adding light. Trudging across through the sand, I passed a handful of other solitary photographers, anonymous shapes enjoying the darkness as much as I was. I stopped few times to answer questions and point out the Big Dipper, then moved on.
Setting up on the steep, sandy slope above the river, I gazed at the Big Dipper and privately chuckled at my good fortune—this prime photo opportunity hadn’t manifest because I proactively made myself seek a scene away from my original subject (as I encourage my students to do), it was a chance glance after I’d mentally put myself to bed. When we landed at that spot the prior afternoon, I’d been so focused on the southern exposure and the Milky Way opportunity in that direction that I hadn’t even considered that there might be something facing north too. Shame on me, but sometimes it’s better to be lucky than good.
Checking my first Big Dipper frame, a couple of things became instantly obvious: though sunrise was still an hour away, and my eyes could detect no sign of its approach, with the same exposure I’d been using for most of the night, the sky was noticeably brighter on my LCD; more significantly, the Big Dipper was reflecting in the river. I realized that pool below me, while not flowing, was sloshing enough that the reflection didn’t stand out to my eyes, but it was smoothed enough by a multi-second exposure that the water mirrored a blurred but clearly visible reflection of the bright Dipper stars.
From my elevated vantage point, part of the handle’s reflection was lost to the sandy beach—I needed to move closer to the river to include the entire reflection. Remember when I said it’s surprisingly easy to navigate in the moonless darkness? On my first step toward the river I learned that functional night vision applies to avoiding objects, not to depth perception. So, as that first step dropped earthward and I waited for it to touch down, where I expected sand I found only air. The rest of me followed quickly and I was in free-fall. Fortunately the fall was not far, just a couple of feet, but it’s amazing how the disorientation of a blind fall slowed time enough for me to curse the darkness before my graceless splat onto the damp beach.
The beach was damp because the place I landed had been river when I went to bed. I popped up almost as quickly as I landed, the unwitting beneficiary of artificial tides induced by upstream releases from the Glen Canyon Dam, timed to meet the power needs of Las Vegas and the rest of the Southwest sprawl. Had I fallen a few hours earlier, I’d have splashed in chilly river water—not enough river to sweep me to my death, but definitely enough to soak me and my camera. So I found myself sandy but otherwise unscathed—glancing about to see if anyone had seen my fall, I instantly forgave the darkness that had made me more or less invisible. The Rokinon lens I’d had on my camera was caked with sand; since it was too dark to clean it, I switched to my Sony 16-35 f/2.8 GM.
The rest of the shoot was fairly uneventful, at least until my final frame. Over the next few minutes I inched even closer to the river, which I discovered had receded enough to add about six feet of soggy shore. With each frame I verified my focus, tweaked my composition, and experimented with different exposures.
On my final few frames I was comfortable enough with all of the photography variables that I wasn’t even thinking about the next shot, and instead simply stood and took in the night sky. As I waited for my last frame of the night to complete, a brilliant meteor sprung from the darkness and split the Dipper’s handle. It came and went in a heartbeat, and I held my breath until the image popped up on my LCD and I confirmed that I’d captured it. The perfect cap to a spectacular night.
Celestial Wonders


He Ain’t Heavy,…
Posted on April 15, 2018
… He’s My Sony 12-24 f/4 G
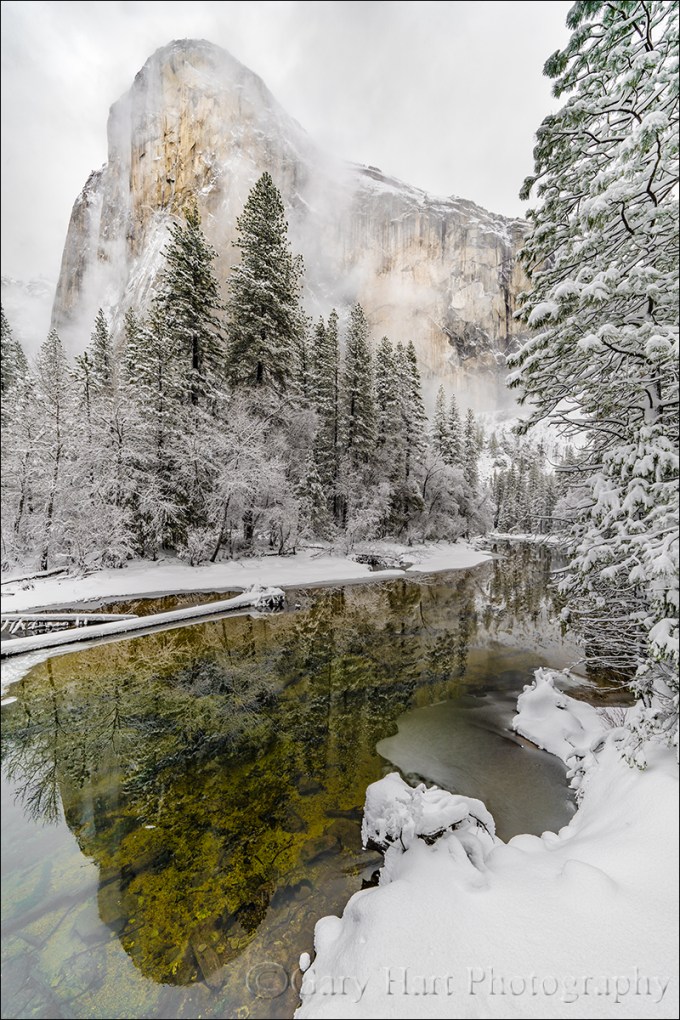
Snowstorm Reflection, El Capitan, Yosemite
Sony a7R III
Sony 12-24 f/4 G
1/50 second
F/10
ISO 100
(With apologies to The Hollies.)
The road is long, with many a winding turn…
But that’s no excuse to cut corners. Probably the question I am most asked on location is some variation of, “What lens should I use?” While I’m always happy to answer questions, this one always makes me cringe because the implicit question is, “Which lenses can I leave behind?”
What many photographers fail to realize is that the “proper” lens is determined by the photographer, not by the scene. While there is often a consensus on the primary composition at a location, that usually only means the first composition everyone sees. But if your goal is to capture something unique, those are just the compositions to avoid. And as every photographer knows, the best way to guarantee you’ll need a lens is to not pack it. I’m not suggesting that you lug Hermione’s purse to every shoot—just try to remember that your images will last far longer than your discomfort.
In my Canon life, my personal rule of thumb was to always carry lenses that cover 16-200mm, regardless of the scene, then add “specialty” lenses as my plans dictated: macro for wildflowers, fast and wide prime for night, and super telephoto for a moon. That meant the 16-35, 24-105, and 70-200 were permanent residents of my Canon bag, and my 100-400, 100 macro, or wide and fast prime came along when I needed them.
Shooting Sony mirrorless, with its more compact bodies and lenses, I now carry a much wider focal range in a lighter camera bag. My new baseline (always with me) lens lineup is the Sony 12-24 G, 24-105 G, and 100-400 GM, plus the Sony 2x teleconverter. My macro and night lenses still stay behind (but they’re usually in the car), but in my bag I always have lenses to cover 12-800mm, a significant advantage over my Canon 16-200 configuration.
It’s kind of a cliché in photography to say “It’s the photographer, not the equipment.” And as much as I agree in principle, sometimes the equipment does help. Wherever I am, I regularly find compositions beyond 200mm, compositions I never would have considered before. And the 12-24 lens has enabled me to approach familiar scenes with a completely fresh eye.
A recent example came on a snowy day in Yosemite early last month. Moving fast to keep up with the rapidly changing clouds and light, I stopped at El Capitan Bridge, directly beneath El Capitan. Having shot this scene for years (decades), I was quite familiar with the perspective. So wide is the top-to-bottom, left-to-right view of El Capitan here, even at 16mm I’ve always had to choose between all of El Capitan or all of the reflection, never both. I never dreamed I’d be able to get El Capitan and its reflection in a single frame. But guess what….
Standing above the river near the south side of the bridge, I framed up a vertical composition and saw that at 12mm I could indeed fit El Capitan and the reflection, top to bottom. Whoa. With very little margin for error on any side of the frame, I moved around a bit to get the scene balanced, eventually framing the right side with the snowy trees lining the Merced. My elevated perch above the river allowed me to shoot straight ahead (no up or down tilt of the camera) and avoid the extreme skewing of the trees that’s so common at wide focal lengths.
12mm provides so much depth of field that I could focus anywhere in the scene and get front-to-back sharpness; the flat light made exposure similarly simple. With composition, focus, and exposure set, all I had to do was watch the clouds and click the shutter, my heart filled with gladness….
A Sony 12-24 Gallery
Click an image for a closer look and slide show. Refresh the window to reorder the display.


Are you insane?
Posted on April 11, 2018

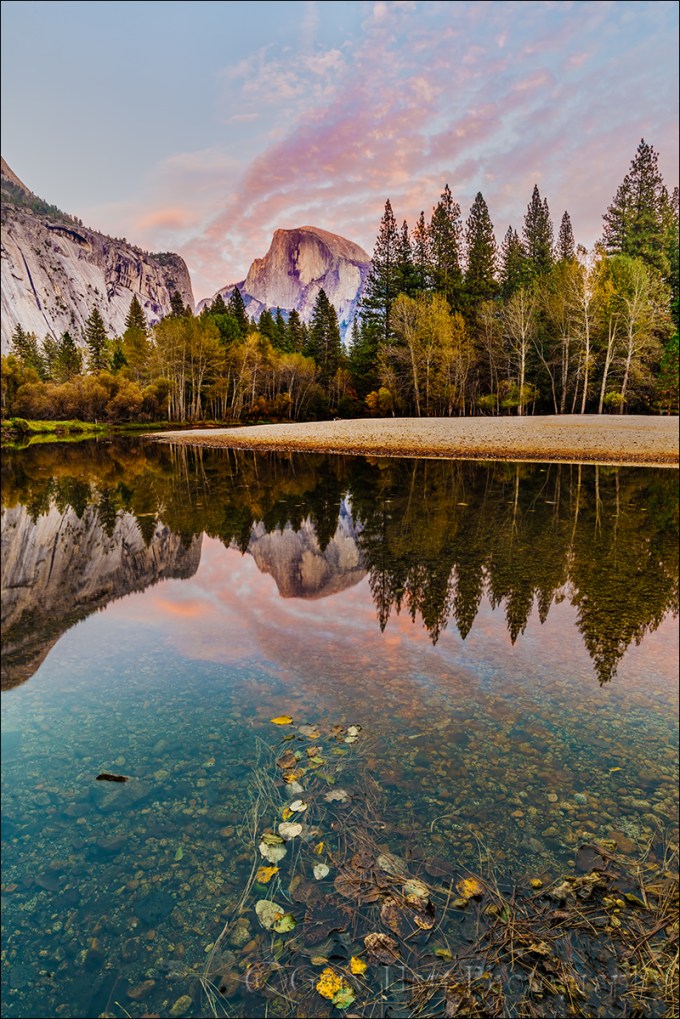
Cotton Candy Reflection, Half Dome, Yosemite
Sony a7R III
Sony 16-35 f/2.8 GM
2 seconds
F/16
ISO 50
Are you insane?
Albert Einstein defined insanity as doing the same thing over and over, but expecting different results. Hmmm. For some reason this reminds me of the thousands of good landscape photographers with hundreds of beautiful images they can’t sell. These photographers have a good eye for composition, own all the best equipment, know when to be at the great locations, and are virtual gurus with state-of-the-art processing software. Yet they haven’t achieved (their definition of) success.
Conducting photo workshops gives me pretty good insight into the mindset of serious amateur photographers, the photographers serious enough to spend time and money to rise before sunrise and stay out after dark to photograph the world’s most beautiful landscapes in frequently miserable conditions. I’m struck that many of these photographers have serious aspirations for their photography, but are so mesmerized by technology that they turned over control of the most important aspects of their craft to their camera. Their solution to photographic failure is to buy more equipment, visit more locations, and master more software. But the most overlooked tool is the one on top of their shoulders.
Knowledge vs. understanding
Just as a new camera won’t make you a better photographer, simply upgrading your photography knowledge won’t do it either—knowledge is nothing more than ingested and regurgitated information. Understanding, on the other hand, (among other things) gives you the ability to use information to create new knowledge and solve problems.
Many photographers invest far too much energy acquiring knowledge, and far too little energy understanding what they just learned. For example, it’s not enough to know that a longer shutter speed or bigger aperture means a brighter image if that knowledge doesn’t translate into an understanding of how to manage motion, depth, and light with your camera. It’s one thing to know you need more light on your sensor, but something altogether different to know whether to add it with a longer shutter speed, larger aperture, or higher ISO—a choice that makes a huge difference in the finished product.
Take control
Automatic modes in most cameras handle static, midday light beautifully, yet struggle in the limited light, extreme dynamic range, and harsh conditions that artistic photographers seek. The auto modes have become so good that they have created the illusion of control in the minds of many photographers. I see many excellent photographers whose profound faith in their technology has caused critical deficiency of two fundamental photographic principles:
- How a light meter determines the exposure information it gives you. This seems so basic, but auto-exposure success has fooled many into thinking they understand metering and exposure.
- How to use the zero-sum relationship between aperture, shutter speed, and ISO to manage photography’s three variables: depth, motion, and light. Proper metering and exposure is the universal tool that enables photographers to handle the limiting factors of every scene.
Books and internet resources are a great place to start learning these principles (here’s my Photo Tip article), but the knowledge you gain there won’t turn to understanding until you get out with your camera and learn to manage a scene’s motion, depth, and light in creative ways that set your photography apart.
For example
My metering philosophy is to approach every scene at ISO 100 (my Sony a7RIII’s best ISO) and f/11 (the best combination of lens sharpness and depth of field with minimal diffraction)—I control the light with my shutter speed and only deviate my baseline ISO and f-stop when the scene variables dictate. For example, when I want more or less depth of field, I’ll choose a different f-stop, or when I can’t get a proper exposure at the shutter speed that gives me the motion effect I want (blurred or sharp), I’ll adjust the ISO.
This Yosemite sunset from last February was about Half Dome, the clouds, the light, and the reflection in the Merced River. After finding my composition, the scene variables to consider when determining my exposure settings were:
- Motion in the river: I wanted to blur the flowing water enough to smooth some of the chop and ripples, and to turn the floating foam fragments into white blurs
- Depth of field: At 34mm, the closest foreground objects were far enough away that depth of field wasn’t a concern
- Light: The dynamic range separating the brilliant highlights in the sunlit clouds from the deep shade in the trees and river was extreme, with a very narrow margin for error
The blur effect I wanted would require at least a one second exposure time, so I dropped my ISO down to 50 (as low as it goes). Keeping my aperture at f/11, I dialed my shutter speed with an eye on the histogram—when the histogram indicated I’d pushed my highlights as far as I could without clipping, my shutter speed was 1 second. This gave me a the proper exposure with sufficient motion blur, but I decided a little more motion blur would be even better. To double the shutter speed to 2 seconds, I stopped down one stop to f-16 and tried one more frame. In this case the benefit of the extra motion blur far outweighed any diffraction and lost sharpness (which experience has shown e would have been minimal with my Sony 16-35 GM lens), so that’s the frame I selected.
Insanity is in the mind of the beholder
If landscape photography gives you what you want, then by all means, continue doing what you’re doing. But if you’re having a hard time achieving a photographic goal, the solution is likely not doing more of what you’re already doing. Instead, try reevaluating your comprehension of fundamental photographic principles that you might not have thought about for years (or ever). Get out of your camera’s auto exposure modes and take control of your scene’s variables. You’ll know you’re there when you know how to get the result you want, or know why it’s simply not possible.
Do I really think you’re insane for doing otherwise? Of course not. But I do think you’ll feel a little more sane if you learn to take more control of your camera.
Workshop Schedule || Purchase Prints
A World in Motion
Click an image for a closer look and slide show. Refresh the window to reorder the display.


Snow Job
Posted on March 24, 2018

Winter Reflection, Bridalveil Fall and the Merced River, Yosemite
Sony a7R III
Sony 16-35 f/2.8 GM
1/4 second
F/14
ISO 50
I’m afraid that making a living as a photographer sometimes means exchanging time to take pictures for time to make money. On the other hand, my schedule is mine alone, which means when there’s something I really, really want to photograph, such as a moonrise or fresh snow in Yosemite, I can usually arrange my schedule to make it happen. The moon shoots I can plan a year or more in advance, but snow requires a little more vigilance and flexibility.
Early this month, with hints of snow coming to Yosemite Valley, I started clearing space in my schedule. At 4000 feet, Yosemite Valley is often right on the snow-line, so a swing of just a couple hundred feet in either direction can mean the difference between snow and soggy. After watching the weather reports vacillate between snow and rain all week (and adjusting plans more than once), my buddy Mark and I took a chance and made the drive to Yosemite, visions of snowflakes dancing in our heads.
Waiting at the traffic-light-controlled, one-lane detour around the Ferguson Slide on Highway 140, I watched dozens of westbound headlights file past the four or five eastbound taillights idling at the light in front of us. With a storm imminent, it occurred to me that we were participating in a kind of changing of the guard, where the evacuating tourists are replaced by a much smaller contingent of what could only be photographers.
We arrived in Yosemite Valley at about the same time as the rain, circled the valley, secured a cheap room at Yosemite Valley Lodge (in Yosemite, any night with plumbing and solid walls for $150 is in fact a steal), and went to dinner. When the rain continued through dinner and all the way until bedtime, I began to fear the weather report had vacillated once more in the wrong direction.
Peeking out the window at around 4:00 a.m. and seeing more rain, I grudgingly turned off the alarm I’d optimistically set for 6:00 a.m. and went back to sleep. The next thing I knew, Mark was waking me at 6:10 to report six inches of fresh snow, and it was still falling. By 6:15 we were bundled and searching for my car in a parking lot filled with identical white lumps.
The rest of the morning was a blur as Mark and I darted from pristine location to pristine location, marveling at how a few hours of snow can completely transform months of accumulated grime and a thirsty forest dotted with dead and dying trees. For those few hours, Yosemite was new again.
At our first stop, El Capitan Meadow, we photographed El Capitan and Cathedral rocks battling the clouds for dominance. Down the road at Valley View, the snow continued falling but the granite was winning and I soon found myself admiring the reflection of Cathedral Rocks and Bridalveil Fall just upriver from the parking area.
Normally the thin branches overhanging this vantage point are a distraction to avoid, but glazed with snow, they had the potential to make a perfect frame. The reflection was the easy part, but somehow I had to figure out how to feature it and the branches without the branches obliterating the rest of the scene.
To separate Bridalveil Fall and Cathedral Rocks from the glazed branches, I splayed my tripod’s legs and dropped it to the ground, then scooted up to the river’s edge. That still left a few branches dangling too low, so I pushed my camera out even farther by extending one tripod leg into the river. I was aided immensely by the articulating screen of my Sony a7RIII—while I still needed to sit in the snow to get low enough to compose and control my camera, I very much appreciated the ability to sit and look down at my LCD rather than sprawl on my stomach in the snow to get my eye to the viewfinder.
When photographing a scene that includes a reflection and nearby objects, it’s important to remember that the focus point of a reflection is the focus point of the reflective subject, not the reflective surface. (I’ll pause here for a few seconds to let you process this because it’s important.) In this case I was at 16mm; at f/11 that gave me a hyperfocal distance of less than four feet; with the branches about five feet away, front-to-back sharpness wouldn’t be a problem, even focused at infinity. Nevertheless, I chose f/14 for this shot, not for more depth of field, but to (along with ISO 50) stretch my shutter speed enough to smooth a few small ripples in the reflection.
Excitement about a scene can overwhelm good sense—we see something that moves us, and quickly point the camera and click with more enthusiasm than thought. While this approach may indeed record memories and impress friends, it almost certainly denies the scene the attention it deserves. I was indeed very excited about this scene, but between the depth of field, reflection, overhanging branches, moving water, dominant background subjects, not to mention the awkwardness of my position, I had many moving parts to consider.
Rather than attempt perfection on the first click, I addressed the obvious stuff (covered above) with a “rough draft” click. Draft image in hand, I popped my camera off the tripod, stood (ahhhhh), and evaluated my result. I immediately saw two things to address: first, I wanted Cathedral Rocks better framed by the branches; second, I wanted the mid-river, snow-capped rocks away from the right edge of my frame.
I returned my camera to live-view, dropped to ground-level, and replaced the camera on my tripod. Because I hadn’t touched the tripod, the scene on my live-view LCD was the very scene I’d just reviewed—making my prescribed adjustments was a simple matter of panning right a couple of inches and pushing the tripod a little farther into the river. Click.
I love my job.
Join me in Yosemite this winter
Workshop Schedule || Purchase Prints
Yosemite Winter


Putting the Gorge in Gorgeous
Posted on March 2, 2018

Sunset Calm, Trout Lake and Mount Adams, Washington
Sony a7R
Sony/Zeiss 24-70 f4
1.3 seconds
F/11
ISO 100
I recently spent some time going through and processing a bunch of Columbia River Gorge images, from many years of visits, I haven’t had time to get to until now. This is the first of several I’ll be posting over the coming weeks.
The first time I visited the Columbia River Gorge, I couldn’t believe I’d lived my entire life without visiting here. For a landscape photographer, the Columbia River Gorge area has everything: lush forests, thundering waterfalls, majestic volcanoes, sparkling streams, and glassy lakes. It’s almost unfair that this year-round beauty is enhanced by the vivid colors of spring wildflowers and autumn foliage.
The Columbia River cuts a wide channel through lava flows that ended around 10 million years ago, leaving a layer of basalt that’s more than a mile thick. Basalt’s hardness is responsible for the gorge’s proliferation of waterfalls. Rather than eroding into gently sloping terrain as softer rock does, the basalt cliffs carved by the Columbia River maintain their verticality, creating resilient platforms that launch the numerous rivers and creeks that drain this saturated region. The result is waterfalls, lots and lots of waterfalls: Tall waterfalls, short waterfalls, wide waterfalls, skinny waterfalls, single waterfalls, multiple waterfalls, plummeting waterfalls, cascading waterfalls….
But it would be a mistake to assume that the Columbia River Gorge experience is all about waterfalls. Bookended by majestic volcanoes, the area surrounding the Gorge is a pastiche of rivers, streams, and lakes that are beautiful subjects by themselves, and as wonderful foreground material for whatever mountain happens to be in view.
On the Oregon (south) side of the Columbia River, Mount Hood towers over the picturesque orchards of the Hood River Valley. Across the river is Washington and its seemingly endless evergreen forests that unfold in the shadows of Mount Hood and Mount St. Helens.
Trout Lake is about a half hour north of the river on the Washington side. Technically not part of the Columbia River Gorge, Trout Lake is nevertheless part of the broader Columbia River Gorge experience. And while I wouldn’t call Trout Lake hidden, or particularly unknown, it’s far enough off the beaten path to avoid trampling by ogling tourists.
Filling with sediments that started their journey on or near Mount Adams, Trout Lake is on its way to becoming a meadow. Its relative shallowness makes it less likely to be disturbed by waves that spoil reflections reflections. While a reflection like the one in this image is far from a sure thing, neither is it a rare occurrence. They’re more common here in the calm air around sunrise, but as this picture illustrates, I’ve found reflections on Trout Lake at sunset too.
Filtered by thin clouds, the light this afternoon had been rather subdued—nice, but unspectacular. Sunset was similarly forgettable. But as I started to pack up, a whisper of pink in the previously bland clouds above Mount Adams gave me pause. Hmmm. Often this kind of color is just there to mess with me (you know what I’m talking about), but I paused to watch the color intensify, until finally I could no longer resist.
Without a lot of foreground options, and not much time to go hunting, I simply centered Mount Adams in the top third of the frame and used a solitary protruding rock to create a diagonal with a cinder cone to Mount Adams’ right. While perhaps not my most creative composition, the mountain, color, and reflection make this one of those moments in nature when it’s best for the photographer to get out of the way and just let the scene speak for itself.
Columbia River Gorge Photo Workshops
Workshop Schedule || Purchase Prints
Celebrating the Columbia River Gorge


A Winter Morning in Yosemite
Posted on December 10, 2017

Winter Reflection, El Capitan, Yosemite
Canon EOS-1Ds Mark III
Canon 17-40
1/4 second
F/16
ISO 200
Missing snow so far this winter, I’m going through some of my old snow images and came across this one from a few years ago. I’d traveled to Yosemite with the promise of snow in the forecast, but the night before the trip’s final day I went to sleep to the steady hum of rain. The next morning dawned damp and gray—and gloriously silent. Outside a thin veneer of fresh snow dusted the trees, and without even considering breakfast I headed to Tunnel View to survey the valley and plan my morning. By the time I arrived a patch of sunlight had burned a hole in the clouds above Cathedral Rocks and hints blue sky mingled with the clouds behind me. I knew the show there would soon be spectacular, but I’ve photographed many clearing storms from Tunnel View and wanted something different.
Without leaving my car I headed back down into the valley, stopping first at El Capitan Bridge, arriving just before the clouds atop El Capitan started lifting. I photographed there for about 15 minutes, long enough to see El Capitan’s nose go from obscure shadow to distinct outline to fully exposed granite. Before the clouds parted completely, I packed up and made a beeline for nearby Cathedral Beach. In the short time it took to drive a half mile most of El Capitan had emerged from the clouds and I rushed to grab my gear. The road to the beach was closed so I set out on foot, running most of the quarter mile to the river.
I found two other photographers at the west end of the beach and rather than compete with them for real estate, I trudged through the brush and fresh snow to an open space just downstream. There I was able to set up in solitude and move around at will. I was quite pleased to find a snow covered snag protruding from the river, adding a little depth to the foreground.
The beauty of photographing a Yosemite clearing storm is that no matter where you are, something spectacular is happening. Often in these situations I move between locations much more quickly than normal, but this morning I took my time and just enjoyed the show.
Wringing out as many compositions as possible, I started wide with both vertical and horizontal compositions that included El Capitan and the reflection. Next I went a little tighter, capturing just El Capitan, or just the reflection, or some of both. Finally I switched to a telephoto and started picking out individual elements: the swirling clouds and brilliant highlights on El Capitan’s vertical edge, the snow covered snag in the river, and so on.
Technical stuff
A couple of related technical issues raised by this image: First, the focus point of a reflection; and second, where to focus when elements are spread from near to far throughout the frame. It’s counterintuitive to many that a reflection’s focus point is the focus point of the reflective subject, not the reflective surface. In other words, since El Capitan is at infinity, its reflection is in focus at infinity, and not when focused on the snag. If you don’t believe me, try it yourself.
Given that knowledge, and the fact that I generally want whatever’s in my foreground to be in focus (even if it means the background is slightly soft), I had to find a compromise focus point to ensure that both the reflection and the snag were in focus. With an extremely wide focal length and small aperture I was confident I could get the entire scene acceptably sharp if I focused carefully.
There are different approaches to maximizing focus range, such as relatively accurate but awkward hyperfocal charts, and rule-of-thumb guidelines like focusing a third of the way into the frame. Both have merit, and many excellent photographers employ them, but I prefer a more seat-of-the-pants approach that relies on my own experience and understanding of focus range. I generally find the closest subject I want in focus—in this case the snag—and then focus on something a little behind it.
Here I estimated the distance of the snag, found something behind me that I thought was a little farther away, and focused there. At f/16 that gave me a pretty large margin for error and I was confident the image was sharp throughout. Is this an approach I’d recommend for others? Perhaps, though it takes trial and error to perfect. I encourage you to familiarize yourself with hyperfocal distances–you don’t need to memorize them, but a basic understanding of the relationship between f-stops, focal lengths, and focus distance is invaluable for decisions like this.
Here’s an article from my Photo Tips section that might help: Depth of Field.
Workshop Schedule || Purchase Prints
Winter in Yosemite


Photography’s Creativity Triad: Depth
Posted on November 18, 2017
Autumn Reflection, Half Dome, Yosemite
Sony a7R II
Sony 16-35 f/2.8 GM
.8 second
F/16
ISO 200
Photography’s Creativity Triad
Enduring photographs don’t duplicate human reality, they reveal unseen aspects of our world. Capturing this hidden world requires mastery of photography’s “creativity triad” that distinguishes the camera’s vision from human vision: motion, light, and depth.
Photography is the futile attempt to squeeze a three-dimensional world into a two-dimensional medium. But just because it’s impossible to truly capture depth in a photograph, don’t think you shouldn’t consider the missing dimension when crafting an image. For the photographer with total control over his or her camera’s exposure variables (what exposure variable to change and when to change it), this missing dimension provides an opportunity to reveal the world in unique ways, or to create an illusion of depth that recreates much of the thrill of being there.
Creative Selective Focus

Poppy Pastel, Sierra Foothills, California (1oomm, f4, ISO 400, 1/125)
A personal favorite solution to the missing depth conundrum I call creative selective focus: An intentionally narrow depth of field with a carefully chosen focus point to flatten a scene’s myriad out-of-focus planes onto the same thin plane as the sharp subject. This technique softens distractions into a blur of color and shape, complementing and emphasizing the subject.
I especially enjoy using creative selective focus for isolation shots of colorful leaves each autumn, and for dogwood and poppy close-ups in spring. Looking for a striking subject that stands out from the surroundings, I position myself to create foreground and/or background relationships that complement my primary subject.
When composing the poppy scene depicted here, I tried to frame the foreground trio of poppies with distant poppies and other wildflowers that I knew would become soft splashes of color. Using a macro lens with extension tubes, a large aperture, and a very close focus point, I achieved a paper-thin range of sharpness that softened the busy background and helped my primary subjects stand out.
A couple of years ago I wrote an article on this very topic for “Outdoor Photographer” magazine. You can read a slightly updated version of this article in my Photo Tips section: Selective Focus.
The Illusion of Depth
Sometimes a scene holds so much near-to-far beauty that we want to capture every inch of it. While we can’t actually capture the depth our stereo vision enjoys, we can take steps to create the illusion of depth. Achieving this is largely about mindset—it’s about not simply settling for a primary subject no matter how striking it is. When you find a distant subject to feature in an image, scan the scene and position yourself to include a complementary fore-/middle-ground subjects. Likewise, when you want to feature a nearby object in an image, position yourself to include a complementary back-/middle-ground subjects.
Autumn Reflection, Half Dome, Yosemite
Guiding my workshop group to a placid bend in the Merced River on this year’s Yosemite Autumn Moon photo workshop, I was instantly drawn to the reflection of Half Dome. The cottonwoods lining the distant shoreline were at their peak autumn gold, and a collection of clouds above Half Dome caught the late afternoon sun, promising good odds for a colorful sunset. These features alone would have made a great image, but I looked around for something to add to the close foreground.
I didn’t need to look long, as just about fifty feet downstream I found a collection of colorful leaves jutting into the river, perpendicular to the shore. I shifted my position until the leaves appeared to point directly at Half Dome and dropped my tripod until my camera was about a foot above the water. With a half hour or so until sunset, I had plenty of time to play with the scene, familiarize myself with all the compositional variables, and refine my composition and focus point. Despite the relative closeness of the floating leaves, at 16mm I knew I had plenty depth of field to carry the entire scene if I was careful. Stopping my lens down to f/16, I focused on a leaf near the middle of the group, about two feet away. This gave me good sharpness from about a foot to infinity and I was in business.
Here’s my Photo Tips article on using hyperfocal focus techniques to enhance your images’ illusion of depth: Depth of Field.
Managing Depth


