Eloquent Images by Gary Hart
Insight, information, and inspiration for the inquisitive nature photographer
Grand Canyon Milky Way Reflection
Posted on June 27, 2021

Milky Way Reflection, Colorado River, Grand Canyon
Sony a7SIII
Sony 20mm f/1.8 G
ISO 6400
f/1.8
30 seconds
It seems that photographing the Milky Way gets a little easier with every passing year. I’m not talking about the dazzling composite hybrids (one frame for the sky, combined with a second frame for the foreground) that have become so popular, I’m talking about the old fashioned (well, as old fashioned as a digital image can be) single-click captures that use only the photons that strike a sensor during a single exposure.
Whether it’s a new low-light camera body, the latest ultra-fast wide lens, or breakthrough noise reduction software, there’s always something to new to look forward to on any of my workshops that include the Milky Way. 2020 was a lost year, so not only was I especially looking forward to returning to my go-to dark sky spots, I was really looking forward to trying out two years of technology advancement: my new Sony a7SIII, (relatively) new Sony 20mm f/1.8 G (the 14mm f/1.8 GM lens didn’t make it in time), and applying my new Topaz DeNoise AI software to the results.
My first Milky Way opportunity of 2021 came on Grand Canyon raft trip in May. On moonless nights the Grand Canyon has some of the darkest skies possible, but towering walls and the general east-west trend of the Colorado River make it tricky to find views of the southern horizon where the Milky Way’s brilliant core is found. And since all Colorado River campsites are first come, first served, and campsites with a Milky Way view are rare, viewing the Milky Way at the bottom of the Grand Canyon is far from a sure thing.
This was the seventh time I’ve done this trip, so my lead river guide and I have become pretty good at maximizing our Milky Way opportunities. Nevertheless, on this trip we didn’t get a campsite that worked until our fourth night. It was actually our second choice for that night, but when we found the site we’d originally targeted occupied, we ended up at our Plan B spot about a mile downstream.
My first thought was that a less than ideal angle of view meant the Milky Way wouldn’t appear until after 1 a.m., and wouldn’t rotate into the prime viewing region above the canyon until after 2 a.m. But after I scoping out the view while waiting for dinner, I found a couple of reasons to like our location. First was the spacious beach that provided room for everyone to set up without jostling for position, a real luxury compared to most of the campsites. The second that gave me hope was that our beach was on a bend in the river that created a large pool of still, reflective water—if the wind held off (never a sure thing), we could have some pretty nice reflections.
After dinner I gave everyone in the group a little orientation, letting them know where to set up, and when and where the Milky Way would appear. I also encouraged them to pre-compose and pre-focus before it got dark. (One of the great things about night photography at the Grand Canyon is that you can set up your shot in advance and leave your camera set up on the tripod without worrying about it “walking away.”)
When I got up at 1 a.m. the Milky Way was cresting the canyon wall on the left, and a few others were already happily clicking away. The air was still, so the reflection was everything I’d hoped it would be.
My early frames were horizontal, but as the Milky Way rotated upward, I started to mix in more vertical frames. Night photography is all about compromise: choosing less than ideal exposure values to capture enough light to bring out the stars and even a little foreground detail. As I do with most of my Milky Way images, before moving on to my next composition I tried a variety of exposure settings, varying the ISO between 6400 to 12800, shutter speeds from 10 to 30 seconds, and f-stops from f/1.8 to f/2.8.
Milky Way nights are so dark that sometimes I go for silhouettes. Silhouettes require less light, but also need a distinctive outline against the sky. I didn’t think silhouettes here were very good, so I exposed for more light to pull out foreground detail. For this image I used ISO 6400, f/1.8, 30 seconds, deciding that ISO 6400 gave me the most manageable noise, and my Sony 20mm f/1.8 G lens is good enough wide open that I really don’t need to stop-down. And given the amount of foreground detail I wanted, I preferred the slight star motion of a 30-second exposure to the extra noise ISO 12800 and 15 seconds gave me. (But this is a personal choice—if even extremely slight star motion bothers you, you might be okay with a little more noise to reduce it.)
Join me at the Grand Canyon
Workshop Schedule || Purchase Prints || Instagram
Here’s an updated version of the Milky Way how-to article in my Photo Tips section

Bristlecone Night, Milky Way from the White Mountains, California
Sony a7S
Rokinon 24mm f1.4
15 seconds
F/2
ISO 6400
See the Milky Way
Look heavenward on a moonless summer night (in the Northern Hemisphere) far from city light. The first thing to strike you is the shear volume of stars, but as your eyes adjust, your gaze is drawn to a luminous band spanning the heavens. Ranging from magnificently brilliant to faintly visible, this is the Milky Way, home to our sun and nearly a half trillion other stars of varying age, size, and temperature.
Size and shape
Though every star you’ve ever seen is part of our Milky Way galaxy, stargazers use the Milky Way label more specifically to identify this luminous river of starlight, gas, and dust encircling the night sky. As you feast your eyes, appreciate that some of the Milky Way’s starlight has traveled 25,000 years to reach your eyes, and that light from a star on one edge of the Milky Way would take 100,000 years to reach the other side.

Milky Way look-alike spiral galaxy: This is what our galaxy would look like from the outside, looking in. (The individual stars visible here are “local” and not part of the spiral galaxy depicted here.) Earth would be between two of the spiral arms, about halfway out from the center.
The rest of the sky appears to be filled with far more discrete stars than the region containing the Milky Way, but don’t let this deceive you. Imagine that you’re out in the countryside where the individual lights of a distant city blend into a homogeneous glow—similarly, the stars in the Milky Way’s luminous band are simply too numerous and distant to resolve individually. On the other hand, much like the lights of nearby farmhouses, the distinct pinpoints of starlight that we name and mentally assemble into constellations are simply closer. The dark patches in the Milky Way aren’t empty space, they’re starlight-blocking interstellar dust and gas, remnants of exploded stars and the stuff of future stars—like the trees and mountains that block our view of the city,.
Just as it’s impossible to know what your house looks like by peering out a window, it’s impossible to know what the Milky Way looks like by simply looking up on a dark night. Fortunate for us, really smart people have been able to infer from painstaking observation, measurement, reconstruction, and comparison with other galaxies that our Milky Way is flat (much wider than it is tall) and spiral shaped, like a glowing pinwheel, with two major arms and several minor arms spiraling out from its center. Our solar system is in one of the Milky Way’s minor arms, a little past midway between the center and outer edge.
Blinded by the light
Sadly, artificial light and atmospheric pollution have erased the view of the Milky Way for nearly a third of the world’s population—eighty percent of Americans. Worse still, even though some part of the Milky Way is overhead on every clear night, many people have never seen it.
The good news is that advances in digital technology have spurred a night photography renaissance that has enabled the Milky Way challenged to enjoy images of its splendor from the comfort of their recliner. But there’s nothing quite like viewing it in person. Fortunately, with just a little knowledge and effort, you too can enjoy the Milky Way firsthand; add the right equipment and a little more knowledge, and you’ll be able to photograph it as well.
Horizon to Horizon
Understanding that our Solar System is inside the Milky Way’s disk makes it easier to understand why we can see some portion of the Milky Way on any night (assuming the sky is dark enough). In fact, from our perspective, the plane of the Milky Way forms a complete ring around Earth (but of course we can only see half the sky at any given time), with its brightness varying depending on whether we’re looking toward our galaxy’s dense center or sparse outer region.
Where the action is

The Milky Way’s brilliant center, its “galactic core,” radiates above Kilauea on Hawaii’s Big Island
Though the plane of the Milky Way stretches all the way across our sky, when photographers talk about photographing the Milky Way, they usually mean the galactic core—the Milky Way’s center and most densely packed, brightest region. Unfortunately, our night sky doesn’t always face the galactic core, and there are many months when this bright region is not visible at all.
To understand the Milky Way’s visibility in our night sky, it helps to remember that Earth both rotates on its axis (a day), and revolves around the sun (a year). When the side of the planet we’re on rotates away from the sun each day, the night sky we see is determined by our position on our annual trip around the sun—when Earth is between the sun and the galactic core, we’re in position to see the most brilliant part of the Milky Way; in the months when the sun is between earth and the galactic core, the bright part of the Milky Way can’t be seen.
Put in terrestrial terms, imagine you’re at the neighborhood playground, riding a merry-go-round beneath a towering oak tree. You face outward, with your back to the merry-go-round’s center post. As the merry-go-round spins, your view changes—about half of the time you’d rotate to face the oak’s trunk, and about half the time your back is to the tree. Our solar system is like that merry-go-round: the center post is the sun, the Milky Way is the tree, and in the year it takes our celestial merry-go-round to make a complete circle, we’ll face the Milky Way about half the time.
Finding the Milky Way
Just like every other celestial object outside our solar system, the Milky Way’s position in our sky changes with the season and time of night you view it, but it remains constant relative to the other stars and constellations. This means you can find the Milky Way by simply locating any of the constellations in the galactic plane. Here’s an alphabetical list of the constellations* through which the Milky Way passes (with brief notes by a few of the more notable constellations):
- Aquila
- Ara
- Auriga—faintest
- Canis Major—faint
- Carina
- Cassiopeia—faint; its easily recognized “w” (or “m”) shape makes Cassiopeia a good landmark for locating the Milky Way in the northern sky
- Cepheus
- Circinus
- Crux
- Cygnus—bright
- Gemini
- Lacerta
- Lupus
- Monoceros
- Musca
- Norma
- Ophiuchus
- Orion—faint; another easy to recognize constellation that’s good for finding the galactic plane
- Perseus—faint
- Puppis
- Pyxis
- Sagitta
- Sagittarius—brightest, galactic core
- Scorpius—bright
- Scutum
- Serpens
- Taurus—faint
- Triangulum
- Vela
- Vulpecula
* Constellations are comprised of stars that only appear connected by virtue of our Earth-bound perspective—a constellation is a direction in the sky, not a location in space.
If you can find any of these constellations, you’re looking in the direction of some part of the Milky Way (if you can’t see it, your sky isn’t dark enough). But most of us want to see the center of the Milky Way, where it’s brightest, most expansive, and most photogenic. The two most important things to understand about finding the Milky Way’s brilliant center are:
- From our perspective here on Earth, the galactic core is in Sagittarius (and a couple of other constellations near Sagittarius)—when Sagittarius is visible, so is the brightest part of the Milky Way (assuming you can find a dark enough sky)
- Earth’s night side most directly faces Sagittarius in the Northern Hemisphere’s summer months (plus part of spring and autumn)
Armed with this knowledge, locating the Milky Way’s core is as simple as opening one of my (too many) star apps to find out where Sagittarius is. Problem solved. Of course it helps to know that the months when the galactic core rises highest and is visible longest are June, July, and August, and to not even consider looking before mid-March, or after mid-October. If you can’t wait until summer and don’t mind missing a little sleep, starting in April, Northern Hemisphere residents with a dark enough sky can catch Sagittarius and the galactic core rising in the southeast shortly before sunrise. After its annual premier in April, the Milky Way’s core rises slightly earlier each night and is eventually well above the horizon by nightfall.
People who enjoy sleep prefer doing their Milky Way hunting in late summer and early autumn, when the galactic core has been above the horizon for most of the daylight hours, but remains high in the southwest sky as soon as the post-sunset sky darkens enough for the stars to appear. The farther into summer and autumn you get, the closer to setting beneath the western horizon the Milky Way will be at sunset, and the less time you’ll have before it disappears.
Into the darkness
The Milky Way is dim enough to be easily washed out by light pollution and moonlight, so the darker your sky, the more visible the Milky Way will be. To ensure sufficient darkness, I target moonless hours, from an hour or so after sunset to an hour before sunrise. New moon nights are easiest because the new moon rises and sets (more or less) with the sun and there’s no moon all night. But on any night, if you pick a time before the moon rises, or after it sets, you should be fine. Be aware that the closer the moon is to full, the greater the potential for its glow to leak into the scene from below the horizon.
Getting away from city lights can be surprisingly difficult (and frustrating). Taking a drive out into the countryside near home is better than nothing, and while it may seem dark enough to your eyes, a night exposure in an area that you expect to be dark enough reveals just how insidious light pollution is as soon as you realize all of your images are washed out by an unnatural glow on the horizon. Since the galactic core is in the southern sky in the Northern Hemisphere, you can mitigate urban glow in your Milky Way images by heading south of any nearby population area, putting the glow behind you as you face the Milky Way.
Better than a night drive out to the country, plan a trip to a location with a truly dark sky. For this, those in the less densely populated western US have an advantage. The best resource for finding world-class dark skies anywhere on Earth is the International Dark-Sky Association. More than just a resource, the IDA actively advocates for dark skies, so if the quality of our night skies matters to you, spend some time on their site, get involved, and share their website with others.
Photograph the Milky Way
Viewing the Milky Way requires nothing more than a clear, dark sky. (Assuming clean, clear skies) the Milky Way’s luminosity is fixed, so our ability to see it is largely a function of the darkness of the surrounding sky—the darker the sky, the better the Milky Way stands out. But because our eyes can only take in a fixed amount of light, there’s a ceiling on our ability to view the Milky Way with the unaided eye.
A camera, on the other hand, can accumulate light for a virtually unlimited duration. This, combined with technological advances that continue increasing the light sensitivity of digital sensors, means that when it comes to photographing the Milky Way, well…, the sky’s the limit. As glorious as it is to view the Milky Way with the unaided eye, a camera will show you detail and color your eyes can’t see.
Knowing when and where to view the Milky Way is a great start, but photographing the Milky Way requires a combination of equipment, skill, and experience that doesn’t just happen overnight (so to speak). But Milky Way photography doesn’t need to break the bank, and it’s not rocket science.
Equipment
Bottom line, photographing the Milky Way is all about maximizing your ability to collect light: long exposures, fast lenses, high ISO.
Camera
In general, the larger your camera’s sensor and photosites (the “pixels” that capture the light), the more efficiently it collects light. Because other technology is involved, there’s not an absolute correlation between sensor and pixel size and light gathering capability, but a small, densely packed sensor almost certainly rules out your smartphone and point-and-shoot cameras for anything more than a fuzzy snap of the Milky Way. At the very least you’ll want a mirrorless or DSLR camera with an APS-C (1.5/1.6 crop) size sensor. Better still is a full frame mirrorless or DSLR camera. (A 4/3 Olympus or Panasonic sensor might work, but as great as these cameras are for some things, high ISO photography isn’t their strength.
Another general rule is that the newer the technology, the better it will perform in low light. Even with their smaller, more densely packed sensors, many of today’s top APS-C bodies outperform in low light full frame bodies that have been out for a few years, so full frame or APS-C, if your camera is relatively new, it will probably do the job.
If you’re shopping for a new camera and think night photography might be in your future, compare your potential cameras’ high ISO capabilities—not their maximum ISO. Read reviews by credible sources like DP Review, Imaging Resource, or DxOMark (among many others) to see how your camera candidates fare in objective tests.
An often overlooked consideration is the camera’s ability to focus in extreme low light. Autofocusing on the stars or landscape will be difficult to impossible, and you’ll not be able to see well enough through a DSLR’s viewfinder to manually focus. Some bodies with a fast lens might autofocus on a bright star or planet, but it’s not something I’d count on (though I expect within a few years before this capability will become more common).
Having photographed for years with Sony and Canon, and working extensively with most other mirrorless and DSLR bodies in my workshops, I have lots of experience with cameras from many manufacturers. In my book, focus peaking makes mirrorless the clear winner for night focusing. Sony’s current mirrorless bodies (a7RII/RIII, a7S/SII) are by far the easiest I’ve ever used for focusing in the dark—what took a minute or more with my Canon, I can do in seconds using focus peaking with my Sony bodies (especially the S bodies). I use the Sony a7SII, but when I don’t want to travel with a body I only use for night photography, the Sony a7RIII does the job too. Of the major DSLR brands, I’ve found Canon’s superior LCD screen (as of 2019) makes it much easier to focus in extreme low light than Nikon. (More on focus later.)
Lens
Put simply, to photograph the Milky Way you want fast, wide glass—the faster the better. Fast to capture as much light as possible; wide to take in lots of sky. A faster lens also makes focus and composition easier because the larger aperture gathers more light. How fast? F/2.8 or faster—preferably faster. How wide? At least 28mm, and wider is better still. I do enough night photography that I have a dedicated, night-only lens—my original night lens was a Canon-mount Zeiss 28mm f/2; my current night lens is the Sony 24mm f/1.4.
Tripod
It goes without saying that at exposure times up to 30 seconds, you’ll need a sturdy tripod and head for Milky Way photography. You don’t need to spend a fortune, but the more you spend, the happier you’ll be in the long run (trust me). Carbon fiber provides the best combination of strength, vibration reduction, and light weight, but a sturdy (albeit heavy) aluminum tripod will do the job.
An extended centerpost is not terribly stable, and a non-extended centerpost limits your ability to spread the tripod’s legs and get low, so I avoid tripods with a centerpost. But if you have a sturdy tripod with a centerpost, don’t run out and purchase a new one—just don’t extend the centerpost when photographing at night.
Read my tips for purchasing a tripod here.
Other stuff
To eliminate the possibility of camera vibration I recommend a remote release; without a remote you’ll risk annoying all within earshot with your camera’s 2-second timer beep. You’ll want a flashlight or headlamp for the walk to and from the car, and your cell phone for light while shooting. And it’s never a bad idea to toss an extra battery in your pocket. And speaking of lights, never, never, NEVER use a red light for night photography (more on this later).
Getting the shot
Keep it simple
There are just so many things that can go wrong on a moonless night when there’s not enough light to see camera controls, the contents of your bag, and the tripod leg you’re about to trip over. After doing this for many years, both on my own and helping others in workshops, I’ve decided that simplicity is essential.
Simplicity starts with paring down to the absolute minimum camera gear: a sturdy tripod, one body, one lens, and a remote release (plus an extra battery in my pocket). Everything else stays at home, in the car, or if I’m staying out after a sunset shoot, in my bag.
Upon arrival at my night photography destination, I extract my tripod, camera, lens (don’t forget to remove the polarizer), and remote release. I connect the remote and mount my lens—if it’s a zoom I set the focal length at the lens’s widest—then set my exposure and focus (more on exposure and focus below). If I’m walking to my photo site, I carry the pre-exposed and focused camera on the tripod (I know this makes some people uncomfortable, but if you don’t trust your tripod head enough to hold onto your camera while you’re walking, it’s time for a new head), trying to keep the tripod as upright and stable as possible as I walk.
Flashlights/headlamps are essential for the walk/hike out to to and from my shooting location, but while I’m there and in shoot mode, it’s no flashlights, no exceptions. This is particularly important when I’m with a group. Not only does a flashlight inhibit your night vision, its light leaks into the frame of everyone who’s there. And while red lights may be better for your night vision and are great for telescope view, red light is especially insidious about leaking into everyone’s frame, so if you plan to take pictures, no red light! If you follow my no flashlight rule once the photography begins, you’ll be amazed at how well your eyes adjust. I can operate my camera’s controls in the dark—it’s not hard with a little practice, and well worth the effort to learn. If I ever do need to see my camera to adjust something, or if I need to see to move around, my cell phone screen (not the phone’s flashlight, just its illuminated screen) gives me all the light I need.
Composition
A good Milky Way image is distinguished from an ordinary Milky Way image by its foreground. Simply finding a location that’s dark enough to see the Milky Way is difficult enough; finding a dark location that also has a foreground worthy of pairing with the Milky Way usually takes a little planning.
Since the Milky Way’s center is in the southern sky (for Northern Hemisphere observers), I look for remote (away from light pollution) subjects that I can photograph while facing south (or southeast or southwest, depending on the month and time of night). Keep in mind that unless you have a ridiculous light gathering camera (like the Sony a7S or a7S II) and an extremely fast lens (f/2 or faster), your foreground will probably be more dark shape than detail. Water’s inherent reflectivity makes it a good foreground subject as well, especially if the water includes rocks or whitewater.
When I encounter a scene I deem photo worthy, not only do I try to determine its best light and moon rise/set possibilities, I also consider its potential as a Milky Way subject. Can I align it with the southern sky? Are there strong subjects that stand out against the sky? Is there water I can include in my frame?
I’ve found views of the Grand Canyon from the North Rim, the Kilauea Caldera, and the bristlecone pines in California’s White Mountains that work spectacularly. And its hard to beat the dark skies and breathtaking foreground possibilities at the bottom of the Grand Canyon. On the other hand, while Yosemite Valley has lots to love, you don’t see a lot of Milky Way images from Yosemite Valley because not only is there a lot of light pollution, and Yosemite’s towering, east/west trending granite walls give its south views an extremely high horizon that blocks much of the galactic core from the valley floor.
The last few years I’ve started photographing the Milky Way above the spectacular winter scenery of New Zealand’s South Island, where the skies are dark and the Milky Way is higher in the sky than it is in most of North America.
To maximize the amount of Milky Way in my frame, I generally (but not always) start with a vertical orientation that’s at least 2/3 sky. On the other hand, I do make sure to give myself more options with a few horizontal compositions as well. Given the near total darkness required of a Milky Way shoot, it’s often too dark to see well enough to compose that scene. If I can’t see well enough to compose I guess at a composition, take a short test exposure at an extreme (unusable) ISO to enable a relatively fast shutter speed (a few seconds), adjust the composition based on the image in the LCD, and repeat until I’m satisfied.
Focus
Needless to say, when it’s dark enough to view the Milky Way, there’s not enough light to autofocus (unless you have a rare camera/lens combo that can autofocus on a bright star and planet), or even to manually focus with confidence. And of all the things that can ruin a Milky Way image (not to mention an entire night), poor focus is number one. Not only is achieving focus difficult, it’s very easy to think you’re focused only to discover later that you just missed.
Because the Milky Way’s focus point is infinity, and you almost certainly won’t have enough light to stop down for more depth of field, your closest foreground subjects should be far enough away to be sharp when you’re wide open and focused at infinity. Before going out to shoot, find a hyperfocal app and plug in the values for your camera and lens at its widest aperture. Even though it’s technically possible to be sharp from half the hyperfocal distance to infinity, the kind of precise focus focusing on the hyperfocal point requires is difficult to impossible in the dark, so my rule of thumb is to make sure my closest subject is no closer than the hyperfocal distance.
For example, I know with my Sony 24mm f/1.4 wide open on my full frame Sony a7SII, the hyperfocal distance is about 50 feet. If I have a subject that’s closer (such as a bristlecone pine), I’ll pre-focus (before dark) on the hyperfocal distance, or shine a bright light on an object at the hyperfocal distance and focus there, but generally I make sure everything is at least 50 feet away. Read more about hyperfocal focus in my Depth of Field article.
By far the number one cause of night focus misses is the idea that you can just dial any lens to infinity; followed closely by the idea that focused at one focal length means focused at all focal lengths. Because when it comes to sharpness, almost isn’t good enough, if you have a zoom lens, don’t even think of trying to dial the focus ring to the end for infinity. And even for most prime lenses, the infinity point is a little short of all the way to the end, and can vary slightly with the temperature and f-stop. Of course if you know your lens well enough to be certain of its infinity point by feel (and are a risk taker), go for it. And that zoom lens that claims to be parfocal? While it’s possible that your zoom will hold focus throughout its entire focal range, regardless of what the manufacturer claims, I wouldn’t bet an entire shoot on it without testing first.
All this means that the only way to ensure night photography sharpness is to focus carefully on something before shooting, refocus every time your focal length changes, and check focus frequently by displaying and magnifying an image on your LCD. To simplify (there’s that word again), when using a zoom lens, I usually set the lens at its widest focal length, focus, verify sharpness, and (once I know I’m focused) never change the focal length again.
While the best way to ensure focus is to set your focal length and focus before it gets dark, sometimes pre-focusing isn’t possible, or for some reason you need to refocus after darkness falls. If I arrive at my destination in the dark, I autofocus on my headlights, a bright flashlight, or a laser 50 feet or more away. And again, never assume you’re sharp by looking at the image that pops up on the LCD when the exposure completes—always magnify your image and check it after you focus.
For more on focusing in the dark, including how to use stars to focus, read my Starlight Photo Tips article.
Exposure
Exposing a Milky Way image is wonderfully simple once you realize that you don’t have to meter—because you can’t (not enough light). Your goal is simply to capture as many photons as you can without damaging the image with noise, star motion, and lens flaws.
Basically, with today’s technology you can’t give a Milky Way image too much light—you’ll run into image quality problems before you overexpose a Milky Way image. In other words, capturing the amount of light required to overexpose a Milky Way image is only possible if you’ve chosen an ISO and/or shutter speed that significantly compromises the quality of the image with excessive noise and/or star motion.
In a perfect world, I’d take every image at ISO 100 and f/8—the best ISO and f-stop for my camera and lens. But that’s not possible when photographing in near total darkness—a usable Milky Way image requires exposure compromises. What kind of compromises? The key to getting a properly exposed Milky Way image is knowing how far you push your camera’s exposure settings before the light gained isn’t worth the diminished quality. Each exposure variable causes a different problem when pushed too far:
- ISO: Raising ISO to increase light sensitivity comes with a corresponding increase in noise that muddies detail. The noise at any particular ISO varies greatly with the camera, so it’s essential to know your camera’s low-light capability(!). Some of the noise can be cleaned up with noise reduction software (I use Topaz DeNoise 6)—the amount that cleans up will depend on the noise reduction software you use, your skill using that software, and where the noise is (is it marring empty voids or spoiling essential detail?).
- Shutter speed: The longer the shutter stays open, the more motion blur spreads the stars’ distinct pinpoints into streaks. I’m not a big fan of formulas that dictate star photography shutter speeds because I find them arbitrary and inflexible, and they fail to account for the fact that the amount of apparent stellar motion varies with the direction you’re composing (you’ll get less motion the closer to the north or south poles you’re aimed). My general shutter-speed rule of thumb is 30-seconds or less, preferably less—I won’t exceed 30 seconds, and do everything I can to get enough light with a faster shutter speed.
- F-stop: At their widest apertures, lenses tend to lose sharpness (especially on the edges) and display optical flaws like comatic aberration (also called coma) that distorts points of light (like stars) into comet shaped blurs. For many lenses, stopping down even one stop from wide open significantly improves image quality.
Again: My approach to metering for the Milky Way is to give my scene as much light as I can without pushing the exposure compromises to a point I can’t live with. Where exactly is that point? Not only does that question require a subjective answer that varies with each camera body, lens, and scene, as technology improves, I’m less forgiving of exposure compromises than I once was. For example, when I started photographing the Milky Way with my Canon 1DS Mark III, the Milky Way scenes I could shoot were limited because my fastest wide lens was f/4 and I got too much noise when I pushed my ISO beyond 1600. This forced me compromise by shooting wide open with a 30-second shutter speed to achieve even marginal results. In fact, given these limitations, despite trying to photograph the Milky Way from many locations, when I started the only Milky Way foreground that worked well enough was Kilauea Caldera, because it was its own light source (an erupting volcano).
Today (mid-2019) I photograph the Milky Way with a Sony a7S II and a Sony 24mm f/1.4 lens. I get much cleaner images from my Sony at ISO 6400 than got a ISO 1600 on my Canon 1DSIII, and the night light gathering capability of an f/1.4 lens revelatory. At ISO 6400 (or higher) I can stop down slightly to eliminate lens aberrations (though I don’t seem to need to with the Sony lens), drop my shutter speed to 20 or 15 seconds to reduce star motion 33-50 percent, and still get usable foreground detail by starlight.
I can’t emphasize enough how important it is to know your camera’s and lens’s capabilities in low light, and how for you’re comfortable pushing the ISO and f-stop. For each of the night photography equipment combos I’ve used, I’ve established a general exposure upper threshold, rule-of-thumb compromise points for each exposure setting that I won’t exceed until I’ve reached the compromise threshold of the other exposure settings. For example, with my Sony a7SII/24mm f/1.4 combo, I usually start at ISO 6400, f/1.4, and 20 seconds. Those settings will usually get me enough light for Milky Way color and pretty good foreground detail. But if I want more light (for example, if I’m shooting into the black pit of the Grand Canyon from the canyon rim), my first exposure compromise might be to increase to ISO 12800; if I decide I need even more light, my next compromise is to bump my shutter speed to 30 seconds. Or if I want a wider field of view than 24mm, I’ll put on my Sony 16-35 f/2.8 G lens and increase to ISO 12800 and 30 seconds.
These thresholds are guidelines rather than hard-and-fast rules, and they apply to my preferences only—your results may vary. And though I’m pretty secure with this workflow, for each Milky Way composition I try a variety of exposure combinations before moving to another composition. Not only does this give me a range of options to choose between when I’m at home and reviewing my images on a big monitor, it also gives me more insight into my camera/lens capabilities, allowing me to refine my exposure compromise threshold points.
One other option that I’ve started applying automatically is long exposure noise reduction, which delivers a noticeable reduction in noise for exposures that are several seconds and longer.
* In normal situations the Sony a7SII can handle ISO 12,800 without even breathing hard, but the long exposure time required of night photography generates a lot of heat on the sensor with a corresponding increase in noise.
It’s time to click that shutter
You’re in position with the right gear, composed, focused, and exposure values set. Before you actually click the shutter, let me remind you of a couple of things you can do to ensure the best results: First, lower that center post. A tripod center post’s inherent instability is magnified during long exposures, not just by wind, but even by nearby footsteps, the press of the shutter button, and slap of the mirror (and sometimes it seems, by ghosts). And speaking of shutter clicks, you should be using a remote cable or two-second timer to eliminate the vibration imparted when your finger presses the shutter button.
When that first Milky Way image pops up on the LCD, it’s pretty exciting. So exciting in fact that sometimes you risk being lulled into a “Wow, this isn’t as hard as I expected” complacency. Even though you think everything’s perfect, don’t forget to review your image sharpness every few frames by displaying and magnifying and image on your LCD. In theory nothing should change unless you changed it, but in practice I’ve noticed an occasional inclination for focus to shift mysteriously between shots. Whether it’s slight temperature changes or an inadvertent nudge of the focus ring as you fumble with controls in the dark, you can file periodically checking your sharpness falls under “an ounce of prevention….” Believe me, this will save a lot of angst later.
And finally, don’t forget to play with different exposure settings for each composition. Not only does this give you more options, it also gives you more insight into your camera/lens combo’s low light capabilities.
The bottom line
Though having top-of-the-line, low-light equipment helps a lot, it’s not essential. If you have a full frame mirrorless or DSLR camera that’s less than five years old, and a lens that’s f/2.8 or faster, you probably have all the equipment you need to get great the Milky Way images. Even with a cropped sensor, or an f/4 lens, you have a good chance of getting usable Milky Way images in the right circumstances. If you’ve never photographed the Milky Way before, don’t expect perfection the first time out. What you can expect is improvement each time you go out as you learn the limitations of your equipment and identify your own exposure compromise thresholds. And success or failure, at the very least you’ll have spent a magnificent night under the stars.
Workshop Schedule || Purchase Prints
A Milky Way Gallery
Click an image for a closer look and slide show. Refresh the window to reorder the display.


Return to Civilization
Posted on May 18, 2021

Rainbow Bridge, Colorado River, Grand Canyon (2016)
Sony a7R II
Sony/Zeiss 16-35 f4
1/80 second
F/11
ISO 100
Yesterday I returned from my annual Grand Canyon raft trip, a week of white water, waterfalls, slot canyons, hiking, and star gazing in some of the most spectacular scenery on our planet—with some of the most spectacular people on our planet. This was my seventh trip, and while each trip is different, each has been unforgettable in its own way.
With highs in the low hundreds and lows in the 60s, this year was probably my hottest trip. But 100 degrees is pretty tolerable when the humidity is low and you’re never far from a splash of 50-degree Colorado River water. And our clear skies, while not ideal for daytime photography, gave us nights-after-night of skies filled with more stars than you’ve ever seen.
I had visions of processing an image or two as soon as I returned to Las Vegas on Sunday afternoon, then whipping out a quick blog post to keep my self-imposed every Sunday blog post schedule. But I hadn’t taken into account the post-trip pizza party I was to host, the shear exhaustion that always follows this trip, and the fact that I’d be breaking my glasses on the trip’s final day (a funny story—more on that in a future post), a mishap that makes spending more than a few minutes at a time on my computer very difficult. So I’ve dusted off this image, and its corresponding blog post (with a few small edits), from 2016.
The Illusion of Genius (May 2016)
Perhaps you’ve noticed that many popular nature photographers have a “hook,” a persona they’ve created to distinguish themselves from the competition (it saddens me to think that photography can be viewed as a competition, but that’s a thought for another day). This hook can be as simple (and annoying) as flamboyant self-promotion, or an inherent gift that enables the photographer to get the shot no one else would have gotten, something like superhuman courage or endurance. Some photographers actually credit a divine connection or disembodied voices that guide them to the shot.
Clearly I’m going to need to come up with a hook of my own if I’m to succeed. Flamboyant self-promotion just isn’t my style, and my marathon days are in the distant past. Courage? I think my poor relationship with heights would rule that out. And the only disembodied voice I hear is my GPS telling me she’s “recalculating.”
Just when I thought I’d reached an impasse that threatened to keep me mired in photographic anonymity, a little word percolated up from my memory, a word that I’d heard uttered behind my back a few times after I’d successfully called a rainbow or moonrise: “Genius.” That’s it! I could position myself as the Sherlock of shutter speed, the Franklin of f-stops, the Einstein of ISO. That’s, well…, genius!
And just as the fact that none of these other photographers are quite as special as their press clippings imply, the fact that I’m not actually a genius will be of no concern.
But seriously
Okay, the truth is that photography is not rocket science, and nature photographers are rarely called to pave the road to scientific or spiritual truth. Not only is genius not a requirement for great photography, for the photographer who thinks too much, genius can be a hindrance. On the other hand, a little bit of thought doesn’t hurt.
It’s true that I’ve photographed more than my share of vivid rainbows and breathtaking celestial phenomena—moonrises and moonsets, moonbows, the Milky Way, and even a few comets—from many iconic locations, but that’s mostly due to just a little research and planning, combined with a basic understanding of the natural world. An understanding that’s basic enough for most people who apply themselves.
Take, for example, this rainbow. It was clearly the highlight of this year’s Grand Canyon raft trip, and while I did predict it about fifteen minutes before it appeared, that doesn’t make me a genius. Like most aspects of nature photography, photographing a rainbow is mostly a matter of being in the right place at the right time. Of course there are things you can do to increase your chances of being in the right place at the right time. Mostly it’s an understanding of the science of rainbows, and the patience to wait, that makes me appear more prescient than I really am.
The essentials for a rainbow are simple: airborne water droplets and sunlight (or moonlight, or any other source of bright, white light) at 42 degrees or lower. Combine these two elements with the correct angle of view and you’ll get a rainbow. The center of the rainbow will always be exactly opposite the sun—in other words, your shadow will always point toward the rainbow’s center. And the lower the sun, the higher (and more full) the rainbow. There are a few other complicating factors, but this is really all you need to know to become a rainbow “genius.”
In this case it had been raining on and off all day, and while rain is indeed half of the ingredients in our rainbow recipe, as is often the case, this afternoon the requisite sunlight was blocked by the very clouds delivering the rain. Not only do rain clouds block sunlight, so do towering canyon walls. Complicating things further, the window when the sun is low enough to create a rainbow is much smaller in the longer daylight months near the summer solstice (because the sun spends much of its day above 42 degrees). So, there at the bottom of the Grand Canyon on this May afternoon, the rainbow odds weren’t in our favor.
But despite the poor odds, because this afternoon’s rain fell from clouds ventilated by lots of blue holes, I gave my group a brief rainbow alert, telling them when (according to my Focalware iPhone app, the sun would drop below 42 degrees at 3:45) and where to look (follow your shadow), and encouraging them to be ready. Being ready means figuring out in advance where the rainbow will appear and finding a composition in that direction, then regularly checking the heavens—not just for what’s happening now, but especially for what might happen soon.
We arrived at our campsite across from Deer Creek Fall with a light rain falling. The sun was completely obscured by clouds, but seeing that the sun would eventually drop into a large patch of blue on the western horizon, I went scouting for possible rainbow views as soon as my campsite was set up. When the rain intensified an hour or so later, I reflexively looked skyward and realized that the sun was about to drop beneath the clouds into a patch of blue that reached all the way to the western horizon. I quickly sounded the alarm (“The rainbow is coming! The rainbow is coming!”), grabbed my gear, and beelined to the spot I’d found earlier.
A few followed my lead and set up with me, but the skeptics (who couldn’t see beyond the heavy rain and no sunlight at that moment) continued with whatever they were doing. After about fifteen minutes standing in the rain, a few splashes of sunlight lit the ridge above us on our side of the river; less than a minute later, a small fragment of rainbow balanced above the right riverbank just upstream. Then, right before our eyes, the color quickly spread across the river to connect with the other side. Soon we had a double rainbow, as vivid as any I’ve ever seen.
Fortunately for the skeptics, this rainbow lasted so long, everyone had a chance to photograph it. Our four guides (with an average of 15 years Grand Canyon guiding experience), agreed that this had been the most vivid and longest lasting rainbow they’d ever seen. (I actually toned it down a little in Photoshop.)
Genius? Hardly. Just a little knowledge and preparation mixed with a large dose of good fortune.
One more thing (May 31, 2016)
The vast majority of photographers whose work I enjoy viewing achieved their success the old fashioned way, by simply taking pictures and sharing them (rather than blatant self-promotion or exaggerated stories of personal sacrifice). In no particular order, here’s a short, incomplete list of photographers I admire for doing things the right way: Charles Cramer, Galen Rowell, David Muench, William Neill, and Michael Frye. In addition to great images, one thing these photographers have in common is an emphasis on sharing their wisdom and experience instead of hyperbolic tales of their photographic exploits.
Read more about the science of rainbows, and how to photograph them
A Gallery of Rainbows


Sony 14mm f/1.8 GM first thoughts
Posted on April 25, 2021

Starlight Reflection, Wizard’s Hat, Bandon, Oregon
Sony a7SIII
Sony 14mm f/1.8 GM
ISO 12800
f/1.8
15 seconds
Last week I got to preview the brand new, and top secret (at the time) Sony 14mm f/1.8 GM lens. I really didn’t have time for this, but this was the lens I’ve been praying for pretty much my entire photography life and I just couldn’t say no. This isn’t so much a review as it is a summary of my experience using it, and my first impressions.
It was a Monday morning (April 12) and Don Smith, his wife Beri, and I were on the road to Bandon, Oregon when the call from Sony came in. It went something like this:
Sony: Would you be willing to try out the new Sony 14mm f/1.8 GM lens.
Don and Gary: Duh—uh, sure!
Sony: We’d need 10 images each, including 2 night images apiece, by Sunday.
Don and Gary: We have a workshop starting tomorrow, but we’ll figure it out.
Sony: Oh, this lens is a secret, so nobody can see you using it.
Don and Gary: Oh, wow—okay, we’ll be careful.
Sony: And one more thing. There’s only one lens, so you guys will need to share.
Don and Gary: (Eyeing each other suspiciously) Uh, sure…
The lens was overnighted arrived the next day, just as the workshop started. By then Don and I had agreed to a sharing plan that would give each of us equal opportunity to use the lens without affecting the workshop, and had even come up with an answer in the (we hoped) unlikely event that anyone asked what lens we were using. (I only had to lie once.)
I checked the moon schedule and determined that the only two nights that week suitable for night photography were our first two with the lens, which were our only two remaining nights in Bandon. Fortunately, with late sunsets and early sunrises, we had no group night shoots planned), so the only cost was sleep.
Don got it the first night, but I went out with him to scout for potential compositions and get up to speed on my as yet unused (thank-you-very-much, COVID) Sony a7SIII. The next night was my night—I went out solo and I had the entire beach to myself.
First impressions
The first thing to strike me about this lens was its compactness, which just blew me away. How can a lens so wide, and so fast, be so small and light? But it also felt quite solid in my hand, which I took as a good sign. It has an aperture control ring on the lens (with a toggle to choose between click or “unclick”), but I especially appreciated the aperture ring’s “A” position, which allows me to set my aperture with the camera’s aperture control dial as I do with all my other lenses. (Since I will use this lens a lot at night and need to do everything by memory and feel, the more I can control my settings without doing something different, the better.)
I have loved, loved, loved night photography with the first two Sony a7Sx series bodies, but, despite having the a7SIII since last summer, this was the first time I’ve been able to use it. All I can say is that it only took a couple of minutes to know that the a7SIII and 14mm GM are a match made in heaven. Not only does the a7SIII give me clean files at 12800 ISO, when paired with a fast lens like the 14mm GM, even with nothing but starlight, I can compose and focus (without guessing) in seconds. But the thing that excited me most this night was the amount of sky I could capture at 14mm—until now my night lenses have always been the (wonderful) Sony 24mm f/1.4 GM and Sony 20mm f/1.8 G, but
In action
Turns out I’d underestimated the breadth of the 14mm lens’s field of view and my ability to deal with the thin, 6% crescent moon hovering near the western horizon. The amount of light necessary to bring out the stars and beach detail also rendered the much brighter moon a large white blob, meaning that many of the compositions I’d planned were simply not doable without being photobombed by the moon. So I spent most of my time on the south end of the beach, concentrating my compositions on Wizard’s Hat. Bandon’s other iconic sea stacks would need to wait for a future visit.
The tide was out, which allowed me to get pretty close to Wizard’s Hat and its neighbors. That was a good thing, because with a 14mm lens, close is essential, the closer the better. It was also a bad thing, because at the beach, the closer the wetter. Fortunately, the long, nearly flat beach meant no rogue waves crashing atop me without warn, it just meant that when a big wave did crash a couple of hundred feet out, it washed up and over my quickly saturated boots and socks. It wasn’t long before I just resigned myself to wet feet if I wanted to include Wizard’s Hat and the spectacular reflection in the sheen left by receding waves.
After my first few frames I magnified the image in my viewfinder and scrutinized the stars and sea stacks. I checked the sea stacks for focus softness and found none—wow, is focus easy with the a7SIII and a fast lens! I also checked for noise all the way up to ISO 12800 and saw nothing that I knew wouldn’t be cleaned up easily by Topaz DeNoise AI. In the stars I looked for distortion, especially in the corners. I did the entire shoot at f/1.8 to really put it to the test and was blown away by the complete lack of distortion throughout the frame. With each close look confirming what I’d seen in the previous checks, I soon stopped checking and just concentrated on taking pictures.
Initial conclusion
I love the night sky, and am thrilled that recent technology has allowed me to photograph it so easily. But I always found myself longing for a wider field of view to get as many stars as possible, especially in New Zealand where the Milky Way is so high in the June sky, or at the bottom of the Grand Canyon, where I find myself always wanting to include more sky and foreground. I know the Sony 12-24 f/2.8 lens will give me the breadth I long for, but f/2.8, while fast enough in a pinch, isn’t as fast as I’d like (especially in the near total darkness at the bottom of the Grand Canyon). And a fast lens that requires me to stop down a stop or two to maximize image quality doesn’t really provide much of an advantage. Until now I’ve had to work around these compromises. There are other lenses as fast as, or even a little faster, but the Sony 14mm GM’s combination of breadth, speed, and compactness sets it apart. Factor in the the distortionless corner-to-corner sharpness I saw, and I think I’m ready to declare the Sony 14mm f/1.4 GM my perfect night lens.
One Week in Oregon with the Sony 14mm f/1.4 GM Lens
Click an image for a closer look, and to view a slide show.


COVID Reflections
Posted on March 14, 2021

Autumn Snow and Reflection, Half Dome, Yosemite
Sony a7RIV
Sony 16-35 f/2.8 GM
2 seconds
F/16
ISO 50
Last week marked the one year anniversary of the COVID shutdown. WOW. One year.
In hindsight I realize that I might have been a little naive when this thing started because of the way I’d spent the two weeks prior to the shutdown: first in Scottsdale, Arizona for my annual MLB Spring Training trip (go Giants!), followed immediately by a week in Anchorage, Alaska to visit my daughter. In Arizona at the beginning of March I noticed very little difference in people’s behavior (though I did have to search long and hard for hand sanitizer), but winging my way to Alaska, I was struck by how empty the airports and flights were. Hmmm….
Alaska is where I was when it started to dawn on me that a couple of my upcoming workshops might be threatened. When that realization hit, I remember thinking I’ll be fine as long as I don’t lose the New Zealand trip at the end of June. Ha! I ended up losing 12 workshops, including New Zealand in both 2020 and 2021. And the workshops I have managed to pull off (three so far since last March) have been impacted as well, both in terms of group size and COVID protocol.
But this isn’t a woe is me post, I promise. I have so much to be grateful for, starting with the flexibility of being self-employed and working from home. And of course continued good health of my family and me. Oh, and the fact that I’m still in business.
And just like that, here’s 2021, I’m fully vaccinated, with two workshops in the mirror and six queued up over the next eight weeks (maybe I should be careful what I wish for). Life’s good.
But anyway…
I started this blog with the idea of a sentence or two reflecting on the COVID anniversary before diving into some thoughts on this just-processed image from last November. But here I am, nearly 500 words later….
I don’t need to gush any more about this day, a highlight of my pandemic year—you can just go back through the many blogs I’ve already posted about it (7—I counted). What I wanted to say about this image is how it underscores the importance of not merely settling for a beautiful scene, no matter how beautiful it is (something this one irrefutably was). Creating an image that stands out from all the other pictures of inherently beautiful scenes requires understanding the difference between the way your camera sees a scene and the way you see it. Unlike your experience of the world, a still image is devoid of motion and depth, has limited dynamic range and depth of field, and is constrained by a rectangular box. Managing these differences requires the ability to control your camera’s exposure variables (f-stop, shutter speed, ISO, focal length) to create the illusion of depth and motion.
The clouds had just started to part when I arrived at this reflective bend in the Merced River. It’s easy to get walloped by the beauty of a scene like this, frame up something nice, and click. But after indulging the creative side of my brain (camera or not, this scene really was gorgeous), I forced myself to set my awe aside for a few beats to work out the best way to convey the beauty.
My first step in most scenes is to identify the most important thing—what I want the scene to be “about.” If that important thing is in the foreground, I look for a complementary background; if my subject is in the background, I try to identify a complementary foreground.
In this case my “most important thing” was the entire scene across the river, anchored of course by Half Dome, but supported by the snow-covered trees and the reflection. I wandered the riverbank and found a few things to put in my foreground. I started with a mini cove rimmed with leaves that I used to frame a horizontal composition. Then, looking for something that would be better for a vertical composition, I moved on to these floating leaves and partially submerged log just a few feet upstream. Framing everything up at eye-level, I didn’t like the empty gap between the leaves/log and Half Dome’s reflection, so I dropped my tripod as low as it would go and went to work.
While there was a fair amount of dynamic range, I knew it was well within the capabilities of my Sony a7RIV—if I exposed carefully. But exposing carefully means more than just getting the light right—it means getting the light right with a shutter speed that handles the motion, and with an f-stop that handles the depth.
With a few ripples disturbing the reflection, I wanted shutter speed long enough to smooth the water and twisted my Breakthrough 6-stop Dark Circular Polarizer onto my Sony 16-35 f/2.8 GM lens. And since sharpness from the closest leaf to Half Dome’s summit was important, I selected f/16 and focused on the log. (My hyperfocal app assured me that this would give me more than enough depth-of-field for front-to-back sharpness.) Next, with my eye on the viewfinder, I slowly turned my polarizer far enough to remove the reflection from the leaves, but not so much that I erased the primary reflection.
Finally, I was ready to meter and select the shutter speed the gave me a good histogram. At my a7RIV’s native ISO (100), the shutter speed I needed was 1-second. To double that and ensure better smoothing of the ripples, I dialed down to ISO 50. Click.
A COVID Compilation
(Images from the last 12 months)
Click an image for a closer look, and to view a slide show.


Back in the Saddle Again
Posted on February 14, 2021
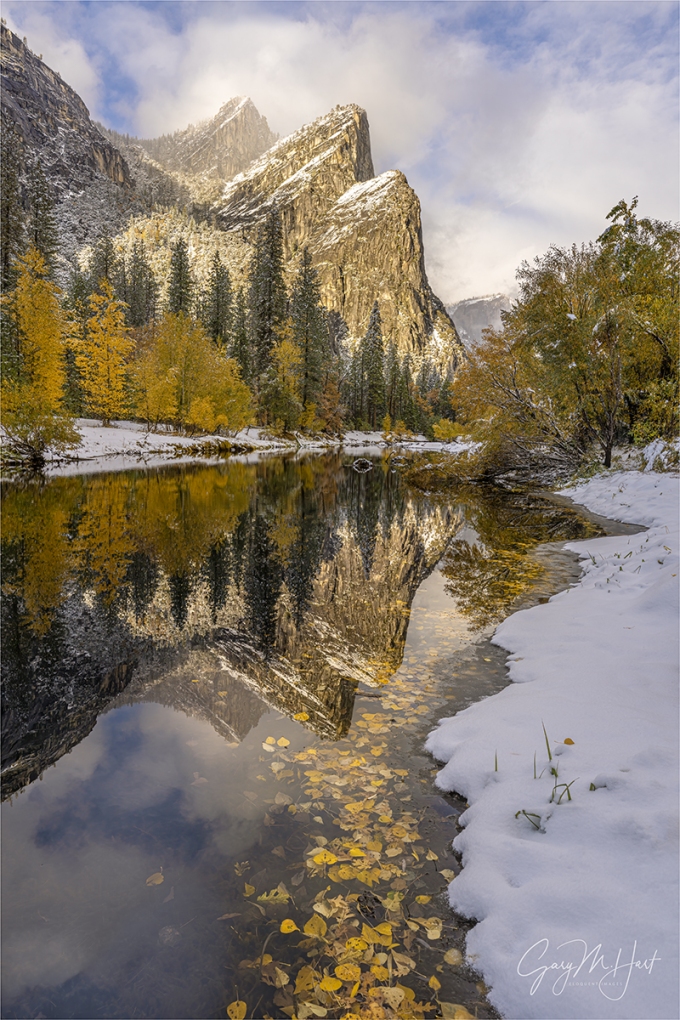
White Gold, Three Brothers Reflection, Yosemite
Sony a7RIV
Sony 12-24 f/2.8 GM
1/80 second
F/11
ISO 100
After losing 12 workshops to COVID since last February, today I returned to Yosemite for my Horsetail Fall workshop. To say I’m excited would be an understatement. I’m also a little apprehensive. One thing I’m not too worried about is COVID, because I’ve put in place protocol that will keep everyone in the group safely distanced: things like suspended carpooling (everyone can drive their own car), and Zoom for meetings and image review sessions, among other things. And this won’t be my first pandemic workshop because last October I was able to get one in, so I know my protocols work without significantly impacting everyone’s experience.
My anxiety is always a little elevated going into my Horsetail Fall workshop because Horsetail Fall is very important to most of the people who sign up, but many natural unknowns make it impossible to guarantee. Usually it’s the light that thwarts us, some unseen cloud on the horizon that snuffs the sunlight at the last minute. Last year the light was great, but the fall was dry. But I’m hopeful because this year there is lots of water in the fall, and the weather forecast is promising (fingers crossed).
Compounding my standard Horsetail Fall apprehension this year is some new rules put in place due to COVID, and the crowds Horsetail Fall always attracts—the most stringent Horsetail Fall viewing restrictions ever—and it’s entirely up to me to make sure these restrictions don’t affect my group.
Of course this is Yosemite, a place where things always seem to work out for photographers. But even though I have a Horsetail Fall plan that I’m pretty confident will work, and the things I worry about never happen anyway (to quote Tom Petty), I won’t breathe easily until I’ve seen exactly what form “work out” takes in this workshop.
About this image
But anyway… Rather than recycle an old Horsetail Fall image (which you can see below anyway), I’m sharing another image from my December snow day in Yosemite. This is the Three Brothers, probably Yosemite Valley’s most anonymous rock formation. Anonymous not because it’s less worthy than other Yosemite landmarks, but because there are just not that many places to view it.
To align the Three Brothers with the ribbon of autumn leaves, I had to alternately scale and boot-ski a few snow drifts to make my way to the river’s edge. To eliminate a couple of other photographers from my frame (not to mention more than a few footprints in the snow, I moved forward and extended one tripod leg into about a foot of river water. This put my viewfinder out of reach, but by bracing myself on the tripod to keep from joining it in the frigid river, I was able to get a clear enough view of my camera’s LCD to compose this frame. (It’s awkward angles like this that really help me appreciate live-view on the LCD.)
Workshop Schedule || Purchase Prints || Instagram
I like to include some kind of knowledge or insight in each blog post, but this week workshop prep has left me without a lot of time. Instead, I’m sharing my Horsetail Fall article, just updated with all the 2021 Yosemite NPS changes. You can also find this article in my Photo Tips section.
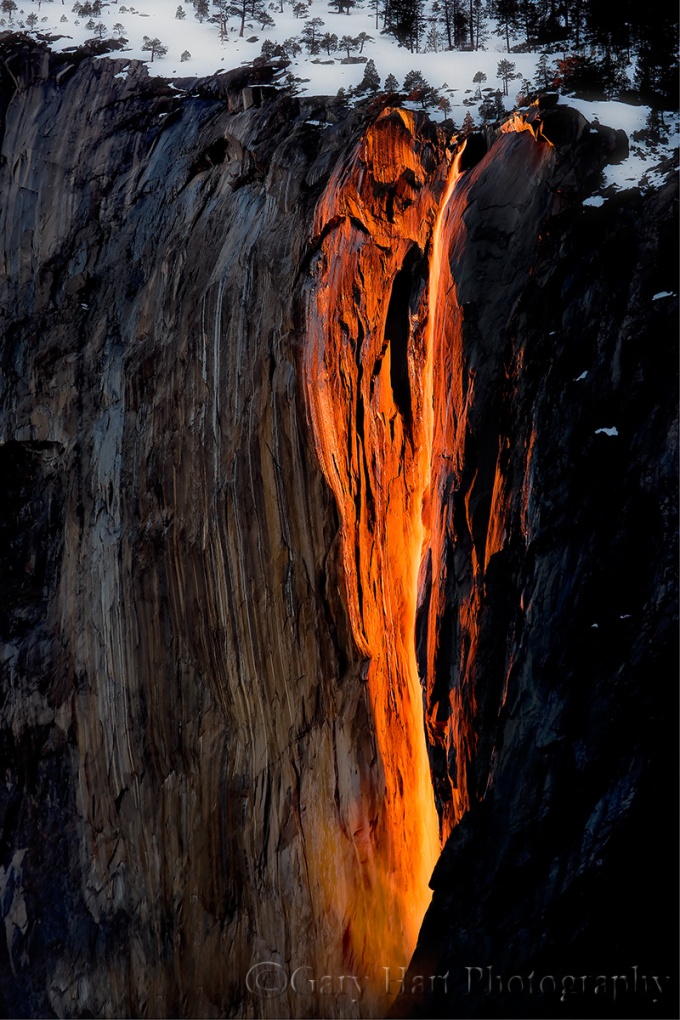
Horsetail Fall, El Capitan, Yosemite (from the Merced River south bank)
Canon EOS-1Ds Mark III
1/4 second
F/8.0
ISO 100
220 mm
2021 Horsetail Fall update
While much of the Horsetail Fall article below is still valid, crowds and COVID have led the NPS to make some fairly impactful changes.
- Access to Yosemite is by reservation only. In other words, if you don’t have a reservation, you will be turned away at the gate. The reservation system will be in effect through February at least, which means for the entire duration of the 2021 Horsetail Fall season. You can make a reservation here: https://www.recreation.gov/timed-entry/10086745. If you have lodging in Yosemite Valley, your reservation is included.
- From noon until 7 p.m., all parking on Southside Drive between the El Capitan crossover and Swinging Bridge is prohibited.
- Also between El Capitan crossover and Swinging Bridge, the entire area between the Merced River and Southside Drive side is closed. In other words, you can’t photograph Horsetail Fall from the south bank of the Merced River. This will be strictly enforced.
- All parking on Northside Drive between Yosemite Valley Lodge and the El Capitan crossover is closed. You also won’t be permitted to unload or stop on this stretch of road. To view Horsetail Fall, the NPS wants you to park in the Yosemite Falls parking area just west of Yosemite Valley Lodge, and walk to the viewing area at or near the El Capitan Picnic Area. This is about 1.5 miles each way, but it’s flat, and one lane of Northside Drive will be blocked for pedestrians.
- Here’s the NPS Yosemite Horsetail Fall page: https://www.nps.gov/yose/planyourvisit/horsetailfall.htm
Please respect these restrictions. The minority of photographers who ignore rules, or try to cut corners, reflect poorly on all photographers, which only leads to even tighter restrictions and risk complete loss of access to Horsetail Fall.
Horsetail Fall
For eleven-plus months each year, Horsetail Fall may just be Yosemite’s most anonymous waterfall. Usually dry or (at best) a wet stain, even when flowing strong this ephemeral cataract is barely visible as a thin white thread descending El Capitan’s east flank. When it’s flowing, my workshop groups can be standing directly beneath Horsetail and I still have to guide their eyes to it: “See that tall tree there? Follow it all the way to the top of El Capitan; now run your eye to the left until you get to the first tree…”. But for a couple of weeks in February, the possibility that a fortuitous confluence of snowmelt, shadow, and sunset light might, for a few minutes, turn this unassuming trickle into a molten stripe draws photographers like cats to a can-opener.
The curtain rises in the second week of February, a couple of hours before sunset, when a vertical shadow begins its eastward march across El Capitan’s south face. As the shadow advances, the sunlight warms; when the unseen sun (direct sunlight is gone from the valley floor long before it leaves towering El Capitan) reaches the horizon, the only part of El Capitan not in shadow is a narrow strip of granite that includes Horsetail Fall, and for a few minutes, when all the photography stars align, the fall is bathed in a red glow resembling flowing lava framed by dark shadow. (Some people mistakenly call the Horsetail spectacle the “Firefall,” but that altogether different, but no less breathtaking, manmade Yosemite phenomenon was terminated by the National Park Service in 1968.)
Some years Horsetail delivers sunset after sunset in February, while other years administer daily doses of February frustration. Unfortunately, it’s impossible to predict when all the tumblers will click into place: I know photographers who nailed Horsetail on their first attempt, and others who have been chasing it for years.
Don’t call it “Firefall”
One important thing before I continue. To avoid outing yourself as a Yosemite rookie, don’t make the mistake of calling Horsetail Fall the “Firefall.” Yosemite’s Firefall was a very real nightly display of burning embers pushed from Glacier Point every summer night. It was as spectacular as it sounds. The phenomenon started in 1872 and continued until the National Park Service, concerned (among other things) about the crowds it drew, terminated the Firefall in 1968.
Anyone who has witnessed or seen pictures of Horsetail Fall would agree that “Firefall” would be a great name for it, but those of us fortunate (and old) enough to have witnessed the actual Firefall know the difference between Horsetail Fall and the Firefall, and will never confuse one for the other.
(Oh yeah, and it’s Horsetail Fall, not Horsetail Falls.)
When to photograph Horsetail Fall
The “when” of Horsetail Fall depends on the convergence of three independent conditions:
- The sun’s angle is refreshingly predictable, lining up perfectly only in February (and October, when the fall is almost always dry). Common wisdom says the shadow on El Capitan most precisely targets Horsetail Fall at sunset during the third week of February, from around the 15th through the 22nd (or a little later). While I won’t dispute this, I’ve had some of my best success a week earlier, and my favorite Horsetail shot (at the top of the page) was captured February 9. I’ve also had success photographing it right up until the end of February. But the stripe of sunset light on El Capitan is thinnest (and therefore most tightly focused and photogenic) in the third week of February—the prime benefit of doing it a week earlier is light almost as good, with far fewer people.
- Water in the fall varies greatly from year to year, depending on how much show has fallen on the fall’s extremely small watershed, and how much of that snow is currently melting. A large snowpack and warm daytime temperatures are ideal. Sometimes Horsetail can be frozen solid in the morning, but afternoon warmth can be enough to get it flowing in time for the show. And a heavy rain can get it going strong for a few hours or even a day or so.
- Direct sunlight at sunset is the most fickle aspect of the Horsetail experience—for every tale of a seemingly perfect evening when the sunset light was doused by an unseen cloud on the western horizon mere seconds before showtime, there’s another story about a cloudy evening when the setting sun somehow threaded a gap in the clouds just as tripods were being collapsed.
The problem with targeting February’s third week is that it isn’t a secret: I generally prefer sacrificing Horsetail perfection in favor of Horsetail near perfection and far fewer photographers. But I’ll leave that decision up to you.
Where to photograph Horsetail Fall
It’s fun to circle Yosemite Valley on pretty much any mid- to late-February afternoon just to watch the hordes of single-minded photographers setting up camp like iPhone users on Release Day. In fact, one non-scientific way to find a spot to photograph Horsetail is to simply park where everyone else parks and follow the crowd. Unfortunately, as Horsetail’s popularity grows, so does the distance you’ll need to walk.
If Horsetail Fall is on the top of your bucket list, it’s best to pick your spot and show up early. Really early. Really, really early. The downside of this approach is that, because the best locations for Horsetail aren’t especially good for anything else, you’ll sacrifice a lot of quality Yosemite photography time waiting for something that might not happen.
And no one has commanded that you worship with the rest of the Horsetail congregation: Experienced Yosemite photographers know that any west-facing location with a view of the fall will do. If you find yourself in Yosemite with time to kill, try walking the Merced River between Cathedral and Sentinel Beaches—any place with a view to Horsetail will work. But because of their open space and relative ease of access, two spots have become the go-to Horsetail spots for most photographers.
El Capitan Picnic Area
 El Capitan Picnic Area, GPS: 37.72782N 119.61844W
The El Capitan Picnic Area, highlighted by Galen Rowell, remains the most popular Horsetail Fall vantage point. The picnic area’s advantages are that it is the closest view of Horsetail Fall, has the most parking, has the most room for photographers (by far), and has a bathroom (plug your nose). The downside is there really isn’t a lot of composition variety here, and thousands of others will have already captured something as good as or better than what you’ll get.

Horsetail Fall from the picnic area
If you like people, the El Capitan Picnic Area is the place to be—more than any other Horsetail vantage point, this one has a festive, tailgate atmosphere that can be a lot of fun. I suspect that’s because people arrive so early and there’s little else to do before the show starts. And since everyone is pointing up with a telephoto, it’s pretty much impossible for anyone to be in anyone else’s way, which eases much of the tension that often exists when shooting among large crowds.
You’ll find the parking lot, with room for twenty or so cars, on Northside Drive, about two miles west of Yosemite Lodge. In recent years the NPS has blocked a lane of Northside Drive to allow more parking (but don’t park illegally because you will be cited). You can shoot right from the parking lot, or wander a bit east to find several clearings with views of the fall.
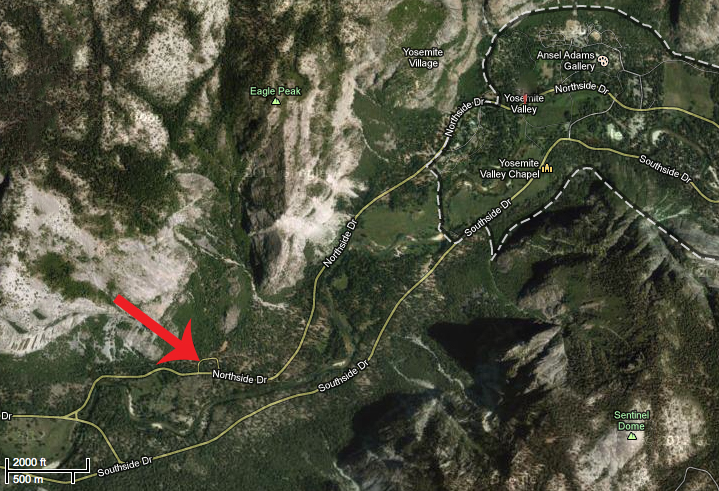
Merced River south bank bend
 Merced River south bank bend, GPS: 37.72885N 119.60743W
Photographed from a bend on the Merced River’s south bank, El Capitan’s extreme sloping summit creates the illusion that you’re somewhere above Yosemite Valley, eye-to-eye with the top of Horsetail Fall—it’s a great perspective.
I like this location because the river greatly increases the variety of possible compositions, and also because you can pivot your view upstream to photograph Upper Yosemite Fall, and behind you toward Sentinel Rock (which also gets fantastic late light), almost directly above while you wait for Horsetail to light up. The downside to photographing here is that there’s precious little room, both to park and to photograph. This requires getting there a couple of hours early, and also can lead to a bit more tension as people jockey for position.

Horsetail Fall reflection from the Southside Drive Merced River view
Driving east on one-way Southside Drive, you’ll parallel the Merced River for most of 1.2 miles beyond the turn for Cathedral Beach. The Horsetail Fall spot is right where the road and river diverge. Parallel park right there in one of two narrow but paved parking areas on opposite sides of the road, where you’ll find room for about a dozen cars. In recent years, all parking on Southside Drive between El Capitan Crossover and Swinging Bridge has been banned, if you plan to shoot here, prepare to walk a mile or more.
Since there’s so little parking here, and Southside Drive is one-way eastbound, if you find no parking (don’t try to squeeze in where there’s no room—I’ve seen rangers doing traffic control and ticketing cars that don’t fit), it also helps to know that the spot is about a ½ mile from the 4-Mile Trail parking area and ¾ miles west of the Swinging Bridge parking area—an easy, flat walk.
Because of the potential for crowds, the best strategy here is to arrive early and forego what may be a great view from the elevated riverbank (that is sure to be blocked by late-arrivers trying to cram their way in), in favor of getting as close to the river as possible. Standing at river level gives you many more compositional choices, and nobody else can block your wide shots. (But if there are other photographers already set up on the elevated riverbank when you arrive, please don’t be the one who sets up in front of them.)
How to photograph Horsetail Fall
Regardless of where you set up to photograph Horsetail Fall, it’s pretty difficult to find something that nobody else has done. But that doesn’t mean you shouldn’t try. There are definitely other places in Yosemite Valley with view of Horsetail Fall, they just take a little hunting—I suggest walking the south bank of the Merced River, and ascending the 4 Mile Trail. And since you’ll likely be doing lots of waiting, take advantage of the downtime to experiment with compositions.
Strategy
When the light begins to warm, it’s time to shoot. Because you never know when the light will shut off, don’t wait until the light is perfect—it’s best to start early and photograph often. Until the light goes away completely, my rule of thumb is that the light now is better than the light a minute ago—just keep shooting . I’m not suggesting you hold your shutter down in burst mode until your card fills; I usually tell my workshop groups to fire a frame every minute or two until the fall turns amber, then pick up the pace as it goes (fingers crossed) pink and (if you’re lucky) red. The best light is in the final five minutes before sunset.
Composition
Viewed from the picnic area, there’s not a lot of visual interest surrounding Horsetail; your most obvious compositions will be moderate telephotos, up to 300mm or full frame. I use my Sony 24-105 and 70-200 (or more recently, my 100-400) lenses almost exclusively here. Use the trees to frame your shots and let them go black; with a telephoto you can isolate aspects of the fall and eliminate the sky and some or all of the trees.
The Merced River bend near Southside Drive is farther away from the fall, with more foreground possibilities, including the river and reflections, so you’ll be able to use a greater range of focal lengths here. Don’t get so caught up in photographing the fall that you overlook wider possibilities that include the river.
From either location I think vertical compositions work best (there’s a reason you don’t see lots of horizontal Horsetail Fall images), but that doesn’t mean there aren’t horizontal opportunities too. I like to identify a go-to composition based on the conditions, then vary between wide/tight and horizontal/vertical. If the sky is boring (cloudless), minimize or eliminate it from your composition. If there are clouds that make the sky interesting, by all means include them.
A frequent rookie mistake is cutting the waterfall off at the bottom. I’m not saying there’s never a reason to do that, but unless you consciously decide to truncate the fall because you think it’s the way to compose your frame, make sure you include the diagonal ridge that Horsetail disappears behind.
Filters
If your camera struggles with dynamic range, a graduated neutral density filter will help any shot that includes the sky—a two-stop hard GND angled across El Capitan parallel to the tree line should do the trick. This usually requires some Photoshop dodging and burning to hide the transition, but it’s the only way to darken the brightest part of the sky, which is usually in front of (not above) El Capitan. Since switching from Canon to Sony, I have no problem with the dynamic range and no longer use a GND for Horsetail Fall.
A polarizer will alter your results, so if you have one on, make sure you orient it properly. I often have a difficult time deciding between maximizing and minimizing the reflections with my polarizer, so I hedge my bets and shoot both ways. I’ve found that when Horsetail is flowing strongly, minimizing the reflection is best; when Horsetail is more of a wet or icy stain, maximizing the reflection works better. Either way, it’s best to just shoot it both ways and decide later.
Exposure
Automatic metering can be problematic in extreme dynamic range scenes when color is paramount, so I always recommend manual exposure, spot metering on Horsetail Fall or the adjacent sunlit granite. To maximize the color on the fall and El Capitan, I usually underexpose slightly. Because the trees rarely add value beyond framing, they usually work better when very dark green to black, a fact that’s completely lost on your meter (which thinks everything should be a middle tone). And monitor your RGB histogram to ensure that you haven’t washed out the red (Horsetail and El Capitan) or blue (sky) channels.
Highlight Alert (blinking highlights) is your friend. While you should never make your final exposure decision based on the highlight alert, when you see the highlights flashing, check your histogram and adjust if necessary.
And finally
And perhaps most important of all, don’t get so caught up in the photography that you forget to appreciate what you’re viewing. Just take a couple of seconds to stand back and allow yourself to appreciate the amazing spectacle unfolding before your eyes.
Join me in a Yosemite Photo Workshop
A Horsetail Fall Gallery
Click an image for a closer look and to view a slide show.


Resolution Revelation
Posted on February 7, 2021

Winter Sunset, Wanaka Willow Tree, New Zealand
Sony a7RIII
Sony 24-105 G
30 seconds
F/9
ISO 200
For years I’ve been pleading with camera manufacturers to stop giving us more resolution, and instead concentrate on things like improving dynamic range and high ISO performance. And while I still think that would be a better approach, I have to admit that I’m loving having all these pixels to play with.

Red Sunset, Lake Wanaka, New Zealand
The catalyst for my resolution revelation was this New Zealand sunset image. A couple of months ago I decided that I wanted to hang a large, vertical print in a space on a wall in my office. I really like this image, but it wasn’t vertical, and the vertical versions I captured that evening weren’t during peak color. In the olden days I’d have just moved on to a different image, but advancing sensor technology has caused me to rethink my position on the resolution race.
Let’s review
In digital photography, light passing through a lens is focused onto a sensor packed with an array of microscopic electronic light-catchers called “photosites.” Each photosite reports information about the incoming photons to the camera’s microprocessor, which interprets the light’s color and intensity at that location on the sensor. That information is digitized and stored with the information from all the other photosites. Voila, a digital image is born.
Digging deeper, we see that not all photosites are created equal, and that (on most sensors, depending on the technology) each photosite measures a specific color, either red, green, or blue. But for simplicity sake, it’s enough to know that one photosite equals one pixel—that is, a 42 megapixel camera has 42 million photosites, and a 50 megapixel camera has 50 million photosites, and so on.
Any digital camera, whether it be a smartphone, a full-frame 35mm mirrorless camera, or whatever, has a fixed amount of sensor real estate upon which to place its photosites. Fortunately, as sensor technology evolves, not only are we getting more photosites, the image quality is improving with it.
But improving sensors can’t change the fact that a larger photosite collects more light than a smaller one, making it more efficient. Think of a bucket: the bigger the bucket, the more water it holds before overflowing. Another undeniable truth is, the farther apart the photosites are, the less each photosite interferes with its neighbors, and the cooler they remain (heat is the enemy of pretty much all things electronic). And while they could solve these problems by just making the sensors bigger whenever they increase the resolution, larger sensors would require different lenses. So there are really only two practical ways to increase a sensor’s resolution: shrink its photosites, and/or cram the photosites closer.
For any given sensor technology, the fewer the photosites (lower megapixel number), the better the image quality. We can define image quality in a number of ways, but as a landscape photographer, the two quality factors that matter most to me are dynamic range (the range of light a sensor can “see,” from the darkest shadows to the brightest highlights) and high ISO capability (light sensitivity). That’s why I’ve always hoped that camera manufacturers would stop adding resolution and instead concentrate on dynamic range and sensitivity.
A little history
My first DSLR camera was 6 megapixels, and I was happy. But as sensor technology improved, cameras were able to add photosites without sacrificing image quality, and I was happier. At around 24 megapixels I reached the point where I was pretty convinced I didn’t need any more resolution, and would gladly sacrifice more resolution to get even more quality.
But the manufactures kept going. When I got the Sony a7RIII that I used to capture this New Zealand winter scene, I though surely its 42 megapixel sensor would be the end of the resolution road. Silly me.
Back to the present
Today, not only does my 61 megapixel Sony a7RIV have more resolution than I ever dared dream would be possible, all that resolution has come without sacrificing my coveted dynamic range and high ISO performance. And lately, I’ve actually started to appreciate having resolution horsepower to spare.
First, I’ve come to realize that for the vast majority of scenes I shoot, my Sony Alpha bodies have more than enough dynamic range—so much that I virtually never use the graduated neutral density filters that I once considered essential for managing extreme dynamic range. And for those rare times I need to test my camera’s ISO limits, I have my 12 megapixel Sony a7SIII (12MP sounds small compared to most of today’s sensors, but it’s more than adequate for most uses), that seems to be able to see in the dark. In other words, I rarely find myself longing for more performance.
And more and more, I find myself appreciating the extra resolution. Of course it’s important to get the framing right at capture, but sometimes that’s not possible. For example, when I photograph lightning, the best I can do is loosely frame a nice composition to ensure that I get the lightning somewhere in the frame. At 50 megapixels, I have plenty of resolution to crop in tighter on the bolt, wherever in my frame it fired. Also, a magazine will ask if I have a vertical version of a horizontal image to put on their cover. 50 megapixels is more than big enough to crop a vertical version from the original file, confident that I’ll still have plenty of resolution for even the highest quality publication.
How much resolution? Reversing the original 2/3 crop of my Sony 61 megapixel Sony a7RIV, gives me nearly 27 megapixels. And even my Sony a7RIII, with its “measly” 42 megapixels gives a nearly 19 megapixel file when I crop a horizontal to a vertical (or vice versa).
So when I wanted a vertical print for my office, I didn’t hesitate open the horizontal original of my New Zealand sunset and find a vertical crop that I liked. I ended up going with a 24×36 print of the vertical (taken from the horizontal original) you see at the top of this blog post. And you know what? It looks marvelous.
Workshop Schedule || Purchase Prints || Instagram
Cropped from the Original
Click an image for a closer look, and to view a slide show.


You Can Only Get So Wet
Posted on January 24, 2021

Vestrahorn Reflection, Stokksnes Black Sand Beach, Iceland
Sony a7RIV
Sony 16-35 f/2.8 GM
5 seconds
F/11
ISO 100
Vestrahorn, on Iceland’s southeast coast, is one impressive chunk of rock. Turns out it only reaches 1500 feet above sea level, but the way it juts so abruptly from the volcanic sand of Stokksnes Peninsula, Vestrahorn creates an imposing presence that rivals El Capitan in Yosemite.
This Vestrahorn shoot came toward the end of the 10-day Iceland workshop Don Smith and I led in January of 2020. Arriving late afternoon (which comes pretty early in Iceland in January), the group instantly scattered across the vast, flat plain offered with a variety of foreground options that included black-sand dunes, iced-over puddles, and a vast black sand beach. I made my way down to the beach and, being a sucker for reflections, was quickly drawn to glassy sand behind each retreating wave.
The beach here is so flat that the surf isn’t dangerous (at least it wasn’t on this day), but this was January in Iceland, so I didn’t really want to get wet. On the other hand, getting the reflection I wanted required being well into the wet part of the sand behind a retreating wave, and each reflection only lasted a few seconds before the water soaked into the sand. Emboldened by waterproof boots that reached about a foot up my calf, I wandered out to where it appeared the waves only reached a depth of 2 or 3 inches, not quite far enough to ensure a full reflection with each receding wave, but not too bad.
I really had a blast working this scene, playing with different compositions as the clouds and light above the mountain changed, and varying my timing to capture each wave in different stages of motion, from the frothy white churn at the wave’s front, followed by the floating foam shapes trailing it, and finally the reflective sheen punctuating each retreat. I also tried a variety of shutter speeds, freezing or applying a variety of blur effects to the moving water. When I get into this zone, I lose all sense of time a surroundings…
So imagine my surprise to feel freezing water soaking my feet. I looked down to see that my legs from the knees down had disappeared, and the beach I’d been standing on now more closely resembled a lake. With the tide clearly coming in (hmmm, perhaps that’s why the reflections seemed to be getting better…), my first inclination was to retreat. But the photography was definitely better in the deeper water, safety wasn’t a concern, and I suddenly remembered my running mantra: You can only get so wet, and once you get that wet, you’re not going to get any wetter. If this mindset could get me through several extremely miserable marathons, it could certainly get me through this. I hadn’t planned to soak my feet in the chilly surf, but now that the damage was done, I couldn’t really make it any worse. So I ended up staying out there, joyfully surrounded by reflections, for another 30 minutes.
One of the things I’ve learned over many years of photographing in extreme conditions is the value of backups. Not just backup photo gear, though I do think it’s foolish to take any photo trip with just one body (I’d already had to spend two days on this trip using my backup body, waiting for my primary body to dry after a unplanned dip in the surf), but also backup clothes.
So loading into the van (not sure what to call our vehicle: it was either a huge van or a little bus) at the beginning of each day, I always made sure to leave out a change of shoes and socks. Though my marinating feet were okay while I was shooting, as soon as I finished and started heading back to the van/bus (ban? vus?), they suddenly became wet, frozen stumps. I never imagined something as simple as a dry pair of socks could bring so much joy.
Read more about reflections
Surf’s Up
Click an image for a closer look, and to view a slide show.


Natural Tension
Posted on January 3, 2021

Clearing Storm, Half Dome Reflection from Sentinel Bridge, Yosemite
Sony a7RIV
Sony 24-105 G
Breakthrough 6-stop dark polarizer
2.5 seconds
F/16
ISO 50
Since the start of the pandemic, many (most?) of us have have found lots of time to catch up on books and movies (among other things). Of course that also includes me, and as a photographer I find it hard not to find parallels between my chosen creative medium and these others. The tension in books and movies, whether dramatic, comedic, or some combination of both, originates from the interaction of characters with each other and/or their surroundings, and the change that interaction spawns over time. Which of course got me thinking about whether it’s possible to create tension in a still photograph, and if so, how?
Relationships
Though we might not be conscious of it, the best photographic images do indeed convey a form of tension. It’s human nature to seek relationships, not just in our lives, but in our art as well. Every relationship has inherent tension, an invisible connecting thread that pulls tighter as the relationship strengthens.
Lacking the passing of time and the change it brings, still-photographers must create tension by setting up relationships between disparate elements in our frame. We signal these relationships, thereby dialing up the tension, through careful positioning of compositional elements (Google “rule of thirds” and “golden ratio”).
The most obvious relationships available to landscape photographers is the juxtaposing independent physical elements in the scene. For example, pairing a foreground tree or flower with a distant peak permanently creates a relationship between two formerly unrelated subjects. Reflections are an easy way to connect a nearby water feature to a distant subject. And then there are the dynamic celestial elements like the moon and stars, and ephemeral weather phenomena such as lightning and rainbows, that make powerful connections with terrestrial subjects.
But wait, there’s more…
Even though no time passes in a still frame, landscape photographers can and do signal time’s advance. Whether conscious of it or not, when we photograph the color and light of the natural boundaries separating day and night, the broken clouds and rainbows of a clearing a storm, or the juxtaposition of elements distinctive to two seasons, we signal the passage of time and the tension inherent in its inexorable march.
Lacking other features to set them apart, the cliched nature of sunrises and sunset images diminishes their power to generate tension—in other words, sunrises and sunsets are a dime a dozen, so if you’re going to photograph one, you’d better make an effort to put it with a strong scene. On the other hand, though it’s always important to seek a strong composition regardless of the conditions, the more rare the change, the better it can overcome an otherwise ordinary scene.
A clearing storm can feel like catching lightning in a bottle (a nice rainbow can elevate nearly any scene), but an even rarer opportunity to capture change is a scene with clear signs of two seasons. That’s especially true in my home state of California, where seasons tend to be more of an afterthought. But that doesn’t mean opportunities to photograph seasonal change here are nonexistent. California does get spectacular spring wildflower blooms, and our autumn color display (though maybe not as spectacular as some other places), can be very nice.
Bracketing spring and autumn on one side is summer, hands-down California’s least photographically compelling season. But on the other side of spring and autumn is winter. While most of the state doesn’t get snow, our mountains do (and lots of it)—capturing late snow on wildflowers and dogwood (an extremely rare event), and early snow on fall color, are real treats.
So maybe I should have warned you that there’d be math…
Which brings me to this image from my visit to Yosemite during an early November snowstorm. I really don’t need to go on any more about this day—if you’ve been reading my blog for the last couple of months, you’re probably well beyond sick of hearing about it. But it does illustrate the synergy of combining two seasons in one image. No one can deny that fall color is beautiful, and fresh snow is beautiful too (which of these is more beautiful is in the eye of the beholder, and a debate for another day). But if we were somehow able to quantify beauty, I suspect that we’d find the total amount of beauty (“beauty-units,” “beauty-bucks”?) in a fresh snow on fall color image would exceed the sum of the beauty derived from an image with fall color plus the beauty of an image with fresh snow.
You could attribute this synergy to the relative rarity of snow on fall color, but I think the power goes deeper than that. There’s just something about change the ups the stakes, so even though this is nothing more than a (totally unprovable) mental exercise (maybe I’ve been locked up too long), I’m sticking with the theory that the synergistic power of an image that combines the distinctive best of two seasons is the tension of change it conveys.
The Tension of Change


To the Pain
Posted on December 20, 2020

White Gold, Half Dome Reflection, Yosemite
Sony a7RIV
Sony 24-105 G
Breakthrough 6-stop dark polarizer
4 seconds
F/16
ISO 50
When you stop to consider all the components that have to fit into place to make a successful landscape image, it’s a wonder we don’t all just stay inside and watch TV. First there’s mastery of photography’s creative side, which requires the ability to distill our dynamic, multi-sensory, three-dimensional world into a coherent two-dimensional image. Then there’s the technical side, where we juggle our camera’s aperture, shutter speed, and ISO settings to control the scene’s depth, light, and motion. And as if meshing all these moving parts into something visually appealing weren’t daunting enough, don’t forget to factor in photography’s mental component: knowing where to be and when to be there; the foresight to recognize what might happen next and the patience to wait for for it; and finally, the fortitude to endure hunger, sleep depravation, and whatever elements Mother Nature throws our way.
Yet somehow photography happens. And like most things in life, I’ve always thought photography’s greatest joy comes from doing the hard work and overcoming difficulty. Sometimes spectacular just falls in our lap, but most of my favorite images simply those images I feel like I earned.
Nature photography’s 3 P’s
To remind myself (and others) of the photography’s mental side, many years ago I identified what I call, “The 3 P’s of nature photography.” These sacrifices, large and small, a nature photographer must make to consistently create successful images.
- Preparation is your foundation, the research that gets you in the right place at the right time, plus the vision and mastery of your camera that allows you to wring the most from the moment. It’s controlling exposure and focus, knowing your equipment, and understanding the subject. Preparation is also just having the right equipment for the moment, from the lenses in your bad to weather-appropriate clothing.
- Persistence is patience with a dash of stubbornness. It’s what keeps you going back when the first, second, or hundredth attempt has been thwarted by unexpected light, weather, or a host of other frustrations, and keeps you out there long after any sane person would have given up. And just as important, persistence is a willingness to wait as long as necessary for the moment to be right, and not just settling for “good enough.”
- Pain is suffering for your craft. I’m not suggesting that you risk your life for the sake of a coveted capture, but you do need to be able to ignore the tug of a warm fire, full stomach, sound sleep, and dry clothes, because the unfortunate truth is that the best photographs almost always seem to happen when most of the world would rather be inside.
An assignment
The truth is, you almost certainly already do it. Pick some of your favorite captures, pop them onto the screen, and try to put yourself back at that time and place. Ask yourself which of the 3 P’s you employed, and be generous with yourself and not too quick to write an image off to blind luck.
Practicing what I preach, here’s my stab at the assignment for this image:
- Preparation: Some would argue that I was lucky to be in Yosemite last month just as several inches of snow fell on peak fall color. And while my good fortune that day isn’t lost on me, the fact that I was there was no accident. I monitored the weather forecast for snow in Yosemite Valley, adjusted my schedule, and packed the right clothes for the conditions. Of course I also had an intimate familiarity of my subject, from the locations themselves to the best time to be there for the current conditions.
- Persistence: I can’t tell you the number trips I’ve taken to Yosemite and elsewhere that didn’t amount to anything. In 2013 I scheduled an entire workshop around the arrival of Comet ISON, only to have the comet disintegrate just a couple of days before the workshop. Many times I’ve made the long drive to Yosemite to photograph snow that turned out to be rain. But no matter how many times Mother Nature throws me a curve, I keep coming back and sometimes it pays off. Like this time.
- Pain: It’s not like I trekked solo across the arctic, or summited Everest without oxygen, for this image. Though this day was cold and wet, and getting to Yosemite required an 8-hour roundtrip drive in less than ideal conditions, I didn’t do anything most other people couldn’t do—I just pried myself from the recliner and hit the road. The drive was sometimes boring (I’ve done it hundreds of times), sometimes stressful (turns out my Outback needed new tires—uhhh, reference Preparation section above), and standing in the snowy cold was less comfortable than lounging inside by a fire. It’s insidious the way these small inconveniences and discomforts try to lure us into staying home, but the payoff happens enough to justify the sacrifice.
A few words about this image

Autumn Snowfall, Half Dome Reflection, Yosemite
Sentinel Bridge is such an iconic view of Half Dome that it would be photographic malpractice not to share it with a workshop group, but when I’m in Yosemite by myself I rarely stop here because it lacks compositional variety (it’s hard to find something I don’t already have). But because the conditions on this day were spectacularly unique, I actually stopped here twice. This image was from my first stop, when a light snow still fell and storm clouds ruled the scene.
Half Dome had been swallowed by clouds for a while, but crossing the bridge I saw that it had just emerged so I whipped into the adjacent parking lot. Rather than mess with my entire kit, I just grabbed my tripod, Sony a7RIV, and Sony 24-105 f/4 G lens and jogged up to the rail (maybe 100 feet from the car).
I always do my best to position myself so the trees frame Half Dome without obscuring any of its face, not always easy at this extremely popular spot. I was lucky this time that there were only a couple of other photographers set up so I didn’t have any trouble finding a spot that worked. With the scene so perfect, I didn’t want to get too fancy and risk losing Half Dome to the clouds. I quickly identified the elements I wanted to feature—Half Dome, the upstream trees, and of course the gorgeous reflection—and went to work.
I often start with a vertical composition on Sentinel Bridge, but surveying the scene, when my eyes were drawn to the serpentine ribbon of autumn leaves clinging to the south riverbank I opted to start with a horizontal frame. That left me with a decision about what to about the trees on both sides of the river—how many to include, and whether to cut them off at the top. I finally decided that not cutting them off would give me more sky than I wanted.
With the frame’s top/bottom established, I panned left and right until I was satisfied: enough of the floating leaves—check; Half Dome properly centered (Half Dome has so much visual weight, putting it too far left or right can throw off the balance)—check; the diagonal trunk and snow-capped rock far enough from the left edge that they create compositional balancing elements for that side of the frame—check.
With a few gentle ripples ruffling the reflection, I added my Breakthrough 6-stop dark polarizer, stopped down to f/16, and dialed my ISO to 50. This gave me a 4-second exposure that smoothed the water just enough to allow the reflection to stand out nicely. Once I was satisfied that this composition was a success, I went on to shoot the scene in a variety of other ways as well: wider, tighter, and vertical. (You can see the vertical version in the gallery below.)
Returning to Sentinel Bridge a few hours later, the sun had broken through to light up Half Dome and the tops of the trees, creating a completely different, but no less beautiful, scene (that I haven’t had a chance to process yet).
Many of you no doubt recognize the reference in this post’s title; for those who don’t (inconceivable!), treat yourself to this scene from the best movie ever.
Preparation, Persistence, and Pain
Click an image for a closer look, and to view a slide show.


")


You Can’t Have It Both Ways
Posted on December 13, 2020
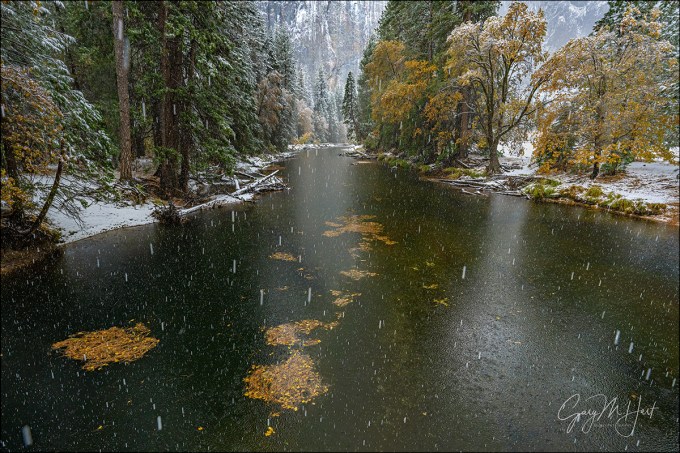
Falling Snow, Cathedral Rocks, Yosemite
Sony a7RIV
Sony 12-24 f/2.8 GM
1/200 second
F/8
ISO 1600
Years of leading photo workshops and reviewing the work of others has convinced me that to capture great images and maintain domestic bliss, you need to decide before a trip whether you’ll be a photographer or tourist—it’s pretty hard to have it both ways. (I say this completely without judgement—there are times when I opt for tourist mode myself, packing only the camera in my iPhone.) I see many well-executed images taken at the wrong times—harsh shadows, blue sky, and poorly located light are all signs that the photographer was sightseeing with his or her camera. Not that there’s anything wrong with that—if your priority was simply to record the scene and you’re happy with the result, the image was a success.
But getting the pictures coveted by serious photographers usually requires being outside at the most inconvenient times. That’s sacrifice a serious photographer will make without hesitation, but the rest of the family? Not so much. Countless intimate getaways and family vacations have been ruined by the photographer who thinks it’ll be no problem tiptoeing out for sunrise (“I’ll be so quiet, you won’t even know I left”), or waiting “just a few minutes longer” after sunset for the Milky Way (“The drive-thru will still be open when we get back”).
When I’m wearing my photographer hat, my decisions put me outside when the conditions are most conducive to finding the images I want, without considering comfort or convenience. Sunrise, sunset, overcast skies, wild weather, darkness are all great for photography, but face it—few people without a camera are thrilled to be outdoors when they’re sleepy, hungry, cold, wet, or ignored.
Many of us, myself included, are blessed with wives/husbands/partners who say quite genuinely, “No problem, take as long as you want—I’ll just read (or wait in the room, or go shopping, or whatever).” And though we know they mean it, based on my own experience and reports from others, even blessed by a sincere sanction from our significant other, we’re still distracted by the knowledge that he or she is waiting, biding time, (and possibly suffering) while we pursue our solitary passion. When someone is waiting for me, I just can’t help rushing my compositions, making decisions designed to get me back fast instead of satisfied, and just generally shortcutting everything I do. Invariably, disappointment ensues.
And when the goal is a pleasant trip with family, if I try to squeeze in photography, I can’t relax and my photography suffers. That’s why, when I’m a tourist, my goal is to simply chill and and enjoy the sights with the people I love. When I leave my camera home, my lights-out and rise times are based on everyone’s comfort and enjoyment, the pace is never rushed, and my forays into nature are timed for convenience and the most pleasant weather for being outside. And guess what: I return with my body and mind fresh and my loved ones happy.
Of course doing nature photography for a living makes it easier for me separate photography and family trips. I get lots of me-time to dedicate to photography, but some people are so busy that their only opportunity to take pictures is when they’re on vacation. In this case, perhaps a compromise can be negotiated. After researching your route and destinations, pick a (reasonable) handful of must-photograph spots. Then, before the trip, get buy-ins on your photography objectives from all concerned, and be as specific as possible: “I’d like to shoot sunrise on our second morning at the Grand Canyon,” “I’d really like to do a moonrise shoot in Yosemite on Wednesday evening,” and so on. The rest of the trip? Bring no more than a point-and-shoot or your cell phone, stash your serious camera gear out of sight, and don’t let anyone catch so much as a longing glimpse in its direction for the rest of the trip. Then relax and enjoy.
About this image
On this November morning, I didn’t have to drive too far into Yosemite Valley to know that the snow falling on fall color was the stuff of my photographic dreams. My first stop was El Capitan Bridge, a don’t-miss spot for El Capitan reflections in the Merced River. As the closest easily accessible top-to-bottom view of the massive granite monolith, El Capitan Bridge was made to order for my new Sony 12-24 f/2.8 GM lens, and I couldn’t wait to try it out. But the storm that had already dropped a couple of inches of snow was still active, wrapping El Capitan in clouds.
After little success photographing El Capitan’s barely discernable outline from the upstream side of the bridge, I crossed the road and set up on the bridge facing downstream. The tops of Cathedral Rocks were smothered by clouds, but the granite base was clearly visible above the river, framed by golden oaks. In the foreground, rafts of pine needles and autumn leaves floated by so slowly that their motion was barely perceptible.
I composed the scene the scene in the viewfinder of my Sony a7RIV, starting at 12mm and slowly tightening the composition to 16mm. As I worked the scene, the snowfall intensified and I methodically increased my ISO, from 100 to 1600, in one-stop increments, with a corresponding shutter speed increase to capture a range of motion-blur in the falling flakes, from long streaks to short dashes.
This is a perfect example weather only a photographer would be crazy enough to be outside in. Not only was it cold and wet, you couldn’t even see the tops most of Yosemite’s most photographed icons. But I’ve learned that there’s no better time to photograph in Yosemite than during and just after a snowfall, a truth I verified many times this day.
Yosemite Weather
Click an image for a closer look, and to view a slide show.


