Eloquent Images by Gary Hart
Insight, information, and inspiration for the inquisitive nature photographer
The Longest Day
Posted on July 7, 2019

Sky Light, The Milky Way and City Lights, Lake Wanaka, New Zealand
Sony a7SII
Sony 16-35 f/2.8 GM
25 seconds
F/2.8
ISO 3200
After one of the most exhausting, exhilarating, and just plain productive photography days of my life, our van rolled into Wanaka a little before midnight and everyone’s thoughts, including my own, were on sleep. But the stars were out and the moon was not (yet), and I knew it would be at least a year before I’d get another chance like this. With a warm bed and blissful sleep beckoning, was I really going to go back out to the lake in the frigid dark for the second time that day? You betcha.
Just what could inspire such craziness? Driven by more than a nice photo opportunity, I’d been infused with the infectious energy of a dozen young, Sony-sponsored social media influencers: the Sony Alpha Imaging Collective (AIC). (It would be doing them a disservice to label them mere photographers.) After spending months arranging this trip on Sony’s behalf, my ostensible role for its execution was as a guide and mentor. But the aggressive creativity of these visual artists was an inspiration to this conventional photographer’s vintage muse, and I can’t imagine that I was able to offer them nearly as much as they gave me.
So, with the Health app on my iPhone reporting that I’d already logged 9 miles and climbed the equivalent of 58 flights of stairs, I found myself standing alone, in icy lake water, photographing something I’d vowed I’d never photograph. So how did I get here?
3:00 a.m.: Note to self

Milky Way and Reflection, Lake Wanaka, New Zealand
When my alarm went off at 3 a.m. that morning, I’d staggered from bed without high expectations. This wasn’t the first time I’d tried rising photograph the Milky Way above the lone willow in Lake Wanaka, but I’d always been thwarted by fog. This morning, instead of another foggy reprieve and a few more hours of welcome sleep, the stars were out.
Despite a 48% waning gibbous moon, the Milky Way was clearly visible and I photographed for about an hour with three or four others from the AIC group. Having never photographed the Milky Way here, I made mental notes for how it could be better the next time. First, the galactic center was a little left of the tree and quite high. And the moon, while adding light to the foreground, washed out the sky a little too much.
Note to self: Next time, come earlier and make sure the moon isn’t up.
11:00 a.m.: Stop the van!

Fogbow, Wairepo Arm, New Zealand
The three hour drive from Wanaka to Aoraki / Mt. Cook National Park had been slowed by a detour, a couple of unplanned stops, and now dense fog. With at least an hour’s drive and a full photography schedule ahead head of us, we couldn’t really afford to stop. But… Oh. My. God. Look at those trees, glazed with hoarfrost and shrouded with fog… The visibility was so limited, by the time the scene popped out of the fog we were past them, but when a simultaneous command issued from every seat, “Stop the van!”, stop we did. (It didn’t hurt that our driver was a photographer too.)
Doubling back, we poked along the shoulder until we found a narrow, unpaved road on which to park, then sprinted toward the trees—which turned out to line a small lake. Wow. The next hour was some of the most magical photography I’ve ever experienced. When the fog started to thin, the sun broke through, framing the trees with a shimmering fogbow that I just had time to capture.
5:30 p.m.: I can’t believe I’ve never been here

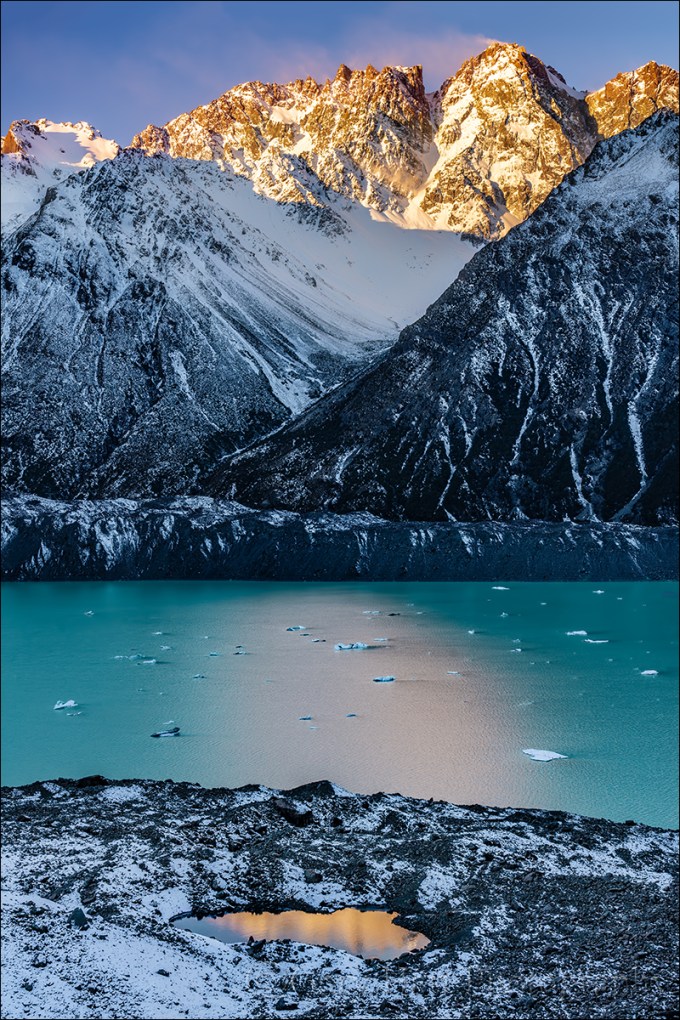
Alpenglow, Tasman Lake, New Zealand
After a beautiful hike to Kea Point (where I opened my bag and realized I’d left my camera in the van—oops, don’t tell anyone), we wrapped our daylight hours with a sunset shoot at Tasman Lake. Normally I scale the 335 steps to the vista overlooking the lake, but it didn’t take much urging to get me to join the group who took the longer but less steep hike to the foot of the lake, where I’d never been.
Getting to the lake from the end of the trail was a short boulder-hopping scramble down a steep hillside, but once I made it down I couldn’t believe I’d never been here. Icebergs, large and small, mingled with the reflection of snowcapped peaks in the clear, turquoise water. We didn’t have clouds to provide an electric sunset, but New Zealand’s impossibly pristine air delivered something I found even more beautiful, the deep magenta of the Belt of Venus.
7:00 p.m.: You’re gonna need a bigger lens

Milky Way and Jupiter, Tasman Lake, New Zealand
From the very first time my eyes feasted on it, I marveled at what a spectacular spot the vista above Tasman Lake would be for Milky Way photography. I was especially pleased to be guiding an entire group of photographers who were as excited about photographing the Milky Way as I was, so this shoot was the plan since before the workshop started. But as the sky darkened, I was still down at the foot of the lake (just off the screen on the far right) where I’d photographed sunset. Most of the group wanted to stay there for the Milky Way shoot, and while I had to admit that spot would be no less spectacular, I just had to check the higher view off my list. Plus, I knew the Milky Way would align better with the peaks up here. So I scrambled back up the boulders and made the roughly two kilometer walk up here in virtual darkness to make it happen.
I thought a couple others in the group would already be up here, but I arrived to find the view empty. While I was happy to eventually be joined by a couple of others, the solitude I enjoyed for the first 30 minutes I was up here was downright spiritual. Going with my dedicated night camera, the Sony a7SII, I started with my default night lens, the amazing Sony 24mm f/1.4. But the scene was so expansive that I soon switched to my Sony 16-35 f/2.8 GM for a wider view. That did the job for a while, but when I found myself wanting an even bigger view, I reached for my Sony 12-24 f/4 G lens. F/4 is a little slow for night photography, but the a7SII can handle 10,000 ISO without any problem, and at 12mm the star motion of a 30-second exposure isn’t too bad. It didn’t hurt that the best parts of the scene, the snow and water, were highly reflective, and the dark rock wasn’t really essential to the scene.
12:00 Midnight: Completing the Circle

Sky Light, The Milky Way and City Lights, Lake Wanaka, New Zealand

Starry Night, Lake Wanaka, New Zealand
I’d spent the week sharing my favorite New Zealand South Island sights with the Sony AIC crew. With lots of night photography and driving, each day had been long, but this one took the record. I’d started 21 hours earlier and had been a non-stop blur of driving to the beat of music I’d never heard (Bubble Butt?), hiking to and through breathtaking scenery both old and new, and taking pictures, lots and lots of pictures.
Despite all this, no one got tired. It would have been easy to attribute this group’s boundless energy to youth, but the more I watched them work this week, the more I realized their carpe diem passion for experiencing and expressing our world was the driving real force. While I lack some of the non-photography technical skills they employ so effortlessly (specifically video and the computer as an artistic tool), as soon as followed their lead and I allowed myself to stretch my own personal boundaries in other ways, I had no problem keeping up with the pace. (Though I did draw the line at the all-night processing parties.)
As I’d expected when I returned to the lake late that night, the sky was moonless and the Milky Way better aligned with the Wanaka Willow that anchors the scene. But photographing the Milky Way with the tree also put the glow of the Wanaka sky directly in my field of view. As someone who always strives to photograph the natural world untouched by humans, this would have been a deal-breaker for the old me. But what the heck—those lights are kind of pretty, and I’m already out here….
Once I embraced the moment, I was free to click and enjoy. And enjoy I did. For the entire time I was out here, I was completely alone (though a couple of others in the group did come out to shoot shortly after I left). The fog was barely visible in the distance when I arrived, but while I was there I got to watch it ebb and flow like the tide, dropping down to lake level, expanding upward until at times it nearly obscured the sky completely. Benefiting from the extra light my camera could capture (beyond what I saw), what appeared to my eyes as a faint amber hue in the clouds registered on my LCD as a vivid gold even more brilliant than what you see in this image (I toned it down slightly simply for credibility).
And when the bank of fog receded at one point to expose most of the southern hemisphere stars, I pointed my camera away from city lights, toward the darkest sky. Just as my new composition and exposure were ready, a rogue patch of fog wafted up, providing the ideal background for the tree. As if in collaboration with the fog, the lake chose that instant to smooth its ripples and dial up the reflection.
After this night I can’t say that cityscapes are going to become a regular part of my repertoire, but for one night it was liberating discard my shackles and roll with the scene—and I’ll be much less hesitant to do it the next time. But more than the images, it was simply a joy being out there to watch the fog dance with the stars.
My Next New Zealand Photo Workshop
New Zealand 2019


New Zealand Beauty
Posted on June 30, 2019

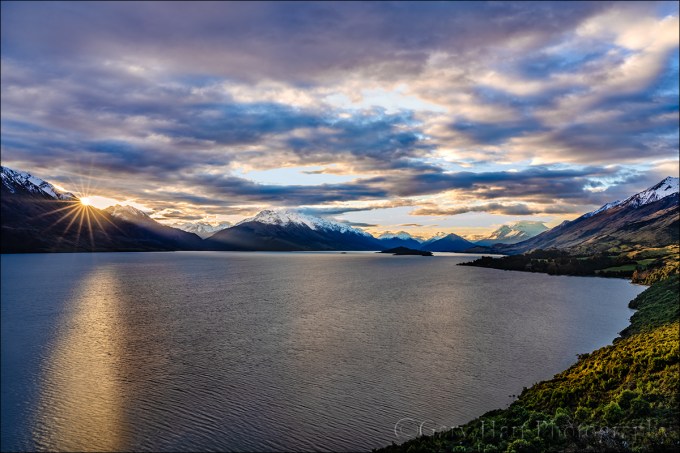
Water Like Glass, Lake Wakatipu, New Zealand
Sony a7RIII
Sony 16-35 f/2.8 GM
Breakthrough neutral polarizer
5 seconds
F/16
ISO 50
I just returned from New Zealand, that remarkable upside-down world where water is clear, summer is winter, and today is yesterday (or maybe it’s the other way around). I’ve been visiting there for a few years, ostensibly to lead photo workshops, but at least as much for my own joy. Each visit focuses on the same region of the South Island, all within 100 kilometers of Queenstown, the area that Don Smith and I determined would give us the most bang for our (and our customers’) photography bucks.
New Zealand’s South Island is a land of rain forests and glaciers, where snow-capped peaks reflect in water clear enough to drink from. Lake Wakatipu is one of these lakes, narrow and S-shaped, with about the same surface area as Lake Tahoe. Wakatipu’s north and east sides are skirted by a road; the south and west sides are accessible only by boat or off-road vehicle.
This image is from the final shoot of this year’s first workshop, just before the fleeting vestiges of a spectacular sunrise disappeared above Lake Wakatipu. I have lots of pictures with more dramatic color, but as I scanned through my thumbnails in Lightroom, the serenity of this one stopped me.
While this scene is from Bob’s Cove, about a 15-minute drive west of Queenstown on the Glenorchy Road, it could be pretty much anywhere along Lake Wakatipu—or for that matter, from any of the dozens of other large and glacial lakes decorating the South Island. For this one I stood in a few inches of water and dropped to just a couple of feet above lake level. With my eye on the viewfinder, I dialed my polarizer just enough to reveal the nearby submerged lakebed without erasing the reflection of the distant peaks.
New Zealand Photo Workshop
Here is a (partial) list of favorite New Zealand features in alphabetical order, plus a brief description of each.
Aoraki (Mt. Cook)

First Light, Aoraki, New Zealand || Rising 12,349 feet above sea level, Aoraki dominates views on both sides of the Southern Alps. Paired with Mt. Tasman, Aoraki forms the cornerstone of the Lake Matheson reflection near Fox Glacier on the island’s east coast, but it makes an even more prominent anchor above many Aoraki / Mt. Cook National Park lake and glacier views.
Doubtful Sound

Reflection, Doubtful Sound, New Zealand || The most spectacular of New Zealand’s many fiords, Doubtful Sound is a narrow, 31-mile, mountain-framed passage that opens to the Tasman Sea. Accessible only by boat, the sound and its many sheltered arms reward visitors with crisp reflections, waterfalls that plunge hundreds of feet into pristine water, and (if you’re lucky) an escort by leaping dolphins.
Glenorchy/Paradise Road
Lake Light, Lake Wakatipu from the Glenorchy Road, New Zealand || Skirting the shore Lake Wakatipu north of Queenstown, the Glenorchy road winds to a quaint village of the same name at the very top of the lake. But the road’s payoff is as much the journey as the destination. On the way to Glenorchy you’ll enjoy views of scenic coves beneath rugged peaks, and expansive panoramas of the Southern Alps that doubled as the Misty Mountains in the Lord of the Rings and Hobbit movies. Beyond Glenorchy, an unpaved but navigable road continues into Paradise and the remote, dense forests of Middle Earth beyond.
Haast Pass
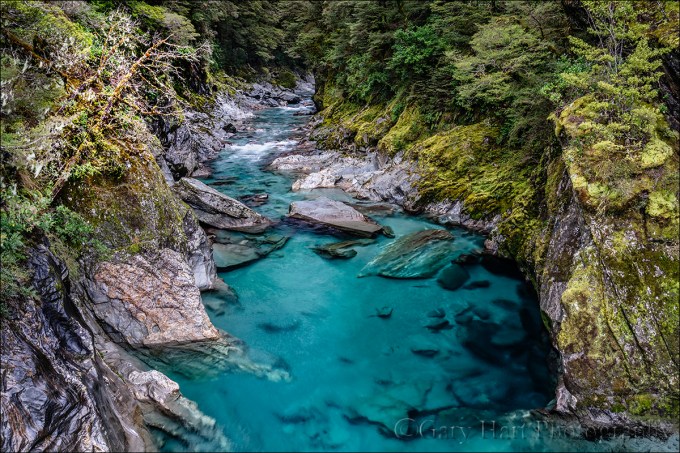
Blue Pools, Haast Pass, New Zealand || Connecting the glacial lakes and rolling hills on east side of the South Island to the wet and rugged west coast, the road through Haast Pass is a scenic treat by itself. Despite an array of waterfalls to choose from, my favorite stop on this route is the Blue Pools, where glacial runoff has colored the water otherworldly shades of blue and green.
Hooker Valley

Sunset, Hooker Valley, New Zealand || The Hooker Valley climbs gradually to iceberg-studded Hooker Lake beneath Aoraki (Mt. Cook), New Zealand’s highest peak. As spectacular as the destination is, this entire hike is a visual feast of turquoise glacial lakes and streams framed by towering mountain peaks.
Lake Matheson
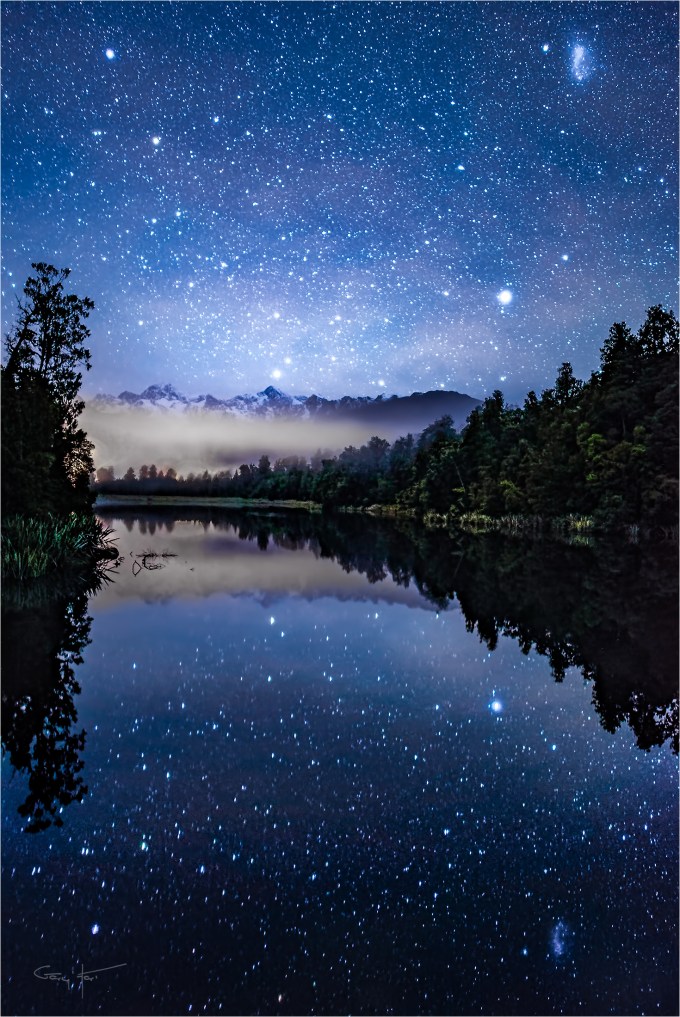
Dark Sky Dreams, Lake Matheson, New Zealand || A reflective jewell set in a emerald rainforest, Lake Matheson provides the perfect foreground for Mt. Cook and Mt. Tasman, New Zealand’s two highest peaks.
Milky Way views

Moonlight and Milky Way, Lake Wakatipu, New Zealand || In the Northern Hemisphere prime time for the Milky Way’s brilliant core is limited by the short nights of summer. But summer solstice in the north is winter solstice on New Zealand’s South Island, and the Milky Way is visible for nearly all of the 14 hours separating dusk and dawn. Combine that with New Zealand’s spectacular scenery and inherently clean air and dark night skies, and it’s easy to understand why New Zealand features some of the best Milky Way photography in the world.
Mirror Lakes
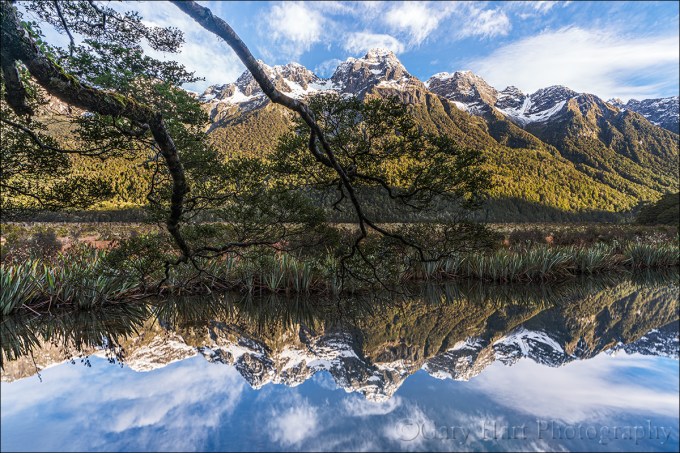
Reflection, Mirror Lakes, New Zealand || Nestled in the shadow of statuesque Mt. Eglinton, aptly named Mirror Lakes provide mountain reflections perfect enough to make you believe the world has turned upside down. The best time to visit these tiny gems is in the quiet air of early morning, before the warm sunlight bathing the mountain has reached the lake.
Lake Wanaka

Wanaka Reflection, New Zealand || The lone willow tree on the shore of Lake Wanaka is one of the most photographed trees in the world. When the lake fills with snowmelt, it encircles the willow with reflections against a backdrop of snowy peaks.
Tasman Lake
Reflection on the Rocks, Nun’s Veil and Tasman Lake, New Zealand || Short and steep, the half-mile hike to the Tasman Lake vista includes 335 stairs, but the view will help you completely forget the leg-burn. At trail’s end you’ll be treated to turquoise water dotted with chunks of ice calved from Tasman Glacier. Look up-lake to see the glacier itself. And directly below the vista is a small lakeside pool that perfectly reflects the serrated summit of 9,000-foot Nun’s Veil peak. And if you don’t want to climb the stairs, you can take the longer but much less steep trail to the shore at the end of the lake.
A New Zealand Gallery
Click an image for a closer look and to view a slide show.


A Milky Way Success Story (Phew)
Posted on June 23, 2019
Moonlight and Milky Way, Lake Wakatipu, New Zealand
Sony a7SII
Sony 16-35 f/2.8 GM
30 seconds
F/2.8
ISO 8000
Several people in this month’s New Zealand workshop had stated pretty emphatically that the Milky Way was a prime reason for attending—one guy even said his wife had told him not to come home without a Milky Way picture (we think she was joking). So no pressure. I reassured everyone in the orientation that I had multiple Milky Way shoots planned, but as the workshop’s nights ticked off, each Milky Way plan was doused—first by clouds, later by moonlight. And with the moon brightening and closer in the sky to the Milky Way each night, the we’d about run out of time.
I’d known all along that a waxing moon meant that our best Milky Way chances would come in the first half of the workshop. And I’d decided long before the workshop started that our final night would be especially problematic for the Milky Way not just because of the moon, but because of our location. But desperate times call for desperate measures, so with just a couple of days to go, I decided to recheck my calculations for about the millionth time (maybe a slight exaggeration, but you get the point). The two nights in Twizel were out of the question—the moon would be pretty much in the Milky Way. But our last night, in Queenstown…. Hmmm, maybe, just maybe, we’d have a 30-45 minute window between sunset and moonrise when the sky might be dark enough for the Milky Way to shine.
But the moon wasn’t the only obstacle. The forecast called for “high clouds,” a frustratingly vague forecast. And even if the sky darkened enough and the clouds cleared, we were in Queenstown, where I’d long ago decided that city lights and the orientation of Lake Wakatipu made finding Milky Way vantage point with a dark enough sky (no light pollution) and a nice enough foreground (lake and mountains) impossible. The moonlight and clouds risk were irrelevant if I couldn’t find a Milky Way location. But I had to give it a shot. Zooming in on the map, my eyes landed on one small tiny of lakeshore with enough of a twist that might work, though I’d never photographed there or even considered its Milky Way potential. But that was enough for me to circle the date and location and tell the group that we were going to give the Milky Way one more shot. All that was left to do was monitor the forecast and wait.
Wanting to be certain (and to avoid hunting blindly in the dark), on the way to our final sunset shoot I asked the driver to swing by my potential spot. I was relieved to confirm that the angle was good, and that there was an open, easily accessible stretch of beach. Yay. Down the road at our sunset location I just watched the clouds and hoped. The sky seemed clear enough there, but looked a little less promising back in the direction of my Milky Way location.
Arriving in twilight I hopped out of the van and checked the twilight sky—In addition to the promised high clouds, an accumulation of thicker clouds sat on the horizon more or less where the brightest part of the galactic center would be. And there were indeed a few high clouds, but Jupiter’s appearance was a relief because I knew Jupiter was on the leading edge of the Milky Way that night. Waiting for darkness, I prepared the group and just tried to stay positive. Every few minutes I’d return to my camera and fire a test frame to see if the sky was dark enough and look for any hint of moonlight.
You can’t imagine my excitement the first time my LCD displayed the faint glow of the Milky Way angling above 6000 foot Cecil Peak—we were in business. As the sky darkened, the Milky Way unfurled overhead in all its Southern Hemisphere glory, flanked by Jupiter and thousands of other stars in completely unfamiliar arrangements.
I started with my dedicated night photography setup, my Sony a7SII body and Sony 24 f/1.4 GM lens, trying a variety of horizontal and vertical compositions. After about 15 minutes I switched to my Sony 16-35 f/2.8 GM, sacrificing two stops of light for a wider field of view (more Milky Way). I liked the extra sky and stuck with that lens for the rest of the shoot.
After about 30 minutes of happy shooting we started to detect a brightening that signaled the moon’s approach behind The Remarkables (my hands-down favorite mountain range name). But rather than being a show stopper, the moonlight added a diaphanous sheen to the previously dark clouds and we kept going. As we wound down, the entire group was giddy with excitement, and I was giddy with relief. Just as we were started to pack up, I detected the faint reflection of Cecil Peak on the lake’s surface and adjusted my composition to include it.
To say that this night exceeded my expectations would be an understatement. In fact, my expectations almost dashed the entire shoot. It was a good a reminder not to get too locked in to preconceived notions. Had I stuck with my original belief that our final night in Queenstown wouldn’t work, I’d never have found a great Milky Way location—and one of the best shoots of an already great workshop would never have happened.
My tutorial on photographing the Milky Way
A Gallery of Stars
Click an image for a closer look and to view a slide show.


New Zealand Reflection
Posted on June 16, 2019

Reflection, Mirror Lakes, New Zealand
Sony a7RIII
Sony 16-35 f/2.8 GM
.4 seconds
F/8
ISO 50
What a crazy life this is. Last month I was rafting the Grand Canyon in short pants and flip-flops, this month I’m bouncing around the New Zealand countryside in my warmest wool and down. Between timezone shock and temperature whiplash, my body isn’t quite sure whether it’s coming or going, but the relentless beauty down here seems to transcend all that difficulty enough to keep me going.
Mirror Lakes is a must-stop on the road to Milford Sound in Fiordland National Park. It’s a popular stop even in mid-winter, but with the help of our New Zealand-based driver, Don Smith and I have figured out how to thread the needle between the tour buses originating in nearby Te Anau, and the tour buses originating in distant Queenstown, and still make it just before the morning sun reaches the water and washes out the reflection.
When our van pulled up here on Friday morning, I was surprised to see a large tour bus right out front, but Steve (our driver) said don’t worry, they’ll be loading up any second—sure enough, within five minutes we had this gorgeous view to ourselves with at least 45 minutes of shade remaining on the water. As pretty as the scene is, limited views through the surrounding foliage make it a little tricky to photograph, so I’m usually content to stand back and let the group work with the prime photography real estate. But on this morning chilly morning last week, I found the clouds and reflection so irresistible that I went looking for a way to photograph the scene without getting in anyone’s way.
I soon found myself over in one the far corner of the most popular railed viewing deck, a zone where the patient (and not-so-patient) wait behind thick overhanging branches for better views to open up. My first thought as I eyed the scene was how cool the branches look—too bad they block the view. But then I realized that by lowering my camera almost all the way to the deck, I could completely eliminate the most dense set of branches at the very top of the frame, and use the lower branches as diagonal compositional elements—without blocking the snowy peaks, or their reflection.
The problem with this idea was that I needed my camera to be on the other side of the deck’s protective railing, and the vertical bars in the railing were too closely spaced to fit my lens through. But just for laughs I pulled the lens out anyway and tested its width against the bars. Sure enough, every opening was too narrow—well, every opening except one. For some reason, the gap separating one, and only one, pair of bars was about an inch wider than all the others, making a gap just wide enough to slip my lens through.
The technical part of the scene was pretty straightforward, though potentially quite awkward with my camera about eight inches off the ground (it’s not the getting down to ground level that’s a problem, it’s the getting up). These are the very situations where I’ve grown to love the articulating LCD on my Sony a7RIII. In this case I was able to compose, level, focus, and meter from the (relative) comfort of my knees.
After centering Mt. Eglinton, I focused on the branches knowing that at f/16 and 18mm, I’d be sharp all the way to infinity. The dynamic range was pretty extreme, but my histogram told me that it was workable if I was careful. With all that out of the way, the biggest problem remaining was the ducks that insisted on swimming through the reflection—fortunately, I’m nothing if not patient (stubborn), and was able to out-wait them long enough to click this frame.
Join me in New Zealand
More Reflections
Click an image for a closer look and to view a slide show.


Finding Focus in the Grand Canyon
Posted on May 12, 2019

Sky Reflection, Blacktail Canyon, Grand Canyon
I returned Friday from my annual Grand Canyon Raft Trip for Photographers and am playing catch-up on all aspects of my photography life. I’ve barely looked at the my raft trip images, but chose this one for a couple of reasons: first, because I think it perfectly conveys the intimate serenity that always catches me by surprise in this landscape known mostly for it’s broad vistas; and second, because it’s the only image I’ve processed so far.
This is Blacktail Canyon, one of hundreds (thousands?) of narrow slot canyons cutting into the Grand Canyon’s towering walls. Most of them we just float past, sometimes because of the physical challenges required to explore their depths, but usually because there just isn’t time to stop at every slot canyon. On my trips we pick our slots for their photo opportunities, and this year Blacktail Canyon was a particular highlight.
With tall, tightly spaced walls, Blacktail Canyon spends most of its daylight hours in full shade, ideal for photography on sunny days. It doesn’t always have water, but this year’s wet winter meant water in lots of places that don’t always get it. We found the little creek that splits the canyon carrying just enough water to create a series of reflective pools before disappearing into the stream bed, only to reappear farther downstream.
What first drew my eye to this scene was a tiny sapling sprouting from an overhanging ledge, but I soon realized that the tree would best serve me as a visuall element to hold the top of my frame rather than the primary subject. The most interesting thing, I decided, was the blue sky reflection like a jewel embedded in the creek bed.
To create this composition, I dropped my tripod to about a foot above the canyon floor and positioned myself so the lines connecting my primary focal points (the sky reflection, the pair of boulders, and the green tree) created a triangle. Fitting all this into the frame required a vertical orientation of my Sony a7RIII, using virtually the entire width of my Sony 16-35 f/2.8 G lens. Even at this wide focal length, the smooth pebbles at my feet were only about a foot away; getting both the nearby pebbles and glowing (from bounced sunlight) sandstone above the tree sharp, meant choosing my exposure settings and focus point very carefully. My hyperfocal app told me that at f/16, by focusing two feet away, I could achieve my sharpness goal. Watching the rapidly changing sky, I timed my click for the best blend of clouds and sky filling the reflection.
To better understand focus technique, below is an updated version of my Depth of Field article from my Photo Tips section
Finding Focus
What’s the point?
It seems like one of photography’s great mysteries is achieving proper focus: the camera settings, where to place the focus point, even the definition of sharpness are all sources of confusion. If you’re a tourist just grabbing snapshots, everything in your frame is likely at infinity and you can just put your camera in full auto mode and click away. But if you’re a photographic artist trying to capture something unique with your mirrorless or DSLR camera and doing your best to have important visual elements objects at different distances throughout your frame, you need to stop letting your camera decide your focus point and exposure settings.
Of course the first creative focus decision is whether you even want the entire frame sharp. While some of my favorite images use selective focus to emphasize one element and blur the rest of the scene, most (but not all) of what I’ll say here is about using hyperfocal techniques to maximize depth of field (DOF). I cover creative selective focus in much greater detail in another Photo Tip article: Creative Selective Focus.
Beware the “expert”
I’m afraid that there’s some bad, albeit well-intended, advice out there that yields just enough success to deceive people into thinking they’ve got focus nailed, a misperception that often doesn’t manifest until an important shot is lost. I’m referring to the myth that you should focus 1/3 of the way into the scene, or 1/3 of the way into the frame (two very different things, each with its own set of problems).
For beginners, or photographers whose scene doesn’t include subjects from near to far, the 1/3 technique may be a useful rule of thumb. But taking the 1/3 approach to focus requires that you understand DOF and the art of focusing well enough to know when 1/3 won’t work, and how to adjust your focus point and settings. And once you achieve that level of understanding, you may as well do it the right way from the start. Focus control becomes especially important in those scenes where missing the focus point by just a few feet or even inches can make or break and image.

Where to focus this? Of course 1/3 of the way into a scene that stretches for miles won’t work. And 1/3 of the way into a frame with a diagonal foreground won’t work either.
Back to the basics
Understanding a few basic focus truths will help you make focus decisions:
- A lens’s aperture is the opening that allows light to reach your sensor—the bigger this opening, the more light gets in, but also the smaller your DOF.
- Aperture is measured in f-stops, which is the lens’s focal length divided by the aperture’s diameter; the higher the f-number, the smaller the aperture and the greater the DOF. So f/8 is actually a bigger aperture (with less DOF) than f/11. This understanding becomes second nature, but if you’re just learning it’s helpful to think of f/stops this way: The higher the f-number, the greater the depth of field. Though they’re not exactly the same thing, photographers usually use f-stop and aperture interchangeably.
- Regardless of its current f-stop setting, a DSLR camera maximizes the light in its viewfinder by always showing you the scene at the lens’s widest aperture. All this extra light makes it easier to compose and focus, but unless your exposure is set for the widest aperture (which it shouldn’t be unless you have a very specific reason to limit your depth of field or maximize light), the image you capture will have more DOF than you see in the viewfinder. The consequence is that you usually can’t see how much of your scene is in focus when you compose. Most cameras have a DOF preview button that temporarily closes the lens down to the f-stop you have set—this shows the scene at its actual DOF, but also darkens the viewfinder considerably (depending on how small your aperture is), making it far more difficult to see the scene.
- For any focus point, there’s only one (infinitely thin) plane of perfect sharpness, regardless of the focal length and f-stop—everything in front of and behind the plane containing your focus point (and parallel to the sensor) will be some degree of less than maximum sharpness. As long as the zone of less than perfect sharpness isn’t perceptible, it’s considered “acceptably sharp.” When that zone becomes visible, that portion of the image is officially “soft.” Acceptable sharpness varies with the display size and viewing distance.
- The zone of acceptable sharpness extends a greater distance beyond the focus point than it does in front of the focus point. If you focus on that rock ten feet in front of you, rocks three feet in front of you may be out of focus, but a tree fifty feet away could be sharp. I’ll explain more about this later.
- While shorter focal lengths may appear to provide more depth of field, believe it or not, DOF doesn’t actually change with focal length. What does change is the size of everything in the image, so as your focal length increases, your apparent DOF decreases. So you really aren’t gaining more absolute DOF with a shorter focal length, the softness just won’t be as visible. When photographers talk about DOF, they’re virtually always talking about apparent DOF—the way the image looks. (That’s the DOF definition I use here too.)
- The closer your focus point, the narrower your DOF (range of front-to-back sharpness). If you focus your 24mm lens on a butterfly sunning on a poppy six inches from your lens, your DOF is so narrow that it’s possible parts of the poppy will be out of focus; if you focus the same lens on a tree 100 feet away, the mountains behind the tree are sharp too.

Moonset, Mt. Whitney and Whitney Arch, Alabama Hills, California
With subjects throughout my frame, from close foreground to distant background, it’s impossible to get everything perfectly sharp. Here in the Alabama Hills near Lone Pine, California, I stopped down to f/16 and focused at the at the most distant part of the arch. This ensured that all of the arch would be perfectly sharp, while keeping Mt. Whitney and the rest of the background “sharp enough.”
Defining sharpness
Depth of field discussions are complicated by the fact that “sharp” is a moving target that varies with display size and viewing distance. But it’s safe to say that all things equal, the larger your ultimate output and closer the intended viewing distance, the more detail your original capture should contain.
To capture detail a lens focuses light on the sensor’s photosites. Remember using a magnifying glass to focus sunlight and ignite a leaf when you were a kid? The smaller (more concentrated) the point of sunlight, the sooner the smoke appeared. In a camera, the finer (smaller) a lens focuses light on each photosite, the more detail the image will contain at that location. So when we focus we’re trying to make the light striking each photosite as concentrated as possible.
In photography we call that small circle of light your lens makes for each photosite its “circle of confusion.” The larger the CoC, the less concentrated the light and the more blurred the image will appear. Of course if the CoC is too small to be seen as soft, either because the print is too small or the viewer is too far away, it really doesn’t matter. In other words, areas of an image with a large CoC (relatively soft) can still appear sharp if small enough or viewed from far enough away. That’s why sharpness can never be an absolute term, and we talk instead about acceptable sharpness that’s based on print size and viewing distance. It’s actually possible for the same image to be sharp for one use, but too soft for another.
So how much detail do you need? The threshold for acceptable sharpness is pretty low for an image that just ends up on an iPhone or an 8×10 calendar on the kitchen wall, but if you want that image to fill the wall above the sofa, acceptable sharpness requires much more detail. And as your print size increases (and/or viewing distance decreases), the CoC that delivers acceptable sharpness shrinks correspondingly.
Many factors determine the a camera’s ability to record detail. Sensor resolution of course—the more resolution your sensor has, the more important it becomes that to have a lens that can take advantage of that extra resolution. And the more detail you want to capture with that high resolution sensor and tack-sharp lens, the more important your depth of field and focus point decisions become.
Hyperfocal focus
The foundation of a sound approach to maximizing sharpness for a given viewing distance and image size is hyperfocal focusing, an approach that uses viewing distance, f-stop, focal length, and focus point to ensure acceptable sharpness.
The hyperfocal point is the focus point that provides the maximum depth of field for a given combination of sensor size, f/stop, and focal length. Another way to express it is that the hyperfocal point is the closest you can focus and still be acceptably sharp to infinity. When focused at the hyperfocal point, your scene will be acceptably sharp from halfway between your lens and focus point all the way to infinity. For example, if the hyperfocal point for your sensor (full frame, APS-C, 4/3, or whatever), focal length, and f-stop combinition is twelve feet away, focusing there will give you acceptable sharpness from six feet (half of twelve) to infinity—focusing closer will soften the distant scene; focusing farther will keep you sharp to infinity but extend the area of foreground softness.
Because the hyperfocal variable (sensor size, focal length, f-stop) combinations are too numerous to memorize, we usually refer to an external aid. That used to be awkward printed tables with long columns and rows displayed in microscopic print, the more precise the data, the smaller the print. Fortunately, those have been replaced by smartphone apps with more precise information in a much more accessible and readable form. We plug in all the variables and out pops the hyperfocal point distance and other useful information
It usually goes something like this:
- Identify the composition
- Determine the closest thing that must be sharp (right now I’m assuming you want sharpness to infinity)
- Dig the smartphone from one of the 10,000 pockets it could be in
- Open the hyperfocal app and plug in the sensor size (usually previously set by you as the default), f-stop, and a focus distance
- Up pops the hyperfocal distance (and usually other info of varying value)
You’re not as sharp as you think
Since people’s eyes start to glaze over when CoC comes up, they tend to use the default returned by the smartphone app. But just because the app tells you you’ve nailed focus, don’t assume that your work is done. An often overlooked aspect of hyperfocal focusing is that app makes assumptions that aren’t necessarily right, and in fact are probably wrong.
The CoC your app uses to determine acceptable sharpness is a function of sensor size, display size, and viewing distance. But most app’s hyperfocal tables assume that you’re creating an 8×10 print that will be viewed from a foot away—maybe valid 40 years ago, but not in this day of mega-prints. The result is a CoC three times larger than the eye’s ability to resolve.
That doesn’t invalidate hyperfocal focusing, but if you use published hyperfocal data from an app or table, your images’ DOF might not be as ideal as you think it is for your use. If you can’t specify a smaller CoC in your app, I suggest that you stop-down a stop or so more than the app/table indicates. On the other hand, stopping down to increase sharpness is an effort of diminishing returns, because diffraction increases as the aperture shrinks and eventually will soften the entire image—I try not to go more than a stop smaller than my data suggests.
Keeping it simple
As helpful as a hyperfocal app can be, whipping out a smartphone for instant in-the-field access to data is not really conducive to the creative process. I’m a big advocate of keeping photography as simple as possible, so while I’m a hyperfocal focus advocate in spirit, I don’t usually use hyperfocal data in the field. Instead I apply hyperfocal principles in the field whenever I think the margin of error gives me sufficient wiggle room.
Though I don’t often use the specific hyperfocal data in the field, I find it helps a lot to refer to hyperfocal tables when I’m sitting around with nothing to do. So if I find myself standing in line at the DMV, or sitting in a theater waiting for a movie (I’m a great date), I open my iPhone hyperfocal app and plug in random values just to get a sense of the DOF for a given f-stop and focal length combination. I may not remember the exact numbers later, but enough of the information sinks in that I accumulate a general sense of the hyperfocal DOF/camera-setting relationships.
Finally, something to do
Unless I think I have very little DOF margin for error in my composition, I rarely open my hyperfocal app in the field. Instead, once my composition is worked out and have determined the closest object I want sharp—the closest object with visual interest (shape, color, texture), regardless of whether it’s a primary subject.
- If I want to be sharp to infinity and my closest foreground object (that needs to be sharp) is close enough to hit by tossing my hat, I need a fair amount of DOF. If my focal length is pretty wide, I might skip the hyperfocal app, stop down to f/16, and focus a little behind my foreground object. But if I’m at a fairly long focal length, or my closest object is within arm’s reach, I have very little margin for error and will almost certainly refer to my hyperfocal app.
- If I could hit my foreground object with a baseball and my focal length is 50mm (or so) or less, I’ll probably go with f/11 and just focus on my foreground object. But as my focal length increases, so does the likelihood that I’ll need to refer to my hyperfocal app.
- If it would take a gun to reach my closest object (picture a distant peak), I choose an f-stop between f/8 and f/11 and focus anywhere in the distance.
Of course these distances are very subjective and will vary with your focal length and composition (not to mention the strength of your pitching arm), but you get the idea. If you find yourself in a small margin for error focus situation without a hyperfocal app (or you just don’t want to take the time to use one), the single most important thing to remember is to focus behind your closest subject. Because you always have sharpness in front of your focus point, focusing on the closest subject gives you unnecessary near sharpness at the expense of distant sharpness. By focusing a little behind your closest subject, you’re increasing the depth of your distant sharpness while (if you’re careful) keeping your foreground subject within the zone of sharpness in front of the focus point.
And finally, foreground softness, no matter how slight, is almost always a greater distraction than slight background softness. So, if it’s impossible to get all of your frame sharp, it’s usually best to ensure that the foreground is sharp.
Some examples

A hat’s toss away: The closest pool was about 6 feet from my lens. I stopped down to f/20 (smaller than I generally like to go) and focused on the back of the pool on the left, about 10 feet away.

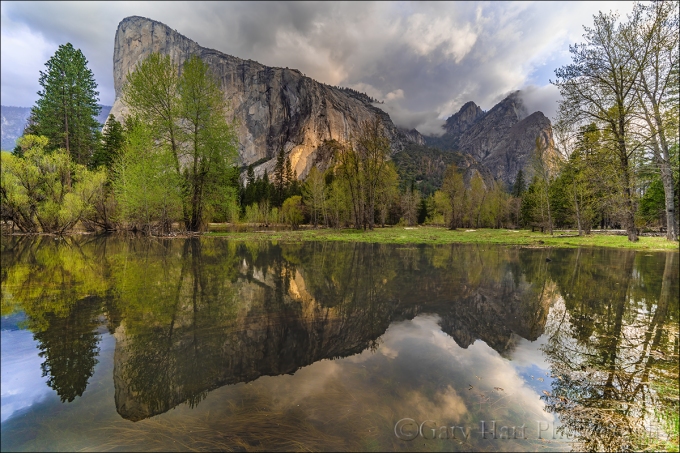
A baseball throw away: The little clump of wildflowers (lower right) was about 35 feet away and the trees started another 35 feet beyond that. With a focal length of 55mm, I dialed to f/11 and focused on the most distant foreground tree, getting everything from the flowers to Half Dome sharp.

Honey, fetch my rifle: With everything here at infinity I knew could focus on the trees or moon confident that the entire frame would be sharp. In this case I opted for f/8 to minimize diffraction but still in my lens’s sharpest f-stop range, and focused on the tree.
Why not just automatically set the aperture to f/22 and be done with it? I thought you’d never ask. Without delving too far into the physics of light and optics, let’s just say that there’s a not so little light-bending problem called “diffraction” that robs your images of sharpness as your aperture shrinks—the smaller the aperture, the greater the diffraction. Then why not choose f/2.8 when everything’s at infinity? Because lenses tend to lose sharpness at their aperture extremes, and are generally sharper in their mid-range f-stops. So while diffraction and lens softness don’t sway me from choosing the f-stop that gives the DOF I want, I try to never choose an aperture bigger or smaller than I need.
Now that we’ve let the composition determine our f-stop, it’s (finally) time to actually choose the focus point. Believe it or not, with this foundation of understanding we just established, focus becomes pretty simple. Whenever possible, I try to have elements throughout my frame, often starting near my feet and extending far into the distance. When that’s the case I stop down focus on an object slightly behind my closest subject (the more distant my closest subject, the farther behind it I can focus).
When I’m not sure, or if I don’t think I can get the entire scene sharp, I err on the side of closer focus to ensure that the foreground is sharp. Sometimes before shooting I check my DOF with the DOF preview button, allowing time for my eye to adjust to the limited light. And when maximum DOF is essential and I know my margin for error is small, I don’t hesitate to refer to the DOF app on my iPhone.
A great thing about digital capture is the instant validation of the LCD—when I’m not sure, or when getting it perfect is absolutely essential, after capture I pop my image up on the LCD, magnify it to maximum, check the point or points that must be sharp, and adjust if necessary. Using this immediate feedback to make instant corrections really speeds the learning process.
Sometimes less is more
The depth of field you choose is your creative choice, and no law says you must maximize it. Use your camera’s limited depth of field to minimize or eliminate distractions, create a blur of background color, or simply to guide your viewer’s eye. Focusing on a near subject while letting the background go soft clearly communicates the primary subject while retaining enough background detail to establish context. And an extremely narrow depth of field can turn distant flowers or sky into a colorful canvas for your subject.
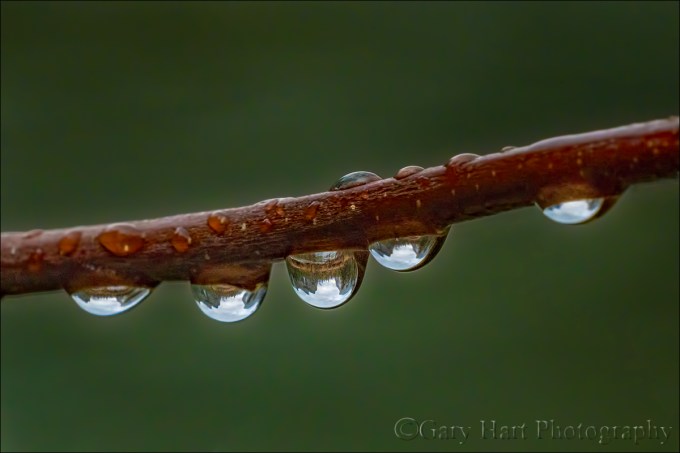
 In this image of a dogwood blossom in the rain, I positioned my camera to align Bridalveil Fall with the dogwood and used an extension tube to focus extremely close. The narrow depth of field caused by focusing so close turned Bridalveil Fall into a background blur (I used f/18 to the fall a little more recognizable), allowing viewers to feast their eyes on the dogwood’s and raindrop’s exquisite detail.
 An extension tube on a macro lens at f/2.8 gave me depth of field measured in fractions of an inch. The gold color in the background is more poppies, but they’re far enough away that they blur into nothing but color. The extremely narrow depth of field also eliminated weeds and rocks that would have otherwise been a distraction.
There’s no substitute for experience
No two photographers do everything exactly alike. Determining the DOF a composition requires, the f-stop and focal length that achieves the desired DOF, and where to place the point of maximum focus, are all part of the creative process that should never be left up to the camera. The sooner you grasp the underlying principles of DOF and focus, the sooner you’ll feel comfortable taking control and conveying your own unique vision.
About this image

Floating Autumn Leaves, Valley View, Yosemite
Yosemite may not be New England, but it can still put on a pretty good fall color display. A few years ago I arrived at Valley View on the west side of Yosemite Valley just about the time the fall color was peaking. I found the Merced River filled with reflections of El Capitan and Cathedral Rocks, framed by an accumulation of recently fallen leaves still rich with vivid fall color.
To emphasize the colorful foreground, I dropped my tripod low and framed up a vertical composition. I knew my hyperfocal distance at 24mm and f/11 would be 5 or 6 feet, but with the scene ranging from the closest leaves at about 3 feet away out to El Capitan at infinity, I also knew I’d need to be careful with my focus choices. For a little more margin for error I stopped down to f/16, then focused on the nearest rocks which were a little less than 6 feet away. As I usually do when I don’t have a lot of focus wiggle room, I magnified the resulting image on my LCD and moved the view from the foreground to the background to verify front-to-back sharpness.
Workshop Schedule || Purchase Prints
Playing with Depth: A Gallery of Focus
Click an image for a closer look and slide show. Refresh the screen to reorder the display.


Yosemite in a Raindrop
Posted on March 24, 2019
Yosemite in a Raindrop, Valley View, Yosemite
Sony a7RIII
Sony 100-400 GM
15mm extension tube
ISO 3200
f/20
1/200 second
I’ve been to Valley View in Yosemite about a million times. For those not familiar with Yosemite Valley, Valley View (sometimes called Gates of the Valley) is the classic view of El Capitan, Cathedral Rocks, and Bridalveil Fall, with the Merced River in the foreground, that represents Yosemite in countless calendars, postcards, and advertisements. Though all this attention is justified, after a million visits and counting (okay, so maybe I’m exaggerating just a little), you’d think it would be easy to take Valley View’s beauty for granted. But I don’t get tired of visiting here, not ever.

Valley View, Yosemite
Like most spots in Yosemite, the scene at Valley View varies greatly with the season and weather. In spring, Bridalveil Fall explodes from beneath Cathedral Rocks, and the surrounding forest is dotted with blooming dogwood. In autumn, rocks dot the Merced River, and colorful leaves mingle with glassy reflections. And on still winter mornings, a low mist hugs Bridalveil Meadow just across the river, while churning clouds surrounding El Capitan after a storm are a sight to behold. Nevertheless, I’m often content to keep my camera in the bag and just privately appreciate Valley View’s majesty.
But I’m a photographer, and sometimes it’s hard to experience this beauty passively. On those visits when I’m moved to photograph Valley View, I challenge myself to find something that hasn’t been done a million times. The final morning of last week’s Yosemite Moonbow and Wildflowers photo workshop was gray and damp, with occasional sprinkles lingering from a heavier overnight rain. We’d been here earlier in the workshop (in different conditions), and I hadn’t planned to photograph this time, but spotting raindrops clinging to the branches of the shrubs that line the river, I recognized a unique opportunity.
If you know optics, you know that a convex shape bends outward (so water striking its surface would run off; water striking a concave surface would pool inside). Due to this curvature, photons passing through a convex lens are diverted toward the center, where they converge and cross to create an inverted image at the point of convergence (focal point).
In fact, the human eye is a convex lens, projecting its inverted image onto the back its sphere, an image your brain promptly reverses. And photographic lenses are a complex arrangement of convex lens elements that ultimately project onto your camera’s sensor an upside-down image that’s flipped for display by the camera’s firmware.
Compared to these two examples, a dangling raindrop is elegant simplicity. Bound by surface tension, water molecules naturally form a spherical shape that is flattened or stretched slightly by gravity. Because water molecules form an electrostatic bond with foreign surfaces as well, they also adhere to things like leaves and branches, sometimes appearing to defy gravity. This small gift from nature turns a raindrop into a natural convex lens. Courtesy of this natural lens, those who peer closely into a water drop will see an inverted microcosm of the surrounding world, a view that changes with the viewing angle.
There’s potential beauty inside every water drop, but on this morning at Valley View I was in the fortuitous position to photograph raindrops holding one of the most beautiful scenes on Earth. I found a quintet of raindrops lining a branch that had nothing behind it but river. Tiptoeing close, I aligned myself and the raindrops with the Valley View scene and extended my tripod to branch level. I started with my Sony 90mm on my Sony a7RIII, adding extension tubes to get even closer. After working with this combination for a few minutes, I switched to my Sony 100-400 GM (still with extension tubes).
The image you see here is from the 100-400. Depth of field with such a close focus point is paper thin, so I stopped down to f/20 and bumped I my ISO to 3200 to ensure a shutter speed fast enough to minimize the risk of motion blur. To focus, I magnified the raindrop scene in my mirrorless viewfinder. Exposing to avoid blowing out the bright highlights in the (inverted) sky also darkened the river, creating the ideal background.
Join my 2020 Yosemite Moonbow and Wildflowers photo workshop
Workshop Schedule || Purchase Prints
The Many Views of Valley View


Love What You Shoot
Posted on February 17, 2019

Snow and Reflection, El Capitan and Bridalveil Fall, Yosemite
Sony a7RIII
Sony 16-35 f/2.8 GM
1/25 second
F/11
ISO 100
Feel the love
One frequently uttered piece of photographic advice is to “shoot what you love.” And while photographing the locations and subjects we love most is indeed pretty essential to consistently successful images, unless we treat our favorite subjects with the love they deserve, we risk losing them.
My relationship with Yosemite predates my memories, so it’s no wonder that Yosemite Valley plays such a significant role in my photography. Of course my love for Yosemite doesn’t make me unique, and like all Yosemite photographers, I’ve learned to share. While it’s nice to have a location to myself (I can still usually find a few of those spots in Yosemite Valley), I’m happy to enjoy Yosemite’s prime photographic real estate with other tourists and photographers. In fact, I get vicarious pleasure watching others view the Yosemite scenes I’ve been visiting my entire life.
But…
In recent years I’ve noticed more tourists and photographers abusing nature in ways that at best betrays their ignorance, and at worst reveals their indifference to the fragility of the very subjects that inspire them to click their shutters in the first place. Of course it’s impossible to have zero impact on the natural world—starting from the time we leave home, we consume energy that pollutes the atmosphere and contributes greenhouse gases. Once we arrive at our destination, every footfall alters the world in ways ranging from subtle to dramatic—not only do our shoes crush rocks, plants, and small creatures, our noise clashes with the natural sounds that comfort humans and communicate to animals, and our vehicles and clothing scatter microscopic, non-indigenous flora and fauna.
A certain amount of damage is an unavoidable consequence of keeping the natural world accessible to all who would like to appreciate it, a tightrope our National Park Service does an excellent job navigating. It’s even easy to believe that we’re not the problem—I mean, who’d have thought merely walking on “dirt” could impact the ecosystem for tens or hundreds of years? But, for example, before straying off the trail for that unique perspective of Delicate Arch in Arches National Park, check out this admonition from the park.
Hawaii’s black sand beaches may appear unique and enduring, but the next time you consider scooping a sample to share with friends back on the mainland, know that Hawaii’s black sand is a finite, ephemeral phenomenon that will be replaced with “conventional” white sand as soon as its volcanic source is exhausted, as evidenced by the direct correlation between the Hawaiian islands age (and the cessation of volcanic activity) and their proliferation of black-sand beaches.
While Yosemite’s durable granite may lull photographers into environmental complacency, its meadows and wetlands are quite fragile, hosting many plants and insects that are an integral part of the natural balance that makes Yosemite unique. Not only that, they’re also home to native mammals, birds, and reptiles that so many enjoy photographing. Despite all this, I can’t tell you how often I see people in Yosemite (photographers in particular) unnecessarily cutting trails and trampling fragile meadows and shorelines, either to get in position for a shot or simply as a shortcut.
Don’t be this photographer
Still not convinced? If I can’t appeal to your environmental conscience, consider that simply wandering about with a camera and/or tripod labels you, “Photographer.” In that role you represent the entire photography community: when you do harm as Photographer, most observers (the general public and decision makers) go no farther than applying the Photographer label and lumping all of us into the same offending group.
Like it or not, one photographer’s indiscretion affects the way every photographer is perceived, and potentially brings about restrictions that directly or indirectly impact all of us. If you like barricades, permits, restrictions, and rules, just keep going wherever you want to go, whenever you want to go there.
It’s not that difficult
Environmental responsibility doesn’t require joining Greenpeace or dropping off the grid (not that there’s anything wrong with that). Simply taking a few minutes to understand natural concerns specific to whatever area you visit is a good place to start. Most public lands have websites with information they’d love you to read before visiting. And most park officials are more than happy to share literature on the topic (you might in fact find useful information right there in that stack of papers you jammed into your center console as you drove away from the park entrance station).
When you’re in the field, think before advancing. Train yourself to anticipate each future step with the understanding of its impact—believe it or not, this isn’t a particularly difficult habit to establish. Whenever you see trash, please pick it up, even if it isn’t yours. And don’t be shy about gently reminding other photographers whose actions risk soiling the reputation for all of us.
A few years ago, as a condition of my Death Valley workshop permit, I was guided to The Center for Outdoor Ethics and their “Leave No Trace” initiative. There’s great information here–much of it is just plain common sense, but I guarantee you’ll learn things too.
Now go out and enjoy nature–and please save it for the rest of us.
A few words about this image
This year’s Yosemite Horsetail Fall photo workshop started with bang. Normally I start a workshop with a two-hour orientation, but with six inches of fresh snow on the ground and more falling, I did a lightning orientation (15 minutes) and we sprinted into Yosemite Valley in time to catch the storm’s clearing. We found a world dipped in pristine white powder, a Yosemite photographer’s dream. Normally I like to give my groups lots of time at every location, but in the rapidly changing conditions of a clearing snowstorm (shifting clouds and light, trees shedding snow, and footprints increasing by the minute), I try to hit as many spots as possible while the shooting is ideal.
Our third stop that afternoon was Valley View, one of the top two or three photo spots in Yosemite, for obvious reasons. Having visited here so often, I don’t stop here on every visit anymore, but I’d be sued for malpractice if I didn’t take my workshop groups here—especially when it’s glazed with fresh snow. I hadn’t taken my camera out yet, and wasn’t going to get it out here either, but while working with a couple of people in the group just upriver from the parking lot, I saw this view and couldn’t resist the opportunity for something new.
When Yosemite is covered with new snow, I look for compositions that emphasize the snow and use the icons as background. Not only did this view give me lots of fresh snow for my foreground, the recent removal of several trees (evergreens in Yosemite are dying from drought and insect infestation) that blocked El Capitan gave me a perspective I’ve never been able to photograph.
I set up on the line that gave me the best window between the trees to El Capitan and started with vertical compositions that emphasized the Yosemite icon, but soon switched to horizontal to include Bridalveil Fall and Cathedral Rocks and better feature the reflection. With my Sony 16-35 f/2.8 GM lens on my Sony a7RIII camera, I set up close to the nearby snow-covered trees, then kept moving closer, widening my focal length as I went to include as much snow as possible. After framing the scene to include the least possible blue sky, the most snow, and to avoid crowding Bridalveil Fall too close to the right border, I dialed my polarizer to minimize polarization on the water (maximum reflection), metered with an eye on my histogram, focused on branches about four feet from my lens, and clicked.
We made a couple of more stops that afternoon before wrapping up with a truly beautiful sunset at an unexpected (and fortuitous) location. But that’s a story for another day.
Workshop Schedule || Purchase Prints
The Many Faces of El Capitan


Iceland Light Show
Posted on February 3, 2019

Green Twist, Aurora Borealis, Glacier Lagoon, Iceland
Sony a7SII
Sony 16-35 f/2.8 GM
8 seconds
F/2.8
ISO 3200
I’ve seen comets, a meteor storm, fireballs, a total solar eclipse, lots of lunar eclipses, the Milky Way, the Andromeda Galaxy, the Magellanic Clouds, Jupiter’s moons, Saturn’s rings, and many other manifestations of celestial splendor, but I’ve never seen the aurora. So when I scheduled a trip to Iceland this January (the heart of aurora borealis season), ostensibly to scout for the new Iceland photo workshop I’ll be doing with Don Smith next winter, my personal goal was to see the northern lights.
We’d only be in Iceland for one week, long enough for our guide (the expert, energetic, and always entertaining Óli Haukur) to give us a quick view of all the locations we’d visit in next year’s 10-day Iceland workshop (which will also include a local photography guide). With 10:30 a.m. sunrises and 5:00 p.m. sunsets, I didn’t expect the schedule to be too grueling, but I hadn’t accounted for Iceland’s two-hour winter sunrises and sunsets. With many miles to cover beneath a sun that never rises higher than (an extremely photogenic) 8 degrees above the horizon, every minute between our early starts and late dinners was spent spent either driving or photographing (fortunately, the schedule will be a little less compressed during the workshop). But wait, there’s more…. Given our aurora aspirations, each night immediately after dinner, we bundled up and ventured into the frigid dark seeking an electric light show.
For our nightly aurora hunt we’d drive to a pretty scene that had both dark skies (not hard to find in Iceland) and a clear view of the northern sky. There we’d sit for an hour or two, fogging the windows in Óli’s spacious Suburban, trading stories and laughs, and periodically stepping into the cold to scan the sky, before ultimately deciding tonight wasn’t going to be the night.
With just two days in Iceland remaining, I was getting a little anxious, but things were looking up (both figuratively and literally). First, Wednesday’s forecast promised completely clear skies, a first for our visit. And Wednesday’s destination was Glacier Lagoon, a magnificent ocean inlet dotted with floating icebergs and a patchwork of thin ice and reflective water that makes an ideal foreground for the northern lights.
The aurora forecast that night was 2 on the 0-9 KP-index of magnetic activity, where 0 is “Enjoy your sleep” and 9 is “Don’t forget the sunglasses” (or something like that), bu Óli assured us that he’s “seen some great shows on ‘2’ and ‘3’ aurora nights,” though I was skeptical because we’d already struck out more than once with a similar forecast. He also told us that his favorite aurora nights are in the 4 and 5 range because with an index higher than that, the aurora can be so intense that an exposure that doesn’t blow the lights is too dark to capture the foreground.
Pulling into the parking lot Wednesday night and turning off the headlights, I immediately spotted a low fog hovering above the lagoon. Except Óli said that wasn’t fog, it was the beginning of the aurora. Dubious, we followed him down to the lagoon. I was thrilled (understatement) when my camera validated Óli’s assertion: My first view of the northern lights!
We spent a couple of hours photographing a low-hanging, fuzzy green bands, with hints of red, that for a few minutes brightened and took on a little definition. On the drive back to the hotel, Don and I could barely contain our elation, while Óli was pleased but relatively subdued. For an Iceland native, this was just another day at the office; for two photographers from California, it was a personal milestone. And then Thursday happened.
All week Óli had told us our best chance for the northern lights would be Thursday, our tour’s final night. We spent that day photographing spots near Glacier Lagoon: sunrise and sunset at Diamond Beach bookending a visit to a glacier ice cave. But as the day progressed, the wind picked up and clouds formed and thickened. We didn’t stress though, because we had our aurora pictures and it was difficult to imagine anything better than what we’d seen on Wednesday.
Nevertheless, despite a 100 percent cloud cover after sunset, we agreed to meet for dinner with camera gear in tow, ready for an optimistic venture back to Glacier Lagoon. And sure enough, emerging from the restaurant we saw the gray blanket had been replaced by ceiling of stars and we were in business. But still no aurora.
Hoping for a little different perspective, we started by scaling a hill overlooking the lagoon, sinking into thigh-high snow and fighting a 40-MPH headwind to summit. That adventure lasted about five minutes before the wind and less than ideal view (you don’t know until you try) drove us back to the site of last night’s success, in retrospect a wise choice indeed.
Back in the lagoon parking lot, we sat and watched a faint aurora ebb and flow, suddenly aurora snobs (“This is nothing like last night”). What looked promising out my north-facing side window one minute, all but disappeared the next, but then we noticed new activity in the western sky out the windshield. This ramped up so fast that we bolted down to the lagoon like Keystone Cops, and by the time I was set up the had become a green and (occasionally) red psychedelic extravaganza.
The next two hours were a blur as I witnessed what was quite possibly the most beautiful thing I’ve ever seen in my life (rivaled only by, and impossible to compare to, the total solar eclipse in August 2017). Starting across the lagoon, in the western sky, the show gradually moved south(defying all my expectations), forcing me to constantly shift further up the lagoon to keep the ice and water in my foreground.
With my head on a swivel, I watched glowing tendrils stretch skyward, some touching both the east and west horizons, others pulsing, spiraling, and doubling back,. It felt like I was inside a giant lava lamp. At one point I tore my eyes from the show above the lagoon and saw the entire eastern sky ablaze with tangled green ribbons. so intense that I turned my back on the lagoon and quickly scaled the snowy hill behind me for a better view in the other direction. Within ten minutes things picked up again over the lagoon and I raced (and occasionally tumbled) back down the hill.
Lessons learned
This is the only picture from that night that I’ve processed so far. And while it definitely should give you an idea of what I saw, it’s just a fraction of night’s mesmerizing display. Though the color wasn’t nearly this vivid to the eye, thanks to the camera’s extreme light gathering capability, this is pretty much the way it looked in the viewfinder of my Sony a7SII, and on my LCD preview after capture. About the only significant processing I did was tone down the green reflecting on the snow—not because it wasn’t there, but because I feared that keeping the actual amount of green I captured would strain credibility.
Getting a shot like this requires a significant amount of good fortune for sure, but all the good fortune in the world will do you no good if you don’t bundle up and get yourself into the extreme latitudes in winter. Also helpful is a little experience with night photography, specifically the ability to control your camera, compose, and focus in extremely low light.
While I benefited from an a7SII that can virtually see in the dark (making low light composition and focus a breeze), pretty much any relatively recent DSLR will do the job. Add to that a sturdy tripod and wide (24mm or wider), relatively fast glass (f/2.8 or faster, though I was able to make my Sony 12-24 f/4 lens work when the show was at its peak), and you’ll be fine.
I can’t emphasize too much how important finding a foreground to go with your aurora is. The northern lights are so spectacular, it’s easy to just show and forget to compose the scene. An aurora show like this changes so quickly, intimate local familiarity to know where to be without hunting is a big help. Our guide got us to a location with a wealth of foreground opportunities, but it certainly didn’t hurt that this was my third visit to Glacier Lagoon in two days. And when you get there, make sure you find both horizontal and vertical compositions.
And finally (because I know you’re going to ask), a few words about exposure settings. Keep in my that this was in fact my first rodeo, so you might find better advice elsewhere. But my Thursday shoot did benefit from knowledge gained Wednesday night. Specifically, my moonless night photography had been mostly limited to star trail and Milky Way shoots, where it’s all about maximizing light. But despite the moon’s absence for both of our northern lights shoots (though I’m told the moon isn’t the aurora deal-breaker it is with a Milky Way shoot), the rules are different for an aurora shoot because the sky’s brightness changes by the minute, and it’s often much brighter than a Milky Way sky.
On Wednesday I started with exposure settings closer to my Milky Way settings, using exposure times in the 15-30 second range because it’s virtually impossible to give a Milky Way scene too much light (with 2019 or earlier camera technology). But with an aurora, there is definitely such a thing as too much light.
When my exposure blew out the aurora during the Wednesday shoot, I took the opportunity to drop my ISO and f-stop, thinking that would improve my image quality. But the fingers of color shift so quickly in an active aurora like Thursday’s, a long a shutter duration blurs the display’s definition. On Thursday I tried to keep my shutter speed at 10-seconds or faster (faster is better), which was no problem given the aurora’s brightness.
By now you’ve probably figured out that you need to check your highlight alert and histogram with every frame, and adjust accordingly. And unlike most scenes, the RGB histogram is essential—many times my luminosity histogram (the white one) looked fine, but the RGB histogram’s green channel was seriously clipped.
Oh yeah, and don’t make the rookie mistake I made. Extreme cold like this (it was probably around 20F) will suck the life from a lithium ion battery. But because I’ve grown so accustomed to the great battery life of my Sony a7RIII, I forgot to make sure I’d packed my backup battery. I had one back in the room, which made it about as useful as chocolate frying pan. My battery started at 100%, dropped to 70% in about thirty minutes, and completely died 5 five minutes later. Fortunately Don took mercy on me and loaned me one of his four batteries. On Thursday I was much smarter: not only did I bring my backup battery, I brought an Anker portable charging cube and a charger.
I’m writing this on the plane home from Iceland, about to lose the charge on my laptop, so you’ll need to wait until a future post to learn more about the fascinating science of auroras (because I think it’s important to understand what you photograph). And let me just apologize in advance for the number of aurora images I’ll be sharing over the coming months (I’ll do my best to spread them out some, and I certainly have many other Iceland delights to share).
Celestial Wonders
Click an image for a closer look and slide show. Refresh the window to reorder the display.


Seeing the Entire Scene
Posted on January 27, 2019
Breaking Light, El Capitan and Three Brothers Reflection, Yosemite
Sony a7R III
Sony 12-24 f/4 G
1/25 second
F/10
ISO 100
As you might imagine, between my own images, my photo workshop participants’ images, browsing other photographers’ pages, and simply being connected to social media, I see a lot of images. A. Lot. Of. Images. And curse or blessing, I can’t help but have opinions—whether my own images or others’, some work wonderfully, others not so much.
There’s a lot that goes into creating a successful image, but if I could whisper in the ear of every photographer just before they click the shutter, it would be a reminder to, “See the entire scene.” It happens to all of us: We’re so drawn to a pretty scene or striking subject that we become blind to what’s happing in the rest of the frame. And it’s the what’s happening in the rest of the frame that separates a mere pretty snap of a beautiful scene from wall-worthy print that satisfies for years.
Dream world
Writer John Gardner talked about creating a “vivid and continuous dream” that so completely immerses readers in the imaginary world on the page, the physical world surrounding them temporarily disappears. Any distraction that jars the reader from the page and back into the present world is a failure.
The same applies to photography. As nature photographers, we invite the viewers of our images into a virtual world of our creation. To encourage these viewers to stay and explore our virtual world, we might offer them a fresh perspective, enable vicarious travel, or perhaps tap latent memories. Regardless of the reason, the longer they stay in our virtual world, the more successful our image. But when a jutting branch on the frame’s border reminds viewers of the world out the scene, or a bright rock tugs their eye and competes for attention with scene’s prime subject, our spell is broken.
Compromise
Sadly, nature rarely presents itself exactly as photographers want it. So many decisions we make are compromises: we bump the ISO to enable the small aperture and fast shutter speed the scene requires; we cut off a rock on the left because panning right would introduce garbage can; we can’t tighten a composition to eliminate a shrub because doing so would cut the top of a mountain; we don’t polarize the sky because the polarizer erases a rainbow; and on and on…. Given these realities, our goal doesn’t need to be perfection, it’s often just to slow down and see the entire scene to ensure the decisions that bring our image as close to perfection as possible.
For example
This flooded Yosemite meadow is a spring phenomenon caused by extreme runoff following a relatively wet winter. Some years it doesn’t happen at all, but last spring’s Yosemite workshop group was fortunate to be there during the few days the Merced River overflowed its banks here (I returned a couple of days later and found the river had receded). I could have plopped my tripod down (or simply raised my camera to my eye) anywhere in a 100 yard radius and been virtually assured of a beautiful picture.
But as beautiful as it was, and as much as I wanted to start clicking, my first stop to take it all in had some problems. From my original vantage point, the stand of trees on the right obscured the Three Brothers, so I moved left along the water’s edge. But given more trees on the left, it soon became clear that part of El Capitan would be obscured. My compromise was to find a spot that exposed both El Capitan’s nose and the Three Brothers.
I’d left the car with my Sony 16-35 f/2.8 GM Sony (on my Sony a7RIII) body because that lens had a polarizer for controlling the reflection—dial it up for the maximum reflection, dial it down to reveal the grassy texture just beneath the water, and maybe even a find midpoint with some reflection and some submerged grass. But 16mm wasn’t wide enough, so I sacrificed reflection control and switch to my Sony 12-24 f/4 G lens.
With my position and lens worked out, I was ready to frame my composition. I felt a little sense of urgency because I didn’t want to miss the rapidly moving splashes of light scooting across El Capitan, but I also didn’t want to rush so much that I missed a problem in my frame.
To dislodge my attention from a scene’s primary focus points, I often use a mnemonic device before clicking: “border patrol.” (Though perhaps in light of current events, I should come up with something different.) Border patrol is a gentle reminder to run my eyes around the border of my frame to check for problems. Potential problems here include cutting off part of a tree on the left or right, a distracting bright spot in the sky near the top of the frame, or inadvertently trimming El Capitan’s reflection on the bottom. (Incomplete reflections and distracting sky holes are some of the most frequently missed distractions.)
In this case I took care to ensure that I got all of El Capitan and its reflection while avoiding a few breaks in the clouds just above this view. I also used the evergreen on the left and the arcing trunks on the right to frame those borders. And by making sure my camera was perfectly level, I managed to keep my vertical lines straight.
Depth of field at 12mm wasn’t a concern; I chose f/10 and focused on the far bank knowing everything would be sharp. Motion wasn’t a concern, so I could just use ISO 100 and go with the shutter speed that gave me the best histogram in the viewfinder (I love mirrorless).
Careful Framing
Click an image for a closer look and slide show. Refresh the window to reorder the display.


Alone in Yosemite
Posted on January 13, 2019
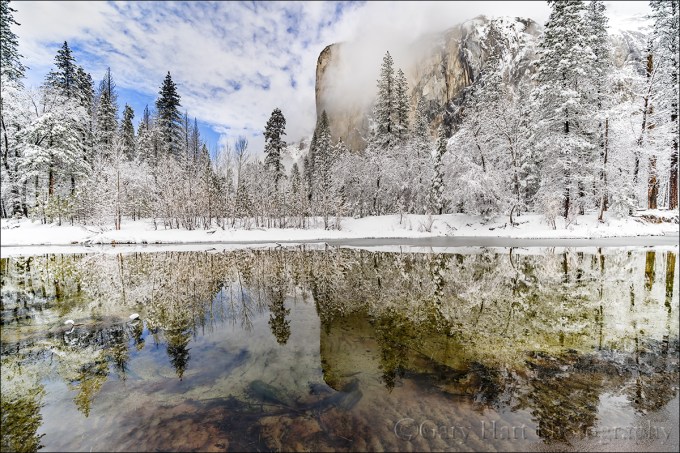
Clearing Storm Reflection, El Capitan, Yosemite
Sony a7R III
Sony 12-24 f/4 G
1/125 second
F/10
ISO 100
Last winter I spent a glorious day by myself in Yosemite Valley, photographing the vestiges of an overnight snowstorm. Inbound to the park the evening before, a continuous strand of outbound headlights reminded me how different a photographer’s priorities are from the general public’s. For a nature photographer, the best time to be outside seems to be everyone else’s worst time to be outside, but we know that before breakfast, at dinnertime, after dark, and wild weather are when all the best pictures seem to happen.
I arrived in Yosemite Valley with just enough light to see El Capitan and Half Dome engulfed in heavy clouds that hinted at what was in store—but so far no snow. With a storm imminent, I had no problem getting a room at a significant discount, virtually unheard of on a typical Yosemite evening. A light mist started after dinner, and I fell asleep to the sound of raindrops tapping leaves outside my window. The next morning I woke before my alarm and lay still, listening in the darkness to the unmistakable silence of falling snow.
Dressing quickly, I opened the door to six inches of untouched snow. In the parking lot I tried to determine which white lump was my Outback, repeatedly punching the lock button on my key fob and following my ears to the lump that chirped back. A little digging confirmed my discovery, and after a few more minutes of excavation I was able to to ease out of my parking space, carving the first tracks into what was probably the road (fingers crossed).
The clouds that had deposited all this powder seemed be trying to squeeze out every possible flake, but they seemed exhausted from their overnight effort and my wipers had no problem keeping up. When the final flake fell a little before 9:00, I was traipsing through drifts near El Capitan Meadow. Patches of blue sky overhead told me it wouldn’t be long before the trees were shedding snow in clumps, so I headed quickly to a favorite spot by the Merced River, hoping for a reflection while the world remained white.
The Merced here was so still and clear that I had to look twice to be sure there really was water in the river. The reflection on the far side was exactly what I had in mind, but the corrugated riverbed on my side was an unexpected complement that wonderfully matched the herringbone clouds above. In the days before my Sony 12-24 lens, I wouldn’t have been able to include all of El Capitan and its reflection in a horizontal frame, but 12mm gave me room to spare (I’m still startled at times by how big the difference is between 16mm and 12mm).
I got lots pictures that make me happy that day, but even more than the pictures, I think I enjoyed the rare opportunity to feel alone in Yosemite for a few hours. The park wasn’t empty, but between the scarcity of people, the reluctance of those who were there to venture onto the roads, and the sound-deadening effect of powdery snow, I had no trouble pretending.
Workshop Schedule || Purchase Prints
Yosemite Winter Reflections


