Eloquent Images by Gary Hart
Insight, information, and inspiration for the inquisitive nature photographer
Just a Pinch of Moon
Posted on January 6, 2019

Sunset Moonrise Reflection, Bridalveil Fall, Valley View, Yosemite
Sony a7RIII
Sony 24-105 f/4 G
1/13 second
F/11
ISO 100
A couple of weeks ago I wrote about how to photograph the moon big, the bigger the better, to overcome its tendency to (appear to) shrink in a wide angle image. But the moon doesn’t need to be big to be a striking addition to a landscape photo.
To balance a landscape frame, I think in terms of “visual gravity” (or “visual weight”): how much the scene’s various elements might pull the viewer’s eye. Unlike conventional gravity, which is a constant determined by an object’s mass (period, end of story), visual gravity is a more subjective quality that is a function of the characteristics of an object, such as its size, brightness, contrast, or color. Thinking in terms of the visual gravity of the various elements in my scene, I (usually) try to avoid any hemisphere of the frame feeling significantly heavier than its corresponding hemisphere (top/bottom, left/right).
Certainly any object as bright (and contrasty) as the moon will pull the eye. But after noticing that many objects at least as bright or contrasty as the moon somehow lack the moon’s ability to pull the eye, I realized I’d been missing an essential component of visual gravity: emotional connection. There is just something about the emotional pull of the moon that draws the human eye far more than its more tangible physical qualities might suggest.
For years I’ve tried to leverage the moon’s emotional weight, using it to elevate a relatively ordinary scene, or to add a simple accent that takes an already beautiful scene to the next level. Last month I got just such an opportunity at Valley View in Yosemite. This was the first night of my annual Yosemite Winter Moon photo workshop. I’d planned moonrises for the other three nights of the workshop, but hadn’t really plotted the first night because the moon would be so high at sunset, and during the moon’s twilight “sweet spot” (when the sky is dark enough for good contrast, but the landscape still has enough light to photograph) the moon wouldn’t align with Half Dome from any of Yosemite Valley’s Half Dome vantage points.
Nevertheless, I chose Valley View for sunset knowing that the moon might make a nice accent above Cathedral Rocks and Bridalveil Fall. As soon as we arrived it was clear the conditions had aligned for us on this chilly December evening. In the distance Bridalveil Fall disappeared into a blanket of dense fog hovering above Bridalveil Meadow, while the moon mingled with wispy clouds in the twilight pastels overhead. And at our feet, the Merced River made a perfect mirror.
I knew that capturing all this beauty required a fairly wide composition that would certainly shrink the moon. Because a horizontal composition that included the moon and its reflection would have to be so wide that would shrink everything (and include a lot of less interesting foreground trees), I opted for a vertical composition that emphasized the scene’s primary elements: the moon, Cathedral Rocks, and Bridalveil Fall.
For this shot I went wide with my Sony 24-105 G lens on my Sony a7RIII body. Once I had the general arrangement of my frame worked out, I moved along the riverbank until everything felt balanced. I used the trees on the left to block the empty sky, and the trees on the right to balance them. And I’ve always liked the small diagonal tree a little left of center, and think in this composition it makes a good counterbalance for the visual weight of Bridalveil Fall.
Is the moon the primary subject the way it would likely be in a telephoto image? Certainly not. I know some people might think the moon is too small in this composition, but for someone like me, with a lifelong relationship with the night sky, the moon makes a perfect accent. And in this image I think just that little pinch of moon is enough to balance a frame that would otherwise be a little heavy on the left.
Lunar Accents
Click an image for a closer look and slide show. Refresh the window to reorder the display.


Fresh Takes
Posted on November 25, 2018

Half Dome Autumn Reflection, Sentinel Bridge, Yosemite
Sony a7RIII
Sony 24-105 f/4 G
1/8 second
F/11
ISO 100
I love the iconic captures as much as the next person—scenes like Yosemite’s Horsetail Fall in February, Upper Antelope Canyon’s famous light shaft, or McWay Fall’s tumble into the Pacific, are both gorgeous and a thrill to photograph. But standing elbow-to-elbow with hundreds (or thousands!) of photographers, each recording virtually identical images that are already duplicates of thousands of prior images, while nice, doesn’t necessarily stimulate my creative juices.
Iconic for a Reason
Once upon a time photographing even the most popular scenes in solitude wasn’t difficult. The tourists who overwhelm the best known views during the comfortable times of day would vacate just when the photography started getting good. But with the proliferation of digital photographers and easy exchange of information in our connected world, there aren’t many photography secrets anymore, and the opportunities to make unique images have become more challenging than ever. And if you do capture something special, posting it online is sure to immediately draw photographers like cats to a can opener.
Given that Yosemite Valley’s eight square miles attracts over five million visitors each year, you’d think it would be impossible to find unique perspectives. But on even the busiest summer day, rising for sunrise will give you at least a couple of peaceful hours. And of course in Yosemite’s backcountry, while relatively crowded by wilderness standards, solitude is always just a short detour away.
But the iconic spots earned their recognition for a reason, and first-time (or infrequent) Yosemite visitors want to see them too. For my workshops, in addition to sharing with my students a variety of my favorite more hidden Yosemite spots, I’ve learned to take them to the Yosemite locations they’ve come to know from a lifetime time of viewing Yosemite pictures.
The first visits to vistas like Glacier Point, Tunnel View, Valley View, and Sentinel Bridge still inspire the awe they always have. It’s easy for photographers, overcome by the majesty before them, to fall back on their memory of others’ images and settle for their own version of the same thing. Rather than suggest that my students avoid doing this (for many, these images are the very reason they signed up in the first place), I suggest that they start with the iconic shots they know, but don’t make it their goal. Rather, I encourage them to use those familiar imagers as a starting point for a fresh take that’s more uniquely theirs. I won’t pretend that this approach always, or even frequently, results in something that no one has ever captured, but I think everyone’s photography benefits when that is the goal—not just the images captured today, but the ability to see and execute better images tomorrow as well.
In this year’s Yosemite Fall Color and Reflections workshop we spent most of our time bouncing from one beautiful scene to the next. Autumn, with its colorful leaves and ubiquitous reflections, provides more opportunities for unique captures than any other season, and the color this years was fantastic. But that didn’t prevent us from checking off the icons.
Speaking of icons, my rule of thumb in Yosemite is El Capitan in the morning and Half Dome in the afternoon. But after breakfast one morning, one of the cars said they wanted to go check out Sentinel Bridge, one of the best Half Dome reflections in the park. Normally I resist photographing Half Dome in the morning because its face doesn’t get direct sunlight until late afternoon, but on the way to breakfast I’d noticed the cottonwoods upstream were beautifully backlit and I thought it might be worth checking out. So I scrapped my original plans and we detoured back to the bridge (hey, never let it be said that I’m not flexible).
I’m so glad I listened to the votes from the other car that morning because we ended up with one of the workshop’s highlight shoots. Half Dome was in full shade, sky was a bland blue mixed with a few thin clouds, but the backlit trees were off the charts. We all started with the wider, more conventional views, capturing Half Dome and the trees doubled by their reflection. But that doesn’t take long, and soon I was encouraging everyone to keep working it.
When working out a composition, I always try to figure out where the scene’s action is. In this scene the highlight for me was the upstream trees and their reflection. Wanting as little as possible of the fairly boring sky, I went with a horizontal composition. I also thought a horizontal composition would be best for framing the cottonwoods and reflection with the shaded trees on both sides of the river. To leave no ambiguity about what this image is about, I removed the actual Half Dome entirely, leaving its reflection for context only.
With my Sony 24-105 f/4 G on my Sony a7RIII, I zoomed to a composition that put the “action” front and center, making sure to get all of Half Dome’s reflection but minimal sky, balancing the backlit trees and their reflection toward the top of the from, and framing everything with the darker trees on the edges. Depth of field and motion weren’t concern, so I went with my default ISO 100 and f/11, focused, and clicked.
As anyone who has been in one of my workshops knows, the first click is a draft, an image to review and refine. Evaluating the picture on my LCD, I ran my eyes around my frame and made a few micro adjustments to ensure a tight composition without cutting off the tops of the sunlit tree in the top center, the shaded trunks on the left and right, and the cloud above (below?) Half Dome.
Judging from the variety of images shared in the image reviews, this shoot was a highlight for everyone else too. Some found their own takes on this upstream scene, while a few ventured across the road to capture a completely different scene looking downstream. Not a bad result for a location that wasn’t even on my radar for that morning.
Yosemite Photo Workshops
Workshop Schedule || Purchase Prints
Fresh Takes on Yosemite’s Icons
Click an image for a closer look and slide show. Refresh the window to reorder the display.


It’s the People
Posted on November 22, 2018

Floating Color, El Capitan, Yosemite
The ability to earn my living visiting the most beautiful places in the world is plenty of reason for gratitude, but that’s not what I’m thinking about today. Today I’m thinking about all of the people my workshops have connected me with, and all the laughter and learning they have added to my life.
I’d be lying if I said I wasn’t looking forward to the people part of photo workshops when I started, but I had no idea how much of the joy I get from leading photo workshops comes from the people. Over the last dozen or so years, my workshop students have taught me about their countries, professions, hobbies, religions,… I could go on. I’ve watched workshop participants from virtually every continent on Earth (no penguins yet), with wildly diverse values and world views, blend seamlessly and enthusiastically. Observing this, I’ve learned that despite the exterior tensions that seem to divide our world today, humans have far more in common than we imagine.
Like most people, I have my share of strong opinions about the way things in the world should be. But the people I’ve met in my workshops have shown me that a person’s “goodness” is not determined by his or her political views or any other category that we so conveniently like to slot people into. I’ve seen firsthand that no political affiliation, religious preference, gender, sexual orientation, or ethnicity has a monopoly on warmth, passion, generosity, empathy, patience, or humor. Even more encouraging, I don’t think these workshop epiphanies are mine alone. Workshop after workshop, I get to observe a dozen of the most diverse people imaginable not just set aside differences and work side-by-side, but actually form friendships that transcend conventional boundaries, deep friendships that often continue long after the workshop ends.
I went into the photo workshop business fully prepared to teach others, but completely unprepared for the learning others would offer me.
About this image
With the fall color for this year’s Yosemite Fall Color and Reflections workshop peaking, I had to work overtime to balance the need for quality photo time at each stop with my desire to get my group to all the photo spots. On the workshop’s final day we finally made it to Cathedral Beach, a great up-close view of El Capitan that’s always good for reflections in the fall.
With El Capitan in full sunlight, the river in shade, and nothing stirring the water, all the ingredients were in place for a nice reflection. We’d been photographing reflections all week, but I didn’t get the sense that anyone was tiring of them. Drifting cottonwood leaves added to the beauty and the group quickly spread along a hundred yards or so in search of a composition to make their own.
Often shooting a scene like this I start wide, but this afternoon I started with my Sony 100-400 GM lens, playing with close-ups of the leaves and reflection. After wringing every possibility from this approach, I went to the other extreme and switched to my Sony 12-24 G lens. A wide composition needs a strong foreground, usually the closer the better, so I dropped down to river level and started working on variations of this scene.
While the water was calm, I was close enough to the leaves that even the slightest ripples risked motion blur, so to increase my shutter speed I dialed my Sony a7RIII to ISO 400. At 12mm I have a tremendous amount of depth of field, but the leaves were so close that I decided to play it safe and use f/16. After a check check of my hyperfocal app, I focused on a leaf about 18 inches from my camera knowing that would give me sharpness from the closest leave all the way out to El Capitan.
Yosemite Fall Color and Reflections Photo Workshop
Workshop Schedule || Purchase Prints
An El Capitan Gallery
Click an image for a closer look and slide show. Refresh the window to reorder the display.


That Didn’t Suck
Posted on November 5, 2018
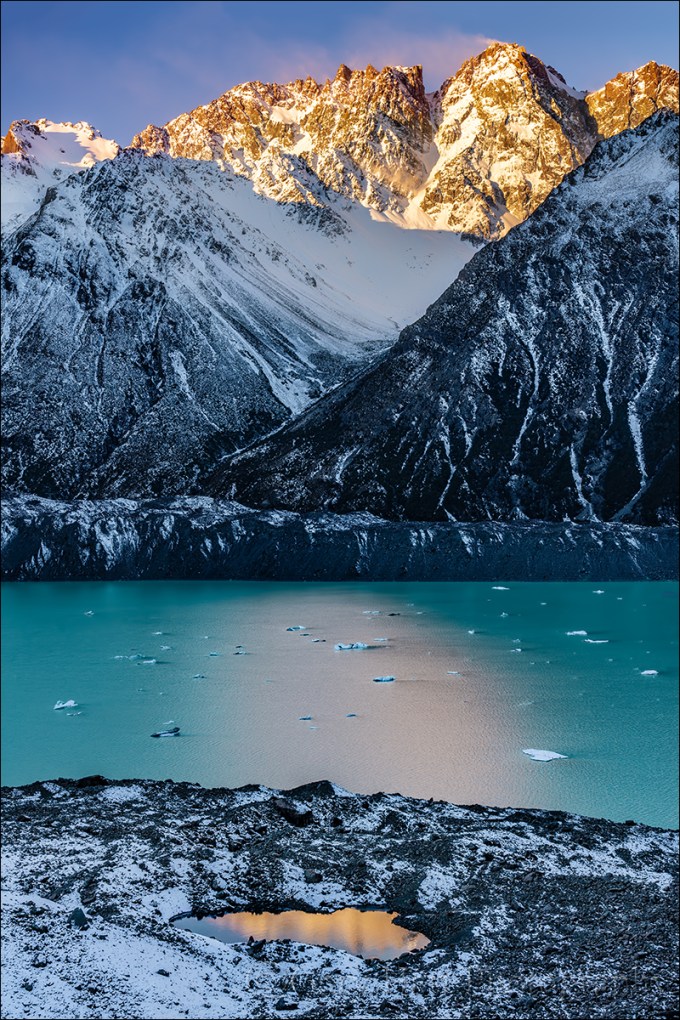
Reflection on the Rocks, Nun’s Veil and Tasman Lake, New Zealand
Sony a7RIII
Sony 24-105 f/4 G
1/13 second
F/11
ISO 100
One evening in New Zealand
I get to a lot of locations and see so many spectacular sights that they sometimes run together. But every once in a while I experience a shoot I know I’ll never forget.
One of (many) highlights of the New Zealand workshop is the hike to Tasman Lake in Aoraki / Mt. Cook National Park. The reward for this short, steep (335 stairs) hike is a 270 degree view that includes 12,000 foot Mt. Cook, icebergs drifting atop turquoise Tasman Lake, Nun’s Veil (pictured here), and the Tasman Valley.
At the trailhead most of the workshop group decided the trail was too icy and opted for a beautiful but less treacherous view a couple miles back down the road. As Don led them to the alternate spot, I guided four members who wanted to brave the icy trail. It turns out the ice wasn’t a big problem, and in fact was completely gone from the trail within a couple hundred yards, and we made it to the vista short of breath but otherwise unscathed.
I’d been up here a few times, but it was the first time for the others, so it was fun to watch their reaction as they summited. Because the trail ends here and the viewing platform is fairly compact, we were able to work in close proximity all evening—having others to share our awe with enhanced the experience even more.
The Tasman Lake view is one of those vistas that’s far too broad to capture with a single frame; any attempt to do so shrinks every feature to the point of insignificance. Opting to divide and conquer by identifying and isolating the scene’s most compelling features, my eye instantly landed on the reflection of Nun’s Veil’s in a small pool down the slope. I soon hopped the vista’s small retaining wall to better center the reflection in the pool, then spent much of the evening here working on compositions that included the reflection. My clicking intensified as light on Nun’s Veil warmed, coloring the wind-whipped snow encircling the peak.
As if all that wasn’t enough, a few minutes after the light left Nun’s Veil, a full moon appeared just to the right of the peak. Despite the advancing night, we were able to photograph the moonrise for a few minutes before the scene became too dark to capture detail in the foreground and moon. But even facing a walk down the icy trail in the dark, we lingered in the moonlight just to marvel at the majesty. As we donned our headlamps for the walk back down the trail, I heard one of the members of the group call my name. “Gary,” long pause. “That didn’t suck.”
New Zealand Photo Workshop
Like reflections? Here’s an article on reflections I wrote a few years ago.
Reflections
Who doesn’t love the soothing tranquility of a good reflection? And like a metaphor in writing, a reflection is an indirect representation that can be more powerful than its literal double by virtue of its ability to engage the brain in different ways than we’re accustomed. Rather than processing the scene directly, we first must mentally reassemble the reflection’s reverse world, and in the process perhaps see the scene a little differently.
Reflections are a powerful photographic tool as well. Water’s universal familiarity makes it an ideal subject for photographers frustrated by their camera’s static representation of our dynamic world. Just as we freeze or blur a waterfall to express turbulent motion, we can include a reflection to convey serenity.
Water reflections come in many forms, from a mirror-sharp reverse of a mountain atop a still pool, to an abstract shuffle of color and texture on a choppy lake. Without getting too far into the physics of light, it’s important to understand that every object we see and photograph (that doesn’t generate its own light) comes to us courtesy of reflected light.
Mirror reflection recipe
The ingredients for a crisp, mirror reflection like the El Capitan image at the top of the page is pretty simple: still water, a reflection subject that’s much brighter than the water’s surface (the greater the contrast the better), and a view angle that matches the angle from the water’s surface to the reflection subject. (The best reflections are usually found on shaded water because there are fewer photons to compete with the photons bouncing from the reflected subject.)
The El Capitan reflection above was a perfect confluence of reflection conditions. Clean, still air, dense shade on the river, and El Capitan’s fully exposed, reflective granite, make early morning the best time for El Capitan reflections. On this April morning I made my way down to the Merced River hoping to photograph the first light on El Capitan reflected in the Merced River. Finding my route down to the river blocked by spring flooding, I was forced to improvise. The morning air was clean and calm, and the ephemeral lake was mirror-still.
Circling the flooded meadow, I found a gap in the trees that opened onto the most complete view and reflection of El Capitan and the Three Brothers I’ve ever seen. So complete in fact, that I couldn’t include it all with my 16-35mm lens at its widest focal length. Fortunately, I was able to borrow a Canon 11-24 lens and Metabones IV adapter from a friend (thanks, Curt!), just wide enough to fit the entire scene at the lens’s shortest focal length.
Playing the angles

Understanding that reflected photons leave the water’s surface at the same angle at which they arrive—imagine the way a tennis ball bounces (if it weren’t affected by spin, wind resistance, or gravity)—helps us get in position for the reflection we want.
A few years ago I found myself atop Sentinel Dome right after an intense rain shower had turned indentations in the granite into small, glistening pools. Rather than simply settle for the vivid sunset coloring the clouds above, I decided to include the sunset reflected in the pools as well. At eye-level the pools reflected blue sky, so I dropped my tripod as low as it would go, almost to granite level, positioning my lens at the same angle to the pools that the red light leaving the clouds struck the water.
When the water’s in motion

On the Rocks, El Capitan and the Merced River, Yosemite
As spectacular as a crisp, mirror reflection in still water is, it’s easy to overlook the visual potential in a reflection that’s not crisp, or to forget your camera’s ability to render a soft or abstract reflection much better than your eyes view it. While a crisp reflection often dominates the primary subject in an image, a splash of reflected color or shape can provide a striking accent to a dominant primary subject. And a reflection disturbed by the continuously varying angles of rippled or choppy water magically appears when a long exposure smoothes the water’s surface.
In the image on the right, the El Capitan reflection undulating atop the Merced River was barely perceptible to my eyes. But the reflection came to in a 25 second exposure achieved with the help of 2-stop hard graduated neutral density filter that subdued the day’s last rays on the clouds and El Capitan, and a neutral polarizer (with the reflection dialed up) that cut the light on the entire scene by a couple of stops. And since a reflection is never as bright as the actual scene, using a GND meant I need to do a little dodging and burning in Photoshop.
Where to focus
An often misunderstood aspect of reflection photography is where to focus. Though it seems counterintuitive, the focus point of a reflection is the reflection subject, not the reflection surface. This isn’t such a big deal in a scene like the El Capitan reflection at the top of the post, where the focus point of everything of visual significance is infinity, but it’s a very big deal when you want both your reflection and rocks or leaves on the nearby water surface sharp.

Autumn Reflection, El Capitan, Yosemite
The El Capitan reflection on the right is very different from the El Capitan reflection above, where the extreme depth of field ensured sharpness had I focused on anything in the scene or the reflection. But here the leaves that were my scene’s primary emphasis were just a couple of feet from my camera, while El Capitan was several thousand feet distant. Even though the leaves floated atop the El Capitan reflection, focusing on El Capitan would have softened the leaves. To increase my depth of field, I stopped down to f/18 and focused several feet into the foreground leaves, then magnified the image on my LCD to verify that all of the leaves were sharp. Though El Capitan is slightly soft, a soft reflection is far more forgivable than a soft fore
Think ahead
It seems that reflections often feel like a fortuitous gift that we just stumbled upon. But given that reflections are entirely beholden to the laws of physics, they’re far more predictable than many of the natural elements we photograph. Taking a little time to understand the nature of reflections, and how they’re revealed by a camera, enables photographers to anticipate their appearance.
For example, in Yosemite I know that low flow makes autumn the best time for reflections in the Merced River. On the other hand, when the Merced is rushing with spring runoff, Yosemite’s meadows often shimmer beneath tranquil vernal pools. I plan many trips (and workshops) to take advantage of these opportunities.
Workshop Schedule || Purchase Prints
A Reflection Gallery
Click an image for a closer look and slide show.


Extracting the Essence
Posted on October 21, 2018

Autumn Light, North Lake, Eastern Sierra
Sony a7R III
Sony 24-105 f/4 G
3/4 second
F/13
ISO 100

Autumn Morning, North Lake, Eastern Sierra
Read about the travails leading up to this shoot in my previous post. But enough about that….
I’m afraid that when faced with a beautiful scene, photographers (myself included) sometimes settle for the obvious shot and leave more subtle opportunities on the table. But the most creative photography (though not necessarily the most popular) comes from looking beyond the obvious to find the scene’s essence.
The question photographers should ask themselves is: What about this scene makes it special? That’s really a personal challenge with as many answers as there are photographers seeking them. Once we identify something to emphasize, we need to figure out the best way to guide our viewers’ eyes. The tools at our disposal include our exposure settings to control the scene’s motion, depth, and light, and compositional elements like isolation, juxtaposition, lines, and shapes.
There were many “obvious” shots at North Lake this morning, and my group certainly did its best to exhaust them. But we spent enough time there that I was able to make it around to everyone to encourage them to break free of whatever they were locked onto and try to find something different. A couple dropped low with a wide angle to put foreground rocks close, some extracted a telephoto and isolated the reflection and/or colorful aspen across the lake, while others switched to a vertical composition that emphasized the clouds building above the peaks. Many played with variations of some or all of these approaches. I’ve shot here enough that I pretty content to observe, until…
About an hour into the shoot the clouds behind us parted and a shaft of sunlight snuck through to spotlight the cascade of orange across the lake, and I couldn’t resist. This sweet accent would be lost to wide field of the Sony 16-35 f/2.8 GM lens I’d had on my a7RIII all morning, so I (very) quickly replaced it with my Sony 24-105 f/4 G and went to work isolating the scene’s best elements. Even though I hadn’t shot much, I’d been composing in my head all morning, so I had a pretty good idea what I wanted to do.
In my mind the scene’s best feature was the vivid color and its reflection. But as striking as these features were, to turn it from a scene into a picture, I needed something to move the eye, and a visual landing place. Enter the zig-zag diagonals and fortuitously positioned sunlight.
I wanted to compose as tightly as I could without losing the light and reflection. With the color as my canvas, I simply let the diagonals span the frame (taking care to include the intersection on the left), and the sunlight fall near the top.
Eastern Sierra Fall Color Photo Workshop
Extracting the Essence
Click an image for a closer look and slide show. Refresh the window to reorder the display.


I Just Love Happy Endings
Posted on October 19, 2018

Autumn Morning, North Lake, Eastern Sierra
Sony a7R III
Sony 16-35 f/2.8 GM
1/4 second
F/16
ISO 100
By the time I made it to North Lake for sunrise, I’d already had a trying morning. After some frustrations with the cars, my Eastern Sierra workshop group had gotten on the road about five minutes later than I’d planned. Fortunately I always schedule a little wiggle room, so we were on track, but still…. Then, just a couple of miles before the turn-off to the lake, I had to swerve to avoid a grapefruit-sized rock in the road, barely avoiding it. Phew. But the middle car in our mini-caravan wasn’t so lucky: Flat tire. Crap.
This year’s group had 13 people (including Don Smith, who was assisting, and me), but this little mishap suddenly dropped us to two cars (10 seats), with sunrise rapidly approaching. Surveying the damage, I decided that rather than make everyone wait, we could still cram all but three of us into the two remaining cars. I sent them up to the lake in Don’s care while I stayed behind with the unfortunate couple and their wounded car. Once everyone was situated at the lake, Don agreed to return in case we weren’t able to replace the tire.
Don pulled up about 20 minutes later, just as I put the finishing touches on the miniature spare. After a brief discussion we decided it wouldn’t be wise to take that (poor excuse for a) tire on the unpaved North Lake road, so the couple decided to return to Bishop to get their tire replaced. Since that would leave us with 11 people to transport with the two remaining cars, Don volunteered to return with them to Bishop while I drove up to North Lake to meet the group.
So I was pretty much worn out by the time I parked, hefted my camera bag onto my back, and started the short walk down to the lake. Making it to the lakeshore right around “official” sunrise, the scene that greeted me was an instant jolt of energy. In nature photography you do your best to time your visit for the best possible conditions, but ultimately have to deal with whatever you’re dealt. The variables we cross our fingers for at North Lake are good color, a crisp reflection, and nice clouds. We hit the trifecta this morning, with peak color from top to bottom across the lake (and everywhere else), water like glass, and a sublime mix of swirling clouds and blue sky. An unexpected bonus was the relatively small number of photographers competing for space at this always popular autumn sunrise spot.
One of the things I like most about North Lake is the variety of fall color here, a rare sight in California. The trees on the slope are a mix of orange and red, while those lining the lake are always vivid yellow. I’ve photographed North Lake a lot over the years, and my own photography during a workshop is never my priority, so I rarely photograph here anymore. But this morning was special and I couldn’t resist, so as I moved around to everyone in the group I found time to fire off a few frames of my own.
The background of the image I share here is a version of the broader, more conventional scene that is usually the starting point for a North Lake fall color composition. (In future posts I’ll share one or two others that I think capture the less obvious essence of the scene.) As always, I worked to find a foreground that complemented the primary scene, finally settling on the tall grass as a frame for the reflection and the the scene beyond—I thought the grass added just enough detail without distracting.) I liked the clouds, but the color was long gone by the time I was able to photograph, so I decided not to include too much sky. Finishing the scene off, I panned left to include a tall, yellow aspen for the left side of my frame. I composed, metered, and focused at eye level, but to get as much reflection as possible, before clicking I elevated my RRS TVC-24L tripod (I love having a tall tripod) to its maximum height, then used the tilting LCD on my Sony a7RIII to restore the composition I’d identified.
Given the way things started out, it would have been very easy to just pack it in and write the morning off as a loss. But despite the difficulties, this turned out to be a wonderful morning of photography for everyone. Just one more reminder that the happiest endings often start with a little hardship.
Eastern Sierra Photo Workshop
Why I Love the Eastern Sierra
Click an image for a closer look and slide show. Refresh the window to reorder the display.


Mastering Focus (Hyperfocal and Otherwise)
Posted on October 14, 2018

Floating Autumn Leaves, Valley View, Yosemite
Canon EOS-1Ds Mark II
Canon 24-105 f/4 L
1/15 second
F/16
ISO 100
What’s the point?
It seems like one of photography’s great mysteries is achieving proper focus: the camera settings, where to place the focus point, even the definition of sharpness are all sources of confusion and angst. If you’re a tourist just grabbing snapshots, everything in your frame is likely at infinity and you can just put your camera in full auto mode and click away. But if you’re a photographic artist trying to capture something unique with your mirrorless or DSLR camera and doing your best to have important visual elements objects at different distances throughout your frame, you need to stop letting your camera decide your focus point and exposure settings.
Of course the first creative focus decision is whether you even want the entire frame sharp. While some of my favorite images use selective focus to emphasize one element and blur the rest of the scene, most (but not all) of what I’ll say here is about using hyperfocal techniques to maximize depth of field (DOF). I cover creative selective focus in much greater detail in another Photo Tip article: Creative Selective Focus.
Beware the “expert”
I’m afraid that there’s some bad, albeit well-intended, advice out there that yields just enough success to deceive people into thinking they’ve got focus nailed, a misperception that often doesn’t manifest until an important shot is lost. I’m referring to the myth that you should focus 1/3 of the way into the scene, or 1/3 of the way into the frame (two very different things, each with its own set of problems).
For beginners, or photographers whose entire scene is at infinity, the 1/3 technique may be a useful rule of thumb. But taking the 1/3 approach to focus requires that you understand DOF and the art of focusing well enough to adjust your focus point when appropriate, and once you achieve that level of understanding, you may as well do it the right way from the start. That ability becomes especially important in those scenes where missing the focus point by just a few feet or inches can make or break and image.

Where to focus this? Of course 1/3 of the way into a scene that stretches for miles won’t work. And 1/3 of the way into a frame with a diagonal foreground won’t work either.
Back to the basics
Understanding a few basic focus truths will help you make focus decisions:
- A lens’s aperture is the opening that allows light to reach your sensor—the bigger this opening, the more light gets in, but also the smaller your DOF.
- Aperture is measured in f-stops, which is the lens’s focal length divided by the aperture’s diameter; the higher the f-number, the smaller the aperture and the greater the DOF. So f/8 is actually a bigger aperture (with less DOF) than f/11. This understanding becomes second nature, but if you’re just learning it’s helpful to think of f/stops this way: The higher the f-number, the greater the depth of field. Though they’re not exactly the same thing, photographers usually use f-stop and aperture interchangeably.
- Regardless of its current f-stop setting, a camera maximizes the light in its viewfinder by always showing you the scene at the lens’s widest aperture. All this extra light makes it easier to compose and focus, but unless your exposure is set for the widest aperture (which it shouldn’t be unless you have a very specific reason to limit your depth of field), the image you capture will have more DOF than you see in the viewfinder. The consequence is that you usually can’t see how much of your scene is in focus when you compose. Most cameras have a DOF preview button that temporarily closes the lens down to the f-stop you have set—this shows the scene at its actual DOF, but can also darken the viewfinder considerably (depending on how small your aperture is), making it far more difficult to see the scene.
- For any focus point, there’s only one (infinitely thin) plane of maximum sharpness, regardless of the focal length and f-stop—everything in front of and behind the plane containing your focus point (and parallel to the sensor) will be some degree of less than maximum sharpness. As long as the zone of less than perfect sharpness isn’t visible, it’s considered “acceptably sharp.” When that zone becomes visible, that portion of the image is officially “soft.” When photographers speak of sharpness in an image, they’re really talking about acceptable sharpness.
- The zone of acceptable sharpness extends a greater distance beyond the focus point than it does in front of the focus point. If you focus on that rock ten feet in front of you, rocks three feet in front of you may be out of focus, but a tree fifty feet away could be sharp. I’ll explain more about this later.
- While shorter focal lengths may appear to provide more depth of field, believe it or not, DOF doesn’t actually change with focal length. What does change is the size of everything in the image, so as your focal length increases, your functional or apparent DOF decreases. So you really aren’t gaining more absolute DOF with a shorter focal length, it just won’t be as visible. When photographers talk about DOF, they’re virtually always talking about apparent DOF—the way the image looks. (That’s the DOF definition I use here too.)
- The closer your focus point, the narrower your DOF (range of front-to-back sharpness). If you focus your 24mm lens on a butterfly sunning on a poppy six inches from your lens, your DOF is so narrow that it’s possible parts of the poppy will be out of focus; if you focus the same lens on a tree 100 feet away, the mountains behind the tree are sharp too.

Moonset, Mt. Whitney and Whitney Arch, Alabama Hills, California
With subjects throughout my frame, from close foreground to distant background, it’s impossible to get everything perfectly sharp. Here in the Alabama Hills near Lone Pine, California, I stopped down to f/16 and focused at the at the most distant part of the arch. This ensured that all of the arch would be perfectly sharp, while keeping Mt. Whitney and the rest of the background “sharp enough.”
Defining sharpness
Depth of field discussions are complicated by the fact that “sharp” is a moving target that varies with display size and viewing distance. But it’s safe to say that all things equal, the larger your ultimate output and closer the intended viewing distance, the more detail your original capture should contain.
To capture detail a lens focuses light on the sensor’s photosites. Remember using a magnifying glass to focus sunlight and ignite a leaf when you were a kid? The smaller (more concentrated) the point of sunlight, the sooner the smoke appeared. In a camera, the finer (smaller) a lens focuses light on each photosite, the more detail the image will contain at that location. So when we focus we’re trying to make the light striking each photosite as concentrated as possible.
In photography we call that small circle of light your lens makes for each photosite its “circle of confusion.” The larger the CoC, the less concentrated the light and the more blurred the image will appear. Of course if the CoC is too small to be seen as soft, either because the print is too small or the viewer is too far away, it really doesn’t matter. In other words, areas of an image with a large CoC (relatively soft) can still appear sharp if small enough or viewed from far enough away. That’s why sharpness can never be an absolute term, and we talk instead about acceptable sharpness that’s based on print size and viewing distance. It’s actually possible for the same image to be sharp for one use, but too soft for another.
So how much detail do you need? The threshold for acceptable sharpness is pretty low for an image that just ends up on an 8×10 calendar on the kitchen wall, but if you want that image large on the wall above the sofa, achieving acceptable sharpness requires much more detail. And as your print size increases (and/or viewing distance decreases), the CoC that delivers acceptable sharpness shrinks correspondingly.
Many factors determine the a camera’s ability to record detail. Sensor resolution of course—the more resolution your sensor has, the more important it becomes that to have a lens that can take advantage of that extra resolution. And the more detail you want to capture with that high resolution sensor and tack-sharp lens, the more important your depth of field and focus point decisions become.
Hyperfocal focus
The foundation of a sound approach to maximizing sharpness for a given viewing distance and image size is hyperfocal focusing, an approach that uses viewing distance, f-stop, focal length, and focus point to ensure acceptable sharpness.
The hyperfocal point is the focus point that provides the maximum depth of field for a given combination of sensor size, f/stop, and focal length. Another way to say it is that the hyperfocal point is the closest you can focus and still be acceptably sharp to infinity. When focused at the hyperfocal point, your scene will be acceptably sharp from halfway between your lens and focus point all the way to infinity. For example, if the hyperfocal point for your sensor (full frame, APS-C, 4/3, or whatever), focal length, and f-stop combinition is twelve feet away, focusing there will give you acceptable sharpness from six feet (half of twelve) to infinity—focusing closer will soften the distant scene; focusing farther will keep you sharp to infinity but extend the area of foreground softness.
Because the hyperfocal variable (sensor size, focal length, f-stop) combinations are too numerous to memorize, we usually refer to an external aid. That used to be awkward printed tables with long columns and rows displayed in microscopic print, the more precise the data, the smaller the print. Fortunately, those have been replaced by smartphone apps with more precise information in a much more accessible and readable form. We plug in all the variables and out pops the hyperfocal point distance and other useful information
It usually goes something like this:
- Identify the composition
- Determine the closest thing that must be sharp (right now I’m assuming you want sharpness to infinity)
- Dig the smartphone from one of the 10,000 pockets it could be in
- Open the hyperfocal app and plug in the sensor size (usually previously set by you as the default), f-stop, and a focus distance
- Up pops the hyperfocal distance (and usually other info of varying value)
You’re not as sharp as you think
Since people’s eyes start to glaze over when CoC comes up, they tend to use the default returned by the smartphone app. But just because the app tells you you’ve nailed focus, don’t assume that your work is done. An often overlooked aspect of hyperfocal focusing is that app makes assumptions that aren’t necessarily right, and in fact are probably wrong.
The CoC your app uses to determine acceptable sharpness is a function of sensor size, display size, and viewing distance. But most app’s hyperfocal tables assume that you’re creating an 8×10 print that will be viewed from a foot away—maybe valid 40 years ago, but not in this day of mega-prints. The result is a CoC three times larger than the eye’s ability to resolve.
That doesn’t invalidate hyperfocal focusing, but if you use published hyperfocal data from an app or table, your images’ DOF might not be as ideal as you think it is for your use. If you can’t specify a smaller CoC in your app, I suggest that you stop-down a stop or so more than the app/table indicates. On the other hand, stopping down to increase sharpness is an effort of diminishing returns, because diffraction increases as the aperture shrinks and eventually will soften the entire image—I try not to go more than a stop smaller than my data suggests.
Keeping it simple
As helpful as a hyperfocal app can be, whipping out a smartphone for instant in-the-field access to data is not really conducive to the creative process. I’m a big advocate of keeping photography as simple as possible, so while I’m a hyperfocal focus advocate in spirit, I don’t usually use hyperfocal data in the field. Instead I apply hyperfocal principles in the field whenever I think the margin of error gives me sufficient wiggle room.
Though I don’t often use the specific hyperfocal data in the field, I find it helps a lot to refer to hyperfocal tables when I’m sitting around with nothing to do. So if I find myself standing in line at the DMV, or sitting in a theater waiting for a movie (I’m a great date), I open my iPhone hyperfocal app and plug in random values just to get a sense of the DOF for a given f-stop and focal length combination. I may not remember the exact numbers later, but enough of the information sinks in that I accumulate a general sense of the hyperfocal DOF/camera-setting relationships.
Finally, something to do
Unless I think I have very little DOF margin for error in my composition, I rarely open my hyperfocal app in the field. Instead, once my composition is worked out and have determined the closest object I want sharp—the closest object with visual interest (shape, color, texture), regardless of whether it’s a primary subject.
- If I want to be sharp to infinity and my closest foreground object (that needs to be sharp) is close enough to hit with my hat, I need a fair amount of DOF. If my focal length is pretty wide, I might skip the hyperfocal app, stop down to f/16, and focus a little behind my foreground object. But if I’m at a fairly long focal length, or my closest object is within arm’s reach, I have very little margin for error and will almost certainly refer to my hyperfocal app.
- If I could hit my foreground object with a baseball and my focal length is 50mm (or so) or less, I’ll probably go with f/11 and just focus on my foreground object. But as my focal length increases, so does the likelihood that I’ll need to refer to my hyperfocal app.
- If it would take a gun to reach my closest object (picture a distant peak), I choose an f-stop between f/8 and f/11 and focus anywhere in the distance.
Of course these distances are very subjective and will vary with your focal length and composition (not to mention the strength of your pitching arm), but you get the idea. If you find yourself in a small margin for error focus situation without a hyperfocal app (or you just don’t want to take the time to use one), the single most important thing to remember is to focus behind your closest subject. Because you always have sharpness in front of your focus point, focusing on the closest subject gives you unnecessary sharpness at the expense of distant sharpness. By focusing a little behind your closest subject, you’re increasing the depth of your distant sharpness while (if you’re careful) keeping your foreground subject within the zone of sharpness in front of the focus point.
And finally, foreground softness, no matter how slight, is almost always a greater distraction than slight background softness. So, if it’s impossible to get all of your frame sharp, it’s usually best to ensure that the foreground is sharp.
Some examples

A hat’s toss away: The closest pool was about 6 feet from my lens. I stopped down to f/20 (smaller than I generally like to go) and focused on the back of the pool on the left, about 10 feet away.

A baseball throw away: The little clump of wildflowers (lower right) was about 35 feet away and the trees started another 35 feet beyond that. With a focal length of 55mm, I dialed to f/11 and focused on the most distant foreground tree, getting everything from the flowers to Half Dome sharp.

Honey, fetch my rifle: With everything here at infinity I knew could focus on the trees or moon confident that the entire frame would be sharp. In this case I opted for f/8 to minimize diffraction but still in my lens’s sharpest f-stop range, and focused on the tree.
Why not just automatically set my aperture to f/22 and be done with it? I thought you’d never ask. Without delving too far into the physics of light and optics, let’s just say that there’s a not so little light-bending problem called “diffraction” that robs your images of sharpness as your aperture shrinks—the smaller the aperture, the greater the diffraction. Then why not choose f/2.8 when everything’s at infinity? Because lenses tend to lose sharpness at their aperture extremes, and are generally sharper in their mid-range f-stops. So while diffraction and lens softness don’t sway me from choosing the f-stop that gives the DOF I want, I try to never choose an aperture bigger or smaller than I need.
Now that we’ve let the composition determine our f-stop, it’s (finally) time to actually choose the focus point. Believe it or not, with this foundation of understanding we just established, focus becomes pretty simple. Whenever possible, I try to have elements throughout my frame, often starting near my feet and extending far into the distance. When that’s the case I stop down focus on an object slightly behind my closest subject (the more distant my closest subject, the farther behind it I can focus).
When I’m not sure, or if I don’t think I can get the entire scene sharp, I err on the side of closer focus to ensure that the foreground is sharp. Sometimes before shooting I check my DOF with the DOF preview button, allowing time for my eye to adjust to the limited light. And when maximum DOF is essential and I know my margin for error is small, I don’t hesitate to refer to the DOF app on my iPhone.
A great thing about digital capture is the instant validation of the LCD—when I’m not sure, or when getting it perfect is absolutely essential, after capture I pop my image up on the LCD, magnify it to maximum, check the point or points that must be sharp, and adjust if necessary. Using this immediate feedback to make instant corrections really speeds the learning process.
Sometimes less is more
The depth of field you choose is your creative choice, and no law says you must maximize it. Use your camera’s limited depth of field to minimize or eliminate distractions, create a blur of background color, or simply to guide your viewer’s eye. Focusing on a near subject while letting the background go soft clearly communicates the primary subject while retaining enough background detail to establish context. And an extremely narrow depth of field can turn distant flowers or sky into a colorful canvas for your subject.
 In this image of a dogwood blossom in the rain, I positioned my camera to align Bridalveil Fall with the dogwood and used an extension tube to focus extremely close. The narrow depth of field caused by focusing so close turned Bridalveil Fall into a background blur (I used f/18 to the fall a little more recognizable), allowing viewers to feast their eyes on the dogwood’s and raindrop’s exquisite detail.
 An extension tube on a macro lens at f/2.8 gave me depth of field measured in fractions of an inch. The gold color in the background is more poppies, but they’re far enough away that they blur into nothing but color. The extremely narrow depth of field also eliminated weeds and rocks that would have otherwise been a distraction.
There’s no substitute for experience
No two photographers do everything exactly alike. Determining the DOF a composition requires, the f-stop and focal length that achieves the desired DOF, and where to place the point of maximum focus, are all part of the creative process that should never be left up to the camera. The sooner you grasp the underlying principles of DOF and focus, the sooner you’ll feel comfortable taking control and conveying your own unique vision.
About this image

Floating Autumn Leaves, Valley View, Yosemite
Yosemite may not be New England, but it can still put on a pretty good fall color display. A few years ago I arrived at Valley View on the west side of Yosemite Valley just about the time the fall color was peaking. I found the Merced River filled with reflections of El Capitan and Cathedral Rocks, framed by an accumulation of recently fallen leaves still rich with vivid fall color.
To emphasize the colorful foreground, I dropped my tripod low and framed up a vertical composition. I knew my hyperfocal distance at 24mm and f/11 would be 5 or 6 feet, but with the scene ranging from the closest leaves at about 3 feet away out to El Capitan at infinity, I also knew I’d need to be careful with my focus choices. For a little more margin for error I stopped down to f/16, then focused on the nearest rocks which were a little less than 6 feet away. As I usually do when I don’t have a lot of focus wiggle room, I magnified the resulting image on my LCD and moved the view from the foreground to the background to verify front-to-back sharpness.
Workshop Schedule || Purchase Prints
Playing with Depth: A Gallery of Focus
Click an image for a closer look and slide show. Refresh the screen to reorder the display.


Improve Your Fall Color Photography
Posted on September 27, 2018

Autumn Snow, El Capitan, Yosemite
Canon EOS-5D Mark III
24-105L
1/15 second
F/16
ISO 100
As we enter the fall color photography season, I’m revisiting and revising previous articles. This is the second in the series.
Improve Your Fall Color Photography
Vivid color and crisp reflections make autumn my favorite season for creative photography. While most landscape scenes require showing up at the right time and hoping for the sun and clouds to cooperate, photographing fall color is often a simple matter of circling the scene until the light’s right. For the photographers who understand this, and know how to control exposure, depth, and motion with their cameras, great fall color images are possible any time of day, in any light.
Backlight, backlight, backlight
The difference between the front-lit and backlit sides of fall foliage is the difference between dull and vivid color. When illuminated by direct sunlight, the side of a leaf opposite the sun throbs with color, as if it has its own source of illumination, while the same leaf’s lit side appears flat—if you ever find yourself thinking that the fall color seems washed out, check the other side of the tree.
While the backlight glow isn’t as pronounced in shade/overcast, when the leaves are illuminated by light that’s spread evenly across the sky, even diffuse sunlight is far more pronounced one side of the leaves than the other, giving the side of a leaf that’s opposite the sky (the side getting less light) a subtle but distinct glow when compared to its skyward side.

Forest Autumn, Yosemite
Isolate elements with a telephoto for a more intimate fall color image
Big fall color scenes are great, but a telephoto or macro enables you to highlight and emphasize elements and relationships. Train your eye to find leaves, groups of leaves, or branches that stand out from the rest of the scene. Zoom close, using the edges of the frame to eliminate distractions and frame subjects. And don’t concentrate so much on your primary subject that you miss complementary background or foreground elements to balance the frame and provide an appealing canvas for your subject.

Solitary Leaf, Bridalveil Creek, Yosemite
Selective depth of field is a great way to emphasize/deemphasize elements in a scene
Limiting depth of field with a large aperture on a telephoto lens can soften a potentially distracting background into a complementary canvas of color and shape. Parallel tree trunks, other colorful leaves, and reflective water make particularly effective soft background subjects. For an extremely soft background, reduce your depth of field further by adding an extension tube to focus closer.
Autumn Bouquet, Zion National Park
Underexpose sunlit leaves to maximize color
Contrary to what many believe, fall foliage in bright sunlight is still photographable if you isolate backlit leaves against a darker background and slightly underexpose them. The key here is making sure the foliage is the brightest thing in the frame, and to avoid including any sky in the frame. Photographing sunlit leaves, especially with a large aperture to limit DOF, has the added advantage of an extremely fast shutter speed that will freeze wind-blown foliage.

Leaves and Reflection, Convict Lake, Eastern Sierra
Slightly underexposing brightly lit leaves not only emphasizes their color, it turns everything that’s in shade to a dark background. And if your depth of field is narrow enough, points of light sneaking between the leaves and branches to reach your camera will blur to glowing jewels.

Autumn Light, Yosemite
A sunstar is a great way to liven up an image in extreme light
If you’re going to be shooting backlit leaves, you’ll often find yourself fighting the sun. Rather than trying to overcome it, turn the sun into an ally by hiding it behind a tree. A small aperture (f16 or smaller is my general rule) with a small sliver of the sun’s disk visible creates a brilliant sunstar that becomes the focal-point of your scene. Unlike photographing a sunstar on the horizon, hiding the sun behind a terrestrial object like a tree or rock enables you to move with the sun.
When you get a composition you like, try several frames, varying the amount of sun visible in each. The smaller the sliver of sun, the more delicate the sunstar; the more sun you include, the more bold the sunstar. You’ll also find that different lenses render sunstars differently, so experiment to see which lenses and apertures work best for you.

Autumn Light, North Rim, Grand Canyon

Autumn Glow, Cook’s Meadow, Yosemite
Polarize away the foliage’s natural sheen
Fall foliage has a reflective sheen that dulls its natural color. A properly oriented polarizer can erase that sheen and bring the underlying natural color into prominence. To minimize the scene’s reflection, slowly turn the polarizer until the scene is darkest (the more you try this, the easier it will be to see). If you have a hard time seeing the difference, concentrate your gaze on a single leaf, rock, or wet surface.

Fallen Color, Rock Creek Canyon, Eastern Sierra
A polarizer isn’t an all-on or all-off proposition. Slowly dial the polarizer’s ring and watch the reflection change until you achieve the effect you desire. This is particularly effective when you want your reflection to share the frame with submerged feature such as rocks, leaves, and grass.

Morning Reflection, North Lake, Eastern Sierra
Blur water with a long exposure
When photographing in overcast or shade, it’s virtually impossible to freeze the motion of rapid water at any kind of reasonable ISO. Rather than fight it, use this opportunity to add silky water to your fall color scenes. There’s no magic shutter speed for blurring water—in addition to the shutter speed, the amount of blur will depend on the speed of the water, your distance from the water, your focal length, and your angle of view relative to the water’s motion. When you find a composition you like, don’t stop with one click. Experiment with different shutter speeds by varying the ISO (or aperture as long as you don’t compromise the desired depth of field).

Autumn Leaf, Bridalveil Creek, Yosemite
Reflections make fantastic complements to any fall color scene
By autumn, rivers and streams that rushed over rocks in spring and summer, meander at a leisurely, reflective pace. Adding a reflection to your autumn scene can double the color, and also add a sense of tranquility. The recipe for a reflection is still water, sunlit reflection subjects, and shaded reflective surface.
When photographing leaves floating atop a reflection, it’s important to know that the focus point for the reflection is the focus point of the reflective subject, not the reflective surface. This is seems counterintuitive, but try it yourself—focus on the leaves with a wide aperture and watch the reflection go soft. Achieving sharpness in your floating leaves and the reflection requires an extremely small aperture and careful focus point selection. Often the necessary depth of field exceeds the lens’s ability to capture it—in this case, I almost always bias my focus toward the leaves and let the reflection go soft.

Autumn Reflection, El Capitan, Yosemite

Fallen Leaves, Valley View, Yosemite
Nothing communicates impending winter like fall color with snow
Don’t think the first snow means your fall photography is finished for the year. Hardy autumn leaves often cling to branches, and even retain their color on the ground through the first few storms of winter. An early snowfall is an opportunity to catch fall leaves etched in white, an opportunity not to be missed. And even after the snow has been falling for a while, it’s possible to find a colorful rogue leaf to accent an otherwise stark winter scene.

Fall into Winter, Bridalveil Fall, Yosemite

First Snow, El Capitan, Yosemite
Workshop Schedule || Purchase Prints
To better understand the science and timing of fall color, read
“A simple how and when of fall color“
A Gallery of Fall Color


, Yosemite")


:: More photography tips ::
A Maui Memory
Posted on September 14, 2018
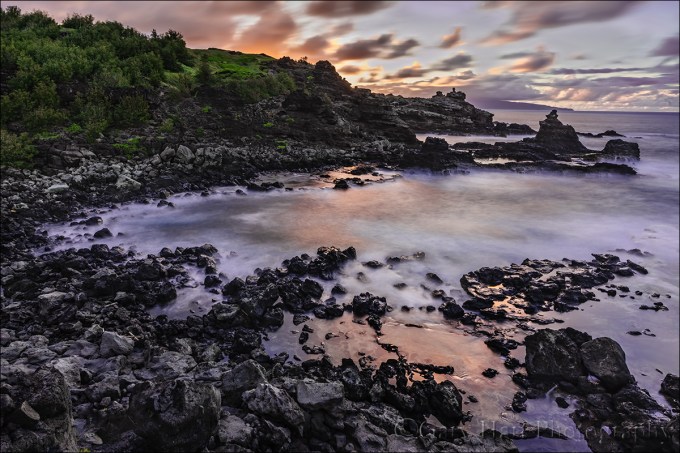
West Maui Tide Pool Sunset, Hawaii
Sony a7R III
Sony 16-35 f/2.8 GM
Breakthrough 6-stop ND filter
20 seconds
F/16
ISO 50
March 2018
Each year I do back-to-back workshops in Hawaii, one on the Big Island and one on Maui (it’s a tough job, but…, well, you know…). This year’s Big Island workshop was complicated first by the recent Kilauea eruption, and then by Hurricane Lane, which deposited 50 inches of rain on our host city Hilo just days before the workshop.
To get my eyes on the damage wrought by Mother Nature, and to scout more alternate locations, I flew to the Big Island five days early (see “tough job” reference above). Despite the complications, the workshop turned out great, with a fantastic group and a few new locations (including a beautiful sunset and Milky Way shoot atop Mauna Kea) added to my tried and true favorites, and I breathed a sigh of relief.
But my dreams of a stress-free Maui workshop were dashed when Hurricane Olivia took laser aim at Maui. Each day I’d check the forecast hoping to see that she had changed course, and each day I was disappointed. Finally, with just a couple days to go, I completely overhauled the workshop, switching lodging and itinerary to avoid the worst of the storm and get the most the island had to offer. I’m happy to say that despite Olivia, we only missed one morning of the workshop and managed to get our Haleakala sunrise in, plus spend a nice day on the Hana road.
My first location adjustment was switching one of my favorite Maui sunset locations, usually a second day destination, to the workshop’s first night because I wasn’t sure we’d be able to get out there the rest of the week. Between dense rainforest and steep, uneven lava, even the walk down here is a bit harrowing, so when I told the group that a few years ago I tried to drive down to this spot, they couldn’t quite believe it. Returning to this spot made me think that it might be time to share the story of my self-inflicted misadventure again. So I dusted off a blog post from five years ago (can’t believe it’s been that long!):
March 2013
On my September scouting trip for my upcoming Maui workshop I hiked cross-country down the rugged flank of West Maui, searching for lava-rock tide pools I’d read about. Scrambling down a steep hill and over sharp rocks, I found the beach I was looking for but decided it was too dangerous for a group. Rather than return the way I came, I continued picking my way along the shore and eventually found another spot I liked better. At first I thought this wouldn’t be suitable for a group either, but climbing out I found an overgrown dirt road/trail leading back to the highway (“highway” in this case is the one-and-a-half lane, mostly-paved, rental-agreement-voiding Highway 340 circling West Maui). But fearing I’d miss this obscure spur from the main road, I saved the trailhead on my GPS.
Last Sunday, the day before my Maui workshop started, I picked up Don Smith (Don assisted this workshop; I’ll return the favor in one of Don’s workshops) at the airport and was excited to share with him the spot I’d “discovered” (it’s not as if I’m the Lewis and Clark of landscape photography—there’s enough debris down there to indicate the spot is known to locals) and off we went. The steady rain that had been falling for most of the afternoon increased with the road’s remoteness and soon we were slaloming around boulders dislodged from the surrounding cliffs by the downpour—at one point we passed a car waylaid by a grapefruit-size rock embedded in its windshield.
Undeterred, we soldiered on through the intensifying rain. This was Don’s first Maui visit, so I narrated the tour with vigor, enthusiastically pointing out the island’s scenic highlights as we passed them, pausing only occasionally to reassure Don that the highway was navigable despite increasing evidence to the contrary, punctuating my confidence with, “And just wait until you see the scene at the end of this ‘secret’ road I discovered.”
Closely monitoring my GPS, at the prescribed location and without hesitation (for dramatic effect) I veered left into a barely distinguishable gap in the trees almost as if I had a brain. The narrow track unfolded between rapidly oscillating wipers, immediately plummeting the steep hill and twisting right. Dense foliage brushed both sides of the car, which by now was clearly losing purchase in the mud. Don hadn’t quite finished a sentence that started, “Are you sure…,” when it began to dawn on me that I’d never intended to actually drive this road, that my plan when I marked it six months earlier was to park at the top and walk down. Oops.
Propelled by momentum and without the benefit of traction put us completely at gravity’s mercy, careening downward (picture the jungle mudslide scene from “Romancing the Stone”). Steering seemed to have more influence on the direction the car faced than it did on its direction of travel and I quickly gave that up. Were it not for the deep ruts that occasionally nudged us back on course, I’m sure we’d have bounced into the jungle. I held my breath as we approached a boulder jutting from the roadbed and exhaled when the undercarriage passed above unscathed. Shortly thereafter the slope moderated somewhat and we slid to a stop, miraculously still on the “road” (more or less).
After a few seconds of cathartic expletives, I scanned our surroundings. Backing up the slippery road was out of the question, but a little farther down the slope we spotted a flat, clear space with a small Y-spur that might enable us to at least turn around. I scrutinized the dash for the switch that would engage the 4-wheel drive (I swear) the guy at rental agency promised my SUV had. When we didn’t find it Don dug the manual from the glovebox—apparently 4WD is an option the powers-that-be at Alamo deem unnecessary on Maui. Uh-oh.
With crossed fingers I gave the car some gas and felt the wheels spin with no effect. More expletives. Don and I exited into the rain to survey our predicament: the road was fast graduating to creek status, and where rubber tires were supposed to be, instead were four mud disks. Scraping the tires clean had little value because the next revolution simply reapplied a fresh layer.
Back in the car I found that cranking the steering wheel hard in both directions gained just enough traction to un-mire the tires and I gingerly rolled the car downhill, away from safety, but at least into a relatively flat, open space. Yay! Once on level ground, and with only a little bit of slip/slide drama, I gingerly pivoted the car into the adjacent spur and nudged back around to face the direction we’d just come. Progress!
Now for the hard part. Looking for the first time toward freedom, we came to grips with the chute that had deposited us: Not only was it steep, at the steepest (and muddiest) point it curved hard-left, but banked hard-right—not exactly an arrangement that would be embraced at Daytona.
I inhaled and goosed the gas and we shot upward, fishtailing like a hooked marlin before losing momentum before coming to a stop a mere fifty feet closer to freedom. This maneuver had also managed to skew the car at a 45-degree angle to the road, its left-front fender in the jungle on one side, its right-rear fender in the jungle on the other. When I gave the car gas the tires spun hopelessly.
Facing defeat we started strategizing Plan B: With an hour of daylight remaining and no cell service, we’d need to walk up to the highway and hope to flag down, in the rain, a good samaritan willing to drive two disheveled, mud-caked strangers back to civilization (about 45 minutes away), then hope to summon a tow truck that would extricate us.
While Don trudged through the rain up to the main road to get help, I stayed with the car, licking my wounds and feeling pretty foolish. It occurred to me that since the road was too narrow for a tow truck, and the distance and tight curve would make winching difficult, even a tow truck wouldn’t guarantee freedom.
Watching Don head back up the hill to seek help, I decided to give extraction one more shot. I shifted the car into reverse, gave it some gas, and cranked the steering wheel back and forth violently until the tires broke free and the car rolled out of the jungle and back onto the muddy trail and back down to the clearing below. So far so good. Once there, I gave the pedal a gentle nudge and reversed slowly all the way to the clearing’s back side (another 20 feet), where I hoped there might be a little more gravel and less mud—and most importantly, a little more room to gather momentum.
With a small prayer I slipped the transmission into in first and floored the accelerator, rocketing ahead with enough forward speed to avoid much of the fishtailing I’d experienced earlier. Peering through flailing wipers I aimed for the small opening that had deposited us, shooting past crumpled shrubs and protruding rocks until the road steepened. With the steepened incline the energy of my forward momentum was replaced by spinning wheels that spewed mud like a dirty firehose, but I just kept my foot to the floor.
Approaching the curve I felt the car start to tilt right and slow almost to 0, but somehow the tires maintained just enough grip to avoid a complete stop. The fishtailing had returned, now exceeded the forward motion but I didn’t care as long as I still had forward motion. I rounded the curve and surprised Don, who dove into the jungle just up the road and turned to cheer me forward. Just as my forward motion was about to to hopelessly be completely transformed into spinning wheels the road leveled, my rear tires grabbed something solid, and I shot forward. Not wanting to slow until the tires kissed pavement I lowered my window and high-fived Don as I flew past and onto the highway. At the top we just couldn’t stop laughing, both at the foolish predicament I’d created, and our utter disbelief that we’d made it out.
March 2018
This year’s visit was far less eventful. We parked at the top and entire group made it down to the water on foot, without incident. After receiving a brief summary of the scene and a return time, the group quickly scattered in search of one of the seemingly infinite number of great photos here. I kept my camera in the bag as I moved around to work with everyone, eventually finding myself atop a jagged rock ridge about 20 feet above pounding surf.
When I saw the sunset color reflecting in the water, I pulled out my Sony a7RIII and added my Breakthrough 6-stop neutral density filter to my Sony 16-35 f/2.8 GM lens. Carefully monitoring my histogram, I dialed in a long exposure that smoothed the surf and blurred the streaking clouds. In my Canon days I’d have needed a graduated neutral density filter (or multiple images) to capture the entire dynamic range in this scene, but the a7RIII has about 3-stops more dynamic range (an entire GND worth!) than my Canon DSLRs did, enabling me to capture this scene’s entire range of light with one click.
A Hawaii Gallery
Click an image for a closer look and slide show. Refresh the window to reorder the display.


New Zealand Night
Posted on September 9, 2018

Mars Rising, Milky Way and Lake Hawea, New Zealand
Sony a7S II
Sony 16-35 f/2.8 GM
15 seconds
F/2.8
ISO 12800
One of the questions I get the most about the New Zealand workshop Don Smith and I do is, “Why winter?” The simple answer is that it’s the best time to photograph there. This answer is usually followed with, “But isn’t it cold?” Not really—it’s more like a Northern California or Oregon winter, with highs in the 40s and 50s, and lows in the 20s and 30s. Also like Northern California and Oregon, New Zealand’s South Island gets some rain and fog in the lowlands, and snow in the mountains—so much better for photography than the persistent blue skies of the California summer I left behind.
While the conditions are certainly tolerable, and winter storms whiten the many peaks and fill the skies with interesting clouds, when pressed for more specifics on my preference for a New Zealand winter, it’s usually not long before I get to the night sky. With clean air and minimal light pollution, New Zealand is an astrophotographer’s paradise any season. But winter is when the Milky Way’s brilliant center shines prominently all night, rising much higher above the horizon than my Northern Hemisphere eyes are accustomed to.
One night in Wanaka Don and I took the group for short drive out to a vista overlooking Lake Hawea, one of many large glacial lakes decorating the South Island. I knew we’d get the Milky Way, but had forgotten about Mars, near opposition and shining brighter than it has in 15 years. We found it rising across the lake, so bright that it cast a sparkling reflection on the water. I started with vertical compositions, but soon switched to horizontal to include both Mars and the snow-capped peaks rising above the north shore.
Here are a couple of links to help with your night photography:
A New Zealand Winter Gallery
Click an image for a closer look and slide show. Refresh the window to reorder the display.


