Eloquent Images by Gary Hart
Insight, information, and inspiration for the inquisitive nature photographer
Spring has sprung
Posted on May 15, 2017

Dogwood and Redbud, Merced River, Yosemite
Sony a7R II
Sony 70-200 f/4
1/40 second
F/4
ISO 200
I spent most of the last week in Yosemite and can confirm that spring has definitely sprung there. The Merced River, swollen by snowmelt, is overspilling its banks, flooding meadows and submerging riverside trails. Reflections are everywhere, and viewing the waterfalls without getting wet? Forget about it.
Another spring highlight is the moonbow that colors the mist beneath Yosemite Falls. A fortunate convergence of Yosemite Falls’ southeast exposure and the angle of the rising full moon when the snowmelt is at its peak make Yosemite one of the best locations in the world to witness a lunar rainbow. I was able to photograph it three times last week, twice with my workshop group and once with a private tour customer. Easily visible to the naked eye as a silvery arc in the billowing mist, a long exposure reveals the moonbow’s true colors.
But of all the spring treats Yosemite offers, for creative photography I think the dogwood might be my favorite. For just a few short weeks in April and May, these graceful blooms shower Yosemite Valley with splashes of white that remind me of the Fourth of July sparklers of my childhood. But unlike the ephemeral sparks of a sparkler, the dogwood progress in slow motion so I can appreciate them at a much more relaxing pace.
I found this branch at the Bridalveil Fall vista on Northside Drive, about a mile east of Valley View. The river was gold with late light, and the air was still as I went to work on the scene. Careful positioning allowed me to juxtapose three layers in my frame: in the foreground is the dogwood branch with varying degrees of detail; the middle-ground is a blend of heavily blurred redbud and more dogwood; all this spring beauty stands out against a backdrop of the sunlit Merced River. I experimented with different depths of field by varying my f-stop, focal length, and focus distance until I was satisfied.
Yosemite Spring
Click an image for a closer look and slide show. Refresh the window to reorder the display.


Dogwood days
Posted on April 21, 2017

Forest Dogwood, Yosemite Valley
Canon EOS 5D Mark III
1/80 second
159 mm
ISO 800
F4
People ask all the time for my favorite season in Yosemite, and I really can’t give them an answer that doesn’t sound like a press conference by a waffling politician—there are things I love about each season in Yosemite, so asking me to choose is like asking me to pick a favorite child. But I can tell you what I like about each season, and I’ve always felt that spring in Yosemite is the most consistently photographable—it doesn’t really matter what the conditions are, I can always find something to photograph.
Spring is when Yosemite’s waterfalls peak, and Yosemite Valley starts to green up. Many of the meadows are home to ephemeral pools that reflect Yosemite’s iconic monoliths, soaring cliffs, and plunging waterfalls. And with all the water in the falls, spring sunshine means rainbow opportunities from many spots if you know when to be there.
Maybe my favorite Yosemite spring treat is dogwood, which usually peaks around May 1, give or take a week or two. I enjoy photographing dogwood in any kind of light, from sunshine, to overcast, to full shade. In sunshine, I put backlit blooms against a dark background, expose for the flower, and go to town. The translucence of these backlit flowers gives them a luminosity that appears to originate from within. In overcast and shade, I opt for soft focus that emphasizes my primary subject and reduces the background to colors, lines, and shapes.
Regardless of the light, I start with a bloom, group of blooms, or entire branch, that I can isolate from surrounding distractions. Once I identify a likely candidate, I maneuver myself until I can get the subject against a complementary background, such as shade, shape, and color.
I worked this scene for about a half hour before I was satisfied. I started with the flower-laden branch and moved around a bit until the background was right. Then I tried a variety of focal lengths to simplify, balance, and soften the composition. Once I was satisfied with my composition, I used live-view to focus toward the front of the center cluster. Finally, I ran the entire range of f-stops from f4 to f16, in one-stop increments, to ensure a variety of bokeh effects to choose from.
A Dogwood Gallery


A few of my favorite things
Posted on March 30, 2017
Yosemite Falls Reflection, Swinging Bridge, Yosemite
Sony a7R II
Sony/Zeiss 16-35 f/4
1/20 seconds
F/9
ISO 100
I love being a photographer, but it’s an unfortunate reality that turning your passion into your profession risks sapping the pleasure when earning money takes priority over taking pictures. When I decided to make photography my livelihood, it was only after observing other very good amateur photographers who, lulled by the ease of digital photography, failed to anticipate that running a photography business requires far more than taking good pictures. Rather than an opportunity for further immersion in their passion, their new profession forced them to photograph not for love, but to put food on the table. And with the constant need for marketing, networking, bookkeeping, collections, taxes, and just plain keeping customers happy, these newly minted photographers soon found that little time remained for the very thing that led them to become photographers in the first place.
I changed from photographer to Photographer about twelve years ago. After seeing what the change had done to others, my transition started with a vow to photograph only what I want to photograph, and to never photograph something simply because I thought I could sell it. In my case that meant sticking with landscapes: no people or wildlife (in other words, pretty much nothing that moves).
But how to make money? For that answer I had to look no farther than my career in technical communications: For five years I’d been a technical writer for a (very) large high tech company; before that I’d spent fifteen years tech training, supporting, documenting, and testing a programming language for a small software company. This experience, combined with a lifetime of camping, hiking, backpacking, and (of course) photographing throughout the western US, made photo workshops a logical choice. Today my workshops, supplemented by writing and print sales, allow me to pay the bills, visit favorite destinations, and explore new locations.
And most importantly, my new life has allowed me to concentrate on photographing the subjects and locations I love most. In no particular order (and far from all-inclusive), my favorite subjects include: poppies, the Milky Way, the moon (both crescent and full), rainbows, moonlight, fresh snow, dogwood, bristlecone pines, lightning, fall color, reflections. Among my favorite locations are Yosemite Valley, Grand Canyon’s North Rim, the Colorado River through the Grand Canyon, California’s foothills, Maui’s bamboo forest, and Kilauea Caldera.
Of course nothing beats photographing a favorite subject at a favorite location. To maximize my opportunity to combine favorite subjects and locations, I monitor weather forecasts, check local condition reports (to learn where the trees have turned or the wildflowers are blooming), study natural phenomena to learn how to anticipate an event (such as rainbows and lightning), and plot celestial alignments and add them to my calendar.
Despite (and more likely because of) a lifetime of visits, Yosemite Valley remains at the top of my favorite locations. I can’t give you a favorite season, but I can tell you that my favorite time to be in Yosemite is just after a snowstorm, when every exposed surface is glazed white and overhead swirls an ever-changing mix of clouds and blue sky.
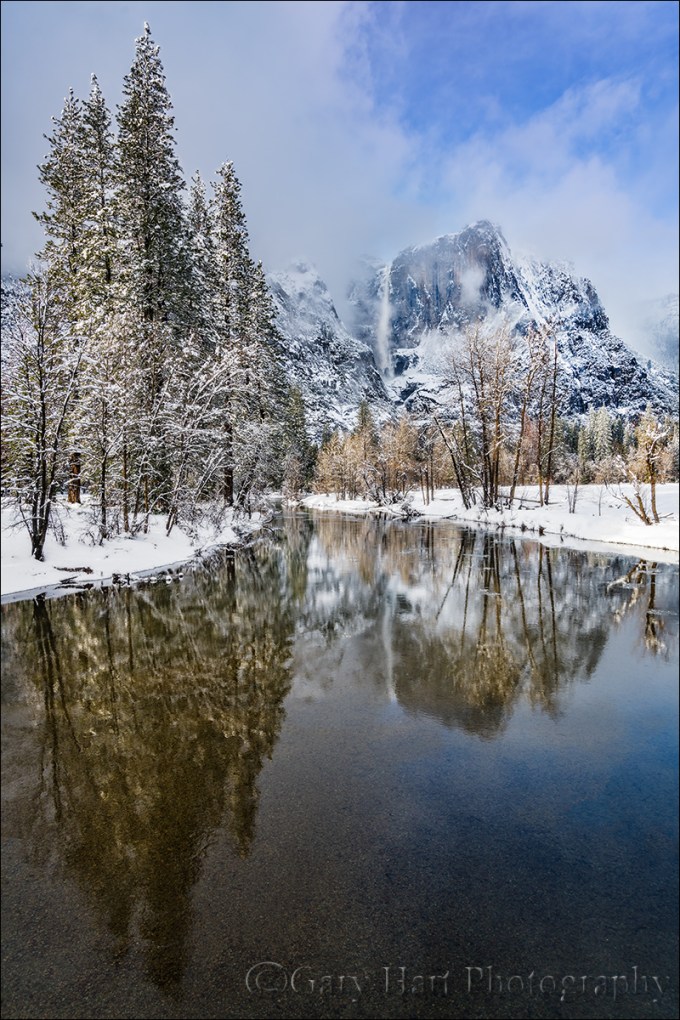
Today’s image of snowy Yosemite with Upper Yosemite Fall reflected in the Merced River is the product of a week’s worth of monitoring weather reports and schedule shifting. That day started with a lock-down blizzard that obscured all views beyond 100 yards, but by late morning the clouds started to lighten and lift and soon the clearing was underway in earnest. Sometimes when a storm clears in Yosemite I’ll pick a spot and work it through the entire clearing process; on this day I took the other approach, moving around capture the clearing in a variety of locations.
I ended up at Swinging Bridge in mid-afternoon. The Merced River widens and slows here, making reflections possible even in high water months. Though Swinging Bridge no longer swings (but I remember when it did), it does bounce enough to jiggle a tripod at the slightest step. To minimize the vibration, I try to set up my tripod atop one of the bridge’s support pillars, but that didn’t give me the exact angle I wanted on this afternoon so I just needed to take extra care to stay still and time my clicks when the bridge was empty.
In the fifteen or so minutes I photographed here that afternoon I tried a variety of compositions, horizontal and vertical. I also played with my polarizer, sometimes maximizing the reflection, other times dialing it down to reveal the rocky riverbed below. Most of my compositions were a little tighter than this, but here I went with a vertical orientation wide enough to include lots of blue sky, and the trees and their reflection from top to bottom. My polarizer was turned to the partial range, enough to capture Upper Yosemite Fall’s reflection, while still revealing some of the submerged smooth stones nearer the bridge. The trees were partially lit by cloud-filtered sunlight just starting to break through.
A Gallery of my Favorite Things
Click an image for a closer look and slide show. Refresh the window to reorder the display.


Silent Night
Posted on March 21, 2017

Silent Night, Yosemite Valley from Tunnel View
Sony a7R II
Sony/Zeiss 16-35 f/4
20 seconds
F/5.6
ISO 1250
One perk of being a photographer is the opportunity to experience normally crowded locations in relative peace. That’s because the best nature photography usually happens at most people’s least favorite time to be outside: crazy weather and after dark. A couple of weeks ago in Yosemite I got the opportunity to enjoy both.
After spending a snowy Sunday guiding a couple around Yosemite Valley in a snowstorm, I dropped them back at (the hotel formerly known as) The Ahwahnee with nothing but the drive home on my mind. But winding through the valley in the fading twilight I saw signs of clearing skies and made a snap decision to check out the scene at Tunnel View.
I found the vista at Tunnel View gloriously empty. By the time I’d set up my camera and tripod the darkness was nearly complete, but as my eyes adjusted I could make out large, black holes in the once solid clouds overhead. Soon stars dotted the blackness above El Capitan and the white stripe of Bridalveil Fall. Each time light from the waxing gibbous moon slipped through the shifting clouds, the entire landscape lit up as if someone had flipped a switch.
Because the best parts of the view were in a narrow strip starting with the snow-glazed trees beneath me and continuing through the scene and up into the star-studded sky, I opted for a vertical composition. To include as much foreground and sky as possible, I went nearly as wide as my 16-35 lens would allow, more or less centering El Capitan and Bridalveil Fall to give the snow and stars equal billing.
Being completely comfortable with my a7RII’s high ISO performance, I didn’t stress the 1250 ISO that allowed me to stop down to a slightly sharper f/5.6 (virtually every lens is a little sharper stopped down from its largest aperture). Night focus with the Sony a7RII is extremely easy, easier than any camera I’ve ever used that isn’t an a7S/a7SII. Often I manually focus on the stars and use focus peaking* to tell me I’m sharp; in this case I back-button auto-focused on the contrast between the moonlit snow and dark granite near Bridalveil Fall. I chose a long enough shutter speed to capture motion blur in the rapidly moving clouds, knowing the potential for visible star streaking was minimized by my extremely wide focal length.
My favorite thing about that evening? The 20 seconds my shutter was open, when I didn’t have anything to do but stand there and enjoy the view in glorious silence.
* Focus peaking is a mirrorless feature that highlights in the viewfinder the in-focus areas of your scene.
Workshop Schedule || Purchase Prints
Yosemite After Dark
Click an image for a closer look and slide show.


Variations on a scene
Posted on March 14, 2017
Snowfall, Tunnel View, Yosemite
Sony a7R II
Sony/Zeiss 16-35 f/4
1/250 second
F/9
ISO 100
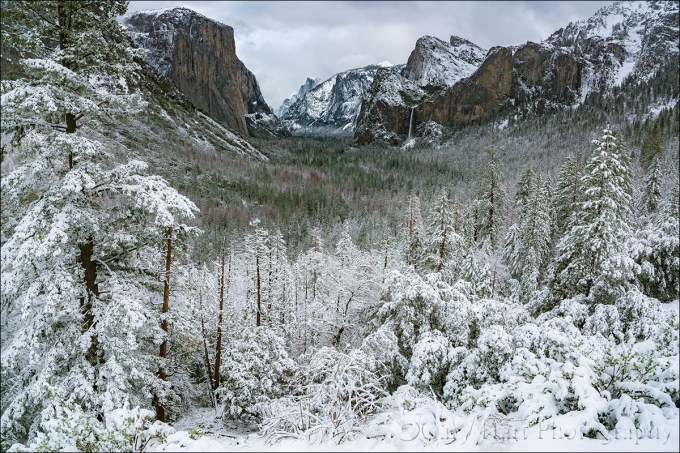
A week or so ago I had the good fortune to be in Yosemite for the most recent snowfall there. All week the National Weather Service had been waffling a bit on the snow—based on the forecast, I probably wouldn’t have made the trip. But I was there anyway, guiding a fun couple from England for the weekend. Following a nice but unspectacular Saturday, we woke Sunday morning to find the world dipped in white.
The snow fell all day, at times so hard that that it was difficult to see more than a couple hundred yards, other times dwindling to a few flakes per minute. During one of the lulls we made our way to Tunnel View for the obligatory shot there. Despite hundreds (thousands?) of pictures of this view, after surveying the scene for a few minutes I couldn’t resist pulling out my camera and tripod.
My general feeling is that people tend to go too wide with their Tunnel View images, shrinking the main features (El Capitan, Half Dome, Bridalveil Fall) to include less exciting granite left of El Capitan and right right of Cathedral Rocks/Bridalveil Fall. That’s why I opt to tighten my horizontal Tunnel View compositions on the left and right, or isolate one or two of the three primary subjects with a telephoto. And when something exciting is happening in the sky (moon, clouds, or color) or foreground (fog, snow, rainbow), I’ll often compose vertically and bias my composition to favor the most compelling part of the scene.
With so many Tunnel View images in my portfolio, that afternoon I consciously set aside my long-held composition biases in favor of something I don’t already have. Of course the feature that most set the scene apart was the snow, so I set out to find the best way to emphasize it. Because the snow level that day was right around 4000 feet, also the elevation of Yosemite Valley, even the three hundred or so feet of elevation gain at Tunnel View resulted in much more snow virtually at my feet than on the distant valley floor. My Sony/Zeiss 16-35 f/4 lens, a great lens that I usually find too wide for Tunnel View, was perfect for highlighting the foreground snow.
Dialing my focal length to about 20mm allowed me to maximize the foreground snow while including minimal less-than-interesting gray sky. Of course going this wide meant shrinking the scene’s “big three” and adding lots of extraneous middle-ground on the left and right. To mitigate that problem I used the snowy pine on the left, often an obtrusive distraction to be dealt with, as a frame for that side of the scene. Not only did the tree block less interesting features, it actually enhanced the snowy effect I sought. On the right the diagonal ridge added a touch of visual motion (diagonal lines are so much stronger visually than horizontal and vertical lines), and it didn’t hurt that much of the bland granite there was covered with snow.
Workshop Schedule || Purchase Prints
A Tunnel View Gallery
Click an image for a closer look and slide show. Refresh the window to reorder the display.


Up a creek
Posted on February 12, 2017
Wonderland, Bridalveil Creek, Yosemite
Sony a7R II
Sony/Zeiss 16-35 f/4
1/4 second
F/10
ISO 100
Many photographers vary their portfolios by visiting as many locations as possible. While I love visiting new locations, I’ve always preferred the kind of intimate familiarity that’s only possible with frequent, quality visits. And as enjoyable as it is photograph the icons, for my personal pleasure I’m most drawn to quiet pastorals and intimate portraits of nature that could be anywhere—wildflowers, fall color, solitary oaks, sparkling reflections, and tumbling creeks can keep me happy for hours.
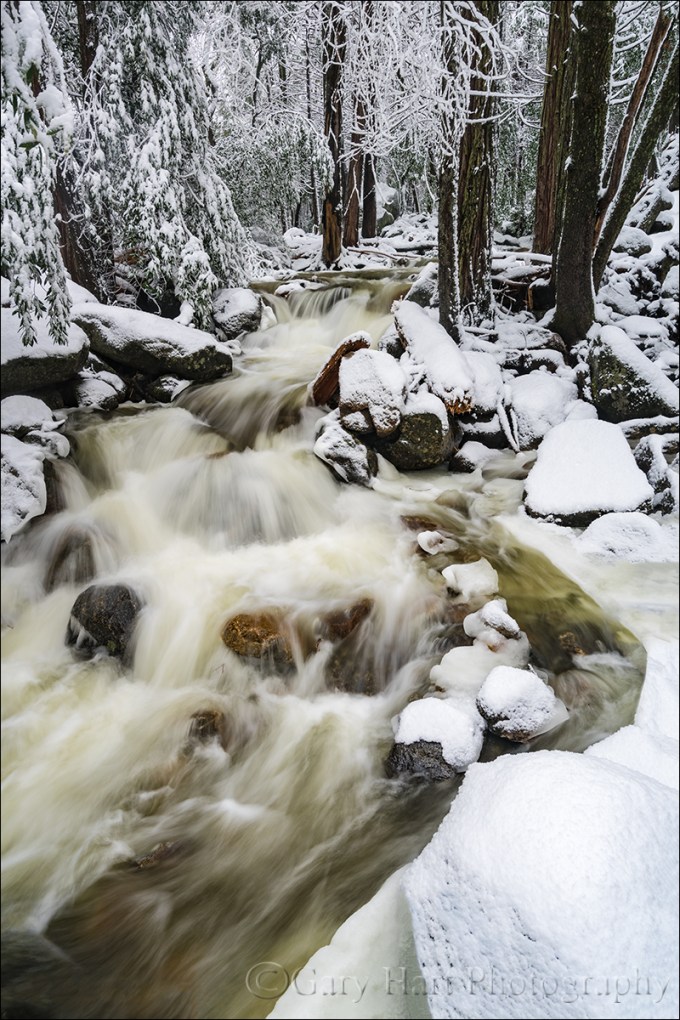
One of my favorite intimate settings is Bridalveil Creek beneath Bridalveil Fall in Yosemite. Not only is there lots to photograph here, it’s different every time I visit. In spring the water in all three of the creek’s branches roars down the slope beneath Bridalveil Fall like it can’t get to the Merced River soon enough. And I’m especially fond of Bridalveil Creek in autumn, when the flow is often down to a single leisurely trickle, its whispering cascades and spinning pools adorned with vivid yellow leaves. Winter can find Bridalveil Creek in a variety of states that range from a gentle rivulet to a raging torrent. During one particularly cold winter the creek was solid ice, as if some frostbitten wizard had waved his wand and frozen the flowing water in place.
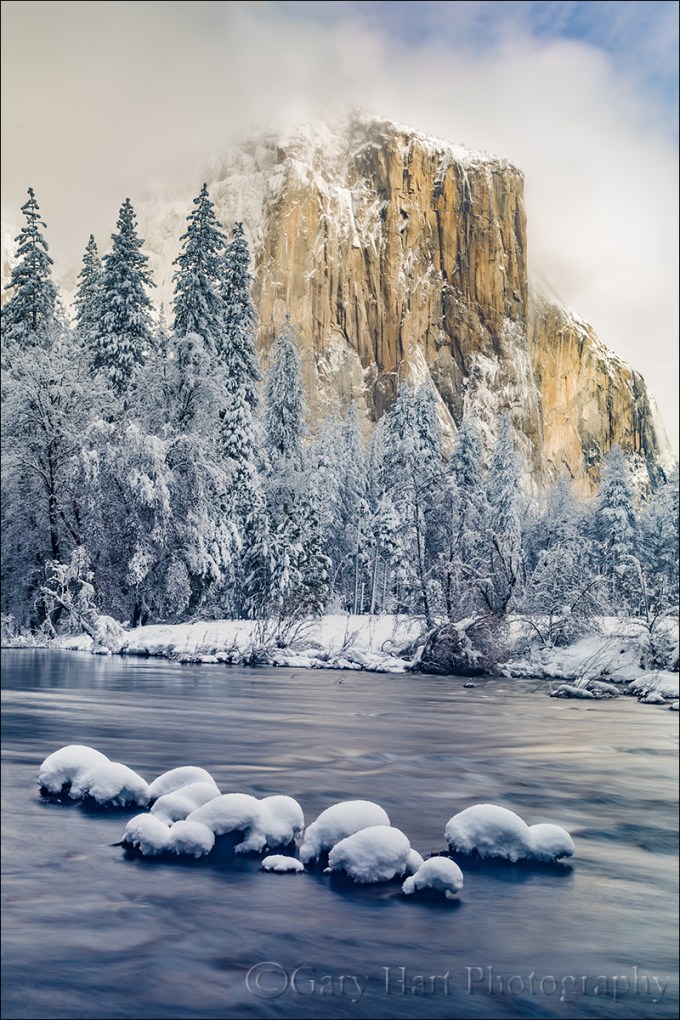
For some reason I haven’t had as much success here in winter as autumn or spring, so this winter I redoubled my efforts. On last month’s snow trip, while waiting for Yosemite’s monoliths to emerge from the clouds, I headed to Bridalveil Creek and found every square inch covered with snow—not a fine etching, but a dense glazing that covered virtually every exposed surface with several inches of white powder.
I hadn’t even crossed the first bridge when I was stopped by the scene here. I extended my tripod and evaluated the possibilities, starting on the bridge before moving down to a rock right on the creek. My first compositions were horizontal, but I eventually adjusted to vertical to emphasize the creek. Following my standard click, review, refine, click process, I finally landed on this composition—just wide enough to include both sides of the creek, and tall enough to include the parallel tree trunks and the creek’s exit from the bottom of the frame. I had to drop down quite low to get beneath an overhanging branch and keep it from occluding part of the creek.
The non-compositional variables I had to consider were motion and depth of field—there was no wind to sway the branches, but I knew the water’s blur would vary greatly with my shutter speed choice. And because I wanted everything in my frame sharp, I needed to be careful with my f-stop choice. The closest point of interest, the snowy foreground rock, was about five feet away. My hyperfocal app told me that at my 22mm focal length and f/8, my hyperfocal distance was about six feet (sharp from three feet to infinity). Because hyperfocal data draws the acceptable sharpness line a little less critically than I do, I stopped down to f/10 and focused on a small rock about eight feet away. Playing with a few ISOs to vary my shutter speed for different water motion effects, I decided I liked 1/4 second because it blurred the creek enough to clearly convey the water’s speed, but not so much that it lost its definition.
Intimate and Anonymous
Click an image for a closer look and slide show. Refresh the window to reorder the display.


The illusion of depth
Posted on February 4, 2017
Frozen Reflection, Half Dome, Yosemite
Sony a7R II
Sony/Zeiss 24-70 f4
1/40 second
F/9
ISO 100
It seems too obvious to mention, but I’ll say it anyway: Photography is a futile attempt to render a three-dimensional world in a two-dimensional medium. Unfortunately, that reality doesn’t seem to keep people from putting their eye to their viewfinder and clicking without regard for their camera’s unique view of the world. But here’s a secret: Anyone with a camera can manage the lateral (left-to-right) aspect of a scene, but the photographers who distinguish themselves are those able to convey the illusion of depth by translating a scene’s actual depth to their camera’s virtual depth.
Creating the illusion of depth isn’t rocket science. It starts with seeking a foreground for your beautiful background, or a background for your beautiful foreground. Once you’ve figured out your foreground or background, do your best to ensure that the elements at varying depths don’t merge with each other—the more elements in your frame stand alone, the more you invite your viewers to move incrementally through the frame, hopping (subconsciously), front to back, from one visual point to the next. Getting elements to stand apart often requires some physical effort on your part (sorry): Moving left/right, up/down, foreword/backward changes the relationship between objects at varying depths, sometimes quite significantly.
With your foreground and background identified, decide whether you want the entire image in focus, or selective focus that guides your viewer to a particular point in the frame. With all your pieces in place, you’re ready to choose your f-stop and focus point. (Here’s some extra credit reading: hyperfocal focusing techniques.)
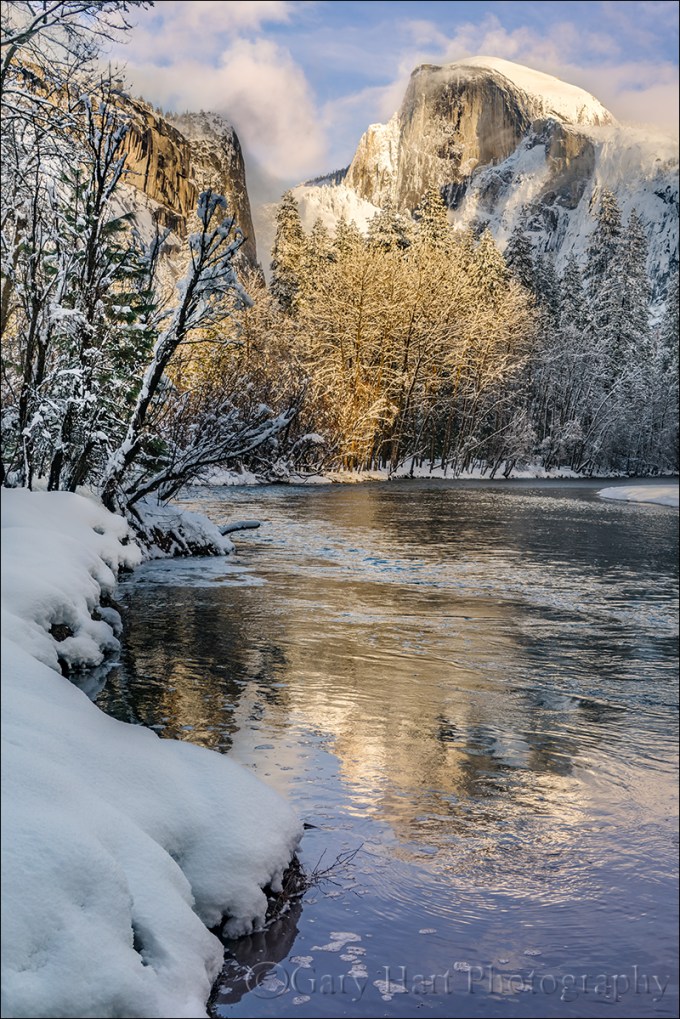
About this image
The primary subject here is Half Dome, but I had to work incorporate all the other wonderful things going on this afternoon: fresh snow, beautiful clouds, warm sunlight, and an abstract reflection.
With Half Dome as my centerpiece, my biggest concern was organizing the other visual elements into a coherent image. I started with the decision that a vertical orientation would make the most efficient use of the scene, allowing me to include the river at the bottom of my frame and Half Dome at the top without shrinking the scene and introducing less interesting elements on the left and right. I didn’t want too much sky, but I found a break in the clouds for the top of my frame.
I could have moved a little to the right and made the reflection my entire foreground, but I decided to use the snowy riverbank to convey an illusion of depth. Because there wasn’t too much visual interest in the snow, I included just enough snow to frame the left side of my scene. A focus point about 20 feet away gave me sharpness throughout my frame. Click.
Focus and depth of field simplified
Workshop Schedule || Purchase Prints
A Gallery of Depth
Click an image for a closer look and slide show. Refresh the window to reorder the display.


Managing light, depth, and motion in nature
Posted on January 29, 2017
Snowcap, El Capitan, Yosemite
Sony a7R II
Sony/Zeiss 24-70 f4
3.2 seconds
F/10
ISO 50
Independent of composition, photographers have three scene variables to play with when setting up a shot: light, depth, and motion. And not so coincidentally, we have three exposure parameters with which to manage those variables: shutter speed, f-stop, and ISO. The exposure parameters have a reciprocal relationship—an increase/decrease in one can be compensated by a corresponding decrease/increase in another—but merely getting the “correct” exposure with a random combination of exposure values can yield wildly different results. This is why I never want my camera making decisions for me, and always photograph in manual mode. It’s also why I tell my workshop students that they should be able to defend (explain their reason for) every exposure value.
My approach to metering
As a landscape photographer who is always on a tripod, I’ve removed camera shake from the exposure equation, so the only motion that concerns me is motion in the scene. Unless I’m trying for a motion effect (for example, blurring moving water or freezing wind-blown leaves) I use the f-stop and ISO that yields the absolute sharpest, cleanest image—no quality compromise (such as a large f-stop or high ISO) to subdue camera shake. This allows me to approach every scene at ISO 100 (most camera’s best ISO) and f/8 – f/11 (the maximum depth of field possible with minimal diffraction, and also the range where most lenses tend to be sharpest), and only deviate when my scene variables dictate.
Once I determine my composition, I refine the f-stop to ensure to depth of field that achieves my desired effect, then dial my shutter speed to whatever value delivers the proper exposure. My ISO only moves from 100 when motion in the scene requires it. For example, photographing at night requires a shutter speed fast enough to minimize star motion and I’m force to increase my ISO to 800, 1600, or higher, depending on the amount of light and the focal length at which I’m shooting.
About this image
In this image from last Monday’s snow day in Yosemite, I wanted to smooth the rapidly flowing Merced River to smooth chop that I thought might distract from rest of this spectacular scene, but first I had to get everything else in place. I on a fairly tight vertical composition that eliminated everything on the left and right of El Capitan. I used the snow-capped boulders in the foreground to create a little depth, and included just a little sky for some extra color (if the clouds swirling about El Capitan had been more interesting, I might not have done this).
Aligning the foreground boulders was both tricky and awkward. First, I had to wade through a couple of shallow pools to reach a one-rock island (not much bigger than a basketball), then thrust my tripod into the water as far to the left as I could and still operate my camera. A focal length too narrow would have cut off important elements, and too would have introduced distractions just outside this frame. Where the camera was positioned, I couldn’t get my eye to the viewfinder without going for a swim, and there was too much light to see my LCD clearly. So I pulled my camera from the tripod and framed the composition to get the right focal length. With my composition established, I decided f/10 was the largest aperture that would ensure front-to-back sharpness, and focused on a ripple a little behind the boulders.
Finally ready to shoot, I returned the camera to the tripod and used what I could see of the LCD to guess the final composition. After each click I removed the camera and reviewed the image in my electronic viewfinder (another reason I love the EVF), adjusting two or three times until the composition was right.
With my composition framed exactly as I wanted, my exposure dialed in, and my focus point set, I was ready to play with the motion. I started by dropping my ISO to 50 (almost as good as ISO 100, but with slightly less dynamic range), but still couldn’t get the shutter speed long enough without shrinking my f-stop to a less than ideal, diffraction inducing number.
The solution was my Singh-Ray Vari-ND filter. Because my Vari-ND is 77mm, I had to stretch to hold it in front of my 67mm Sony/Zeiss 24-70 f4. Dialing the filter ever so slightly darker between exposures and adjusting my shutter speed to maintain the correct exposure, I ended up with a variety of motion effects. I found that this one, at around 3 seconds, smoothed the water enough while retaining just enough texture for visual interest without being distracting.
Yosemite Winter Photo Workshop
Workshop Schedule || Purchase Prints
A Gallery of Motion
Click an image for a closer look and slide show. Refresh the window to reorder the display.


It ain’t over till it’s over
Posted on January 26, 2017

After Twilight, Valley View, Yosemite
Sony a7R II
Sony/Zeiss 24-70 f4
30 seconds
F/8
ISO 800
(How many photography blogs out there quote Yogi Berra? Just sayin’….) During the 1973 baseball season, Yogi Berra was asked about his last place Mets’ chances in the pennant race. His reply, “It ain’t over till it’s over,” was greeted with chuckles, but Yogi got the last laugh when the Mets rallied to make it all the way to the World Series. I couldn’t help thinking of Yogi’s quote on my drive home Monday night with this image, my final click of the day, still fresh in my mind.
When the weatherman promised snow down to 2500 feet on Monday, I drove to Yosemite late Sunday night so I could beat sunrise and have an entire day to play. And snow I found, lots and lots of it, and still falling. The snowfall continued throughout morning, so heavy that my first few hours were limited to photographing close scenes, interspersed with lots of waiting for conditions to improve. But a little before noon the clouds started to thin and the snow became more showery and I was in business.
When the clearing started in earnest I was at Valley View (but it didn’t look anything like this). The rest of the day I spent dashing around Yosemite Valley, chasing the clouds’ parting and the light that came with it. It’s so much fun watching a storm clear in Yosemite, poised beneath Yosemite Falls or Half Dome or El Capitan, and wait for the big reveal when the clouds to pull back.
For sunset I ended up trudging through about 18 inches of virgin snow to a favorite Half Dome reflection spot by the Merced River, recently rendered much less accessible by major roadwork underway in the valley. Throughout the day I’d crossed paths several times with good friend Don Smith who had driven up for the day with our mutual friends Scott and Mike, and they eventually joined me at sunset. As we shot we shared stories of the day—for example, how they had just missed getting crushed by a falling tree (true story). After a half hour of really nice photography, a large cloud set up shop atop Half Dome right around sunset, completely obscuring the scene’s main attraction. Satisfied with a tremendous day of photography, we declared the day, “Over.”
It wasn’t until I was back at my car that fully appreciated how wet everything was—my gear, my car, and even me (a day of plunging through snowdrifts had been enough for the snow to find its way over the top my waterproof boots and underneath my waterproof outer pants). I decided I’d swing into Valley View on my way out of the valley to use the bathroom and change into drier clothes. In the back of my mind was possibility of a parting shot of El Capitan in the late, blue twilight.
The west end of Yosemite Valley gets much less winter sunlight, so while trees had already started shedding the snow on the east side (where I’d photographed sunset), I pulled in at Valley View to find virtually every exposed surface still glistening white. Bridalveil Fall and Cathedral Rocks clearly visible in the fading light, but El Capitan was cloud-shrouded from top to bottom. Still quite cold, tired, and more than a little hungry, this would have been a perfect excuse to beeline home. But the scene was so beautiful, and the light so perfect, that after changing my clothes I just sat in my car, peeled an orange, and waited for El Capitan to show itself.
I didn’t have to wait long. At the first sign of clearing I hopped out and was completely set up by the river before El Capitan appeared. Bumping my ISO to 800, I composed the standard horizontal frame with El Capitan on the left, Leaning Tower on the right, and the Merced River in the foreground. Often the most difficult thing about shooting in low light like this is finding focus, but despite the fact that it was more 30 minutes after sunset, my Sony a7RII was able to autofocus on Cathedral Rocks. I spent a several clicks refining that original composition and was about to call the day “Over” one more time when something moved me to shift my view to the right. As soon as the image popped up on my LCD I knew I was onto something. I refined for about a half dozen more frames, culminating with the one you see here, until I was satisfied that a great day truly was over.
The lesson here, one I learned many years ago but I see many photographers struggle to grasp, is that the camera can still do fantastic things long after your eyes tell you the show is over. Another satisfying reminder from this day is that it’s still possible to enjoy Yosemite in glorious peace. As someone who has seen Yosemite at its congested worst, I relish the solitude possible when I choose times that the average person (tourists, fair weather photographers) won’t venture out: miserable weather, late at night, before sunrise. The entire time I was out there at Valley View that evening I was alone, and only two cars drove by. As Yogi would say, “Nobody goes there anymore—it’s too crowded.”
Workshop Schedule || Purchase Prints
A Twilight Gallery
Click an image for a closer look and slide show. Refresh the window to reorder the display.


Seeing double
Posted on January 22, 2017
Autumn Mirror, Half Dome, Yosemite
Sony a7R II
Sony/Zeiss 16-35 f4
30 seconds
F/8
ISO 50
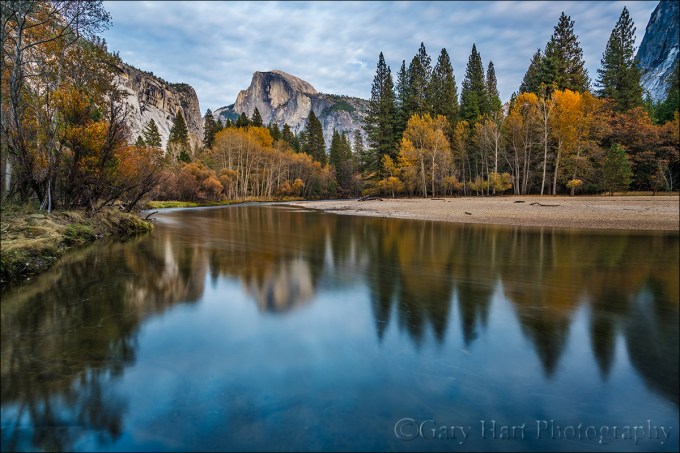
People stay away from Yosemite in autumn because that’s when the waterfalls are at their lowest. But believe it or not, Yosemite isn’t all about waterfalls. El Capitan, Half Dome, Cathedral Rocks, the Three Brothers (I could go on) are great subjects in their own right. Subtract the waterfalls but add the yellows, oranges, and reds of Yosemite Valley’s many deciduous trees and you have what I think is a pretty a fair trade. And when the water is low, the usually turbulent Merced River smooths to a reflecting ribbon of glass; suddenly, pretty much any scene can be doubled at your feet.
These reflections add layers of creative possibilities impossible the rest of the year. I usually try to photograph each reflection scene several ways—splitting it in the middle for a 50/50 mirror effect, isolating the reflection only, emphasizing the reflection with just enough of the primary scene to establish context, and using a partial reflection to accent to the primary scene—then decide later which I like best.

In this image I split the frame 50/50, but dialed down the reflection with my polarizer. Even polarized, the bright sky’s glare washed out much of the river surface, painting the outline of El Capitan like a negative that uses the trees with a jigsaw of submerged river rocks.

This one is all about the reflection, with the snow-covered forest used to frame El Capitan’s image in the Merced River. Here I dialed my polarizer to a mid-point, holding the reflection of El Capitan but dialing down the homogenous gray sky.

Here I used a more conventional composition, emphasizing El Capitan’s bulk against clouds that were spitting small, wet snowflakes.
About this image

I took another favorite approach for the featured image at the top of this post, using a long exposure in low light to smooth moving water and enhance the reflection. My workshop group had already had a nice shoot that evening—it started with warm, late light on Half Dome, some nice color at sunset, and rapping up with textured clouds above Half Dome as darkness fell.
By the time I captured this frame the scene was much darker than what you see here. With the reflection disturbed by slight ripples and floating bubbles, the darkness of post-sunset twilight enabled me to extend my shutter speed to 30 seconds, which smoothed the reflection and turned the bubbles into soft white streaks.
Workshop Schedule || Purchase Prints
A Gallery of Yosemite Reflections
Click an image for a closer look and slide show. Refresh the window to reorder the display.


