Eloquent Images by Gary Hart
Insight, information, and inspiration for the inquisitive nature photographer
Winter is coming
Posted on October 20, 2016

Elm in Blizzard, Cook’s Meadow, Yosemite (2007)
Canon EOS-1Ds Mark II
Canon 70-200 f/4L
1/4 second
F/11.0
ISO 100
Photographing snow-covered Yosemite requires planning and patience: planning to ensure your arrival before the snow stops; patience to wait out the storm when visibility is so poor that you can barely see the nearest tree.
Planning
When the snow stops, Yosemite’s relatively mild temperatures (usually in the 30s when it snows) conspire with sunshine, wind, and gravity to clear the trees in a matter of hours. Meanwhile, park visitors driven inside by the storm, swarm outdoors to gape, quickly adding footprints and spreading mud with their boots, bikes, and cars. In other words, if you delay your departure for Yosemite until you hear that it snowed there, you’re too late. The key is being in the park during the storm.
All winter I monitor the National Weather Service Yosemite forecast and discussion (in-depth forecast analysis) pages for hints of a cold storm. I know there are lots of weather forecast options out there, but most either lack the resources of the NWS, or simply use the NWS data. The NWS may not always nail the forecast, but they’re more consistent and reliable than all the other options.
Sometimes the weather can change at the last minute, but I’m always ready. (It doesn’t hurt that I live less than four hours by car from Yosemite Valley.) In the back of my AWD Subaru Outback all winter are chains (required to be carried in Yosemite in winter, even with AWD/4WD), a portable charger that can recharge a car battery (among other things) in a pinch, and a duffle bag with all my cold weather gear (waterproof pants and upper shell, hat, gloves, umbrella, and ice grips for my shoes).
Patience
Once I decide I’m in, I’m all in. That usually means getting a room in or near Yosemite Valley, driving to the park a day early, and waiting for the snow to start. Once the snow arrives, I don’t hole up in my room, I’m out shooting. Even though Yosemite’s storms often erase all signs of its most recognizable features, stormy weather is a great time to photograph swirling clouds and accumulating snow in glorious (and rare!) solitude.
As much as I love photographing Yosemite in near white-out conditions, I sometimes get too cold, wet, or worn out to continue. But even when I reach that point, I don’t go in. Instead, I park at Tunnel View and wait for the weather to clear. Tunnel View is the perfect place to wait out a Yosemite storm because it’s on the west side of Yosemite Valley (where the clearing usually starts), provides an elevated vantage point with a view all the way down to Half Dome on the valley’s east side, and is spectacular to photograph when the storm clears. It even has decent cell service. And if I’m looking for an excuse to turn on the engine and warm things up, I drive through the tunnel for a view to the west, a preview of coming weather.
My final advice for anyone waiting out a storm at Tunnel View is when the storm clears, don’t spend so much time there that you miss opportunities elsewhere. This is easy to do because the photography will remain spectacular long after you should have moved on to other scenes.
Today’s image
Among my many snowy-Yosemite go-to spots is Cook’s Meadow. On this trip several years ago, until the snow arrived, the meadow was a field of lumpy brown grass, its sentinel elm a bare skeleton in the shadow of Half Dome. But a few inches of overnight snow transformed the bland meadow into an undulating sea of frozen white waves and etched the tree in white.
The snow was still falling when I arrived, wet and fast, slanted by a stiff breeze. Half Dome was gone. I positioned my tripod so the elm stood by itself, balanced in the frame by a stand of evergreens. The falling snow added an interesting dynamic to the otherwise static scene and I chose a 1/4 shutter speed that would blur its motion to streaks of white.
Yosemite Photo Workshops

Snowy Yosemite
Click an image for a closer look and slide show. Refresh the window to reorder the display.


The night sky and me
Posted on August 12, 2016
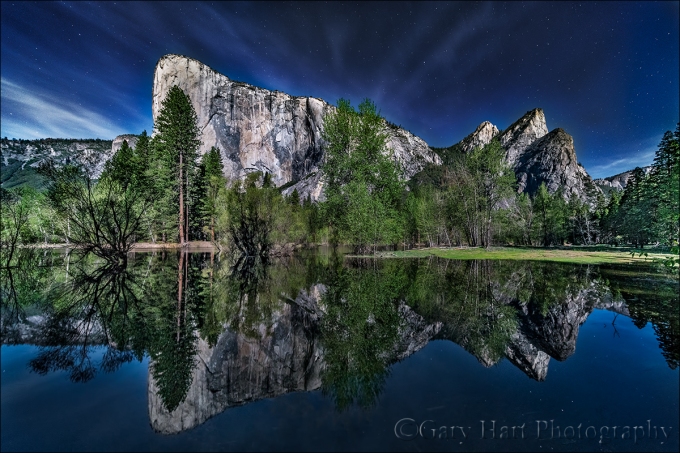
Moonlight Reflection, El Capitan and the Three Brothers, Yosemite
Sony a7R II
Canon 11-24 f/4L with Metabones IV adapter @11mm
20 seconds
F/4
ISO 3200
My relationship with the night sky started when I was ten. Astronauts were my generation’s cowboys, so when I was given a castoff, six-inch reflector telescope by an amateur astronomer friend of my dad, I jumped at the opportunity to explore the celestial frontier on my terms. On clear nights my best friend Rob and I dragged that old black tube onto the front lawn and pointed it, randomly and full of wonder, at the brilliant points of light overhead. With guidance from our dads and the books of Herbert S. Zim, we learned the difference between stars, which despite their great size and temperature, are at such great distance that even the strongest telescope only sees discrete points of light, and planets, nearby worlds reflecting sunlight, which my telescope revealed as glowing disks.
With that telescope Rob and I searched in vain for comets and galaxies, watched Venus and Mercury cycle through phases just like the moon’s, tracked the nightly dance of Jupiter’s Galilean moons, and monitored the changing tilt of Saturn’s rings. Suddenly and hopelessly infected with the astronomy bug, on camping trips I declined the luxury of the family tent in favor of a sleeping bag beneath more stars than I imagined possible. There, nestled to my neck in the bag’s warmth, I’d stretch beneath the boundless ceiling, counting “shooting stars” and scouring the sky for satellites, fighting sleep for as long as my eyelids could hold out. In my later teen years I discovered backpacking and with it skies that inspired ponderings of infinity. My first college major was astronomy, a most impractical aspiration that I managed to correct before quantification of the universe spoiled my appreciation of its elegance.
In my early twenties I discovered photography, but, frustrated by my film camera’s inability to capture the night sky’s beauty, quickly moved on to more terrestrial subjects. Fast forward to the twenty-first century, when the advent of digital photography offered light capturing and processing capabilities impossible with film. My first night subject was the Big Dipper; since then I’ve tried to include some form of night photography in most of my workshops and as many personal shoots as possible, seeking to use my camera’s unique perspective to convey the emotion the night experience brings me, rather than attempt the impossible task of recreating the sky literally.
Among other subjects, I’ve developed a particular fondness for photographing the gold/blue transition-zone separating day and night. Arriving on location well before sunrise gives me a front-row view of the indigo night’s slow retreat in favor of the golden promise of a new day; lingering long after the sun sets, I watch the day’s vestiges linger on the horizon, as if waiting with me for the stars to materialize.
About this image
This year’s Yosemite Moonbow and Wildflowers workshop group had the good fortune to photograph Yosemite brimming with more water than I’ve seen in years. A particular highlight was this location beside the Merced River, one of my favorite early morning spots. The morning we arrived we found my normal vantage points flooded beyond recognition, but rather than let the flooding turn us around, I explored the new shoreline and found view through the trees onto a crystal clear reflection. We stayed and photographed here until bad light and empty stomachs finally drove us to breakfast.
Excited by our good fortune that morning (read The Power of Reflections), I offered to return that night with anyone who wanted to photograph the scene by moonlight. Though I already had a moonbow shoot scheduled for later in the workshop, the moonlight potential here was so great that I wanted to at least give everyone the option of photographing it (on the other hand, with such early mornings, I knew from experience that I needed to give everyone the option to return to the hotel for an early bedtime).
Despite a long drive back from our sunset at Glacier Point, about half the group still joined me for what turned out to be a very memorable moonlight shoot. The already somewhat limited space was made even more difficult by the darkness (we were shaded from the moonlight by trees and the valley wall behind us), but we made it work with great cooperation and no shortage of laughter.
Among other things, this image highlights one of the great joys of photography with today’s advanced technology: the camera’s improving ability to reveal a world previously obscured by night’s dark curtain. (It will only get better.)
Photo Workshop Schedule
A moonlight gallery


Someday My Prints Will Come
Posted on August 1, 2016

First Light, Yosemite Valley
Canon EOS-1Ds Mark III
Canon 24-105L
1/3 second
F/16
ISO 100
Someday is now…
The dilemma
I’ve been selling prints of my images for about fifteen years. I started at weekend art shows and in art galleries, and soon added a modest online store. The art shows in particular were very successful, but as much as I enjoyed them (I truly did), the shows required so much work that I stopped because they detracted from my primary bread and butter, the photo workshops.
Despite my workshop emphasis, I have maintained a small gallery presence, and continue to offer my prints for sale on my website (which I’ve upgraded significantly). While I still sell prints fairly regularly, I know there are many more people who don’t purchase them because they’re just too expensive.
I can explain
Though printing is a pretty labor intensive process, I’ve always insisted on doing it myself, largely because I’ve never trusted anyone else to create the print to my satisfaction. But the amount of work that goes into each print (even after it’s been processed and sized)—from constant maintenance (clearing clogged print heads, monitor calibration, paper and ink management, and so on) to careful packaging and shipping—results in pricing that’s prohibitive for many people.
Finally, a solution
For a long time I’ve sought a solution that would cut me out of the printing and shipping side of the transaction while still yielding quality prints, and think I’ve finally found one. I’ve spent the last few weeks creating a SmugMug website exclusively for showcasing my prints for sale: GaryHartPrints.com. On this new site, instead of coming to me, your print orders will go to the much acclaimed Bay Photo Labs, my longtime lab of choice for jobs my own printer can’t handle (such as prints too large, or paper I don’t offer).
Though these prints won’t have my personal signature, each print has been photographed, processed, copyrighted, and digitally signed by me. I can also vouch for the quality, which will be at least as good as what I can offer. By taking the printing process out of my hands and putting it in the hands of people who do this exclusively, you get more choices, including multiple papers (lustre, glossy, metallic, and gicleé watercolor) and many matting and framing options—all at a much lower price than I can offer by printing directly.
Check it out*
*This site is brand new, so the images you see here are by no means a complete representation of all that’s available. If you don’t see what you’re looking for, just send me message.
About this image
In a post announcing a new print sale website, I thought it appropriate to re-share my most requested image, captured on a chilly April morning in 2009. As with many of my images, it was captured during a workshop. And also like many of my images, it almost didn’t happen.
My workshop group was at Tunnel View overlooking Yosemite Valley, wrapping up our first sunrise shoot. A storm had moved through overnight, dusting the granite walls with snow down to about 5,000 feet (Yosemite Valley is at about 4,000 feet), and soaking the lower elevations with a light rain. With no wind to mix the chilly atmosphere, the coldest air dropped all the way to the saturated valley floor, where it found the dew point and condensed into a ground-hugging fog.
Overhead, the parting storm’s cloudy vestiges covered the scene with a dull, gray blanket of homogenous clouds, so our attention all morning had been on the wispy valley fog below. The dynamic range at Tunnel View is pretty unmanageable when the morning sun arrives, so I was about to move the group on to greener pastures when I noticed a golden glow expanding behind Sentinel Dome. As the color spread, it was apparent that the uniform clouds above were far more translucent than I’d imagined and I put a hold on our exit. Soon I was so mesmerized by the buttery veneer stretch from rim to rim , reflecting softly on the fog below, that I almost forgot about my camera.
I raced to the car to get my gear and sprinted back to set up far faster than I like. By the time I was ready, the sun was just about to crest the ridge behind Sentinel Dome. I worked quickly, using a 2-stop hard graduated neutral density filter to subdue the bright sky. I stopped down to f16 thinking a sunstar might be possible, but the sunlight was too diffused by the clouds.
Of all the pictures of Yosemite that I’ve taken, this is the one that makes it easiest for me to imagine how this heavenly location might have looked before human interference.
America the Beautiful
A gallery of favorites (coming to a wall near you)


Yosemite Moon
Posted on July 21, 2016
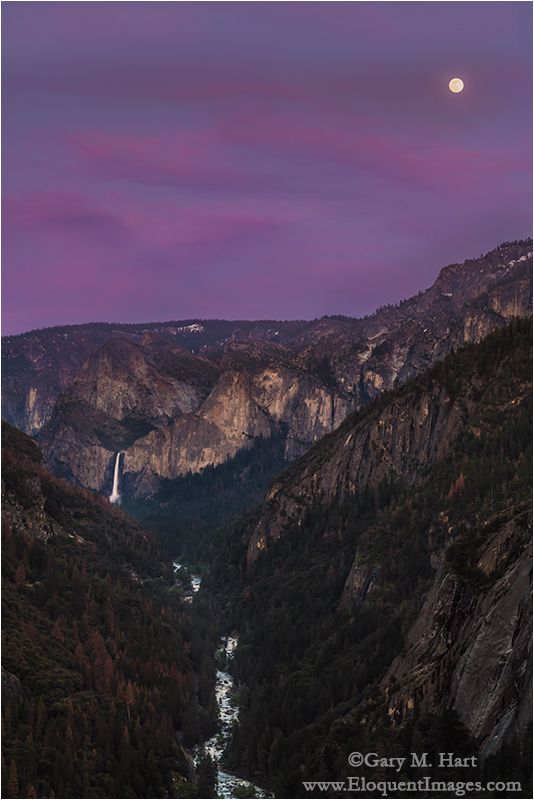
Spring Moonrise, Bridalveil Fall and the Merced River Canyon, Yosemite
Sony a7R II
Sony 70-200 f4
1/2 second
F/8
ISO 100
I’m a relationship photographer. By that I mean I’ve never been one of those photographers who expands his portfolio by adding new locations. Rather, I like to get a feel for a place, not just the where and when of its photo opportunities, but its history, geology, flora, and fauna. I much prefer digging deeply into one scenic area to visiting a large variety of scenic areas. This is a personal style thing, and I know my more deliberate approach would drive many photographers crazy, but I’ve learned that I’m rarely very productive on my first visit anywhere, and often not until I’m several visits in.
I’m probably several hundred (thousand?) visits into my Yosemite relationship, with no end in sight. But despite this extensive history, any moonrise above Yosemite Valley, regardless of the phase, still takes my breath away. Orbital geometry aligns Yosemite’s moon with different features as the seasons change, and I try to be there for as many moonrises as possible. Whether it’s the late fall and winter full moon hovering above Yosemite Valley, the summer crescent moon appearing from behind Half Dome, or the spring full moon rising above Bridalveil Fall, I just can’t get enough of it.
As with most of my Yosemite workshops, a planned highlight for this year’s April Yosemite Moonbow and Wildflowers workshop was a moonrise, this time the Bridalveil Fall full moon. Throughout the workshop we’d enjoyed a Yosemite Valley bursting with more water than I’d seen in several years, a dogwood bloom that was just about at peak, and a sky enhanced by an assortment of beautiful clouds.
When the moonrise day came and the clouds stayed, there were a few concerns for our moonrise. But knowing Yosemite well enough to understand that you can’t predict the conditions five minutes from now based on the conditions right now, I made sure we were in position with cameras ready (and fingers crossed).
Moon or not, the view up the Merced River Canyon that evening was beautiful, but when the moonrise time arrived and the moon didn’t, I scanned the clouds for hints of the moon’s glow. Though there was no sign of it, a little higher, and directly in the moon’s path, the clouds appeared thinner; higher still, actual stripes of blue sky gave me hope.
By the time the moon emerged, nearly ten minutes after sunset, the entire sky had taken on a rich magenta hue. The Merced River Canyon below had become quite dark, but my Singh-Ray two-stop hard-transition graduated neutral density filter held back the (daylight-bright) moon enough for me to give the canyon the light it needed. The final step for this image came in Lightroom and Photoshop, which enabled me to add a little more light to both the canyon and the clouds (which had been darkened along with the moon by the GND), and pull back the highlights in the moon.
One more thing
People ask me if I ever tire of Yosemite, and I can honestly answer, no. Part of keeping it fresh is the infectious excitement when the people I’m with witness something like this moonrise. (I don’t think this makes me unusual—most people get vicarious pleasure from the joy of others’ first experience of something that’s special to us.) This night the moonless pink sky was enough to thrill everyone, but when the moon poozed out, it became one of those once-in-a-lifetime moments for everyone in the group. That just never gets old.
Join me in a Yosemite photo workshop
Yosemite Moons
Click an image for a closer look and slide show. Refresh the screen to reorder the display.


Can you defend your exposure settings?
Posted on July 15, 2016
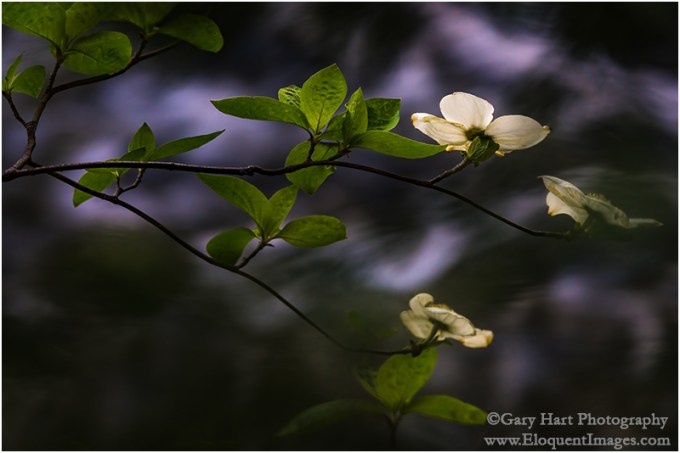
Dogwood Above the Merced River, Near Fern Spring, Yosemite
Sony a7R II
Tamron 150-600, Canon-mount with Metabones IV adapter
1/125 second
F/8
ISO 1600
While I’m a huge advocate of manual metering (it’s all I’ve ever used), I stop short of saying everyone shoot shoot in manual mode. But I do believe that anyone who is serious about their photography should at least be comfortable shooting in manual mode. That means understanding how a light meter “sees” a scene, the information the meter returns, and how each of the camera’s three exposure variables affect an image. (I won’t get into the rudiments of metering now, but you can brush up here: Exposure basics.)
We have three ways to control the amount of light our sensor records:
- Aperture, measured in f-stops, is the size of the opening that allows the light in. Controlling exposure by changing the aperture affects your depth of field—larger aperture (smaller f-stop), means less depth of field.
- Shutter speed is how long the light strikes the sensor. Controlling exposure by changing the shutter speed affects the way the camera captures motion—a faster shutter speed freezes motion, a longer shutter speed blurs motion.
- ISO is the sensor’s sensitivity to light. Controlling your exposure by adjusting the ISO affect the digital noise in the image—increasing the ISO to make the sensor more sensitive to light increase’s the resulting image’s noise.
Every image you capture uses a combination of these three variables to establish the exposure (amount of light) for every image. And because the variable you choose to adjust affects more than just the exposure of your image, if you can’t justify your choice for each of the three exposure settings for every shot (if it’s not a conscious decision), you have a wonderful opportunity to improve.
To illustrate, I’ll explain my exposure choices in the dogwood image above (a new image, captured during my 2016 Yosemite Moonbow and Wildflowers workshop in April). Though I used f/8, 1/125 second, and ISO 1600 to achieve my desired exposure, keep in mind that I could have achieved exactly the same exposure by choosing f16, 1/4 second, and ISO 100. Or f5.6, 1/500, and ISO 6400. Or a virtually unlimited variety of other combinations that all would have captured the same amount of light. But since whatever exposure combination I decide on will potentially yield a completely different image (different depth, different motion, different noise), I had to be very careful with my decisions.
So here goes:
- f/8: Because the f-stop determines the depth of field for my chosen focal length and focus point, and I try to compose with front-to-back relationships in every frame, f-stop is usually my primary, non-negotiable exposure variable. In this case I wanted my background soft to force my viewers’ eyes to the dogwood only, but not so soft that the background whitewater was unrecognizable. I decided that f/8 gave me the right balance of foreground sharpness and background softness.
- 1/125 second: When photographing a stationary landscape on a tripod, I can go with whatever shutter speed I need, but when there’s motion in the scene, my shutter speed becomes as important as my f-stop. On this afternoon, in addition to the water moving in the background, I was dealing with a slight breeze. If the breeze hadn’t been a consideration I could have chosen whatever shutter speed gave me the best motion effect, but I needed to freeze the swaying dogwood and was confident I could do that at 1/125 second.
- ISO 1600: Because it gives me the cleanest images, I always go with ISO 100 when possible, but that wasn’t an option here. Given that I needed f/8 for my desired depth of field, and I wasn’t comfortable keeping my shutter open longer than 1/125 second, ISO was the only remaining variable to control the light in my scene. I spot-metered on the brightest dogwood and increased the ISO until my meter indicated the flower was as bright as I could make it without overexposing. The dynamic range in this scene was great enough that even though the dogwood bloom was fully exposed, the shadows remained quite dark, but fortunately that helps the dogwood stand out.
This was my process and rationale for this image. Depending on the factors I’m dealing with, my process might follow a completely different path for another image.
In general I tell people just learning to master manual metering to approach every scene with a tripod (non-negotiable—with no tripod, my suggestions below aren’t valid) and this mindset:
- F-stop: f/11, because this provides the most depth of field possible at an f/stop that is in most lens’s sharpest range, and without significant diffraction.
- ISO: 100 (or whatever your camera’s native ISO is), because this is where you’ll get your cleanest (least noise) images.
- Shutter speed: Adjust until you’ve achieved the proper exposure.
These guidelines certainly don’t apply to all situations, but they’re a good starting point that will simplify the decision making process until you get more comfortable juggling your exposure variables. And keep in mind that you’ll need to deviate from f/11 and ISO 100 whenever your creative needs and the scene conditions (such as wind or moving water) dictate. Practice makes perfect.
I cover all this stuff in much greater detail in my photo workshops.
Walking the Exposure Tightrope
(Images that required a very specific combination of exposure variables)


The Power of Reflections
Posted on July 1, 2016

Spring Reflection, El Capitan and Three Brothers, Yosemite
Sony a7R II
Canon 11-24 f/4L with Metabones IV adapter @11mm
1/60 second
F/8
ISO 100
Reflection
Dictionary.com: The return of light, heat, sound, etc., after striking a surface.
Okay, so that’s pretty basic. How about this one?
Wikipedia: The change in direction of a wavefront at an interface between two different media so that the wavefront returns into the medium from which it originated
Whoa, I hope that’s not on the test.
Who doesn’t love the soothing tranquility of a good reflection? And like a metaphor in writing, a reflection is an indirect representation that can be more powerful than its literal double by virtue of its ability to engage the brain in different ways than we’re accustomed. Rather than processing the scene directly, we first must mentally reassemble the reflection’s reverse world, and in the process perhaps see the scene a little differently.
Reflections are a powerful photographic tool as well. Water’s universal familiarity makes it an ideal subject for photographers frustrated by their camera’s static representation of our dynamic world. Just as we freeze in space or blur a waterfall to express turbulent motion, we can include a reflection to convey serene peace.
Water reflections come in many forms, from a mirror-sharp reverse of a mountain atop a still pool, to an abstract shuffle of color and texture on a choppy lake. Without getting too far into the physics of light, it’s important to understand that every object we see (and photograph) comes to us courtesy of reflected light. For example, when sunlight strikes El Capitan, some of the sun’s photons bounce straight back into our eyes, and there it is: El Capitan!
But other photons striking El Capitan head off in different directions—some are captured by other sets of eyes, and others land on the surface of the Merced River. Some of these photons pass beneath the river’s surface to reveal the submerged riverbed, while others bounce off. The ricocheting photons that travel from El Capitan and bounce off the river, reach our eyes as a reflection. In other words, what we call a reflection is in fact re-reflected light (reflected first from El Capitan, then by the river).
Mirror reflection recipe
The ingredients for a crisp, mirror reflection like the El Capitan image at the top of the page is pretty simple: still water, a reflection subject that’s much brighter than the water’s surface (the greater the contrast the better), and a view angle that matches the angle from the water’s surface to the reflection subject. (The best reflections are usually found on shaded water because there are fewer photons to compete with the photons bouncing from the reflected subject.)
The El Capitan reflection above was a perfect confluence of reflection conditions. Clean, still air, dense shade on the river, and El Capitan’s fully exposed, reflective granite, make early morning the best time for El Capitan reflections. On this April morning I made my way down to the Merced River hoping to photograph the first light on El Capitan reflected in the Merced River. Finding my route down to the river blocked by spring flooding, I was forced to improvise. The morning air was clean and calm, and the ephemeral lake was mirror-still.
Circling the flooded meadow, I found a gap in the trees that opened onto the most complete view and reflection of El Capitan and the Three Brothers I’ve ever seen. So complete in fact, that I couldn’t include it all with my 16-35mm lens at its widest focal length. Fortunately, I was able to borrow a Canon 11-24 lens and Metabones IV adapter from a friend (thanks, Curt!), just wide enough to fit the entire scene at the lens’s shortest focal length.

Sunset Palette, Half Dome from Sentinel Dome, Yosemite
Playing the angles
Understanding that reflected photons leave the water’s surface at the same angle at which they arrive—imagine the way a tennis ball bounces (if it weren’t affected by spin, wind resistance, or gravity)—helps us get in position for the reflection we want.
A few years ago I found myself atop Sentinel Dome right after an intense rain shower had turned indentations in the granite into small, glistening pools. Rather than simply settle for the vivid sunset coloring the clouds above, I decided to include the sunset reflected in the pools as well. At eye-level the pools reflected blue sky, so I dropped my tripod as low as it would go, almost to granite level, positioning my lens at the same angle to the pools that the red light leaving the clouds struck the water.
When the water’s in motion

On the Rocks, El Capitan and the Merced River, Yosemite
As spectacular as a crisp, mirror reflection in still water is, it’s easy to overlook the visual potential in a reflection that’s not crisp, or to forget your camera’s ability to render a soft or abstract reflection much better than your eyes view it. While a crisp reflection often dominates the primary subject in an image, a splash of reflected color or shape can provide a striking accent to a dominant primary subject. And a reflection disturbed by the continuously varying angles of rippled or choppy water magically appears when a long exposure smoothes the water’s surface.
In the image on the right, the El Capitan reflection undulating atop the Merced River was barely perceptible to my eyes. But the reflection came to in a 25 second exposure achieved with the help of 2-stop hard graduated neutral density filter that subdued the day’s last rays on the clouds and El Capitan, and a neutral polarizer (with the reflection dialed up) that cut the light on the entire scene by a couple of stops. And since a reflection is never as bright as the actual scene, using a GND meant I need to do a little dodging and burning in Photoshop.
Where to focus
Another often misunderstood aspect of reflection photography is where to focus. Though it seems counterintuitive, the focus point of a reflection is the reflection subject, not the reflection surface. This isn’t such a big deal in a scene like the El Capitan reflection at the top of the post, where the focus point of everything of visual significance is infinity, but it’s a very big deal when you want both your reflection and rocks or leaves on the nearby water surface sharp.

Autumn Reflection, El Capitan, Yosemite
The El Capitan reflection on the right is very different from the El Capitan reflection above, where the extreme depth of field ensured sharpness had I focused on anything in the scene or the reflection. But here the leaves that were my scene’s primary emphasis were just a couple of feet from my camera, while El Capitan was several thousand feet distant. Even though the leaves floated atop the El Capitan reflection, focusing on El Capitan would have softened the leaves. To increase my depth of field, I stopped down to f/18 and focused several feet into the foreground leaves, then magnified the image on my LCD to verify that all of the leaves were sharp. Though El Capitan is slightly soft, a soft reflection is far more forgivable than a soft foreground.
Think ahead
It seems that reflections often feel like a fortuitous gift that we just stumbled upon. But given that reflections are entirely beholden to the laws of physics, they’re far more predictable than many of the natural elements we photograph. Taking a little time to understand the nature of reflections, and how they’re revealed by a camera, enables photographers to anticipate their appearance.
For example, in Yosemite I know that low flow makes autumn the best time for reflections in the Merced River. On the other hand, when the Merced is rushing with spring runoff, Yosemite’s meadows often shimmer beneath tranquil vernal pools. I plan many trips (and workshops) to take advantage of these opportunities.
Photo Workshop Schedule
A Reflection Gallery
Click an image for a closer look and slide show. Refresh the screen to reorder the display.


Some advice for President Obama
Posted on June 17, 2016

Sunset Storm, Half Dome from Sentinel Dome, Yosemite
Canon EOS-1Ds Mark II
6 seconds
F/16
ISO 100
Canon 24-105 f/4L
President Obama and family visit Yosemite this weekend, and rather than wait by my phone for him to call with questions, I thought I’d just share my suggestions here
Dear Mr. President,
I just heard that you’re coming to Yosemite this weekend. Bravo! I’m sure by the time you leave you’ll agree that Yosemite is worthy of its reputation as the most beautiful place on Earth. But that said, I am a little concerned about the wisdom of your decision to visit in summer. Of course Yosemite is beautiful any time, but boring skies and shrinking waterfalls make summer Yosemite’s least desirable season for photography. Photography notwithstanding, the biggest reason to avoid Yosemite in summer is the crowds—much as I’m sure you would avoid invading Canada on Canada Day.
Had you checked with me first (as pretty much every other person who visits Yosemite seems to do), I’d have told you that any other season in Yosemite is less crowded than summer, and each has its own charm: Yosemite in autumn is decorated with red and gold leaves that reflect in the Merced River; winter, with its clearing storms and fresh snow, can be Yosemite’s most visually spectacular season; and spring, when the waterfalls boom and the dogwood bloom, is Yosemite’s postcard season. But summer? It’s all about the people. So unless you have an armed security brigade to clear a path through the crowds…. Oh, wait a minute—never mind.
Secret Service or not, you’ll need to brace yourself this weekend—if you think Congress is difficult, just try squeezing your tripod into the scrum on Sentinel Bridge for a summer sunset. Fortunately, despite the mayhem, there are a few things that will enhance your summer visit to Yosemite. Here are a few suggestions:
- Since you’ve brought your family, I strongly suggest that you leave your tripod in the room and be content with a couple of quick snaps at each stop. Trust me on this—nothing ruins a vacation faster than planning everything around your photography. (And given all that you have to deal with at work, the last thing you need is tension with Michelle and the girls.)
- No matter how crowded Yosemite is, if you get up and out at sunrise, you’ll have a couple of hours to wander Yosemite Valley in genuine peace. Before 8 a.m. is definitely the best time to hit Yosemite’s most popular landmarks and vistas.
- Avoid Yosemite Valley as much as possible in summer, so once the tourists start streaming from their tents and hotel rooms, it’s time to head for the high country. Though Glacier Point and Tuolumne Meadows will be crowded too, they’ll certainly be more tolerable than Yosemite Valley.
- Yosemite’s hiking trails will be more packed than a Rednecks for Trump rally, but at least on a hike you won’t need to be looking for a place to squeeze that limo. It seems like every Yosemite visitor does the Vernal Fall Mist Trail hike, or the hike to the top Yosemite Falls—they’re nice, but if I had only one hike to do in Yosemite, it would be the Four Mile Trail to Glacier Point (actually 4.8 miles). It’s a lot of work, but unlike the other hikes I mentioned, there are spectacular views along the entire route, so you can go as far as you want and turn around without feeling like you’ve wasted your time.
- If you do manage to get out with your camera and tripod (surely if you can negotiate a nuclear deal with Iran, or convince teenagers to join the family summer vacation, you can arrange some quality photography time while the rest of the family rents bikes or something), here’s some knowledge to help you make the most of the photo opportunity:
- Any view of Half Dome is best at sunset.
- El Capitan gets really nice light in the early morning, starting about fifteen minutes after sunrise (the “official,” flat horizon sunrise).
- In summer, Yosemite Falls doesn’t get good light until mid-morning.
- Bridalveil Fall and Cathedral Rocks get their best light in late afternoon (though the east side of Cathedral Rocks gets good morning light too).
- Mid-morning rainbows are possible in the mist beneath Lower Yosemite Fall from the pedestrian bridge. Bridalveil Fall gets rainbows in late afternoon (time varies with the date and viewing location).
- I’ve got a lot more information on Yosemite throughout my blog—feel free to browse. Or if you don’t want to spring for the WiFi at the Ahwahnee, you could just pull it off the NSA servers. In the meantime, here’s a link that will help you plan: Yosemite locations.
Mr. President, I’m sure you and your family will enjoy your visit, but I encourage you to return in Yosemite’s other seasons. Come January you’re going to have lots of free time on your hands, so once you get settled in your new place and have made a dent in the honey-do list, let me suggest that there are far worse things to do in your retirement than a photo workshop. Check out my workshop schedule—and don’t forget to ask about my “Past President” discount.
Best regards,
Gary M. Hart
A Yosemite Gallery


, Yosemite")


Eye on the sky
Posted on April 27, 2016

High Sierra Moonrise, Glacier Point, Yosemite
Sony a7R II
Sony/Zeiss 24-70 f4
2.5 seconds
F/10
ISO 200
I spend much of my photography time chasing the moon. Most of my trips factor in the moon’s phase and location—usually to catch a full or crescent moon rising or setting above a particular landmark, and often to photograph a landscape by moonlight (full moon) or starlight (no moon). But sometimes the moon catches me less than fully prepared, and I need to improvise.
For example
I enjoyed the January full moon with my workshop group in Death Valley and the Alabama Hills; in February my Horsetail Fall workshop group photographed a full moon rising above Yosemite Valley; in March I was in Sedona with Don Smith to photograph the full moon as it rose above Cathedral Rock and Oak Creek; and last week my Yosemite Moonbow and Wildflowers workshop group photographed the April full moon above Bridalveil Fall and the Merced River Canyon, then headed off to catch a moonbow in the mist at the base of Lower Yosemite Fall. And chasing the moon isn’t all about the full moon—already this year I’ve photographed several thin crescents in the Sierra foothills, and next week I raft Grand Canyon, where my group will (fingers crossed) witness a waning crescent moon just after sunset, and later that night photograph the canyon illuminated by nothing but the Milky Way and thousands of stars only visible in a moonless sky.
All this planning around the moon does indeed get me to many beautiful locations at just the right time, but sometimes the moon catches me in situations where, without the necessary knowledge at hand, I’m forced to think on my feet (and smartphone). Most recently was the unplanned moonrise added to last week’s Yosemite workshop. When the National Park Service opened Glacier Point about a month earlier than expected, I quickly inserted a Glacier Point sunset into the workshop but didn’t have time for anything more than a cursory moonrise check.
Beautiful clouds and light made our Glacier Point sunset a success, but as we were about ready to return to the warmth of the cars, the moon’s imminent arrival crept into the back of my mind. What I knew was that this night, from Glacier point the moon would be rising far to the right of Half Dome (out of the primary view), and probably just slightly too late to photograph effectively (not enough light to capture both landscape and lunar detail). Nevertheless, before packing up my gear I pulled out my iPhone to be certain we weren’t making the classic photographer’s mistake of leaving too early.
This won’t be on the test
Without a strong cell signal, I had to resort to apps that function offline. I started with Focalware, my go-to app for the sun’s and moon’s altitude and azimuth from any location on Earth. Next, now armed with the moon’s azimuth, I opened MotionX-GPS (with the map pre-downloaded) to plot its location relative to the current landscape, determining that it would emerge from behind Mt. Clark.
The final (and most difficult) piece of the puzzle was determining when the moon would appear. This is tricky because published moonrise times always assume a flat horizon—great if you’re on a ship at sea, but not so much anywhere else, and especially not in the mountains.
Using the topo info in the MotionX app, I determined that Mt. Clark’s elevation was around 11,500 feet. Knowing the Glacier Point is at 7,200 feet, I subtracted 7,200 from 11,500 and got 4,300 feet, the vertical distance between my location and the point where the moon would appear. Because the MotionX app also gave me the horizontal (as the crow flies) distance between me and Mt. Clark (about 8.2 miles, or around 43,300 feet), I had everything I needed to plug into my HP-11C (scientific calculator) app and compute the altitude, in degrees, that the moon would need to achieve before cresting the peak (thank God I stayed awake in trigonometry). With that information, it was a simple matter of returning to Focalware to see what time the moon would ascend to that altitude (appear above Mt. Clark).
There are apps that will do all this for me (PhotoPills and The Photographer’s Ephemeris are the ones I recommend), but they require connectivity, and the foresight to do the work when my signal is strong enough to download the maps. (Plus, I just like doing it my way.)
I never tire of this stuff
So, after less than five minutes of figuring, I was confident enough to tell everyone the moon would appear from behind Mt. Clark at 7:57 p.m., plus or minus two minutes. That gave us a couple of minutes to prepare a composition, and sure enough, right around 7:55, the clouds behind Mt. Clark started to glow; at 7:58, there it was and we were in business. In this case the thin clouds on the horizon subdued the moon’s brilliance just enough that I could give the foreground enough light without turning the moon to a white disk.
As often as I do this (sometimes I plot the moon just for fun, even though I know I can’t be there to enjoy it), few things thrill me more than my eyes on the exact point on the horizon at the moment the moon first nudges into view.
Understanding vs. knowledge
I know my process sounds complicated, but it really isn’t—in fact, plotting the moon this way doesn’t require any special insight beyond what most of us learned in high school. But it does illustrate something I constantly stress: the advantage of understanding over knowledge. When we know something, we can respond to a finite set of circumstances; when we understand something, we can reason our way to knowledge beyond our training.
One more quick example: A couple of days ago, I was scouting a potential sunrise location in the Columbia River Gorge. Because I’m reluctant to trust compass apps that point an arrow (or whatever) in a general direction, I pulled out Focalware and saw that tomorrow’s sunrise azimuth would be 70 degrees. Focalware also told me that the sun’s current azimuth was 253 degrees. Since I know that a (solar) shadow always points exactly 180 degrees from the sun’s current azimuth, I knew that my shadow was pointing directly at the 73 degree azimuth (253 minus 180), more than close enough to figure out where the sun would appear (in this case, farther north than ideal).
Whether it’s lunar geometry, exposure settings, depth of field, or whatever, understanding (and visualizing) a system’s underlying principles is always superior to memorizing its facts. And amazingly, it’s almost always simpler than we imagine. Since the position of the sun, moon, and stars are important to me, I try to visualize the celestial choreography.
Likewise, the more you can understand what’s happening when you adjust your shutter speed, f-stop, and ISO, the better prepared you’ll be to reason your way through difficult exposure puzzles, such as, I really need a lot of depth of field to get this tree and that mountain sharp, but the breeze is really blowing the leaves?, or, The exposure is perfect for this 20-second pinpoint stars image, but how can I do a 30-minute star trail shot of the same scene without changing the exposure?.
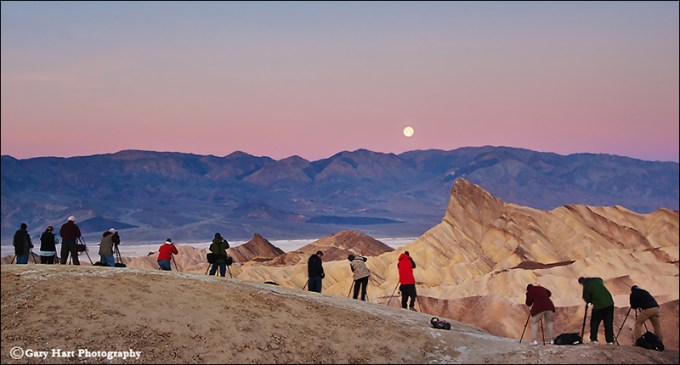
Photo Workshop Schedule
A gallery of celestial wonders


Stop the madness
Posted on February 25, 2016
Horsetail Fall and Clouds, El Capitan, Yosemite
Sony a7R II
Sony/Zeiss 24-70 f4
1/40 seconds
F/8
ISO 160
For some background, read about photographing Horsetail Fall
Anyone who doesn’t understand what all the Horsetail hubbub’s about hasn’t seen it. When all the conditions align—ample water (rain and/or snowmelt), sun position, and unobstructed sunset light—there’s nothing in the world that compares. And while these convergences are rare, that doesn’t seem to deter the gawkers who show up to witness it.
Conventional wisdom says that the end of February is the best time to photograph Horsetail Fall. And if there’s one thing many years of photography has taught me, it’s that trophy-hunting photographers rarely deviate from conventional wisdom. Because Yosemite’s proximity to San Francisco, Los Angeles, and all the Central Valley cities makes it an easy target for photographers with only enough time for a quick trip, I usually avoid February’s final two weekends when I schedule my Yosemite Horsetail Fall workshop. But this year I couldn’t resist the full moon, which I knew I could align with Half Dome on multiple workshop nights.
For a workshop leader, another Horsetail Fall dilemma is that when the sunset light isn’t just right, there are many much better photo options elsewhere in the park. Spending an afternoon waiting for Horsetail Fall to do its thing on a day when the light decides to take the day off (always a distinct possibility) means pretty much wasting the best time of day for photography in Yosemite. That problem is compounded by the fact that the western horizon isn’t visible from the valley floor, making it impossible to anticipate what the sunset light is going to do until it’s doing it. For each time I’ve been surprised when a shaft of light slips beneath overcast skies to illuminate El Capitan at the very last minute, I can cite a clear sky sunset that was snuffed by an unseen cloud just as the light started to get good.
My plan for this workshop was to go for Horsetail Thursday evening, and again Friday if Thursday didn’t work out, then concentrate on the moon for the final two sunsets. I figured by the time Saturday came, anyone whose life depended on photographing Horsetail Fall would have enough experience to do it on their own.
The workshop started Thursday afternoon, and because it had snowed earlier that day, I postponed the orientation until after dinner so we could go straight out and start shooting. After an hour or so photographing light-catching clouds and waterfall rainbows (Horsetail and Bridalveil Falls) from Tunnel View, we beelined to the picnic area beneath El Capitan. Despite the fact that we were far from the first photographers there, my group managed to score the last three legal spaces in the parking lot (that’s not to say others arriving after us weren’t able to employ creative parking strategies), and we found plenty of room to set up and wait with fingers crossed for the Horsetail show.
Aside from a handful of for-the-record images (to remind myself of the conditions for each year), I rarely photograph Horsetail anymore. But conditions that evening were so nice that at one point I actually had both tripods set up, one with my a7RII and 24-70 for wider images, the other with my a6000 and 70-200 for tighter compositions. Rather than the standard stand-around-and-wait-for-the-light-to-get-good experience that’s the hallmark of a Horsetail shoot, lots of water in the fall and clouds swirling on and around El Capitan made our entire 90-minute wait photographable.
While I’ve seen Horsetail get more red than what we saw, everyone was so thrilled that I was able to declare Horsetail Fall captured for 2016, freeing my group to spend the rest of the workshop’s sunsets concentrating on other things. Phew.
It wasn’t until we tried to navigate Yosemite Valley during the workshop’s final three days that I fully appreciated how fortunate we were to be done with Horsetail Fall. I’ll spare you the gory details and instead just give you the bullet points of what we witnessed Friday, Saturday, and Sunday:
- The Southside Drive parking area (with room for a dozen or so cars) closest to the most popular Horsetail View on that side of the river was full by 9 a.m. So were all the prime views of the fall at that location.
- By 3 p.m. (sunset was about 5:45) the parked cars, crammed bumper-to-bumper in Southside Drive’s coned-off left lane, stretched two miles, from just past the Cathedral Beach to Sentinel Meadow (I clocked it on my odometer).
- Many of the early arriving, legally parked cars were completely blocked by a second row of late-arriving cars whose drivers apparently decided that merely being able to fit into an area made it parking spot. The pinned first-arriving drivers would be stuck until the late-arriving drivers moved their cars.
- Many cars had simply gone off-road and parked in the forest, apparently deciding that paying towing and/or ticket charges was preferred to parking legally and walking a mile or two.
- Several times traffic in the lane that was supposed to be moving (not designated for parking) stopped long enough that drivers got out to find out what the holdup was. The only time I saw the cause, it was a driver using the driving lane to turn around and squeeze perpendicularly between two parallel-parked cars.
- On both sides of the road, every possible square inch of forest containing even a partial view of Horsetail Fall was crammed full of tripods, sometimes stacked 100 photographers deep (I didn’t actually count, but I think that’s a pretty good estimate). I heard through the grapevine that the general mood at these scrums was testy.
- I personally redirected many photographers poised to photograph the wrong waterfall—some were clustered around Bridalveil Fall, others had targeted Ribbon Fall.
- We saw man getting handcuffed and arrested by rangers. It may have been a routine DUI arrest, but I wouldn’t be surprised if it was some kind of Horsetail-view real estate violence. Interestingly, that was the only time I saw rangers all weekend—it was almost as if they’d thrown up their hands in defeat.
- After sunset, the lines at the Yosemite Lodge cafeteria stretched out the door, and we heard from others that the cafeteria actually closed for the night while there were still hundreds outside, waiting to get in.
- Gridlock exiting the park after sunset was so bad that some drivers just gave up.
While I can’t fix the crowds, I do believe the Horsetail Fall experience can be both rewarding and enjoyable. Despite the crowds, I still enjoy it after all these years, and I never cease to be awed by the beauty. Here my suggestions for anyone considering joining the fray next year:
- Avoid the weekends. Period.
- While I think the best views on Southside Drive are better than the views from (and near) the El Capitan picnic area, the dense forest near the river means far fewer good views on Southside Drive. Also, the proximity to the river means photographers will to include the river in their frame—they tend to be less than thrilled when someone encroaches on their frame. This all adds up to more tension on Southside Drive.
- Conversely, the mood at the El Capitan picnic is generally more like a tailgate party, with people mingling and barbecuing. That’s because the view of Horsetail Fall is much more open than on Southside Drive, and poor foreground options make it almost exclusively a telephoto location. In other words, everyone is point up with a telephoto lens and no one is in anyone else’s way.
- Arrive early, or be prepared to walk a mile or more.
- If I weren’t leading a group and really wanted to maximize my mobility, I’d bring a bike and just park wherever it’s convenient.
And don’t forget that you have options. If the crowds become too much for you, you could simply forget Horsetail Fall and concentrate on the other great winter scenes that are everywhere in Yosemite.
Avoid the mayhem in my
2017 Yosemite Horsetail Fall and Winter Moon photo workshop
Winter in Yosemite


A Horsetail of a different color
Posted on February 22, 2016
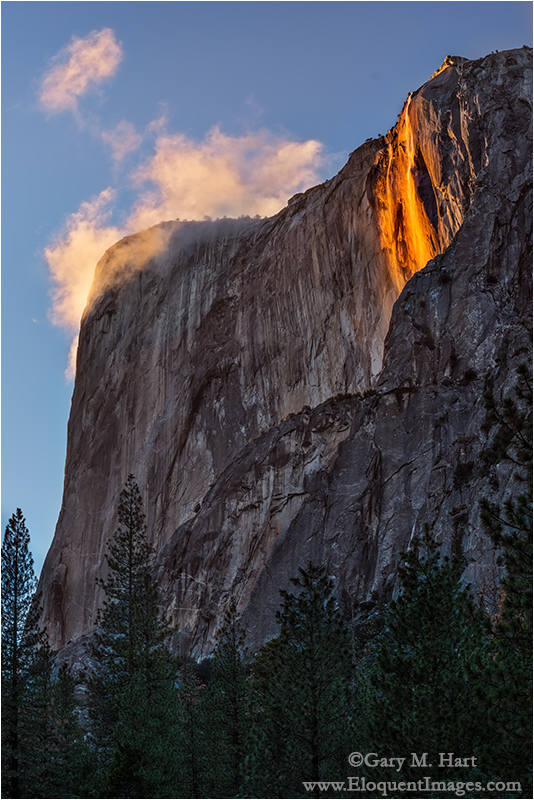
Horsetail Fall Rainbow, El Capitan, Yosemite
Sony a7R II
Tamron 150-600 (Canon-mount with Metabones IV adapter)
1/250 second
F/8
ISO 125
I just returned from my 2016 Yosemite Horsetail Fall photo workshop. I’ve the photographed the midday light shafts at Upper Antelope Canyon, Schwabacher Landing at sunrise, Mesa Arch at sunrise, winter sunset at Pfeiffer Arch, and Horsetail fall each February for over ten years. But nothing compares to the mayhem I witnessed this weekend at Horsetail Fall. Not even close. I’ll be writing more about the experience soon, but right now the only words I have are: Oh. My. God.
But anyway…
About an inch of snow fell the night before my workshop’s 1:30 p.m. Thursday start. Because the storm was clearing and the snow was melting fast, I postponed the orientation that always precedes each workshop’s first shoot and, following quick introductions, hustled the group straight out to photograph what would likely be the best conditions of the workshop.
Our first stop was Tunnel View, and it didn’t disappoint. I rarely get my camera out at Tunnel View unless I can get something truly special, and I had no plan to that afternoon. But the storm had rejuvenated Horsetail Fall enough to make it clearly visible, a rare treat from that distance, and I decided to click a couple of frames.
Extracting my a7RII, I attached my Tamron 150-600 lens and targeted the fall, clicking a few images of the fall amidst shifting clouds. When the clouds opened enough to illuminate El Capitan, I did a double-take when splashes of red, yellow, and violet appeared in Horsetail’s wind-whipped mist.
After alerting my group to the rainbow, I zoomed all the way to 600mm and snapped a few vertical images of my own. With the wind tossing the spray, each image was a little different from the one preceding it. As I clicked this frame, an ephemeral spiral of wind spread the mist, making it the most colorful of the group.
As the sun dropped behind us, the rainbow climbed the fall and finally disappeared. Soon another rainbow appeared, this one at the base of Bridalveil Fall across the valley. We stayed long enough to photograph that rainbow, then headed out for what turned out to be a very successful, more classic Horsetail sunset shoot. Our Horsetail success that night allowed us to concentrate on other Yosemite subjects the rest of the week, while thousands of Horsetail Fall aspirants jockeyed for parking and a clear view through the trees.
Stay tuned for more about the Horsetail Fall experience, which has now officially achieved ridiculous status.
Let me help you photograph Horsetail Fall next February
~ ~ ~
Or, (if you’re brave) you could do it yourself
Ten Years of Horsetail Fall Images
(Look closely at the horizontal, “Twilight Mist” image to see Horsetail’s location)


