It’s in the Bag
Posted on March 25, 2020

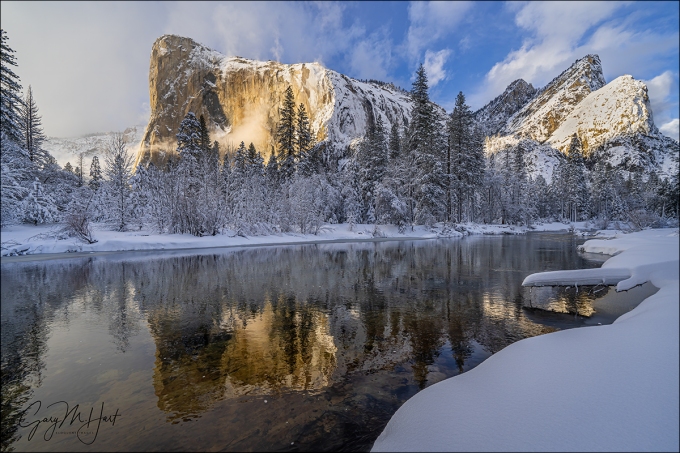
Winter Storm, El Capitan in the Snow, Yosemite
Sony a7RIII
Sony 12-24 G
1/20 seconds
F/16
ISO 50
Ready for some irony? One reason I switched from a Canon DSLR system to Sony Alpha mirrorless (about 5 1/2 years ago) was that Sony’s bodies and lenses are smaller and lighter, yet today I’m probably carrying the heaviest bag I’ve ever carried. What I hadn’t counted on when I made the switch was that smaller gear meant more room in my camera bag, which gave me two options: a smaller camera bag, or more gear. Guess which option I chose. Since people ask all the time about my gear, and it’s been a couple of years since I actually shared it all in one place…
Let’s peek in my camera bag
The contents of my camera bag has evolved over the years, from the vanilla 16-35, 24-105, 70-200 lens lineup that most landscape photographer carry, to my current setup that allows covers 12mm to 800mm (1200mm if you factor in the APS-C crop option) at all times—plus the option to go up to 1800mm (factoring in the APS-C crop factor) if I need it.
Here’s what’s I carry today:
Always in my bag
- Sony a7R IV camera body: My primary body—61 amazing megapixels.
- Sony a7R III camera body: My backup/second body—peace of mind in case I break/lose my primary body; or if I want to have two cameras going at the same time (because you’ll never hear me say 42 megapixels isn’t enough).
- Sony 12-24 f/4 G lens: Though I don’t use it a lot, this lens has allowed me to photograph things I never could, and I love that it’s compact enough to keep with me at all times.
- Sony 16-35 f/2.8 GM lens*: This focal range is covered by other lenses in my bag, but I love the lens too much to leave it behind—crazy sharp, and f/2.8 means it’s fast enough for night photography in a pinch. Plus, it’s a whole lot easier to use with polarizing and neutral density filters than the 12-24.
- Sony 24-105 G lens*: This is my workhorse—what a fantastic focal range! Really sharp, too.
- Sony 100-400 GM lens*: Replacing my 70-200 with this slightly bigger lens doubled my focal range—and it’s a fantastic match with the Sony 2X teleconverter.
- Sony 2X teleconverter
- Filters (in a Mindshift filter bag attached to my tripod): 72mm and 77mm Breakthrough 6-stop polarizing ND filters, Breakthrough 2-stop hard graduated neutral density filter
- Other stuff: Several lens cloths, headlamp, insulated water bottle, extension tubes, Giotto Rocket Blower, and a couple of RX Bars (because photography always trumps meals).
* Plus a Breakthrough polarizer

Mindshift Backlight 26L bag fully loaded
Notice how the compactness of the Sony bodies and lenses allows me to pack almost everything on its end? This is the primary reason I’m able to get so much gear in my bag.
Specialty Equipment (not in the picture—stays behind until I need it)
- Sony a7S II camera body: For Milky Way and other moonless night photography—it’s “only” 12 megapixels (remember when 12 megapixels was huge?), but this camera sees in the dark.
- Sony 24mm f/1.4 GM lens: For Milky Way and other moonless night photography—I can’t believe how compact this lens is.
- Sony 28mm f/1.8 G lens: For Milky Way and other moonless night photography—this one’s even more compact than the 24mm.
- Sony 90mm Macro: I use this lens a lot with extension tubes to get super close for my creative selective focus work (wildflowers, fall color).
- Sony 200-600 G lens: When I want to go big on a moonrise/moonset—sometimes I’ll pare it with the 2X teleconverter and really go crazy. I also use this lens with extension tubes for selective focus fall color.
Support
- Really Right Stuff 24L Tripod with a RRS BH-55 ball head: Sturdy enough for whatever I put on it, in pretty much any conditions. I also like that, fully extended with the head and camera, it’s several inches taller than I am—without a centerpost.
- Colorado Tripod Company Centennial 2-Series (Breakthrough Filters affiliate) with a RRS BH-40 ballhead: This recent addition is my new travel/hiking tripod. Without extending the centerpost it’s not quite as tall as I like, but it’s a couple of inches taller than the RRS TQC-14 I’d been using before, and just as sturdy.
About this image
In my Canon days, and my first couple of years with Sony, the focal-length range I carried at all times was 16mm – 200mm. With Canon it was mostly a size thing—I just didn’t have enough room for much more than my DSLR body and 16-35, 24-105, and 70-200 lenses. When I switched to Sony, even though Yosemite has some scenes that are too wide for a 16mm lens, I figured Sony lenses covering the same focal range would be sufficient.
Then one spring morning in Yosemite, I was photographing a flooded meadow when a friend loaned me his Canon 11-24 f/4 lens (which I adapted to my Sony a7RII body with a Metabones adapter), and I was in love (with the lens, not my friend). Wow! Even though I knew I wouldn’t use an ultra-wide lens very much, the ability to go wide when the situation calls for it suddenly opened up a whole new world. But as much as I’d have loved a Canon 11-24 of my own, it was just too big and heavy (not to mention expensive) to live full-time in my bag.

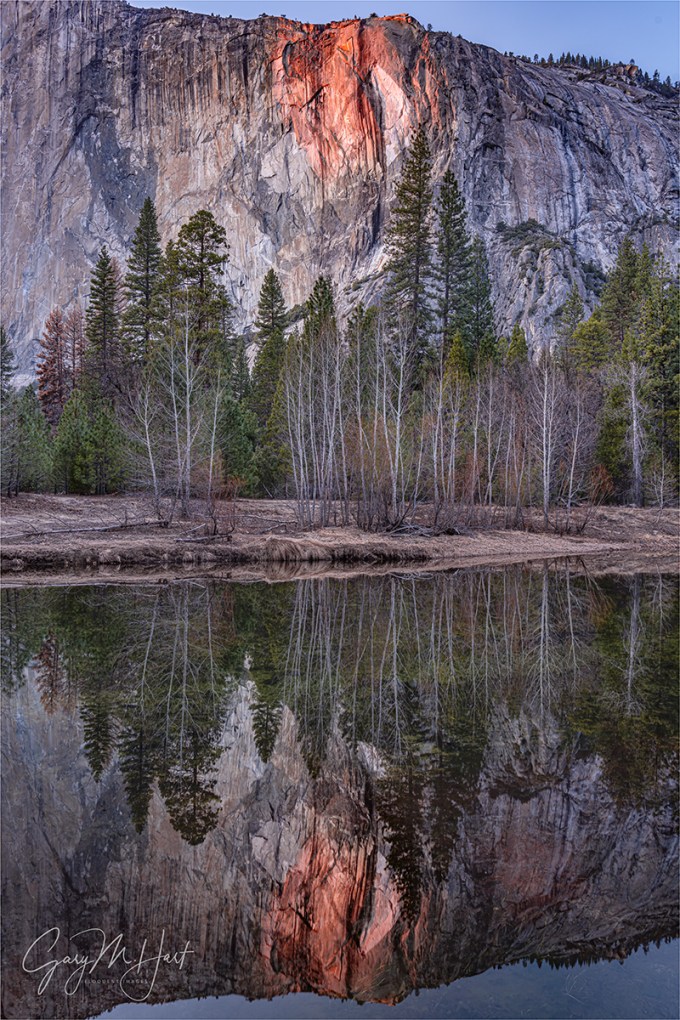
Spring Reflection, El Capitan and Three Brothers, Yosemite
This 11mm image with a Canon 11-24 lens, adapted to my Sony a7RII, is my first ultra-wide image.
Just a year after that ultra-wide epiphany, Sony released its very own ultra-wide lens. Not only is the Sony 12-24 f/4 G lens just as sharp as its Canon counterpart (at about half the price), the Sony 12-24 is less than half the Canon’s size and weight. I was so excited when I realized how compact it is that I instantly reconfigured a few partitions in my camera bag and voila, it fit —without having to jettison anything.
That’s a long-winded way of explaining how I happened to be able to capture this image at a spot in Yosemite that for most of my photography life was too close to photograph El Capitan and its reflection, top to bottom, in a single frame. My brother and I had arrived in the park the previous afternoon, got a room at the lodge, and hunkered down against the incoming storm. What had been forecast to be 3-5 inches of overnight snow had just been upgraded to 12-16 inches, so we knew we’d wake Tuesday morning to something exceptional. A peek through the curtains in the predawn darkness confirmed a world of white with the snow still falling hard. Checking the Yosemite road conditions hotline, I learned that not only were all park entrances closed, all roads in Yosemite Valley were closed.
I dressed and trudged through the snow in the twilight to survey the photography potential near the lodge and found the view of Yosemite Falls completely obscured by clouds. The cafeteria was open, but serving nothing because the employees couldn’t make it to work. At the adjacent Starbucks I found only two people had been able to negotiate the snowy darkness to get to work—it turned out to be the Starbucks manager and his wife, a non-employee drafted into action and put on the front line.
On my way back to my room, I swung by the parking lot and checked my car. About the time I identified the white lump that was mine, Yosemite Falls made an appearance and I hustled back to the room for my gear, but within a couple of minutes it had been re-swallowed. My brother and I spent most of the rest of the morning watching the skies, waiting for the views of Yosemite Falls or Half Dome to clear enough to photograph, or simply for the snow to slow enough to allow us to photograph some of the closer views. We the snowfall finally abated, we ventured out into the elements and forged a trail through the snow to the bridge beneath Lower Yosemite Fall, because any photography is better than no photography.
Shortly after returning to the room we got a call from the front desk telling us outbound Highway 140 had reopened. We had no plans to evacuate, but I took this as a signal that the valley roads would be open too (otherwise, what use would there be to open 140). So we dug out my Outback (no small feat) and hit the road. With snow still falling, we spent the next few hours circling Yosemite Valley, stopping occasionally when a view appeared, waiting for the storm to clear.
We were at El Capitan Bridge when blue sky appeared. Being here in the snow reminded me of an image I’d captured here a year earlier using my 12-24. I’d been blown away that I could get that entire scene in a single vertical frame, but wished there had be more blue sky. But here was a second chance, this time with blue sky, and I set up real fast to reprise that composition.
As I had the first time, I was able to keep my camera level (my lens exactly parallel to the ground) to avoid distorting the trees on edge of the frame. Focus was easy because at 12mm, depth of field feels nearly infinite. Metering was a little trickier than the first time because El Capitan was brighter, but I knew my Sony a7RIII could handle it. Not sure of the best way to handle the falling snow, I tried a few ISO and f-stop combinations, and ended up going with the one that gave me a shutter speed that turned the snow into small streaks of white (the snow showed up better this way).
-

- Winter Storm, El Capitan in the Snow, Yosemite
-

- Storm Clouds, El Capitan, Yosemite
It’s pretty amazing (and a little disconcerting) how close I came to duplicating that earlier composition. The biggest difference is the trees that have been removed in the last year, victims of the drought and pine bark beetle.
An Ultra-Wide Gallery
Click an image for a closer look, and to view a slide show.


, Yosemite")


2019 Highlights: Social Distancing Edition
Posted on March 22, 2020
What have you been doing with your spring “vacation.” Sequestered here in the Gary Hart Photography World Headquarters, I’ve been spending a lot of time going through my 2019 images and have already uncovered a half dozen or so that qualify for my 2019 Highlights post. It’s a welcome relief from coronavirus news and the stress of rescheduling workshops. As I work, I’m starting to realize that the coolest thing about going through past images isn’t finding new images to process and share, it’s reviving the faded memories of wonderful moments in nature.
Here’s the “new” stuff I’ve found so far

Sand Like Glass, Bandon Beach Sunset, Oregon
I blogged about this image last week, but I like it so much that I’m sharing it again. One of my favorite thing about photographing a beach sunset is the sand reflections that appear as a wave recedes. I was so taken by the reflections this evening that I wasn’t even aware that two Bandon Beach icons were in my frame: Howling Dog (the pointy rock in the distant left) and Face Rock (the large, most distant rock near the center).

Island in the Sand, Bandon Beach, Oregon
Farther down the beach later that evening, the light had started to warm when I found a couple of rocks that formed virtual islands in a reflective pool. These pools only last for a few seconds, so you have to be fast (or just wait for the next wave).

Howling Dog at Sunset, Bandon Beach, Oregon
This is also Bandon Beach, but it’s three months later. Unlike my earlier image that reduced Howling Dog (no, this is not Wizard’s Hat) to a bit part, this composition features Howling Dog front and center (I must admit, from this angle, it does look more like a wizard’s hat than a howling dog). I like the way the little stream picks up the sunset light and guides my eye into the frame.

Lightning Strike, Grand Canyon
This was the first shoot of last year’s first Grand Canyon Monsoon workshop. The forecast said mostly sunny and no rain. The forecast was wrong.
Winter Reflection, El Capitan and Three Brothers, Yosemite
Heavy snow had closed Yosemite Valley to incoming visitors, but my brother and I had arrived the day before (as most of the current visitors were heading for the exits), so it felt like we had the park to ourselves. We trudged about 100 yards through four foot drifts to get out to this spot.

Gary Hart Photography: Winter Reflection, El Capitan and Cathedral Rocks, Yosemite
This is looking west from the same location as the previous image. Maybe there’s something on Earth more beautiful than watching a Yosemite snowstorm clear, but I haven’t seen it.
Winter Storm, El Capitan in the Snow, Yosemite
This was one of our first stops that morning. The snow was still falling when we stopped at El Capitan Bridge (you can see it streaking in the lower left), but the blue sky told us we needed to work fast.
Here’s my original 2019 Highlights post
We’ve reached that time of year where everyone is compiling their Top 10 lists. I like retrospectives as much as the next person, but I’ve always resisted assembling these “top-whatever” end-of-year countdowns of my own images. Then last week Sony asked me to provide my favorite image of 2019 and I struggled mightily because it felt like they were asking me to pick a favorite child—which, as we all know, can vary on a daily basis. (Just kidding—I love you girls!) But seriously, I did hesitate because I wasn’t sure Sony and I aren’t defining “favorite” the same, and in fact favorite for me can mean many things that are easily skewed by mood and memory.
So instead of attempting to rate and rank my images at year’s end, I prefer using them as a catalyst for reflection. Each December I go through the images I’ve processed from the waning year and reflect on the circumstances of their capture. Rather than focus on individual images, I’ll start by reflecting more on the experience surrounding three memorable shoots that stand out from in a year filled with too many individual highlights to detail here (but feel free to go through my 2019 blog posts). And if you’re just here for the pictures, jump to the bottom to see a gallery of 2019 images that make me happy (including some new images that I’ve never shared).
Iceland northern lights
I can think of no better way to start a year than the opportunity to photograph something I’ve fantasized about seeing for my entire life. When Don Smith and I traveled to Iceland last January, I had two goals in mind: scout for our upcoming photo workshop, and see the northern lights. The scouting trip was a great success, but with just a couple of days to go, and not for lack of trying, we still hadn’t seen the northern lights.
On our penultimate night we finally witnessed a nice aurora display that spread ebbing and flowing veils of green, coloring the sky above Glacier Lagoon from the horizon to about 45 degrees—I was thrilled and felt like my aurora dreams had been fulfilled. Then came our final night, when I learned what a real northern lights display is.
There really are no words to describe this experience, so I’ll just let my images speak for me. I will say that two-dimensional, still images don’t fully convey the experience of witnessing the aurora in person, but they do at least least give you an idea of the drama and magnitude: for one thing, the foreground was darker than what I captured (though it was bright enough that I walked around without a flashlight); the aurora moves, maybe at about the speed of the minute hand on a clock. And while the previous night’s display was only in the northwest and covered no more than a quarter of the sky, the display this night at times spread across the entire sky and needed to constantly spin around to make sure I wasn’t missing something.
Read more about this night of a lifetime: Chasing the Northern Lights
New Zealand winter night
Don and I did two winter photo workshops on New Zealand’s South Island in 2019. The first was our regularly scheduled New Zealand winter workshop, the second was a workshop we put together to guide a group from the Sony Alpha Imaging Collective. Though night photography was a priority for both groups, the moon and clouds hindered the first group’s efforts (until our final night, but that’s another story).
The second group fared better in the night photography department in general, one day in particular stood out. We started with a 3 a.m. starlight shoot at Lake Wanaka, then made the 3-hour drive to Aoraki National Park, where we spent a day photographing spectacular fog and hoarfrost along the way, and glaciers, lakes, and mountains once we arrived. Following our beautiful sunset on the shore of Tasman Lake, we bundled up to wait for dark and were rewarded with one of the most breathtaking Milky Way shoots in my life (which has been filled with many Milky Way shoots).
All I could think about on the foggy 3-hour drive back from Aoraki was curling up in my warm bed and getting some much needed sleep. But when we pulled into our hotel a little before midnight and I looked up and saw stars, it felt like someone had flipped the switch on my reserve generator and I just had to go back out and shoot some more. So while everyone else headed to their rooms to process images or sleep, I grabbed my camera gear and raced to the lake. For the entire 10-minute walk to Wanaka’s iconic willow tree, I kept an eye on a bank of fog massing on the far shore and willed it to hold off long to allow me a few frames.
Finding the view of the tree completely devoid of people (a personal first), I photographed for nearly an hour in glorious solitude. While waiting for each exposure to complete, and with nothing in my world but me, my camera, and a sky full of stars, I reflected on the last 21 hours realize this was the perfect cap to what was no doubt one of the most memorable photography days of my life.
Read more about this day seemed to last forever: The Longest Day
Grand Canyon electrical storm
Each year starting in 2013, Don and I have guided two photo workshop groups around both rims of the Grand Canyon, chasing the lightning, towering clouds, and dramatic light of the Southwest’s summer monsoon. This year’s Grand Canyon monsoon trip was filled with lots of great memories and photography that included rainbows and more lightning strikes than I can count, but one experience in particular stands out above the rest.
The best vantage point for an electrical storm on the Grand Canyon North Rim is probably the twin view decks at Grand Canyon Lodge. Not only do these open-air decks provide a beautiful, sweeping view of the canyon, they’re shielded from lightning by a network of lightning rods, and anchored by an enclosed viewing area for retreat when the action gets too close.
We’d been watching a storm build in the distant west, but unlike most storms here, this one moved toward us and didn’t veer or fade as it approached. The storm arrived so quickly, and so mesmerized were we by its power, that it was almost on top of us before we could react. The rain was just starting to pelt us when Oza Butte, about a mile away, was stabbed with multiple strokes that made everyone jump and gasp. That was our signal to grab our gear and race for cover.
Safe inside as the storm raged around us, everyone in the group buzzed about “the big one.” I moved around the room and confirmed that nearly everyone had some version of this spectacular strike, then scrolled through my own frames holding my breath until I came across this one. Many in the group only had the bolt on the right because that’s the direction the lighting had been firing. I was silently patted myself on the back for having the foresight (good luck) to have widened and shifted my composition to the left shortly before this bolt hit. First, because it seemed like the storm was moving in that direction, and also because I wanted my composition to include more canyon.
Read more about this hair raising experience: I Just Have to Share This

Lightning Explosion, Oza Butte, Grand Canyon North Rim
2019 Highlights (Updated March 2020)
Click an image for a closer look and to view a slide show.


")


Hunkered Down
Posted on March 17, 2020
Sand Like Glass, Bandon Beach Sunset, Oregon
Sony a7RIII
Sony 16-35 GM
1/30 second
F/18
ISO 100
So how has your world been upended by the coronavirus? Fortunate for me, mine so far has been firmly pegged on the inconvenience side of the coronavirus inconvenience-tragedy continuum. I’ve had to reschedule a couple of workshops, answer lots of concerned e-mails, and abandon some firmly established routines, but (as far as I know) no one in my circle has even gotten sick. So you won’t hear me complaining.
One thing this shelter-in-place time has provided is the opportunity to mine my image folders for forgotten gems that my (formerly) busy schedule never allowed me to process. And you know what? It’s actually kind of fun. I have some shoots that I’ve mentally bookmarked as “sure things,” but the coolest thing is that I’m finding stuff I’d completely forgotten about. I started with this image from January 2019 at Bandon Beach (for no other reason than it was in the oldest folder on the hard drive that happened to be in closest reach), and it turns out this is the first image I’ve processed from this scouting trip Don Smith and I took fourteen months ago—one of the shoots I’d completely forgotten.
In addition to going through old images, and to prevent myself from going completely stir crazy, I plan to take this opportunity to spend more quality time with my camera. One of the nice things about landscape photography is that it can be both a group or a solitary endeavor, and both are pretty great The group aspect I’ve covered pretty thoroughly with my workshops, but the solitary part has suffered in recent years. Spring is one of the best times to photograph the foothills near my Sacramento home, and with everyone’s travel so restricted, I plan to take full advantage of the reduced crowds during what’s normally one of Yosemite’s busiest seasons.
I also think I’ll try to do some of that education and skill refreshing that I always say I need to get to, but never do. And who knows—maybe I’ll even find more time for my blog….
About this image
Don and I were in Bandon scouting locations for our shared Oregon Coast photo workshops that were scheduled to kick off a couple of months later. We’d been to Bandon a number of times before, so the goal this evening wasn’t so much to identify photo spots as it was to become more familiar with the light, tide, and surf here.
I started this evening way up at the north end of the beach and slowly made my way south. The tide was out, exposing lots of sand and rocks that had been submerged on previous visits, and the thing that most drew my eye was the reflections on the sand left by receding waves. In most places the reflections faded as the water percolated downward into the sand, but in the spots where extra water was funneled by rocks embedded in the beach, deeper indentations created pools. At first I was just content to look and mentally compose, but when the sun approached the horizon I got my camera out and went to work. I started with a few sunstars as the sun dropped into the clouds, but the best stuff didn’t come until after the sun disappeared.
I don’t have any specific memories of composing this shot, but I can tell by looking at it that my mindset was to pair the foreground rocks and reflection with the background sea stacks. To emphasize the rocks and reflection, I went wide and got very close, allowing them to nearly fill my frame. Then I waited for a wave to flood the scene, and recede to reveal a reflection.
Hang in there everybody (and wash your hands!).
Workshop Schedule || Purchase Prints
Life’s a Beach
Click an image for a closer look, and to view a slide show.


I Laughed, I Cried…
Posted on March 9, 2020

Heaven Sent, Aurora Above Glacier Lagoon, Iceland
Sony a7RIV
Sony 16-35 GM
20 seconds
F/2.8
ISO 3200
To photograph the northern lights, lots of things need to go right. It starts with picking the right time of year, and finding a location far from city lights—the best months and locations can be determined with research and scouting, but far more problematic are the factors beyond my control: solar activity and weather. And unfortunately, when people sign up for a January Iceland workshop, no matter how clear you make it to them the northern lights are not guaranteed, they really, really, really expect to see the northern lights.
Before Don Smith and I scheduled our 2020 Iceland photo workshop, we did our best to maximize our group’s photography opportunities in general, and northern lights chances in particular: we researched Iceland’s prime northern lights months, identified the best guiding service, and in January 2019 spent 10 days with our guide scouting the spectacular Iceland landscape. On this advance trip we even were treated to a breathtaking northern lights show that enabled us to hone our aurora photography skills, and fill our websites with images.
When we announced the 2020 trip we did all the right stuff, providing preparation and educational material that emphasized the disclaimer that we can’t guarantee the northern lights. But as the trip approached and I started receiving good natured (I think) threats (“You better get us the northern lights or I’ll…”), I couldn’t help feeling a little anxious. As early as 10 days before the workshop, I started checking the long-range forecasts, but no matter which resource I chose, and how many times I checked, things weren’t turning out the way I’d hoped. Not only did the weather look pretty bleak (rain, snow, fog), the KP forecast of solar activity was pegged in the 0-2 range (on a scale that goes all the way up to 9). Gulp.
Throughout the workshop Óli (our guide), Don, and I obsessively monitored the forecasts and tried to stay as positive as possible, but with two nights to go, we hadn’t had a hint of northern lights opportunity, and the natives were getting restless. I suspect that the only thing preventing an all-out coup was that the locations and frequent clouds and snow made the rest of the workshop’s photography pretty fantastic. (Okay, seriously, this group was tons of fun and very understanding about our impossible aurora conditions, but I really wanted to deliver for them.)
In the back of my mind was the experience Óli, Don, and I had last year, when the forecasts were bleak until an unexpected uptick in the KP index coincided with a clearing of the sky at Glacier Lagoon on the trip’s last two nights. Throughout this year’s trip, I told myself (and all who would listen) that if it happened once, it could happen again. And guess what…
By the time we wrapped up our sunset shoot at Glacier Lagoon on the workshop’s penultimate day, we all knew that tonight could be the night—the weather forecast had improved to “partly cloudy,” and the KP index had bumped up into the 2-3 range. Far from a sure thing, but definitely worth bundling up and giving it a shot. So after dinner we piled back onto our bus and returned to Glacier Lagoon.
At the lagoon I hopped from the bus to scan the dark northern sky and saw a mix of clouds and stars. There was the Big Dipper and Cassiopeia. And once my eyes adjusted, I found the faint section of the Milky Way overhead and traced its path downward until it disappeared into a mass of clouds—not ideal, but there were enough stars to know we’d be okay. Unlike the previous year’s shoot, the northern lights weren’t visible to the naked eye, so I quickly set up my tripod and camera to take a test exposure, and there it was in my LCD, a faint but distinct green glow hovering above the northern horizon, partially obscured by clouds but unquestionably the northern lights. We were in business.
The darkness made keeping track of people pretty difficult, but since we’d already photographed here, everyone had their own idea of where they wanted to be and quickly scattered. I, and many others, started along the lagoon’s shoreline, but within an hour or so almost everyone had ascended the hillside overlooking the lagoon for a much more expansive view of the horizon.
Even though the aurora had brightened and was now visible to the naked eye, it remained just a green and (occasionally) red glow that lacked definition. Nevertheless, I could sense everyone’s relief—despite maintaining a positive facade, until this night I think most of us had become silently resigned to the fact that the northern lights weren’t in our future. At least they could all now say they’d seen the beauty of the northern lights. And then something amazing happened.
As if someone had suddenly cranked the intensity knob, a visible green shaft climbed skyward from behind the mountains, and within five minutes half the sky was alive with dancing light. The display was so beautiful and unexpected that we all just couldn’t help laughing at our good fortune. This great group that had spent more than a week bouncing around the Iceland countryside, marveling, eating, sharing, shivering, and (especially) dreaming of northern lights, was having a blast photographing together above Glacier Lagoon.
I can’t begin to express the joy I felt that night. It’s always wonderful to witness nature’s marvels firsthand, but sharing a first time with an infinitely deserving group of friends is truly special. After a while I stopped shooting to just watch the show and listen to the joy and felt tears welling in my eyes.
Epilogue
I spent more time this shoot moving around in the dark, helping people in the group with focus and exposure, than I did taking pictures. And it turns out that at some point in these travels, my camera lost focus and more than half of my images, including those from the peak of the aurora activity, are unusably soft. This is only mildly disappointing because 1) in a workshop it really isn’t about my photography anyway, and 2) I already have plenty spectacular Glacier Lagoon northern lights images from last year’s trip.
And despite that setback, I did get enough images to confirm that my Sony a7RIV is an excellent night photography camera. Until this trip I’ve always used my Sony a7SII (or the a7S that preceded it) for my night work, but I decided to save weight by leaving the a7SII home. While the low-light vision of the a7SII makes its viewfinder second to none for night composition and focus, the a7RIV proved good enough for that, and the image quality difference isn’t discernible.
My Aurora Bounty So Far (mostly from 2019)
Click an image for a closer look and to view a slide show.


To Polarize, or Not to Polarize
Posted on March 3, 2020
One of my most frequently asked questions during a workshop shoot is, “Should I use my polarizer here?” Of course that’s an impossible question to answer absolutely because as a creative choice, the polarizer decision is rarely absolute.
While many people believe the sole purpose of a polarizer is to make the sky darker (deeper blue), blue sky is just a byproduct of the polarizer’s function: to cut reflections. In fact, if someone could design a polarizer that only worked on the landscape and did nothing to the sky, that’s the one I’d be using because: 1) I generally don’t care for blue sky in my images, and 2) a polarizer doesn’t usually darken the sky uniformly.
Before going any farther, I should probably explain a little about what a polarizer does, and how it does it.
Put simply
A polarizer cuts reflections. It’s a piece of glass mounted on a threaded ring—the threaded ring screws onto a lens, while the glass part of the polarizer rotates independently, allowing the photographer to rotate the glass 360 degrees on the front of the lens. (Contrary to popular belief, a polarizer is a single piece of rotating glass, not one piece of glass rotating atop a second stationary piece of glass.) The polarizer is designed to rotate because its greatest (reflection cutting) effect is at 90 degrees to the light source; at all other angles polarization decreases as the angle moves away from 90 degrees; it becomes nonexistent at 0 and 180 degrees. By watching the scene through the viewfinder as you rotate the glass, you can see the polarization effect change.
On the surface, cutting reflections might not seem so desirable for someone who likes photographing reflections as much as I do, but reflections are a much bigger part of our visual experience than most people realize. Virtually every object reflects at least a little, and many things reflect a lot more than we’re aware. Worse still, these reflections often hide the very surface features and color we most want to photograph.
When reflections hide an object’s underlying beauty, a polarizer can restore some of that beauty. I use a polarizer when I want to capture the submerged rocks or sand hidden by the reflection atop a river or lake, the rich color overwhelmed by glare reflecting from foliage, and sometimes even the sky’s deep blue that has been washed out by light scattered by atmospheric molecules.
Put a little less simply…
In reality, reflections are merely collateral damage to your polarizer. What a polarizer really does is eliminate light that’s already been polarized. To understand what’s really going on with a polarizer, read on….
Essential terminology
- Oscillation is motion relative to a fixed point. For example, when you snap a whip, the whip “oscillates” along its length. Without external interference (e.g., friction from the atmosphere or other objects), motion in one direction along the whip will have an identical motion in the opposite direction (e.g., up=down, left right, and so on), and that motion will move forward along the whip.
- A wave is oscillation along or through a medium (such as air, water, or space). The bulge that moves up and down (oscillates) along a cracked whip is a wave. For the liberal arts folks, (in this context) wave is a noun, oscillate is a verb. A wave is measured by its wavelength and frequency—the higher the frequency, the shorter the wavelength.
- Frequency is the number of times a wave peak passes a discrete point in a given unit of time (usually one second: “per second”).
- Wavelength is the distance from one wave peak to the next at any instant frozen in time.
- A transverse wave oscillates perpendicular (90°) to its direction of motion. To imagine the motion of a transverse wave, picture an ocean wave, which oscillates up and down as it advances through the water. Now think about a bottle floating in the open ocean—bobbing up and down with each wave, its up/down motion is perpendicular to the wave’s forward motion, but when that wave has passed, the bottle is in the same place it was before the wave arrived. (Waves don’t move bobbing bottles across the ocean, wind and currents do.)
- Visible light is electromagnetic radiation that reaches our eyes as a transverse wave somewhere in the wavelength range the human eye can register, about 380 to 740 nanometers (really small).
- Sunlight (or more accurately, solar energy) reaches earth as a transverse wave with a very broad and continuous spectrum of wavelengths that include, among others, the visible spectrum (lucky for photographers), infrared (lucky for everyone), and ultraviolet (lucky for sunscreen vendors). The oscillation of solar energy’s transverse wave is infinitely more complicated than an ocean wave because light oscillates in an infinite number of directions perpendicular to its direction of motion. Huh? Think about the blades of a propeller—each is perpendicular to the shaft upon which the propeller rotates, so in theory you can have an infinite number of propeller blades pointing in an infinite number of directions, each perpendicular to the shaft. So a light wave oscillates not just up/down, but also left/right, and every other (perpendicular) angle in between.
Polarization
While an unpolarized light wave oscillates on every plane perpendicular to the wave’s motion, polarized light only oscillates on one perpendicular plane (up/down or left/right or 45°/225° and so on).
Polarization can be induced many ways, but photographers are most interested in light that has already been polarized by reflection from a nonmetallic surface (such as water or foliage), or light that has been scattered by molecules in our atmosphere. Light scattered by a reflective surface is polarized parallel to the reflective surface; light scattered by molecules in the atmosphere is polarized perpendicular to the direction of the light.
Polarization can also be induced artificially with a polarizing filter (“polarizer”), a filter coated with a material whose molecular structure allows most light to pass, but blocks light waves oscillating in a specific direction. When unpolarized light (most of the light that illuminates our lives) passes through a polarizer, the light that enters the lens to which it’s attached has been stripped of the waves oscillating in a certain direction and we (through the viewfinder) see a uniform darkening of the entire scene (usually one to two stops).
But that uniform darkening is not usually what we use a polarizer for. (I say usually because sometimes we use a polarizer to reduce light and stretch the shutter speed in lieu of a neutral density filter.) Photographers are most interested in their polarizers’ ability to eliminate reflective glare and darken the sky, which occurs when their polarizer’s rotating glass element matches the oscillation direction of light that has already been polarized by reflection or scattering, cancelling that light. By watching the scene as we rotate the filter’s polarizing element, photographers know that we’ve achieved maximum polarization (reflection reduction) when we rotate the polarizer until maximum darkening is achieved—voila!
The exception that proves the rule
Most photographers know that a polarizer has its greatest effect on the sky when it’s at right angles (90°) to the sun, and least effective when pointed directly into or away from the sun (0º or 180°). We also know that a rainbow, which is always centered on the “anti-solar point” (a line drawn from the sun through the back of your head and out between your eyes points to the anti-solar point) exactly 180° from the sun, can be erased by a polarizer. But how can it be that a polarizer is most effective at 90° to the sun, and a rainbow is 180° from the sun? To test your understanding of polarization, try to reason out why a rainbow is eliminated by a polarizer.
Did you figure it out? I won’t keep you in suspense: light entering a raindrop is split into its component colors by refraction; that light is reflected off the back of the raindrop and back to your eyes (there’s a little more bouncing around going on inside the raindrop, but this is the end result). Because a rainbow is reflected light, it’s polarized, which means that it can be eliminated by a properly oriented polarizer.
But back to the original question
Should I use a polarizer? I’m still not going to answer. What I will tell you is that I carry a polarizer for every lens in my bag, and when the sun’s out I virtually always have a polarizer on my lens. But my approach comes with some caveats:
- A polarizer cuts the amount of light reaching your sensor by 1 to 2 stops, which means if don’t use a tripod (shame on you), a polarizer requires a faster shutter speed.
- You must get in the habit of orienting the polarizer with each composition, or risk doing more harm than good to your image
While I use a polarizer on pretty much all of my daylight images, there are times I remove it:
- At night (duh), or whenever the scene is so dark that the polarizer’s cost to my exposure settings exceeds its benefit.
- On a wide lens with lots of blue sky, the polarizer’s effect on different areas of the sky can be both obvious and uncorrectable (I can dodge/burn minor differences). On the other hand, I almost always avoid wide shots with lots of blue sky, so this is rarely a consideration.
- When the sun is in my frame—for example, when I’m going for a sunstar—the extra glass a polarizer adds increases the likelihood of unsightly reflections.
- Photographing a full rainbow with a wide lens, a polarizer can eliminate or diminish part of the rainbow.
- When I put on a neutral density filter, my polarizer comes off because stacking filters causes vignetting, the less glass between my subject and sensor the better, and nature abhors stacked filters (every time you stack filters, the photography gods fuse them until you’ve learned your lesson).
- Any time I absolutely need the fastest shutter speed possible without increasing my ISO further, the polarizer comes off.
- I should probably add that I don’t have a polarizer for my Sony 12-24 lens because ultra-wide lenses like this aren’t threaded for filters. Using a polarizer on an ultra-wide lens requires an awkward, expensive system that provides minimal benefit due to the wide field of view.
One time when I absolutely, without exception, always (have I made my point?) use a polarizer is when there’s no sky in my frame. These are the times I’m using diffuse light to capture the color and texture of leaves, flowers, water, and rocks. All of these things reflect, sometimes subtly and sometimes not so subtly, and that reflection is rarely beneficial.
And finally, a common misconception about polarizers is that their use is either all or nothing (full polarization or minimal polarization). The amount of polarization I dial in depends on the effect I’m going for. For example, each of the four images at the top of this post was captured with the polarizer oriented at a point between maximum and minimum effect by watching the scene as I turned the polarizer, then waiting until I had the combination of reflection/no-reflection I wanted. This allowed me to reveal submerged nearby features while saving the reflection of the more distant subject.
So, when should you use a polarizer? I still can’t tell you, but at least now you have the knowledge to make the decision for yourself.
Managing Reflections With a Polarizer
Click an image for a closer look and to view a slide show.


Assembly Required
Posted on February 23, 2020

Dune Patterns, Mesquite Dunes, Death Valley
Sony a7RIV
Sony 100-400 GM
1/30 second
F/5.6
ISO 100
Some images are so obvious that all you need to do is frame the scene and click; others require a little assembly.
For example
There was a lot going on visually in this January sunrise at Mesquite Flat Dunes in Death Valley—some of it good, some of it not so good. The not-so-good was the sky, which was clear and infinitely blue—great for being outside, but lousy for photography. The good was the parallel arcs etched in the pristine sand, and the play of light on the dunes’ clean lines and sweeping curves.
My problem this morning was assembling all of this good stuff into a coherent photo. I usually start by finding something to anchor my scene, then construct an image around that anchor using positioning, focal length, and framing. But out on the dunes I couldn’t find a satisfying anchor and my muse was floundering without it. Compounding the difficulty, because I was out there with my Death Valley workshop group, my mobility was limited because when you move through someone’s frame, your footprints become a permanent stain in their scene.
Rather than concede defeat and settle for something not worthy of the morning’s beauty, I switched to my Sony 100-400 GM lens (on my Sony a7RIV), zoomed to 400mm, and slowly panned the dunes in long, sweeping, horizontal arcs, hoping to find the composition that had eluded me so far. The secret to this approach is to pan slowly and disengage conscious thought, allowing my unconscious to guide my eye until something stops it (easier said than done, but surprisingly effective when I can clear my mind). The element in this scene that stopped me was the large sunlit dune at least a mile away.
I started with compositions that emphasized the large dune at the expense of foreground sharpness. That was okay, but when I briefly focused on wind-etched ridges of nearby sand about 100 yards away, the spectacular patterns and intricate detail grabbed my eye and didn’t let go. Reluctant to give up the distant dune that had drawn me in the first place, I stopped all the way down to f/22, computed the hyperfocal distance with a hyperfocal app on my phone, and tried a variety of focus points before finally surrendering to the fact that I couldn’t get both the foreground and background sharp in one frame.
Today, most photographers would simply shoot two frames and blend them in post, a perfectly valid and ridiculously simple solution that (sadly) gives me no satisfaction. So I went the other way and used the limited depth of field to my advantage. Realizing that it was the distant dune’s shape that most appealed to me, not its detail, I went instead for a soft background that focused the frame’s primary attention on the exquisite detail in the nearby sand while retaining the background’s soft shapes and shadows.
I opened my lens to f/5.6, its widest aperture at 400mm, and focused near the middle of the nearby slope. This gave me a front-to-back range of sharpness of nearly 60 feet (according to my hyperfocal app)—enough to keep the entire slope sharp, a fact I later confirmed by magnifying my capture in my mirrorless viewfinder and moving the view around. I also confirmed that the softness of background dunes was sufficient to be clearly intentional (rather than a just-missed focus error).
In addition to using a soft background to emphasize detail on the closest dune slope, I slightly underexposed the entire scene to render the shaded mountainside in the extreme distance extremely dark. The nearly black background created contrast contrast that helped the dunes stand out even better, and virtually eliminated unattractive ruts and ravines in the barren brown slope.
A Death Valley Gallery
Click an image for a closer look and to view a slide show.


Yosemite Horsetail Fall update, February 2020
Posted on February 16, 2020
Horsetail Fall Light (but no visible water), Merced River, Yosemite
Sony a7RIV
Sony 24-105 G
3 2/3 seconds
F/11
ISO 100
On Thursday night I returned from a week in Yosemite following back-to-back workshops there. The featured goal of my first workshop was to photograph the full moon; the highlight of the second workshop was supposed to be Horsetail Fall. The moon cooperated wonderfully, but Horsetail Fall…? Well…, I’ve got some good news and some bad news…
First, the good news…
Despite reports to the contrary, Horsetail Fall is flowing (and I have the pictures to prove it). Not only that, with no clouds in the forecast, Horsetail Fall’s normally fickle warm sunset light suddenly looks like a pretty good bet. What could possibly go wrong?

")
The bad news
Unfortunately, you can’t actually see Horsetail Fall’s water from Yosemite Valley (and I have the picture to prove it).

This is what Horsetail Fall looked like at sunset the same day (about 30 minutes later), from the same location in Yosemite Valley (no visible water, even when I zoom way into my 61 megapixel file)
More bad news
No rain or snow is in California’s forecast for at least ten days, which means little chance for more water in the fall. Also, as my group wrapped up our workshop on Thursday evening, the National Park Service was putting up cones and signs to prevent people from accessing all Horsetail Fall views on Southside Drive (such as the one in the above images) between noon and 7 p.m. through February 27.
This is why we can’t have nice things
In recent years, photographers have obliviously trampled sensitive riverbank areas while jostling for Horsetail Fall vantage points. Three years ago the weight of hundreds of photographers caused an entire section of elevated riverbank to crack and slump toward the river, damage that persists and worsens each year.

Screenshot from the NPS Yosemite Horsetail Fall web page of a recent Southside Drive viewing experience.
I know most photographers care about and respect their subjects; it’s sad that a selfish minority have to ruin it for everyone. This problem doesn’t just apply to Yosemite; photographer abuse seems to be pretty universal and I’m afraid we’re going be dealing with more (justifiable) restrictions at other popular photo spots in the future.
The 2020 Horsetail Fall prognosis
Even without visible water, I expect hundreds of photographers, and possibly thousands on peak weekends, to attempt to view Horsetail Fall from the open vantage points on Northside Drive. The El Capitan picnic area is the epicenter of this activity—you’ll need to walk 1 1/2 miles to get there this year—but there are other spots for people with advance knowledge, or who spend a little time scouting.
- For the latest from the National Park Service on Horsetail Fall and its viewing restrictions, visit the Horsetail Fall web page.
- For my general (not year-specific) tips for photographing Horsetail Fall, read my Horsetail Fall Photo Tips article.
About this image
As this year’s Horsetail Fall workshop group learned, a Horsetail Fall photo workshop without Horsetail Fall is not the end of the world. February’s lack of crowds (at any location that’s not Horsetail Fall) is a joy for anyone who has visited Yosemite in spring and summer. And even without snow or clouds, Yosemite Valley has some pretty spectacular in winter. Winter delivers the year’s best light to El Capitan and Yosemite Falls (the late light on Half Dome is always good), and the Merced River is low and slow enough to flash reflections nearly everywhere. Though not at their spring peak, Yosemite and Bridalveil Falls flow nicely in winter, even providing nice rainbows for those who know where and when to look.
The red sunset light that colors Horsetail Fall in February also works its magic on Half Dome. In fact, when there’s no water in Horsetail, I prefer the light on Half Dome to the light on Horsetail because the entire face of Half Dome lights up all the way to sunset (and a little beyond). Another reason to favor Half Dome over a Horsetail Fall of dubious potential (dry, or a good chance clouds will block the light) is that from most of the favored Horsetail Fall vantage points, there’s not much to shoot besides Horsetail Fall—if it doesn’t put on its show, you’ve pretty much wasted a sunset. So for this year’s Horsetail Fall group, most of our sunset shoots featured Half Dome.
Nevertheless, wanting to give everyone an idea of the Horsetail Fall light, for one of our sunsets I chose a popular Merced River spot just upstream from Cathedral Beach. Unlike the most popular Horsetail Fall photo locations, the view here is wide open, with views and reflections of Cathedral Rocks, El Capitan, and the Three Brothers. So regardless of the conditions, the view here is always good—maybe not the classic Horsetail perspective everyone sees, but a good compromise that shows off the Horsetail light while still offering other nice stuff to photograph at sunset.
Arriving about 40 minutes before sunset, we found a few photographers set-up by the road with telephotos trained on (virtually dry) Horsetail Fall, but we were the only ones to venture down to the river. I’d taken my group to the same spot for the morning’s first light on El Capitan, so there was no need to orient them—everyone beelined to the river and went right to work.
Unlike the morning shoot, when the group spread out, we pretty much stayed together at the best view of El Capitan. The first thing I did was attach my Sony 100-400 and 2X teleconverter to my Sony a7RIV and point it at the top of Horsetail Fall. With my camera in APS-C (1.5 magnification) mode, I maxed the digital magnification in my viewfinder and saw that there was indeed water springing from the top of El Capitan—maybe not a lot, but enough to get airborne as it reached the precipice.
After sharing the magnified view on my LCD with the rest of the group, I fired off a couple of frames as evidence of water for any skeptics. Then I went to work on El Capitan’s beautiful, rapidly warming light and its reflection in the Merced River. The light this evening did its classic Horsetail thing, warming and turning orange as the lit patch shrunk with the setting sun. Also in character, the light teased us by fading to nearly nothing about five minutes before sunset, but I knew this had to be due to an unseen cloud because El Capitan stays lit for three or four minutes after sunset.
Sure enough, just two or three minutes before sunset the light bounced back, now with a distinct orange-red hue. For the next five minutes we watched the light redden and fade (the light gets more red as the sun sets, becoming most red just before snuffing out completely), clicking frantically. That evening’s light was about as good as it gets (at least a 9 on a 1-10 scale of what I’ve seen in previous years)—in other words, with water, Horsetail Fall would have been nearly perfect. But water in the fall or not, this turned out to be a pretty successful shoot.
Join me in a Yosemite photo workshop (including next year’s Horsetail Fall)
Horsetail Fall from Many Angles
Click an image for a closer look and to view a slide show.


You’re Gonna Need a Bigger Moon
Posted on February 13, 2020
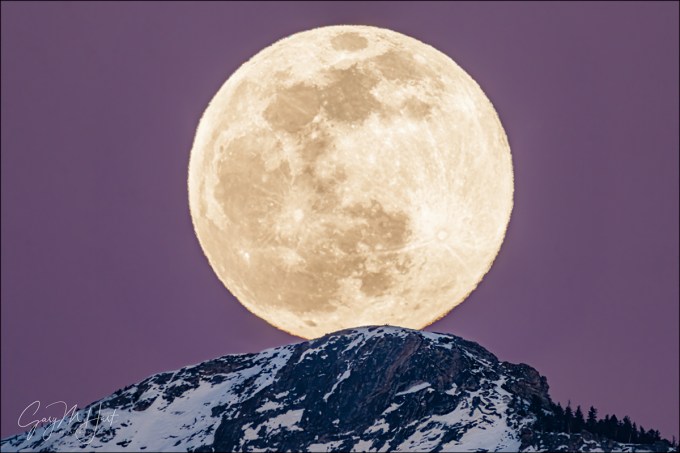
Moon’s Rest, Cloud’s Rest, Yosemite
Sony a7RIV
Sony 200-600 G (APS-C crop)
Sony 2x teleconverter
1800mm focal length equivalent
ISO 200
f/13
1/20 second
Size matters
About 15 years ago I pitched a moon photography article to a national photography magazine. I was declined because, according to the editor, “No one likes to photograph the moon because it looks too small in a picture.” While I respectfully disagree and in fact love using a small moon as an accent to my landscape scenes, that felt like a challenge to prove that it is possible to capture the moon BIG.
Then…
When I started plotting and photographing moonrises (long before The Photographer’s Ephemeris and PhotoPills), my longest lens was 200mm—adding a 100-400 to my bag was just a dream. When I finally got a good deal on a slightly used Canon 100-400 lens, I thought I was set for big-moon photography for life—until my friend Don Smith’s 150-600 lens gave me feelings of inadequacy. Soon I was packing a Tamron 150-600 lens. I liked the extra size my Tamron 150-600 gave my moons, and while found the images sharp enough to continue using the lens with an adapter after switching to Sony, when got my hands on the Sony 100-400 GM lens, I was so excited about that len’s sharpness with the Sony 2X Teleconverter, that I jettisoned the Tamron for good.
For a couple of years my standard big-moon setup was a Sony a7RIII and Sony 100-400 with the 2X Teleconverter, giving me 42 megapixel images and 800mm for the biggest, sharpest moon I’d ever photographed. Better still, putting the Sony 100-400 and 2X Teleconverter on my 1.5-crop Sony a6300, I was able to capture 24 megapixel files at a 1200mm equivalent. Wow, 1200 megapixels: Surely I’d achieved the zenith of my lunar supersizing aspirations. Nope.
… and now
Last year Sony released its 200-600 lens and the 61 megapixel a7RIV body. Since the APS-C (1.5x) crop on the a7RIV is 26 megapixels (2 megapixels more than the a6300), I dropped the a6300 from my moon shooting arsenal. In October I played with my new setup a little using a crescent moon in the Eastern Sierra, but I couldn’t wait to try it out on my favorite moon shoot of all: the Yosemite Tunnel View full moon.
Last Saturday night I assembled my Yosemite Winter Moon photo workshop group on the granite above Tunnel View to wait for the moonrise I’d timed the workshop for. Sunset was 5:30, and I expected the moon to appear directly behind Cloud’s Rest between a little before 5:35, which meant the sky and landscape would already be starting to darken. The exposure for a post-sunset full moon is trickier than many people realize because capturing detail in both the daylight-bright moon and the rapidly fading landscape requires vigilant scrutiny of the camera’s histogram and highlight alert (blinking highlights). To get everyone up to speed, I used nearly full rising moons on the workshop’s first two nights to teach them to trust their camera’s exposure aids and ignore the image on the LCD (kind of like flying a plane on instruments). With two moonrises under their belts, by Saturday evening I was confident everyone was ready.
I was ready too. In my never-ending quest to photograph the moon as large as possible, I went nuclear—none of that wimpy-ass 200mm glass for me, for this moonrise I used every resource in my bag. I set up two tripods: mounted on one was my Sony a7RIII and 100-400 GM lens; on the other tripod was my Sony a7RIV and 200-600, doubled by the 2X teleconverter: 1200mm. But I wasn’t done. Normally I shoot full frame and crop later (for more compositional flexibility), but just for fun, on this night I decided to put my camera in APS-C mode so I could compose the scene at a truly ridiculous 1800mm—I just couldn’t resist seeing what 1800mm looked like in my viewfinder.
While waiting for the moon the group enjoyed experimenting with different compositions using the warm sunset light illuminating Half Dome and El Capitan. I used the time to test the focus at this unprecedented focal length. Waiting for an event like this with a group is one of my favorite things about photo workshops, and this evening was no exception. Between questions and clicks, we traded stories, laughed, and just enjoyed the spectacular view.
The brilliant sliver of the moon’s leading edge peaked above Cloud’s Rest at 5:33. It is truly startling to realize how quickly the moon moves through the frame at 1800mm, so everything after that was kind of a blur. Adjusting compositions and tweaking exposure and focus on two bodies, I felt like the percussionist in a jazz band, but I somehow managed to track the moon well enough to keep it framed in both cameras.
By the time the moon was about to clear Cloud’s Rest, the darkening sky had started to pink-up nicely—underexposing slightly to avoid blowing out the moon’s highlights enriched the color further. The image you see here is exactly what I saw in my viewfinder (not cropped in post-processing), a full 1800mm equivalent that nearly fills the frame top-to-bottom. After years of thinking I’ll never need a bigger lens, I know enough now not make that claim again, but I’m definitely satisfied (for now).
Learn how to photograph a big moon
Workshop Schedule || Purchase Prints
Fifteen Years of Supersized Moons
Click an image for a closer look and to view a slide show.


")


")


Good Times at Badwater
Posted on February 4, 2020

Sunset Reflection, Badwater, Death Valley
Sony a7RIV
Sony 12-24 G
.8 seconds
F/11
ISO 100
When I decided to make my living as a photographer, about 15 years ago, I promised myself that I would photograph only what I want to photograph. That’s one reason, and perhaps the prime reason, I built my business around photo workshops rather than image sales. Because not only do photo workshops align with some of my personal strengths, they allow me to select my photography subjects and compositions for their personal appeal instead of their salability. By photographing and sharing only the images that most please me, I give potential customers a pretty good idea of what I have to offer—if you don’t like my photography, you probably shouldn’t sign up for my workshops.
That’s a long way of explaining why you see so many moon and stars, lightning, rainbow, and reflection images in my portfolio: I can photograph anything I want, and photographing those things makes me happy. With all the online ridicule and disagreement in the online photography community, sometimes its easy to forget what a joyful endeavor photography is (or should be).
In 2005, the very first time I visited Death Valley as a photographer, there was water on the Badwater Playa—so much water that a kayaker scooted atop its surface. But I didn’t appreciate the uniqueness of that experience enough to take full photographic advantage, which is is how I ended up waiting 15 years to see water at Badwater again.
The Badwater lake was much smaller this year than it was in 2005. That year, the water lapped at the shoulder of Badwater Road; this year the lake was a 10-minute walk from the road. And I don’t know how deep it was in 2005, but this year it wasn’t deep enough for a kayak, not even close. In fact, I’m pretty sure I could have walked all the way across in sneakers without getting my socks wet.
But because the lake was so shallow, the reflection was off the charts. So nice in fact that I took my workshop group out here twice, once for sunrise and again a day later for sunset. For the sunset shoot most of us ventured far enough into the lake that we were entirely surrounded by reflection. The sky that evening was a disorganized medley of thin clouds that throbbed with sunset color, and its reflection completely surrounded us.
The water was thin enough that the polygon patterns that Badwater is famous for remained clearly visible at our feet. Composing this spectacular sunset, I went with my 12-24 lens to include as much sky and water as possible, dropped low, and positioned myself to feature the symmetry of the polygon patterns.
Workshop Schedule || Purchase Prints
|| Here’s an updated version of my Photo Tips article on reflections ||
Reflections
Reflection
Dictionary.com: The return of light, heat, sound, etc., after striking a surface.
Okay, so that’s pretty basic. How about this one?
Wikipedia: The change in direction of a wavefront at an interface between two different media so that the wavefront returns into the medium from which it originated
Whoa, I hope that’s not on the test.
Who doesn’t love the soothing tranquility of a good reflection? And like a metaphor in writing, a reflection is an indirect representation that can be more powerful than its literal double thanks to its ability to engage the brain in different ways than we’re accustomed. Rather than processing the scene directly, we first must mentally reassemble the reflection’s reverse world, and in the process perhaps see the scene a little differently.
Reflections are a powerful photographic tool as well. Water’s universal familiarity makes it an ideal subject for photographers frustrated by their camera’s static representation of our dynamic world. Just as we freeze or blur a waterfall to express turbulent motion, we can include a reflection to convey serenity.
Water reflections come in many forms, from a mirror-sharp reverse of a mountain shimmering atop a still pool, to an abstract shuffle of color and texture on an undulating lake. Without getting too far into the physics of light, it’s important to understand that every object we see and photograph (that doesn’t generate its own light) comes to us courtesy of reflected light. For example, when sunlight strikes El Capitan in Yosemite, some of the sun’s photons bounce straight back into our eyes, and there it is: El Capitan!
But other photons striking El Capitan head off in different directions—some are captured by other sets of eyes, and others land on the surface of the Merced River. Some of these photons pass beneath the river’s surface to reveal the submerged riverbed, while others bounce off. The ricocheting photons that travel from El Capitan and bounce off the river, reach our eyes as a reflection. In other words, what we call a reflection is in fact re-reflected light (reflected first from El Capitan, then by the river).
Mirror reflection recipe
The ingredients for a crisp, mirror reflection like the El Capitan image at the top of the page is pretty simple: still water, a reflection subject that’s much brighter than the water’s surface (the greater the contrast the better), and a view angle that matches the angle from the water’s surface to the reflection subject. (The best reflections are usually found on shaded water because there are fewer photons to compete with the photons bouncing from the reflected subject.)
The El Capitan reflection above was a perfect confluence of reflection conditions. Clean, still air, dense shade on the river, and El Capitan’s fully exposed, reflective granite, make early morning the best time for El Capitan reflections. On this April morning I made my way down to the Merced River hoping to photograph the first light on El Capitan reflected in the Merced River. Finding my route down to the river blocked by spring flooding, I was forced to improvise. The morning air was clean and calm, and the ephemeral lake was mirror-still.
Circling the flooded meadow, I found a gap in the trees that opened onto the most complete view and reflection of El Capitan and the Three Brothers I’ve ever seen. So complete in fact, that I couldn’t include it all with my 16-35mm lens at its widest focal length. Fortunately, I was able to borrow a Canon 11-24 lens and Metabones IV adapter from a friend (thanks, Curt!), just wide enough to fit the entire scene at the lens’s shortest focal length.

Sunset Palette, Half Dome from Sentinel Dome, Yosemite
Playing the angles
Understanding that reflected photons leave the water’s surface at the same angle at which they arrive—imagine the way a tennis ball bounces (if it weren’t affected by spin, wind resistance, or gravity)—helps us get in position for the reflection we want.
A few years ago I found myself atop Sentinel Dome right after an intense rain shower had turned indentations in the granite into small, glistening pools. Rather than simply settle for the vivid sunset coloring the clouds above, I decided to include the sunset reflected in the pools as well. At eye-level the pools reflected blue sky, so I dropped my tripod as low as it would go, almost to granite level, positioning my lens at the same angle to the pools that the red light leaving the clouds struck the water.
When the water’s in motion

On the Rocks, El Capitan and the Merced River, Yosemite
As spectacular as a crisp, mirror reflection in still water is, it’s easy to overlook the visual potential of a reflection that’s not crisp, or to forget your camera’s ability to render a soft or abstract reflection much better than your eyes view it. While a crisp reflection often dominates the primary subject in an image, a splash of reflected color or shape can provide a striking accent to a dominant primary subject. And a reflection disturbed by the continuously varying angles of rippled or choppy water magically appears when a long exposure smoothes the water’s surface.
In the image on the right, the El Capitan reflection undulating atop the Merced River was barely perceptible to my eyes. But the reflection came out in a 25 second exposure achieved with the help of 6-stop neutral density filter.
Where to focus

Autumn Reflection, El Capitan, Yosemite
An often misunderstood aspect of reflection photography is where to focus. Though it seems counterintuitive, the focus point of a reflection is the reflection subject, not the reflection surface. This isn’t such a big deal in a scene like the El Capitan reflection at the top of the post, where the focus point of everything of visual significance is infinity, but it’s a very big deal when you want both your reflection and rocks or leaves on the nearby water surface sharp.
The El Capitan reflection on the right is very different from the El Capitan reflection above, where the extreme depth of field ensured sharpness had I focused on anything in the scene or the reflection. But here the leaves that were my scene’s primary emphasis were just a couple of feet from my camera, while El Capitan was several thousand feet distant. Even though the leaves floated atop the El Capitan reflection, focusing on El Capitan would have softened the leaves. To increase my depth of field, I stopped down to f/18 and focused several feet into the foreground leaves, then magnified the image on my LCD to verify that all of the leaves were sharp. Though El Capitan is slightly soft, a soft reflection is far more forgivable than a soft foreground.
Think ahead
It seems that reflections often feel like a fortuitous gift that we just stumbled upon. But given that reflections are entirely beholden to the laws of physics, they’re far more predictable than many of the natural elements we photograph. Taking a little time to understand the nature of reflections, and how they’re revealed by a camera, enables photographers to anticipate their appearance.
For example, in Yosemite I know that low flow makes autumn the best time for reflections in the Merced River. On the other hand, when the Merced is rushing with spring runoff, Yosemite’s meadows often shimmer beneath tranquil vernal pools. I plan many trips (and workshops) to take advantage of these opportunities.
Photo Workshop Schedule
A Reflection Gallery
Click an image for a closer look and slide show.


Near and Far: Thinking in Three Dimensions
Posted on January 27, 2020

Prickly Sunset, Hell’s Gate, Death Valley
Sony a7RIV
Sony 12-24 G
.4 seconds
F/11
ISO 100
Photography is the futile attempt to render a three dimensional world in a two dimensional medium. It’s “futile” because including actual depth in a photograph is literally impossible—but impossible doesn’t mean hopeless. One of the simplest things photographers can do to elevate their images is to think about their scene in three dimensions, specifically how to create the illusion of depth by composing elements at multiple distances from the camera.
Many photographers miss opportunities by simply settling for the beautiful scene before them instead of looking for ways to make it even better. A more productive approach is to start with the beautiful aspect of the scene you want to emphasize (brilliant sunset, backlit flower, towering peak, vivid rainbow, plunging waterfall, whatever), then aggressively seek an object or objects nearer or farther to complement it (this is one reason I love including the moon in my images). Of course it’s sometimes easier said than done, but this near/far mindset should drive every capture.
Thinking foreground and background is a great start, but merely having objects at varying distances usually isn’t enough—you also need to be aware of how those objects guide your viewer’s eye through the frame. We hear a lot of photographers talk about using “leading lines” to move the eye, but a line doesn’t need to be a literal (visible) line to move the eye because viewers will subconsciously connect certain elements to create virtual lines.
To help me achieve virtual leading lines, a term I like to use is “visual weight”: a quality in an object that tugs the eye like gravity, subconsciously pulling the viewer’s gaze in its direction. Qualities in an object that can create visual weight include mass, shape, brightness, contrast, color, texture, and sometimes just position in the frame. A single one of these qualities can give an object visual weight, but usually a combination of more than one is more effective.
Additionally, an object’s emotional power can boost its visual weight. For example, a small moon will pull the eye more than a larger bright cloud, and Half Dome has more visual weight than a random rock occupying the same amount of frame real estate.
With my primary subject and complementary (eye moving) objects identified, I still need to consider the linear connection between these visual components. I usually prefer diagonal relationships because I like the visual tension created by moving the eye along multiple planes. Creating these virtual diagonals requires careful positioning, but it’s surprising how many photographers just remain planted with their tripod as if it has grown roots—either they don’t see the benefit of repositioning, or don’t think moving is worth the effort.
Whatever the reason, it’s important for photographers to understand the power of shifting position to control foreground and background relationships: move left and your foreground shifts right relative to the background; move right and the foreground shifts left relative to the background. Either way, the closer the foreground is relative to the background, the more dramatic the shift. And contrary to what you might believe, it’s impossible to change foreground/background perspective with focal length—to change perspective, you must change position: forward/backward, left/right, up/down.
An often overlooked shift that can be quite powerful is the up/down shift. Often I’m able to un-merge objects at different distances by simply raising my tripod or climbing atop a nearby rock. And when my frame has a large and boring empty space (such as a field of weeds or dirt) between the foreground and background, I drop lower to shrink that gap.
For example
On the first evening of my Death Valley Winter Moon workshop earlier this month, I took my group to Hell’s Gate. At Hell’s Gate the view south is straight down the valley toward Furnace Creek and Badwater; in the east are rutted hills that turn gold with the sun’s last light; the view west takes in nearby Death Valley Buttes, with the Panamint Range in the distance. While I like this spot for these grand vistas, it’s the assortment of cacti, rocks, and shrubs to include with the vistas that especially appeal to me.
Of the many barrel cacti that dotting the hillside at Hell’s Gate, I’m especially drawn to a large specimen above the trail and about halfway up the steep slope. But because I’m leading a group and this barrel cactus usually taken by someone else, I rarely get to photograph it at prime time. This year, however, the rest of the group was occupied with other foreground subjects, so when the sky started to turn pink with sunset, I scrambled up the talus and went to work.
The color was best in the direction of the pyramid-shaped Death Valley Buttes, so I started working on a composition in that direction. I knew my foreground would be the barrel cactus, and the background subject would be the buttes, but I still needed to turn the scene into a picture. Using my Sony a7R IV, I started with my Sony 12-24 G lens to allow me to get as close as possible to the photogenic barrel cactus. Scanning the scene, I quickly recognized the visual weight potential in the bare shrub—not for its inherent beauty, but for the its contrast (against the dark rock) and flame-like shape. These qualities gave it enough visual weight to balance the right half of the frame and move the viewer’s eye diagonally toward the buttes.
I positioned myself so the cactus was closest to the frame and left of center, and the shrub was right of center, with the Death Valley Buttes right down the middle. With my camera at eye level the empty plain in the middle distance occupied too much of the frame, so I dropped down to near cactus level. Doing this had the added advantage of increasing the prominence of the interesting jumble of rocks in the near-right—they don’t stand out enough to pull the eye from the cactus-shrub-buttes path I’d laid out, but their texture added some secondary visual interest in that part of the frame.
At 12mm I had a ridiculous amount of depth of field to play with, but I still took care with my focus choices. My rule of thumb for these extreme front-to-back scenes is to identify the closest thing that must be sharp (the cactus), and focus a little behind it—if I focus on the cactus, I get near sharpness I don’t need, at the potential risk of essential distant sharpness. I probably could have gotten away with f/8, but since the light was changing fast, I didn’t want to take the time to check my hyperfocal app. I stopped down to f/11, focused on a rock a foot or so behind the cactus, metered, and clicked.
Near and Far
Click an image for a closer look and to view a slide show.


