Anchor Management
Posted on August 5, 2018
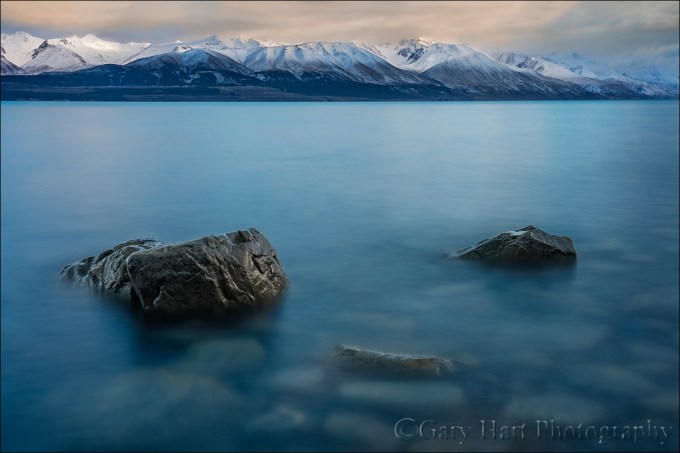
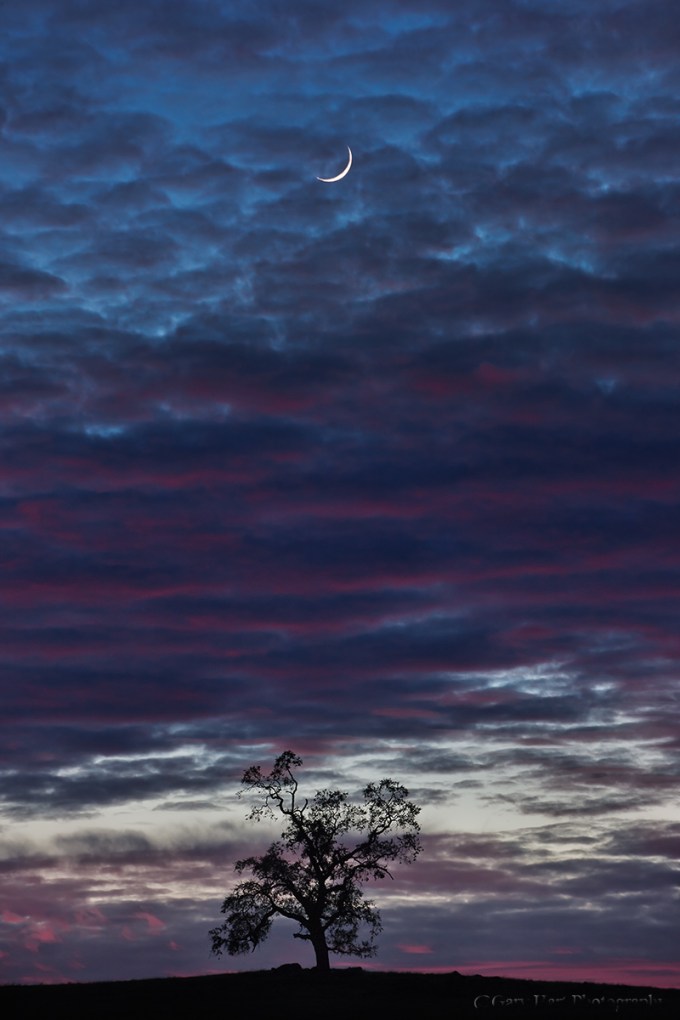
Dawn on the Rocks, Lake Pukaki, New Zealand
Sony a7R III
Sony 24-105 f/4 G
15 seconds
F/18
ISO 50
Virtually every scene I approach with a camera is beautiful, but a beautiful scene is rarely enough for a great image. Human experience of the world differs greatly from what the camera captures—the photographer’s job is to understand and use those differences.
I’ve always felt that viewers of an image are more comfortable exploring the frame—and therefore tend to linger longer with the image—when they have a starting and return place. So the first thing I do when trying to turn a beautiful scene into a beautiful picture is create that place by finding something to anchor my frame. Sometimes this anchor is an object that’s beautiful in its own right (such as a reflection, a flower, or the moon), but often it’s just a grounding element that aligns with the scene’s more striking features.
When I approached this scene on the shore of Lake Pukaki in New Zealand, I was struck first by the rich glacial turquoise water (I’ve seen a few lakes with similar color, but none that were nearly as big as Lake Pukaki), and second by the snowcapped peaks lining the distant shore. And in the pre-sunrise gloaming I could see that the sky was very nice too—maybe not spectacular, but with lots of character in the clouds plus the potential for soft, warm light when the sun finally arrived. Given all the scene had going for it, I probably could have raised my camera and composed something decent from any spot with a view of the lake, but a scene like this deserves something more than decent.
So before advancing any further, I performed my standard scan for something to anchor my frame, a visual element to surround with the scene’s inherent beauty. I was instantly drawn to an area of the beach where a few rocks protruded from the lake and quickly made my way down to the water. At the shore, in addition to the rocks that drew me I found a striking mosaic of rocks submerged beneath the clear water. A bonus for sure, but as beautiful as these submerged rocks were, as I tried to get all the visual pieces to fit together I quickly realized that they introduced a layer of complication as well.
For the next 10 or 15 minutes I wandered the lakeshore experimenting with compositions that used a variety of foreground rock combinations, but couldn’t really find anything that thrilled me. I’d click a frame or two, evaluate the result, but just couldn’t seem to organize all the foreground rocks with the mountains and sky to form something coherent.
But this wasn’t the time to become discouraged. I knew something was here and continued experimenting, hoping to find it before the light changed. As the sky brightened, I settled on the trio of rocks you see in this image. They aligned nicely with the mountains, better than anything else I’d found so far. But they were also orbited by a disorganized arrangement of satellite rocks that competed with the simple foreground I sought. I moved closer, extending my tripod as far into the water as I could, then dropped low and composed a fairly tight frame.
Eliminating the superfluous rocks made my foreground all about the rock trio, and with a few tweaks (preliminary frames followed by adjustments) arrived at the composition you see here. At this point the rocks were just a few feet from my camera, making depth of field a concern. Assisted by my hyperfocal app, I stopped down to f/18 and focused at the back of the farthest rock, taking only a couple of frames before I was confident my hyperfocal distance was dialed in.
The final piece of the puzzle was dealing with the chop in the water. Sometimes water motion can be a feature and I try to find a middle ground that softens it while retaining a bit of shape or texture. In this case I wanted simplicity, and felt that anything that wasn’t mountains, rocks, or color would be a distraction. The solution was to smooth the water as much as possible with a 15-second shutter speed.
There’s nothing inherently special about the rocks I used to anchor this image. The scene’s true beauty lies in the water and mountains, but if I’d have settled for an image that was just water and mountains, there would have been nowhere for your eye to land. Adding a simple foreground element to anchor my frame serves as a visual launching pad from which you’re free to explore the rest of this beautiful scene.
Join Don Smith and Me in New Zealand
Visual Anchors
Click an image for a closer look and slide show. Refresh the window to reorder the display.


Right Vs. Left
Posted on July 31, 2018
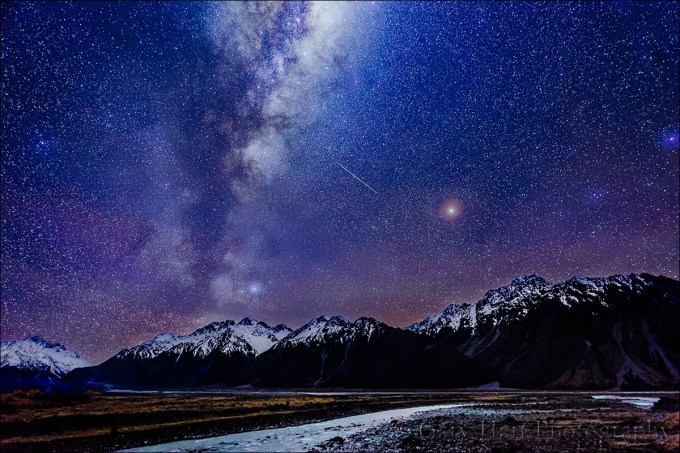
Milky Way and Hooker River, Aoraki / Mt. Cook National Park, New Zealand
Sony a7S II
Sony 16-35 f/2.8 GM
30 seconds
F/2.8
ISO 6400
Two photographers approach the same scene: One can clearly visualize a uniquely beautiful image, but he has no idea how to achieve it. The other is so intent on finding the hyperfocal point for her lens’s “sweet spot” focal length and f-stop that she barely registers the beauty before her.
While most photographers don’t fall at these extremes of the creative/analytical continuum, the vast majority do approach their craft with a dominant analytical or intuitive bias, a right-brain versus left-brain struggle with one side or the other significantly stronger than the other. Compounding the problem, rather than simply getting out of the way and letting the strong side do its work, much like an irritating little brother, the less developed (notice I didn’t say “weaker”) side seems committed to distracting its dominant counterpart.
But every once in a while we run into a photographer who seems to have negotiated a synergistic truce between her conflicting mental camps. She’s able to efficiently analyze and execute the plan-and-setup stage of a shoot, then check-in with her aesthetic counterpart for creative inspiration. As the time to click the shutter approaches, she seamlessly switches between the two camps: the right brain knows how much to soften the background and blur the water, while her left brain knows exactly how to make this happen. The result is images that consistently amaze with their creative inspiration and technical execution.
My job as a workshop leader (among other things) is to identify where each photographer falls on this analytical/intuitive spectrum so I can nurture the less developed side (first) and refine the dominant side. And after more than a dozen years of leading photo workshops, I’ve learned that what most photographers perceive as a terminal shortcoming in their creative or analytical aptitude can usually be remedied by untangling it from the other side.
When I hear, “I have a good eye for composition…,” I know before the “but” is out of his lips that I’ll need to prove that he’s smarter than his camera (he is). Our time in the field will be spent working on jettisoning the automatic modes (as smart as it might seem, your camera is not creative). I’ll demystify and simplify metering, exposure, and depth management until it’s second nature, an comforting ally rather than a distracting antagonist. Fortunately, despite the fact that much of the available photography education seems designed to intimidate Einstein, the foundation for mastering photography’s technical side is ridiculously simple.
On the other hand, before the sentence that starts, “I know my camera inside and out…,” is finished, I know I’ll need to foster this photographer’s curiosity, encourage experimentation, and help her disengage the rules that constrain her creativity. We’ll think in terms of whether the scene feels right, and work on what-if camera games (“What happens if I do this”) that break rules. Success won’t require a brain transplant, she’ll just learn to value and trust her instincts.
Intuition is the key to breaking the rules that inhibit creativity, while technical proficiency provides the ability to execute creative vision. Alone, these qualities are incomplete; in conflict, they’re mutually exclusive anchors; in concert, their synergy is the foundation of photographic success.
About this image
As the second New Zealand workshop neared an end, I wanted to take one more stab at the New Zealand night sky. While most of the group opted for the cozy confines of our hotel, a hearty few braved the elements for what I promised would be a quick drive to Peters Lookout, not too far up the road into Mt. Cook / Aoraki National Park. But at the lookout I wasn’t crazy about the way the Milky Way aligned with the rest of the scene and suggested that we continue about 30 minutes up the road to the bridge over the Hooker River, where we’d photographed earlier in the afternoon. Even though this would mean a much later return than I’d advertised, everyone was more than happy to sacrifice sleep for stars and off we went.
As I’d hoped, the bridge location beautifully aligned the Milky Way with the mountains and we were in business. As a bonus, Saturn floated at the fringe of the Milky Way, and glowing low and red above the Leibig Range was Mars, less than a month from opposition and ridiculously bright.
With my a7SII, I started with my Rokinon 24mm f1.4 lens, but eventually switched to my Sony 16-35 f/2.8 GM because the Rokinon wasn’t wide enough. I have a tendency to shoot my Milky Way images with a vertical orientation, so I took advantage of this scene’s breadth to compose a series of horizontal frames. I don’t remember seeing the meteor that flashed through the middle of this one, but since most of my horizontal frames were similar, that made it the obvious choice.
Workshop Schedule || Purchase Prints
Just past the halfway point in 2018, here are my highlights so far…
2018 So Far


That’s so fake…
Posted on July 24, 2018
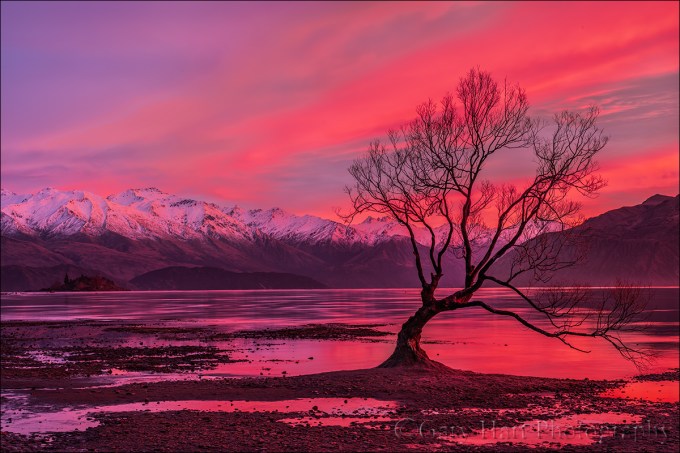
Crimson Morning, Lake Wanaka, New Zealand
Sony a7R III
Sony 24-105 f/4 G
4 seconds
F/16
ISO 50
We’ve all heard it: “That’s so fake,” or “You Photoshopped that,” or some other derisive barb implying that an image is trying to be something it isn’t. But before you say that about this image, let me say that I processed it five times, each time dialing down the saturation, attempting to create something that would appear credible to the dubious masses. And with each pass, the color looked a little less like what we saw this unforgettable New Zealand morning. So finally I just said, enough is enough—you’ll just have trust me when I tell you that for the sake of credibility, you’re already being cheated of that morning’s full spectacle.
Don Smith and I got our New Zealand winter workshop group up early to photograph sunrise at the famous Wanaka willow tree. The tree was just a short walk from our hotel, and even though we still had 45 minutes until sunrise, it was apparent the second we stepped outside that something special was in store. Though it was still dark enough to require flashlights, already the entire sky radiated a rich ruby red. Since we’d shown the group the tree the prior afternoon, a few rushed ahead, but Don and I held back with the stragglers. Nevertheless, even the stragglers pace quickened as the red deepened, and by the time we reached the tree we were pretty much jogging.
Turns out we needn’t have rushed. For the next 30 minutes the red intensified until everything in sight seemed to buzz with color. I’ve experienced color like this a few times in my life, and the best way to describe is that it feels like the light possesses a physical component that penetrates my skin and everything else it touches. And with the sky throbbing in all directions, I felt like I might get dizzy whirling about to avoid missing something. Soon we all just started laughing at how unbelievable the show was, knowing that every picture we shared would be met with the obligatory “That’s so fake” skepticism.
All this got me thinking again about what causes color in the sky, so I dusted off a post I wrote a few years ago, tweaked a few things, and…
A sunset myth
If your goal is a colorful sunset/sunrise and you have to choose between pristine or polluted air, which would you choose? If you said clean air, you’re in the minority. You’re also right. But despite some pretty obvious evidence to the contrary, it seems that the myth that a colorful sunset requires lots of particles in the air persists. If particles in the air were necessary for sunset color, Los Angeles would be known for its incredible sunsets and Hawaii would only be known for its beaches.
But what is the secret to a great sunrise or sunset? Granted, a cool breeze, warm surf, and a Mai Tai are a great start, but I’m thinking more photographically than recreationally (sorry). I look for a mix of sky (to pass the sunlight) and clouds (to catch the color), with a particular emphasis on a clear horizon in the direction of the sun. But even with a nice mix of clouds and sky, sometimes the color fizzles. Often the missing ingredient, contrary to common belief, is clean air, the cleaner the better. And like most things, it all makes sense when you understand what’s going on.
Light and color
Understanding sunset color starts with understanding how sunlight and the atmosphere interact to make the sky blue. As you probably know, visible light reaches our eyes in waves of varying length, with each wavelength perceived as a different color. Starting with the shortest wavelengths and moving toward the longest, visible light goes from violet, indigo, blue, green, yellow, orange, and red. (These color names are arbitrary labels we’ve assigned to the colors we perceive at various points along the visible portion of the electromagnetic spectrum—there are an infinite number of colors in between each of these colors.) When a beam of light passes through a vacuum (such as space), it moves in a straight line, without interference, so all its wavelengths reach our eyes simultaneously and we perceive the light as white.
Why is the sky blue?
When light interacts with a foreign object—for example, when a beam of sunlight enters our atmosphere—different wavelengths respond differently depending on the size of the molecules they encounter. If sunlight encounters molecules that are larger than its wavelengths, such as atmospheric impurities like dust or smoke, all of the wavelengths bounce off (reflect). Because these large molecules are of varying sizes, a variety of wavelengths (colors) get blended into a murky sky with a gray or brown cast. If all the wavelengths get bounced equally, the sky will appear white(ish).
When a beam of sunlight hits the much smaller molecules of the gases that comprise our atmosphere (such as nitrogen and oxygen), some of its wavelengths are absorbed while others are reflected and scattered in all directions. Because the shorter wavelengths (violet and blue) scatter most easily; the longer wavelengths (orange and red) continue on to color the sky of someone farther away. The more direct the sunlight’s path to our eyes, the less atmosphere it passes through and the more we see the first (blue) wavelengths to scatter. When the sun is high in our sky, its light takes the most direct path through the atmosphere and our sky is most blue (assuming no pollutants have altered the scattering). In the mountains, sunlight has passed through even less atmosphere and the sky appears even more blue than it does at sea level.
Sunrise/sunset color
When the sun is on the horizon, the light that reaches us has traveled through so much atmosphere that at the very least it has been stripped of its blueness because the blue wavelengths are the first to scatter (those wavelengths are coloring the sky of someone whose sun is high overhead). And if that sunrise/sunset light hasn’t encountered larger dust and smoke molecules on its journey, only the red wavelengths will have survived unscathed, and everyone enjoys the show.
The cleaner the air, the more vivid the sunrise/sunset color. To understand the mixing effect that happens when a variety of wavelengths are bounced around by large airborne particles, think about blending a smoothie consisting of a variety of brightly colored ingredients (such as strawberries, blueberries, and spinach—yum). Your smoothie’s color won’t be nearly as vivid as any of its ingredients, not even close. Instead you’ll end up with a brownish or grayish muck that might at best be slightly tinted with the color of the predominant ingredient. That’s what happens to the color when the light has to interact with large airborne particles like dust, smoke, and smog. Because these particles aren’t of uniform size, they each reflect a slightly different color rather than allowing one vivid color to dominate. In the middle of the day pollution means less blue; at sunrise/sunset, it’s less pink, red, and orange.
Clouds can enhance sunrise/sunset color by catching the red wavelengths and reflecting them back to our eyes, but only if there’s an opening on the horizon for the light pass through. Without clouds, the red wavelengths continue on to color the horizon opposite the sun—a “twilight wedge” when the color is in the sky, and “alpenglow” when mountains jut into the colored region of the sky and take on the color themselves.
………………………………………
So. To the skeptics who reflexively dismiss pictures like this, you might want to suggest that they spend more time out in nature. Whether it’s a tropical bird, a fluttering butterfly, a field of wildflowers, or a New Zealand sunrise, there really is nothing subtle about color in nature.
New Zealand Photo Workshops
Sunrise, Sunset


Oh, What a Night…
Posted on July 17, 2018

Dark Sky, Lake Matheson, New Zealand
Sony a7S II
Rokinon 24mm f/1.4
30 seconds
F/1.4
ISO 12800
(Jump to the bottom for a “how-to” and my starlight photography exposure recipe)
Five photographers followed bouncing headlamps through the chilly dark. Even in midday the trail through the dense rainforest surrounding Lake Matheson has a twilight feel; on a moonless winter night like this, the path becomes downright cave-like. Soon our footsteps were in sync, each tap broken by a beat of eerie silence. For me, the solitary experience at the front of the line was simultaneously serene and disconcerting, a feeling enhanced by occasional rustling and primal cries from the primitive world outside radius of my light.
We were midway through the second of the back-to-back New Zealand Winter photo workshops Don Smith and I did in 2018. Just a couple of hours earlier the entire group had completed the nearly 3-mile loop in daylight. So striking was the sunset reflection of Mt. Tasman and Mt. Cook on that hike, that when we looked up after dinner and saw stars, a few of us hardcore night shooters couldn’t resist returning to the lake to photograph the Milky Way above the peaks.
Rather than hike all the way out there, we reasoned that we could satisfy our objective with a relatively short walk to Jetty Viewpoint, the closest view of the lake and mountains, less than a quarter of the way along the loop. Given the spur-of-the-moment nature of our adventure, I hadn’t done my usual (obsessive) plotting of the Milky Way’s position before bundling up and heading our to the lake. I knew only that it would be more or less vertical, in the general direction of the peaks.
What I hadn’t fully accounted for is how much higher in the sky as the Milky Way is in New Zealand. So unfortunately, by the time the five of us arrived at Jetty Viewpoint, we found the Milky Way was so high that capturing the bright galactic core and its reflection required a vertical composition. And it had rotated so far north that including the Milky Way and the peaks required a horizontal composition. After trying a few versions of those either/or compositions, we decided that since the reflection was the real star of the show, we may as well just continue another 20 minutes to the Lake Matheson’s best view, Reflection Island.
The shear volume of stars in the pure New Zealand darkness is mesmerizing, but it’s disorienting to look up at night and not see a single familiar constellation . Once we’d settled in at Reflection Island, I spent the time waiting exposures to complete just wandering my gaze about the foreign sky.
A camera can “see” much better in the dark than we can, a capability that only continues to improve. For many years my night photography was limited by technology to moonlight only, but the low-light capability of the newest cameras has opened the door to a world that’s been invisible to the naked eye. Combining a modern camera that captures clean high ISO images with a fast lens not only enables moonless night photography, it pulls unseen wonders from the darkness.
I only use my Sony a7SII and Rokinon 24mm f/1.4 lens when photographing extreme dark skies, but when I do, I never cease to be blown away by what they “see.” Packing for four weeks in winter without exceeding the airline’s weight limits is difficult. But anticipating the opportunity to photograph the Southern Hemisphere night sky, I bit the bullet and added my dedicated night photography gear to my camera bag. Every time an exposure completed, I couldn’t take my eyes off the image on my LCD. As saturated with stars as the sky appeared, each image revealed far more stars than were visible to my eyes, and the brightest stars stood out like an approaching locomotive.
A quick check of my astronomy app told me that the bright star burning a hole in the sky above the trees on the right is Achernar, well known Down Under but new to me. Slightly brighter than magnitiude .5 (the lower the number, the brighter the star), it’s the ninth brightest star in the night sky—the Achernar photons that landed on my sensor started their Earthward journey nearly 140 years ago.
The Magellanic Clouds (satellite galaxies gravitationally bound to the Milky Way but not visible in the Northern Hemisphere) that were faint fuzzy blurs to my eyes took on actual shapes. And while I couldn’t fit the mountains and both of the Magellanic Clouds in my frame, I was able to included the Small Magellanic Cloud in this image.
More exciting than the volume of stars revealed by my camera was the spectacular reflection it pulled from the seemingly black void of the lake’s surface. This ability to view beauty hidden from my eyes by darkness is the best part of night photography.
Starlight exposure made simple
Based on many years experience teaching starlight photography (not to be confused with moonlight photography), I’ve come up with what I think is the simplest approach to the most frequently asked night photography question: “What exposure settings should I use?”
The problem is, there isn’t a single set of ISO, f-stop, and shutter speed settings you can plug in for great results because the setting you use (and the results you get) depend on your equipment. Starlight photography is all about capturing light, the more the better. But as good as today’s camera technology is, successful night photography is still about making compromises. As you try to maximize the light reaching your sensor, you’ll need to manage these exposure compromises:
- Shutter speed: Star motion is a function of the time the shutter is open, the focal length, and the direction your lens points—the faster the shutter speed, wider the lens, and closer to the poles (due north or south) you’re composed, the less star motion you’ll record. As much as we like pinpoint stars, I’ve always felt that getting enough light is more important than perfect pinpoints. Your compromise comes as you try to decide how much motion you can live with. My drop-dead shutter speed that I won’t exceed is 30 seconds.
- F-stop: Sharpness and distortion, especially on the edges, becomes a concern when any lens is wide open. With some lenses it’s a livable problem, with others you’ll probably want to stop-down a stop or two. A starlight f-stop rule of thumb I follow is that (assuming a current camera with good high ISO capability) at f/4, the best you’ll be able to hope for is silhouettes; at f/2.8, you can probably get decent but dark landscape detail; making the scene significantly brighter than your eyes see (like this image) usually requires f/2 or faster. Given that, I like to shoot starlight at f/1.4 (hence my dedicated night lenses), and just live with slightly less than perfect quality in the corners.
- ISO: Noise is the threshold that most limits our night efforts. If we didn’t have to deal with noise, we could push our ISO as far as necessary to eliminate star motion and lens flaws. High ISO noise varies a lot with the camera—some cameras struggle mightily beyond ISO 1600, others deliver very usable results at ISO 12800 or even higher. As a general rule, the larger the sensor, and the fewer the megapixels, the better the high ISO performance (larger, farther apart photosites mean more light gathering and less heat). So an APS-C sensor will usually yield cleaner high ISO images than a 4/3 sensor (Olympus and Panasonic), and a full frame sensor will yield cleaner high ISO images than an APS-C sensor. This is by no means an absolute—today’s 40+ megapixel sensors are much better at high ISOs than yesterday’s 12 megapixel sensors, and some of today’s high resolution sensors (for example, the Sony a7RIII) are far superior to contemporary sensors with lower resolution. My night camera is the 12 megapixel Sony a7SII. Regardless of the camera, and I can’t emphasize this too much, is to know your camera and how far you can push your ISO and still yield usable results. One more thing: because high ISO performance decreases significantly with shutter speed, base your high ISO evaluations on long shutter speeds, 15-30 seconds.
Understanding these compromises, you’re ready for my starlight-exposure-made-simple axiom: Give the scene as much light as you can without ruining the image. In other words, for the most light possible, use the longest shutter speed, widest aperture, and highest ISO that gives you results you can live with.
Taking this approach doesn’t mean that I don’t vary my exposure settings. Once I’ve settled on a composition, I use a variety exposure-setting combinations. Not only does this give me as many options as possible at processing time, it’s also an opportunity better understand my cameras’ and lenses’ limitations to learn how far I can push the exposure threshold next time.
Experience the New Zealand Night Sky for Yourself
Workshop Schedule || Purchase Prints
New Zealand After Dark
Click any image to scroll through the gallery LARGE


Off to a great start
Posted on July 10, 2018
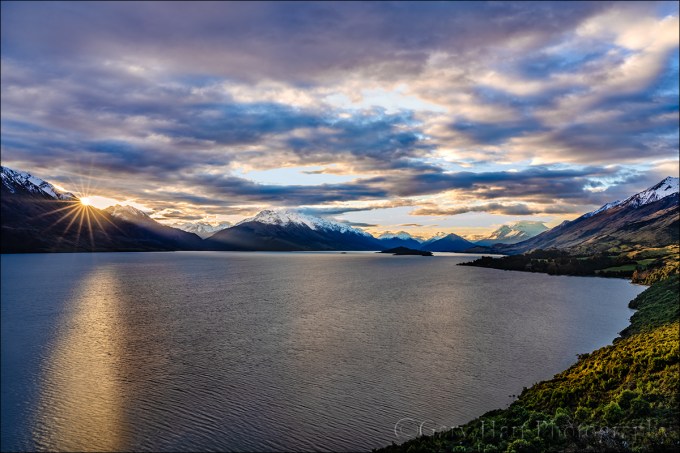
Last Light, Lake Wakatipu, New Zealand
Sony a7R III
Sony 24-105 f/4 G
.8 seconds
F/18
ISO 50
It’s a little ironic that on my first day back from New Zealand, I’m (finally) starting a blog post about the start of my winter workshops there. When I departed for New Zealand about a month ago, I had the best intentions to post several times per week, but soon realized there was going to be precious little time for that. I’ve processed a few images from the trip, but have only just scratched the surface of what I’m certain will turn out to be the most photographically rewarding four weeks of my life. But the rewards of this trip turned out to be so much more than photographic, and I have some great stories to share.
First, a little background
I’ve been leading photo workshops for a dozen years. From the outset my friend and fellow pro photographer Don Smith and I have had a reciprocal workshop relationship: he assists a few of my workshops, and I assist a like number of his workshops. In 2013 Don and I added a collaborative workshop at the Grand Canyon during the monsoon season (lightning photography)—instead of the workshop being owned by one and assisted by the other, we share the planning, marketing, and leading responsibilities 50/50. The Grand Canyon workshop became so successful (and enjoyable for both of us) that we’ve since added collaborative workshops at the Columbia River Gorge and on the Oregon Coast.
The next frontier
The New Zealand workshops take our collaborative workshop model to a new level. Not only are they our first international workshops, they’re much longer and more immersive. We’ve always provided lodging, but for New Zealand we added transportation (including a driver) and many meals.
Organizing a 10-day, 5 town workshop half-way around the world adds unprecedented layers of complications. Not just finding the best photo locations with good backups for weather closures, but also arranging lodging, meals, and permits. Though we’d scouted our locations thoroughly, had the permits, lodging, meals, and transportation arranged, we had no idea what it would be like photographing, eating, and traveling with a group for many consecutive hours, every day for 10 days. It turns out that our anxiety was completely unfounded.
It’s a sign
After the workshop orientation we hit Glenorchy Road on the shores of Lake Wakatipu for our first sunset shoot. Following a preliminary stop at Wilson Bay, where we were treated to beautiful light on the peaks across the lake, we headed farther down the road to our sunset destination—a spectacular view of the Humboldt Mountains (among others) above the lake. The sky looked especially promising for something special, so as we drove I gave everyone a quick primer on photographing a sunstar.
We pulled up to the vista just before the sun dropped out of the clouds. With just a few minutes until it disappeared behind the mountains, everyone scrambled out of the Sprinter (the 16-passenger Mercedes van that would be our chariot for the next 10 days) and set up. The sunstar window opened and closed quickly, but it was followed by a show of color and light that turned out to be a harbinger of upcoming good fortune.
I haven’t processed those images yet, so I’m sharing this one from the previous sunset, when I photographed a sunstar from the same location. (Honestly, the group got a much better sunset than this one.)
Why winter?
Ever since Don and I scheduled this workshop, I’ve had to answer the “Why winter?” question. Most photographers get it—not only does the lower sun angle make the light better, the mountains are covered with snow, and I’ve always felt that winter weather makes great skies. And a New Zealand South Island winter isn’t much different from the kinds of winters we get in Northern California and Oregon. During the four weeks we were in New Zealand, we dealt with lows in the 20s and 30s, and highs in the 40s and 50s—cold, but unlike the summer heat most of you endured while I was in New Zealand, nothing that couldn’t be easily handled with the right clothing.
Over the next few weeks I hope to share enough New Zealand winter images that I hope will further prove my point. Until then, below you’ll find a collection of winter images, from a variety of locations, for a little vicarious cooling on a hot summer day.
New Zealand 2019
A Winter Gallery
Click an image for a closer look and slide show. Refresh the window to reorder the display.


Escaping Summer
Posted on July 2, 2018

Dawn on the Rocks, Lake Wakatipu, New Zealand
Sony a7R III
Sony 16-35 f/2.8 GM
Breakthrough 6-stop ND filter
15 seconds
F/16
ISO 50
(If you subscribe to my Image of the Month e-mail and this post seems familiar, it’s because I borrowed the text from my June message.)
I just checked the date of my last post, I couldn’t believe how long it’s been. But I have a good excuse, I swear: I’ve been busy. Busy taking pictures, busy leading workshops, busy checking in and out of hotels, busy staying warm (really)….
But I’m not complaining—not even close. For the last three weeks I’ve been in New Zealand. The day I left home, the high temperature in Sacramento was 100 degrees. Less than twenty-four hours later I deplaned in Queenstown, New Zealand to a refreshing 40 degrees (or, as we say Down Under, 5 degrees). While this winter chill is a nice bonus, I’m here on New Zealand’s South Island mostly because winter is hands-down the best time to photograph this spectacular country. Last Thursday (or, as you say Up Over, Wednesday) Don Smith and I wrapped up our first ever New Zealand Winter workshop, but after two weeks of down jackets and wool hats, I’m not ready to return to summer, not even close.
It’s impossible to pick my favorite thing about this trip. I could cite the all-day cruises on Doubtful Sound (though we learned it should really be named Doubtful Fjord), plowing through glassy water framed by towering cliffs and plunging waterfalls, and shadowed by leaping dolphins. Or the breathtaking helicopter ride onto Fox Glacier, where we explored blue ice-caves, climbed through gaping crevices, and observed firsthand that a glacier is so much more than a featureless sheet of ice.
But it’s not just about the big stuff here in “Lord of the Rings” land. Something else that’s starting to sink in about New Zealand is the routine beauty that’s pretty much everywhere I look. Snow-capped peaks in all directions, daily sunrises and sunsets that become almost monotonous in their beauty, and pristine glacial lakes and streams with blues and greens that rival anything in the Canadian Rockies.
This image is from last Thursday’s sunrise, our first workshop’s final shoot. Carved thousands of years ago by massive glaciers, Lake Wakatipu is one of New Zealand’s largest lakes. Arriving just as the first hints of dawn touched the clouds, we watched the scene slowly materialize out of the darkness like a developing Polaroid. The snowy peaks appeared first, followed soon by textured clouds above the turquoise lake. As the sky brightened further, the opaque lakebed transformed into an intricate mosaic of colorful stones.
I moved along the lakeshore until I found a group of protruding rocks to anchor my frame. To emphasize the foreground, I dropped low and framed the scene with a wide lens. I used a neutral density filter to enable an exposure long enough to smooth the gentle waves rippling the lake surface. The long exposure also gave me the opportunity to savor the sublime scene and say a small prayer of gratitude that my trip is not over yet…
Join Don Smith and Me in New Zealand in 2019
New Zealand So Far (believe me, I’m just scratching the surface)
Click an image for a closer look and slide show. Refresh the window to reorder the display.


Search and Rescue
Posted on June 23, 2018

Winter Sun, Lake Tasman, New Zealand
Sony a7R III
Sony 12-24 f/4 G
1/250 second
F/20
ISO 100
I’m five days into the first of two New Zealand winter photo workshops with my friend Don Smith. With such full days down under, it’s hard to find time to post, but I’m doing my best to keep up (and to keep warm). Today I’m in Fox Glacier watching a spectacular electrical storm from the fireside confines of our hotel’s lounge. Yesterday we enjoyed sunrise at the Wanaka Tree, the waterfalls and Blue Pools of Haast Pass, and a short hike through the Lake Matheson rain forest; tomorrow we’ll helicopter onto Fox Glacier….
Don and I arrived in New Zealand last Friday, and spent several days pre-workshop scouting in the Mt. Cook National Park area. Before going on, I should probably clarify what I mean by “pre-workshop scouting”—or more specifically, what I don’t mean. I don’t mean that I show up for a workshop a few days early and hope to find enough shooting locations to keep the group busy. All that work starts years in advance—I never schedule a new workshop until I’m completely comfortable with the destination. For me, comfortable means backup photo spots and backup-backup photo spots. I’m kind of obsessive that way. My worst workshop fear is losing a location to weather or road closures or erupting volcanoes (hmmm, I wonder what made me think of that…), I sleep easier knowing that if a spot were to go down, I have a quality replacement.
But plugging in a viable backup spot also requires a little last-minute knowledge that can often be gained with feet on the ground just a day or two before the workshop. So I always arrive early and run as many (all, if possible) of my workshop locations in advance.
For New Zealand, hitting every one of ten days worth of locations isn’t practical, but in this case Don and I have an advantage because we’ve hired a local driver whose business it is to know every nook and cranny of the South Island. Nevertheless, we came over early to see what the current winter has done (specifically, how much snow and water there is), to add to our bank of potential photo locations, and to get our eyes on a few spots in the Twizel area that were inaccessible on previous visits due to conditions. (Plus, it was a great excuse to spend quality photo time with spectacular scenery.)
But anyway…
Last Saturday Don and I were in Mt. Cook National Park. One photo spot that was inaccessible last year was Lake Tasman, a pristine glacial lake often dotted with floating icebergs. We found the trail to Lake Tasman short but steep, immaculately maintained in typical New Zealand fashion. The hike ends at a vista above the lake, with a visual payoff that’s more than worth any oxygen depravation. As I sized up the scene at trail’s end, a park ranger (or whatever they’re called in New Zealand) trudged up behind me and asked if I could help him out. He explained that he was searching for a missing young woman, but had just been notified via walkie-talkie that the woman’s boyfriend was having a severe panic attack back at the trailhead.
Since David (the ranger) was a search party of one at this point, he had to continue the search. He told me the man’s name was Julian, gave me a brief description, and asked me to check on him and reassure him that an ambulance is on the way. So before clicking a single frame, I found myself hoisting my camera bag back onto my shoulders and beelining back to the trailhead, about a half mile down the hill.
About 100 yards from the bottom, a young woman on her way up stopped me and asked if I’d seen the ranger. When I asked if this had anything to do with the missing person, she told me she was in fact the missing person, and that she’d just reunited with Julian and was trying to catch the ranger to let him know she was no longer lost. I told her what I knew, including where I’d seen David last, and that I would continue down the trail to check on her friend and let him know help was on the way if he still needed it.
I found Julian resting in a shelter at the trailhead and confirmed that he was doing better now that he’d reunited with Sophie. Soon another search and rescue person showed up—when I relayed the status to him, he was able to contact David and tell him to stand down, all is well.
But now Sophie was wandering around who-knows-where trying to locate David. So back up the trail I went to catch her. I briefly considered leaving my camera bag but decided if I was going to go all the way back up there, I at least wanted the option to reward myself with pictures.
On the trail’s final switchback I ran into Sophie and David descending the trail, all smiles. We chatted briefly and I got a quick summary of how Julian and Sophie became separated, Sophie’s wanderings, and how she had taken a minor fall but was uninjured (though she would need a new pair of pants). They learned that Julian was fine and the ambulance had arrived and been turned around. I’m not sure the outcome would have been much different without my contribution, both were nevertheless very appreciative (and I have a story to tell).
Time for a little photography
Crisis resolved, I soon found myself back at the Tasman Lake vista. Unfortunately, the sun had come out and chased away the great light that had greeted my initial arrival, but I decided I wasn’t going to let that stop me. Since it was impossible to create a shot that included as much of the scene as I thought was necessary without also including the sun, I decided to make the sun part of my composition by turning it into a sunstar.
I started with my Sony 16-35 f/2.8 GM on my Sony a7RIII, but soon switched to the 12-24 f/4 G so I could include more of the lake and nearby foreground rocks. I stopped down to f/20 to enhance the sunstar, and since I rarely shoot with the sun smack in the middle of my frame, I bracketed a few exposures to give me options at processing time. Like all my images, this is a single click—no HDR or other blending of multiple images.
Typical of most extreme dynamic range images, this one looked pretty awful on my LCD (nearly black shadows, nearly white sky). The bipolar histogram reflected these extremes, but based on what I saw I was pretty sure I’d be able to recover enough usable detail to save the image. Nevertheless, just to be safe (since I don’t usually feature a the midday sun prominently in my frame), I bracketed a few exposures and chose the one that worked best.
I suppose the lesson here is that rather passing on difficult conditions, sometimes it pays to make the best of the hand you’re dealt. My standard response to a scene like this is to enjoy the view and vow to shoot it again another day. But being (literally) halfway around the world with no other day guaranteed, I decided to search for something I could use. Armed with my great Sony a7RIII sensor, a reliable histogram, and the knowledge to read it, I was able to rescue my image in post and come up with something that works.
Stay tuned for an announcement of the 2019 New Zealand Winter photo workshop….
Workshop Schedule || Purchase Prints
A Sunstar Gallery


Greetings from Winterland
Posted on June 16, 2018

Wanaka Reflection, New Zealand
Sony a7R III
Sony 16-35 f/2.8 GM
1 second
F/16
ISO 50
Saturday, 3 a.m.: The search for winter, and visiting an old friend
When I boarded the plane Wednesday afternoon in Sacramento, the temperature outside was 100 degrees. After 24 hours of inadequate legroom, angry infants, delayed departures, inadequate portions of bland food, suspicious customs inspectors, and a 10-minute sprint (or whatever your call moving full speed with 90 pounds of luggage) that ended in a missed flight, I deplaned Friday morning in Queenstown, New Zealand. (Somewhere along the way I’d lost Thursday.) The temperature on the tarmac was a glorious 35 degrees (or, as we say down under, 2 degrees).
In addition to Thursday, my travels cost me sleep, lots and lots of sleep. The good news is that I just woke-up from 6 consecutive hours of sleep, my first quality shut-eye in more than 48 hours. The bad news is, the sun won’t be up for another five hours.
I’m on New Zealand’s South Island because Don Smith and I have back-to-back 10-day photo workshops starting on Tuesday (which the folks in America know as Monday). We came over a few days early to scout the conditions on the ground in this highly changeable New Zealand winter.

Lone Tree, Lake Wanaka, New Zealand
Leaving Queenstown Friday, our destination was Twizel, a small town near Mt. Cook National Park. But our first stop was Wanaka, where we had workshop business to take care of at the hotel there. Before swinging into the hotel, we detoured by the (famous) “Wanaka Tree.” Last year the lake level was far below the tree’s trunk-line, pretty much eliminating reflection opportunities. This year we found the water up and the reflections good. In fact, the clouds and light were so nice, we couldn’t resist pulling out the cameras.
I started at the long end of my 24-105 to compress the tree and distant island, but gradually moved closer and composed wider to emphasize the reflection. The shoreline was soggy and I was still in my Sacramento sandals, but photography trumps comfort and I soon found myself switching to the 16-35 and squishing in the mud at lake’s edge for the best reflection. To smooth a few lightly undulating ripples, I attached a 6-stop neutral density filter.
Saturday, 8 p.m.: Preview of coming attractions
Don and I just wrapped up our first full day of scouting; In addition to getting fresh eyes on the familiar photo locations, we found some spectacular new spots. (And oh yeah, the South Island of New Zealand is ridiculously beautiful.) We also participated in a genuine search-and-rescue effort in the national park (including search parties, walkie-talkies, and an ambulance)—a great and ultimately successful adventure, though perhaps not quite as heroic as it sounds.
The day ended photographing a crescent moon above Mt. Cook, from the shore of Lake Pukaki. Oh yeah, and that may have also involved an ill-conceived cliff descent that precipitated a small rockslide.
Stay tuned…
More Trees
Click an image for a closer look and slide show. Refresh the window to reorder the display.


Tapping your inner Dorothy
Posted on June 12, 2018
Alone Together, Oak and Crescent Moon, Sierra Foothills, California
Canon 1Ds Mark III
8/5 seconds
F/8.0
ISO 400
Canon 70-200 f/4 L
Spend enough time on Facebook and Instagram and you get a pretty good idea of what it takes to make a picture that generates attention. The unfortunate consequence is a photographic feedback loop, where one ostentatious image inspires more similarly ostentatious images, which inspire more…, well, you get the point. This uninspired feedback loop reminds me of top-40 music, where one groundbreaking success generates a flood of uninspired clones. Catchy tunes are fine for a few listens, but few possess staying power. Contrast that to the Beatles, who aggressively resisted repetition and pursued new sounds that the world has been listing to pretty much nonstop for more than 50 years.
Admittedly, few artists are blessed with the Beatles’ creative genius, but that’s no excuse to shortcut creativity. The same holds for photography: images that elicit a reflexive Like and Share from digital passersby, and maybe (if you’re lucky) a “Stunning!” in the comments section, are forgotten with the next click. But images that resonate on a personal level by revealing something unseen, or by touching a hidden place inside the viewer, not only stop people in their tracks, they grab them and don’t let go.
Of course this sounds great in theory, but how is it accomplished? If the answer were easy, we’d all be doing it. But like Dorothy and the Ruby Slippers, perhaps we’ve had the power all along.
Because most people long for a connection with the world around them—not simply a connection with nature, but more importantly a connection with kindred souls—a good place to start would be to give viewers of your images something of yourself to latch on to by concentrating on subjects that resonate with you.
My own photography took a huge leap forward when I started photographing simply to please myself. The more I pursue moments in nature that touch me personally, (as if by magic) the more unique, gratifying, and successful my images became. While my most personal images don’t please everyone, the people they do reach seem to feel a deeper connection than they do to my images intended to impress.
Familiarity is the first step toward intimacy. With many picturesque trees and hills to work with, on this evening (as with many shoots) my compositions started wider, but didn’t seem to be about anything. But as the moon fell and the light faded, the scene’s essence began to materialize.
So what moved me to this composition? At the time it was enough that the scene finally felt right. But given the benefit of time and introspection, even though the moon and tree share the same frame, each is isolated: the tree is grounded in its terrestrial world, while the moon soars in its celestial world.
I’m writing this at Starbucks, very much by myself, but in the company of a dozen or so other people similarly isolated at the center of their world. It occurs to me that the shared isolation of the tree and moon makes a great metaphor for the human experience.
On the other hand, maybe it’s just a pretty picture….
Workshop Schedule || Purchase Prints
A Gallery of Personal Connection


(Sometimes) I’d Rather Be Lucky Than Good
Posted on June 3, 2018

Big Dipper Reflection, Colorado River, Grand Canyon
Sony a7S II
Sony 16-35 f/2.8 GM
20 seconds
F/2.8
ISO 12800

Grand Night, Milky Way Above the Colorado River, Grand Canyon Sony a7S II Rokinon 24mm f/1.4 20 seconds F/1.4 ISO 6400
It was 4:00 a.m. and I’d spent the last two hours photographing the Milky Way’s brilliant core above the Colorado River. In about 75 minutes the guides would be ringing the “coffee’s ready” gong, signaling the start of another day at the bottom of the Grand Canyon. Collapsing my tripod, I performed a little mental math and found slight relief in the knowledge that I might be able to squeeze in one more hour of sleep. That relief vanished in the time it took to turn and glance toward the northern sky and see the Big Dipper, suspended like a celestial mobile in the notch separating the canyon walls.
My Milky Way position had been chosen for its unobstructed view of the southern sky; the best view of the Big Dipper was clear across the campsite, at a sheltered pool just beyond our rafts. The moonless night sky at the bottom of the Grand Canyon is so dark that the Milky Way casts a slight shadow, but once your eyes adjust, it’s surprisingly easy to navigate without adding light. Trudging across through the sand, I passed a handful of other solitary photographers, anonymous shapes enjoying the darkness as much as I was. I stopped few times to answer questions and point out the Big Dipper, then moved on.
Setting up on the steep, sandy slope above the river, I gazed at the Big Dipper and privately chuckled at my good fortune—this prime photo opportunity hadn’t manifest because I proactively made myself seek a scene away from my original subject (as I encourage my students to do), it was a chance glance after I’d mentally put myself to bed. When we landed at that spot the prior afternoon, I’d been so focused on the southern exposure and the Milky Way opportunity in that direction that I hadn’t even considered that there might be something facing north too. Shame on me, but sometimes it’s better to be lucky than good.
Checking my first Big Dipper frame, a couple of things became instantly obvious: though sunrise was still an hour away, and my eyes could detect no sign of its approach, with the same exposure I’d been using for most of the night, the sky was noticeably brighter on my LCD; more significantly, the Big Dipper was reflecting in the river. I realized that pool below me, while not flowing, was sloshing enough that the reflection didn’t stand out to my eyes, but it was smoothed enough by a multi-second exposure that the water mirrored a blurred but clearly visible reflection of the bright Dipper stars.
From my elevated vantage point, part of the handle’s reflection was lost to the sandy beach—I needed to move closer to the river to include the entire reflection. Remember when I said it’s surprisingly easy to navigate in the moonless darkness? On my first step toward the river I learned that functional night vision applies to avoiding objects, not to depth perception. So, as that first step dropped earthward and I waited for it to touch down, where I expected sand I found only air. The rest of me followed quickly and I was in free-fall. Fortunately the fall was not far, just a couple of feet, but it’s amazing how the disorientation of a blind fall slowed time enough for me to curse the darkness before my graceless splat onto the damp beach.
The beach was damp because the place I landed had been river when I went to bed. I popped up almost as quickly as I landed, the unwitting beneficiary of artificial tides induced by upstream releases from the Glen Canyon Dam, timed to meet the power needs of Las Vegas and the rest of the Southwest sprawl. Had I fallen a few hours earlier, I’d have splashed in chilly river water—not enough river to sweep me to my death, but definitely enough to soak me and my camera. So I found myself sandy but otherwise unscathed—glancing about to see if anyone had seen my fall, I instantly forgave the darkness that had made me more or less invisible. The Rokinon lens I’d had on my camera was caked with sand; since it was too dark to clean it, I switched to my Sony 16-35 f/2.8 GM.
The rest of the shoot was fairly uneventful, at least until my final frame. Over the next few minutes I inched even closer to the river, which I discovered had receded enough to add about six feet of soggy shore. With each frame I verified my focus, tweaked my composition, and experimented with different exposures.
On my final few frames I was comfortable enough with all of the photography variables that I wasn’t even thinking about the next shot, and instead simply stood and took in the night sky. As I waited for my last frame of the night to complete, a brilliant meteor sprung from the darkness and split the Dipper’s handle. It came and went in a heartbeat, and I held my breath until the image popped up on my LCD and I confirmed that I’d captured it. The perfect cap to a spectacular night.
Celestial Wonders


