Dynamic Juxtaposition
Posted on February 4, 2018

Moonset Eclipse, Zabriskie Point, Death Valley
Sony a7RII
Sony 100-400 GM
ISO 800
f/11
1/4 seconds
Much of my photography is about juxtaposition of elements with the landscape. Sometimes that’s simply combining static terrestrial features, but when possible I try to add something more dynamic, such as meteorological subjects like lightning or a rainbow, or celestial objects like the Milky Way or the Moon. The challenge with dynamic juxtapositions is timing—while the meteorological juxtapositions are usually a matter of playing the odds, celestial juxtapositions are gloriously precise.
Lunar choreography
Just as the Earth revolves around the Sun, the Moon revolves around Earth; at any point in this celestial dance, half of Earth is daylight and half is night, while half of the Moon is lit and half is dark. The amount of the Moon we see (its phase) depends on the relative position of the Sun, Moon, and Earth in this dance, and once each month all of the sunlit side of the Moon faces the dark side of Earth, and we Earthlings enjoy a full Moon.
This alignment of three or more orbiting celestial bodies necessary for a full (and new) Moon is called ‘syzygy.’ Due to the Moon’s orbit around Earth, the Sun, Earth, and Moon achieve syzygy twice each lunar month: once when the Moon is between the Sun and Earth (a new Moon), and again when Earth is between the Sun and Moon (a full Moon).
The Moon completes its trip around Earth every 27.3 days, but it takes 29.5 days to cycle through all its phases, from new to full and back to new again. The Moon’s phases need that extra 2+ days because as the Moon circles Earth, Earth also circles the Sun, taking the syzygy point with it—imagine a race with a moving finish line.
Viewed from Earth, the Sun and Moon are on opposite sides of the sky when the Moon is full, so a full Moon rises in the east at sunset and sets in the west at sunrise. We rarely see a full Moon rising exactly as the Sun sets (or setting as the Sun rises) because: 1) the point of maximum fullness (when the Sun, Earth, and Moon align perfectly) only happens at one instant on the full Moon day—at every other instant of each month’s full Moon day, the Moon is merely almost full (but still full enough to appear full); 2) published Sun/Moon rise/set times assume a flat horizon—if you have mountains between you and the horizon, your view of the true Sun/Moon rise/set is blocked; and 3) The more extreme your latitude (angular distance from the equator), the more skewed the Sun/Moon alignment appears.
Knowing this, it should make sense that the closer the Moon is to full, the longer it’s in the night sky, and a full Moon is in the sky all night long. Less intuitive but very important for lunar photographers to know, each day the Moon rises an average of 50 minutes later (between 30-70 minutes) than it rose the previous day—I usually mentally round to an hour for quick figuring.
Lunar Eclipse
If the Moon orbited Earth on the same plane Earth orbits the Sun, we’d have an eclipse with each syzygy: every new Moon, Earth would pass through the Moon’s shadow and somewhere on Earth would experience a solar eclipse; every full Moon the night side of Earth would witness a lunar eclipse as the Moon passes into Earth’s shadow. But the Moon’s orbit is tilted about 5 degrees from Earth’s orbit, making the perfect alignment an eclipse requires relatively rare.
It turns out that the alignment of the Sun, Earth, and Moon necessary for a lunar eclipse happens from two to four times each year. Of these, about one-third are total eclipses, when Earth’s shadow completely covers the Moon. At totality, most of the sunlight illuminating the Moon is blocked by Earth, and the only light to reach the Moon has passed through Earth’s atmosphere, which filters out all but the long, red wavelengths. For the same reason sunsets are red, during a total lunar eclipse we see a red or “blood” Moon.
Putting it all together
As frequent and familiar as the rise and set of the Moon is, the opportunity to witness the beauty of an eclipse is rare. But in the last six months, after being shut out by schedule or weather for many years, I’ve managed to photograph my first total solar and lunar eclipses. I wasn’t able to juxtapose the August solar eclipse with a favorite landscape, but I wasn’t going to let that happen again for last week’s lunar eclipse.
Viewed from Death Valley’s Zabriskie Point in winter, the setting full Moon’s azimuth aligns nicely with Manly Beacon, one of the park’s most recognizable features. Though this year’s alignment was particularly good, the morning of the eclipse was a day earlier than I’d normally photograph the Zabriskie Point moonset—the next day the Moon would be setting about 45 minutes later, providing ample time to photograph the landscape in the warm early light before the Moon descended behind the Panamints. Nevertheless, I decided that a total lunar eclipse trumps everything, and since Zabriskie was the best place for the eclipse, that’s where we were.
We started with telephoto compositions of the beautiful “blood Moon” phase because there wasn’t enough light to include the eclipsed Moon with the landscape without compositing two exposures. Composites are fine, but I prefer capturing scenes with one click. For wider images that included the landscape I waited until totality had passed, shortly before the Moon set, and switched to the Sony/Zeiss 24-70 with my Sony a7RIII, moving my Sony 100-400 GM to my Sony a7RII.
I captured this image about 25 minutes before sunrise, normally too early to capture landscape detail without over exposing the Moon. But this morning, following the total eclipse, the lit portion of the moon was still darkened by Earth’s penumbral shadow, which reduced the dynamic range to something my cameras could handle.
To enlarge the Moon and emphasize its juxtaposition with Manly Beacon, I went with the 100-400. With my composition and focus set, I slowly dialed up the shutter speed until I saw my a7RII’s pre-capture “zebra” highlight alert. After clicking I magnified my image preview and examined the moon to confirm that I did indeed still have detail. The foreground was quite dark on my LCD, but my histogram indicated the shadows were recoverable, something I later confirmed in Lightroom.
A Gallery of Dynamic Juxtapositions
Click an image for a closer look and slide show. Refresh the window to reorder the display.


Are you tired of eclipse photos yet?
Posted on February 1, 2018

Blood Moon, Death Valley, California
Sony a7RIII
Sony 100-400 GM
Sony 2x teleconverter
ISO 3200
f/11
2 seconds
Since everyone else seems to be doing it, I thought I’d join the party….
I always schedule my Death Valley workshop to coincide with the January (or early February) full Moon, so it was just a coincidence that North America’s first super (a full Moon that’s within 90 percent of its closest approach to Earth), blue (the second full moon of a given month), blood (a lunar eclipse: a full Moon that passes into the Earth’s shadow and is bathed in light stripped of all but its red wavelengths by Earth’s atmosphere) Moon in 150 years coincided with my workshop. But since we were already there….
I got my group up to Zabriskie Point at around 4:30, well into the eclipse but before totality. Unlike most group photo events I’ve experienced, this morning’s crowd at Zabriskie was a little subdued—I suspect due to the early hour. Compared to the solar eclipse I photographed last August, a lunar eclipse moves with the speed of a glacier. While it was underway, I was able to assist my workshop students, set up my own equipment, switch lenses and camera bodies, experiment with exposure, gawk at the spectacle, and still had plenty of time to chat, laugh, and marvel with the rest of my group.
Starting with my Sony a7RIII, Sony 100-400 f/4 GM, and Sony 2x teleconverter, I cranked my focal length all the way out to 800mm and started clicking. After a while I pulled out my Sony/Zeiss 24-70 f/4, putting it on the a7RIII and switching the telephoto setup to my a7RII. Since time wasn’t a concern, I only used one tripod, switching the two bodies back and forth as my needs dictated.
Throughout the eclipse the Moon was softened by a thin layer of cirrus clouds. This image is among my first of the morning, before the Moon reached a band of denser clouds close to the horizon. I ended up with more creative captures, but those will need to wait for another day.
Workshop Schedule || Purchase Prints
The Moon In All Shapes And Sizes


Tapping the joy
Posted on January 28, 2018

Rainbow and Snowfall, Bridalveil Fall, Yosemite
Sony a7R II
Sony/Zeiss 24-70 f4
1/60 second
F/11
ISO 100
The downside of turning your passion into your profession is that so many decisions are no longer based on the pleasure they bring. Since my early 20s, I’d been very happy as an amateur photographer, picking my photo destinations and the images I clicked for the sheer joy of it. But I knew becoming a professional photographer risked preempting that joy with photography decisions designed to pay the bills.
For that reason, part of my decision to become professional a dozen or so years ago included a personal vow to only photograph what I want to photograph, and to never take a picture just because I thought it would make money. I was able to blend my years of photography experience with my prior career in technical communications (tech writing, training, and support) to create a photography business based on photo workshops, not image sales. Of course I do sell images too, but I’ve always viewed image sales as a bonus rather than something to something I rely on.
I’m thinking about this right now because this image reminds me how little time I actually have to work on my images. I’d totally forgotten about this afternoon from last April, when a storm cleared to reveal a dusting of fresh snow on the granite surrounding Yosemite Valley. As we stood marveling at the majesty, a ray of sun burst through the clouds to paint a vivid rainbow in the mist gathered beneath Bridalveil Fall.
It’s finds like this that remind me of the hundreds (thousands?) of images waiting to be processed and shared, some going back more than ten years. This isn’t a complaint—I can’t image a better life than mine. In fact, instead of lamenting the inability to reap the fruits of my labor, I find comfort in the knowledge of these images’ existence. Even if I never process and share them, they’re a reminder of my good fortune. If there’s a lesson here, maybe it’s that, for me at least, the true joy of photography isn’t the images and the acclaim they evoke, it’s simply the act of capturing them.
Workshop Schedule || Purchase Prints
Some Personal Favorites


It’s in the bag(s)
Posted on January 19, 2018

Sunstar, Haystack Rock, Cannon Beach, Oregon
Sony a7R III
Sony 12-24 f/4 G
1/25 second
F/16
ISO 100

Surf’s Up, Haystack Rock, Cannon Beach, Oregon
Sony a7R III
Sony 12-24 f/4 G
1/4 second
F/16
ISO 100
I just returned from a trip to Oregon with Don Smith. The prime purpose of our trip was to check out the fire damage in the Columbia River Gorge in advance of our annual spring workshop there. Because the damage in the areas where we take our groups wasn’t as severe as we’d feared, we didn’t need to spend a lot of time scouting alternate locations, leaving us with some extra time on our hands. And what do photographers do when they have extra time? That’s right—they take pictures.
In our case, we drove down the Oregon Coast as far as Bandon. Though Bandon was a complete washout photographically—wind, rain, minimal visibility, and an incoming storm that chased us inland on our final night—we saw enough of the coast that we decided to add a workshop there. (More on that later.) The photographic highlight of the coast trip was Cannon Beach, where we found the conditions much more favorable for photography.
If it looks like I got wet capturing these images, it’s because I did. Really, really wet. I started just trying to keep the water out of my shoes; by the time I finished, the surf was coming up to my waist and it no longer mattered because I knew I wasn’t going to get any wetter (as long as I stayed upright).
I did this entire shoot with a body and two lenses I didn’t have a year ago, which make me realize how new gear I added in 2017. Since I get asked so frequently about my gear, it occurs to me that I should just add my inventory to a blog post. So here goes…
What’s in my bag
I photograph nothing but landscapes, but the content of my bag varies with the location, whether I’m driving or flying, the amount of hiking/scrambling the trip will entail, and my overall objective for the shoot (conventional landscape, moon, stars, lightning, macro, or whatever). I have a core set of equipment that’s always with me, and an assortment of specialty gear that I add or subtract as the situation dictates.
Core gear (almost) always with me
- Body: Sony a7R Mark III with Really Right Stuff L-Plate
- Body: Sony a7R Mark II with Really Right Stuff L-Plate
- Lens: Sony 12-24 f/4 G
- Lens: Sony/Zeiss 16-35 GM f/2.8 + Breakthrough neutral polarizer
- Lens: Sony/Zeiss 24-70 f/4 + Breakthrough neutral polarizer
- Lens (coming soon): Sony 24-105 f/4 (will likely replace the 24-70 for most uses)
- Lens: Sony 100-400 GM + Breakthrough neutral polarizer
- Teleconverter: Sony 1.4x
- Teleconverter: Sony 2x
- Sony RM-VPR1 remote release
- Tripod: Really Right Stuff TVC-24L with Really Right Stuff BH-40
- Tripod: Really Right Stuff TQC-14 with BH-30 (I always carry one tripod, but rarely both)
- Black Diamond headlamp
- Giotto Rocket blower
- Filter bag: MindShift Gear Filter Hive—attaches to my tripod (but I wish it opened on the other side) and carries…
- Breakthrough 3-stop hard graduated neutral density filter
- Breakthrough 5-stop ND
- 1 Sony NP-FZ100 battery (a7RIII)
- 2 Sony NP-FW50 batteries (a7RII)
My Sony mirrorless system is the lightest, most compact core gear I’ve ever carried. The a7RIII is my primary body. A always carry a backup body; that used to be the a6300, but I like the a7rII so much that I couldn’t part with it when I got the a7RIII. But I do like having a backup body with a crop sensor, so the a6300 is rarely far away. It’s very compact, and I’m so happy with the image quality that I don’t hesitate to use it as my primary body when I want the extra reach its 1.5-crop sensor provides.
As a 100 percent landscape shooter (nothing that moves), I’m always on a tripod. That means f/4 glass is usually all I need, and Sony’s f/4 glass provides a great combination of compactness and image quality. In a moment of weakness I replaced my Sony/Zeiss 16-35 f/4 with the Sony 16-35 f/2.8 GM and like it so much that I can’t go back. It’s quite compact for an f/2.8 lens, and fast enough for most of my night photography. And the sharpness is off the charts.
My primary tripod/ball-head choice is the RRS TVC-24L and BH-40 for its combination sturdiness and height in a relatively light configuration. When weight is a concern, such as when I’ll be flying or plan some serious hiking, I opt for the RRS TQC-14 with the BH-30. While not quite as tall as I’d like, this combo is much lighter and plenty sturdy enough for all my body/lens combinations.
Specialty gear (with me as needs dictate)
- Body: Sony a7S Mark II with Really Right Stuff L-Plate
- Body: Sony a6300 with Really Right Stuff L-Plate
- Lens: Rokinon 24mm f/1.4
- Lens: Sony 90mm Macro
- Lens: Sony 70-200 f/4
- Extension tube set: Kenko 10mm and 16mm
- Lightning sensor: Stepping Stone Lightning Trigger LT-IV
My specialty gear comes with me when I have a specific objective outside the typical landscape scenes I encounter (and that are well handled by my core gear). Whether I’ve planned a moon rising above Half Dome, the Milky Way above the bristlecone pines, lightning on the rim of Grand Canyon, or wildflower or fall color creative selective focus, I have the body, lens, and accessory combination to handle it.
To capture a huge moon in my moon rise/set shoots, I use the 100-400 with the 1.4x or 2x teleconverter. Even with a teleconverter, this combination is sharper than any long lens I’ve ever used. Adding it to my a6300 gives me 1200mm full-frame-equivalent.
For my creative selective focus photography, I add extension tubes to this my telephoto lenses or Sony 90mm macro. Though extension tubes cut light, I don’t hesitate pushing the ISO of any of my Sony bodies as far as I need to.
Night photography is another personal joy. While the a7RIII gives me all the high ISO performance I need for most of my night photography, the a7SII’s ability to virtually see in the dark is ideal for the darkest nights photographing the Milky Way. Paired with the Rokinon 24mm f/1.4 lens, this combination finds usable detail in impossible darkness. Equally important, using focus peaking with the a7SII/Rokinon combination, I can focus effortlessly on the stars, in seconds.
As a long-time daylight lightning shooter, both on my own and leading photo workshops, I have accumulated many years of lightning photography trial and error (not necessarily in that order) experience. More than enough experience, in fact, to know that shutter lag is death to lightning photography. Though I was fully committed to Sony before I had a chance to try it for lightning, I was thrilled to discover that the electronic front curtain shutter on Sony mirrorless bodies has the fastest (best) shutter lag of any camera available. Any of my Sony bodies paired with the Stepping Stone Lightning Trigger (the only lightning sensor I trust) provide the best chance for lightning success.
Camera backpacks
- F-Stop Gear Tilopa
- F-Stop Gear Guru
I like the F-Stop bags because they’re the perfect combination of roomy comfortable (for long hikes), and durable, yet compact enough for an airline overhead bin. In the field, I can fit virtually all of my core and most of my specialty gear in my Tilopa, plus a down jacket, gloves, and hat. When I fly, my tripod goes in my suitcase, but the rest of my camera gear never leaves me because I can fit a fully packed Tilopa into any overhead bin I’ve ever encountered (including the puddle-jumpers). When I want to travel light (my Grand Canyon raft trip, for example), I opt for the Guru, which handles all of my core gear and some of my specialty gear.
Since I always want my bodies and lenses with me (not in my checked luggage), sometimes I fly with the Tilopa stuffed with gear and the empty Guru packed in my large suitcase; at my destination I load the Guru with whatever gear I need for the next shoot. And if limited overhead space ever forces me to check my bag at the gate (which has never happened, fingers crossed), I can remove the bag’s ICU (Internal Camera Unit) and store it at my feet, leaving the mostly empty bag for the flight attendants to store.
Workshop Schedule || Purchase Prints
Surf’s Up
Click an image for a closer look and slide show. Refresh the window to reorder the display.


Yosemite’s Rainbows
Posted on January 14, 2018
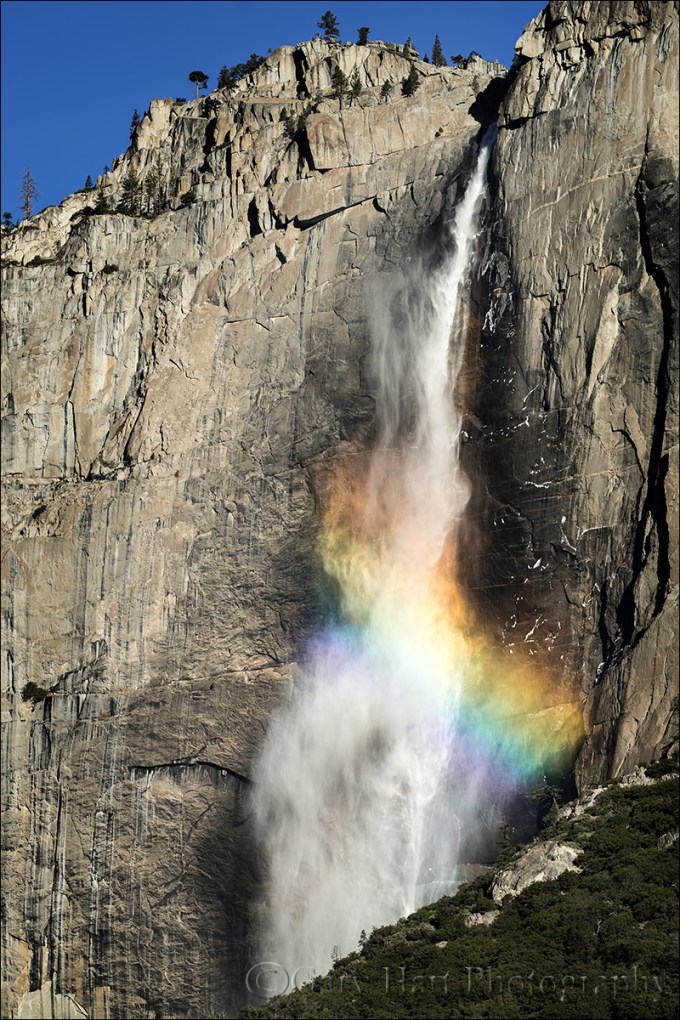
Winter Rainbow, Upper Yosemite Fall, Yosemite
Sony a7RIII
Sony 100-400 GM
ISO 250
f/9
1/200 second
Despite being one Yosemite Valley’s most dramatic sights, Yosemite Falls can frustrate photographers. Its best light comes on winter mornings, when frigid temperatures in the high Sierra hold most of Yosemite Creek hostage until spring. But by the time the spring thaw has arrived, the sun rises behind Half Dome Yosemite Falls is in shade until midmorning. Adding insult to injury, not only do we miss out on the best light while the fall is at its peak flow, we’re cheated of a wonderful rainbow opportunity as well.
Rainbows feel like random gifts from heaven, but there’s nothing random about them. Sun or moonlight entering airborne water droplets is separated by refraction into its component colors and reflected back as a rainbow to any viewer at the right angle.

Double Rainbow, Tunnel View, Yosemite

Moonbow and Big Dipper, Lower Yosemite Fall, Yosemite
When the rainbow is caused by rain, it’s impossible to be certain sunlight and raindrops will mix, but you can still get yourself in position in the event that it does happen.
One spring afternoon I saw that the conditions were ripe for a rainbow above Yosemite Valley and altered my plans to get myself in position to photograph it. I got wet, but I also got a spectacular double rainbow.
On the other hand, when the source of the airborne water is a waterfall, photographing a rainbow is simply a matter of knowing where and when to be on a sunny day. Yosemite, with its waterfalls and easily accessible vistas, is ideal for this kind of rainbow chasing.
In fact, with just a little knowledge, it’s possible to photograph multiple rainbows on the same waterfall on the same day with a little strategic placement. In many of my workshops we photograph the Yosemite Falls rainbows in the morning, and Bridalveil Fall rainbows in the afternoon. And in the spring we return to Yosemite Falls after dark to finish the day with a moonbow.
This year my Yosemite Winter Moon workshop students benefited from a recent storm and unseasonable warmth that sent more snowmelt than we usually see in early December into Yosemite Creek and over Yosemite Fall. Naturally, we took full advantage of this unexpected treat.
On the workshop’s first morning, a stiff breeze conspired with early morning sunlight to paint a prism of color at the bottom of Upper Yosemite Fall. After a successful sunrise shoot we were on our way to breakfast, but I didn’t hear too many complaints when I aborted that mission when we rounded the corner and saw the rainbow.
Everyone hopped out of the cars as soon as I pulled over and I nearly got trampled. With composition possibilities that ranged from wide to telephoto, I attached my Sony 100-400 GM lens to my (brand new at the time) Sony a7RIII and went to work. Many of my frames were tightly focused on the rainbow, but for this one I went a little wider to get the entire upper fall and just a little blue sky. With the wind whipping the fall, I gave each composition several clicks to capture the fall in a variety of shapes. Breakfast that morning was particularly tasty.
Yosemite Photo Workshops
Rainbows in Yosemite
Click an image for a closer look and slide show. Refresh the window to reorder the display.


A few words about the “supermoon”
Posted on January 7, 2018
Sunset Moonrise, Yosemite Valley, Yosemite
Sony a7R II
Sony 70-200 f/4
1/10 second
F/8
ISO 200
I used to resist using the supermoon label because it’s more of a media event than an astronomical event, and it creates unrealistic expectations. But since the phenomenon appears to be with us to stay, I’ve changed my approach and decided to take advantage of the opportunity to educate and encourage.
What’s the big deal?
So just what is so “super” about a “supermoon?” Maybe another way of asking the question would be, if I hadn’t told you that the moon in this image is in fact a supermoon, would you be able to tell? Probably not. So what’s the big deal? And why do we see so many huge moon images every time there’s a supermoon? So many questions….
Celestial choreography: Supermoon explained
To understand what a supermoon is, you first have to understand that all orbiting celestial bodies travel in an ellipse, not a circle. That’s because, for two (or more) objects to have the gravitational relationship an orbit requires, each must have mass. And if they have mass, each has a gravitational influence on the other. Without getting too deep into the gravitational weeds, let’s just say that the mutual influence the earth and moon have on each other causes the moon’s orbit to deviate ever so slightly from the circle it seems to be (without precise measurement): an ellipse. And because an ellipse isn’t perfectly round, as it orbits earth, the moon’s distance from us depends its position in its orbit.
An orbiting object’s closest approach to the center of its ellipse (and the object it orbits) is at “perigee”; its greatest distance from the ellipse’s center is “apogee.” And the time it takes an object to complete one revolution of its orbit is its “period.” For example, earth’s period is one year (365.25-ish days), while the moon’s period is a little more than 27 days.
But if the moon reaches perigee every 27 days, why don’t we have a supermoon every month? That’s because we’ve also added “syzygy” to the supermoon definition. In addition to being a great Scrabble word, syzygy is the alignment of celestial bodies—in this case it’s the alignment of the sun, moon, and earth (not necessarily in that order). Not only does a supermoon need to be at perigee, it must also be syzygy.
Syzygy happens twice each month, once when the moon is new (sun-moon-earth), and again when it’s full (sun-earth-moon). (While technically a supermoon can also be a new moon, the full moon that gets all the press because a new moon isn’t visible.) Since the earth revolves around the sun as the moon revolves around earth, the moon has to travel a couple extra days each month to achieve syzygy. That’s why the moon reaches perigee ever 27 days, but syzygy comes every 29.5 days, and the moon’s distance from earth is different each time syzygy is achieved.
The view from earth: Supermoon observed
While perigee, apogee, and period are precise terms that can be measured to the microsecond, a supermoon is a non-scientific, media-fueled phenomenon loosely defined a moon that happens to be at or near perigee when it’s full. To you, the viewer, a full moon at perigee (the largest possible supermoon) will appear about 14% larger and 30% brighter than a full moon at the average distance. The rather arbitrary consensus definition of the distance that qualifies a moon as a supermoon is a full moon that is within 90 percent of its closest approach to earth.
I really doubt that the average viewer could look up at even the largest possible supermoon and be certain that it’s different from an average moon. And all those mega-moon photos that confuse people into expecting a spectacular sight when there’s a supermoon? They’re either composites—a picture of a large moon inserted into a different scene—or long telephoto images. I don’t do composites, but they’re a creative choice that I’m fine with others doing as long as they’re clearly identified as composites.
For an image that’s not a composite, the moon’s size in the frame is almost entirely a function of the focal length used. I have no idea whether most of the moons the full moon gallery below were super, average, or small. The images in this and my previous blog post were indeed super, taken within minutes of each other last Sunday evening, at completely different focal lengths.


Every full moon is super
A rising or setting full moon is one of the most beautiful things in nature. But because a full moon rises around sunset and sets around sunrise, most people are eating dinner or sleeping, and seeing it is usually an accident. So maybe the best thing to come of the recent supermoon hype is that it’s gotten people out, cameras or not, to appreciate the beauty of a full moon. If you like what you saw (or photographed), mark your calendar for every full moon and make it a regular part of your life—you won’t be sorry.
Learn more
A full moon gallery (super and otherwise)
Click an image for a closer look and slide show. Refresh the window to reorder the display.


The first rule of photography: Just show up
Posted on January 4, 2018

Magenta Moonrise, Yosemite Valley, Yosemite
Sony a7R III
Sony/Zeiss 24-70 f4
.8 seconds
F/18
ISO 100
A man with a plan
It was New Year’s Eve and I was perched on a cliff overlooking Yosemite Valley, two feet from certain death and ten minutes from the rise of the largest full moon of 2018. While the death thing would have only been a problem if I’d have lost my mind, the moon’s appearance was entirely subject to the whims of Nature. And at that moment, she wasn’t cooperating.
The vast majority of my images are the result of a plan. But planning in nature requires both flexibility and resolve—an ability to adjust and persevere rather than quit when things don’t unfold as expected.
The master plan for this trip was to photograph 2018’s largest moon twice, on opposite sides of the Sierra. I’d start with super-telephoto shots of the moon’s appearance above Yosemite Valley at sunset on December 31, then drive to Lone Pine (just 100 or so miles as the drone flies, but more than 350 miles as the car drives) to capture its disappearance behind Mt. Whitney at sunrise on January 2. Unfortunately, it seemed that each day leading up to my trip, the weather forecast for both locations trended worse. But moon or not, can you think of a better way to celebrate the New Year than circumnavigating the Sierra? Me neither.
Assembling the parts
A beautiful scene is one part landscape and one part conditions (light, weather, and so on). We generally know where the great landscapes are, but finding them in the right conditions requires research, planning, and execution (plus a little luck). I try to time my trips, workshops and personal, to coincide with these special moments, usually some weather or celestial event. Whether it’s lightning at the Grand Canyon, the Milky Way above Kilauea or the bristlecone pines, or a moon rising or setting behind Half Dome or Mt. Whitney, I want to be there.
The problem is, nothing in nature is guaranteed. We know to the microsecond where the sun, moon, and stars will be at any given time, but have no way of knowing what weather we’ll encounter. I’ve lost many a shoot to inconveniently placed clouds, and I’ll never forget the time I scheduled an entire Yosemite workshop based on the anticipated arrival of Comet ISON, only to have the comet go all Icarus on me just days before the workshop.

Three Strikes, Bright Angel Point, North Rim, Grand Canyon
But experience has taught me that regardless of the score you don’t leave the game until the last out, and you don’t cancel just because the odds are against you. Sometime the odds are wrong, and sometimes I end up getting an unexpected gift that feels like a reward for my persistence. One of the most memorable shoots of my life happened on a morning with clear skies forecast, but we ignored the forecast and went out for sunrise anyway. And I ended up getting the last laugh on the ISON workshop when Yosemite Valley became the beneficiary of a snowstorm and sudden cold that coated every exposed surface in sparkling ice crystals.
Meanwhile, back on the ledge…
It turns out that my Sierra circumnavigation didn’t yield the big moon images I’d planned, but it definitely delivered in many ways. Ignoring the clouds, I arrived in Yosemite Valley on New Year’s Eve afternoon and ended up at my chosen location at around 4:00 p.m. The sky was mostly clouds, but a few patches of blue in the east gave me reason to hope.
The spot I’d chosen was indeed on a cliff 300 vertical feet above Yosemite Valley, but it was only dangerous if I wasn’t paying attention to what I was doing, and given my relationship with heights, there was little chance of that. Flanked by two tripods, I kept one eye on the horizon and the other on void at my feet. On my big tripod (RRS TVC-24LS) was my Sony a7RIII and 100-400 GM with a 2x teleconverter; on my compact tripod (RRS TQC-14) was my Sony a7RII and 70-200 f/4. Each tripod had one leg about two inches from the edge and two legs in the shrubs at my back. Me? I had two legs firmly planted on the narrow granite shelf, with my backside hugging the shrubs.
Sunset was at 4:50. With a cloudless sky the moon would appear from behind Cloud’s Rest at around 4:30, a location similar to last month’s full moon but closer to El Capitan. I’d hoped to start the moonrise with a long telephoto, then transition wider as it rose, but by 4:20 the persistent clouds made it pretty likely that if I saw the moon at all, it would be well above Cloud’s Rest and too high for a telephoto shot. At around 4:30 I waved a white flag at the big moon idea and replaced the 100-400 lens with my Sony/Zeiss 24-70 f/4, hopeful that the moon would make its way into a gap in the clouds before the sky became too dark. At around 4:45 the moon teased with a brief appearance between the clouds, but they scissored shut before the moon had an opportunity to shine.
While waiting I worked on my revised composition, which was complicated by my desire to include with the distant moon and Yosemite Valley, a dead tree in my immediate foreground. With very little margin for depth of field error, I opened my hyperfocal app and plugged in the numbers to determine the f-stop and focus point that would ensure front-to-back sharpness. With that out of the way, I bided my time photographing beautiful warm light on El Capitan and Half Dome.
The moon finally peeked above the clouds for good at 4:48. Ascending the darkening sky, the moon was enhanced by a sheer film of nearly transparent clouds that started out pink that intensified to fuchsia on their way to a vivid magenta that colored all of Yosemite Valley. I kept clicking as the foreground darkened, magnifying my image periodically to be sure I wasn’t losing detail in the moon. The image I share here was captured fifteen minutes after sunset.
You win some and you lose some
The Lone Pine segment of my trip was a photographic flop, but photography really shouldn’t be all about the photography. I arrived in Lone Pine mid-afternoon on New Year’s Day and spent the remaining daylight doing reconnaissance for the next day’s sunrise moonset. This was going to be another super-telephoto opportunity, this time at a location I’d driven past but never photographed from, so I wanted to ensure no surprises. That afternoon I enjoyed nice clouds and light above the Sierra’s east face, but to have photographed it would have compromised my scouting objective so I was just content to enjoy.
I rose before 6:00 a.m. on January 2 and drove out to my planned location with a pretty good idea that the clouds would shut me down. When I parked, the moon penetrated the clouds as an indistinct glowing sphere. As I waited, it descended into more-dense clouds and disappeared for good, but I stayed, quite content to simply watch Mt. Whitney and its towering neighbors emerge beneath the brightening sky.
The drive home took my beneath the serrated Sierra crest, past Mono Lake, through the Hope Valley, over Echo Summit and back down into Sacramento, completing the circuit with at least one successful image and many memories of a great trip. A very Happy New Year indeed.
I always have at least one Yosemite moon workshop on my schedule
Because I Showed Up
(Planned shoots that followed the plan…, or not)
Click an image for a closer look and slide show. Refresh the window to reorder the display.


2017 in the Mirror
Posted on December 26, 2017


One of my favorite things to do at year’s end is to look back at the things that made the year memorable. And my favorite part of this exercise is the realization that, even though I can’t say how, I know I will indeed be similarly rewarded in the coming year.
I’ll remember 2017 for several significant personal milestones, the many unexpected gifts from nature that I call “the most beautiful thing happening on Earth at this moment” moments, and (somewhat more prosaically) a lot of great new equipment that has made photography even more enjoyable for me.
Personal Milestones
New Zealand
In August of 1995 I visited the South Island of New Zealand for the first time. This was in my previous life, back when I trained programmers how to use the programming language of the company I worked for. And though I didn’t make my living as a photographer, I was very much a photographer at heart. My lodging for that trip was in rural countryside outside Christchurch, and I was so taken by the beauty that I carried a camera (this was before cameras were tiny and ubiquitous) on my 7-mile run each morning.
In late June of this year I finally fulfilled my dream to return to New Zealand. For ten days my good friend and fellow photographer Don Smith and I explored the mountains, fjords, lakes, and rainforests near Queenstown, New Zealand. We were scouting locations for a possible workshop, and were not disappointed. Though my previous visit had set my expectations bar quite high, this trip exceeded that bar with ease—Don and I came away with enough locations within a 150 kilometer radius of Queenstown to fill a 10-day workshop. By the time we returned, I was ready to proclaim New Zealand the most beautiful place I’ve ever seen.

Twilight Reflection, Mount Tasman and Mount Cook, Lake Matheson, New Zealand
Total Solar Eclipse
What can I say? There is nothing, absolutely nothing, that can prepare a person for the experience of a total solar eclipse. So. After hearing many words of advice to that effect, I prepared like crazy, then almost blew my chance to photograph it because…, wait for it…, I wasn’t prepared. Honestly, the photographer in me felt like a college freshman trying to chat up a supermodel: pretty cocky going in, and instantly aware I was hopelessly out of my league.
This isn’t something I’m embarrassed about because, if asked to choose between experiencing the moment and photographing it, I’d choose the experience any day. I had no idea that I ended up with a couple of pretty nice images until I reviewed them on my computer later. And I still have no memory of how I did it.

Here Comes the Sun, Idaho, Earth, Solar System, Milky Way
Andromeda Galaxy
Anyone who reads my blog knows how much I love astronomy. It’s an interest that goes back to childhood, and is so much more than identifying constellations (which I’m not especially strong at). Put simply, I love having my mind boggled, and nothing boggles my mind more than the immensity of the universe.
So imagine my excitement when I got the opportunity to peer into a telescope for my first in-person view of the Andromeda Galaxy (at least the first view that wasn’t just a faint smudge in the dark sky). And what could be better than that? How about actually attaching my camera to the telescope and letting it accumulate and record far more light than my eyes saw.

Andromeda Galaxy
The Most Beautiful Thing Happening On Earth At This Moment
Like pretty much every other serious photographer, I always do my best to photograph my subjects in the best conditions. But for landscape photographers, great conditions are never guaranteed. And when they do happen, expected or not, they’re often so spectacular that it feels like I’m witnessing the most beautiful thing happening on Earth at that moment. Here’s a slideshow of my 2017 TMBTHOEATM candidates (in no particular order):
Equipment
When I started this post, I didn’t imagine I’d be writing about equipment. But I realized that probably more than any other year in my career as a photographer, in 2017 I added equipment that actually made a difference.
Here’s a list of my equipment difference makers, and why they made a difference:
Sony 12-24 f/4 G: I’ve never had a lens that allowed me to go this wide. From the first time I took it to Yosemite, I knew it would allow me to photograph things I couldn’t have photographed before.
Sony 16-35 f/2.8 GM: I didn’t think this lens would make much of a difference in my photography, but its combination of speed and incredible sharpness made it my go-to night lens for most situations. I’m not throwing away my Rokinon 24mm f/1.4, but I’ll probably have to dust it off each time I use it.
Sony 100-400 f/2.8 GM: I’ve had lenses this sharp, and lenses this long, but I’ve never had a lens this long that’s this sharp. Not only that, whereas my other earlier long lenses were specialty lenses that I only packed when I planned to use them, this one is compact enough to have become a permanent resident in my camera bag.
Sony a7R III: Despite my love for my Sony a7RII, it had a few significant shortcomings (battery life and a single card slot to name two) that I longed to be fixed. Not only does the a7RIII fix these shortcomings, it actually gives me more dynamic range and better high ISO and I’m in photography heaven.
Here’s a random slideshow if images captured with my new toys:
What’s next?
I have no idea what’s in store for next year, but I’m ready. Bring it on!
Workshop Schedule || Purchase Prints
2017 Highlights
Click an image for a closer look and slide show. Refresh the window to reorder the display.


Three Moons
Posted on December 19, 2017
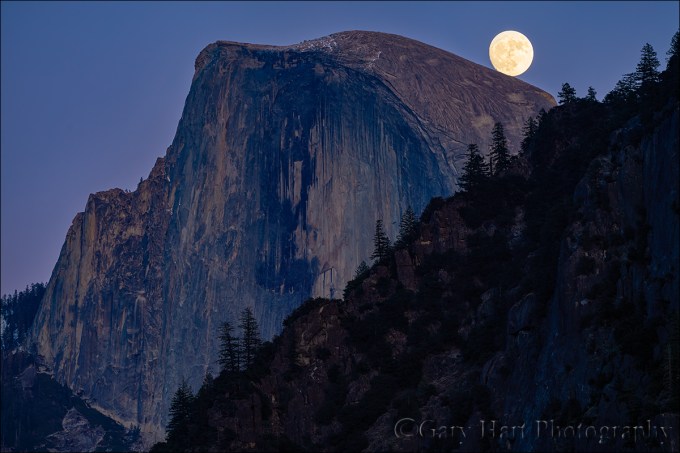
Balanced Moon, Half Dome, Yosemite
Sony a7RIII
Sony 100-400 GM
ISO 100
f/8
1/10 second
This month’s Yosemite Winter Moon photo workshop group got the rare opportunity to photograph a full (or nearly full) moon rising above Half Dome at sunset on three consecutive nights. One reason it’s rare is that, as viewed from Yosemite Valley, the full moon and Half Dome only align in winter. But the real tricky part is making it happen three times when sunset happens at pretty much the same time each evening, but the moon rises about 45 minutes later.
-

- Sunset Moonrise, Half Dome, Yosemite (11/30/17)
-

- Balanced Moon, Half Dome, Yosemite (12/1/17)
-

- Winter Supermoon, Half Dome, Yosemite
My goal for photographing a rising full moon is to get the moon on the horizon in the window from 15 minutes before to 15 minutes after the “official” (flat horizon) sunset. Earlier and there’s not enough contrast and the moon looks bland; later and there’s too much dynamic range to capture detail in the dark landscape and daylight-bright moon.
The key to making this work starts with understanding that when you see a sunset or moonrise time published for a location, that time is always based on a flat horizon. So unless you’re atop a mountain or on a ship at sea, you’ll probably see the sun disappear behind the terrain in the west before sunset, and you’ll probably need to wait for the moon to rise above the terrain in the east.
Since the sun is at my back when a full moon rises, I’m not too concerned about the precise timing of the sun’s disappearance. But I need to be pretty dead-on for the moon’s arrival. Knowing the moon will rise an 40-60 minutes (or so) later each day, it’s easy to infer that the more days until the full moon, the higher the moon will be at sunset. Sadly, I have no control over the timing of the absolute sunset/moonrise, but I can control the elevation of the horizon, and therefore the moon’s appearance on a given day, by choosing my position relative to the horizon above which the moon will rise.
To make this workshop’s consecutive moonrises work, each evening I picked a view that was farther from Half Dome than the previous evening. On our first evening I chose a spot on the east side of Yosemite Valley; the next evening we were closer to the middle of the valley; on our the third evening our vantage point was near Tunnel View, at the opposite side of Yosemite Valley from Half Dome. The moon rose later above the flat horizon each evening, but by moving farther away, we reduced the distance the moon had to travel before it appeared.
Big moon, small moon
The other thing this little exercise illustrates is how to make the moon big in your frame. Notice that in each image, Half Dome is more or less the same size, but the moon gets progressively bigger. That’s because on any given day, no matter where I am on Earth, the moon is so far away that its apparent size doesn’t change. But the size of earthbound features, like Half Dome, changes a lot with proximity. When I was on Yosemite Valley’s east side for the first moonrise, filling my frame with Half Dome required just a little more than 100mm; the next night I was far enough back to require about 250mm to fill the frame; and on the final night, from eight miles away I needed more than 500mm. And as my focal length increased, so did the moon’s size in my frame.
Join me as I do this all over again next December
A Full Moon Gallery


A Galaxy Far, Far Away
Posted on December 14, 2017

Andromeda Galaxy, Local Group, 2.5 Million Light Years
Sony a7RIII
Unknown telescope (sorry)
ISO 8000
20 seconds
I won’t pretend that this picture is a creative achievement of any sort—I captured it at a Sony-organized night shoot during last month’s Sedona media event promoting the Sony a7RIII. All I did was attach my a7RIII to someone else’s telescope (equipped with a computerized tracking mechanism to cancel the earth’s rotation), dial in the recommended exposure settings, focus, and click my shutter. But that does’t change the fact that I think this is one of my coolest images ever. It truly epitomizes the reason I say my favorite thing about photography isn’t the way it reproduces my reality, it’s the way enhances it.
I’ve been interested in astronomy since I was a kid, and one of the first celestial objects to intrigue me was the Andromeda Galaxy. (At the risk of stating the obvious, it’s called Andromeda because we view it in the constellation Andromeda.) Armed with this knowledge and a simple star chart, on camping trips I’d shun the tent to sleep beneath the stars, hoping to get a glimpse of the Andromeda Galaxy but not knowing exactly what I was looking for. I know now that even under in the darkest, clearest sky, I’d have only seen the this massive collection of stars as an unimpressive smudge. But my failure to find my target didn’t dampen my enthusiasm—the search was as much an excuse to take in the entire night sky and ponder its mysteries.
When I wasn’t observing, I was reading. I learned that Andromeda Galaxy is the largest galaxy in the “Local Group” of more than 50 gravitationally connected galaxies that also includes our Milky Way. Both the Milky Way and Andromeda are spiral galaxies, but with a trillion stars, Andromeda is at least twice the size of the Milky Way. Andromeda is also on a collision course with the Milky Way—put on your helmets and mark your calendar for 4.5 billion years.
The light that struck my sensor to render this image traveled more than 2.5 million years, making the Andromeda Galaxy the farthest we can see with the naked eye—that’s about 150,000,000,000,000,000,000 miles, so fill up before you leave. Because everything we know about the Andromeda Galaxy happened 2.5 million years ago, we’ll need to wait another 2.5 million years to know what’s happening there right now. But while Andromeda is indeed far, far away from our earthbound perspective, it’s actually the closest galaxy to us (Magellanic Clouds notwithstanding). There are a couple trillion or so galaxies even farther away.
Knowing all this stuff made my search for the Andromeda Galaxy quite thrilling. In recent years I’ve actually captured it in a few frames targeting something else, clearly visible but not particularly impressive. But the Sedona experience took my thrill to the next level. Leveraging the telescope’s supreme magnification and light gathering capabilities, I let my sensor collect light for 20 seconds at ISO 8000, long enough for the galaxy’s spiral arms start to appear. Also popping into view are two fuzzy objects that I’d only seen in pictures—these are satellite galaxies bound by gravity to the Andromeda Galaxy, much like the Magellanic Clouds that grace our Southern Hemisphere sky. All the pinpoint stars in the image are part of the Milky Way—much closer and unrelated to the Andromeda Galaxy, just in the line of sight (much the way sensor dust or a lens smudge is not part of a scene you photograph).
This image has rekindled my passion for astronomy. It reminds me of my very small place in a universe that’s too large for even the greatest minds to comprehend. Because there’s a lifetime worth of cool stuff to view up there and time’s wasting, I’m seriously considering getting a telescope and letting my camera show me what I’ve been missing. Stay tuned….
Retirement announcement
(No, not me)
Since I just switched to the Sony a7RIII, my a7RII has been relegated to backup status. As excited as I am about my new camera, I’m already a bit nostalgic about my a7RII, the best camera I’ve ever owned, as well as my favorite camera ever to shoot with (not necessarily the same thing).
I made the switch to Sony mirrorless more than three years ago, starting with the a7R. The image quality of the a7R was so much better than what I had been shooting that I was able to forgive its interface and usability shortcomings. The a7RII was a huge improvement over the a7R, both in image quality and usability, so much better that it soon felt more like an extra limb with a direct connection to my brain than an inanimate tool. It’s clear already that I’ll soon love using the a7RIII even more, but right now I just want to give a shout-out to my a7RII as it enters semi-retirement.
Here some scenes my a7RII and I saw
Click an image for a closer look and slide show. Refresh the window to reorder the display.


