Fallen color
Posted on September 5, 2015
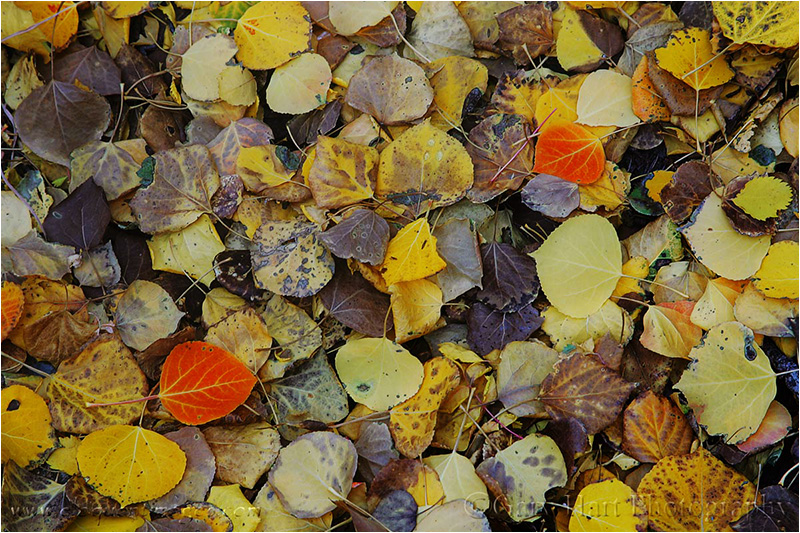
Fallen Color, Rock Creek Canyon, Eastern Sierra
Canon EOS-1D Mark II
3/10 second
F/9.0
ISO 100
85 mm
When you’re surrounded by beautiful scenery, it’s easy to overlook the small details that make a scene special. But there’s no substitute for the pleasure that comes from spending a little time in a scene, identifying its intricacies, and creating an image that conveys this connection to others. Capturing these intricacies can be the most rewarding aspect of photography, because they’re almost always uniquely reflective your own vision.
About this image
People frequently look at this image and ask if I arranged the red leaves. The answer is an emphatic, No! I usually go on to remind them that you can draw a straight line between any two objects on the face of the earth (or any other planet, as far as I know). In fact, the only arranging I do to an image is myself—circling, rising, dropping—and in that regard I’m quite aggressive.
In the field I look for individual elements to isolate in my frame; or better yet, groups of elements. Of course finding a subject is not the end of the job—without properly positioning the subjects in the frame, the scene is likely to fail. But rather than moving your subjects (the lazy solution), move yourself.
In this scene I circled the leaves slowly, camera to my eye, until the frame felt balanced. And while the leaves ended up at the “rule of thirds” points, that wasn’t a conscious decision on my part, but rather confirmation that the rule of thirds is indeed valid (sometimes).
Putting the Rule of Thirds in its place
What is the rule of thirds? Very simply, imagine a tic-tac-toe grid on your frame—the Rule of Thirds says that important linear elements (like the horizon) should be on the lines, and important compositional elements (like these leaves) should be at (or near) the intersections.
I hesitate to even bring the Rule of Thirds up because it’s one of the easiest photography “rules” to be broken effectively. It’s also probably the rule most frequently abused by well meaning judges at your local camera club. (If you get too much abuse about your Rule of Thirds choices in images you really like, don’t change your compositions, change your camera club.)
I think the Rule of Thirds true value is to help remind beginners not to bullseye subjects, or not to crowd elements against the edges. In fact, I could probably show about as many successful images that break the Rule of Thirds as follow it. When I’m composing a shot, any Rule of Thirds voices in my head are overruled by my intuition, my sense for what what balances a frame, and even more simply, what feels right.
Read more about photographing fall color
A fall color gallery
Click an image for a closer look, and a slide show. Refresh the screen to reorder the display.


Going long
Posted on August 24, 2015
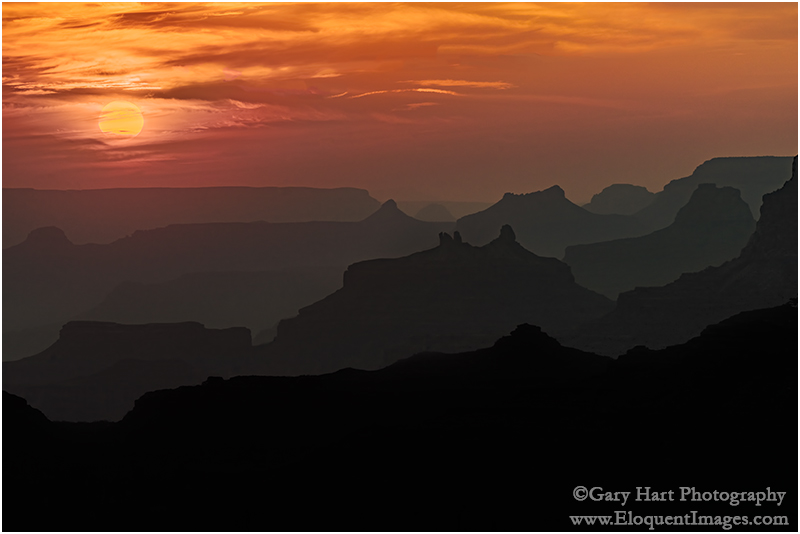
Sunset Silhouettes, Desert View, Grand Canyon
Sony a7R II
Tamron 150-600 (Canon-mount with Metabones IV adapter)
1/125 second
F/11
ISO 200
It’s no secret that a prime benefit of mirrorless photography is the smaller form-factor of the bodies and lenses. And while I was looking forward to lightening my bag when I made the switch, it turns out that my first mirrorless thought wasn’t, “Oh gee, this bag is so light!” (it was). My first thought was actually, “Oh gee, look at all that extra room!”
While everyone knows that nature abhors a vacuum, it appears that nature photographers do too. Rather than leave that space empty and revel in my eased burden, I opted to fill every cubic inch with more gear. So, in a bag that was formerly maxed out with one Canon SLR body and four lenses covering 16mm to 200mm, I now carry three mirrorless bodies and four lenses that go from 16mm to 600mm. It’s the heaviest bag I’ve ever carried—and I love every ounce of it.
Occupying the most bag real estate (and weight!) is a Tamron 150-600mm lens (and Metabones adapter). My original thought when I purchased the Tamron was that I’d leave this beast in the car and only lug it out for very specific uses (much the way I used my Canon 100-400). But I’ve been having so much fun doing long telephotos with the 150-600 that I suck it up and pack it out pretty much everywhere I go.
I had particular fun with the big Tamron on my recent Grand Canyon trip. With distant vistas at virtually every stop, Grand Canyon provides infinite opportunities for the isolation and compression shots an extreme telephoto lens does so well. Suddenly I was enjoying familiar vistas in brand new ways—far off rock spires and buttes suddenly filled my entire frame, the distance separating receding ridges compressed until they lined up like a column of dominos, and the sun’s throbbing disk expanded on the horizon like a hot air balloon.
On the final sunset of our second workshop, Don Smith and I guided the group to Desert View, where we all spread along the rim west of the Watchtower. The canyon was extremely hazy, but I told everyone in the group within earshot that the haze would subdue the sun enough that we’d probably get that red rubber ball sun as it dropped from view.
I wasn’t planning to shoot, but as I stood on the rim working with the students (who were by now pretty independent anyway), I couldn’t resist setting up my tripod and breaking out the 150-600. Anticipating where the sun would reach the horizon, I moved a little east to balance it better with the most striking features in the view. Then I framed up my composition and waited for the sun to slip into the haze. With the help of my 3-stop Singh-Ray reverse graduated neutral density filter, I was indeed able to retain some yellow in the sun while still capturing silhouettes of the ridges stacked all the way to the horizon.
When I got the image home and opened it in Lightroom, the canyon was completely black, and the sun was a white disk. But tugging the Shadows slider to the right pulled out the silhouettes you see here (with remarkably little noise), and dragging the Highlights slider all the way to the left filled almost the entire sun with yellow (a thin band of white remained along the top edge, which I touched up in Photoshop). While the sun appeared more red to my eye, I was thrilled to get any color at all.
Schedule of Photo Workshops
A long shot gallery
Click an image for a closer look, and a slide show. Refresh the screen to reorder the display.


The dark night
Posted on August 20, 2015

Angel’s View, Milky Way from Angel’s Window, Grand Canyon
Sony a7S
Rokinon 24 f1.4
20 seconds
F/1.4
ISO 6400
How to offend a photographer
Gallery browser: “Did you take that picture?”
Photographer: “Yes.”
Gallery browser: “Wow, you must have a good camera.”
Few things irritate a photographer more than the implication that it’s the equipment that makes the image, not the photographer. We work very hard honing our craft, have spent years refining our vision, and endure extreme discomfort to get the shot. So while the observer usually means no offense, comments discounting a photographer’s skill and effort are seldom appreciated.
But…
As much as we’d like to believe that our great images are 100 percent photographic skill, artistic vision, and hard work, a good camera sure does allow us to squeeze the most out of our skill, vision, and effort.
As a one-click shooter (no HDR or image blending of any kind), I’m constantly longing for more dynamic range and high ISO capability. So, after hearing raves about Sony sensors for several years, late last year (October 2014) I switched to Sony. My plan was a gradual transition, shooting Sony for some uses and Canon for others, but given the dynamic range and overall image quality I saw from my Sony a7R starting day one, I haven’t touched my Canon bodies since picking up the Sony.
While I don’t think my Sony cameras have made me a better photographer, I do think ten months is long enough to appreciate that I’ve captured images that would have been impossible in my Canon days. I instantly fell in love with the resolution and 2- to 3-stop dynamic range improvement of my Sony a7R (and now the a7R II) over the Canon 5D III, the compactness and extra reach of my 1.5-crop a6000 (with little loss of image quality), and my a7S’s ability to pretty much see in the dark.
But what will Sony do for my night photography?
I need more light
I visit Grand Canyon two or three times each year, and it’s a rare trip that I don’t attempt to photograph its inky dark skies. But when the sun goes down and the stars come out, Grand Canyon’s breathtaking beauty disappears into a deep, black hole. Simply put, I needed more light.
Moonlight was my first Grand Canyon night solution—I’ve enjoyed many nice moonlight shoots here, and will surely enjoy many more. But photographing Grand Canyon by the light of a full moon is a compromise that sacrifices all but the brightest stars to achieve a night scene with enough light to reveal the canyon’s towering spires, receding ridges, and layered red walls.
What about the truly dark skies? For years (with my Canon bodies) the only way to satisfactorily reveal Grand Canyon’s dark depths with one click was to leave my shutter open for 30 minutes or longer. But the cost of a long exposure is the way Earth’s rotation stretches those sparkling pinpoints into parallel arcs.
As with moonlight, I’m sure I’ll continue to enjoy star trail photography. But my ultimate goal was to cut through the opaque stillness of a clear, moonless Grand Canyon night to reveal the contents of the black abyss at my feet, the multitude of stars overhead, and the glowing heart the Milky Way.
So, ever the optimist, on each moonless visit to Grand Canyon, I’d shiver in the dark on the canyon’s rim trying to extract detail from the obscure depths without excessive digital noise or streaking stars. And each time I’d come away disappointed, thinking, I need more light.
The dynamic duo
Early this year, with night photography in mind, I added a 12 megapixel Sony a7S to my bag. Twelve megapixels is downright pedestrian in this day of 50+ megapixel sensors, but despite popular belief to the contrary, image quality has very little to do with megapixel count (in fact, for any given technology, the lower the megapixel count, the better the image quality). By subtracting photosites, Sony was able to enlarge the remaining a7S photosites into light-capturing monsters, and to give each photosite enough space that it’s not warmed by the (noise-generating) heat of its neighbors.
With the a7S, I was suddenly able to shoot at ridiculously high ISOs, extracting light from the darkest shadows with very manageable noise. Stars popped, the Milky Way throbbed, and the landscape glowed with exquisite detail. I couldn’t wait to try it at Grand Canyon.
My first attempt was from river level during this year’s Grand Canyon raft trip in May. Using my a7S and Canon-mount Zeiss 28mm f2 (after switching to Sony, I was able to continue using my Zeiss lens with the help of a Metabones IV adapter), I was immediately blown away by what I saw on my LCD, and just as excited when I viewed my captures on my monitor at home.
But I wasn’t done. Though I’d been quite pleased with my go-to dark night Zeiss lens, I wanted more. So, in my never-ending quest for more light, just before departing for the August Grand Canyon monsoon workshop, I purchased a Rokinon 24mm f1.4 to suck one more stop’s worth of photons from the opaque sky. The new lens debuted last Friday night, and I share the results here.
About this image
Don Smith and I were at Grand Canyon for our annual back-to-back monsoon workshops. On the night between workshops, Don and I photographed sunset at Cape Royal, then walked over to Angel’s Window where we ate sandwiches and waited for the Milky Way to emerge. The sky was about 80 percent clouds when the sun went down and we debated packing it in, but knowing these monsoon clouds often wane when the sun drops, we decided to stick it out.
Trying to familiarize myself with the capabilities of my new dark night lens, I photographed a handful of compositions at varying settings. To maximize the amount of Milky Way in my frame, everything oriented vertically. As with all my images, the image I share here is a single click.
Despite the moonless darkness, exposing the a7S at ISO 6400 for 20 seconds at f1.4 enabled me to fill my entire histogram from left to right (shadows through highlights) without clipping. Bringing the shadows up a little more in Lightroom revealed lots of detail with just a moderate amount of very manageable noise.
This is an exciting time indeed for photographers, as technology advances continue to push the boundaries of possibilities. Just a few years ago an image like this would have been unthinkable in a single click—I can’t wait to see what Sony comes up with yet.
Some comments on processing night images
Processing these dark sky images underscores the quandary of photography beyond the threshold of human vision—no one is really sure how it’s supposed to look. We’re starting to see lots of night sky images from other photographers, including many featuring the Milky Way, and the color is all over the map. Our eyes simply can’t see color with such little light, but a long exposure and/or fast lens and high ISO shows that it’s still there—it’s up to the photographer to infer a hue.
So what color should a night scene be? It’s important to understand that an object’s color is more than just a fixed function of an inherent characteristic of that object, it varies with the light illuminating it. I can’t speak for other photographers, but I try to imagine how the scene would look if my eyes could capture as much light as my camera does.
To me a scene with blue cast is more night-like than the warmer tones I see in many night images (they look like daylight with stars), so I start by cooling the color temperature below 4,000 degrees in Lightroom. The purplish canyon and blue sky in this image is simply the result of the amount of light I captured, Grand Canyon’s naturally red walls, and me cooling the image’s overall color temperature in Lightroom. For credibility, I actually decided to desaturate the result slightly. (The yellow glow on the horizon is the lights of Flagstaff and Williams, burned and desaturated in Photoshop.)
Learn more about starlight photography
A dark night gallery
Click an image for a closer look, and a slide show. Refresh the screen to reorder the display.


Hurry up and wait
Posted on August 14, 2015

Diagonal Lightning Strike, Lipan Point, Grand Canyon
Sony a7R II
Sony/Zeiss 24-70
1/13 second
F/11
ISO 50
Photographing lightning is about 5 percent pandemonium, and 95 percent arms folded, toe-tapping, just plain standing around. A typical lightning shoot starts with a lot of waiting for the storm to develop and trying to anticipate the best (and safest) vantage point. But with the first bolt often comes the insight that you anticipated wrong and: 1) The lightning is way over there; or 2) The lightning is right here (!). What generally ensues is a Keystone Cops frenzy of camera bag flinging, tire screeching, gear tossing, tripod expanding, camera cursing, Lightning Trigger fumbling bedlam. Then it’s more waiting. And waiting. And waiting….
In many ways the waiting part is a lot like fishing—except these fish have the ability to strike you dead without warning. And a strike is no guarantee that you’ve landed something—that assurance won’t come until you review your images. Unfortunately, when a Lightning Trigger is attached, LCD reviews are disabled. But to avoid missing the next one, I’ve learned to resist the temptation to turn off my Lightning Trigger and check after every bolt (like pulling the line from the water every few minutes to see if the worm’s still there).
About this image
With clear skies in the forecast, Don Smith and I started last Sunday with plans to recover from the preceding day’s 12 hour drive to the Grand Canyon, and to recharge for our Grand Canyon Monsoon workshop that started Monday. But walking outside after lunch, dark clouds building overhead sent us racing up to the rim (a 15 minute drive) to see what was going on (see Keystone Cops frenzy reference above).
Starting at Grand View, we quickly set up our tripods, cameras, and Lightning Triggers and aimed toward promising clouds up the canyon. But within 10 minutes the clouds overhead darkened; when they started pelting us with hail, we retreated to the car. Since the storm appeared to be moving east-to-west, we drove east to get on the back side of it, eventually ending up at Lipan Point (one of our favorite spots).
We set up west of the Lipan vista, enjoying relative peace and quiet away from the summer swarm. The cell that had chased us from Grand View was diminishing, so much so that we needed sunscreen when we started, but we could see an even more impressive cell was moving up from the south. Meanwhile, the clouds in the canyon were spectacular, but all the lightning was firing above the flat, scrub pine plain to the south. Our hope was that it would reach the canyon in our viewfinders before reaching us.
Of course I wanted lightning firing into the canyon, but at first I hedged my bets and composed wide enough to include the less aesthetically pleasing evergreen forest. As the rain moved across the canyon to our west, our blue sky had started to give way to darkening clouds, and distant thunder rolled through the afternoon stillness.
This was my first lighting shoot (and just my second overall) with my brand new Sony a7R II, so I was quite anxious to test its lightning capture capability. Speed is of the essence with lightning, and the faster the shutter responds to a click command, the better the chances of capturing it. My Canon 5D III had done the job in the past, but I knew I missed a number of strikes due to its only mediocre shutter lag.
The a7R II, like the a7S and a6000 (but not the a7R), has an electronic front curtain shutter that drastically shrinks shutter lag, so in theory its performance would rival the a7S and a6000, both of which I’d already succeeded with. That morning I’d tested the a7R II against the a7S and found its response identical, but you never know for sure until you try. (The other part of this equation is a good lightning sensor, and the only one I’ve seen work to my satisfaction is the Lightning Trigger from Stepping Stone Products.)
That afternoon we enjoyed about a half hour of quality shooting before the storm moved too close for comfort. In that span I saw at least a half dozen canyon strikes; the new camera captured most (all?) of them. The one you see here was from early in the show—subsequent strikes were further north (right) before petering out.
Read more about lightning photography, and see a gallery of lightning captures, on my Lightning Photography photo tips page.
Our first date: First impressions of my Sony a7R II
Posted on August 10, 2015

Flaming Oaks, Sierra Foothills, California
Sony a7R II
Tamron 150-600 (Canon-mount with Metabones IV adapter)
1 second
F/8
ISO 100
Love at first sight
My Sony a7R II arrived Wednesday, but my schedule limited my use to staying home and familiarizing myself with menus and overall handling. If you’re familiar with Sony’s e-mount mirrorless bodies, you’ll be able to hit the ground running with the a7R II. The menu system is the same, though of course there are few new features.
The buttons and controls have moved a bit from their placement on the original a7 bodies (a7, a7R, a7S), but it’s essentially the same body as the a7 II (released late last year). Blindfolded, it would be difficult to distinguish the a7R II from the a7 II, and in fact, my Really Right Stuff L-plate (which I ordered several weeks ago), is the a7 II L-plate. I didn’t order the battery grip, but I know the a7 II battery grip fits the a7R II as well.
On the other hand, the a7R II has more heft than the a7R—the body, while still far more compact than my Canon bodies, is definitely larger and heavier than the original a7R body. The grip noticeably larger too. The result is a camera that feels more solid without sacrificing its mirrorless compactness—a definite upgrade.
I find mirrorless so perfectly suited to manual focus (for stationary landscape subjects), and the a7R autofocus so sluggish, that I just stopped using autofocus. I think that will change with the a7R II, as just a few test frames made it clear that the autofocus is vastly improved, both in speed and accuracy—not just for my Sony glass, but for my Canon lenses paired with a Metabones IV adapter (just make sure you’re using the latest Metabones firmware). Manual will remain my primary focus paradigm, but it’s nice to know that autofocus is now a viable option.
Shutter lag
One prime consideration for me is shutter-lag (the time it takes the shutter to engage once the button it pressed). Measure in milliseconds, it’s not a big factor for virtually all uses, but when photographing lightning, every millisecond matters. My Canon 5D Mark III’s shutter lag was decent but not great; the a7R is too slow to even consider for lightning; the a6000 is quite fast; and the a7S is (dare I say) lightning fast. So on the eve of my annual Grand Canyon monsoon trip (for the workshop Don Smith and I do each year), I was quite anxious to know how the a7R II would perform in the shutter lag department.
I don’t have the means to measure the actual shutter lag of a camera, but since I have the shutter lag numbers for the a7S, and have had great success photographing lightning with it already, I just wanted to know know how the a7R II compares the a7S. And I was able to devise a way to test their relative speed. Without going into too much detail, my test involved both cameras set up on a tripod with a Lightning Trigger (the only lightning sensor I’d even consider using—I own two) attached.
With both cameras focused on a timer that recorded milliseconds, I simultaneously triggered each using its Lightning Trigger, then compared the times captured in the images of each camera. They were identical. Just to be sure I ran a second test and again they were identical.
As I write this I’m one day into my Grand Canyon trip and can tell you that I now have empirical data confirming that the a7R II is a great lightning camera, maybe even the best lightning camera. But that’s a story for another day….
Kiss and tell
Thursday night I took my new camera out to one of my favorite sunset spots in the foothills. Sporting her brand new L-plate and 128 GB media card, she was clearly primed for action. This being our first date, I didn’t want to push her too hard, but I could tell she was definitely ready for whatever I asked.
As luck would have it, this turned out to be more than a dry run shoot to test a new camera. The sunset that night was off the charts, so much so that I ended up breaking out a second camera (she didn’t seem to mind that either). I haven’t had a lot of time to play with the images from that night, but am sharing this one here from the very end of the shoot. Despite its appearance, and the rash of fires burning throughout California, no trees were injured in the making of this image. This is just silhouette of a trio of oaks against the sunset, underexposed to enhance the trees’ shape and hold the color in the sky.
My first impressions of the a7R II? I think it’s a relationship that’s going to last (at least until the next version comes out). In addition to the improved focus and increased resolution, in the very brief time we’ve been together, it’s clear that the dynamic range is even better than the phenomenal dynamic range I get from my a7R.
All this, and a great body.
My Sony Gallery (a history of my ten months as a Sony shooter)
Click an image for a closer look, and a slide show. Refresh the screen to reorder the display.


The camera’s vision: Light
Posted on August 2, 2015
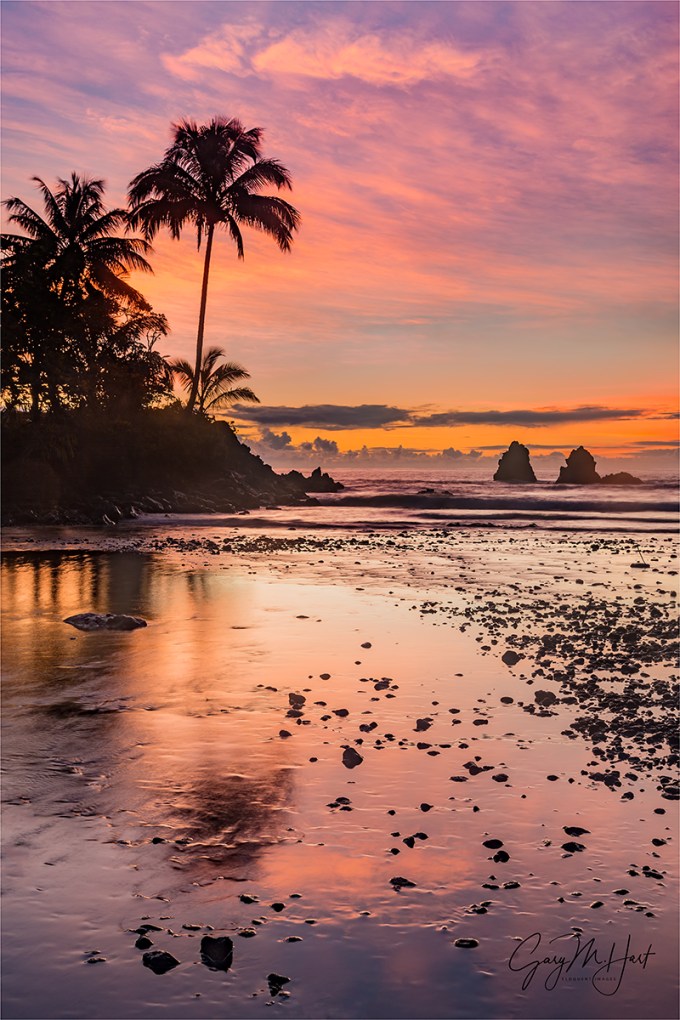
Tropical Sunrise, Hawaii Big Island
Canon EOS-5D Mark III
32 mm
1 second
F/11
ISO 200
Something I teach, write, and lecture on frequently (ad naseum?) is the photographer’s obligation to understand, not fight, the camera’s vision. Some people get this; others, not so much.
So here I go again…
Visual “Truth” is relative
Without getting too philosophical, it’s important to understand that, like your camera, your view of the universe is both limited and interpreted. In other words, there is no absolute visual truth. Instead, we (you, me, our cameras) each have a unique vision of the world that’s based on the way we receive it. Our definition of “real” is biased toward the three-dimensional, 360 degree, continuous-motion way our eye/brain system processes our universe, but it’s wrong to contend that the camera’s perspective is any less real than yours or mine.
The visible spectrum
Before lamenting your camera’s limitations, pause to consider that, in the grand scheme of perpetual electromagnetic energy surrounding us, what you and I see is incredibly limited as well. The visible (to the human eye) portion of the electromagnetic spectrum is an insignificant fraction of the infinite continuum of electromagnetic wavelengths permeating the Universe. For example, X-ray machines peer into the world of electromagnetic waves in the one nanometer (one billionth of a meter); TVs and radios “see” waves that are measured in centimeters; humans, on the other hand, see only waves in the very narrow band between (about) 400 and 750 nanometers.
With tools that target specific wavelengths, doctors reveal subcutaneous secrets, astronomers explore our galaxy and beyond, law enforcement and the military use “invisible” (to us) infrared radiation (heat) to see people and objects in complete darkness. In other words, in the grand scheme of things, there’s no single absolute visual standard—it’s all relative to your frame of reference.
The camera has its own frame of reference. While it’s sensitive to more or less the same visible spectrum our eyes see, the camera is oblivious to an entire dimension (depth). Not only that (since we’re not talking about movies here), a camera only returns a snap of a single instant. But a camera has advantages—its narrow perspective (compared to the human experience) allows photographers to hide distractions outside the frame, and that “instant” reflected in a photo can actually be an accumulation of infinite number of instants.
Despite these differences, photographers often go to great lengths attempting to force their cameras to record the world the way their eyes see it—not necessarily bad, but extremely limiting. Not only is duplicating human vision with a camera impossible, doing so sacrifices the camera’s ability to reveal things the eye/brain misses.
Interpreted vision
Every photograph must be processed (interpreted) in some way before it can be viewed. The processing can happen in a lab (remember those days?), the camera, and/or in a computer. But human visual input is also interpreted before we perceive it. Visual processing happens in the brain, which adjusts for things like color temperature, perspective, motion, and so on.
Of course human vision is a lot more complex than that, and while the eye/brain relationship might not be a perfect analog for the camera/computer paradigm, suffice to say, whether you’re looking at Yosemite in a digital print, on a computer screen, or through your own two eyes, the scene has been interpreted. And with interpretation comes bias.
Leveraging limitations
In many ways, the eye’s ability to capture light exceeds that of even the best cameras, effortlessly pulling detail out of deep shadows and bright highlights. But savvy photographers know how to use their cameras’ limited dynamic range to hide distractions, emphasize the scene’s most important elements, and reveal washed out color.
In the image above, captured on the Big Island of Hawaii last September, I used my camera’s (relatively) narrow dynamic range to simplify a sunrise to its essential color and shape. I could have blended multiple exposures to bring the detail in this scene closer to what my eyes saw, but it wasn’t the scene’s detail that moved me. Instead, underexposing the shadows minimized detail in the trees and rocks and allowed me to reveal color that had been washed out by the rising sun. I was able to simplify an originally complex scene to the elements that I found most compelling: the very tropical outline of swaying palms, the

Brilliant Poppy, American River Parkway, Sacramento
tenacious strength of rugged sea stacks, and the vivid color of a Hawaii sunrise, all mirrored in an abstract foreground reflection.
Instead, using my camera’s “limited” dynamic range, I blackened the superfluous detail that would have distracted from the qualities of the scene that I most wanted to convey.
In the poppy image on the right, the scene’s dynamic range was again impossible to capture with a camera—everything you see as white was blue sky or brilliant sunlight to my eyes. I chose to properly expose the poppy and let the sky blow out. The result was this beautifully backlit poppy isolated against a white background that was nothing like my view of the scene—but it was exactly what my camera saw.
Open your mind
So the next time you feel like labeling “real” or “not real,” or insisting that your camera do things it’s not very good at (just to satisfy your own perception of reality), remember that real is relative and far broader than your narrow perspective.
A few words about this image
I get to Onomea Bay each time I’m on the Big Island, and each time this scene is a little different. In recent years the stream feeding the bay has been low, and the tide has been out, so I haven’t been able to capture reflections like this. But on this visit in 2014 I got the reflection I wanted and a colorful sky to boot. Because this scene is more about the shapes of the palm tree and nearby rocks, I was able to save the sunrise color by turning them into silhouettes.
Workshop Schedule || Purchase Prints
Stuff my camera saw that I didn’t
(Or saw far differently)
Click an image for a closer look, and a slide show. Refresh the screen to reorder the display.


Blue moon
Posted on July 30, 2015
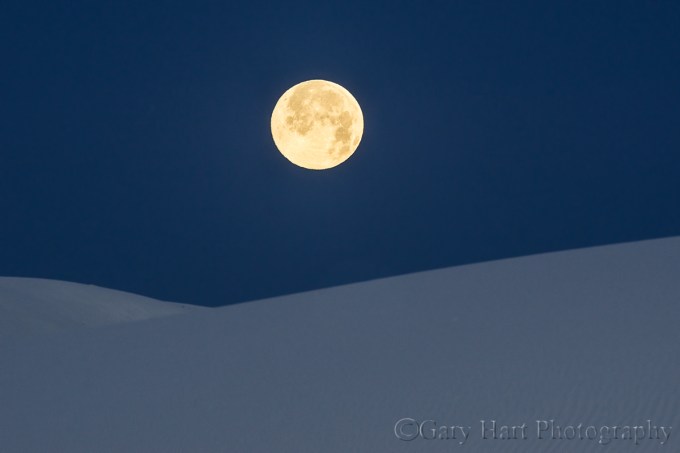
Dune Moon, White Sands National Monument, New Mexico
Sony a6000
Tamron 150-600 (Canon-mount with Metabones IV adapter)
1/8 second
F/11
ISO 400
As you no doubt know, the moon orbits Earth, which orbits the sun, and the percentage of the moon we see each night (its phase) changes with the angle connecting Earth, the moon, and the sun. The lunar cycle—the time it takes the moon to circle Earth and repeat a phase (due to Earth’s orbit of the sun, the moon actually has to travel a little more than a full circle to repeat a phase)—is about 29 1/2 days. Because our 12-month calendar cycles in almost the same time, averaging about 30 1/2 days until we return to today’s day next month, we usually have one full moon each month.
But every few years a coincidence of calendar and orbital geometry gives us a phenomenon that probably generates more attention than it deserves. Labeled a “blue moon,” the second full moon in a calendar month is a lot more rare than it is visually interesting, a fact that is lost on the media. Nevertheless, if you want to see the first blue moon since 2012 (the next one won’t happen until 2018), look to the sky Friday night (July 31, 2015), when July’s second full moon will be overhead. Just don’t expect it to look any different than any other full moon.
So what’s the deal with the moon in this image? Captured in the morning gloaming of White Sands National Monument, the blue dunes in this scene were colored by the short wavelengths of indirect sunlight. With the sun still well below the horizon, these blue and violet wavelengths are all the that’s able to survive the trip around Earth’s curve. Rather than white balancing my capture to give the scene a (misleading) daylight quality, I chose to allow the cool light to imbue the scene a more true twilight feel.
If you want to photograph the upcoming full moon at sunset, I suggest you go out Thursday (July 30), when the moon will rise about 45 minutes before sunset—if you wait until Friday evening, when the moon rises almost an hour later, you’ll likely struggle to capture simultaneous detail in the darkening landscape and the daylight-bright moon.
Or you could go out at sunrise tomorrow and Saturday mornings to photograph the moon as it sets in the west after sunrise. Friday’s moonset will be a little closer to sunrise, ideal if you have a fairly good view of the horizon (no high mountains or other obstructions); Saturday’s moon will set later, making it a little easier to photograph (fewer dynamic range challenges).
Learn more about full moon photography in my “Full Moon” photo tips article.
A full moon gallery
Click an image for a closer look, and a slide show. Refresh the screen to reorder the display.


The Secret Weapon for Overcoming Unsung Landscapes
Posted on July 24, 2015

Crescent at Sunset, Sierra Foothills, California
Sony a7R
Tamron 150-600 (Canon-mount with Metabones IV adapter)
1/6 second
F/9
ISO 800
I travel a lot. A lot. Don’t get me wrong—I know I’m incredibly fortunate to see and photograph the things I do, but sometimes it’s nice to be home. Despite the world-class locations I get to visit, I don’t cease being a photographer just because I’m home. I spend a lot of time exploring and photographing the unsung landscapes near home, landscapes that few would cross borders to photograph, but landscapes that I feel a particular connection to by virtue of a lifetime in California.
Look to the sky
The landscape is only half of an image. Since the best photography is usually more than simply a picture of a pretty thing, I always try to juxtapose my terrestrial subjects with an interesting sky. And unlike stationary terrestrial subjects, you can stand in one place and without moving, watch the sky do some pretty spectacular stuff: moon, stars, clouds, rainbows, whatever.
Sadly, as nice as California’s landscapes are, compared to most places, California has relatively boring skies. If I lived somewhere that gets summer thunderstorms (pretty much anywhere in the United States except the West Coast), I’d find a photogenic tree or creek, then make sure I was there the next time the sky did something special. But in California, I end up doing a lot of moon and star photography (not that there’s anything wrong with that).
Local favorites
My foreground options near Sacramento are rivers and oaks (and wildflowers in spring), and I particularly love our oaks (the rivers near town are often overrun with people). The criteria I use when searching for oaks to put with my sky images are a striking shape (with an oak, that’s usually a given), a distant vantage point that allows me to use a telephoto (to magnify to moon without losing most of the tree), and elevation that puts the tree against the sky instead of other hills and trees. Over the years I’ve collected a number of these spots, and will never tire of looking for more.
Chasing the moon
Last week I drove to the foothills east of Sacramento to photograph a thin slice of moon on the western horizon just after sunset. This wasn’t an exploration mission, it was specifically planned to take advantage of a spot I’d found earlier this year.
Unfortunately, (as I feared) the developers had found my spot too, and I arrived to find “my” trees surrounded by new homes in varying stages of completion—lucky for a handful of homebuyers, but not so much for all the rest of us who enjoy the foothills’ solitude and pristine views.

Tequila Sunset, Sierra Foothills, California

New Moon and Oaks, Sierra Foothills, California
Plan B
Just down the hill from this recently found-and-lost spot was the subject of my very first planned moon shoot, an oak-topped hillside that I’d photographed at sunset many years ago, decided that it would look really nice with a crescent moon, then figured out when to return.
But this time I found the moon far north (to the right) of its position all those years ago (the closer to the summer solstice, the farther north a crescent moon sets), and it soon became clear that only spot that would work was on a shoulderless, blind curve of a busy, two-land road. Compounding the difficulty, the moon this night was also closer to new (thinner and nearer the horizon), significantly shrinking my window of shooting opportunity, which limited the distance I could hike to get there in time. I made several passes in both directions before finding a safe(ish) place to park, then crammed my car all the way up against a tilting fence, two tires in a drainage ditch, and put on my hazard blinkers.
Why did the photographer cross the road?
Getting the alignment I wanted required crossing the road, scaling a barbed-wire fence, and traipsing through knee-high weeds. The knowledge that rattlesnakes pretty much rule these foothills made me acutely aware that the weeds were so thick that I couldn’t really see the landing spot for each step.
I photographed the entire scene with my Tamron 150-600 on my Sony a7R. As the moon dropped, sliding left to right, I moved forward along the fence line to control the relationship between the descending moon and the trees, starting with wider focal lengths that included some or all of the eight to ten trees capping the hill. Because my route dropped as I moved forward, the moon quickly fell into the trees from my perspective, allowing me to include the moon and trees increasingly tighter compositions.
For the night’s grand finale I found an alignment that cradled the moon in the silhouetted branches of a single tree, zooming to 600mm to magnify the moon and eliminate all but one tree. Because a 600mm focal length will catch even the slightest vibration, I went to 800 ISO to maximize my shutter speed in the deepening twilight. Once I shot this I actually rescaled the fence and darted back across the highway attempting to get the moon on the other side of the tree, but by the time I got everything aligned, the trees had been swallowed by the too-dark sky.
Your assignment…
Every location has features that set its landscape apart. Trees, rivers, lakes, mountains, hills, farmland—I could go on, but you get the point. Your local subject doesn’t need to be spectacular, because when the sky is spectacular, all you need is an interesting terrestrial anchor for your image.
The next time you find yourself with time to kill, explore your outskirts and identify unique subjects that you can add to a striking sky. Now, get to work!
Photo workshop schedule
A gallery of unsung landscapes
Click an image for a closer look, and a slide show. Refresh the screen to reorder the display.


Yosemite, weather or not
Posted on July 19, 2015

Clearing Storm, Glacier Point, Yosemite
Sony a7R
Sony/Zeiss 16-35
1/15 second
F/11
ISO 125
Photography weather and tourist weather are polar opposites: What’s good for photography—clouds, rain, snow—isn’t usually so great for being outside. This is especially true in Yosemite, where stormy weather can add an entirely new dimension to the park’s already renowned scenery (not to mention inclement weather’s crowd-thinning effect).
Sometimes Yosemite’s clouds simply diffuse the light, subduing shadows into a much more camera-friendly range, and extending the quality photography window. Other times, the clouds become subjects themselves, contorting into diaphanous curtains or towering pillars whose beauty rivals Yosemite’s granite icons. But rain or shine, there’s always something to photograph in Yosemite if you know where to look.
Wet weather gear
Regardless of the forecast, I never travel to Yosemite without my rain gear duffel containing everything necessary to keep me head-to-toe dry and focused on photography: hat, gloves, parka, rain pants, and waterproof boots for me, and an umbrella for my camera. I haven’t found a satisfactory rain cover for my camera, but a plastic garbage bag is quite handy for keeping the camera dry while it’s on my tripod but I’m not shooting (searching or waiting for a shot). Another essential wet weather accessory is a towel or chamois to dry any gear (especially the front of my lens) that gets wet despite my best efforts.

Elm in Blizzard, Cook’s Meadow, Yosemite
The teeth of the storm
Some of my favorite Yosemite photography has been in the teeth of the storm, when rain or snow has forced all but the most hardy indoors, and obliterated the recognizable landmarks, forcing me to look a little closer for subjects. A bonus during these extreme weather shoots are the occasional cameos by Yosemite’s star attractions (so stay alert).
My go-to mid-storm subjects in Yosemite include: the elm in Cook’s Meadow, the Cascade Creek waterfall above the bridge on Big Oak Flat Road (the road descending into Yosemite Valley from the Big Oak Flat entrance), Bridalveil Creek beneath Bridalveil Fall, Fern Spring and the Pohono Bridge, and El Capitan Bridge. But really, you’ll find shots wherever you look.
Clear skies
As much as I enjoy photographing in stormy weather, I don’t put my camera away when skies are clear. My favorite clear sky spots are the frequently shady locations on the south side of the valley, such as Bridalveil Creek and the forest near Fern Spring and the Pohono Bridge. Depending on the season (the closer to the winter solstice, the better), these spots can offer several hours of shade at the beginning and ends of the day.
Clear skies also open the door to night photography—all those popular spots that were packed with gawkers and washed out by the harsh midday light are peaceful and photogenic by moon- or starlight. My favorite moonlight (full moon) subjects are Yosemite Falls and El Capitan, because they’re the first to be illuminated by the rising moon—the face of Half Dome doesn’t get moonlight until the moon has dropped toward the western horizon, well after midnight on a full moon night. On the other hand, Half Dome does make a nice starlight subject because most views are to the east, where the sky is darkest before midnight. An unappreciated key to successful Yosemite night photography is finding a spot unsullied by headlights.
Midday in the summer, when it’s virtually impossible to find shade that’s not stained with sunlight, is a good time to break for lunch, take a hike, or (especially) explore.
Clearing storm

Warm Light, El Capitan Clearing Storm, Yosemite
Venture out to photograph during Yosemite’s harshest weather is the most reliable way to ensure a clearing storm opportunity. If you wait out the most miserable stuff by the fire, you risk missing the best stuff, which often happens with startling suddenness—for hours visibility might not extend beyond 100 yards, then you blink and there’s a rainbow.
With its bird’s-eye view east, up Yosemite Valley, Tunnel View is the most popular location to photograph a Yosemite clearing storm, but it’s easy to be so mesmerized by the show there that you miss all the great photography elsewhere. Because the west side of Yosemite Valley is where storms usually clear first, I often wait out the storm at Tunnel View, photograph its initial clearing there, then force myself to move on (believe me, it’s not easy to leave) while the shooting is still good.
The best subjects for a Yosemite clearing storm are the icons—El Capitan, Bridalveil Fall, Yosemite Falls, Half Dome—but not necessarily from the standard locations. Pretty much any spot with a view of one or more of these subjects will work, but I often try to include the Merced River and reflections.
Wet and dry seasons
Blue skies rule Yosemite’s summer, with clouds and rain the exception (but still possible). Yosemite’s wet season comes in late fall, winter, and and early spring, with rain and snow always a possibility. In general, in Yosemite Valley rain is far more common than snow, but snow can happen any month from November through April, with December, January, and February being your best bet (but some of my best snow experiences have come in November and April, and in 2015, Yosemite Valley didn’t get any significant snow until April).

Double Rainbow, Yosemite Valley
Rainbows
With its east/west orientation and primarily east-facing views, Yosemite is particularly well situated for afternoon rainbows. Tunnel View, Glacier Point, Valley View are great rainbow spots, but pretty much any valley location with a view of Half Dome, or a view of El Capitan’s west-facing wall, will work.
When the sun is lower than 42 degrees above the horizon (late afternoon in the long-day months, all day in winter), look for signs of clearing in the west (where the clearing usually starts). Sometimes you’ll see a few patches of blue, other times you’ll notice that the sky is brightening slightly. Find your shadow, which will point to the rainbow’s center (if there’s no shadow, draw an imaginary line from where you guess the sun is, through your position, and toward the scene opposite the sun)—if it’s not pointing toward anything interesting, move to another location—set up your shot, cross your fingers, and wait. And don’t forget to remove your polarizer, or orient it to maximize reflections (the opposite from the standard polarizer orientation) because an improperly oriented polarizer will erase your rainbow.
Winter wonderland
You know those images with every Yosemite feature draped in white? Those scenes happen just a handful of times each year (if

Winter Reflection, El Capitan, Yosemite
we’re lucky), and rarely last for more than an hour or two after the snow stops falling. So simply taking a trip to Yosemite in winter is very unlikely to net you fresh snow opportunity. In fact, even if you hear that it just snowed in Yosemite and beeline straight to the park, you’re almost surely too late.
To get that coveted Yosemite winter wonderland shot, you actually need to be there during the storm. And when the snow stops (see clearing storm reference above), move as quickly as you can, because the trees will begin shedding snow almost immediately.
Those of us within a reasonable driving distance of Yosemite have a distinct advantage if we’re good about monitoring the weather forecast. I look for storms with predicted snow levels below 4,000 feet, then try to arrive before the worst weather hits.
About this image
Because I avoid the crowds and blue skies of summer, I don’t make it to Glacier Point as frequently as I do locations in Yosemite Valley. But a few weeks ago my brother and I went to Glacier Point to photograph lightning, then hung around until the storm cleared.
Clearing Storm, Glacier Point, Yosemite
Unlike the California winter storm fronts that originate in the Pacific and sweep eastward across the Central Valley and into the Sierra, summer thunderstorms are usually borne of subtropical moisture encountering High Sierra convection and billowing into towering thunderheads above the Sierra crest. In the right conditions, these thunderstorms can slip far enough west to soak Yosemite Valley and stab the rim with jagged lightning.
At its most intense, the storm that afternoon nearly obscured Half Dome, completely drenching us. With the rain came lightning that soon chased us to the safety of the car. When things calmed we ventured back out to the vista to photograph the storm’s clearing. I can’t tell you how much fun it is to watch the shifting clouds that seem to create an entirely different image with each passing minute. For the this shot I waited for the cloud to part enough to reveal Nevada (above) and Vernal Falls, going wide to frame them with Half Dome on the left, and Mt. Starr King on the right.
The many faces of Yosemite weather
Click an image for a closer look, and a slide show. Refresh the screen to reorder the display.


Anticipating the exceptional
Posted on July 11, 2015

Morning Glory, Sunrise Clearing Storm, Yosemite Valley
Sony a7R
Sony/Zeiss 24-70
1/50 second
F/16
ISO 100
No one denies that an image records a single, unrepeatable instant. But just as each instant is the culmination of a series of connected preceding events, most images have their own history that can be traced backward, often months or years before the shutter clicked. The moon didn’t just materialize above Half Dome that evening, and a moonbow isn’t just some random event at the base of Lower Yosemite Fall—their appearance can be directly connected to celestial dance that was set in motion with the birth of our Solar System, and can be predicted with surgical precision (minus a few wild card variables like weather and water flow to keep photographers from getting too cocky).
Photographers spend a great deal of time trying to anticipate instants like these. We start with the common-knowledge stuff, things like the February sunset light on Horsetail Fall, a shaft of summer light slanting in Upper Antelope Canyon, or a moonbow in the spring mist billowing beneath Lower Yosemite Fall. But the precision of the celestial choreography that delivers light shafts to slot canyons and moonbows to waterfalls is just as predictable for anonymous hidden trees, lakes, and peaks. Iconic or undiscovered, each of these spectacles are the convergence of location and predictable natural processes just waiting to be appreciated (and photographed!).
Image planning isn’t limited to the sun, moon, and stars. Understanding and monitoring a favorite location’s weather can put you in the right place, with the best chance to add a rainbow, lightning bolt, or fresh snow. And simply finding a complementary foreground/background alignment that connects two or more terrestrial subjects can elevate an image to the next level.
Rather than a fortuitous right-place, right-time convergence, the creative aspect of many images starts long before capture. When I find a new location, or identify a potential subject, my brain immediately starts spinning on the ways I can make it better. Can I align it with another foreground or background subject? What natural phenomena will take the scene to the next level, and how I can be there when it happens?
For example…

Bridalveil Dogwood, Valley View, Yosemite
Before capturing my image of a raindrop-festooned dogwood flower with Bridalveil Fall in the background, I had long visualized a scene somewhere in Yosemite that featured a dogwood bloom aligned with a soft-focus but recognizable Yosemite landmark. I knew I’d need overcast skies that would illuminate the entire scene with diffuse, soft light, then filed my vision away until the next time the forecast predicted clouds during the short window the dogwood bloom in Yosemite.
On my drive to the park, I started mentally working on locations where I might be able to align a dogwood with a recognizable Yosemite subject, the lens I’d use, the amount of background sharpness I wanted, and so on. Once I was in the valley, I was able to conduct a pretty orderly search that eventually led me to this flower near Valley View.
Sometimes bringing my ideas to fruition requires a lot more research, planning, and patience. I’ll start with a scene that appeals to me, then mentally add something that I think will take it to the next level. A moon? Stars? A rainbow? Lightning? Fresh snow? Maybe all of the above (so far not at the same time, sadly).
The moon and stars are a relatively straightforward matter of plotting angles and timing (and hoping the weather cooperates). On the other hand, weather phenomena, such as rainbows, lightning, and snow, require an understanding of the processes behind them, careful and persistent monitoring of long- and short-term weather forecasts (only the National Weather Service for me), and a lot patience while waiting for the moment to arrive. Then, when the moment does arrive, I need to move quickly and not allow myself to be swayed by fear of failure (always a distinct possibility).
For example…

Double Rainbow, Tunnel View, Yosemite
I’d long fantasized about adding a rainbow arcing over Yosemite Valley to the already breathtaking Tunnel View scene. And being a lover of rainbows and a photographer, I’d long ago taken the time to become extremely aware of the why, where, and when of rainbows. Which is how, on a spring afternoon a few years ago, I was in perfect position when my rainbow fantasy came true.
I was in Yosemite to meet customers for dinner, and to plan the next day’s guided tour of the park. But when my mostly sunny drive up the Merced River Canyon turned to rain as I entered Yosemite Valley, my mental wheels started turning—Yosemite weather almost always moves west-to-east, which meant soon Yosemite Valley would have rain on the east side and sunlight low on the western horizon. It wasn’t hard to rearrange my customers’ priorities, and this was our reward.
Celestial phenomena are wonderfully predictable, so much so that I make very few non-spontaneous photo trips without factoring in the moon and/or Milky Way. (My spontaneous trips are usually spurred by the weather forecast.) And there are few locations I photograph that I can’t tell you the altitude and azimuth necessary to align a the sun, moon, or Milky Way with the location’s most prominent feature.
Hawaii, Death Valley, Mono Lake, Alabama Hills (Mt. Whitney), plus many personal favorite subjects near home—I know exactly where I want to be and when I want to be there, and do my best to make it happen, sometimes planning several years in advance. In Yosemite my terrestrial subject is usually Half Dome, and and my celestial subject is usually a rising moon. And depending the direction of the moon’s arrival, I have an array of locations that I know will align with the moon’s appearance.
For example…

Rising Crescent, El Capitan and Half Dome, Yosemite
Tunnel View is my favorite location for photographing a Yosemite moonrise, but it’s not my only location. Across the Merced River Canyon on Big Oak Flat Road is Half Dome View, a turnout vista with a slightly different, less popular view of Half Dome and El Capitan.
From Half Dome View, the visual distance separating the two monoliths is quite narrow, meaning an extremely small margin of error for a photographer hoping to catch the moon splitting the gap. But the idea had always intrigued me, so I went to work with my plotting method (I do it manually using topo maps, moonrise tables, and an HP-11C scientific calculator that does trig functions).
When I discovered that a crescent moon would indeed split this gap before sunrise on a certain May morning in about a year, I started a plan of attack. Despite the fact that I’d never photographed a moonrise from this location, and even the slightest error in computation would foil the attempt, I went ahead and scheduled a workshop for this date. Try to imagine my anxiety as the day approached and the realization that failure wouldn’t just impact me, it would impact my entire group, really started to sink in. And imagine my euphoria (not to mention everyone with me) that morning when the moon slid into the gap, right on schedule.
When photography’s less than ideal, I might leave the camera in my bag, but I don’t stop being a photographer. I spend a lot of non-camera time scouting locations, looking for complementary subjects that I can align with the grand scene. If my primary subject is in the foreground, I add move around until I can align it with a complementary background. And when my subject is in the distance (like Mt. Whitney from the Alabama Hills, or Yosemite Valley from Tunnel View), I spend a lot of time exploring the nearby terrain in search of subjects I can align with the grand primary scene.
When I find a subject that merits something exceptional, I try to wait until I can enhance it with similarly exceptional natural phenomenon.
For example…
Morning Glory, Sunrise Clearing Storm, Yosemite Valley
When I “discovered” this tree, it was love at first sight. But rather than photograph it in the more conventional quality light conditions that are fairly easy to anticipate, or wait for one of Yosemite’s inevitable exceptional but fairly regular moments, I saved my discovery for something truly extraordinary. And, after about ten years of waiting for location, light, conditions, and circumstances (this spot is too small and dangerous for a group), extraordinary finally happened this April.
Anticipating snow, I’d traveled to Yosemite the previous afternoon. A little snow had fallen earlier that day, and while the storm had passed, its cloudy vestiges lingered overhead and in the valley below. While not the winter wonderland I’d hoped for, there was enough snow still hugging the trees that I found some very nice images. Nice enough, in fact, that I’d have been completely satisfied with my captures if my trip had ended right then. But I wasn’t done.
Because more snow was promised overnight, I got a room nearby and returned the next morning. I wasn’t too far into my drive back into the park before it became clear that I was in for something special. The snow had just stopped, and while there wasn’t a lot of snow, the air was cold enough that I knew until the morning sunlight made it all the way down into Yosemite Valley, everything would remain in a state of suspended animation. And the clouds that had deposited the snow were doing their typical slow-clear dance on the valley floor.
I first stopped at a spot along the Merced River and photographed dogwood and El Capitan. I got so caught up in that scene that I lost track of the time and didn’t give myself a lot of time for my next stop, up the hill at “my” tree (that I often check but rarely photograph). I also realized that given the light snowfall on the valley floor, I’d severely underestimated the amount of snow that had fallen just a few hundred feet up the hill from Yosemite Valley.
I found an entire world covered with white, and the sun about ready to pop up over Sentinel Dome—once the sun arrived, I’d only have about 60 seconds of quality photography before the sun overpowered the scene. I quickly grabbed my gear and scrambled up to the tree. Fortunately, I’d photographed here the previous afternoon, so I didn’t really have to hunt for a composition (generally a fairly painstaking, trial-and-error process). With the sun about to appear, I knew I’d need to do a sunstar and set my aperture accordingly. Without a lot of time to play with the exposure, I made the snap judgement to spare the highlights and hope I could recover the shadows laters, and click.
This image was literally the first click I made of the scene this morning—subsequent captures showed increasingly blown highlights as the sun rose into the scene. On my LCD this image looked severely underexposed, but I trusted the histogram on my a7R, which indicated there was indeed detail in the shadows. (Yes, I know I could have accomplished it by bracketing and blending multiple exposures, but I’m a one-click guy.) And when I finally found the courage to process the image, I held my breath as I grabbed the Lightroom Shadows slider and watched my scene appear.
A gallery of “planned” images
Click an image for a closer look, and a slide show. Refresh the screen to reorder the display.


