Eloquent Images by Gary Hart
Insight, information, and inspiration for the inquisitive nature photographer
Just Another Day at the Office
Posted on April 18, 2021

Sunset, McWay Fall, Big Sur, California
Canon EOS-1Ds Mark III
Canon 17-40mm f/4L USM
.4 seconds
F/18
ISO 100
With vaccines taking hold and COVID restrictions easing, I’ve suddenly found myself in “be careful what you wish for mode.” I’m currently in Oregon with Don Smith, where we wrapped up our Oregon Coast workshop yesterday, and start our Columbia River Gorge workshop this afternoon. When this stretch is over, I’ll have done five workshops in five weeks. In addition to that, I had an unexpected (but welcome), time-critical project dumped in my lap that has occupied virtually all of workshop down-time. But rather than skip this week’s blog entirely, I’ve pulled one of my most popular from the archives (March, 2011), updated it slightly, and am sharing it today.
As some readers know, fellow pro photographer Don Smith and I partner on many workshops, donating our time as co-leaders for each other’s trips. On a recent trip Don and I stood on a bluff at sunrise gazing at the Big Sur Coast (or was it sunset overlooking Yosemite Valley?) and reminded ourselves of all the people idling in traffic or confined in a cubicle, and how fortunate we are to do what we do for a living.
Not only do photo workshops allow me to see and photograph great stuff, they give me the opportunity to learn from the diverse perspectives of dedicated photographers from every hemisphere on Earth and virtually every state in America. My workshop participants have been, in no particular order, musicians, computer professionals, artists, physicians, writers, lawyers, corporate executives, electricians, accountants, bond traders, active and retired military, other professional photographers, real estate agents, clergy, a classical composer, a Hollywood graphic artist, and a Hooters girl (a very sweet young lady who would completely dash any preconceived impression of what that might mean). One workshop included a rocket scientist and a brain surgeon.
Sometimes the education I gain from this eclectic mix of professions, preferences, and personalities is simply an insight or point-of-view that helps me better understand or inform future workshop participants. And sometimes my education is a bit more, uh, “esoteric.” On the day I captured this image of McWay Fall in Big Sur, I got a little of both.
This was a couple of years ago, on the first day of Don’s spring Big Sur workshop. Driving to the workshop’s first shoot we hadn’t been on the road five minutes when it was discovered my backseat featured a sex therapist and a gynecologist. Uh-oh. While they seemed quite excited by their mutual interest, I was uncertain that the other passengers shared the doctors’ outspoken zeal for the subject and did my best to deflect the conversation into more benign territory. But the doctors were not to be deterred. We spent the duration of the drive listening to these experts compare notes in graphic and excruciatingly uncensored detail. Topics ranged from, uh, well let’s just say we covered everything from oysters to “When Harry Met Sally.” Much to my relief, and after fifty minutes without exhaling, I pulled into the parking area at Julia Pfeiffer Burns State Park with a car-full of laughing (and, it turns out, just a little better informed) passengers. Phew.
Amazingly, it turned out that the drive wasn’t even the most memorable part of the afternoon. That honor goes to the sunset, which I was fortunate enough to capture in today’s image. When we arrived at the view of McWay Fall, the sun was behind a cloud bank that painted land, sea, and sky matching gray. But successful photography is often not as much about what’s happening now as it is about what’s going to happen later. And few opportunities excite me more than watching the sun slip from the clouds just before it completes its dash for the horizon–exactly what was in store this evening.
Don and I rallied the troops and told them not to be deceived by the flat scene, to prepare for a sudden and dramatic change in the color and light when the sun popped from behind the clouds. We told everyone that the display wouldn’t last long and encouraged them to forego the current moment and search for a composition that would work when “the moment” happened. With about ten minutes to pick a spot, refine our compositions, and ready our cameras, I ended up working with about half the group at this location. Don stationed himself with the rest of the group a couple hundred feet up the trail.
After getting everyone situated, I opted for this wide shot that used the fall and sun to balance the frame. To reduce the contrast between the sky and foreground I stacked two graduated neutral density filters (totaling five stops); to get the starburst effect I stopped down to f18. Because everyone in my group was ready and comfortable enough with their camera, we were all able to capture our own version of this special moment.
I’m afraid Don wasn’t so fortunate. Most of his group was successful, but with little warning one of his people decided that this very moment was the absolute best time to learn the manual metering techniques Don and I had covered in our orientation. Despite suggestions from Don (and stronger “urgings” from her husband) to shoot the way she’s most comfortable now and defer the learning to later, she insisted that now is the time to crack the manual metering puzzle.
To Don’s credit, he passed his opportunity at this magic moment to work with her. So while Don didn’t get his shot (kind of the photographer’s equivalent of taking one for the team), we did come away with a great cautionary tale we now spin to all of our workshop participants: Practice, practice, practice, when everything’s static, but when the magic happens, always, always, always revert to what’s most comfortable.
All in all, a very educational (and productive!) day. I don’t remember the drive back up the coast that night, but given the sunset we’d witnessed I’m pretty sure the primary topic was photography. Over the course of the workshop our woman did in fact learn manual metering (as she has demonstrated in subsequent workshops), and Don will forever be able to tell people about “the one that got away.” I, on the other hand, learned how long I can hold my breath.
Workshop Schedule || Purchase Prints || Instagram
A Seaside Gallery


Telephoto Landscapes
Posted on April 11, 2021

California Spring, Oak and Poppies, Sierra Foothills
Sony a7RIV
Sony 200-600 G
ISO 400
f/9
1/4 second
Over the years I’ve spent a lot of time photographing with my good friend and fellow Sony Artisan Don Smith. Both in workshops and on our personal trips, we’ll head out into the scene or meet back later at the car, and more often than not I’ll have a wide angle lens on my camera, while Don will have a telephoto. Each of us would usually end up with images that pleased us, and I think Don would agree that neither of us could say whose images were “better”—they were just different. But those observations have made me conscious of my wide angle bias, and helped remind me that I may in fact be missing a telephoto opportunity.
What’s it all about?
I’ve always felt strongly that an image needs to be about something, and the photographer’s job is to make it clear to viewers what that something is. I usually accomplish that with my wide lenses by positioning strong elements throughout my frame in a way that creates virtual connecting lines that guide my viewers’ eyes. The problem is, the wider the focal length, the greater the chance of introducing unwanted elements that pull my viewers’ eyes off their prescribed path.
The cure for this problem is often to simplify the scene by going tighter with a telephoto. That doesn’t necessarily mean forgoing the wide version; rather, it can just be a matter of also trying the scene through a telephoto to see what else might be there. If that doesn’t come naturally to you in the field, you might be able to teach yourself how many telephoto shots you left in the field (and to train your eyes in the process) by opening any wide angle image in Photoshop (or your photo editor of choice), setting the crop tool to 2/3 aspect ratio (to match what you see in your viewfinder), and see how many new compositions you can find.
Practicing what I preach
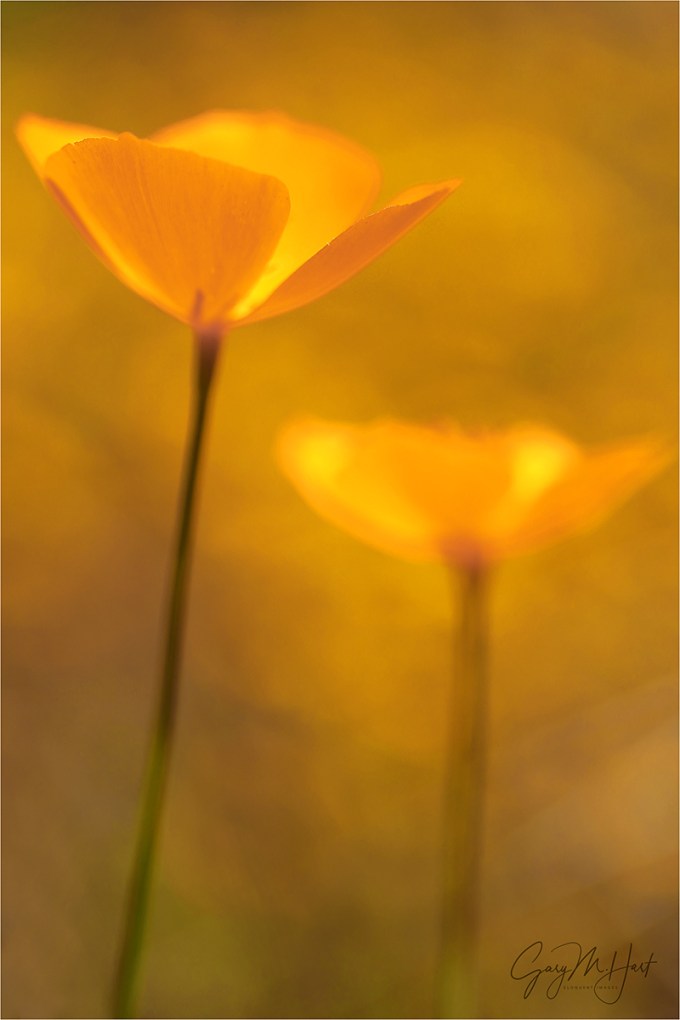
Over the years I’ve gotten better about using my telephoto, but I’d be lying if I said it’s usually the first thing I reach for when I work a landscape. My standard workflow in the field (not conscious, just the way I seem to work naturally) is to start wide and go tighter as I become more familiar with the scene. But last week I got a great reminder of the value of a telephoto as I was driving home from real nice poppy shoot in the foothills near Jackson, California. It was just a few minutes after sunset and my mind was already on dinner when I rounded a bend and saw an oak-studded hillside completely blanketed with poppies.

Poppy Hillside, Highway 49, California Gold Country
I was very familiar with this hillside because it’s the site of one of my oldest, and favorite images, captured in spring of 2005 (read the story). A 24×36 print of this 2005 scene graces the wall in my living room above my fireplace. The one thing I’ll never forget about photographing it is how much steeper this hill is than it appears in the image—so steep, in fact, that when I decided to scale it to get a better vantage point, I jettisoned my tripod so I could have two hands free to hold on and pull myself up. While it wasn’t quite mountain climbing, it was steep enough that I’d have rolled all the way to the bottom had I fallen (much like this).
But this time there was no time to ascend the hill because the scene was rapidly darkening (and the photographer is rapidly aging). The conditions weren’t quite as good as back then either: there were no clouds and the sky was completely colorless. But still, it was just so pretty…
I made the split-second decision to brake and pull over. Safely on the shoulder, I quickly hopped out, grabbed my tripod and Sony a7RIV, and surveyed the scene. I wanted to feature one striking oak that stood alone about 2/3 of the way up the hill, and tried to determine the best way to do it. The fence from my old image was not too far off to the right of the tree, but I now try to avoid manmade objects in my scenes—in fact, the 2005 image is the only image in my current portfolio I can think of with anything manmade. Other nearby concerns were a couple of kind of scraggly trees that definitely didn’t merit inclusion, a few brown patches, and several unsightly rocks. And the sky added absolutely nothing.
It was clear that the best way to highlight the oak and poppies was to eliminate all the surrounding distractions with a long telephoto. Given the distance, perhaps 350 yards, I went straight to my Sony 200-600 G lens. For this image I used 500mm, which completely eliminated all the problems. The light was dimming fast, and a slight breeze stirred the poppies, so I bumped my ISO to 400, focused. I ended up taking 18 frames, some a little wider, some a little tighter, but all more than 400mm. Most of my frames were horizontal, but I finished with a couple of verticals just to cover my bases. Then I packed up and headed to dinner.
Workshop Schedule || Purchase Prints || Instagram
Telephoto Landscapes
Click an image for a closer look, and to view a slide show.


, California")


")


Making Your Own Luck
Posted on April 4, 2021
Moonrise Through the Clouds, Half Dome, Yosemite
Sony a7RIV
Sony 100-400 GM
1/30 second
F/10
ISO 200
“Chance favors only the prepared mind.” ~ Louis Pasteur
Successful nature photography requires the convergence of physical objects, position (relative to those objects), light, weather conditions, the right equipment, and mastery of craft (did I miss anything?). Though we can control many of these factors, the overriding element that trumps everything else is plain old luck. But despite the undeniable luck factor in photography, most photographers bristle at the suggestion that a particular capture was “lucky.” For good reason.
No one denies that photography involves a great deal of luck, but each of us chooses our relationship with the fickle whims of chance, and we have more control than you might imagine. Which is why, like Ansel Adams, Galen Rowell, and a host of other photographers, I embrace Louis Pasteur’s belief that chance does indeed favor the prepared mind. In other words, the more prepared we are, the less luck will effect our outcomes.
As photographers, job-1 is subtracting as much luck as possible from the image capture equation: we hone our craft, get the best gear our budget allows (including backups), painstakingly research our locations, study the science behind the conditions we want to photograph, then sacrifice comfort and convenience (and sleep!) to be in the right place at the right time. Though we definitely appreciate our good fortune when the magic does happen, much of photography’s joy comes from the special effort it took to be there. Yes, it was fortunate that a lightning bolt struck right there, or the clouds parted just as the moon appeared, but it was no accident that we were there when it happened, fully prepared to capture the moment.
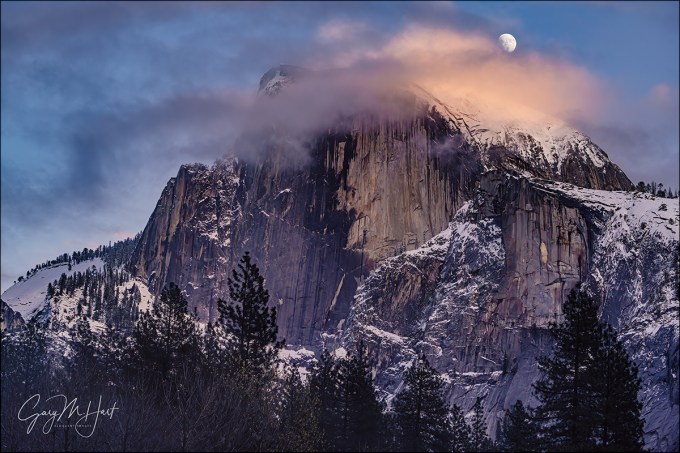
All photographers, in one way or another, work to manufacture their own luck. Because I’m particularly drawn to capturing nature’s ephemeral phenomena above its terrestrial wonders, that’s where my efforts are spent. Whether it’s lightning at the Grand Canyon, the Milky Way over Tasman Lake in New Zealand, or a moonrise above Half Dome in Yosemite, I schedule most of my photo trips (both personal and workshops) to maximize my chances for something special. While there’s never a guarantee that it will actually happen, and I’ve been disappointed more times than I can count, that doesn’t stop me from planning and getting out there just in case.
Which is how I happened to be in Yosemite in December 2019 for this moonrise. I’d plotted this alignment more than a year in advance. When I scheduled a workshop to capture it (fingers crossed), I knew full well that December is the wet season in Yosemite, making it entirely possible, maybe even likely, that my much anticipated moonrise could happen entirely behind a curtain of clouds.
Since this was a workshop, my first job is to reduce the luck factor for my entire group. That started with letting everyone know what gear they needed (nothing special: camera, lenses covering 24mm to 200mm, and a tripod), and (more important) getting them up to speed on the surprisingly tricky exposure idiosyncrasies of sunset moonrises. Meanwhile, behind the scenes I obsessively refreshed the NWS Yosemite forecast page every five minutes, trying will the forecast into promising something more definitive than the annoyingly ambiguous “partly cloudy.” No such luck.
The day of the event proceeded as advertised, teasing us with skies that alternated between mostly clear to mostly cloudy. Fickle skies notwithstanding, there was no thought of abandoning Plan A—I’ve been surprised enough by Nature (especially in Yosemite) to know that, no matter what the forecast promised, I’d have my group out there. Another thing I try to do to improve my group’s odds of success is get them on location early enough to familiarize themselves with the scene and its variety of composition options. Even though I’ve photographed this spot countless times, experience has taught me that first time need time to get comfortable with a scene.
Even without the moon, this location is very photo-worthy. So by the time moonrise approached, they’d all had plenty of photos under their belt and were pretty comfortable with the possibilities here. Clouds came and went as we waited, but the moon’s appearance coincided with one of the more clear moments. We started clicking wildly when the moon peeked out from behind Half Dome, then held our collective breaths as Half Dome’s cloud-making machine churned into action, completely erasing the moon within minutes of its arrival. But instead of getting discouraged, we just hung tight and hoped the moon would punch through. Punch through it did, delighting us with a moon/cloud dance that lasted until it became too dark to photograph.
We all felt very lucky walking back to the cars that evening, but we felt so much more than that. Exiting Safeway to see a rainbow arcing over the parking lot is lucky. Period. But when you see an image of one of nature’s ephemeral gifts matched with a beautiful landscape, try to appreciate that its creation, as lucky as the moment might have felt to the photographer, was probably much more than simple good luck.
Fortunately, anticipating these special moments in nature doesn’t require any real gifts—just a basic understanding of the natural phenomena you’d like to photograph, and a little effort to match your anticipated natural event (a rainbow, lightning, a moonrise, or whatever) with your location of choice. Mix in the right gear, the resolve to get out there, and the perseverance not to give up when nature appears to have other ideas, and voila: You’re a photographer! And that’s about as lucky as you can be.
Workshop Schedule || Purchase Prints || Instagram
More Self-Made “Luck”
Click an image for a closer look, and to view a slide show.


")


It’s All a Blur
Posted on March 28, 2021
Champagne Glass Poppies, Merced River Canyon, California
Canon 10D
Canon 100mm f2.8 macro
f/2.8
Kenko 20mm extension tube
ISO 100
1/1000 second
This has always been one of my favorite images. It’s also one of the oldest images in my digital portfolio. I photographed it 17 years ago (!) with my very first DSLR, a Canon 10D. Despite the 10D’s postage-stamp-size LCD, being able to instantly view and refine my images led to an epiphany that permanently altered the way I photograph: Even though photography is a two-dimensional medium, the ability to visualize and manage its missing dimension—depth—separates artistic photography from snapshots.
I’m sharing this image today because yesterday afternoon I returned to the location of its capture, a hidden hillside in the Merced River Canyon, just west of Yosemite Valley. It was the last day of my Yosemite Moonbow and Wildflowers workshop, and while there wasn’t enough water to create the explosion of mist a March moonbow requires, the wildflowers were out in force. Rather than pull out my camera and try to reprise this old favorite, I was content to stand by, take in the beauty, and watch my group happily work this now familiar scene. Between occasional iPhone clicks, I mentally returned to that afternoon 17 years ago, and to the lessons I learned that day.


Getting an entire scene, front to back, in sharp focus is important, but fueled by digital photography’s instant feedback, I grew to appreciate the power of shallow depth of field. On shoots like this I’d take a picture, evaluate my result, and notice the way an out-of-focus background smoothes potential distractions into blurs of color and shape. With that realization, I started challenging myself to see how far I could take background blur.
While working on this pair of poppies, my eyes could sharply resolve every background detail, from colorful wildflowers to scraggly weeds, but I found that much detail distracting in an image. Simply blurring the background helped, but I wanted more blur, as well as a background that complemented the closest two poppies that were to be my scene’s focal point.
Circling the poppies, I positioned camera downhill and as close to the ground as possible, which enabled me to shoot uphill, toward the most densely populated part of the poppy covered hillside. To achieve maximum blur, I added an extension tube to my macro lens, set my f-stop to f/2.8 (wide open), and moved my lens to within a few inches of the closest poppy. When the image on my LCD after the first click revealed the hillside blurred into a golden fog, I knew I was on to something.
But I wasn’t done. Nailing the focus point, always important, is even more essential in macro photography. Sometimes the focus point is a difficult choice, but in this case it was pretty clear that the leading edge of the front poppy was where focus needed to be.
With my camera flat on the ground and the lens resting on a beanbag (homemade, from a Ziploc and dried lentils), focus was easier said than done. Had I been doing this today, with my Sony a7RIV, I could have tilted my live-view LCD upward, magnified the front poppy’s leading edge, and focused without getting dirty. But with my ancient Canon I had to do it the “old fashioned” way, sprawling on the ground and contorting to get my eye to the viewfinder. Fortunately, a calm wind gave me the time to get the focus right.
Not only is this one of my personal favorite images, it’s also one of my most popular. And even though the resolution on my 10D was only 6 megapixels, I’ve sold prints of this image up to 24×36. But sprawled in the weeds that afternoon, I had no idea was creating something that would still be important to me 17 years later. Where has the time gone? …
Here’s my Photo Tips article explaining my selective focus technique
It’s All a Blur
Click an image for a closer look, and to view a slide show.


Hold My Gear
Posted on March 21, 2021

Sunstar, Horsetail Fall and El Capitan, Yosemite
Sony a7RIV
Sony 24-105 G
1/6 second
F/20
ISO 100
Most people know how much photographers love their toys. Whether it’s the latest ultra-fast lens, that new space-age composite tripod that’s a full 1/4 ounce lighter, or (especially) a “game changing” camera body with even more megapixels than last year’s game changing camera body (and even though we already have more resolution than we’ll ever need), we can’t wait to get our hands on it and start sharing our new and improved images with the world (while somehow figuring out a subtle way to mention our new gear). But let me share a dirty little secret: Probably the single piece of equipment that most photographers have more versions of than anything else is the camera bag. Yawn. Don’t believe me? Ask any serious photographer how many camera bags they own—if the answer is less than five, they’re lying.
I don’t think anyone can deny that an efficient instrument to store, organize, and transport all this gear is essential. But let’s face it—a camera bag, as essential as it is, isn’t sexy. And when it comes right down to it, what’s the point of having the latest, greatest (and most expensive) gear if it doesn’t foster envy? So we’ll purchase a new bag simply because we can’t imagine living without our newest toy, but never for bragging rights.
Full disclosure: I’m as guilty as the next person of harboring an obscene number of camera bags. More than I can count. In fact, a few years ago I stuffed as many camera bags as I could fit into a 100 gallon garbage bag, shoved it into my attic, and haven’t seen them since.
Here’s my theory
Most photographers fantasize about carrying a compact, lightweight kit in the field (we want all the gear, we just hate carrying it). And to justify the purchase of the next great thing, we convince ourselves that (despite all history to the contrary) this will the final piece of equipment we’ll ever need. Of course since that’s what we told ourselves the last time we bought new gear, our current camera bag is suddenly too small. In other words, our camera bag is always just big enough to carry our current inventory of gear because we never imagine wanting more. Which is all well and good—until we start coveting the next toy.
This cycle repeats many time before the photographer gets wise. And some photographers, even those with a large garbage bag full of slightly used camera bags in their attic, never seem to get wise.
By now you might have guessed…
That’s right, I just got a new camera bag. This time it’s a Shimoda Action X50, to replace the Mindshift Backlight 26L I bought in late 2019. Sigh. In my defense, while I may be a slow learner, I did figure out a few camera bags ago to always get a bigger bag than I think I need. Nevertheless, the need for more space was a factor in this decision because, now that I have two Sony a7RIV bodies, I’ve been trying to store each with a lens attached: my Sony 16-35 GM on one, and my Sony 24-105 G on the other. But this new paradigm suddenly made my Mindshift bag cramped and awkward. Not so bad that I couldn’t have lived with had I loved the bag—but I didn’t, so here we are.
The primary reason to get new bag this time was comfort. While I was originally thrilled with the space and the way my gear fit in the 26L, I made the mistake of not fully loading it and walking around before buying. There are many things to like about the Mindshift bag, but fully loaded comfort over extended distances isn’t one of them. For someone who logs a lot of miles with a camera bag on my back, from trudging switchbacks to scrambling rugged terrain to airport sprints, comfort is essential.
Introducing my new camera bag
I really, really hope the Shimoda Action X50 will be my final camera bag. In case you haven’t figured it out, the numbers both names, the Mindshift 26L and the Shimoda X50, represents the displacement in liters. So the Shimoda has almost twice the capacity. While all of that extra room isn’t just for camera gear (there’s other storage galore), the camera gear section is significantly larger. I can’t imagine either needing, or wanting, to carry any more weight than I currently have, so if I ever decide to replace this one (heaven forbid), it won’t be because I need more space.
The most important thing for me is the X50’s comfort. I had the advantage of test driving a couple in my February workshops. And I’ve been trying mine around the house enough to know that it’s night-and-day better than my Mindshift bag. It feels like an actual back pack, not a camera bag with straps.

Shimoda Action X50 Outside: Yes, that’s my logo on the outside (it’s nice to have generous, talented friends).

Shimoda Action X50 Inside: I’m still tweaking the layout, but as you can see, I have space to spare, even with lenses on both bodies. It has a sleeve that will fit my 16-inch MacBook Pro, and I can also fit my Sony 200-600 in the top compartment if I really want to punish myself.
Let’s look inside
The contents of my camera bag has evolved over the years, from the vanilla 16-35, 24-105, 70-200 lens lineup that most landscape photographer carry, to my current setup that allows covers 12mm to 800mm (1200mm if you factor in the APS-C crop option) at all times—plus the option to go up to 1800mm (factoring in the APS-C crop factor) if I go with my Sony 200-600.
Here’s what’s I carry today (spring 2021):
Always in my bag
- 2 Sony a7R IV camera bodies
- Sony 12-24 f/2.8 GM lens: Though I don’t use it a lot, 12mm allows me to photograph things I never could before, and I love that it’s compact enough to keep with me at all times. (I also can’t wait for the pandemic to end so I can get out and use it for serious night photography this summer.)
- Sony 16-35 f/2.8 GM lens (plus a Breakthrough polarizer): This focal range is covered by other lenses in my bag, but I love the lens too much to leave it behind—crazy sharp, and f/2.8 means it’s fast enough for night photography in a pinch. Plus, it’s a whole lot easier to use with polarizing and neutral density filters than the 12-24.
- Sony 24-105 G lens (plus a Breakthrough polarizer): This is my workhorse—what a fantastic focal range! Really sharp, too.
- Sony 100-400 GM lens (plus a Breakthrough polarizer): Replacing my 70-200 with this slightly bigger lens doubled my focal range—and it’s a fantastic match with the Sony 2X teleconverter.
- Sony 2X teleconverter
- Filters (in a Mindshift filter bag attached to my tripod): 72mm and 77mm Breakthrough 6-stop polarizing ND filters, Breakthrough 2-stop hard graduated neutral density filter (which I don’t use a lot since switching to Sony, but still nice to have)
- Other stuff: Several lens cloths, headlamp, insulated water bottle, extension tubes, Giotto Rocket Blower, and a couple of RX Bars (because photography always trumps meals).
Specialty Equipment (not pictured—stays behind unless I have a specific plan for it)
- Sony a7S III camera body: For Milky Way and other moonless night photography—it’s “only” 12 megapixels (remember when 12 megapixels was huge?), but this camera sees in the dark.
- Sony 24mm f/1.4 GM lens: For Milky Way and other moonless night photography—I can’t believe how compact this lens is.
- Sony 28mm f/1.8 G lens: For Milky Way and other moonless night photography—this one’s even more compact than the 24mm.
- Sony 90mm Macro: I use this lens a lot with extension tubes to get super close for my creative selective focus work (wildflowers, fall color).
- Sony 200-600 G lens: When I want to go big on a moonrise/moonset—sometimes I’ll pare it with the 2X teleconverter and really go crazy. I also use this lens with extension tubes for selective focus fall color.
Support
- Really Right Stuff 24L Tripod with a RRS BH-55 ball head: Sturdy enough for whatever I put on it, in pretty much whatever conditions I encounter. I also like that, fully extended with the head and camera, even without a centerpost it’s several inches taller than I am.
- Gitzo 1530 tripod with a RRS BH-40 ball head: My travel/hiking tripod. Without extending the centerpost it’s not quite as tall as I prefer, but it’s tall enough and I like the compactness for suitcases and long hikes.
Final camera bag thoughts
A camera bag is personal choice, based on many individual variables. So I’m not recommending against the Mindshift bag, which I found great in many ways. Because everyone’s body is different, I can only tell that the Shimoda was best for me.
If you’re in the market for a camera bag, make sure you try your candidate with weight before purchasing. And don’t just throw the bag on your back and call it good—actually walk around with it, bounce up and down, twist, bend over, take it off and put it on, and so on until you’re sure.
I know this kind of testing isn’t easy in this day of online shopping. If you don’t have a chance to try out your next camera bag before placing an order, find a nearby camera store do your research there. But if accept even a little of the camera store’s goodwill, don’t even think of ordering it online—support your local camera store.
About this image
For better or worse, February is Horsetail Fall month in Yosemite. For years I’ve thought about photographing the fall from the Four Mile Trail to Glacier Point, but never had the time or motivation to make it happen. Though this is my favorite trail out of Yosemite Valley, I hadn’t been on it in years and figured I’d need to scout it first. But this year a couple of people in my first February workshop shot Horsetail Fall from there on their own, and were able to give me enough info that I figured I could make it work without any advance recon.
I drove to Yosemite the afternoon before my February Yosemite Winter Moon photo workshop. With all the people, and Southside Drive closed to all parking, I had to walk nearly a mile to get to the Four Mile Trail trailhead. Even I’d been on level ground, my back and shoulders were already fatigued by the time I started ascending the switchbacks. I only had to walk another half mile or so, but by the time I reached my photo spot, I’d decided it was time for a new bag.


After scrambling up a short but steep hillside, I found a small gap in the trees with a good view of Horsetail Fall. Shedding my gear, it was time forget my aches and pains and to get to work. The first thing I noticed was how clearly visible the top of El Capitan was. It’s not visible at all from Northside Drive; it is visible from some of the vantage points on (now closed) on Southside Drive, but this was even better because I could clearly see the Horsetail Creek drainage.
For this shoot I loaded up both a7RIV bodies, one with my 24-105 and the other with the 100-400. Because I was shooting through a window in the surrounding foliage, I thought I’d be shooting mostly telephoto, but when I saw the setting sun slipping through the trees, I recognized a sunstar opportunity as well. This isn’t possible on the valley floor, so I took full advantage. With only one tripod on hand, I frequently switched between my 24-105 and 100-400 bodies, firing non-stop until the light finally faded about five minutes after sunset.
I was already on the verge admitting camera bag my mistake when the pandemic shut everything down, but by the time I made it back to the car that evening my mind was made up. Fingers crossed that I’m finally done.
February 2021
Click an image for a closer look, and to view a slide show.


COVID Reflections
Posted on March 14, 2021

Autumn Snow and Reflection, Half Dome, Yosemite
Sony a7RIV
Sony 16-35 f/2.8 GM
2 seconds
F/16
ISO 50
Last week marked the one year anniversary of the COVID shutdown. WOW. One year.
In hindsight I realize that I might have been a little naive when this thing started because of the way I’d spent the two weeks prior to the shutdown: first in Scottsdale, Arizona for my annual MLB Spring Training trip (go Giants!), followed immediately by a week in Anchorage, Alaska to visit my daughter. In Arizona at the beginning of March I noticed very little difference in people’s behavior (though I did have to search long and hard for hand sanitizer), but winging my way to Alaska, I was struck by how empty the airports and flights were. Hmmm….
Alaska is where I was when it started to dawn on me that a couple of my upcoming workshops might be threatened. When that realization hit, I remember thinking I’ll be fine as long as I don’t lose the New Zealand trip at the end of June. Ha! I ended up losing 12 workshops, including New Zealand in both 2020 and 2021. And the workshops I have managed to pull off (three so far since last March) have been impacted as well, both in terms of group size and COVID protocol.
But this isn’t a woe is me post, I promise. I have so much to be grateful for, starting with the flexibility of being self-employed and working from home. And of course continued good health of my family and me. Oh, and the fact that I’m still in business.
And just like that, here’s 2021, I’m fully vaccinated, with two workshops in the mirror and six queued up over the next eight weeks (maybe I should be careful what I wish for). Life’s good.
But anyway…
I started this blog with the idea of a sentence or two reflecting on the COVID anniversary before diving into some thoughts on this just-processed image from last November. But here I am, nearly 500 words later….
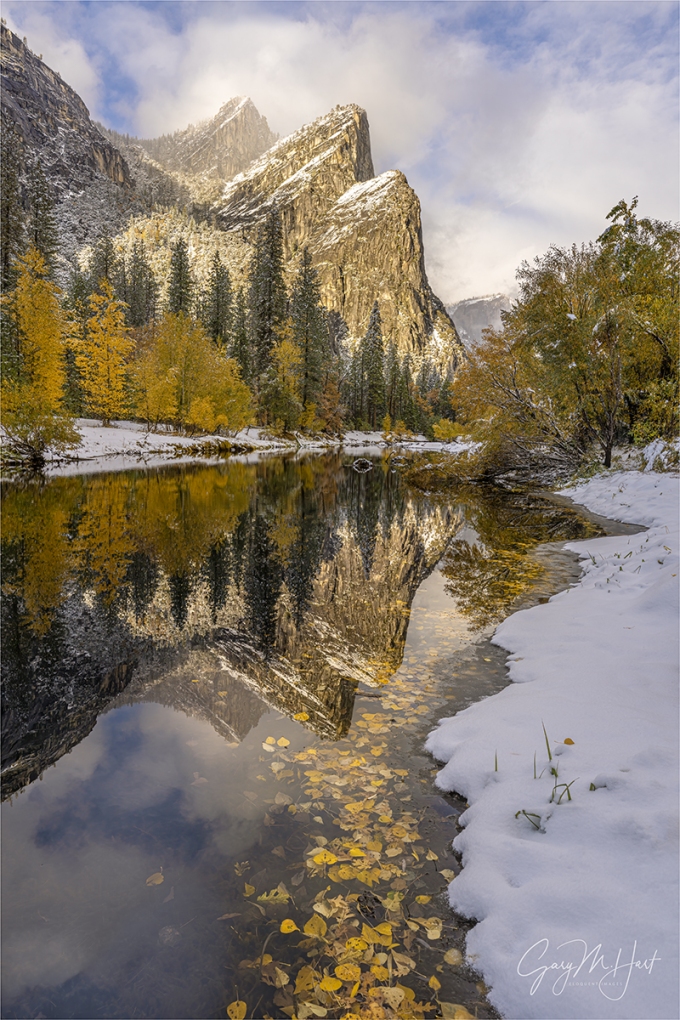
I don’t need to gush any more about this day, a highlight of my pandemic year—you can just go back through the many blogs I’ve already posted about it (7—I counted). What I wanted to say about this image is how it underscores the importance of not merely settling for a beautiful scene, no matter how beautiful it is (something this one irrefutably was). Creating an image that stands out from all the other pictures of inherently beautiful scenes requires understanding the difference between the way your camera sees a scene and the way you see it. Unlike your experience of the world, a still image is devoid of motion and depth, has limited dynamic range and depth of field, and is constrained by a rectangular box. Managing these differences requires the ability to control your camera’s exposure variables (f-stop, shutter speed, ISO, focal length) to create the illusion of depth and motion.
The clouds had just started to part when I arrived at this reflective bend in the Merced River. It’s easy to get walloped by the beauty of a scene like this, frame up something nice, and click. But after indulging the creative side of my brain (camera or not, this scene really was gorgeous), I forced myself to set my awe aside for a few beats to work out the best way to convey the beauty.
My first step in most scenes is to identify the most important thing—what I want the scene to be “about.” If that important thing is in the foreground, I look for a complementary background; if my subject is in the background, I try to identify a complementary foreground.
In this case my “most important thing” was the entire scene across the river, anchored of course by Half Dome, but supported by the snow-covered trees and the reflection. I wandered the riverbank and found a few things to put in my foreground. I started with a mini cove rimmed with leaves that I used to frame a horizontal composition. Then, looking for something that would be better for a vertical composition, I moved on to these floating leaves and partially submerged log just a few feet upstream. Framing everything up at eye-level, I didn’t like the empty gap between the leaves/log and Half Dome’s reflection, so I dropped my tripod as low as it would go and went to work.
While there was a fair amount of dynamic range, I knew it was well within the capabilities of my Sony a7RIV—if I exposed carefully. But exposing carefully means more than just getting the light right—it means getting the light right with a shutter speed that handles the motion, and with an f-stop that handles the depth.
With a few ripples disturbing the reflection, I wanted shutter speed long enough to smooth the water and twisted my Breakthrough 6-stop Dark Circular Polarizer onto my Sony 16-35 f/2.8 GM lens. And since sharpness from the closest leaf to Half Dome’s summit was important, I selected f/16 and focused on the log. (My hyperfocal app assured me that this would give me more than enough depth-of-field for front-to-back sharpness.) Next, with my eye on the viewfinder, I slowly turned my polarizer far enough to remove the reflection from the leaves, but not so much that I erased the primary reflection.
Finally, I was ready to meter and select the shutter speed the gave me a good histogram. At my a7RIV’s native ISO (100), the shutter speed I needed was 1-second. To double that and ensure better smoothing of the ripples, I dialed down to ISO 50. Click.
A COVID Compilation
(Images from the last 12 months)
Click an image for a closer look, and to view a slide show.


My Horsetail Fall Epiphany
Posted on March 7, 2021

Windswept, Horsetail Fall, Yosemite
Sony a7RIV
Sony 100-400 GM
1/15 second
F/9
ISO 100
I’ve written quite a bit about Horsetail Fall over the last few weeks, but believe it or not, I have a few words to add.
In recent years it has become fashionable for photographers, myself included, to criticize the whole trophy shot phenomenon that creates a rugby scrum of photographers jostling to get their own version of something that’s been photographed a million times before. I’m thinking about, to name just a few, events like sunrise at Mesa Arch in Canyonlands, the Maroon Bells fall color reflection, the light shaft in Upper Antelope Canyon, and of course the February sunset light on Horsetail Fall.
Each experience has its own set of undesirable challenges that make it easy for many to wonder why others go through so much hassle to capture something that’s virtually guaranteed not to be anything close to unique. But this year’s Horsetail Fall event was kind of an epiphany for me because on the fourth attempt in two weeks (twice with my first workshop group, once with my second group, and once by myself), it suddenly occurred to me how much I was enjoying myself.


More than anything else, photography should make us happy. For me that happiness comes from witnessing nature at its most special, and Horsetail Fall at its best is truly special. Indescribably special.
But that wasn’t my epiphany. Last month’s epiphany was realizing how much being surrounded by thousands of awestruck others adds to the experience, which is where I think the Horsetail Fall experience is unique compared to most other trophy shots.
That’s because most of these trophy scenes are overrun by far more photographers than can comfortably (or even uncomfortably) fit, creating a Darwinian competition that usually spells disappointment for the defeated majority. At these spots I’ve witnessed failure, tears, and actual fistfights as too many photographers jockey for not enough positions.
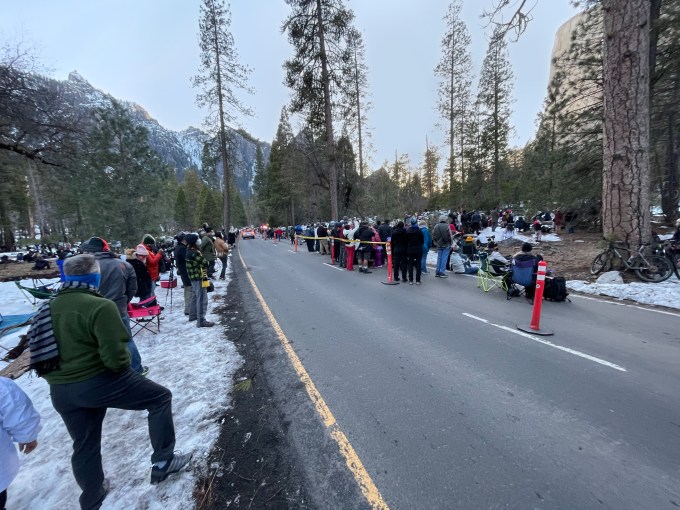
2021 Horsetail Fall Crowd, Northside Drive, Yosemite: This scene repeats itself all along a nearly one mile stretch of Northside Drive as sunset approaches in the last two weeks of February
I won’t argue that the Horsetail Fall scene is ridiculously crowded. But to photograph Horsetail Fall from Northside Drive (the more challenging, and competitive, Southside Drive perspective is now off-limits during Horsetail Fall season), you’re pointing up, and most likely using a telephoto lens (or at least not using a wide angle lens). This means that no matter how many people are trying to view the fall, no one is in anyone else’s shot. The result is a tailgate party atmosphere as the entire crowd unifies around a single goal: that special light on Horsetail Fall.
About this image
My second February workshop was scheduled for the full moon, so I made clear to everyone who signed up that even though we’d be there right in the heart of “Horsetail Fall season,” Horsetail Fall wouldn’t be a priority. But when the crowds pretty much wiped out one of my planned sunset locations, and with the Horsetail Fall conditions so ideal (water in the fall, no clouds), I decided we’d give Horsetail one shot.
By this (my fourth) attempt I had the traffic and parking strategy down to a science, so we were easily in position and set-up with about 90 minutes to spare. I actually like getting there so early because it’s cool, especially for those who haven’t witnessed Horsetail Fall before, to see the light warm as the vertical shadow advances across El Capitan’s face.
While watching the light change, we all chatted and laughed amongst ourselves and with the other nearby gawkers. Some of our neighbors had cameras too, and some were just there to watch.
With so much time to kill, a few of us even spent some time walking up and down Northside Drive, taking in the party atmosphere. Unlike most of the trophy scenes I’ve photographed, I saw lots of kids and even a few (leashed) dogs. Many people had brought chairs and ice chests, some were barbecuing, and everyone seemed to be enjoying themselves.
About 15 minutes before sunset the light had acquired an amber hue and the photographers stopped chatting and went to work. The light this evening warmed steadily, from amber to the deep orange in this image. I tried to time each click for when the wind near El Capitan’s summit caught the falling water just right, spreading it into a glowing veil.
After such a great Horsetail Fall experience with the previous week’s group, it’s impossible not to compare the two. On this evening we had less concern about the light because there was no sign of clouds. And though the prior week’s clouds had created a unique opportunity to have some character in the sky, I was pretty sure that there was a little more water this week. I also noticed that the last light was thinner, more tightly focused on the fall, but also didn’t stretch as far down the fall. And while the color wasn’t quite as red as it had been the prior week, I heard no complaints.
Read about the entire Horsetail Fall experience and how to photograph it
A Few Trophies of My Own
Click an image for a closer look, and to view a slide show.


")


Good Things Come to Those Who Wait
Posted on February 28, 2021

Nightfall, Yosemite Valley Moonrise
Sony a7RIV
Sony 24-105 G
.8 second
F/10
ISO 400
So much to do after two workshops in the last two weeks (and all the planning and recovery that goes with them). I had ambitious plans to return home late Friday night and hit the ground running first thing Saturday morning, so imagine my frustration to walk into my chilly house (I’d turned off the heat before I left), equal parts hungry and tired, at about 11 p.m. to find my internet down. When I discovered no dial tone on my landline (yes, I still have a landline), I realized this was a Comcast problem. Uh-oh. Having dealt with Comcast problems in the past (don’t get me started on their automated phone support system), I set aside food, warmth, and sleep to immediately call Comcast tech support. (Cold, hungry, tired, and no internet—suddenly I knew how the Donner Party must have felt.)
After about two hours on the phone (no, I do not want to reset my modem for the eighth time!), the best I could do was arrange for a Sunday house call—not bad for Comcast, but certainly not great for someone with a business to run, especially given all I had to do. I went to bed strategizing my Saturday, figuring I could at least load and process my images, and handle my basic internet needs by turning my phone into a wifi hot spot. But Saturday morning when I tried to connect my computer to my phone and load a page, my computer just stared back dumbly. I checked my reception and saw it bouncing between one and zero bars. I found a corner by the window that at least seemed to stay at one bar and called T-Mobile. Turns out a tower was down, but at least they were sorry. (I actually think T-Mobile’s tech support is very good, especially after dealing with Comcast.) And for some reason my Adobe Creative Suite wouldn’t load either (usually it works fine without connectivity, but I didn’t have the bandwidth to debug the problem without internet).
The additional technical frustration between then and now included multiple support calls with Comcast and T-Mobile and a trip to the Comcast store to swap out my modem, all culminating with a visit from a very nice Comcast technician who fixed the problem and told me the support rep I talked to yesterday could have fixed it over the phone. Sigh.
So here I am, it’s Sunday night and have a blog to write. I loaded my images, grabbed one from Friday night, processed it, and here you go. Now for something to say….
I’d scheduled my Yosemite Winter Moon workshop around this grand finale, a full moon rising from directly behind Half Dome right at sunset on Friday evening. The rest of the workshop had already been really nice—multiple rainbows on Yosemite Falls (Upper and Lower), a warmup moonrise on Thursday night, and even a bonus Horsetail Fall shoot (I’d made it clear that the moon, not Horsetail Fall, was the priority for this workshop) when it became clear the conditions would be perfect, and I had cracked this year’s NPS Horsetail Fall restrictions code—but this moonrise is what we’d all been looking forward to.
Because of the crowds in the park and the fact that the moonrise was apparently not a secret (how I long for the good old days), we got to our moonrise spot above the Tunnel View vista about two hours early. After not seeing a single cloud for the entire workshop, the first thing we saw as we unpacked and set up our gear was a bank of thin clouds that had set up camp low on the horizon, directly behind Half Dome. At first they appeared to be moving on and I was pretty optimistic about our moonrise, but as the appointed hour approached I grew increasingly pessimistic—not only were clouds thickening, they were expanding.
Sure enough, zero hour arrived with no sign of the moon, but we did get some nice color in the clouds and the group, while disappointed, seemed happy enough with what did get. The scene was so nice in fact that we were in no rush to leave despite the darkening landscape. Which is why we were still primed and ready for action when I noticed a faint glow in the clouds above Sentinel Rock. Could it be?
Yes it could. What started as a glow quickly revealed itself to be the lunar disk we’d been waiting for. And though it wasn’t apparent to our eyes, it was clear that the moon had edged into a patch of thinner clouds, because as we frantically clicked, actual lunar detail started to emerge. In fact, the clouds that originally thwarted our moonrise turned out to be a benefit when they moderated the moon’s brightness enough to allow us to photograph long after it have been too bright.
In my prior blog post I wrote about the joy of unexpected gifts from nature, events that seem to come out of nowhere, just when you’ve about given up hope. Now it had happened in consecutive workshops. I realize that moments like this are the exception, but they really do more than make up for all the disappointment nature likes to deal.
Workshop Schedule || Purchase Prints || Instagram
Worth Waiting For


Shared Magic
Posted on February 21, 2021

Last Light, Horsetail Fall, Yosemite
Sony a7RIV
Sony 100-400 GM
1/2 second
F/9
ISO 100
Everything was progressing perfectly. With a little strategic planning and vehicle shuffling, I’d successfully navigated my workshop group through the teeming throng to the El Capitan Picnic Area. When we’d arrived, more than two hours earlier, there was hardly a cloud in the sky and everyone was pretty confident that the Horsetail Fall gods would smile upon us this evening. Spirits were sky-high, but I just held my breath and crossed my fingers…
For those who have been living under a rock and have never heard of Horsetail Fall, for most of the year it’s probably Yosemite’s most anonymous waterfall. But for a couple weeks in February, it seems like all the photographers on the planet (and their cameras) assemble to pray for the confluence of conditions that renders this El Capitan trickle an otherworldly shade of red: the position of the setting sun (a mid- to late-February thing), water in the fall (depends on rainfall and/or snowmelt), and a clear path for sunset light to travel from the horizon to El Capitan (cross your fingers).
I’d made last week’s workshop group very much aware of the uncertainties, warning them in advance not to get too high or low about anything they see leading up to the 5-minute Horsetail Fall sunset window. But despite my admonishment, and the arrival of a seemingly endless swarm of puffy clouds above and near El Capitan’s nose, as the magic moment approached and the sunlight on the fall held steady, they couldn’t contain their excitement.
About an hour before sunset a countdown started—every few minutes someone would check the time and announce how many minutes were left until showtime. My job was to be the wet blanket, trying to temper their enthusiasm with stories of times (So. Many. Times.) when everything looked perfect until just a couple of minutes before the main event, when some unseen cloud on the horizon snuffed the sunlight and crushed the spirit of every person who had already mentally printed and framed their Horsetail Fall image above the sofa. One hour; 50 minutes; 45 minutes; 30 minutes; 20 minutes… And then it happened—less than 20 minutes before sunset, the clouds dancing around El Capitan’s nose thickened suddenly the light was gone.
In my many years leading photo workshops I’ve had more special moments than I can count—the warm light, vivid color, spectacular clouds, breathtaking celestial event, or whatever else makes a group giddy with excitement. These moments are the most rewarding part of leading photo workshops and may be the number one reason it never gets old for me.
But every once in a while a group and I share something that’s so off the charts magical that I can count it, and recall every little detail and who I was with. There was the 2-hour Grand Canyon lightning storm punctuated by a sunrise rainbow; the Lake Wanaka sunset that turn the sky red from horizon to horizon; the unexpected northern lights display at Glacier Lagoon in Iceland; the rainbow at the bottom of the Grand Canyon that spanned from rim to rim—and few more magic moments that I’ll never forget.
You never know when these events are going to happen, and they’re infrequent enough that you never really expect them. Nevertheless, when the light on El Capitan shut off, I switched from wet-blanket mode to cheerleader mode. I explained that experience has taught me that you really can’t anticipate what the Horsetail Fall light will be in five minutes based on its light right now. What really matters when the sun gets that low is what’s happening on the horizon, which isn’t visible down there amidst the granite and trees of Yosemite Valley. But I don’t think I convinced anyone.
About five minutes before sunset, many people around us started packing up their gear and shuffling off in defeat. I told my group we were staying put until five minutes after sunset, and shared stories of two previous February evenings when Horsetail Fall’s light had disappeared shortly before sunset, only to return after all had seemed lost. They still weren’t convinced, and I’d be lying if I said I believed that’s what was in store for us this evening—until I glanced up and saw a shaft of light moving up from the bottom of the fall. Before I could get the words, “There it is!” out of my mouth the entire fall was glowing red. Not orange-red, or pink, or reddish—it was red, actual RED.
I’ve only seen Horsetail Fall this red once before. People who have never seen Horsetail Fall at its best can’t believe that it really can as red as it can get in the pictures (and having seen the actual thing, I can tell when a picture’s red has been juice), but it’s very real—thanks to the same phenomenon that turns clouds red at sunset.
We got about three minutes of unforgettable magic this evening, but I’m pretty sure everyone who saw it left with a memory that will last for the rest of their life. I know I did.
Read about the Horsetail Fall phenomenon and how to photograph it
Workshop Schedule || Purchase Prints || Instagram
Shared Magic
(Particularly memorable moments I’ve shared with a workshop group)
Click an image for a closer look, and to view a slide show.


Back in the Saddle Again
Posted on February 14, 2021
White Gold, Three Brothers Reflection, Yosemite
Sony a7RIV
Sony 12-24 f/2.8 GM
1/80 second
F/11
ISO 100
After losing 12 workshops to COVID since last February, today I returned to Yosemite for my Horsetail Fall workshop. To say I’m excited would be an understatement. I’m also a little apprehensive. One thing I’m not too worried about is COVID, because I’ve put in place protocol that will keep everyone in the group safely distanced: things like suspended carpooling (everyone can drive their own car), and Zoom for meetings and image review sessions, among other things. And this won’t be my first pandemic workshop because last October I was able to get one in, so I know my protocols work without significantly impacting everyone’s experience.
My anxiety is always a little elevated going into my Horsetail Fall workshop because Horsetail Fall is very important to most of the people who sign up, but many natural unknowns make it impossible to guarantee. Usually it’s the light that thwarts us, some unseen cloud on the horizon that snuffs the sunlight at the last minute. Last year the light was great, but the fall was dry. But I’m hopeful because this year there is lots of water in the fall, and the weather forecast is promising (fingers crossed).
Compounding my standard Horsetail Fall apprehension this year is some new rules put in place due to COVID, and the crowds Horsetail Fall always attracts—the most stringent Horsetail Fall viewing restrictions ever—and it’s entirely up to me to make sure these restrictions don’t affect my group.
Of course this is Yosemite, a place where things always seem to work out for photographers. But even though I have a Horsetail Fall plan that I’m pretty confident will work, and the things I worry about never happen anyway (to quote Tom Petty), I won’t breathe easily until I’ve seen exactly what form “work out” takes in this workshop.
About this image
But anyway… Rather than recycle an old Horsetail Fall image (which you can see below anyway), I’m sharing another image from my December snow day in Yosemite. This is the Three Brothers, probably Yosemite Valley’s most anonymous rock formation. Anonymous not because it’s less worthy than other Yosemite landmarks, but because there are just not that many places to view it.
To align the Three Brothers with the ribbon of autumn leaves, I had to alternately scale and boot-ski a few snow drifts to make my way to the river’s edge. To eliminate a couple of other photographers from my frame (not to mention more than a few footprints in the snow, I moved forward and extended one tripod leg into about a foot of river water. This put my viewfinder out of reach, but by bracing myself on the tripod to keep from joining it in the frigid river, I was able to get a clear enough view of my camera’s LCD to compose this frame. (It’s awkward angles like this that really help me appreciate live-view on the LCD.)
Workshop Schedule || Purchase Prints || Instagram
I like to include some kind of knowledge or insight in each blog post, but this week workshop prep has left me without a lot of time. Instead, I’m sharing my Horsetail Fall article, just updated with all the 2021 Yosemite NPS changes. You can also find this article in my Photo Tips section.
Horsetail Fall, El Capitan, Yosemite (from the Merced River south bank)
Canon EOS-1Ds Mark III
1/4 second
F/8.0
ISO 100
220 mm
2021 Horsetail Fall update
While much of the Horsetail Fall article below is still valid, crowds and COVID have led the NPS to make some fairly impactful changes.
- Access to Yosemite is by reservation only. In other words, if you don’t have a reservation, you will be turned away at the gate. The reservation system will be in effect through February at least, which means for the entire duration of the 2021 Horsetail Fall season. You can make a reservation here: https://www.recreation.gov/timed-entry/10086745. If you have lodging in Yosemite Valley, your reservation is included.
- From noon until 7 p.m., all parking on Southside Drive between the El Capitan crossover and Swinging Bridge is prohibited.
- Also between El Capitan crossover and Swinging Bridge, the entire area between the Merced River and Southside Drive side is closed. In other words, you can’t photograph Horsetail Fall from the south bank of the Merced River. This will be strictly enforced.
- All parking on Northside Drive between Yosemite Valley Lodge and the El Capitan crossover is closed. You also won’t be permitted to unload or stop on this stretch of road. To view Horsetail Fall, the NPS wants you to park in the Yosemite Falls parking area just west of Yosemite Valley Lodge, and walk to the viewing area at or near the El Capitan Picnic Area. This is about 1.5 miles each way, but it’s flat, and one lane of Northside Drive will be blocked for pedestrians.
- Here’s the NPS Yosemite Horsetail Fall page: https://www.nps.gov/yose/planyourvisit/horsetailfall.htm
Please respect these restrictions. The minority of photographers who ignore rules, or try to cut corners, reflect poorly on all photographers, which only leads to even tighter restrictions and risk complete loss of access to Horsetail Fall.
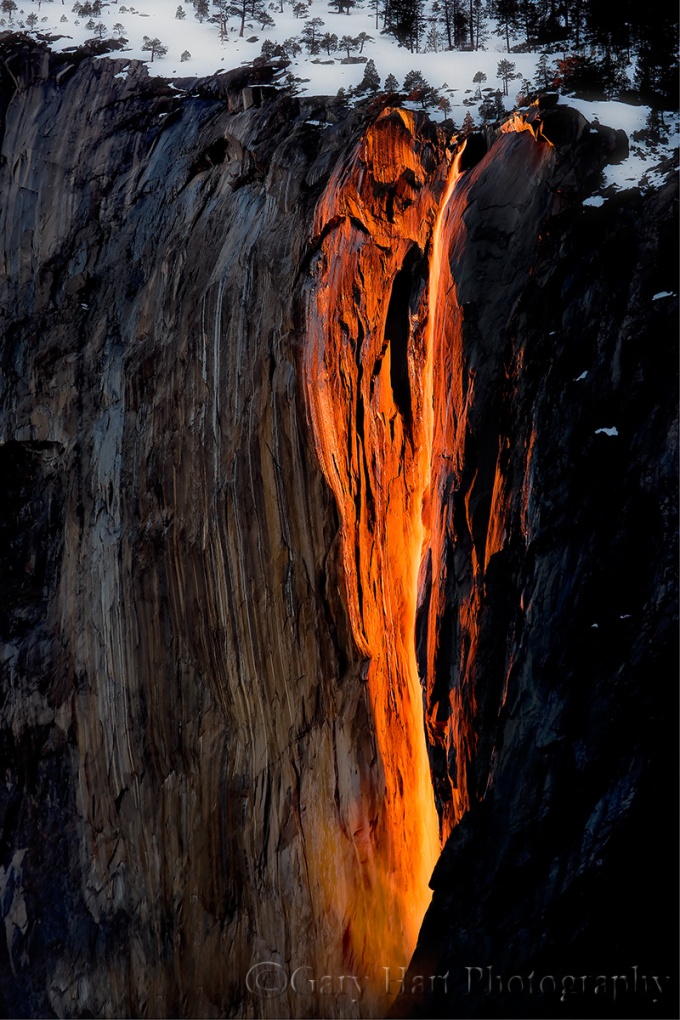
Horsetail Fall
For eleven-plus months each year, Horsetail Fall may just be Yosemite’s most anonymous waterfall. Usually dry or (at best) a wet stain, even when flowing strong this ephemeral cataract is barely visible as a thin white thread descending El Capitan’s east flank. When it’s flowing, my workshop groups can be standing directly beneath Horsetail and I still have to guide their eyes to it: “See that tall tree there? Follow it all the way to the top of El Capitan; now run your eye to the left until you get to the first tree…”. But for a couple of weeks in February, the possibility that a fortuitous confluence of snowmelt, shadow, and sunset light might, for a few minutes, turn this unassuming trickle into a molten stripe draws photographers like cats to a can-opener.
The curtain rises in the second week of February, a couple of hours before sunset, when a vertical shadow begins its eastward march across El Capitan’s south face. As the shadow advances, the sunlight warms; when the unseen sun (direct sunlight is gone from the valley floor long before it leaves towering El Capitan) reaches the horizon, the only part of El Capitan not in shadow is a narrow strip of granite that includes Horsetail Fall, and for a few minutes, when all the photography stars align, the fall is bathed in a red glow resembling flowing lava framed by dark shadow. (Some people mistakenly call the Horsetail spectacle the “Firefall,” but that altogether different, but no less breathtaking, manmade Yosemite phenomenon was terminated by the National Park Service in 1968.)
Some years Horsetail delivers sunset after sunset in February, while other years administer daily doses of February frustration. Unfortunately, it’s impossible to predict when all the tumblers will click into place: I know photographers who nailed Horsetail on their first attempt, and others who have been chasing it for years.
Don’t call it “Firefall”
One important thing before I continue. To avoid outing yourself as a Yosemite rookie, don’t make the mistake of calling Horsetail Fall the “Firefall.” Yosemite’s Firefall was a very real nightly display of burning embers pushed from Glacier Point every summer night. It was as spectacular as it sounds. The phenomenon started in 1872 and continued until the National Park Service, concerned (among other things) about the crowds it drew, terminated the Firefall in 1968.
Anyone who has witnessed or seen pictures of Horsetail Fall would agree that “Firefall” would be a great name for it, but those of us fortunate (and old) enough to have witnessed the actual Firefall know the difference between Horsetail Fall and the Firefall, and will never confuse one for the other.
(Oh yeah, and it’s Horsetail Fall, not Horsetail Falls.)
When to photograph Horsetail Fall
The “when” of Horsetail Fall depends on the convergence of three independent conditions:
- The sun’s angle is refreshingly predictable, lining up perfectly only in February (and October, when the fall is almost always dry). Common wisdom says the shadow on El Capitan most precisely targets Horsetail Fall at sunset during the third week of February, from around the 15th through the 22nd (or a little later). While I won’t dispute this, I’ve had some of my best success a week earlier, and my favorite Horsetail shot (at the top of the page) was captured February 9. I’ve also had success photographing it right up until the end of February. But the stripe of sunset light on El Capitan is thinnest (and therefore most tightly focused and photogenic) in the third week of February—the prime benefit of doing it a week earlier is light almost as good, with far fewer people.
- Water in the fall varies greatly from year to year, depending on how much show has fallen on the fall’s extremely small watershed, and how much of that snow is currently melting. A large snowpack and warm daytime temperatures are ideal. Sometimes Horsetail can be frozen solid in the morning, but afternoon warmth can be enough to get it flowing in time for the show. And a heavy rain can get it going strong for a few hours or even a day or so.
- Direct sunlight at sunset is the most fickle aspect of the Horsetail experience—for every tale of a seemingly perfect evening when the sunset light was doused by an unseen cloud on the western horizon mere seconds before showtime, there’s another story about a cloudy evening when the setting sun somehow threaded a gap in the clouds just as tripods were being collapsed.
The problem with targeting February’s third week is that it isn’t a secret: I generally prefer sacrificing Horsetail perfection in favor of Horsetail near perfection and far fewer photographers. But I’ll leave that decision up to you.
Where to photograph Horsetail Fall
It’s fun to circle Yosemite Valley on pretty much any mid- to late-February afternoon just to watch the hordes of single-minded photographers setting up camp like iPhone users on Release Day. In fact, one non-scientific way to find a spot to photograph Horsetail is to simply park where everyone else parks and follow the crowd. Unfortunately, as Horsetail’s popularity grows, so does the distance you’ll need to walk.
If Horsetail Fall is on the top of your bucket list, it’s best to pick your spot and show up early. Really early. Really, really early. The downside of this approach is that, because the best locations for Horsetail aren’t especially good for anything else, you’ll sacrifice a lot of quality Yosemite photography time waiting for something that might not happen.
And no one has commanded that you worship with the rest of the Horsetail congregation: Experienced Yosemite photographers know that any west-facing location with a view of the fall will do. If you find yourself in Yosemite with time to kill, try walking the Merced River between Cathedral and Sentinel Beaches—any place with a view to Horsetail will work. But because of their open space and relative ease of access, two spots have become the go-to Horsetail spots for most photographers.
El Capitan Picnic Area
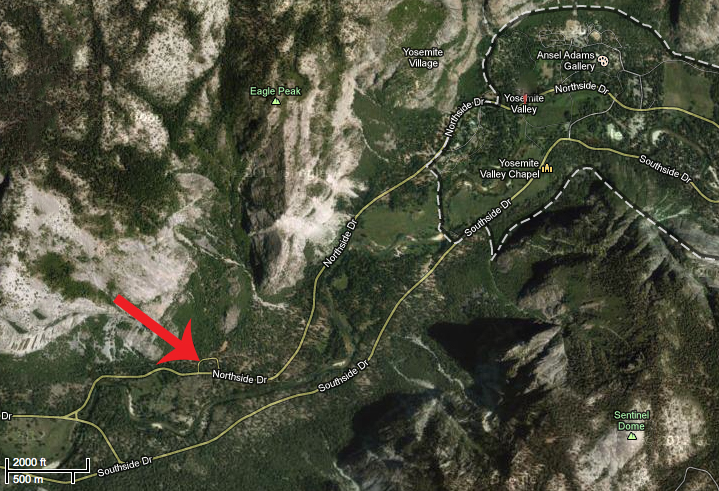 El Capitan Picnic Area, GPS: 37.72782N 119.61844W
The El Capitan Picnic Area, highlighted by Galen Rowell, remains the most popular Horsetail Fall vantage point. The picnic area’s advantages are that it is the closest view of Horsetail Fall, has the most parking, has the most room for photographers (by far), and has a bathroom (plug your nose). The downside is there really isn’t a lot of composition variety here, and thousands of others will have already captured something as good as or better than what you’ll get.

Horsetail Fall from the picnic area
If you like people, the El Capitan Picnic Area is the place to be—more than any other Horsetail vantage point, this one has a festive, tailgate atmosphere that can be a lot of fun. I suspect that’s because people arrive so early and there’s little else to do before the show starts. And since everyone is pointing up with a telephoto, it’s pretty much impossible for anyone to be in anyone else’s way, which eases much of the tension that often exists when shooting among large crowds.
You’ll find the parking lot, with room for twenty or so cars, on Northside Drive, about two miles west of Yosemite Lodge. In recent years the NPS has blocked a lane of Northside Drive to allow more parking (but don’t park illegally because you will be cited). You can shoot right from the parking lot, or wander a bit east to find several clearings with views of the fall.
Merced River south bank bend
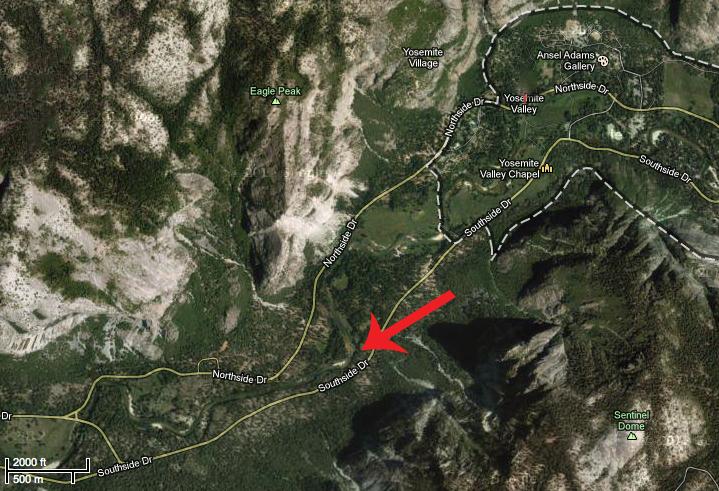 Merced River south bank bend, GPS: 37.72885N 119.60743W
Photographed from a bend on the Merced River’s south bank, El Capitan’s extreme sloping summit creates the illusion that you’re somewhere above Yosemite Valley, eye-to-eye with the top of Horsetail Fall—it’s a great perspective.
I like this location because the river greatly increases the variety of possible compositions, and also because you can pivot your view upstream to photograph Upper Yosemite Fall, and behind you toward Sentinel Rock (which also gets fantastic late light), almost directly above while you wait for Horsetail to light up. The downside to photographing here is that there’s precious little room, both to park and to photograph. This requires getting there a couple of hours early, and also can lead to a bit more tension as people jockey for position.

Horsetail Fall reflection from the Southside Drive Merced River view
Driving east on one-way Southside Drive, you’ll parallel the Merced River for most of 1.2 miles beyond the turn for Cathedral Beach. The Horsetail Fall spot is right where the road and river diverge. Parallel park right there in one of two narrow but paved parking areas on opposite sides of the road, where you’ll find room for about a dozen cars. In recent years, all parking on Southside Drive between El Capitan Crossover and Swinging Bridge has been banned, if you plan to shoot here, prepare to walk a mile or more.
Since there’s so little parking here, and Southside Drive is one-way eastbound, if you find no parking (don’t try to squeeze in where there’s no room—I’ve seen rangers doing traffic control and ticketing cars that don’t fit), it also helps to know that the spot is about a ½ mile from the 4-Mile Trail parking area and ¾ miles west of the Swinging Bridge parking area—an easy, flat walk.
Because of the potential for crowds, the best strategy here is to arrive early and forego what may be a great view from the elevated riverbank (that is sure to be blocked by late-arrivers trying to cram their way in), in favor of getting as close to the river as possible. Standing at river level gives you many more compositional choices, and nobody else can block your wide shots. (But if there are other photographers already set up on the elevated riverbank when you arrive, please don’t be the one who sets up in front of them.)
How to photograph Horsetail Fall
Regardless of where you set up to photograph Horsetail Fall, it’s pretty difficult to find something that nobody else has done. But that doesn’t mean you shouldn’t try. There are definitely other places in Yosemite Valley with view of Horsetail Fall, they just take a little hunting—I suggest walking the south bank of the Merced River, and ascending the 4 Mile Trail. And since you’ll likely be doing lots of waiting, take advantage of the downtime to experiment with compositions.
Strategy
When the light begins to warm, it’s time to shoot. Because you never know when the light will shut off, don’t wait until the light is perfect—it’s best to start early and photograph often. Until the light goes away completely, my rule of thumb is that the light now is better than the light a minute ago—just keep shooting . I’m not suggesting you hold your shutter down in burst mode until your card fills; I usually tell my workshop groups to fire a frame every minute or two until the fall turns amber, then pick up the pace as it goes (fingers crossed) pink and (if you’re lucky) red. The best light is in the final five minutes before sunset.
Composition
Viewed from the picnic area, there’s not a lot of visual interest surrounding Horsetail; your most obvious compositions will be moderate telephotos, up to 300mm or full frame. I use my Sony 24-105 and 70-200 (or more recently, my 100-400) lenses almost exclusively here. Use the trees to frame your shots and let them go black; with a telephoto you can isolate aspects of the fall and eliminate the sky and some or all of the trees.
The Merced River bend near Southside Drive is farther away from the fall, with more foreground possibilities, including the river and reflections, so you’ll be able to use a greater range of focal lengths here. Don’t get so caught up in photographing the fall that you overlook wider possibilities that include the river.
From either location I think vertical compositions work best (there’s a reason you don’t see lots of horizontal Horsetail Fall images), but that doesn’t mean there aren’t horizontal opportunities too. I like to identify a go-to composition based on the conditions, then vary between wide/tight and horizontal/vertical. If the sky is boring (cloudless), minimize or eliminate it from your composition. If there are clouds that make the sky interesting, by all means include them.
A frequent rookie mistake is cutting the waterfall off at the bottom. I’m not saying there’s never a reason to do that, but unless you consciously decide to truncate the fall because you think it’s the way to compose your frame, make sure you include the diagonal ridge that Horsetail disappears behind.
Filters
If your camera struggles with dynamic range, a graduated neutral density filter will help any shot that includes the sky—a two-stop hard GND angled across El Capitan parallel to the tree line should do the trick. This usually requires some Photoshop dodging and burning to hide the transition, but it’s the only way to darken the brightest part of the sky, which is usually in front of (not above) El Capitan. Since switching from Canon to Sony, I have no problem with the dynamic range and no longer use a GND for Horsetail Fall.
A polarizer will alter your results, so if you have one on, make sure you orient it properly. I often have a difficult time deciding between maximizing and minimizing the reflections with my polarizer, so I hedge my bets and shoot both ways. I’ve found that when Horsetail is flowing strongly, minimizing the reflection is best; when Horsetail is more of a wet or icy stain, maximizing the reflection works better. Either way, it’s best to just shoot it both ways and decide later.
Exposure
Automatic metering can be problematic in extreme dynamic range scenes when color is paramount, so I always recommend manual exposure, spot metering on Horsetail Fall or the adjacent sunlit granite. To maximize the color on the fall and El Capitan, I usually underexpose slightly. Because the trees rarely add value beyond framing, they usually work better when very dark green to black, a fact that’s completely lost on your meter (which thinks everything should be a middle tone). And monitor your RGB histogram to ensure that you haven’t washed out the red (Horsetail and El Capitan) or blue (sky) channels.
Highlight Alert (blinking highlights) is your friend. While you should never make your final exposure decision based on the highlight alert, when you see the highlights flashing, check your histogram and adjust if necessary.
And finally
And perhaps most important of all, don’t get so caught up in the photography that you forget to appreciate what you’re viewing. Just take a couple of seconds to stand back and allow yourself to appreciate the amazing spectacle unfolding before your eyes.
Join me in a Yosemite Photo Workshop
A Horsetail Fall Gallery
Click an image for a closer look and to view a slide show.


