Eloquent Images by Gary Hart
Insight, information, and inspiration for the inquisitive nature photographer
Resolution Revelation
Posted on February 7, 2021

Winter Sunset, Wanaka Willow Tree, New Zealand
Sony a7RIII
Sony 24-105 G
30 seconds
F/9
ISO 200
For years I’ve been pleading with camera manufacturers to stop giving us more resolution, and instead concentrate on things like improving dynamic range and high ISO performance. And while I still think that would be a better approach, I have to admit that I’m loving having all these pixels to play with.

Red Sunset, Lake Wanaka, New Zealand
The catalyst for my resolution revelation was this New Zealand sunset image. A couple of months ago I decided that I wanted to hang a large, vertical print in a space on a wall in my office. I really like this image, but it wasn’t vertical, and the vertical versions I captured that evening weren’t during peak color. In the olden days I’d have just moved on to a different image, but advancing sensor technology has caused me to rethink my position on the resolution race.
Let’s review
In digital photography, light passing through a lens is focused onto a sensor packed with an array of microscopic electronic light-catchers called “photosites.” Each photosite reports information about the incoming photons to the camera’s microprocessor, which interprets the light’s color and intensity at that location on the sensor. That information is digitized and stored with the information from all the other photosites. Voila, a digital image is born.
Digging deeper, we see that not all photosites are created equal, and that (on most sensors, depending on the technology) each photosite measures a specific color, either red, green, or blue. But for simplicity sake, it’s enough to know that one photosite equals one pixel—that is, a 42 megapixel camera has 42 million photosites, and a 50 megapixel camera has 50 million photosites, and so on.
Any digital camera, whether it be a smartphone, a full-frame 35mm mirrorless camera, or whatever, has a fixed amount of sensor real estate upon which to place its photosites. Fortunately, as sensor technology evolves, not only are we getting more photosites, the image quality is improving with it.
But improving sensors can’t change the fact that a larger photosite collects more light than a smaller one, making it more efficient. Think of a bucket: the bigger the bucket, the more water it holds before overflowing. Another undeniable truth is, the farther apart the photosites are, the less each photosite interferes with its neighbors, and the cooler they remain (heat is the enemy of pretty much all things electronic). And while they could solve these problems by just making the sensors bigger whenever they increase the resolution, larger sensors would require different lenses. So there are really only two practical ways to increase a sensor’s resolution: shrink its photosites, and/or cram the photosites closer.
For any given sensor technology, the fewer the photosites (lower megapixel number), the better the image quality. We can define image quality in a number of ways, but as a landscape photographer, the two quality factors that matter most to me are dynamic range (the range of light a sensor can “see,” from the darkest shadows to the brightest highlights) and high ISO capability (light sensitivity). That’s why I’ve always hoped that camera manufacturers would stop adding resolution and instead concentrate on dynamic range and sensitivity.
A little history
My first DSLR camera was 6 megapixels, and I was happy. But as sensor technology improved, cameras were able to add photosites without sacrificing image quality, and I was happier. At around 24 megapixels I reached the point where I was pretty convinced I didn’t need any more resolution, and would gladly sacrifice more resolution to get even more quality.
But the manufactures kept going. When I got the Sony a7RIII that I used to capture this New Zealand winter scene, I though surely its 42 megapixel sensor would be the end of the resolution road. Silly me.
Back to the present
Today, not only does my 61 megapixel Sony a7RIV have more resolution than I ever dared dream would be possible, all that resolution has come without sacrificing my coveted dynamic range and high ISO performance. And lately, I’ve actually started to appreciate having resolution horsepower to spare.
First, I’ve come to realize that for the vast majority of scenes I shoot, my Sony Alpha bodies have more than enough dynamic range—so much that I virtually never use the graduated neutral density filters that I once considered essential for managing extreme dynamic range. And for those rare times I need to test my camera’s ISO limits, I have my 12 megapixel Sony a7SIII (12MP sounds small compared to most of today’s sensors, but it’s more than adequate for most uses), that seems to be able to see in the dark. In other words, I rarely find myself longing for more performance.
And more and more, I find myself appreciating the extra resolution. Of course it’s important to get the framing right at capture, but sometimes that’s not possible. For example, when I photograph lightning, the best I can do is loosely frame a nice composition to ensure that I get the lightning somewhere in the frame. At 50 megapixels, I have plenty of resolution to crop in tighter on the bolt, wherever in my frame it fired. Also, a magazine will ask if I have a vertical version of a horizontal image to put on their cover. 50 megapixels is more than big enough to crop a vertical version from the original file, confident that I’ll still have plenty of resolution for even the highest quality publication.
How much resolution? Reversing the original 2/3 crop of my Sony 61 megapixel Sony a7RIV, gives me nearly 27 megapixels. And even my Sony a7RIII, with its “measly” 42 megapixels gives a nearly 19 megapixel file when I crop a horizontal to a vertical (or vice versa).
So when I wanted a vertical print for my office, I didn’t hesitate open the horizontal original of my New Zealand sunset and find a vertical crop that I liked. I ended up going with a 24×36 print of the vertical (taken from the horizontal original) you see at the top of this blog post. And you know what? It looks marvelous.
Workshop Schedule || Purchase Prints || Instagram
Cropped from the Original
Click an image for a closer look, and to view a slide show.


Blue Hour Photography
Posted on January 31, 2021

Blue Hour, Diamond Beach, Iceland
Sony a7RIV
Sony 100-400 GM
15 seconds
F/20
ISO 50
If you’re fortunate enough to be outside after the sunset color has subsided, but before the world is enveloped in total darkness, you may find yourself basking in the rarified hues of the “blue hour*.” It’s called the blue hour because, wait for it…, the landscape is indeed bathed in blue. (And also because it just rolls off the tongue better than “the blue 20-minutes,” which would actually be more accurate.)
The greatest joy I get from photography is the connection it gives me to the natural world. Whether it’s lightning, some celestial event or geological feature, a technical aspect of photography, the qualities of light, or whatever, whenever possible I try to share something of the science behind my blog image subject or its capture. The goal of this sharing isn’t entirely altruistic—it’s also a great excuse to dig deep into things that absolutely fascinate me. And as it turns out, the science behind the blue hour is especially fascinating.
The blue hour actually lasts less than one hour, with its duration decreasing with latitude because the sun ascends and descends at a steeper angle (faster) as the latitude (distance from the equator) decreases. This means that in Hawaii, if I’m on location 30-minutes before sunrise, I can probably catch the entire show, whereas in Iceland, even if I’m there an hour before sunrise (brrrr), I still might miss something. In the mid-latitudes, 20-minutes is a reasonable rule-of-thumb blue hour duration to rely on.
The cool thing about blue hour color is that, unlike daylight blue sky and sunrise/sunset color, it’s not a function of scattered sunlight. (Read my Sunset Color Photo Tips article for more on this.) Instead, until the sun drops about 8 degrees below the horizon, its blue wavelengths are absorbed by ozone in the upper atmosphere. Though this absorption (Chappuis absorption, if you must know) happens when the sun is above the horizon too, its effects are completely overpowered by direct sunlight. But as direct and scattered sunlight fades with the sinking sun, about the time the sun is about 4 degrees below the horizon, the blue ozone in the sky enjoys its 20-minutes of fame. (In other words, the blue hour reigns when the sun is between 4 and 8 degrees below the horizon.) Because the cones in our eyes require a certain amount of light to register color, this twilight blue is fairly subtle, but still noticeable, to human vision. A camera, on the other hand, with its ability to increase its light sensitivity (ISO) and accumulate light over time (shutter speed), has no problem capturing the dominant blue cast.
Nature photographers love the blue hour, both for the otherworldly hues that aren’t possible any other time of day, and for the exquisitely soft, shadowless light that’s a joy to photograph. The key for getting the most out of blue hour photography is understanding that the camera sees the world differently than you. Some of the best blue hour photography happens after the color is nearly gone from our eyes, tricking us into to packing up and going home too soon. But as I said earlier, the camera can see color too faint for our eyes to register. The color your camera might pick up can range from a purplish mix of the longest waves of sunlight and the beginning of the blue hour light, to the absolute deep-blue that soon fades to night.
The blue hour is also absolutely the best time to photograph the moon, which is why you see so many moon images in the Blue Hour gallery below. While fitting the dynamic range of a daylight-bright moon above virtually dark landscape is tricky, it’s definitely worth trying because the darker the sky, the greater the contrast between the daylight-bright moon and surrounding sky. (Check out my articles on moon photography in the Photo Tips menu above.)
One of my favorite blue hour subjects is the ocean, because the low light means long exposures that turn the surf into a gauzy haze. In Iceland for a workshop last January, I was photographing the surf washing up onto Diamond Beach in the fading twilight. As the blue hour descended, I was drawn the way the distant snow-covered peaks (that’s Vestrahorn on the right) seemed to glow in the bluish twilight. Looking for something to put in the foreground, my eyes landed on a pair of (relatively) large icebergs just offshore and I positioned myself to align them with mountains.
Though I’d spent most of the evening shooting with my widest lenses, for this shot I switched to my Sony 100-400 GM to compress the distance between the mountains and nearby ice. Before dialing in my exposure settings, I studied the icebergs to make sure they were stationary enough to not blur in a long exposure, and decided it would be work if I could expose between waves. It took a few tries, but I finally managed this 15-second exposure without motion blur in the ice.
* The blue hour of course happens in reverse before sunrise (from dark to light); for simplicity sake, I’ll just describe the evening half of the phenomenon.
Workshop Schedule || Purchase Prints || Instagram
Blue Hour


You Can Only Get So Wet
Posted on January 24, 2021

Vestrahorn Reflection, Stokksnes Black Sand Beach, Iceland
Sony a7RIV
Sony 16-35 f/2.8 GM
5 seconds
F/11
ISO 100
Vestrahorn, on Iceland’s southeast coast, is one impressive chunk of rock. Turns out it only reaches 1500 feet above sea level, but the way it juts so abruptly from the volcanic sand of Stokksnes Peninsula, Vestrahorn creates an imposing presence that rivals El Capitan in Yosemite.
This Vestrahorn shoot came toward the end of the 10-day Iceland workshop Don Smith and I led in January of 2020. Arriving late afternoon (which comes pretty early in Iceland in January), the group instantly scattered across the vast, flat plain offered with a variety of foreground options that included black-sand dunes, iced-over puddles, and a vast black sand beach. I made my way down to the beach and, being a sucker for reflections, was quickly drawn to glassy sand behind each retreating wave.
The beach here is so flat that the surf isn’t dangerous (at least it wasn’t on this day), but this was January in Iceland, so I didn’t really want to get wet. On the other hand, getting the reflection I wanted required being well into the wet part of the sand behind a retreating wave, and each reflection only lasted a few seconds before the water soaked into the sand. Emboldened by waterproof boots that reached about a foot up my calf, I wandered out to where it appeared the waves only reached a depth of 2 or 3 inches, not quite far enough to ensure a full reflection with each receding wave, but not too bad.
I really had a blast working this scene, playing with different compositions as the clouds and light above the mountain changed, and varying my timing to capture each wave in different stages of motion, from the frothy white churn at the wave’s front, followed by the floating foam shapes trailing it, and finally the reflective sheen punctuating each retreat. I also tried a variety of shutter speeds, freezing or applying a variety of blur effects to the moving water. When I get into this zone, I lose all sense of time a surroundings…
So imagine my surprise to feel freezing water soaking my feet. I looked down to see that my legs from the knees down had disappeared, and the beach I’d been standing on now more closely resembled a lake. With the tide clearly coming in (hmmm, perhaps that’s why the reflections seemed to be getting better…), my first inclination was to retreat. But the photography was definitely better in the deeper water, safety wasn’t a concern, and I suddenly remembered my running mantra: You can only get so wet, and once you get that wet, you’re not going to get any wetter. If this mindset could get me through several extremely miserable marathons, it could certainly get me through this. I hadn’t planned to soak my feet in the chilly surf, but now that the damage was done, I couldn’t really make it any worse. So I ended up staying out there, joyfully surrounded by reflections, for another 30 minutes.
One of the things I’ve learned over many years of photographing in extreme conditions is the value of backups. Not just backup photo gear, though I do think it’s foolish to take any photo trip with just one body (I’d already had to spend two days on this trip using my backup body, waiting for my primary body to dry after a unplanned dip in the surf), but also backup clothes.
So loading into the van (not sure what to call our vehicle: it was either a huge van or a little bus) at the beginning of each day, I always made sure to leave out a change of shoes and socks. Though my marinating feet were okay while I was shooting, as soon as I finished and started heading back to the van/bus (ban? vus?), they suddenly became wet, frozen stumps. I never imagined something as simple as a dry pair of socks could bring so much joy.
Read more about reflections
Surf’s Up
Click an image for a closer look, and to view a slide show.


Sunsets are Red Because the Sky is Blue
Posted on January 17, 2021

California Sunset, El Dorado Hills, Sierra Foothills
Sony a7R
Sony 70-200 f/4 G
ISO 100
f/8
1/200 second
From time to time I’ll edit one of the many articles in the Photo Tips section of my blog, tweaking and clarifying a few things just to keep it fresh. But every once in a while I do a complete rewrite. Here’s my latest such effort, a brand new article explaining how the interaction of sunlight with our atmosphere gives us blue skies and red sunsets. Spoiler alert: Sunsets are red because the sky is blue.
(And of course everything below applies to sunrise, only in reverse.)
Sunset Color
Nature photography isn’t rocket science, but a basic understanding of nature’s processes can make the difference between success and failure. That applies even to something as fundamental as sunsets and sunrises, from the way sunlight interacts with the atmosphere, to the conditions necessary for vivid sunset color.
Light and color
Sunlight reaches Earth in energy waves of varying length. The total of sunlight’s visible wavelengths combine give us light that appears white. The colors we perceive when specific wavelengths within the visible spectrum are absorbed or scattered, with each wavelength creating a distinct color. While the visible portion of the sun’s energy generates a virtually infinite number of colors, we’ve all become familiar with the arbitrary color name labels assigned to wavelength points throughout the spectrum.
Moving from the longest visible wavelength to the shortest, visible light breaks down into some shade of red, orange, yellow, green, blue, indigo, or violet. Not coincidentally, these are also the colors of the rainbow we see when the white light of the sun, separated by refraction in airborne water droplets, is reflected back to our eyes. Maybe you remember from your college physics days the mnemonic acronym for the rainbow colors and their order (from the outermost to the innermost color): ROY G BIV.
When a beam of sunlight passes through a vacuum (such as space), all of its wavelengths reach our eyes simultaneously and we perceive the visible portion as white. When sunlight encounters something (like a tree, a rock, air molecules, or whatever), some of its light will either be absorbed or scattered, depending on the wavelength and the properties of the interfering medium. So, unless we’re in space, the light that eventually reaches our eyes has either been reflected or stripped of certain wavelengths by whatever it encountered on its journey.
For example, a patch of fresh snow reflects all of the sun’s visible wavelengths uniformly and appears white to our eyes. A piece of coal uniformly absorbs most of the sunlight that strikes it, so we see coal as black. And when sunlight strikes a leaf, all of its wavelengths except those that we perceive as green are absorbed, while the green wavelengths bounce to our eyes.
Color in the sky
Since our atmosphere is not a vacuum, sunlight is changed simply by passing through the air. In an atmosphere without impurities (like dust, smoke, and water vapor), light interacts only with air molecules. In very simple terms, an air molecule will scatter any wavelength that’s smaller than it is, so the shortest wavelengths are most easily scattered. This scattering of incoming solar energy by atmospheric molecules becomes a filter that catches the violet and blue wavelengths first, allowing the longer wavelengths to pass through and continue their journey to more distant eyes.
When the sun is overhead, sunlight travels through a relatively small amount of atmosphere. The wavelengths that reach our eyes are the first to be scattered, the short violet and blue wavelengths, making the sky blue (the sky appears more blue than violet because our eyes are more sensitive to blue light).
On the other hand, when the sun is on the horizon, the light that reaches our eyes has passed through much more atmosphere than it did when the sun was directly overhead. The shorter violet and blue wavelengths are long gone, bluing-up the sky for others on their way, and the only remaining wavelengths are the longer, less easily scattered, orange and red wavelengths. It’s sunset! (Or sunrise.)
Airborne impurities dampen the atmosphere’s filtering process, so contrary to popular belief, a vivid sunset requires clean, unpolluted air. That’s because smoke, dust, and water molecules are much larger than air molecules. Rather than only scattering specific colors the way tiny air molecules do, larger molecules scatter much more completely—in other words, instead of scattering only the blue and violet wavelengths, polluted air catches lots of orange and red too (and everything in between).
Anyone who has blended a smoothie consisting of a variety of brightly colored ingredients (such as strawberries, blueberries, cantaloupe, and kale—uh, yum?) knows the smoothie’s color won’t be nearly as vivid as any of its ingredients, not even close. Instead you’ll end up with a brownish or grayish muck that at best might be slightly tinted with the color of the predominant ingredient.
Verify this yourself: The next time a storm clears, check the color in the sky—whether it’s midday blue, or sunset red, it’s easy to see how much more vivid the color is when the air is clean. And what’s better known for its sunsets, Hawaii, where it rains almost daily, or Los Angeles, with its urban sprawl and exhaust-spewing vehicles?
Another source of color at sunset has become all too familiar to anyone in or near wildfire-prone regions is red-rubber-ball sunsets when a fire is nearby. A vivid sunset requires intense sunlight, the more intense the better. In a typical brilliant sunset, while the rest of the sky is filled with color, the sun itself is far too bright to photograph as anything but a white disk (without rendering the rest of the scene much too dark). But when sunlight has to battle its way through smoke particles, the total amount of light is significantly reduced and there’s not enough scattered light of any wavelength to color the sky. But look straight at the sun—it’s so inherently bright that some of its longest wavelengths have battled their way to your retinas, turning the sun red while the rest of the sky is a murky brownish-gray.
Getting the most from your sunset images
Any time rain has cleared the atmosphere and the remaining clouds are mixed with sunlight, there’s a good chance for a vivid sunrise or sunset. I have a few go-to locations near home, and at my frequently visited photo locations (Yosemite, Grand Canyon, Death Valley, Hawaii, and so on) that I beeline to when the conditions for color in the sky look promising.
Wherever I am, as I prepare my shot shortly before the sunset show begins, I look for clouds receiving direct sunlight. This is the light that will most likely color-up at sunset, starting with an amber glow that transitions to pink, and red. Conversely, if no clouds are getting light shortly before sunset, that may be an indication that the sunset will fizzle. But don’t give up, because Nature is full of surprises.
A couple of mistakes inexperienced photographers often make is giving up on sunset too soon, and forgetting to check the sky behind them. Some of the best sunsets I’ve ever seen have happened when the sun slipped through an unseen hole in the clouds just below the horizon. And shortly after the sun sets, the pink vestiges of the longest wavelengths still color the eastern horizon. As this color deepens, the steely blue of the Earth’s shadow starts to descend. This combination of rich color and soft, shadowless light creates some of the best color and light for photography. Even when the scene appears too dark to your eye, don’t forget that your camera can accumulate light and bring out color and detail lost to your eye.
Maximizing color in the high dynamic range conditions of a sunset requires careful exposure. Rather than trusting the preview image on your scenes with extreme contrast, it’s essential to trust your histogram. If the histogram for a high dynamic range sunset scene looks good (highlights and shadows not clipped), it’s likely that on the LCD the highlights will look too bright, and the shadows too dark. Resist the urge to fix one or the other in the field, and instead trust that you’ll be able to recover both in processing later. If you’re not sure (or just don’t trust your ability to read the histogram), backet your exposures by a stop or two around what you think is best.
And don’t forget to check your RGB histogram—even if the luminosity histogram looks good, it’s possible that the red channel is clipped and you’ll need to reduce your exposure a little.
About this image
It was January 2015 and I had only recently made the switch from Canon DSLR to Sony Alpha mirrorless. With fewer than 1000 frames shot on my new Sony a7R, I’d already been completely blown away by its dynamic range compared to my Canon 5DIII, and was anxious for opportunities to reap these newfound benefits.
On this winter evening I ended up in the foothills south and east of Sacramento, my go-to photo location closest to home. I have a number of spots here, each highlighted by one or more oak trees atop a west-facing hill that gives me great silhouette opportunities from the back side.
Rather than return to one of my tried and true spots, I wanted to find something new. I was alarmed at all the development underway in this once pastoral area, but I was able to get to this spot because a new road had been carved into the hills behind it. Construction had already begun and while it’s illegal in California to cut down our beautiful oaks, it seems that they can develop right up to them and it wouldn’t be long before this trio was completely surrounded by homes. It was pretty clear that this shot wouldn’t be possible if I were to return in even just a few weeks.
As you can see here, I once again confirmed the dynamic range of my new Sony sensor. But of course no camera can shoot directly into a completely unfiltered sun, but this evening I benefited from the moisture-laden haze that hovers over the Central Valley in winter.
One other thing I remember exciting me about my new camera was its extra resolution. My longest lens at the time was the Sony 70-200 f/4 and I wanted to shoot this tighter. I just shot it at 200mm, but found that I had plenty of resolution to crop it down to what you see here.
Workshop Schedule || Purchase Prints || Instagram
Foothill Oaks
Click any image to scroll through the gallery LARGE


")


Border Patrol
Posted on January 10, 2021
Frozen, Kirkjufellsfoss, Iceland (2020)
Sony a7RIV
Sony 24-105 G
1/2 second
F/9
ISO 200
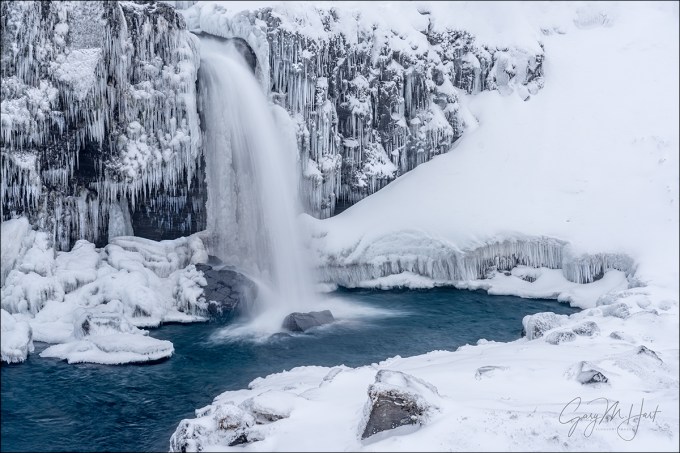
A year ago Don Smith and I, with the aid of our Icelandic guide (the legendary Óli Haukur), had a blast sharing Iceland’s winter beauty with a great group of photographers. But our trip wasn’t without its challenges. One of our earliest locations was Kirkjufell, arguably Iceland’s most recognizable mountain. While proponents of Vestrahorn might debate this, no one will deny that everyone who visits Iceland wants a picture of Kirkjufell, just as everyone visiting Yosemite wants a picture of Half Dome. And even though Kirkjufellsfoss (the nearby waterfall) is gorgeous and the obvious foreground for Kirkjufell images, the mountain really is the main event here.

Frozen Sunrise, Kirkjufell, Iceland (2019)
So imagine our disappointment on the morning our workshop group visited Kirkjufell and found the mountain completely obscured by clouds. Not only that, the temperature was 25 degrees (F), and a 40 MPH wind made it feel like 5 degrees and turned the sleet into rocketing needles. In other words, it was stupid-cold. Nevertheless, our hardy group geared up, braved the short trudge out to the vista, and went to work without complaint.
While waiting for Kirkjufell to emerge (fingers crossed), I turned my attention to the tiered, multi-channel, ice-encrusted Kirkjufellsfoss. In normal conditions, while waiting for the Kirkjufell to appear it would have been natural to fire off a few oooh-that’s-pretty clicks of the waterfall. But without the distraction of Kirkjufell (or anything else more than 1/2 mile away), I set up my tripod and actually worked the scene like an actual photographer (go figure). And as often happens when I spend quality time with a scene, the longer I worked this one, the more I saw.
Border patrol
With so much going on, the trickiest part of making this image was managing all the scene’s visual elements while minding my frame’s borders. As much as we try be vigilant, sometimes the emotion of a scene overwhelms our compositional good sense—we see something that moves us, point our camera at it, and click without a lot of thought. While this approach may indeed capture the scene well enough to save memories and impress friends, it’s far from the best way to capture a scene’s full potential. So before every click, I do a little “border patrol,” a simple mnemonic that reminds me to deal with small distractions on the perimeter that can have a disproportionately large impact on the entire image. (I’d love to say that I coined the term in this context, but I think I got it from Brenda Tharp—not sure where Brenda picked it up.)
To understand the importance of securing your borders, it’s important to understand that our goal as photographers is to create an image that not only invites viewers to enter, but also persuades them to stay. And the surest way to keep viewers in your image is to help them forget the world outside the frame. Lots of factors go into crafting an inviting, persuasive image—things like compositional balance, visual motion, and relationships are all essential (and topics for another day), but nothing reminds a viewer of the world outside the frame more than an object jutting in or cut off at the edge.
When an object juts in on the edge of a frame, it often feels like part of a different scene is photobombing the image. Likewise, when an object is cut off on the edge of the frame, it can feel like part of the scene is missing. Either way, it’s a subconscious and often jarring reminder of the world beyond the frame.
And there are other potential problems on the edge of an image. Simply having something with lots of visual weight—an object with enough bulk, brightness, contrast, or anything else that pulls the eye—on the edge of the frame can throw off the balance and compete with the primary subject for the viewer’s attention.
To avoid these distractions, I remind myself of “border patrol” and slowly run my eyes around the perimeter of the frame. Sometimes border patrol is easy—a simple scene with just a small handful of objects to organize, all conveniently grouped toward the center, usually requires minimal border management. But more often than not we’re dealing with complex scenes containing multiple objects scattered throughout and beyond the frame.
In this Kirkjufellsfoss scene I had to contend with ice, rocks, snow, and flowing water. The biggest problem was an assortment of randomly dispersed rocks jutting from the snow at bottom of the frame, and a railed pathway visible just above the fall. It wasn’t too hard to eliminate the path with careful placement of the top of my frame, but if my entire focus had been on the waterfall the rocks might have been overlooked. Border patrol. Placing the bottom of my frame a little higher would have cut off the large rock near the bottom-center, an important compositional element that combines with the fall to create a virtual diagonal; placing the bottom lower would have introduced more rocks that I’d have had to cut off somewhere. Instead, I was able find a clean line of snow that traversed the entire bottom of my frame: perfect! (And lucky.)
One other important compositional element that would have been easily easy to overlook is the switchback snow-line that enters the frame at the bottom and exits at the top (or vice-versa). Diagonals like this are strong compositional elements that I love including whenever possible, so I chose a horizontal composition to allow room for each switchback to complete. The eye subconsciously follows lines like this, so cutting them off on the edge of the frame is an tacit invitation to exit the scene, something I try to check for when I execute my border patrol.
Of course nature doesn’t often cooperate and I’m usually forced to chop off parts of visual elements. When I do this, I always want it to be a conscious decision that doesn’t make my viewer think that I’ve cut off something that belongs in the scene, or that something jutting in is part of a different scene. Usually when I have to cut something on the edge (often impossible to avoid), I try to do it boldly, somewhere near the middle of the object, to signal that was my intent and not just an oversight.
I realize because these things are often only noticed on a subconscious level they may seem trivial, but every image is house of cards comprised mostly of small decisions, and you never know which one might send it crashing down.
Epilogue
I did end up photographing Kirkjufell this morning, but didn’t get anything that thrilled me.
Minding the Border
Click an image for a closer look and slide show. Refresh the window to reorder the display.


Natural Tension
Posted on January 3, 2021

Clearing Storm, Half Dome Reflection from Sentinel Bridge, Yosemite
Sony a7RIV
Sony 24-105 G
Breakthrough 6-stop dark polarizer
2.5 seconds
F/16
ISO 50
Since the start of the pandemic, many (most?) of us have have found lots of time to catch up on books and movies (among other things). Of course that also includes me, and as a photographer I find it hard not to find parallels between my chosen creative medium and these others. The tension in books and movies, whether dramatic, comedic, or some combination of both, originates from the interaction of characters with each other and/or their surroundings, and the change that interaction spawns over time. Which of course got me thinking about whether it’s possible to create tension in a still photograph, and if so, how?
Relationships
Though we might not be conscious of it, the best photographic images do indeed convey a form of tension. It’s human nature to seek relationships, not just in our lives, but in our art as well. Every relationship has inherent tension, an invisible connecting thread that pulls tighter as the relationship strengthens.
Lacking the passing of time and the change it brings, still-photographers must create tension by setting up relationships between disparate elements in our frame. We signal these relationships, thereby dialing up the tension, through careful positioning of compositional elements (Google “rule of thirds” and “golden ratio”).
The most obvious relationships available to landscape photographers is the juxtaposing independent physical elements in the scene. For example, pairing a foreground tree or flower with a distant peak permanently creates a relationship between two formerly unrelated subjects. Reflections are an easy way to connect a nearby water feature to a distant subject. And then there are the dynamic celestial elements like the moon and stars, and ephemeral weather phenomena such as lightning and rainbows, that make powerful connections with terrestrial subjects.
But wait, there’s more…
Even though no time passes in a still frame, landscape photographers can and do signal time’s advance. Whether conscious of it or not, when we photograph the color and light of the natural boundaries separating day and night, the broken clouds and rainbows of a clearing a storm, or the juxtaposition of elements distinctive to two seasons, we signal the passage of time and the tension inherent in its inexorable march.
Lacking other features to set them apart, the cliched nature of sunrises and sunset images diminishes their power to generate tension—in other words, sunrises and sunsets are a dime a dozen, so if you’re going to photograph one, you’d better make an effort to put it with a strong scene. On the other hand, though it’s always important to seek a strong composition regardless of the conditions, the more rare the change, the better it can overcome an otherwise ordinary scene.
A clearing storm can feel like catching lightning in a bottle (a nice rainbow can elevate nearly any scene), but an even rarer opportunity to capture change is a scene with clear signs of two seasons. That’s especially true in my home state of California, where seasons tend to be more of an afterthought. But that doesn’t mean opportunities to photograph seasonal change here are nonexistent. California does get spectacular spring wildflower blooms, and our autumn color display (though maybe not as spectacular as some other places), can be very nice.
Bracketing spring and autumn on one side is summer, hands-down California’s least photographically compelling season. But on the other side of spring and autumn is winter. While most of the state doesn’t get snow, our mountains do (and lots of it)—capturing late snow on wildflowers and dogwood (an extremely rare event), and early snow on fall color, are real treats.
So maybe I should have warned you that there’d be math…
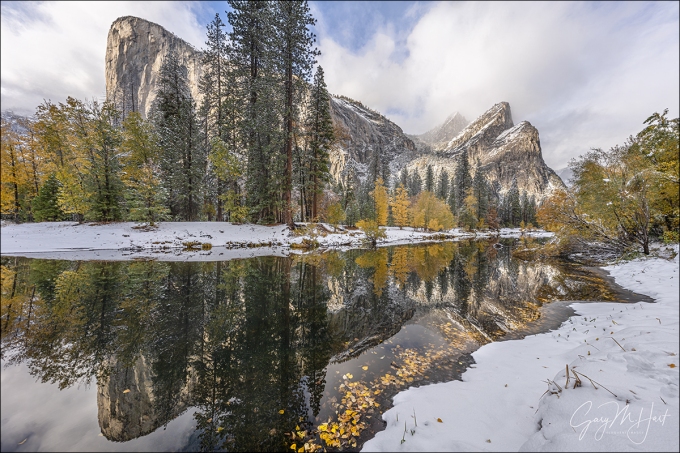
Which brings me to this image from my visit to Yosemite during an early November snowstorm. I really don’t need to go on any more about this day—if you’ve been reading my blog for the last couple of months, you’re probably well beyond sick of hearing about it. But it does illustrate the synergy of combining two seasons in one image. No one can deny that fall color is beautiful, and fresh snow is beautiful too (which of these is more beautiful is in the eye of the beholder, and a debate for another day). But if we were somehow able to quantify beauty, I suspect that we’d find the total amount of beauty (“beauty-units,” “beauty-bucks”?) in a fresh snow on fall color image would exceed the sum of the beauty derived from an image with fall color plus the beauty of an image with fresh snow.
You could attribute this synergy to the relative rarity of snow on fall color, but I think the power goes deeper than that. There’s just something about change the ups the stakes, so even though this is nothing more than a (totally unprovable) mental exercise (maybe I’ve been locked up too long), I’m sticking with the theory that the synergistic power of an image that combines the distinctive best of two seasons is the tension of change it conveys.
The Tension of Change


2020 Highlights: Quality Over Quantity
Posted on December 27, 2020


Being a photographer is more than just capturing images, it’s also very much the experiences that go with their capture. So looking back on a year most notable for its lowlights, and browsing a portfolio that’s by far the smallest of any year since I’ve called myself a photographer, I’m surprised by the number of 2020 experiences that give me shear joy to relive.
So far so good
January 2020 kicked off what appeared to be shaping up to be a banner year, with wonderful conditions in Death Valley and the Alabama Hills: reflections at Badwater, a Zabriskie Point moonset, and a series of beautiful sunrises and sunsets. The year’s first month wrapped up in Iceland with too many highlights to mention, but none more memorable than back-to-back northern lights shoots on the workshop’s final two nights. February followed with some fantastic moonrises in Yosemite—so far so good.
Hit the brakes
Then came March, and the world shut down. Since the end of February, I’ve had to cancel 11 workshops. Lost to COVID and (in one case) wildfires were the Oregon and New Zealand workshops I share with Don Smith, two Yosemite spring workshops, my Grand Canyon raft trip, two Grand Canyon monsoon workshops, and the Eastern Sierra workshop. I was finally able to squeeze in the Yosemite fall color workshop in October, but have since had to cancel the upcoming Iceland workshop (also a collaboration with Don Smith) in January 2021.
But wait…
After wallowing in the isolation of a severely socially distanced spring, early summer arrived and out of nowhere came Comet NEOWISE. I’ve been comet-obsessed since I was 10 years old, so the opportunity to photograph what is arguably the most breathtaking phenomenon to grace the heavens (rivaled only by the northern/southern lights and a total solar eclipse) above Yosemite and the Grand Canyon, was just the elixir I needed. While my two Yosemite trips were comet-specific (8 hours of driving for about an hour of photography each time), my Grand Canyon trip was a (socially distanced) multi-day affair that also featured lightning and beautiful monsoon skies.
After the Grand Canyon in late July, I didn’t really get to do much photography until my Yosemite fall color workshop in late October—a real treat that enabled me to share with a group Yosemite at its autumn, reflective best. Not only was the photography nice, it was a joy to be back with a group of enthusiastic, fun photographers.
Then, just a week later, I hit the jackpot, spending a day in Yosemite photographing snow falling on peak fall color—not just a highlight of my year, but a highlight of my photography life. And finally, in early December I arranged a last-minute gathering with a few of my favorite photography friends to photograph a Yosemite Half Dome moonrise.
Quality (of experience) over quantity (of images)
Compiling the 2020 Highlights gallery at the bottom of this post, I’ve chosen not to focus on the opportunities lost in 2020, but instead to count the blessings I was granted. From sharing the northern lights with an ecstatic group of photographers/friends, to watching the miracle of Comet NEOWISE suspended above two of the most beautiful locations on Earth, to a magical day photographing Yosemite Valley with fresh snow on fall color, 2020 brought me memories that will stand as some of the most outstanding of my life. I can’t say that I’m not looking forward to 2021 more than I look forward to most new years, but I’m going to let 2020’s losses fade in favor of its indelible highlights.
For example
Click the image for the rest of the story (and check out the entire gallery at the bottom)

Sunset Reflection, Badwater, Death Valley (January)

Heaven Sent, Aurora Above Glacier Lagoon, Iceland (January)

Magenta Moonrise, Half Dome and the Merced River, Yosemite (February)

Moon’s Rest, Cloud’s Rest, Yosemite (February)

Comet Neowise and Venus, Half Dome from Glacier Point, Yosemite (July)

Comet NEOWISE and the Big Dipper, Grandview Point, Grand Canyon (July)

Fall Into Winter, Bridalveil Fall Reflection, Yosemite (November)
A Gallery of My 2020 Highlights
Click an image for a closer look, and to view a slide show.


To the Pain
Posted on December 20, 2020

White Gold, Half Dome Reflection, Yosemite
Sony a7RIV
Sony 24-105 G
Breakthrough 6-stop dark polarizer
4 seconds
F/16
ISO 50
When you stop to consider all the components that have to fit into place to make a successful landscape image, it’s a wonder we don’t all just stay inside and watch TV. First there’s mastery of photography’s creative side, which requires the ability to distill our dynamic, multi-sensory, three-dimensional world into a coherent two-dimensional image. Then there’s the technical side, where we juggle our camera’s aperture, shutter speed, and ISO settings to control the scene’s depth, light, and motion. And as if meshing all these moving parts into something visually appealing weren’t daunting enough, don’t forget to factor in photography’s mental component: knowing where to be and when to be there; the foresight to recognize what might happen next and the patience to wait for for it; and finally, the fortitude to endure hunger, sleep depravation, and whatever elements Mother Nature throws our way.
Yet somehow photography happens. And like most things in life, I’ve always thought photography’s greatest joy comes from doing the hard work and overcoming difficulty. Sometimes spectacular just falls in our lap, but most of my favorite images simply those images I feel like I earned.
Nature photography’s 3 P’s
To remind myself (and others) of the photography’s mental side, many years ago I identified what I call, “The 3 P’s of nature photography.” These sacrifices, large and small, a nature photographer must make to consistently create successful images.
- Preparation is your foundation, the research that gets you in the right place at the right time, plus the vision and mastery of your camera that allows you to wring the most from the moment. It’s controlling exposure and focus, knowing your equipment, and understanding the subject. Preparation is also just having the right equipment for the moment, from the lenses in your bad to weather-appropriate clothing.
- Persistence is patience with a dash of stubbornness. It’s what keeps you going back when the first, second, or hundredth attempt has been thwarted by unexpected light, weather, or a host of other frustrations, and keeps you out there long after any sane person would have given up. And just as important, persistence is a willingness to wait as long as necessary for the moment to be right, and not just settling for “good enough.”
- Pain is suffering for your craft. I’m not suggesting that you risk your life for the sake of a coveted capture, but you do need to be able to ignore the tug of a warm fire, full stomach, sound sleep, and dry clothes, because the unfortunate truth is that the best photographs almost always seem to happen when most of the world would rather be inside.
An assignment
The truth is, you almost certainly already do it. Pick some of your favorite captures, pop them onto the screen, and try to put yourself back at that time and place. Ask yourself which of the 3 P’s you employed, and be generous with yourself and not too quick to write an image off to blind luck.
Practicing what I preach, here’s my stab at the assignment for this image:
- Preparation: Some would argue that I was lucky to be in Yosemite last month just as several inches of snow fell on peak fall color. And while my good fortune that day isn’t lost on me, the fact that I was there was no accident. I monitored the weather forecast for snow in Yosemite Valley, adjusted my schedule, and packed the right clothes for the conditions. Of course I also had an intimate familiarity of my subject, from the locations themselves to the best time to be there for the current conditions.
- Persistence: I can’t tell you the number trips I’ve taken to Yosemite and elsewhere that didn’t amount to anything. In 2013 I scheduled an entire workshop around the arrival of Comet ISON, only to have the comet disintegrate just a couple of days before the workshop. Many times I’ve made the long drive to Yosemite to photograph snow that turned out to be rain. But no matter how many times Mother Nature throws me a curve, I keep coming back and sometimes it pays off. Like this time.
- Pain: It’s not like I trekked solo across the arctic, or summited Everest without oxygen, for this image. Though this day was cold and wet, and getting to Yosemite required an 8-hour roundtrip drive in less than ideal conditions, I didn’t do anything most other people couldn’t do—I just pried myself from the recliner and hit the road. The drive was sometimes boring (I’ve done it hundreds of times), sometimes stressful (turns out my Outback needed new tires—uhhh, reference Preparation section above), and standing in the snowy cold was less comfortable than lounging inside by a fire. It’s insidious the way these small inconveniences and discomforts try to lure us into staying home, but the payoff happens enough to justify the sacrifice.
A few words about this image

Autumn Snowfall, Half Dome Reflection, Yosemite
Sentinel Bridge is such an iconic view of Half Dome that it would be photographic malpractice not to share it with a workshop group, but when I’m in Yosemite by myself I rarely stop here because it lacks compositional variety (it’s hard to find something I don’t already have). But because the conditions on this day were spectacularly unique, I actually stopped here twice. This image was from my first stop, when a light snow still fell and storm clouds ruled the scene.
Half Dome had been swallowed by clouds for a while, but crossing the bridge I saw that it had just emerged so I whipped into the adjacent parking lot. Rather than mess with my entire kit, I just grabbed my tripod, Sony a7RIV, and Sony 24-105 f/4 G lens and jogged up to the rail (maybe 100 feet from the car).
I always do my best to position myself so the trees frame Half Dome without obscuring any of its face, not always easy at this extremely popular spot. I was lucky this time that there were only a couple of other photographers set up so I didn’t have any trouble finding a spot that worked. With the scene so perfect, I didn’t want to get too fancy and risk losing Half Dome to the clouds. I quickly identified the elements I wanted to feature—Half Dome, the upstream trees, and of course the gorgeous reflection—and went to work.
I often start with a vertical composition on Sentinel Bridge, but surveying the scene, when my eyes were drawn to the serpentine ribbon of autumn leaves clinging to the south riverbank I opted to start with a horizontal frame. That left me with a decision about what to about the trees on both sides of the river—how many to include, and whether to cut them off at the top. I finally decided that not cutting them off would give me more sky than I wanted.
With the frame’s top/bottom established, I panned left and right until I was satisfied: enough of the floating leaves—check; Half Dome properly centered (Half Dome has so much visual weight, putting it too far left or right can throw off the balance)—check; the diagonal trunk and snow-capped rock far enough from the left edge that they create compositional balancing elements for that side of the frame—check.
With a few gentle ripples ruffling the reflection, I added my Breakthrough 6-stop dark polarizer, stopped down to f/16, and dialed my ISO to 50. This gave me a 4-second exposure that smoothed the water just enough to allow the reflection to stand out nicely. Once I was satisfied that this composition was a success, I went on to shoot the scene in a variety of other ways as well: wider, tighter, and vertical. (You can see the vertical version in the gallery below.)
Returning to Sentinel Bridge a few hours later, the sun had broken through to light up Half Dome and the tops of the trees, creating a completely different, but no less beautiful, scene (that I haven’t had a chance to process yet).
Many of you no doubt recognize the reference in this post’s title; for those who don’t (inconceivable!), treat yourself to this scene from the best movie ever.
Preparation, Persistence, and Pain
Click an image for a closer look, and to view a slide show.


")


You Can’t Have It Both Ways
Posted on December 13, 2020
Falling Snow, Cathedral Rocks, Yosemite
Sony a7RIV
Sony 12-24 f/2.8 GM
1/200 second
F/8
ISO 1600
Years of leading photo workshops and reviewing the work of others has convinced me that to capture great images and maintain domestic bliss, you need to decide before a trip whether you’ll be a photographer or tourist—it’s pretty hard to have it both ways. (I say this completely without judgement—there are times when I opt for tourist mode myself, packing only the camera in my iPhone.) I see many well-executed images taken at the wrong times—harsh shadows, blue sky, and poorly located light are all signs that the photographer was sightseeing with his or her camera. Not that there’s anything wrong with that—if your priority was simply to record the scene and you’re happy with the result, the image was a success.
But getting the pictures coveted by serious photographers usually requires being outside at the most inconvenient times. That’s sacrifice a serious photographer will make without hesitation, but the rest of the family? Not so much. Countless intimate getaways and family vacations have been ruined by the photographer who thinks it’ll be no problem tiptoeing out for sunrise (“I’ll be so quiet, you won’t even know I left”), or waiting “just a few minutes longer” after sunset for the Milky Way (“The drive-thru will still be open when we get back”).
When I’m wearing my photographer hat, my decisions put me outside when the conditions are most conducive to finding the images I want, without considering comfort or convenience. Sunrise, sunset, overcast skies, wild weather, darkness are all great for photography, but face it—few people without a camera are thrilled to be outdoors when they’re sleepy, hungry, cold, wet, or ignored.
Many of us, myself included, are blessed with wives/husbands/partners who say quite genuinely, “No problem, take as long as you want—I’ll just read (or wait in the room, or go shopping, or whatever).” And though we know they mean it, based on my own experience and reports from others, even blessed by a sincere sanction from our significant other, we’re still distracted by the knowledge that he or she is waiting, biding time, (and possibly suffering) while we pursue our solitary passion. When someone is waiting for me, I just can’t help rushing my compositions, making decisions designed to get me back fast instead of satisfied, and just generally shortcutting everything I do. Invariably, disappointment ensues.
And when the goal is a pleasant trip with family, if I try to squeeze in photography, I can’t relax and my photography suffers. That’s why, when I’m a tourist, my goal is to simply chill and and enjoy the sights with the people I love. When I leave my camera home, my lights-out and rise times are based on everyone’s comfort and enjoyment, the pace is never rushed, and my forays into nature are timed for convenience and the most pleasant weather for being outside. And guess what: I return with my body and mind fresh and my loved ones happy.
Of course doing nature photography for a living makes it easier for me separate photography and family trips. I get lots of me-time to dedicate to photography, but some people are so busy that their only opportunity to take pictures is when they’re on vacation. In this case, perhaps a compromise can be negotiated. After researching your route and destinations, pick a (reasonable) handful of must-photograph spots. Then, before the trip, get buy-ins on your photography objectives from all concerned, and be as specific as possible: “I’d like to shoot sunrise on our second morning at the Grand Canyon,” “I’d really like to do a moonrise shoot in Yosemite on Wednesday evening,” and so on. The rest of the trip? Bring no more than a point-and-shoot or your cell phone, stash your serious camera gear out of sight, and don’t let anyone catch so much as a longing glimpse in its direction for the rest of the trip. Then relax and enjoy.
About this image
On this November morning, I didn’t have to drive too far into Yosemite Valley to know that the snow falling on fall color was the stuff of my photographic dreams. My first stop was El Capitan Bridge, a don’t-miss spot for El Capitan reflections in the Merced River. As the closest easily accessible top-to-bottom view of the massive granite monolith, El Capitan Bridge was made to order for my new Sony 12-24 f/2.8 GM lens, and I couldn’t wait to try it out. But the storm that had already dropped a couple of inches of snow was still active, wrapping El Capitan in clouds.
After little success photographing El Capitan’s barely discernable outline from the upstream side of the bridge, I crossed the road and set up on the bridge facing downstream. The tops of Cathedral Rocks were smothered by clouds, but the granite base was clearly visible above the river, framed by golden oaks. In the foreground, rafts of pine needles and autumn leaves floated by so slowly that their motion was barely perceptible.
I composed the scene the scene in the viewfinder of my Sony a7RIV, starting at 12mm and slowly tightening the composition to 16mm. As I worked the scene, the snowfall intensified and I methodically increased my ISO, from 100 to 1600, in one-stop increments, with a corresponding shutter speed increase to capture a range of motion-blur in the falling flakes, from long streaks to short dashes.
This is a perfect example weather only a photographer would be crazy enough to be outside in. Not only was it cold and wet, you couldn’t even see the tops most of Yosemite’s most photographed icons. But I’ve learned that there’s no better time to photograph in Yosemite than during and just after a snowfall, a truth I verified many times this day.
Yosemite Weather
Click an image for a closer look, and to view a slide show.


Image Building
Posted on November 29, 2020
Autumn Snow, El Capitan and Three Brothers Reflection, Yosemite
Sony a7RIV
Sony 12-24 f/2.8 GM
1/100 second
F/10
ISO 100
I warned you that you’ll be seeing images from this month’s Yosemite snow day a while. …
As I may have mentioned, the conditions this day were so off-the-charts-spectacular that I probably could have closed my eyes and still had a good chance for a useable image with any click. But I knew I had an opportunity capture something truly special, so I forced myself to slow down and work with purpose at every stop.
Lots of variables go into creating a successful landscape image. Many people struggle with the scene variables—light, depth, and motion—that are managed by their camera’s exposure settings: shutter speed, f-stop, ISO. Others struggle more with the composition variables: recognizing, isolating, and framing a subject. And then there’s the overlap between these two sides of image creation that requires simultaneous, synergistic mastery. So I thought I’d use this image to demonstrate my image creation process.
What was I thinking?
Glassy reflections and the ability to include the Three Brothers makes this location beside the Merced River one of my favorite El Capitan views. But, as much as I love this spot, for years it also frustrated me because my widest lens was only 16mm, forcing me to choose between El Capitan and Three Brothers, or their reflection, but never both. My frustration vanished a few years ago when I added the Sony 12-24 f/4 G lens to my arsenal.
But now I was armed with the brand new Sony 12-24 f/2.8 GM lens. Though I’d used it some in my Yosemite Fall Color photo workshop a week earlier, my own photography isn’t a priority during a workshop, so this would be my first chance to give my new lens the undivided attention it deserved. And what better spot to do that?
Exposure
I approach every scene starting with my camera at its best ISO (100) and the lens’s “ideal” f-stop (generally f/8 – f/11, where lenses tend to be sharpest, the depth of field is good, with minimal diffraction). Given that motion wasn’t a factor in this scene (I was on a tripod, the wind was calm, and the river’s slow motion didn’t concern me), I stuck with ISO 100. And while the snow and floating leaves were an essential part of my immediate foreground, the 12mm focal length this scene required provided more than enough depth of field at f/10, no matter where in my frame I focused. (At 12mm and f/10, the hyperfocal distance is less than two feet.) In this case I just focused on the leaves and didn’t think about DOF again.
With my ISO and f/stop established, I simply put my eye to the viewfinder of my Sony a7RIV and dialed my shutter speed until the histogram looked right. Since this was a fairly high dynamic range scene (big difference between the darkest shadows and brightest highlights), I knew the exposure wouldn’t look great on my LCD image preview—my highlights would be a little too bright, my shadows a little too dark, but since the histogram looked good, I knew I’d be able to fix the highlights and shadows with a couple of easy Lightroom adjustments.
Composition
Some scenes you can walk up to and plant your tripod pretty much anywhere without much thought. But the variety of foreground and middle-ground elements here made the simple decision of where to set up my tripod very important. Normally I use the tall trees cut off near the center of this image as framing elements, and to block empty sky just left of El Capitan. But with clouds in what is all too often blank blue sky, and unable to find a foreground that worked from that position, I moved downstream and found a ribbon of autumn leaves hugging the riverbank that would make a great foreground.
I was pretty pleased so far, but I still had be careful to position myself so the floating leaves framed the reflection rather than blocked it. Try as I might, I wasn’t able to avoid blocking some of the Three Brothers reflection, but overall I was satisfied to include the leaves and all of the El Capitan reflection without blocking the nose of El Capitan.
Next I started working on the left/right aspect of the scene. The things that get left out of an image can be as important as what’s included. This is especially true on an image’s perimeter frequently, where distractions are easy overlooked by photographers too focused on their primary subject. This framing can managed by some combination of position, focal length, and aim (where my camera is pointed). In this scene I’d already worked out my position, focal length was non-negotiable because I had to be at 12mm (my lens couldn’t go any wider than 12mm, and composing longer than 12mm would have cut off the top and/or bottom of El Capitan). That left only framing option the direction my camera is aimed. Not wanting to cut of any of the riverbank, I shifted my view right until the bank formed a continuous line from the bottom of my frame until it disappeared into the mass of autumn tinted shrubbery on the middle-right.
When I thought I had things just right, I clicked a frame, stood back, and reviewed my composition on my LCD, made a small tweak to add a little more on the right and subtract a little from the left, then waited with my eyes on the rapidly shifting clouds and light. Each time I liked what I saw, I’d click another frame until I was satisfied I had something worth keeping.
The Many Faces of El Capitan
Click an image for a closer look, and to view a slide show.


