Eloquent Images by Gary Hart
Insight, information, and inspiration for the inquisitive nature photographer
Photograph the Eastern Sierra
Posted on October 10, 2017
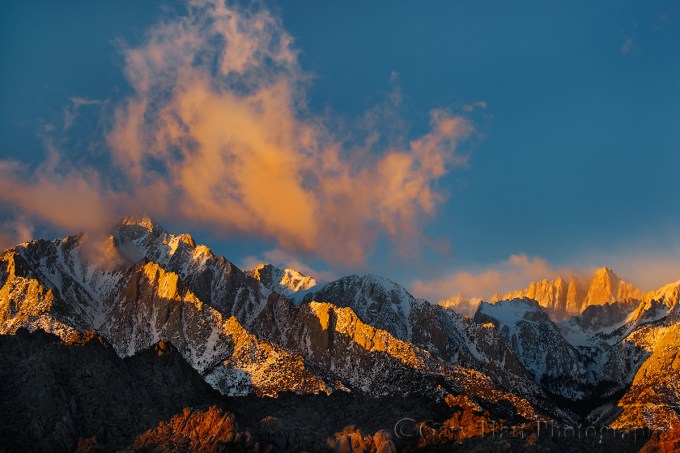
First Light, Lone Pine Peak and Mt. Whitney, Alabama Hills, Eastern Sierra (2006)
Canon EOS-1Ds Mark II
Canon 70-200 f/4L
1/20 second
F/8
ISO 200
This is an edited and updated version of my Eastern Sierra article that appeared in the September 2016 edition of “Outdoor Photographer” magazine
Eastern Sierra
Skirting the east side of the Sierra Nevada, US 395 enchants travelers with ever-changing views of California’s granite backbone. Unlike anything on the Sierra’s gently sloped west side, Highway 395 parallels the range’s precipitous east flank in the shadow of jagged peaks that soar up to 2 miles above the blacktop. More than just beautiful, these massive mountains form a natural barrier against incursion from the Golden State’s major metropolitan areas, keeping the Eastern Sierra region cleaner and quieter than its scenery might lead you to expect.
It would be difficult to find any place in the world with a more diverse selection of natural beauty than the 120-mile stretch of 395 between Lone Pine and Lee Vining: Mt. Whitney and the Alabama Hills, the ancient bristlecones of the White Mountains (across the Owens Valley, east of the Sierra), the granite columns of Devil’s Postpile, Mono Lake and its tufa towers, and too many lake-dotted, aspen-lined canyons to count. Long a favored escape for hikers, hunters, and fishermen, in recent years photographers have come to appreciate the rugged, solitary beauty possible only on the Sierra’s sunrise side.
I prefer photographing most Eastern Sierra locations at sunrise, when the day’s first rays paint the mountains with warm light, and the highest peaks are colored rose by alpenglow. (Without clouds, Eastern Sierra sunset light can be tricky, as you’ll be photographing the shady side of the mountains against the brightest part of the sky.) Devoid of large metropolitan areas, low light pollution also makes the Eastern Sierra one California’s finest night photography destinations. But regardless of the time of day, the key to photographing the Eastern Sierra is flexibility—if you don’t like the light in one direction, you usually don’t need to travel far to find something nice in another direction.
Lone Pine area
The southern stretch US 395 bisects the Owens Valley, a flat, arid plane separating the Sierra Nevada to the west from the Inyo ranges to the east. Just west of Lone Pine lies the Alabama Hills. Named for a Confederate Civil War warship, the Alabama Hills’ jumble of weathered granite boulders and proliferation of natural arches would be photogenic in any setting. Putting Mt. Whitney (the highest point in the 48 contiguous states), Lone Pine Peak (the subject of Mac OS X Sierra’s desktop image), and the rest of the serrated southern Sierra crest seems almost unfair.
The Alabama Hills are traversed by a network of unpaved but generally quite navigable roads. To get there, drive west on Whitney Portal Road (the only traffic signal in Lone Pine). After 3 miles, turn right onto Movie Road and start exploring. If you’re struck by a vague sense of familiarity here, it’s probably because for nearly a century the Alabama Hills has attracted thousands of movie, TV show, and commercial film crews.
Mobius Arch (also called Whitney Arch and Alabama Hills Arch) is the most popular photo spot in the Alabama Hills. It’s a good place to start, but settling for this frequently photographed subject risks missing numerous opportunities for truly unique images here. To get to Mobius Arch, drive about a mile-and-half on Movie Road to the dirt parking area at the trailhead. Following the marked trail down and back up the nearby ravine, the arch is an easy ¼ mile walk. There’s not a lot of room here, but if the photographers work together it’s possible to arrange four or five photographers on tripods with Mt. Whitney framed by the arch. And don’t make the mistake many make: the prominent peak on the left is Lone Pine Peak; Mt. Whitney is serrated peak at the back of the canyon.
Sunrise is primetime for Alabama Hills photography, but good stuff can be found here long before the sun arrives. I try to be set up 45 minutes before the sun (earlier if I want to ensure the best position for Whitney Arch) to avoid missing a second of the Sierra’s striking transition from night to day.
The grand finale from anywhere in the Alabama Hills is the rose alpenglow that colors the Sierra crest just before sunrise. Soon after the alpenglow appears, the light will turn amber and slowly slide down the peaks until it reaches your location, warming the nearby boulders and casting dramatic, long shadows. But unless there are clouds to soften the light, you’ll find that the harsh morning light will end your shoot pretty quickly once the sunlight arrives on the Alabama Hills.
Whitney Portal Road (closed in winter) ends about 11 miles beyond Movie Road, at Whitney Portal, the trailhead for the hike to Mt. Whitney and the John Muir Trail. On this paved but steep road, anyone not afraid of heights will enjoy great views looking east over the Alabama Hills and Owens Valley far below, and up-close views of Mt. Whitney looming in the west. At the back of the Whitney Portal parking lot is a nice waterfall that tumbles several hundred feet in multiple steps.
The Alabama Hills are one of my favorite moonlight locations. Because the full moon rises in the east right around sunset, on full moon nights the Alabama Hills and Sierra crest are bathed in moonlight as soon as darkness falls. Lit by the moon, the hills’ rounded boulders mingle with long, eerie shadows, and the snow-capped Sierra granite radiates as if lit from within.
If you find yourself with extra time, drive about 30 miles east of Lone Pine on Highway 136 until you ascend to a plain dotted with photogenic Joshua trees—after you’ve finished photographing the Joshua trees, turn around and retrace the drive back to Lone Pine on 136 to enjoy spectacular panoramic views of the Sierra crest. And just north of Lone Pine on 395 is Manzanar National Historic site, a restored WWII Japanese relocation camp. Camera or not, this historic location is definitely worth taking an hour or two to explore.
Bristlecone pine forest
Continuing north from Lone Pine on 395, on your left the Sierra stretch north as far as the eye can see, while the Inyo mountains on the right transition seamlessly to the White Mountains. Though geologically different from the Sierra, the White Mountains’ proximity and Sierra views make it an essential part of the Eastern Sierra experience.
Clinging to rocky slopes in the thin air above 10,000 feet, the bristlecone pines of the White Mountains are among the oldest living things on earth—many show no signs of giving up after 4,000 years; at least one bristlecone is estimated to be 5,000 years old.
Abused by centuries of frigid temperatures, relentless wind, oxygen deprivation, and persistent drought, the bristlecones display every year of their age. Their stunted, twisted, gnarled, polished wood makes the bristlecones suited for intimate macros and mid-range portraits, or as a striking foreground for a distant panorama.
The two primary destinations in the bristlecone pine forest are the Schulman and Patriarch Groves. Get to the bristlecone pine forest by driving east from Big Pine on Highway 168 and climbing about 13 car-sickness inducing miles. Turn left on White Mountain Road and continue climbing another 10 twisting miles to reach the Schulman Grove. Despite the incline and curves, the road is paved all the way to this point. Stop at the Sierra panorama after about 8 miles for a spectacular view that also makes a great excuse to pause and collect yourself.
Stop at the small visitor center in the Schulman Grove to pay the modest use fee, then choose between the 1-mile Discovery loop trail, and the 4 1/2 mile Methuselah loop trail. Both trails are in good shape, but the extreme up and down in very thin air will test your fitness. Most of the trees on the Methuselah Trail get more morning light, while the majority of the Discovery Trail trees get their light in the afternoon.
If you’re unsure of your fitness, or have limited time, the Discovery Trail is definitely the choice for you. Because the photogenic trees start with the very first steps, on this trail you can turn around at any point without feeling cheated of opportunities to photograph nice bristlecones. And along the way you’ll appreciate the handful of benches for enjoying the view and catching your breath. Hikers who can make it to the top of the switchbacks are rewarded great views of the snow-capped Sierra across the Owens Valley.
The Discovery Trail climbs for a couple hundred more yards beyond the switchbacks, but just as you’re beginning to wonder whether all the effort is worth it, the trail levels, turns, and drops. Soon you’ll round a 90-degree bend and be rewarded for your hard work with two of the most spectacular bristlecones in the entire forest. Spend as much time here as you have, because the rest of the loop back to the parking lot has nothing to compete with these two trees.
The pavement ends at the Schulman Grove, but the unpaved 12-mile drive to the Patriarch Grove is navigable by all vehicles in dry conditions. Home to the Patriarch Tree, the world’s largest bristlecone pine, the Patriarch Grove is more primitive and much less visited than the Schulman Grove. Unlike the Schulman Grove, where I rarely stray far from the trail, I often find the most photogenic bristlecones here by venturing cross-country, over several small ridges east of the Patriarch Tree. Even without a trail, the sparse vegetation and hilly terrain provides enough vantage points that make getting lost difficult.
Clean air, few clouds, and very little light pollution make the bristlecone groves a premier night photography location. On moonless summer and early autumn nights, the bright center of the Milky Way is clearly visible from the slopes of the bristlecone forest. For the best Milky Way images, look for trees that can be photographed against the southern sky. And no matter how warm it is on 395 below, pack a jacket.
The bristlecone forest closes in winter.
Bishop area
An hour north of Lone Pine on 395 is Bishop. Its central location, combined with ample lodging, restaurant, and shopping options make Bishop an excellent hub for an Eastern Sierra trip—if you want to anchor in one spot and venture out to the other Eastern Sierra locations, Bishop is probably your best bet.
West of Bishop are many small but scenic lakes nestled in steep, creek-carved canyons that are lined with aspen (and some cottonwood) that turn brilliant yellow each fall. Many of these canyons can be accessed on paved roads, others via unpaved roads of varying navigability, and a few solely by foot.
Of these canyons, Bishop Creek Canyon is the best combination of accessible and scenic. To get there, drive west on Highway 168 (Line Street in Bishop). After about 15 miles you can decide whether to turn left on the road to South Lake, or continue straight to reach North Lake and Lake Sabrina (pronounced with a long “i”).
One of the area’s most popular sunrise spots, North Lake is a 1-mile signed detour on a narrow, steep, unpaved road—easily navigated in good conditions by all vehicles, but the un-railed, near vertical drop is not for the faint of heart. A mile or so beyond the turn to North Lake the road ends at Lake Sabrina, a fairly large reservoir in the shadow of rugged peaks and surrounded by beautiful aspen (but its bathtub ring when less than full is not for me).
South Lake is another aspen-lined reservoir that shrinks in late summer and autumn. Highlights on South Lake Road are a manmade but photogenic waterfall leaping from the mountainside, clearly visible on the left as you ascend, and Weir Lake, just before South Lake.
Both Bishop Canyon roads are worth exploring, especially in autumn, when the fall color can be spectacular. Each features scenic tarns and dense aspen stands accented by views of nearby Sierra peaks. Rather than beeline to a fall color spot, in autumn I drive the Sabrina and South Lake roads and pick the best color.
Highway 395 north of Bishop features a few of my favorite fall color destinations, including Rock Creek Canyon and McGee Creek. About a half hour north of Bishop, detour west off the highway to postcard-perfect Convict Lake. And just beyond the road to Convict Lake is the upscale resort town of Mammoth Lakes, just a few miles west of 395. The drive on 203 through Mammoth Lakes takes you past the Mammoth Mountain Ski slopes to Minaret Vista. This panoramic view of the sawtooth Minaret Range, Mt. Ritter, and Mt. Banner captures the essence of high Sierra beauty. From here, follow the road down the other side to see the basalt columns of Devil’s Postpile, and to take the short hike to Rainbow Fall.
Lee Vining area
Leaving Bishop, Highway 395 climbs steeply, crests near Crowley Lake, skirts the communities of Mammoth Lakes and June Lake, finally dropping down into the Mono Basin and Lee Vining. Though this is an easy, one-hour drive, you’ll feel like you’ve landed on a different planet. In October, detour onto the June Lake Loop, another popular fall color drive.
By far the most popular Mono Lake location is South Tufa, a garden of limestone tufa towers that line the shore and rise from the lake. Tufa are calcium carbonate protrusions formed by submerged springs and revealed when the lake drops. In addition to the striking tufa towers, South Tufa is on a point that protrudes into the lake, allowing photographers to compose with both tufa and lake in the frame while facing west, north, or east.
To visit South Tufa, turn east on Highway 120 about 5 miles south of Lee Vining. Follow this road for another 5 miles and turn left at the sign for South Tufa. Drive about a mile on an unpaved, dusty but easily navigated road to the large dirt parking lot. From here it’s an easy ¼ mile walk to the lake, but wear your mud shoes if you want to get close to the water. And don’t climb on the tufa.
While South Tufa can be really nice at sunset, mirror reflections on the frequently calm lake surface, and warm light skimming over the low eastern horizon, make this one of California’s premier sunrise locations. To get the most out of a sunrise shoot here, it’s a good idea to photograph South Tufa at sunset to familiarize yourself with the many possibilities here (and who knows, maybe you’ll get lucky and catch one of the Eastern Sierra’s spectacular sunsets).
In the morning, arrive at the lake at least 45 minutes before sunrise to ensure a good spot at this popular location—you can start shooting as soon as you arriving, using long exposures to brighten the scene and smooth the water. I usually start with scenes to the east, capturing tufa silhouettes against indigo sky and water. As the dawn brightens, keep your head on a swivel and be prepared to shift positions with the changing light.
As the sun approaches and the dynamic range increases in the east, I often turn to face west. Soon the highest Sierra peaks are colored with pink alpenglow, followed quickly by the day’s first direct sunlight. With the sun rising beneath the horizon behind me, its light slowly descends the Sierra peaks stretching before me. When the sunlight finally reaches lake level, for a few minutes the tufa towers are awash with warm sidelight, creating wonderful opportunities facing north. As with the Alabama Hills, without clouds to soften the sunlight and make the sky more interesting, the sunrise show is terminated quickly by contrasty light.
Other options in and near Lee Vining are the excellent Mono Lake visitor center on the north side of town, the small but very informative Mono Committee headquarters in the middle of town, any meal at the Whoa Nellie Deli in the Mobil Station (trust me on this), and Bodie, an extremely photogenic ghost town maintained in a state of arrested decay, less than an hour’s drive north. And a sinuous 20-minute drive west, up 120 (closed in winter) lands you at Tioga Pass, Yosemite’s east entrance and the gateway to Tuolumne Meadows.
Fall color in the Eastern Sierra
Each fall the Eastern Sierra becomes a Mecca for photographers chasing the vivid gold coloring the area’s ubiquitous aspen groves. The show starts in late September at the highest elevations, and continues well into October in some of the lower elevations. Fall color timing and locations vary from year-to-year, but the general fall color rule to follow here is: If the trees are still green, just keep climbing.
The best way to photograph the Eastern Sierra’s fall color is to explore: Pick a road that heads west and start climbing until something stops you. To give you a head start, here are a few of my favorite spots, from south to north. (Rather than beeline to specific locations in these ever-changing canyons, I’ve found it’s best to drive slowly and stay alert for opportunities along the way.)
Bishop Creek Canyon: Nice any season it’s open, Bishop Creek Canyon (detailed earlier) comes alive with gold each autumn. Aspen surrounding the canyon’s many lakes make for spectacular reflections. Of these, North Lake is probably the most popular, but autumn mornings can be extremely crowded here. The color in Bishop Creek Canyon usually peaks in late September at the highest elevations (near North Lake, Lake Sabrina, and South Lake), but lasts until mid-October farther down the canyon.
Rock Creek Canyon: Near the crest of the climb out of Bishop on 395, turn left at the sign for Rock Creek Lake. Climb this road along Rock Creek all the way up to its terminus at Mosquito Flat trailhead. Over 10,000 feet, this is the highest paved road in the Sierra. As with Bishop Creek Canyon, the best photography in Rock Creek Canyon is usually found at random points along the road—drive slowly and keep your eyes peeled.
McGee Creek: When you see Crowley Lake on the right, look for the road to McGee Creek on the left. This 2-mile unpaved road is navigable by all vehicles, but take it slow. It ends at a paved parking lot that’s the launching point for a hike up McGee Creek, into the canyon, and the mountains beyond. Unlike most other Eastern Sierra canyons, the dominant tree here is cottonwood. While I’ve had good success photographing along the creek right beside the parking lot, you can find nice color as far up the canyon as your schedule (and fitness) permits.
Convict Lake: The road to Convict Lake is just south of Mammoth Lakes. It’s a 2-mile paved drive to a beautiful lake nestled at the base of towering mountains—definitely worth the short detour off of 395.
June Lake Loop: Between Mammoth Lakes and Lee Vining is a 15 mile loop that exits 395 near the small town of June Lake (look for a gas station on the left) and returns to 395 a few miles down. Along the route you’ll find several lakes, and a waterfall at the very back of the loop (visible from the road).
Lundy Canyon: About 5 miles north of Lee Vining, turn left onto the Lundy Canyon road to enjoy one of my favorite Eastern Sierra fall color spots. The lower half of this road, below Lundy Lake, is often a good place to find late season color, but my favorite photo spots aren’t until road turns bad, just beyond the lake.
Driving slowly and with great care, most vehicles can make the 2 unpaved miles along Mill Creek to the end of the road. In addition to beautiful creek scenes, you’ll find several small, reflective beaver ponds along the way. If you make it to the end of the road, park and follow the trail up the canyon, through an aspen grove, for about ¼ mile to reach a small, waterfall-fed lake. The overgrown lakeshore makes photography here difficult, but a short walk along the shoreline to the left, toward the lake outlet, will take you to a massive beaver dam. Roll up your pants and get your feet (and more) wet for the best views of the lake.
Dunderberg Peak and Virginia Lakes: Shortly after the turn to Lundy Canyon, 395 climbs steeply to Conway Summit, at 8143 feet, the highest point on the entire route. On the left, just past a spectacular view of the entire Mono basin (worth the stop), is the road to Virginia Lakes. Here you’ll find some of the area’s earliest aspen to turn. Just beyond the Virginia Lakes road are colorful views of Dunderberg Peak and its aspen-blanketed slopes.
There’s far too much to photograph in the Eastern Sierra to describe here. Join me in an Eastern Sierra photo workshop to explore all these locations, plus many more less known spots: Eastern Sierra Photo Workshops
Workshop Schedule || Purchase Prints
An Eastern Sierra Gallery


How a polarizer works
Posted on October 5, 2017

Autumn Reflection, North Lake, Eastern Sierra
Canon EOS-1Ds Mark III
Canon 17-40L
1/5 second
F/16
ISO 200
Some people couldn’t care less how a polarizer works—they’re satisfied knowing what a polarizer does, and how to make it happen. But if you’re like me, you also need to understand why things behave the way they do.
Put simply…
A polarizer cuts reflections. On the surface that not might seem so desirable for someone who likes photographing reflections as much as I do, but reflections are a much bigger part of our visual experience than most people realize. Virtually every object reflects at least a little, and many things reflect a lot more than we’re aware. Worse still, these reflections often hide the very surface features and color we most love to photograph.
When reflections hide an object’s underlying beauty, a polarizer can restore some of that beauty. I use a polarizer when I want to capture the submerged rocks or sand hidden by the reflection atop a river or lake, the rich color overwhelmed by glare reflecting from foliage, or the sky’s deep blue washed out by light scattered by atmospheric molecules.
Put a little less simply…
In reality, reflections are merely collateral damage to your polarizer. What a polarizer really does is eliminate light that’s already been polarized. To understand what’s really going on with a polarizer, read on….
Essential terminology
- Oscillation is motion relative to a fixed point. For example, when you snap a whip, the whip “oscillates” along its length. Without external interference (e.g., friction from the atmosphere or other objects), motion in one direction along the whip will have an identical motion in the opposite direction (e.g., up=down, left right, and so on), and that motion will move forward along the whip.
- A wave is oscillation along or through a medium (such as air, water, or space). The bulge that moves up and down (oscillates) along a cracked whip is a wave. For the liberal arts folks, (in this context) wave is a noun, oscillate is a verb. A wave is measured by its wavelength and frequency—the higher the frequency, the shorter the wavelength.
- Frequency is the number of times a wave peak passes a discrete point in a given unit of time (usually one second: “per second”).
- Wavelength is the distance from one wave peak to the next at any instant frozen in time.
- A transverse wave oscillates perpendicular (90°) to its direction of motion. To imagine the motion of a transverse wave, picture an ocean wave, which oscillates up and down as it advances through the water. Now think about a bottle floating in the open ocean—bobbing up and down with each wave, its up/down motion is perpendicular to the wave’s forward motion, but when that wave has passed, the bottle is in the same place it was before the wave arrived. (Waves don’t move bobbing bottles across the ocean, wind and currents do.)
- Visible light is electromagnetic radiation that reaches our eyes as a transverse wave somewhere in the wavelength range the human eye can register, about 380 to 740 nanometers (really small).
- Sunlight (or more accurately, solar energy) reaches earth as a transverse wave with a very broad and continuous spectrum of wavelengths that include, among others, the visible spectrum (lucky for photographers), infrared (lucky for everyone), and ultraviolet (lucky for sunscreen vendors). The oscillation of solar energy’s transverse wave is infinitely more complicated than an ocean wave because light oscillates in an infinite number of directions perpendicular to its direction of motion. Huh? Think about the blades of a propeller—each is perpendicular to the shaft upon which the propeller rotates, so in theory you can have an infinite number of propeller blades pointing in an infinite number of directions, each perpendicular to the shaft. So a light wave oscillates not just up/down, but also left/right, and every other (perpendicular) angle in between.
Polarization
While an unpolarized light wave oscillates on every plane perpendicular to the wave’s motion, polarized light only oscillates on one perpendicular plane (up/down or left/right or 45°/225° and so on).
Polarization can be induced many ways, but photographers are most interested in light that has already been polarized by reflection from a nonmetallic surface (such as water or foliage), or light that has been scattered by molecules in our atmosphere. Light scattered by a reflective surface is polarized parallel to the reflective surface; light scattered by molecules in the atmosphere is polarized perpendicular to the direction of the light.
Polarization can also be induced artificially with a polarizing filter (“polarizer”), a filter coated with a material whose molecular structure allows most light to pass, but blocks light waves oscillating in a specific direction. When unpolarized light (most of the light that illuminates our lives) passes through a polarizer, the light that enters the lens to which it’s attached has been stripped of the waves oscillating in a certain direction and we (through the viewfinder) see a uniform darkening of the entire scene (usually one to two stops).
But that uniform darkening is not usually what we use a polarizer for. (I say usually because sometimes we use a polarizer to reduce light and stretch the shutter speed in lieu of a neutral density filter.) Photographers are most interested in their polarizers’ ability to eliminate reflective glare and darken the sky, which occurs when their polarizer’s rotating glass element matches the oscillation direction of light that has already been polarized by reflection or scattering, cancelling that light. By watching the scene as we rotate the polarizing element on the filter, photographers know that we’ve achieved maximum polarization (reflection reduction) when we rotate the polarizer until maximum darkening is achieved—voila!
The exception that proves the rule
Most photographers know that a polarizer has its greatest effect on the sky when it’s at right angles (90°) to the sun, and least effective when pointed directly into or away from the sun (0º or 180°). We also know that a rainbow, which is always centered on the “anti-solar point” (a line drawn from the sun through the back of your head and out between your eyes points to the anti-solar point) exactly 180° from the sun, can be erased by a polarizer. But how can it be that a polarizer is most effective at 90° to the sun, and a rainbow is 180° from the sun? To test your understanding of polarization, try to reason out why a rainbow is eliminated by a polarizer.
Did you figure it out? I won’t keep you in suspense: light entering a raindrop is split into its component colors by refraction; that light is reflected off the back of the raindrop and back to your eyes (there’s a little more bouncing around going on inside the raindrop, but this is the end result). Because a rainbow is reflected light, it’s polarized, which means that it can be eliminated by a properly oriented polarizer.
About this image
Long before achieving international fame as the background scene for Apple OS X High Sierra, North Lake near the top of Bishop Canyon in the Eastern Sierra has been beloved by photographers. Each autumn this little gem of a lake teams with photographers longing for even one of the following conditions: peak gold and red in the aspen, a glassy reflection, or a dusting of snow.
I visit North Lake multiple times each autumn, sometimes with my workshop groups, sometimes by myself. I’ve found pretty much every possible combination of conditions: snow/no-snow; early, peak, or late fall color; and a lake surface ranging from mirror smooth to churning whitecaps.
One sunrise early October of 2010 I hit the North Lake trifecta. Crossing my freezing fingers that the reflection would hold until I was ready, I lowered my tripod on the rocky shore and framed the aspen-draped peak and its vivid reflection. I used a couple of protruding rocks to anchor my foreground, slowly dialed my polarizer until the entire lake surface became a reflection, and clicked. But rather than settle for that shot, I reoriented my polarizer until the reflection virtually disappeared and a world of submerged granite rocks appeared. I clicked another frame and stood back to study the image on my LCD.
As much as I liked the rocky lakebed version, I knew there was no way I could pass on the best reflection I’d ever seen at North Lake. So I returned my eye to my viewfinder and very slowly dialed the polarizer again, watching the reflection reappear across the lake and advance toward me until the entire mountain unfolded in reverse atop the lake. Stopping just at that midway polarization point, I had the best of both worlds: my pristine reflection and an assortment of submerge rocks.
I Use Breakthrough Filters
Dialing In My Polarizer
Click an image for a closer look and slide show. Refresh the window to reorder the display.


Rules are a crutch
Posted on September 17, 2017
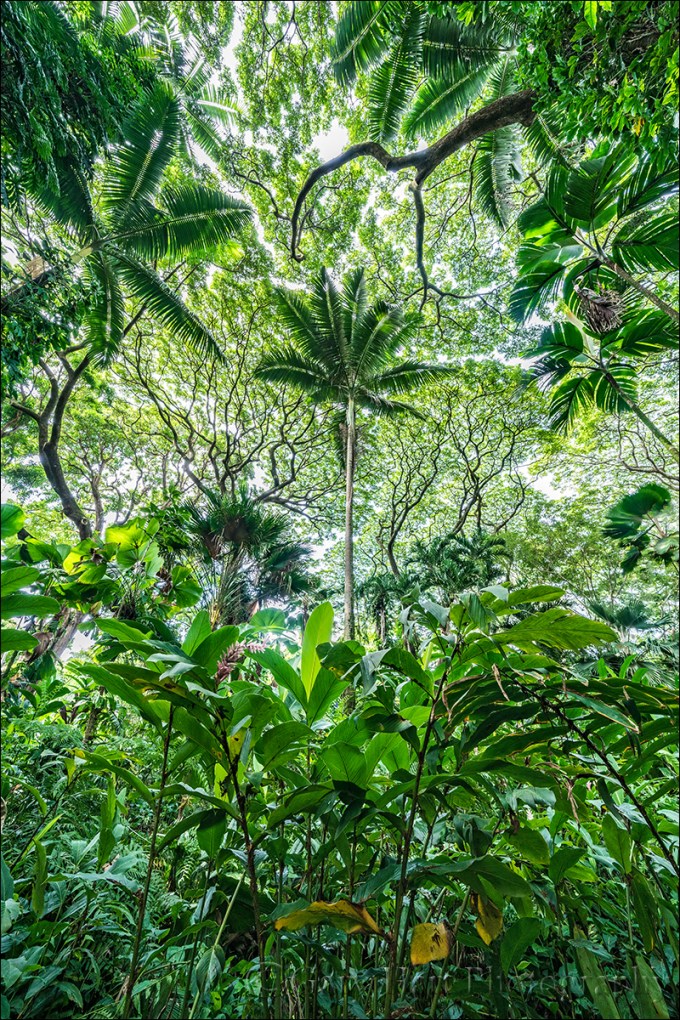
Looking Up, Hawaii Tropical Botanical Garden, Hawaii
Sony a7R II
Sony 12-24 f4 G
12mm
1/8 second
F/8
ISO 800
Aloha from Hawaii!
Let’s have a show of hands: Who feels like their photography has stagnated? Let me suggest to all with your hands up that what’s holding you back may be the very rules that helped elevate you to your current level of proficiency. I’ll be the first to acknowledge that rules are important, the glue of civilization. Bedtimes, homework, and curfews got us through childhood and taught us to self-police as adults. Now we get enough sleep (right?), meet deadlines at work, and toe the line well enough to have become productive members of society with very little supervision (give yourself a gold star). But let me suggest that many of us have become so conditioned to follow rules that we honor them simply because they’ve been labeled “rule.”
As important as this conditioning is to the preservation of society, our reluctance to question rules sometimes impacts areas of our lives that might not be so cut-and-dried. One example would be photographers’ blind adherence to the (usually) well-intended “experts” proliferating online, in print, and at the local camera club. These self-proclaimed authorities spew absolutes for their disciples to embrace: Expose to the right!; Never center your subject!; Tack-sharp front-to-back!; Blurred water is cliché! Blah, blah, blah…. (My standard advice to anyone seeking photographic guidance is to beware of absolutes, and when you hear one, beeline to the nearest exit because the truth is, there are very, very few absolutes in photography.)
Rules serve a beginning photographer the way training wheels serve a five-year-old on a bike: They’re great for getting started, but soon get in the way. At first, following expert guidance, beginners’ photography improves noticeably and it’s easy to attribute all this success to rules. But by the time the improvement slows or even ceases altogether, those rules have become so deeply ingrained that it’s difficult to realize they now hold us back. You wouldn’t do Tour de France with training wheels, or run the Boston Marathon on crutches.
If photography were entirely rule-bound, engineers could write algorithms and design robots that did our photography for us. But the very definition of creativity is venturing beyond the comfortable confines of our preconceptions to create something new. In other words, if you’re not breaking the rules, you’re not being creative.
For example
For the last eight years I’ve spent one or two weeks on Hawaii’s Big Island. And on each trip I make multiple visits to the (fabulous) Hawaii Tropical Botanical Garden just north of Hilo. There’s so much to love here, but I’m always drawn to the bottom of the garden overlooking Onomea Bay, where the luxuriant jungle unfolds beneath an interlaced canopy of towering monkeypod trees (albizia saman). Every time I’m down here I try to find a composition that captures the lushness I feel in the saturated air, and the way the monkeypod’s branches seem etched against the sky. And each time I come away a little disappointed.
This year, armed with my new Sony 12-24 f/4 G lens, I decided to give the scene another shot beneath the late afternoon overcast. With a decent breeze stirring the leaves, I pushed my ISO to 800 to be safe. Widening my view to 12mm and pointing up, it soon became clear that the palm tree I needed to anchor my frame belonged in the middle. And even without metering I knew that the crazy dynamic range (the shaded side of every leaf juxtaposed against a bright sky) would force me to sacrifice the texture in the clouds in favor of the essential detail and color in the jungle’s dense shadows.
Both of these important considerations flew in the face of rules that have constrained photographers for years. For as long as we’ve held a camera, our inclination to bullseye every subject has been stifled by voices whispering the “rule” of thirds (horizon 1/3 up from the bottom or down from the top; primary subjects at the intersections of an imaginary tic-tac-toe grid on our frame) in our ear. And of course digital photographers everywhere know to never blow the highlights.
In this case, even though it would get me booted from many camera club photo competitions, I’ve been scoffing at the rule of thirds long enough that centering the palm tree wasn’t hard. But seeing nearly half my frame flashing highlight warnings was a little more difficult. Nevertheless, I held my breath and went ahead with the shot you see here. And it turns out, instead of creating a problem, the white (overexposed) sky becomes a feature that only enhances the rich green and etched branches.
Homework
Sit down and write out your strongest, longest held photography rules (trust me, they’re there). Challenge yourself to break at least one of these rules each time you go out with your camera. Don’t expect miracles—at first your resulting images might not thrill you, but I promise that you’ll grow as a photographer, and you just might learn something in the process. (Oh, and you can put your hands down now.)
Mahalo!
Breaking the rules
Click an image for a closer look and slide show. Refresh the window to reorder the display.


Eclipse 2017: Savor the Moment
Posted on August 18, 2017

Three Strikes, Bright Angel Point, North Rim, Grand Canyon (2013)
Canon EOS 5D Mark III
1/3 second
24-105L
ISO 100
F11
Today I drive to the mountains of Idaho to photograph Monday’s total solar eclipse. Having never photographed an eclipse, total or otherwise, I have no eclipse images to share. And I won’t pretend to be an expert, or attempt to tell you how to photograph it. But I do have one piece of experienced-based advice that I want to share with photographers planning to capture the eclipse: Don’t forget to savor the moment.
For most, the eclipse will be a once-in-a-lifetime experience, a memory of a lifetime. Totality will be over in minutes. I’ve had more than my share of these special opportunities, some as simple as a fortuitous confluence of breathtaking landscape and spectacular light; some as predictable as the moon hovering above a favorite subject; and some as unexpected as a sudden rainbow above an iconic landscape.
One such moment for me was the August morning in 2013 on the North Rim of the Grand Canyon, when the weather forecast called for clear (boring) skies, and instead we got a two hour lightning display that started in the dark and climaxed with a rainbow and three simultaneous lightning strikes. For the first ten minutes of this show, my camera was misbehaving and I was unable to photograph anything. Nevertheless, my awe for what I was witnessing transcended my frustration, and today my memories are so much greater than a few favorite images. More important than the pictures I captured that morning are the vivid images etched in my memory, the people I shared the morning with, the emotion that came with each lightning bolt, and our giddy laughter at our good fortune. Truly one of the highlights of my life that would have been reduced to a few favorite captures if I’d have allowed myself to be too caught up in the photography. (And I still got my pictures.)
I honestly don’t know what to expect on Monday, but I expect it to be similarly thrilling, and I plan to drink in every second of it. I’ll do my scouting and planning to be as prepared as possible in advance, but I refused to be so focused on getting “the shot” that I fail to appreciate this experience of a lifetime. I’ll take a great memory over a great photo any day.
Read more about this unforgettable morning
A Few of My Own “Moments of a Lifetime”
Click an image for a closer look and slide show. Refresh the window to reorder the display.


A National Park Secret
Posted on August 10, 2017
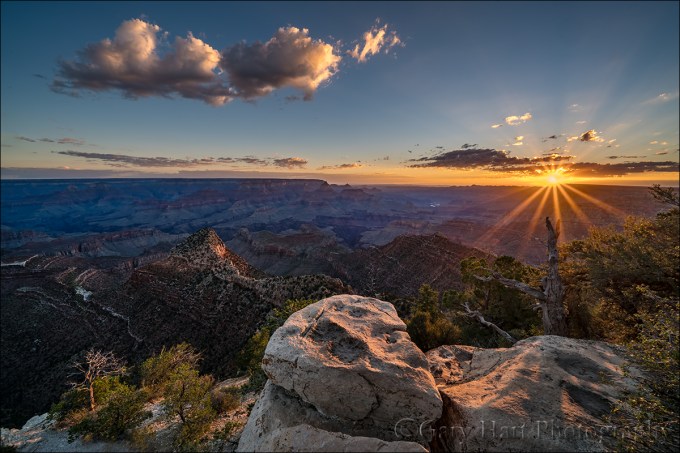
New Day, Grandview Point Sunstar, Grand Canyon
Sony a7R II
Sony 12-24 f4 G
12mm
1/8 second
F/18
ISO 100
America’s National Parks have always been busy in the summer, but in recent years the summer crowds have virtually overwhelmed many of our parks. Between gridlock on the roads, more cars than parking places, and hip-to-hip tourists at the vista rails, what was once an opportunity to commune with nature has become a survival of the fittest endurance test.
My solution has been to avoid the national parks in summer, but for many summer is the only time to visit the special locations they’ve longed to see for their entire lives. And the only thing worse than visiting Yosemite or Grand Canyon in summer, is never visiting them at all.
Though I can’t make the crowds go away, let me offer an experience-based suggestion that is guaranteed to enhance your national park experience: Sunrise. Or more accurately, the morning hours from about thirty minutes before sunrise until around two hours after sunrise.
For most people the idea of rising before the sun on a vacation is laughable, but therein lies the genius. If you can overcome the urge to be most people, you can enjoy America’s most crowded national parks, at the height of the summer rush, in glorious peace. You won’t be alone, but you’ll be savoring the day’s first rays with a microscopic subset of the park’s total visitors, kindred spirits who relish nature and solitude as much as you do, who speak softly, stroll slowly, and respect personal space.
About this image
As much as I try to leave the national parks to the tourists in summer, my desire to photograph the lightning and rainbows of the Grand Canyon’s summer monsoon leaves me no choice. A couple of days ago, Don Smith and I guided our photo workshop group out to photograph sunrise at Grandview Point on the always crowded South Rim. Grandview is one of Grand Canyon’s most popular spots, but leaving our hotel about 45 minutes before sunrise got us out there about a half hour before the sun, and long before the tourists had even hit their snooze button the first time.
There were just a couple of other cars in the parking lot, the same lot that in just a few hours people will be circling in vain for five, ten, even fifteen minutes. Having Grandview virtually to ourselves, the group was able to spread out and find their own view of the canyon without competing with the teaming midday hordes that most people experience there.
Along with a few other people in the group, I set up in front a concave sandstone rock with a view across the canyon to where the sun would soon appear. Because this is my first trip with my new Sony 12-24 f/4 G lens, I’ve been making a point to familiarize myself with it, so I twisted it on and went wide. With a clear horizon and relative dearth of clouds, I dialed my f-stop to f/18 to ensure a good sunstar when the sun crested the horizon, and composed a frame.
When photographing a sunrise, the advancing light makes it impossible to set the exposure very far in advance. In these rapidly changing conditions, I love my mirrorless Sony a7RII’s pre-capture histogram in my viewfinder—I just kept my eye on the histogram, dropped the shutter speed in 1/3-stop increments as the horizon brightened, and was ready to hit the ground clicking the second the sun appeared.
Grand Canyon Monsoon Photo Workshops
Workshop Schedule || Purchase Prints
A Grand Canyon Gallery
Click an image for a closer look and slide show. Refresh the window to reorder the display.


Going wide
Posted on August 6, 2017
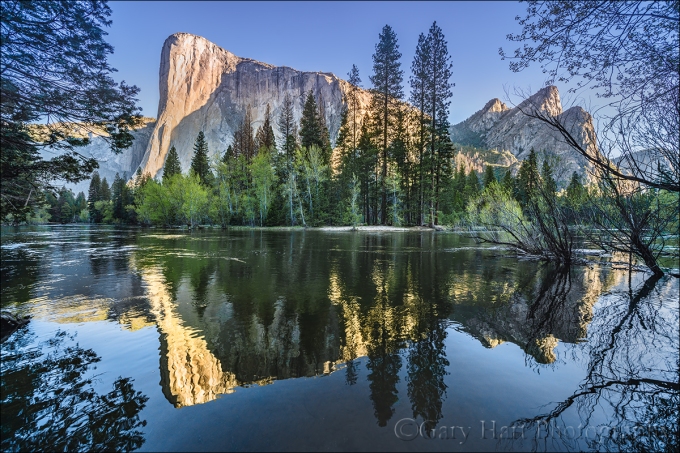
El Capitan and Three Brothers Reflection, Merced River, Yosemite
Sony a7R II
Sony 12-24 f4 G
12mm
1/25 second
F/8
ISO 100
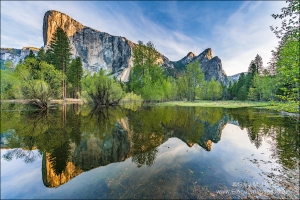
After years of drought, in spring of 2016 I had the good fortune to photograph Yosemite Valley with actual flooding—nothing devastating, just enough for the Merced River to overspill its banks and create reflections where meadows normally exist. One such location was a spot beneath El Capitan, where I found myself faced with the challenge of capturing more scene than my 16-35 lens could handle.
Stitching multiple frames was an option, but because I have a thing about not doing things I couldn’t do with film, my goal is to always capture a scene with one click (this is my problem, and in no way do I mean to discourage others from entering the 21st century). One benefit of my self-imposed one-click rule is that I often find creative compositions I might have overlooked had I settled for the easy solution, but in this case I really, really wanted to photograph the entire scene. The photography gods were smiling upon me that day, as I was leading a workshop and the photographer assisting me generously offered to loan me his Canon 11-24 f/4 lens (thanks, Curt). Since I had in my possession a Metabones adapter that allowed me to pair Canon glass to my Sony body, I leapt at the opportunity.
Spring Reflection, El Capitan and Three Brothers, Yosemite
That was an epiphany moment for me, because even though I knew that the difference between 11mm and 16mm is more significant than it sounds, I’d never really compared the two focal lengths side-by-side. Replacing my 16-35 with Curt’s 11-24, suddenly I had the entire scene in my viewfinder, with room to spare. Not only that, I learned as soon as I put the images up on my monitor that the Canon lens was really sharp—I was in love. Sony shooter or not, I came home fully intending to purchase the Canon lens, and came very close to making a big mistake.
My decision not to pull the trigger on a Canon 11-24 purchase was three-fold: 1) it was $3000 2) it’s so massive that it could never be a full time resident of my camera bag 3) I knew Sony was committed to expanding their lens lineup, and that I’d be wracked with regret if Sony released a similar lens soon after I’d sunk $3,000 into a lens that could double as a boat anchor. But still….
Imagine my relief when my Sony doused my Canon fantasies with an ultra-wide lens of their own this spring. Given the opportunity to test the Sony 12-24 f/4 G lens before it was announced, I immediately took it to Yosemite where the flooding on the Merced was even more extreme than last year. Finding “my” spot underwater, I probed the riverbank for nearby vantage points and found the view I’ve shared at the top of this post.
It wasn’t difficult to see that the Sony 12-24 is every bit as sharp as the Canon 11-24. And not only does it not require an adapter to use on my Sony bodies, it weighs less than half of what the Canon ultra-wide weighs. I ordered the 12-24 immediately and this week packed for my first trip with it.
When I drive to a photo destination I bring virtually every piece of camera gear I own, but when I fly, I need to be a little more selective. As I chewed on what to bring and what to leave out, not only did I quickly confirm that the 12-24 would make the cut, I discovered that the new lens is small and compact enough to occupy a permanent space my camera bag.
Which brings me to another thought. I shoot Sony mirrorless for several reasons—foremost is the image quality: Sony’s unmatched combination of resolution, dynamic range, and low-light capability is exactly what I need for landscape photography. And after a few growing pains, I’ve come to love the electronic viewfinder and can’t imagine ever going back. Sony’s lenses are as sharp or sharper than anything I had from Canon, but I don’t think the compactness of Sony’s f/4 glass gets the credit it deserves for their ability to provide so much quality in such a compact package. How compact? They’re small enough to slide into a slot in my bag oriented up/down (resting on an end rather than along a side), which gives me so much more room for more gear (and what photographer doesn’t love more gear).
Here’s what’s in my camera bag (F-stop Tilopa) for this week’s trip to the Grand Canyon:
- Sony a7RII
- Sony a7SII
- Sony a6300
- Sony 12-24 f/4 G
- Sony/Zeiss 16-35 f/4
- Sony/Zeiss 24-70 f/4
- Sony/Zeiss 70-200 f/4 G
- Rokinon 24 f/1.4
- Two Lightning Triggers
That’s three (!) bodies and five (!) lenses, with room for even more stuff. Photographer heaven.
A few words about wide angle photography
Despite the fact that wide angle is the reflex response to most landscapes by virtually every tourist who picks up a camera, good wide angle photography is not easy. From diminished backgrounds to tilting verticals, wide angle lenses pose problems that can be turned to opportunities if they’re fully understood. I’ll save a full discussion of wide angle photography for another day, but here are a couple of tips that might help:
- Put something in your foreground: Many of my wide angle images put the primary subject front and center, but even when the background scene is my main subject, I try to have something of visual interest in my foreground. Browse the gallery below and note how many images have an empty foreground (Hint: Not very many). Sometimes I’m able to include something as striking as a mirror reflection or colorful flowers, but often my wide angle foregrounds are as simple as nearby rocks or leaves. If there’s nothing at my feet and I’m required to use something distant, at the very least I want the foreground of my wide image to be filled something worthy of the space it occupies.
- The tilting of vertical lines caused when you’re close to your subject is minimized when the sensor is on the same plane as the subject (not tilted up or down): Mount on your camera a wide angle lenses at its widest focal length, point it at a row of nearby trees (or some other vertical lines that spans the edges of your frame), and tilt up and down while looking through your viewfinder. At what point do the trees appear straightest? Most slanted? I rest my case.
Going Wide
Click an image for a closer look and slide show. Refresh the window to reorder the display.


All’s well that ends well
Posted on July 30, 2017

Rainbow Reflection, Queen’s Bath, Kauai, Hawaii
Sony a7R II
Sony/Zeiss 16-35
1/15 second
F/11
ISO 100
Most photographers will tell you that some of the best locations are a bit of a pain to get to. Not necessarily death-defying dangerous, just a pain. Not only is Queen’s Bath on Kauai one of those locations, this year getting there required dealing with the Hawaii equivalent of the troll who lives under the bridge.
For many years I’ve been helping my friend Don Smith with his Kauai workshop (it’s a tough job, but, well, you know…). One of the highlights of the Kauai trip is Queen’s Bath, a surf-pounded lava shelf accessed by a short but steep trail through dense rainforest. When it’s dry the trail isn’t a big deal if you can avoid the deep ruts and protruding roots, but after any rain the route down is more waterslide than trail. We’ve had enough falls (including a broken bone that happened when someone who had been in the group tried to go down on her own after the workshop), that we won’t even attempt the hike if it has rained.
Queen’s Bath is on the wet side of Hawaii’s wettest island. Most years we pull up to the trailhead in the dark (well before sunrise), inspect the conditions, and move on to another location because the QB trail is too slippery. But after last year’s disappointment it occurred to me that maybe the funky tire-chain-like shoe attachments (AKA, YakTrax) that I use in winter to keep from slipping on ice might be worth a try. Don took that suggestion and ran with it; after a little research he found actual crampons on sale on Amazon, sent the upcoming group the link, and told them crampons or YakTrax would be required footwear for Queen’s Bath.
On our scouting mission to Queen’s Bath before the workshop started we negotiated the slick slope like velcroed mountain goats. While congratulating ourselves on our genius down at Queen’s Bath, we were warned by a couple who had arrived a little after us that there was a “crazy lady” (their description, not ours) yelling at everyone parking in the Queen’s Bath parking area for making too much noise. (Mind you, this is Kauai, where the roosters are at full volume well before sunrise.) We shook our heads and chuckled, but didn’t think much about it.
Driving away later that morning, we discovered that our SUV had a flat tire—weird, but stuff happens. We soon learned that there’s only one AAA truck on all of Kauai, so rather than wait, Don and I decided to answer the age-old question, “How many photographers does it take to change a tire.” (FYI, it’s two: one to change the tire, and one to make sure everyone knows he’s doing it all wrong.)
Fast forward to the next morning when, group in tow now, we charged down slope in the rain without a single slip. (Score one for genius.) The rain intensified soon after we arrived on the lava shelf, and for a while it looked like we might need to retreat. But soon we saw brightening clouds in the east, and not much later the rain stopped and out popped a full rainbow. The rainbow lasted at least 15 minutes, and the light stayed nice much longer than that. Thanks in no small part to the crampons, no one fell on the muddy trail or rain-slickened basalt, and everyone ended up with some fantastic photos and the morning seemed a huge success.
We were still basking in the glow of our beautiful morning as we returned to the cars—until someone noticed that the license plates were missing from our three vehicles. Huh? Suddenly yesterday’s ranting neighbor and our flat tire took on an entirely new meaning: Crazy Lady had vandalized our cars. I understand that photographers can be a little insensitive to their impact on their surroundings, but in our defense, Don and I always lecture the group about being quiet in the Queen’s Bath parking area, then monitor closely to ensure that no one forgets. We don’t allow any conversation or laughter in or near the parking area, so the only sounds we make are doors closing and feet shuffling—not completely silent, but certainly quieter than Kauai’s ubiquitous chicken population.
It’s possible that our nemesis was interrupted in her vile act, because we soon found the license plates and screws, as if they’d been haphazardly stashed as she made a hasty retreat. We recovered our property and with the help of someone’s screwdriver reinstalled the plates and departed without further incident. I have no idea how regularly this neighbor’s crazy manifests, but since it happened to Don and me on consecutive days (and we had exchanged our rental car with the flat tire, so there’s no way she knew it was the same people), I suspect she’s a serial vandal. But the bottom line is, no real harm was done, and we ended up with a great story and some fantastic images. So I guess all’s well that ends well.
A few words about this image
Rainbows feel like random gifts from heaven, but there’s really nothing random about them. Monitoring the conditions, you can usually anticipate the rainbow and get yourself in the best position to photograph it. What’s the best position? Successful photography is all about juxtaposition of visual elements, and (as much as we wish it were so) very rarely is the perfect relationship between the various elements in a scene exactly where you happen to be standing right now.
When a rainbow is one of your elements, it helps to understand that the rainbow’s center will always be at the anti-solar point (where your shadow points) and the rainbow will move with you. If you want your rainbow over that tree, or mountain, or lake, just move until they align.
In Hawaii, or any location where rain showers are possible, the first thing I do is figure out where the rainbow will appear, and identify compositions to put with it. On this morning at Queen’s Bath, when I arrived I made a mental note of where the rainbow would appear, and when the sky near the eastern horizon started to brighten while the rain continued falling in the west, I moved closer to the ocean to get as much ocean and rainbow as possible in my frame. I also shifted toward an area with a collection of small reflective pools that I thought would make a great foreground, rainbow or not.
When the rainbow appeared, I was ready. After photographing it with a variety of foregrounds for a few minutes, I thought it would be pretty cool to get a reflection of the rainbow. I didn’t have to move far to align myself with the little pool you see in my image; from there it was about micro-positioning, moving closer/farther and up/down to maximize the rainbow’s reflection without cutting off the pools with the edge of my frame. For this image, I ended up about three feet from the pools and just a couple of feet above the rocks.
Read more about rainbows
A Rainbow Gallery
Click an image for a closer look and slide show. Refresh the window to reorder the display.


What’s the deal with Yosemite’s dead trees?
Posted on July 28, 2017

One of the most frequently asked questions in my Yosemite workshops is some variation of, “Why are there so many dead trees?” My standard answer has always been a summary of what I’ve learned from talking to Yosemite rangers: The drought has stressed the trees and made them more susceptible to the bark beetle. This morning I read an excellent summary of the problem on the NPS Yosemite site explaining the problem, and adding to what I already knew, and I thought I’d share what I learned.
The problem
As someone who has been visiting Yosemite for (pretty much literally) my entire life, the tree death in Yosemite Valley in the last five years has been staggering. Yosemite Valley, once a carpet of green, is now stained with large patches of rust-brown dead or dying trees. Scenes I’ve photographed for over 40 years are suddenly marred by these trees.
Going through my portfolio of Tunnel View images, I chose two with very similar compositions that illustrate the tree death. The first, my rainbow image from 2009, shows the green valley floor I remember. The second is a winter scene from 2016, and the tree death is obvious. And sadly, in the year-and-a-half since I took the 2016 image, I guess that at least twice as many trees have died.
Double whammy
The drought has clearly taken its toll on Yosemite’s trees, both by killing the thirstiest outright, and by weakening many others until they become easy targets for a very opportunistic bark beetle. But the problem is not just about weak trees—it’s also about healthy beetles, a lot of them. Consider that while the 2016 image was taken in late January, there is absolutely no snow in Yosemite Valley. Of course the drought has something to do with that, but the lack of valley snow in recent years can also be attributed to warming temperatures. As Yosemite’s climate warms, much of the precipitation that once fell as snow now falls as rain.
Snow doesn’t kill the bark beetle (it’s still not cold enough), but an extreme freeze does. But as the number of sub-freezing days in Yosemite decline, the mechanism that kept the bark beetle in check gets out of whack. While Yosemite’s evergreens have no problem handling an extreme freeze, each freeze kills many bark beetles. But fewer freezing days each winter means more bark beetles, and more bark beetles makes even healthy trees more prone to attack.
Triple whammy
And finally, America’s long-time knee-jerk fire suppression policy has taken its toll. By thinning growth, consuming dead wood, and enabling regeneration, fire is a natural part of maintaining forest health. But for over a century, fires in Yosemite (and pretty much every other national park and forest) were doused as soon as they ignited because they were inconvenient, and they (temporarily) scarred the scenery.
Thankfully that misguided policy is largely behind us, but its legacy remains. We’re left with too many trees competing for the available water. Some die of thirst, while many survivors lack the resources to stave off a beetle infestation.
What’s being done
The National Park Service has undertaken the monumental task of removing dead and dying trees. Because it’s impractical to remove all of them, the emphasis is on those trees that pose a hazard to people and property. Also, in developed areas the NPS has started prophylactic application of a (naturally occurring) pheromone that discourages the beetles from attacking susceptible trees.
No one knows for sure, but it’s possible that the tree death will stabilize, or even start to decline over the next few years. While the current mitigation efforts might help stem the tide, the primary hope is that an equilibrium will be reached as the most susceptible trees die and forest health is restored through better management. Fingers crossed.
From the horse’s mouth
Here’s the link to the NPS tree mortality article.
The Trees of Yosemite
Click an image for a closer look and slide show. Refresh the window to reorder the display.


Meeting a celebrity
Posted on July 17, 2017
Lone Tree, Lake Wanaka, New Zealand
Sony a7R II
Sony/Zeiss 24-70 f4
20 seconds
F/16
ISO 200
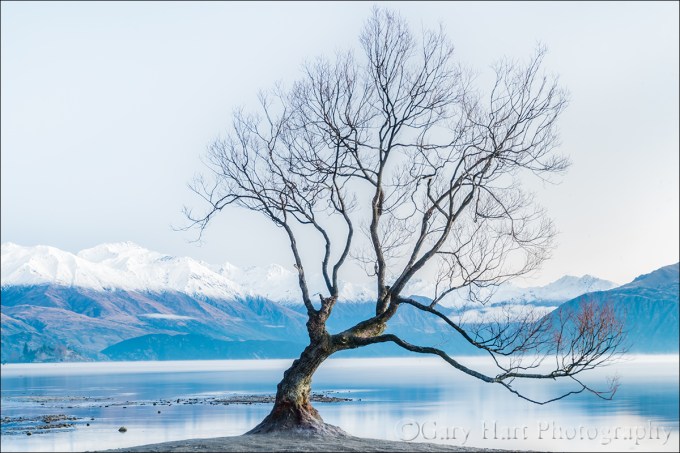
For those who don’t recognize it, this is the much-photographed willow tree that inhabits Lake Wanaka on New Zealand’s South Island. I’ve seen it described “the most photographed tree in the world,” and while I doubt that’s true, it is at least among the world’s more photographed trees.
Seeing a popular subject like this for the first time is a lot like meeting a celebrity. While I’ve never been one to be terribly star-struck by famous subjects, I could certainly understand the tree’s appeal—a graceful trunk and spreading branches beside a shimmering lake beneath snow-capped peaks. Adding to the tree’s appeal is the fact that it usually juts from the lake and is surrounded by reflections.
Though we’d heard stories of mornings with close to 100 photographers crowding around the tree, the morning Don and I visited, the crowds had no doubt been kept at bay by a recent drought that has exposed the tree’s base, and by temperatures in the 20s. We were fortunate to share the scene with a half-dozen or so other good natured photographers who were more than happy to work together to ensure that no one was in anyone else’s way.
I was well aware of the popularity of this tree, and the difficulty of finding a fresh interpretation on my one-and-only visit. But that didn’t keep me from doing my best, and for such a simple image, there’s a lot going on behind the scenes to make it happen: foreground/background relationships, framing, depth of field, motion, and light all factored into my creation of this image.
Don and I had walked down to the tree the night before, so I’d had 12 hours or so to chew on my approach. Evaluating the scene in the pre-dawn gloaming, I started by determining the background I wanted. Since the snowy peaks were easily the most striking background feature, I found a position that I thought best aligned the peaks with the tree, eliminating most of the less appealing brown peaks on the right and all of a grove of evergreens on the left. But this just established the line I needed to be on—I still had to find the right distance and framing.
Since I didn’t find the exposed lakebed terribly appealing, and the pre-sunrise sky was pretty boring, I wanted a tight composition that minimized both. Most of the other photographers seemed to be shooting the scene fairly wide, but I found that by moving about 40 back from the tree, at around 70mm I could both compress the distance to the mountains and fill my frame with the tree. But 70mm created depth of field considerations that required careful selection of my f-stop and focus point. My DOF app told me that stopping down to f/16 and focusing about 40 feet behind the tree gave me sharpness from the tree back to the mountains, a fact I confirmed on my LCD after clicking this frame.
There was no wind to move the branches, but the lake surface was slightly disturbed by small waves. Because this was about 20 minutes before sunrise, the scene was still fairly dark and I had no problem using a long exposure to flatten the water.
But how much light? Often when presented with a striking tree, I try to put the tree entirely against the sky and underexpose slightly, so the tree stands out in silhouette. But the only way to position this tree against enough sky for an effective silhouette would have been to lay beneath it and shoot up. Not only would this have required an extremely wide focal length that would have shrunk the mountains and introduced far too many other less interesting elements, it would have also put me smack in the middle of everyone else’s frame.
Instead of a silhouette, I went the other direction, giving the scene extra light to allow the dark tree stand out in contrast to the bright lake, mountains, and sky. I’m not sure I would have tried this high-key solution had a silhouette been feasible, but in hindsight this was clearly the way to go. It’s a good reminder to not get so stuck in my conventional approach that I lose sight of other possibilities.
Join Don Smith and me in New Zealand next year
A Gallery of Outstanding Trees
Click an image for a closer look and slide show. Refresh the window to reorder the display.


Winter in July
Posted on July 9, 2017

Mt. Eglinton, Mirror Lakes, Fiordland National Park, New Zealand
iPhone 7 pano
I’ve been home from New Zealand for less than 24 hours, and I already miss it. I miss the mountains, the fiords (AKA, fjords, but when in New Zealand…), the lakes, the rivers, the skies, the people, and the winter—right now (when it’s 105 in Sacramento), especially the winter. FYI, picking a favorite season for photography is kind of like having to pick a favorite child—but asking me now would be like asking right after one of my children brought me breakfast in bed, so today I’m going with winter.
But anyway…. As I mentioned in my previous post, I was in New Zealand with Don Smith; we were scouting for our New Zealand workshop, scheduled to debut next June. When I posted my first New Zealand image a few days ago, I’d only been there a couple of days and had seen lots of clouds but not many mountains. That changed on the day we drove the road to Milford Sound, through Fiordland National Park. For the rest of the trip (with a couple of exceptions), the majority of the clouds we saw were the ephemeral, radiation variety that form when the air cools to the dew point. Sometimes the clouds swirled and hovered near the mountain peaks, other times they hugged the lakes and meadows in the still hours around sunrise and sunset. One day we spent a couple of hours driving in a dense fog that had lifted just enough to reveal trees and hillsides glazed with frost.
I’m afraid a scouting trip emphasizes quantity of locations over the quality of the photography—with so much territory to cover, it’s just impossible to time our visits to each spot for the best possible time to photograph it. The priority is to get our eyes on locations, as many as possible—first to see if they’re photo-worthy, and second to determine the lay of the land so we can bring our groups back when they are most photo-worthy. Which is how I happened to be at Mirror Lakes in Fiordland National Park carrying nothing but my iPhone.
We’d left the little town of Te Anau after a glorious sunrise at a remote location, found thanks to a local tip (thanks, Steve at Trips & Tramps), heading for Milford Sound. We were rushing to get in as much scouting as possible before doubling back and driving all the way up to that night’s hotel in Wanaka. So, at the turnout for the short walk down to Mirror Lakes, Don and I just hopped out of the car armed with nothing but iPhones. Fortunately, the scene was perfect for a pano, and the dynamic range was just within the bounds the iPhone could handle.
I’ve never been shy about snapping a quick shot with my iPhone to share on my personal Facebook page or with my wife, but this is the first time I’ve actually put an iPhone image in a blog. Honestly, I’ve never really scrutinized the iPhone images very closely, but I have to say that I’m pretty pleased with the results. Who knows, maybe this is the start of a whole new career….
Contact me to be notified as soon as we have the details of our New Zealand workshop.
A Winter Gallery
(Most of these aren’t New Zealand images, and only one is an iPhone image)


