Eloquent Images by Gary Hart
Insight, information, and inspiration for the inquisitive nature photographer
Static Juxtaposition
Posted on February 9, 2018

Framed Sunset, Mt. Whitney and Mobius Arch, Alabama Hills
Sony a7R III
Sony 12-24 f/4 G
.8 seconds
F/11
ISO 100
My previous post was about dynamic juxtaposition in landscape photography—combining static landscape subjects with transient meteorological and celestial elements. The other side of the juxtaposition coin I call static juxtaposition: combining stationary landscape objects. I am a little reluctant to use the word “static” because there is one element that absolutely can’t be static in these compositions: You.
Since I don’t photograph people or wildlife, I often joke that I don’t photograph anything that moves. And because of this, I need to create motion by encouraging my viewers’ eyes to move through my frame, either providing a path for their eyes to follow and/or a place for them to land. Accomplishing this with static subjects isn’t necessarily difficult, but it does require some physical effort.
Most photographers don’t have a problem getting themselves to the general locations that align foreground and background subjects, but many get a little lazy once they’re there, planting their tripods clinging to the spot like a ship an anchor.
Once I’ve arrived at a location and identified my primary subject, I challenge myself to find at least one other element on a different plane. Sometimes that’s easy, other times…, not so much. Nevertheless, when my subject is in the distance, I look for something closer that has visual weight; likewise, if my subject is nearby, I want something with visual weight in my background. Visual weight is something that pulls the eye: a flower, tree, shrub, leaf, reflection, rock—I could go on, but you get the point. Sometimes it’s not even a distinct entity, but rather a pattern, texture, color, or splash of light.
My secondary subject can have strong aesthetic value or not—sometimes it’s there simply to balance the frame, while other times it has almost as much visual appeal as my primary subject. Regardless of its visual strength, my secondary subject’s placement, both in the frame and relative to the scene’s other visual elements, can make or break an image. And lacking a forklift, pretty much the only way to change the relative position of two static objects in a photographic frame is carefull positioning of the camera (and the photographer behind it!).
Some guidelines
As a general rule I avoid merging my essential visual elements—to do conflates those elements and sacrifices the illusion of depth that’s so essential in a two-dimentional image. Another thing I try to avoid is objects with visual weight at the edge of my frame because anything that pulls my viewers’ eyes toward the image’s boundary dilutes its impact.
Viewers’ eyes move most effectively through a scene by following lines. Sometimes those lines are tangible, like a horizontal horizon, vertical waterfall, or diagonal river. But often it’s up to me to create virtual lines—an implicit, connect-the-dots path between visual elements, or textures and shapes that frame my primary subject and constrain my viewers’ eyes. For example:

Diagonal: This is a strong visual connection because the line created traverses the frame’s top, bottom, left, and right hemispheres.

Linear (yes, I know a diagonal line is linear too): I often do this in a vertical composition to guide the eye to my primary subject. Here I use floating autumn leaves to guide my viewer straight to Half Dome.

Circular: Okay, maybe not literally a circle, more of a frame that surrounds the primary subject. In this case I framed Half Dome and its reflection with the color and texture of grass, spring foliage, and vertical tree trunks.
For example
Last week I was at Mobius Arch beneath Mt. Whitney, the final stop of my annual Death Valley photo workshop. After three days of spectacular Death Valley sunrises and sunsets that seem to be trying to outdo the one before it, I didn’t dare to hope that the string would continue when we moved to the Alabama Hills.
The real show here is sunrise, when day’s first rays of sun color the Sierra Crest with alpenglow’s pink hues, even on clear sky mornings. Sunsets here require a little help. The view here faces west, so at sunset you usually find yourself photographing the shaded side of your subjects against the brightest part of the sky—not really a recipe for success. But a few clouds on the western horizon not only add color and texture, they soften the light. And that’s what happened last week.
Before sunset the thin, translucent cirrus layer was lost in the late afternoon glare, but as the sun dropped below the horizon, the clouds picked up its refracted long wavelengths and colored the sky deepening shades of red. Soon the color was so intense that it shaded weathered granite boulders.
The three elements I wanted to feature in my composition were Mobius Arch, the Sierra Crest (Lone Pine Peak and Mt. Whitney), and the colorful sky. As dramatic as the Sierra Crest is, the star of this scene is the arch. With no real access to a telephoto view, filling my frame with the arch means a wide angle lens that includes too much sky. But the vivid color this evening gave me a rare opportunity to include a sky worthy of the rest of the scene.
My Sony 12-24 f/4 G lens allowed me to within a couple feet of the arch while still fitting it in my frame. With the Sierra Crest framed by the arch, I was careful to position myself so both Lone Pine Peak (on the left) and Mt. Whitney (on the right) were visible. Finally, I needed to decide the camera height. When the sky is less interesting, I raise my camera to fill the arch’s opening with the mountains and minimize the sky. But this evening the colorful sky was an asset, so I dropped as low as I could to maximize it.
At such a wide focal length, depth of field was a piece of cake—I didn’t need to check my hyperfocal app to know that I had lots of margin for error. Focusing toward the back of the arch, I easily achieved the front-to-back sharpness I wanted. Click.
Workshop Schedule || Purchase Prints
A Gallery of Static Juxtapositions


Dynamic Juxtaposition
Posted on February 4, 2018

Moonset Eclipse, Zabriskie Point, Death Valley
Sony a7RII
Sony 100-400 GM
ISO 800
f/11
1/4 seconds
Much of my photography is about juxtaposition of elements with the landscape. Sometimes that’s simply combining static terrestrial features, but when possible I try to add something more dynamic, such as meteorological subjects like lightning or a rainbow, or celestial objects like the Milky Way or the Moon. The challenge with dynamic juxtapositions is timing—while the meteorological juxtapositions are usually a matter of playing the odds, celestial juxtapositions are gloriously precise.
Lunar choreography
Just as the Earth revolves around the Sun, the Moon revolves around Earth; at any point in this celestial dance, half of Earth is daylight and half is night, while half of the Moon is lit and half is dark. The amount of the Moon we see (its phase) depends on the relative position of the Sun, Moon, and Earth in this dance, and once each month all of the sunlit side of the Moon faces the dark side of Earth, and we Earthlings enjoy a full Moon.
This alignment of three or more orbiting celestial bodies necessary for a full (and new) Moon is called ‘syzygy.’ Due to the Moon’s orbit around Earth, the Sun, Earth, and Moon achieve syzygy twice each lunar month: once when the Moon is between the Sun and Earth (a new Moon), and again when Earth is between the Sun and Moon (a full Moon).
The Moon completes its trip around Earth every 27.3 days, but it takes 29.5 days to cycle through all its phases, from new to full and back to new again. The Moon’s phases need that extra 2+ days because as the Moon circles Earth, Earth also circles the Sun, taking the syzygy point with it—imagine a race with a moving finish line.
Viewed from Earth, the Sun and Moon are on opposite sides of the sky when the Moon is full, so a full Moon rises in the east at sunset and sets in the west at sunrise. We rarely see a full Moon rising exactly as the Sun sets (or setting as the Sun rises) because: 1) the point of maximum fullness (when the Sun, Earth, and Moon align perfectly) only happens at one instant on the full Moon day—at every other instant of each month’s full Moon day, the Moon is merely almost full (but still full enough to appear full); 2) published Sun/Moon rise/set times assume a flat horizon—if you have mountains between you and the horizon, your view of the true Sun/Moon rise/set is blocked; and 3) The more extreme your latitude (angular distance from the equator), the more skewed the Sun/Moon alignment appears.
Knowing this, it should make sense that the closer the Moon is to full, the longer it’s in the night sky, and a full Moon is in the sky all night long. Less intuitive but very important for lunar photographers to know, each day the Moon rises an average of 50 minutes later (between 30-70 minutes) than it rose the previous day—I usually mentally round to an hour for quick figuring.
Lunar Eclipse
If the Moon orbited Earth on the same plane Earth orbits the Sun, we’d have an eclipse with each syzygy: every new Moon, Earth would pass through the Moon’s shadow and somewhere on Earth would experience a solar eclipse; every full Moon the night side of Earth would witness a lunar eclipse as the Moon passes into Earth’s shadow. But the Moon’s orbit is tilted about 5 degrees from Earth’s orbit, making the perfect alignment an eclipse requires relatively rare.
It turns out that the alignment of the Sun, Earth, and Moon necessary for a lunar eclipse happens from two to four times each year. Of these, about one-third are total eclipses, when Earth’s shadow completely covers the Moon. At totality, most of the sunlight illuminating the Moon is blocked by Earth, and the only light to reach the Moon has passed through Earth’s atmosphere, which filters out all but the long, red wavelengths. For the same reason sunsets are red, during a total lunar eclipse we see a red or “blood” Moon.
Putting it all together
As frequent and familiar as the rise and set of the Moon is, the opportunity to witness the beauty of an eclipse is rare. But in the last six months, after being shut out by schedule or weather for many years, I’ve managed to photograph my first total solar and lunar eclipses. I wasn’t able to juxtapose the August solar eclipse with a favorite landscape, but I wasn’t going to let that happen again for last week’s lunar eclipse.
Viewed from Death Valley’s Zabriskie Point in winter, the setting full Moon’s azimuth aligns nicely with Manly Beacon, one of the park’s most recognizable features. Though this year’s alignment was particularly good, the morning of the eclipse was a day earlier than I’d normally photograph the Zabriskie Point moonset—the next day the Moon would be setting about 45 minutes later, providing ample time to photograph the landscape in the warm early light before the Moon descended behind the Panamints. Nevertheless, I decided that a total lunar eclipse trumps everything, and since Zabriskie was the best place for the eclipse, that’s where we were.
We started with telephoto compositions of the beautiful “blood Moon” phase because there wasn’t enough light to include the eclipsed Moon with the landscape without compositing two exposures. Composites are fine, but I prefer capturing scenes with one click. For wider images that included the landscape I waited until totality had passed, shortly before the Moon set, and switched to the Sony/Zeiss 24-70 with my Sony a7RIII, moving my Sony 100-400 GM to my Sony a7RII.
I captured this image about 25 minutes before sunrise, normally too early to capture landscape detail without over exposing the Moon. But this morning, following the total eclipse, the lit portion of the moon was still darkened by Earth’s penumbral shadow, which reduced the dynamic range to something my cameras could handle.
To enlarge the Moon and emphasize its juxtaposition with Manly Beacon, I went with the 100-400. With my composition and focus set, I slowly dialed up the shutter speed until I saw my a7RII’s pre-capture “zebra” highlight alert. After clicking I magnified my image preview and examined the moon to confirm that I did indeed still have detail. The foreground was quite dark on my LCD, but my histogram indicated the shadows were recoverable, something I later confirmed in Lightroom.
A Gallery of Dynamic Juxtapositions
Click an image for a closer look and slide show. Refresh the window to reorder the display.


A few words about the “supermoon”
Posted on January 7, 2018
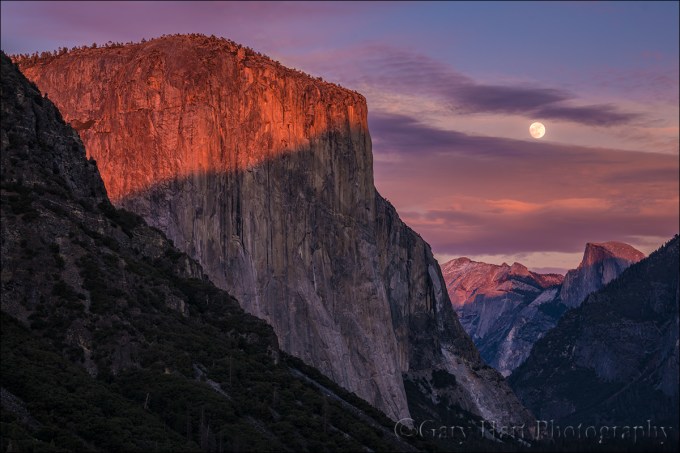
Sunset Moonrise, Yosemite Valley, Yosemite
Sony a7R II
Sony 70-200 f/4
1/10 second
F/8
ISO 200
I used to resist using the supermoon label because it’s more of a media event than an astronomical event, and it creates unrealistic expectations. But since the phenomenon appears to be with us to stay, I’ve changed my approach and decided to take advantage of the opportunity to educate and encourage.
What’s the big deal?
So just what is so “super” about a “supermoon?” Maybe another way of asking the question would be, if I hadn’t told you that the moon in this image is in fact a supermoon, would you be able to tell? Probably not. So what’s the big deal? And why do we see so many huge moon images every time there’s a supermoon? So many questions….
Celestial choreography: Supermoon explained
To understand what a supermoon is, you first have to understand that all orbiting celestial bodies travel in an ellipse, not a circle. That’s because, for two (or more) objects to have the gravitational relationship an orbit requires, each must have mass. And if they have mass, each has a gravitational influence on the other. Without getting too deep into the gravitational weeds, let’s just say that the mutual influence the earth and moon have on each other causes the moon’s orbit to deviate ever so slightly from the circle it seems to be (without precise measurement): an ellipse. And because an ellipse isn’t perfectly round, as it orbits earth, the moon’s distance from us depends its position in its orbit.
An orbiting object’s closest approach to the center of its ellipse (and the object it orbits) is at “perigee”; its greatest distance from the ellipse’s center is “apogee.” And the time it takes an object to complete one revolution of its orbit is its “period.” For example, earth’s period is one year (365.25-ish days), while the moon’s period is a little more than 27 days.
But if the moon reaches perigee every 27 days, why don’t we have a supermoon every month? That’s because we’ve also added “syzygy” to the supermoon definition. In addition to being a great Scrabble word, syzygy is the alignment of celestial bodies—in this case it’s the alignment of the sun, moon, and earth (not necessarily in that order). Not only does a supermoon need to be at perigee, it must also be syzygy.
Syzygy happens twice each month, once when the moon is new (sun-moon-earth), and again when it’s full (sun-earth-moon). (While technically a supermoon can also be a new moon, the full moon that gets all the press because a new moon isn’t visible.) Since the earth revolves around the sun as the moon revolves around earth, the moon has to travel a couple extra days each month to achieve syzygy. That’s why the moon reaches perigee ever 27 days, but syzygy comes every 29.5 days, and the moon’s distance from earth is different each time syzygy is achieved.
The view from earth: Supermoon observed
While perigee, apogee, and period are precise terms that can be measured to the microsecond, a supermoon is a non-scientific, media-fueled phenomenon loosely defined a moon that happens to be at or near perigee when it’s full. To you, the viewer, a full moon at perigee (the largest possible supermoon) will appear about 14% larger and 30% brighter than a full moon at the average distance. The rather arbitrary consensus definition of the distance that qualifies a moon as a supermoon is a full moon that is within 90 percent of its closest approach to earth.
I really doubt that the average viewer could look up at even the largest possible supermoon and be certain that it’s different from an average moon. And all those mega-moon photos that confuse people into expecting a spectacular sight when there’s a supermoon? They’re either composites—a picture of a large moon inserted into a different scene—or long telephoto images. I don’t do composites, but they’re a creative choice that I’m fine with others doing as long as they’re clearly identified as composites.
For an image that’s not a composite, the moon’s size in the frame is almost entirely a function of the focal length used. I have no idea whether most of the moons the full moon gallery below were super, average, or small. The images in this and my previous blog post were indeed super, taken within minutes of each other last Sunday evening, at completely different focal lengths.


Every full moon is super
A rising or setting full moon is one of the most beautiful things in nature. But because a full moon rises around sunset and sets around sunrise, most people are eating dinner or sleeping, and seeing it is usually an accident. So maybe the best thing to come of the recent supermoon hype is that it’s gotten people out, cameras or not, to appreciate the beauty of a full moon. If you like what you saw (or photographed), mark your calendar for every full moon and make it a regular part of your life—you won’t be sorry.
Learn more
A full moon gallery (super and otherwise)
Click an image for a closer look and slide show. Refresh the window to reorder the display.


2017 in the Mirror
Posted on December 26, 2017


One of my favorite things to do at year’s end is to look back at the things that made the year memorable. And my favorite part of this exercise is the realization that, even though I can’t say how, I know I will indeed be similarly rewarded in the coming year.
I’ll remember 2017 for several significant personal milestones, the many unexpected gifts from nature that I call “the most beautiful thing happening on Earth at this moment” moments, and (somewhat more prosaically) a lot of great new equipment that has made photography even more enjoyable for me.
Personal Milestones
New Zealand
In August of 1995 I visited the South Island of New Zealand for the first time. This was in my previous life, back when I trained programmers how to use the programming language of the company I worked for. And though I didn’t make my living as a photographer, I was very much a photographer at heart. My lodging for that trip was in rural countryside outside Christchurch, and I was so taken by the beauty that I carried a camera (this was before cameras were tiny and ubiquitous) on my 7-mile run each morning.
In late June of this year I finally fulfilled my dream to return to New Zealand. For ten days my good friend and fellow photographer Don Smith and I explored the mountains, fjords, lakes, and rainforests near Queenstown, New Zealand. We were scouting locations for a possible workshop, and were not disappointed. Though my previous visit had set my expectations bar quite high, this trip exceeded that bar with ease—Don and I came away with enough locations within a 150 kilometer radius of Queenstown to fill a 10-day workshop. By the time we returned, I was ready to proclaim New Zealand the most beautiful place I’ve ever seen.

Twilight Reflection, Mount Tasman and Mount Cook, Lake Matheson, New Zealand
Total Solar Eclipse
What can I say? There is nothing, absolutely nothing, that can prepare a person for the experience of a total solar eclipse. So. After hearing many words of advice to that effect, I prepared like crazy, then almost blew my chance to photograph it because…, wait for it…, I wasn’t prepared. Honestly, the photographer in me felt like a college freshman trying to chat up a supermodel: pretty cocky going in, and instantly aware I was hopelessly out of my league.
This isn’t something I’m embarrassed about because, if asked to choose between experiencing the moment and photographing it, I’d choose the experience any day. I had no idea that I ended up with a couple of pretty nice images until I reviewed them on my computer later. And I still have no memory of how I did it.

Here Comes the Sun, Idaho, Earth, Solar System, Milky Way
Andromeda Galaxy
Anyone who reads my blog knows how much I love astronomy. It’s an interest that goes back to childhood, and is so much more than identifying constellations (which I’m not especially strong at). Put simply, I love having my mind boggled, and nothing boggles my mind more than the immensity of the universe.
So imagine my excitement when I got the opportunity to peer into a telescope for my first in-person view of the Andromeda Galaxy (at least the first view that wasn’t just a faint smudge in the dark sky). And what could be better than that? How about actually attaching my camera to the telescope and letting it accumulate and record far more light than my eyes saw.

Andromeda Galaxy
The Most Beautiful Thing Happening On Earth At This Moment
Like pretty much every other serious photographer, I always do my best to photograph my subjects in the best conditions. But for landscape photographers, great conditions are never guaranteed. And when they do happen, expected or not, they’re often so spectacular that it feels like I’m witnessing the most beautiful thing happening on Earth at that moment. Here’s a slideshow of my 2017 TMBTHOEATM candidates (in no particular order):
Equipment
When I started this post, I didn’t imagine I’d be writing about equipment. But I realized that probably more than any other year in my career as a photographer, in 2017 I added equipment that actually made a difference.
Here’s a list of my equipment difference makers, and why they made a difference:
Sony 12-24 f/4 G: I’ve never had a lens that allowed me to go this wide. From the first time I took it to Yosemite, I knew it would allow me to photograph things I couldn’t have photographed before.
Sony 16-35 f/2.8 GM: I didn’t think this lens would make much of a difference in my photography, but its combination of speed and incredible sharpness made it my go-to night lens for most situations. I’m not throwing away my Rokinon 24mm f/1.4, but I’ll probably have to dust it off each time I use it.
Sony 100-400 f/2.8 GM: I’ve had lenses this sharp, and lenses this long, but I’ve never had a lens this long that’s this sharp. Not only that, whereas my other earlier long lenses were specialty lenses that I only packed when I planned to use them, this one is compact enough to have become a permanent resident in my camera bag.
Sony a7R III: Despite my love for my Sony a7RII, it had a few significant shortcomings (battery life and a single card slot to name two) that I longed to be fixed. Not only does the a7RIII fix these shortcomings, it actually gives me more dynamic range and better high ISO and I’m in photography heaven.
Here’s a random slideshow if images captured with my new toys:
What’s next?
I have no idea what’s in store for next year, but I’m ready. Bring it on!
Workshop Schedule || Purchase Prints
2017 Highlights
Click an image for a closer look and slide show. Refresh the window to reorder the display.


Three Moons
Posted on December 19, 2017
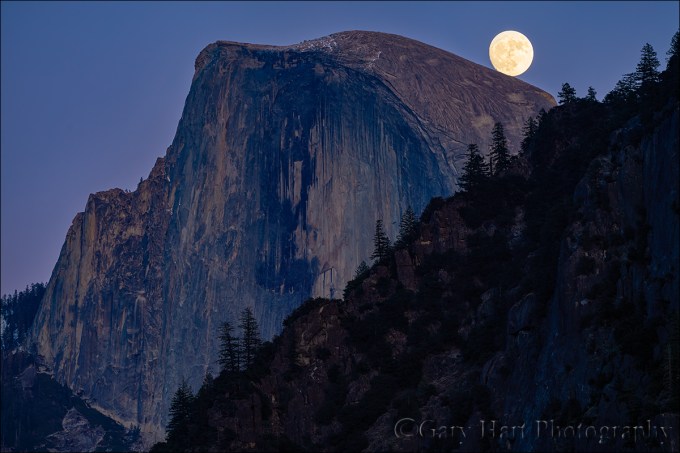
Balanced Moon, Half Dome, Yosemite
Sony a7RIII
Sony 100-400 GM
ISO 100
f/8
1/10 second
This month’s Yosemite Winter Moon photo workshop group got the rare opportunity to photograph a full (or nearly full) moon rising above Half Dome at sunset on three consecutive nights. One reason it’s rare is that, as viewed from Yosemite Valley, the full moon and Half Dome only align in winter. But the real tricky part is making it happen three times when sunset happens at pretty much the same time each evening, but the moon rises about 45 minutes later.
-

- Sunset Moonrise, Half Dome, Yosemite (11/30/17)
-

- Balanced Moon, Half Dome, Yosemite (12/1/17)
-

- Winter Supermoon, Half Dome, Yosemite
My goal for photographing a rising full moon is to get the moon on the horizon in the window from 15 minutes before to 15 minutes after the “official” (flat horizon) sunset. Earlier and there’s not enough contrast and the moon looks bland; later and there’s too much dynamic range to capture detail in the dark landscape and daylight-bright moon.
The key to making this work starts with understanding that when you see a sunset or moonrise time published for a location, that time is always based on a flat horizon. So unless you’re atop a mountain or on a ship at sea, you’ll probably see the sun disappear behind the terrain in the west before sunset, and you’ll probably need to wait for the moon to rise above the terrain in the east.
Since the sun is at my back when a full moon rises, I’m not too concerned about the precise timing of the sun’s disappearance. But I need to be pretty dead-on for the moon’s arrival. Knowing the moon will rise an 40-60 minutes (or so) later each day, it’s easy to infer that the more days until the full moon, the higher the moon will be at sunset. Sadly, I have no control over the timing of the absolute sunset/moonrise, but I can control the elevation of the horizon, and therefore the moon’s appearance on a given day, by choosing my position relative to the horizon above which the moon will rise.
To make this workshop’s consecutive moonrises work, each evening I picked a view that was farther from Half Dome than the previous evening. On our first evening I chose a spot on the east side of Yosemite Valley; the next evening we were closer to the middle of the valley; on our the third evening our vantage point was near Tunnel View, at the opposite side of Yosemite Valley from Half Dome. The moon rose later above the flat horizon each evening, but by moving farther away, we reduced the distance the moon had to travel before it appeared.
Big moon, small moon
The other thing this little exercise illustrates is how to make the moon big in your frame. Notice that in each image, Half Dome is more or less the same size, but the moon gets progressively bigger. That’s because on any given day, no matter where I am on Earth, the moon is so far away that its apparent size doesn’t change. But the size of earthbound features, like Half Dome, changes a lot with proximity. When I was on Yosemite Valley’s east side for the first moonrise, filling my frame with Half Dome required just a little more than 100mm; the next night I was far enough back to require about 250mm to fill the frame; and on the final night, from eight miles away I needed more than 500mm. And as my focal length increased, so did the moon’s size in my frame.
Join me as I do this all over again next December
A Full Moon Gallery


A Winter Morning in Yosemite
Posted on December 10, 2017

Winter Reflection, El Capitan, Yosemite
Canon EOS-1Ds Mark III
Canon 17-40
1/4 second
F/16
ISO 200
Missing snow so far this winter, I’m going through some of my old snow images and came across this one from a few years ago. I’d traveled to Yosemite with the promise of snow in the forecast, but the night before the trip’s final day I went to sleep to the steady hum of rain. The next morning dawned damp and gray—and gloriously silent. Outside a thin veneer of fresh snow dusted the trees, and without even considering breakfast I headed to Tunnel View to survey the valley and plan my morning. By the time I arrived a patch of sunlight had burned a hole in the clouds above Cathedral Rocks and hints blue sky mingled with the clouds behind me. I knew the show there would soon be spectacular, but I’ve photographed many clearing storms from Tunnel View and wanted something different.
Without leaving my car I headed back down into the valley, stopping first at El Capitan Bridge, arriving just before the clouds atop El Capitan started lifting. I photographed there for about 15 minutes, long enough to see El Capitan’s nose go from obscure shadow to distinct outline to fully exposed granite. Before the clouds parted completely, I packed up and made a beeline for nearby Cathedral Beach. In the short time it took to drive a half mile most of El Capitan had emerged from the clouds and I rushed to grab my gear. The road to the beach was closed so I set out on foot, running most of the quarter mile to the river.
I found two other photographers at the west end of the beach and rather than compete with them for real estate, I trudged through the brush and fresh snow to an open space just downstream. There I was able to set up in solitude and move around at will. I was quite pleased to find a snow covered snag protruding from the river, adding a little depth to the foreground.
The beauty of photographing a Yosemite clearing storm is that no matter where you are, something spectacular is happening. Often in these situations I move between locations much more quickly than normal, but this morning I took my time and just enjoyed the show.
Wringing out as many compositions as possible, I started wide with both vertical and horizontal compositions that included El Capitan and the reflection. Next I went a little tighter, capturing just El Capitan, or just the reflection, or some of both. Finally I switched to a telephoto and started picking out individual elements: the swirling clouds and brilliant highlights on El Capitan’s vertical edge, the snow covered snag in the river, and so on.
Technical stuff
A couple of related technical issues raised by this image: First, the focus point of a reflection; and second, where to focus when elements are spread from near to far throughout the frame. It’s counterintuitive to many that a reflection’s focus point is the focus point of the reflective subject, not the reflective surface. In other words, since El Capitan is at infinity, its reflection is in focus at infinity, and not when focused on the snag. If you don’t believe me, try it yourself.
Given that knowledge, and the fact that I generally want whatever’s in my foreground to be in focus (even if it means the background is slightly soft), I had to find a compromise focus point to ensure that both the reflection and the snag were in focus. With an extremely wide focal length and small aperture I was confident I could get the entire scene acceptably sharp if I focused carefully.
There are different approaches to maximizing focus range, such as relatively accurate but awkward hyperfocal charts, and rule-of-thumb guidelines like focusing a third of the way into the frame. Both have merit, and many excellent photographers employ them, but I prefer a more seat-of-the-pants approach that relies on my own experience and understanding of focus range. I generally find the closest subject I want in focus—in this case the snag—and then focus on something a little behind it.
Here I estimated the distance of the snag, found something behind me that I thought was a little farther away, and focused there. At f/16 that gave me a pretty large margin for error and I was confident the image was sharp throughout. Is this an approach I’d recommend for others? Perhaps, though it takes trial and error to perfect. I encourage you to familiarize yourself with hyperfocal distances–you don’t need to memorize them, but a basic understanding of the relationship between f-stops, focal lengths, and focus distance is invaluable for decisions like this.
Here’s an article from my Photo Tips section that might help: Depth of Field.
Workshop Schedule || Purchase Prints
Winter in Yosemite


Moon Over Yosemite
Posted on December 5, 2017

Winter Supermoon, Half Dome, Yosemite
Sony a7RIII
Sony 100-400 GM
Sony 2x teleconverter
ISO 400
f/11
1/8 second
Large or small, crescent or full, I love photographing the moon rising above Half Dome. The alignment doesn’t work most months, so those months when the alignment is right, I do my best to be there.
For last week’s Yosemite Winter Moon photo workshop I’d planned three moonrises: Thursday and Friday we got lucky with the never reliable December skies, but Saturday night concerned me. Not only was this moonrise the “main event,” the forecast was less than promising. And while the first two moonrises were absolutely beautiful, the moon was less full and we were on the valley floor, much closer to Half Dome. Our location required a wider focal length that meant a relatively small moon. But on Saturday (it would rise too late to photograph on Sunday) the moon would be 99 percent full and rise shortly after sunset, just left of Half Dome when viewed from Tunnel View. Tunnel View is eight miles west of Half Dome, a distance, when combined with the moon’s proximity to Half Dome, that would allow a long telephoto that would fill the frame with the moon and all of Half Dome.
Saturday started clear, but soon a thin layer of clouds moved in, bathing Yosemite Valley in diffuse light that was wonderful for photographing pretty much anything that didn’t involve the sky. These clouds weren’t dense enough to completely obscure the sun, but with a chance of rain coming overnight, I knew they’d be thickening at some point.
I got my group in position near Tunnel View about a half hour before sunset. I’ve attempted moonrises that were completely obscured by clouds, and some where we could see the moon’s glow through the clouds, but no detail. I tried to stay positive but the fading light made it impossible to tell exactly how thick the clouds were. Fearing the worst, I rationalized that we’d already had two nice moonrises and maybe wishing for a third was just greedy. But still….
Hoping for the best, I pointed out where the moon should appear about ten minutes after sunset, advising everyone to continue shooting normally until then, but to have an idea of their moonrise compositions. Practicing what I preach, I got out my Sony 100-400 GM, added my 2x teleconverter, and framed up the scene. Because I wasn’t going to shoot anything else (as you may have noticed, I already have a couple of Tunnel View images in my portfolio), I focused and waited.
About five minutes after sunset an amber glow in the clouds next to Half Dome signaled the moon’s imminent arrival. That we could even see any sign of the moon gave me hope and I held my breath as the glow intensified, still unsure whether we’d see lunar detail or just a white blob. The glow was actually unique and very beautiful in its own way and I started clicking. The instant the moon’s brilliant leading edge nudged into view, silhouetting the trees, I knew we were in luck. The landscape was already fairly dark by then, but because this was the group’s third moonrise, they’d become old pros at dealing with the scene’s extreme dynamic range—at that point the workshop’s mantra had become: “Push the exposure until the moon’s highlights start blinking, and fix the shadows in Photoshop.”
The experience that evening was even more spectacular than I had dared hope, a perfect storm of conditions I might never see repeated: the moon’s alignment with Half Dome, the telephoto distance, the timing of the moon’s arrival that put it on the horizon with just enough twilight remaining, and (especially) the translucent clouds that enveloped the moon in a golden halo and eased the scene’s dynamic range.
Some thoughts on the Sony a7RIII
A couple of weeks ago, at a Sony sponsored event in Sedona, I got the opportunity to do some night photography with the new Sony a7RIII. But this Yosemite trip was my first time using the new camera on my own. It’s too soon for any final proclamations, but my general sense is that this camera has even more dynamic range than the a7RII (which is pretty incredible). The other significant takeaway from this weekend is that I used the same battery for three-and-half days and came home with more than 25 percent remaining. Anyone who shot with the a7RII, knows how significant this is.
I’m still getting used to the new camera’s interface—while similar to the a7RII, there are definite differences. I do like the new button layout and improved menu interface, but am still getting used to the joystick and touchscreen—pretty sure I’ll learn to love them too. And the dual card slots are a necessary and most welcome improvement.
My biggest complaint with the new camera is that the back-button focus that I loved so much on the a7rII is broken on the a7RIII. Every camera I’ve ever used (Canon and Sony) has allowed me, after tweaking some settings, to switch seamlessly between auto and manual focus without requiring me to change the focus mode. So the first thing I do when I get a new camera is disengage autofocus from the shutter button and assign autofocus to a button on the back of the camera. With back-button focus enabled, my workflow has always been manually focus by default, but always with the ability to autofocus with the simple push of a button—no focus mode change required. Doing this with the a7RII was the easiest of any camera I’ve ever used, but for some reason Sony changed the focus behavior of the a7RIII, so now I have to deal with the added step of switching focus modes on the camera before focusing. This might not sound like a big deal, but I don’t want to have to think about my camera when I’m composing a scene, so this behavior is extremely frustrating. That said, I’ve already communicated my frustration to Sony’s engineers and am hopeful (confident?) this is a firmware fix that will come soon. Sony’s responsiveness to things like this is one of the reasons I’m so happy I made the switch from Canon.
I’m happily retracting those words after Sony found a solution for the a7RIII back-button focus problem. At last month’s Sony media event Sedona, I was surrounded by Sony’s best and brightest engineers; when I brought the BBF problem to their attention, we all scratched our heads over how to make it work, and they finally asked me to send them a detailed write-up. They promised to address it ASAP, but I didn’t think it would happen without a firmware update.
To enable back-button focus on a Sony a7RIII or a9, simply assign any custom button (Tab 2, Screen 8) to the AF/MF Control Hold option (AF1 screen). To use BBF, keep the camera in Manual Focus mode—this allows you to manually focus with the focus ring, or to autofocus by pressing whatever button you assigned AF/MF Control Hold.
Bottom line
I’m pretty sure this is the best camera I’ve ever had my hands on. In fact, the dynamic range improvement was obvious as soon as I started processing this moonrise shoot—we continued shooting about 25 minutes after sunset, and just a little processing reveals useable detail in my highlights and shadows, even in my final image. Ridiculous.
A couple of full moon photography tips
Sun and moon rise/set times always assume a flat horizon, which means the sun usually disappears behind the local terrain before the “official” sunset, while the moon appears after moonrise. When that happens, there’s usually not enough light to capture landscape detail in the moon and landscape, always my goal. To capture the entire scene with a single click (no image blending), I usually try to photograph the rising full moon on the day before it’s full, when the nearly full (99 or so percent illuminated) moon rises before the landscape has darkened significantly.
The moon’s size in an image is determined by my focal length—the longer the lens, the larger the moon appears. Photographing a large moon above a particular subject requires not only the correct alignment, it also requires distance from the subject—the farther back your position, the longer the lens you can use without cutting of some of the subject.
This moonrise image is a perfect example. Tunnel View in Yosemite is one of my favorite locations to photograph a moonrise because it’s about eight miles from Half Dome. At this distance I can use 500+ mm (250mm plus a 2x teleconverter) to fill my frame with Half Dome—with the moon nearby, I get an image that includes all of Half Dome and a very large moon.
Moon Over Yosemite
Click an image for a closer look and slide show. Refresh the window to reorder the display.


Photography’s Creativity Triad: Depth
Posted on November 18, 2017
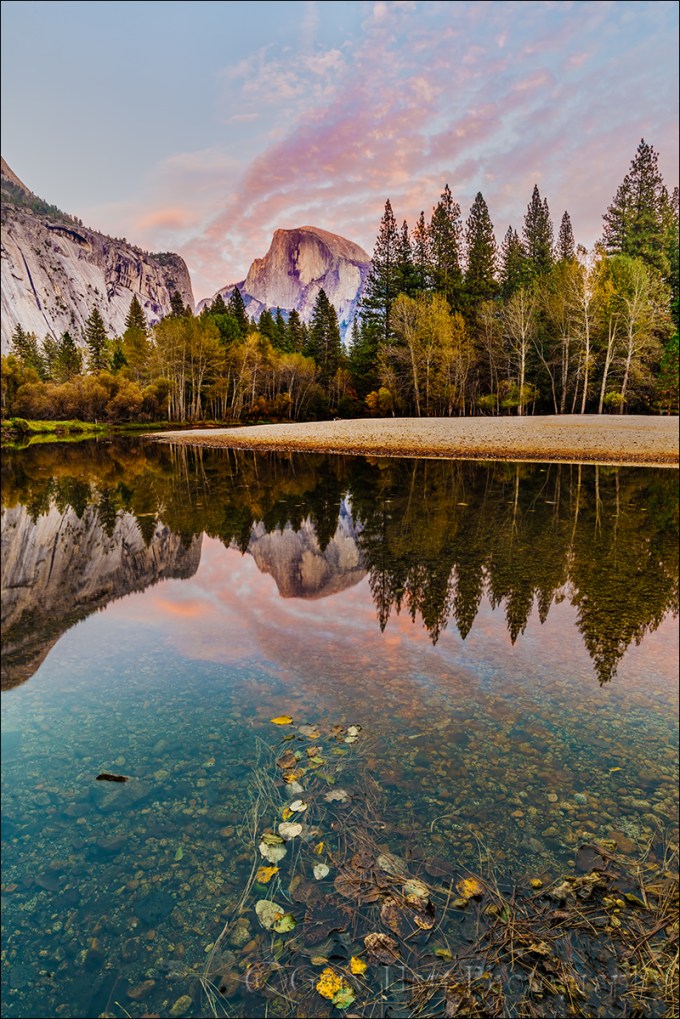
Autumn Reflection, Half Dome, Yosemite
Sony a7R II
Sony 16-35 f/2.8 GM
.8 second
F/16
ISO 200
Photography’s Creativity Triad
Enduring photographs don’t duplicate human reality, they reveal unseen aspects of our world. Capturing this hidden world requires mastery of photography’s “creativity triad” that distinguishes the camera’s vision from human vision: motion, light, and depth.
Photography is the futile attempt to squeeze a three-dimensional world into a two-dimensional medium. But just because it’s impossible to truly capture depth in a photograph, don’t think you shouldn’t consider the missing dimension when crafting an image. For the photographer with total control over his or her camera’s exposure variables (what exposure variable to change and when to change it), this missing dimension provides an opportunity to reveal the world in unique ways, or to create an illusion of depth that recreates much of the thrill of being there.
Creative Selective Focus
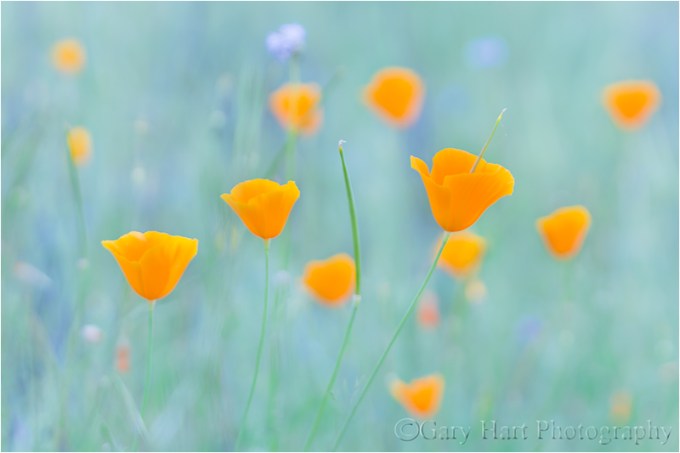
Poppy Pastel, Sierra Foothills, California (1oomm, f4, ISO 400, 1/125)
A personal favorite solution to the missing depth conundrum I call creative selective focus: An intentionally narrow depth of field with a carefully chosen focus point to flatten a scene’s myriad out-of-focus planes onto the same thin plane as the sharp subject. This technique softens distractions into a blur of color and shape, complementing and emphasizing the subject.
I especially enjoy using creative selective focus for isolation shots of colorful leaves each autumn, and for dogwood and poppy close-ups in spring. Looking for a striking subject that stands out from the surroundings, I position myself to create foreground and/or background relationships that complement my primary subject.
When composing the poppy scene depicted here, I tried to frame the foreground trio of poppies with distant poppies and other wildflowers that I knew would become soft splashes of color. Using a macro lens with extension tubes, a large aperture, and a very close focus point, I achieved a paper-thin range of sharpness that softened the busy background and helped my primary subjects stand out.
A couple of years ago I wrote an article on this very topic for “Outdoor Photographer” magazine. You can read a slightly updated version of this article in my Photo Tips section: Selective Focus.
The Illusion of Depth
Sometimes a scene holds so much near-to-far beauty that we want to capture every inch of it. While we can’t actually capture the depth our stereo vision enjoys, we can take steps to create the illusion of depth. Achieving this is largely about mindset—it’s about not simply settling for a primary subject no matter how striking it is. When you find a distant subject to feature in an image, scan the scene and position yourself to include a complementary fore-/middle-ground subjects. Likewise, when you want to feature a nearby object in an image, position yourself to include a complementary back-/middle-ground subjects.
Autumn Reflection, Half Dome, Yosemite
Guiding my workshop group to a placid bend in the Merced River on this year’s Yosemite Autumn Moon photo workshop, I was instantly drawn to the reflection of Half Dome. The cottonwoods lining the distant shoreline were at their peak autumn gold, and a collection of clouds above Half Dome caught the late afternoon sun, promising good odds for a colorful sunset. These features alone would have made a great image, but I looked around for something to add to the close foreground.
I didn’t need to look long, as just about fifty feet downstream I found a collection of colorful leaves jutting into the river, perpendicular to the shore. I shifted my position until the leaves appeared to point directly at Half Dome and dropped my tripod until my camera was about a foot above the water. With a half hour or so until sunset, I had plenty of time to play with the scene, familiarize myself with all the compositional variables, and refine my composition and focus point. Despite the relative closeness of the floating leaves, at 16mm I knew I had plenty depth of field to carry the entire scene if I was careful. Stopping my lens down to f/16, I focused on a leaf near the middle of the group, about two feet away. This gave me good sharpness from about a foot to infinity and I was in business.
Here’s my Photo Tips article on using hyperfocal focus techniques to enhance your images’ illusion of depth: Depth of Field.
Managing Depth


Yosemite Reflections
Posted on October 28, 2017

Spring Sunset, Leidig Meadow, Yosemite
Sony a7R II
Sony/Zeiss 16-35
3.2 seconds
F/9
ISO 200
Rather than attempt the impossible task of choosing a favorite season in Yosemite, I find it easier to identify the things I like most about each season. From colorful fall to white winter to saturated spring, Yosemite becomes a completely different place with each season. (FYI, summer is for tourists.) But regardless of the season, I think it’s Yosemite’s reflections that make me happiest.
Yosemite’s reflection locations vary with the season. After a storm, small reflective pools form in Yosemite’s ubiquitous granite, then disappear almost as quickly as they appeared. The Merced River, is a continuous ribbon of reflection in the late summer and autumn low-water months, and a churning torrent in spring. But even in those high snowmelt months, reliable pockets of calm can be found along the riverbank, and there are a handful of spots where the river widens and smooths enough to reflect color and shape.
I think my favorite Yosemite reflections may be the ones I find in the flooded meadows during a wet spring, not necessarily because they’re any more beautiful than the other reflections, but mostly because they’re much more rare. Many years we don’t get these vernal pools at all, and even when they do form, their lifetime is measured in days or weeks.
Following years of drought, a record winter snowfall earlier this year translated to a record spring snowmelt, sending the Merced River well over its banks and into many of Yosemite’s normally high-and-dry meadows. This wasn’t “run for your life!” flooding, it was a gradual rise that seeped into and eventually submerged meadows, trails, and even some Yosemite Valley roads.
Leidig Meadow west of Yosemite Lodge is one of those spots that doesn’t usually flood, but flooding here is far from unprecedented. This year when I parked in my usual spot west of the meadow and attempted the normally relaxing 1/4 mile stroll along the river, I had to wade through eight inches of water to make it to the meadow. When I returned a few days later with my workshop group, even after choosing another somewhat less treacherous parking spot, we still had to pick our steps carefully or risk a shoe-full of water.
Meadows are always fragile, but never more-so than when they’re wet, so rather than venture further into the meadow, we set our sights on the numerous reflections among the trees near the (mostly submerged) trail. Even still, we ended up with a number of wet shoes and pant legs, some accidental and some by design (to get the shot, of course).
When it appeared the sunset show was over, the group started to pack up and head back to the cars. About the time I was ready to call it myself, I noticed a little bounce-back pink in the thin clouds overhead and warned everyone that they might be packing it in a little too soon. Many were anxious to get dry and escape the mosquito feast, but those of us who stayed were rewarded with about ten minutes of post-sunset color that went from pale pink to electric magenta, one of those moments in nature that you think just can’t get any better until somehow it does.
Reflecting a bit on reflections
A reflection can turn an ordinary pretty picture into something special. Of course they aren’t always possible, but when the opportunity exists I pursue reflections aggressively, scanning the scene for potentially reflective water and positioning myself accordingly. Too often I see people walk up to a reflection, plop down their tripod, and make a picture of whatever happens to be bouncing off the water at their feet. But maximizing reflection opportunities starts with understanding that, just like a billiard ball striking a cushion, a reflection always bounces off the reflective surface at exactly the same angle at which it arrived.
Armed with this knowledge, when I encounter a reflective surface, I scan the area for something worthy of reflecting. Sometimes that’s easy (Half Dome, for example), sometimes it’s a little tougher (like a rapidly moving sunlit cloud). Knowing that all I need to do is position myself in the path of the reflection of my target subject, I move left/right, forward/backward, up/down until my object appears. I’ve observed that many people are pretty good about the left/right thing, not quite so good with the forward/backward part, and downright miserable at the up/down. But I’ve found that once I get the left/right position nailed, it’s the up/down that makes the most difference.
For example, in the spring reflection of Half Dome at the top of this post, it’s not an accident that the Half Dome and North Dome reflections are centered and uncluttered by all the grass and leaves scattered throughout the water. The centering part was pretty easy, but finding a large enough clean surface to reflect the two domes required a lot of forward/backward maneuvering, combined with frequent up/down dipping—I’m sure to the uninformed observer it appeared that I was trying out a new dance routine.
Read more about reflections
A Gallery of Yosemite Reflections


Playing with my new toy
Posted on October 21, 2017

Tufa Pastel, South Tufa, Mono Lake
Sony a7R II
Sony 12-24 f4 G
1/20 second
F/10
ISO 160
Leading 15-20 photo workshops per year means coming to terms with photographing the same locations year in, year out. This is not a complaint—I only guide people to locations I love photographing—but it sometimes makes me long for the opportunity to capture something new. Which is why I’m loving visiting my familiar haunts with my newest lenses, the Sony 12-24 G and Sony 100-400 GM. (I’ve had the Tamron 150-600 for a couple of years, but find it too big to lug routinely.)
Back-to-back Eastern Sierra workshops earlier this month meant multiple visits to Mono Lake. My first group hit the jackpot on our South Tufa sunset shoot, finding a glassy reflection (usually reserved for sunrises here) beneath a striking formation of cirrocumulus clouds. Because I was with my group, and I’d guided them all to the spot where the majority wanted to be (justifiable so for first-time visitors), I couldn’t go out in search of something a little different. Instead I just whipped out my 12-24 lens, dropped my tripod to lake-level with one leg in the water, and started composing.
I’m still getting used to shooting at 12mm, which is not only considerably different from what my eyes see, it’s considerably different from what I’ve become used to seeing in my viewfinder (the difference between 16mm and 12mm is huge). The lesson here is the importance of a strong foreground in a wide composition—the wider the focal length, the more important the foreground becomes. Here the entire lakebed was so alive with color and shape, and the water was so still and clear, finding a foreground wasn’t really a problem. I just needed to make sure I organized all the scene’s visual elements into something coherent.
Anchoring my frame with a nearby quartet of small rocks (just a couple of feet away) and a larger protruding lump of tufa a little behind it (everything else in my foreground was submerged), I peered into my viewfinder and quickly decided to go for symmetry with the larger background elements. The clouds couldn’t have been more perfectly positioned—combined with their reflection, they seemed to point directly my composition’s centerpiece, the “Shipwreck” tufa formation (not really an official name, but widely used) that is probably Mono Lake’s most recognizable feature. At 12mm depth of field wasn’t a huge concern—I focused about three feet into the scene and was able to achieve sharpness throughout my frame.
Anyone who has ever been to Mono Lake’s South Tufa can appreciate, looking at this image, how 12mm on a full frame body shrinks distant subjects—the Shipwreck is a very prominent feature here, but the wide lens shrinks it to almost secondary status. On the other hand, dropping down and getting as close as possible to the shore at 12mm really emphasizes the beautiful submerged patterns.
A Mono Lake Gallery
Click an image for a closer look and slide show. Refresh the window to reorder the display.


