Eloquent Images by Gary Hart
Insight, information, and inspiration for the inquisitive nature photographer
Watch Out For That Tree
Posted on July 24, 2022

Reflection on the Rocks, Wanaka Willow Tree, New Zealand
Sony a7RIV
Sony 12-24 f/4 G
1/5 second
F/11
ISO 100
I’m incredibly blessed to make my living guiding enthusiastic photographers to many of our planet’s most beautiful locations. While this makes my life far too rich for complaint, let me say (without complaining) that a particular challenge imposed by frequent return visits to the same locations is finding unique ways to photograph them.
My usual go-to approach at these familiar locations is to play with the scene’s “creative triad,” using the exposure variables manage my images’ motion, light, and depth. Whether it’s blurring or freezing water, going for silhouettes or high key, or choosing depth-of-field from narrow to extreme, I love love playing with these variables to create something unique. But some scenes don’t even offer a lot of those opportunities.
Never is that more clear than when I visit the solitary willow tree near the south shore of Lake Wanaka in New Zealand. This striking tree just stands by itself in a lake (most of the time), with little motion, silhouette, or depth of field options to play with.
Nevertheless, each time I visit Wanaka, I challenge myself to find a version of the scene that’s different from anything I’ve captured. And just because I don’t have my full arsenal of creativity weapons doesn’t mean I’ve arrived completely disarmed.
Without the creative triad, my creativity relies largely on some combination of conditions, juxtaposition, and focal length. As you can see in the gallery below, the conditions at the time of my visit play a huge role in my creative choices. Weather conditions for sure, but also things like the quality of the reflection, the light, and whether it’s day or night.
Because a picture is worth a thousand words, I’ll spare you long explanations and share some examples with just a few words of explanation

Wanaka Reflection, New Zealand
New Zealand’s winter clouds are a frequent source of delight. This image was captured late-morning (not usually great light), but the clouds and reflection were so nice that I couldn’t resist shooting. I chose a horizontal composition because it allowed me to include more clouds reflection, while filling the frame top-to-bottom with the tree and its reflection, than a vertical would.

Red Sunset, Lake Wanaka, New Zealand
Juxtaposition is almost always a prime consideration. I especially love the snow-capped Southern Alps, so all things equal, I’ll usually position myself so they’re in the background. In this scene the reflection was slightly disturbed by gentle undulations on the lake’s surface, so I added a 6-stop neutral density filter to smooth the water. The resulting 30-second exposure also softened the fast moving clouds—a bonus.

Gray Dawn, Lake Wanaka, New Zealand
But it’s not always about background juxtaposition. For example, one morning the fog was so thick, the background was completely irrelevant, so I chose a spot that best emphasized the tree’s shape and allowed me to fill my foreground with a mosaic of barely submerged stones.


One of the conditions I have at least partial control over is stars. By going out after dark on a clear night, I can include stars. And depending on the timing, I can juxtapose the tree with the Milky Way. Because these images were captured at different times of the night, including the Milky Way resulted in completely different backgrounds. The first image came a few hours after sunset, when the Milky Way hung above the amber lights of Wanaka; the second image came on a different night, a couple of hours before sunrise, when the Milky Way had rotated above the Southern Alps.

Lone Willow Reflection, Lake Wanaka, New Zealand
I wasn’t really crazy about the sky when I captured this image, but I liked the background peaks and low-hanging clouds. So I retreated down the lakeshore, away from the tree, and then climbed a gentle slope to distance myself even further, then used a telephoto to enlarge the tree and shrink the distance between it and the mountains and clouds.

Reflection on the Rocks, Wanaka Willow Tree, New Zealand
This image is the product of a last minute change to the sunset plan in this year’s New Zealand workshop that I do with Don Smith. We had a feeling something special might happen at Lake Wanaka, and wanted make sure we had the group in the best possible spot in case it did. Read more about this evening in my June 28 blog post.The beautiful clouds that had started the evening over the Southern Alps were quickly moving southeast and out of my frame. My options were to hold my position and photograph the tree with the mountains and no clouds, or reposition myself to feature the best of the clouds against the town of Wanaka. I went with the clouds.
Because I saw the potential for a beautiful sky, I went went wide to maximize the sky, choosing my Sony 12-24 f/2.8 GM lens on my Sony a7RIV body. I positioned myself so the reflection mirrored the arc of retreating clouds, creating a frame for the tree. I was aware that I was picking up the homes and buildings lining the opposite lakeshore, but felt that was justifiable compromise to ensure the best clouds and sunset color potential.
The light was beautiful when I started, but it just kept improving as the color ramped up. Every few minutes I repositioned myself to keep the tree framed by the shifting clouds. Wanting to feature the flat, multi-toned rocks visible beneath a thin veneer of still water, I dropped my tripod and moved it a foot or so into the water. And finally, I shifted just enough for the trunk to split the gap between two distant peaks. Going vertical allowed me to get the full arc of clouds and their reflection above the rocks, with less far lakeshore than a horizontal composition would have.
This image required very little processing, but I did burn the far lakeshore a little to deemphasize the buildings there.
Workshop Schedule || Purchase Prints || Instagram
Variations on a Tree


Before and After
Posted on June 28, 2022

Reflection, Lake Wanaka Willow Tree, New Zealand
Sony 𝛂1
Sony 24-105 G
1/20 second
F/11
ISO 100
I’m sitting in the Queenstown, New Zealand airport waiting to board the first of four flights that will total 26 hours and land me a mere 2-hour drive from home. While I’m still coherent, I’ll attempt to whip out this week’s (slightly late) blog post, using low hanging fruit from the just-completed New Zealand workshop: The always beautiful Wanaka Willow Tree.
Each year (that we’re not thwarted by a global pandemic) Don Smith and I guide one or two groups of photographers to our favorite locations on New Zealand’s indescribable South Island. In a land brimming with highlights, right near the top of this workshop’s highlights is our visit to the lone willow tree in Lake Wanaka.
The Wanaka Willow is arguably the most photographed tree in the world. Rising in solitary splendor from the glassy surface of Lake Wanaka, further enhanced by a backdrop of snow-capped peaks, the graceful outline of this arboreal icon has pleased visitors for decades. With free public parking just 100 yards away (or a five minute stroll from the workshop hotel), the tree’s effortless access makes it easy for all to enjoy.
I first photographed the tree in 2017, and have returned maybe a dozen times since—sunrise and sunset, day and night. In addition to the wonderful photography, on each visit I’m struck by the pleasure viewing it brings to everyone present. Whether they came to photograph, meditate, or simply gaze, each visitor is soothed by its presence, and seems infused with an infectious, positive spirit.
So, right at the start of the pandemic, to say I was mortified to learn that someone had vandalized this glorious tree would be an understatement. Visitors that morning in March 2020 were shocked to discover that overnight someone had taken a saw to several of the branches, including the graceful bottom branch that dipped toward the water before arcing skyward. I won’t even try to comprehend what would motivate someone to damage this source of so much joy for so many people, but it’s disturbing to know that we share the same planet.
Given all this, I was somewhat apprehensive about my first post-pandemic visit to the Wanaka Willow. Had it been ruined? Will we be forced to strike Wanaka from our New Zealand workshop destinations?
After photographing it twice on this month’s trip, I’m happy to declare that, while the Wanaka Willow may be (metaphorically) down, it’s far from out. Despite its scars, this solitary survivor has maintained its essence, and the joy remains. This year’s experience showed me that the Wanaka Willow’s appeal is so much more than its distinctive outline, and given its sublime setting, the new version has a chance to establish a new distinctive (albeit somewhat less graceful) outline.
The Wanaka Willow Before and After


Every time Don and I take a group to Wanaka, we like to give them a preview of the tree so their first exposure to it isn’t in the dark, at the start of the sunrise shoot. This year we checked that box with a lunch stop as we passed through town on our way to Fox Glacier.
Returning to Wanaka a couple of days later, the original plan called for a sunset shoot elsewhere on the lake, followed by a sunrise shoot at the tree. But with a forecast that included a chance of rain the next morning, we decided the tree shoot in particular is too important to risk and offered to split the group so anyone who wanted to go to the other spot could. Fortunately, the vote was unanimous to stay at the tree.
I love it when things work out and I look a lot smarter than I am. That evening’s sunset delivered beautiful pink clouds reflecting on a mirror surface. I captured this image toward the end of the sunset, after most of the clouds had moved on. As I was about to pack up, I spied one remaining cloud fragment reflecting in the lake and ran down to a spot where I could juxtapose it with the tree. While the earlier brilliant pink had softened to muted pastels, I thought the subdued tones enhanced the moment and perfectly reflected the quiet peace I felt.
More Trees


Making a Scene
Posted on May 9, 2022
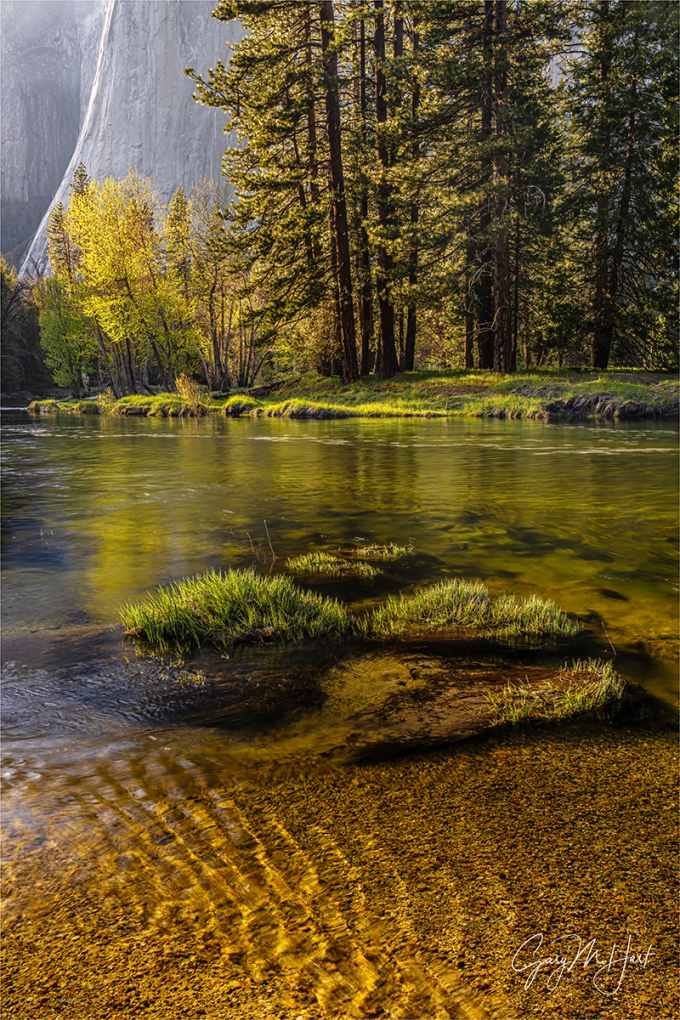
Spring Evening, Cathedral Beach, Yosemite
Sony 𝛂1
Sony 24-105 G
1/3 second
F/16
ISO 50
Think about what goes into making a landscape image. If the scenes and conditions are our raw materials, then it would be logical to say that our camera gear is our tools. But in addition to cameras, lenses, and other physical photography hardware, I’d say that our photography toolkit also includes the techniques we employ to deal with nature’s fickle whims.
And speaking of fickle whims, it’s impossible to deny that conditions make some scenes easier than others. But as much as I long for crimson sunsets, vivid rainbows, mirror reflections, and a host of other natural phenomena that can make virtually any shot feel like a slam dunk, these things are not always available when I want to make an image. For me, one of the greatest challenges is overcoming the boring (cloudless) skies that my California home is known (and loved) for. Not only do blank skies add rarely anything to a scene, they’re responsible for harsh light and the extreme dynamic range that even the best cameras struggle to handle. What’s a photographer to do?
For starters, we need to open our mind (and eyes). One of photography’s less heralded gifts is its ability, over time, to teach us to tune-in to nature’s subtleties, and how to leverage conditions that we once viewed as too difficult, into beautiful images. Fortunately, difficult doesn’t mean impossible—in fact, difficult can be downright fun. And the truth is, there are a lot of ways to overcome boring skies. Here are some suggestions:
- Shade: One of my favorite approaches to blank skies is photographing moving water, spring flowers, and fall color in full shade. While not spectacular, shade light is shadowless and easy to work with. It also makes it easy to blur water without a filter.
- Reflection: For the best reflections, look for sunlit subjects (the brighter the better) reflecting in still, shaded water.
- Sunstar: Any time the sun’s up, a sunstar is a readily available addition option for spicing up your scene. Position yourself so all but a small sliver of sun is blocked by an opaque object (such as a tree, rock, or the horizon), dial your f-stop to f/16 or smaller. Note that some lenses deliver sharper, more defined sunstars than others, and in general, wide lenses work best, especially primes and high quality zooms.
- Silhouette: Blank skies at sunrise and sunset are a great opportunity to create silhouettes that emphasize color and shape by eliminating everything in the scene except color and shape. Better still, incorporating a crescent moon (which always rises just before the sun, and sets just after the sun), can take silhouette scenes to the next level.
- Stars: Don’t forget the night sky. Often when I’m disappointed by a lack of clouds at a nice location, I just wait until dark and photograph the scene by moon- or starlight.
- Black and white and infrared: While I don’t photograph B&W and infrared, they are wonderful techniques for dealing with harsh midday light.
For example
Given their frequency, I’ve become pretty good at making the best of blue sky days in Yosemite. While last month’s Yosemite Waterfalls and Dogwood photo workshop did enjoy a few clouds, we also dealt with a fair amount of blank skies. For our first sunrise we photographed silhouettes and a rising crescent moon. And later in the workshop we spent a couple of hours photographing dogwood in the shade (mixed with a little sunlight) in the Fern Springs / Pohono Bridge area. But I think my favorite blue sky shoot came at Cathedral Beach on the workshop’s penultimate afternoon.
Cathedral Beach is an up-close view of El Capitan right on the Merced River. The low and slow flow of autumn makes a glassy reflection here, and in the months closer to the winter solstice, when the sun is farther south, all of El Capitan gets spectacular late afternoon light. But by mid-spring the river rushes and swirls with snowmelt, and the sun has moved so far north that only El Capitan’s west-facing wall gets late sunlight. But as you can see, all is not lost.
Viewing El Capitan from Cathedral Beach that afternoon, the first thing to catch my eye was the gorgeous light etching the otherwise shaded granite’s vertical plunge. No less spectacular was the brilliant backlight illuminating the cottonwood and grass across the river and reflecting color in the river.
I pulled out my (brand new!) Sony A1 and pondered my lens choice. Since capturing all of El Capitan from this location requires something wider than 24mm, I’d normally go with my Sony 16-35 GM or 12-24 GM lens here. But with no clouds and most of El Capitan in shade, I really wanted to eliminate the sky, most of the granite, and the less interesting surrounding foliage, so I reached for my Sony 24-105G lens.
This scene worked as a horizontal or vertical, but I finally zeroed in on the vertical composition because it was the best way to distill the scene down to its essentials: El Capitan’s edge light, the backlit foliage, the reflection, and the gold-flecked riverbed beneath parallel ripples. I moved along the riverbank until all this good stuff aligned with the set of grassy mounds catching light in the near foreground. I wanted front-to-back sharpness, so I stopped down to f/16 and focused on the most distant of the foreground mounds. And even though I didn’t have a mirror surface, I dialed the reflection up with my polarizer to add a little color to the river.
In Yosemite it’s hard to take a bad picture, but some are more rewarding than others. While I doubt it will be one of those images that goes viral, this image makes me especially happy because finding it and assembling all the components took a little creative effort.
Workshop Schedule || Purchase Prints || Instagram
The Cure for Blank Skies


, California")


This is My Office
Posted on April 5, 2022
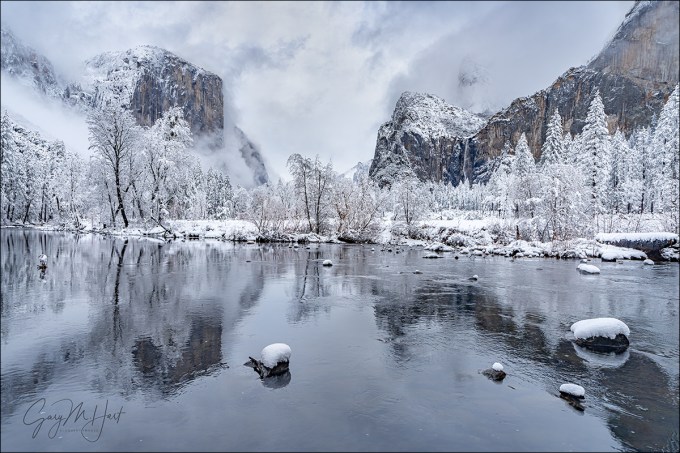
Fresh Snow, Valley View, Yosemite
Sony a7RIV
Sony 16-35 f/2.8 GM
1/15 second
F/9
ISO 100
More than 15 years ago I left a good job at an excellent (and very well known) tech company to pursue a career in nature photography. After all, I had a good camera and years of amateur photography experience—what could possibly go wrong? Turns out I had no interest in any of the kinds of photography that actually make money, so (in hindsight) my decision was somewhat riskier than I had imagined. But, while photography hasn’t brought me great financial fortune, I do indeed feel rich beyond all measure.
Since first picking up a serious camera in my early 20s (an Olympus OM-2, if you must know), I’d been a very content amateur photographer, able to choose my photo destinations and the images I clicked for the sheer joy they brought. Period. But, being stuck in a job that stifles your creativity tends to make you rethink life choices.
At the time I’d found myself swept up in the earliest waves of the photography renaissance spurred by digital capture. I loved the instant feedback and control it brought, and started fantasizing about a transitioning my livelihood to photography. But as I started plotting my transition, I sensed that a significant risk of turning one’s passion into a profession is making choices based on the income they generate rather than the pleasure they bring. Hoping to keep the joy in my photography, I made a personal vow to only photograph what I want to photograph, and to never take a picture just because I thought it would earn money.
To honor this commitment while still paying the bills, I blended my 20+ year career in technical communications (tech writing, training, and support) with my years of photography experience and subject knowledge, to create a photography business based on photo workshops rather than image sales. (Of course I do sell images too, but because I’ve always viewed image sales as a bonus rather than something to something I rely on, I’ve been able to honor my commitment to only take pictures that make me happy.) And here I am.
I’m thinking about this right now because sometimes I’ll come across an image that reminds me how lucky I was to have been at these places when I would have otherwise been fighting traffic or imprisoned in a cubicle. I found today’s image while engaged in one of my favorite idle time exercises: Start with a favorite image, return to the folder for that trip, and look for unprocessed images captured in the conditions of that day. This time, overdue for a blog post, I didn’t go too far back, ending up revisiting my images from the snowy opening day of last year’s December Yosemite Winter Moon workshop.


Given how happy the previously shared images from this day make me, this choice was low hanging fruit, but I’m actually a little surprised to have found something I like as much as, or more than, what I already had.
When I’m in the park by myself I tend to avoid from the popular spots. But these spots are popular for a reason, and since this was the workshop’s first day, I wanted to give my group a chance to photograph the iconic scenes in the best conditions. Granted (speaking of low hanging fruit), Valley View is one of those spots that really doesn’t need help to be beautiful, so adding fresh snow almost seems unfair. But after a lifetime of visiting Yosemite, I can honestly say that it doesn’t get much better than this, and it was a treat to be able to share that beauty with an appreciative group. The fact that this was the first view of Yosemite for some (but I didn’t have the heart to tell them it’s not always like this) made it even more memorable for me.
For this composition I used the snow-capped rocks to add a little foreground interest. They’d have been pretty hard to avoid anyway, but I was very conscious of where I set up my tripod to control where the rocks landed in my scene—not too close to the borders, and not merged with the important parts of the reflection.
In addition to the snow, the clouds this afternoon were truly special—not only the swirling fragments between El Capitan and Cathedral Rocks, but also the column that appears to be tumbling down El Capitan like a waterfall. Just another day at the office….
The View From My Office
Click an image for a closer look, and to view a slide show.


")


, California")


Worth the Sacrifice
Posted on March 13, 2022

Aurora Reflection, Vestrahorn, Iceland
Sony a7RIV
Sony 12-24 GM
15 seconds
F/2.8
ISO 3200
Photography should, first and foremost, make you happy. But every once in a while, for some reason (I have to be really bored) I’ll surf over to an online photography forum or Facebook photography group, only to be instantly reminded why it’s been so long since I visited. The litany of online insults, one-upmanship, and destructive criticism makes me wonder whether there are any happy photographers out there.
Of course I know there are, because I meet them all the time: in my workshops, on location, or simply sharing their images online. I don’t know whether the same photographers who seem so happy when they’re taking pictures do a Jekyll to Hyde transformation as soon as their butts hit the computer chair, or whether there are two types of photographers: those who actually take pictures, and those who simply prefer their computer to Mother Nature (no wonder they’re so unhappy).
Of course getting out to take pictures does require more effort than sitting at a computer. And nature photography usually requires some level of sacrifice because the best time for photography is usually the worst time to be outside: sunrise, when we’d rather be in bed; sunset, when we’d rather be at dinner; crazy weather, when we’d rather be warm; and after dark, when we’d rather be in front of the TV. But I’ve decided that there’s something about witnessing Nature’s majesty that transcends any transient discomfort and inconvenience. And doing it with people who appreciate it as much as you do makes it even better.
Don Smith and I got another reminder in last month’s Iceland photo workshop. On this trip we dealt with all the wind, snow, and frigid temperatures you’d expect in Iceland in February. And then there were the long days and bumpy miles—not to mention a fair share of unexpected hardship. For example, less than 36 hours after clicking this image, several members of our group were nearly swept into the North Atlantic by a rogue wave. Then there were the hotel room snow drifts (note to self: Don’t sleep with the window open in Iceland in February), the lost and found camera bag, the stolen airport shuttle….
But despite all this difficultly, this trip was an absolute blast. This night is a great example. It must have been freezing, but I have no memory of that now. But I do remember standing on the beach beneath Vestrahorn with the rest of the group that night, the waves washing over (and sometimes into) our boots, waiting for the northern lights. Approaching from behind was a storm that, according to the forecast, threatened to close the roads. This scene is beautiful in any conditions, and to be able to photo Vestrahorn under the stars, with even a little bit of aurora, was truly special. Doing it with a group of like-minded, fun loving friends is something I’ll never forget.
What you see here is about as good as the aurora got—nice, but nothing spectacular. Nevertheless, we were having such a great time, we stayed out in the cold dark until the clouds swallowed the stars. Back at the bus, with a storm threatening and an hour’s drive back to the hotel, we were anxious to get on the road. So imagine our chagrin when Óli (or Icelandic guide) turned the key and got nothing but a click. If you’ve every photographed Vestrahorn from here, you know this isn’t one of those places where you can just walk out onto the road and flag down a car. Uh-oh. It would have been easy, understandable even, for people to be upset—or frightened, or angry. Instead, while Óli worked his phone trying find help (the cellular coverage in Iceland is fantastic, FYI), we just continued enjoying each other’s company.
As it turned out, we only had to wait an hour or so for a friend of Óli’s to come out and give us a jumpstart (one more reason why it pays to have a local guide). He also arranged for another friend to drive our direction with van large enough for the entire group, in case the battery charge didn’t hold. Rather than wait for the backup vehicle to arrive, we just started driving in toward the hotel—the other vehicle met us halfway and followed us from there, but we made it without need for more help.
The next morning the battery was dead again, and we were stuck at the hotel all morning while the bus was being repaired (turned out to be an alternator problem). As luck would have it, the storm was so bad that we’d have had to stay in anyway. That afternoon we were picked up for our visit to the ice cave, and the bus was good as new when we returned. So all’s well that ends well.
Worth the Sacrifice
Click an image for a closer look, and to view a slide show.


Doing the Scene Justice
Posted on January 19, 2022

Falling Snow, El Capitan, Yosemite
Sony a7RIV
Sony 12-24 f/2.8 GM
1/250 second
F/9
ISO 800
Woe is me
I just returned from nearly a week in Death Valley, where I had virtually no connectivity (wifi at my hotel made the Grand Canyon North Rim feel like a Silicon Valley Starbucks). Workshop or not, I try to post something on social media every day, and a new blog article each Sunday, but with no wifi and spotty 3G cellular that struggled just to send or load a text-only e-mail, I felt virtually cut off from civilization (there was a tsunami?!). I know in the grand scheme of things these are small problems, and that I probably missed the world more than it missed me, but still….
So anyway…
Last week I wrote about creating unique perspectives of familiar scenes, and offered some ideas for achieving this. As admirable as it is to make unique images, sometimes Mother Nature delivers something so magnificent that best thing to do is just get out of the way and let the scene stand on its own.
For example
Though last month’s Yosemite Winter Moon workshop wasn’t scheduled to start until the afternoon I took this picture, I drove to Yosemite the evening before the workshop to get a few hours of morning one-on-one time with the multiple inches of snow forecast to fall overnight. And as hoped, I arrived that morning to find every square inch of exposed surface glazed white—and the snow was still falling.
The paradox of photographing Yosemite during a storm is that all of the features you came to photograph are most likely obliterated by clouds. Sometimes visibility is so poor, it’s difficult to imagine the obscured features ever existed—and quite easy to imagine the comfort and warmth of your hotel room. The key Yosemite storm success is to be there when the storm clears—but job-one for catching the clearing part of a Yosemite clearing storm, is first enduring the storm part.
So, rather than succumb to the temptation of comfort and warmth, I armored up and went to work in near zero visibility. After an hour or so of driving around, interrupted by a stop or two (or three) to photograph some of the more intimate nearby beauty, I pulled up to El Capitan Bridge and noticed the clouds starting to lift (fingers crossed). In the still-falling snow, I quickly set up my tripod, grabbed my Sony a7RIV, attached my Sony 12-24 f/2.8 GM lens, and hoped.
I digress
Without getting too preachy, let me just say that if you ever want to piss off a photographer, look at one of their images and say, “Ooooh, you must have a great camera.” While that may very well be true, the photographer’s unavoidable inference will be that the questioner means the beautiful image is a product of the photographer’s equipment, not his or her photographic vision and skill.
But…. As much as I’d like to say my equipment is irrelevant and I could achieve the same results with a pinhole camera, I’ll admit that I have images I couldn’t have created without the right camera or lens. And this is one of them.
Back on point
I’ve written before about Sony’s 12-24 lenses, and how they feel specifically designed for Yosemite’s ultra-close views of massive monoliths. El Capitan Bridge is one of those views, so close that I’ve always felt that even a 16-35 wasn’t wide enough to do the scene justice. So when Sony released its 12-24 f/4 G lens, this was one of my very first stops. My excitement was validated when I discovered that at 12mm I could indeed get all of El Capitan, plus its entire reflection, in a single vertical frame. I became so enamored of my new top-to-bottom-reflection power that pretty much every subsequent 12-24 El Capitan composition here (both with the original Sony 12-24 f/4 G, and the newer Sony 12-24 f/2.8 GM) had been vertical. My goal this morning was to change that.
-

- Winter Storm, El Capitan in the Snow, Yosemite
-

- Autumn and Winter, El Capitan Reflection, Yosemite
-

- Storm Clouds, El Capitan, Yosemite
While the clouds didn’t completely part for several more hours, during this stop at El Capitan Bridge they did lift just enough to reveal all of El Capitan for about 15 minutes. During that time, their swirling vestiges careened across the granite face so rapidly that the scene seemed to change by the second.
Photographically, there wasn’t really a lot I could do for this scene besides not mess it up. Mounting my camera horizontally, I widened my lens all the way out to 12mm, put the top of the frame slightly above El Capitan (to maximize the amount of reflection below it—more sky would have meant less reflection), and used the snow-covered trees on both sides to frame the scene.
Depth of field wasn’t a factor, and very little contrast made metering easy. Wanting a fast enough shutter speed to freeze the falling snowflakes, I dialed to ISO 800 and f/9, which I quickly determined centered my (pre-capture) histogram at a more than adequate 1/250 second. Then I clicked a dozen or so images to ensure a wide variety of cloud formations and falling snowflake patterns, pausing occasionally to appreciate the moment.
This scene felt like a gift that I really didn’t want to overthink. I’m just grateful for the opportunity to photograph it (and the equipment that allowed me to do it justice).
An El Capitan Gallery
Click an image for a closer look, and to view a slide show.


Shooting the Light Fantastic
Posted on December 5, 2021
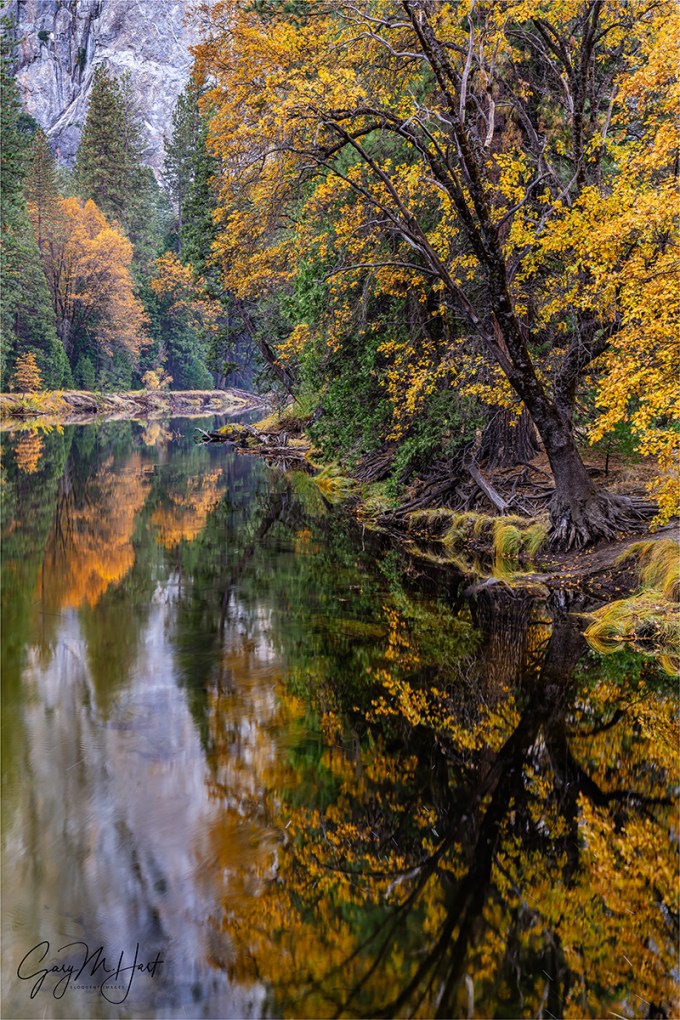
Autumn Reflection, Cathedral Rocks, Yosemite
Sony a7RIV
Sony 24-105 G
2 seconds
F/11
ISO 100
Blue sky may be great for picnics and outdoor weddings, but it makes for lousy photography. To avoid boring blue skies, flat midday light, and extreme highlight/shadow contrast, landscape photographers usually go for the color of sunrise and sunset, and low-angle sunlight of early morning and late afternoon.
Of course the great light equalizer is clouds, which can soften harsh light and add enough texture and character to the sky, making almost any subject photographable—any time of day. Sadly, clouds are never guaranteed, especially here in California. Fortunately, all is not lost when the great clouds and light we hope for don’t manifest.
Spending a large part of my photography time in Yosemite, over the years I’ve created a mental list for when to find the “best” cloudless-sky light on Yosemite’s icons: for Half Dome, Bridalveil Fall, and Cathedral Rocks it’s late afternoon through sunset; El Capitan is good early morning, while Yosemite Falls is best a little later in the morning. And then there are seasonal considerations: Half Dome at the end of the day is good year-round, but Bridalveil Fall and Cathedral Rocks are much better from April through September; while El Capitan gets nice morning light year-round, it also gets good late light from October through February; and while the best light on Yosemite Falls happens in winter, that doesn’t usually coincide with the best water, which comes in spring (unless you’re lucky enough to get a lot of early rain, like we got this autumn).
But even when the sun’s up and the sky is blank, all is not lost. In those situations I head to locations I can photograph in full shade. Yosemite Valley’s steep walls help a lot, especially from November through February, when much of the valley never gets direct sun.
Following our sunrise shoot on the first morning of last month’s Yosemite Fall Color photo workshop, I took my group to El Capitan Bridge to photograph the first light on El Capitan. But as nice as that El Capitan first light was, on this morning I couldn’t help notice the downstream view of Cathedral Rocks across the bridge. With everything on that side in full shade, this downstream scene wasn’t as dramatic as the sun-warmed El Capitan, but the soft, shadowless light was ideal for the colorful trees reflecting in the Merced River.
After encouraging everyone in the group not to check out this downstream view, I went to work on the scene. If the sky had been more interesting, I’d have opted for my Sony 16-35 GM lens to include all of Cathedral Rocks, more trees, lots of reflection, and an ample slice of sky. But the sky this morning was both bright and blue (yuck), so I chose the Sony 24-105G lens for my Sony a7RIV to tighten the composition.
Before shooting, I actually walked up and down at the railing quite a bit, framing up both horizontal and vertical sample compositions, until I found the right balance of granite, trees, and reflection. Because the air was perfectly still, I didn’t need to worry about movement in the leaves, which enabled me to add my Breakthrough 6-stop Dark Circular Polarizer for a shutter speed long enough the smooth some of the ripples in the water.
I guess the lesson here is the importance of understanding and leveraging light. And all this talk about light inspired me to dust off my Light Photo Tips article—I’ve added the updated and clarified version below (with a gallery of images beneath it).
Light

Three Strikes, Lightning and Rainbow from Bright Angel Point, Grand Canyon
Good light, bad light
Photograph: “Photo” comes from phos, the Greek word for light; “graph” is from graphos, the Greek word for write. And that’s pretty much what photographers do: Write with light.
Because we have no control over the sun, nature photographers spend a lot of time hoping for “good” light and cursing “bad” light—despite the fact that there is no universal definition of “good” and “bad” light. Before embracing someone else’s good/bad light labels, let me offer that I (and most other serious photographers) could probably show you images that defy any good/bad label you’ve heard. The best definition of good light is light that allows us to do what we want to do; bad light is light that prevents us from doing what we want to do.
Studio photographers’ complete control of the light that illuminates their subjects, a true art, allows them to define and create their own “good” light. On the other hand, nature photographers, rely on sunlight and don’t have that kind of control. But knowledge is power: The better we understand light—what it is, what it does, and why/how it does it—the better we can anticipate and be present for the light we seek, and deal with the light we encounter.
The qualities of light
Energy generated by the sun bathes Earth in continuous electromagnetic radiation, its wavelengths ranging from extremely short to extremely long (how’s that for specific?). Among the broad spectrum of electromagnetic solar wavelengths we receive are ultraviolet rays that burn our skin (10-400 nanometers), infrared waves that warm our atmosphere (700 nanometers to 1 millimeter), and the visible spectrum that we (and our cameras) use to view the world—a narrow range of wavelengths between ultraviolet and infrared with wavelengths that range between 400 and 700 nanometers.
When all visible wavelengths are present, we perceive the light as white (colorless). But when light interacts with an object, the object absorbs or scatters some of the light’s wavelengths. The amount of scattering and absorption is determined by the interfering object’s properties. For example, when light strikes a tree, characteristics of the tree determine which of its wavelengths are absorbed, and the wavelengths not absorbed are scattered. Our eyes capture these scattered wavelengths and send that information to our brains, which translates it into a color.
When light strikes a mountain lake, some is absorbed by the water, allowing us to see the water. Some light bounces back to the atmosphere to create a reflection. The light that isn’t absorbed or reflected by the water light passes through to the lakebed and we see whatever is on the lake’s bottom.
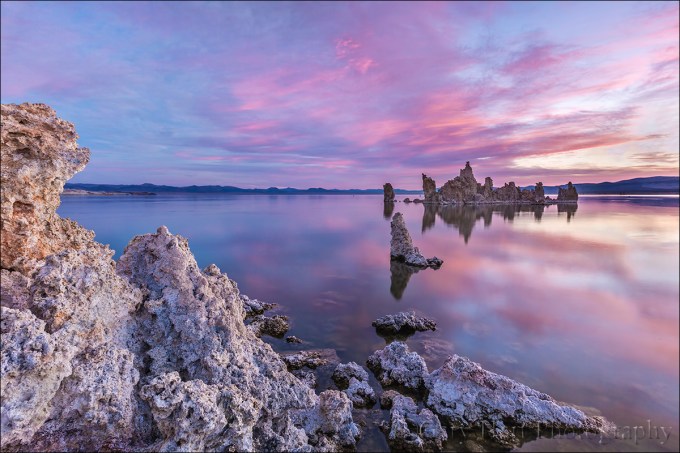
This vivid sunrise was reflected by the glassy surface of Mono Lake, but just enough light made it through to reveal the outline of submerged tufa fragments on the lake bed.
Let’s get specific
Rainbows
For evidence of light’s colors, look no farther than the rainbow. Because light slows when it passes through water, but shorter wavelengths slow more than longer wavelengths, water refracts (bends) light. A single beam of white light (light with an evenly distributed array of the entire visible spectrum) entering a raindrop separates and spreads into a full range of visible wavelengths that we perceive a range of colors. When this separated light strikes the back of the raindrop, some of it reflects: A rainbow!

Under the Rainbow, Colorado River, Grand Canyon
Blue sky
When sunlight reaches Earth, the relatively small nitrogen and oxygen molecules that are most prevalent in our atmosphere scatter its shorter wavelengths (violet and blue) first, turning the sky overhead (the most direct path to our eyes) blue. The longer wavelengths (orange and red) don’t scatter as easily continue traveling through more atmosphere—while our midday sky is blue, these long wavelengths are coloring the sunset sky of someone to the east.
In the mountains, sunlight has passed through even less atmosphere and the sky appears even more blue than it does at sea level. On the other hand, when relatively large pollution and dust molecules are present, all the wavelengths (colors) scatter, resulting in a murky, less colorful sky (picture what happens when your toddler mixes all the paints in her watercolor set).
Most photographers (myself included) don’t like blank blue sky. Clouds are interesting, and their absence is boring. Additionally, when the sun is overhead, bright highlights and deep shadows create contrast that cameras struggle to handle. That means even a sky completely obscured by a homogeneous gray stratus layer, while nearly as boring as blue sky, is generally preferred because it reduces contrast and softens the light (more below).
Sunrise, sunset
Remember the blue light that scattered to color our midday sky? The longer orange and red wavelengths that didn’t scatter overhead, continued on. As the Earth rotates, eventually our location reaches the point where the sun is low and the sunlight that reaches us has had to fight its way through so much atmosphere that it’s been stripped of all blueness, leaving only its longest wavelengths to paint our sunrise/sunset sky shades of orange and red.
When I evaluate a scene for vivid sunrise/sunset color potential, I look for an opening on the horizon for the sunlight to pass through, pristine air (such as the clean air immediately after a rain) that won’t muddy the color, and clouds overhead and opposite the sun, to catch the color.
Overcast and shade
Sunny days are generally no fun for nature photographers. In full sunlight, direct light mixed with dark shadows often forces nature photographers to choose between exposing for the highlights or the shadows (or to resort to multi-image blending). So when the sun is high, I generally hope for clouds or look for shade.
Clouds diffuse the omni-directional sunlight—instead of originating from a single point, overcast light is spread evenly across the sky, filling shadows and painting the entire landscape in diffuse light. Similarly, whether caused by a single tree or a towering mountain, all shadow light is indirect. While the entire scene may be darker, the range of tones in shade very easily handled by a camera.
Flat gray sky or deep shade may appear dull and boring, but it’s usually the best light for midday photography. When skies are overcast, I can photograph all day—rather than seeking sweeping landscapes, in this light I tend to look for more intimate scenes that minimize or completely exclude the sky. And when the midday sun shines bright, I look for subjects in full shade. Overcast and shade is also the best light for blurring water because it requires longer shutter speeds.
Another option for midday light is high-key photography that uses the overexposed sky as a brilliant background. Putting a backlit subject against the bright sky, I simply meter on my subject and blow out the sky.
Leveraging light
Whether I’m traveling to a photo shoot, or looking for something near home, my decisions are always based on getting myself to my locations when the conditions are best. For example, in Yosemite I generally prefer sunset because that’s when Yosemite Valley’s most photogenic features get late, warm light. Mt. Whitney, on the other side of the Sierra, gets its best light at sunrise, and I prefer photographing the lush redwood forests along the California coast in rain or fog. Though I plan obsessively to get myself in the right place, in the best light, sometimes Nature throws a curve, just to remind me (it seems) not to get so locked in on my subject and the general tendencies of its light that I fail to recognize the best light at that moment.
The Light Fantastic
Click an image for a closer look, and a slide show.


Motion in Nature
Posted on November 7, 2021

Autumn Swirl, Half Dome, Yosemite
Sony a7RIV
Sony 24-105 G
20 seconds
F/16
ISO 50
As a landscape photographer, I often joke that I don’t photograph anything that moves—no wildlife, no pets, no portraits, no sports. And don’t even think about asking me to do your wedding. I’ve always been a deliberate shooter who likes to anticipate and prepare my frame with the confidence my shot will still be there when I’m ready—landscape photography suits me just fine (thankyouverymuch).
But as much as I appreciate the comfortable pace of a static landscape, the reality is that nature is in constant motion. Earth’s rotation spins the moon and stars across our night sky, and continuously changes the direction, intensity, and color of the sunlight that rules our day. Rivers cascade toward sea level, clouds scoot and transform overhead, ocean waves curl and explode against sand and rock, then vanish and repeat. And even a moderate breeze can send the most firmly rooted plants into a dancing frenzy.
Photographing motion is frustrating because a still image can’t duplicate the human experience (not to mention the technical skill required to subdue it without compromising exposure and depth). But motion also presents a creative opportunity for the photographer who knows how to create a motion-implying illusion that conveys power, flow, pattern, and direction.
While a camera can’t do what the human eye/brain do, it can accumulate seconds, minutes, or hours of light, recording a scene’s complete history in a single image. Or, a camera can freeze an instant, an ephemeral splash of water or bolt of lightning that’s gone so fast it’s merely a memory by the time a viewer’s conscious mind processes it. This is powerful stuff—accumulating motion in a long frame reveals hidden patterns; freezing motion saves an instant for eternal scrutiny.
For example
-

- Starry Night, Lake Wanaka, New Zealand
-

- Bristlecone Star Trails, Schulman Grove, White Mountains, California
When I photograph the night sky, I have to decide how to handle the motion of the stars (yes, I know it’s not really the stars that are moving). Freezing celestial motion is a balancing act that combines a high ISO and large aperture with a shutter speed long enough to squeeze every possible photon from a dark sky, but that stops before discernible streaks form. Or, I can emphasize celestial motion by holding my shutter open for many minutes, stretching the stars into parallel arcs.
-

- Electric Night, Grand Canyon Lodge, North Rim, Grand Canyon
-

- Lightning Explosion, Oza Butte, Grand Canyon North Rim
Lightning comes and goes faster than human reflexes can respond. At night, a long exposure can be initiated when and where lighting might strike, recording any bolt that occurs during the exposure. But in daylight I need a lightning sensing device like a Lightning Trigger, that detects the lightning and fires the shutter faster than I can. If I succeed, I can reveal intricate filaments of electricity my eyes missed.
Moving water is probably the most frequently photographed example of motion in nature, with options that range from suspended water droplets to an ethereal gauze. I’m always amused when I hear someone say they don’t like blurred water images because they’re not “natural.”
Ignoring the fact that it’s usually impossible to achieve a shutter speed fast enough to freeze airborne water in the best light for photographing it (shade or overcast), I don’t find blurred water any less natural than a water drop suspended in midair (when was the last time you saw that in the real world). Blurred water isn’t unnatural, it’s different.
Sometimes a long exposure can smooth distracting ripples to enhance a reflection. I often add a neutral density filter and employ this technique when I arrived at a lake or river hoping for a reflection, only to find my plan thwarted by a waves or a wind-whipped surface.

Autumn Swirl, Half Dome, Yosemite
A long exposure can also reveal patterns of motion that are too slow to discern. Which brings me to today’s image from the penultimate night of last week’s Yosemite Fall Color photo workshop
I’d guided my group through the woods to bend in the Merced River that’s usually a glassy reflection in the still autumn flow. But just a week before the workshop, a 6-inch rainfall filled the waterfalls and accelerated the normally languid Merced into a more spring-like flow. Great conditions for most of our photography, but not so much for reflections.
This Half Dome view, known to photographers but just far enough off the beaten path to discourage most tourists, is always a highlight of my Yosemite workshops. I especially like it autumn, for the colorful cottonwood just upstream, and the (usually reliable) glassy surface. This year the cottonwood delivered, but the rapid flow disturbed the mirror reflection I’m accustomed to.
No problem. I suggested to my group that an ND filter would enable an exposure long enough to flatten the water—the result wouldn’t be a mirror reflection, but the gauzy effect would create an ethereal reflection that would be both striking and distinctive.
Working individually with photographers in my group, I soon noticed small patches of foam drifting by in the flow—not just occasionally, but pretty much continuously. I knew from experience that a long exposure would blur them into parallel streaks (like star trails), especially in the darker water, and got a few people started adding this effect to their images.
Then I noticed a collection of foam patches trapped in a small zone of sheltered, (apparently) static water just a few feet upstream. While helping one of the members of the group find a composition here, it soon became obvious that this water was in fact moving, albeit too slow to see.
Once I was confident that everyone was successfully engaged with the scene, I went upstream about 20 feet and looked downstream, searching for something different than the standard view here. I ended up having a blast photographing the slow motion swirl patterns in the foam (and occasional leaf) that clearly wasn’t static, using a few trees and their reflections downstream as my background.
Finally, after shooting that scene to within an inch of its life (each frame was completely different from the previous), I returned to the more conventional upstream composition to see if I could use these swirls to create something a little different.
This was probably 10 minutes after sunset, just possibly my favorite light for photography, and now dark enough to forego the ND filter. The biggest trick here was finding a position with a view of Half Dome, the fall color, the reflection, and with enough swirls to occupy a significant part of the frame.
First, I moved upstream as far as I could move without losing Half Dome and the golden cottonwood behind the nearby trees. Next, to maximize the foreground swirls, I dropped my tripod as near to the ground as I could.
But, from this new perspective, dialing my polarizer to maximize the reflection also enhanced the sky reflection enough to nearly obliterate the foam swirls. So, with my eye on the Half Dome reflection in my viewfinder, I dialed my polarizer just far enough for Half Dome to stand out, but not so much that the water with the swirling foam and leaves lost its blackness.
Setting my Sony a7RIV to ISO 50, and dialing my Sony 24-105 G lens to f/16, enable me to keep my shutter open for 20 seconds—plenty of time to reveal the patterns of motion. A bonus was the leaves and foam flowing much faster in the main river channel, creating linear streaks that I didn’t notice until I processed the image.
Read more about photographing motion
Workshop Schedule || Purchase Prints || Instagram
Motion in Nature
Click an image for a closer look, and to view a slide show.


Reflecting on the Polarizer
Posted on October 17, 2021

Aspen Autumn Reflection, Bishop Creek Canyon, Eastern Sierra
Sony a7RIV
Sony 24-105 G
1/5 second
F/16
ISO 200
Who else loves reflections? I don’t know about you, but I love photographing them, and even without a camera, I just love staring at them. Part of a reflection’s power is its ability to engage the brain in different ways than we’re accustomed: Rather than processing the scene directly, we first must mentally reassemble the reverse world of a reflection, and in the process perhaps see the scene a little differently. And in a photo, a nice reflection simply introduces a soothing calmness.
So if reflections are so great, why do I spend almost my entire photography life with a filter designed to remove reflections? I’m talking about the polarizer, which I have on nearly all my lenses and rarely remove, except at night (and maybe a small handful of other situations). But truth be told, most reflections in nature aren’t the glassy water we picture when we think of reflections, they’re a distracting sheen that create distracting glare and wash out color on rocks, foliage, and water. And that’s where the polarizers comes in.
Polarizer 101
Put simply, a polarizer removes reflections.
As powerful as today’s image processing software is, one landscape-essential filter that can’t be added after the shot is the polarizer. Valued by inexperienced photographers only for darkening blue skies, more serious photographers value their polarizers more for their ability to remove the sheen that desaturates color, hides submerged objects, and flattens texture.
Even worse than not appreciating their polarizer’s power, some photographers screw on a polarizer without understanding how it works, mistakenly believing that merely having a polarizer on their lens is sufficient. The amount of polarization a composition calls for is a creative decision that can make or break an image. And unfortunately, a mis-oriented polarizer can be worse than no polarizer.
This won’t be on the test
So what does a polarizer do?
If you’re like me, it helps to understand that a wave of light oscillates (vibrates) perpendicular to its direction of motion. A real world example of this kind of motion is the way a wave in the middle of the ocean rises and falls as it advances: while the wave moves forward, the water moves up and down.
A wave of light is much more complex than an ocean wave, oscillating in every possible direction perpendicular to its direction of motion. For example, to represent the direction of motion, imagine a string connecting a light source to the subject it illuminates. To understand the wave’s oscillation, picture the string moving not only up/down, but also left/right and every other angle perpendicular to the direction the wave moves.
And still one more way to view this motion would be to visualize a beam of light (or our string) passing through the center of a spoked wheel, where the axle would be. Each of the spoke pairs (one on each side of the light beam) would represent a direction the wave would oscillate, and there could be an infinite number of spoke pairs.
In very simple terms, polarized light is light that has all but one of its planes of oscillation removed. So returning to our spoked wheel, we’d be left only with the light that oscillates in the direction of one of the spoke pairs.
Without getting too deep (or at least any deeper) into the weeds, a polarizing filter eliminates reflections by removing the light that carries reflections back to our eyes. Polarization (reflection reduction) is most effective when your lens points 90 degrees (perpendicular) to the direction of the sun or other light source; it is least effective when the lens points directly toward or away from the sun.
Polarizers come in two flavors, linear and circular (the designation has to do with the way the polarizer achieves its effect, not the shape of the filter). For today’s digital cameras, you want to use a circular polarizer (which is almost certainly what you’ll be sold if you ask for a polarizer). Most polarizers are comprised of two connected pieces: a circular threaded frame that screws onto your lens’s threads, and an attached piece of polarizing glass (in its own circular frame) that rotates independently of threaded frame. Rotating the polarizer’s glass element relative to the fixed lens varies the orientation, and therefore the amount of polarization. You can see the polarization effect (sometimes large, sometimes small) through your viewfinder or on your live-view LCD.
What a polarizer does for you
With reflections minimized by a polarizer, pale blue sky is transformed to a deeper blue, glare is removed from rocks and foliage to reveal underlying color and texture, reflections are removed from water to expose submerged features, and clouds that were barely visible suddenly snap into prominence. Or imagine mountains reflected in a still alpine lake: As you rotate your polarizer, the reflection is replaced by rocks and leaves dotting the lakebed; keep turning and the reflection returns.
So what’s the catch?
Lost light
A polarizer costs you one to two stops of exposure, depending on the polarizer and the amount of polarization you dial in. Since aperture manages depth and is often non-negotiable, landscape photographers usually compensate for the lost light with a longer shutter speed—one more reason to use a tripod. If motion is a concern, the next best way to compensate for lost light is to increase the ISO.
Differential polarization
Because a polarizer’s effect varies with the direction of the light, and wide lenses cover a broad field of view, light arrives at different parts of a wide scene from different angles. The result is “differential polarization”: parts of the scene that are more polarized than others.
Differential polarization is particularly troublesome in the sky, appearing as an unnatural transition from light to dark blue across a single frame. This effect can often be reduced, but rarely eliminated, with careful dodging and burning in Photoshop. Better yet, avoid images with lots of (boring) blue sky.
Vignetting
A standard polarizer is comprised of a circle of polarized glass mounted in a frame that screws into, and rotates relative to, the fixed lens beneath. Most also include an outer ring with threads for attaching other filters. The field of view of ultra-wide lenses can be so great that, at their wider focal lengths, they include the polarizer’s frame: vignetting. Polarizer vignetting manifests as dark edges on your images, particularly at the corners.
Most of the best polarizer manufacturers offer a low-profile version that mitigates vignetting. Low profile polarizers are more money (oh well), usually require a special lens cap (a minor annoyance), and don’t have external threads (not an issue for me).
Me and my polarizer(s)
Always on
Since I’m all about simplicity in the field, and determining whether or not I need a polarizer and then adding or removing it as needed is more trouble than it’s worth, each lens in my bag has its own polarizer that rarely comes off during daylight hours. I remove my polarizer only when I need more light, want to use a neutral density filter (I don’t like stacking filters), or if I’m concerned about differential polarization.
But. Shooting with no polarizer is better than using an incorrectly oriented polarizer. If you’re going to follow my “always on” polarizer approach, you must be diligent about rotating the polarizer and checking its effect on each composition, or risk doing more harm than good to your image. This is especially important if you change a composition’s orientation between horizontal and vertical.
Protection
Like many photographers, I always use a filter as protection for my front lens element; unlike many photographers, I don’t use UV or skylight filters. While it’s possible to stack a polarizer atop a UV or skylight filter, I don’t. Instead, because it never comes off, my polarizer doubles as protection for the front lens element.
Given that my polarizers are in the $200 range, this gets a little expensive when a filter “takes one for the team,” but it’s cheaper than replacing an entire lens, and more desirable than stacking superfluous glass between my subject and my sensor, not to mention the vignetting stacking causes. On the other hand, I will use a graduated neutral density filter with a polarizer, because GNDs serve a specific (not superfluous) need that doesn’t disappear when a polarizer is added.
The polarizer and lens hoods
To those photographers who complain that it’s a real pain to rotate a polarizer with a lens hood in the way, I have a simple solution: remove the lens hood. I never use a lens hood. Ever. This is blasphemy to many photographers, but I hate lens hoods, which always seem to be in the way (see my “simplicity in the field” comment above). But (there’s that word again), jettisoning the lens hood must come with the understanding that lens flare is real and usually impossible to entirely correct after the fact.
When there’s a chance direct sunlight will strike my front lens element, I check to see if shielding the lens helps. With my composition ready (on my tripod!), I peer through my viewfinder and shade my lens with my hand or hat (or whatever handheld shade is handy). If shading my lens makes the scene darker and more contrasty, and/or eliminates lens flare (random fragments of light), I know I must shield my lens while exposing. Of course if the sun is in my composition, no shading in the world (or lens hood) will eliminate the lens flare.
Polarizer techniques
Polarizer on a budget
All scenes don’t benefit equally from a polarizer, and photographers on a budget can’t always afford one for every lens. If you’re only going to go with one polarizer, buy one for your largest lens, and step-up rings for each lens thread size. Or you could simply hand-hold the larger polarizer in front of the smaller lens (as long as you’re on a tripod).
Does this scene call for a polarizer?
To determine the polarizer’s effect, rotate the outer element 360 degrees as you peer through your viewfinder (or view the LCD in live-view). Often just holding the polarizer to your eye while you look in the direction of your composition and rotating it slowly is enough to determine its benefit.
Unless I’m trying to maximize a reflection, I rotate the polarizer until the scene appears darkest. If there’s no apparent change, I watch specific objects that might have a slight sheen (water, a leaf, or a rock) as I rotate the polarizer—I can almost always find some change. Shooting with a mirrorless camera, I have the benefit of a histogram in my viewfinder. Sometimes when I can’t detect a difference with my eye, I slowly turn my polarizer as I watch the histogram, looking for the histogram to shift slightly to the left (or my highlight alert “zebras” shrink). If you can’t see any change as you rotate your polarizer, you probably don’t need to worry about orienting the polarizer.
It’s not just for the sky

Autumn Reflection, North Lake, Eastern Sierra
As nice as the the effect on the sky is, it’s the polarizer’s more subtle ability to reduce glare in overcast or shade that I find irreplaceable. Peering through your viewfinder, lock your eyes on a reflective surface and rotate the polarizer. The effect is most obvious on water, or wet rocks and leaves, but even when completely dry, most rocks and leaves have a discernible sheen. As you rotate the polarizer, harsh glare is replaced by natural color and texture; continue rotating and the glare reappears.
Usually my goal is to dial in maximum polarization, but if I’m photographing a reflection, I turn the polarizer until the reflection peaks. And there’s no rule that requires you to turn the polarizer to one extreme or anther (maximum or minimum reflection). Sometimes I want a little reflection plus a little submerged lake or river detail. In these situations I rotate the outer element slowly and watch the scene change, stopping when I achieve the desired effect. In my North Lake autumn reflection scene, I was able to find a midpoint in the polarization that kept the best part of the reflection (the mountains and trees), while still revealing the submerged granite rocks at my feet.
-

Floating Leaves, Merced River, Yosemite

In the image of autumn leaves floating in the Merced River, I used my polarizer to completely dial down the reflection, creating the illusion of leaves suspended in empty space. Polarizing away the reflection also helped the leaves’ color stand out by eliminating distracting glare.
-

Redbud, Merced River

An emergency neutral density filter
A polarizer can also be used as a two-stop neutral density filter by dialing it to maximum polarization (minimum light). In this image of a redbud above the surging Merced River, even at ISO 100 and f32, I couldn’t reach the 3/4 second shutter speed that would give me the motion blur I wanted. But the two stops of light I lost to my polarizer was just enough to snow my shutter speed enough to blur the water.
If you’re serious about your photography
Use only quality polarizers; you don’t need to spend a fortune, but neither should you skimp. Not only does the quality of the optics affect the quality of your results, I’ve also seen more than one poorly made polarizer simply fall apart for no apparent reason.
I advise buying polarizers that are commensurate with your lens quality—in other words, if you have top-of-the-line lenses, it makes no sense to use anything but top-of-the-line polarizers. I use Breakthrough filters because for their quality and emphasis on customer service.
My personal recipe for using a polarizer
- (Almost) always on
- No other filters except a graduated neutral density filter, when needed
- Compose my shot and lock it in place on my tripod
- Turn the polarizer to get the effect I want
- Check for lens flare and shield if necessary
- Meter the scene
- Click
About this image

Aspen Autumn Reflection, Bishop Creek Canyon
This image is from the second of my two Eastern Sierra workshops earlier this month. Processing it reminded me of the struggle I had deciding how orient my polarizer, because in addition to the glassy water mirroring the colorful aspen across the pond, this scene also contained a lot of reflective sheen that I try to polarize away. What’s a photographer to do?
After a nice sunrise at North Lake, followed by another fall color stop a little down down the road, I set my workshop group free near this small retaining pond just downstream from Lake Sabrina (pronounced “sa-BRI-na,” BTW). There was so much happening here we could have spent hours, but a scene like this needs to be in full shade and the sun was slowly encroaching.
I spent most of my time with a few others in the group, drawn to this mirror reflection of gold aspen with parallel white trunks. After playing with a few different compositions, I ended up concentrating on a pair of leaves clinging to protruding rock as a foreground anchor. I chose a vertical composition largely to eliminate an unsightly stump jutting into the middle of the pond. Sometimes features like that can be the anchor I look for, but everyone working the scene agreed that it was more of a bulky blob than a viable visual element. The top of the frame was limited by the encroaching sunlight—any higher and I’d have had an unwieldy mix of shade and sunlight. And I put the bottom of the frame just above the muddy shore.
As soon as I identified my composition, it became apparent that my biggest problem was going to be what to do with my polarizer. This scene was all about the spectacular reflection, but the rock, leaves, and (especially) blue sky were all washed out by reflections from the bright sky overhead. If I turned my polarizer to maximize the reflection, I also maximize the sheen; turning the polarizer to minimize the sheen also significantly dulled the tree reflection.
My solution was to turn the polarizer slowly, with my eye on my view finder, watching the reflection increase, and stopping just as it reached the rock. The result was a workable compromise—not quite as flat in the close foreground as it would have been had I gone all-in with the polarization, and not quite as vivid as the reflection would have been if I’d have dialed it all the way up (minimal polarization). But my compromise gave me enough to work with in post, dodging (brightening) the “good” reflection, and burning (darkening) the “bad” reflection.
Breakthrough Filters
More Reflections
Click an image for a closer look, and to view a slide show.


The Rest of the Story
Posted on July 5, 2021

Dark Night, Milky Way Reflection, Grand Canyon
Sony a7SIII
Sony 20mm f/1.8 G
ISO 12800
f/1.8
20 seconds
Last week I posted a Milky Way reflection image (and the story of its capture) from my recent Grand Canyon raft trip, and this week I’m sharing another one from the same night. What I didn’t share last week is the rather circuitous (and somewhat embarrassing) path to offering my images from that night. So here goes…
There’s a certain mystique that comes with being a professional photographer that I must say isn’t always completely deserved. I mean, sometimes it feels we’re viewed as creative savants who never make mistakes, when in reality we struggle to make things happen just like everyone else. Like you, I’ve checked my EXIF data and wondered what in the world I was thinking when I chose f/16 or ISO 800 (or whatever), left a shoot just a little early or arrived a little late, decided not to bring (or simply forgotten to pack) the right lens, not charged a battery (or brought a spare), clumsily dropped a valuable piece of precision electronics, deleted important images, or…, well, let’s just say I could go on.
Case in point: As I’ve said as recently as last week, the Milky Way may just be my favorite thing to photography on my Grand Canyon raft trip. So important in fact, that I always spend a significant amount of the trip’s precious (and strictly enforced) equipment-weight budget on a camera body and lens that will be used for nothing but the Milky Way. But one year unseasonal rain and clouds that provided spectacular photography also unfortunately completely wiped out the trip’s night shoots. Which is why I didn’t discover until returning home that instead of packing the 20mm f/1.4 dedicated night lens (at the time), I’d packed my 90mm macro (which was a similar size but didn’t really look anything like the 20mm).
In my defense, I try not to make the same mistake twice, and every subsequent trip I’ve double- and triple-checked my gear to make sure I have everything I’ll need. This year’s night setup was my brand new Sony a7SIII and relatively new Sony 20mm f/1.8 G lens, and I’m happy to report that both made it onboard and downstream, and were ready for action when we scored a prime Milky Way campsite on the trip’s third night. In fact, I managed to navigate the entire shoot that night with the right camera and lens, proper camera settings, everything in focus, plenty of space on the SD card, and without dropping a single thing. What could possibly go wrong?
The next day I was pretty excited about what I’d captured, and couldn’t wait to get home and look the images on my computer. That afternoon was hot, and we arrived at our campsite early. With the sun still quite high as we prepared to motor across the river for some quality photography, swimming, and hiking at Deer Creek Fall, out of an abundance of caution, I removed from my duffle the small case containing my a7SIII and 20mm, carefully setting it in the cool shade of a nearby rock. Do you see where this is going?
Like most mornings, the next morning was a blur of activity as we ate breakfast, packed up our campsite, and hit the river. At Havasu Creek, about 30 miles downstream, I had the sudden realization that I had no memory of returning the camera and lens to my duffle, a thought that I quickly attributed to what I call the “garage door axiom”: just because you don’t remember doing something, doesn’t mean you didn’t do it (how many times have you not remembered closing the garage door and u-turned home only to find it closed tight?). Which is why I wasn’t really that concerned at camp that night, but I figured I’d better check my duffle anyway, just in case.
I was instantly reminded that no matter how many times you check a spot for something that you know should be there but isn’t, doesn’t make it appear. My panic eventually turned to embarrassment as my mind processed the ramifications. Not only were my camera and lens gone, so were the SD cards containing the only copies of the previous night’s bounty. The Colorado River is a one-way juggernaut, so going back was not an option. And with no connectivity at the bottom of the Grand Canyon, there would be no getting the word out until we returned to civilization.
I tried consoling myself with the knowledge that the camera and lens were insured, but the rationalization the Milky Way images were the only irreplaceable loss was little comfort. And that certainly didn’t make me feel any less stupid. It gets worse…
The first thing I did upon returning to the land of connectivity was report the loss to Trent at Western River Expeditions, the director of operations who puts together my charter each year. The second thing I did was gather the information necessary to file an insurance claim. So imagine my surprise when I realized that I’d somehow forgotten to add my new a7SIII to my insurance policy. Oops.
At first Trent was hopeful that some Good Samaritan would find my gear and do the right thing, but when two weeks passed with no word, my faith in humankind started to wane. But just about the time I’d given up all hope, I got a text from Trent saying that someone had just exited the canyon and posted online that he’d found a camera across from Deer Creek Fall and was trying to find the rightful owner. The next few days were a blur of online searching, messaging, effusive gratitude, shipping, tracking, and finally more effusive gratitude when I actually had my camera, lens, and SD cards in my possession.
I don’t know if there’s a real moral to this story, other than it’s nice to be reminded that humans are generally good and most people will do the right thing when the opportunity presents itself. That, and I’m a pretty lucky guy.
Help Me Keep Track of my Gear on a Future Grand Canyon Trip
Workshop Schedule || Purchase Prints || Instagram
Grand Canyon from the Bottom Up
Click an image for a closer look, and to view a slide show.


