Eloquent Images by Gary Hart
Insight, information, and inspiration for the inquisitive nature photographer
Snow Job
Posted on March 24, 2018

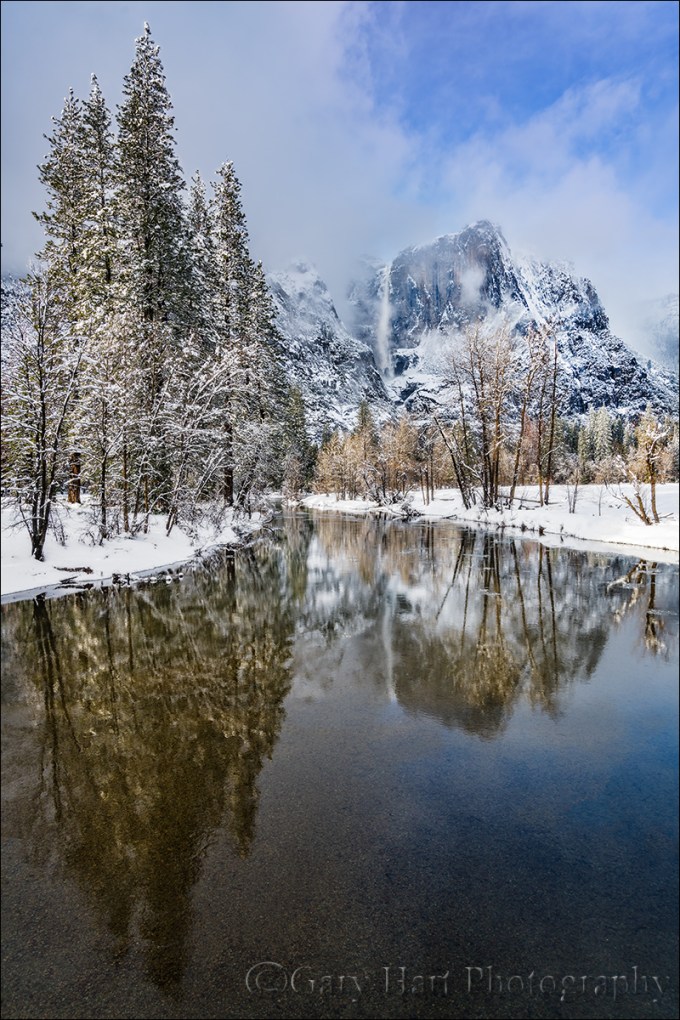
Winter Reflection, Bridalveil Fall and the Merced River, Yosemite
Sony a7R III
Sony 16-35 f/2.8 GM
1/4 second
F/14
ISO 50
I’m afraid that making a living as a photographer sometimes means exchanging time to take pictures for time to make money. On the other hand, my schedule is mine alone, which means when there’s something I really, really want to photograph, such as a moonrise or fresh snow in Yosemite, I can usually arrange my schedule to make it happen. The moon shoots I can plan a year or more in advance, but snow requires a little more vigilance and flexibility.
Early this month, with hints of snow coming to Yosemite Valley, I started clearing space in my schedule. At 4000 feet, Yosemite Valley is often right on the snow-line, so a swing of just a couple hundred feet in either direction can mean the difference between snow and soggy. After watching the weather reports vacillate between snow and rain all week (and adjusting plans more than once), my buddy Mark and I took a chance and made the drive to Yosemite, visions of snowflakes dancing in our heads.
Waiting at the traffic-light-controlled, one-lane detour around the Ferguson Slide on Highway 140, I watched dozens of westbound headlights file past the four or five eastbound taillights idling at the light in front of us. With a storm imminent, it occurred to me that we were participating in a kind of changing of the guard, where the evacuating tourists are replaced by a much smaller contingent of what could only be photographers.
We arrived in Yosemite Valley at about the same time as the rain, circled the valley, secured a cheap room at Yosemite Valley Lodge (in Yosemite, any night with plumbing and solid walls for $150 is in fact a steal), and went to dinner. When the rain continued through dinner and all the way until bedtime, I began to fear the weather report had vacillated once more in the wrong direction.
Peeking out the window at around 4:00 a.m. and seeing more rain, I grudgingly turned off the alarm I’d optimistically set for 6:00 a.m. and went back to sleep. The next thing I knew, Mark was waking me at 6:10 to report six inches of fresh snow, and it was still falling. By 6:15 we were bundled and searching for my car in a parking lot filled with identical white lumps.
The rest of the morning was a blur as Mark and I darted from pristine location to pristine location, marveling at how a few hours of snow can completely transform months of accumulated grime and a thirsty forest dotted with dead and dying trees. For those few hours, Yosemite was new again.
At our first stop, El Capitan Meadow, we photographed El Capitan and Cathedral rocks battling the clouds for dominance. Down the road at Valley View, the snow continued falling but the granite was winning and I soon found myself admiring the reflection of Cathedral Rocks and Bridalveil Fall just upriver from the parking area.
Normally the thin branches overhanging this vantage point are a distraction to avoid, but glazed with snow, they had the potential to make a perfect frame. The reflection was the easy part, but somehow I had to figure out how to feature it and the branches without the branches obliterating the rest of the scene.
To separate Bridalveil Fall and Cathedral Rocks from the glazed branches, I splayed my tripod’s legs and dropped it to the ground, then scooted up to the river’s edge. That still left a few branches dangling too low, so I pushed my camera out even farther by extending one tripod leg into the river. I was aided immensely by the articulating screen of my Sony a7RIII—while I still needed to sit in the snow to get low enough to compose and control my camera, I very much appreciated the ability to sit and look down at my LCD rather than sprawl on my stomach in the snow to get my eye to the viewfinder.
When photographing a scene that includes a reflection and nearby objects, it’s important to remember that the focus point of a reflection is the focus point of the reflective subject, not the reflective surface. (I’ll pause here for a few seconds to let you process this because it’s important.) In this case I was at 16mm; at f/11 that gave me a hyperfocal distance of less than four feet; with the branches about five feet away, front-to-back sharpness wouldn’t be a problem, even focused at infinity. Nevertheless, I chose f/14 for this shot, not for more depth of field, but to (along with ISO 50) stretch my shutter speed enough to smooth a few small ripples in the reflection.
Excitement about a scene can overwhelm good sense—we see something that moves us, and quickly point the camera and click with more enthusiasm than thought. While this approach may indeed record memories and impress friends, it almost certainly denies the scene the attention it deserves. I was indeed very excited about this scene, but between the depth of field, reflection, overhanging branches, moving water, dominant background subjects, not to mention the awkwardness of my position, I had many moving parts to consider.
Rather than attempt perfection on the first click, I addressed the obvious stuff (covered above) with a “rough draft” click. Draft image in hand, I popped my camera off the tripod, stood (ahhhhh), and evaluated my result. I immediately saw two things to address: first, I wanted Cathedral Rocks better framed by the branches; second, I wanted the mid-river, snow-capped rocks away from the right edge of my frame.
I returned my camera to live-view, dropped to ground-level, and replaced the camera on my tripod. Because I hadn’t touched the tripod, the scene on my live-view LCD was the very scene I’d just reviewed—making my prescribed adjustments was a simple matter of panning right a couple of inches and pushing the tripod a little farther into the river. Click.
I love my job.
Join me in Yosemite this winter
Workshop Schedule || Purchase Prints
Yosemite Winter


A Winter Morning in Yosemite
Posted on December 10, 2017

Winter Reflection, El Capitan, Yosemite
Canon EOS-1Ds Mark III
Canon 17-40
1/4 second
F/16
ISO 200
Missing snow so far this winter, I’m going through some of my old snow images and came across this one from a few years ago. I’d traveled to Yosemite with the promise of snow in the forecast, but the night before the trip’s final day I went to sleep to the steady hum of rain. The next morning dawned damp and gray—and gloriously silent. Outside a thin veneer of fresh snow dusted the trees, and without even considering breakfast I headed to Tunnel View to survey the valley and plan my morning. By the time I arrived a patch of sunlight had burned a hole in the clouds above Cathedral Rocks and hints blue sky mingled with the clouds behind me. I knew the show there would soon be spectacular, but I’ve photographed many clearing storms from Tunnel View and wanted something different.
Without leaving my car I headed back down into the valley, stopping first at El Capitan Bridge, arriving just before the clouds atop El Capitan started lifting. I photographed there for about 15 minutes, long enough to see El Capitan’s nose go from obscure shadow to distinct outline to fully exposed granite. Before the clouds parted completely, I packed up and made a beeline for nearby Cathedral Beach. In the short time it took to drive a half mile most of El Capitan had emerged from the clouds and I rushed to grab my gear. The road to the beach was closed so I set out on foot, running most of the quarter mile to the river.
I found two other photographers at the west end of the beach and rather than compete with them for real estate, I trudged through the brush and fresh snow to an open space just downstream. There I was able to set up in solitude and move around at will. I was quite pleased to find a snow covered snag protruding from the river, adding a little depth to the foreground.
The beauty of photographing a Yosemite clearing storm is that no matter where you are, something spectacular is happening. Often in these situations I move between locations much more quickly than normal, but this morning I took my time and just enjoyed the show.
Wringing out as many compositions as possible, I started wide with both vertical and horizontal compositions that included El Capitan and the reflection. Next I went a little tighter, capturing just El Capitan, or just the reflection, or some of both. Finally I switched to a telephoto and started picking out individual elements: the swirling clouds and brilliant highlights on El Capitan’s vertical edge, the snow covered snag in the river, and so on.
Technical stuff
A couple of related technical issues raised by this image: First, the focus point of a reflection; and second, where to focus when elements are spread from near to far throughout the frame. It’s counterintuitive to many that a reflection’s focus point is the focus point of the reflective subject, not the reflective surface. In other words, since El Capitan is at infinity, its reflection is in focus at infinity, and not when focused on the snag. If you don’t believe me, try it yourself.
Given that knowledge, and the fact that I generally want whatever’s in my foreground to be in focus (even if it means the background is slightly soft), I had to find a compromise focus point to ensure that both the reflection and the snag were in focus. With an extremely wide focal length and small aperture I was confident I could get the entire scene acceptably sharp if I focused carefully.
There are different approaches to maximizing focus range, such as relatively accurate but awkward hyperfocal charts, and rule-of-thumb guidelines like focusing a third of the way into the frame. Both have merit, and many excellent photographers employ them, but I prefer a more seat-of-the-pants approach that relies on my own experience and understanding of focus range. I generally find the closest subject I want in focus—in this case the snag—and then focus on something a little behind it.
Here I estimated the distance of the snag, found something behind me that I thought was a little farther away, and focused there. At f/16 that gave me a pretty large margin for error and I was confident the image was sharp throughout. Is this an approach I’d recommend for others? Perhaps, though it takes trial and error to perfect. I encourage you to familiarize yourself with hyperfocal distances–you don’t need to memorize them, but a basic understanding of the relationship between f-stops, focal lengths, and focus distance is invaluable for decisions like this.
Here’s an article from my Photo Tips section that might help: Depth of Field.
Workshop Schedule || Purchase Prints
Winter in Yosemite


How a polarizer works
Posted on October 5, 2017

Autumn Reflection, North Lake, Eastern Sierra
Canon EOS-1Ds Mark III
Canon 17-40L
1/5 second
F/16
ISO 200
Some people couldn’t care less how a polarizer works—they’re satisfied knowing what a polarizer does, and how to make it happen. But if you’re like me, you also need to understand why things behave the way they do.
Put simply…
A polarizer cuts reflections. On the surface that not might seem so desirable for someone who likes photographing reflections as much as I do, but reflections are a much bigger part of our visual experience than most people realize. Virtually every object reflects at least a little, and many things reflect a lot more than we’re aware. Worse still, these reflections often hide the very surface features and color we most love to photograph.
When reflections hide an object’s underlying beauty, a polarizer can restore some of that beauty. I use a polarizer when I want to capture the submerged rocks or sand hidden by the reflection atop a river or lake, the rich color overwhelmed by glare reflecting from foliage, or the sky’s deep blue washed out by light scattered by atmospheric molecules.
Put a little less simply…
In reality, reflections are merely collateral damage to your polarizer. What a polarizer really does is eliminate light that’s already been polarized. To understand what’s really going on with a polarizer, read on….
Essential terminology
- Oscillation is motion relative to a fixed point. For example, when you snap a whip, the whip “oscillates” along its length. Without external interference (e.g., friction from the atmosphere or other objects), motion in one direction along the whip will have an identical motion in the opposite direction (e.g., up=down, left right, and so on), and that motion will move forward along the whip.
- A wave is oscillation along or through a medium (such as air, water, or space). The bulge that moves up and down (oscillates) along a cracked whip is a wave. For the liberal arts folks, (in this context) wave is a noun, oscillate is a verb. A wave is measured by its wavelength and frequency—the higher the frequency, the shorter the wavelength.
- Frequency is the number of times a wave peak passes a discrete point in a given unit of time (usually one second: “per second”).
- Wavelength is the distance from one wave peak to the next at any instant frozen in time.
- A transverse wave oscillates perpendicular (90°) to its direction of motion. To imagine the motion of a transverse wave, picture an ocean wave, which oscillates up and down as it advances through the water. Now think about a bottle floating in the open ocean—bobbing up and down with each wave, its up/down motion is perpendicular to the wave’s forward motion, but when that wave has passed, the bottle is in the same place it was before the wave arrived. (Waves don’t move bobbing bottles across the ocean, wind and currents do.)
- Visible light is electromagnetic radiation that reaches our eyes as a transverse wave somewhere in the wavelength range the human eye can register, about 380 to 740 nanometers (really small).
- Sunlight (or more accurately, solar energy) reaches earth as a transverse wave with a very broad and continuous spectrum of wavelengths that include, among others, the visible spectrum (lucky for photographers), infrared (lucky for everyone), and ultraviolet (lucky for sunscreen vendors). The oscillation of solar energy’s transverse wave is infinitely more complicated than an ocean wave because light oscillates in an infinite number of directions perpendicular to its direction of motion. Huh? Think about the blades of a propeller—each is perpendicular to the shaft upon which the propeller rotates, so in theory you can have an infinite number of propeller blades pointing in an infinite number of directions, each perpendicular to the shaft. So a light wave oscillates not just up/down, but also left/right, and every other (perpendicular) angle in between.
Polarization
While an unpolarized light wave oscillates on every plane perpendicular to the wave’s motion, polarized light only oscillates on one perpendicular plane (up/down or left/right or 45°/225° and so on).
Polarization can be induced many ways, but photographers are most interested in light that has already been polarized by reflection from a nonmetallic surface (such as water or foliage), or light that has been scattered by molecules in our atmosphere. Light scattered by a reflective surface is polarized parallel to the reflective surface; light scattered by molecules in the atmosphere is polarized perpendicular to the direction of the light.
Polarization can also be induced artificially with a polarizing filter (“polarizer”), a filter coated with a material whose molecular structure allows most light to pass, but blocks light waves oscillating in a specific direction. When unpolarized light (most of the light that illuminates our lives) passes through a polarizer, the light that enters the lens to which it’s attached has been stripped of the waves oscillating in a certain direction and we (through the viewfinder) see a uniform darkening of the entire scene (usually one to two stops).
But that uniform darkening is not usually what we use a polarizer for. (I say usually because sometimes we use a polarizer to reduce light and stretch the shutter speed in lieu of a neutral density filter.) Photographers are most interested in their polarizers’ ability to eliminate reflective glare and darken the sky, which occurs when their polarizer’s rotating glass element matches the oscillation direction of light that has already been polarized by reflection or scattering, cancelling that light. By watching the scene as we rotate the polarizing element on the filter, photographers know that we’ve achieved maximum polarization (reflection reduction) when we rotate the polarizer until maximum darkening is achieved—voila!
The exception that proves the rule
Most photographers know that a polarizer has its greatest effect on the sky when it’s at right angles (90°) to the sun, and least effective when pointed directly into or away from the sun (0º or 180°). We also know that a rainbow, which is always centered on the “anti-solar point” (a line drawn from the sun through the back of your head and out between your eyes points to the anti-solar point) exactly 180° from the sun, can be erased by a polarizer. But how can it be that a polarizer is most effective at 90° to the sun, and a rainbow is 180° from the sun? To test your understanding of polarization, try to reason out why a rainbow is eliminated by a polarizer.
Did you figure it out? I won’t keep you in suspense: light entering a raindrop is split into its component colors by refraction; that light is reflected off the back of the raindrop and back to your eyes (there’s a little more bouncing around going on inside the raindrop, but this is the end result). Because a rainbow is reflected light, it’s polarized, which means that it can be eliminated by a properly oriented polarizer.
About this image
Long before achieving international fame as the background scene for Apple OS X High Sierra, North Lake near the top of Bishop Canyon in the Eastern Sierra has been beloved by photographers. Each autumn this little gem of a lake teams with photographers longing for even one of the following conditions: peak gold and red in the aspen, a glassy reflection, or a dusting of snow.
I visit North Lake multiple times each autumn, sometimes with my workshop groups, sometimes by myself. I’ve found pretty much every possible combination of conditions: snow/no-snow; early, peak, or late fall color; and a lake surface ranging from mirror smooth to churning whitecaps.
One sunrise early October of 2010 I hit the North Lake trifecta. Crossing my freezing fingers that the reflection would hold until I was ready, I lowered my tripod on the rocky shore and framed the aspen-draped peak and its vivid reflection. I used a couple of protruding rocks to anchor my foreground, slowly dialed my polarizer until the entire lake surface became a reflection, and clicked. But rather than settle for that shot, I reoriented my polarizer until the reflection virtually disappeared and a world of submerged granite rocks appeared. I clicked another frame and stood back to study the image on my LCD.
As much as I liked the rocky lakebed version, I knew there was no way I could pass on the best reflection I’d ever seen at North Lake. So I returned my eye to my viewfinder and very slowly dialed the polarizer again, watching the reflection reappear across the lake and advance toward me until the entire mountain unfolded in reverse atop the lake. Stopping just at that midway polarization point, I had the best of both worlds: my pristine reflection and an assortment of submerge rocks.
I Use Breakthrough Filters
Dialing In My Polarizer
Click an image for a closer look and slide show. Refresh the window to reorder the display.


, California")


A few of my favorite things
Posted on March 30, 2017
Yosemite Falls Reflection, Swinging Bridge, Yosemite
Sony a7R II
Sony/Zeiss 16-35 f/4
1/20 seconds
F/9
ISO 100
I love being a photographer, but it’s an unfortunate reality that turning your passion into your profession risks sapping the pleasure when earning money takes priority over taking pictures. When I decided to make photography my livelihood, it was only after observing other very good amateur photographers who, lulled by the ease of digital photography, failed to anticipate that running a photography business requires far more than taking good pictures. Rather than an opportunity for further immersion in their passion, their new profession forced them to photograph not for love, but to put food on the table. And with the constant need for marketing, networking, bookkeeping, collections, taxes, and just plain keeping customers happy, these newly minted photographers soon found that little time remained for the very thing that led them to become photographers in the first place.
I changed from photographer to Photographer about twelve years ago. After seeing what the change had done to others, my transition started with a vow to photograph only what I want to photograph, and to never photograph something simply because I thought I could sell it. In my case that meant sticking with landscapes: no people or wildlife (in other words, pretty much nothing that moves).
But how to make money? For that answer I had to look no farther than my career in technical communications: For five years I’d been a technical writer for a (very) large high tech company; before that I’d spent fifteen years tech training, supporting, documenting, and testing a programming language for a small software company. This experience, combined with a lifetime of camping, hiking, backpacking, and (of course) photographing throughout the western US, made photo workshops a logical choice. Today my workshops, supplemented by writing and print sales, allow me to pay the bills, visit favorite destinations, and explore new locations.
And most importantly, my new life has allowed me to concentrate on photographing the subjects and locations I love most. In no particular order (and far from all-inclusive), my favorite subjects include: poppies, the Milky Way, the moon (both crescent and full), rainbows, moonlight, fresh snow, dogwood, bristlecone pines, lightning, fall color, reflections. Among my favorite locations are Yosemite Valley, Grand Canyon’s North Rim, the Colorado River through the Grand Canyon, California’s foothills, Maui’s bamboo forest, and Kilauea Caldera.
Of course nothing beats photographing a favorite subject at a favorite location. To maximize my opportunity to combine favorite subjects and locations, I monitor weather forecasts, check local condition reports (to learn where the trees have turned or the wildflowers are blooming), study natural phenomena to learn how to anticipate an event (such as rainbows and lightning), and plot celestial alignments and add them to my calendar.
Despite (and more likely because of) a lifetime of visits, Yosemite Valley remains at the top of my favorite locations. I can’t give you a favorite season, but I can tell you that my favorite time to be in Yosemite is just after a snowstorm, when every exposed surface is glazed white and overhead swirls an ever-changing mix of clouds and blue sky.
Today’s image of snowy Yosemite with Upper Yosemite Fall reflected in the Merced River is the product of a week’s worth of monitoring weather reports and schedule shifting. That day started with a lock-down blizzard that obscured all views beyond 100 yards, but by late morning the clouds started to lighten and lift and soon the clearing was underway in earnest. Sometimes when a storm clears in Yosemite I’ll pick a spot and work it through the entire clearing process; on this day I took the other approach, moving around capture the clearing in a variety of locations.
I ended up at Swinging Bridge in mid-afternoon. The Merced River widens and slows here, making reflections possible even in high water months. Though Swinging Bridge no longer swings (but I remember when it did), it does bounce enough to jiggle a tripod at the slightest step. To minimize the vibration, I try to set up my tripod atop one of the bridge’s support pillars, but that didn’t give me the exact angle I wanted on this afternoon so I just needed to take extra care to stay still and time my clicks when the bridge was empty.
In the fifteen or so minutes I photographed here that afternoon I tried a variety of compositions, horizontal and vertical. I also played with my polarizer, sometimes maximizing the reflection, other times dialing it down to reveal the rocky riverbed below. Most of my compositions were a little tighter than this, but here I went with a vertical orientation wide enough to include lots of blue sky, and the trees and their reflection from top to bottom. My polarizer was turned to the partial range, enough to capture Upper Yosemite Fall’s reflection, while still revealing some of the submerged smooth stones nearer the bridge. The trees were partially lit by cloud-filtered sunlight just starting to break through.
A Gallery of my Favorite Things
Click an image for a closer look and slide show. Refresh the window to reorder the display.


Silent Night
Posted on March 21, 2017

Silent Night, Yosemite Valley from Tunnel View
Sony a7R II
Sony/Zeiss 16-35 f/4
20 seconds
F/5.6
ISO 1250
One perk of being a photographer is the opportunity to experience normally crowded locations in relative peace. That’s because the best nature photography usually happens at most people’s least favorite time to be outside: crazy weather and after dark. A couple of weeks ago in Yosemite I got the opportunity to enjoy both.
After spending a snowy Sunday guiding a couple around Yosemite Valley in a snowstorm, I dropped them back at (the hotel formerly known as) The Ahwahnee with nothing but the drive home on my mind. But winding through the valley in the fading twilight I saw signs of clearing skies and made a snap decision to check out the scene at Tunnel View.
I found the vista at Tunnel View gloriously empty. By the time I’d set up my camera and tripod the darkness was nearly complete, but as my eyes adjusted I could make out large, black holes in the once solid clouds overhead. Soon stars dotted the blackness above El Capitan and the white stripe of Bridalveil Fall. Each time light from the waxing gibbous moon slipped through the shifting clouds, the entire landscape lit up as if someone had flipped a switch.
Because the best parts of the view were in a narrow strip starting with the snow-glazed trees beneath me and continuing through the scene and up into the star-studded sky, I opted for a vertical composition. To include as much foreground and sky as possible, I went nearly as wide as my 16-35 lens would allow, more or less centering El Capitan and Bridalveil Fall to give the snow and stars equal billing.
Being completely comfortable with my a7RII’s high ISO performance, I didn’t stress the 1250 ISO that allowed me to stop down to a slightly sharper f/5.6 (virtually every lens is a little sharper stopped down from its largest aperture). Night focus with the Sony a7RII is extremely easy, easier than any camera I’ve ever used that isn’t an a7S/a7SII. Often I manually focus on the stars and use focus peaking* to tell me I’m sharp; in this case I back-button auto-focused on the contrast between the moonlit snow and dark granite near Bridalveil Fall. I chose a long enough shutter speed to capture motion blur in the rapidly moving clouds, knowing the potential for visible star streaking was minimized by my extremely wide focal length.
My favorite thing about that evening? The 20 seconds my shutter was open, when I didn’t have anything to do but stand there and enjoy the view in glorious silence.
* Focus peaking is a mirrorless feature that highlights in the viewfinder the in-focus areas of your scene.
Workshop Schedule || Purchase Prints
Yosemite After Dark
Click an image for a closer look and slide show.


Variations on a scene
Posted on March 14, 2017
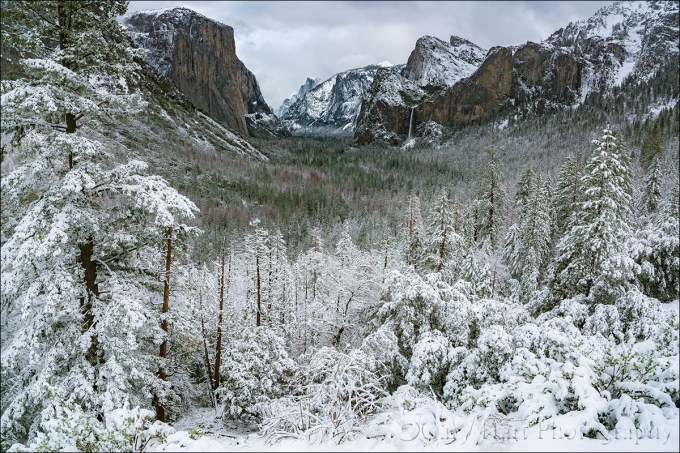
Snowfall, Tunnel View, Yosemite
Sony a7R II
Sony/Zeiss 16-35 f/4
1/250 second
F/9
ISO 100
A week or so ago I had the good fortune to be in Yosemite for the most recent snowfall there. All week the National Weather Service had been waffling a bit on the snow—based on the forecast, I probably wouldn’t have made the trip. But I was there anyway, guiding a fun couple from England for the weekend. Following a nice but unspectacular Saturday, we woke Sunday morning to find the world dipped in white.
The snow fell all day, at times so hard that that it was difficult to see more than a couple hundred yards, other times dwindling to a few flakes per minute. During one of the lulls we made our way to Tunnel View for the obligatory shot there. Despite hundreds (thousands?) of pictures of this view, after surveying the scene for a few minutes I couldn’t resist pulling out my camera and tripod.
My general feeling is that people tend to go too wide with their Tunnel View images, shrinking the main features (El Capitan, Half Dome, Bridalveil Fall) to include less exciting granite left of El Capitan and right right of Cathedral Rocks/Bridalveil Fall. That’s why I opt to tighten my horizontal Tunnel View compositions on the left and right, or isolate one or two of the three primary subjects with a telephoto. And when something exciting is happening in the sky (moon, clouds, or color) or foreground (fog, snow, rainbow), I’ll often compose vertically and bias my composition to favor the most compelling part of the scene.
With so many Tunnel View images in my portfolio, that afternoon I consciously set aside my long-held composition biases in favor of something I don’t already have. Of course the feature that most set the scene apart was the snow, so I set out to find the best way to emphasize it. Because the snow level that day was right around 4000 feet, also the elevation of Yosemite Valley, even the three hundred or so feet of elevation gain at Tunnel View resulted in much more snow virtually at my feet than on the distant valley floor. My Sony/Zeiss 16-35 f/4 lens, a great lens that I usually find too wide for Tunnel View, was perfect for highlighting the foreground snow.
Dialing my focal length to about 20mm allowed me to maximize the foreground snow while including minimal less-than-interesting gray sky. Of course going this wide meant shrinking the scene’s “big three” and adding lots of extraneous middle-ground on the left and right. To mitigate that problem I used the snowy pine on the left, often an obtrusive distraction to be dealt with, as a frame for that side of the scene. Not only did the tree block less interesting features, it actually enhanced the snowy effect I sought. On the right the diagonal ridge added a touch of visual motion (diagonal lines are so much stronger visually than horizontal and vertical lines), and it didn’t hurt that much of the bland granite there was covered with snow.
Workshop Schedule || Purchase Prints
A Tunnel View Gallery
Click an image for a closer look and slide show. Refresh the window to reorder the display.


Up a creek
Posted on February 12, 2017
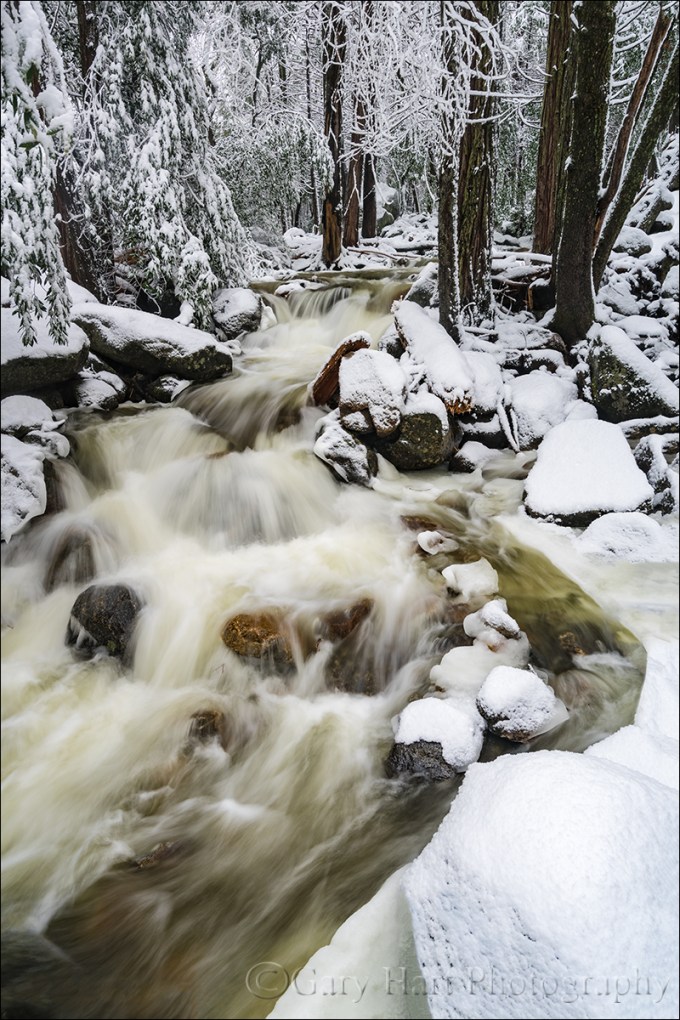
Wonderland, Bridalveil Creek, Yosemite
Sony a7R II
Sony/Zeiss 16-35 f/4
1/4 second
F/10
ISO 100
Many photographers vary their portfolios by visiting as many locations as possible. While I love visiting new locations, I’ve always preferred the kind of intimate familiarity that’s only possible with frequent, quality visits. And as enjoyable as it is photograph the icons, for my personal pleasure I’m most drawn to quiet pastorals and intimate portraits of nature that could be anywhere—wildflowers, fall color, solitary oaks, sparkling reflections, and tumbling creeks can keep me happy for hours.
One of my favorite intimate settings is Bridalveil Creek beneath Bridalveil Fall in Yosemite. Not only is there lots to photograph here, it’s different every time I visit. In spring the water in all three of the creek’s branches roars down the slope beneath Bridalveil Fall like it can’t get to the Merced River soon enough. And I’m especially fond of Bridalveil Creek in autumn, when the flow is often down to a single leisurely trickle, its whispering cascades and spinning pools adorned with vivid yellow leaves. Winter can find Bridalveil Creek in a variety of states that range from a gentle rivulet to a raging torrent. During one particularly cold winter the creek was solid ice, as if some frostbitten wizard had waved his wand and frozen the flowing water in place.
For some reason I haven’t had as much success here in winter as autumn or spring, so this winter I redoubled my efforts. On last month’s snow trip, while waiting for Yosemite’s monoliths to emerge from the clouds, I headed to Bridalveil Creek and found every square inch covered with snow—not a fine etching, but a dense glazing that covered virtually every exposed surface with several inches of white powder.
I hadn’t even crossed the first bridge when I was stopped by the scene here. I extended my tripod and evaluated the possibilities, starting on the bridge before moving down to a rock right on the creek. My first compositions were horizontal, but I eventually adjusted to vertical to emphasize the creek. Following my standard click, review, refine, click process, I finally landed on this composition—just wide enough to include both sides of the creek, and tall enough to include the parallel tree trunks and the creek’s exit from the bottom of the frame. I had to drop down quite low to get beneath an overhanging branch and keep it from occluding part of the creek.
The non-compositional variables I had to consider were motion and depth of field—there was no wind to sway the branches, but I knew the water’s blur would vary greatly with my shutter speed choice. And because I wanted everything in my frame sharp, I needed to be careful with my f-stop choice. The closest point of interest, the snowy foreground rock, was about five feet away. My hyperfocal app told me that at my 22mm focal length and f/8, my hyperfocal distance was about six feet (sharp from three feet to infinity). Because hyperfocal data draws the acceptable sharpness line a little less critically than I do, I stopped down to f/10 and focused on a small rock about eight feet away. Playing with a few ISOs to vary my shutter speed for different water motion effects, I decided I liked 1/4 second because it blurred the creek enough to clearly convey the water’s speed, but not so much that it lost its definition.
Intimate and Anonymous
Click an image for a closer look and slide show. Refresh the window to reorder the display.


Managing light, depth, and motion in nature
Posted on January 29, 2017
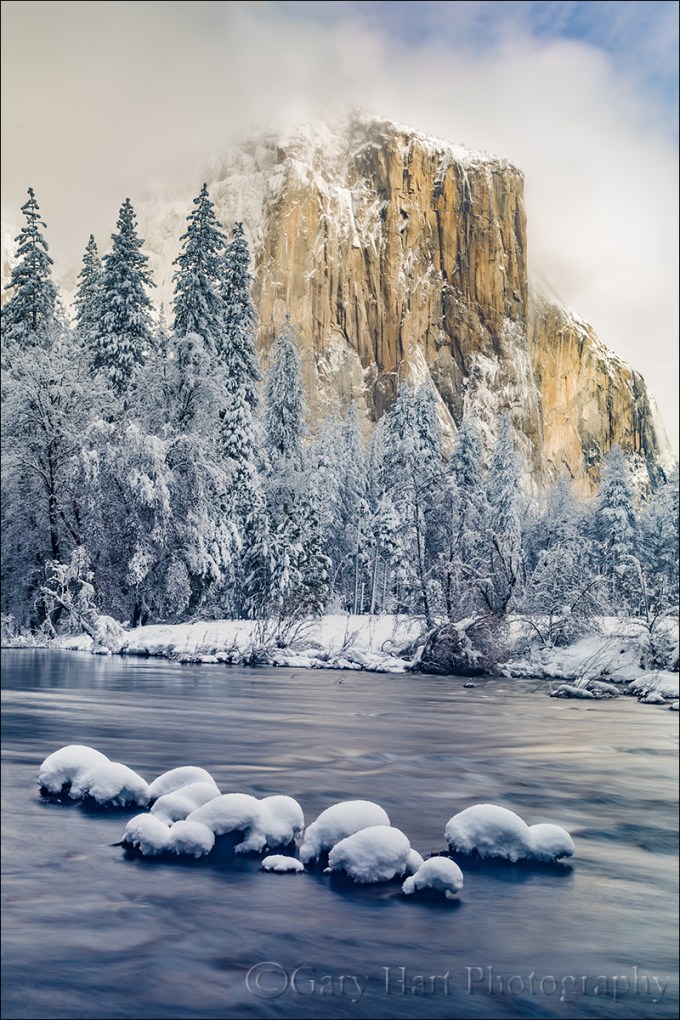
Snowcap, El Capitan, Yosemite
Sony a7R II
Sony/Zeiss 24-70 f4
3.2 seconds
F/10
ISO 50
Independent of composition, photographers have three scene variables to play with when setting up a shot: light, depth, and motion. And not so coincidentally, we have three exposure parameters with which to manage those variables: shutter speed, f-stop, and ISO. The exposure parameters have a reciprocal relationship—an increase/decrease in one can be compensated by a corresponding decrease/increase in another—but merely getting the “correct” exposure with a random combination of exposure values can yield wildly different results. This is why I never want my camera making decisions for me, and always photograph in manual mode. It’s also why I tell my workshop students that they should be able to defend (explain their reason for) every exposure value.
My approach to metering
As a landscape photographer who is always on a tripod, I’ve removed camera shake from the exposure equation, so the only motion that concerns me is motion in the scene. Unless I’m trying for a motion effect (for example, blurring moving water or freezing wind-blown leaves) I use the f-stop and ISO that yields the absolute sharpest, cleanest image—no quality compromise (such as a large f-stop or high ISO) to subdue camera shake. This allows me to approach every scene at ISO 100 (most camera’s best ISO) and f/8 – f/11 (the maximum depth of field possible with minimal diffraction, and also the range where most lenses tend to be sharpest), and only deviate when my scene variables dictate.
Once I determine my composition, I refine the f-stop to ensure to depth of field that achieves my desired effect, then dial my shutter speed to whatever value delivers the proper exposure. My ISO only moves from 100 when motion in the scene requires it. For example, photographing at night requires a shutter speed fast enough to minimize star motion and I’m force to increase my ISO to 800, 1600, or higher, depending on the amount of light and the focal length at which I’m shooting.
About this image
In this image from last Monday’s snow day in Yosemite, I wanted to smooth the rapidly flowing Merced River to smooth chop that I thought might distract from rest of this spectacular scene, but first I had to get everything else in place. I on a fairly tight vertical composition that eliminated everything on the left and right of El Capitan. I used the snow-capped boulders in the foreground to create a little depth, and included just a little sky for some extra color (if the clouds swirling about El Capitan had been more interesting, I might not have done this).
Aligning the foreground boulders was both tricky and awkward. First, I had to wade through a couple of shallow pools to reach a one-rock island (not much bigger than a basketball), then thrust my tripod into the water as far to the left as I could and still operate my camera. A focal length too narrow would have cut off important elements, and too would have introduced distractions just outside this frame. Where the camera was positioned, I couldn’t get my eye to the viewfinder without going for a swim, and there was too much light to see my LCD clearly. So I pulled my camera from the tripod and framed the composition to get the right focal length. With my composition established, I decided f/10 was the largest aperture that would ensure front-to-back sharpness, and focused on a ripple a little behind the boulders.
Finally ready to shoot, I returned the camera to the tripod and used what I could see of the LCD to guess the final composition. After each click I removed the camera and reviewed the image in my electronic viewfinder (another reason I love the EVF), adjusting two or three times until the composition was right.
With my composition framed exactly as I wanted, my exposure dialed in, and my focus point set, I was ready to play with the motion. I started by dropping my ISO to 50 (almost as good as ISO 100, but with slightly less dynamic range), but still couldn’t get the shutter speed long enough without shrinking my f-stop to a less than ideal, diffraction inducing number.
The solution was my Singh-Ray Vari-ND filter. Because my Vari-ND is 77mm, I had to stretch to hold it in front of my 67mm Sony/Zeiss 24-70 f4. Dialing the filter ever so slightly darker between exposures and adjusting my shutter speed to maintain the correct exposure, I ended up with a variety of motion effects. I found that this one, at around 3 seconds, smoothed the water enough while retaining just enough texture for visual interest without being distracting.
Yosemite Winter Photo Workshop
Workshop Schedule || Purchase Prints
A Gallery of Motion
Click an image for a closer look and slide show. Refresh the window to reorder the display.


It ain’t over till it’s over
Posted on January 26, 2017

After Twilight, Valley View, Yosemite
Sony a7R II
Sony/Zeiss 24-70 f4
30 seconds
F/8
ISO 800
(How many photography blogs out there quote Yogi Berra? Just sayin’….) During the 1973 baseball season, Yogi Berra was asked about his last place Mets’ chances in the pennant race. His reply, “It ain’t over till it’s over,” was greeted with chuckles, but Yogi got the last laugh when the Mets rallied to make it all the way to the World Series. I couldn’t help thinking of Yogi’s quote on my drive home Monday night with this image, my final click of the day, still fresh in my mind.
When the weatherman promised snow down to 2500 feet on Monday, I drove to Yosemite late Sunday night so I could beat sunrise and have an entire day to play. And snow I found, lots and lots of it, and still falling. The snowfall continued throughout morning, so heavy that my first few hours were limited to photographing close scenes, interspersed with lots of waiting for conditions to improve. But a little before noon the clouds started to thin and the snow became more showery and I was in business.
When the clearing started in earnest I was at Valley View (but it didn’t look anything like this). The rest of the day I spent dashing around Yosemite Valley, chasing the clouds’ parting and the light that came with it. It’s so much fun watching a storm clear in Yosemite, poised beneath Yosemite Falls or Half Dome or El Capitan, and wait for the big reveal when the clouds to pull back.
For sunset I ended up trudging through about 18 inches of virgin snow to a favorite Half Dome reflection spot by the Merced River, recently rendered much less accessible by major roadwork underway in the valley. Throughout the day I’d crossed paths several times with good friend Don Smith who had driven up for the day with our mutual friends Scott and Mike, and they eventually joined me at sunset. As we shot we shared stories of the day—for example, how they had just missed getting crushed by a falling tree (true story). After a half hour of really nice photography, a large cloud set up shop atop Half Dome right around sunset, completely obscuring the scene’s main attraction. Satisfied with a tremendous day of photography, we declared the day, “Over.”
It wasn’t until I was back at my car that fully appreciated how wet everything was—my gear, my car, and even me (a day of plunging through snowdrifts had been enough for the snow to find its way over the top my waterproof boots and underneath my waterproof outer pants). I decided I’d swing into Valley View on my way out of the valley to use the bathroom and change into drier clothes. In the back of my mind was possibility of a parting shot of El Capitan in the late, blue twilight.
The west end of Yosemite Valley gets much less winter sunlight, so while trees had already started shedding the snow on the east side (where I’d photographed sunset), I pulled in at Valley View to find virtually every exposed surface still glistening white. Bridalveil Fall and Cathedral Rocks clearly visible in the fading light, but El Capitan was cloud-shrouded from top to bottom. Still quite cold, tired, and more than a little hungry, this would have been a perfect excuse to beeline home. But the scene was so beautiful, and the light so perfect, that after changing my clothes I just sat in my car, peeled an orange, and waited for El Capitan to show itself.
I didn’t have to wait long. At the first sign of clearing I hopped out and was completely set up by the river before El Capitan appeared. Bumping my ISO to 800, I composed the standard horizontal frame with El Capitan on the left, Leaning Tower on the right, and the Merced River in the foreground. Often the most difficult thing about shooting in low light like this is finding focus, but despite the fact that it was more 30 minutes after sunset, my Sony a7RII was able to autofocus on Cathedral Rocks. I spent a several clicks refining that original composition and was about to call the day “Over” one more time when something moved me to shift my view to the right. As soon as the image popped up on my LCD I knew I was onto something. I refined for about a half dozen more frames, culminating with the one you see here, until I was satisfied that a great day truly was over.
The lesson here, one I learned many years ago but I see many photographers struggle to grasp, is that the camera can still do fantastic things long after your eyes tell you the show is over. Another satisfying reminder from this day is that it’s still possible to enjoy Yosemite in glorious peace. As someone who has seen Yosemite at its congested worst, I relish the solitude possible when I choose times that the average person (tourists, fair weather photographers) won’t venture out: miserable weather, late at night, before sunrise. The entire time I was out there at Valley View that evening I was alone, and only two cars drove by. As Yogi would say, “Nobody goes there anymore—it’s too crowded.”
Workshop Schedule || Purchase Prints
A Twilight Gallery
Click an image for a closer look and slide show. Refresh the window to reorder the display.


Winter is coming
Posted on October 20, 2016

Elm in Blizzard, Cook’s Meadow, Yosemite (2007)
Canon EOS-1Ds Mark II
Canon 70-200 f/4L
1/4 second
F/11.0
ISO 100
Photographing snow-covered Yosemite requires planning and patience: planning to ensure your arrival before the snow stops; patience to wait out the storm when visibility is so poor that you can barely see the nearest tree.
Planning
When the snow stops, Yosemite’s relatively mild temperatures (usually in the 30s when it snows) conspire with sunshine, wind, and gravity to clear the trees in a matter of hours. Meanwhile, park visitors driven inside by the storm, swarm outdoors to gape, quickly adding footprints and spreading mud with their boots, bikes, and cars. In other words, if you delay your departure for Yosemite until you hear that it snowed there, you’re too late. The key is being in the park during the storm.
All winter I monitor the National Weather Service Yosemite forecast and discussion (in-depth forecast analysis) pages for hints of a cold storm. I know there are lots of weather forecast options out there, but most either lack the resources of the NWS, or simply use the NWS data. The NWS may not always nail the forecast, but they’re more consistent and reliable than all the other options.
Sometimes the weather can change at the last minute, but I’m always ready. (It doesn’t hurt that I live less than four hours by car from Yosemite Valley.) In the back of my AWD Subaru Outback all winter are chains (required to be carried in Yosemite in winter, even with AWD/4WD), a portable charger that can recharge a car battery (among other things) in a pinch, and a duffle bag with all my cold weather gear (waterproof pants and upper shell, hat, gloves, umbrella, and ice grips for my shoes).
Patience
Once I decide I’m in, I’m all in. That usually means getting a room in or near Yosemite Valley, driving to the park a day early, and waiting for the snow to start. Once the snow arrives, I don’t hole up in my room, I’m out shooting. Even though Yosemite’s storms often erase all signs of its most recognizable features, stormy weather is a great time to photograph swirling clouds and accumulating snow in glorious (and rare!) solitude.
As much as I love photographing Yosemite in near white-out conditions, I sometimes get too cold, wet, or worn out to continue. But even when I reach that point, I don’t go in. Instead, I park at Tunnel View and wait for the weather to clear. Tunnel View is the perfect place to wait out a Yosemite storm because it’s on the west side of Yosemite Valley (where the clearing usually starts), provides an elevated vantage point with a view all the way down to Half Dome on the valley’s east side, and is spectacular to photograph when the storm clears. It even has decent cell service. And if I’m looking for an excuse to turn on the engine and warm things up, I drive through the tunnel for a view to the west, a preview of coming weather.
My final advice for anyone waiting out a storm at Tunnel View is when the storm clears, don’t spend so much time there that you miss opportunities elsewhere. This is easy to do because the photography will remain spectacular long after you should have moved on to other scenes.
Today’s image
Among my many snowy-Yosemite go-to spots is Cook’s Meadow. On this trip several years ago, until the snow arrived, the meadow was a field of lumpy brown grass, its sentinel elm a bare skeleton in the shadow of Half Dome. But a few inches of overnight snow transformed the bland meadow into an undulating sea of frozen white waves and etched the tree in white.
The snow was still falling when I arrived, wet and fast, slanted by a stiff breeze. Half Dome was gone. I positioned my tripod so the elm stood by itself, balanced in the frame by a stand of evergreens. The falling snow added an interesting dynamic to the otherwise static scene and I chose a 1/4 shutter speed that would blur its motion to streaks of white.
Yosemite Photo Workshops

Snowy Yosemite
Click an image for a closer look and slide show. Refresh the window to reorder the display.


