Eloquent Images by Gary Hart
Insight, information, and inspiration for the inquisitive nature photographer
Photography’s Creativity Triad: Motion
Posted on November 5, 2017
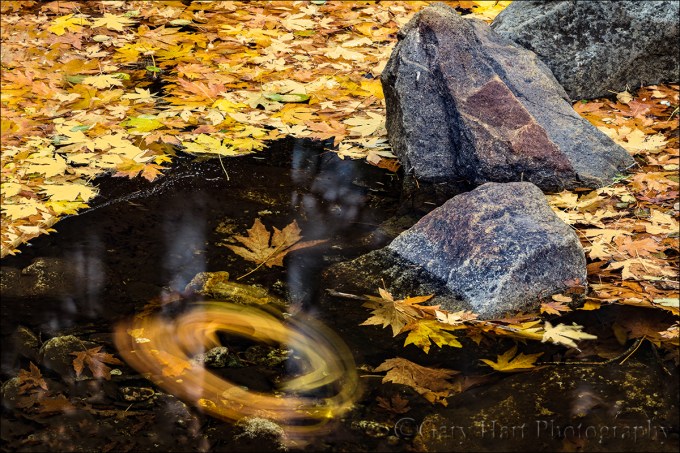
Autumn Spiral, Bridalveil Creek, Yosemite
Sony a7RII
Sony 100-400 GM
ISO 50
f/16
20 seconds
Photography’s Creativity Triad
Enduring photographs don’t duplicate human reality, they reveal unseen aspects of our world. Capturing this hidden world requires mastery of photography’s “creativity triad” that distinguishes the camera’s vision from human vision: motion, light, and depth.
Motion: Autumn Spiral
The human experience of the world unfolds like a seamless movie of continuous instants, while a camera accumulates light throughout its exposure to conflates those instants into a single frame.
Last week in Yosemite I got an opportunity to play with motion while photographing autumn leaves blanketing nearly every exposed surface below Bridalveil Fall. Beneath the fall Bridalveil Creek splits into three branches I love to explore—up- or down-stream, it doesn’t matter—searching for more intimate scenes. Last week I stayed close to the trail—not by design, but because I found enough to occupy every available minute.
Most of the fallen leaves had come to rest on granite, but those that had landed on the creek had been instantly swept downstream until they came to rest in sheltered pools, pushing up against and accumulating the rocks that bounded the pool. I found some pools that were entirely covered with leaves of varying shades of yellow and (just a little) green.
This little scene was downstream from the third bridge. The leaves here had been accumulating in this pool for a few days, leaving it more than half covered on this my final day in Yosemite. More than the golden pool, what really drew my attention from the bridge was a small collection of leaves, soon to become part of the pool’s autumn mosaic, swirling in a slowly spiraling current.
I set up my tripod right on the bridge, pulled out my new Sony 100-400 GM lens, dialed my polarizer to minimize reflections, and went to work. Because so much was happening in the scene, I started toward the lens’s wide end, but quickly found myself tightening each composition until I got down to a version of what you see here.
Once I had my composition, it became all about the motion in the leaves. When photographing landscape subjects in motion, each click can render a completely different image, so I’ve learned to never stop at one (or two, or three…). Whether it’s ocean waves, churning whitewater, or spinning leaves, I always make sure I have a variety of motion effects from which to choose. In this case, while the leaves were spiraling in a fairly consistent current, it seemed that with each rotation at least one leaf would go rogue, either slowing, accelerating, or making a break for the perimeter. The result was a distinctly different spiral with each capture.
I experimented with shutter speeds between ten and thirty seconds. Sometimes I’ll use a neutral density filter to stretch my shutter speed, but for this scene I was using a polarizer (minus two stops), it was quite early (shortly after sunrise) in an always densely shaded location, and darkened even further by the dense clouds of an approaching storm. In other words, the scene was dark enough that I could get the shutter speed all the way out to thirty seconds with my f-stop and ISO settings. When I was done, I had about 20 frames to choose from (one more argument for the tripod), identical except for a little different swirl.
While a still camera can’t capture motion as humans view it, in the right hands the camera absolutely does capture motion in ways that I’d argue can be even more appealing than being there. In this case, the spiral nature of this pool’s motion is much more apparent in this image than it was witnessing it firsthand.
Because there always has to be a moral…
The moral of this story is the importance of being able to manage your exposure variables: You can’t control motion, depth, and light without knowing how to achieve the shutter speed, f-stop, and ISO that serves your creative objective with minimal image quality compromise. That means retaining full control of your exposure settings by shooting in manual, aperture priority, or shutter priority modes. (And if you choose aperture or shutter priority, you must be able to manage your camera’s exposure compensation dial.)
Learn About Photographing Motion
World in Motion
Click an image for a closer look and slide show. Refresh the window to reorder the display.


Yosemite Reflections
Posted on October 28, 2017

Spring Sunset, Leidig Meadow, Yosemite
Sony a7R II
Sony/Zeiss 16-35
3.2 seconds
F/9
ISO 200
Rather than attempt the impossible task of choosing a favorite season in Yosemite, I find it easier to identify the things I like most about each season. From colorful fall to white winter to saturated spring, Yosemite becomes a completely different place with each season. (FYI, summer is for tourists.) But regardless of the season, I think it’s Yosemite’s reflections that make me happiest.
Yosemite’s reflection locations vary with the season. After a storm, small reflective pools form in Yosemite’s ubiquitous granite, then disappear almost as quickly as they appeared. The Merced River, is a continuous ribbon of reflection in the late summer and autumn low-water months, and a churning torrent in spring. But even in those high snowmelt months, reliable pockets of calm can be found along the riverbank, and there are a handful of spots where the river widens and smooths enough to reflect color and shape.
I think my favorite Yosemite reflections may be the ones I find in the flooded meadows during a wet spring, not necessarily because they’re any more beautiful than the other reflections, but mostly because they’re much more rare. Many years we don’t get these vernal pools at all, and even when they do form, their lifetime is measured in days or weeks.
Following years of drought, a record winter snowfall earlier this year translated to a record spring snowmelt, sending the Merced River well over its banks and into many of Yosemite’s normally high-and-dry meadows. This wasn’t “run for your life!” flooding, it was a gradual rise that seeped into and eventually submerged meadows, trails, and even some Yosemite Valley roads.
Leidig Meadow west of Yosemite Lodge is one of those spots that doesn’t usually flood, but flooding here is far from unprecedented. This year when I parked in my usual spot west of the meadow and attempted the normally relaxing 1/4 mile stroll along the river, I had to wade through eight inches of water to make it to the meadow. When I returned a few days later with my workshop group, even after choosing another somewhat less treacherous parking spot, we still had to pick our steps carefully or risk a shoe-full of water.
Meadows are always fragile, but never more-so than when they’re wet, so rather than venture further into the meadow, we set our sights on the numerous reflections among the trees near the (mostly submerged) trail. Even still, we ended up with a number of wet shoes and pant legs, some accidental and some by design (to get the shot, of course).
When it appeared the sunset show was over, the group started to pack up and head back to the cars. About the time I was ready to call it myself, I noticed a little bounce-back pink in the thin clouds overhead and warned everyone that they might be packing it in a little too soon. Many were anxious to get dry and escape the mosquito feast, but those of us who stayed were rewarded with about ten minutes of post-sunset color that went from pale pink to electric magenta, one of those moments in nature that you think just can’t get any better until somehow it does.
Reflecting a bit on reflections
A reflection can turn an ordinary pretty picture into something special. Of course they aren’t always possible, but when the opportunity exists I pursue reflections aggressively, scanning the scene for potentially reflective water and positioning myself accordingly. Too often I see people walk up to a reflection, plop down their tripod, and make a picture of whatever happens to be bouncing off the water at their feet. But maximizing reflection opportunities starts with understanding that, just like a billiard ball striking a cushion, a reflection always bounces off the reflective surface at exactly the same angle at which it arrived.
Armed with this knowledge, when I encounter a reflective surface, I scan the area for something worthy of reflecting. Sometimes that’s easy (Half Dome, for example), sometimes it’s a little tougher (like a rapidly moving sunlit cloud). Knowing that all I need to do is position myself in the path of the reflection of my target subject, I move left/right, forward/backward, up/down until my object appears. I’ve observed that many people are pretty good about the left/right thing, not quite so good with the forward/backward part, and downright miserable at the up/down. But I’ve found that once I get the left/right position nailed, it’s the up/down that makes the most difference.
For example, in the spring reflection of Half Dome at the top of this post, it’s not an accident that the Half Dome and North Dome reflections are centered and uncluttered by all the grass and leaves scattered throughout the water. The centering part was pretty easy, but finding a large enough clean surface to reflect the two domes required a lot of forward/backward maneuvering, combined with frequent up/down dipping—I’m sure to the uninformed observer it appeared that I was trying out a new dance routine.
Read more about reflections
A Gallery of Yosemite Reflections


Going wide
Posted on August 6, 2017
El Capitan and Three Brothers Reflection, Merced River, Yosemite
Sony a7R II
Sony 12-24 f4 G
12mm
1/25 second
F/8
ISO 100
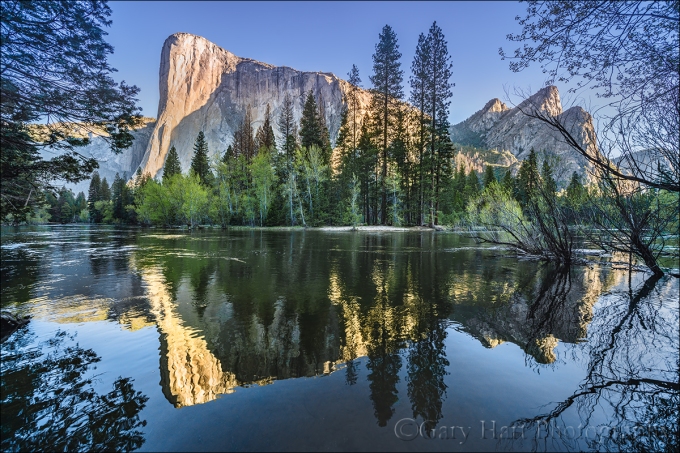
After years of drought, in spring of 2016 I had the good fortune to photograph Yosemite Valley with actual flooding—nothing devastating, just enough for the Merced River to overspill its banks and create reflections where meadows normally exist. One such location was a spot beneath El Capitan, where I found myself faced with the challenge of capturing more scene than my 16-35 lens could handle.
Stitching multiple frames was an option, but because I have a thing about not doing things I couldn’t do with film, my goal is to always capture a scene with one click (this is my problem, and in no way do I mean to discourage others from entering the 21st century). One benefit of my self-imposed one-click rule is that I often find creative compositions I might have overlooked had I settled for the easy solution, but in this case I really, really wanted to photograph the entire scene. The photography gods were smiling upon me that day, as I was leading a workshop and the photographer assisting me generously offered to loan me his Canon 11-24 f/4 lens (thanks, Curt). Since I had in my possession a Metabones adapter that allowed me to pair Canon glass to my Sony body, I leapt at the opportunity.

Spring Reflection, El Capitan and Three Brothers, Yosemite
That was an epiphany moment for me, because even though I knew that the difference between 11mm and 16mm is more significant than it sounds, I’d never really compared the two focal lengths side-by-side. Replacing my 16-35 with Curt’s 11-24, suddenly I had the entire scene in my viewfinder, with room to spare. Not only that, I learned as soon as I put the images up on my monitor that the Canon lens was really sharp—I was in love. Sony shooter or not, I came home fully intending to purchase the Canon lens, and came very close to making a big mistake.
My decision not to pull the trigger on a Canon 11-24 purchase was three-fold: 1) it was $3000 2) it’s so massive that it could never be a full time resident of my camera bag 3) I knew Sony was committed to expanding their lens lineup, and that I’d be wracked with regret if Sony released a similar lens soon after I’d sunk $3,000 into a lens that could double as a boat anchor. But still….
Imagine my relief when my Sony doused my Canon fantasies with an ultra-wide lens of their own this spring. Given the opportunity to test the Sony 12-24 f/4 G lens before it was announced, I immediately took it to Yosemite where the flooding on the Merced was even more extreme than last year. Finding “my” spot underwater, I probed the riverbank for nearby vantage points and found the view I’ve shared at the top of this post.
It wasn’t difficult to see that the Sony 12-24 is every bit as sharp as the Canon 11-24. And not only does it not require an adapter to use on my Sony bodies, it weighs less than half of what the Canon ultra-wide weighs. I ordered the 12-24 immediately and this week packed for my first trip with it.
When I drive to a photo destination I bring virtually every piece of camera gear I own, but when I fly, I need to be a little more selective. As I chewed on what to bring and what to leave out, not only did I quickly confirm that the 12-24 would make the cut, I discovered that the new lens is small and compact enough to occupy a permanent space my camera bag.
Which brings me to another thought. I shoot Sony mirrorless for several reasons—foremost is the image quality: Sony’s unmatched combination of resolution, dynamic range, and low-light capability is exactly what I need for landscape photography. And after a few growing pains, I’ve come to love the electronic viewfinder and can’t imagine ever going back. Sony’s lenses are as sharp or sharper than anything I had from Canon, but I don’t think the compactness of Sony’s f/4 glass gets the credit it deserves for their ability to provide so much quality in such a compact package. How compact? They’re small enough to slide into a slot in my bag oriented up/down (resting on an end rather than along a side), which gives me so much more room for more gear (and what photographer doesn’t love more gear).
Here’s what’s in my camera bag (F-stop Tilopa) for this week’s trip to the Grand Canyon:
- Sony a7RII
- Sony a7SII
- Sony a6300
- Sony 12-24 f/4 G
- Sony/Zeiss 16-35 f/4
- Sony/Zeiss 24-70 f/4
- Sony/Zeiss 70-200 f/4 G
- Rokinon 24 f/1.4
- Two Lightning Triggers
That’s three (!) bodies and five (!) lenses, with room for even more stuff. Photographer heaven.
A few words about wide angle photography
Despite the fact that wide angle is the reflex response to most landscapes by virtually every tourist who picks up a camera, good wide angle photography is not easy. From diminished backgrounds to tilting verticals, wide angle lenses pose problems that can be turned to opportunities if they’re fully understood. I’ll save a full discussion of wide angle photography for another day, but here are a couple of tips that might help:
- Put something in your foreground: Many of my wide angle images put the primary subject front and center, but even when the background scene is my main subject, I try to have something of visual interest in my foreground. Browse the gallery below and note how many images have an empty foreground (Hint: Not very many). Sometimes I’m able to include something as striking as a mirror reflection or colorful flowers, but often my wide angle foregrounds are as simple as nearby rocks or leaves. If there’s nothing at my feet and I’m required to use something distant, at the very least I want the foreground of my wide image to be filled something worthy of the space it occupies.
- The tilting of vertical lines caused when you’re close to your subject is minimized when the sensor is on the same plane as the subject (not tilted up or down): Mount on your camera a wide angle lenses at its widest focal length, point it at a row of nearby trees (or some other vertical lines that spans the edges of your frame), and tilt up and down while looking through your viewfinder. At what point do the trees appear straightest? Most slanted? I rest my case.
Going Wide
Click an image for a closer look and slide show. Refresh the window to reorder the display.


What’s the deal with Yosemite’s dead trees?
Posted on July 28, 2017


One of the most frequently asked questions in my Yosemite workshops is some variation of, “Why are there so many dead trees?” My standard answer has always been a summary of what I’ve learned from talking to Yosemite rangers: The drought has stressed the trees and made them more susceptible to the bark beetle. This morning I read an excellent summary of the problem on the NPS Yosemite site explaining the problem, and adding to what I already knew, and I thought I’d share what I learned.
The problem
As someone who has been visiting Yosemite for (pretty much literally) my entire life, the tree death in Yosemite Valley in the last five years has been staggering. Yosemite Valley, once a carpet of green, is now stained with large patches of rust-brown dead or dying trees. Scenes I’ve photographed for over 40 years are suddenly marred by these trees.
Going through my portfolio of Tunnel View images, I chose two with very similar compositions that illustrate the tree death. The first, my rainbow image from 2009, shows the green valley floor I remember. The second is a winter scene from 2016, and the tree death is obvious. And sadly, in the year-and-a-half since I took the 2016 image, I guess that at least twice as many trees have died.
Double whammy
The drought has clearly taken its toll on Yosemite’s trees, both by killing the thirstiest outright, and by weakening many others until they become easy targets for a very opportunistic bark beetle. But the problem is not just about weak trees—it’s also about healthy beetles, a lot of them. Consider that while the 2016 image was taken in late January, there is absolutely no snow in Yosemite Valley. Of course the drought has something to do with that, but the lack of valley snow in recent years can also be attributed to warming temperatures. As Yosemite’s climate warms, much of the precipitation that once fell as snow now falls as rain.
Snow doesn’t kill the bark beetle (it’s still not cold enough), but an extreme freeze does. But as the number of sub-freezing days in Yosemite decline, the mechanism that kept the bark beetle in check gets out of whack. While Yosemite’s evergreens have no problem handling an extreme freeze, each freeze kills many bark beetles. But fewer freezing days each winter means more bark beetles, and more bark beetles makes even healthy trees more prone to attack.
Triple whammy
And finally, America’s long-time knee-jerk fire suppression policy has taken its toll. By thinning growth, consuming dead wood, and enabling regeneration, fire is a natural part of maintaining forest health. But for over a century, fires in Yosemite (and pretty much every other national park and forest) were doused as soon as they ignited because they were inconvenient, and they (temporarily) scarred the scenery.
Thankfully that misguided policy is largely behind us, but its legacy remains. We’re left with too many trees competing for the available water. Some die of thirst, while many survivors lack the resources to stave off a beetle infestation.
What’s being done
The National Park Service has undertaken the monumental task of removing dead and dying trees. Because it’s impractical to remove all of them, the emphasis is on those trees that pose a hazard to people and property. Also, in developed areas the NPS has started prophylactic application of a (naturally occurring) pheromone that discourages the beetles from attacking susceptible trees.
No one knows for sure, but it’s possible that the tree death will stabilize, or even start to decline over the next few years. While the current mitigation efforts might help stem the tide, the primary hope is that an equilibrium will be reached as the most susceptible trees die and forest health is restored through better management. Fingers crossed.
From the horse’s mouth
Here’s the link to the NPS tree mortality article.
The Trees of Yosemite
Click an image for a closer look and slide show. Refresh the window to reorder the display.


Yosemite game-changer
Posted on June 26, 2017

Evening Reflection, Mirror Lake, Yosemite
Sony a7R II
Sony 12-24 f4 G
12mm
1/15 second
F/9
ISO 100
“Game changer” is most certainly a cliché, but every once in a while I get to use the term without shame. I used it when I switched from film to digital; again when I discovered that the Sony a7R (and now the a7RII) gave me 2- to 3-stops more dynamic range than my Canon 5DIII; one more time when I first turned the Sony a7S (since replaced with the a7SII) toward the night sky. And I think I’ll trot it out once more for Sony’s new 12-24 f4 G lens.
Of course I can only speak for the 12-24’s change in my game—your results may vary. But as a landscape-only shooter who spends a lot of time in Yosemite, this lens allows me to capture images that were heretofore not possible with anything in my bag: Game changed.
Early last month, with only a few days to play with the new (and at the time, top secret) lens, I beelined to Yosemite. My first stop was Mirror Lake, a wide spot in Tenaya Creek that isn’t technically a lake (it’ll be dry by summer’s end), but each spring is most definitely a mirror. The coveted feature here is Half Dome, which towers more than 4,000 feet above the glassy water, close enough to require some serious neck craning. Many times at Mirror Lake I’ve visualized a composition that includes Half Dome and its reflection, only to be thwarted because even at its widest, a 16-35 lens isn’t wide enough.
Since my days with the lens were limited, I wasn’t able to time my visit for interesting weather or some celestial event. No worries, I rationalized, even on Yosemite’s standard blue-sky days, I can always count on warm, late afternoon light bathing Half Dome—not spectacular, but reliably nice.
I arrived at the lake about an hour before sunset and immediately started seeking out compositions to put the new lens to the test. I can’t tell you how thrilled I was to mount the 12-24 on my a7RII, put my eye to the viewfinder, and see all of Half Dome and its reflection with room to spare. It wasn’t long before I zeroed in on the scene you see here (that required me to balance atop a rock about three feet from the shore, tripod 10 inches deep in frigid snowmelt).
As luck would have it, just as the light started to warm, a few clouds drifted down from the north, so I quickly adjusted my composition and waited for them to slip into my composition. They were moving quite fast, leaving a window of just a few seconds when they filled the sky without being seriously truncated by the border. With composition, exposure, and focus set, I clicked a half dozen rapid-fire frames before the clouds started drifting out of the frame.
This was just my first stop with this lens. On the walk back to my car I stopped for a shot that I shared a few weeks ago; that night, and again the next morning, I tried it at a favorite El Capitan View with great success (to be shared in a future blog). And before returning home, I discovered a completely unexpected use at Yosemite Falls. Needless to say, I’ve already ordered this lens—I expect to see it next month.
Workshop Schedule || Purchase Prints
A Half Dome Gallery
Click an image for a closer look and slide show. Refresh the window to reorder the display.


Happy Father’s Day, Dad
Posted on June 18, 2017

Sunset Palette, Half Dome from Sentinel Dome, Yosemite
Canon EOS-1Ds Mark II
Canon 24-105L
2 seconds
F/20
ISO 100
June 2017
This summer it will be 13 years since I lost my dad to Alzheimer’s disease. He would have turned 87 next month, and I have no doubt that his body would still be going strong if the Alzheimer’s hadn’t taken over. Sadly, it’s difficult to fully appreciate a parent’s influence until they’re gone. We’re certainly aware of the love, wisdom, advice, discipline, tears, and laughs while we’re in the midst of growing up, but it takes being a parent to fully appreciate our parents’ influence on the adults we become.
Dad was a United Methodist minister who literally practiced what he preached. In 1965, when Martin Luther King issued a plea to clergy to join him, Dad borrowed money and flew across the country to march with Dr. King in Selma, Alabama (he was on national TV getting arrested). His was an inclusive theology that respected all religions: I can remember Dad preaching at the local synagogue on a Saturday, and reciprocating in our Sunday service by opening his pulpit to the rabbi. And I’ve lost track of the number of homeless people, including families with young children, we housed while they tried to get back on their feet.
More than the values he instilled, so many of the things that define me today are directly attributable to my dad’s influence. My love of sports and sense of humor for sure. And when asked how I became a photographer, I have to cite Dad. My standard answer has always been that Dad was a serious amateur photographer whose 80-hour work week offered too little time to pursue his passion, so he made up for lost time on our summer family vacations—I grew up believing that a camera was just a standard outdoor accessory. But I think his influence goes deeper than that. More than simply modeling camera use, Dad instilled his appreciation of nature’s beauty, and his longing for its soothing qualities.
Our vacations were, without exception, camping trips—always tent-camping, though in the later years we splurged on a used, very basic tent trailer (no kitchen, bathroom, or any of the other luxuries available in today’s tent trailers). A few times we (Dad, Mom, my two brothers, and I) hit the road for a longer camping trip, one summer taking a month to camp all the way across the country, another summer venturing into the Canadian Rockies. But usually we took advantage of the mountain scenery (always the mountains) closer to our California home.
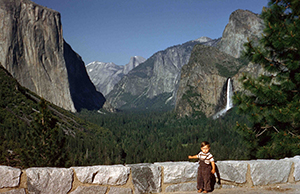
Me, on an early (but probably not my first) Yosemite trip
Of these locations, Yosemite was the clear favorite. Marveling at the Firefall from Camp Curry and Glacier Point, waiting in lawn chairs at the Yosemite dump for the bears to arrive for their evening meal (really), rising in the dark for a fishing expedition to Tuolumne Meadows, family hikes up the Mist Trail to Vernal and Nevada Falls, are just a few of the memories that I only realize in hindsight formed my Yosemite connection.

My father’s rainbow
My favorite Dad photography story happened when I was about ten. It involves an electrical storm atop Sentinel Dome, and his desire to get the shot that was so great that it trumped common sense. As his ignorant assistant, I stretched to hold an umbrella high above Dad’s head to keep his camera dry. (In his defense, as Californians, lightning was a true novelty that trumped full appreciation of its dangers.) We didn’t get the lightning, and more importantly, it didn’t get us. But what I remember more than anything about that day was Dad’s excitement when later that afternoon he was able to photograph a rainbow arcing across the face of Half Dome.
This story has achieved family legend status, and we’ve felt a special connection to Sentinel Dome as a result. When it came time to scatter Dad’s ashes, Sentinel Dome was the obvious choice.
One more thing
I have the reputation for being very lucky where photography conditions are concerned: The clouds that part just as the moon rises, the snowstorm that blankets Yosemite Valley just as the workshop begins, the rainbow arcing across the Grand Canyon. In our family we like to believe that Dad is somehow up there pulling some strings. It’s just the kind of thing he’d do.
I love you, Dad.
Workshop Schedule || Purchase Prints || Instagram
Sharing the Love: A Yosemite Gallery
Click any image to scroll through the gallery LARGE


Downhill All the Way
Posted on June 5, 2017

El Capitan Reflection, Yosemite
Canon EOS 10D
1/4 second
F22
ISO 100
27 mm
On Saturday, with little fanfare, Alex Honnold stunned the climbing world when he free-soloed El Capitan in Yosemite, the world’s largest granite monolith. (What’s the big deal? From this image, you can clearly see that it’s downhill all the way….)
But seriously…
Speaking for all non-climbers, Alex Honnold didn’t just stun the entire climbing world, he stunned the entire rational world. Soaring three-thousand feet above Yosemite Valley, El Capitan is the Holy Grail of climbing. Among climbers, if you’ve summited El Cap, you’ve made the Major Leagues.
First conquered by Warren Harding in 1958, today dozens of climbers dot El Capitan’s vertical surface on any non-winter day with reasonable weather in the forecast. But until Saturday, all who scale El Capitan do it with ropes and a virtual hardware store worth of climbing aids. Most require multiple days to summit.
Alex Honnold chose to ascend El Capitan unencumbered by ropes or safety hardware of any sort (free climbing uses ropes for safety only; free-soloing is completely sans rope), scampering up the shear granite the old fashioned way, using only his hands and feet like a kid climbing a tree in his backyard. Even more astonishing, he accomplished his feat in less than four hours.
I’m not a climber, and in fact have a difficult time getting within three feet of any un-railed vertical drop greater than thirty feet. But I’ve always lived vicariously through climbers, devouring climbing books, videos, and documentaries just to marvel at their accomplishments. And for years Alex Honnold has been the climber I’ve followed most closely, not just because he’s the best (he is), but also because of our common affinity for Yosemite, and the fact that my daughters went to high school with him (and I was a Honnold fan even before I knew this connection).
I also admire Alex Honnold not only for his skill and accomplishments, but for his humble demeanor (I suspect that he’d prefer climbing in complete anonymity) and quiet wisdom. And though we’ve never met, I can’t help worrying a little about him when I think of the number of mistakes I make with my camera—”Oops, I’m still at ISO 3200 from last night’s Milky Way shoot”; “Crap, I forgot to orient my polarizer”; “Did I remember to focus?” (I could go on)—and realize that for Alex Honnold, even one small mistake likely means death. I mean, even if I knew with absolute certainty that missing my exposure by just 1/3 stop would cause my camera to explode, I’m pretty sure I’d still be dead long ago.
So hats off to you, Alex Honnold, here’s wishing you many happy years as the world’s greatest living climber.
Links
- Check out this “60 Minutes” segment
- Here he is climbing El Sendero Luminoso in Mexico
- And if the video makes you squeamish, here’s a simple interview
An El Capitan Gallery


, Yosemite")
Seeing the future
Posted on June 1, 2017

Rapids, Half Dome and Tenaya Creek, Yosemite
Sony a7R II
Sony 12-24 f4 G
12mm
.8 seconds
F/9
ISO 200
Ansel Adams and visualization
Most photographers know that Ansel Adams visualized his prints, and the darkroom work necessary to create them, before clicking the shutter. This ability to look into the future of each capture is part of what set Ansel Adams apart from his peers.
But Adams’ extensive darkroom work is often cited by digital photographers defending their over-processesed images. We’ve all heard (and perhaps even uttered ourselves) statements like, “Ansel Adams spent more time in the darkroom than he did in the field,” or “Ansel Adams would love Photoshop.” Perhaps true, but using Ansel Adams’ darkroom mastery to justify extreme Photoshop processing misses a significant point: Adams’ mental picture of the ultimate print was founded on a synergistic relationship between his vision and his camera’s vision, coupled with a master’s control of capture variables like composition, light, motion, and depth. In other words, Adams’ gift wasn’t merely his darkroom skills, it was an overarching vision that enabled him to make decisions now based on invisible realities he knew he’d encounter later.
I bring this up because I’m concerned about many photographers’ Photoshop-centric “fix it later” approach that seriously undervalues capture technique. This mindset ranges from simple over-reliance on the LCD for exposure with no real understanding of the histogram or how metering works (shoot-review-adjust, shoot-review-adjust, shoot-review-adjust, until the picture looks okay), to photographers who channel their disappointment with an image into an overzealous Photoshop session, pumping color, adding “effects,” or inserting/removing objects until they achieve the ooooh-factor they crave.
The better approach is to understand the potential in a scene, anticipate the processing that will be required to make the most of it, and shoot accordingly. In other words, Photoshop should inform capture decisions, not fix them.
Putting Photoshop in its place
Every image ever shot, film or digital, was processed. Just as the processing piece was easy to ignore when the exposed film you sent to a lab magically returned as prints or slides, many digital shooters, forgetting that a jpeg capture is processed by their camera, brag that their jpeg images are “Exactly the way I shot them.” Trust me, they’re not.
Whether you shoot monochrome film, Fuji Velvia slides, or low-compression jpeg, there’s nothing inherently “pure” about your image. On the other hand, digital landscape photographers who understand that processing is unavoidable, rather than relinquish control of their finished product to black-box processing algorithms in the camera, usually opt for the control provided by raw capture and hands-on processing.
Unfortunately, Photoshop’s power makes it difficult for many to know where to draw the processing line. And every photographer draws that line in a different place—one man’s “manipulation” is another’s “masterpiece.” Photoshop isn’t a panacea; its main function should be to complement the creativity already achieved in the camera, and not to fix problems created (or missed) at capture.
While I’m not a big Photoshop user, I readily acknowledge that it’s an amazing tool that’s an essential part of my workflow. I particularly appreciate that Photoshop gives the me ability to achieve things that are possible with black and white film and a decent darkroom, but difficult-to-impossible with the color transparencies I shot for over 25 years.
Creating an image, from start to finish
I was in Yosemite on a “secret mission” (my inner 10-year-old just loves saying that) for Sony, trying out the yet-to-be-announced (at the time) Sony 12-24 f4 G lens. Among the many places in Yosemite that are especially conducive to ultra-wide photography is Mirror Lake and its view of Half Dome from directly below, and that’s where I started.
Walking up the trail to Mirror Lake, I skirted Tenaya Creek in less than ideal light, scouting potential scenes for later. On the walk back after sunset, I returned to this scene that I’d found and mentally composed earlier. Despite already having an idea of how I wanted to shoot it, there’s quite a bit going on here, so it took some time and a bit of rock scrambling to get all the elements to work together: Half Dome, Tenaya Creek, the nearby evergreen, and the creekside boulders.
While most of the scene was in deep shade, the sky was still relatively bright. Capturing this much dynamic range in an unprocessed jpeg (or color transparency) would have been impossible—my highlights would have been too bright, the color in the sky would have been washed out, and the shadow detail would have been lost to blackness. And that’s exactly what I saw in the jpeg that popped onto my LCD. But despite the crappy looking jpeg on the back of my camera, my histogram told me all my color and detail was there in my raw file.
With a good histogram, I adjusted my ISO up and down, compensating with a corresponding shutter speed adjustment, to get different blur effects in the creek. Opening the raw file in Lightroom, I simply pulled the Highlights slider to the left and the Shadows slider to the right to confirm my successful exposure. While the exposure adjustment was essential, once that was done, there was very little processing left to do. And as much as he enjoyed the dark room, I suspect Ansel would have embraced any technology that gave him more time outdoors with his camera.
Workshop Schedule || Purchase Prints
Different Takes on Half Dome


A Star in the East
Posted on May 22, 2017

Yosemite Falls Sunstar, Yosemite (Sony 12-24 f/4)
Sony a7R II
Sony 12-24 f4 G
12mm
1/30 second
F/20
ISO 100
When Sony asked Don Smith and me to try out their new lenses, I immediately thought of a couple of El Capitan and Half Dome views in Yosemite that would be ideal for the new Sony 12-24 f4 G lens. After great success photographing Yosemite’s granite icons as I’ve never been able to before (okay, well there was that one time last year when I borrowed a friend’s ultra-wide lens), I was ready to go home. But before leaving, I decided to walk up to the bridge beneath Lower Yosemite Fall, which was bursting with spring flow.
With my Yosemite Moonbow and Dogwood workshop starting in just five days, my goal this morning was more to see exactly how wet it is on the bridge than it was to take any more pictures, but I decided to take my camera anyway. On the way back I played with ultra-wide (12mm) vertical compositions of this scene. Still getting used to how much I can actually fit in my frame at 12mm, I flipped the camera to horizontal and was startled to find the sun in the right corner of my viewfinder. Startled because from my location, the top of Yosemite Falls is due north (0 degrees), and the sun at that time was at 125 degrees azimuth (35 degrees south of due east).
I quickly came to terms with this revelation and repositioned myself until the sun was behind a tree, dialed the aperture to f/20, composed, metered, and focused, then clicked as the sun peaked out. For the next ten minutes or so I moved as the sun moved, keeping my lens right on the edge of the tree’s shadow.
I knew the sunstar’s highlights would clip, but I wanted to give the shadows as much light as possible without losing the highlights in the waterfall. And as important as the histogram is in these scenes with brilliant highlights and dark shadows, I knew in this case it wouldn’t tell me the entire story. As I increased the light by lengthening my shutter speed, in my viewfinder (I love mirrorless!) I monitored both the shadow side of the histogram and the highlight alert in the fall. I know that shooting raw on my Sony Alpha bodies, I can increase the exposure a stop beyond where the highlight alert appears, but in this case I found that I only needed to add 2/3 stop before the histogram showed me that I had all the recoverable data in the shadows I needed.
A few words about sunstars
Sunstars can be overdone, but they’re often the best way to make something interesting in difficult light. When I find myself wanting to photograph a clear sky scene facing the sun, I often use the sunstar to add visual interest to a sky that is otherwise pretty boring. Often the sunstar makes an excellent counterbalance to another strong visual object. And while a sunstar isn’t exactly what our eyes see when we look toward the sun, I think it makes a pretty good substitute for the blinding experience of looking into the sun. Take a look at the gallery of images below and ask yourself how many of these images would have been as visually appealing without a sunstar spicing up the sky.
To capture a sunstar, use a small aperture (I usually use f/16 or smaller), remove any filters (to minimize flare), and place the sun on a hard edge with most of the sun obscured: the horizon, a cloud, a tree, a flower, and so on. The more sun visible, the bigger (and more blown out) the sunstar will be. As a general rule, I try to avoid too much sun. And since each lens creates a slightly different sunstar, it helps to experiment with different lenses to determine which ones work best.
I’ll be on my annual Grand Canyon raft trip, off the grid and unable to respond, until May 30
Workshop Schedule || Purchase Prints
A Sunstar Gallery


The cat’s out of the bag…
Posted on May 19, 2017
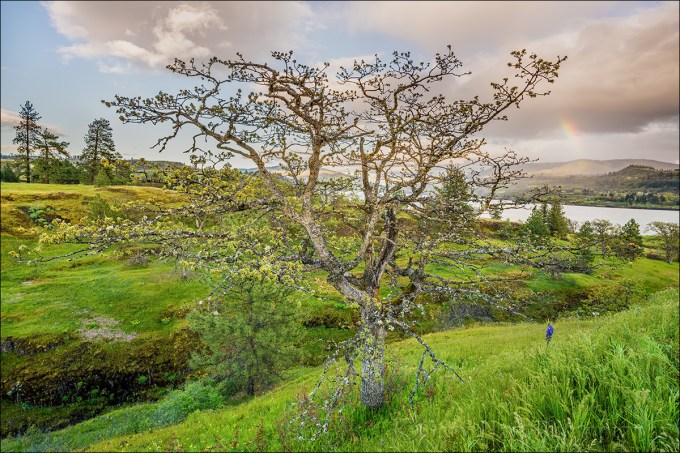
Spring Rainbow, Catherine Creek Trail, Columbia River Gorge
Sony a7R II
Sony 16-35 f2.8 GM
18mm
1/125 second
F/11
ISO 400
For about three weeks I’ve had to bite my tongue about two new Sony lenses I got to try out a few weeks ago. But yesterday Sony announced their brand new 16-35 f2.8 GM and 12-24 f4 G lenses and I’m free to share.
I spent most of this week just outside of Santa Barbara, California with a hundred or so Sony Artisan and Creative Collective photographers at Sony’s Kando Summit. This event was revelatory in many ways: Not only did I get to commune with fellow Sony Artisan’s who had previously been just names on e-mails and pictures on Facebook, I also learned that the future of photography is in the very capable hands of the Collective members—such an impressive group of creative, intelligent young adults.
For most of the Summit the hardware show-stealer was the brand new Sony a9—each of us got our own a9 to play with (but not to keep) for the duration of the event, along with many great photo opportunities (models, sets, and demonstrations) provided to us by Sony. Without going into a lot of detail, I predict that time will prove that the Sony a9 is an actual photography game changer and not just another “next great camera” cliché.
But the availability of the a9 wasn’t a surprise; the surprise (to almost everyone else) was the announcement of the new 16-35 and 12-24 lenses, and their instant availability (again only to borrow). Since I’d already had nearly a week of quality time with them, I passed on this opportunity, but had to jump aside to avoid being trampled by a stampede of photographers intent on getting their hands on these two new lenses.
Don Smith and I were just wrapping up our back-to-back Columbia River Gorge workshops when Sony asked us if we could stay a couple of extra days to try out their two new (super-secret) lenses. They overnighted them to us, and since we had them for a week, Don and I decided we had time to try them for a couple of extra days at our favorite locations closer to home. For me that was Yosemite (Don went to Big Sur). Since I knew I wanted the 12-24 in Yosemite, I took the 16-35 for our two extra days in the CRG.
First Impressions: 16-35 f2.8 GM
The first thing that struck me about this lens was its compactness. As a landscape shooter always on a tripod, I value compactness over speed in a lens, but this one gives me both. Of course it’s not as compact as my Sony/Zeiss 16-35 f4, but it’s noticeably more compact than my Canon 16-35 f2.8 was. I was also pleased with its smoothness of operation and speed of focus—this lens is definitely a joy to use.
Of course compactness and ease of use mean nothing if a lens isn’t sharp, and I can tell you with certainty that this lens is as sharp as we’ve come to expect Sony’s GM lenses to be—that is, ridiculously sharp from corner to corner and throughout the aperture range. I haven’t really taken the time to do a/b tests against any other lenses (I leave the pixel-peeping to others), but I did magnify many images to 100% (on my 27-inch iMac Retina 5K monitor) and can’t imagine that I have any lenses sharper than this one (including primes).
First Impressions: 12-24 f4 G
Even more than with the 16-35, the 12-24 blew me away with its compactness. I’ve handled the Nikon 14-24 f2.8 many times, and actually used Canon’s 11-24 f4, and as sharp as those lenses are, the first thing I remember about those lenses is their heft—they’re beasts, and just too heavy to carry in my bag for regular use. Not so with the Sony 12-24: This lens is 1/3 the weight of Canon’s 11-24—in fact it’s noticeably lighter than the Canon 24-105, and not much heavier than the Canon 17-40. Wow.
Like the 16-35, this lens just felt good on my camera and in my hand. The operation was smooth, and focus was fast and easy. Having rarely shot with a lens this wide, I found myself frequently surprised by how much more I could get in my frame at 12mm than I can at 16mm—suddenly things not possible with a single click before were very doable. With so many views of very large and close subjects (such as El Capitan and Half Dome), this lens was made for Yosemite. And I did an actual double-take at the top of the trail to lower Yosemite Fall when I realized I could get the entire fall and a sunstar (with the sun behind my right shoulder) in one frame (see the gallery below).
Sharpness? Again, I didn’t do any pixel peeping beyond magnifying my images to 100%, but they looked every bit as sharp as the Canon 11-24 images that blew me away when I used it a year ago. I will own this lens the first day it’s available.
About this image
On the first evening with our new toys, Don and I went to Catherine Creek on the Washington side of the Columbia River Gorge. At the trailhead Don headed off in one direction and I went in the other, eventually ending up at this tree that I remembered from previous visits.
With the wind blowing like crazy, probably 25-35 MPH, this lens was perfect for the wide scenes that deemphasize motion. To further ensure against any motion blur I bumped my ISO to 400 and went to work. I started by balancing the tree with a small waterfall that was down the hillside to my left, but when a surprise rainbow fragment popped out above the Columbia River I quickly shifted position. My exposure variables were already set, so all I had to do was compose, focus, and shoot. Good thing, because the rainbow faded quickly and I only had time for a handful of images before it was gone completely.
Listen to Don and I discuss the new lenses on the Alpha Universe Podcast
Sony 16-35 f2.8 GM and Sony 12-24 f4 G Sample Images
Click an image for a closer look and slide show. Refresh the window to reorder the display.


, Catherine Creek Trail, Columbia River Gorge")

