Eloquent Images by Gary Hart
Insight, information, and inspiration for the inquisitive nature photographer
Seeing the future
Posted on June 1, 2017

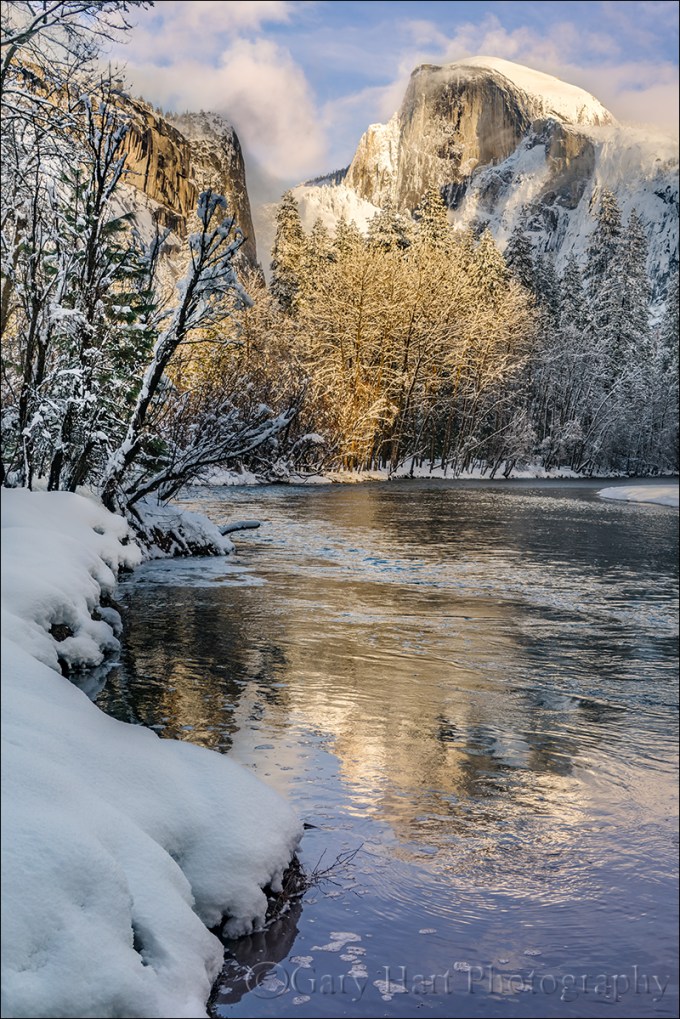
Rapids, Half Dome and Tenaya Creek, Yosemite
Sony a7R II
Sony 12-24 f4 G
12mm
.8 seconds
F/9
ISO 200
Ansel Adams and visualization
Most photographers know that Ansel Adams visualized his prints, and the darkroom work necessary to create them, before clicking the shutter. This ability to look into the future of each capture is part of what set Ansel Adams apart from his peers.
But Adams’ extensive darkroom work is often cited by digital photographers defending their over-processesed images. We’ve all heard (and perhaps even uttered ourselves) statements like, “Ansel Adams spent more time in the darkroom than he did in the field,” or “Ansel Adams would love Photoshop.” Perhaps true, but using Ansel Adams’ darkroom mastery to justify extreme Photoshop processing misses a significant point: Adams’ mental picture of the ultimate print was founded on a synergistic relationship between his vision and his camera’s vision, coupled with a master’s control of capture variables like composition, light, motion, and depth. In other words, Adams’ gift wasn’t merely his darkroom skills, it was an overarching vision that enabled him to make decisions now based on invisible realities he knew he’d encounter later.
I bring this up because I’m concerned about many photographers’ Photoshop-centric “fix it later” approach that seriously undervalues capture technique. This mindset ranges from simple over-reliance on the LCD for exposure with no real understanding of the histogram or how metering works (shoot-review-adjust, shoot-review-adjust, shoot-review-adjust, until the picture looks okay), to photographers who channel their disappointment with an image into an overzealous Photoshop session, pumping color, adding “effects,” or inserting/removing objects until they achieve the ooooh-factor they crave.
The better approach is to understand the potential in a scene, anticipate the processing that will be required to make the most of it, and shoot accordingly. In other words, Photoshop should inform capture decisions, not fix them.
Putting Photoshop in its place
Every image ever shot, film or digital, was processed. Just as the processing piece was easy to ignore when the exposed film you sent to a lab magically returned as prints or slides, many digital shooters, forgetting that a jpeg capture is processed by their camera, brag that their jpeg images are “Exactly the way I shot them.” Trust me, they’re not.
Whether you shoot monochrome film, Fuji Velvia slides, or low-compression jpeg, there’s nothing inherently “pure” about your image. On the other hand, digital landscape photographers who understand that processing is unavoidable, rather than relinquish control of their finished product to black-box processing algorithms in the camera, usually opt for the control provided by raw capture and hands-on processing.
Unfortunately, Photoshop’s power makes it difficult for many to know where to draw the processing line. And every photographer draws that line in a different place—one man’s “manipulation” is another’s “masterpiece.” Photoshop isn’t a panacea; its main function should be to complement the creativity already achieved in the camera, and not to fix problems created (or missed) at capture.
While I’m not a big Photoshop user, I readily acknowledge that it’s an amazing tool that’s an essential part of my workflow. I particularly appreciate that Photoshop gives the me ability to achieve things that are possible with black and white film and a decent darkroom, but difficult-to-impossible with the color transparencies I shot for over 25 years.
Creating an image, from start to finish
I was in Yosemite on a “secret mission” (my inner 10-year-old just loves saying that) for Sony, trying out the yet-to-be-announced (at the time) Sony 12-24 f4 G lens. Among the many places in Yosemite that are especially conducive to ultra-wide photography is Mirror Lake and its view of Half Dome from directly below, and that’s where I started.
Walking up the trail to Mirror Lake, I skirted Tenaya Creek in less than ideal light, scouting potential scenes for later. On the walk back after sunset, I returned to this scene that I’d found and mentally composed earlier. Despite already having an idea of how I wanted to shoot it, there’s quite a bit going on here, so it took some time and a bit of rock scrambling to get all the elements to work together: Half Dome, Tenaya Creek, the nearby evergreen, and the creekside boulders.
While most of the scene was in deep shade, the sky was still relatively bright. Capturing this much dynamic range in an unprocessed jpeg (or color transparency) would have been impossible—my highlights would have been too bright, the color in the sky would have been washed out, and the shadow detail would have been lost to blackness. And that’s exactly what I saw in the jpeg that popped onto my LCD. But despite the crappy looking jpeg on the back of my camera, my histogram told me all my color and detail was there in my raw file.
With a good histogram, I adjusted my ISO up and down, compensating with a corresponding shutter speed adjustment, to get different blur effects in the creek. Opening the raw file in Lightroom, I simply pulled the Highlights slider to the left and the Shadows slider to the right to confirm my successful exposure. While the exposure adjustment was essential, once that was done, there was very little processing left to do. And as much as he enjoyed the dark room, I suspect Ansel would have embraced any technology that gave him more time outdoors with his camera.
Workshop Schedule || Purchase Prints
Different Takes on Half Dome


A Star in the East
Posted on May 22, 2017

Yosemite Falls Sunstar, Yosemite (Sony 12-24 f/4)
Sony a7R II
Sony 12-24 f4 G
12mm
1/30 second
F/20
ISO 100
When Sony asked Don Smith and me to try out their new lenses, I immediately thought of a couple of El Capitan and Half Dome views in Yosemite that would be ideal for the new Sony 12-24 f4 G lens. After great success photographing Yosemite’s granite icons as I’ve never been able to before (okay, well there was that one time last year when I borrowed a friend’s ultra-wide lens), I was ready to go home. But before leaving, I decided to walk up to the bridge beneath Lower Yosemite Fall, which was bursting with spring flow.
With my Yosemite Moonbow and Dogwood workshop starting in just five days, my goal this morning was more to see exactly how wet it is on the bridge than it was to take any more pictures, but I decided to take my camera anyway. On the way back I played with ultra-wide (12mm) vertical compositions of this scene. Still getting used to how much I can actually fit in my frame at 12mm, I flipped the camera to horizontal and was startled to find the sun in the right corner of my viewfinder. Startled because from my location, the top of Yosemite Falls is due north (0 degrees), and the sun at that time was at 125 degrees azimuth (35 degrees south of due east).
I quickly came to terms with this revelation and repositioned myself until the sun was behind a tree, dialed the aperture to f/20, composed, metered, and focused, then clicked as the sun peaked out. For the next ten minutes or so I moved as the sun moved, keeping my lens right on the edge of the tree’s shadow.
I knew the sunstar’s highlights would clip, but I wanted to give the shadows as much light as possible without losing the highlights in the waterfall. And as important as the histogram is in these scenes with brilliant highlights and dark shadows, I knew in this case it wouldn’t tell me the entire story. As I increased the light by lengthening my shutter speed, in my viewfinder (I love mirrorless!) I monitored both the shadow side of the histogram and the highlight alert in the fall. I know that shooting raw on my Sony Alpha bodies, I can increase the exposure a stop beyond where the highlight alert appears, but in this case I found that I only needed to add 2/3 stop before the histogram showed me that I had all the recoverable data in the shadows I needed.
A few words about sunstars
Sunstars can be overdone, but they’re often the best way to make something interesting in difficult light. When I find myself wanting to photograph a clear sky scene facing the sun, I often use the sunstar to add visual interest to a sky that is otherwise pretty boring. Often the sunstar makes an excellent counterbalance to another strong visual object. And while a sunstar isn’t exactly what our eyes see when we look toward the sun, I think it makes a pretty good substitute for the blinding experience of looking into the sun. Take a look at the gallery of images below and ask yourself how many of these images would have been as visually appealing without a sunstar spicing up the sky.
To capture a sunstar, use a small aperture (I usually use f/16 or smaller), remove any filters (to minimize flare), and place the sun on a hard edge with most of the sun obscured: the horizon, a cloud, a tree, a flower, and so on. The more sun visible, the bigger (and more blown out) the sunstar will be. As a general rule, I try to avoid too much sun. And since each lens creates a slightly different sunstar, it helps to experiment with different lenses to determine which ones work best.
I’ll be on my annual Grand Canyon raft trip, off the grid and unable to respond, until May 30
Workshop Schedule || Purchase Prints
A Sunstar Gallery


The cat’s out of the bag…
Posted on May 19, 2017
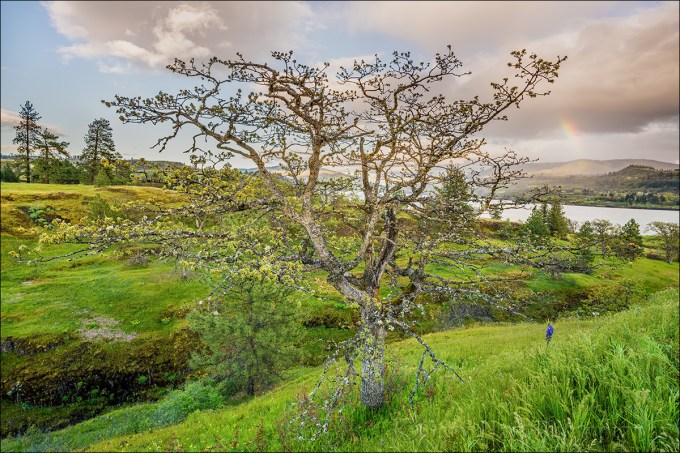
Spring Rainbow, Catherine Creek Trail, Columbia River Gorge
Sony a7R II
Sony 16-35 f2.8 GM
18mm
1/125 second
F/11
ISO 400
For about three weeks I’ve had to bite my tongue about two new Sony lenses I got to try out a few weeks ago. But yesterday Sony announced their brand new 16-35 f2.8 GM and 12-24 f4 G lenses and I’m free to share.
I spent most of this week just outside of Santa Barbara, California with a hundred or so Sony Artisan and Creative Collective photographers at Sony’s Kando Summit. This event was revelatory in many ways: Not only did I get to commune with fellow Sony Artisan’s who had previously been just names on e-mails and pictures on Facebook, I also learned that the future of photography is in the very capable hands of the Collective members—such an impressive group of creative, intelligent young adults.
For most of the Summit the hardware show-stealer was the brand new Sony a9—each of us got our own a9 to play with (but not to keep) for the duration of the event, along with many great photo opportunities (models, sets, and demonstrations) provided to us by Sony. Without going into a lot of detail, I predict that time will prove that the Sony a9 is an actual photography game changer and not just another “next great camera” cliché.
But the availability of the a9 wasn’t a surprise; the surprise (to almost everyone else) was the announcement of the new 16-35 and 12-24 lenses, and their instant availability (again only to borrow). Since I’d already had nearly a week of quality time with them, I passed on this opportunity, but had to jump aside to avoid being trampled by a stampede of photographers intent on getting their hands on these two new lenses.
Don Smith and I were just wrapping up our back-to-back Columbia River Gorge workshops when Sony asked us if we could stay a couple of extra days to try out their two new (super-secret) lenses. They overnighted them to us, and since we had them for a week, Don and I decided we had time to try them for a couple of extra days at our favorite locations closer to home. For me that was Yosemite (Don went to Big Sur). Since I knew I wanted the 12-24 in Yosemite, I took the 16-35 for our two extra days in the CRG.
First Impressions: 16-35 f2.8 GM
The first thing that struck me about this lens was its compactness. As a landscape shooter always on a tripod, I value compactness over speed in a lens, but this one gives me both. Of course it’s not as compact as my Sony/Zeiss 16-35 f4, but it’s noticeably more compact than my Canon 16-35 f2.8 was. I was also pleased with its smoothness of operation and speed of focus—this lens is definitely a joy to use.
Of course compactness and ease of use mean nothing if a lens isn’t sharp, and I can tell you with certainty that this lens is as sharp as we’ve come to expect Sony’s GM lenses to be—that is, ridiculously sharp from corner to corner and throughout the aperture range. I haven’t really taken the time to do a/b tests against any other lenses (I leave the pixel-peeping to others), but I did magnify many images to 100% (on my 27-inch iMac Retina 5K monitor) and can’t imagine that I have any lenses sharper than this one (including primes).
First Impressions: 12-24 f4 G
Even more than with the 16-35, the 12-24 blew me away with its compactness. I’ve handled the Nikon 14-24 f2.8 many times, and actually used Canon’s 11-24 f4, and as sharp as those lenses are, the first thing I remember about those lenses is their heft—they’re beasts, and just too heavy to carry in my bag for regular use. Not so with the Sony 12-24: This lens is 1/3 the weight of Canon’s 11-24—in fact it’s noticeably lighter than the Canon 24-105, and not much heavier than the Canon 17-40. Wow.
Like the 16-35, this lens just felt good on my camera and in my hand. The operation was smooth, and focus was fast and easy. Having rarely shot with a lens this wide, I found myself frequently surprised by how much more I could get in my frame at 12mm than I can at 16mm—suddenly things not possible with a single click before were very doable. With so many views of very large and close subjects (such as El Capitan and Half Dome), this lens was made for Yosemite. And I did an actual double-take at the top of the trail to lower Yosemite Fall when I realized I could get the entire fall and a sunstar (with the sun behind my right shoulder) in one frame (see the gallery below).
Sharpness? Again, I didn’t do any pixel peeping beyond magnifying my images to 100%, but they looked every bit as sharp as the Canon 11-24 images that blew me away when I used it a year ago. I will own this lens the first day it’s available.
About this image
On the first evening with our new toys, Don and I went to Catherine Creek on the Washington side of the Columbia River Gorge. At the trailhead Don headed off in one direction and I went in the other, eventually ending up at this tree that I remembered from previous visits.
With the wind blowing like crazy, probably 25-35 MPH, this lens was perfect for the wide scenes that deemphasize motion. To further ensure against any motion blur I bumped my ISO to 400 and went to work. I started by balancing the tree with a small waterfall that was down the hillside to my left, but when a surprise rainbow fragment popped out above the Columbia River I quickly shifted position. My exposure variables were already set, so all I had to do was compose, focus, and shoot. Good thing, because the rainbow faded quickly and I only had time for a handful of images before it was gone completely.
Listen to Don and I discuss the new lenses on the Alpha Universe Podcast
Sony 16-35 f2.8 GM and Sony 12-24 f4 G Sample Images
Click an image for a closer look and slide show. Refresh the window to reorder the display.
, Catherine Creek Trail, Columbia River Gorge")


Spring has sprung
Posted on May 15, 2017

Dogwood and Redbud, Merced River, Yosemite
Sony a7R II
Sony 70-200 f/4
1/40 second
F/4
ISO 200
I spent most of the last week in Yosemite and can confirm that spring has definitely sprung there. The Merced River, swollen by snowmelt, is overspilling its banks, flooding meadows and submerging riverside trails. Reflections are everywhere, and viewing the waterfalls without getting wet? Forget about it.
Another spring highlight is the moonbow that colors the mist beneath Yosemite Falls. A fortunate convergence of Yosemite Falls’ southeast exposure and the angle of the rising full moon when the snowmelt is at its peak make Yosemite one of the best locations in the world to witness a lunar rainbow. I was able to photograph it three times last week, twice with my workshop group and once with a private tour customer. Easily visible to the naked eye as a silvery arc in the billowing mist, a long exposure reveals the moonbow’s true colors.
But of all the spring treats Yosemite offers, for creative photography I think the dogwood might be my favorite. For just a few short weeks in April and May, these graceful blooms shower Yosemite Valley with splashes of white that remind me of the Fourth of July sparklers of my childhood. But unlike the ephemeral sparks of a sparkler, the dogwood progress in slow motion so I can appreciate them at a much more relaxing pace.
I found this branch at the Bridalveil Fall vista on Northside Drive, about a mile east of Valley View. The river was gold with late light, and the air was still as I went to work on the scene. Careful positioning allowed me to juxtapose three layers in my frame: in the foreground is the dogwood branch with varying degrees of detail; the middle-ground is a blend of heavily blurred redbud and more dogwood; all this spring beauty stands out against a backdrop of the sunlit Merced River. I experimented with different depths of field by varying my f-stop, focal length, and focus distance until I was satisfied.
Yosemite Spring
Click an image for a closer look and slide show. Refresh the window to reorder the display.


Dogwood days
Posted on April 21, 2017

Forest Dogwood, Yosemite Valley
Canon EOS 5D Mark III
1/80 second
159 mm
ISO 800
F4
People ask all the time for my favorite season in Yosemite, and I really can’t give them an answer that doesn’t sound like a press conference by a waffling politician—there are things I love about each season in Yosemite, so asking me to choose is like asking me to pick a favorite child. But I can tell you what I like about each season, and I’ve always felt that spring in Yosemite is the most consistently photographable—it doesn’t really matter what the conditions are, I can always find something to photograph.
Spring is when Yosemite’s waterfalls peak, and Yosemite Valley starts to green up. Many of the meadows are home to ephemeral pools that reflect Yosemite’s iconic monoliths, soaring cliffs, and plunging waterfalls. And with all the water in the falls, spring sunshine means rainbow opportunities from many spots if you know when to be there.
Maybe my favorite Yosemite spring treat is dogwood, which usually peaks around May 1, give or take a week or two. I enjoy photographing dogwood in any kind of light, from sunshine, to overcast, to full shade. In sunshine, I put backlit blooms against a dark background, expose for the flower, and go to town. The translucence of these backlit flowers gives them a luminosity that appears to originate from within. In overcast and shade, I opt for soft focus that emphasizes my primary subject and reduces the background to colors, lines, and shapes.
Regardless of the light, I start with a bloom, group of blooms, or entire branch, that I can isolate from surrounding distractions. Once I identify a likely candidate, I maneuver myself until I can get the subject against a complementary background, such as shade, shape, and color.
I worked this scene for about a half hour before I was satisfied. I started with the flower-laden branch and moved around a bit until the background was right. Then I tried a variety of focal lengths to simplify, balance, and soften the composition. Once I was satisfied with my composition, I used live-view to focus toward the front of the center cluster. Finally, I ran the entire range of f-stops from f4 to f16, in one-stop increments, to ensure a variety of bokeh effects to choose from.
A Dogwood Gallery


A few of my favorite things
Posted on March 30, 2017
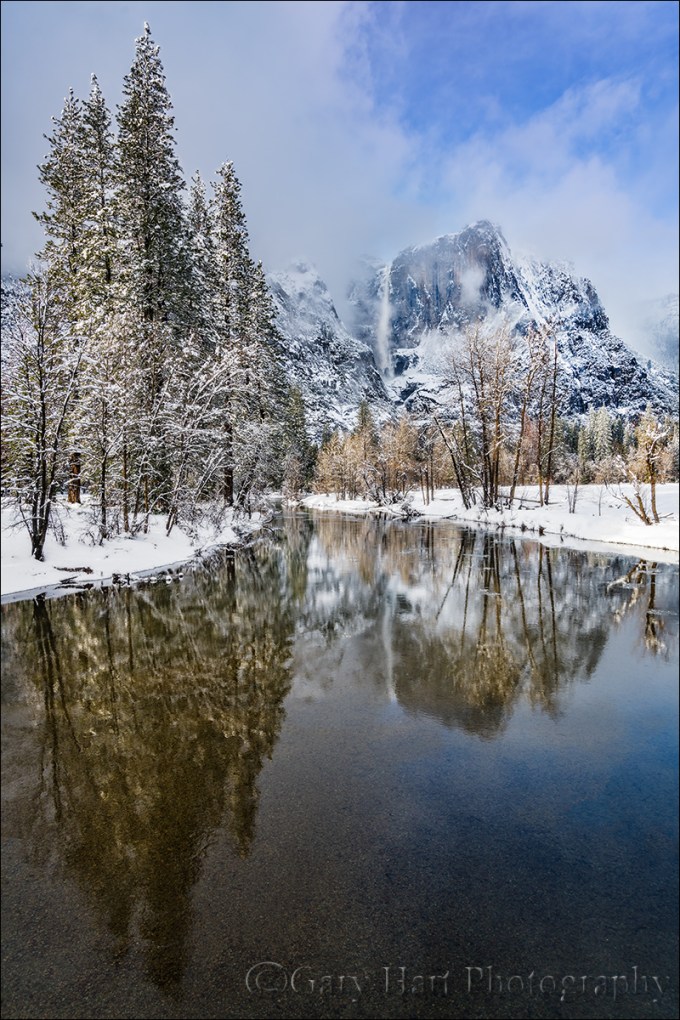
Yosemite Falls Reflection, Swinging Bridge, Yosemite
Sony a7R II
Sony/Zeiss 16-35 f/4
1/20 seconds
F/9
ISO 100
I love being a photographer, but it’s an unfortunate reality that turning your passion into your profession risks sapping the pleasure when earning money takes priority over taking pictures. When I decided to make photography my livelihood, it was only after observing other very good amateur photographers who, lulled by the ease of digital photography, failed to anticipate that running a photography business requires far more than taking good pictures. Rather than an opportunity for further immersion in their passion, their new profession forced them to photograph not for love, but to put food on the table. And with the constant need for marketing, networking, bookkeeping, collections, taxes, and just plain keeping customers happy, these newly minted photographers soon found that little time remained for the very thing that led them to become photographers in the first place.
I changed from photographer to Photographer about twelve years ago. After seeing what the change had done to others, my transition started with a vow to photograph only what I want to photograph, and to never photograph something simply because I thought I could sell it. In my case that meant sticking with landscapes: no people or wildlife (in other words, pretty much nothing that moves).
But how to make money? For that answer I had to look no farther than my career in technical communications: For five years I’d been a technical writer for a (very) large high tech company; before that I’d spent fifteen years tech training, supporting, documenting, and testing a programming language for a small software company. This experience, combined with a lifetime of camping, hiking, backpacking, and (of course) photographing throughout the western US, made photo workshops a logical choice. Today my workshops, supplemented by writing and print sales, allow me to pay the bills, visit favorite destinations, and explore new locations.
And most importantly, my new life has allowed me to concentrate on photographing the subjects and locations I love most. In no particular order (and far from all-inclusive), my favorite subjects include: poppies, the Milky Way, the moon (both crescent and full), rainbows, moonlight, fresh snow, dogwood, bristlecone pines, lightning, fall color, reflections. Among my favorite locations are Yosemite Valley, Grand Canyon’s North Rim, the Colorado River through the Grand Canyon, California’s foothills, Maui’s bamboo forest, and Kilauea Caldera.
Of course nothing beats photographing a favorite subject at a favorite location. To maximize my opportunity to combine favorite subjects and locations, I monitor weather forecasts, check local condition reports (to learn where the trees have turned or the wildflowers are blooming), study natural phenomena to learn how to anticipate an event (such as rainbows and lightning), and plot celestial alignments and add them to my calendar.
Despite (and more likely because of) a lifetime of visits, Yosemite Valley remains at the top of my favorite locations. I can’t give you a favorite season, but I can tell you that my favorite time to be in Yosemite is just after a snowstorm, when every exposed surface is glazed white and overhead swirls an ever-changing mix of clouds and blue sky.
Today’s image of snowy Yosemite with Upper Yosemite Fall reflected in the Merced River is the product of a week’s worth of monitoring weather reports and schedule shifting. That day started with a lock-down blizzard that obscured all views beyond 100 yards, but by late morning the clouds started to lighten and lift and soon the clearing was underway in earnest. Sometimes when a storm clears in Yosemite I’ll pick a spot and work it through the entire clearing process; on this day I took the other approach, moving around capture the clearing in a variety of locations.
I ended up at Swinging Bridge in mid-afternoon. The Merced River widens and slows here, making reflections possible even in high water months. Though Swinging Bridge no longer swings (but I remember when it did), it does bounce enough to jiggle a tripod at the slightest step. To minimize the vibration, I try to set up my tripod atop one of the bridge’s support pillars, but that didn’t give me the exact angle I wanted on this afternoon so I just needed to take extra care to stay still and time my clicks when the bridge was empty.
In the fifteen or so minutes I photographed here that afternoon I tried a variety of compositions, horizontal and vertical. I also played with my polarizer, sometimes maximizing the reflection, other times dialing it down to reveal the rocky riverbed below. Most of my compositions were a little tighter than this, but here I went with a vertical orientation wide enough to include lots of blue sky, and the trees and their reflection from top to bottom. My polarizer was turned to the partial range, enough to capture Upper Yosemite Fall’s reflection, while still revealing some of the submerged smooth stones nearer the bridge. The trees were partially lit by cloud-filtered sunlight just starting to break through.
A Gallery of my Favorite Things
Click an image for a closer look and slide show. Refresh the window to reorder the display.


Silent Night
Posted on March 21, 2017

Silent Night, Yosemite Valley from Tunnel View
Sony a7R II
Sony/Zeiss 16-35 f/4
20 seconds
F/5.6
ISO 1250
One perk of being a photographer is the opportunity to experience normally crowded locations in relative peace. That’s because the best nature photography usually happens at most people’s least favorite time to be outside: crazy weather and after dark. A couple of weeks ago in Yosemite I got the opportunity to enjoy both.
After spending a snowy Sunday guiding a couple around Yosemite Valley in a snowstorm, I dropped them back at (the hotel formerly known as) The Ahwahnee with nothing but the drive home on my mind. But winding through the valley in the fading twilight I saw signs of clearing skies and made a snap decision to check out the scene at Tunnel View.
I found the vista at Tunnel View gloriously empty. By the time I’d set up my camera and tripod the darkness was nearly complete, but as my eyes adjusted I could make out large, black holes in the once solid clouds overhead. Soon stars dotted the blackness above El Capitan and the white stripe of Bridalveil Fall. Each time light from the waxing gibbous moon slipped through the shifting clouds, the entire landscape lit up as if someone had flipped a switch.
Because the best parts of the view were in a narrow strip starting with the snow-glazed trees beneath me and continuing through the scene and up into the star-studded sky, I opted for a vertical composition. To include as much foreground and sky as possible, I went nearly as wide as my 16-35 lens would allow, more or less centering El Capitan and Bridalveil Fall to give the snow and stars equal billing.
Being completely comfortable with my a7RII’s high ISO performance, I didn’t stress the 1250 ISO that allowed me to stop down to a slightly sharper f/5.6 (virtually every lens is a little sharper stopped down from its largest aperture). Night focus with the Sony a7RII is extremely easy, easier than any camera I’ve ever used that isn’t an a7S/a7SII. Often I manually focus on the stars and use focus peaking* to tell me I’m sharp; in this case I back-button auto-focused on the contrast between the moonlit snow and dark granite near Bridalveil Fall. I chose a long enough shutter speed to capture motion blur in the rapidly moving clouds, knowing the potential for visible star streaking was minimized by my extremely wide focal length.
My favorite thing about that evening? The 20 seconds my shutter was open, when I didn’t have anything to do but stand there and enjoy the view in glorious silence.
* Focus peaking is a mirrorless feature that highlights in the viewfinder the in-focus areas of your scene.
Workshop Schedule || Purchase Prints
Yosemite After Dark
Click an image for a closer look and slide show.


Variations on a scene
Posted on March 14, 2017
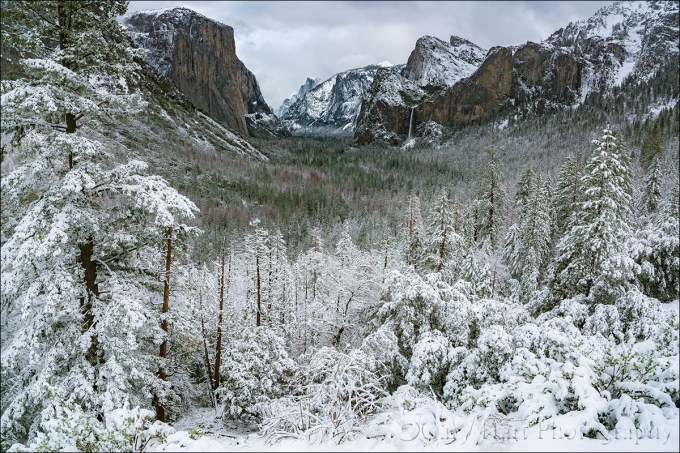
Snowfall, Tunnel View, Yosemite
Sony a7R II
Sony/Zeiss 16-35 f/4
1/250 second
F/9
ISO 100
A week or so ago I had the good fortune to be in Yosemite for the most recent snowfall there. All week the National Weather Service had been waffling a bit on the snow—based on the forecast, I probably wouldn’t have made the trip. But I was there anyway, guiding a fun couple from England for the weekend. Following a nice but unspectacular Saturday, we woke Sunday morning to find the world dipped in white.
The snow fell all day, at times so hard that that it was difficult to see more than a couple hundred yards, other times dwindling to a few flakes per minute. During one of the lulls we made our way to Tunnel View for the obligatory shot there. Despite hundreds (thousands?) of pictures of this view, after surveying the scene for a few minutes I couldn’t resist pulling out my camera and tripod.
My general feeling is that people tend to go too wide with their Tunnel View images, shrinking the main features (El Capitan, Half Dome, Bridalveil Fall) to include less exciting granite left of El Capitan and right right of Cathedral Rocks/Bridalveil Fall. That’s why I opt to tighten my horizontal Tunnel View compositions on the left and right, or isolate one or two of the three primary subjects with a telephoto. And when something exciting is happening in the sky (moon, clouds, or color) or foreground (fog, snow, rainbow), I’ll often compose vertically and bias my composition to favor the most compelling part of the scene.
With so many Tunnel View images in my portfolio, that afternoon I consciously set aside my long-held composition biases in favor of something I don’t already have. Of course the feature that most set the scene apart was the snow, so I set out to find the best way to emphasize it. Because the snow level that day was right around 4000 feet, also the elevation of Yosemite Valley, even the three hundred or so feet of elevation gain at Tunnel View resulted in much more snow virtually at my feet than on the distant valley floor. My Sony/Zeiss 16-35 f/4 lens, a great lens that I usually find too wide for Tunnel View, was perfect for highlighting the foreground snow.
Dialing my focal length to about 20mm allowed me to maximize the foreground snow while including minimal less-than-interesting gray sky. Of course going this wide meant shrinking the scene’s “big three” and adding lots of extraneous middle-ground on the left and right. To mitigate that problem I used the snowy pine on the left, often an obtrusive distraction to be dealt with, as a frame for that side of the scene. Not only did the tree block less interesting features, it actually enhanced the snowy effect I sought. On the right the diagonal ridge added a touch of visual motion (diagonal lines are so much stronger visually than horizontal and vertical lines), and it didn’t hurt that much of the bland granite there was covered with snow.
Workshop Schedule || Purchase Prints
A Tunnel View Gallery
Click an image for a closer look and slide show. Refresh the window to reorder the display.


Up a creek
Posted on February 12, 2017
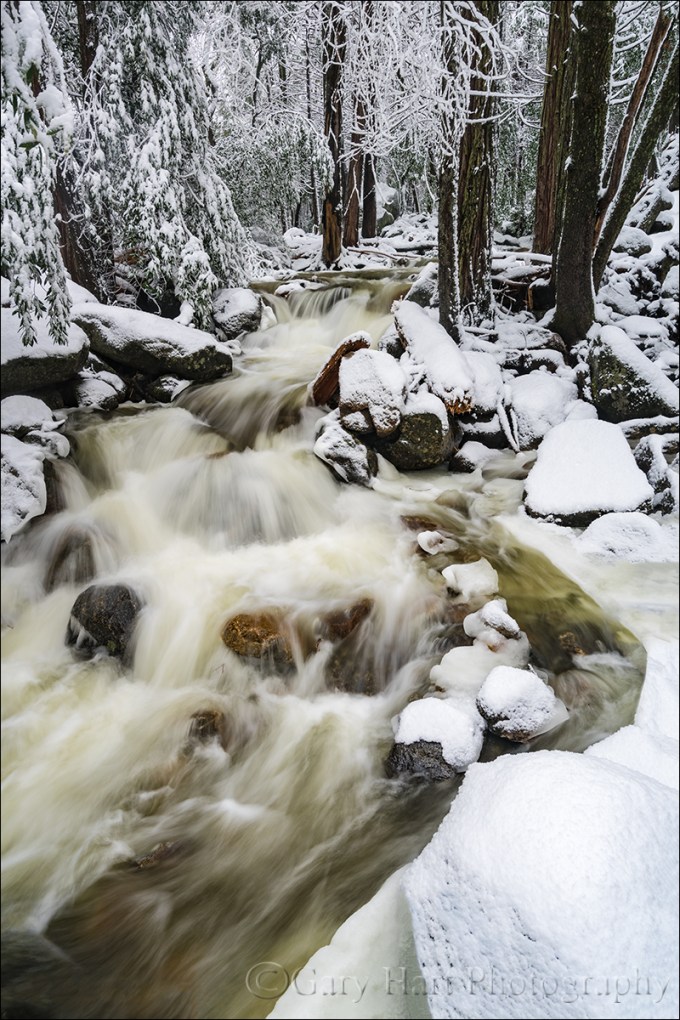
Wonderland, Bridalveil Creek, Yosemite
Sony a7R II
Sony/Zeiss 16-35 f/4
1/4 second
F/10
ISO 100
Many photographers vary their portfolios by visiting as many locations as possible. While I love visiting new locations, I’ve always preferred the kind of intimate familiarity that’s only possible with frequent, quality visits. And as enjoyable as it is photograph the icons, for my personal pleasure I’m most drawn to quiet pastorals and intimate portraits of nature that could be anywhere—wildflowers, fall color, solitary oaks, sparkling reflections, and tumbling creeks can keep me happy for hours.
One of my favorite intimate settings is Bridalveil Creek beneath Bridalveil Fall in Yosemite. Not only is there lots to photograph here, it’s different every time I visit. In spring the water in all three of the creek’s branches roars down the slope beneath Bridalveil Fall like it can’t get to the Merced River soon enough. And I’m especially fond of Bridalveil Creek in autumn, when the flow is often down to a single leisurely trickle, its whispering cascades and spinning pools adorned with vivid yellow leaves. Winter can find Bridalveil Creek in a variety of states that range from a gentle rivulet to a raging torrent. During one particularly cold winter the creek was solid ice, as if some frostbitten wizard had waved his wand and frozen the flowing water in place.
For some reason I haven’t had as much success here in winter as autumn or spring, so this winter I redoubled my efforts. On last month’s snow trip, while waiting for Yosemite’s monoliths to emerge from the clouds, I headed to Bridalveil Creek and found every square inch covered with snow—not a fine etching, but a dense glazing that covered virtually every exposed surface with several inches of white powder.
I hadn’t even crossed the first bridge when I was stopped by the scene here. I extended my tripod and evaluated the possibilities, starting on the bridge before moving down to a rock right on the creek. My first compositions were horizontal, but I eventually adjusted to vertical to emphasize the creek. Following my standard click, review, refine, click process, I finally landed on this composition—just wide enough to include both sides of the creek, and tall enough to include the parallel tree trunks and the creek’s exit from the bottom of the frame. I had to drop down quite low to get beneath an overhanging branch and keep it from occluding part of the creek.
The non-compositional variables I had to consider were motion and depth of field—there was no wind to sway the branches, but I knew the water’s blur would vary greatly with my shutter speed choice. And because I wanted everything in my frame sharp, I needed to be careful with my f-stop choice. The closest point of interest, the snowy foreground rock, was about five feet away. My hyperfocal app told me that at my 22mm focal length and f/8, my hyperfocal distance was about six feet (sharp from three feet to infinity). Because hyperfocal data draws the acceptable sharpness line a little less critically than I do, I stopped down to f/10 and focused on a small rock about eight feet away. Playing with a few ISOs to vary my shutter speed for different water motion effects, I decided I liked 1/4 second because it blurred the creek enough to clearly convey the water’s speed, but not so much that it lost its definition.
Intimate and Anonymous
Click an image for a closer look and slide show. Refresh the window to reorder the display.


The illusion of depth
Posted on February 4, 2017
Frozen Reflection, Half Dome, Yosemite
Sony a7R II
Sony/Zeiss 24-70 f4
1/40 second
F/9
ISO 100
It seems too obvious to mention, but I’ll say it anyway: Photography is a futile attempt to render a three-dimensional world in a two-dimensional medium. Unfortunately, that reality doesn’t seem to keep people from putting their eye to their viewfinder and clicking without regard for their camera’s unique view of the world. But here’s a secret: Anyone with a camera can manage the lateral (left-to-right) aspect of a scene, but the photographers who distinguish themselves are those able to convey the illusion of depth by translating a scene’s actual depth to their camera’s virtual depth.
Creating the illusion of depth isn’t rocket science. It starts with seeking a foreground for your beautiful background, or a background for your beautiful foreground. Once you’ve figured out your foreground or background, do your best to ensure that the elements at varying depths don’t merge with each other—the more elements in your frame stand alone, the more you invite your viewers to move incrementally through the frame, hopping (subconsciously), front to back, from one visual point to the next. Getting elements to stand apart often requires some physical effort on your part (sorry): Moving left/right, up/down, foreword/backward changes the relationship between objects at varying depths, sometimes quite significantly.
With your foreground and background identified, decide whether you want the entire image in focus, or selective focus that guides your viewer to a particular point in the frame. With all your pieces in place, you’re ready to choose your f-stop and focus point. (Here’s some extra credit reading: hyperfocal focusing techniques.)
About this image
The primary subject here is Half Dome, but I had to work incorporate all the other wonderful things going on this afternoon: fresh snow, beautiful clouds, warm sunlight, and an abstract reflection.
With Half Dome as my centerpiece, my biggest concern was organizing the other visual elements into a coherent image. I started with the decision that a vertical orientation would make the most efficient use of the scene, allowing me to include the river at the bottom of my frame and Half Dome at the top without shrinking the scene and introducing less interesting elements on the left and right. I didn’t want too much sky, but I found a break in the clouds for the top of my frame.
I could have moved a little to the right and made the reflection my entire foreground, but I decided to use the snowy riverbank to convey an illusion of depth. Because there wasn’t too much visual interest in the snow, I included just enough snow to frame the left side of my scene. A focus point about 20 feet away gave me sharpness throughout my frame. Click.
Focus and depth of field simplified
Workshop Schedule || Purchase Prints
A Gallery of Depth
Click an image for a closer look and slide show. Refresh the window to reorder the display.


