Eloquent Images by Gary Hart
Insight, information, and inspiration for the inquisitive nature photographer
Think before you shoot
Posted on January 5, 2016

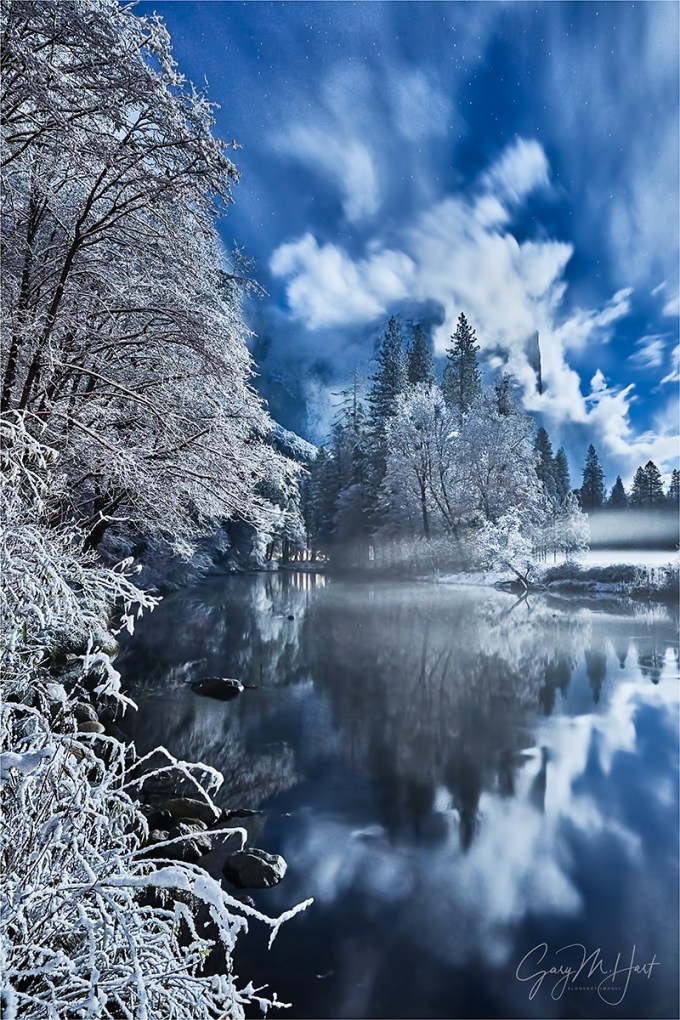
Winter Arrives, El Capitan, Yosemite
Sony a7R II
Sony/Zeiss 16-35 f4
1/8 second
F/11
ISO 125
True story: I once had a woman in a workshop who put her camera in Continuous mode and every time she clicked her shutter, she held it down and waved her camera in the general direction of a scene until the buffer was full. When I asked what she was doing, she said, “There’s bound to be a good one in there somewhere.” We were in Yosemite, so I couldn’t really disagree with her. But I’m guessing she wasn’t seeing a lot of growth as a photographer.
I tend to fall on the other end of the photography spectrum. Rather than a high volume of low-effort images, much of my photography style carries over from my film days—back then, a photographer who wasn’t careful might return from Europe to find that the photographs cost more than the trip. With our wallets forcing us to be more calculated and discriminating with our captures, we took our time, checked and double-checked our compositions and settings, and relied much more on our tripods.
Times have changed. While every film click costs money, every digital click increases the return on our investment. So far, so good: Combined with a histogram and instant review, digital shooters can click liberally, secure in the knowledge that each shot can be better than the one preceding. But I fear that this great benefit digital has bestowed, combined with powerful processing capabilities, has engendered a “shoot now, think later” mentality among many photographers. Rather than taking advantage of digital’s instant feedback to ensure that everything’s perfect at capture, these photographer adopt a high volume approach that sometimes hits a bullseye, but does nothing to improve their aim.
While there’s nothing wrong with lots of clicks, to advance your photography, each click needs a purpose. That purpose doesn’t even need to be a great image, it can simply be an I-wonder-what-happens-if-I-do-this experiment. Or it can be an incremental approach that begins with a “draft” and works toward perfection.
For example
On my recent snow day in Yosemite, I tried to highlight locations a little off the beaten path (as much as that’s possible in Yosemite). One of my stops was along Southside Drive, a little west of the crossover (to Northside Drive). Traipsing through wet snow, I made my way through the trees down to the Merced River. Bounding El Capitan Meadow, here the river widens and slows, as if gathering strength for its headlong charge down the Merced River Canyon.
The relatively open views and leisurely pace of the Merced River at this spot makes this one of my favorite place for full reflections of El Capitan. Ever on the lookout for juxtaposed disparate elements, I didn’t have to venture too far upstream before the collision of autumn leaves and winter snow stopped me. Parallel yellow and white, El Capitan reflection, towering evergreens, snow-etched oaks, swirling clouds, all against a granite background: I knew there was a shot in here somewhere, and I was going to work these elements until I found it.
To identify the shot, I started with an initial, “rough draft” click, then stood back and critiqued my result. With that frame as a foundation, I made incremental refinements, adjusting individual aspects rather than trying to fix everything at once: My horizontal orientation became vertical to highlight the (more or less) parallel snow and leaves; I determined the lowest f-stop that would ensure front-to-back sharpness and carefully refined my focus point, selecting leaves about a quarter of the way into the frame; I shifted slightly left to avoid merging the snowy log with El Capitan’s reflection; and finally, I tweaked the borders slightly (micro-zooming and -widening) to ensure that no significant visual elements were cut off. With everything set, I watched the shifting clouds and clicked when they did something interesting.
I was satisfied after about a dozen frames—far more than I could have afforded in my film days, but a far cry from my workshop student’s machine gun approach. No doubt she’d have gotten something I didn’t get, but I like this one. I bet I had more fun, too.
Join my
Yosemite Winter Moon photo workshop

An El Capitan gallery
Click an image for a closer look, and a slide show. Refresh the screen to reorder the display.


Who needs vacations?
Posted on January 1, 2016
Moonlight Magic, El Capitan and Clearing Storm, Yosemite
Sony a7R II
Sony/Zeiss 16-35 f4
30 seconds
F/11
ISO 3200
I was hungry, wet, and cold. With the blacktop obscured by a slippery white veneer, I carefully followed my headlights and a faint set of parallel tire tracks through the Northside Drive tree tunnel. Though the storm that had lured me to Yosemite was finally clearing, that show was lost to the night and dense forest canopy. But even without another clearing storm to add to my Yosemite portfolio, I was quite content with what I’d photographed that day.
Just as my heated seats started to work their magic and visions of dinner filled my head, I rounded a curve and reflexively hit the brakes, sliding not so gracefully into the empty Valley View parking lot. With no forethought I bolted from the car, then had to grab the door to keep from losing my footing on the icy pavement.
Always a beautiful place for photography, Valley View this time was quite literally one of the most beautiful sights I’d ever witnessed. I inhaled cold air and held it. Instead of racing for my gear, I exhaled slowly and gaped through my vaporized breath at ice-coated trees and granite, moonlight infused clouds draping El Capitan, and the glassy Merced River spreading before me like a luminous carpet. The scene’s centerpiece, the element that really took the experience over the top for me, was a full moon embedded in the night sky like a blazing gem, illuminating every exposed surface.
Gathering my wits along with my gear, I started to think about photographing the scene. Because the moon was too bright to photograph (and I have the pictures to prove it), I started with a composition my favorite aspects of the rest of the scene: the clouds, the reflection, and the frozen moonlight magic—the moon would remain out of the frame, to the right.
In most moonlight images, my foreground is distant enough that everything in my frame is at infinity, regardless of my f-stop. But the nearby glazed trees and rocks meant this scene needed to be sharp from just a few feet away all the way to the stars, requiring a small aperture and very precise focus point selection. A quick check of my hyperfocal app told me that focusing 5 feet away at f/11 would give me the depth of field I needed. Once my eyes adjusted, the moonlit branches were just bright enough to manually focus on by magnifying the scene in my Sony a7R II’s viewfinder (I love mirrorless).
But at f/11, even with the brilliant moonlight, getting enough light to reveal the scene required other compromises. Pushing my shutter speed to 30 seconds—the after-dark threshold that the risk of star motion prevents me from crossing—I had to bump my ISO to 3200 to capture enough light. Fortunately, the a7R II was up to the task—while I did get some noise in the shadows, it cleaned up nicely in processing.
Leaving Valley View that night, the chill and hunger I’d felt earlier had disappeared. Photography is funny that way—we put ourselves in the most miserable conditions, then completely forget how miserable we are when Nature delivers. The key is to remember this capacity when we’re debating whether to set the alarm for zero-dark-thirty, skip a meal, or brave extreme conditions.
This El Capitan moonlight moment turned out to be my final 2015 photo shoot, a fitting conclusion to a year filled with highlights. Breaking in a new camera while learning a completely new system and way of shooting (Sony mirrorless), I visited the dunes of Death Valley, the rain forests of Hawaii, Yosemite’s glacier-carved granite (many times), Grand Canyon top and bottom—among many. I photographed lightning, rainbows, snow and ice, an active volcano, spring wildflowers and fall color, the moon in many phases, and the Milky Way above some of the world’s most spectacular scenery. How fortunate I am to have a job that I don’t need a vacation from!
At the end of 2014, while reflecting on the beauty I’d witnessed that year, the new friends I’d made, not to mention countless new memories with old friends, I wondered what 2015 would bring. And now I know. In one year I’ll do a similar retrospective on 2016, and while I have no idea what’s in store, I’m confident my good fortune will continue.
So let’s go….
Workshop Schedule || Purchase Prints || Instagram
Here’s what my 2015 looked like
Click any image to scroll through the gallery LARGE


Snow day
Posted on December 17, 2015

Winter Storm Reflection, El Capitan, Yosemite
Sony a7R II
Sony/Zeiss 16-35 f4
1/8 second
F/10
ISO 100
From my front door I can be in Yosemite Valley in less than four hours (including a stop for gas and another for Starbucks). I enjoy the drive and am not averse to doing a one day up-and-back when I think something special is in store. And nothing is more special than a chance to photograph Yosemite with fresh snow.
My most recent Yosemite snow-dash was last month. Given the fickle nature of Yosemite’s weather, and four years of drought that have made Yosemite snow a rare commodity, I made this trip an overnighter to maximize my odds.
Though I arrived well ahead of the storm, dense clouds and a damp chill ruled the afternoon. Instead of rushing into photography mode, I used the relative calm to scout the conditions, and was pleased to find water in the falls and a few traces of autumn color lingering in some of the more sheltered spots.
The rain started just as night fell. Descending the hill to my hotel that evening, I monitored the outside temperature and was cautiously optimistic about the next day. I enjoyed a warm, quiet evening in my room, cleaning sensors and filters, organizing my wet-weather gear, and visualizing scenes of snow and granite.
Yosemite Valley is at 4,000 feet, but my room was in El Portal, less than 15 minutes away but 2,000 feet lower. Staying in El Portal means I often wake to rain and hold my breath as I ascend to the valley because, regardless of the forecast, snow in Yosemite Valley is never a sure thing.
As expected, that morning I left El Portal in a steady rain, but the drops on my windshield turned to flakes at about 3,000 feet—exhale. By the time I reached Cascade Fall at 3,500 feet, snow was sticking to the trees, and it only got better from there.
This was not a particularly heavy snowfall, but I stayed all day and the clouds never completely cleared. Instead, the storm ebbed and flowed, lifting its stratus cap enough to reveal all of Yosemite’s iconic landmarks, then dropping the lid to obscure everything beyond a few hundred yards.
I concentrated most of my attention on the assortment of El Capitan reflections on the west end of Yosemite Valley. For this image I parked at the El Capitan Bridge and walked upstream along the riverbank a short distance. From here I was close enough to El Capitan that I was unable to get all of El Capitan and all of its reflection in one frame, even at 16mm. I decided to bias my composition to the reflection, and as I worked the sky peaked through just long enough for me to include it in a handful of frames.
The ultimate clearing finally came shortly after sunset. With a nearly full moon illuminating snow-covered Yosemite Valley, I couldn’t resist photographing for a couple hours longer than planned. Stay tuned….

Schedule of upcoming photo workshops
Yosemite in the snow
Click an image for a closer look, and a slide show. Refresh the screen to reorder the display.


What lens should I use?
Posted on December 11, 2015
Half Dome at Sunset, Olmsted Point, Yosemite
Sony a6000
Tamron 150-600 (Canon-mount with Metabones IV adapter)
4 seconds
F/9
ISO 400
Inexperienced photographers tend to approach every scene with the idea that there’s one “best” shot, and that other photographers already know what that shot is. This might explain why there’s no better way to meet other photographers than to set up a tripod (I’ve learned that this even works on the shoulder of a busy highway with no obvious view). It might also explain why the most frequent question asked in my workshops is probably, “What lens should I use?”
The question usually comes as we’re unloading from the cars and assembling our gear for the walk to our shooting site. I don’t mind the question (I swear), but my answer rarely satisfies. That’s because I’ve done this long enough to know that their real question is, “What lenses can I leave in the car?” If only photography were that easy.
Your lens choice is part of your composition process. In other words, by limiting the lenses you carry, you’re also limiting your creative options. If adding an extra lens or two is the difference between going out or staying put, by all means, jettison the extra lenses and get out there. But here’s a photographic truth: The surest way to ensure that you’ll want a lens is to leave it behind.
I will acknowledge the most landscapes have an “obvious” shot—the first thing people see when they walk up—that everyone shoots. While many photographers are satisfied with the obvious shot, I wouldn’t be much of a workshop leader if I allowed my students to settle for the shot that everyone else takes.
While there’s nothing wrong with taking the obvious shot, it should be your starting point, never your goal. Your goal should be to find something unique, and the greater the focal range at your disposal, the greater your opportunity for a unique capture.
All this is to explain why, regardless of the scene, at the very least I carry lenses to cover the focal range spanning 20-200mm (full frame). For me that’s three lenses: the Sony/Zeiss 16-35 f4, the Sony/Zeiss 24-70 f4, and the Sony 70-200 f4. For practical reasons (to minimize bulk and weight and enhance my range and mobility), I might leave behind my specialty lenses (an ultra-telephoto, macro, and fast prime). But it’s a rare scene that, given enough time, I can’t find something for each of my three primary lenses.

Sunset Fire, Olmsted Point, Yosemite
Generally (and incorrectly) labeled a “wide angle location,” Yosemite has lots of spectacular views that can overwhelm the first time visitor. It’s natural to want to capture everything with one click, and these wide Yosemite images don’t disappoint. But with familiarity comes recognition and appreciation of details easily overlooked in the big picture. The longer you spend looking at Half Dome or El Capitan (or Yosemite Falls, or Bridalveil Fall, or …), the more work you can find for your telephoto lens.
At Olmsted Point, the obvious subject is Half Dome, but the composition possibilities here, from wide to tight, are endless.
In my October Eastern Sierra workshop I got my group to Olmsted Point with plenty of time for everyone to familiarize themselves with the scene. Moving around to check on the group, I reminded each person not to get so committed to one lens that they ignore the other options. (I find that merely carrying a variety of lenses often isn’t enough—using the full assortment is a habit to be cultivated.)
I don’t think there’s a better illustration of why it’s important carry a range of lenses than that evening’s shoot. I found myself switching not only between lenses, but between bodies, with my wide lenses on the full frame Sony a7R II, and my Tamron 150-600 on the Sony a6000 (with its 1.5 crop sensor) .
I started with the wider scene, because the composition had so many variables that required a lot more work to get just right. But once the color overhead started to fade, I switched to the a6000 and 150-600 team and zoomed tight on Half Dome, working through a number of long and ultra-long compositions.
Sunset hues, especially in the direction of the sun, usually outlast photographers. As the sky darkened beyond my eyes’ ability to register the color, all I needed to do was dial up the exposure to see that the color was still there. I finally stopped not because I’d run out of shots, but because the light was leaving and I don’t like the group scrambling down Olmsted’s granite in the dark.
In retrospect, I can’t help marvel at the difference between these two images of Half Dome captured just a few minutes apart, and the opportunities I’d have missed if I’d have lightened my bag.
Workshop Schedule || Purchase Prints || Instagram
A gallery of Yosemite close-ups
Click any image to scroll through the gallery LARGE


Is a tripod really necessary?
Posted on December 6, 2015

Sunset Fire, Olmsted Point, Yosemite
Sony a7R II
Sony/Zeiss 16-35 f4
1.3 seconds
F/11
ISO 100
If you’re content with derivative snaps of pretty scenes, a tripod may not be for you. But for those who agree that, rather than regurgitating a rough representation of the world as we know it, landscape photography should reveal deeper, less obvious natural truths—things like relationships between diverse elements, an intimate exploration of larger scenes, detail and pattern lost in the blur of motion—there is no substitute for a tripod.
The case against the tripod
Once upon a time, the tripod’s sole purpose was stability—preventing blur caused by camera shake during the exposure. And while stability remains important, clean high ISO and stabilized bodies and lenses make possible shooting hand-held in light we’d never dreamed of just a few years ago.
The anti-tripod argument says that tripods are expensive, add weight and bulk, are awkward to set up, get in people’s way, and slow the composition process. Given that the exposure compromises (higher ISO, larger than ideal aperture, longer shutter speed) forced by hand-holding are usually minor and more easily corrected today than what we faced with our film cameras, why bother with a tripod at all?
I’d argue that you never know when even a minor, hand-held compromise—such as shooting at ISO 400 instead of ISO 100, opening to f5.6 when f11 would have been better, or stretching your exposure duration out to 1/4 second and holding your breath—will be a deal-breaker for that law firm downtown who ordered a 10-foot print for their lobby. Why spend all this money on state-of-the art equipment only to compromise your image quality even just a little?
Nevertheless, I’ll (grudgingly) acknowledge that for many current landscape photographers, the convenience of tripod-free shooting outweighs these compromises—clean, printable images are possible without a tripod most of the time.
But….
Inconveniences notwithstanding, serious landscape photography is improved by a tripod. In fact, despite the advantages digital capture has brought to tripod-free shooting, digital photography has enhanced the tripod’s value to landscape photographers.
There’s a draft in here
The odds of the perfect landscape image happening on the first click are about the same as crafting a perfect poem, novel, or essay on the first pass. When we write something important, we don’t sit down and spin it out without stop or correction, we start with an idea, write a draft, review, rewrite, review, rewrite, until we’re satisfied.
A photograph should be no different—no matter how much you like the first click, it’s pretty unlikely that frame is so perfect that further scrutiny and adjustment won’t improve it further. Much like the drafts I create when I write, my workflow in the field is a click/review/adjust, click/review/adjust cycle that continues until I’m either satisfied with my image, or convinced there’s no image to be had. I can’t imagine doing this without a tripod.
To review a hand-held image, you must completely remove the camera from its shooting position (your eye) and extend it down and in front of you, essentially erasing your camera’s view of composition the way vigorous shaking erases and Etch A Sketch—fine if you’re done, but to fix problems and add improvements, you must return the camera to your eye and completely recreate the composition you just reviewed. Standing at a vista snapping a scene that’s been snapped a million times before? No big deal. But what about an image with layers of detail at varying distances, trying to include all of that rock on the left while without including any of that tree-branch on the right, all while trying to maintain front-to-back sharpness?
When I shot film (always on a tripod thank-you-very-much), my personal image reviews involved alternating between studying the scene and peering through the viewfinder. The most I could hope for was a good guess that I had everything right. Enter digital, with its instantaneous display, including a graph and flashing pixels that tell me if I messed up the exposure. Suddenly, I can critique the image itself, right on the spot.
With digital, composing on a tripod gives me the freedom to stand back and take time to scrutinize my creation. I can study the frame for balance, scan the borders for distractions, check the histogram to ensure proper exposure, magnify the LCD for sharpness and depth of field—doing all this comfortable in the knowledge that when I’m ready, the exact image I just critiqued is waiting right there atop my tripod, ready for my improvements. In other words, my adjustments are applied to an existing creation, rather than an approximate (fingers crossed) recreation.
Revisiting the writing analogy, hand-holding reminds me of the typewriter days, when a major revision required retyping everything I just wrote; using a tripod is more like a word-processor that allows me to edit the existing document.
For example
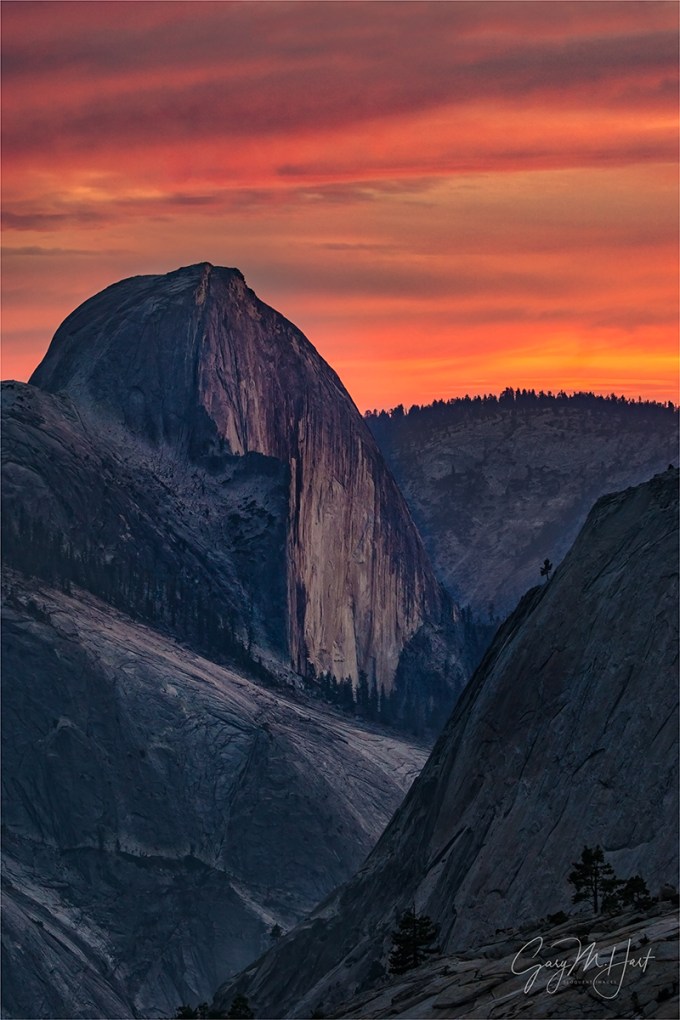
A trip to Olmsted Point in Yosemite has become a tradition for the final sunset of my Eastern Sierra Fall Color photo workshop. Olmsted Point offers a distant, less common view of Half Dome and an assortment of photogenic trees and boulders for the foreground.
On this year’s visit we parked and made the short hike to the “point” (more of a granite dome than an actual point) for the best view down Tenaya Canyon to Half Dome and beyond. I pointed out that the sky was setting up for something special; following my encouragement to anticipate the colorful sunset and find a foreground to complement the obvious background, the group quickly scattered.
I tried to stay fairly centrally located, eventually choosing a nearby triangle of glacial erratics (granite boulders carried by glaciers and deposited in place when the retreating glaciers melted) anchored by a weathered pine. With time to spare, I set about finding a composition. I decided vertical orientation would be the best way to exclude peripheral distractions, emphasize my primary subjects (rocks, tree, Half Dome), while including enough of the sky feature what had the potential to be dramatic color.
Working methodically, I started wide and gradually tightened, refining the focal length, focus point, and borders. I’m kind of obsessive about no distractions on the edge of my frame, and try as I might, it always seems that widening or tightening to eliminate one distraction introduces a new distraction over there.
In this case I was dealing with a couple of large boulders carrying too much visual weight to be on the edge of my frame, plus the leg of a nearby tripod, and an overhanging tree branch. I was able to tighten enough to eliminate these distractions without going so tight that I cut off the boulder on the right, or crowded Half Dome on the left. Of course, since I was on a tripod, each click was an improvement of the one that preceded it—in this case it took only about a half dozen images until I was satisfied.
The foreground was static, but the sky seemed to change with each second. While I had the general framework of my composition ready, as the color overhead intensified I decided I wanted a little more sky. Fortunately, by now I was so familiar with my composition that adjustments were easy. This image came as the color reached a crescendo, intensifying until the entire landscape throbbed with color.
My primary tripod is a Really Right Stuff TVC-24L with a RRS BH-55
My travel/hiking tripod is a Really Right Stuff TQC-14 with a RRS BH-30
Each of my cameras has a RRS L-plate
A gallery of tripod-crafted images
(All of my images were captured using a tripod, but my favorites tend to be the images that require the click/review/refine/repeat process that’s greatly enhanced by a tripod)
Click an image for a closer look, and a slide show. Refresh the screen to reorder the display.


")


On the rocks
Posted on November 14, 2015

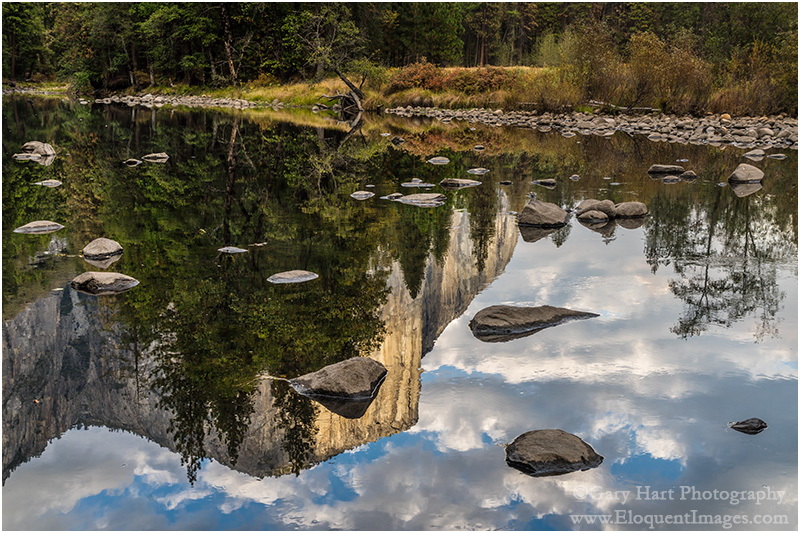
Reflection On the Rocks, El Capitan and the Merced River, Yosemite
Sony a7R II
Sony/Zeiss 24-70 f4
25 seconds
F/11
ISO 100
Yosemite is known for its waterfalls, but I gotta say, I think I’m happiest photographing Yosemite when the falls are dry. Not that I don’t love Yosemite’s waterfalls (I do!), but when the falls are dry, the Merced River has slowed to a reflective crawl that paints reflections everywhere. And as an added bonus, when the falls dry up, so do the crowds.
Last month I spent a day guiding a couple from Sweden through Yosemite when the Merced River was at its drought-starved nadir. I’d been looking forward to this day for a while, but two days earlier I’d cracked ribs and my collarbone in a cycling accident—I could walk, I could talk, but I couldn’t do both, and simply getting in and out of the car was an achievement. The seatbelt? Torture. So my camera and tripod stayed in the car all day.
But when we pulled up to Valley View for sunset, I just couldn’t resist the mix of light, clouds, sky, and reflection. By the time I extracted my camera and tripod and made my way down to the river (no more than 20 feet from the car), the sun was about done with El Capitan. There were a few hot spots in the clouds, but my Singh-Ray two-stop hard GND held back the highlights enough to enable enough exposure to bring out the shadows. The resulting 25 second exposure added a gauzy texture to the reflection.
The trickiest thing about photographing a reflection with embedded features is achieving depth of field throughout. Though it seems counter-intuitive, the focus point for a reflection is the focus point of the reflective subject, not the reflective surface. In this case I wasn’t too worried about the reflection because I knew the long exposure would soften it anyway. But I did want to be sharp from embedded rocks all the way back to El Capitan. A quick check of my hyperfocal app told me that at f11 and 28mm, focusing on the closest rock (about ten feet away), would ensure sharpness all the way to infinity.
A public service announcement
I don’t always wear a helmet when I bike. I’m fortunate to live adjacent to a bike trail that can keep me off city streets for virtually all of my bike trips, so (my rationalization went), why mess with a helmet?
My accident last month happened on the bike trail, with no cars in sight, when I clipped a portable barricade with my handlebar and my bike went right while I continued forward. In addition to cracked ribs and collarbone, some nasty road-rash, and a torn-up shirt, my helmet was totaled. I shudder to think what would have happened had I decided not to wear a helmet that day (about a 50/50 chance), and will never, ever ride a bike again without one. I encourage you to make the same promise to yourself.
I return you now to your regular programming.
A gallery of Yosemite reflections
Click an image for a closer look, and a slide show. Refresh the screen to reorder the display.


Reflection season
Posted on October 26, 2015
Reflection on the Rocks, El Capitan, Yosemite
Sony a7R II
Sony/Zeiss 24-70 f4
1/40 second
F/11
ISO 400
It’s reflection season in Yosemite, that time of year when the falls are dry and the Merced River slows to a glassy crawl. Plugging in the golds and reds of autumn makes this my favorite time for creative photography in Yosemite, and explains the volume of Yosemite autumn images in my portfolio.
It also explains why I’ve been to Yosemite three times this month. The month’s first visit, with my Eastern Sierra workshop group, we photographed high Sierra reflections and a Half Dome sunset from Olmsted Point—we’d had lots yellow and orange aspen in the canyons above Bishop and Lee Vining, but it was a little early for Yosemite color. The next two trips were primarily focused on Yosemite Valley, ground-zero for autumn reflections. On both Yosemite Valley trips, the Merced River, always low and slow in autumn, was down far enough that I saw places I could have rock-hopped from one side to the other without getting wet.
Today’s image, from about a week and a half ago, almost didn’t happen. I’d been looking forward to this visit (to guide a couple from Sweden) for several months, but a bike accident two days earlier had cracked a rib, torn a muscle in my shoulder, removed copious amounts of skin from my arm, and pretty much prevented me from doing anything requiring movement (or breathing, for that matter).
When I left home that morning I knew I was going to be sore, but I was actually a little surprised by just how uncomfortable I was. Somehow, bolstered by liberal quantities of ibuprofen, I managed to survive the day, quite content to limit my activity to driving, narrating, and and answering questions. Even getting in and out of the car was an ordeal, and photography seemed out of the question. But when we pulled into the parking lot at Valley View for the day’s final stop, the reflection drew me to the rocks like the Sirens of Greek mythology.
Rather than grab my camera bag and sling it over my shoulder as I normally would (the mere thought makes me flinch), I gingerly extracted my tripod, camera, and 16-35 lens, and assembled them them at my car’s tailgate. Given my level of pain and the precarious footing on the rocks by the river, I knew wouldn’t be able to move around as much as I’m accustomed to (or at all), so scanned the route and I very carefully selected my destination before departing on the 20 foot journey. In a perfect world I’d have been able to shuffle slowly, but the route to the river was over a disorganized jumble of granite rocks that made each step feel like a knife had been thrust into my ribcage.
At the river I found a flat granite platform just large enough for both my feet, and a solid rock for each tripod leg. Using the tripod for support, I found that if I moved slowly enough, I could keep the pain to a manageable minimum. Nevertheless, I was even more deliberate than I usually am, strategizing and executing each movement. Soon I developed a workflow that allowed me to do pretty much all I needed to do by only moving my arms from the elbow down.
There were a lot of moving parts to consider as I crafted this image. Since the focus point of a reflection is the focus point of the reflective subject, not the reflective surface, I needed DOF that went from the nearby rocks, just a few feet away, all the way out to El Capitan at infinity. But I couldn’t make DOF decisions until I composed and decided on a focal length. And as I tried to compose, I found that even the slight adjustment in focal length and framing introduced new problems—rocks cut off or jutting in from the side, or even worse, introducing bright sky at the top of the frame.
At one point I thought I finally had it, only to realize that the top rock of the foreground triangle intersected El Capitan. Moving my tripod a few inches to the left solved that problem, but also made it impossible to use my viewfinder without repositioning myself. Rather than destabilize my precarious perch, I decided to forego the viewfinder in favor of the LCD (thank you Sony for the articulating viewfinder).
With a little work I finally found a composition that achieved my framing objectives: balanced foreground, clean borders, and no sky. Now for my exposure variables. I estimated that foreground rocks were about 10 feet away—according to my hyperfocal app, at 40mm and f11, the hyperfocal distance was a little less than 16 feet. I picked a rock about that distance and carefully focused there, thus ensuring acceptable sharpness from about 8 feet to infinity. I decided to go with ISO 400 to mitigate the light breeze that moved the leaves just a little.
The shadows were quite dark, while the cloud reflections contained some hot spots, but I was confident that my Sony a7R II could handle the dynamic range if I was careful. Watching my histogram, I increased my shutter speed until the highlights were right up to the point of clipping.
Finally ready, I realized that my remote cable was in the car. Since there was no way I was going to put myself through an extra roundtrip, I engaged my camera’s 2-second timer and clicked. After reviewing the image on my viewfinder I made a couple of small adjustments and clicked again. I repeated this click/review/click cycle a couple more times, until I was satisfied that I’d achieved my vision.
Photograph reflections like this in my next Yosemite Autumn Moon photo workshop
A gallery of reflections
Click an image for a closer look, and a slide show. Refresh the screen to reorder the display.


Yosemite, weather or not
Posted on July 19, 2015

Clearing Storm, Glacier Point, Yosemite
Sony a7R
Sony/Zeiss 16-35
1/15 second
F/11
ISO 125
Photography weather and tourist weather are polar opposites: What’s good for photography—clouds, rain, snow—isn’t usually so great for being outside. This is especially true in Yosemite, where stormy weather can add an entirely new dimension to the park’s already renowned scenery (not to mention inclement weather’s crowd-thinning effect).
Sometimes Yosemite’s clouds simply diffuse the light, subduing shadows into a much more camera-friendly range, and extending the quality photography window. Other times, the clouds become subjects themselves, contorting into diaphanous curtains or towering pillars whose beauty rivals Yosemite’s granite icons. But rain or shine, there’s always something to photograph in Yosemite if you know where to look.
Wet weather gear
Regardless of the forecast, I never travel to Yosemite without my rain gear duffel containing everything necessary to keep me head-to-toe dry and focused on photography: hat, gloves, parka, rain pants, and waterproof boots for me, and an umbrella for my camera. I haven’t found a satisfactory rain cover for my camera, but a plastic garbage bag is quite handy for keeping the camera dry while it’s on my tripod but I’m not shooting (searching or waiting for a shot). Another essential wet weather accessory is a towel or chamois to dry any gear (especially the front of my lens) that gets wet despite my best efforts.

Elm in Blizzard, Cook’s Meadow, Yosemite
The teeth of the storm
Some of my favorite Yosemite photography has been in the teeth of the storm, when rain or snow has forced all but the most hardy indoors, and obliterated the recognizable landmarks, forcing me to look a little closer for subjects. A bonus during these extreme weather shoots are the occasional cameos by Yosemite’s star attractions (so stay alert).
My go-to mid-storm subjects in Yosemite include: the elm in Cook’s Meadow, the Cascade Creek waterfall above the bridge on Big Oak Flat Road (the road descending into Yosemite Valley from the Big Oak Flat entrance), Bridalveil Creek beneath Bridalveil Fall, Fern Spring and the Pohono Bridge, and El Capitan Bridge. But really, you’ll find shots wherever you look.
Clear skies
As much as I enjoy photographing in stormy weather, I don’t put my camera away when skies are clear. My favorite clear sky spots are the frequently shady locations on the south side of the valley, such as Bridalveil Creek and the forest near Fern Spring and the Pohono Bridge. Depending on the season (the closer to the winter solstice, the better), these spots can offer several hours of shade at the beginning and ends of the day.
Clear skies also open the door to night photography—all those popular spots that were packed with gawkers and washed out by the harsh midday light are peaceful and photogenic by moon- or starlight. My favorite moonlight (full moon) subjects are Yosemite Falls and El Capitan, because they’re the first to be illuminated by the rising moon—the face of Half Dome doesn’t get moonlight until the moon has dropped toward the western horizon, well after midnight on a full moon night. On the other hand, Half Dome does make a nice starlight subject because most views are to the east, where the sky is darkest before midnight. An unappreciated key to successful Yosemite night photography is finding a spot unsullied by headlights.
Midday in the summer, when it’s virtually impossible to find shade that’s not stained with sunlight, is a good time to break for lunch, take a hike, or (especially) explore.
Clearing storm

Warm Light, El Capitan Clearing Storm, Yosemite
Venture out to photograph during Yosemite’s harshest weather is the most reliable way to ensure a clearing storm opportunity. If you wait out the most miserable stuff by the fire, you risk missing the best stuff, which often happens with startling suddenness—for hours visibility might not extend beyond 100 yards, then you blink and there’s a rainbow.
With its bird’s-eye view east, up Yosemite Valley, Tunnel View is the most popular location to photograph a Yosemite clearing storm, but it’s easy to be so mesmerized by the show there that you miss all the great photography elsewhere. Because the west side of Yosemite Valley is where storms usually clear first, I often wait out the storm at Tunnel View, photograph its initial clearing there, then force myself to move on (believe me, it’s not easy to leave) while the shooting is still good.
The best subjects for a Yosemite clearing storm are the icons—El Capitan, Bridalveil Fall, Yosemite Falls, Half Dome—but not necessarily from the standard locations. Pretty much any spot with a view of one or more of these subjects will work, but I often try to include the Merced River and reflections.
Wet and dry seasons
Blue skies rule Yosemite’s summer, with clouds and rain the exception (but still possible). Yosemite’s wet season comes in late fall, winter, and and early spring, with rain and snow always a possibility. In general, in Yosemite Valley rain is far more common than snow, but snow can happen any month from November through April, with December, January, and February being your best bet (but some of my best snow experiences have come in November and April, and in 2015, Yosemite Valley didn’t get any significant snow until April).

Double Rainbow, Yosemite Valley
Rainbows
With its east/west orientation and primarily east-facing views, Yosemite is particularly well situated for afternoon rainbows. Tunnel View, Glacier Point, Valley View are great rainbow spots, but pretty much any valley location with a view of Half Dome, or a view of El Capitan’s west-facing wall, will work.
When the sun is lower than 42 degrees above the horizon (late afternoon in the long-day months, all day in winter), look for signs of clearing in the west (where the clearing usually starts). Sometimes you’ll see a few patches of blue, other times you’ll notice that the sky is brightening slightly. Find your shadow, which will point to the rainbow’s center (if there’s no shadow, draw an imaginary line from where you guess the sun is, through your position, and toward the scene opposite the sun)—if it’s not pointing toward anything interesting, move to another location—set up your shot, cross your fingers, and wait. And don’t forget to remove your polarizer, or orient it to maximize reflections (the opposite from the standard polarizer orientation) because an improperly oriented polarizer will erase your rainbow.
Winter wonderland
You know those images with every Yosemite feature draped in white? Those scenes happen just a handful of times each year (if

Winter Reflection, El Capitan, Yosemite
we’re lucky), and rarely last for more than an hour or two after the snow stops falling. So simply taking a trip to Yosemite in winter is very unlikely to net you fresh snow opportunity. In fact, even if you hear that it just snowed in Yosemite and beeline straight to the park, you’re almost surely too late.
To get that coveted Yosemite winter wonderland shot, you actually need to be there during the storm. And when the snow stops (see clearing storm reference above), move as quickly as you can, because the trees will begin shedding snow almost immediately.
Those of us within a reasonable driving distance of Yosemite have a distinct advantage if we’re good about monitoring the weather forecast. I look for storms with predicted snow levels below 4,000 feet, then try to arrive before the worst weather hits.
About this image
Because I avoid the crowds and blue skies of summer, I don’t make it to Glacier Point as frequently as I do locations in Yosemite Valley. But a few weeks ago my brother and I went to Glacier Point to photograph lightning, then hung around until the storm cleared.
Clearing Storm, Glacier Point, Yosemite
Unlike the California winter storm fronts that originate in the Pacific and sweep eastward across the Central Valley and into the Sierra, summer thunderstorms are usually borne of subtropical moisture encountering High Sierra convection and billowing into towering thunderheads above the Sierra crest. In the right conditions, these thunderstorms can slip far enough west to soak Yosemite Valley and stab the rim with jagged lightning.
At its most intense, the storm that afternoon nearly obscured Half Dome, completely drenching us. With the rain came lightning that soon chased us to the safety of the car. When things calmed we ventured back out to the vista to photograph the storm’s clearing. I can’t tell you how much fun it is to watch the shifting clouds that seem to create an entirely different image with each passing minute. For the this shot I waited for the cloud to part enough to reveal Nevada (above) and Vernal Falls, going wide to frame them with Half Dome on the left, and Mt. Starr King on the right.
The many faces of Yosemite weather
Click an image for a closer look, and a slide show. Refresh the screen to reorder the display.


Anticipating the exceptional
Posted on July 11, 2015

Morning Glory, Sunrise Clearing Storm, Yosemite Valley
Sony a7R
Sony/Zeiss 24-70
1/50 second
F/16
ISO 100
No one denies that an image records a single, unrepeatable instant. But just as each instant is the culmination of a series of connected preceding events, most images have their own history that can be traced backward, often months or years before the shutter clicked. The moon didn’t just materialize above Half Dome that evening, and a moonbow isn’t just some random event at the base of Lower Yosemite Fall—their appearance can be directly connected to celestial dance that was set in motion with the birth of our Solar System, and can be predicted with surgical precision (minus a few wild card variables like weather and water flow to keep photographers from getting too cocky).
Photographers spend a great deal of time trying to anticipate instants like these. We start with the common-knowledge stuff, things like the February sunset light on Horsetail Fall, a shaft of summer light slanting in Upper Antelope Canyon, or a moonbow in the spring mist billowing beneath Lower Yosemite Fall. But the precision of the celestial choreography that delivers light shafts to slot canyons and moonbows to waterfalls is just as predictable for anonymous hidden trees, lakes, and peaks. Iconic or undiscovered, each of these spectacles are the convergence of location and predictable natural processes just waiting to be appreciated (and photographed!).
Image planning isn’t limited to the sun, moon, and stars. Understanding and monitoring a favorite location’s weather can put you in the right place, with the best chance to add a rainbow, lightning bolt, or fresh snow. And simply finding a complementary foreground/background alignment that connects two or more terrestrial subjects can elevate an image to the next level.
Rather than a fortuitous right-place, right-time convergence, the creative aspect of many images starts long before capture. When I find a new location, or identify a potential subject, my brain immediately starts spinning on the ways I can make it better. Can I align it with another foreground or background subject? What natural phenomena will take the scene to the next level, and how I can be there when it happens?
For example…

Bridalveil Dogwood, Valley View, Yosemite
Before capturing my image of a raindrop-festooned dogwood flower with Bridalveil Fall in the background, I had long visualized a scene somewhere in Yosemite that featured a dogwood bloom aligned with a soft-focus but recognizable Yosemite landmark. I knew I’d need overcast skies that would illuminate the entire scene with diffuse, soft light, then filed my vision away until the next time the forecast predicted clouds during the short window the dogwood bloom in Yosemite.
On my drive to the park, I started mentally working on locations where I might be able to align a dogwood with a recognizable Yosemite subject, the lens I’d use, the amount of background sharpness I wanted, and so on. Once I was in the valley, I was able to conduct a pretty orderly search that eventually led me to this flower near Valley View.
Sometimes bringing my ideas to fruition requires a lot more research, planning, and patience. I’ll start with a scene that appeals to me, then mentally add something that I think will take it to the next level. A moon? Stars? A rainbow? Lightning? Fresh snow? Maybe all of the above (so far not at the same time, sadly).
The moon and stars are a relatively straightforward matter of plotting angles and timing (and hoping the weather cooperates). On the other hand, weather phenomena, such as rainbows, lightning, and snow, require an understanding of the processes behind them, careful and persistent monitoring of long- and short-term weather forecasts (only the National Weather Service for me), and a lot patience while waiting for the moment to arrive. Then, when the moment does arrive, I need to move quickly and not allow myself to be swayed by fear of failure (always a distinct possibility).
For example…

Double Rainbow, Tunnel View, Yosemite
I’d long fantasized about adding a rainbow arcing over Yosemite Valley to the already breathtaking Tunnel View scene. And being a lover of rainbows and a photographer, I’d long ago taken the time to become extremely aware of the why, where, and when of rainbows. Which is how, on a spring afternoon a few years ago, I was in perfect position when my rainbow fantasy came true.
I was in Yosemite to meet customers for dinner, and to plan the next day’s guided tour of the park. But when my mostly sunny drive up the Merced River Canyon turned to rain as I entered Yosemite Valley, my mental wheels started turning—Yosemite weather almost always moves west-to-east, which meant soon Yosemite Valley would have rain on the east side and sunlight low on the western horizon. It wasn’t hard to rearrange my customers’ priorities, and this was our reward.
Celestial phenomena are wonderfully predictable, so much so that I make very few non-spontaneous photo trips without factoring in the moon and/or Milky Way. (My spontaneous trips are usually spurred by the weather forecast.) And there are few locations I photograph that I can’t tell you the altitude and azimuth necessary to align a the sun, moon, or Milky Way with the location’s most prominent feature.
Hawaii, Death Valley, Mono Lake, Alabama Hills (Mt. Whitney), plus many personal favorite subjects near home—I know exactly where I want to be and when I want to be there, and do my best to make it happen, sometimes planning several years in advance. In Yosemite my terrestrial subject is usually Half Dome, and and my celestial subject is usually a rising moon. And depending the direction of the moon’s arrival, I have an array of locations that I know will align with the moon’s appearance.
For example…

Rising Crescent, El Capitan and Half Dome, Yosemite
Tunnel View is my favorite location for photographing a Yosemite moonrise, but it’s not my only location. Across the Merced River Canyon on Big Oak Flat Road is Half Dome View, a turnout vista with a slightly different, less popular view of Half Dome and El Capitan.
From Half Dome View, the visual distance separating the two monoliths is quite narrow, meaning an extremely small margin of error for a photographer hoping to catch the moon splitting the gap. But the idea had always intrigued me, so I went to work with my plotting method (I do it manually using topo maps, moonrise tables, and an HP-11C scientific calculator that does trig functions).
When I discovered that a crescent moon would indeed split this gap before sunrise on a certain May morning in about a year, I started a plan of attack. Despite the fact that I’d never photographed a moonrise from this location, and even the slightest error in computation would foil the attempt, I went ahead and scheduled a workshop for this date. Try to imagine my anxiety as the day approached and the realization that failure wouldn’t just impact me, it would impact my entire group, really started to sink in. And imagine my euphoria (not to mention everyone with me) that morning when the moon slid into the gap, right on schedule.
When photography’s less than ideal, I might leave the camera in my bag, but I don’t stop being a photographer. I spend a lot of non-camera time scouting locations, looking for complementary subjects that I can align with the grand scene. If my primary subject is in the foreground, I add move around until I can align it with a complementary background. And when my subject is in the distance (like Mt. Whitney from the Alabama Hills, or Yosemite Valley from Tunnel View), I spend a lot of time exploring the nearby terrain in search of subjects I can align with the grand primary scene.
When I find a subject that merits something exceptional, I try to wait until I can enhance it with similarly exceptional natural phenomenon.
For example…
Morning Glory, Sunrise Clearing Storm, Yosemite Valley
When I “discovered” this tree, it was love at first sight. But rather than photograph it in the more conventional quality light conditions that are fairly easy to anticipate, or wait for one of Yosemite’s inevitable exceptional but fairly regular moments, I saved my discovery for something truly extraordinary. And, after about ten years of waiting for location, light, conditions, and circumstances (this spot is too small and dangerous for a group), extraordinary finally happened this April.
Anticipating snow, I’d traveled to Yosemite the previous afternoon. A little snow had fallen earlier that day, and while the storm had passed, its cloudy vestiges lingered overhead and in the valley below. While not the winter wonderland I’d hoped for, there was enough snow still hugging the trees that I found some very nice images. Nice enough, in fact, that I’d have been completely satisfied with my captures if my trip had ended right then. But I wasn’t done.
Because more snow was promised overnight, I got a room nearby and returned the next morning. I wasn’t too far into my drive back into the park before it became clear that I was in for something special. The snow had just stopped, and while there wasn’t a lot of snow, the air was cold enough that I knew until the morning sunlight made it all the way down into Yosemite Valley, everything would remain in a state of suspended animation. And the clouds that had deposited the snow were doing their typical slow-clear dance on the valley floor.
I first stopped at a spot along the Merced River and photographed dogwood and El Capitan. I got so caught up in that scene that I lost track of the time and didn’t give myself a lot of time for my next stop, up the hill at “my” tree (that I often check but rarely photograph). I also realized that given the light snowfall on the valley floor, I’d severely underestimated the amount of snow that had fallen just a few hundred feet up the hill from Yosemite Valley.
I found an entire world covered with white, and the sun about ready to pop up over Sentinel Dome—once the sun arrived, I’d only have about 60 seconds of quality photography before the sun overpowered the scene. I quickly grabbed my gear and scrambled up to the tree. Fortunately, I’d photographed here the previous afternoon, so I didn’t really have to hunt for a composition (generally a fairly painstaking, trial-and-error process). With the sun about to appear, I knew I’d need to do a sunstar and set my aperture accordingly. Without a lot of time to play with the exposure, I made the snap judgement to spare the highlights and hope I could recover the shadows laters, and click.
This image was literally the first click I made of the scene this morning—subsequent captures showed increasingly blown highlights as the sun rose into the scene. On my LCD this image looked severely underexposed, but I trusted the histogram on my a7R, which indicated there was indeed detail in the shadows. (Yes, I know I could have accomplished it by bracketing and blending multiple exposures, but I’m a one-click guy.) And when I finally found the courage to process the image, I held my breath as I grabbed the Lightroom Shadows slider and watched my scene appear.
A gallery of “planned” images
Click an image for a closer look, and a slide show. Refresh the screen to reorder the display.


Are you a photographer or a tourist?
Posted on June 30, 2015

Warm Light, El Capitan Clearing Storm, Yosemite (2007)
Canon EOS-1Ds Mark II
17 mm
1/6 second
F/11
ISO 100
Years of leading photo workshops and reviewing the work of others has convinced me that to capture great images and maintain domestic bliss, you need to decide before the trip whether you’ll be a tourist or a photographer. You just can’t have it both ways. (I say this completely without judgement—there are times when I opt for tourist mode myself, and on a recent Mexico cruise I didn’t even take my camera.)
I see many well composed images taken at the wrong times—harsh shadows, cloudless skies, and poorly aligned light are all signs that the photographer was sightseeing with his or her camera. Not that there’s anything wrong with that—if your priority was simply to record the scene, the image was a success.
But to get the pictures serious photographers covet, you need to be out there at the most inconvenient times. These are sacrifices a photographer is willing to make, but others? Not so much. Many family vacations and intimate getaways have been ruined by the photographer who thinks it’ll no problem sneaking out for sunrise (“I’ll be quiet—you won’t even know I left”), or waiting just a few minutes longer after sunset (“Denny’s will still be open when we get back”).
When I’m a photographer, my decisions put me outside when the conditions are most conducive to finding the images I want, with no consideration of comfort or convenience: Sunrise, sunset, overcast skies, wild weather, and after dark are all great times for photography, but not necessarily the most comfortable times to be in the elements. Face it—few people without a camera are thrilled to be outdoors when they’re sleepy, hungry, cold, or wet.
That’s why, when I’m a tourist, my goal is to relax and and enjoy the sights with the people I love—I leave my camera home and simply take in nature’s splendor. My lights-out and rise times are based on comfort and enjoyment, and my forays into nature are timed for convenience and to coincide with the most pleasant weather for being outside. This approach keeps my body and mind fresh, my loved ones happy, and gives me a perspective that I think ultimately benefits my photography (try it sometime).
Of course doing nature photography for a living makes it easier for me to . But what about the photographers who are so busy that their only opportunity to take pictures is when they’re on vacation? My suggestion is to get buy-ins on your objectives before the trip, and be as specific as possible: “I’d like to shoot sunrise on our second morning at the Grand Canyon,” “I’d really like to do a moonrise shoot in Yosemite on Wednesday evening,” and so on. The rest of the trip? Bring a point-and-shoot, store your serious camera gear out of sight, and don’t let anyone so much as see a longing glimpse in its direction for the rest of the trip.
For today’s image I pretty much hung out (alone) in miserable snow and wind waiting for the storm to break. On this stormy evening, I chose the bridge just east of El Capitan Meadow. Though there were no guarantees, I knew if I went inside to warm up, I’d be out of position if something special happened. Shortly before sunset the snow stopped and soon thereafter I was treated to about 20 minutes of beautiful warm light dancing with the retreating clouds swirling atop El Capitan. Of course there are many times when nothing happens and all I get is soggy clothes and frigid limbs for my trouble, but those times only make the successes like this that much more special.
A gallery of solitary sacrifices
(Images that required discomfort and inconvenience that I wouldn’t subject a non-photographer to)
Click an image for a closer look, and a slide show. Refresh the screen to reorder the display.


