2018 Highlights
Posted on December 30, 2018
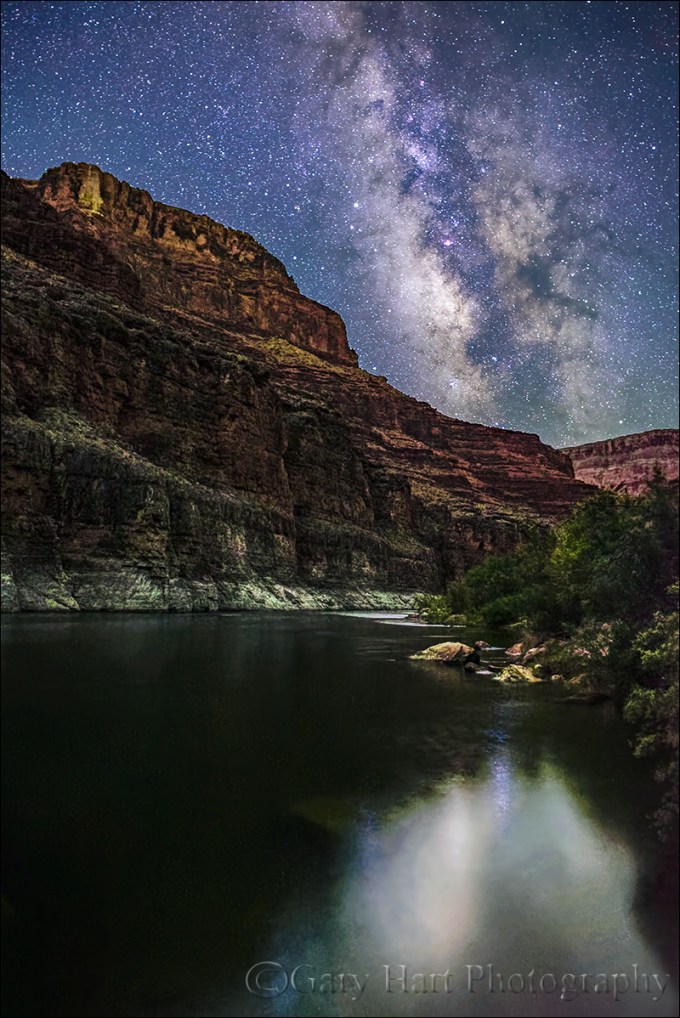
Milky Way Reflection, Colorado River, Grand Canyon
Sony a7S II
Rokinon 24mm f/1.4
20 seconds
f/1.4
ISO 12,800
I’ve always struggled with the “top-whatever” end-of-year countdown of my favorite images because the choices are so subjective and mood dependent, and so many images are favorites as much for their memories as they are for their aesthetic value. And coming up with a predetermined number is arbitrary, and inevitably requires choices I don’t want to make and will almost certainly regret later. One year I may have only seven or eight images that thrill me; the next year I might have two dozen. This year I chose 27, and I still have some left to process.
So rather than attempt to rate and rank my images at year’s end, I prefer using them as a catalyst for reflection. Each December I go through everything I’ve processed from the waning year (this year I know of several that would certainly qualify as a highlight but they’re as yet unprocessed) think about the circumstances of their capture.
I remember
I remember the New Year’s Eve solo drive to Yosemite to photograph the full moon rising behind, followed by a night drive to the other side of the Sierra (a six hour drive in winter) where I hoped to capture the full moon setting behind Mt. Whitney. The Yosemite part of that trip was spectacular, the Mt. Whitney half was a photography flop, but I enjoyed the entire journey.
I remember nearly a month in New Zealand, photographing the South Island’s unmatched beauty in its most beautiful season (hint: brrrrrrr). In New Zealand I hiked on a glacier, photographed the (far superior) Southern Hemisphere version of Milky Way, was chased through a fjord by leaping dolphins, witnessed one of the most vivid crimson sunrises I’ve ever seen, and logged hundreds of quality kilometers with a group of wonderful people.
I remember a solo drive to Yosemite to photograph fresh snow, never a sure thing regardless of the forecast. I approached Yosemite on the evening prior, I felt like a lone spawning salmon fighting up current against the continuous stream of headlights evacuating Yosemite in advance of the storm. I settled into my room in dark and dry Yosemite Valley, and woke to so much snow that I couldn’t find my car. I’m convinced there is nothing, nothing on Earth more beautiful than Yosemite Valley with fresh snow, and with the park mostly vacant and the noise-damping quality of powdery snow, for a few hours I felt like I had heaven all to myself.
I remember chasing lightning on the Grand Canyon’s North Rim, the thrill (and relief) when everyone in both workshop groups captured lightning, and an especially spectacular lightning storm that started in the telephoto distances and chased us to the cars. This year’s Grand Canyon workshops were altered by fires burning in and near the park and I feared that they’d spoil the photography—instead, in addition to all the lightning, we ended up with spectacular red-rubber-ball sunrises and sunsets that allowed genuinely unique images in this heavily photographed destination.


I remember arriving on the Big Island shortly after Kilauea had shut down after 35 years of continuous eruption, and discovering that between the just-concluded Kilauea eruption and the recently depart remnants of Hurricane Lane, I’d lost nearly half of my locations. Instead I ended up finding alternate photo spots that I like even better than the ones I lost. The high point (literally and figuratively) of that trip turned out to be a chilly, first-ever sunset and Milky Way shoot from atop 13,800 foot Mauna Kea.
I remember my Yosemite Fall Color workshop group finding Yosemite Valley at peak fall color, and three beautiful moonrises in my just concluded winter moon workshop. And while thousand of photographers jockeyed for position beneath bone dry Horsetail Fall in February, my workshop group set up elsewhere and photographed one of the most beautiful sunsets of the year.
I remember way back in January, along with my Death Valley workshop group, photographing my first-ever lunar eclipse (on the heals of my first-ever solar eclipse in August of 2017).
And I remember trudging through Grand Canyon sand by starlight to a spot that I’d decided before nightfall was probably not a good Milky Way candidate, and discovering that I was wrong. It turned out the level of the Colorado River level had changed in the night, replacing mushy sand with a swirling pool that rendered the Milky Way’s reflection as a luminous abstract.

Milky Way Reflection, Colorado River, Grand Canyon
I could go on and on about my memories of 2018, but all these great memories also remind me of the unknown highlights in store for 2019. Certainly the planned trips, which include my first-ever Iceland visit (with Don Smith in preparation for our 2020 workshop), my first-ever Oregon Coast workshop (with Don Smith), another raft trip through the Grand Canyon, a return visit to New Zealand, and on and on. But what excites me more than anything is the inevitable surprises, those special moments that dazzle when dazzling is the last thing you expect. Bring it on!
2018 Highlights
(Click an image for a bigger view, and to see a slide show)


Winter Moonrise
Posted on December 23, 2018
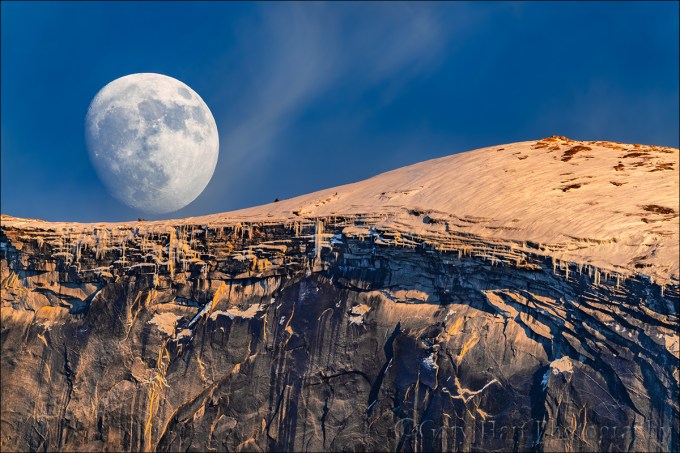
Winter Moonrise, Half Dome, Yosemite
Sony a7RIII
Sony 100-400 GM
Sony 2x teleconverter
ISO 100
f/11
1/25 second
With a wide variety of spectacular and diverse east-facing views, I can think of no better place to photograph a moonrise than Yosemite. I especially like the December full moon because it aligns so well with Half Dome, not just on the night it’s full, but on the nights leading up to the full moon.
When I realized that this year’s December full moon was so close to Christmas, I almost didn’t schedule my annual Yosemite Winter Moon workshop, but then I figured that since I’ll be there anyway, I may as well. I’m so glad I did—the workshop filled, and the skies were clear enough (never a sure thing in December) that we photographed the moon on three of the workshop’s four nights, culminating in a very special moonrise to wrap up the workshop (a topic for a future blog post).
The closer it is to full, the closer to sunset the moon rises, arriving several hours before sunset a few days before it’s full, then a little later each evening before rising right around sunset on the full moon day. Since a waxing (increasing in fullness) moon is always higher at sunset than it will be the next day, with a little planning, it’s possible to time several consecutive days’ shoots to coincide with the moon rising right around sunset. For this year’s workshop I’d planned three sunset moonrises for my group, each (more or less) aligning the moon and Half Dome, getting farther from Half Dome each day.
About this image
While the first of my planned moonrise shoots was Wednesday, when the moon rose above the flat horizon about two hours before sunset, the horizon in Yosemite is anything but flat. I took my group to a favorite location beside the Merced River on Yosemite Valley’s east side, less than three miles from Half Dome, where the relatively steep view angle to the top of Half Dome means that it takes the moon a couple of hours to climb into view here.
Though not labeled on the map, this spot isn’t a secret to photographers, so I arrived about 45 minutes early, partly to allow everyone time to prepare, but also to ensure that we wouldn’t need to battle anyone else for position. I told everyone that the moon would appear at around 4:30 from directly above the top of Half Dome, and suggested that they be ready with their compositions beforehand.
My own composition had been planned long in advance—having photographed more than my share of moonrises from this wide angle location, I decided on an extreme telephoto approach this time. I added my Sony 2X teleconverter to my Sony 100-400 GM lens, mounted the pair on my tripod, and attached my (full frame) Sony a7RIII. I pointed my 800mm of focal length at Half Dome’s summit and waited. <Continues below>
Prior Moonrises From This Location
I never tire of seeing the glow of the moon’s leading edge peak above the horizon, and this evening was no exception. When the moon nudged into view, the sounds of chatter and laughter were instantly replaced by clicking shutters. Watching the moon grow in my viewfinder, I adjusted my composition slightly before each click. When the moon gained separation from the granite to become fully visible, I panned slowly to the right and saw that with the right framing it would appear nestled into a subtle bowl-shaped curve atop Half Dome and locked in a composition that would last for a few minutes as the moon continued its ascent. A thin wisp of cloud scooted through the scene as I clicked this frame, lit by the day’s final rays.
One more thing
Looking at the distant world at 800mm reveals previous invisible detail. So once I’d settled on a composition that I could stick with for a few clicks, I allowed my eye wander the frame and noticed dangling icicles lining Half Dome’s rim. I continue to be blown away by the sharpness of the Sony 100-400; not only is this lens unbelievably sharp, I literally cannot tell a difference when I pair it with the Sony 2X teleconverter.
Join me in the next Yosemite Winter Moon workshop
Workshop Schedule || Purchase Prints
Yosemite Moons


Shoot the Moon
Posted on December 16, 2018

Yosemite Silhouette, Crescent Moon With El Capitan and Half Dome
Canon EOS 1DS Mark III
4 seconds
400 mm
ISO 400
F8
Nothing draws the eye quite like a large moon, bright and bold, with a striking foreground. But something happens when you try to photograph the moon—somehow a moon that looks to the eye like you could reach out and pluck it from the sky, shrinks to a small white speck in a photo.
While a delicate accent of moon is great when properly framed above a nice landscape, most people like their moons BIG. The trick isn’t photographing a large moon, it’s photographing a large moon with a nice landscape.
Bigger is better
Crescent or full, the moon will be as big as the focal length you choose—photograph it at 16mm and the moon registers as a tiny dot; photograph it at 600mm and your moon dominates the frame.
But a landscape image with a large moon requires more than just a long focal length. If big was all that mattered, you could attach your camera to a telescope, point skyward, and get a huge moon. But without a landscape to go with your huge moon, no one would know whether you took the picture standing on a beach in Hawaii, atop a glacier in New Zealand, or beside the garbage cans in your driveway.
“Big moon” is a subjective label, but I usually won’t use it unless I can photograph the moon at 200mm or longer. And while a 200mm lens is okay, the moon doesn’t really start to jump out of the frame for me until I approach 400mm.
My go-to big moon lens is my Sony 100-400 GM because it provides good magnification along with focal length wiggle-room for pulling back when I need to fit a foreground subject that’s a little too close. A telephoto zoom also provides focal length flexibility that allows you to balance your composition, or add variety with a series of different compositions. Of course you can always switch lenses mid-shoot, but you don’t fully appreciate how fast the moon is moving in the sky until you try to align it with a terrestrial subject in a telephoto composition.
When I want a moon even bigger than 400mm gives me, I add a 2X teleconverter and voilà, I’m at 800mm. Bigger still? Out comes my 1.5-crop body and I’m zoomed all the way to a 1200mm equivalent.
Distance yourself
Often the most difficult part of including a large moon with a specific landscape subject is finding a vantage point far enough back to fit the subject and the moon. But the farther back from your foreground subject you can position yourself, the longer the focal length you can use, and the bigger the moon will be.
For example, I love photographing a big moon rising behind Half Dome in Yosemite. But at Yosemite’s popular east-side locations, even 200mm is too close to get the moon and all of Half Dome in my frame. And while Yosemite’s most distant east-facing Half Dome vistas are up to 10 miles away, Half Dome is large so that even at that distance the longest focal length that will include the moon and all of Half Dome isn’t much more than 400mm.
A little easier for me is including a big moon with smaller foreground objects like a prominent tree. Near my home in Northern California are rolling hills topped by solitary oaks that make perfect moon foregrounds when I can shoot up so they’re against the sky. And since these trees are much smaller than Half Dome, even vantage points that are less than a mile away lets me zoom all the way up to 1200mm.
Depth of field
With subjects so far away, it’s easy to forget about depth of field. But extreme focal lengths mean extremely limited depth of field. Depth of field isn’t a concern when Half Dome is your closest subject and it’s ten miles distant, but when your foreground is an oak tree on a hill that’s a mile away, you absolutely need to consider the hyperfocal distance.
For example, at 800mm and f/11 (with a full frame sensor), the hyperfocal distance is about a mile-and-a-quarter (look it up)—focus on the tree and the moon will be soft; focus on the moon and the tree is soft. But if you can focus on something that’s a little beyond the tree, at maybe one-and-a-half miles away, the image will be sharp from front to back.
When I’m not sure of my subject distance, I estimate as best I can, focus on a point beyond my foreground subject, then review my image magnified to check sharpness. If my focus point is in my frame, great, but I won’t hesitate to remove my camera from the tripod to focus on something behind me that’s the right distance (if you do this, to prevent refocusing, be sure you use back-button focus or are in manual focus mode when you click your shutter). It’s always best to get the focus sorted out before the moon arrives, a good reason to arrive at a new location well in advance of the moon’s arrival.
Location, location, location
As your focal length increases, your compositional margin for error shrinks. You can’t expect to go out on the evening of a full or crescent moon, look to the horizon, and automatically put the moon in the frame with your planned foreground subject.
Even when the moon and your foreground do align, once the moon appears, you’ll only have a few minutes before it rises out of your telephoto frame. This means extreme telephoto images that include both the moon and a foreground subject are only possible when the moon is right on the horizon, making proper timing essential.
Like the sun, the moon traces a different path across the sky each day. This path changes with each lunar cycle (from full, to new, back to full); whether the moon is full or crescent, a location that perfectly aligns the moon and foreground one month will probably be nowhere close the next.
Coordinating all the moving parts (moon phase and position, foreground subject alignment, subject distance, and rise/set timing) requires some planning and plotting. When I started photographing the moon, in the days before smart phones and apps that do the heavy lifting, I had to refer to tables to get the moon’s phase and position in the sky, manually plot the alignment, then apply the Pythagorean theorem to figure the timing of the moon’s arrival above (or disappearance behind) the terrain.
Today there are countless apps that will do this for you. Apps like The Photographer’s Ephemeris and Photo Pills (to name just two of many) are fantastic tools that give photographers access to moonrise/set data for any location on Earth. There is a bit of a learning curve (so don’t wait until the last minute to plan your shoot), but they’re infinitely easier than the old fashioned way.
Plan ahead
When the moon is a small accent to a wide scene, it’s often enough to just show up on its full or crescent day and shoot it somewhere above your subject. But because the margin of error is so small, planning for a big moon image is best done months in advance.
I identify big-moon candidate locations near home and on the road, and am always on the lookout for more. My criteria are a prominent subject that stands out against the sky, with a distant east or west facing vantage point. Over the years I’ve assembled a mental database ranging from hilltop trees near home, to landscape icons like Half Dome, Mt. Whitney, and Zabriskie Point (Death Valley).
With my subjects identified, I do my plotting (I still do it the old fashioned way) and mark my calendar for the day I want to be there. That often means waiting close to a year for the alignment I want. And if the weather or schedule doesn’t cooperate, my wait can be longer than that.
About this image
<Some may recognize this from the horizontal version of this moonrise I’ve shared for years; I just processed this vertical version.>
A few years ago I scheduled a spring Yosemite workshop to coincide with a 3% crescent moon that I’d computed would slip into the narrow gap between El Capitan and Half Dome about 45 minutes before sunrise on our final morning. Though we were all at the same place, photographing the same thing, the true magic was simply being there to witness a special moment that probably won’t repeat for decades.
The afternoon before this moonrise, I brought the group to this spot on Big Oak Flat Road so they could familiarize themselves with the location and plan their compositions. During this preview someone asked exactly where the moon would rise, and I confidently blurted that it will appear in the small notch separating El Capitan and Half Dome, between 5:15 and 5:20 a.m. I’d never actually photographed a moonrise from this spot, and as I spoke to the group I became painfully aware of how small the opening is—even the slightest error in my plotting could find the moon blocked by El Capitan or Half Dome.
Sunday morning we departed dark and early (4:45 a.m.), full of anticipation. We arrived at Half Dome View a little after 5:00, early enough to enable everyone to set up their tripods, frame their compositions, and prepare their exposure settings. Then we waited, all eyes locked on the notch.
And then there it was, the slightest point of moonlight edging into that small gap between Yosemite’s iconic monoliths. Phew. The rest of the morning was a blur of shutter clicks and exclamations of delight.
Before the shared euphoria abated, I suggested to everyone that they take a short break from photography and simply appreciate that they’re probably witnessing the most beautiful thing happening on Earth at this moment (a feeling every nature photographer should experience from time to time). It’s always exciting to witness a moment like this, a breathtaking convergence of Earth and sky that may not occur again exactly like this in my lifetime. It’s even more rewarding when the event isn’t an accident, that I’m experiencing it because of my own effort, and that I get to share the fruit of my perspiration with others who appreciate the magic just as much as I do.
Workshop Schedule || Purchase Prints
Big Moon


Where there’s smoke…
Posted on December 9, 2018

Sun and Smoke, Sierra Foothills, California
Sony a6300
Sony 100-400 GM
Sony 2x teleconverter
ISO 100
f/16
1/8 second
Humans, we have a problem
Earth’s climate is changing, and the smoking gun belongs to us. Sadly, in the United States policy lags insight and reason, and the world is suffering.
Climate change science is complex, with many moving parts that make it difficult to communicate to the general public. Climate change also represents a significant reset for some of the world’s most profitable corporations. Those colliding realities created a perfect storm for fostering the doubt and confusion that persists among people who don’t understand climate science and the principles that underpin it.
I’m not a scientist, but I do have enough science background (majors in astronomy and geology before ultimately earning my degree in economics) to trust the experts and respect the scientific method. I also spent 20 years doing technical communication in the tech industry (tech writing, training, and support) for companies large and small. So I know that the fundamentals of climate change don’t need to intimidate, and the more accessible they can be to the general public, the better off we’ll all be.
It’s personal
Recently it feels like I’ve been living on the climate change front lines. On each visit to Yosemite, more dead and dying trees stain forests that were green as recently as five years ago. And throughout the Sierra (among other places), thirsty evergreens, weakened by drought, are under siege by insects that now thrive in mountain winters that once froze them into submission. More dead trees means more fuel, making wildfires not just more frequent, but bigger and hotter.
Speaking of wildfires, for a week last month I couldn’t go outside without a mask thanks to smoke from the Camp Fire that annihilated Paradise (70 miles away). I have friends who evacuated from each of this November’s three major California wildfires (Camp, Hill, and Woolsey), and last December the Thomas Fire forced a two-week evacuation of Ojai, where my wife and I rent a small place (to be near the grandkids). Our cleanup from the Thomas fire took months, and we still find ash in the most unexpected places (and we were among the lucky who had a home to clean).
The debate is dead
Despite its inevitable (and long overdue) death, the climate change debate continues to stagger on like a mindless zombie. We used to have to listen to the skeptics claim that our climate wasn’t changing at all, so I guess hearing them acknowledge that okay-well-maybe-the-climate-is-changing-but-humans-aren’t-responsible can be considered progress.
Despite what you might read on social media or fringe websites, climate change alternative “explanations” like “natural variability” and “solar energy fluctuations” have been irrefutably debunked by rigorously gathered, thoroughly analyzed, and closely scrutinized data. (And don’t get me started on the whole “scientists motivated by grant money” conspiracy theory.)
Science we all can agree on
One thing that everyone does agree on is the existence of the greenhouse effect, which has been used for centuries to grow plants in otherwise hostile environments.
As you may already know, a greenhouse’s transparent exterior allows sunlight to penetrate and warm its interior. The heated interior radiates at longer wavelengths (infrared) that don’t escape as easily through the greenhouse’s ceiling and walls. That means more heat is added to a greenhouse than exits it, so the interior is warmer than the environment outside.
There’s something in the air
Perhaps the most common misperception about human induced climate change is that it’s driven by all the heat we create when we burn stuff. But that’s not what’s going on, not even close.
Our atmosphere behaves like a greenhouse, albeit with far more complexity. The sun bathes Earth with continuous electromagnetic radiation that includes infrared, visible light, and ultraviolet. Solar radiation not reflected back to space reaches Earth’s surface to heat water, land, and air. Some of this heat makes it back to space, but much is absorbed by molecules in Earth’s atmosphere, forming a virtual blanket that makes Earth warmer than it would be without an atmosphere. In a word, inhabitable.
Because a molecule’s ability to absorb heat depends on its structure, some molecules absorb heat better than others. The two most common molecules in Earth’s atmosphere, nitrogen (N2: two nitrogen atoms) and oxygen (O2: two oxygen atoms), are bound so tightly that they don’t absorb heat. Our atmospheric blanket relies on other molecules to absorb heat: the greenhouse gases.
Also not open for debate is that Earth warms when greenhouse gases in the atmosphere rise, and cools when they fall. The rise and fall of greenhouse gases has been happening for as long as Earth has had an atmosphere. So our climate problem isn’t that our atmosphere contains greenhouse gases, it’s that human activity changes our atmosphere’s natural balance of greenhouse gases.
Earth’s most prevalent greenhouse gas is water vapor. But water vapor responds quickly to temperature changes, leaving the atmosphere relatively fast as rain or snow, while other greenhouse gases hold their heat far longer.
The two most problematic greenhouse gases are carbon dioxide (CO2: one carbon atom bonded with two oxygen atoms) and methane (CH4: one carbon atom bonded with four hydrogen atoms). The common denominator in these “problem” gases is carbon. (There are other, non-carbon-based, greenhouse gases, but for simplicity I’m focusing on the most significant ones.)
Carbon exists in many forms: as a solo act like graphite and diamond, and in collaboration with other elements to form more complex molecules, like carbon dioxide and methane. When it’s not floating around the atmosphere as a greenhouse gas, carbon in its many forms is sequestered in a variety of natural reservoirs called a “carbon sink,” where it does nothing to warm the planet.
Oceans are Earth’s largest carbon sink. And since carbon is the fundamental building block of life on Earth, all living organisms, from plants to plankton to people, are carbon sinks as well. The carbon necessary to form greenhouse gases has always fluctuated naturally between the atmosphere and natural sinks like oceans and plants.
For example, a growing tree absorbs carbon dioxide from the atmosphere, keeping the carbon and expelling oxygen (another simplification of a very complex process)—a process that stops when the tree dies. As the dead tree decomposes, some of its carbon is returned to the atmosphere as methane, but much of it returns to the land where it is eventually buried beneath sediments. Over tens or hundreds of millions of years, some of that sequestered carbon is transformed by pressure and heat to become coal.
Another important example is oil. For billions of years, Earth’s oceans have been host to simple-but-nevertheless-carbon-based organisms like algae and plankton. When these organisms die they drop to the ocean floor, where they’re eventually buried beneath sediment and other dead organisms. Millions of years of pressure and heat transforms these ancient deposits into…: oil.
Coal and oil (hydrocarbons), as significant long-term carbon sinks, were quite content to lounge in comfortable anonymity as continents drifted, mountains lifted and eroded, and glaciers advanced and retreated. Through all this slow motion activity on its surface, Earth’s temperatures ebbed and flowed and life evolved accordingly.
Enter humans. We have evolved, migrated, and built civilizations based on a relatively stable climate. And since the discovery of fire we humans have burned plants for warmth and food preparation. Burning organic material creates carbon dioxide, thereby releasing sequestered carbon into the atmosphere. Who knew that such a significant advance was the first crack in the climate-change Pandora’s Box?
For thousands of years the demand for fuel was met simply by harvesting dead plants strewn about on the ground and the reintroduction of carbon to the atmosphere was minimal. But as populations expanded and technology advanced, so did humans’ thirst for fuel to burn.
We nearly killed off the whales for their oil before someone figured out that those ancient, subterranean metamorphosed dead plants burn really nicely. With an ample supply of coal and oil and a seemingly boundless opportunity for profit, coal and oil soon became the driving force in the world’s economy. Suddenly, hundreds of millions of years worth of sequestered carbon was being reintroduced to our atmosphere as fast as it could be produced—with a corresponding acceleration in greenhouse gases (remember, when we burn hydrocarbons, we create carbon dioxide).
Compounding the fossil-fuel-as-energy problem is the extreme deforestation taking place throughout the world. Not only does burning millions of forest and jungle acres each year instantly reintroduce sequestered carbon to the atmosphere, it destroys a significant sink for present and future carbon.
Scientists have many ways to confirm humans’ climate change culpability. The most direct is probably the undeniable data showing that for millennia carbon dioxide in Earth’s atmosphere hovered rather steadily around 280 parts per million (ppm). Then, corresponding to the onset of the Industrial Revolution in the late 18th century, atmospheric carbon dioxide has risen steadily and today sits somewhere north of 400 ppm, with a bullet.
Humans don’t get a pass on atmospheric methane either. While not nearly as abundant in Earth’s atmosphere as carbon dioxide, methane is an even more powerful greenhouse gas, trapping about 30 times more heat than its more plentiful cousin. Methane is liberated to the atmosphere by a variety of human activities, from the decomposition of waste (sewage and landfill) to agricultural practices that include rice cultivation and bovine digestive exhaust (yes, that would be cow farts).
While the methane cycle is less completely understood than the carbon dioxide cycle, the increase of atmospheric methane also correlates to fossil fuel consumption. Of particular concern (and debate) is the cause of the steeper methane increase since the mid-2000s. Stay tuned while scientists work on that….
Balancing act
For humans, the most essential component of Earth’s habitability is the precarious balance between water’s three primary states: gas (water vapor), ice, and liquid. Since the dawn of time, water’s varied states have engaged in a complex, self-correcting choreography of land, sea, and air inputs—tweak one climate variable here, and another one over there compensates.
Earth’s climate remains relatively stable until the equilibrium is upset by external input like solar energy change, volcanic eruption, or (heaven forbid) a visit from a rogue asteroid. Unfortunately, humans incremented the list of climate catalysts by one with the onset of the Industrial Revolution, and our thirst for fossil fuels.
As we’re learning firsthand in realtime, even the smallest geospheric tweak can initiate a self-reinforcing chain reaction with potentially catastrophic consequences for humanity’s long-term wellbeing. For example, a warmer planet means a warmer ocean and less ice, which means more liquid water and water vapor. Adding carbon dioxide to water vapor kicks off a feedback loop that magnifies atmospheric heat: More carbon dioxide raises the temperature of the air—>warmer air holds more water vapor—>more water vapor warms the air more—>and so on.
But that’s just the beginning. More liquid water swallows coastlines; increased water vapor means more clouds, precipitation, and warmer temperatures (remember, water vapor is a greenhouse gas). Wind patterns and ocean currents shift, changing global weather patterns. Oh yeah, and ice’s extreme albedo (reflectivity) bounces solar energy back to space, so shrinking our icecaps and glaciers means less solar energy returned to space even more solar energy to warm our atmosphere, which only compounds the problems.
Comparing direct measurements of current conditions to data inferred from tree rings, ice and sediment cores, and many other proven methods, makes it clear that human activity has indeed upset the climate balance: our planet is warming. What we’re still working on is how much we’ve upset it (so far), what’s coming, and where the tipping point is (or whether the tipping point is already in our rearview mirror).
We do know that we’re already experiencing the effects of these changes, though it’s impossible to pinpoint a single hurricane, fire, or flood and say this one wouldn’t have happened without climate change. And contrary to the belief of many, everyone will not be warmer. Some places are getting warmer, others are getting cooler; some are wetter, others are drier. The frequency and intensity of storms is changing, growing seasons are changing, animal habitats are shifting or shrinking, and the list goes on….
We won’t fix the problem by simply adjusting the thermostat, building dikes and levees, and raking forests. Until we actually reduce greenhouse gases in our atmosphere, things will get worse faster than we can adjust. But the first step to fixing a problem is acknowledging we have one.
About this image
The Camp Fire had been burning for ten days, devouring Paradise and filling the air in Sacramento with brown smoke so thick that at times not only could we not see the sun, we couldn’t see the end of the block. But on this afternoon, when an orange ball of sun burned through the smoke I donned a mask, grabbed my camera bag, and headed for the hills.
I have a collection of go-to foothill oak trees for sun and moonsets, but most of these trees are too close to my shooting position for the extreme telephoto image I had in mind. Too close because at this kind of focal length, the hyperfocal distance is over a mile. So I made my way to a quiet country road near Plymouth where I thought the trees might just be distant enough to work. But I’m less familiar with this location than many of my others, so I didn’t know exactly how the trees and sun would align. Turning onto the road, I drove slowly, glancing at the sun and trees until they lined up. Because there wasn’t a lot of room to park on either side, I was pleased that the shoulder at the location that worked best was just wide enough for my car.
Envisioning a maximum telephoto shot, I added my Sony 2X teleconverter to my Sony 100-400 GM lens. While my plan was to use my 1.5-crop Sony a6300, when I arrived the sun was high enough that that combination provided too much magnification, so I started with my full frame Sony a7RIII. But soon as the sun dropped to tree level I switched to the a6300 and zoomed as tight as possible.
When I started the sun was still bright enough that capturing its color made the trees complete silhouettes, with no detail or color in the foreground. But as the setting sun sank into increasingly thick smoke, it became redder and redder and my exposure became easier. It always surprises me how fast the sun and moon move relative to the nearby horizon, so found myself running around to different positions to get the right sun and tree juxtaposition as the sun fell. The smoke near the horizon was so thick that it swallowed the sun before it actually set.
Later I plotted my location and the sun’s position on a map and realized that I was pointing right at San Francisco, about 100 miles away, with a large swath of the Bay Area in between. Then I thought about this air that was thick enough to completely obscure the sun, and the millions of people who had been breathing that air for weeks.
I’d be lying if I said I don’t like this image—it’s exactly what I was going for. But I’d be very happy if I never got another opportunity to photograph something like this.
Learn more
- https://climate.nasa.gov/causes/
- https://grist.org/article/we-broke-down-what-climate-change-will-do-region-by-region/
- https://www.ncdc.noaa.gov/monitoring-references/faq/greenhouse-gases.php
Workshop Schedule || Purchase Prints
Solar Energy
Click an image for a closer look and slide show. Refresh the window to reorder the display.


Waiting for the Stars
Posted on December 2, 2018
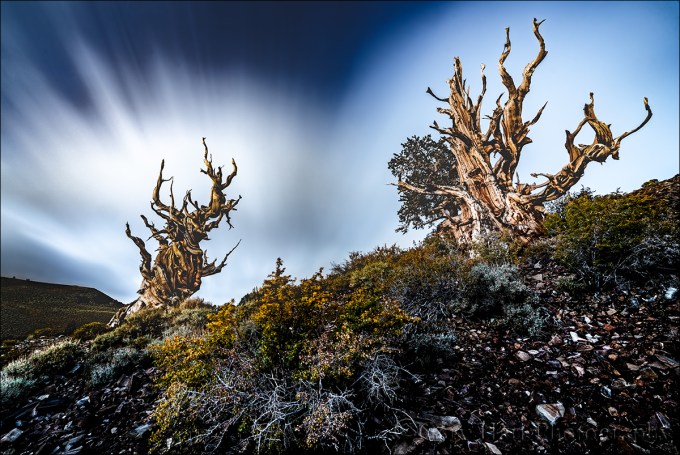
Nightfall, Schulman Grove, White Mountains, California
Sony a7R III
Sony 16-35 f/2.8 GM
Breakthrough 6-stop ND filter
30 seconds
F/11
ISO 400
The bristlecone pines are among the oldest living organisms on earth. Some of these trees pre-date the Roman Empire by 2000 years—and they look every year of their age. The more harsh a bristlecone’s environment, the longer it lives.
As with the giant redwoods, it’s humbling to be among the bristlecone pines. What they lack in bulk they make up for in character, with their corkscrew branches, gnarled trunks, and intricate texture that make them fascinating subjects from any angle or distance, with any lens from wide to macro.
The plan this evening was to photograph these trees until sunset, then wait until dark and photograph them beneath the Milky Way. Despite an afternoon that included rain, fog, and lots of overcast, my hardy Eastern Sierra workshop group bundled up and toughed it out with the hope we’d get lucky. Occasionally patches of clear sky would tease us, only to vanish as quickly as it appeared.
Not getting what you came for is no reason to put the camera away, and I encouraged everyone to keep shooting while we waited. Because I was preparing everyone for a potential night shoot, I just found a composition I liked, set up my tripod in the fading light, and clicked a frame every couple of minutes.
When the darkness was nearly complete and there was still no sign of the Milky Way, we decided it head back down to the cars. I like to be the last one down the trail when we come out of the bristlecones in the dark, so I shot for a few more minutes while the rest of the group packed up. This image is my final frame of the evening. With no moon and a mostly cloudy sky, it was too dark to effectively compose and focus, so I stuck with the composition I’d started with when it was brighter. I used a 30-second exposure at f/11 and ISO 400 to capture more light than my eyes saw. That long exposure also really conveyed the motion in the clouds that had been whipping around overhead all evening. The rather ethereal quality I captured here is a perfect example of why twilight is an underrated time for photography.
Eastern Sierra Photo Workshops
Workshop Schedule || Purchase Prints
A Few Bristlecones


Fresh Takes
Posted on November 25, 2018

Half Dome Autumn Reflection, Sentinel Bridge, Yosemite
Sony a7RIII
Sony 24-105 f/4 G
1/8 second
F/11
ISO 100
I love the iconic captures as much as the next person—scenes like Yosemite’s Horsetail Fall in February, Upper Antelope Canyon’s famous light shaft, or McWay Fall’s tumble into the Pacific, are both gorgeous and a thrill to photograph. But standing elbow-to-elbow with hundreds (or thousands!) of photographers, each recording virtually identical images that are already duplicates of thousands of prior images, while nice, doesn’t necessarily stimulate my creative juices.
Iconic for a Reason
Once upon a time photographing even the most popular scenes in solitude wasn’t difficult. The tourists who overwhelm the best known views during the comfortable times of day would vacate just when the photography started getting good. But with the proliferation of digital photographers and easy exchange of information in our connected world, there aren’t many photography secrets anymore, and the opportunities to make unique images have become more challenging than ever. And if you do capture something special, posting it online is sure to immediately draw photographers like cats to a can opener.
Given that Yosemite Valley’s eight square miles attracts over five million visitors each year, you’d think it would be impossible to find unique perspectives. But on even the busiest summer day, rising for sunrise will give you at least a couple of peaceful hours. And of course in Yosemite’s backcountry, while relatively crowded by wilderness standards, solitude is always just a short detour away.
But the iconic spots earned their recognition for a reason, and first-time (or infrequent) Yosemite visitors want to see them too. For my workshops, in addition to sharing with my students a variety of my favorite more hidden Yosemite spots, I’ve learned to take them to the Yosemite locations they’ve come to know from a lifetime time of viewing Yosemite pictures.
The first visits to vistas like Glacier Point, Tunnel View, Valley View, and Sentinel Bridge still inspire the awe they always have. It’s easy for photographers, overcome by the majesty before them, to fall back on their memory of others’ images and settle for their own version of the same thing. Rather than suggest that my students avoid doing this (for many, these images are the very reason they signed up in the first place), I suggest that they start with the iconic shots they know, but don’t make it their goal. Rather, I encourage them to use those familiar imagers as a starting point for a fresh take that’s more uniquely theirs. I won’t pretend that this approach always, or even frequently, results in something that no one has ever captured, but I think everyone’s photography benefits when that is the goal—not just the images captured today, but the ability to see and execute better images tomorrow as well.
In this year’s Yosemite Fall Color and Reflections workshop we spent most of our time bouncing from one beautiful scene to the next. Autumn, with its colorful leaves and ubiquitous reflections, provides more opportunities for unique captures than any other season, and the color this years was fantastic. But that didn’t prevent us from checking off the icons.
Speaking of icons, my rule of thumb in Yosemite is El Capitan in the morning and Half Dome in the afternoon. But after breakfast one morning, one of the cars said they wanted to go check out Sentinel Bridge, one of the best Half Dome reflections in the park. Normally I resist photographing Half Dome in the morning because its face doesn’t get direct sunlight until late afternoon, but on the way to breakfast I’d noticed the cottonwoods upstream were beautifully backlit and I thought it might be worth checking out. So I scrapped my original plans and we detoured back to the bridge (hey, never let it be said that I’m not flexible).
I’m so glad I listened to the votes from the other car that morning because we ended up with one of the workshop’s highlight shoots. Half Dome was in full shade, sky was a bland blue mixed with a few thin clouds, but the backlit trees were off the charts. We all started with the wider, more conventional views, capturing Half Dome and the trees doubled by their reflection. But that doesn’t take long, and soon I was encouraging everyone to keep working it.
When working out a composition, I always try to figure out where the scene’s action is. In this scene the highlight for me was the upstream trees and their reflection. Wanting as little as possible of the fairly boring sky, I went with a horizontal composition. I also thought a horizontal composition would be best for framing the cottonwoods and reflection with the shaded trees on both sides of the river. To leave no ambiguity about what this image is about, I removed the actual Half Dome entirely, leaving its reflection for context only.
With my Sony 24-105 f/4 G on my Sony a7RIII, I zoomed to a composition that put the “action” front and center, making sure to get all of Half Dome’s reflection but minimal sky, balancing the backlit trees and their reflection toward the top of the from, and framing everything with the darker trees on the edges. Depth of field and motion weren’t concern, so I went with my default ISO 100 and f/11, focused, and clicked.
As anyone who has been in one of my workshops knows, the first click is a draft, an image to review and refine. Evaluating the picture on my LCD, I ran my eyes around my frame and made a few micro adjustments to ensure a tight composition without cutting off the tops of the sunlit tree in the top center, the shaded trunks on the left and right, and the cloud above (below?) Half Dome.
Judging from the variety of images shared in the image reviews, this shoot was a highlight for everyone else too. Some found their own takes on this upstream scene, while a few ventured across the road to capture a completely different scene looking downstream. Not a bad result for a location that wasn’t even on my radar for that morning.
Yosemite Photo Workshops
Workshop Schedule || Purchase Prints
Fresh Takes on Yosemite’s Icons
Click an image for a closer look and slide show. Refresh the window to reorder the display.


It’s the People
Posted on November 22, 2018

Floating Color, El Capitan, Yosemite
The ability to earn my living visiting the most beautiful places in the world is plenty of reason for gratitude, but that’s not what I’m thinking about today. Today I’m thinking about all of the people my workshops have connected me with, and all the laughter and learning they have added to my life.
I’d be lying if I said I wasn’t looking forward to the people part of photo workshops when I started, but I had no idea how much of the joy I get from leading photo workshops comes from the people. Over the last dozen or so years, my workshop students have taught me about their countries, professions, hobbies, religions,… I could go on. I’ve watched workshop participants from virtually every continent on Earth (no penguins yet), with wildly diverse values and world views, blend seamlessly and enthusiastically. Observing this, I’ve learned that despite the exterior tensions that seem to divide our world today, humans have far more in common than we imagine.
Like most people, I have my share of strong opinions about the way things in the world should be. But the people I’ve met in my workshops have shown me that a person’s “goodness” is not determined by his or her political views or any other category that we so conveniently like to slot people into. I’ve seen firsthand that no political affiliation, religious preference, gender, sexual orientation, or ethnicity has a monopoly on warmth, passion, generosity, empathy, patience, or humor. Even more encouraging, I don’t think these workshop epiphanies are mine alone. Workshop after workshop, I get to observe a dozen of the most diverse people imaginable not just set aside differences and work side-by-side, but actually form friendships that transcend conventional boundaries, deep friendships that often continue long after the workshop ends.
I went into the photo workshop business fully prepared to teach others, but completely unprepared for the learning others would offer me.
About this image
With the fall color for this year’s Yosemite Fall Color and Reflections workshop peaking, I had to work overtime to balance the need for quality photo time at each stop with my desire to get my group to all the photo spots. On the workshop’s final day we finally made it to Cathedral Beach, a great up-close view of El Capitan that’s always good for reflections in the fall.
With El Capitan in full sunlight, the river in shade, and nothing stirring the water, all the ingredients were in place for a nice reflection. We’d been photographing reflections all week, but I didn’t get the sense that anyone was tiring of them. Drifting cottonwood leaves added to the beauty and the group quickly spread along a hundred yards or so in search of a composition to make their own.
Often shooting a scene like this I start wide, but this afternoon I started with my Sony 100-400 GM lens, playing with close-ups of the leaves and reflection. After wringing every possibility from this approach, I went to the other extreme and switched to my Sony 12-24 G lens. A wide composition needs a strong foreground, usually the closer the better, so I dropped down to river level and started working on variations of this scene.
While the water was calm, I was close enough to the leaves that even the slightest ripples risked motion blur, so to increase my shutter speed I dialed my Sony a7RIII to ISO 400. At 12mm I have a tremendous amount of depth of field, but the leaves were so close that I decided to play it safe and use f/16. After a check check of my hyperfocal app, I focused on a leaf about 18 inches from my camera knowing that would give me sharpness from the closest leave all the way out to El Capitan.
Yosemite Fall Color and Reflections Photo Workshop
Workshop Schedule || Purchase Prints
An El Capitan Gallery
Click an image for a closer look and slide show. Refresh the window to reorder the display.


Taking Yosemite for Granite (sorry)
Posted on November 18, 2018
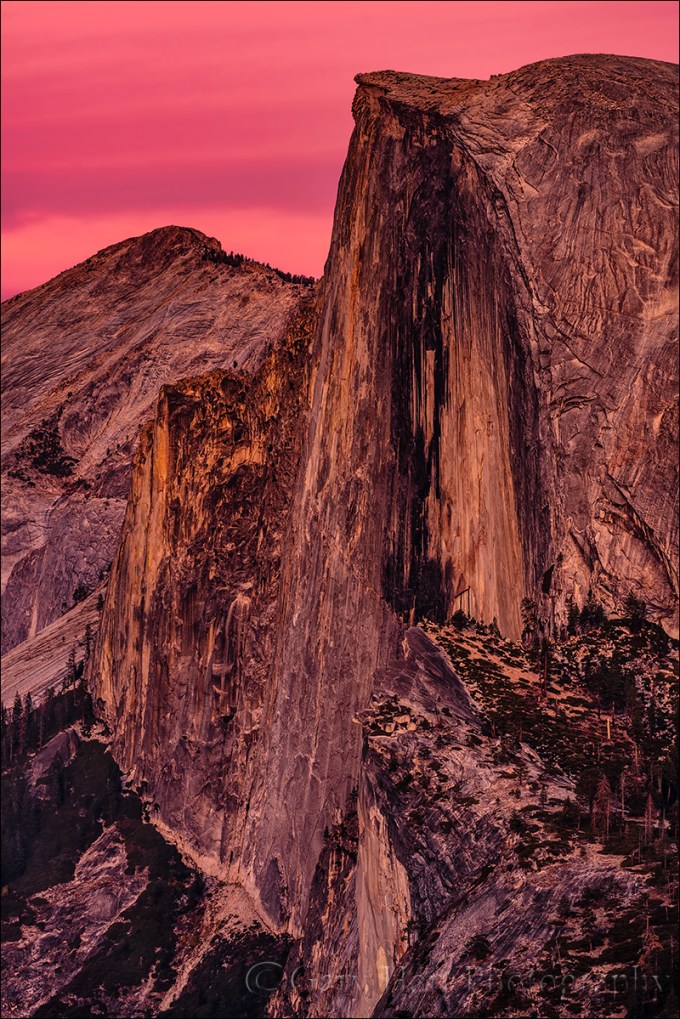
Face to Face, Half Dome from Glacier Point, Yosemite
Sony a7RIII
Sony 100-400 GM
ISO 100
f/11
1/6 second
Yosemite, like most of the Sierra Nevada, was carved from an intrusive igneous rock (subterranean magma that cooled without reaching the surface). This subterranean magma cooled slowly enough for its primary constituents, quartz and feldspar, plus mica and other minerals, to form crystals that fuse into an extremely hard matrix: granite. The granite waited patiently in the dark while overhead oceans advanced and receded, leaving thousands of feet of new sediment behind.
Beginning tens of millions of years ago, a slow-motion collision of tectonic plates uplifted the granite and its overlying sedimentary layers. As the ancient mountain range rose, erosion accelerated the demise of the sedimentary layers, eventually exposing the much harder granite. As the uplift continued, rivers moved faster, carving V-shaped river valleys that included the predecessor of what we now know as Yosemite Valley.
Then came the glaciers, an irresistible force meeting granite’s immovable object. Instead of breaking apart and collapsing as a lesser rock might, Yosemite’s granite stood tall as the glaciers cleared out the ancient Yosemite Valley, carving it into the U-shaped feature we know today—a flat floor bounded by vertical cliffs.
Granite’s hardness also affects the way it breaks up when exposed to the elements of weathering. Instead of crumbling under wind and rain like softer rock, or cleaving along aligned planes of weakness, granite retains its shape until fracturing along microscopic cracks caused by external stress such as pressure or weathering. These cracks allow water to seep into the rock. Of course you remember from high school science (right?) that unlike most substances, water expands when it freezes. This expansion pushes open the cracks, allowing even more water to seep in after the ice melts. This crack/seep/freeze/expand cycle continues until the rock fails, splitting along the expanded crack. In this process large chunks of granite are shed, often quite suddenly, while the remaining granite stands tall.
Granite’s unique qualities are on exquisite display in Yosemite Valley, where streams bursting with snowmelt tumble over shear granite walls, and granite monoliths tower 3,000 feet above the Merced River. Yosemite and Bridalveil Falls are Yosemite’s most recognized waterfalls, but look up on a spring day and you might count a dozen or more. The waterfalls dominate in spring, but Yosemite’s monoliths endure year-round, drawing visitors from around the world in every season. El Capitan, the largest chunk of granite in the world, is a climbers’ mecca, and few mountains have a more recognizable profile than Half Dome.
Half Dome is a bit of a misnomer, but one look at it the name is easy to visualize a rounded dome that lost a full half of its mass to a passing glacier. The reality is that Half Dome’s current shape is fairly close to the rock that was exposed by millions of years of erosion. While Yosemite’s glaciers filled most of Yosemite Valley, Half Dome was tall enough to protrude from the ice sheet and avoid direct contact. Half Dome’s shear face resulted from a single fracture that separated a large slice of granite to expose the flat granite face we all recognize.
After a nice day photographing fall color and reflections El Capitan’s shadow, we finished our day at Glacier Point for a face-to-face view Half Dome. The gray stratus blanket that had permitted a full day of sweet photography in diffuse the sunlight was about to become a liability for anyone longing for a colorful sunset.
Half Dome gets light all the way up to, and in fact even a couple of minutes beyond, the “official” (flat horizon) sunset. But because the view of Half Dome faces east, and the view to the west is obscured by terrain, there’s no way to know whether the horizon is clear in the direction of the setting sun. Even on cloudy days like this, my rule in Yosemite is to never give up on sunset until at least five minutes the after the official sunset time has passed. When a couple of people in the group started rumbling about heading back to the cars, I issued one of my favorite Yosemite proclamations to all within earshot: Never try to predict the conditions in five minutes based on the conditions now. I knew the odds were long for capturing anything more than darkening shades of gray fading to black, but without cameras they’d be zero.
I have no idea whether they truly believed me, or simply stayed put to humor me, but either way, I started to look pretty smart about five minutes before sunset when we spotted a faint glow on Half Dome. I held my breath as the sun slipped into a clear slot of unknown size on the horizon behind us to paint Half Dome with warm light. I hadn’t planned to shoot that evening, but as the light intensified I was glad I’d dragged my bag around anyway. As I quickly set up my tripod and extracted my camera, I urged everyone to keep shooting because there was no guarantee that this would last—just as I’ve witnessed many of these last minute miracles in Yosemite, I’ve also seen euphoria dashed in a heartbeat when the sun was suddenly snuffed right at the climactic moment (Horsetail Fall is notorious for this). But this evening the light held strong, warming to a golden crescendo, then fading to pink that intensified to a rich red that colored the sky from horizon to horizon.
The light tones of quartz and feldspar, plus its crystalline nature, make granite especially reflective. So while Yosemite isn’t especially known for its sunsets, when they do get red like this, granite’s inherent reflectivity causes the entire landscape to throb with a crimson glow. It’s one of my favorite phenomena in nature.
I ended up photographing the entire sunset with my Sony 100-400 GM lens on my Sony a7RIII. Not because I didn’t have a wealth of wide angle shots to choose from (I did!), but because I was working with my group and the telephoto compositions were simpler. Simpler in the sense that (for me at least) a wide shot requires a bit more strategic planning to first identify the frame’s foreground, middle-ground, and background elements, then position myself to give them a coherent relationship. A telephoto composition, on the other hand, has always felt more intuitive than strategic (though each generally requires elements of strategy and intuition), so I’m usually able to put my camera and telephoto to my eye, then move and zoom until something feels right.
With so many views at Glacier Point, the group had scattered a little before sunset, so I was only with about half of them for the good stuff at the end. Back at the cars I checked in with those who had gone elsewhere and found that while most had photographed it, a couple had watched the show from the parking lot. Sigh.
Yosemite Photo Workshops
Workshop Schedule || Purchase Prints
Half Dome Near and Far


The Sky’s the Limit
Posted on November 11, 2018

Look to the Sky, Milky Way and Mauna Kea Gemini Observatory, Hawaii
Sony a7S II
Sigma 20mm f/1.4 Art
20 seconds
F/1.4
ISO 6400
I sometimes rail against camera clubs for their rule-bound creative constipation (yes, I know there are exceptions). On Hawaii in September I was reminded that I’m not immune to the same malady.
Because Nature doesn’t have a monopoly on beauty, earlier in my photographic life I was somewhat less discriminating with my choice of subjects, photographing anything outdoors that I found beautiful. Many of my bridge and skyline images were on (or atop) my personal bestseller list, but as my career evolved, I found myself resenting the intrusion humankind on nature and less inclined to include it—unconscious choices that evolved into my present style, photographing a world untouched by humans. The mere presence of a building, fence, path, or human is now enough for me to put my camera down. I’ve never felt it’s wrong to photograph manmade subjects—in fact I enjoy others’ photos of these things—it’s just that I’m not drawn to them as a photographer.
But this year’s Big Island workshop forced me to reevaluate my bias. As you might already know, not only do I love night photography in general, and Milky Way photography in particular, I’ve also been an astronomy enthusiast since childhood. The Big Island trip is one I’ve always especially looked forward to, partly for the opportunity to photograph the Milky Way above Kilauea. But (unless you’ve been living under a rock) you probably know that early this year Kilauea underwent a spectacular upheaval that spewed lava, altered the Hawaii landscape, and ultimately terminated the eruption that had been underway since 1983, much as the grand finale marks the end of the Independence Day fireworks show.
Pele’s festivities started in early May with a 6.9 magnitude earthquake that kicked off daily 5+ magnitude earthquakes, a sequence lasting for three months and precipitating an incremental collapse of the summit caldera. When the ash finally settled, there was no more glowing lava at the summit (or anywhere else on the Big Island) to accent the Milky Way.
Losing my Milky Way vista was an infinitesimal loss compared to the losses suffered by others on Hawaii, but I still faced a challenge to replace it with something that would satisfy a group of photographers expecting a spectacular night shoot. Enter Mauna Kea. I’d always been reluctant to take a group here because the road is rough and steep, and the air at (nearly) 14,000 feet is very thin (and cold!). I’d been up there before, but on this year’s pre-workshop reconnaissance mission another visit to Mauna Kea’s summit encouraged me enough to offer the option to the group. After explaining my concerns in the workshop orientation, I asked how many wanted to give the summit a shot and the enthusiasm was unanimous.
We summited in late afternoon with little drama (though the check engine light in my rental car came on about halfway up the mountain) and the group quickly scattered to take in the incredible view that included Maui, a blanket of gauzy cloud tops, and the glistening Pacific. While the rest of the group photographed a beautiful sunset, my focus was on two people having difficulty with the altitude—they ended up retreating to a spot about 6000 feet down the mountain and enjoyed a beautiful shoot of their own.
After sunset we simply drank in the view waiting for the stars to pop out. Fortunately I’d told the group before leaving to pack warm clothes (because I knew the Mauna Kea summit was a possibility), but next year I’ll tell them to pack for winter because even with jackets and gloves, it was cold up there. But when the Milky Way came out the cold somehow became a bit more tolerable.
Awestruck by the Milky Way’s shimmering ribbon, I scanned the surroundings for a subject to put with it. In the rocky, treeless terrain the obvious choice was the Gemini Observatory right in front of me. Similarly awed to be in the shadow of this impressive instrument, I rationalized that it would be okay to photograph a manmade something whose purpose was probing the celestial mysteries that had mesmerized me for most of my life. I’m so happy bent my rule.
I’ve photographed the Milky Way many times from the bottom of the Grand Canyon, which is about as dark as the sky can get, but this night I learned firsthand why they put observatories on mountain peaks. Not only is the sky dark, the air atop Mauna Kea is both pristine and unfettered by atmosphere (well, at least by much atmosphere). The sky’s clarity was made obvious when I studied my images and found virtually every one etched by at least one meteor. The image I share here captured five (!) meteors in a single 20 second exposure. Because none share a common point of origin, they can’t be the progeny of an unheralded meteor shower—it seems meteors just show up better in the clear, dark air at 14,000 feet.
We descended the mountain equal parts frigid and elated. I can’t wait to reprise this shoot next year and have promised myself that both my group and I will be much more prepared for the cold. I don’t think this success will much change my desire to photograph only natural subjects, but I will approach scenes with my mind a bit more open.
Hawaii Big Island Photo Workshop
Human Influence (just to prove I can do it)


That Didn’t Suck
Posted on November 5, 2018
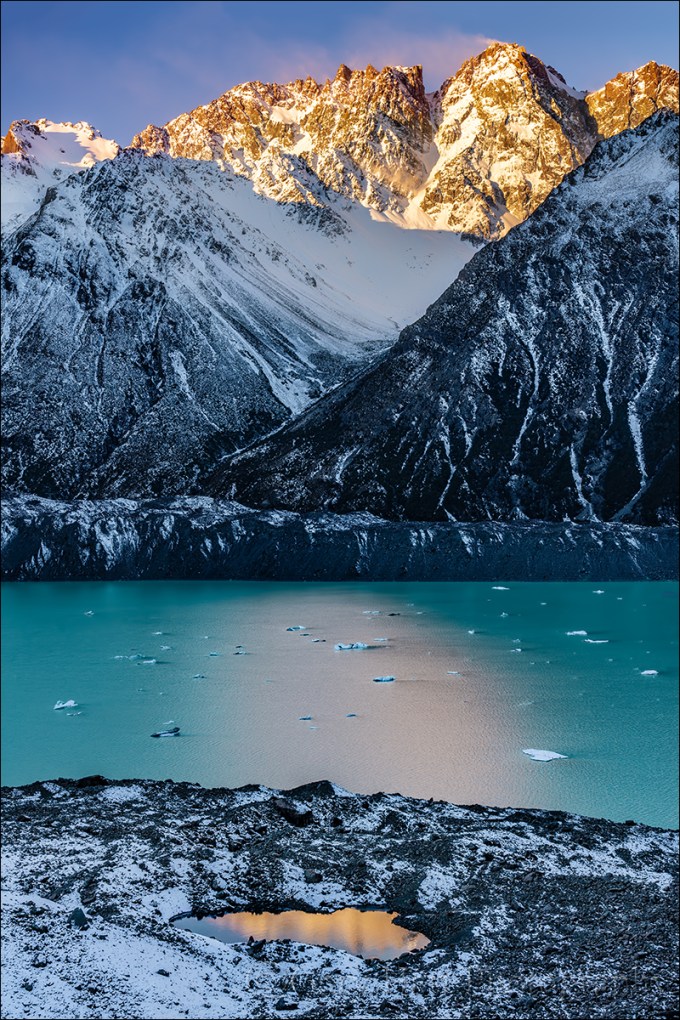
Reflection on the Rocks, Nun’s Veil and Tasman Lake, New Zealand
Sony a7RIII
Sony 24-105 f/4 G
1/13 second
F/11
ISO 100
One evening in New Zealand
I get to a lot of locations and see so many spectacular sights that they sometimes run together. But every once in a while I experience a shoot I know I’ll never forget.
One of (many) highlights of the New Zealand workshop is the hike to Tasman Lake in Aoraki / Mt. Cook National Park. The reward for this short, steep (335 stairs) hike is a 270 degree view that includes 12,000 foot Mt. Cook, icebergs drifting atop turquoise Tasman Lake, Nun’s Veil (pictured here), and the Tasman Valley.
At the trailhead most of the workshop group decided the trail was too icy and opted for a beautiful but less treacherous view a couple miles back down the road. As Don led them to the alternate spot, I guided four members who wanted to brave the icy trail. It turns out the ice wasn’t a big problem, and in fact was completely gone from the trail within a couple hundred yards, and we made it to the vista short of breath but otherwise unscathed.
I’d been up here a few times, but it was the first time for the others, so it was fun to watch their reaction as they summited. Because the trail ends here and the viewing platform is fairly compact, we were able to work in close proximity all evening—having others to share our awe with enhanced the experience even more.
The Tasman Lake view is one of those vistas that’s far too broad to capture with a single frame; any attempt to do so shrinks every feature to the point of insignificance. Opting to divide and conquer by identifying and isolating the scene’s most compelling features, my eye instantly landed on the reflection of Nun’s Veil’s in a small pool down the slope. I soon hopped the vista’s small retaining wall to better center the reflection in the pool, then spent much of the evening here working on compositions that included the reflection. My clicking intensified as light on Nun’s Veil warmed, coloring the wind-whipped snow encircling the peak.
As if all that wasn’t enough, a few minutes after the light left Nun’s Veil, a full moon appeared just to the right of the peak. Despite the advancing night, we were able to photograph the moonrise for a few minutes before the scene became too dark to capture detail in the foreground and moon. But even facing a walk down the icy trail in the dark, we lingered in the moonlight just to marvel at the majesty. As we donned our headlamps for the walk back down the trail, I heard one of the members of the group call my name. “Gary,” long pause. “That didn’t suck.”
New Zealand Photo Workshop
Like reflections? Here’s an article on reflections I wrote a few years ago.
Reflections
Who doesn’t love the soothing tranquility of a good reflection? And like a metaphor in writing, a reflection is an indirect representation that can be more powerful than its literal double by virtue of its ability to engage the brain in different ways than we’re accustomed. Rather than processing the scene directly, we first must mentally reassemble the reflection’s reverse world, and in the process perhaps see the scene a little differently.
Reflections are a powerful photographic tool as well. Water’s universal familiarity makes it an ideal subject for photographers frustrated by their camera’s static representation of our dynamic world. Just as we freeze or blur a waterfall to express turbulent motion, we can include a reflection to convey serenity.
Water reflections come in many forms, from a mirror-sharp reverse of a mountain atop a still pool, to an abstract shuffle of color and texture on a choppy lake. Without getting too far into the physics of light, it’s important to understand that every object we see and photograph (that doesn’t generate its own light) comes to us courtesy of reflected light.
Mirror reflection recipe
The ingredients for a crisp, mirror reflection like the El Capitan image at the top of the page is pretty simple: still water, a reflection subject that’s much brighter than the water’s surface (the greater the contrast the better), and a view angle that matches the angle from the water’s surface to the reflection subject. (The best reflections are usually found on shaded water because there are fewer photons to compete with the photons bouncing from the reflected subject.)
The El Capitan reflection above was a perfect confluence of reflection conditions. Clean, still air, dense shade on the river, and El Capitan’s fully exposed, reflective granite, make early morning the best time for El Capitan reflections. On this April morning I made my way down to the Merced River hoping to photograph the first light on El Capitan reflected in the Merced River. Finding my route down to the river blocked by spring flooding, I was forced to improvise. The morning air was clean and calm, and the ephemeral lake was mirror-still.
Circling the flooded meadow, I found a gap in the trees that opened onto the most complete view and reflection of El Capitan and the Three Brothers I’ve ever seen. So complete in fact, that I couldn’t include it all with my 16-35mm lens at its widest focal length. Fortunately, I was able to borrow a Canon 11-24 lens and Metabones IV adapter from a friend (thanks, Curt!), just wide enough to fit the entire scene at the lens’s shortest focal length.
Playing the angles

Understanding that reflected photons leave the water’s surface at the same angle at which they arrive—imagine the way a tennis ball bounces (if it weren’t affected by spin, wind resistance, or gravity)—helps us get in position for the reflection we want.
A few years ago I found myself atop Sentinel Dome right after an intense rain shower had turned indentations in the granite into small, glistening pools. Rather than simply settle for the vivid sunset coloring the clouds above, I decided to include the sunset reflected in the pools as well. At eye-level the pools reflected blue sky, so I dropped my tripod as low as it would go, almost to granite level, positioning my lens at the same angle to the pools that the red light leaving the clouds struck the water.
When the water’s in motion

On the Rocks, El Capitan and the Merced River, Yosemite
As spectacular as a crisp, mirror reflection in still water is, it’s easy to overlook the visual potential in a reflection that’s not crisp, or to forget your camera’s ability to render a soft or abstract reflection much better than your eyes view it. While a crisp reflection often dominates the primary subject in an image, a splash of reflected color or shape can provide a striking accent to a dominant primary subject. And a reflection disturbed by the continuously varying angles of rippled or choppy water magically appears when a long exposure smoothes the water’s surface.
In the image on the right, the El Capitan reflection undulating atop the Merced River was barely perceptible to my eyes. But the reflection came to in a 25 second exposure achieved with the help of 2-stop hard graduated neutral density filter that subdued the day’s last rays on the clouds and El Capitan, and a neutral polarizer (with the reflection dialed up) that cut the light on the entire scene by a couple of stops. And since a reflection is never as bright as the actual scene, using a GND meant I need to do a little dodging and burning in Photoshop.
Where to focus
An often misunderstood aspect of reflection photography is where to focus. Though it seems counterintuitive, the focus point of a reflection is the reflection subject, not the reflection surface. This isn’t such a big deal in a scene like the El Capitan reflection at the top of the post, where the focus point of everything of visual significance is infinity, but it’s a very big deal when you want both your reflection and rocks or leaves on the nearby water surface sharp.

Autumn Reflection, El Capitan, Yosemite
The El Capitan reflection on the right is very different from the El Capitan reflection above, where the extreme depth of field ensured sharpness had I focused on anything in the scene or the reflection. But here the leaves that were my scene’s primary emphasis were just a couple of feet from my camera, while El Capitan was several thousand feet distant. Even though the leaves floated atop the El Capitan reflection, focusing on El Capitan would have softened the leaves. To increase my depth of field, I stopped down to f/18 and focused several feet into the foreground leaves, then magnified the image on my LCD to verify that all of the leaves were sharp. Though El Capitan is slightly soft, a soft reflection is far more forgivable than a soft fore
Think ahead
It seems that reflections often feel like a fortuitous gift that we just stumbled upon. But given that reflections are entirely beholden to the laws of physics, they’re far more predictable than many of the natural elements we photograph. Taking a little time to understand the nature of reflections, and how they’re revealed by a camera, enables photographers to anticipate their appearance.
For example, in Yosemite I know that low flow makes autumn the best time for reflections in the Merced River. On the other hand, when the Merced is rushing with spring runoff, Yosemite’s meadows often shimmer beneath tranquil vernal pools. I plan many trips (and workshops) to take advantage of these opportunities.
Workshop Schedule || Purchase Prints
A Reflection Gallery
Click an image for a closer look and slide show.


