2017 in the Mirror
Posted on December 26, 2017


One of my favorite things to do at year’s end is to look back at the things that made the year memorable. And my favorite part of this exercise is the realization that, even though I can’t say how, I know I will indeed be similarly rewarded in the coming year.
I’ll remember 2017 for several significant personal milestones, the many unexpected gifts from nature that I call “the most beautiful thing happening on Earth at this moment” moments, and (somewhat more prosaically) a lot of great new equipment that has made photography even more enjoyable for me.
Personal Milestones
New Zealand
In August of 1995 I visited the South Island of New Zealand for the first time. This was in my previous life, back when I trained programmers how to use the programming language of the company I worked for. And though I didn’t make my living as a photographer, I was very much a photographer at heart. My lodging for that trip was in rural countryside outside Christchurch, and I was so taken by the beauty that I carried a camera (this was before cameras were tiny and ubiquitous) on my 7-mile run each morning.
In late June of this year I finally fulfilled my dream to return to New Zealand. For ten days my good friend and fellow photographer Don Smith and I explored the mountains, fjords, lakes, and rainforests near Queenstown, New Zealand. We were scouting locations for a possible workshop, and were not disappointed. Though my previous visit had set my expectations bar quite high, this trip exceeded that bar with ease—Don and I came away with enough locations within a 150 kilometer radius of Queenstown to fill a 10-day workshop. By the time we returned, I was ready to proclaim New Zealand the most beautiful place I’ve ever seen.

Twilight Reflection, Mount Tasman and Mount Cook, Lake Matheson, New Zealand
Total Solar Eclipse
What can I say? There is nothing, absolutely nothing, that can prepare a person for the experience of a total solar eclipse. So. After hearing many words of advice to that effect, I prepared like crazy, then almost blew my chance to photograph it because…, wait for it…, I wasn’t prepared. Honestly, the photographer in me felt like a college freshman trying to chat up a supermodel: pretty cocky going in, and instantly aware I was hopelessly out of my league.
This isn’t something I’m embarrassed about because, if asked to choose between experiencing the moment and photographing it, I’d choose the experience any day. I had no idea that I ended up with a couple of pretty nice images until I reviewed them on my computer later. And I still have no memory of how I did it.

Here Comes the Sun, Idaho, Earth, Solar System, Milky Way
Andromeda Galaxy
Anyone who reads my blog knows how much I love astronomy. It’s an interest that goes back to childhood, and is so much more than identifying constellations (which I’m not especially strong at). Put simply, I love having my mind boggled, and nothing boggles my mind more than the immensity of the universe.
So imagine my excitement when I got the opportunity to peer into a telescope for my first in-person view of the Andromeda Galaxy (at least the first view that wasn’t just a faint smudge in the dark sky). And what could be better than that? How about actually attaching my camera to the telescope and letting it accumulate and record far more light than my eyes saw.

Andromeda Galaxy
The Most Beautiful Thing Happening On Earth At This Moment
Like pretty much every other serious photographer, I always do my best to photograph my subjects in the best conditions. But for landscape photographers, great conditions are never guaranteed. And when they do happen, expected or not, they’re often so spectacular that it feels like I’m witnessing the most beautiful thing happening on Earth at that moment. Here’s a slideshow of my 2017 TMBTHOEATM candidates (in no particular order):
Equipment
When I started this post, I didn’t imagine I’d be writing about equipment. But I realized that probably more than any other year in my career as a photographer, in 2017 I added equipment that actually made a difference.
Here’s a list of my equipment difference makers, and why they made a difference:
Sony 12-24 f/4 G: I’ve never had a lens that allowed me to go this wide. From the first time I took it to Yosemite, I knew it would allow me to photograph things I couldn’t have photographed before.
Sony 16-35 f/2.8 GM: I didn’t think this lens would make much of a difference in my photography, but its combination of speed and incredible sharpness made it my go-to night lens for most situations. I’m not throwing away my Rokinon 24mm f/1.4, but I’ll probably have to dust it off each time I use it.
Sony 100-400 f/2.8 GM: I’ve had lenses this sharp, and lenses this long, but I’ve never had a lens this long that’s this sharp. Not only that, whereas my other earlier long lenses were specialty lenses that I only packed when I planned to use them, this one is compact enough to have become a permanent resident in my camera bag.
Sony a7R III: Despite my love for my Sony a7RII, it had a few significant shortcomings (battery life and a single card slot to name two) that I longed to be fixed. Not only does the a7RIII fix these shortcomings, it actually gives me more dynamic range and better high ISO and I’m in photography heaven.
Here’s a random slideshow if images captured with my new toys:
What’s next?
I have no idea what’s in store for next year, but I’m ready. Bring it on!
Workshop Schedule || Purchase Prints
2017 Highlights
Click an image for a closer look and slide show. Refresh the window to reorder the display.


Three Moons
Posted on December 19, 2017
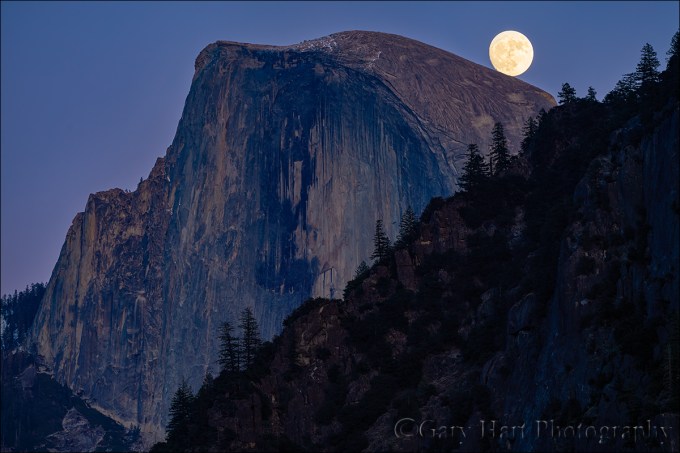
Balanced Moon, Half Dome, Yosemite
Sony a7RIII
Sony 100-400 GM
ISO 100
f/8
1/10 second
This month’s Yosemite Winter Moon photo workshop group got the rare opportunity to photograph a full (or nearly full) moon rising above Half Dome at sunset on three consecutive nights. One reason it’s rare is that, as viewed from Yosemite Valley, the full moon and Half Dome only align in winter. But the real tricky part is making it happen three times when sunset happens at pretty much the same time each evening, but the moon rises about 45 minutes later.
-

- Sunset Moonrise, Half Dome, Yosemite (11/30/17)
-

- Balanced Moon, Half Dome, Yosemite (12/1/17)
-

- Winter Supermoon, Half Dome, Yosemite
My goal for photographing a rising full moon is to get the moon on the horizon in the window from 15 minutes before to 15 minutes after the “official” (flat horizon) sunset. Earlier and there’s not enough contrast and the moon looks bland; later and there’s too much dynamic range to capture detail in the dark landscape and daylight-bright moon.
The key to making this work starts with understanding that when you see a sunset or moonrise time published for a location, that time is always based on a flat horizon. So unless you’re atop a mountain or on a ship at sea, you’ll probably see the sun disappear behind the terrain in the west before sunset, and you’ll probably need to wait for the moon to rise above the terrain in the east.
Since the sun is at my back when a full moon rises, I’m not too concerned about the precise timing of the sun’s disappearance. But I need to be pretty dead-on for the moon’s arrival. Knowing the moon will rise an 40-60 minutes (or so) later each day, it’s easy to infer that the more days until the full moon, the higher the moon will be at sunset. Sadly, I have no control over the timing of the absolute sunset/moonrise, but I can control the elevation of the horizon, and therefore the moon’s appearance on a given day, by choosing my position relative to the horizon above which the moon will rise.
To make this workshop’s consecutive moonrises work, each evening I picked a view that was farther from Half Dome than the previous evening. On our first evening I chose a spot on the east side of Yosemite Valley; the next evening we were closer to the middle of the valley; on our the third evening our vantage point was near Tunnel View, at the opposite side of Yosemite Valley from Half Dome. The moon rose later above the flat horizon each evening, but by moving farther away, we reduced the distance the moon had to travel before it appeared.
Big moon, small moon
The other thing this little exercise illustrates is how to make the moon big in your frame. Notice that in each image, Half Dome is more or less the same size, but the moon gets progressively bigger. That’s because on any given day, no matter where I am on Earth, the moon is so far away that its apparent size doesn’t change. But the size of earthbound features, like Half Dome, changes a lot with proximity. When I was on Yosemite Valley’s east side for the first moonrise, filling my frame with Half Dome required just a little more than 100mm; the next night I was far enough back to require about 250mm to fill the frame; and on the final night, from eight miles away I needed more than 500mm. And as my focal length increased, so did the moon’s size in my frame.
Join me as I do this all over again next December
A Full Moon Gallery


A Galaxy Far, Far Away
Posted on December 14, 2017

Andromeda Galaxy, Local Group, 2.5 Million Light Years
Sony a7RIII
Unknown telescope (sorry)
ISO 8000
20 seconds
I won’t pretend that this picture is a creative achievement of any sort—I captured it at a Sony-organized night shoot during last month’s Sedona media event promoting the Sony a7RIII. All I did was attach my a7RIII to someone else’s telescope (equipped with a computerized tracking mechanism to cancel the earth’s rotation), dial in the recommended exposure settings, focus, and click my shutter. But that does’t change the fact that I think this is one of my coolest images ever. It truly epitomizes the reason I say my favorite thing about photography isn’t the way it reproduces my reality, it’s the way enhances it.
I’ve been interested in astronomy since I was a kid, and one of the first celestial objects to intrigue me was the Andromeda Galaxy. (At the risk of stating the obvious, it’s called Andromeda because we view it in the constellation Andromeda.) Armed with this knowledge and a simple star chart, on camping trips I’d shun the tent to sleep beneath the stars, hoping to get a glimpse of the Andromeda Galaxy but not knowing exactly what I was looking for. I know now that even under in the darkest, clearest sky, I’d have only seen the this massive collection of stars as an unimpressive smudge. But my failure to find my target didn’t dampen my enthusiasm—the search was as much an excuse to take in the entire night sky and ponder its mysteries.
When I wasn’t observing, I was reading. I learned that Andromeda Galaxy is the largest galaxy in the “Local Group” of more than 50 gravitationally connected galaxies that also includes our Milky Way. Both the Milky Way and Andromeda are spiral galaxies, but with a trillion stars, Andromeda is at least twice the size of the Milky Way. Andromeda is also on a collision course with the Milky Way—put on your helmets and mark your calendar for 4.5 billion years.
The light that struck my sensor to render this image traveled more than 2.5 million years, making the Andromeda Galaxy the farthest we can see with the naked eye—that’s about 150,000,000,000,000,000,000 miles, so fill up before you leave. Because everything we know about the Andromeda Galaxy happened 2.5 million years ago, we’ll need to wait another 2.5 million years to know what’s happening there right now. But while Andromeda is indeed far, far away from our earthbound perspective, it’s actually the closest galaxy to us (Magellanic Clouds notwithstanding). There are a couple trillion or so galaxies even farther away.
Knowing all this stuff made my search for the Andromeda Galaxy quite thrilling. In recent years I’ve actually captured it in a few frames targeting something else, clearly visible but not particularly impressive. But the Sedona experience took my thrill to the next level. Leveraging the telescope’s supreme magnification and light gathering capabilities, I let my sensor collect light for 20 seconds at ISO 8000, long enough for the galaxy’s spiral arms start to appear. Also popping into view are two fuzzy objects that I’d only seen in pictures—these are satellite galaxies bound by gravity to the Andromeda Galaxy, much like the Magellanic Clouds that grace our Southern Hemisphere sky. All the pinpoint stars in the image are part of the Milky Way—much closer and unrelated to the Andromeda Galaxy, just in the line of sight (much the way sensor dust or a lens smudge is not part of a scene you photograph).
This image has rekindled my passion for astronomy. It reminds me of my very small place in a universe that’s too large for even the greatest minds to comprehend. Because there’s a lifetime worth of cool stuff to view up there and time’s wasting, I’m seriously considering getting a telescope and letting my camera show me what I’ve been missing. Stay tuned….
Retirement announcement
(No, not me)
Since I just switched to the Sony a7RIII, my a7RII has been relegated to backup status. As excited as I am about my new camera, I’m already a bit nostalgic about my a7RII, the best camera I’ve ever owned, as well as my favorite camera ever to shoot with (not necessarily the same thing).
I made the switch to Sony mirrorless more than three years ago, starting with the a7R. The image quality of the a7R was so much better than what I had been shooting that I was able to forgive its interface and usability shortcomings. The a7RII was a huge improvement over the a7R, both in image quality and usability, so much better that it soon felt more like an extra limb with a direct connection to my brain than an inanimate tool. It’s clear already that I’ll soon love using the a7RIII even more, but right now I just want to give a shout-out to my a7RII as it enters semi-retirement.
Here some scenes my a7RII and I saw
Click an image for a closer look and slide show. Refresh the window to reorder the display.


A Winter Morning in Yosemite
Posted on December 10, 2017

Winter Reflection, El Capitan, Yosemite
Canon EOS-1Ds Mark III
Canon 17-40
1/4 second
F/16
ISO 200
Missing snow so far this winter, I’m going through some of my old snow images and came across this one from a few years ago. I’d traveled to Yosemite with the promise of snow in the forecast, but the night before the trip’s final day I went to sleep to the steady hum of rain. The next morning dawned damp and gray—and gloriously silent. Outside a thin veneer of fresh snow dusted the trees, and without even considering breakfast I headed to Tunnel View to survey the valley and plan my morning. By the time I arrived a patch of sunlight had burned a hole in the clouds above Cathedral Rocks and hints blue sky mingled with the clouds behind me. I knew the show there would soon be spectacular, but I’ve photographed many clearing storms from Tunnel View and wanted something different.
Without leaving my car I headed back down into the valley, stopping first at El Capitan Bridge, arriving just before the clouds atop El Capitan started lifting. I photographed there for about 15 minutes, long enough to see El Capitan’s nose go from obscure shadow to distinct outline to fully exposed granite. Before the clouds parted completely, I packed up and made a beeline for nearby Cathedral Beach. In the short time it took to drive a half mile most of El Capitan had emerged from the clouds and I rushed to grab my gear. The road to the beach was closed so I set out on foot, running most of the quarter mile to the river.
I found two other photographers at the west end of the beach and rather than compete with them for real estate, I trudged through the brush and fresh snow to an open space just downstream. There I was able to set up in solitude and move around at will. I was quite pleased to find a snow covered snag protruding from the river, adding a little depth to the foreground.
The beauty of photographing a Yosemite clearing storm is that no matter where you are, something spectacular is happening. Often in these situations I move between locations much more quickly than normal, but this morning I took my time and just enjoyed the show.
Wringing out as many compositions as possible, I started wide with both vertical and horizontal compositions that included El Capitan and the reflection. Next I went a little tighter, capturing just El Capitan, or just the reflection, or some of both. Finally I switched to a telephoto and started picking out individual elements: the swirling clouds and brilliant highlights on El Capitan’s vertical edge, the snow covered snag in the river, and so on.
Technical stuff
A couple of related technical issues raised by this image: First, the focus point of a reflection; and second, where to focus when elements are spread from near to far throughout the frame. It’s counterintuitive to many that a reflection’s focus point is the focus point of the reflective subject, not the reflective surface. In other words, since El Capitan is at infinity, its reflection is in focus at infinity, and not when focused on the snag. If you don’t believe me, try it yourself.
Given that knowledge, and the fact that I generally want whatever’s in my foreground to be in focus (even if it means the background is slightly soft), I had to find a compromise focus point to ensure that both the reflection and the snag were in focus. With an extremely wide focal length and small aperture I was confident I could get the entire scene acceptably sharp if I focused carefully.
There are different approaches to maximizing focus range, such as relatively accurate but awkward hyperfocal charts, and rule-of-thumb guidelines like focusing a third of the way into the frame. Both have merit, and many excellent photographers employ them, but I prefer a more seat-of-the-pants approach that relies on my own experience and understanding of focus range. I generally find the closest subject I want in focus—in this case the snag—and then focus on something a little behind it.
Here I estimated the distance of the snag, found something behind me that I thought was a little farther away, and focused there. At f/16 that gave me a pretty large margin for error and I was confident the image was sharp throughout. Is this an approach I’d recommend for others? Perhaps, though it takes trial and error to perfect. I encourage you to familiarize yourself with hyperfocal distances–you don’t need to memorize them, but a basic understanding of the relationship between f-stops, focal lengths, and focus distance is invaluable for decisions like this.
Here’s an article from my Photo Tips section that might help: Depth of Field.
Workshop Schedule || Purchase Prints
Winter in Yosemite


Moon Over Yosemite
Posted on December 5, 2017

Winter Supermoon, Half Dome, Yosemite
Sony a7RIII
Sony 100-400 GM
Sony 2x teleconverter
ISO 400
f/11
1/8 second
Large or small, crescent or full, I love photographing the moon rising above Half Dome. The alignment doesn’t work most months, so those months when the alignment is right, I do my best to be there.
For last week’s Yosemite Winter Moon photo workshop I’d planned three moonrises: Thursday and Friday we got lucky with the never reliable December skies, but Saturday night concerned me. Not only was this moonrise the “main event,” the forecast was less than promising. And while the first two moonrises were absolutely beautiful, the moon was less full and we were on the valley floor, much closer to Half Dome. Our location required a wider focal length that meant a relatively small moon. But on Saturday (it would rise too late to photograph on Sunday) the moon would be 99 percent full and rise shortly after sunset, just left of Half Dome when viewed from Tunnel View. Tunnel View is eight miles west of Half Dome, a distance, when combined with the moon’s proximity to Half Dome, that would allow a long telephoto that would fill the frame with the moon and all of Half Dome.
Saturday started clear, but soon a thin layer of clouds moved in, bathing Yosemite Valley in diffuse light that was wonderful for photographing pretty much anything that didn’t involve the sky. These clouds weren’t dense enough to completely obscure the sun, but with a chance of rain coming overnight, I knew they’d be thickening at some point.
I got my group in position near Tunnel View about a half hour before sunset. I’ve attempted moonrises that were completely obscured by clouds, and some where we could see the moon’s glow through the clouds, but no detail. I tried to stay positive but the fading light made it impossible to tell exactly how thick the clouds were. Fearing the worst, I rationalized that we’d already had two nice moonrises and maybe wishing for a third was just greedy. But still….
Hoping for the best, I pointed out where the moon should appear about ten minutes after sunset, advising everyone to continue shooting normally until then, but to have an idea of their moonrise compositions. Practicing what I preach, I got out my Sony 100-400 GM, added my 2x teleconverter, and framed up the scene. Because I wasn’t going to shoot anything else (as you may have noticed, I already have a couple of Tunnel View images in my portfolio), I focused and waited.
About five minutes after sunset an amber glow in the clouds next to Half Dome signaled the moon’s imminent arrival. That we could even see any sign of the moon gave me hope and I held my breath as the glow intensified, still unsure whether we’d see lunar detail or just a white blob. The glow was actually unique and very beautiful in its own way and I started clicking. The instant the moon’s brilliant leading edge nudged into view, silhouetting the trees, I knew we were in luck. The landscape was already fairly dark by then, but because this was the group’s third moonrise, they’d become old pros at dealing with the scene’s extreme dynamic range—at that point the workshop’s mantra had become: “Push the exposure until the moon’s highlights start blinking, and fix the shadows in Photoshop.”
The experience that evening was even more spectacular than I had dared hope, a perfect storm of conditions I might never see repeated: the moon’s alignment with Half Dome, the telephoto distance, the timing of the moon’s arrival that put it on the horizon with just enough twilight remaining, and (especially) the translucent clouds that enveloped the moon in a golden halo and eased the scene’s dynamic range.
Some thoughts on the Sony a7RIII
A couple of weeks ago, at a Sony sponsored event in Sedona, I got the opportunity to do some night photography with the new Sony a7RIII. But this Yosemite trip was my first time using the new camera on my own. It’s too soon for any final proclamations, but my general sense is that this camera has even more dynamic range than the a7RII (which is pretty incredible). The other significant takeaway from this weekend is that I used the same battery for three-and-half days and came home with more than 25 percent remaining. Anyone who shot with the a7RII, knows how significant this is.
I’m still getting used to the new camera’s interface—while similar to the a7RII, there are definite differences. I do like the new button layout and improved menu interface, but am still getting used to the joystick and touchscreen—pretty sure I’ll learn to love them too. And the dual card slots are a necessary and most welcome improvement.
My biggest complaint with the new camera is that the back-button focus that I loved so much on the a7rII is broken on the a7RIII. Every camera I’ve ever used (Canon and Sony) has allowed me, after tweaking some settings, to switch seamlessly between auto and manual focus without requiring me to change the focus mode. So the first thing I do when I get a new camera is disengage autofocus from the shutter button and assign autofocus to a button on the back of the camera. With back-button focus enabled, my workflow has always been manually focus by default, but always with the ability to autofocus with the simple push of a button—no focus mode change required. Doing this with the a7RII was the easiest of any camera I’ve ever used, but for some reason Sony changed the focus behavior of the a7RIII, so now I have to deal with the added step of switching focus modes on the camera before focusing. This might not sound like a big deal, but I don’t want to have to think about my camera when I’m composing a scene, so this behavior is extremely frustrating. That said, I’ve already communicated my frustration to Sony’s engineers and am hopeful (confident?) this is a firmware fix that will come soon. Sony’s responsiveness to things like this is one of the reasons I’m so happy I made the switch from Canon.
I’m happily retracting those words after Sony found a solution for the a7RIII back-button focus problem. At last month’s Sony media event Sedona, I was surrounded by Sony’s best and brightest engineers; when I brought the BBF problem to their attention, we all scratched our heads over how to make it work, and they finally asked me to send them a detailed write-up. They promised to address it ASAP, but I didn’t think it would happen without a firmware update.
To enable back-button focus on a Sony a7RIII or a9, simply assign any custom button (Tab 2, Screen 8) to the AF/MF Control Hold option (AF1 screen). To use BBF, keep the camera in Manual Focus mode—this allows you to manually focus with the focus ring, or to autofocus by pressing whatever button you assigned AF/MF Control Hold.
Bottom line
I’m pretty sure this is the best camera I’ve ever had my hands on. In fact, the dynamic range improvement was obvious as soon as I started processing this moonrise shoot—we continued shooting about 25 minutes after sunset, and just a little processing reveals useable detail in my highlights and shadows, even in my final image. Ridiculous.
A couple of full moon photography tips
Sun and moon rise/set times always assume a flat horizon, which means the sun usually disappears behind the local terrain before the “official” sunset, while the moon appears after moonrise. When that happens, there’s usually not enough light to capture landscape detail in the moon and landscape, always my goal. To capture the entire scene with a single click (no image blending), I usually try to photograph the rising full moon on the day before it’s full, when the nearly full (99 or so percent illuminated) moon rises before the landscape has darkened significantly.
The moon’s size in an image is determined by my focal length—the longer the lens, the larger the moon appears. Photographing a large moon above a particular subject requires not only the correct alignment, it also requires distance from the subject—the farther back your position, the longer the lens you can use without cutting of some of the subject.
This moonrise image is a perfect example. Tunnel View in Yosemite is one of my favorite locations to photograph a moonrise because it’s about eight miles from Half Dome. At this distance I can use 500+ mm (250mm plus a 2x teleconverter) to fill my frame with Half Dome—with the moon nearby, I get an image that includes all of Half Dome and a very large moon.
Moon Over Yosemite
Click an image for a closer look and slide show. Refresh the window to reorder the display.


Compromise less, smile more
Posted on November 28, 2017

Night Fire, Milky Way Above Kilauea Caldera, Hawaii
Sony a7S II
Sony 16-35 f/2.8 GM
10 seconds
F/2.8
ISO 3200
Night photography always requires some level of compromise: extra equipment, ISOs a little too noisy, shutter speeds a little too long, f-stops a little too soft. For years the quality threshold beyond which I wouldn’t cross came far too early and I’d often find myself having to decide between an image that was too dark and noisy, or simply not shooting at all.
Because the almost total darkness of night photography requires a fast lens, the faster the better, one of the first compromises night photography forced on me was adding a night-only lens—a prime lens that was both ultra-fast and wide. Ultra-fast to maximize light capture, wide enough to give me lots of sky and to reduce the star streaking that occurs with the long shutter speeds night photography requires (the wider the focal length, the less visible any motion in the frame).
I started doing night photography as a Canon shooter, so my first night lens was a Canon-mount Zeiss 28mm f/2.0—it did the job but wasn’t quite as fast or wide as I’d have liked. After switching to Sony I added a Sony-mount Rokinon 24mm f/1.4—I loved shooting at f/1.4, and 24mm was a definite improvement over 28mm, but I still found myself wishing for something wider. And the Rokinon had other shortcomings as well: because the camera doesn’t even know the lens is mounted (f-stop set on the lens, not in the camera), I always had to guess the f-stop I used to capture an image. Worse than that, at f/1.4 the Rokinon had pretty significant comatic aberration that made my stars look like little comets.
Since switching to Sony, one compromise I’ve happily made is carrying an extra body that’s dedicated to night photography. Because the Sony a7S and (later) a7SII are just ridiculously good at high ISO, I was able to compensate for the Rokinon’s distortion by stopping down to f/2 or f/2.8 at a higher ISO. The a7SII is worth the extra weight, but I’ve longed for the day when I could replace the Rokinon lens with something wider, and something that had a better relationship with my camera.
That day came earlier this year, when Sony released the 16-35 f/2.8 GM lens. I got to sample this lens before it was released and was surprised by its compactness despite being so wide and fast—it wasn’t long before the 16-35 f/2.8 GM occupied a full-time spot in my camera bag. And in the back of my mind I couldn’t help thinking that the 16-35 GM might just work as a night lens.
I don’t have the time or temperament to be a pixel-peeper, but I had a sense that this lens was pretty sharp wide open, and few things reveal comatic aberration more than stars. I finally got my chance to test the 16-35 GM lens at night on the Hawaii Big Island workshop in September. When this year’s Milky Way images revealed that the 16-35 GM is sharp and pretty much aberration free at f/2.8, I couldn’t have been happier.
As with every night shoot, this night at the caldera I tried a variety of exposure settings to maximize my processing options later. I was pretty pleased to get a clean exposure at 10 seconds (minimal star motion) and f/2.8 (maximum light). While the a7SII doesn’t even breathe hard at the ISO 3200 I used for this image, I know if I were shooting someplace without its own light source (for example, at the Grand Canyon, the bristlecone pine forest, or pretty much any other location lacking an active volcano), I’d probably need to be at ISO 6400 or even 12800 to make a 10 second exposure work. But it’s nice to know that the a7SII and 16-35 f/2.8 GM will do the job even in darkness that extreme.
One more thing
A couple of weeks ago while in Sedona for Sony I got the opportunity to use the new a7RIII. One highlight of that trip was two night shoots with the new camera. I haven’t had a chance to spend any quality time with those images, but I got the sense that its high ISO performance is nearly as good as the a7SII. If that’s true, that will be one less compromise and a lighter camera bag—at least until Sony releases the a7SIII.
Hawaii Photo Workshops
The Milky Way
Click an image for a closer look and slide show. Refresh the window to reorder the display.


It’s only cold on the outside
Posted on November 22, 2017
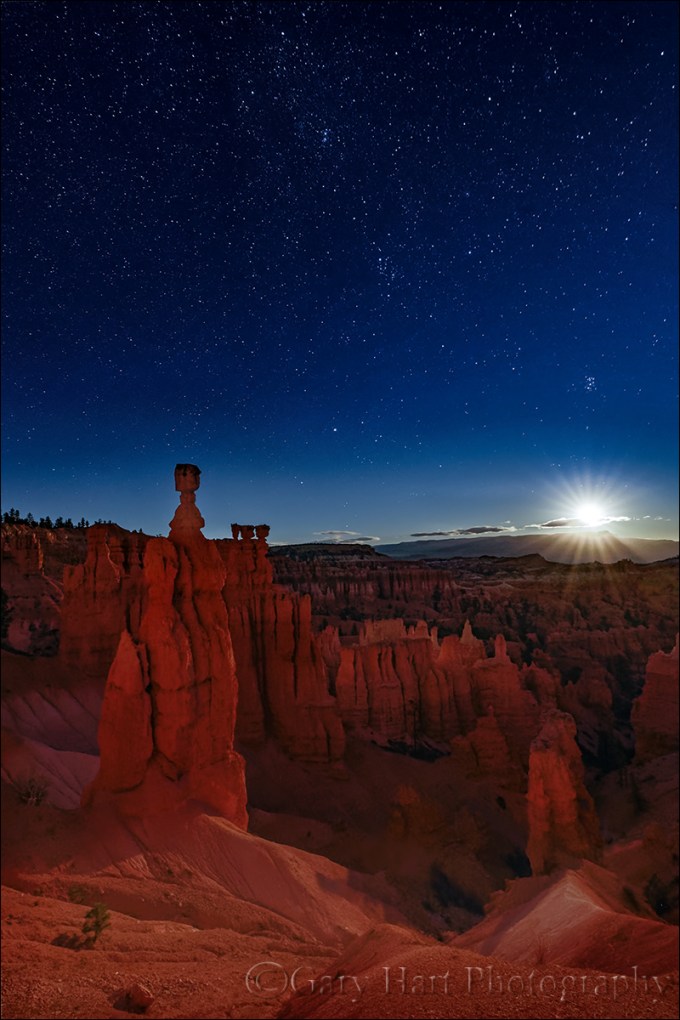
Moonstar, Thor’s Hammer, Bryce Canyon National Park, Utah
Sony a7R II
Sony 16-35 f/2.8 GM
30 seconds
F/8
ISO 3200
We all all have different hot/cold comfort thresholds, a temperature above or below which it’s just too hot or cold to feel human. Of course wind and moisture can move the needle a little bit, but let me just say that regardless of the other factors, after spending a few days in Bryce Canyon NP co-teaching a workshop with Don Smith, I’ve determined that the comfort threshold for my California bones is somewhere north of 20 degrees.
That Bryce is cold in November wasn’t really a revelation because couple of Novembers ago I experienced one of the coldest shoots of my life there, a sunrise at Rainbow Point (9,000 feet) where the temperature was 10F and the wind was a constant 35 MPH. Informed by that experience, I showed up this year with full body armor that included multiple layers of silk, wool, down, fleece, and pretty much every other insulation material known to humankind. This visit wasn’t nearly as cold as I experienced a couple of years ago, but layers or not, cold finds exposed skin like a hungry mosquito and virtually ever minute outdoors tested my comfort threshold.
But despite appearances to the contrary, I’m not complaining. Discomfort is part of being a nature photographer, and miserable conditions definitely keep the crowds at bay. These thoughts bring to mind a phenomenon I’ve been aware of my entire photography life: when the shooting is good, the conditions just don’t matter. I’m not saying that I’m not aware that it’s cold, or hot, or wet, I’m saying that good photography somehow turns off the part of my brain that registers discomfort.
On this year’s Bryce visit we had low temperatures in the teens and low twenties, with a little wind. We also had quite a few clouds, but on our last night, when the skies cleared and the stars appeared, Don and I took the group to Thor’s Hammer for a night shoot. With a 95% moon rising more than 90 minutes after sunset, we knew we’d have about an hour or so of quality dark sky photography. The air that night was wonderfully clear, but without the cloud’s insulation, the temperature plummeted as soon as the sun went down and we found ourselves shooting in the coldest temperatures of the trip—somewhere in the teens, I’m certain.
I was well bundled head-to-toe, but gloves and photography don’t mix, especially night photography when you need to locate and adjust all the camera’s controls by feel. So I spent most of the evening with my delicate digits exposed to the elements, full commando. Of course adjusting camera settings with finger-shaped ice cubes is only marginally better than the gloved alternative, but somehow I managed.
It didn’t hurt that the pristine air and remote, moonless darkness made for a dazzling sky. I positioned myself to align Thor’s Hammer with the faint, outward-facing part of the Milky Way in Cassiopeia, trying both vertical and horizontal compositions. Without moonlight, the faint-to-the-eye Milky Way seemed to leap from the blackness on my LCD. Especially exciting were my vertical frames, which revealed near the top the fuzzy disk of the Andromeda Galaxy, our sister galaxy, a mere two-and-a-half million light-years away.
I was having so much fun that I completely forgot how cold I was, and I think that goes for the rest of the group as well. About the time we thought we’d accomplished all there was to accomplish, the clouds on the eastern horizon came alive with the glow of the approaching moon. Everyone seemed to be having such a good time that Don and I decided we should stick around long enough to catch the first rays of moonlight on the red hoodoos.
Most of my full(-ish) moon photography takes place when there’s enough ambient daylight to capture both landscape and lunar detail in a single frame. But since daylight was long gone well before the moon arrived, my exposures that night had been all about maximizing the amount of light reaching my sensor to bring out the foreground. So when the moon showed up my original exposure became far too much and I needed a different plan. I had a couple of options: either find a composition that didn’t include the moon, or figure out a way include the moon in my frame without ruining the picture.
Since the moon was above the best part of the scene, I decided to try for a “moonstar” and repositioned myself to balance it with Thor’s Hammer. Letting the moonlight do the heavy lifting on the hoodoos, I was able to get all the foreground detail I needed, with enough light left over to enhance my moonstar by stopping down to f/8. When we were finished the walk up from Thor’s Hammer is short but steep, perfect for warming my frigid blood, but despited my frozen digits, I honestly have no memory of discomfort.
This was a truly exceptional experience I’ll never forget, a perfect memory to highlight on the eve of Thanksgiving here in America.
A Starry Night Gallery
Click an image for a closer look and slide show. Refresh the window to reorder the display.


Photography’s Creativity Triad: Depth
Posted on November 18, 2017
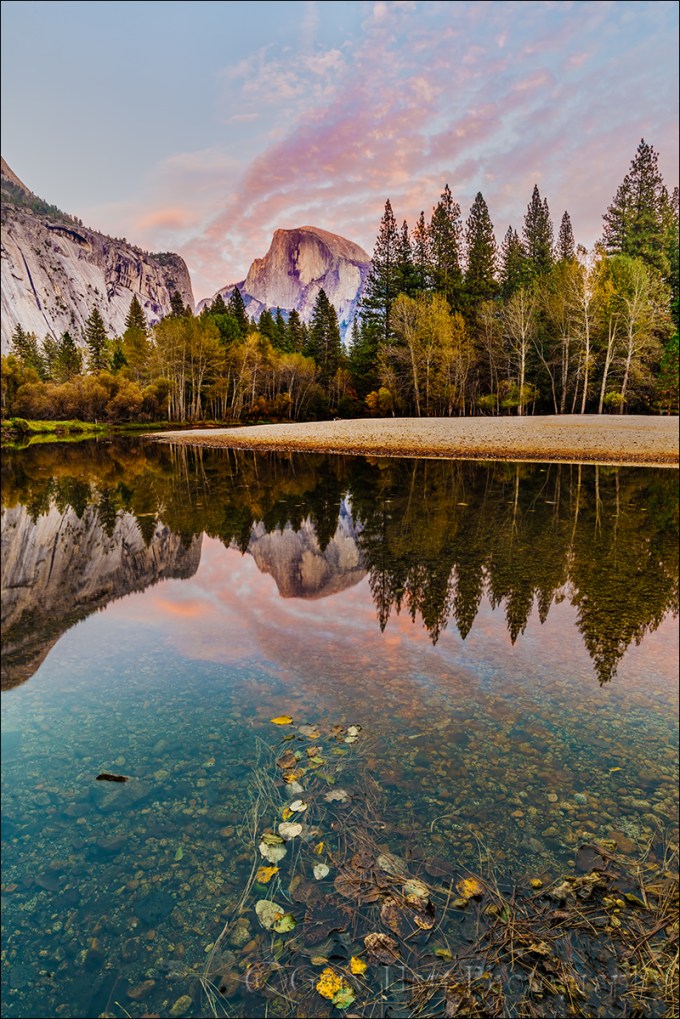
Autumn Reflection, Half Dome, Yosemite
Sony a7R II
Sony 16-35 f/2.8 GM
.8 second
F/16
ISO 200
Photography’s Creativity Triad
Enduring photographs don’t duplicate human reality, they reveal unseen aspects of our world. Capturing this hidden world requires mastery of photography’s “creativity triad” that distinguishes the camera’s vision from human vision: motion, light, and depth.
Photography is the futile attempt to squeeze a three-dimensional world into a two-dimensional medium. But just because it’s impossible to truly capture depth in a photograph, don’t think you shouldn’t consider the missing dimension when crafting an image. For the photographer with total control over his or her camera’s exposure variables (what exposure variable to change and when to change it), this missing dimension provides an opportunity to reveal the world in unique ways, or to create an illusion of depth that recreates much of the thrill of being there.
Creative Selective Focus

Poppy Pastel, Sierra Foothills, California (1oomm, f4, ISO 400, 1/125)
A personal favorite solution to the missing depth conundrum I call creative selective focus: An intentionally narrow depth of field with a carefully chosen focus point to flatten a scene’s myriad out-of-focus planes onto the same thin plane as the sharp subject. This technique softens distractions into a blur of color and shape, complementing and emphasizing the subject.
I especially enjoy using creative selective focus for isolation shots of colorful leaves each autumn, and for dogwood and poppy close-ups in spring. Looking for a striking subject that stands out from the surroundings, I position myself to create foreground and/or background relationships that complement my primary subject.
When composing the poppy scene depicted here, I tried to frame the foreground trio of poppies with distant poppies and other wildflowers that I knew would become soft splashes of color. Using a macro lens with extension tubes, a large aperture, and a very close focus point, I achieved a paper-thin range of sharpness that softened the busy background and helped my primary subjects stand out.
A couple of years ago I wrote an article on this very topic for “Outdoor Photographer” magazine. You can read a slightly updated version of this article in my Photo Tips section: Selective Focus.
The Illusion of Depth
Sometimes a scene holds so much near-to-far beauty that we want to capture every inch of it. While we can’t actually capture the depth our stereo vision enjoys, we can take steps to create the illusion of depth. Achieving this is largely about mindset—it’s about not simply settling for a primary subject no matter how striking it is. When you find a distant subject to feature in an image, scan the scene and position yourself to include a complementary fore-/middle-ground subjects. Likewise, when you want to feature a nearby object in an image, position yourself to include a complementary back-/middle-ground subjects.
Autumn Reflection, Half Dome, Yosemite
Guiding my workshop group to a placid bend in the Merced River on this year’s Yosemite Autumn Moon photo workshop, I was instantly drawn to the reflection of Half Dome. The cottonwoods lining the distant shoreline were at their peak autumn gold, and a collection of clouds above Half Dome caught the late afternoon sun, promising good odds for a colorful sunset. These features alone would have made a great image, but I looked around for something to add to the close foreground.
I didn’t need to look long, as just about fifty feet downstream I found a collection of colorful leaves jutting into the river, perpendicular to the shore. I shifted my position until the leaves appeared to point directly at Half Dome and dropped my tripod until my camera was about a foot above the water. With a half hour or so until sunset, I had plenty of time to play with the scene, familiarize myself with all the compositional variables, and refine my composition and focus point. Despite the relative closeness of the floating leaves, at 16mm I knew I had plenty depth of field to carry the entire scene if I was careful. Stopping my lens down to f/16, I focused on a leaf near the middle of the group, about two feet away. This gave me good sharpness from about a foot to infinity and I was in business.
Here’s my Photo Tips article on using hyperfocal focus techniques to enhance your images’ illusion of depth: Depth of Field.
Managing Depth


Photography’s Creativity Triad: Light
Posted on November 11, 2017
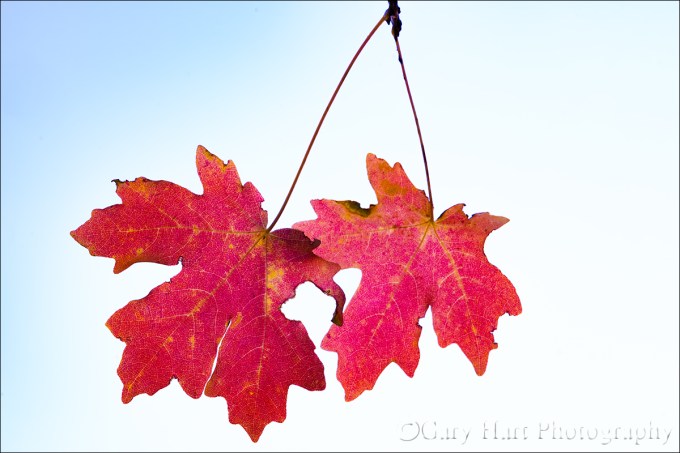
Red Maple Twins, Zion National Park
Sony a7RII
Sony 100-400 GM
ISO 1600
f/16
1/10 second
Photography’s Creativity Triad
Enduring photographs don’t duplicate human reality, they reveal unseen aspects of our world. Capturing this hidden world requires mastery of photography’s “creativity triad” that distinguishes the camera’s vision from human vision: motion, light, and depth.
Light is arguably the single most important element in an image. And the way a camera handles light may very well be photographers’ single biggest frustration—while our eyes can pluck detail from the deepest shadows to the brightest highlights, with a camera we can have shadows, or we can have highlights, but we can’t have both. Photographers go to great lengths to mitigate the shortcomings of their camera’s dynamic range (range of light a camera can pull detail from in a single frame, from shadows to highlights): Artificial light, blending of multiple exposures, and graduated neutral density filters absolutely have their place, but we often overlook the opportunity limited dynamic range provides.
In my previous post I wrote about how the camera’s ability to accumulate light over the duration of a single frame can reveal motion that’s invisible to the naked eye. Where light is concerned, while many see it as a limitation, I see my camera’s “limited” dynamic range as an opportunity to hide distractions and emphasize features. Whether it’s a Yosemite silhouette that emphasizes shape, or a high-key autumn image that highlights color, narrow dynamic range doesn’t need to be a handicap.
Red Maple Twins, Zion National Park
Last week I was in Zion National Park, co-teaching Don Smith’s workshop there. Zion’s yellows were peaking while we were there, but most of its red maples were about a week past prime. Nevertheless, I was able to find enough crimson leaves to keep me happy.
One morning I found a group of leaves dangling away from most of the tree. Seeking the best way to isolate the leaves from their surroundings, I experimented with different positions and focal lengths, starting with a half dozen or so leaves against a background of soft-focus branches and leaves. I love my new Sony 100-400 GM lens for isolation shots like this and had fun composing these leaves with a variety of focal lengths. The longer I worked on the scene, the more my eye was drawn to the shape, crimson translucence, and vein pattern of one pair of leaves in particular.
Suddenly, simplicity was the operative word. Strategizing the best way to separate these two leaves from their surroundings, I quickly realized a background of more leaves and branches, no matter how soft, was too distracting. But most angles that eliminated background foliage blended my my leaves into Zion’s towering red sandstone walls. Eventually I found a position far enough beneath the tree to put the backlit leaves against the cloudy sky.
Though my Sony a7RII has enough dynamic range to capture the entire range of light from shadows to highlights (with a little help from Lightroom/Photoshop, pulling up the shadows and down the highlights), I found the texture in the clouds almost as distracting as the branches. Instead, I metered on the leaves, which, though nicely backlit, were nowhere near as bright as the sky. My histogram showed that I’d clipped the sky, which I knew would put my leaves against a white background.
With no background detail to blur, I was able to stop down to f/16 and expand my depth of field to get more of both leaves in focus. The downside of this stop-down decision was significantly less light on my sensor, necessitating a longer shutter speed to achieve my desired exposure. For a shutter speed that overcame a breeze wiggling the leaves, I bumped to 1600 ISO. While my plan at capture was to put the backlit leaves against an entirely white background, when I started processing the image, I realized I’d captured a patch of blue sky (revealed by pulling the Lightroom Highlights slider to the left). I decided to keep blue sky while still hiding the texture in the clouds in the “blown” highlights.
Playing with Light
Click an image for a closer look and slide show. Refresh the window to reorder the display.


Photography’s Creativity Triad: Motion
Posted on November 5, 2017
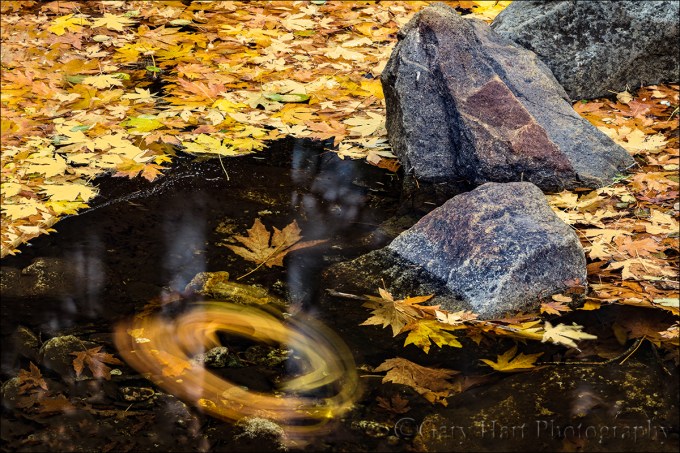
Autumn Spiral, Bridalveil Creek, Yosemite
Sony a7RII
Sony 100-400 GM
ISO 50
f/16
20 seconds
Photography’s Creativity Triad
Enduring photographs don’t duplicate human reality, they reveal unseen aspects of our world. Capturing this hidden world requires mastery of photography’s “creativity triad” that distinguishes the camera’s vision from human vision: motion, light, and depth.
Motion: Autumn Spiral
The human experience of the world unfolds like a seamless movie of continuous instants, while a camera accumulates light throughout its exposure to conflates those instants into a single frame.
Last week in Yosemite I got an opportunity to play with motion while photographing autumn leaves blanketing nearly every exposed surface below Bridalveil Fall. Beneath the fall Bridalveil Creek splits into three branches I love to explore—up- or down-stream, it doesn’t matter—searching for more intimate scenes. Last week I stayed close to the trail—not by design, but because I found enough to occupy every available minute.
Most of the fallen leaves had come to rest on granite, but those that had landed on the creek had been instantly swept downstream until they came to rest in sheltered pools, pushing up against and accumulating the rocks that bounded the pool. I found some pools that were entirely covered with leaves of varying shades of yellow and (just a little) green.
This little scene was downstream from the third bridge. The leaves here had been accumulating in this pool for a few days, leaving it more than half covered on this my final day in Yosemite. More than the golden pool, what really drew my attention from the bridge was a small collection of leaves, soon to become part of the pool’s autumn mosaic, swirling in a slowly spiraling current.
I set up my tripod right on the bridge, pulled out my new Sony 100-400 GM lens, dialed my polarizer to minimize reflections, and went to work. Because so much was happening in the scene, I started toward the lens’s wide end, but quickly found myself tightening each composition until I got down to a version of what you see here.
Once I had my composition, it became all about the motion in the leaves. When photographing landscape subjects in motion, each click can render a completely different image, so I’ve learned to never stop at one (or two, or three…). Whether it’s ocean waves, churning whitewater, or spinning leaves, I always make sure I have a variety of motion effects from which to choose. In this case, while the leaves were spiraling in a fairly consistent current, it seemed that with each rotation at least one leaf would go rogue, either slowing, accelerating, or making a break for the perimeter. The result was a distinctly different spiral with each capture.
I experimented with shutter speeds between ten and thirty seconds. Sometimes I’ll use a neutral density filter to stretch my shutter speed, but for this scene I was using a polarizer (minus two stops), it was quite early (shortly after sunrise) in an always densely shaded location, and darkened even further by the dense clouds of an approaching storm. In other words, the scene was dark enough that I could get the shutter speed all the way out to thirty seconds with my f-stop and ISO settings. When I was done, I had about 20 frames to choose from (one more argument for the tripod), identical except for a little different swirl.
While a still camera can’t capture motion as humans view it, in the right hands the camera absolutely does capture motion in ways that I’d argue can be even more appealing than being there. In this case, the spiral nature of this pool’s motion is much more apparent in this image than it was witnessing it firsthand.
Because there always has to be a moral…
The moral of this story is the importance of being able to manage your exposure variables: You can’t control motion, depth, and light without knowing how to achieve the shutter speed, f-stop, and ISO that serves your creative objective with minimal image quality compromise. That means retaining full control of your exposure settings by shooting in manual, aperture priority, or shutter priority modes. (And if you choose aperture or shutter priority, you must be able to manage your camera’s exposure compensation dial.)
Learn About Photographing Motion
World in Motion
Click an image for a closer look and slide show. Refresh the window to reorder the display.


