Eloquent Images by Gary Hart
Insight, information, and inspiration for the inquisitive nature photographer
Silent Night
Posted on March 21, 2017

Silent Night, Yosemite Valley from Tunnel View
Sony a7R II
Sony/Zeiss 16-35 f/4
20 seconds
F/5.6
ISO 1250
One perk of being a photographer is the opportunity to experience normally crowded locations in relative peace. That’s because the best nature photography usually happens at most people’s least favorite time to be outside: crazy weather and after dark. A couple of weeks ago in Yosemite I got the opportunity to enjoy both.
After spending a snowy Sunday guiding a couple around Yosemite Valley in a snowstorm, I dropped them back at (the hotel formerly known as) The Ahwahnee with nothing but the drive home on my mind. But winding through the valley in the fading twilight I saw signs of clearing skies and made a snap decision to check out the scene at Tunnel View.
I found the vista at Tunnel View gloriously empty. By the time I’d set up my camera and tripod the darkness was nearly complete, but as my eyes adjusted I could make out large, black holes in the once solid clouds overhead. Soon stars dotted the blackness above El Capitan and the white stripe of Bridalveil Fall. Each time light from the waxing gibbous moon slipped through the shifting clouds, the entire landscape lit up as if someone had flipped a switch.
Because the best parts of the view were in a narrow strip starting with the snow-glazed trees beneath me and continuing through the scene and up into the star-studded sky, I opted for a vertical composition. To include as much foreground and sky as possible, I went nearly as wide as my 16-35 lens would allow, more or less centering El Capitan and Bridalveil Fall to give the snow and stars equal billing.
Being completely comfortable with my a7RII’s high ISO performance, I didn’t stress the 1250 ISO that allowed me to stop down to a slightly sharper f/5.6 (virtually every lens is a little sharper stopped down from its largest aperture). Night focus with the Sony a7RII is extremely easy, easier than any camera I’ve ever used that isn’t an a7S/a7SII. Often I manually focus on the stars and use focus peaking* to tell me I’m sharp; in this case I back-button auto-focused on the contrast between the moonlit snow and dark granite near Bridalveil Fall. I chose a long enough shutter speed to capture motion blur in the rapidly moving clouds, knowing the potential for visible star streaking was minimized by my extremely wide focal length.
My favorite thing about that evening? The 20 seconds my shutter was open, when I didn’t have anything to do but stand there and enjoy the view in glorious silence.
* Focus peaking is a mirrorless feature that highlights in the viewfinder the in-focus areas of your scene.
Workshop Schedule || Purchase Prints
Yosemite After Dark
Click an image for a closer look and slide show.


Variations on a scene
Posted on March 14, 2017
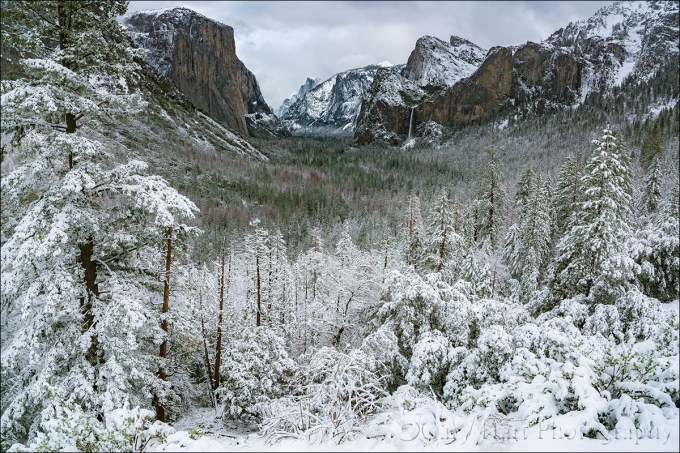
Snowfall, Tunnel View, Yosemite
Sony a7R II
Sony/Zeiss 16-35 f/4
1/250 second
F/9
ISO 100
A week or so ago I had the good fortune to be in Yosemite for the most recent snowfall there. All week the National Weather Service had been waffling a bit on the snow—based on the forecast, I probably wouldn’t have made the trip. But I was there anyway, guiding a fun couple from England for the weekend. Following a nice but unspectacular Saturday, we woke Sunday morning to find the world dipped in white.
The snow fell all day, at times so hard that that it was difficult to see more than a couple hundred yards, other times dwindling to a few flakes per minute. During one of the lulls we made our way to Tunnel View for the obligatory shot there. Despite hundreds (thousands?) of pictures of this view, after surveying the scene for a few minutes I couldn’t resist pulling out my camera and tripod.
My general feeling is that people tend to go too wide with their Tunnel View images, shrinking the main features (El Capitan, Half Dome, Bridalveil Fall) to include less exciting granite left of El Capitan and right right of Cathedral Rocks/Bridalveil Fall. That’s why I opt to tighten my horizontal Tunnel View compositions on the left and right, or isolate one or two of the three primary subjects with a telephoto. And when something exciting is happening in the sky (moon, clouds, or color) or foreground (fog, snow, rainbow), I’ll often compose vertically and bias my composition to favor the most compelling part of the scene.
With so many Tunnel View images in my portfolio, that afternoon I consciously set aside my long-held composition biases in favor of something I don’t already have. Of course the feature that most set the scene apart was the snow, so I set out to find the best way to emphasize it. Because the snow level that day was right around 4000 feet, also the elevation of Yosemite Valley, even the three hundred or so feet of elevation gain at Tunnel View resulted in much more snow virtually at my feet than on the distant valley floor. My Sony/Zeiss 16-35 f/4 lens, a great lens that I usually find too wide for Tunnel View, was perfect for highlighting the foreground snow.
Dialing my focal length to about 20mm allowed me to maximize the foreground snow while including minimal less-than-interesting gray sky. Of course going this wide meant shrinking the scene’s “big three” and adding lots of extraneous middle-ground on the left and right. To mitigate that problem I used the snowy pine on the left, often an obtrusive distraction to be dealt with, as a frame for that side of the scene. Not only did the tree block less interesting features, it actually enhanced the snowy effect I sought. On the right the diagonal ridge added a touch of visual motion (diagonal lines are so much stronger visually than horizontal and vertical lines), and it didn’t hurt that much of the bland granite there was covered with snow.
Workshop Schedule || Purchase Prints
A Tunnel View Gallery
Click an image for a closer look and slide show. Refresh the window to reorder the display.


Managing light, depth, and motion in nature
Posted on January 29, 2017
Snowcap, El Capitan, Yosemite
Sony a7R II
Sony/Zeiss 24-70 f4
3.2 seconds
F/10
ISO 50
Independent of composition, photographers have three scene variables to play with when setting up a shot: light, depth, and motion. And not so coincidentally, we have three exposure parameters with which to manage those variables: shutter speed, f-stop, and ISO. The exposure parameters have a reciprocal relationship—an increase/decrease in one can be compensated by a corresponding decrease/increase in another—but merely getting the “correct” exposure with a random combination of exposure values can yield wildly different results. This is why I never want my camera making decisions for me, and always photograph in manual mode. It’s also why I tell my workshop students that they should be able to defend (explain their reason for) every exposure value.
My approach to metering
As a landscape photographer who is always on a tripod, I’ve removed camera shake from the exposure equation, so the only motion that concerns me is motion in the scene. Unless I’m trying for a motion effect (for example, blurring moving water or freezing wind-blown leaves) I use the f-stop and ISO that yields the absolute sharpest, cleanest image—no quality compromise (such as a large f-stop or high ISO) to subdue camera shake. This allows me to approach every scene at ISO 100 (most camera’s best ISO) and f/8 – f/11 (the maximum depth of field possible with minimal diffraction, and also the range where most lenses tend to be sharpest), and only deviate when my scene variables dictate.
Once I determine my composition, I refine the f-stop to ensure to depth of field that achieves my desired effect, then dial my shutter speed to whatever value delivers the proper exposure. My ISO only moves from 100 when motion in the scene requires it. For example, photographing at night requires a shutter speed fast enough to minimize star motion and I’m force to increase my ISO to 800, 1600, or higher, depending on the amount of light and the focal length at which I’m shooting.
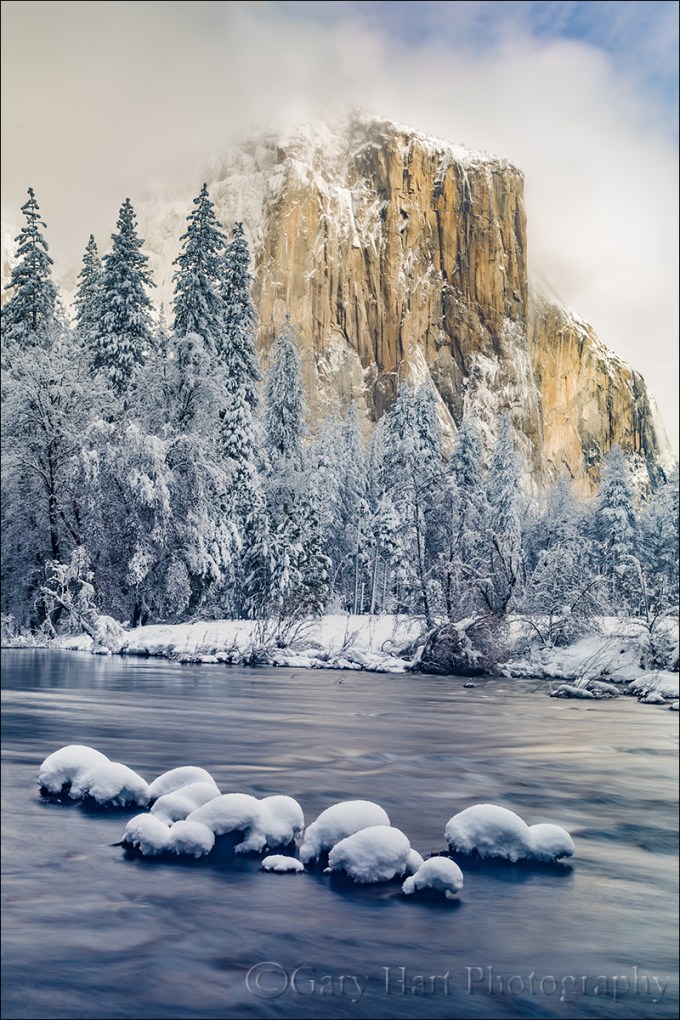
About this image
In this image from last Monday’s snow day in Yosemite, I wanted to smooth the rapidly flowing Merced River to smooth chop that I thought might distract from rest of this spectacular scene, but first I had to get everything else in place. I on a fairly tight vertical composition that eliminated everything on the left and right of El Capitan. I used the snow-capped boulders in the foreground to create a little depth, and included just a little sky for some extra color (if the clouds swirling about El Capitan had been more interesting, I might not have done this).
Aligning the foreground boulders was both tricky and awkward. First, I had to wade through a couple of shallow pools to reach a one-rock island (not much bigger than a basketball), then thrust my tripod into the water as far to the left as I could and still operate my camera. A focal length too narrow would have cut off important elements, and too would have introduced distractions just outside this frame. Where the camera was positioned, I couldn’t get my eye to the viewfinder without going for a swim, and there was too much light to see my LCD clearly. So I pulled my camera from the tripod and framed the composition to get the right focal length. With my composition established, I decided f/10 was the largest aperture that would ensure front-to-back sharpness, and focused on a ripple a little behind the boulders.
Finally ready to shoot, I returned the camera to the tripod and used what I could see of the LCD to guess the final composition. After each click I removed the camera and reviewed the image in my electronic viewfinder (another reason I love the EVF), adjusting two or three times until the composition was right.
With my composition framed exactly as I wanted, my exposure dialed in, and my focus point set, I was ready to play with the motion. I started by dropping my ISO to 50 (almost as good as ISO 100, but with slightly less dynamic range), but still couldn’t get the shutter speed long enough without shrinking my f-stop to a less than ideal, diffraction inducing number.
The solution was my Singh-Ray Vari-ND filter. Because my Vari-ND is 77mm, I had to stretch to hold it in front of my 67mm Sony/Zeiss 24-70 f4. Dialing the filter ever so slightly darker between exposures and adjusting my shutter speed to maintain the correct exposure, I ended up with a variety of motion effects. I found that this one, at around 3 seconds, smoothed the water enough while retaining just enough texture for visual interest without being distracting.
Yosemite Winter Photo Workshop
Workshop Schedule || Purchase Prints
A Gallery of Motion
Click an image for a closer look and slide show. Refresh the window to reorder the display.


Fall color explained
Posted on November 27, 2016

Autumn Morning, El Capitan Reflected in the Merced River, Yosemite
Sony a7R II
Sony/Zeiss 16-35 f4
2 seconds
F/16
ISO 50
Like most photographers in the Northern Hemisphere, my fall color season is about finished. But things are just ramping up along the streets near my home in California’s Central Valley (where winter doesn’t really begin until December, and spring’s first blooms start to pop up at the end of January—sorry). While there’s not a lot for me to photograph in my neighborhood, the opportunity to partake of the visual feast without a camera in my hands is refreshing.
I’m also harvesting the fruits the most intense autumn workshop/travel schedule of my photography life, and appreciating all over again how much I enjoy fall photography. Browsing my autumn images, I’m reminded of the need to understand my subjects. That goes double for the why and when of fall color, a blend of science and myth so intertwined that casual observers often resort to memory, anecdote, and lore to fill knowledge voids with partial truth and downright falsehood.
Innkeeper logic
Show up at at the fall color spot that guy in your camera club said was peaking at this time last year, you might find the same trees displaying lime green mixed with just hints of yellow and orange. Ask the old guy behind the desk at the inn, and you’ll get a head shake and confident explanation that, “The color’s late this year—it hasn’t gotten cold enough yet.” Check into the same inn on the same weekend next year, you might find just a handful of leaves clinging to exposed branches—this time, as the old guy hands you the key, he proclaims, “That hot summer got everything started early—you should have been here last week.”
While “expert” testimony like this sounds like objective truth, it only perpetuates the myths surrounding fall color. Fortunately, science has provided a pretty good understanding of the fall color process to all who want to understand.
It’s all about the sunlight
The leaves of deciduous trees contain a mix of green, yellow, and orange pigments. During the spring and summer growing season, the green chlorophyl pigment overpowers the orange and yellow pigments, keeping the trees green. While this chlorophyl is quickly broken down by sunlight, the photosynthesis that turns sunlight into nutrients that nourish the tree, warmth and long days provide the energy to sustain chlorophyl creation through the summer.
As the days shrink toward autumn, things begin to break down. Cells at the “abscission layer” at the base of the leaves’ stem (the knot where the leaf connects to the branch) begin a thickening process that blocks the transfer of carbohydrates from the leaves to the rest of the tree. Meanwhile, movement of nutrients to the leaves is inhibited as well—without these minerals, the leaves’ chlorophyl production dwindles and finally stops. No longer masked by the chlorophyl’s green, it’s time for the tree’s yellow and orange pigments to shine: Color!
Sunlight and weather
Contrary to popular belief, the timing of the onset of this fall color chain reaction is much more daylight-dependent than temperature- and weather-dependent—triggered by a genetically programmed day/night-duration threshold; contrary to innkeeper-logic, the trees in any given region will commence their transition from green to color at about the same time each year (when the day length drops to a certain point).
Nevertheless, though it doesn’t trigger the process, weather does play a significant part in the intensity, duration, and demise of the color season. Because sunlight breaks down the green chlorophyl, cloudy days after the suspension of chlorophyl creation will slow the coloring process. And while the yellow and orange pigments are present and pretty much just hanging out, waiting all summer for the chlorophyl to relinquish control of the tree’s color, the red and purple pigments are manufactured from sugar stored in the leaves—the more sugar, the more vivid their color. Ample moisture, warm days, and cool (but not freezing) nights after chlorophyl replacement has stopped are most conducive to the creation and retention of the sugars that form the vivid red and purple pigments.
On the other hand, freezing temperatures destroy the color pigments, bringing a premature end to the color display. Drought can stress trees so much that they drop their leaves before the color has a chance to manifest. And wind and rain can wreak havoc with the fall display—go to bed one night beneath a canopy of red and gold, wake the next morning to find the trees bare and the ground blanketed with color.
Of course all these weather factors come in an infinite number of variations that make this year’s color timing and intensity a little different from last year’s and next’s. Despite my need to understand nature’s mysteries, it’s this (perceived) randomness, the impossibility of ever knowing for sure what I’ll encounter, that draws me back.
About this image
Yosemite isn’t an inherently great sunrise location. With most of its views facing east, toward shaded subjects beneath the brightest part of the sunrise sky, sunrise light is difficult here. And without clouds, more the the rule than the exception in California, Yosemite sunrises can be rather bland. But Yosemite’s bland sunrises are more than compensated by the first direct sunlight light visible Yosemite Valley, which starts on the highest points a few minutes after the “official” (flat horizon) sunrise, and progresses over the next hour or so until the valley floor is bathed in sunlight. El Capitan is among the first of Yosemite’s prominent features to benefit from this early light.
I have a mental list of go-to El Capitan views for photographing its first light. Among them is a quiet bend in the river, known affectionately (and unofficially) to photographers as “Tahiti Beach,” with views of Cathedral Rocks, El Capitan, and the Three Brothers. Additionally, the river widens and slows here, providing some of Yosemite Valley’s best reflection opportunities as well.
One morning in the first of this year’s two Yosemite fall color workshops, I guided my group to Tahiti Beach for El Capitan’s first light. Clouds ruled the sky as the first light window opened, but fleeting patches of blue gave me hope. And with the deciduous trees across the river displaying their finest golds and oranges, we weren’t lacking for opportunities in the meantime.
The sun broke through suddenly, spotlighting a thin slice of granite near El Capitan’s summit. Unsure how long the opportunity would last, I moved quickly to compose this wide, vertical frame that emphasized the reflection juxtaposed with a thin veneer of colorful leaves floating at my feet. I reminded myself to heed the frequent admonition I issue my workshop groups: the focal point for a reflection is the focus point for the reflective subject, not the reflective surface. In other words, while the leaves floated in water that was just a few feet from my lens, their focus point was much closer than the infinity focus point of the reflection in the same water. I focused on the leaves, confident that the depth of field provided by f/16 at my 18mm would render El Capitan, the trees, and the reflection acceptably sharp.
Another noteworthy exposure setting in this image is my 50 ISO decision. Though the leaves were completely still, there were slight ripples disturbing the river where most of my reflection lay. Stopping down to f/16, dialing my sensor’s sensitivity to ISO 50, combined with a polarizer carefully tuned to cut the reflective glare on the leaves without diminishing the rest of the reflection too much, allowed a 2-second exposure that smoothed the ripples enough to enhance the reflection.
Purchase Prints
Photo Workshop Schedule
A fall color gallery


Supermoon
Posted on November 14, 2016

Supermoon, Half Dome and El Capitan, Yosemite
Sony a7RII
Tamron 150-600 (Canon-mount with Metabones IV adapter)
1/3 second
F/9
ISO 100
The media tends to distort facts and blow events out of proportion. Perhaps you’ve noticed. The latest example is this week’s “supermoon,” an event heralded on TV, in print, and online like the Second Coming. Okay, now for a little perspective. Despite hype to the contrary, a supermoon occurs at least twice, and up to five times, in a year. In fact, our last supermoon was all the way back in October, and the next one isn’t until December.
But, as I’m sure you’ve heard, this month’s supermoon was special, an event the likes of which we haven’t seen since 1946, and won’t see again until 2034. True enough. But exactly how special was it? Not nearly as special as you might have heard: the diameter of the “epic” November supermoon was only one-half of one percent (.57) larger than the October full moon, and four-fifths of one percent (.84) larger than the December full moon—differences that are impossible to discern with the naked eye. Next year we’ll get two moons that are more than 99 percent the size of this month’s supermoon, and last year we had four.
So why was I out taking pictures of the full moon Sunday night? Because I think every full moon is beautiful, regardless of its size, and I take any opportunity to photograph it over my favorite landscapes. Which is also why each fall I schedule a workshop in Yosemite to coincide with the full moon.
Thursday night my Yosemite Autumn Moon workshop group photographed an 82% (of full) waxing gibbous (on its way to full) moon above Valley View at sunset. For Friday night’s sunset, from a quiet beach beside the Merced River we glimpsed through clouds an 87% moon rising just right of Half Dome. Saturday’s sunset found us beneath a magenta sky at Tunnel View to witness the 96% moon ascend between Sentinel Dome and Cathedral Rocks.
The workshop’s grand finale came Sunday night, when we gathered at the Half Dome vista on Big Oak Flat Road. Though I rarely encounter other photographers for any of my moon rise/set shoots, limited parking and tripod space here prompted me to arrive an hour before sunset. That turned out to be a fortunate decision, as within 30 minutes of our arrival the parking lot was brimming beyond full and photographers swarmed the nearby rocks like ants at a picnic.
With an hour to kill, I made sure everyone in my group was ready (but by now, this being our fourth moonrise, they were experienced veterans) and chatted with other photographers nearby. Comparing notes, it seemed that most (all?) of the other photographers had relied on apps like The Photographer’s Ephemeris and Photo Pills to plot the moon’s arrival location and time, while I was the only one clinging to my old fashioned topo map, scientific calculator, trigonometry plotting approach. (I do it this way because I’ve been plotting the moon since long before the apps were available, I feel like I can be more precise, and I enjoy it—not necessarily in that order.)
In the viewfinder of my Sony a7R Mark II, atop my tripod and armed with my Tamron 150-600 lens to enlarge the moon as much as possible, was the composition I wanted—assuming the accuracy of my calculations. The consensus among others seemed to be that the moon would appear from behind Half Dome’s right flank, anytime between 5:00 and 5:10 p.m. I stuck to my guns that the moon would show up at about 5:05, and that it would be straight over the top of Half Dome. While I saw this more as an opportunity to check my plotting method’s accuracy than a competition between methods, it was pretty thrilling when the moon popped into view right on schedule and on target. Take that, technology!
Since the moon didn’t appear until a full fifteen minutes after sunset, the extreme dynamic range (very dark landscape beneath a daylight-bright moon) made this an extremely tricky exposure for anyone (like me) not interested in compositing two images (one with the moon properly exposed, another with the scene properly exposed). To capture this scene with a single click, I closely monitored the pre-capture “zebra stripes” highlight alert in my a7RII and pushed my exposure 2/3 stop after the first hint of the alert appeared. To hedge my bets and give myself processing options, I varied my exposure 1/3 to 2/3 of a stop in either direction (an exception to my standard workflow because the moon is too small to register on the histogram).
The result was a scene that looked quite dark on my LCD, and a moon with no detail. No problem, I reassured myself, for my a7RII’s ridiculous dynamic range. This morning in Lightroom I adjusted the white balance, pulled up the shadows, and pulled down the highlights. In Photoshop I applied a moderate dose of Topaz DeNoise and did a few minor dodge/burn moves to get the image you see here.
One more thing
The size of the moon in this image has virtually nothing to do with the fact that this was a “supermoon,” and virtually everything to do with the fact that I was far enough away to be able to use a 600mm lens. Click below to read about how to capture your own big moon:

Photo Workshop Schedule
The Moon in all Shapes and Sizes
Click an image for a closer look and slide show. Refresh the window to reorder the display.


The night sky and me
Posted on August 12, 2016
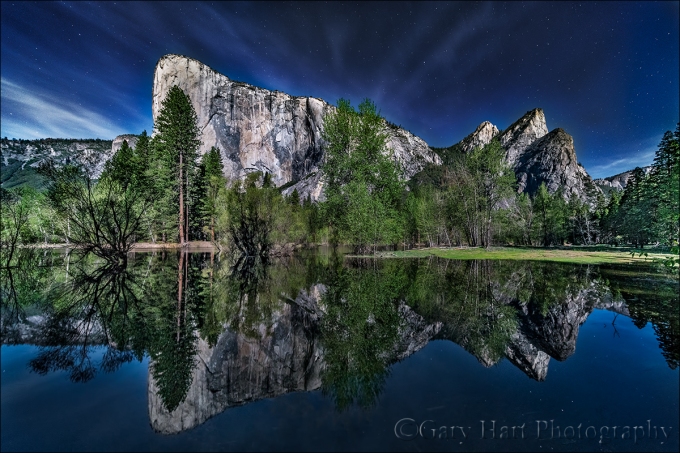
Moonlight Reflection, El Capitan and the Three Brothers, Yosemite
Sony a7R II
Canon 11-24 f/4L with Metabones IV adapter @11mm
20 seconds
F/4
ISO 3200
My relationship with the night sky started when I was ten. Astronauts were my generation’s cowboys, so when I was given a castoff, six-inch reflector telescope by an amateur astronomer friend of my dad, I jumped at the opportunity to explore the celestial frontier on my terms. On clear nights my best friend Rob and I dragged that old black tube onto the front lawn and pointed it, randomly and full of wonder, at the brilliant points of light overhead. With guidance from our dads and the books of Herbert S. Zim, we learned the difference between stars, which despite their great size and temperature, are at such great distance that even the strongest telescope only sees discrete points of light, and planets, nearby worlds reflecting sunlight, which my telescope revealed as glowing disks.
With that telescope Rob and I searched in vain for comets and galaxies, watched Venus and Mercury cycle through phases just like the moon’s, tracked the nightly dance of Jupiter’s Galilean moons, and monitored the changing tilt of Saturn’s rings. Suddenly and hopelessly infected with the astronomy bug, on camping trips I declined the luxury of the family tent in favor of a sleeping bag beneath more stars than I imagined possible. There, nestled to my neck in the bag’s warmth, I’d stretch beneath the boundless ceiling, counting “shooting stars” and scouring the sky for satellites, fighting sleep for as long as my eyelids could hold out. In my later teen years I discovered backpacking and with it skies that inspired ponderings of infinity. My first college major was astronomy, a most impractical aspiration that I managed to correct before quantification of the universe spoiled my appreciation of its elegance.
In my early twenties I discovered photography, but, frustrated by my film camera’s inability to capture the night sky’s beauty, quickly moved on to more terrestrial subjects. Fast forward to the twenty-first century, when the advent of digital photography offered light capturing and processing capabilities impossible with film. My first night subject was the Big Dipper; since then I’ve tried to include some form of night photography in most of my workshops and as many personal shoots as possible, seeking to use my camera’s unique perspective to convey the emotion the night experience brings me, rather than attempt the impossible task of recreating the sky literally.
Among other subjects, I’ve developed a particular fondness for photographing the gold/blue transition-zone separating day and night. Arriving on location well before sunrise gives me a front-row view of the indigo night’s slow retreat in favor of the golden promise of a new day; lingering long after the sun sets, I watch the day’s vestiges linger on the horizon, as if waiting with me for the stars to materialize.
About this image
This year’s Yosemite Moonbow and Wildflowers workshop group had the good fortune to photograph Yosemite brimming with more water than I’ve seen in years. A particular highlight was this location beside the Merced River, one of my favorite early morning spots. The morning we arrived we found my normal vantage points flooded beyond recognition, but rather than let the flooding turn us around, I explored the new shoreline and found view through the trees onto a crystal clear reflection. We stayed and photographed here until bad light and empty stomachs finally drove us to breakfast.
Excited by our good fortune that morning (read The Power of Reflections), I offered to return that night with anyone who wanted to photograph the scene by moonlight. Though I already had a moonbow shoot scheduled for later in the workshop, the moonlight potential here was so great that I wanted to at least give everyone the option of photographing it (on the other hand, with such early mornings, I knew from experience that I needed to give everyone the option to return to the hotel for an early bedtime).
Despite a long drive back from our sunset at Glacier Point, about half the group still joined me for what turned out to be a very memorable moonlight shoot. The already somewhat limited space was made even more difficult by the darkness (we were shaded from the moonlight by trees and the valley wall behind us), but we made it work with great cooperation and no shortage of laughter.
Among other things, this image highlights one of the great joys of photography with today’s advanced technology: the camera’s improving ability to reveal a world previously obscured by night’s dark curtain. (It will only get better.)
Photo Workshop Schedule
A moonlight gallery


The Power of Reflections
Posted on July 1, 2016

Spring Reflection, El Capitan and Three Brothers, Yosemite
Sony a7R II
Canon 11-24 f/4L with Metabones IV adapter @11mm
1/60 second
F/8
ISO 100
Reflection
Dictionary.com: The return of light, heat, sound, etc., after striking a surface.
Okay, so that’s pretty basic. How about this one?
Wikipedia: The change in direction of a wavefront at an interface between two different media so that the wavefront returns into the medium from which it originated
Whoa, I hope that’s not on the test.
Who doesn’t love the soothing tranquility of a good reflection? And like a metaphor in writing, a reflection is an indirect representation that can be more powerful than its literal double by virtue of its ability to engage the brain in different ways than we’re accustomed. Rather than processing the scene directly, we first must mentally reassemble the reflection’s reverse world, and in the process perhaps see the scene a little differently.
Reflections are a powerful photographic tool as well. Water’s universal familiarity makes it an ideal subject for photographers frustrated by their camera’s static representation of our dynamic world. Just as we freeze in space or blur a waterfall to express turbulent motion, we can include a reflection to convey serene peace.
Water reflections come in many forms, from a mirror-sharp reverse of a mountain atop a still pool, to an abstract shuffle of color and texture on a choppy lake. Without getting too far into the physics of light, it’s important to understand that every object we see (and photograph) comes to us courtesy of reflected light. For example, when sunlight strikes El Capitan, some of the sun’s photons bounce straight back into our eyes, and there it is: El Capitan!
But other photons striking El Capitan head off in different directions—some are captured by other sets of eyes, and others land on the surface of the Merced River. Some of these photons pass beneath the river’s surface to reveal the submerged riverbed, while others bounce off. The ricocheting photons that travel from El Capitan and bounce off the river, reach our eyes as a reflection. In other words, what we call a reflection is in fact re-reflected light (reflected first from El Capitan, then by the river).
Mirror reflection recipe
The ingredients for a crisp, mirror reflection like the El Capitan image at the top of the page is pretty simple: still water, a reflection subject that’s much brighter than the water’s surface (the greater the contrast the better), and a view angle that matches the angle from the water’s surface to the reflection subject. (The best reflections are usually found on shaded water because there are fewer photons to compete with the photons bouncing from the reflected subject.)
The El Capitan reflection above was a perfect confluence of reflection conditions. Clean, still air, dense shade on the river, and El Capitan’s fully exposed, reflective granite, make early morning the best time for El Capitan reflections. On this April morning I made my way down to the Merced River hoping to photograph the first light on El Capitan reflected in the Merced River. Finding my route down to the river blocked by spring flooding, I was forced to improvise. The morning air was clean and calm, and the ephemeral lake was mirror-still.
Circling the flooded meadow, I found a gap in the trees that opened onto the most complete view and reflection of El Capitan and the Three Brothers I’ve ever seen. So complete in fact, that I couldn’t include it all with my 16-35mm lens at its widest focal length. Fortunately, I was able to borrow a Canon 11-24 lens and Metabones IV adapter from a friend (thanks, Curt!), just wide enough to fit the entire scene at the lens’s shortest focal length.

Sunset Palette, Half Dome from Sentinel Dome, Yosemite
Playing the angles
Understanding that reflected photons leave the water’s surface at the same angle at which they arrive—imagine the way a tennis ball bounces (if it weren’t affected by spin, wind resistance, or gravity)—helps us get in position for the reflection we want.
A few years ago I found myself atop Sentinel Dome right after an intense rain shower had turned indentations in the granite into small, glistening pools. Rather than simply settle for the vivid sunset coloring the clouds above, I decided to include the sunset reflected in the pools as well. At eye-level the pools reflected blue sky, so I dropped my tripod as low as it would go, almost to granite level, positioning my lens at the same angle to the pools that the red light leaving the clouds struck the water.
When the water’s in motion

On the Rocks, El Capitan and the Merced River, Yosemite
As spectacular as a crisp, mirror reflection in still water is, it’s easy to overlook the visual potential in a reflection that’s not crisp, or to forget your camera’s ability to render a soft or abstract reflection much better than your eyes view it. While a crisp reflection often dominates the primary subject in an image, a splash of reflected color or shape can provide a striking accent to a dominant primary subject. And a reflection disturbed by the continuously varying angles of rippled or choppy water magically appears when a long exposure smoothes the water’s surface.
In the image on the right, the El Capitan reflection undulating atop the Merced River was barely perceptible to my eyes. But the reflection came to in a 25 second exposure achieved with the help of 2-stop hard graduated neutral density filter that subdued the day’s last rays on the clouds and El Capitan, and a neutral polarizer (with the reflection dialed up) that cut the light on the entire scene by a couple of stops. And since a reflection is never as bright as the actual scene, using a GND meant I need to do a little dodging and burning in Photoshop.
Where to focus
Another often misunderstood aspect of reflection photography is where to focus. Though it seems counterintuitive, the focus point of a reflection is the reflection subject, not the reflection surface. This isn’t such a big deal in a scene like the El Capitan reflection at the top of the post, where the focus point of everything of visual significance is infinity, but it’s a very big deal when you want both your reflection and rocks or leaves on the nearby water surface sharp.

Autumn Reflection, El Capitan, Yosemite
The El Capitan reflection on the right is very different from the El Capitan reflection above, where the extreme depth of field ensured sharpness had I focused on anything in the scene or the reflection. But here the leaves that were my scene’s primary emphasis were just a couple of feet from my camera, while El Capitan was several thousand feet distant. Even though the leaves floated atop the El Capitan reflection, focusing on El Capitan would have softened the leaves. To increase my depth of field, I stopped down to f/18 and focused several feet into the foreground leaves, then magnified the image on my LCD to verify that all of the leaves were sharp. Though El Capitan is slightly soft, a soft reflection is far more forgivable than a soft foreground.
Think ahead
It seems that reflections often feel like a fortuitous gift that we just stumbled upon. But given that reflections are entirely beholden to the laws of physics, they’re far more predictable than many of the natural elements we photograph. Taking a little time to understand the nature of reflections, and how they’re revealed by a camera, enables photographers to anticipate their appearance.
For example, in Yosemite I know that low flow makes autumn the best time for reflections in the Merced River. On the other hand, when the Merced is rushing with spring runoff, Yosemite’s meadows often shimmer beneath tranquil vernal pools. I plan many trips (and workshops) to take advantage of these opportunities.
Photo Workshop Schedule
A Reflection Gallery
Click an image for a closer look and slide show. Refresh the screen to reorder the display.


Stop the madness
Posted on February 25, 2016
Horsetail Fall and Clouds, El Capitan, Yosemite
Sony a7R II
Sony/Zeiss 24-70 f4
1/40 seconds
F/8
ISO 160
For some background, read about photographing Horsetail Fall
Anyone who doesn’t understand what all the Horsetail hubbub’s about hasn’t seen it. When all the conditions align—ample water (rain and/or snowmelt), sun position, and unobstructed sunset light—there’s nothing in the world that compares. And while these convergences are rare, that doesn’t seem to deter the gawkers who show up to witness it.
Conventional wisdom says that the end of February is the best time to photograph Horsetail Fall. And if there’s one thing many years of photography has taught me, it’s that trophy-hunting photographers rarely deviate from conventional wisdom. Because Yosemite’s proximity to San Francisco, Los Angeles, and all the Central Valley cities makes it an easy target for photographers with only enough time for a quick trip, I usually avoid February’s final two weekends when I schedule my Yosemite Horsetail Fall workshop. But this year I couldn’t resist the full moon, which I knew I could align with Half Dome on multiple workshop nights.
For a workshop leader, another Horsetail Fall dilemma is that when the sunset light isn’t just right, there are many much better photo options elsewhere in the park. Spending an afternoon waiting for Horsetail Fall to do its thing on a day when the light decides to take the day off (always a distinct possibility) means pretty much wasting the best time of day for photography in Yosemite. That problem is compounded by the fact that the western horizon isn’t visible from the valley floor, making it impossible to anticipate what the sunset light is going to do until it’s doing it. For each time I’ve been surprised when a shaft of light slips beneath overcast skies to illuminate El Capitan at the very last minute, I can cite a clear sky sunset that was snuffed by an unseen cloud just as the light started to get good.
My plan for this workshop was to go for Horsetail Thursday evening, and again Friday if Thursday didn’t work out, then concentrate on the moon for the final two sunsets. I figured by the time Saturday came, anyone whose life depended on photographing Horsetail Fall would have enough experience to do it on their own.
The workshop started Thursday afternoon, and because it had snowed earlier that day, I postponed the orientation until after dinner so we could go straight out and start shooting. After an hour or so photographing light-catching clouds and waterfall rainbows (Horsetail and Bridalveil Falls) from Tunnel View, we beelined to the picnic area beneath El Capitan. Despite the fact that we were far from the first photographers there, my group managed to score the last three legal spaces in the parking lot (that’s not to say others arriving after us weren’t able to employ creative parking strategies), and we found plenty of room to set up and wait with fingers crossed for the Horsetail show.
Aside from a handful of for-the-record images (to remind myself of the conditions for each year), I rarely photograph Horsetail anymore. But conditions that evening were so nice that at one point I actually had both tripods set up, one with my a7RII and 24-70 for wider images, the other with my a6000 and 70-200 for tighter compositions. Rather than the standard stand-around-and-wait-for-the-light-to-get-good experience that’s the hallmark of a Horsetail shoot, lots of water in the fall and clouds swirling on and around El Capitan made our entire 90-minute wait photographable.
While I’ve seen Horsetail get more red than what we saw, everyone was so thrilled that I was able to declare Horsetail Fall captured for 2016, freeing my group to spend the rest of the workshop’s sunsets concentrating on other things. Phew.
It wasn’t until we tried to navigate Yosemite Valley during the workshop’s final three days that I fully appreciated how fortunate we were to be done with Horsetail Fall. I’ll spare you the gory details and instead just give you the bullet points of what we witnessed Friday, Saturday, and Sunday:
- The Southside Drive parking area (with room for a dozen or so cars) closest to the most popular Horsetail View on that side of the river was full by 9 a.m. So were all the prime views of the fall at that location.
- By 3 p.m. (sunset was about 5:45) the parked cars, crammed bumper-to-bumper in Southside Drive’s coned-off left lane, stretched two miles, from just past the Cathedral Beach to Sentinel Meadow (I clocked it on my odometer).
- Many of the early arriving, legally parked cars were completely blocked by a second row of late-arriving cars whose drivers apparently decided that merely being able to fit into an area made it parking spot. The pinned first-arriving drivers would be stuck until the late-arriving drivers moved their cars.
- Many cars had simply gone off-road and parked in the forest, apparently deciding that paying towing and/or ticket charges was preferred to parking legally and walking a mile or two.
- Several times traffic in the lane that was supposed to be moving (not designated for parking) stopped long enough that drivers got out to find out what the holdup was. The only time I saw the cause, it was a driver using the driving lane to turn around and squeeze perpendicularly between two parallel-parked cars.
- On both sides of the road, every possible square inch of forest containing even a partial view of Horsetail Fall was crammed full of tripods, sometimes stacked 100 photographers deep (I didn’t actually count, but I think that’s a pretty good estimate). I heard through the grapevine that the general mood at these scrums was testy.
- I personally redirected many photographers poised to photograph the wrong waterfall—some were clustered around Bridalveil Fall, others had targeted Ribbon Fall.
- We saw man getting handcuffed and arrested by rangers. It may have been a routine DUI arrest, but I wouldn’t be surprised if it was some kind of Horsetail-view real estate violence. Interestingly, that was the only time I saw rangers all weekend—it was almost as if they’d thrown up their hands in defeat.
- After sunset, the lines at the Yosemite Lodge cafeteria stretched out the door, and we heard from others that the cafeteria actually closed for the night while there were still hundreds outside, waiting to get in.
- Gridlock exiting the park after sunset was so bad that some drivers just gave up.
While I can’t fix the crowds, I do believe the Horsetail Fall experience can be both rewarding and enjoyable. Despite the crowds, I still enjoy it after all these years, and I never cease to be awed by the beauty. Here my suggestions for anyone considering joining the fray next year:
- Avoid the weekends. Period.
- While I think the best views on Southside Drive are better than the views from (and near) the El Capitan picnic area, the dense forest near the river means far fewer good views on Southside Drive. Also, the proximity to the river means photographers will to include the river in their frame—they tend to be less than thrilled when someone encroaches on their frame. This all adds up to more tension on Southside Drive.
- Conversely, the mood at the El Capitan picnic is generally more like a tailgate party, with people mingling and barbecuing. That’s because the view of Horsetail Fall is much more open than on Southside Drive, and poor foreground options make it almost exclusively a telephoto location. In other words, everyone is point up with a telephoto lens and no one is in anyone else’s way.
- Arrive early, or be prepared to walk a mile or more.
- If I weren’t leading a group and really wanted to maximize my mobility, I’d bring a bike and just park wherever it’s convenient.
And don’t forget that you have options. If the crowds become too much for you, you could simply forget Horsetail Fall and concentrate on the other great winter scenes that are everywhere in Yosemite.
Avoid the mayhem in my
2017 Yosemite Horsetail Fall and Winter Moon photo workshop
Winter in Yosemite


A Horsetail of a different color
Posted on February 22, 2016
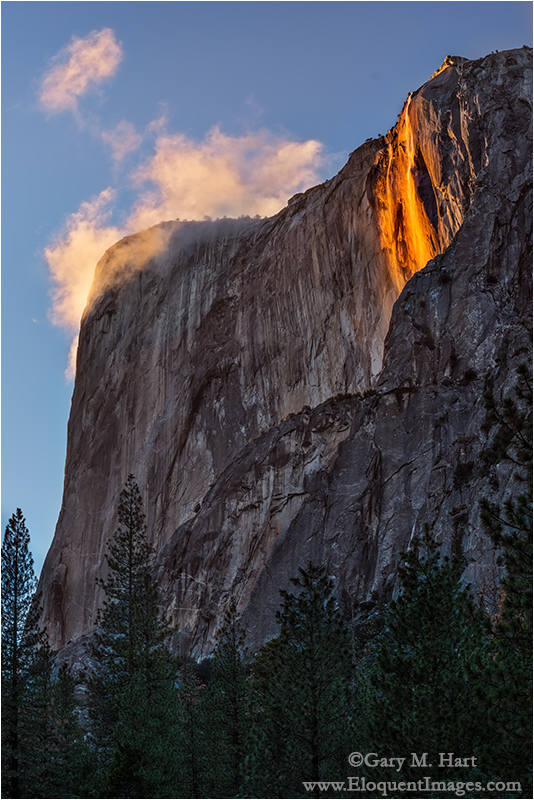
Horsetail Fall Rainbow, El Capitan, Yosemite
Sony a7R II
Tamron 150-600 (Canon-mount with Metabones IV adapter)
1/250 second
F/8
ISO 125
I just returned from my 2016 Yosemite Horsetail Fall photo workshop. I’ve the photographed the midday light shafts at Upper Antelope Canyon, Schwabacher Landing at sunrise, Mesa Arch at sunrise, winter sunset at Pfeiffer Arch, and Horsetail fall each February for over ten years. But nothing compares to the mayhem I witnessed this weekend at Horsetail Fall. Not even close. I’ll be writing more about the experience soon, but right now the only words I have are: Oh. My. God.
But anyway…
About an inch of snow fell the night before my workshop’s 1:30 p.m. Thursday start. Because the storm was clearing and the snow was melting fast, I postponed the orientation that always precedes each workshop’s first shoot and, following quick introductions, hustled the group straight out to photograph what would likely be the best conditions of the workshop.
Our first stop was Tunnel View, and it didn’t disappoint. I rarely get my camera out at Tunnel View unless I can get something truly special, and I had no plan to that afternoon. But the storm had rejuvenated Horsetail Fall enough to make it clearly visible, a rare treat from that distance, and I decided to click a couple of frames.
Extracting my a7RII, I attached my Tamron 150-600 lens and targeted the fall, clicking a few images of the fall amidst shifting clouds. When the clouds opened enough to illuminate El Capitan, I did a double-take when splashes of red, yellow, and violet appeared in Horsetail’s wind-whipped mist.
After alerting my group to the rainbow, I zoomed all the way to 600mm and snapped a few vertical images of my own. With the wind tossing the spray, each image was a little different from the one preceding it. As I clicked this frame, an ephemeral spiral of wind spread the mist, making it the most colorful of the group.
As the sun dropped behind us, the rainbow climbed the fall and finally disappeared. Soon another rainbow appeared, this one at the base of Bridalveil Fall across the valley. We stayed long enough to photograph that rainbow, then headed out for what turned out to be a very successful, more classic Horsetail sunset shoot. Our Horsetail success that night allowed us to concentrate on other Yosemite subjects the rest of the week, while thousands of Horsetail Fall aspirants jockeyed for parking and a clear view through the trees.
Stay tuned for more about the Horsetail Fall experience, which has now officially achieved ridiculous status.
Let me help you photograph Horsetail Fall next February
~ ~ ~
Or, (if you’re brave) you could do it yourself
Ten Years of Horsetail Fall Images
(Look closely at the horizontal, “Twilight Mist” image to see Horsetail’s location)


Doing the math
Posted on January 13, 2016

Autumn Snow, El Capitan, Yosemite
Sony a7R II
Sony/Zeiss 16-35 f4
1/160 second
F/11
ISO 800
A few days ago Sony asked me to write a couple of small pieces on “my favorite landscape lenses.” Hmmm. My answer?
My favorite lens is the lens that allows me to do what I need to do at that moment. In fact, to avoid biasing my creativity, I consciously avoid approaching a scene with a preconceived notion of the lens to use.
What I mean is, when I charge into a scene too committed to a lens, I miss things. And “favorite” tends to become a self-fulfilling label that inhibits creativity and growth. Rather than picking a favorite, I’m all about keeping my mind open and maximizing options.
I went on to say:
Because the focal range I want to cover whenever I’m photographing landscapes is 20-200mm, the three lenses I never leave home without are my Sony/Zeiss 16-35 f4, Sony/Zeiss 24-70 f4, and Sony 70-200 f4.
I have other, “specialty” lenses that I bring out when I have a particular objective in mind. For example, my Tamron 150-600 when I’m after a moonrise or moonset, or my Rokinon 24mm f1.4 when the Milky Way is my target. And even though I have a bag that will handle all of these (plus three bodies, thank you very much Sony mirrorless), I need to weigh the value of lugging lenses I probably won’t use against inhibited mobility in the field.
Ruminating on this favorite lens thing kindled my curiosity about which lenses I really do favor—so I did the math. (Okay, I let Lightroom Filters do the math.) Of the 10,395 times I clicked my shutter in 2015, here’s the breakdown:
Primary lenses (always in my bag)
- Sony/Zeiss 16-35mm f4: 3064
- Sony/Zeiss 24-70mm f4: 3529
- Sony 70-200mm f4: 1566
Specialty lenses
- Rokinon 24mm f1.4 (night only): 189
- Zeiss Distagon 28mm f2* (night only): 161
- Tamron 150-600mm* (mostly moon and extreme close focus): 1886
*Canon Mount with Metabones IV adapter
There are a lot of qualifiers for these numbers—for example, the total may be skewed a bit for the 24-70 as it is the lens I use most for lightning photography, and when my Lightning Trigger is attached and an active storm is nearby, it can go through hundreds of fames in a relatively short time (even when I’m not seeing lightning). Also, since getting the Tamron 150-600, I sometimes used that lens as a substitute for the 70-200, something I virtually never did with Canon and my 100-400 (which I didn’t particularly like). And I haven’t used the Zeiss since getting the Rokinon, so I really could lump those two together.
What does all this mean? I don’t know, except that I have a fairly even distribution between wide, midrange, and telephoto. That’s encouraging, because I never want to feel like I’m too locked into a single lens. But two things in particular stand out for me: the high number of 16-35 images, and the low number of 70-200 images.
The 16-35 number is significant only in comparison to my Canon 17-40 and 16-35 numbers from previous years, which were much lower (especially for the 17-40). Wide angle clicks went up quite a bit when I replaced my Canon 17-40 (which I was never thrilled with) with the Canon 16-35 f2.8 (which I liked a lot more). But I don’t think they were as high as they are with my Sony/Zeiss 16-35, which is probably a reflection of how pleased I am with the quality of those images, combined with that lens’s compactness. The jury is out on whether it signals a transition in my style, but it’ll be worth monitoring.
The most telling statistic to me is how few 70-200 images I took. I really like the lens, so it’s not a quality thing. And as I said earlier, some of that is an indication of how much I enjoyed shooting with the big Tamron, but that’s not the entire answer. My Canon 70-200 f4 was one of my favorite lenses, and I always enjoyed using it to isolate aspects of a scene, and maybe I’m not doing that so much since my switch to Sony. So here’s a goal for 2016: Don’t forget the 70-200. Stay tuned….
About this image
This is another image from my recent Yosemite snow day. It’s just another example of how much I enjoy photographing Yosemite when its seasons are changing—either snow with autumn leaves, or snow with spring dogwood and waterfalls.
On this chilly, wet morning, during one of the breaks when the clouds lifted enough to expose Yosemite’s icons, I was at a spot above the Merced River with a nice view of El Capitan. I like this spot for the dogwood tree I can align with El Capitan, and because it’s not particularly well known. I found it about ten years ago while wandering the bank of the Merced River looking for views (something I encourage anyone who wants to get serious about photographing Yosemite to do).
I tried a few different things here, starting with closer compositions using my 70-200 and 24-70 to highlight the snow on the leaves with El Capitan in the background. I eventually landed on this wide angle view that used the snow-dusted dogwood tree to balance a more prominent El Capitan. Because the opening is narrow here, I struggled with how to handle the tree on the left. I eventually decided, rather than featuring it or eliminating it, to just let its textured trunk frame the scene’s left side.
Sharpness throughout the frame was essential. With the trunk less than three feet away, the depth of field benefit of shooting at 16mm was a life-saver, giving me front-to-back sharpness at my preferred f11 (the best balance of DOF, lens sharpness, and minimimal diffraction)—as long as I focused about five feet away. Focus handled, my next concern was the breeze jiggling the leaves. At ISO 100, my shutter speed in the overcast, shaded light was 1/20 second; increasing my ISO to 800 allowed a much more manageable 1/160 second. Click.
Workshop schedule
Yosemite in transition
Click an image for a closer look, and a slide show. Refresh the screen to reorder the display.


