Eloquent Images by Gary Hart
Insight, information, and inspiration for the inquisitive nature photographer
Four sunsets, part three: A marvelous night for a moondance
Posted on February 19, 2014
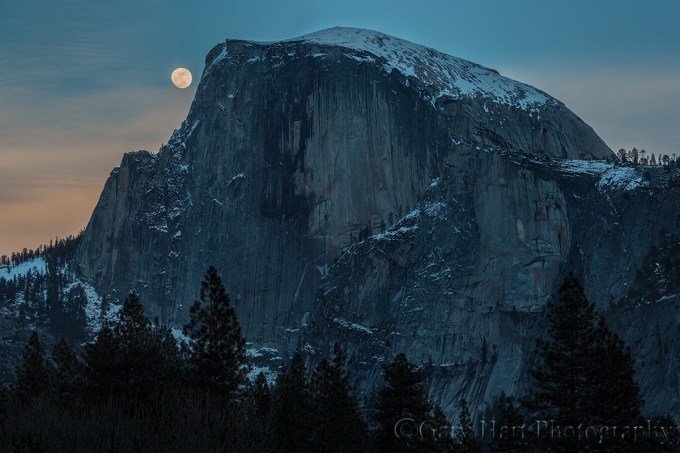
Moondance, Half Dome, Yosemite
Canon EOS 5D Mark III
1/5 second
125 mm
ISO 100
F11
How many Yosemite moonrise images are too many? I have no idea, but I’ll let you know as soon as I find out.
- Read the first in the series here: Four sunsets, part one: A Horsetail of a different color
- Read the second in the series here: Four sunsets, part two: Classic Horsetail
5:10 p.m.
I stand on the bank of the Merced River, eyes locked on the angled intersection of Half Dome’s sharp northeast edge and its adjacent, tree-lined ridge. If the clouds cooperate, and I’ve done my homework right, a nearly full moon (96%) will be poking above this intersection any minute. We’d been fortunate the first two sunsets of my workshop; dare I hope for one more?
If the moonrise happens as I plan (hoped), the sight could rival what we’d gotten from Horsetail Fall on the first two nights of our workshop. But right now the sky behind Half Dome is smeared with thin-ish clouds—how thin I won’t know until the moon appears (or doesn’t). Gazing heavenward, I find it odd that a moonrise, something that can be predicted with such absolute precision, is so subject to weather’s fickle whim. And the clouds aren’t my only concern—just a half-degree error in my plotting would put the moon behind Half Dome and out of sight.
Few things in nature thrill me more than a moonrise. Camera or not, crescent or full, I love everything about a it: the obsessive plotting and re-plotting that gets me out there in the first place; the hand-wringing anticipation while I await the moon’s appearance; the first white pinprick of moonlight on the horizon (Is that it? There it is!); the ridge-top evergreens silhouetted against the rising disk; the glowing sphere hovering above the darkening landscape; and finally, the moonlit landscape beneath a star-studded sky. Everything.
So it shouldn’t surprise that virtually all of my photo trips—workshops and personal—are scheduled around the moon’s phase and some condition of the night sky. Sometimes I target a full moon, sometimes a crescent, and sometimes I want no moon at all (for dark skies that reveal the most stars)—the choice depends on the kind of moonrise and/or night photography I think best suits the landscape I’m traveling to photograph. But because this workshop is timed to coincide with the few February days that Horsetail Fall might turn a molten red at sunset, a calendar window I shrink even further to avoid the crowds that flock a little later in February, the moon is rarely a priority when I schedule the Horsetail Fall workshop. But I still check. And when I started planning my 2013 Yosemite Horsetail Fall workshop a couple of years ago, I was thrilled to discover that not only could I could time this trip for a full moon, I’d also be able to align that moon with Half Dome at sunset. Twice.
5:13 p.m.
I check my watch: 5:13. Sunset is 5:35; the moon should appear almost adjacent to Half Dome at about 5:15, then slowly rise, like a ball rolling uphill along Half Dome’s left side. By 5:30 the disk will have almost reached Half Dome’s summit, less than its own width with from the granite face. That is, if I’ve done my homework right. 5:14.
Any minute now….
I’d done all my figuring months in advance, which of course didn’t stop me from double-, triple-, quadruple-, and so-on-checking my results in the days leading up to my waiting beside the Merced River with a dozen or so other photographers. Part of my anxiety is the particularly fortuitous alignment of location, moon, and time that put the moon appearance above Half Dome right in my “ideal” sunset window as viewed from one of my favorite Yosemite locations. Not only does this spot provide a clear, relatively close view of Half Dome, it also is at a nice, reflective bend in the Merced River. Even without the moon this is a nice spot, end everyone in the group seems to be finding things to photograph. But I want the moon tonight. Really, really want the moon.
(You really don’t need to read this section)
My moonrise/set workflow was in place long before smartphones apps and computer software laid it all out for any photographer willing to look it up. But those tools are new tricks and I’m an old dog. So here’s how I’ve done it for years:
- Use my topo map software to determine the latitude and longitude of the location I want to photograph.
- Give my location’s latitude and longitude to my Focalware app (or, if I need the data to be a little more granular, the US Naval Observatory website), which returns the moon and sun rise/set altitude (degrees above a flat horizon) and azimuth (the angular distance relative to due north, from 0 to 360 degrees—imagine a clock: 12 is 0 degrees; 3 is 90 degrees; 6 is 180 degrees and so on).
- Next I plug the moon’s altitude/azimuth for my location into the plotting tool of my computer’s mapping software. This draws a line from my location (where I’ll be with my camera) to the location of the moonrise (or set). Most importantly, the line shows the moon’s alignment with whatever landscape feature I’m interested in (such as Half Dome). It also gives me both the distance and the elevation change between my location and the point above which it will rise.
- Finally, I use the elevation and distance data with the trig functions of a scientific calculator to get the altitude to which the moon must rise before it’s visible from my vantage point.
If this all sounds convoluted, that’s probably because it is. I suggest that you try something like The Photographer’s Ephemeris or Photo Pills, which does all this for you. But like I say, that’s a new trick….
5:15 p.m.
I squint, hoping to engage my x-ray vision enough to make out the moon’s outline through the clouds. Nothing. With conditions fairly static, the group has gotten their shots and is chatting more than clicking. Moon or not, the photography will improve as the light warms toward sunset. I walk uphill, away from the river and slightly upstream to improve my angle of view. Still nothing. (Did Ansel Adams experience this angst?)
We’ve reached the time that I expect the moon to appear. I’ve been plotting the moon long enough to be fairly confident within about one moon’s width (a half degree in either direction) of where it will rise, and within plus/minus two minutes of when it will rise. But the whether of seeing a moonrise depends on, well, the weather. Will rain, snow, or even just a rouge cloud shut us out? There’s really no way to know until the day arrives. And sometimes, for example this very instant, I can’t tell whether the sky will cooperate until I actually see the moon.
I’ve learned that the best time to photograph a full moon (when I say “full,” I often mean almost full, generally between 95 and 100 percent of the complete disk illuminated) is during a ten minute window straddling sunset. Much earlier and the light isn’t particularly interesting, and there isn’t enough contrast between the moon and the sky for the moon to stand out dramatically; much later and there’s too much contrast between the moon and everything else in the scene for the camera to handle.
Choosing this location introduces another unknown. Remember when I said that I can pinpoint the moonrise within about its width? Well, in this case that margin of error is just enough to give me pause, because rising slightly to the right of where I think it will rise puts the moon behind Half Dome until about five minutes after sunset. Sentinel Bridge, just a short distance downstream, would have been safer, but the Sentinel Bridge Half Dome shot is far more common, the bridge is usually teaming with people at sunset, and the moon would have been a little higher in the sky during “prime time.” So here we stand.
5:17 p.m.
What’s that faint white blob in the clouds? Without saying anything I squint and look closer. Sure enough, there it is, barely visible, less than one degree above the ridge (its rise above the ridge a couple of minutes ago must have been obscured by the clouds), pretty much where I expect it. Phew. I announce the moon’s arrival to the rest the group, but need to guide their eyes to it. As everyone’s attention returns to their cameras, I cross my fingers for the clear sky in its path to hang in there until at least sunset.
5:25-5:45 p.m.
The moon finally climbs above the clouds and I exhale. Still daylight bright, it now makes a striking contrast against the darkening sky. For the next fifteen minutes we shoot continuously, pausing only to recompose and monitor the highlights. Compositions, which I’d had everyone practice before the moon arrived, range from wide reflections that reduce the moon to a tiny accent, to tight isolations of the moon and Half Dome’s face.
As sunset approaches, the biggest concern becomes those lunar highlights—too small to register on the camera’s histogram, the moon’s face is easily blown out as we try to give the darkening foreground more light. Before we started I made certain everyone has engaged their camera’s Highlight Alert (“blinking highlights”) feature. They all know that when the moon starts flashing, they’ve reached the exposure threshold and must back off on their exposure and lock it in (a few “blinkies” are recoverable in Lightroom or Photoshop, but if the entire disk is flashing, the moon’s detail is probably lost for good)—while the moon will remain the same brightness (can’t take any more exposure), from that point on the foreground will continue darkening until it becomes too dark to photograph. Then we go to dinner.
Like everyone else, I used a variety of compositions. I already have a wide reflection image from a prior shoot, so the image I share here is a moderate telephoto—any tighter (to enlarge the moon further) would have truncated some of Half Dome’s face, something I just cant bring myself to do.
We finally wrapped up at about 5:45, when long exposures to bring out detail in the dark landscape made capturing detail in the bright moon impossible. Everyone was pretty thrilled at dinner, and even though the clouds thickened and washed out our planned moonlight shoot, there were no complaints. And little did we know, Mother Nature had concocted a grand finale for our final sunset.
Join me in Yosemite
PURCHASE PRINTS || PHOTO WORKSHOPS
A Gallery of Yosemite Moons


The cure for blue skies
Posted on January 20, 2014

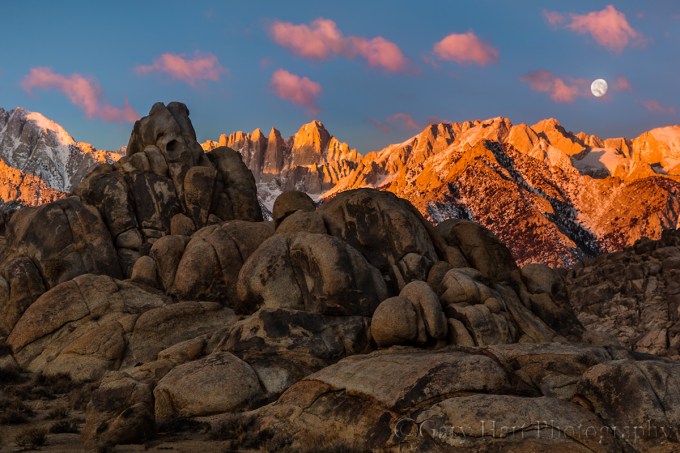
Sunrise Moonset, Sierra Crest, Alabama Hills, California
Canon EOS 5D Mark III
1/8 second
29 mm
ISO 200
F11
* * *
The prominent mountain on the left is 12,944 foot Lone Pine Peak. At 14,495 feet, Mt. Whitney is the highest point in the 48 contiguous United States; it’s the shark-tooth peak left of center. The slightly concave mountain on the far right is 14,380 foot Mt. Williamson.
A good landscape image usually involves, well…, a good landscape. But that’s only half the equation—photographers also need photogenic conditions—soft light, interesting skies, dramatic weather, or anything else that elevates the scene to something special. While we have absolute control over the time and location of our photo outings, the conditions have a significant random (luck) component.
Despite being less than a day’s drive from many of the most treasured photo destinations in the world, most of my photo trips are planned months in advance. Workshops in particular require at least a year of advance planning on my part, and many months of schedule adjustment and travel arrangements for the participants. I think I’ve pretty much established that positive thinking, finger crossing, divine pleas, and ritual incantation (no virgin sacrifice yet) are of zero value where photography is concerned—sometimes conditions work out wonderfully, sometimes not so much. And while I’ve photographed my workshop locations many times, I know most of my workshop participants haven’t, which is why I do my best to schedule my workshops when the odds are best for interesting skies.
My annual Death Valley / Mt. Whitney photo workshop is a perfect example: Among the driest places on Earth, Death Valley gets only about an inch of rain each year and suffers from chronic blue skies. Ever the optimist, I schedule my DV/Whitney workshop from mid-January through early February, when the odds, though still low, are at least best for clouds. And while I’ve actually been pretty lucky with the clouds in past workshops, to hedge my bets further, I always schedule this workshop to coincide with a full moon—if we don’t get clouds, the moon always seems to save the day (and night).
This year’s DV/Whitney workshop wrapped up Saturday morning. Unfortunately, it landed in the midst of what is on its way to becoming an unprecedented drought in California. After two dry winters, this winter is worse—a persistent high pressure system has set up camp above California, creating an impenetrable force field that deflects clouds and and bathes the state weather that is absolutely beautiful for everything but photography. In this year’s DV/Whitney workshop’s four+ days, we enjoyed highs in the glorious 80s, and I don’t recall seeing a single cloud (though there were unconfirmed rumors of a cloud sighting on the distant horizon late in the workshop).
But cloudless skies don’t need to mean lousy photography—they just shrink the window of opportunity. Places like Mosaic Canyon and Artist’s Palette are nice in the early morning or late afternoon shade. And in general, when clouds aren’t in the picture, the best photography skies are on the horizon opposite the sun before sunrise and after sunset. Last week I made a point of getting my group on location at least 45 minutes before sunrise, and kept them out well past sunset to photograph Death Valley’s one-of-a-kind topography beneath twilight’s shadowless pink and blue pastels. Among other things, in this light the dunes were fantastic (I was able to find a relatively footprint free area) all the way from shadowless twilight through high contrast early morning light, and the first light on Telescope Peak from Badwater was wonderful.
But the workshop’s real highlight, the element that elevated our week into something special, was the moon. The real moon show didn’t begin until it showed up above the primary views on our final two sunrises, but we got a nice preview on our first sunset when the waxing gibbous disk rose into the twilight wedge above the mountains east of Hell’s Gate. The next evening I took the group to panoramic Dante’s View; while the prime objective was photographing Death Valley’s last light and the sun setting from 5,000 vertical feet above Badwater, I instructed everyone to walk across the parking lot after sunset to catch the nearly full moon rising above the equally expansive (though significantly less spectacular) panorama of distant peaks to the east. The moon arrived early enough to allow at least ten minutes of quality photography, then we just kind of hung out to watch it for a little while longer. Very nice.
Friday morning’s sunrise we found the moon glowing as promised in the predawn indigo above Zabriskie Point. As the morning brightened, we watched the nearly round disk slide through twilight’s throbbing pink before disappearing directly behind Manly Beacon just a few minutes after sunrise.
But as nice as the Zabriskie shoot was, I think my personal favorite was the workshop’s final sunrise from the Alabama Hills. The group, now expert at managing the difficult contrast between foreground shadows and brilliant moon, immediately spread out to find their own foreground. One or two headed straight for the Whitney Arch (aka, Mobius Arch), while the rest of us were quite content with the variety of boulders west and south of our the arch.
The thing that makes the Alabama Hills such a special location for sunrise is its position between towering peaks to the west, and relatively flat horizon to the east. At sunrise here, the Sierra crest juts into the blue and rose of the Earth’s receding shadow, then transitions to amber when the first rays of sunlight kiss its serrated peaks. You anticipate watch the sun’s arrival by watch the shadow descent the vertical granite until it bathes the weathered boulders with warm, ephemeral sunlight. Then, just like that, the show’s over.
I’ve shot this scene at sunrise so many times that I usually remain a spectator unless something special moves me to pull out my camera. Last Saturday, despite the absence of clouds, I just couldn’t resist the pull of the moon, which hovered like a mylar balloon in the night/day transition. At first there wasn’t enough light to photograph detail in the rocks and moon in a single frame, but eventually, with the help of a two-stop graduated neutral density filter, I was able to capture the image at the top of the blog.
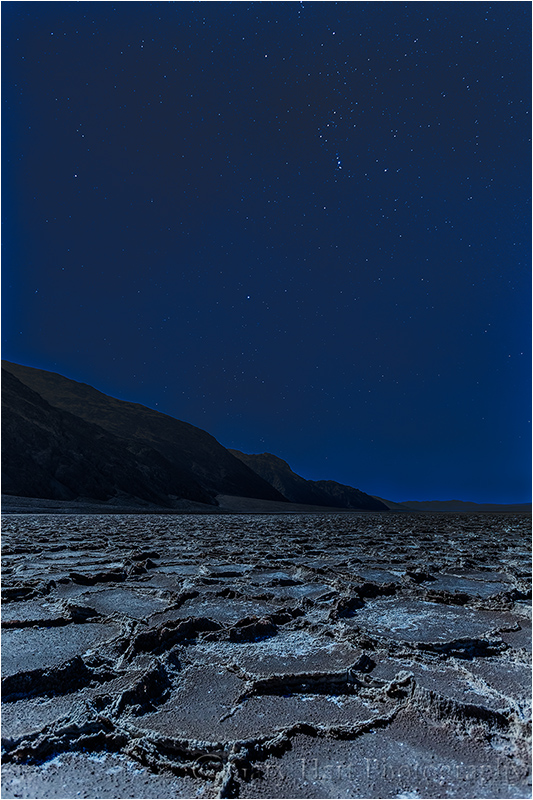
Orion, Badwater by Moonlight, Death Valley
Canon EOS 5D Mark III
15 seconds
17 mm
ISO 1600
F4
* * *
Another great thing about timing the Death Valley workshop to coincide with a full moon is our moonlight shoots. Of all the workshop moonlight shoots I do throughout the year, I think I look forward to the Death Valley Badwater shoot the most. This year’s didn’t disappoint—not only was the photography great, there’s just something about the playa’s warm temperatures and utter stillness that creates a genuinely festive atmosphere.

Moonset, Mt. Whitney and the Alabama Hills, California
* * *
Last year I photographed the same scene in different conditions. While this year’s capture highlights the Sierra crest and uses the blank sky and dark foreground to create a twilight feel, last year’s image was captured shortly after the sun lit the peaks and colored the clouds. I used a tighter composition to emphasize Mt. Whitney, the moon, and the pink clouds.
Oops
Posted on December 17, 2013

Winter Moonrise, Merced River, Yosemite
Canon EOS 5D Mark III
1/10 second
40mm
ISO 800
F16
Last Friday evening, this professional photographer I know spent several hours photographing an assortment of beautiful Yosemite winter scenes at ISO 800. Apparently, he had increased his ISO earlier in the day while photographing a macro scene with three extension tubes—needing a faster shutter speed to freeze his subject in a light breeze, he’d bumped his ISO to 800. Wise decision. But, rushing to escape to the warmth of his car, rather than reset the camera to his default ISO 100 the instant he finished shooting, he packed up his camera with a personal promise to adjust it later, when his fingers were warmer—surely, he rationalized, removing the extension tubes and macro lens would remind him to reset the ISO too. (You’d think.) But, despite shutter speeds nowhere near what they should have been given the light and f-stop, he just kept shooting beautiful scene after beautiful scene, as happy as if he had a brain.
I happen to know for a fact that this very same photographer has done other stupid things. Let’s see…. There was that time, while chasing a sunset at Mono Lake, that he drove his truck into a creek and had to be towed out. And the two (two!) times he left his $8,000 camera beside the road as he motored off to the next spot. And you should see his collection of out-of-focus finger and thumb close-ups (a side effect of hand-holding his graduated neutral density filters). Of course this photographer’s identity isn’t important—what is important is dispelling the myth that professional photographers aren’t immune to amateur mistakes.
And on a completely unrelated note…
Let’s take a look at this image from, coincidentally, last Friday evening. Also completely coincidentally, it too was photographed at ISO 800 (go figure)—not because I made a mistake (after all, I am a trained professional), but, uhhh, but because I think there are just too many low noise Yosemite images. So anyway….
This was night-two of what was originally my Yosemite ISON workshop—but, after the unfortunate demise of Comet ISON and a week of frigid temperatures in Yosemite, became my Yosemite ice-on workshop. That’s because, to the delight of the workshop students (and the immense relief of their leader), much of the one foot of snow that had fallen the Saturday before the workshop’s Thursday start had been frozen into a state of suspended animation by a week of temperatures in the teens and low-twenties.
Each day we rose to find nearly every shaded surface in Yosemite sheathed in a white veneer of snow and ice. (Valley locations that received any sunlight were largely brown and bare.) And the Merced River, particularly low and slow following two years of drought, was covered in ice in an assortment of textures and shapes from frosted glass to blooming flowers. Adding to all this terrestrial beauty was a waxing moon, nearly full, ascending our otherwise boring blue skies and illuminating our nightscapes.
On Friday night I guided my group to this spot just downstream from Leidig Meadow. There we found the moon, still several days from full, glowing high above the valley floor, and Half Dome reflected by a watery window in the ice. I captured many versions of this scene, from tight isolations of the reflections to wide renderings of the entire display. It’s too soon to say which I like best, but I’m starting with this one because it most clearly conveys what we saw that evening.
I chose a vertical composition because including the moon in a horizontal frame would have shrunk Half Dome and the moon, and introduced elements on the right and left that weren’t as strong as Half Dome, its reflection, and the snowy Merced River. (Sentinel Rock is just out of the frame on the right—as striking as it is, I wanted to make this image all about Half Dome.)
My f16 choice was to ensure sharpness throughout the frame, from the ice flowers blooming in the foreground, to Half Dome and its reflection. As you may or may not know, the focus point for a reflection is the focus point of the reflective subject, not the reflective surface. That means when photographing a reflection surrounded by leaves, ice, rocks, or whatever, you need to ensure adequate DOF or risk having either the reflection or its surrounding elements out of focus. Here I probably could have gotten away with f11, but my iPhone and its DOF app were buried beneath several layers of clothes, and using it would have require removing two pair of gloves.
I’d love to say that I chose ISO 800 to freeze the rapids, but I’m not sure you’d buy it. So I’m sticking with my too many low noise Yosemite images story and moving on. (A few cameras ago, ISO 800 would have meant death to this image, but today, thankfully, it’s mostly just a lesson in humility.)
A Yosemite Winter Gallery
Click an image for a closer look, and a slide show. Refresh the screen to reorder the display.


Chasing the moon in Yosemite
Posted on November 18, 2013
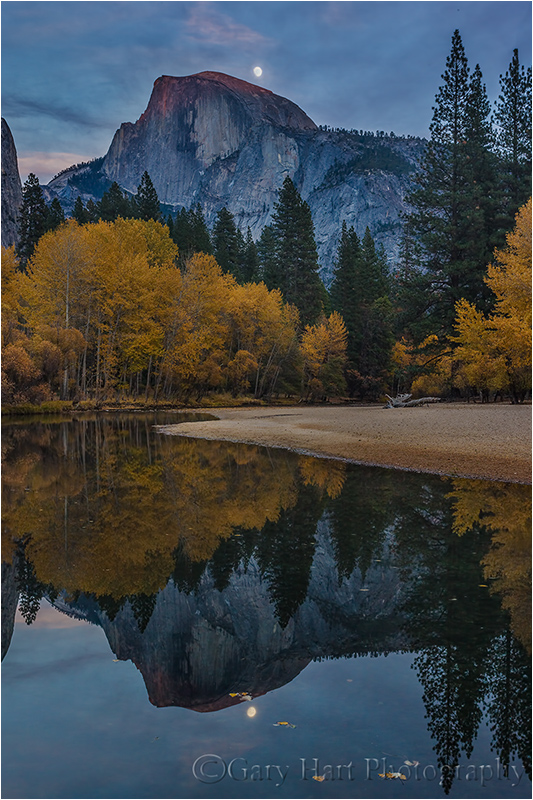
Moonrise Reflection, Half Dome and the Merced River, Yosemite
Canon EOS-1Ds Mark III
1.3 seconds
F/16.0
ISO 200
40 mm
The highlight of my just completed Yosemite Autumn Moon photo workshop was a full moon rising above Half Dome at sunset. But rather than settle for just one Half Dome sunset moonrise, I’d “arranged for” three. Clouds shut us out on sunset-moonrise number two, but sunset-moonrise number one was a huge success. (And sunset-moonrise number three, from Tunnel View, was so special that I’ll dedicate a whole blog post to it.)
Any location’s “official” sun and moon rise/set times assume a flat horizon—if you read that today’s moonrise is at 5:00 p.m., you need to account for the time it takes for the moon to rise above whatever obstacles (mountains, hills, trees) are between you and the flat horizon. And due to the same motion around Earth that causes the moon’s phases, anyone planted in the same location night after night would see the moon rise about fifty minutes later each day (this is an average—the nightly lag varies with many factors). For example, a moon that hovered right on the horizon at sunset last night will rise too late to photograph tonight.
While you can’t do anything about the moon’s absolute position in the sky, you can control the elevation of your horizon simply by changing your location. In other words, careful positioning makes it possible to photograph a moonrise at sunset on multiple nights—move lower and/or closer to the horizon to delay the moon’s appearance, higher and/or farther to view the moon sooner.
The earlier the moon will rise, the closer to your subject (for example, Half Dome) you should be to increase the angle of view; the later the moonrise, the farther back and higher you should be. So, positioning ourselves on the valley floor, close to Half Dome, provided a steep angle of view that delayed the moon’s appearance on Thursday night, when it rose (above a flat horizon) several hours before sunset. Conversely, standing at elevated Tunnel View a couple of nights later decreased our angle of view, enabling us to see the moon sooner when official moonrise is closer to sunset.
Last Saturday night, from Tunnel View on Yosemite Valley’s west side (farthest from Half Dome) the moon was “scheduled” to appear about five minutes after sunset—that would put it in the magenta, post-sunset band with just enough light for about ten minutes of shooting before the dynamic range (the brightness difference between the sunlit moon and darkening foreground) shut us down. While that was the shoot we were most looking forward to, for Friday night I’d picked a mid-valley spot by the Merced River that would put the moon above Half Dome just about sunset. And for our initial sunset on Thursday evening, I took the group to a riverside spot on Yosemite Valley’s east side, much closer to Half Dome.
Clouds obscured the moon Friday night, but Thursday night was a real treat. Not only did we find the fall color in the cottonwood trees upriver still hanging in there (despite a fairly early autumn in most of Yosemite Valley), the clouds parted just in time for the moon’s arrival. In addition to Half Dome, the trees, and the moon in the distance, we were able to get a mirror image of the scene reflected on the glassy surface of the Merced River at our feet.
While the downside of moving closer to Half Dome (or whatever your subject is) is that the wider focal length necessary to include the entire scene also shrinks the moon, I’ve always believed a small moon adds a powerful accent that makes an already beautiful scene even more special. But what if you prefer your moon big? Simple: just wait a day or two, and move back as far as possible. Stay tuned….
Join me next fall as we do this all over again.
* * *
One final point: Notice the cool (blue) color cast of this scene. This is an indication of not just the rapidly advancing twilight, but also the depth of the shade there in the shadow of the steep valley walls and dense evergreens. An image’s color temperature is a creative choice made during processing by photographers capturing in raw (unprocessed) mode. While warming the light would have made the trees more yellow, I decided that the coolness adds a soothing calmness that is lost in the warmth of a daylight scene.
A Yosemite Autumn Moon Gallery


Moon over wherever
Posted on July 26, 2013
Winter Moonrise, Half Dome, Yosemite
Canon EOS-1Ds Mark III
1/6 second
F/11.0
ISO 100
188 mm
Often, including a rising or setting moon will turn an ordinary landscape into something special. Of course, like most things worth doing, moon photography adds a couple of layers of complication: First, there’s the matter of getting there at the right time, with the moon in the right place (it does little good to arrive as the moon rises if it’s skewed 90 degrees from the scene you came to photograph); and once you have everything lined up, you still have to contend with the almost always tricky exposure issues.
A little lunar geometry (you can skip this section of you’re more interested in “how” than “why”)
Many factors, some within our control, some completely beyond our control, determine the time, location, and phase of the moon at any time. The factors beyond our control are things like the earth’s rotation and the moon’s orbit, which determine the moon’s phase and its absolute position in the sky. On the other hand, we can control our location, and take the steps necessary to get us in the right place at the right time.
A full moon always rises and sets directly opposite the sun, rising in the east at sunset and setting in the west at sunrise. This actually makes perfect sense when you take a little time to understand the monthly choreography of the earth, moon, and sun. Just as the earth revolves around the sun, the moon revolves around the earth; at any point in this dance, half of the earth is lit (daytime) and half of the earth is dark (nighttime), half of the moon is lit and half of the moon is dark.
What we on earth see as a full moon is simply that one day each month that the moon’s entire lit side faces the earth’s dark side—that is, when the earth is directly between the sun and the moon (picture a beam of light that follows a straight line that starts at the sun, passes through earth, and ends on the moon). On that day only, as the point of your location on earth rotates from day to night, you’ll see the sun disappear in the west and the moon rise in the east. As the earth keeps rotating away from daylight and into night, the full moon rises higher and higher, reaching its highest point around midnight, then dropping as your location rotates back toward the sunlit side (and sunrise).
So then why do we rarely see a full moon rising exactly as the sun sets? That’s because: 1) the point of maximum fullness (when the sun, earth, and moon align perfectly) only happens at one instant each month—at every other instant of each month’s full moon day, the moon is only almost full (but still full enough to appear completely full); and 2) sun/moon rise/set times we see published always assume a flat horizon—if you have mountains between you and the horizon, your view of the actual sun/moon rise/set will be blocked.
Due to its monthly orbit about the earth, each day (or night) the moon rises a little later and gains or loses a little bit of its disk (the farther it has revolved from that sun->earth->moon line, the less of the moon’s lit side we see). So the night after the moon is full, it rises after sunset and is a little less full. The next night it rises a little later still, and is even less full, and so on. Eventually (in a little more than two weeks after it was full) the moon has revolved all the way around the earth until it lies between the earth and sun (now our imaginary line goes sun->moon->earth); all of its sunlit side faces away from the earth and we have a new (invisible) moon.
We call the moon “new” because the night before it disappears into the sun, all that was left of the shrinking moon (that was completely full about two weeks ago) was a small sliver that shined briefly on the eastern horizon just before sunrise, then disappeared as soon as the sky brightened (it’s still up there, but completely overpowered by the sun’s brightness). The next day the moon won’t appear at all because seeing it would require looking directly into the sun; but the following day, there it is, this time as a thin sliver on the western horizon immediately after sunset (again, it was up there most of the day, we just can’t see it until the sun sets and the sky darkens). This brand new crescent slips below the horizon shortly after it appears. And for the next two-plus weeks it will rise a little later, and grow a little larger, each night, until it’s full again and rising at sunset. Cycle complete.
If we do the math (this won’t be on the test), we can infer that if the moon takes 29.5 days to complete its cycle (from full to new and back to full), and there are 24 hours in a day, the moon must be rising about 50 minutes later each day (29.5/24=48.8). This rough approximation varies with many factors; for simplicity I usually round it to an hour when I do rough calculations in my head. And I always rely on much more precise software or astronomical charts for my critical calculations.
Locating the moon
Those who don’t do a lot of moon photography are amazed at how much the moon shifts above the landscape throughout the year—you can sight a full moon rising between Half Dome and El Capitan one month, and a few months later it’ll be rising above Leaning Tower (far to the south). Fortunately, like many things in nature that appear random to the uninformed, there is actually nothing random about the moon’s location once you take the time to figure it out.
If the idea of figuring anything saps the pleasure from your photography (or sends you into a panic), you’ll be happy to know that sometimes it’s enough to simply know that the moon will be rising in the east a little before sunset (this info is available in many places, in many forms, but the most complete source I’ve found is the US Naval Observatory website). Armed with that knowledge, you can go out to a location with a view of the western horizon, wait for the moon to appear, and start shooting.
On the other hand, juxtaposing the moon with a specific landmark requires more planning. And because its position is so not random, many others have done the heavy lifting for the rest of us. There are far too many moon phase/position resources to name even a small percentage of them, so rather than even try, I’ll just give you a couple of techniques, and the tools that enable them:
- My old fashioned way (old trick for an old dog): I figured out my technique for locating the moon long before computer software and smartphone apps took away most of the effort. Nevertheless, I continue to do it this way because I’ve already done all the hard work (figuring out how to do it), and I can do it in the field, with zero connectivity (no wifi or cell signal required). After relying for years on a the US Naval Observatory website for the info I need (moon phase and moon/sun rise, set, altitude, and azimuth), I now get all the pertinent data from my Focalware iPhone app (I never said I’m opposed to new technology), plugging it into my National Geographic Topo! (that’s NG’s exclamation point, not mine) mapping software (discontinued) to plot the direction of the moon’s rise/set. To determine when the moon will appear above (or disappear behind) the surrounding terrain, I plug distance and elevation information from Topo! into the trigonometric functions of my HP 11C scientific calculator (originally an actual calculator, but now also an iPhone 11C emulation app) to compute the elevation in of my horizon.
- Software (the better way for 99.999 percent of you): The Photographer’s Ephemeris (a free computer download or fairly inexpensive smartphone app) is the most complete solution that I know of (though I’m sure there are others I don’t know of)—I probably would have never taken the time to figure out my technique if TPE had been available. Not only does TPE give you the sun and moon’s location and elevation above the flat horizon, it also figures out the the actual (terrain included) horizon. The downside is that because it uses Google Maps, TPE requires connectivity and is better used in advance of your shoot (usually not a problem). Recent TPE versions also allow you to download the maps to your device for offline access—if I were a TPE user, I’d be doing this before every trip.
Exposure
My rule for photographing a rising/setting full moon is that I must capture detail in the landscape and the moon. If my landscape is black (or just too dark), or my moon is a white disk (or blob), my image has failed. But since the post-sunset landscape is in full shade, and the moon is as bright as a sunlit landscape (because it is a sunlit landscape), the dynamic range of a full moon scene is pretty extreme, often too extreme for a camera to handle with a single click (always my goal).
But here’s the great part—if you figure that the moon rises about an hour later each day, and the full moon rises at sunset, then it stands to reason that the day before it’s full the moon will rise about an hour before the sun sets. Factoring in the terrain on the horizon (and assuming you’re not at the base of a mountain), that means that the day before the moon is full is the best opportunity to photograph a nearly full (say 97%, give or take a percent or two) moon rising in the east above a landscape painted with the warm sunlight of the golden hour. Conversely, if your view is to the west, you can photograph a nearly full moon setting in warm sunrise light the day after it’s full. Either way, the day before or after the full moon gives you everything you need to capture your scene in nice, photographable light that’s still sufficient to hold the moon’s highlights at bay.
I’ve found that if I’m really careful with my exposure, I can usually capture enough foreground and lunar detail until five or ten minutes after sunset. Shooting after sunset usually requires raw capture, then massaging the dark foreground brighter, and bright moon darker, in the raw processor. A graduated neutral density filter can increase this threshold to maybe fifteen or twenty minutes after sunset—after that my foreground is unusably dark (or my moon is recoverably bright).
Another technique that works when the light gets too extreme is a composite—two images, one exposed for the landscape and the other exposed for the moon, combined in Photoshop. In the “Rules According to Gary,” this isn’t cheating if you don’t change the size or position of the moon. (Though it doesn’t break my rules, I no longer do composites because I have this weird compulsion to get everything with one click.)
The final piece of exposure advice I’ll add is to make sure your camera’s blinking highlights (also called highlight alert) are set (as far as I’m concerned, they should be set anyway because I see no downside to highlight alert). The moon is usually so small in your frame that it won’t register in the histogram, which means blinking highlights are usually the only way to know that you’re blowing out the moon. I monitor my highlights closely after each exposure and have found that, when shooting raw (jpeg shooters don’t have as much margin for error), I can usually recover enough detail with an exposure 2/3 to 1 stop brighter than the exposure that first showed blinking.
Just do it
Like most things photographic, don’t expect resounding success the first time you try adding a full moon to your landscape. But each time you go out, not only will you improve, you’ll probably come away with ideas for how to do it differently the next time.
Read more about moon photography


Later that same morning…
Posted on March 1, 2013
Moonset, Mt. Whitney and the Alabama Hills, California
Canon EOS-5D Mark III
24-105L
1/2 second
F/11
ISO 100
It’s fun to browse the thumbnails from a shoot in chronological order to see the evolution of that day’s process. While can’t always remember specific choices, it’s always clear from the progression of my images that I was indeed quite conscious of what I was doing. I can look at one thumbnail and usually predict what the next will be.
This January morning in the Alabama Hills started for me about forty-five minutes before sunrise. When the sun finally warmed Mt. Whitney, a 95% waning gibbous moon was about to dip below the Sierra crest; comparing images, it’s clear I’d moved no more than twenty feet from the location of that morning’s earliest images. This is pretty typical of my approach—unlike many (but not all) photographers, who actively bounce around a location in search of something different, I tend to seek the scene until I find it, then work it to within an inch of its life. If I’m moving around, it usually means I haven’t found something that completely satisfies me.
Is mine the best approach? Of course not, but it is the best approach for me. There is no all encompassing rule for workflow in the field, except maybe to be true to your instincts. Because I happen to be very deliberate in my approach to many things, and can be incredibly (obsessively?) patient when I sense the potential for something I want, that’s the way I shoot. But, regardless of changing conditions and possible compositional variations, some photographers would go crazy locking into one scene. And just as my deliberate approach continually reveals details I’d have missed had I moved on sooner, it sometimes cheats me of even better opportunities waiting just around the corner. But I learned a long time ago not to stress about what I might be missing (because for me it’s even worse to chase what’s around the corner only to find what I end up with doesn’t match what I left).
Early on this chilly morning I found a relationship between a nearby stack of boulders and the distant Sierra peaks (Mt. Whitney in particular); the more time I spent with the scene, the more I saw and the better all the elements seemed to fit for me, so I just kept working. It didn’t hurt that conditions were changing almost as quickly as I could compose. Clouds ascended from behind Mt. Williamson as if churned out by a cloud making machine, sprinted south past Mt. Whitney, and disappeared behind Lone Pine Peak. On their way they took on whatever hue the rising sun was delivering, from white (before the sun) to vivid pink to amber.
Comparing today’s image to the image in my previous post, I see that my composition shifted to account for the moon. In the earlier image the most prominent boulder and Mt. Whitney serve as a set that anchors the center of the frame. In the later image I keep the set together but offset them to the left to balance the moon’s extreme visual weight. And while at first glance it appears both images were captured from the same spot with just slight focal length and direction adjustments, the height and position of the foreground boulder relative to Mt. Whitney’s summit shows that I’ve moved a little left and about twenty feet closer.

Before Sunrise, Mt. Whitney and the Alabama Hills, California
Relationships between elements in a frame are essential to an image’s success—controlling these relationships is a matter of moving up/down, left/right, forward/backward. Without remembering my decision to move that morning, I can still reconstruct my likely thought process: The more I worked the scene, the more clear I became on where the boulders’ left and right boundaries should be. Moving left and closer let me go wide enough to include the moon and clouds, fill the foreground with no more of the foreground boulders than I wanted, and balance the frame with the boulder/Whitney pair on the left and the moon on the right.
So while I do indeed stick with one scene for a long time, I’m far from static. Each frame is slightly different from the previous one. Like most of my favorite images, this Whitney sunrise moonset is an evolution; it started in the dark, evolving with the conditions and my growing familiarity with the scene’s elements.
There are no guarantees in nature, and I’ve had my share of “panic shoots” when something unexpected forced me to run around frantically searching for a scene to go with the moment. But when this morning’s dance of light, clouds, and moon blended into one of those magic moments photographers dream about, I was ready.
Photo Workshop Schedule
An Eastern Sierra Gallery
Click an image for a closer look and slide show. Refresh the screen to reorder the display.


A tale of two moons
Posted on December 24, 2012

Moonset, Badwater and Telescope Peak, Death Valley
* * * *
Going through images from earlier this year, I was struck by the difference the rendering of the moon makes in the overall effect of two images taken from different locations in Death Valley, a couple of days apart. In one, the moon is merely a garnish for a scene that’s all about the repeating patterns and harsh desolation of Death Valley’s Badwater playa; in the other, the moon is clearly the main course, enjoyed vicariously through the experience of six anonymous photographers atop a remote Death Valley ridge. In both cases, using my camera to control the moon’s size relative to the rest of the scene allowed me to emphasize the aspect of the scene I thought was most important.
Badwater moonset
Badwater is at the nadir of an expansive, paper-flat playa that spans Death Valley’s breadth between the looming Black Mountains to the immediate east and the distant Panamint Range in the distant west. At 282 feet below sea level, it’s the lowest point in North America. Centuries of flood-evaporate-repeat have spread a veneer of minerals and buckled them into a jigsaw of interlocking polygons. Some winters the playa is completely submerged beneath several inches of mountain runoff; as the shallow lake evaporates, the polygons’ protruding boundaries emerge to form interlocking reflective pools that shimmer like thousands of faceted jewels. But most of the year Badwater is a bone-dry plane that ranges from chalk white to dirty brown, depending on how long it has been exposed to Death Valley’s ubiquitous dust without a bath. To walk out onto the playa is to loose all sense of scale and distance.
On my visit last February I with a polygon that filled the immediate foreground. I went with a wide lens and dropped almost to the ground, taking care to include all of the polygon’s perimeter in my frame, a composition intended to create the sense of the endless expanse I feel when I’m out there. Including the complete polygon in the foreground (rather than cutting off a side), makes it easier to imagine the shape repeating into infinity.
A wide angle lens emphasizes the foreground and shrinks the background, in this case shrinking the moon so much that it all but disappears in the distance, just as it is about to literally disappear behind sun-kissed Telescope Peak. Making something as familiar as the moon this small enhances the illusion vastness.
A two-stop hard graduated neutral density filter kept the sky and mountain color in check at the exposure necessary to bring out Badwater’s radiant surface. And with important compositional elements near and far, I wanted lots of depth of field in this image. DOF at 28mm is pretty good, but I nevertheless stopped down to f16 and focused on a spot about six feet in front me, which gave me “acceptable” sharpness from three feet to infinity. My general rule is to bias my focus to the foreground because softness is more easily forgiven than foreground softness—on close scrutiny at 100 percent, I see that my foreground in this image is indeed perfectly sharp, while the mountains and moon are ever so slightly, but not unusably, soft (had it been the other way around, the image would have been a failure).
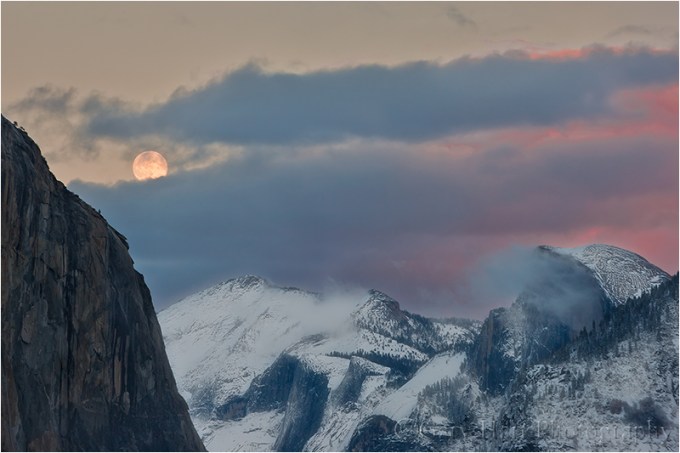
Moonrise silhouette
A telephoto lens compresses distance, making distant objects appear closer to the foreground than they really are. In my ridge-top moonrise, instead of shrinking the moon to emphasize the foreground as I did in the Badwater image, I stood as far back as possible and framed the photographers with an extreme telephoto, compressing the scene and magnifying the moon to make it appear closer to the silhouetted photographers (I magnified it even more later by cropping extraneous emptiness from the perimeter). And because it’s rising here, the moon’s extreme size works as a metaphor for its arrival above the landscape (contrast that with the small, departing moon in the Badwater image)—not a conscious decision, but I don’t believe it was an accident either. (Metaphor happens organically when you listen to your internal intuitive, creative muse.)

Moonrise Silhouette, Death Valley
While my right brain mused, my left brain chewed on the scene’s extreme dynamic range. The moon is always daylight bright, but here the foreground is in dark shadow—a difference between highlights and shadows far beyond a camera’s ability to capture. But my composition doesn’t require any foreground detail—in fact, foreground detail could have been a distraction. Instead I exposed for the moon, which brought out the twilight color and simplified the foreground into silhouettes that conveyed everything I needed.
Just a dash of moon…
Posted on December 11, 2012

Tree and Crescent, Sierra Foothills, California
A new moon debuts this week, and with it some nice opportunities for photographers to accent favorite scenes with a delicate crescent. This morning the diminishing vestiges of the waning moon rose in the east, a couple of hours before sunrise (did you see it?); tomorrow morning, what remains of the “old” moon will be too thin and close to the sun to be seen at all. Thursday night’s sky will be moonless, as the Earth/Moon/Sun alignment puts the moon’s dark side facing us. On Friday the (rejuvenated) moon reappears, this time in the evening twilight, a three percent crescent trailing the sun to the western horizon.
Because it frustrates me no end to see a graceful slice of moon suspended above the landscape when I’m on my way to somewhere else, I now put these lunar milestones in my calendar. When my schedule permits, I’ll schedule a trip around the sunrise or sunset crescent moon, but often I’ll just head up to the foothills east of town.
It helps to know that the more of the moon that’s illuminated, the farther in the sky from the sun it appears (a full moon is exactly opposite the sun, rising at sunset and setting at sunrise). A crescent moon is always in close proximity to the sun, hanging in the brightest part of the post-sunset/pre-sunrise sky, above a (relatively) dark landscape. A camera’s limited dynamic range makes it impossible to photograph a crescent moon against twilight color and landscape detail in a single frame. In these scenes, subtle subjects and fine detail are lost in the dark foreground. Instead, look for strong shapes to silhouette against the colorful twilight sky, or bodies of water that reflect the sky.
For my foothill forays I’ve identified a number of hilltop oaks that stand out against the sky. The best ones for a moon are those that are far enough from my vantage point to allow me to magnify the moon with a telephoto. But even without a telephoto, the moon holds so much “emotional weight” (I’ll need to write about that sometime) that even the tiniest sliver can carry a large portion of the frame.
The tree in the image at the top of this post stands on a ridge south of El Dorado Hills. I come here often, and have a variety of images from this spot that please me (one appeared on the cover of Sierra Heritage magazine a few years ago). When I arrived that evening I feared that the clouds would shut me out, but they turned out to be thin enough to let the moon shine through as the sky darkened. Just a couple of minutes later the thicker clouds rose to obscure the moon, but as they did the pink deepened to a rich crimson and I just kept shooting.
Learn more on my Crescent moon page.

Red Sky, Oak at Sunset, Sierra Foothills :: This is one of my last captures that evening, about eight minutes later than the crescent at the top of the post. To emphasize the fiery red, I slightly underexposed this frame.
My essential smartphone apps for photography
Posted on June 12, 2012

Moonset, Zabriskie Point, Death Valley
I have a few iPhone apps that I use all the time, and am always on the lookout for more (so feel free to share). There are many great apps out there, but given the amount of photography time I spend off the grid, a prime consideration for me is the ability to use an app without cell or wifi coverage, taking many out of the running. For example, I think The Photographer’s Ephemeris is a great piece of software for getting sun and moon information, but never use the app because I rarely photograph in locations with adequate cell or wifi service. (A recent update may now enable PE to pre-download maps, but my sun/moon workflow is already in place so I haven’t tried it yet.)
On the other hand, at the top of my own list of essential apps is Focalware, which gives me sun and moon rise/set time, altitude, and azimuth for any location on Earth, regardless of connectivity. For example, until recently Death Valley had no cell coverage whatsoever; even now most of Death Valley is a cell dead zone, and wifi is limited to the (extremely unphotogenic) hotels in Furnace Creek Ranch and Stovepipe Wells. But using my iPhone’s GPS to pinpoint my location, Focalware gave me the sunrise and moonset information I needed to capture this full moon setting behind Manly Beacon (I won’t even touch the Freudian ramifications of that name) at Zabriskie Point. It’s also handy to be able to input the GPS coordinates of any location, which allows me to get the astronomical data I need for remote locations as well.
Another app that works great regardless of connectivity is Depth of Field Calculator by Essence Computing. With it I’m able to quickly compute hyperfocal focus info for any camera or lens. I don’t need it all the time, but having this information instantly available when I’m trying to focus near and far objects in a single frame makes my life considerably easier. It’s also a fun app to play what-if games when I find myself waiting on hold or in line somewhere. I just plug in arbitrary values and try to guess the hyperfocal distance—a great exercise for improving hyperfocal focus skills.
Dropbox is a bigger part of my home and mobile computing, but I do use my Dropbox app to access essential files when I’m on the road and away from a computer and the Cloud. While the Dropbox app requires connectivity to access files in the main Dropbox folder in the Cloud, I can specify files as “Favorites” to be kept downloaded and current on my iPhone at all times. My most important files are always flagged as favorites, and before leaving home I add other files I’m pretty sure I’ll need on that trip.
The state of the tides makes a huge difference when photographing coastal scenes. Tide pools will materialize or vanish with the tide, and the look of the coast can change drastically when the tide swallows or reveals rocks. And some areas I’m accustomed to shooting may be completely inaccessible when the tide’s in. For all these reasons, before photographing on the coast I check the state of the tide with Ayetides. Ayetides stores its information on my iPhone, so I don’t need to worry about connectivity. On the other hand, I’m not crazy about Ayetides’ interface, which I find less than intuitive.
Another app that I recently started using and have high hopes for is Trail Maps by National Geographic. In theory it’s exactly what I need—-an app that allows me to download specific topographic maps onto my iPhone for anytime, any connectivity access. It also allows me to plot point-to-point azimuth and distance for any location, great for computing moon and sun rise/set position. While I’ve been able to use it some, I’m afraid the current version of this app has far too many bugs, large and small, for me to recommend it.
Since I don’t have vast experience with other similar apps, I can’t guarantee that the apps I mention here are the best. But I can say that they work great for me, and they make my photography life much easier. How about you? Do you have any apps on your iOS or Android phones that you find indispensable?
Digital photography the old fashioned way
Posted on January 29, 2012

Moonlight, Garrapata Beach, Big Sur
Canon EOS-1Ds Mark III
4 seconds
F/8
ISO 400
35 mm
Photoshop processing sometimes gets a bad rap. There’s nothing inherently pure about a jpeg file, and because a jpeg is processed by the camera, it’s actually less pure than a raw file. As a general rule, the less processing an image needs, the better, but sometimes raw capture followed by Lightroom/Photoshop processing is the only way to a successful image.
I’ve always considered myself a film shooter with a digital camera. But that doesn’t mean that I’m opposed to processing an image—in fact, processing is an essential part of every image. But just as Ansel Adams visualized the finished print long before he clicked the shutter, success today requires understanding before capture a scene’s potential, and the steps necessary to extract it later Lightroom/Photoshop.
For example
A couple of weeks ago, while co-leading Don Smith’s Big Sur photo workshop, our group had an early morning shoot that was equal parts difficult and glorious. The plan was a Garrapata Beach sunrise featuring the moon, one day past full, dropping into the Pacific at sunrise. But high tide and violent surf banished us to about 500 square feet of sheltered sand, and the cliffs above the beach (it’s bad for business when workshop participants get swept out to sea). Compounding the difficulty, the most striking aspect of the scene, a nearly full moon, was too bright for the rest of the scene. But despite the morning’s difficulties, I set to work trying to make an image because, well, that’s what photographers do.
As much as I wanted to be on the sand, aligning the moon with the the best foreground from down there would have made me a sitting duck for the waves. So I made my way along the cliff to an off-trail spot above a group of surf-swept rocks. It turns out the higher perspective was perfect for emphasizing the reflected moonlight that stretched all the way to the horizon.
With long exposures on a tripod, photographing the moonlight and beach wasn’t a problem. But adding the daylight-bright moon burning through the pre-dawn darkness made capturing the entire range of light in a single frame (a personal requirement) difficult, and perhaps impossible. Nevertheless, I spot-metered on the moon to determine the maximum exposure that would retain the ability to recover overexposed lunar detail later in the Lightroom raw processor. But even after maximizing the moon’s exposure, I didn’t have nearly enough light for the rest of the scene without first darkening the sky further using five stops of graduated neutral density (stacking my Singh-Ray three-stop reverse and two-stop hard GND filters). So far so good.
Satisfied that I could make the exposure work, but with very little margin for error, my next concern was finding a shutter speed that allowed enough light without risking motion blur in the moon. Because I needed sharpness throughout the frame, from the beach right below me all the way out to the moon, I couldn’t open all my aperture all the way. Whipping out my DOF app, I computed that focusing twenty feet away at f8 would give me sharpness from ten feet to infinity. Bumping to ISO 400 at f8 brought my shutter speed to four seconds, a value I was confident would freeze the moon enough. I clicked several frames to get a variety of wave effects, ultimately choosing this one for the implicit motion in foreground wave’s gentle arc.
In Lightroom, I cooled the light temperature slightly to restore the night-like feel. Using five GND stops at capture required significant Photoshop brightening of the sky to return it to a reasonable range. A few years ago this would have introduced far too much noise, but the latest noise reduction software (I use Topaz) is amazing. As expected, even after all my exposure and processing machinations, I still needed to process the raw file a second time to recover the highlights in the moon. Because the two versions were the same capture, combining them in Photoshop was a piece of cake.
A Gallery of Favorite Seascapes
Click an image for a closer look, and a slide show. Refresh your screen to reorder the display.


")


