Eloquent Images by Gary Hart
Insight, information, and inspiration for the inquisitive nature photographer
In Defense of the Tripod
Posted on July 5, 2020

Spring Sunrise, Rowena Crest, Columbia River Gorge
Canon EOS-5D Mark III
Canon 70-200 f/4L
1/10 second
F/8
ISO 800
This is another 6-year-old “brand new” image, just excavated from the depths of my 2014 folder
Photography without compromise
If you think the main reason to use a tripod is to avoid camera-shake, you’re mistaken. In this day of phenomenal high ISO performance and stabilized bodies and lenses, acceptable hand-held sharpness is possible in the vast majority of images. But here’s a reality that’s tough to deny: The steadiest hand-held image will never be sharper than it would have been if it had been properly executed using a sturdy tripod. And that’s not even the best reason to use a tripod.
Each camera has an ideal ISO—the quality of any image that doesn’t use it is compromised, sometimes just slightly, other times a lot. So if hand-holding an images forces you out of your camera’s ideal f-stop to reduce camera shake, you’ve made an unnecessary compromise. “Photographer’s light” (such as sunrise, sunset, and stormy or cloudy weather) only compounds the problem. While most of these compromises can be more or less remedied in post-processing, and many may not show up at all on a fifteen-inch laptop screen or in an 8×10 print, most serious photographers like the option to print their images large—and nothing reveals flaws more than a large print.
Let’s imagine you just got a request for a 24×36 print of the pride of your portfolio—a (hand-held) Yosemite Valley moonrise telephoto, captured at ISO 800 (it looks great in your Flickr gallery)—for the reception area of your mother-in-law’s law firm (a real coup after that whole llama-farm investment fiasco). So what do you tell her when you go to hang it and she asks why it looks “so mushy,” and what’s with all that “sludge in the shadows”? Oops—looks like another Thanksgiving at the kids’ table.
Not only does every camera have an ideal ISO, every scene has an ideal f-stop. Anyone with a camera can snap the lateral (left/right, up/down) dimensions of a scene, but artistic photographers understand that the key to rendering our three-dimensional world in photography’s two-dimensional medium is creating the illusion of the missing dimension, depth, by composing elements throughout the frame, from near to far. Since depth of field is controlled by the f-stop, of all the exposure variables at a landscape photographer’s disposal, f-stop is the least negotiable. In a static scene (as most landscape images are), the tripod removes motion (camera shake) from the equation, allowing you to select the ideal f-stop at your camera’s best ISO.
But what about a scene that’s all on the same plane, where depth isn’t a factor? The f-stop still matters because every lens has a single f-stop that renders the sharpest result. For some lenses the sharpness difference between f-stops is small, for others it’s significant. But it’s always there. So even when DOF isn’t a consideration, I choose my lens’s sharpest f-stop, usually f/5.6-f/11. Some photographers put each lens through extensive testing to determine its sweet spot; I usually go with f/8 or f/11 unless I see clear evidence that a lens is sharper at a different f-stop. I also try to avoid f-stops smaller than f/11 unless the scene requires extra depth—not only do lenses tend to be less sharp at their extreme f-stops, at f-stops smaller than f/11, diffraction starts to rear its ugly head.
The bottom line: By removing camera shake from the equation, a tripod frees you to choose the best f-stop for your composition, without compromise.
An image is not a snap, it’s a process
Still not convinced? Consider also the control a tripod gives to your composition process. Managing the relationship of elements in the frame is usually the single most important compositional decision a photographer can make. Relationships are especially important when you’ve included the front-to-back objects so essential to enhancing the illusion of depth. Photographing on a tripod gives you the time to consider each element in your frame and its relationship to other elements and eliminate distractions, and the flexibility to evaluate and refine until everything’s perfect.
When setting up an image, I try to achieve a sense of visual balance throughout my frame. I think about the path for my viewers’ eyes to follow, and where I want them to pause or land. I consider the elements that will move or stop the eye, and potential distractions that might pull the eye away, and merged elements that rob the scene of depth. With these things in mind, I position myself and frame my composition, identifying the focus point and f-stop for the ideal depth of field. Having my composition frozen in place atop my tripod enables me to make these adjustments deliberately and methodically, and helps me ensure that one tweak here didn’t break something else over there.
After each click, I step back and study the image on the LCD, imagine it framed large and hanging on a wall. I scrutinize my composition for possible composition and depth of field improvements, and check the histogram for exposure problems. With a tripod I can do all this at my pace, taking as much time as necessary, knowing that when I’m ready to make adjustments, the image I just reviewed will be waiting right there in my viewfinder atop my tripod, exactly as I captured it, ready for me to enhance.
And finally
Other benefits of a tripod I’ve almost come to take for granted. For example, I sometimes use graduated neutral density filters but find the holders that screw onto the end of my lens awkward. With a tripod, it’s easy to position my GND and hold it with my fingers during exposure (I don’t even own a filter holder). During long exposures I’ll sometimes move the GND up and down slightly to disguise the transition—also easy on a tripod.
A tripod also makes it easy to use a polarizer to reduce color-robbing glare, something I can do on virtually every daylight shot because unless something in my scene is moving, the two stops of light I lose to a polarizer are irrelevant when I’m on a tripod.
And advanced digital techniques such as image stitching (for panoramas or high resolution capture), HDR (high dynamic range blending of multiple images for exposure management), or focus blending to increase depth of field are all easier on a tripod. As is old-fashioned mirror lock-up to reduce mirror-slap induced vibration. And live-view focusing, the best way to ensure precise focus, is a snap on a tripod (and pretty much impossible hand-held).
For example

Spring Sunrise, Rowena Crest, Columbia River Gorge
There was a lot going on in this scene. I had wildflowers everywhere, the Columbia River, clouds, a freeway, railroad tracks, power lines, and lots of other photographers and wildflower peepers. Organizing all this into a coherent image, including the good stuff and eliminating the distractions, required no small measure of planning and execution.
I’d been wandering the hillsides of the Tom McCall Preserve on the Rowena Crest in the Columbia River Gorge for about an hour, playing with compositions and identifying potential subjects. I could see the potential for a colorful sunrise and wanted to be ready when (if) it happened. I wanted a foreground subject to anchor my frame, and needed to eliminate the freeway, tracks, wires, and people, and finally landed on this spot about 15 minutes before sunrise.
Rather than wait for the color to arrive, I started working on my composition immediately, choosing a height about two feet above the ground—any higher and the power lines would come into view; any lower and the flowers and near cliff (on the left) would merge with the opposite bank. To compress the foreground/background distance, I moved back a little and chose my 70-200 lens, putting the bottom of the frame a few inches below the yellow balsam root to frame the flowers with a little green, and taking care not to cut off any of the large, ear-shaped leaves.
The clouds weren’t very interesting, but I knew that if they colored up they’d add an important layer to my frame, so I made sure to include a strong stripe of clouds across the top of my frame. I liked the nearby sprinkling of lupine and other wildflowers, so I went wide enough to include a few without diluting my primary clump of wildflowers.
The final step was to determine depth of field and focus. To make the flowers’ sharpness stand out even more, I slightly softened the background by dialing to f/8 and choosing a focus point closer than the hyperfocal distance.
Each of these framing decisions were part of an iterative process that took more than a dozen clicks before everything was just as I wanted it. Because I was working on a tripod, I was able to click a frame, evaluate all of the variables, and make small refinements. The tripod also gave me the luxury of straightening to unkink my back between clicks. When I was sure everything was right, I stood and waited (fingers crossed) for the color. When the sky did finally color-up, an intermittent breeze came with it, forcing me to compromise my ISO (ISO 800) to freeze the flowers’ movement. But because I was on a tripod, I was able to stand and watch the scene confident in the knowledge that my composition was fixed, and click my remote release whenever there was a lull.
Workshop Schedule || Purchase Prints


Think Fast
Posted on June 21, 2020

Almost Heaven, Big Dipper Above the Clouds, Big Sur
Canon EOS-1Ds Mark III
Canon 24-105 f/4L
25 seconds
F/4
ISO 400
In virtually all aspects of my life, “think fast” is rarely my default response. Rather, given a choice, I prefer evaluation and analysis to instant reaction. This think-first mindset might also explain why my favorite sport is baseball (which many consider “too slow”), and why I prefer chess and Scrabble to video games (the last video game I played was Pong). So I guess it should be no surprise that, as a landscape photographer, my subjects don’t move. I’m much happier working a scene comfortable in the knowledge that when I’m finally ready, it will still be there.
But nature isn’t truly static, and sometimes I don’t have the luxury of analysis. A few years ago while helping Don Smith with his summer Big Sur workshop, we’d spent most of an afternoon and evening working in the fog (it was billed as a fog workshop). Driving home after a gray sunset, the fog showed no signs of clearing so Don and scrapped the group’s night shoot plans. But climbing toward Hurricane Point, the car suddenly broke through the fog and the world completely changed. We were above the clouds, whose undulating tops seemed to stretch to the horizon where a fading stripe of orange was the only evidence of the retreating day. In the darkening blue sky, the stars had just started to pop into view, with more seeming to appear with every passing second.
Change of plans: Screeching to a halt at the Hurricane Point vista, everyone piled out and raced to set up their gear. As much as I like to take my time when I arrive at a scene, something told me to hurry and once I got to the edge of the overlook and peered over, I saw why. The fog that looked so static and serene from a distance was in fact a roiling soup charging up the steep slope. With a few advance fragments of cloud scooting across my view, I frantically loaded my camera onto my tripod. To save time, I stuck with the lens that was already mounted on my body, pointed in the direction of the Big Dipper, and quickly focused on the stars. This was pre-mirrorless, so without the pre-capture histogram, I just guessed on the exposure. Fortunately my focus and exposure choices were right-on because this was the only shot I got before that foreground fog bank engulfed the world in clouds—score one for instant reaction.
The value of some images can transcend their aesthetic appeal—sometimes they offer lessons as well. For me, this is one of those images. In my workshops I see photographers who are deliberate like me, and others who are constantly in motion. What I’ve come to realize is, wherever we might naturally fall on the deliberate<->reactive continuum, it benefits our photography to sometimes shake things up and come at a scene from a different place than we usually do. I learned from this night’s experience, and others like it, to trust my instincts more. I know I’ll never not be one to take time to pause and consider a scene because that’s how I’m wired. But now when I arrive at a scene, I try to start with the more instinctive shot—even if that turns out not to be exactly the image I end up with, that alternate perspective often sends me down a completely different path than I’d have otherwise taken.
Workshop Schedule || Purchase Prints
In a Fog
Click an image for a closer look, and to view a slide show.


Random Thoughts on a Sunday Afternoon
Posted on June 14, 2020
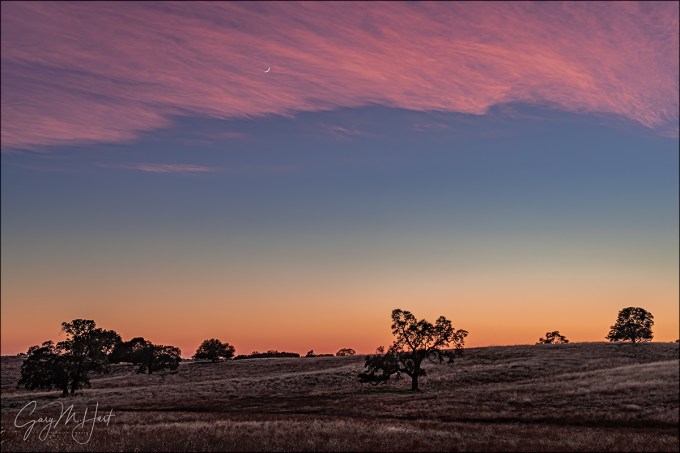
Sunset Accent, Crescent Moon and Oaks, Sierra Foothills
Sony a7R
Sony/Zeiss 24-70
1/3 second
F/9
ISO 100
Here’s a brand new image that’s nearly six years old. Brand new because I processed it for the first time just yesterday; six years old because I found it after loading my pre-Lightroom raw files from 2014 into Lightroom, something I’ve been wanting to do for a long time and I finally ran out of reasons not to do it. Before 2015 I did all my raw processing in Adobe Camera Raw, which worked fine as far as individual image processing was concerned, but also made it pretty easy for things to get out of control on my hard-disk because there was no underlying organization to my import process. Want proof? I’m actually missing about a month’s worth of images from 2013—I know because I have several processed jpegs from that span for which I have no originals. Sigh.
This is also just my 282nd image after switching to Sony mirrorless in the fall of 2014. While I have no specific memories of this evening (there have been many, many like this, as you’ll see in the gallery), I imagine that I was still struggling with the Sony interface—partly because mirrorless was a new trick for this old dog, and partly because the original a7R’s interface pretty much sucked (a problem that has been incrementally, and now completely, addressed in succeeding models). But it was fun processing this “old” image and recalling why I was able to forgive the lousy interface and abysmal battery life (also addressed) of the a7R: man, even right out of the gate that Sony dynamic range just doesn’t quit.
Skeptics might might look at this image and think I added the moon because it appears to be in front of the clouds. Anyone who has been in one of my workshops, or who knows me even just a little, knows I don’t do that. But for the skeptics in the audience, let me assure you that it is indeed possible for clouds to catch sunset color while still being translucent enough for the moon to shine through (you can actually see other examples below).
It saddens me that photography has reached a point where every beautiful, or interesting, or revealing image is (often justifiably, I’m afraid) scrutinized with a cynical eye. Photographers have brought this on themselves with their never-ending quest for more social media Likes, or to make a case for something for which they have no evidence (as we’ve seen in some of the recent news reporting).
After spending a good chunk of my photography life as a color transparency (slides) shooter who was pretty much stuck with whatever came back from the lab, I appreciate the ability to process my images as much as the next photographer. But there’s a continuum with basic processing on one end (there’s no such thing as an unprocessed image, whether you do it yourself or leave the processing to your camera) and Frankenstein hybrids on the other. To me the decision about where to draw the line on the processing continuum is similar to the decision between wearing nice clothes and putting on makeup and resorting to cosmetic surgery (yes, I understand that there are in fact many valid reasons for cosmetic surgery, and that this is not a flawless analogy).
So it really comes down to honesty—a commitment not to deceive. I love nature and want to share my love by portraying my subjects at their absolute best, but I want people’s first thought when they see one of my images to be, “Wow, I need to get out in nature more,” and not, “Wow, what a great photographer, or, “Wow, that’s impossible.” The scene you see in this image really happened, and there’s a photo of it because I put myself in position for the (very predictable) confluence of a new moon hanging above rolling hills dotted with statuesque oaks, plus the fortuitous addition of thin clouds that lingered just long enough to catch sunset color. It helped that I had a camera that could easily handle the difference between the brilliant sky and darkening hills, and enough photographic skill to properly frame and expose the scene. The image itself was remarkably easy to process and required very little digital help. This image is a success if it first helps you realize how beautiful even the simplest foothill scenes are, without being distracted by my skill as a photographer (good or bad), or the processing decisions I made.
A Foothills Gallery
Click an image for a closer look, and to view a slide show.


")


The View from Space
Posted on June 3, 2020
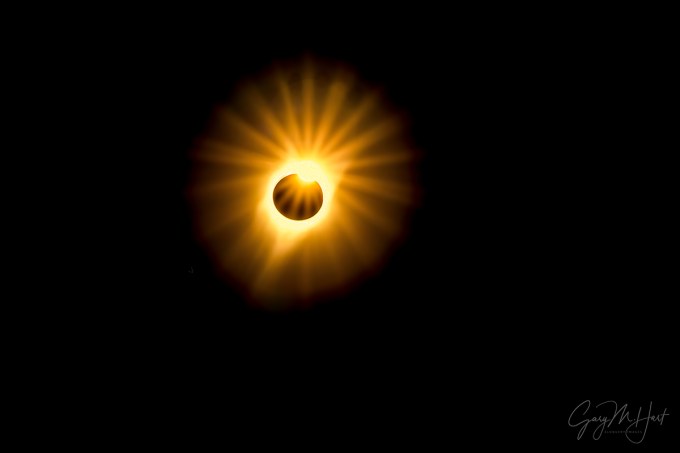
Let There Be Light, Planet Earth, Solar System, Milky Way (August 21, 2017)
If you follow me on social media, you know that I don’t get political online. That doesn’t mean that I don’t have political opinions, but photography needs to make you happy, and there are already too many unhappy photographers to inject politics into the mix. I’ve also learned, and I have the people I’ve met in my workshops to thank for this, that individuals with completely different social and political beliefs are not idiots, uncaring, morons, crazy, or whatever other pejorative you might be inclined to hurl. They’re good people who arrived at their values and beliefs through a completely different combination of family history, opportunities, life experiences, good/bad fortune, and present circumstances, than you and I have.
But I’m writing this post because yesterday, like millions of others, I shared a completely black image on my Instagram page to show my support for BLM. Not only did I feel like solidarity on the issue of police not killing innocent people is important right now, I also thought, wow, here’s something everyone can agree on. And for the most part I was right—I was thrilled to see the truly diverse support this simple act received, crossing traditional political and social boundaries.
On the other hand, I guess I shouldn’t have been surprised that this support wasn’t universal. I got a little pushback on my Facebook page (swiftly dealt with—to borrow from the late, great Tom Petty, it’s good to be king), and noticed that the number of followers of my Instagram page, which goes up every day, declined yesterday—from that I can only infer that some people were reflexively unfollowing anyone who posted a black image. To those people, I say good riddance.
Call me an optimist (or naive), but I’m hopeful that the United States has finally reached a tipping point, and real change is in store. So to pivot from politics to photography, I’m sharing this image from the 2017 total eclipse, because nothing in my portfolio expresses my hope better than the instant of sunlight’s return after a total solar eclipse. For those who haven’t had the privilege to witness one (mark your calendars for April 8, 2024), a total solar eclipse is one of those transcendent moments in nature where humans’ insignificance is impossible to deny. I don’t think I’ve ever felt smaller than I did at the instant I clicked this picture.
Because I can’t help but think that so much of our planet’s divisiveness would evaporate if we all had a clearer picture of our place in the Universe, I’m going to close with a few quotes from astronauts, who are uniquely qualified to speak on the subject:
- Anousheh Ansari, the first Iranian in space: “The actual experience exceeds all expectations and is something that’s hard to put to words… It sort of reduces things to a size that you think everything is manageable, all these things that may seem big and impossible… We can do this. Peace on Earth — No problem. It gives people that type of energy, that type of power…”
- Neil Armstrong: “It suddenly struck me that that tiny pea, pretty and blue, was the Earth. I put up my thumb and shut one eye, and my thumb blotted out the planet Earth. I didn’t feel like a giant. I felt very, very small.”
- Ron Garan, Shuttle and International Space Station astronaut: “When we look down at the earth from space, we see this amazing, indescribably beautiful planet. It looks like a living, breathing organism. But it also, at the same time, looks extremely fragile.”
- Edward Gibson, Skylab astronaut: “You see how diminutive your life and concerns are compared to other things In the universe.”
- Jeff Hoffman, Space Shuttle astronaut: “You do, from that perspective, see the Earth as a planet. You see the sun as a star – we see the sun in a blue sky, but up there, you see the sun in a black sky. So, yeah, you are seeing it from the cosmic perspective.”
- Edgar Mitchell, Apollo 14 astronaut: “You develop an instant global consciousness, a people orientation, an intense dissatisfaction with the state of the world, and a compulsion to do something about it. From out there on the moon, international politics look so petty. You want to grab a politician by the scruff of the neck and drag him a quarter of a million miles out and say, ‘Look at that, you son of a bitch.’”
- Nicole Stott, Space Shuttle and ISS astronaut: “We have this connection to Earth. I mean, it’s our home. And I don’t know how you can come back and not, in some way, be changed. It may be subtle. You see differences in different people in their general response when they come back from space. But I think, collectively, everybody has that emblazoned on their memories, the way the planet looks. You can’t take that lightly.”
The View From Earth
Click an image for a closer look, and to view a slide show.


")


Something new
Posted on May 31, 2020
For many years my website has featured my workshops, while my social media pages (WordPress blog, Instagram, and Facebook) have been where I’ve shared my latest photography. While I originally kept galleries on my Eloquent Images website, I rarely updated them and after a while the website galleries ceased being a reliable reflection of my current work.
About three years ago I redesigned my website, completely changing the interface and removed the galleries entirely, doubling-down on my blog galleries. But when I started hearing from people that they couldn’t find my latest images online, I realized that, even though they’re really easy to find in the galleries right here on my blog, many people don’t take the trouble to look for them—if they don’t see a Galleries option on the website, they just move on. I made a mental note that I need to bring my website galleries back, but between workshops and travel, I never found the time.
Well guess what—suddenly I have time! So a few weeks ago I asked my webmaster to add galleries to my website, and I’ve spent the last couple of weeks populating them, and having far more fun than I could have imagined. My webmaster labeled my six galleries Gallery 1, Gallery 2, …, Gallery 6. Hmmm, surely I can do better than that. I thought long and hard about more descriptive names, trying on locations and other similarly prosaic labels, before deciding I need themes to describe my motivations for clicking my shutter.
Backstory
You may or may not know that when I decided to make photography my profession, I promised myself that I’d only photograph what I want to photograph, that I would never take a picture just because I thought it would earn me money. I’d just seen too many miserable photographers earning a living but hating what they do. But since all I want to photograph is nature (which, while universally loved, is not universally purchased), I needed to come up with a way to earn money. I landed on photo workshops, which perfectly leveraged my prior career in technical communications (tech writing, training, and support) and my love for both photography and nature. Not only did this enable me to photograph only what I love, my images turned out to be the perfect intro and marketing tools for my workshops: if you like my images, you’ll probably like my workshops; if you don’t like my images, you probably won’t be happy with my workshops. (Of course I do sell images too, but image sales isn’t an essential part of my business and never motivates me to take a picture.)
Rabbit hole
So I guess it should have been no surprise that thinking about what my gallery themes should be would lead me down this rabbit hole of introspection. Many photographers create spectacular images that reveal the damage humans are doing to our natural world, but I seem to simply be driven to share nature’s beauty, both the obvious and the overlooked. Rather than a conscious choice, this is more an organic outcome of a life spent seeking and finding happiness in the natural world, combined with regular old human nature that causes most of us to find pleasure sharing the things we love most: “Here’s something that makes me happy—I hope it makes you happy too.” Here’s where the rabbit hole led me—I can’t think of a clearer distillation of the things in nature that move me:
- Four Seasons: Winter, Spring, Summer, Fall
- Color and Light: Sunlight’s interplay with air, land, and water
- Water Like Glass: A Time for Reflection
- It Came from the Sky: Unexpected gifts from above
- In the Flow: Water on the move: Waves, waterfalls, and whitewater
- Celestial Carousel: Sun, Moon, and Stars
These galleries are a work in progress. Assembling them, I quickly realized that many of my images would work in more than one gallery, but I decided not to duplicate any image. Rather than a comprehensive retrospective, my new galleries are more of a summary of my own favorites. But I’m still adding to them, so feel free to suggest additions you think I’ve overlooked. Or simply browse and enjoy.
Gallery Highlights
Click an image for a closer look, and to view a slide show.


Out of this World
Posted on May 25, 2020

Fern Cascade, Russian Gulch Fall, Mendocino Coast (2012)
Canon EOS-5D Mark III
Canon 70-200 f/4 L
1 second
F/11
ISO 400
On a quiet spring morning you step from the car and are greeted by electric-pink rhododendrons basking in splashes of early sunlight. Your arms prickle at the morning chill, but you wisely decide to leave the sweater behind, closing the door as softly as possible to preserve the peace. At a mostly overgrown gap in the foliage, you part the branches and step onto a dirt track that leads into the forest.
Following the trail a short distance, you realize you’re witnessing a competition for sunlight, each rhododendron spreading and stretching to get its share, but within a few hundred yards your route descends into old-growth redwoods benefiting from a multi-century head-start. These trees tower above everything, intercepting all but a handful of the sun’s rays, and the rhododendrons have surrendered.
As the trail descends further, you feel like you’re moving back in time. Ducking a spider web that spans the trail, you privately celebrate that you’re the first to pass this way today. Down here, the sunlight has to work harder to penetrate the canopy so the chill remains, but now its invigorating tingle propels you forward.
Before rounding a hairpin bend you pause, inhale, and listen. Gradually, what seemed like absolute silence reveals itself to be breeze-induced swish from swaying redwood boughs. Shortly after your steps resume, a bird’s cry warns the forest of your approach. You’re dropping faster now, but the tap-tap of your feet is dampened by the trail’s powdery surface.
Soon there’s a new sound, subtle and difficult to separate from the wind in the branches. As the trail’s decline moderates, the rhythm of your footfall slows and the new sound finally separates from wind’s gentle swish: rushing water. The creek is nearby but not yet visible. You follow the trail around fallen redwood that nature has repurposed as a giant fern garden and there it is, springing from the dense understory. With the creek comes more ferns and few flying insects, and a smell that’s pleasantly, paradoxically musty and fresh.
Your path parallels the creek now, spongy beneath your feet. You know the sun is well up, but the morning light is subdued, dusk-like. The creek’s music builds with each step, a soundtrack preparing you for something significant. One more bend and you’re facing your goal, a glistening cataract tumbling thirty vertical feet over mossy logs and rocks, framed by ferns.
You’ve arrived at Russian Gulch Fall, deep in the perpetually damp, green hills east of Mendocino on California’s north coast. Down here it’s easy to imagine a world untouched by humans, and finding this eden empty is heaven. The staircase down to the fall is carved into the hillside and almost invisible; the weathered redwood bridge crossing the creek, just downstream, blends with the surroundings to form the ideal platform from which to imagine a prehistoric reality. Even if you’re not so inclined, it’s difficult to be down here without lapsing into something akin to meditation.
About this image
I’ve been to Russian Gulch Fall a number of times, alone and with other photographers. I try to make it to the fall before midmorning, before the sun rises high enough to penetrate the dense redwood canopy and create too much contrast for my camera to capture.

Deep Forest Cascade, Russian Gulch Fall, Mendocino Coast
On this morning I arrived early enough to work the scene for a full two hours before tiny patches of sunlight blighted the forest floor and sent me packing. And work it I did, starting wide and trending tighter as I became more familiar with the scene.
I started by orienting my polarizer, an often overlooked component in a forest water scene like this. Many people think the polarizer’s purpose is to make the sky more blue, but I think its greatest benefit is removing the sheen from foliage and rocks, especially (but not exclusively) when they’re wet. Between the two stops of light lost to the polarizer, and the dense forest dark, achieving a shutter speed fast enough to freeze the water without severely compromising my ISO and f-stop was impossible, so I just went with extreme blur in the water.
The morning air seemed perfectly still, but to guard against an imperceptible breeze nudging the ferns during my exposure, I bumped my ISO to 400. I selected f/11 to ensure front-to-back sharpness, which gave me a one second exposure that created extreme motion blur that I thought made the delicate strands of plummeting water quite nice.
A handful of people came through while I was down there, pausing briefly to savor the scene before continuing on or turning back, but for the most part I had the fall to myself. I photographed until the sun climbed into the treetops, paused a few minutes to bask in the quiet, then started the trudge back to the present.
Keeping the world out
Even when I’m surrounded by people, or signs of human influence, I try to photograph the world as if I’m the only one who has ever been here. It’s not that I don’t like people (I love and need people, as this pandemic has confirmed for me), it’s that I recharge in their absence, and my photography is an extension of that part of me. Whether I’m photographing at a location where I am indeed completely alone, as I was that morning at Russian Gulch Fall, or in the midst of a workshop group, or rubbing elbows with hundreds of gawking tourists (I’m looking at you, Antelope Canyon), I frame my scenes to convey a feeling of solitude.
Many of the images in the gallery below were captured in the presence of others, but the feeling I get from viewing them now is no different than it would be had I been completely alone. While many of my images feature the sky, for this gallery I selected smaller, more intimate scenes that soothe.
Alone in the World
Click an image for a closer look, and to view a slide show.


, California")


Blue Hour
Posted on May 20, 2020

Blue Hour, Vestrahorn, Iceland
Sony a7RIV
Sony 12-24 G
8 seconds
F/16
ISO 50
“Many of us would probably be better fishermen if we did not spend so much time watching and waiting for the world to become perfect.”
― Norman Maclean, A River Runs Through It
I haven’t fished in years (decades), but of course Norman Maclean’s words really aren’t about fishing anyway. Nevertheless, I’m reminded of this quote every time I find myself frozen by minutia, mired in the moment by small distractions that matter very little, or looking for excuses not to take pictures.
There are a lot of reasons not to take a picture—tell me if any of these sound familiar: “The light was better yesterday”; “The light will be better tomorrow”; “It’s too cold”; “It’s too hot”; “It’s too wet”; “I’m hungry”; “there’s dust on my sensor”; “This lens is soft,” and on, and on….
This Vestrahorn shoot came toward the end of the 10-day Iceland workshop Don Smith and I led in January of this year (was that really only 4 months ago?!). As the sun disappeared on this chilly winter evening, there were a lot of reasons not to stay out photographing: it was cold, I was wet, the clouds, it was getting dark, and there was a 90-minute drive separating us from dinner. It had been a nice shoot, but I was a little disappointed that the sky that had looked quite promising all afternoon, never really delivered the color I’d been waiting for. But before heading back to the van, I wandered up the beach a bit and found this rocky section that was different from the waves, and the reflections left in their wake, I’d been concentrating on all afternoon. As I reconsidered whether to call it a day, I came upon a lone shell embedded in the sand. With the light fading fast, I quickly dropped my tripod as low as it would go and set up with my Sony 12-24 G lens on my Sony a7RIV, and went to work.
Before I knew it, the “blue hour,” that magnificent transition from day to night (and back) that always looks better on an image than it does to the eye, had taken over. If you’ve ever stayed out to photograph after your eyes tell you it’s time to go in (or started shooting a little early while waiting for sunrise), you know what I’m talking about. What we humans perceive as darkness is really just our eyes’ relatively limited ability to gather light at any given instant. But a camera’s sensor (or a rectangle of unexposed film) can patiently accumulate all the light striking it for whatever duration we prescribe, thereby stretching its “instant” of perception indefinitely. Advantage camera.
On a clear night, you can actually watch the Earth’s shadow descend and engulf the landscape in deepening blue light. And unlike daylight (and moonlight) photography, when a discrete light source casts high-contrast shadows that test a camera’s dynamic range, and starlight photography, when the light is so faint that extremely long exposures are required to register any foreground detail at all, in the pre-sunrise/post-sunset gloaming, a camera can still “see” these diminishing vestiges of daylight. Given enough exposure, the image’s world is rendered blue, and because the entire sky is the light source, this blue hour light is spread so evenly that most shadows disappear.
When I can, I’ll stay out at least long enough for the first stars to pop out. On this evening, because I didn’t want the rest of the group to have to wait for me, I wrapped up before the stars appeared, but still stay out long enough to capture this 8-second exposure—my very last image of the evening. The perfection I’d been watching and waiting for never made it to my eyes, but fortunately my camera revealed that it was there all along.
Workshop Schedule || Purchase Prints
Blue Hour


Moonlight Magic
Posted on May 12, 2020
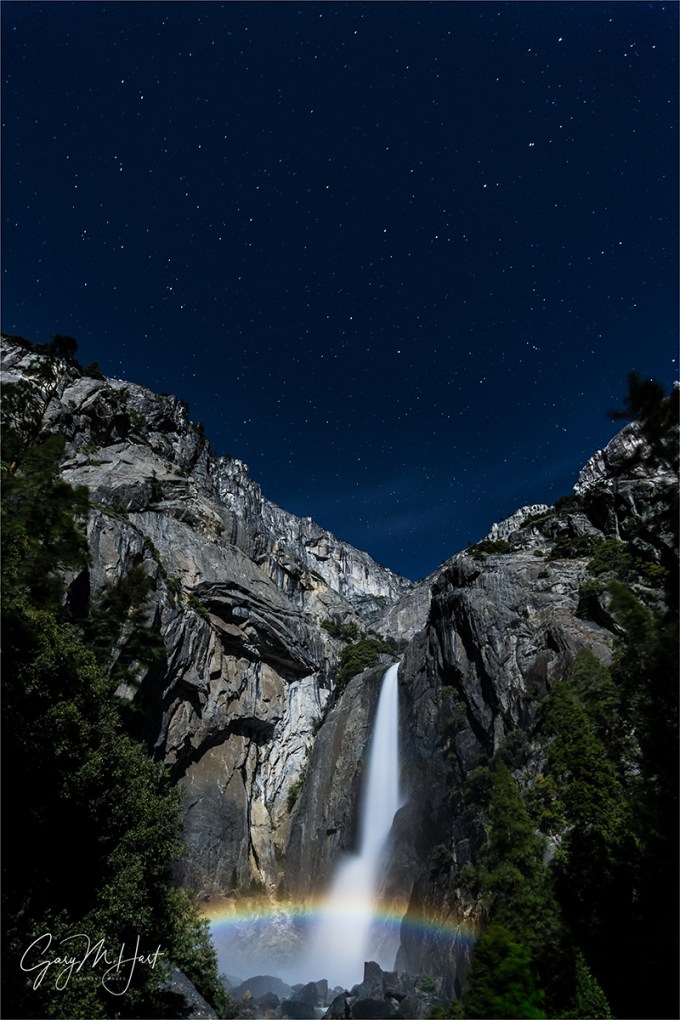
Moonbow and Big Dipper, Lower Yosemite Fall, Yosemite
Canon EOS-1Ds Mark III
22 mm
30 seconds
F/4
ISO 800
Rainbows demystified
A rainbow forms when sunlight strikes airborne water droplets and is separated into its component spectral colors by characteristics of the water. The separated light is reflected back to our eyes when it strikes the backside of the droplets: Voila—a rainbow!
There’s nothing random about a rainbow—despite their seemingly random advent and location in the sky, rainbows follow very specific rules of nature. Draw an imaginary line from the sun, through the back of your head and exiting between your eyes—when there are airborne water droplets to catch that light, a will rainbow form a full circle at 42 degrees surrounding that line (this won’t be on the test). Normally, because the horizon (almost always) gets in the way, we see no more than half of the rainbow’s circle (otherwise it might be called a “raincircle”). The lower the sun is, the more of the rainbow’s circle we see and the higher in the sky the rainbow extends; when the sun is higher than 42 degrees (assuming a flat horizon), we don’t see the rainbow at all unless we’re at a vantage point that allows us to look down (for example, looking into the Grand Canyon from the rim).
Read more about rainbows on my Photo Tips Rainbows Demystified page.
Moonbows
Moonlight is nothing more than reflected sunlight—like all reflections, moonlight is a dimmer version its source (the sun). So it stands to reason that moonlight would cause a less bright rainbow under the same conditions that sunlight causes a rainbow. So why have so few people heard of lunar rainbows (a.k.a., moonbows)? I thought you’d never ask.
Color vision isn’t nearly as important to human survival in the wild as our ability to see shapes, so we evolved to bias shape over color in low-light conditions. In other words, colorful moonbows have been there all along, we just haven’t be able to see them because they’re not bright enough. But cameras, with their ability to dial up sensitivity to light (high ISO) and accumulate light (long exposures), “see” much better in low light than you and I do.
While it’s entirely possible for a moonbow to form when moonlight strikes rain, the vast majority of moonbow photographs are waterfall-based. I suspect that’s because waterfall moonbows are so predictable—unlike a sunlight rainbow, which doesn’t require any special photo gear (a smartphone snap will do it), capturing a lunar rainbow requires at the very least enough foresight to carry a tripod, and enough knowledge to know where to look.
Nevertheless, even though we can’t see a moonbow’s color with the unaided eye, it’s not completely invisible. In fact, even without color, there’s nothing at all subtle about a bright moonbow—it may not jump out at you the way a sunlight rainbow does, but if you know where to look, you can’t miss a moonbow’s shimmering silvery band arcing across the water source.
Yosemite Falls moonbow
Despite frequent claims to the contrary, moonbows can be seen on many, many waterfalls. Among the more heralded moonbow waterfalls are Victoria Falls in Africa, Cumberland Fall in Kentucky, and (of course) Yosemite Falls in Yosemite National Park.
Yosemite Falls is separated into three connected components: Upper Yosemite Fall plummets about 1400 feet from the north rim of Yosemite Valley; the middle section is a series of cascades dropping more than 600 feet to connect the upper and lower falls; Lower Yosemite Fall drops over 300 feet to the valley floor. While there are many locations from which to photograph the moonbow on Upper Yosemite Fall, the most popular spot to photograph it is from the bridge at the base of Lower Yosemite Fall.
The Lower Yosemite Fall moonbow is not a secret. Arrive at the bridge shortly after sunset on a full moon night in April, May, and (often, if the fall is still going strong) June, and you’ll find yourself in an atmosphere of tailgate-party-like reverie. By all means come with your camera, tripod, and rain gear, but don’t get so caught up in the photography that you fail to appreciate the majesty of this natural wonder.
Following a typical winter, in spring the mist and wind (the fall generates its own wind) on and near the bridge will drench revelers and cameras alike. After a particularly wet winter, the airborne water and long exposures can completely obscure your lens’s view during the necessarily long exposures. And if the wet conditions aren’t enough, if you can find a suitable vantage point, expect to find yourself constantly jostled by a densely packed contingent of photographers and gawkers stumbling about in limited light. Oh yeah, and then there are the frequent flashes and flashlights that will inevitably intrude upon your long exposures. But despite all these challenges, I’ve done this long enough to know that success is very possible if you know what you’re doing.
If, knowing all that, you still have visions of a moonbow image, it’s best to come prepared:
- A tripod and digital SLR camera are must (a film camera will work too, but it adds complications I won’t get into here)
- Wear head-to-toe rain gear so you can concentrate on keeping your camera dry
- Bring a chamois or towel—you’ll be using it frequently
- An umbrella can help keep water off your lens during a long exposure
- Practice moonlight photography (you’ll find my how-to of moonlight photography, including exposure settings and focus techniques, in the link) before you get there—trust me when I say that you don’t want to be learning how to photograph by moonlight while you’re trying to capture a moonbow in a mosh pit.
- Don’t have time to practice before your visit? Stop at the top of the Lower Yosemite Falls trail, where you can see the entire fall from top-to-bottom, and practice there—you won’t see a moonbow (the angle is wrong), but the conditions are much easier, and these might just turn out to be your favorite images of the night.
About this image
I’d taken my May workshop group to Glacier Point on this night, so we didn’t arrive at Yosemite Falls until nearly an hour after the moonbow started. This late arrival was intentional because California’s severe drought has severely curtailed the mist at the base of the lower fall. In a normal year the mist rises so high that the moonbow starts when the moon is quite low (remember, the lower the sun or moon, the higher the bow); this year, I knew that the best moonbow wouldn’t appear until the moon rose and the bow dropped into the heaviest mist. Not only that, the later it gets, the few people there are to deal with.
I’d given the group a talk on moonlight photography that afternoon, but we stopped at the top of the trail to practice for about 20 minutes, using the exquisite, tree-framed view of the entire fall. When everyone had had success, we took the short walk up to the bridge and got to work.
We found conditions that night were remarkably manageable—by the time we arrived at the bridge, at around 9:45, the crowd had thinned, and our dry winter meant virtually no mist on the bridge to contend with. I started with couple of frames to get more precise exposure values to share with the group (moonlight exposures can vary by a stop or so, based on the fullness of the moon, its size that month, and atmospheric conditions), then spent most of my time assisting and negotiating locations for my group to shoot (basically, wedging my tripod into an opening then inviting someone in the group to take my spot).
This image is one of my early test exposures—I went just wide enough to include the Big Dipper (just because it’s a test doesn’t mean I’ll ignore my composition). In wetter years I’ve captured move vivid double moonbows and complete arcs that stretch all the way across the frame, but I kind of like the simplicity of this image, and the fact that I was able to include the Big Dipper, which appears to be pouring in the the fall.
Chase the Moonbow With Me in April
Workshop Schedule || Purchase Prints || Instagram
Moonlight Magic


A Lot Like Fishing—Until It’s Not
Posted on May 7, 2020

Diagonal Lightning Strike, Lipan Point, Grand Canyon
Sony a7RII
Sony/Zeiss 24-70
1/13 second
F/11
ISO 50
Photographing lightning is about 95 percent arms folded, toe-tapping, just-plain-standing-around-scanning-the-horizon—interspersed with random bursts of pandemonium. Usually, after all that waiting waiting around, with the first bolt usually comes the realization that you anticipated wrong and either, 1) the lightning is way over there; or 2) the lightning is right here (!). What generally ensues is a Keystone Cops frenzy of camera bag flinging, tire screeching, gear tossing, tripod expanding, camera cursing, Lightning Trigger fumbling, bedlam. Followed by more waiting. And waiting. And waiting….
I’ve always thought that the waiting part of lightning photography is a lot like fishing (spiced up by the understanding that these fish have the ability to strike you dead without warning). Both are an intoxicating mix of serene communing with nature and an electric current of anticipation. And whether you’re fishing for trying to photograph lightning, the strike far from a guarantee that you’ll reel anything in. Just as fish somehow slip the hook, you a lightning strike can come and go before even the fastest cameras can respond. Most of my lightning “the one that got away” stories turn out to be something I’ve done wrong (and my list of stupid mistakes is too long, and embarrassing, to detail here).
One frustration that I’ve learned to deal with is that when a Lightning Trigger is attached and turned on, the camera is in pre-focus mode (to allow the fastest shutter-lag), which disables LCD review—and I guarantee that the surest way to ensure another lightning strike is to turn off your Lightning Trigger because the second you turn off your Lightning Trigger to see if you got that last strike, a spectacular triple-strike will fire right in the middle of your frame. Guaranteed. (This is an extension of the axiom every photographer knows: The best way to make something you’ve been waiting for happen, is to put away your camera gear.) Though there’s no way to know, I would bet that each time you pull the line out of the water to make sure the worm is still there, the “big one” you’ve been dreaming about swims right by.
Read the lightning photography tutorial in my Lightning Photography photo tips article.
About this image
Still reeling from Saturday’s 12-hour drive to the Grand Canyon for our 2015 Grand Canyon Monsoon photo workshop, and with clear skies in the forecast for Sunday, Don Smith and I planned to take the day to recharge for the workshop that started Monday. But dark clouds after lunch sent us racing up to the rim (a 15 minute drive) to see what was going on (see Keystone Cops reference above).
Starting at Grand View Point, we quickly set up our tripods, attached our Lightning Triggers to our cameras, and aimed toward promising clouds in the east, up the canyon, and waited. Soon these distant clouds weakened, but a new batch of clouds overhead darkened, and a breeze picked up—usually a sign that rain is coming. Aside from the spectacular beauty, another great thing about photographing lightning at the Grand Canyon is the expansive vistas that allow you to photograph distant lightning. Basically, we want to be photographing someone else’s storm—if you’re in the storm you’re photographing, you’re too close. So when the rain started falling we packed up and bid a hasty retreat; by the time we made it to the car, the rain had turned to hail we could hear thunder. Since the storm appeared to be moving west, we drove east to get on the back side of it, eventually ending up at Lipan Point—one of my favorite spots for lightning because it has long views both up and down the canyon.
We set up west of the Lipan vista, enjoying relative peace and quiet away from the summer tourist swarm. The cell that had chased us from Grand View was diminishing, but we could see an even more impressive cell moving up to replace it from the south. The first bolts this storm fired were above the flat, scrub pine plain south of the rim, but it was moving toward the canyon so we set up and waited. At first I hedged my bets, composing wide enough to get lightning over the less aesthetically pleasing terrain, along with the canyon. But as the cell moved out over the canyon, my composition moved with it.
When photographing lightning, not only do you need to get the light right, you need to make sure your shutter speed is slow enough to capture secondary and tertiary strikes, but fast enough that the lightning doesn’t get lost in the background. That’s because a long shutter speed, even if the rest of the scene is perfectly exposed, will wash out the lightning (not problem at night, when there’s plenty of contrast). The light this afternoon was particularly schizophrenic, so because I prefer photographing lightning in manual metering mode (I explain in the lightning tutorial linked above), I had to frequently monitor the changes and adjust my exposure accordingly.
That afternoon we enjoyed about a half hour of quality shooting before lightning moved too close for comfort. In that span I saw at least a half dozen canyon strikes, not an especially active storm by Grand Canyon standards, but one that delivered several photogenic strikes like this one (my favorite of the bunch). Lightning photography can be mesmerizing, and when the strikes just keep getting more and more spectacular, it’s easy to lose track of (or not care) how close the storm is. Fortunate for us this afternoon, a second active cell snuck up behind us and jarred us from our trance. It was over less photogenic terrain, so we managed to pull ourselves away before things became too dangerous.
Grand Canyon Photo Workshops
Workshop Schedule || Purchase Prints
Grand Canyon Lightning
Click an image for a closer look, and to view a slide show.


The Bright Side
Posted on May 4, 2020

Moon Over East Mitten, Monument Valley
Canon EOS-5D Mark III
Canon 24-105L
1.6 seconds
F/11
ISO 100
Some of the best things that have happened in my life would not have happened had something bad not happened first. Not only does this apply to life’s important things, like relationships and careers, I can also say the same thing about my photography.
In 2013, the politicians we Americans elected to serve us got in a pissing match about the budget and the public suffered. When they shut down the government, the workers who could least afford it lost their income, and people who had been planning vacations to our national parks had to cancel or find alternatives. I make my living conducting photo workshops in the national parks, so to say I was anxious about the government shutdown would be an understatement.
Because of the timing, the shutdown affected my friend Don Smith’s workshops even more that it affected mine—I lost one sunset shoot in my Eastern Sierra workshop (and simply replaced it with an alternate location), but Don lost the Grand Tetons the day before the start of his workshop there (and still managed to make it work with alternate locations just outside the park), and it looked he was going to lose his Arches/Canyonlands workshop too.
As many of you may know, Don and I sometimes trade off assisting each other’s workshops, and I was scheduled to help him in Arches/Canyonlands. Don wanted to find alternate locations for his Arches/Canyonlands group as he’d done in the Tetons, but a schedule conflict prevented him from traveling to Moab early to scout. With an opening in my schedule, I volunteered to do the advance scouting instead. I flew out a few days early and spent that extra time identifying options in areas surrounding the parks’ boundaries.
It turned out that while I was out there, the state of Utah paid the federal government to reopen their parks, so by the time the workshop started everything was back to business as usual. But because of that advance scouting trip, that only happened because of the government shutdown, Don was able to give his participants several really nice spots that would never have happened without the shutdown.
The highlight of the entire workshop was a trip to Monument Valley to photograph the full moon rising above The Mittens that would never had happened without the shutdown. I knew we’d have a full moon during this workshop and was looking for places to photograph it outside Arches and Canyonlands NPs. My first evening in Moab, on a whim I checked the sunset moonrise above The Mittens and realized it would align perfectly. Even though the drive from Moab to Monument Valley was 2 1/2 hours, Don and I thought this opportunity was too good to pass up. When we shared the opportunity with the rest of the group at the orientation, even though we now had access to Arches and Canyonlands and didn’t need to drive to Monument Valley, everyone was excited to do it.
We left early enough to allow the group to explore some of the beauty along the route, enjoy the loop drive through Monument Valley, and even have dinner at the spectacular (and aptly named) The View restaurant. And as you can see, the moonrise itself was a rousing success. All because our original plans were blown up by the national parks closure.
The moral of the story
I’m not saying that a global pandemic is a good thing, and certainly am not trivializing the true tragedies COVID-19 has brought. But I do believe that those of us not affected by extreme COVID loss can find comfort in the positives that come from an experience we can all agree feels quite negative. Here’s my list of things that have happened thanks to COVID that would not have happened with business as usual (in no particular order):
- I’m learning video!
- I emptied a storage unit I hadn’t visited in four years and that was sucking $170/month from my checking account
- My garage is cleaner that it has been in years, in spite of (in fact because of) the infusion of mostly useless junk from my storage unit
- I’m refinancing my house and saving $$$
- I’ve learned that I can go (at least) 6 weeks without a haircut
- I’m walking 7-10 miles per day and have started running again
- I’ve processed tons of images that I had completely forgotten about (and even sold some)
- I’ve learned (or at least been reminded) that “success” isn’t as money-centric as we tend to believe
I can’t wait to return to “normal” (whatever that may be), to get out and photograph the nature I love so much and reconnect in person with my workshop students. But in the meantime I find comfort in the knowledge that in many ways I’ll be better for this experience. I hope you can say the same thing.
Workshop Schedule || Purchase Prints
Change of Plans: Images That Happened Because Something Went Wrong
Click an image for a closer look, and to view a slide show.


")


")


