Eloquent Images by Gary Hart
Insight, information, and inspiration for the inquisitive nature photographer
Our first date: First impressions of my Sony a7R II
Posted on August 10, 2015

Flaming Oaks, Sierra Foothills, California
Sony a7R II
Tamron 150-600 (Canon-mount with Metabones IV adapter)
1 second
F/8
ISO 100
Love at first sight
My Sony a7R II arrived Wednesday, but my schedule limited my use to staying home and familiarizing myself with menus and overall handling. If you’re familiar with Sony’s e-mount mirrorless bodies, you’ll be able to hit the ground running with the a7R II. The menu system is the same, though of course there are few new features.
The buttons and controls have moved a bit from their placement on the original a7 bodies (a7, a7R, a7S), but it’s essentially the same body as the a7 II (released late last year). Blindfolded, it would be difficult to distinguish the a7R II from the a7 II, and in fact, my Really Right Stuff L-plate (which I ordered several weeks ago), is the a7 II L-plate. I didn’t order the battery grip, but I know the a7 II battery grip fits the a7R II as well.
On the other hand, the a7R II has more heft than the a7R—the body, while still far more compact than my Canon bodies, is definitely larger and heavier than the original a7R body. The grip noticeably larger too. The result is a camera that feels more solid without sacrificing its mirrorless compactness—a definite upgrade.
I find mirrorless so perfectly suited to manual focus (for stationary landscape subjects), and the a7R autofocus so sluggish, that I just stopped using autofocus. I think that will change with the a7R II, as just a few test frames made it clear that the autofocus is vastly improved, both in speed and accuracy—not just for my Sony glass, but for my Canon lenses paired with a Metabones IV adapter (just make sure you’re using the latest Metabones firmware). Manual will remain my primary focus paradigm, but it’s nice to know that autofocus is now a viable option.
Shutter lag
One prime consideration for me is shutter-lag (the time it takes the shutter to engage once the button it pressed). Measure in milliseconds, it’s not a big factor for virtually all uses, but when photographing lightning, every millisecond matters. My Canon 5D Mark III’s shutter lag was decent but not great; the a7R is too slow to even consider for lightning; the a6000 is quite fast; and the a7S is (dare I say) lightning fast. So on the eve of my annual Grand Canyon monsoon trip (for the workshop Don Smith and I do each year), I was quite anxious to know how the a7R II would perform in the shutter lag department.
I don’t have the means to measure the actual shutter lag of a camera, but since I have the shutter lag numbers for the a7S, and have had great success photographing lightning with it already, I just wanted to know know how the a7R II compares the a7S. And I was able to devise a way to test their relative speed. Without going into too much detail, my test involved both cameras set up on a tripod with a Lightning Trigger (the only lightning sensor I’d even consider using—I own two) attached.
With both cameras focused on a timer that recorded milliseconds, I simultaneously triggered each using its Lightning Trigger, then compared the times captured in the images of each camera. They were identical. Just to be sure I ran a second test and again they were identical.
As I write this I’m one day into my Grand Canyon trip and can tell you that I now have empirical data confirming that the a7R II is a great lightning camera, maybe even the best lightning camera. But that’s a story for another day….
Kiss and tell
Thursday night I took my new camera out to one of my favorite sunset spots in the foothills. Sporting her brand new L-plate and 128 GB media card, she was clearly primed for action. This being our first date, I didn’t want to push her too hard, but I could tell she was definitely ready for whatever I asked.
As luck would have it, this turned out to be more than a dry run shoot to test a new camera. The sunset that night was off the charts, so much so that I ended up breaking out a second camera (she didn’t seem to mind that either). I haven’t had a lot of time to play with the images from that night, but am sharing this one here from the very end of the shoot. Despite its appearance, and the rash of fires burning throughout California, no trees were injured in the making of this image. This is just silhouette of a trio of oaks against the sunset, underexposed to enhance the trees’ shape and hold the color in the sky.
My first impressions of the a7R II? I think it’s a relationship that’s going to last (at least until the next version comes out). In addition to the improved focus and increased resolution, in the very brief time we’ve been together, it’s clear that the dynamic range is even better than the phenomenal dynamic range I get from my a7R.
All this, and a great body.
My Sony Gallery (a history of my ten months as a Sony shooter)
Click an image for a closer look, and a slide show. Refresh the screen to reorder the display.


The camera’s vision: Light
Posted on August 2, 2015
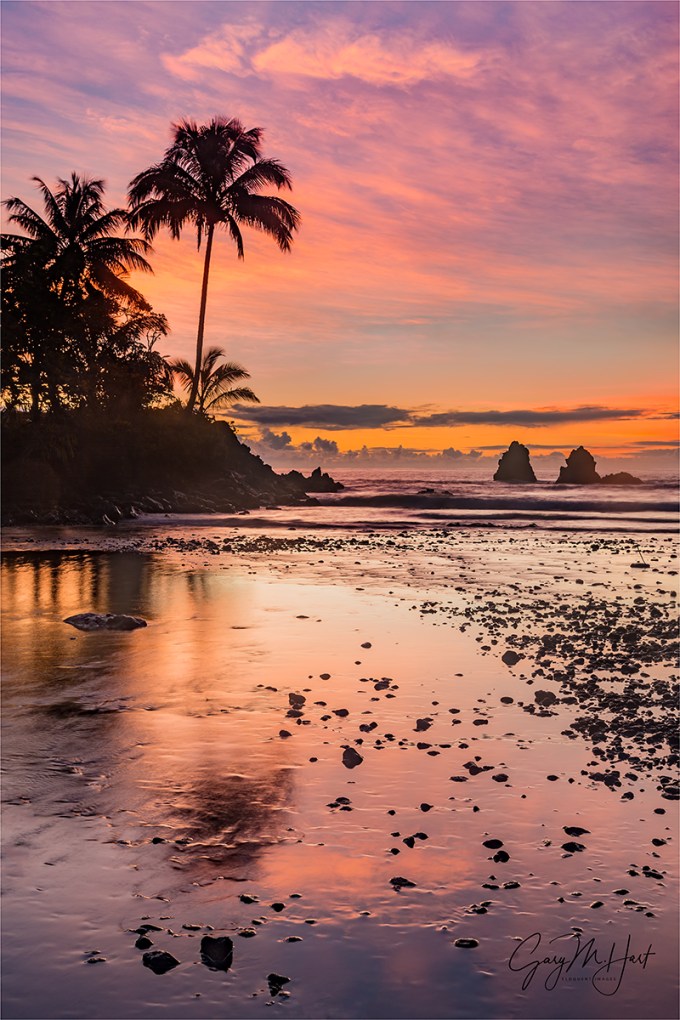
Tropical Sunrise, Hawaii Big Island
Canon EOS-5D Mark III
32 mm
1 second
F/11
ISO 200
Something I teach, write, and lecture on frequently (ad naseum?) is the photographer’s obligation to understand, not fight, the camera’s vision. Some people get this; others, not so much.
So here I go again…
Visual “Truth” is relative
Without getting too philosophical, it’s important to understand that, like your camera, your view of the universe is both limited and interpreted. In other words, there is no absolute visual truth. Instead, we (you, me, our cameras) each have a unique vision of the world that’s based on the way we receive it. Our definition of “real” is biased toward the three-dimensional, 360 degree, continuous-motion way our eye/brain system processes our universe, but it’s wrong to contend that the camera’s perspective is any less real than yours or mine.
The visible spectrum
Before lamenting your camera’s limitations, pause to consider that, in the grand scheme of perpetual electromagnetic energy surrounding us, what you and I see is incredibly limited as well. The visible (to the human eye) portion of the electromagnetic spectrum is an insignificant fraction of the infinite continuum of electromagnetic wavelengths permeating the Universe. For example, X-ray machines peer into the world of electromagnetic waves in the one nanometer (one billionth of a meter); TVs and radios “see” waves that are measured in centimeters; humans, on the other hand, see only waves in the very narrow band between (about) 400 and 750 nanometers.
With tools that target specific wavelengths, doctors reveal subcutaneous secrets, astronomers explore our galaxy and beyond, law enforcement and the military use “invisible” (to us) infrared radiation (heat) to see people and objects in complete darkness. In other words, in the grand scheme of things, there’s no single absolute visual standard—it’s all relative to your frame of reference.
The camera has its own frame of reference. While it’s sensitive to more or less the same visible spectrum our eyes see, the camera is oblivious to an entire dimension (depth). Not only that (since we’re not talking about movies here), a camera only returns a snap of a single instant. But a camera has advantages—its narrow perspective (compared to the human experience) allows photographers to hide distractions outside the frame, and that “instant” reflected in a photo can actually be an accumulation of infinite number of instants.
Despite these differences, photographers often go to great lengths attempting to force their cameras to record the world the way their eyes see it—not necessarily bad, but extremely limiting. Not only is duplicating human vision with a camera impossible, doing so sacrifices the camera’s ability to reveal things the eye/brain misses.
Interpreted vision
Every photograph must be processed (interpreted) in some way before it can be viewed. The processing can happen in a lab (remember those days?), the camera, and/or in a computer. But human visual input is also interpreted before we perceive it. Visual processing happens in the brain, which adjusts for things like color temperature, perspective, motion, and so on.
Of course human vision is a lot more complex than that, and while the eye/brain relationship might not be a perfect analog for the camera/computer paradigm, suffice to say, whether you’re looking at Yosemite in a digital print, on a computer screen, or through your own two eyes, the scene has been interpreted. And with interpretation comes bias.
Leveraging limitations
In many ways, the eye’s ability to capture light exceeds that of even the best cameras, effortlessly pulling detail out of deep shadows and bright highlights. But savvy photographers know how to use their cameras’ limited dynamic range to hide distractions, emphasize the scene’s most important elements, and reveal washed out color.
In the image above, captured on the Big Island of Hawaii last September, I used my camera’s (relatively) narrow dynamic range to simplify a sunrise to its essential color and shape. I could have blended multiple exposures to bring the detail in this scene closer to what my eyes saw, but it wasn’t the scene’s detail that moved me. Instead, underexposing the shadows minimized detail in the trees and rocks and allowed me to reveal color that had been washed out by the rising sun. I was able to simplify an originally complex scene to the elements that I found most compelling: the very tropical outline of swaying palms, the

Brilliant Poppy, American River Parkway, Sacramento
tenacious strength of rugged sea stacks, and the vivid color of a Hawaii sunrise, all mirrored in an abstract foreground reflection.
Instead, using my camera’s “limited” dynamic range, I blackened the superfluous detail that would have distracted from the qualities of the scene that I most wanted to convey.
In the poppy image on the right, the scene’s dynamic range was again impossible to capture with a camera—everything you see as white was blue sky or brilliant sunlight to my eyes. I chose to properly expose the poppy and let the sky blow out. The result was this beautifully backlit poppy isolated against a white background that was nothing like my view of the scene—but it was exactly what my camera saw.
Open your mind
So the next time you feel like labeling “real” or “not real,” or insisting that your camera do things it’s not very good at (just to satisfy your own perception of reality), remember that real is relative and far broader than your narrow perspective.
A few words about this image
I get to Onomea Bay each time I’m on the Big Island, and each time this scene is a little different. In recent years the stream feeding the bay has been low, and the tide has been out, so I haven’t been able to capture reflections like this. But on this visit in 2014 I got the reflection I wanted and a colorful sky to boot. Because this scene is more about the shapes of the palm tree and nearby rocks, I was able to save the sunrise color by turning them into silhouettes.
Workshop Schedule || Purchase Prints
Stuff my camera saw that I didn’t
(Or saw far differently)
Click an image for a closer look, and a slide show. Refresh the screen to reorder the display.


The Secret Weapon for Overcoming Unsung Landscapes
Posted on July 24, 2015

Crescent at Sunset, Sierra Foothills, California
Sony a7R
Tamron 150-600 (Canon-mount with Metabones IV adapter)
1/6 second
F/9
ISO 800
I travel a lot. A lot. Don’t get me wrong—I know I’m incredibly fortunate to see and photograph the things I do, but sometimes it’s nice to be home. Despite the world-class locations I get to visit, I don’t cease being a photographer just because I’m home. I spend a lot of time exploring and photographing the unsung landscapes near home, landscapes that few would cross borders to photograph, but landscapes that I feel a particular connection to by virtue of a lifetime in California.
Look to the sky
The landscape is only half of an image. Since the best photography is usually more than simply a picture of a pretty thing, I always try to juxtapose my terrestrial subjects with an interesting sky. And unlike stationary terrestrial subjects, you can stand in one place and without moving, watch the sky do some pretty spectacular stuff: moon, stars, clouds, rainbows, whatever.
Sadly, as nice as California’s landscapes are, compared to most places, California has relatively boring skies. If I lived somewhere that gets summer thunderstorms (pretty much anywhere in the United States except the West Coast), I’d find a photogenic tree or creek, then make sure I was there the next time the sky did something special. But in California, I end up doing a lot of moon and star photography (not that there’s anything wrong with that).
Local favorites
My foreground options near Sacramento are rivers and oaks (and wildflowers in spring), and I particularly love our oaks (the rivers near town are often overrun with people). The criteria I use when searching for oaks to put with my sky images are a striking shape (with an oak, that’s usually a given), a distant vantage point that allows me to use a telephoto (to magnify to moon without losing most of the tree), and elevation that puts the tree against the sky instead of other hills and trees. Over the years I’ve collected a number of these spots, and will never tire of looking for more.
Chasing the moon
Last week I drove to the foothills east of Sacramento to photograph a thin slice of moon on the western horizon just after sunset. This wasn’t an exploration mission, it was specifically planned to take advantage of a spot I’d found earlier this year.
Unfortunately, (as I feared) the developers had found my spot too, and I arrived to find “my” trees surrounded by new homes in varying stages of completion—lucky for a handful of homebuyers, but not so much for all the rest of us who enjoy the foothills’ solitude and pristine views.

Tequila Sunset, Sierra Foothills, California

New Moon and Oaks, Sierra Foothills, California
Plan B
Just down the hill from this recently found-and-lost spot was the subject of my very first planned moon shoot, an oak-topped hillside that I’d photographed at sunset many years ago, decided that it would look really nice with a crescent moon, then figured out when to return.
But this time I found the moon far north (to the right) of its position all those years ago (the closer to the summer solstice, the farther north a crescent moon sets), and it soon became clear that only spot that would work was on a shoulderless, blind curve of a busy, two-land road. Compounding the difficulty, the moon this night was also closer to new (thinner and nearer the horizon), significantly shrinking my window of shooting opportunity, which limited the distance I could hike to get there in time. I made several passes in both directions before finding a safe(ish) place to park, then crammed my car all the way up against a tilting fence, two tires in a drainage ditch, and put on my hazard blinkers.
Why did the photographer cross the road?
Getting the alignment I wanted required crossing the road, scaling a barbed-wire fence, and traipsing through knee-high weeds. The knowledge that rattlesnakes pretty much rule these foothills made me acutely aware that the weeds were so thick that I couldn’t really see the landing spot for each step.
I photographed the entire scene with my Tamron 150-600 on my Sony a7R. As the moon dropped, sliding left to right, I moved forward along the fence line to control the relationship between the descending moon and the trees, starting with wider focal lengths that included some or all of the eight to ten trees capping the hill. Because my route dropped as I moved forward, the moon quickly fell into the trees from my perspective, allowing me to include the moon and trees increasingly tighter compositions.
For the night’s grand finale I found an alignment that cradled the moon in the silhouetted branches of a single tree, zooming to 600mm to magnify the moon and eliminate all but one tree. Because a 600mm focal length will catch even the slightest vibration, I went to 800 ISO to maximize my shutter speed in the deepening twilight. Once I shot this I actually rescaled the fence and darted back across the highway attempting to get the moon on the other side of the tree, but by the time I got everything aligned, the trees had been swallowed by the too-dark sky.
Your assignment…
Every location has features that set its landscape apart. Trees, rivers, lakes, mountains, hills, farmland—I could go on, but you get the point. Your local subject doesn’t need to be spectacular, because when the sky is spectacular, all you need is an interesting terrestrial anchor for your image.
The next time you find yourself with time to kill, explore your outskirts and identify unique subjects that you can add to a striking sky. Now, get to work!
Photo workshop schedule
A gallery of unsung landscapes
Click an image for a closer look, and a slide show. Refresh the screen to reorder the display.


Yosemite, weather or not
Posted on July 19, 2015

Clearing Storm, Glacier Point, Yosemite
Sony a7R
Sony/Zeiss 16-35
1/15 second
F/11
ISO 125
Photography weather and tourist weather are polar opposites: What’s good for photography—clouds, rain, snow—isn’t usually so great for being outside. This is especially true in Yosemite, where stormy weather can add an entirely new dimension to the park’s already renowned scenery (not to mention inclement weather’s crowd-thinning effect).
Sometimes Yosemite’s clouds simply diffuse the light, subduing shadows into a much more camera-friendly range, and extending the quality photography window. Other times, the clouds become subjects themselves, contorting into diaphanous curtains or towering pillars whose beauty rivals Yosemite’s granite icons. But rain or shine, there’s always something to photograph in Yosemite if you know where to look.
Wet weather gear
Regardless of the forecast, I never travel to Yosemite without my rain gear duffel containing everything necessary to keep me head-to-toe dry and focused on photography: hat, gloves, parka, rain pants, and waterproof boots for me, and an umbrella for my camera. I haven’t found a satisfactory rain cover for my camera, but a plastic garbage bag is quite handy for keeping the camera dry while it’s on my tripod but I’m not shooting (searching or waiting for a shot). Another essential wet weather accessory is a towel or chamois to dry any gear (especially the front of my lens) that gets wet despite my best efforts.

Elm in Blizzard, Cook’s Meadow, Yosemite
The teeth of the storm
Some of my favorite Yosemite photography has been in the teeth of the storm, when rain or snow has forced all but the most hardy indoors, and obliterated the recognizable landmarks, forcing me to look a little closer for subjects. A bonus during these extreme weather shoots are the occasional cameos by Yosemite’s star attractions (so stay alert).
My go-to mid-storm subjects in Yosemite include: the elm in Cook’s Meadow, the Cascade Creek waterfall above the bridge on Big Oak Flat Road (the road descending into Yosemite Valley from the Big Oak Flat entrance), Bridalveil Creek beneath Bridalveil Fall, Fern Spring and the Pohono Bridge, and El Capitan Bridge. But really, you’ll find shots wherever you look.
Clear skies
As much as I enjoy photographing in stormy weather, I don’t put my camera away when skies are clear. My favorite clear sky spots are the frequently shady locations on the south side of the valley, such as Bridalveil Creek and the forest near Fern Spring and the Pohono Bridge. Depending on the season (the closer to the winter solstice, the better), these spots can offer several hours of shade at the beginning and ends of the day.
Clear skies also open the door to night photography—all those popular spots that were packed with gawkers and washed out by the harsh midday light are peaceful and photogenic by moon- or starlight. My favorite moonlight (full moon) subjects are Yosemite Falls and El Capitan, because they’re the first to be illuminated by the rising moon—the face of Half Dome doesn’t get moonlight until the moon has dropped toward the western horizon, well after midnight on a full moon night. On the other hand, Half Dome does make a nice starlight subject because most views are to the east, where the sky is darkest before midnight. An unappreciated key to successful Yosemite night photography is finding a spot unsullied by headlights.
Midday in the summer, when it’s virtually impossible to find shade that’s not stained with sunlight, is a good time to break for lunch, take a hike, or (especially) explore.
Clearing storm

Warm Light, El Capitan Clearing Storm, Yosemite
Venture out to photograph during Yosemite’s harshest weather is the most reliable way to ensure a clearing storm opportunity. If you wait out the most miserable stuff by the fire, you risk missing the best stuff, which often happens with startling suddenness—for hours visibility might not extend beyond 100 yards, then you blink and there’s a rainbow.
With its bird’s-eye view east, up Yosemite Valley, Tunnel View is the most popular location to photograph a Yosemite clearing storm, but it’s easy to be so mesmerized by the show there that you miss all the great photography elsewhere. Because the west side of Yosemite Valley is where storms usually clear first, I often wait out the storm at Tunnel View, photograph its initial clearing there, then force myself to move on (believe me, it’s not easy to leave) while the shooting is still good.
The best subjects for a Yosemite clearing storm are the icons—El Capitan, Bridalveil Fall, Yosemite Falls, Half Dome—but not necessarily from the standard locations. Pretty much any spot with a view of one or more of these subjects will work, but I often try to include the Merced River and reflections.
Wet and dry seasons
Blue skies rule Yosemite’s summer, with clouds and rain the exception (but still possible). Yosemite’s wet season comes in late fall, winter, and and early spring, with rain and snow always a possibility. In general, in Yosemite Valley rain is far more common than snow, but snow can happen any month from November through April, with December, January, and February being your best bet (but some of my best snow experiences have come in November and April, and in 2015, Yosemite Valley didn’t get any significant snow until April).

Double Rainbow, Yosemite Valley
Rainbows
With its east/west orientation and primarily east-facing views, Yosemite is particularly well situated for afternoon rainbows. Tunnel View, Glacier Point, Valley View are great rainbow spots, but pretty much any valley location with a view of Half Dome, or a view of El Capitan’s west-facing wall, will work.
When the sun is lower than 42 degrees above the horizon (late afternoon in the long-day months, all day in winter), look for signs of clearing in the west (where the clearing usually starts). Sometimes you’ll see a few patches of blue, other times you’ll notice that the sky is brightening slightly. Find your shadow, which will point to the rainbow’s center (if there’s no shadow, draw an imaginary line from where you guess the sun is, through your position, and toward the scene opposite the sun)—if it’s not pointing toward anything interesting, move to another location—set up your shot, cross your fingers, and wait. And don’t forget to remove your polarizer, or orient it to maximize reflections (the opposite from the standard polarizer orientation) because an improperly oriented polarizer will erase your rainbow.
Winter wonderland
You know those images with every Yosemite feature draped in white? Those scenes happen just a handful of times each year (if

Winter Reflection, El Capitan, Yosemite
we’re lucky), and rarely last for more than an hour or two after the snow stops falling. So simply taking a trip to Yosemite in winter is very unlikely to net you fresh snow opportunity. In fact, even if you hear that it just snowed in Yosemite and beeline straight to the park, you’re almost surely too late.
To get that coveted Yosemite winter wonderland shot, you actually need to be there during the storm. And when the snow stops (see clearing storm reference above), move as quickly as you can, because the trees will begin shedding snow almost immediately.
Those of us within a reasonable driving distance of Yosemite have a distinct advantage if we’re good about monitoring the weather forecast. I look for storms with predicted snow levels below 4,000 feet, then try to arrive before the worst weather hits.
About this image
Because I avoid the crowds and blue skies of summer, I don’t make it to Glacier Point as frequently as I do locations in Yosemite Valley. But a few weeks ago my brother and I went to Glacier Point to photograph lightning, then hung around until the storm cleared.
Clearing Storm, Glacier Point, Yosemite
Unlike the California winter storm fronts that originate in the Pacific and sweep eastward across the Central Valley and into the Sierra, summer thunderstorms are usually borne of subtropical moisture encountering High Sierra convection and billowing into towering thunderheads above the Sierra crest. In the right conditions, these thunderstorms can slip far enough west to soak Yosemite Valley and stab the rim with jagged lightning.
At its most intense, the storm that afternoon nearly obscured Half Dome, completely drenching us. With the rain came lightning that soon chased us to the safety of the car. When things calmed we ventured back out to the vista to photograph the storm’s clearing. I can’t tell you how much fun it is to watch the shifting clouds that seem to create an entirely different image with each passing minute. For the this shot I waited for the cloud to part enough to reveal Nevada (above) and Vernal Falls, going wide to frame them with Half Dome on the left, and Mt. Starr King on the right.
The many faces of Yosemite weather
Click an image for a closer look, and a slide show. Refresh the screen to reorder the display.


Anticipating the exceptional
Posted on July 11, 2015

Morning Glory, Sunrise Clearing Storm, Yosemite Valley
Sony a7R
Sony/Zeiss 24-70
1/50 second
F/16
ISO 100
No one denies that an image records a single, unrepeatable instant. But just as each instant is the culmination of a series of connected preceding events, most images have their own history that can be traced backward, often months or years before the shutter clicked. The moon didn’t just materialize above Half Dome that evening, and a moonbow isn’t just some random event at the base of Lower Yosemite Fall—their appearance can be directly connected to celestial dance that was set in motion with the birth of our Solar System, and can be predicted with surgical precision (minus a few wild card variables like weather and water flow to keep photographers from getting too cocky).
Photographers spend a great deal of time trying to anticipate instants like these. We start with the common-knowledge stuff, things like the February sunset light on Horsetail Fall, a shaft of summer light slanting in Upper Antelope Canyon, or a moonbow in the spring mist billowing beneath Lower Yosemite Fall. But the precision of the celestial choreography that delivers light shafts to slot canyons and moonbows to waterfalls is just as predictable for anonymous hidden trees, lakes, and peaks. Iconic or undiscovered, each of these spectacles are the convergence of location and predictable natural processes just waiting to be appreciated (and photographed!).
Image planning isn’t limited to the sun, moon, and stars. Understanding and monitoring a favorite location’s weather can put you in the right place, with the best chance to add a rainbow, lightning bolt, or fresh snow. And simply finding a complementary foreground/background alignment that connects two or more terrestrial subjects can elevate an image to the next level.
Rather than a fortuitous right-place, right-time convergence, the creative aspect of many images starts long before capture. When I find a new location, or identify a potential subject, my brain immediately starts spinning on the ways I can make it better. Can I align it with another foreground or background subject? What natural phenomena will take the scene to the next level, and how I can be there when it happens?
For example…

Bridalveil Dogwood, Valley View, Yosemite
Before capturing my image of a raindrop-festooned dogwood flower with Bridalveil Fall in the background, I had long visualized a scene somewhere in Yosemite that featured a dogwood bloom aligned with a soft-focus but recognizable Yosemite landmark. I knew I’d need overcast skies that would illuminate the entire scene with diffuse, soft light, then filed my vision away until the next time the forecast predicted clouds during the short window the dogwood bloom in Yosemite.
On my drive to the park, I started mentally working on locations where I might be able to align a dogwood with a recognizable Yosemite subject, the lens I’d use, the amount of background sharpness I wanted, and so on. Once I was in the valley, I was able to conduct a pretty orderly search that eventually led me to this flower near Valley View.
Sometimes bringing my ideas to fruition requires a lot more research, planning, and patience. I’ll start with a scene that appeals to me, then mentally add something that I think will take it to the next level. A moon? Stars? A rainbow? Lightning? Fresh snow? Maybe all of the above (so far not at the same time, sadly).
The moon and stars are a relatively straightforward matter of plotting angles and timing (and hoping the weather cooperates). On the other hand, weather phenomena, such as rainbows, lightning, and snow, require an understanding of the processes behind them, careful and persistent monitoring of long- and short-term weather forecasts (only the National Weather Service for me), and a lot patience while waiting for the moment to arrive. Then, when the moment does arrive, I need to move quickly and not allow myself to be swayed by fear of failure (always a distinct possibility).
For example…

Double Rainbow, Tunnel View, Yosemite
I’d long fantasized about adding a rainbow arcing over Yosemite Valley to the already breathtaking Tunnel View scene. And being a lover of rainbows and a photographer, I’d long ago taken the time to become extremely aware of the why, where, and when of rainbows. Which is how, on a spring afternoon a few years ago, I was in perfect position when my rainbow fantasy came true.
I was in Yosemite to meet customers for dinner, and to plan the next day’s guided tour of the park. But when my mostly sunny drive up the Merced River Canyon turned to rain as I entered Yosemite Valley, my mental wheels started turning—Yosemite weather almost always moves west-to-east, which meant soon Yosemite Valley would have rain on the east side and sunlight low on the western horizon. It wasn’t hard to rearrange my customers’ priorities, and this was our reward.
Celestial phenomena are wonderfully predictable, so much so that I make very few non-spontaneous photo trips without factoring in the moon and/or Milky Way. (My spontaneous trips are usually spurred by the weather forecast.) And there are few locations I photograph that I can’t tell you the altitude and azimuth necessary to align a the sun, moon, or Milky Way with the location’s most prominent feature.
Hawaii, Death Valley, Mono Lake, Alabama Hills (Mt. Whitney), plus many personal favorite subjects near home—I know exactly where I want to be and when I want to be there, and do my best to make it happen, sometimes planning several years in advance. In Yosemite my terrestrial subject is usually Half Dome, and and my celestial subject is usually a rising moon. And depending the direction of the moon’s arrival, I have an array of locations that I know will align with the moon’s appearance.
For example…

Rising Crescent, El Capitan and Half Dome, Yosemite
Tunnel View is my favorite location for photographing a Yosemite moonrise, but it’s not my only location. Across the Merced River Canyon on Big Oak Flat Road is Half Dome View, a turnout vista with a slightly different, less popular view of Half Dome and El Capitan.
From Half Dome View, the visual distance separating the two monoliths is quite narrow, meaning an extremely small margin of error for a photographer hoping to catch the moon splitting the gap. But the idea had always intrigued me, so I went to work with my plotting method (I do it manually using topo maps, moonrise tables, and an HP-11C scientific calculator that does trig functions).
When I discovered that a crescent moon would indeed split this gap before sunrise on a certain May morning in about a year, I started a plan of attack. Despite the fact that I’d never photographed a moonrise from this location, and even the slightest error in computation would foil the attempt, I went ahead and scheduled a workshop for this date. Try to imagine my anxiety as the day approached and the realization that failure wouldn’t just impact me, it would impact my entire group, really started to sink in. And imagine my euphoria (not to mention everyone with me) that morning when the moon slid into the gap, right on schedule.
When photography’s less than ideal, I might leave the camera in my bag, but I don’t stop being a photographer. I spend a lot of non-camera time scouting locations, looking for complementary subjects that I can align with the grand scene. If my primary subject is in the foreground, I add move around until I can align it with a complementary background. And when my subject is in the distance (like Mt. Whitney from the Alabama Hills, or Yosemite Valley from Tunnel View), I spend a lot of time exploring the nearby terrain in search of subjects I can align with the grand primary scene.
When I find a subject that merits something exceptional, I try to wait until I can enhance it with similarly exceptional natural phenomenon.
For example…
Morning Glory, Sunrise Clearing Storm, Yosemite Valley
When I “discovered” this tree, it was love at first sight. But rather than photograph it in the more conventional quality light conditions that are fairly easy to anticipate, or wait for one of Yosemite’s inevitable exceptional but fairly regular moments, I saved my discovery for something truly extraordinary. And, after about ten years of waiting for location, light, conditions, and circumstances (this spot is too small and dangerous for a group), extraordinary finally happened this April.
Anticipating snow, I’d traveled to Yosemite the previous afternoon. A little snow had fallen earlier that day, and while the storm had passed, its cloudy vestiges lingered overhead and in the valley below. While not the winter wonderland I’d hoped for, there was enough snow still hugging the trees that I found some very nice images. Nice enough, in fact, that I’d have been completely satisfied with my captures if my trip had ended right then. But I wasn’t done.
Because more snow was promised overnight, I got a room nearby and returned the next morning. I wasn’t too far into my drive back into the park before it became clear that I was in for something special. The snow had just stopped, and while there wasn’t a lot of snow, the air was cold enough that I knew until the morning sunlight made it all the way down into Yosemite Valley, everything would remain in a state of suspended animation. And the clouds that had deposited the snow were doing their typical slow-clear dance on the valley floor.
I first stopped at a spot along the Merced River and photographed dogwood and El Capitan. I got so caught up in that scene that I lost track of the time and didn’t give myself a lot of time for my next stop, up the hill at “my” tree (that I often check but rarely photograph). I also realized that given the light snowfall on the valley floor, I’d severely underestimated the amount of snow that had fallen just a few hundred feet up the hill from Yosemite Valley.
I found an entire world covered with white, and the sun about ready to pop up over Sentinel Dome—once the sun arrived, I’d only have about 60 seconds of quality photography before the sun overpowered the scene. I quickly grabbed my gear and scrambled up to the tree. Fortunately, I’d photographed here the previous afternoon, so I didn’t really have to hunt for a composition (generally a fairly painstaking, trial-and-error process). With the sun about to appear, I knew I’d need to do a sunstar and set my aperture accordingly. Without a lot of time to play with the exposure, I made the snap judgement to spare the highlights and hope I could recover the shadows laters, and click.
This image was literally the first click I made of the scene this morning—subsequent captures showed increasingly blown highlights as the sun rose into the scene. On my LCD this image looked severely underexposed, but I trusted the histogram on my a7R, which indicated there was indeed detail in the shadows. (Yes, I know I could have accomplished it by bracketing and blending multiple exposures, but I’m a one-click guy.) And when I finally found the courage to process the image, I held my breath as I grabbed the Lightroom Shadows slider and watched my scene appear.
A gallery of “planned” images
Click an image for a closer look, and a slide show. Refresh the screen to reorder the display.


Photographic vision: Motion
Posted on July 6, 2015
Sunset on the Rocks, Ke’e Beach, Kauai
Sony a7R
Sony/Zeiss 16-35
1 second
F/18
ISO 50
True story
I once had a photographer tell me that he didn’t like blurred water images because they’re “not natural.” The conversation continued something like this:
Me: “So how would you photograph that waterfall?”
Misguided Photographer: “I’d use a fast shutter speed to freeze the water.”
Me: “And you think that’s more natural than blurred water?”
Misguided Photographer: “Of course.”
Me: “And how many times have you seen water droplets frozen in midair?”
Misguided Photographer: “Uhhh….”
Photographic reality
The truth is, “natural” is a target that moves with the perspective. Humans experience the world as a 360 degree, three-dimentional, multi-sensory reel that unfolds in an infinite series of connected instants that our brain seamlessly processes as quickly as it comes in. But the camera discards 80 percent of the sensory input, limits the view a rectangular box, and compresses those connected instants into a single, static frame. In other words, it’s impossible for a camera to duplicate human reality—the sooner photographers get that, the sooner they can get to work on expressing the world using their camera’s very different but quite compelling reality.
Despite the creative opportunities in their hands (or on their tripod), many photographers expend a great deal of effort trying to force their cameras closer to human reality (HDR, focus blending, and so on)—not inherently wrong, but in so doing they miss opportunities to reveal overlooked aspects of our complex natural world. Subtracting the distractions from the non-visual senses, controlling depth of focus, and banishing unwanted elements to the world outside the frame, a camera can distill a scene to its overlooked essentials, offering perspectives that are impossible in person.
Motion
While a still image can’t display actual motion, it can convey an illusion of motion that, among other things, frees the viewer’s imagination and establishes the scene’s mood. Nothing like our experience of the world, a camera can freeze the extreme chaos of a single instant, or combine a series of instants to convey a pattern of motion.
Combining creative vision and technical skill, a photographer chooses where on the continuum that connects these extremes of motion will fall: The sudden drama of a crashing wave, or the soothing calm of soft surf; the explosive power of a plunging river, or the silky curves of tumbling cascades. Or perhaps someplace in the midrange of the motion continuum, stopping the action enough that discrete elements stand out, but not so much that a sense of flow is lost.
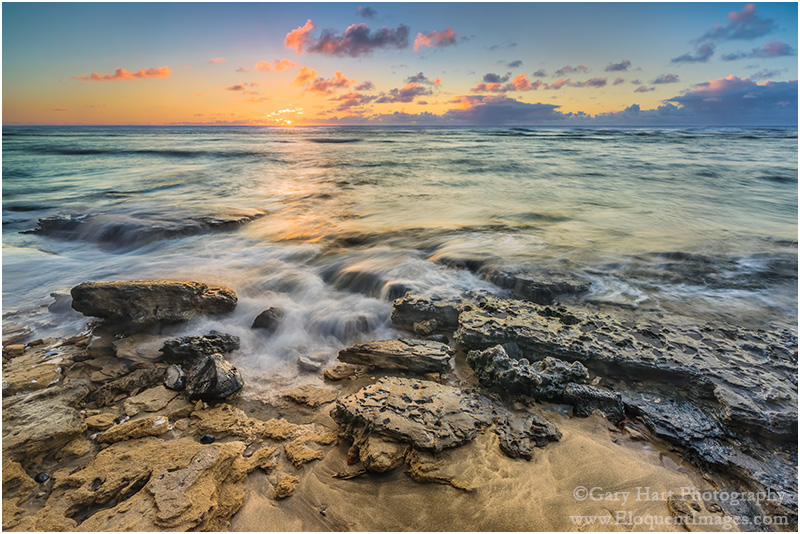
Blurred water
One question I’m quite frequently asked is, “How do I blur water?” And while there’s no magic formula, no shutter speed threshold beyond which all water blurs, blurring water isn’t that hard (as long as you use a tripod). In fact, when you photograph in the full shade or cloudy sky conditions I prefer, it’s usually more difficult to freeze moving water than to blur it (which is why I have very few images of water drops suspended in midair).
In addition to freezing motion or revealing a pattern of motion, an often overlooked opportunity is the smoothing effect a long exposure has on choppy water. I photograph at a lot of locations known for their reflections, but sometimes I arrive to find a wind has stirred the water into a disorganized, reflection thwarting frenzy. In these situations a long exposure can often smooth the chop, allowing the reflection to come through. Rather than the mirror reflection I came for, I get an ethereal, gauzy effect still captures the reflection’s color and shape.
The amount of water motion blur you get depends on several variables:
- The water’s speed—the faster the water, and the (especially) the more whitewater (green water, no matter how fast it’s moving, doesn’t usually display obvious motion blur), the greater the blur
- Your focal length—the longer the focal length, the greater the blur
- Your distance from the water—the closer the water, the greater the blur
- And of course, the shutter speed—the longer your shutter is open, the greater the blur
Of these variables, it’s shutter speed that gets the most attention. That’s because focal length and subject distance are compositional considerations, and we usually don’t start thinking about blurring the water until after we have our composition. (This is as it should be—when composition doesn’t trump motion, the result is often a gimmicky image without much soul.)
You have several tools at your disposal for reducing the light reaching your sensor (and thereby lengthening your shutter speed), each with its advantages and disadvantages:
- Reducing ISO: Since you’re probably already at your camera’s native ISO (usually 100), this option usually isn’t available. Some cameras allow you to expand the ISO below the native value, usually down to ISO 50. That extra stop of shutter duration you gain comes with a (very) slight decrease in image quality—most obvious to me is about 1/3 stop of dynamic range lost.
- Shrinking your aperture (larger f-stop value): A smaller aperture also buys you more depth of field, but it also increases diffraction. Also, lenses tend to be less sharp at their most extreme apertures. As a general rule, I resist going with an aperture smaller than f11 unless it’s absolutely necessary. That said, I often find myself shooting at f16 (and only very rarely smaller), but it’s always a conscious choice after eliminating all other options (or a mistake).
- Adding a polarizing filter: In addition to reducing reflections, a polarizer will subtract 1 to 2 stops of light (depending on its orientation). When using a polarizer you need to be vigilant about orienting it each time you recompose (especially if you change your camera’s orientation), and monitoring its effect on the rest of your scene.
- Adding a neutral density filter: A neutral density filter is, as its name implies, both neutral and dense. Neutral in that it doesn’t alter the color of your image; dense in that it cuts the amount of light reaching your sensor. While a dark enough ND filter might allow you to blur water on even the brightest of days, it does nothing for the other problems inherent in midday, full sunlight shooting. ND filters come in variable and fixed-stop versions—because I prefer the flexibility of variable NDs (the ability to dial the amount of light up and down), I live with the vignetting they add to my wide angle images.

Before Sunrise, South Tufa, Mono Lake
Here a 3-second exposure smoothed a wind-induced chop and restored the reflection.
Because blurring water depends so much on the amount of light reaching your sensor, I can’t emphasize too much the importance of actually understanding metering and exposure, and how to manage the zero-sum relationship between shutter speed, aperture (f-stop), and ISO.
Read my Exposure basics Photo Tips article
I use Singh-Ray filters
Bracketing for motion
Back in the film days, we used to bracket (multiple clicks of the same scene with minor adjustments) for exposure. But in today’s world of improved dynamic range and pre- and post-capture histograms, exposure bracketing is (or at least should be) limited to photographers who blend multiple exposures. Today I only bracket for scene changes that will give me a variety of images to choose between later.
Often my scene bracketing is for depth of field, as I run a series of clicks with a range of f-stops, then decide later whether I want a little or a lot of DOF. But my most frequent use of scene bracketing is to capture a variety of water motion effects. I start by finding a composition I like, then adjust my shutter speed (compensating for the exposure change with ISO and/or f-stop changes) to get different motion blur.
River and stream whitewater is usually (but not always) fairly constant, so my adjustments are usually just to vary the amount of motion blur. But when I’m photographing waves, the timing of the waves is as important as the motion blur. It helps to stand back and observe the waves for a while to get a sense for any patterns. Watching the direction of the waves and the size of the approaching swells not only allows me to time my exposures more efficiently, it also keeps me safe (and dry).
Star motion
Few images validate the power of the camera’s unique vision better than a scene etched with the parallel arcs of rotating stars (yes, I know it’s actually not the stars that are rotating). Nothing like human reality, the camera’s view of the night sky is equal parts beautiful and revealing. (Can you think of a faster, more effective way to demonstrate Earth’s rotation than a star trail image?)
Here are the factors that determine the amount of stellar motion:
- Exposure duration: The longer your shutter is open, the more motion your sensor captures.
- Focal length: Just as it is with terrestrial subjects, a longer focal length shrinks the range of view and magnifies the stars that remain.
- Direction of composition: Compositions aimed toward the North or South Poles will display less star motion than compositions aimed toward the celestial equator. That’s because, due to Earth’s rotation on its axis (an imaginary, infinite line skewering our North and South Poles), everything in the sky rotates 360 degrees, around the Poles, in 24 hours. But the farther a star is from a Pole, the greater the visual distance it needs to cover to complete its circuit (it appears to move faster).
As with water motion, you can choose between a long exposure that exaggerates stellar motion, or a shorter exposure that freezes the stars in place to display a more conventional night sky (albeit with more stars than our eyes can discern).
Read more in my Starlight photography Photo Tips article
So what’s the point?
In the static world of a photograph, it’s up to the photographer to to create a sense of motion. Sometimes we achieve this with lines that lead the eyes through the scene, but even more powerful is an image that uses motion to tap its viewers imagination. Your handling of the motion in your scene is a creative choice that’s enabled by your technical skill.
For example
I captured this beach sunset at Ke’e Beach on Kauai last month while co-teaching a workshop with Don Smith. I’ve photographed enough at Ke’e to know there are a couple of very different options there. One option is to follow a short trail west, toward the Na Pali Cliffs, to a rocky section of coast where the waves crash and large, rounded boulders predominate. But I’ve always preferred the calmer scene to the east, along the smooth beach, where the water is shallow and the surf laps gently at wave-carved sand and basalt.
So while Don led most of the group toward the rocky shore, I guided a small handful of outliers about a quarter mile in the other direction, up the beach, beyond the activity and around a bend until we had the pristine beach to ourselves. After a little time spent trying assemble the scene’s variables into a cohesive composition, we settled down and went to work. I finished with several dozen clicks of this composition, or something quite similar, each with different wave action—approaching, breaking, receding—and motion ranging from still to extreme blur.
A gallery of motion
Click an image for a closer look, and a slide show. Refresh the screen to reorder the display.


Are you a photographer or a tourist?
Posted on June 30, 2015

Warm Light, El Capitan Clearing Storm, Yosemite (2007)
Canon EOS-1Ds Mark II
17 mm
1/6 second
F/11
ISO 100
Years of leading photo workshops and reviewing the work of others has convinced me that to capture great images and maintain domestic bliss, you need to decide before the trip whether you’ll be a tourist or a photographer. You just can’t have it both ways. (I say this completely without judgement—there are times when I opt for tourist mode myself, and on a recent Mexico cruise I didn’t even take my camera.)
I see many well composed images taken at the wrong times—harsh shadows, cloudless skies, and poorly aligned light are all signs that the photographer was sightseeing with his or her camera. Not that there’s anything wrong with that—if your priority was simply to record the scene, the image was a success.
But to get the pictures serious photographers covet, you need to be out there at the most inconvenient times. These are sacrifices a photographer is willing to make, but others? Not so much. Many family vacations and intimate getaways have been ruined by the photographer who thinks it’ll no problem sneaking out for sunrise (“I’ll be quiet—you won’t even know I left”), or waiting just a few minutes longer after sunset (“Denny’s will still be open when we get back”).
When I’m a photographer, my decisions put me outside when the conditions are most conducive to finding the images I want, with no consideration of comfort or convenience: Sunrise, sunset, overcast skies, wild weather, and after dark are all great times for photography, but not necessarily the most comfortable times to be in the elements. Face it—few people without a camera are thrilled to be outdoors when they’re sleepy, hungry, cold, or wet.
That’s why, when I’m a tourist, my goal is to relax and and enjoy the sights with the people I love—I leave my camera home and simply take in nature’s splendor. My lights-out and rise times are based on comfort and enjoyment, and my forays into nature are timed for convenience and to coincide with the most pleasant weather for being outside. This approach keeps my body and mind fresh, my loved ones happy, and gives me a perspective that I think ultimately benefits my photography (try it sometime).
Of course doing nature photography for a living makes it easier for me to . But what about the photographers who are so busy that their only opportunity to take pictures is when they’re on vacation? My suggestion is to get buy-ins on your objectives before the trip, and be as specific as possible: “I’d like to shoot sunrise on our second morning at the Grand Canyon,” “I’d really like to do a moonrise shoot in Yosemite on Wednesday evening,” and so on. The rest of the trip? Bring a point-and-shoot, store your serious camera gear out of sight, and don’t let anyone so much as see a longing glimpse in its direction for the rest of the trip.
For today’s image I pretty much hung out (alone) in miserable snow and wind waiting for the storm to break. On this stormy evening, I chose the bridge just east of El Capitan Meadow. Though there were no guarantees, I knew if I went inside to warm up, I’d be out of position if something special happened. Shortly before sunset the snow stopped and soon thereafter I was treated to about 20 minutes of beautiful warm light dancing with the retreating clouds swirling atop El Capitan. Of course there are many times when nothing happens and all I get is soggy clothes and frigid limbs for my trouble, but those times only make the successes like this that much more special.
A gallery of solitary sacrifices
(Images that required discomfort and inconvenience that I wouldn’t subject a non-photographer to)
Click an image for a closer look, and a slide show. Refresh the screen to reorder the display.


2015 Grand Canyon Raft Trip: Mishaps
Posted on June 22, 2015
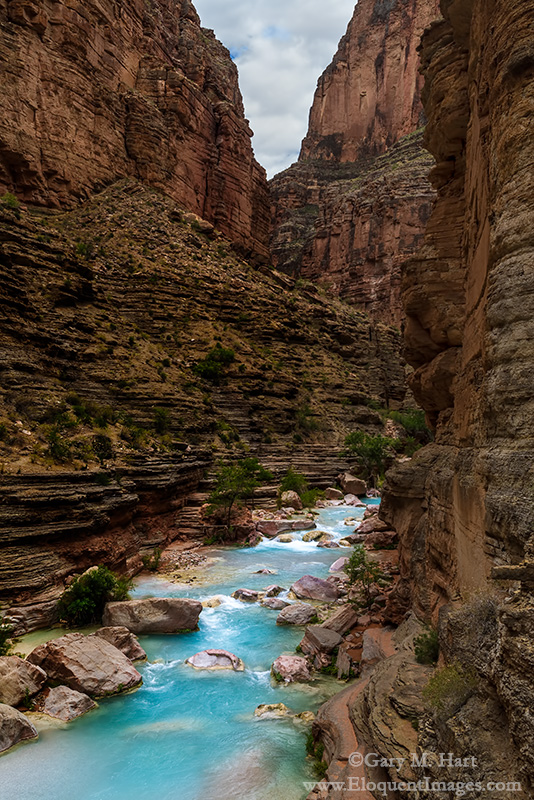
Blue Ribbon, Havasu Creek, Inner Grand Canyon
Sony a7S
Sony/Zeiss 24-70
1/20 second
F/11
ISO 50
May 2014
After a short but strenuous hike in 90-plus degree heat, I wasn’t thinking about much more than cooling off. And what better way to cool off than a plunge into the cerulean chill of Havasu Creek? Rushing toward its imminent liaison with the Colorado River, Havasu Creek’s disorientingly blue water plunges through gaps in the red sandstone, pauses and widens into inviting pools, then departs rapidly downstream.
Beckoning me forward was one of a series of these glistening pools, connected like sapphires on a necklace by the creek’s cascading strand. Wading in to my knees, I watched my feet disappear in mineralized water that obscured everything in an azure haze. A few steps later I was submerged to my shoulders, feet planted firmly to brace against a deceptively strong current, basking in the coolness. Refreshed from the neck down, I took a deep breath and completed my immersion.
Coinciding with my sudden dunking came the insight that I was still wearing my (new) glasses. Oops. Unfortunately, my cat-like reflexes were no match for the light-speed enthusiasm the brisk current demonstrated for my glasses and just like that they were whisked away to who knows where.
Given the water’s speed and opacity, I knew chances of recovery were remote. Nevertheless, I quickly drafted a handful of nearby rafters to scan the shallow water near the pool’s outlet; meanwhile, I plunged the nearby depths. After ten minutes of fruitless diving and blindly groping the creek bed, I was ready to give up the glasses as lost when a passing hiker offered to give it a try with his diving mask. And try he did, with relish. Disappearing beneath the surface for extended periods, bobbing up just long enough to refill his lungs, then disappearing again, the hiker must have repeated his dive a dozen or more times before emerging fist-first, glasses in hand.
I was surprised, ecstatic, and appropriately effusive. To say I was lucky to be spared the consequences of my own stupidity would be an understatement. I mean, seriously, who swims wearing $500 glasses? Grateful for the reprieve, I vowed I’d never do that again. (Duh.)
May 2015
The first evening of this year’s Grand Canyon raft trip was markedly different from anything we experienced last year. Gone were the warm temperatures and relentless sunshine, replaced by a cool breeze and heavy clouds. Last year the 50-degree water of the Colorado River was a bracing relief; this year it was a bone-chilling nemesis.
Which of course explains why, while rallying the willpower for my first full-immersion bath in the chilly river (a required raft trip ritual that’s always as satisfying in retrospect as it is daunting in anticipation), I was thinking about nothing more than getting the ordeal over with. And not at all about the (very same) glasses perched on my face.
To my credit, I immediately realized my mistake, but the river gods frown on stupidity. This year I was unable to rally an army of hardy rafters willing to brave the chill (and neither was Yours Truly brave enough to do any more than peer into the frigid depths from the relative warmth of the riverbank), nor did a magic diving hiker materialize to save the day.
After surviving last year’s trip relatively unscathed, it turns out that the lost glasses were just the first of a series of mishaps that made this trip memorable. For example (in no particular order):
- At 4 a.m. on our second morning, the group was wakened by large raindrops that quickly turned into a thunder and lightning infused downpour that sent 28 rafters scurrying to assemble, in the dark, tents they’d never assembled before (insert Keystone Cops music here).
- Cold and rain dogged us all week. Air temperatures never climbed above the mid-70s, not too bad until you factor in the rain, persistent wind, and continual drenchings by 50-degree river water. There was one day in particular when it just seemed that we couldn’t get dry, and several times I felt like we were navigating a gale on a North Sea fishing trawler. (That was also the day when I made the mistake of asking one shivering rafter if she’d do this again, and she replied, “That’s like asking a mother in labor if she’d like to have another baby.” Point taken.)
- Pushing off from camp on our final morning, I realized that in the confusion of organizing 28 rafters and 4 guides for the group photo, I’d left my insulated rain pants and camping pillow back at the campsite.
- Midway through the trip I dropped my primary camera (Sony a7R) on a slab of sandstone and damaged its electronic viewfinder. I then compounded the problem by using the still functioning LCD to go into the menu system and manually turn on the viewfinder (reasoning that maybe that would correct the problem). Not only did that not fix the viewfinder, it turned off the LCD, which of course left me with no more access to the menu system necessary to turn the LCD back on. (I never claimed to be smart—refer to glasses story above.)
- Last year we managed to keep all 28 rafters on the rafts through every one of 60-plus rapids. This year we did almost as well, keeping 27 of 28 rafters out of the river. The one mishap occurred when a rafter was launched mid-rapid and sent cartwheeling into the Colorado River with one hand still fused by a death grip to his safety rope. He was quickly pulled back in, soaking wet but otherwise unscathed. Said rafter learned later that, while he was indeed hanging on with both hands as instructed, his handholds were reversed from the prescribed arrangement, thereby creating a hinge effect that swung him right into the water when one hand was torn free. The rapid: Unkar. The rafter: uh, Anonymous.
Did all this difficulty ruin my trip? Not even close. I had an extra pair of glasses and a backup camera body, so those losses were barely an inconvenience. And while the cost of a new pair of glasses and camera repair are quickly forgotten, the stories surrounding those losses will always bring a smile. The misery of a river soaking fades as soon the clothing dries (or so I’ve been told), but the story will last forever. The chilly weather? I’ll gladly trade a few days of discomfort for the incredible photography our rainy weather brought.
More than anything, I cite this litany of mishaps to underscore a truth I’ve learned in ten years of leading photo workshops: the greater the hardship, the better the memories. And true to form, this year’s raft trip group bonded with a wonderful spirit of cooperation and humor, largely because of our mishaps and shared discomfort. I’m already looking forward to next year.
Inside Out at Grand Canyon
Click an image for a closer look, and a slide show. Refresh the screen to reorder the display.


Lucky strike
Posted on June 10, 2015

Half Dome Lightning Strike, Glacier Point, Yosemite
Sony a7S
Sony/Zeiss 24-70
.4 seconds
F/11
ISO 50
A Lightning Trigger in California is usually about as useful as a fishing pole in the Sahara. But every once in a while a little sub-tropical moisture sneaks up the Sierra crest and blossoms into afternoon thunderstorms. I monitor the weather daily (okay, that’s probably understating it a bit) for just these opportunities, rooting for Yosemite thunderstorms the way a Cubs fan roots for a World Series. And until last weekend, with just about as much success.
Last week the moist vestiges of Hurricane Blanca were sucked into an unstable airmass above the Sierra, just the thunderstorm recipe I’d been looking for. While each day’s Yosemite forecast called for at least a slight chance of afternoon thunderstorms, the Saturday forecast looked particularly promising. Nevertheless, several days out, the Saturday thunderstorm probability from the National Weather Service varied widely, fluctuating with each report between 40 and 70 percent. But as Saturday approached, the chances settled in at around 60 percent and I made plans to be there.
Saturday morning my brother Jay and I left Sacramento a little after 8 a.m., and were pulling into Yosemite Valley before noon. Blue sky prevailed upon our arrival, but by the time we finished our sandwiches at Tunnel View, cumulus puffs were sprouting along the crest, a very good sign. Stomachs full, we continued up the road toward Glacier Point. In the forty or so minutes it took to reach Washburn Point, just up the road from Glacier Point, the cumulus puffs had congealed into roiling gray mass that was already delivering coin-size raindrops to my windshield.
The best way to photograph lightning is from a distance (the greater the better), not impossible at the Grand Canyon, where I can stand on one rim and photograph strikes pounding the opposite rim a dozen or more miles away. But my Yosemite lightning target is more specific: Half Dome, which towers above Yosemite Valley like a granite lightning rod, no more than 2 1/2 miles from any vantage point on the Glacier Point road—well within the Margin of Death of even a moderate thunderstorm. (The Margin of Death, or MOD, is my term for the radius surrounding the last lighting strike within which the next bolt could strike.)
In addition to the dramatic profile of Half Dome above Vernal and Nevada Falls, Washburn Point has the advantage of nearby, elevated parking lot that would allow us to set up a Lightning-Trigger-armed camera on a tripod and wait from the safety of the car with a view of the cameras. So, rather than risk trying the more exposed and more remote (much longer sprint to the car) Glacier Point vistas, we started at Washburn Point.
Setting up, we saw lightning firing on the most distant peaks beyond Cloud’s Rest, and safely behind Half Dome. This being my first real attempt with the Lightning Trigger on my Sony bodies (with the exception of one rushed, impromptu, and unexpectedly successful attempt at White Sands last week), I was looking forward to comparing the response of the Sony bodies to my Canon 5D Mark III (shutter lag is a major body-to-body variable that can make or break a lightning shoot). But since Jay didn’t have a Lightning Trigger, and his body is an older Canon 5DII, good brother that I am (plus, he threatened to tell Mom if I didn’t share), I let him use my Lightning Trigger (I have two) and 5DIII.
Soon the rain and wind intensified, the flashes came more frequently, and the thunder grew louder, but rather than retreat to safety, we stayed with our cameras. The activity continued to approach until it seemed to be centered just down the hill in the general direction of Glacier Point, visible to us not as discrete bolts but rather as general flashes in the clouds. Still, we knew the lightning was close because of the relatively short gap separating flash and bang, yet it wasn’t until Jay said he felt the hair standing up on his head and arms that we got smart. Or rather, less stupid.
Back in the car we watched the show at Washburn Point until it abated, then decided to move down the road a bit, to another view closer to Glacier Point. Here we couldn’t see our cameras from the car, but we were able to park within 50 feet or so of their vantage point. Despite the continued dangerously close proximity of the lightning, we again stayed out a little longer than we should have, finally being driven back to shelter not by lightning but by the wet and cold conditions.
This was my first attempt at lightning since my switch to Sony; I was using the a7S because the a7R wasn’t fast enough for lightning (a problem completely cured on the a7RII). The a7S caught all three of the Half Dome hits I saw, with the twin-branched bolt you see here being the most spectacular. My composition was fairly wide for a couple of reasons: first, because the wider I go, the greater my odds of capturing something; second, with Nevada and Vernal Falls on the right, and Tenaya Canyon and Mt. Watkins on the left, the scene justified it.
To say I was lucky this afternoon would be an understatement. Not only did a lightning bolt hit my intended target, my camera captured it (never a sure thing, no matter how fast the camera), and I actually lived to share the shot with you. Here in the comfort of my recliner, I’m kind of at a loss to explain why I thought it was a good idea to stay out with lightning landing well within the MOD. While there are definitely things to tend to while waiting for lightning—shielding the camera from rain, wiping raindrops from the lens, adjusting exposure as the light changes, monitoring that the camera does indeed fire with a visible strike, and simply answering questions from curious onlookers (and preempting their urge to touch the equipment)—none is important enough to risk my life. In my defense, I am much more cautious when I’m guiding a group, which of course will be small consolation to my wife and kids at my funeral.
Photographing daylight lightning
Here are my tips for photographing daylight lightning:
- You need a lightning sensor that detects the lightning and fires your shutter much faster than your reflexes can react. The only sensor that I’ve found to work reliably is the Lightning Trigger by Stepping Stone Products (I get no kickback, I swear). Of course have brands many to choose from, some much cheaper than the Lightning Trigger. While I have no direct experience with many of the other sensors, I do lead lightning workshops and have witnessed some major fails by other brands.
- Your camera must be fast, the faster the better. The speed you’re looking for is the time from the shutter-button press until shutter release: shutter lag. Unfortunately, shutter lag is a difficult number to find, and it’s rarely (never?) provided by the manufacturer. The best resource I’ve found is the Performance tab of the Imaging Resource camera reviews. Even they can’t provide a simple value because there are multiple variables, and you can’t simply assume that your camera is automatically working at the fastest. To ensure the fastest shutter lag possible, turn off autofocus (this is important) and shoot in manual exposure (on some cameras this might not make much difference, but there’s no way of knowing for sure so I think it’s best to just turn it off). The pre-focused time (shutter button pressed halfway) is what you’re going for, but some (most?) triggers don’t do this—the Lightning Trigger does.
- The shutter-speed “sweet spot” is 1/8 to 1/4 second, but anywhere between 1/15 and 1/2 second should work pretty well. If you’re too fast, you risk missing some of the secondary strikes that often accompany the initial strike; if you’re too slow, the lighting tends to get washed out. Keeping the shutter open long enough to get into the sweet spot in broad daylight often requires the lowest ISO possible (it helps if your camera goes down to ISO 50), and a polarizer (I use Singh-Ray). A neutral density filter will work too, but make sure you don’t go too slow with the shutter speed or the lightning you capture might faint or not even visible.
- Come with a strategy for keeping you and (especially) your gear dry. I never go out to photograph in the rain without my waterproof gear, which keeps me dry from head-to-toe: rain hat, parka, waterproof over-pants, waterproof shoes—a stylish ensemble that frees my umbrella for my camera. This strategy works great when there’s no lightning, but—well, let’s just say that an umbrella might not be the best choice when lightning’s in the area. When photographing lightning, I use a waterproof rain cover for my camera (which I won’t recommend because it’s a pain and I’m looking for something I like better—stay tuned). And as much as I hate lens hoods (they just get in the way), I have to admit that they can help keep raindrops off your front lens element. I also make sure to carry multiple lens cloths in my pockets (because there are too many pockets in photography, so it’s just easier to have a cloth in each pocket than it is to remember which pocket I put it in) and check my front element for raindrops frequently. Also handy is a bath towel to dry all of your equipment before you put it away. A chamois (check your local auto parts store) also works great for this. And a garbage or plastic grocery bag (there’s always one in my camera bag) is great for tossing over your camera any time you’re caught in a sudden downpour.
Some links
- Before attempting to photograph lightning, visit the NOAA lightning safety page
- Read my “Outdoor Photographer” article on Grand Canyon monsoon photography (lots of lightning tips)
- Photo Tip: Lightning Photography
- Sign up for a Grand Canyon monsoon photo workshop, where Don Smith and I do our best to get you lightning captures in one of the most beautiful places on Earth (unfortunately, Yosemite doesn’t offer the frequency of thunderstorms necessary to support a lightning workshop)
Upcoming workshops
A stormy weather gallery
Click an image for a closer look, and a slide show. Refresh the screen to reorder the display.


2015 Grand Canyon Raft Trip: The Little Colorado
Posted on June 8, 2015

Red, White, and Blue | Little Colorado River | Grand Canyon
Sony a7R
Sony/Zeiss 16-35
1/50 second
F/11
ISO 100
“Uh, we’re going to need more time here”
Before last year’s raft trip, my relationship with the Little Colorado River was limited to the view from the Cameron Suspension Bridge on US 89: Rarely more than a muddy trickle, the Little Colorado seemed better suited as an indicator of recent precipitation than a photo destination. So last year, when Wiley (my raft trip’s lead guide) said we’d be stopping at the Little Colorado River confluence, I shrugged.
The day had been a mix of clouds and sun, great for photography. The sun was behind the clouds when we tied up on the rocks at the confluence; as I hopped off the raft, camera bags in tow, Wiley told us to be back on the raft in 45 minutes. I remember thinking, Really? Surely we can find a better spot to take advantage of this great light, but I kept my mouth shut. Expectations low, I rounded the corner and stopped like I’d slammed into a brick wall. Unable at first to process what I was seeing, I finally turned and called back to Wiley, “Uh, we’re going to need more time here.” And it was so.
So what happened?
Clearly, somewhere between Cameron and the canyon, the Little Colorado had gotten an infusion. And not just an infusion of regular old greenish-brown river water, but an infusion of mineral-laced, other-worldly turquoise water. It turns out that, after leaving Cameron, the Little Colorado carves a deep (and quite scenic) canyon, a canyon so deep that it cuts into a travertine- and limestone-laced aquifer that recharges and colors its flow. The limestone also paints the river’s bed a reflective white, further enhancing the turquoise hue. (It’s the same color, for the same reason, as the more heralded Havasu Creek.)
Do-over
Unfortunately, on that first visit, the photogenic clouds and light that had been with us all day took our arrival as its cue to move on, forcing us photograph this beautiful scene in ordinary, harsh, mid-afternoon light. On that visit, despite the extra time, I wasn’t able to capture anything that would do this magnificent spot justice. But I made plans to return, and strategized with Wiley the best way to maximize our chances for good light the next time.
Our original plan for the Little Colorado this year was a late afternoon stop on day 2, but after a windy morning, Wiley suggested stopping early at a more sheltered campsite. Though that meant not getting to the Little Colorado until the morning of day 3, the weather forecast before we departed (to the land of no weather forecasts) had called for lots of clouds and a slight chance of showers for most of the week; the clouds had been with us so far, so I crossed my fingers that they’d hang in there for us.
And hang in they did. For the hour-and-half we had there, the sun made cameo appearances but largely remained offstage. In place of the typical horizon-to-horizon blue sky, we got patches of blue mixing with rapid changing cumulus. When the sun did appear, it spotlighted individual features rather than illuminate the entire scene.
The biggest problem I had was deciding where to point my camera. Usually I identify where the best shot is and concentrate my attention there. In this case, because I couldn’t decide, I shot both upstream and down, hedging my bets with wide and tight, horizontal and vertical compositions. I know I left a lot of shots farther upstream, so I guess I’ll just need to go back next year.
Inside out at Grand Canyon
Click an image for a closer look, and a slide show. Refresh the screen to reorder the display.


