What Would Michael Scott Do?
Posted on March 20, 2022

Thunderhead and Lightning, Lipan Point, Grand Canyon
Sony a7RIV
Sony 24-105 G
1/10 second
F/9
ISO 100
“You miss 100% of the shots you don’t take. — Wayne Gretzky” — Michael Scott
Rules are important. The glue of civilization. Bedtime, homework, and curfews constrained our childhood and taught us to self-police to the point where as adults we’re so conditioned that we honor rules simply because we’ve been told to. (Who among us doesn’t always wait for the signal to change, even with no car or cop in sight?)

As important as this conditioning is to the preservation of civil society, rules can sometime keep us from taking shots that might have turned out to be special. Rather than trusting their own instincts, less than confident photographers are often held back by blind adherence to the (usually) well-intended photography “experts” proliferating online, in print, and maybe even in your very own camera club. These self-proclaimed authorities love nothing more than to issue edicts for their disciples to embrace. But my general advice to anyone seeking photography guidance is to beware of absolutes, and when you hear one, run (don’t walk) to the nearest exit. The truth is, there are very, very few absolutes in photography. (Remove the lens cap?)
A more insidious hindrance to photographers is our own rules—things we truly believe to be true. These are like training wheels that served us so well at the start that we never considered removing them: the rule of thirds, never blow your highlights, don’t center the horizon, everything sharp from front to back, avoid bright sunlight, just to name a few. But they’re insidious because, while they may be founded on some basic truth, they also hinder our growth. Like walls that give comfort by protecting us from intruders, photographic rules obscure the horizons of our creativity.
The truth is you often don’t know whether an image will work until you click the shutter—and sometimes not even until you get home and look at it on your computer. The more you’re able to turn off that internal editor (who keeps repeating all the rules spewed by others), the better your results will be. Just remember this: If you’re not breaking the rules, you’re not being creative.
The image I share above might never have happened had I followed a couple of rules—one I hear all the time from well-intended photo judges, another I often impose on myself: A photo judge might ding it for the centered lightning bolt and (more or less) centered horizon; and I may have never had the opportunity to photograph this beautiful thunderhead at all had I not overcome my personal aversion to photographing in midday light.
The afternoon I captured this came during one of three Grand Canyon Monsoon photo workshops last summer. The sky was blue and the forecast for lightning not so great, but we headed out toward Desert View that afternoon anyway. Shortly after pointing east along the rim on Highway 64, I saw this towering thunderhead blooming in the distance. Given all the twists and turns on the road, I wasn’t even sure at first it would be in our scene at Desert View. And since our destination was still about 30 minutes away, I was even less confident that even if the thunderhead was over the canyon, it would still be active by the time we got there.
I was assisted in this workshop by my friend and fellow photographer Curt Fargo. I can always count on Curt, realtime lightning app open, relaying instant reports on the activity as we drive, and it wasn’t long before he determined that thunderhead had to be where the app showed a lot of lightning activity about 15 miles up the canyon from Desert View—not exactly close, but at least the viewing angle would work. At that point all we could do was drive, watch the cloud, and pray it didn’t peter out before we got there. (Why is the speed of the car in front of you always inversely proportional to the amount of hurry you’re in?)
As you can see, we made it. Rather than drive all the way out to Desert View, we stopped at the first good view of the canyon and thunderhead—Lipan Point, about two miles closer with a much shorter walk to the rim. By the time we were set up the lightning activity had peaked, but we still got a few strikes. We also got to watch this cell absolutely dump an ocean of water on one spot for nearly an hour, no doubt creating a significant flash flood for whatever canyon drained it. This is the only image I captured that included the entire thunderhead.
The moral is, whenever you find yourself basing composition or exposure decisions on pre-conceived ideas (either your own or others’) of how things should be, just slow down a bit and challenge yourself to break the rules. Go ahead and get your standard shot, but then force yourself to try something outside your comfort zone. And remember Michael Scott.
Here’s my guide for photographing lightning
Breaking the Rules


, California")


Worth the Sacrifice
Posted on March 13, 2022

Aurora Reflection, Vestrahorn, Iceland
Sony a7RIV
Sony 12-24 GM
15 seconds
F/2.8
ISO 3200
Photography should, first and foremost, make you happy. But every once in a while, for some reason (I have to be really bored) I’ll surf over to an online photography forum or Facebook photography group, only to be instantly reminded why it’s been so long since I visited. The litany of online insults, one-upmanship, and destructive criticism makes me wonder whether there are any happy photographers out there.
Of course I know there are, because I meet them all the time: in my workshops, on location, or simply sharing their images online. I don’t know whether the same photographers who seem so happy when they’re taking pictures do a Jekyll to Hyde transformation as soon as their butts hit the computer chair, or whether there are two types of photographers: those who actually take pictures, and those who simply prefer their computer to Mother Nature (no wonder they’re so unhappy).
Of course getting out to take pictures does require more effort than sitting at a computer. And nature photography usually requires some level of sacrifice because the best time for photography is usually the worst time to be outside: sunrise, when we’d rather be in bed; sunset, when we’d rather be at dinner; crazy weather, when we’d rather be warm; and after dark, when we’d rather be in front of the TV. But I’ve decided that there’s something about witnessing Nature’s majesty that transcends any transient discomfort and inconvenience. And doing it with people who appreciate it as much as you do makes it even better.
Don Smith and I got another reminder in last month’s Iceland photo workshop. On this trip we dealt with all the wind, snow, and frigid temperatures you’d expect in Iceland in February. And then there were the long days and bumpy miles—not to mention a fair share of unexpected hardship. For example, less than 36 hours after clicking this image, several members of our group were nearly swept into the North Atlantic by a rogue wave. Then there were the hotel room snow drifts (note to self: Don’t sleep with the window open in Iceland in February), the lost and found camera bag, the stolen airport shuttle….
But despite all this difficultly, this trip was an absolute blast. This night is a great example. It must have been freezing, but I have no memory of that now. But I do remember standing on the beach beneath Vestrahorn with the rest of the group that night, the waves washing over (and sometimes into) our boots, waiting for the northern lights. Approaching from behind was a storm that, according to the forecast, threatened to close the roads. This scene is beautiful in any conditions, and to be able to photo Vestrahorn under the stars, with even a little bit of aurora, was truly special. Doing it with a group of like-minded, fun loving friends is something I’ll never forget.
What you see here is about as good as the aurora got—nice, but nothing spectacular. Nevertheless, we were having such a great time, we stayed out in the cold dark until the clouds swallowed the stars. Back at the bus, with a storm threatening and an hour’s drive back to the hotel, we were anxious to get on the road. So imagine our chagrin when Óli (or Icelandic guide) turned the key and got nothing but a click. If you’ve every photographed Vestrahorn from here, you know this isn’t one of those places where you can just walk out onto the road and flag down a car. Uh-oh. It would have been easy, understandable even, for people to be upset—or frightened, or angry. Instead, while Óli worked his phone trying find help (the cellular coverage in Iceland is fantastic, FYI), we just continued enjoying each other’s company.
As it turned out, we only had to wait an hour or so for a friend of Óli’s to come out and give us a jumpstart (one more reason why it pays to have a local guide). He also arranged for another friend to drive our direction with van large enough for the entire group, in case the battery charge didn’t hold. Rather than wait for the backup vehicle to arrive, we just started driving in toward the hotel—the other vehicle met us halfway and followed us from there, but we made it without need for more help.
The next morning the battery was dead again, and we were stuck at the hotel all morning while the bus was being repaired (turned out to be an alternator problem). As luck would have it, the storm was so bad that we’d have had to stay in anyway. That afternoon we were picked up for our visit to the ice cave, and the bus was good as new when we returned. So all’s well that ends well.
Worth the Sacrifice
Click an image for a closer look, and to view a slide show.


Know Your Subjects
Posted on March 7, 2022

Alpenglow, Kirkjufell, Iceland
Sony a7RIV
Sony 16-35 f/2.8 GM
3 seconds
F/16
ISO 100
One of my personal rules for photography is knowledge of my subjects—I simply get more pleasure from an image when I know something about what I’ve captured. Of the many potential subjects available to a landscape photographer, mountains have always been a particular draw for me. Living my entire life in the shadow of the Sierra Nevada has certainly influenced that connection, as have fond memories of family camping trips in the mountains throughout my childhood, and Sierra backpack trips with friends in my teens and beyond. In college I even majored in geology for several semesters (after astronomy, but before eventually earning my bachelor’s degree in, yawn, economics), and was most interested in the processes responsible for mountain building: tectonics and volcanism.
Kirkjufell, Iceland
Given all this, I guess it makes sense that after returning from last month’s Iceland trip I found myself digging a little deeper into the origins of Kirkjufell, the prominent peak that is arguably Iceland’s most recognizable landmark. Game of Thrones fans who recognize Kirkjufell (Arrowhead Mountain) will be relieved to know that, after several visits over the last few years, I can confirm that the White Walkers appear to have moved on. (But come to think of it, maybe that shouldn’t be much of a relief….)
Kirkjufell rises slightly more than 1500 feet above Breiðafjörður Bay on the Snæfellsnes Peninsula. Given Iceland’s volcanic origins, it would be reasonable to assume that this cone-shaped peak is just one of of the island’s many volcanos. But that assumption would be incorrect. Skeptical? The mountain’s clearly visible parallel strata layers are a giveaway that Kirkjufell is not a volcano. (And viewing from other angles would reveal that Kirkjufell isn’t really cone-shaped either.)
Though many of Kirkjufell’s layers were indeed laid down by lava or explosive debris from nearby volcanos, these igneous layers are interspersed with layers of submarine sediment deposits, each layer a product of the environment at the time of its deposition. Kirkjufell’s base layer was a large lava flow that happened sometime in the last 5 to 10 million years (relatively recently in Earth’s grand geological picture). After that came millions of years of alternating sediment and volcanic deposits, separated by thousands or millions of years for which there’s no record.
This assortment of parallel layers created a horizontal layer cake of strata bearing no resemblance to the mountain we know today (or any mountain for that matter). Because all sedimentary layers are deposited horizontally, and Kirkjufell has a slight SE-NW tilt, it would also be reasonable to assume that at some point since the last layer went down, the entire area to the southeast rose relative to the area northwest.
Once all Kirkjufell’s layers were deposited and tilted, the area was squeezed between two glaciers that carved away most of the surrounding rock, leaving the remaining peak jutting above the glaciers like an island. When the glaciers retreated, the peak we see today remained.
Twilight colors
The other striking feature in this image is the pink that spreads in the shadowless pre-sunrise/post-sunset sky of civil twilight, when the sun is around six degrees or closer to the horizon. Sometimes called the “Belt of Venus,” we get this color because the only the longest, red wavelengths are able to traverse the atmosphere once the sun drops below the horizon.
The interface between the Belt of Venus and the blue-gray Earth’s shadow directly is called the “twilight wedge,” a designation earned because you can sometimes see the earth’s curve in the shadow, with its apex at the anti-solar point (directly opposite the sun). At sunset, the gradual upward motion of the shadow gives the appearance of a wedge being driven into the darkening sky.
About this image
I won’t pretend that there’s anything especially unique about my composition here (and I have the pictures to prove it)—it’s one of those scenes that improves more with conditions than composition, especially if you haven’t been here enough to get really familiar with it.
Because this was the first evening of photography for Don Smith’s and my 2022 Iceland photo workshop, Don and I stayed especially close to the group. From past visits I knew that to align Kirkjufell and Kirkjufellsfoss (the waterfall), you’re pretty limited for places to set up, but we managed to find prime tripod real estate for everyone. I encourage my groups to move around as much as possible, but the thick snow and steep drop to the river further limited our mobility, so we just lined up along the cable barrier between the trail and the drop. And because there were other people besides our group out there, once you landed a vantage point, you were pretty much stuck there until someone moved.
Given the mobility limitations and my desire to align the mountain and waterfall, my composition options were mostly focal length choices. Another, self imposed, compositional limitation was my desire to exclude the footbridge just out of my frame on the left. I like to believe that if I’d have been here by myself, with lots of time to explore, I’d have come up with something a little more creative. But I’m certainly not complaining—between the fresh snow and beautiful sky, the conditions for photography were off the charts and everyone was thrilled.
This image came late in the shoot, just as the twilight wedge reached peak color. By then I was pretty familiar with all my composition options and opted to go with my Sony 16-35 f/2.8 GM lens at 17mm (an my Sony a7RIV body). Turns out my resulting composition is remarkably similar to my northern lights image from later that night, and a sunrise image I captured here 3 years ago. Since I clearly have this composition nailed, I’ll need to challenge myself to find something different next year.


Workshop Schedule || Purchase Prints || Instagram
More Magnificent Mountains


Yosemite Moonrise
Posted on February 27, 2022

Twilight Moon, Tunnel View, Yosemite
Sony a7RIV
Sony 24-105 f/4 G
1/3 second
F/11
ISO 100
Though last week’s harrowing story of a sneaker wave that drenched members of the Iceland photo workshop group had a (relatively) happy ending (R.I.P., 3 cameras and lenses), it generated more responses than any blog post in recent memory. Exactly one week later, that sobering reminder of Nature’s power and ability to surprise was still on my mind when I was gifted a reminder of Nature’s ability to also soothe and inspire.
This epiphany struck me as I reclined on a granite slab above Tunnel View, waiting for the full moon to grace the most beautiful view on Earth. Just as in Iceland, I was with a workshop group. Unseen in Yosemite Valley below us, I knew thousands of photographers were assembled with eyes glued to a section of granite stained by Horsetail Fall’s trickle, praying to avoid a reminder of Nature’s ability to disappoint. If all went as hoped, the moon would appear at about the same time light from the setting sun colored the waterfall some shade of orange or (fingers crossed) red.
While clouds were a factor for both events, I wasn’t concerned about the moonrise because I could see there was only one cloud that might delay the moon’s appearance, but certainly wouldn’t wipe it out. On the other hand, I knew from experience that the people on the ground beneath Horsetail Fall would have no idea of the clouds poised to block the sun, and ultimate fate that evening’s light, until it actually happened (or didn’t). For me and my group, the light on Horsetail Fall would be tomorrow night’s anxiety; tonight was our opportunity to bask and marvel.
My general moonrise approach is to start with max telephoto until the moon gets some separation from the landscape, then go wider as the moon climbs. This evening my tripod was mounted with my Sony a7RIV and Sony 200-600 composed at full magnification on Cloud’s Rest, the peak between El Capitan and Half Dome, behind which the moon should appear about 25 minutes before sunset. Within arm’s reach was my other a7RIV with my Sony 24-105.
Once everyone was set up with lenses trained, we had time to sit and appreciate the view. From our perch not only could we see the spot behind which the moon would appear, we also could see the part of El Capitan where Horsetail flowed (though there wasn’t enough water to actually see the fall from this distance). As we waited for the moon, we watched the shadow cast by the setting sun move across the face of El Capitan, gradually warming the granite as it advanced.
My eyes were trained more on the cloud taking a breather atop Cloud’s Rest—more specifically, trying to figure out if the cloud was dense enough to completely block the moon. I got my answer when the time for moonrise came and passed, and adjusted my composition by widening my composition somewhat.
The moon came out from behind the cloud about 10 minutes before sunset, still close enough to Horsetail Fall to include both at 400mm. Meanwhile, the light on Horsetail Fall faded as the sun dropped into thin clouds near the horizon—faded just enough to subdue the color and disappoint the massed throngs below.
From our vantage point the light on El Capitan was good, but I could tell that the color wasn’t what people came for. As pretty as our scene was was, my favorite time to photograph a full moon isn’t until after the sun has set and the blue and pink pastels of Earth’s shadow starts to paint the sky. By this time the daylight-bright moon stands out strikingly against the darkening sky. Waiting for this to happen, I switched to my 24-105 and started playing with a variety of compositions that included some combination of El Capitan, Half Dome, and Bridalveil Fall.
Since I need to capture detail in both the moon and the foreground, and I never blend images (combine exposures to make a single image), the exposure margin for error shrinks significantly as the sky darkens around the moon. I captured this image more than 15 minutes after sunset, when the scene looked much better to my eyes than it did on my LCD. This is where I especially appreciate the dynamic range of my Sony sensors—I just monitor the moon, making it as bright possible without blowing it out, then rely on Lightroom and Photoshop to reveal the unbelievable amount of usable detail hidden in the shadows and highlights.
Large or small, crescent or full, I love photographing the moon rising above Yosemite as much as ever. I’m fully aware that I have far more than my share of these images, but it just makes me so happy, I have no plans to stop.
Workshop Schedule || Purchase Prints || Instagram
Yosemite Moonrise


The Sea Was Angry That Day, My Friends
Posted on February 20, 2022

Ocean and Ice, Diamond Beach, Iceland
Sony a7RIV
Sony 24-105 f/4 G
15 seconds
F/11
ISO 100
I returned from Iceland with a lot of memories, but none will stay with me longer than the events of this stormy February morning on Diamond Beach. I guess given how much of my life is spent chasing Nature’s most dramatic moments, every once in a while it’s good to be reminded of the suddenness with which Nature can surprise you to impose its uncompromising will. But still…
The wind was howling and sunrise was still nearly an hour away when Don Smith and I guided our workshop group out to Diamond Beach. In fact, it had been so cold and dark when we arrived that we’d hung out in the bus for about 10 minutes.
Our group had actually photographed Diamond Beach a couple of days earlier, on a sunny but chilly morning. The surf that day had been relatively benign, washing up a more-or-less predictable distance up the beach at regular intervals. On that visit we could wander among the ice chunks, advancing close enough to use a wide lens for close-ups of the waves washing around individual ice blocks.
The blocks of ice here, some as large as a small car, have calved from nearby Fjallsárlón Glacier, have drifted across Glacier Lagoon and eventually into the ocean, before being swept back onto this black sand beach to pose for our photographs. On that first visit the biggest concern was a slightly larger than average wave washing up over the top of our (nearly knee-high) waterproof boots if we somehow hadn’t paid enough attention to its approach. Wet feet might ruin your day, but they won’t kill you.
This morning, however, given the storm that had raged all night and the cold wind still blowing hard, we weren’t a bit surprised to find the surf frighteningly agitated. Each wave attacked the beach with an explosive vengeance, and no one needed to be told to give the ocean space. Making beach access even more difficult was the a very high tide that had crested less than an hour before our arrival.
The section of Diamond Beach we were trying to photograph slopes steeply, 30 diagonal feet or so down to the ocean. (Given the size and violence of the waves, it’s really impossible to say where the beach ends and the ocean begins.) Above this inclined beach stretches a broad and relatively flat plain of sand, elevated far enough above the water to provide the illusion of safety. On this morning we watched individual waves charge up the beach before petering out 10 feet or so feet from the top of the slope—some a few feet closer, some a few feet farther back, but none seemed to threaten the high ground we surveyed the scene from.
Bobbing in the surf and dotting the sand were the ice blocks we’d come to photograph. All of the best ice was down in the area under constant attack from the surf, but instead of walking down among the ice as we had on our previous visit, the group seemed content to put on longer lenses and stay in the safety of the elevated plain.
Given the day I’d spent with saturated socks following our previous Diamond Beach visit, on this visit I was very motivated to keep my feet dry. Planting my tripod several feet back from the edge, I attached my Sony 24-105 f/4 G lens to my Sony a7RIV and turned my attention to a pair of ice chunks a safe distance away. My first click came about 40 minutes before sunrise, when the sky was dark enough to stretch my exposures into the 15 to 30 second range, making it very challenging to avoid blurring the ice that shifted with almost every wave.
At one point I saw someone in our group venture down, close enough to the water to take a wave almost to his waist. Braced, with camera held high, he remained standing and came out laughing, but stayed further back after that. I went back to shooting, trying to time my exposures for the seconds between waves when my subjects were less likely to be shuffled mid-exposure. The image I share here was one of my earliest successes.
Waiting for an exposure to complete, I looked up and saw a human shape emerging from the darkness and heading my direction. It wasn’t until I heard the shape utter, “I went in,” that I squinted and realized I was looking at Don. And not until he got right up to me and repeated, “I went in,” did I register exactly what he meant.
He was dripping, head-to-toe, camera and tripod, with frigid North Atlantic seawater. Holy crap! With chattering teeth he gave me a quick summary of events. He’d seen a piece of ice he wanted to photograph, so after monitoring the waves enough to feel confident that he was safe (-ish), he’d moved down onto the sloping part of the beach to get closer. Once down there, he’d been so focused on making his shot that he hadn’t seen the large wave until it was on him. The wave came up to his waist, and just as he thought he might ride it out without going down, he was sucker-punched by a block of ice that sent him sprawling into the surf (turns out it left him a nasty bruise too, but I managed to refrain from suggesting that he ice it). Fortunately, this was our last morning there, so our suitcases were packed and loaded the bus, so it didn’t take any convincing to get him to return the bus to change into dry clothes.
My ice subjects had drifted away, so I wandered over to where a few members of the group were shooting comfortably in the “safe” zone, well back from the beach. Rather than feeling concerned about our safety, I considered Don’s mishap a one-off accident—a dedicated photographer a little too anxious to get the shot. I’ve been there, and I suspect most landscape photographers have as well at one time or another. So far, I rationalized, no wave had come close to our elevated sand platform.
About the time these thoughts were cementing in my brain, I glanced seaward and saw a massive, roiling wall of water charging my position. Usually when a wave approaches the first inclination is to backpedal, but this wave was on a completely different scale from any I’d ever encountered. Without conscious thought I turned and sprinted inland so quickly (picture George Costanza in a fire) that if my camera bag hadn’t been on my back, and my tripod in my hand, I’d have lost everything.
The wave caught up with me at least 50 feet back from the top of the sloping beach that just seconds earlier I’d believed was completely safe. By then it had lost significant momentum but still rose halfway up my calf (and just below the top of my very high boots). After retreating another 50 feet or so to dry ground, I turned and looked back toward the others and saw three people in the group down.
I planted my tripod and sloshed back through about 8 inches of water where there had been only dry sand just a few seconds ago. Fortunately, no one had been swept down onto the beach (and beyond) by the receding wave. By the time I reached them, those who were down were scrambling back to their feet. I looked around and saw that the others had managed to retreat far enough to remain upright, though all were some degree of wetter than they wanted to be.
After a few seconds to process what had just happened, pulled everyone from the beach and onto the bus. We stopped at Glacier Lagoon where there were bathrooms for people to change, but I think those who got wettest didn’t fully warm until we reached our hotel that afternoon. Once it was clear that we’d incurred no lasting personal harm, I took stock of the gear that suffered and learned that four cameras and lenses weren’t working. One of the camera/lens pairs returned to life later, but three were permanently demoted to paperweight status.
The images from this morning became an afterthought—I didn’t even think about them again until unloaded my card and saw that I had captured 10 frames before all hell broke loose. Many had too much motion in the ice, but it looks like I did manage to capture two or three worth processing—all variations on the same ice blocks with different wave action.
Born and raised in California, I’ve photographed and recreated at the beach more times than I can count. I’ve heard stories of “rogue” or “sneaker” waves, but this is the first time I’ve ever actually experienced one. Only after experiencing this wave do I realize that all those other large waves that surprised me were not the full extent of the potential risk, not even close.
Without getting too preachy (after all, you are reading advice from a guy who chases lightning), I just want to remind everyone to never take Nature for granted. Just because you feel safe, doesn’t mean you are safe. I tell my monsoon workshop students not to get too comfortable just because there’s been no lightning yet, that every lightning storm needs to strike first somewhere (and it could be here). And after this experience, I’ll certainly tell my ocean photographing students in Iceland and Hawaii that, no mater how many waves you’ve seen, the next wave could be several times bigger than anything you’ve seen so far. I know, because I’ve seen it.
Iceland Photo Workshops
Workshop Schedule || Purchase Prints || Instagram
Surf’s Up
Click an image for a closer look, and to view a slide show.


Back in the Saddle
Posted on February 13, 2022

Sun Kissed, Horsetail Fall, Yosemite (2021)
Sony a7RIV
Sony 24-105 f/4 G
1/15 second
F/9
ISO 100
Horsetail Fall’s February sunset show is an indescribable delight that thrills all who view it. After photographing Horsetail Fall in relative solitude for many years, when all the people started showing up, I actually started dreading the experience a little—especially the prospect of negotiating tripod space for a dozen workshop participants. But last year, despite record crowds, after adjusting my attitude and actually leaning in to the mayhem, I had more fun at Horsetail Fall than I’ve had in years. And following last year’s experience, I’m actually looking forward to tomorrow’s return for this year’s festivities.
Because arriving early to ensure a good vantage point is important, photographing Horsetail Fall requires a lot of standing around. Of course my priority is always my group, but once everyone was settled in and all the questions were answered, I had time to chat with neighbors, and even wander up and down the road to take in the infectious tailgate party atmosphere, dodging flying frisbees and inhaling mouth-watering barbecue smoke as I went.
But for Horsetail Fall, as sunset approaches, group anxiety starts to take over. That’s because part of the thrill is the possibility that on any given evening, it won’t happen. Not only does there need to be water in the fall (never a sure thing), the setting sun needs an unobstructed path to El Capitan. But those in position to view Horsetail are standing on the valley floor with no view of the sun in the minutes leading up to the main event.
In some years, due I suspect to some nefarious conspiracy between water and light, the sunset fire never happens, not even once. Other years, it seems like every day our social media pages burst with pictures of the previous night’s display.
Horsetail failure comes in many forms, ranging from the fall simply being dry (2020, I’m looking at you), or the sunlight being blocked, for days or weeks at a time, by a string of winter storms. The worst kind of failure happens when the fall is flowing and the light strong as the clock ticks toward sunset—until some unseen cloud on the horizon snuffs the sun and breaks hearts.
I’ve also seen the reverse happen, when there’s no sign of sunlight on El Capitan and people have begun packing their gear when, without warning, the sun sneaks out to spotlight El Capitan for just a minute or two as it is swallowed by the horizon.
Maybe that’s why it seems that everyone who has tried it has their own Horsetail Fall story. And for every Horsetail aspirant who has been trying and failing for years, there’s another one who got it on the first attempt. For the fortunate, success is a badge of honor; for the unlucky, the quest can rise to obsession status.
Last year was a great year for Horsetail Fall, with good flow and light throughout the February viewing window. Trying to recover from 2020 COVID losses, in 2021 I had the good fortune to have scheduled two Yosemite workshops in February. The first one emphasized Horsetail Fall, while the second focused on photographing the full moon rising at sunset.
My Horsetail group enjoyed the first attempt so much that, despite our success, we went back for another shot the next night. And after the first workshop’s success, I gave my moon group the option to try Horsetail on a non-moonrise evening—they jumped at the chance, and weren’t disappointed. In between the two workshops, I hiked by myself up the Four Mile Trail (that goes to Glacier Point) far enough to photograph it from a perspective I’ve never tried. (If you’re keeping score, that’s 4 for 4.)
Today’s image is from my first group’s first attempt. In the minutes leading up to sunset, we’d been teased by light that seemed to come and go, before ultimately staying just long enough to thrill everyone. When the show was over, applause broke out, strangers hugged, and no one seemed to mind the 1 1/2 mile walk back to the car, and the ensuing gridlock.
Look below the gallery for my updated guide to photographing Horsetail Fall
Horsetail Fall 2021
Click an image for a closer look, and to view a slide show.


Horsetail Fall Do-It-Yourself Guide
(from my Photo Tips section)

Horsetail Fall, El Capitan, Yosemite
2022 Horsetail Fall Update 1 (01Feb2022)
- No reservations are required to view Horsetail Fall in 2022
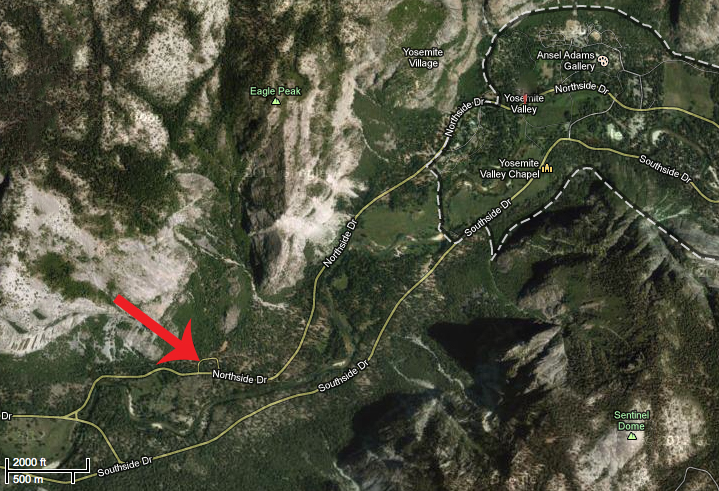
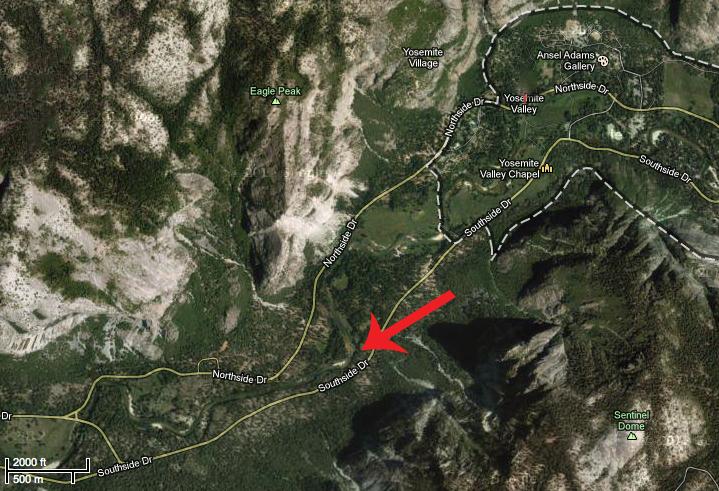
- From noon until 7 p.m., all parking on Southside Drive between the El Capitan crossover and Swinging Bridge is prohibited.
- Also between El Capitan crossover and Swinging Bridge, the entire area between the Merced River and Southside Drive side is closed to parking and pedestrians. In other words, you can’t photograph Horsetail Fall from the south bank of the Merced River. This will be strictly enforced.
- All parking on Northside Drive between Yosemite Valley Lodge and the El Capitan crossover is closed. You also won’t be permitted to unload or stop on this stretch of road. To view Horsetail Fall, the NPS wants you to park in the Yosemite Falls parking area just west of Yosemite Valley Lodge, and walk to the viewing area at or near the El Capitan Picnic Area. This is about 1.5 miles each way, but it’s flat, and one lane of Northside Drive will be blocked for pedestrians. If this lot is full, you can park at the Yosemite Village parking lot and walk, or take the free shuttle to the Yosemite Falls parking area (and walk from there).
- It’s impossible know what Horsetail Fall will deliver in 2022—that will depend on the weather (it needs sunlight at sunset), and the runoff. One small bit of hopeful news is the early and heavy snow Yosemite received this season. Though California is in a drought, several significant storms in October and December gave the snowpack a significant boost, increasing the chances that there will at least be a little water flowing (you don’t need a lot). But no promises, so keep your fingers crossed.
- Here’s the NPS Yosemite Horsetail Fall page: https://www.nps.gov/yose/planyourvisit/horsetailfall.htm
- And finally, if you think you’ll be able to skirt the rules and slip under the radar, think again. I saw a very active ranger presence monitoring the activity on both sides of the river. The rangers were very friendly and helpful, but they were also clearly serious about making sure everyone abided by the rules. So be patient, stay mellow, and enjoy the show…
Please respect these restrictions. The minority of photographers who ignore rules, or try to cut corners, reflect poorly on all photographers, which only leads to even tighter restrictions and risks complete loss of access to Horsetail Fall.

2021 Horsetail Fall Crowd, Northside Drive, Yosemite :: For nearly a mile, scenes like this one from a small section of Northside Drive, repeated themselves every couple hundred yards.
Photographing Horsetail Fall
For eleven-plus months each year, Horsetail Fall may just be Yosemite’s most anonymous waterfall. Usually dry or (at best) a wet stain, even when flowing strong this ephemeral cataract is barely visible as a thin white thread descending El Capitan’s east flank. When it’s flowing, my workshop groups can be standing directly beneath Horsetail and I still have to guide their eyes to it: “See that tall tree there? Follow it all the way to the top of El Capitan; now run your eye to the left until you get to the first tree…”. But for a couple of weeks in February, the possibility that a fortuitous confluence of snowmelt, shadow, and sunset light might, for a few minutes, turn this unassuming trickle into a molten stripe draws photographers like cats to a can-opener.
The curtain rises in the second week of February, a couple of hours before sunset, when a vertical shadow begins its eastward march across El Capitan’s south face. As the shadow advances, the sunlight warms; when the unseen sun (direct sunlight is gone from the valley floor long before it leaves towering El Capitan) reaches the horizon, the only part of El Capitan not in shadow is a narrow strip of granite that includes Horsetail Fall, and for a few minutes, when all the photography stars align, the fall is bathed in a red glow resembling flowing lava framed by dark shadow.
Some years Horsetail delivers sunset after sunset in February, while other years administer daily doses of February frustration. Unfortunately, it’s impossible to predict when all the tumblers will click into place: I know photographers who nailed Horsetail on their first attempt, and others who have been chasing it for years.
Don’t call it “Firefall”
One important thing before I continue. To avoid outing yourself as a Yosemite rookie, don’t make the mistake of calling Horsetail Fall the “Firefall.” Yosemite’s Firefall was a very real nightly display of burning embers pushed from Glacier Point every summer night. It was as spectacular as it sounds. The phenomenon started in 1872 and continued until the National Park Service, concerned (among other things) about the crowds it drew, terminated the Firefall in 1968.
Anyone who has witnessed or seen pictures of Horsetail Fall would agree that “Firefall” would be a great name for it, but those of us fortunate (and old) enough to have witnessed the actual Firefall know the difference between Horsetail Fall and the Firefall, and will never confuse one for the other.
(Oh yeah, and it’s Horsetail Fall, not Horsetail Falls.)
Where does the red come from?
Horsetail Fall turns red for the same reason clouds turn red at sunset. When the sun drops below the horizon, the last rays to make it through the atmosphere are long, red wavelengths. El Capitan, towering more than 3,000 feet above Yosemite Valley, is high enough above the surrounding terrain to receive extended exposure to these red rays.
Horsetail Fall’s sunset color varies between orange and red. The color’s hue and intensity is a function of atmospheric clarity—the cleaner the air, the more vivid the red will be. You can read more about sunrise/sunset color in my Sunset Color article.
When to photograph Horsetail Fall
The “when” of Horsetail Fall depends on the convergence of three independent conditions:
- The sun’s angle is refreshingly predictable, lining up perfectly only in February (and October, when the fall is almost always dry). Common wisdom says the shadow on El Capitan most precisely targets Horsetail Fall at sunset during the third week of February, from around the 15th through the 22nd (or a little later). While I won’t dispute this, I’ve had some of my best success a week earlier, and my favorite Horsetail shot (at the top of the page) was captured February 9. I’ve also had success photographing it right up until the end of February. But the stripe of sunset light on El Capitan is thinnest (and therefore most tightly focused and photogenic) in the third week of February—the benefit of doing it a week earlier is fewer people.
- Water in the fall varies greatly from year to year, depending on how much show has fallen on the fall’s extremely small watershed, and how much of that snow is currently melting. A large snowpack and warm daytime temperatures are ideal. Sometimes Horsetail can be frozen solid in the morning, but afternoon warmth can be enough to get it flowing in time for the show. And a heavy rain can get it going strong for a few hours or even a day or so.
- Direct sunlight at sunset is the most fickle aspect of the Horsetail experience—for every tale of a seemingly perfect evening when the sunset light was doused by an unseen cloud on the western horizon mere seconds before showtime, there’s another story about a cloudy evening when the setting sun somehow threaded a gap in the clouds just as tripods were being collapsed.
The problem with targeting February’s third week is that it isn’t a secret: I generally prefer sacrificing Horsetail perfection in favor of Horsetail near perfection and far fewer photographers. But I’ll leave that decision up to you.
Where to photograph Horsetail Fall
It’s fun to circle Yosemite Valley on pretty much any mid- to late-February afternoon just to watch the hordes of single-minded photographers setting up camp like iPhone users on “Release Day.” In fact, one non-scientific way to find a spot to photograph Horsetail is to simply park where everyone else parks and follow the crowd. Unfortunately, as Horsetail’s popularity grows, so does the distance you’ll need to walk.
If Horsetail Fall is on the top of your bucket list, it’s best to pick your spot and show up early. Really early. Really, really early. The downside of this approach is that, because the best locations for Horsetail aren’t especially good for anything else, you’ll sacrifice a lot of quality Yosemite photography time waiting for something that might not happen.
And no one has commanded that you worship with the rest of the Horsetail congregation: Experienced Yosemite photographers know that any west-facing location with a view of the fall will do. If you find yourself in Yosemite with time to kill, try walking the Merced River between Cathedral and Sentinel Beaches—any place with a view to Horsetail will work. But because of their open space and relative ease of access, two spots have become the go-to Horsetail spots for most photographers.
El Capitan Picnic Area / Northside Drive
El Capitan Picnic Area, GPS: 37.72782N 119.61844W
The El Capitan Picnic Area (highlighted by Galen Rowell) on Northside Drive for years was the epicenter of the Horsetail Fall experience. The picnic area’s advantages are that it is the closest view of Horsetail Fall, has the most parking, has the most room for photographers (by far), and has a bathroom (plug your nose). The downside is there really isn’t a lot of composition variety here, and thousands of others will have already captured something as good as or better than what you’ll get.

Horsetail Fall from the picnic area
If you like people, the El Capitan Picnic Area is the place to be—more than any other Horsetail vantage point, this one has a festive, tailgate atmosphere that can be a lot of fun. I suspect that’s because people arrive so early and there’s little else to do before the show starts. And since everyone is pointing up with a telephoto, it’s pretty much impossible for anyone to be in anyone else’s way, which eases much of the tension that often exists when shooting among large crowds.
You’ll find the parking lot, with room for twenty or so cars, on Northside Drive, about two miles west of Yosemite Lodge (now only open to people with handicap parking permits). You can shoot right from the parking lot, or wander a bit east to find several clearings with views of the fall.
There are variations of the picnic area view all along Northside Drive that in recent years have surpassed the picnic area in popularity (crowds). My suggestion is to scout El Capitan views in any month that’s not February; if your only Yosemite visit is the day you’re there to photograph Horsetail Fall, scout early in the morning. Or, as you set out to photograph Horsetail Fall, simply walk Northside Drive (one lane is blocked for pedestrians walking from Yosemite Valley Lodge) until you find a view that you like (but don’t expect to have it to yourself).
The farther east you set up, the better your view of the top of El Capitan. But some of the east-most views are too aligned with El Capitan’s face, giving you a more side view of Horsetail that makes it very hard to see. You can also try venturing off into the woods to get a better angle, but doing that also means trying to avoid trees that obstruct your view.
Merced River south bank bend
Merced River south bank bend, GPS: 37.72885N 119.60743W
Due to extreme crowds and the damage they’ve caused, in 2021 the National Park Service closed Southside Drive to any Horsetail Fall viewing. While there’s no indication that this closure is permanent, it won’t surprise me if it is (in fact, it would surprise me if it doesn’t become permanent). So, until further notice, the information below is strictly historical (as I write this in February 2022).
Photographed from a bend on the Merced River’s south bank, El Capitan’s extreme sloping summit creates the illusion that you’re somewhere above Yosemite Valley, eye-to-eye with the top of Horsetail Fall—it’s a great perspective.
I like this location because the river greatly increases the variety of possible compositions, and also because you can pivot your view upstream to photograph Upper Yosemite Fall, and behind you toward Sentinel Rock (which also gets fantastic late light), almost directly above while you wait for Horsetail to light up. The downside to photographing here is that there’s precious little room, both to park and to photograph. This requires getting there a couple of hours early, and also can lead to a bit more tension as people jockey for position.

Horsetail Fall reflection from the Southside Drive Merced River view
Driving east on one-way Southside Drive, you’ll parallel the Merced River for most of 1.2 miles beyond the turn for Cathedral Beach. The Horsetail Fall spot is right where the road and river diverge. Parallel park right there in one of two narrow but paved parking areas on opposite sides of the road, where you’ll find room for about a dozen cars.
Since there’s so little parking here, and Southside Drive is one-way eastbound, if you find no parking (don’t try to squeeze in where there’s no room—I’ve seen rangers doing traffic control and ticketing cars that don’t fit), it also helps to know that the spot is about a ½ mile from the 4-Mile Trail parking area and ¾ miles west of the Swinging Bridge parking area—an easy, flat walk.
Because of the potential for crowds, the best strategy here is to arrive early and forego what may be a great view from the elevated riverbank (that is sure to be blocked by late-arrivers trying to cram their way in), in favor of getting as close to the river as possible. Standing at river level gives you many more compositional choices, and nobody else can block your wide shots. (But if there are other photographers already set up on the elevated riverbank when you arrive, please don’t be the one who sets up in front of them.)
How to photograph Horsetail Fall
Regardless of where you set up to photograph Horsetail Fall, it’s pretty difficult to find something that nobody else has done. But that doesn’t mean you shouldn’t try. There are definitely other places in Yosemite Valley with view of Horsetail Fall, they just take a little hunting—I suggest walking the south bank of the Merced River, and ascending the 4 Mile Trail. And since you’ll likely be doing lots of waiting, take advantage of the downtime to experiment with compositions.
Strategy
When the light begins to warm, it’s time to shoot. Because you never know when the light will shut off, don’t wait until the light is perfect—it’s best to start early and photograph often. Until the light goes away completely, my rule of thumb is that the light now is better than the light a minute ago—just keep shooting . I’m not suggesting you hold your shutter down in burst mode until your card fills; I usually tell my workshop groups to fire a frame every minute or two until the fall turns amber, then pick up the pace as it goes (fingers crossed) pink and (if you’re lucky) red. The best light is in the final five minutes before sunset.
Composition
Viewed from the picnic area, there’s not a lot of visual interest surrounding Horsetail; your most obvious compositions will be moderate telephotos, up to 300mm or full frame. I use my Sony 24-105 and 70-200 (or more recently, my 100-400) lenses almost exclusively here. Use the trees to frame your shots and let them go black; with a telephoto you can isolate aspects of the fall and eliminate the sky and some or all of the trees.
The Merced River bend near Southside Drive is farther away from the fall, with more foreground possibilities, including the river and reflections, so you’ll be able to use a greater range of focal lengths here. Don’t get so caught up in photographing the fall that you overlook wider possibilities that include the river.
From either location I think vertical compositions work best (there’s a reason you don’t see lots of horizontal Horsetail Fall images), but that doesn’t mean there aren’t horizontal opportunities too. I like to identify a go-to composition based on the conditions, then vary between wide/tight and horizontal/vertical. If the sky is boring (cloudless), minimize or eliminate it from your composition. If there are clouds that make the sky interesting, by all means include them.
A frequent rookie mistake is cutting the waterfall off at the bottom. I’m not saying there’s never a reason to do that, but unless you consciously decide to truncate the fall because you think it’s the way to compose your frame, make sure you include the diagonal ridge that Horsetail disappears behind.
Filters
Years ago I used to use a graduated neutral density filter to keep from washing out the color in the bright sky, but today’s cameras all have enough dynamic range to handle the exposure if you monitor your histogram. A polarizer cuts reflections will alter your results, so if you have one on, make sure you orient it properly. I often have a difficult time deciding between maximizing and minimizing the reflections with my polarizer, so I hedge my bets and shoot both ways. I’ve found that when Horsetail is flowing strongly, minimizing the reflection is best; when Horsetail is more of a wet or icy stain, maximizing the reflection works better. Either way, it’s best to just shoot it both ways and decide later.
Exposure
Automatic metering can be problematic in extreme dynamic range scenes when color is paramount, so I always recommend manual exposure, spot metering on Horsetail Fall or the adjacent sunlit granite. To maximize the color on the fall and El Capitan, I usually underexpose slightly. Because the trees rarely add value beyond framing, they usually work better when very dark green to black, a fact that’s completely lost on your meter (which thinks everything should be a middle tone). And monitor your RGB histogram to ensure that you haven’t washed out the red (Horsetail and El Capitan) or blue (sky) channels.
Highlight Alert (blinking highlights) is your friend. While you should never make your final exposure decision based on the highlight alert, when you see the highlights flashing, check your histogram and adjust if necessary.
And finally
And perhaps most important of all, don’t get so caught up in the photography that you forget to appreciate what you’re viewing. Just take a couple of seconds to stand back and allow yourself to appreciate the amazing spectacle unfolding before your eyes.
A Horsetail Fall Gallery
Click an image for a closer look and to view a slide show.


Clicking the Lights Fantastic
Posted on February 7, 2022
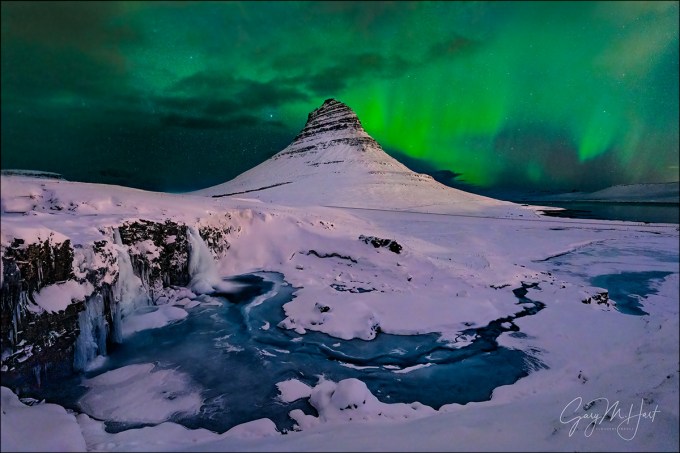
Northern Lights, Kirkjufell, Iceland
Sony a7RIV
Sony 12-24 GM
10 seconds
F/2.8
ISO 3200
I woke in my hotel room this morning to find a 6-inch snow drift (I measured) on the floor beneath my window, and still more snow frosting the curtains and wall. An expanding glacial lake stretched almost to my bed. Honestly, the risk of turning my room into an ice cave is never a consideration when opening the window at bedtime back home—but this is not home, not even close.
So why would someone choose to leave scenic, mild California for frigid Iceland in early February? Believe it or not, there are many reasons, including snowy volcanic peaks, a mind-boggling assortment of waterfalls, shimmering ice caves, all-day low-angle light (the sun in early February never ascends higher than 10 degrees), and hour-long sunrises and sunsets. (I could go on.)
But the number one motivator, the thing that most inspired Don Smith and me to consider an Iceland photo workshop in the middle of winter, and that drove a dozen people to sign up for it, is the potential to witness nature’s mesmerizing celestial dance, the northern lights.
Let’s review
Our planet is continuously bombarded by solar energy. When this perpetual solar wind encounters Earth’s atmosphere, a narrow range of wavelengths (infrared and visible) passes through to warm us and light our way. But other energy wavelengths in the solar wind interact with the molecules they encounter, stripping electrons and creating an atmospheric charge imbalance.
Instead of penetrating our atmosphere to create havoc on Earth’s surface, most of these ions (charged particles) are intercepted by Earth’s magnetosphere, our protective magnetic shield. Under constant bombardment from the sun, the magnetosphere forms a teardrop-shaped shield around Earth, with the battered side that faces the sun compressed, and the shielded side behind Earth stretching much farther into space.
As Earth rotates, the daylight side at any given moment faces the thinner, compressed region of the magnetosphere, while Earth’s night side looks out toward the extended region of the magnetosphere. Particles ionized by the sun are pushed by the solar wind from the daylight side of the magnetosphere to the upper regions of the polar latitudes on Earth’s leeward (night) side.
The result of these atmospheric machinations is an accumulation of ionized molecules dancing high in the night sky, creating an atmospheric oval of geomagnetic activity that increases with the intensity of the solar wind. The greater the solar activity, the greater the oval’s size and the intensity and range of the aurora display.
The aurora’s color depends on the molecules involved, as well as their altitude. The most plentiful and frequently activated molecules vibrate in the green wavelengths, but reds and blues are possible as well, depending on the intensity and altitude of the activity.
To view the northern lights, you need all of the above: the right location, activity in the magnetosphere, and clear skies. As with terrestrial weather, there’s no such thing as an aurora “sure thing”—the best we can do is put ourselves in position to be as close to the auroral oval on nights with the greatest chance for activity. Planning a winter trip to the high latitudes (the higher the better), like Iceland, is a good start—then just pray for clear skies.
Essential to aurora chasing is access to and comprehension of the Kp- (or K-) index. The Kp-index is a 0-9 scale of atmospheric electromagnetic activity, with 0 being little or no activity (get some sleep), and 9 being the most extreme activity (don’t forget the sunglasses). Many governments and scientific organizations issue regular Kp forecasts that seem about as reliable as a weather forecast—pretty good, but far from perfect. There are many websites and smartphone apps that will provide you with up-to-date Kp forecasts for your current location—some will even issue alerts.
Meanwhile, back in Iceland
This is my third trip to Iceland in winter, all with my friend and fellow pro photographer Don Smith: in 2019 to scout for our planned workshop, then in 2020 and 2022 for our workshops. On all three trips we’ve been guided, chauffeured, and entertained by our Icelandic guide, (the unforgettable) Óli Haukur.
On our previous two winter Iceland visits, it seemed the aurora was toying with us, tantalizing us each evening with clear skies (yay!) and just enough aurora potential to drive us out to wait in the cold dark night (meh), before ultimately disappointing (boo!). But on both trips, after a week of torture, the aurora finally came through with a dazzling display on the trip’s penultimate night (phew).
This year, the aurora gods played a different game. On our first night we were based near Kirkjufell (English translation: Church Mountain), arguably Iceland’s most iconic landmark—not to mention the north-facing vantage point that makes Kirkjufell a perfect foreground for photographing the northern lights. But, in a stunning plot twist, instead of the clear skies and KP-1 or 2 we’d been accustomed to, this year’s opening night’s aurora forecast was KP-6—the highest KP rating I’d had for any of my Iceland visits (even the big display nights). However…
Remember the aurora big 3: location, activity, and sky? We had location and activity, but even two out of three isn’t enough. So my ecstasy was quenched the instant I checked the Kirkjufell weather forecast: cloudy, with a chance of snow. But, because photographers will endure all kinds of abuse when a good shot is even remotely possible, our group bundled up and went out anyway. One small benefit: Though we certainly weren’t the only ones out there, the weather forecast and overall COVID-reduced tourist numbers made Kirkjufell’s crowd much more manageable than it would have been.
But crowds aren’t the only limiting factor at Kirkjufell. Night photographers there also need to deal with light leaks from the nearby village of Grundarfjörður (just as easy to pronounce at it is to spell), a couple of lights on the mountain, random headlights from the parking area, and a highway that runs along the base of the mountain and right through any composition that includes it. (Fortunately there weren’t a lot of cars, because each one lights the mountain for at least two minutes before its arrival.)
When we arrived at the Kirkjufell parking lot, there was no visible sign of the northern lights, but there were a few stars visible above the mountain, giving me a slight surge of hope. A couple of us tried test frames and our cameras picked up a slight green glow, nothing to write home about, but enough to justify making the short hike out to the prime viewing area. Though there was space for everyone in our group to set up with a good composition, it was crowded enough to make it difficult to move around a lot.
For the first hour or so we stood around waiting for the aurora to improve, clicking occasional frames to check its status. Most of this time the aurora was a benign glow, just bright enough to make out with the naked eye as a faint, colorless glow on the horizon. Our cameras, on the other hand, with their ability to accumulate light and brighten the darkness, easily pulled out some color. Nothing spectacular, but at least everyone was getting nice, albeit unspectacular, images.
Eventually a few in our group reached their chill threshold and began packing up. When I saw more clouds moving in from the west, I texted our guide that we were heading back to the bus (to call this beast a mere “bus” doesn’t really do it justice)—then joked that if that doesn’t start the light show, nothing will. (All photographers know that the best stuff doesn’t happen until at least one person packs up his or her gear.)
And sure enough, just as I collapsed my tripod and started zipping my bag, I took one last northward glance and saw actual, naked eye green. By the time I had my tripod re-extended and camera mounted, the color was really starting to kick in and stretch skyward. Soon we saw curtains of green waving in the solar wind, first a little right of the mountain, and soon directly behind it.
I can’t say that the composition I got here is much different from the composition everyone else got, but there were a few framing decisions that I was very particular about. I used my Sony a7RIV with my Sony 12-24 f/2.8 GM lens wide open, starting at ISO 1600 and 10 seconds before quickly bumping to ISO 3200.
As you may know, my goal is to photograph the world in a way that allows viewers to imagine it untouched by humans. So I took care to avoid including the footbridge that mars the left side of the scene. (I did have to clone out a small piece of bridge that snuck in under the cover of darkness to photo-bomb me.) Down the hill on the right side of the scene I had to contend with a pair of photographers (and their lights), plus the lights from Grundarfjörður, but I hid them behind the right side of the frame.
The top of the frame I set at the base of the thick clouds covering most of the sky. On the bottom, I took care to include enough of the riverbank to create a continuous white frame.
Given the clouds, it’s impossible to know the extent of the aurora’s spread, but I don’t think while we were there it ever reached the KP-6 we’d been promised. Nevertheless, it was a real treat for all of us—especially those who had never seen the northern lights. We finally left when the clouds closed in, but on the trip back we drove into clearer skies and actually stopped to photograph a little more along the side of the road. We didn’t get back to our hotel until midnight, but no one minded.
The last thing I want to mention here is my processing decisions. While everyone there that night got more or less the same version of this scene, I’ve seen several different processing approaches (from others in the group), resulting in noticeable differences in the finished products.
Because night images usually take in a lot more light than the human eye sees, there’s not really any way to say how it “really looked.” But I’m happy to share my own processing choices and why I made them, and try not to argue with anyone else’s night photography choices (within reason).
The unprocessed raw preview of this image looked very similar to this finished version, but there were a few important adjustments I wanted to add. I started in Lightroom by cooling the temperature of the entire scene to shift the yellow-ish daylight cast my camera’s auto white balance imposed, to a blue-ish, more night-like cast.
And very important to me during processing was minimizing signs of human influence on this naturally beautiful scene. In addition to cropping out that tiny section of bridge and a few rogue house lights, I cooled and subdued the town’s warm, artificial glow brightening Kirkjufell’s east (right) slope (many people liked this glow). And to bring out Kirkjufellsfoss (the waterfall), the turquoise water, and snow-cover shoreline, I brightened the foreground a little.
Epilogue
Several days have elapsed since I started this post. Since then we’ve had a couple more northern lights shoots—nothing spectacular, but very nice. We’ve also had lots of fun and a few adventures that I’ll share in future posts. Oh, and the snow drift in my hotel room was dealt with swiftly by the hotel staff—with no harm, financial or otherwise, on the perpetrator. (The hotel staff was very nice about the stupid American’s open window in a blizzard, and I got the distinct impression that this wasn’t their guest-room-snow-removal rodeo. And in my defense, it wasn’t snowing when I went to bed.)
My (Growing) Northern Lights Collection
Click an image for a closer look, and to view a slide show.


Reach for the Sky
Posted on January 31, 2022

Sierra Sunrise, Lone Pine Peak and Mt. Whitney, Alabama Hills
Sony a7RIV
Sony 24-105 G
2 seconds
F/16
ISO 100
We tend to photograph the things we love most, but I don’t think that necessarily happens consciously. For example, I never appreciated the role the sky plays in my photography until someone pointed it out a few years ago. Browsing my galleries to verify, I was amazed at the percentage of my images that include at least one of the following: the sun, the moon, stars, a rainbow, lightning, or dramatic clouds. (And more recently, the northern lights.)
While I never set out to be a “skyscape” photographer, given my background, I guess it makes sense. (Or more succinctly, “Duh.”) As an astronomy enthusiast since I was a child, and an armchair meteorologist since my late teens, I spent most of my formative years with my eyes and mind on the sky. I continued these childhood interests into adulthood, studying both astronomy and meteorology in college (I even majored in astronomy for a few semesters), and to this day can’t pass up a book or article on either topic. Even without a camera, I can spend hours watching clouds form and dissipate, or gazing at the stars.
A few tips for good sky photography
- The amount of sky and landscape a frame gets is pretty much a function of the visual appeal of each: the better the sky relative to the landscape, the more frame real-estate it gets. Both nice? No problem splitting the frame in the middle (despite what the “expert” at your camera club says).
- Clear sky? Use the absolute minimum sky possible—sometimes that’s a thin strip at the top of the frame; other times it’s no sky at all.
- Great sky? Give it most of your frame, with only something like a tree, rock, or water feature as a visual anchor.
- Watch the clouds. Clouds can add as much to a scene as the landscape feature you’re there to photograph. While the rules for compositional elements in the sky are no different than they are for elements in the landscape, I’m afraid clouds are frequently overlooked, leading to things like a towering thunderhead with its top cropped, or a rogue patch of blue intruding into a uniformly cloudy ceiling. Sometimes these things can’t be avoided, but you should always make the edges of your frame a conscious choice, even in the sky.
- As great as clouds are, I especially enjoy including special elements that can be subjects in themselves (like a rainbow, lightning, the Milky Way, the moon, and so on). Rather than showing up and benignly accepting whatever the scene delivers, I aggressively pursue sky subjects by planning my visits to coincide with the best chance for something interesting in the sky. I start with a landscape scene I like, then figure out what sky feature or features I might be able to put with it. How can I get this scene with the Milky Way? What about a full or crescent moon? A rainbow? Lightning? ( (And before you ask, I refuse to add a sky in post—like everything else I photograph, all of my images that include the sky happen with one click.)
- Weather phenomena require a little knowledge and planning, and a lot of luck. For example, whenever I shoot in rain, or just when there’s the potential for rain, I figure out where a rainbow would appear if the sun were to break through (your shadow will point to the center of the rainbow). And don’t think you can just go out and photograph lightning because you’re in an electrical storm and have a camera. Not only is capturing lightning very difficult without knowledge, experience, and the right equipment, it’s just plain dangerous. Read my tips for photographing lightning.
- Night photography is about the stars, so make sure you give enough of your frame to the sky to highlight the stars. My rule of thumb is 2/3 sky, but sometimes I’ll do even more. And exceptions are okay (always!): if the foreground is more spectacular than the starry sky, go ahead and split the frame evenly between the sky and landscape, or give it more landscape than sky.
- While photographing the Milky Way’s isn’t as dangerous as photographing lightning (unless you walk off a cliff in the dark), like lightning photography, including the Milky Way (the right way) also requires a lot of knowledge and experience, as well as the right equipment. Read my tips on photographing the Milky Way.
- The moon is predictable, requiring only clear skies, a sturdy tripod, and maybe some warm clothes. Before any photo trip, I make a point of knowing the moon’s phase and rise/set times and position. Read my tips for photographing the moon.
About this image
I captured this scene on the final morning of this year’s Death Valley photo workshop. After three glorious days in Death Valley, we made the 90 minute drive to Lone Pine for a chance to photograph the Alabama Hills at sunset and sunrise. While Death Valley and the Alabama Hills are spectacular landscapes, both are plagued by chronic blue skies, so (speaking of planning for the sky) this workshop is always scheduled around the full moon.
We’d had fantastic clouds throughout our Death Valley stay, but the forecast for Lone Pine was clear skies. No problem, I thought, we’ll have the moon. And we did indeed get the moon, but we also got a bonus layer of thin cirrus clouds that turned a brilliant pink shortly before the sun touched the tallest peaks.
I’d been focused on the moon’s slow descent toward Mt. Williamson (the next peak to the north and just out of the frame on the right) when the color started to kick in. Instead of sticking with Plan A (the moon), I quickly reevaluated the scene and decided that the color in the clouds was best above Lone Pine Peak (on the left) and Mt. Whitney. Vivid color like this doesn’t last long, so I just took the foreground before me, grateful to be in the Alabama Hills, where there’s no such thing as a bad foreground.
With so much going on visually, this is one of those scenes where it’s easy to unconsciously cut off clouds. Ideally every cloud would be a complete entity, surrounded on all sides by blue sky or other clouds. Of course achieving that is easier said than done, but my goal is to make all of my border choices conscious rather than having to later accept what I got because my attention was elsewhere.
Because in my mind the most important cloud feature was the large, pink blob above and right of Lone Pine Peak, I was very careful to include all of it. And you need to take my word that the clouds that run right up to an edge (or just barely poke in from an edge) were in fact seen and consciously handled. But it was impossible to go wide enough on the right to include all of that cloud; and going wide enough to avoid cutting off the other clouds on the edges would have introduced other, even worse, compositional problems.
My point isn’t to justify my choices, it’s merely to point out that they were conscious. (In fact, you may have evaluated this scene differently and made much better choices.) But this underscores one of the things I love most about photography: the blend of conscious and unconscious. I started this post writing about my love of the sky and how that love unconsciously became a major factor in my personal style. Now I finish by emphasizing my drive to be hyper-conscious. And you know what? Each is equally true.
More Clouds
Click an image for a closer look, and to view a slide show.


Step Aside and Let Nature Do Its Thing
Posted on January 24, 2022

Nature’s Curves, Mesquite Flat Dunes, Death Valley
Sony a7RIV
Sony 24-105 G
1 second
F/11
ISO 125
Once upon a time, my most frequently asked question was some version of, “Did you put that leaf (or whatever) there?” (No.) When digital photography and Photoshop processing started to gather momentum, those questions expanded to whether or not I added the moon or the Milky Way to an image. (Again, no.) And now, with effortless sky replacement, any beautiful sunset seems to generate dubious looks. Sigh.
As discouraging as this cynicism is, given the number of photographers who seem willing to manipulate the natural world, viewers of today’s images have every right to be skeptical of their origin. But nature photography’s prime objective should to reveal natural beauty—and when we succeed, viewers’ first reaction shouldn’t be skepticism.
Order vs. chaos
The main reason I’ve always resisted manipulating scenes and manufacturing images is that I try to approach my photography with the mindset that Nature is inherently ordered and unimprovable. Sometimes natural beauty slaps us in the face; other times we have to look a little harder. But I’m afraid in a world where humans go to great lengths to suppress fires, divert rivers, raze forests, and in countless other ways try to control, contain, and otherwise manage the natural world, we’ve fostered the arrogant mindset that we can do it better.
When Nature gets “out of control,” we label it chaos and try to “fix” it. But what humans perceive as “chaos” is actually just a manifestation of the universe’s inexorable push toward natural order. I mean, think about it: Imagine that all humans leave Earth for an extended tour of the Milky Way. While we’re gone, no lawns are mowed, no buildings maintained, no fires extinguished, no floods controlled, no Starbucks built. Let’s say we return in 100 Earth years*. While the state of things upon our return would no doubt be perceived as chaotic, the reality is that our planet would in fact be closer to its natural state. And the longer we’re away, the more human-imposed “order” would be replaced by natural order—and I dare say, more beautiful.
I’m thinking about all this because there’s nothing like a visit to pristine sand dunes to remind a person that Nature doesn’t need our help when it comes to creating beauty. The exquisite choreography of dipping and soaring arcs, lines, and parallel grooves that form naturally when sand, wind, and gravity combine and are left alone is both beautiful and humbling.
I got my most recent dose of sand dune splendor last week, when I guided my Death Valley workshop group out onto the Mesquite Flat Dunes. Given their proximity to the highway and the tiny enclave of Stovepipe Wells, these dunes are almost aways swarmed by people and stained by enduring footprints. To avoid both, I take my groups on a one-mile cross-country (no trail) hike out to a spot much more likely to reward us with virgin sand.
When last week’s visit delivered as hoped, we made the trek twice—once for sunset, and again the next morning for sunrise. The sunset shoot featured a gorgeous red sky in all directions that had everyone spinning in circles to avoid missing something. But I actually enjoyed our sunrise shoot even more, when an 80-percent cloud cover created a natural softbox that let the dunes do their elegant thing.
It was still completely dark when we parked and started our morning hike—dark enough that I just kind of pointed my headlamp in the general direction I wanted to go, confident that it didn’t really matter exactly where in the dunes we’d end up. Because footprints in sand are forever (in the context of a 90 minute photoshoot), part of my job is finding a spot where we can all set up in relatively close proximity, then to play traffic cop to ensure no one strays into sand that might be photo-worthy. After scaling and descending several dunes, I finally paused atop an elevated sand platform. Surveying our surroundings in the first gray light of dawn, my eye was instantly drawn to a graceful serpentine ridge arcing across the face of the dune just opposite us. With enough space for the entire group, a view that spanned nearly 270 degrees, and a gorgeous foreground element, I decided that we’d found our spot.
One of the things I love about photographing sand dunes is that there are compositions for every lens in my bag, from my Sony 12-24 f/2.8 GM to the Sony 100-400 GM (and the Sony 200-600 if I hadn’t left it in the car). I played with several lenses before zeroing in on the arc that had originally grabbed my eye. For this feature I used my Sony 24-105 GM on my Sony a7RIV, starting fairly wide to include more dunes and some sky, then gradually zooming tighter to isolate the arc.
While I do all of my photography on a tripod, for dunes especially I like to take my camera off the tripod, put my eye to the viewfinder, and slowly scan the scene until something stops me. I can’t even tell you exactly why I stopped with this composition, except to say that it just felt right.
As these dunes illustrate (and I hope my image conveys), Nature creates the most astonishing beauty. I have no illusions I can improve on Nature’s offerings, but as long as I keep looking, I’m pretty confident that there’s enough naturally occurring beauty to keep me occupied for the rest of my life.
* Since this is my fantasy, I’ve chartered a spaceship that accommodates all of humankind and travels at 90 percent of the speed of light. While Earth has indeed aged 100 years during our holiday, we travelers return only a year older. (Dubious? Don’t take my word for it, ask Albert Einstein.)
Sand Dune Splendor
Click an image for a closer look, and to view a slide show.


Doing the Scene Justice
Posted on January 19, 2022

Falling Snow, El Capitan, Yosemite
Sony a7RIV
Sony 12-24 f/2.8 GM
1/250 second
F/9
ISO 800
Woe is me
I just returned from nearly a week in Death Valley, where I had virtually no connectivity (wifi at my hotel made the Grand Canyon North Rim feel like a Silicon Valley Starbucks). Workshop or not, I try to post something on social media every day, and a new blog article each Sunday, but with no wifi and spotty 3G cellular that struggled just to send or load a text-only e-mail, I felt virtually cut off from civilization (there was a tsunami?!). I know in the grand scheme of things these are small problems, and that I probably missed the world more than it missed me, but still….
So anyway…
Last week I wrote about creating unique perspectives of familiar scenes, and offered some ideas for achieving this. As admirable as it is to make unique images, sometimes Mother Nature delivers something so magnificent that best thing to do is just get out of the way and let the scene stand on its own.
For example
Though last month’s Yosemite Winter Moon workshop wasn’t scheduled to start until the afternoon I took this picture, I drove to Yosemite the evening before the workshop to get a few hours of morning one-on-one time with the multiple inches of snow forecast to fall overnight. And as hoped, I arrived that morning to find every square inch of exposed surface glazed white—and the snow was still falling.
The paradox of photographing Yosemite during a storm is that all of the features you came to photograph are most likely obliterated by clouds. Sometimes visibility is so poor, it’s difficult to imagine the obscured features ever existed—and quite easy to imagine the comfort and warmth of your hotel room. The key Yosemite storm success is to be there when the storm clears—but job-one for catching the clearing part of a Yosemite clearing storm, is first enduring the storm part.
So, rather than succumb to the temptation of comfort and warmth, I armored up and went to work in near zero visibility. After an hour or so of driving around, interrupted by a stop or two (or three) to photograph some of the more intimate nearby beauty, I pulled up to El Capitan Bridge and noticed the clouds starting to lift (fingers crossed). In the still-falling snow, I quickly set up my tripod, grabbed my Sony a7RIV, attached my Sony 12-24 f/2.8 GM lens, and hoped.
I digress
Without getting too preachy, let me just say that if you ever want to piss off a photographer, look at one of their images and say, “Ooooh, you must have a great camera.” While that may very well be true, the photographer’s unavoidable inference will be that the questioner means the beautiful image is a product of the photographer’s equipment, not his or her photographic vision and skill.
But…. As much as I’d like to say my equipment is irrelevant and I could achieve the same results with a pinhole camera, I’ll admit that I have images I couldn’t have created without the right camera or lens. And this is one of them.
Back on point
I’ve written before about Sony’s 12-24 lenses, and how they feel specifically designed for Yosemite’s ultra-close views of massive monoliths. El Capitan Bridge is one of those views, so close that I’ve always felt that even a 16-35 wasn’t wide enough to do the scene justice. So when Sony released its 12-24 f/4 G lens, this was one of my very first stops. My excitement was validated when I discovered that at 12mm I could indeed get all of El Capitan, plus its entire reflection, in a single vertical frame. I became so enamored of my new top-to-bottom-reflection power that pretty much every subsequent 12-24 El Capitan composition here (both with the original Sony 12-24 f/4 G, and the newer Sony 12-24 f/2.8 GM) had been vertical. My goal this morning was to change that.
-

- Winter Storm, El Capitan in the Snow, Yosemite
-

- Autumn and Winter, El Capitan Reflection, Yosemite
-

- Storm Clouds, El Capitan, Yosemite
While the clouds didn’t completely part for several more hours, during this stop at El Capitan Bridge they did lift just enough to reveal all of El Capitan for about 15 minutes. During that time, their swirling vestiges careened across the granite face so rapidly that the scene seemed to change by the second.
Photographically, there wasn’t really a lot I could do for this scene besides not mess it up. Mounting my camera horizontally, I widened my lens all the way out to 12mm, put the top of the frame slightly above El Capitan (to maximize the amount of reflection below it—more sky would have meant less reflection), and used the snow-covered trees on both sides to frame the scene.
Depth of field wasn’t a factor, and very little contrast made metering easy. Wanting a fast enough shutter speed to freeze the falling snowflakes, I dialed to ISO 800 and f/9, which I quickly determined centered my (pre-capture) histogram at a more than adequate 1/250 second. Then I clicked a dozen or so images to ensure a wide variety of cloud formations and falling snowflake patterns, pausing occasionally to appreciate the moment.
This scene felt like a gift that I really didn’t want to overthink. I’m just grateful for the opportunity to photograph it (and the equipment that allowed me to do it justice).
An El Capitan Gallery
Click an image for a closer look, and to view a slide show.


