A new way of shooting
Posted on May 6, 2015

Forest Spring, Valley View, Yosemite
Sony a7S
Sony/Zeiss 16-35
1/125 second
F/8
ISO 6400
Regular readers of my blog know of my recent switch from Canon DSLR to Sony mirrorless. I started the transition with the Sony a7R, fully expecting to prefer it over my Canon 5D Mark III enough to justify the switch, but not so much that I’d completely jettison my Canon gear. In addition to 60 percent more resolution than my 5D III, the a7R gave me dynamic range that I never dreamed possible, and significantly better high ISO performance. So, despite a less than trivial adjustment to mirrorless shooting, it didn’t take long to realize that I wasn’t going to miss Canon at all—I haven’t picked up a Canon camera since October.
When it became clear that I was with Sony for the long haul, and because I can’t afford to travel without a backup camera, I started thinking about a backup body. My usual backup body strategy is to complement my full-frame primary body with a crop sensor backup body in case I ever want extra reach with any of my lenses. The Sony a6000 seemed the perfect choice—extremely compact (without a lens, the a6000 fits in the hip pocket of my Levis), more than enough resolution (24 megapixels), compatible with all of my Sony lenses, and inexpensive (easily found for under $600).
Usually my backup bodies gather dust and only come out in an emergency, or perhaps for the occasional long-distance moonrise (when my foreground subject is far enough away that I want as much telephoto reach as possible). What I wasn’t expecting from the a6000 was primary-body image quality in an extremely compact package—not only does the a6000 have (slightly) more resolution than my 5DIII, its high ISO performance and dynamic range is better than the 5DIII (though not as good as the full-frame Sonys). Given all this, I don’t hesitate using the a6000 when I think I might want a little more reach, often juggling it with the a7R for extra flexibility.
Routinely carrying two bodies is certainly not groundbreaking, but it’s new for me. But I wasn’t finished with the a7R and a6000. Given my passion for night photography, it wasn’t long before I added the 12 megapixel Sony a7S to my bag. It took just a couple of night shoots to confirm the raves I’d heard about the a7S’s “magic” ability to see in the dark, but as with the two previous Sony bodies, the a7S proved its value in unexpected ways. More than just a night camera, the high ISO capability of the a7S allows me to freeze daylight motion at twilight and in full shade.
I knew I’d appreciate the size and weight savings of a significantly smaller body and (slightly) smaller lenses, but I thought the primary benefit would simply be a smaller bag. And while I do appreciate the option to travel and hike with a more compact, lighter bag without sacrificing the 20-200mm focal range I consider essential, my primary bag has actually gotten a little heavier since I switched to mirrorless. But with that slight increase in weight comes a significant increase in shooting power and flexibility.
For my entire photography life I switched lenses as my needs dictated (like pretty much every other SLR photographer). Now, with bodies this small, my bag easily holds three, and rather than switching lenses on one primary body, I first decide which body to use based on the composition (wide or long) and conditions (light and motion).
Here’s what I carried in my F-Stop Tilopa during my Canon days:
- 5D Mark III
- Canon 16-35 f2.8L
- Canon 24-105 f4L
- Canon 24-70 f4L
- Zeiss 28 f2
And here’s what my F-Stop Tilopa carries now:
- Sony a7R
- Sony a7S
- Sony a6000
- Sony/Zeiss 16-35 f4
- Sony/Zeiss 24-70 f4
- Sony/Zeiss 70-200 f4
- Zeiss 28 f2 (Canon mount)
- Tamron 150-600 f5-f6.3 (Canon mount)
- Metabones Mark IV Canon to Sony adapter
My primary body is the a7R, but when I want extra reach, I don’t hesitate going to the a6000. Sometimes I carry my a7R with a wide lens and my a6000 with a telephoto. And when I need to freeze motion in low light, the a7S is my body of choice. The addition of the a7S to my bag has made the biggest difference, allowing me to shoot in conditions I’d never have considered before.
Moonrise above a ridge five miles away? No problem—out comes the a6000 and Tamron 150-600 for 900mm of telephoto reach. Breeze-blown dogwood in a shady forest? No problem—here’s my a7S at 6400 ISO.

Ridgetop Moon, Yosemite
Sony a6000
Tamron 150-600 (Canon-mount with Metabones IV adapter)
600mm (900mm full frame equivalent)
1/100 second
F/11
ISO 400
For example
In Yosemite last week I broke out the a6000 and Tamron 150-600 (225-900 full-frame millimeters) for the dogwood, and for a rising full moon. The a7S was my moonlight camera, and just what the doctor ordered when I wanted to photograph wind swaying dogwood in full shade.
On our final morning I guided my workshop group to Valley View to photograph the first light on El Capitan. Beautiful as that scene is, it wasn’t long before a few drifted across the road to an evergreen forest sprinkled with blooming dogwood. A breeze, further augmented by speeding vehicles, limited everyone else to distant views and brightly backlit flowers. I, on the other hand, simply switched to the a7S and bumped my ISO to 6400 to enable a fast enough shutter speed for extreme close photography.
With my 16-35 lens at 16mm, I put the front element about three inches from a bloom in full shade, dialing to f8 to ensure enough depth of field to keep my flower sharp throughout. Even in the dense shade, I was able to achieve a shutter speed fast enough to freeze the breeze. Noise at 6400 ISO? What do you think?
Six months of Sony captures
Click an image for a closer look, and a slide show. Refresh the screen to reorder the display.


Playing the Hand You’re Dealt
Posted on April 27, 2015

Spring Sunrise, Memaloose Overlook, Columbia River Gorge, Oregon
Sony a7R
Sony/Zeiss 24-70
1/13 second
F/11
ISO 400
In family Hearts games when I was a kid, I loved to “shoot the moon” (tremendous reward for success, extreme cost for failure). But simply wanting to shoot the moon wasn’t enough to make it happen, and I didn’t really start winning until I learned to separate my desires from the reality of the moment—I know now to evaluate my cards when they’re dealt, set a strategy, then adjust my strategy as the game unfolds. It’s that way for most card games, and it’s that way with photography.
So much of successful nature photography is about flexibility, an ability to anticipate conditions, establish a plan, then adjust that plan when things don’t play out as expected. That’s why, given nature’s fickle tendencies, I’m never comfortable photographing any location without backup options. I was reminded of this during my recent 10-day, two photo workshop trip to the Columbia River Gorge with Don Smith, where rapidly changing Pacific Northwest weather makes flexibility the name of the game.
The Columbia River Gorge offers a full deck of photo opportunities that include numerous waterfalls in the gorge’s steep tributary canyons, mirror reflections of Mt. Hood and Mt. Adams in small lakes south and north of the gorge, and spring wildflowers blanketing the eastern gorge’s more exposed slopes. Of course merely showing up at a spot and expecting great captures isn’t sufficient: Waterfalls are dramatic subjects the camera struggles to capture in brilliant, midday sunlight; towering volcanos are the first subjects disappear when it rains; and I can photograph wildflowers all day—as long as there’s no wind.
During our workshops, Don and I had to shuffle our groups’ photo locations and timing around snow, rain, and clear skies, temperatures that reached the 80s and dropped into the 20s, and winds that ranged from calm to 40 MPH. Our plan for clear skies was to head to the volcanos; if we were dealt clouds and rain, we would use the diffuse light (subdued dynamic range) to concentrate on the gorge’s waterfalls. And rain or shine, the wildflowers were ideally positioned for sunrise and sunset if the wind cooperated.
Somehow we managed to pull it all off, our trip culminating with a sunrise jackpot on the final morning of the second workshop. The plan that morning was a vast, exposed, wildflower-smothered hillside on the southwest end of the gorge. I’d been monitoring the weather obsessively throughout the trip, and with the morning’s forecast calling for clear skies and calm wind, Don and I were looking forward showing the group these wildflowers backlit by the rising sun’s warm rays.
Despite our optimism for the morning’s shoot, as the group gathered in the dark, a chilly breeze gave me pause. The breeze stiffened on the drive to our planned location, and rather than cling to our original vision and attempt to photograph dancing wildflowers in low light, I started considering options.
Don and I had done extensive scouting in the area on multiple prior visits, and had arrived two days before these workshops for more scouting and to get a handle on conditions. My mind immediately jumped to a sheltered location just a short distance from our planned spot. This location had wildflowers too, but instead of being all about the wildflowers, we’d have lots scenes with rocks and trees above the Columbia River, allowing the clumps of balsam root, lupine, and paintbrush to serve as accents. This location’s advantages were that its primary subjects (rocks, trees, river) would be less affected by wind, and its wildflowers would be a little more sheltered.
The group ended up with an absolutely wonderful shoot that made Don and I look like geniuses. The morning started with a pink sky that reflected beautifully in the river, and ended with an orange ball of sun floating low above the horizon. There were more than enough wildflowers go around, and wind was much less of a problem than it would have been on a more exposed hillside.
Honestly, there was nothing genius about what Don and I did that morning. It should be standard operating procedure for any photographer to base location and timing plans on the expected conditions, but to be familiar enough with the area to have options if the conditions don’t materialize as expected. Additionally, no photographer should get so locked in to a plan, regardless of its potential, that he or she fails to see that it might not work out. (Because what good are options if you don’t use them?)
No shoot is a guaranteed success—sometimes nature’s cards just don’t fall right. But the more options you have, the more you read and respond to conditions, the more winners you’ll come home with.
Workshop Schedule || Purchase Prints || Instagram
A Spring Gallery
Click any image to scroll through the gallery LARGE


Nature’s surprises
Posted on April 25, 2015

Emergence, Half Dome from Olmsted Point, Yosemite
Canon EOS-1Ds Mark III
159 mm
3.2 seconds
F/16
ISO 400
October, 2010
One of the things I enjoy most about landscape photography is the element of surprise, the anticipation that comes with never quite knowing what’s going to happen when I go out with my camera. I usually start with a plan, and while there are times I get exactly what I hoped for, many times I don’t. But it’s the times I witness something I never imagined possible that excite me the most.
On the final night of my Eastern Sierra workshops I like to take my groups to Olmsted Point in Yosemite. The Olmsted trip is a particular treat because it presents a view of Half Dome’s less photographed east flank, behind a photogenic foreground of trees, boulders, and glaciated granite. (Another highlight of the Olmsted shoot is the opportunity to photograph Yosemite’s Tuolumne Meadows, the best experience of the High Sierra’s raw granite topography possible without a backpack.) But in 2010, after four days of spectacular photography, my workshop group’s Olmsted finale was jeopardized by an early snowstorm that closed Tioga Pass, the only route into Yosemite from our current base in Lee Vining. Disappointment would have been difficult given all we’d seen so far, but I nevertheless had already planned an alternate sunset location when I got word that Tioga had just reopened. I quickly returned to Plan A.
As we ascended Tioga Pass, the storm’s vestiges darkened the sky and sprinkled our windshield and I wondered about another pass closure trapping us on the wrong side of the pass, suddenly six circuitous hours from our hotel. But the ranger at the entrance station assured me we’d be okay, so we continued on to Olmsted Point, stopping on the way to photograph at a couple of my favorite Tuolumne Meadows locations.
Arriving about an hour before sunset, we found Olmsted Point completely enshrouded by clouds that obscured everything beyond 100 yards. Not quite what I’d envisioned, but the group had lots of fun exploring the nearby granite and creating compositions featuring large boulders (glacial “erratics,” deposited by retreating glaciers) and gnarled trees amidst the dense fog. As sunset approached I kept an anxious eye on the sky hoping for a break, wavering between cautiously optimistic and hopelessly resigned. Nevertheless, I reassured the group (and myself) with one of my favorite Yosemite axioms: It’s impossible to predict what Yosemite will be like in five minutes based on what it’s like right now.
Shortly before “official” sunset (when the sun reaches the horizon on a flat, terrain-free Earth), the sky lightened noticeably. Hmmm. Soon the persistent fog still engulfing us started to glow, first amber and then pink and we quickly realized we were actually in the midst of clouds alive with the sunset color we’d all our lives only seen in the distance. This was both eerie and spectacular and everyone scrambled frantically looking for subjects, trying to photograph a moment that defies photography. Within five minutes the color was gone, leaving us all breathlessly grateful to have witnessed it with others who could validate what we’d just experienced.
With night falling fast and the visibility still measured in yards, it would have been easy to pack up and revel in our success over dinner. But when the clouds in the direction of Half Dome showed signs of thinning, we greedily decided to stay put in the hope that Mother Nature had an encore for us. Just a couple of minutes later the clouds on the western horizon lifted, revealing Half Dome’s granite face against sunset’s orange afterglow.
Everything after that was a blur of churning clouds, exposed granite, and deepening color as Yosemite’s most distinctive monolith emerged from its shroud. We were all positioned in close enough proximity that I could hear everyone’s amazed gasps punctuated by rapid shutter clicks. Confident that everyone else was content to be left alone, I went to work, frantically zooming wider and tighter, changing orientation, and swapping lenses, all in a futile attempt to capture every single compositional possibility before the darkness was complete.
The entire scene, from Cloud’s Rest on the left to Mt. Watkins on the right, swirled with clouds, with Half Dome at the vortex. In this frame I opted for a tight composition to emphasize the churn of clouds surrounding Half Dome. I exposed to hold the color in the sky and timed the exposure to silhouette the trees against an ephemeral finger of clouds rising from Tenaya Canyon. (I’d love to tell you my f-stop was a conscious choice, but if I hadn’t been rushed I’d have been at f11 rather than the f16 left over from a couple minutes earlier when I was trying to include a foreground.)
In addition to some amazing images, my group finished that evening with a first-hand understanding of how long after sunset the shooting can be good. And a good lesson on the rewards of patience. The great stuff doesn’t always happen, and I’ve had many a shoot where I waited in vain long after everyone else had packed up and retreat to comfort and warmth, but whenever I’m tempted to leave just because it would be more comfortable than staying, I remember this night and hang in just a little longer.
Our final clicks that night were thirty second exposures that included stars, late enough that flashlights were necessary to make our way back to the cars. Dinner was really good.
A gallery of unexpected magic
Click an image for a closer look, and a slide show. Refresh the screen to reorder the display.


A sunny day solution
Posted on April 19, 2015

Wildflowers and Mt. Hood, Columbia Hills State Park, Washington
Sony a7R
Sony/Zeiss 16-35
1/50 second
F/20
ISO 400
For wildflower photography I prefer the diffuse light and soft shadows of a cloudy day, but when Mother Nature delivers clear skies and harsh sunlight, I look for backlight opportunities. Backlit flowers and leaves glow like they’ve been plugged in, and their brilliance allows faster shutter speeds that will compensate for a small aperture and quell a flower-waving breeze.
A frustrating downside of backlight is that the sun is more or less in the direction of your backlit subject, risking lens flare (scattered light that manifests as a contrast-robbing haze or distracting artifacts). If the sun isn’t in your frame, shading your lens will eliminate the lens flare. A lens hood helps, but I find lens hoods more trouble than they’re worth. Instead, when I encounter lens flare, I shade my lenses with my hand, a hat, or an umbrella (no camera bag should be without one). Or better yet, I do my best to position my lens in the shadow of a nearby tree.
But when the sun is in the frame, no amount of shading will work. In these situations I make the best of a bad thing by looking for sunstar opportunities. On last week’s visit to Columbia Hills State Park in southern Washington, I found a hillside awash with wildflowers—mostly yellow balsam root and violet lupine—in brilliant sunlight.
While waiting for the shade to arrive, I decided to take advantage of the backlight and look for a sunstar opportunity. The lupine were in better shape than most of the balsam root, and soon my eyes landed on a colorful group I could balance with Mt. Hood and the setting sun. I stopped down to f20, pulled out my Singh-Ray 2-stop graduated neutral density filter, and waited for the sun to drop to the horizon.
To salvage as much of my highlights as possible, I gave the scene as little exposure as I thought I could get away with. The foreground was pretty dark on my LCD, but the histogram looked okay (not perfect, but manageable)—in Lightroom I was able to pull up the shadows and subdue the highlights enough to work with. Photoshop’s Content Aware Fill tool helped me clean up the worst lens flare, but I still ended up with a little more than I like. (Oh well.)
Here’s my sunstar recipe (excerpted from a previous post):
- Start with a brilliant, fine point of light: The sun is the most logical candidate, but you can do it with the moon, stars, and pretty much any bright artificial light (lighthouse, headlights, and so on). The finer the light source, the more precise the star effect will be, and the less lens flare and blown highlights you’ll have. If it’s the sun you’re using, virtually all of it needs to be hidden to get the delicate, symmetrical distribution of beams that generally work best. In this image the horizon hides most of the sun, but you can use a cloud, tree, rock, or whatever.
- The smaller your aperture, the finer your sunstar will appear: I generally use f16 or smaller (larger f-number).
- Do something to control the highlights: When the sun is entering your frame, you’re invariably dealing with a sky that’s much brighter than your foreground and will need to take steps to avoid the foreground of murky shadows. If you have a foreground shape or shapes against the sky, you could turn the foreground into a silhouette. But when I want to capture foreground detail, I use graduated neutral density filters to hold back the brilliant sky. My 3-stop reverse is my go-to GND in these situations; in particularly difficult light I’ll stack it with a 2-stop hard GND. Whenever I use a GND, I find Lightroom or Photoshop dodging/burning is a great way to disguise the telltale GND transition. HDR blending of multiple images is another way to mitigate extreme sky/foreground contrast (but I don’t do HDR, so you’ll need to Google this). And Photoshop’s Content Aware Tool will help clean up lens flare.
- Different lenses will yield different results: Experiment with your lenses to see which one gives the most pleasing sunstar effect.
- Practice: You can practice sunstars any time the sun’s out. Just go outside with your camera, dial in a small aperture, and hide the sun behind whatever object is convenient (a tree, your house, etc.).
A sunstar gallery
Click an image for a closer look, and a slide show. Refresh the screen to reorder the display.


")


Exploring the familiar
Posted on April 17, 2015

Snow on Old Tree, Half Dome and Bridalveil Fall, Yosemite
Sony a7R
Sony/Zeiss 24-70
1/30 second
F/16
ISO 100
I spend a lot of time guiding and teaching photographers who have traveled a great distance to capture a particular shot: Horsetail Fall in February, the spring moonbow on Yosemite Fall, the Milky Way above the Kilauea Caldera, to name a few. They’ve seen an image on my website, or someone else’s, and have decided want to add their version to their portfolio. Many have saved money and vacation time for years for the opportunity; others have been chasing the shot without success more times than they can count. Either way, it’s a vicarious rush watching it happen for them.
The captures that make me happiest are the one’s I’ve never seen before. But given that my “job” is guiding people to the scenes I (and others) have photographed many times, I don’t get a lot of opportunity to explore new territory. Instead, I challenge myself to find something new in these heavily photographed areas. And “new” to me is more than just capturing an extraordinary sunset or glorious moonrise, it’s looking beyond the obvious to find a new perspective or fresh interpretation.
Finding new scenes can happen by accident, but there’s no substitute for conscious, calculated exploration. For example, a typical day in Yosemite has lots of blue sky and flat light hours that aren’t conducive to the type of photography I enjoy. Rather than waste that lousy light time simply waiting for the good stuff, I spend it collecting new scenes for later use. In Yosemite that usually means deciding on a subject (Half Dome, El Capitan, Yosemite Falls, Bridalveil Fall, and so on) and poking around looking for foregrounds to put with it.
Despite its apparent permanence, Yosemite is a dynamic environment. Rocks cleave and fall, trees grow and die, water ebbs and flows. Whether it’s walking the bank of the Merced River searching for a reflection of Half Dome, or scrambling granite slopes for a fresh view of Yosemite Valley, there are new perspectives and subjects to be mined everywhere.
When I find something I like, I try to figure out the conditions that would make the best photography. Sometimes this is simply a matter of plotting a moonrise or moonset; other times the best photography requires very specific weather or light. Whatever the condition might be, I do my best to get myself there to photograph it.
Though I photographed this scene just a couple of weeks ago, the view I found on one of these reconnaissance missions several years ago. The first time I saw the twisted remains of this old tree, I imagined it etched with snow. Unfortunately the tree’s location—perched on a ledge above a vertical drop of several hundred feet, is not for the faint of heart, even in the most benign conditions. And getting out here in snow can be downright dangerous.
On my most recent Yosemite trip earlier this month (sandwiched between my Yosemite moonbow workshop and a week-and-half in the Columbia River Gorge), my desire for something new trumped my “respect” for heights. I took a long way around to avoid the cliff as much as possible, then did my best not to look down once I arrived. As I worked, every shift of foot or tripod was planned and tested before execution.
I tried a variety of compositions, wide and tight, vertical and horizontal, that included some or all of the Tunnel View trio: El Capitan, Half Dome, and Bridalveil Fall. Exposure was pretty straightforward, but depth of field was a concern. I stopped down to f16, but chose not to go any smaller due to diffraction (light bending around small apertures to fill the entire sensor can inhibit resolution) concerns. As always in these scenes where I might not be able to achieve complete front-to-back sharpness, I biased my sharpness to my foreground—rather than focusing on Half Dome, I focused on a branch toward the back of the tree.
I actually returned to this scene the next morning, when the snow was much thicker and the light much more difficult. I haven’t had a chance to work with those images, so stay tuned….
A Gallery of the Shot Less Taken
Click an image for a closer look, and a slide show. Refresh the screen to reorder the display.


When seasons collide
Posted on April 11, 2015

Spring Snow, El Capitan, Yosemite
Sony a7R
Sony/Zeiss 24-70
1/8 second
F/11
ISO 100
Ever notice how the best photography happens at nature’s boundaries, the interface separating disparate elements? Sometimes it’s visual elements, like the collision of surf and shore or the intersection of shadow and light. But often we’re moved by images that capture the transition of our experience of the world, such as the color and light that happens when we shift between night and day, or distinctive elements of two seasons together in one frame.
Sunrises and sunsets are a daily occurrence, but the opportunity to capture snow and autumn leaves, or snow and spring flowers, comes just once a year. And until last week, with Yosemite’s waterfalls approaching a summer trickle, and the spring dogwood bloom at least a month early, prospects for the elusive snow with dogwood opportunity didn’t look good.
Storm brewing
Despite Yosemite Valley’s snowless winter, the optimist in me steadfastly monitored an incoming storm, openly defying my internal pessimist that knew the promise of snow would surely fade as the designated day neared. In recent years the pessimist has prevailed in these internal conflicts, thanks to a stream of promising storm after promising storm detoured into the Pacific Northwest by a persistent ridge of high pressure.
But for some reason this storm was different, and while the forecast details changed daily, the one constant was that it seemed determined to defy the ridge. Not only that, this new storm originated in the arctic—what it lacked in tropical (drought busting) moisture, it made up for with air cold enough to deposit snow all the way down to Yosemite Valley.
Obi-Wan Kanobe, you’re my only hope
So, despite the fact that I’d just returned Saturday night from four days in Yosemite (for my spring photo workshop), I found myself on the road back Tuesday morning. With my (4-wheel-drive) Pilot in the shop for some minor body work, I congratulated myself for having the good sense to rent a Jeep when I scheduled the work, even though at the time snow was the last thing on any Californian’s mind.
The queue at the Yosemite entrance station was backed up about a 1/4 mile, and as I idled in a steady rain (the outside temperature was 38F, and with 1500 more feet to climb, I had no doubt it was snowing in Yosemite Valley), it occurred to me that I didn’t actually see anything indicating 4WD anywhere in or on the vehicle. Of course surely a Jeep will have 4WD, but for peace of mind I reached for the manual in the glovebox….
The manual provided no encouraging or discouraging words. As I crept toward the entrance, chain requirement signs seemed to be taunting me, I saw several cars ahead of me turned away for not having chains or 4WD. Approaching the booth, I still wasn’t sure whether I had 4WD (I think I knew, but I was in serious denial), but it dawned on me that without it, my trip was in jeopardy. I rolled to the entrance window and the ranger eyeballed my Jeep—I waved my National Park pass in front of him, and without coming to a complete stop uttered, “These aren’t the droids you’re looking for”, then held my breath as he moved me along. Phew.
Of course my problem was more than simply getting into the park—if conditions truly did merit chains, I knew of no Jedi tricks that would spare me. The snow appeared just a couple of miles up the road, but by the time I got there it was no longer falling and the road turned out to be clear all the way up to the valley. The rest of the afternoon I photographed Yosemite Valley sporting a light but nice dusting of snow. Parking the car for dinner at Yosemite Lodge, I crossed my fingers that the predicted overnight snow would hold off until I retreated to my hotel below the snow line.
No such luck. Stomach full, I exited the cafeteria to at least an inch of new snow, now falling fast enough that my visibility was severely limited and traction was dubious—beautiful indeed, but extremely stressful for this driver. With no other cars on the road, I split the gap in the trees (all actual signs of a road had been obliterated) all the way down the mountain, poking along at about 10 miles per hour but still occasionally unable to resist flipping on my high-beams to recreate a slow-motion Millennium Falcon shift into hyperspace effect.
All’s well that ends well
I made it down the hill without incident, then immediately started stressing about the next morning. If the snow fell this hard all night, Yosemite would surely be spectacular, but lacking chains or 4WD, I’d not be able to get there to enjoy it.
I rose at 5:30 and headed back into the park in the dark. Much to my relief, the snow had stopped in the night, and at each “Chains required” sign I rationalized that the warning was left over from the night before and decided to continue until I actually encountered snow and ice on the road. In Yosemite Valley I found every tree and rock fringed with snow, but the roads were fine.
Freed to concentrate on photography, I knew I had about two hours of quality shooting before the clouds departed, the light hardened, and snow dropped from the trees. My first stop was a personal favorite spot beside the Merced River, too small for a group, where I hoped to find blooms on the dogwood tree that aligns with El Capitan and the Merced River.
I arrived just in time to catch the morning’s first light on El Capitan, the moment made even more dramatic by the diaphanous vestiges of the departing storm. I worked the rapidly changing scene hard, shooting entirely with my 24-70 lens, but using pretty much every millimeter of the lens’s focal range before heading up the hill to Tunnel View.
I drove home thankful for enough snow to photograph, but not so much that I couldn’t navigate, and for the rare opportunity to leverage the late snow and early spring into images capturing the best of both seasons.
Join me in Yosemite next spring
An El Capitan Gallery
Click an image for a closer look, and a slide show. Refresh the screen to reorder the display.


Half Dome moonrise
Posted on April 4, 2015
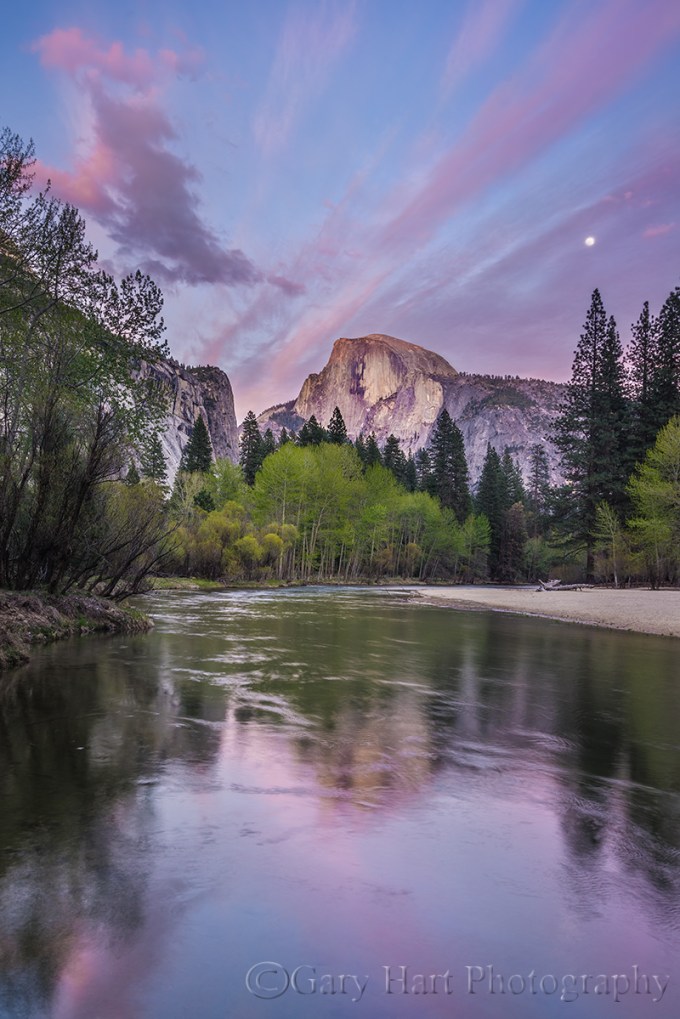
Spring Moon, Half Dome, Yosemite
Sony a7R
Sony/Zeiss 16-35
1.3 seconds
F/11
ISO 80
Last week I was in Arizona (Grand Canyon, Page, Sedona); next week it’ll be Oregon (Columbia River Gorge). But this week my focus is little closer to home, as I enjoy the familiar confines of Yosemite Valley.
The big news here is the water, or rather, the lack thereof. In a lifetime of visits to Yosemite, I’ve never seen the water lower in spring than it is this week, not even close. Most years, the water in Yosemite’s falls peaks in May; this year the flow peaked in February. On my visit to the bridge beneath Lower Yosemite Fall, always a guaranteed drenching in spring, I didn’t feel a single drop. The reflective vernal pool in Cooks meadow is a dirt hole, and the Merced River, which normally roars through Yosemite Valley in spring, is drifting near its leisurely autumn pace.
While these dry conditions might force Yosemite photographers to alter some plans, there is a silver lining to this week’s metaphorical cloud. Thursday night my Yosemite Moonbow and Dogwood workshop group was able to photograph sunset from Glacier Point, which opened last week, the earliest opening on record. And Friday morning we photographed dogwood blooms that already starting to pop out everywhere, a month early.
A particular highlight came Wednesday night. I’d taken my group to a favorite location beside the Merced River, a location I visit so frequently that I usually leave my camera in the car here. But this night, with spring-green cottonwoods framing the upstream riverbank and mix of clouds, sky, and sunlight above Half Dome, it was clear that the conditions were primed for something special. My ace in the hole was the nearly full moon, obscured by clouds when we arrived, that emerged right on cue, just as the sunset pink sky reflected in the Merced River, to provide a perfect accent to an already beautiful scene.
The operative word is accent. As I explained to my group, the moon doesn’t need to be large to be effective. Glowing disk or thin crescent, the moon carries so much emotional weight that, over the right scene and properly placed in the frame, it creates a simple accent that turns a conventionally beautiful scene into something special.
Yosemite, with its host of east-facing vistas, is my favorite spot to photograph a moonrise. Whether it’s a full moon at sunset, or a crescent at sunrise, I do my best to find the Yosemite view that best aligns with the rising moon, scheduling as many workshops and personal visits to coincide with this marvel. When possible the view I choose includes Half Dome, Yosemite’s monolithic centerpiece.
When I can position myself at one of Yosemite’s more distant western vistas, on the opposite side of Yosemite Valley from Half Dome (such as Tunnel View), I have the option of using a telephoto lens to isolate Half Dome in the frame with a magnified moon. When the moon rises too early at one of these distant vantage points, I set up on the east side of Yosemite Valley and closer to Half Dome (raising the horizon so the moon appears later), usually near the Merced River, and use a wide lens that includes the entire scene that uses the moon as an accent.
Of course you don’t need to travel to Yosemite to include the moon in your images. With a little bit of homework, you can find a rising moon in any east-facing scene, or a setting moon in any west-facing scene. To read more about photographing the moon, read the Full Moon and Crescent Moon Photo Tips articles.
Photo workshop schedule
A Half Dome Moonrise Gallery
Click an image for a closer look, and a slide show. Refresh the screen to reorder the display.


Mastering the mayhem
Posted on March 31, 2015

Divine Radiance, Upper Antelope Canyon
Sony a7R
Sony/Zeiss 24-70
1/3 second
F/11
ISO 400
Last week I joined (contributed to) the elbow-to-elbow fray in Upper Antelope Canyon. Helping Don Smith with his Northern Arizona workshop, I’ve done this every year for nearly ten years (I’ve lost exact count). While I never tire of the cathedral-like power of beaming, bouncing sunlight, I find that, like most beautiful, easily accessed locations, it’s difficult to separate Antelope Canyon’s beauty from its mayhem.
Upper Antelope’s mayhem is multiplied by narrow, twisting sandstone walls that contain, reflect, amplify, and spread every sound along the canyon’s entire length, and make it impossible to move without dodging, brushing, or jostling another human. It’s a claustrophobe’s worst nightmare—even people who’ve never experienced claustrophobia find the experience unnerving.
It’s in these environments that I most appreciate the limited perspective of a still camera, its ability to isolate the essence of a scene and separate it from all sensory distractions. As difficult as the Upper Antelope Canyon experience is, I can visit my images later and remember only the best things about being there. Gone is the noise and congestion, tripods and camera flashes, and all the concomitant distraction and anxiety. I’m left with graceful curves in layered sandstone polished smooth by water, wind, and time, and the heavenly glow of reflected sunlight.
About this image
Though the workshop group was ours, Don and I must defer to our Navajo guide when we’re in the canyon, which means we aren’t allowed to teach. Our job is mostly to not get in anyone’s way. While we do monitor the group to make sure no one’s missing an opportunity, much of our time is spent hanging in the back, waiting for the “prime” shots we’ll only get a chance to photograph if there’s time when everyone else is done. This has turned out to be a blessing for me, because it’s forced me to find my own stuff, especially stuff that’s on the walls above everyone’s head, or even straight up, at the ceiling.
The image here is a straight-up ceiling capture found while waiting for the group to finish photographing a shafting ray of sunlight further up the canyon. In the narrow confines of a crowded slot canyon, crouching to see through a viewfinder, or lying down to get beneath the camera, is not practical. It’s in these awkward situations that have given me a real appreciation for the Sony mirrorless bodies’ articulating LCD, which makes photographing these straight-up scenes about as difficult as glancing down at a cell phone.
Another advantage to the straight-up composition is that it has no top, bottom, left, or right. By rotating my camera on the tripod, I was able to turn the overhead opening into a diagonal, which I found more compelling orienting it horizontally or vertically. In fact, when I processed this image I decided to reverse the top and bottom of the image, resulting in an orientation that’s no different than if I’d have rotated my camera 180 degrees at capture (try doing that with conventional, straight-ahead image).
And finally, I just have to say something about the dynamic range of the a7R. The difference between the brightest highlights and darkest shadows in this scene was far beyond what I’d have attempted with my Canon 5D Mark III. And while my histogram told me I’d gotten the full range of tones, I didn’t completely believe it until I actually got it on my computer, pulled down the highlights, pulled up the shadows, and looked closely.
Read my tips for photographing Upper Antelope Canyon
Workshop Schedule || Purchase Prints || Instagram
An Antelope Canyon gallery
Click any image to scroll through the gallery LARGE


As far as the eye can see
Posted on March 25, 2015

Starry Night, Mather Point, Grand Canyon
Sony a7S
Zeiss 28mm
15 seconds
F/2.8
ISO 25,600
“As far as the eye can see.” How many times have we heard, and even uttered, those words without really considering their true meaning? Just how far can the eye see? Adults use the expression to convey wide open spaces, and as a kid I remember arguments on the playground about who had seen the farthest, trying to one-up each other with our ocular feats.
To me the words “as far as the eye can see” reveal a misconception that our eyesight somehow travels to a distant location and returns a real-time picture of a person, tree, building, mountain, or whatever for our brain to process. That perception might work for terrestrial scenes, where the time it takes a distant image to reach our eye is so imperceptible that for all intents and purposes, we are witnessing the scene in real time—what we see is happening as we see it.
Let’s take a tour of this night scene from the Grand Canyon to see how that real-time visual model works. Standing at Mather Point on the South Rim, our eyes start with nearby trees lining layered sedimentary cliffs, quickly plummeting to the river-scarred basalt of the inner canyon nearly a mile below. Beyond rise the similarly layered wall of the canyon’s North Rim. So far our eyes have traveled only ten miles or so—on a clear day they could continue another hundred miles or so before dropping off the horizon.
Scan any terrestrial scene this way and it’s easy to believe our eyes have done the work—when we see an object, we feel like we’re sharing its simultaneous reality. But this shared reality concept falls apart when you elevate your eyes above the Grand Canyon and beyond the horizon to the celestial sphere overhead, where everything we see (except the small meteor that’s burning up in Earth’s atmosphere, just a few miles away) was over and done years before it entered my lens.
That delay is the time it takes starlight to span the immense distances of interstellar space. Instead of a simultaneous reality, each star in our sky is on its own clock. In other words, we’re not seeing the stars in this image as they are today, we’re seeing them as they were tens, hundreds, or thousands of years ago.
But back to this distance thing. If starlight takes so long to get here, how far did it travel? Or more specifically, just how far can the eye see? Consider that light travels about 186,000 miles in one second. That’s more than 15 billion (twice the population of Earth, BTW) miles in a day, and nearly 6 trillion miles in a year. These numbers are beyond human comprehension, but suffice to say, a light year is a really long way.
So the next time someone says “As far as the eye can see,” remember this image. Ten miles to the opposite rim of the Grand Canyon, or 100 or so miles to the horizon, aren’t even a drop in the interstellar bucket. To comprehend the limits of our visual distance, individual stars are a good place to start, but they’re still in Earth’s general neighborhood. Beyond the pinpoint stars, this image captures the glow of our Milky Way Galaxy’s spiral arm in which our Sun is a very small player. This glow is a few thousand light years distant—now that’s more like it. But wait, there’s more. In Sagittarius, opposite the view in this frame, is our galaxy’s center. There the Milky Way’s glow reaches our eyes after traveling a mind boggling 25,000 light years. Surely that must be the limit of human vision.
But before you run out and brag to friends that you can see 145,000,000,000,000,000 miles (the distance light travels in 25,000 years), we’re still not done. See that roundish smudge of light on the left side of the frame? That’s the Andromeda Galaxy, the Milky Way’s nearest neighbor, 2.5 million light years away (not counting refueling and bathroom breaks). At 14,500,000,000,000,000,000 miles (count the zeros—moving from left to right, each zero increases the distance by 10 times), that truly is as far as the eye can see.
A few words about this image
Last week I helped Don Smith with his Northern Arizona workshop. After a 12 hour drive from California, Don and I had dinner near the South Rim before heading out to chilly Mather Point to try our new(ish) Sony a7S mirrorless cameras in what is the most difficult location I’ve every tried night photography.
Because I do everything with one click or not at all, I’ve never had any success photographing the stars on a moonless Grand Canyon night. Moonless night photography is difficult in any location, but at the Grand Canyon it’s like photographing a black pit. Honestly, I never imagined I’d be able to make it work.
A close look at this image will reveal that it’s not perfect—there’s a fair amount of noise, and a little motion in the stars (and every flaw is made worse by jpeg compression). Cleaning up the noise softened the image some, but eliminating it completely resulted in an noticeable plastic look, so I tried to find a balance. But flaws notwithstanding, given that the only thing illuminating my scene was the stars and a faint (imperceptible to the eye) ambient glow from the sky, to get this much detail in so much darkness is nothing short of amazing.
This is just my second night shoot with the a7S, so I’m still working out the best combination of f-stop/ISO/shutter-speed variations. I haven’t scrutinized all my images yet, but I have many variations to play with, both from this night at Mather Point, and from the next night as well, when Don and I took a hardy few from the workshop group out to Yavapai Point.
One thing that is an absolute game changer for me is the ease with which I can focus on the stars with the Sony a7S. With my Canon 5D Mark III and its (pretty great) LCD, I am able to live-view manual focus, but it takes some work. With the a7S, focusing is just a simple matter of putting my eye to the viewfinder and dialing the focus ring until the stars sharpen—a couple of seconds at most. Composition is also much easier with the a7S.
But clearly there’s room for more image quality, as the extremely limited light of a moonless night at the Grand Canyon forces many compromises. My Zeiss 28mm f2 lens is generally quite sharp, but it’s noticeably less sharp at its widest apertures. And there’s quite a bit of noise at 25,600 ISO (but the fact that I can shoot anywhere near that high is simply amazing). Of course I’d like to use an even higher ISO to allow a smaller (sharper) aperture and faster shutter speed (less star motion), but I won’t be greedy (yet). Right now I don’t know what excites me more about the a7S—that I’m able to capture night scenes I never dreamed possible, or what low-light technology Sony will deliver next. It’s a great time to be a photographer.
A Stellar Gallery
Click an image for a closer look, and a slide show. Refresh the screen to reorder the display.


The grass is greener
Posted on March 18, 2015

Under the Weather, Sierra Foothills, California
Sony a7R
Sony/Zeiss 16-35
1/8 second
F/11
ISO 100
“You’re so lucky to live so close to <fill in the blank>”: Yosemite, Lake Tahoe, Big Sur, San Francisco, Muir Woods (and countless other coastal redwood sites), Point Reyes, the Napa Valley wine country, Mt. Shasta, Mono Lake. I hear it all the time. Okay, I’ll concede that—I’m lucky.
But…
Their implicit message is, “If only I lived closer to such-and-such, my photography would be so much better.” But you know what? We all have our grass-is-greener longings. When someone tells me how lucky I am to live where I live (I am), I can usually counter with, “Yeah, but I’d love to have the skies that you get.” Because the sad truth is, for someone who loves dramatic weather and interesting skies as much as I do, California is definitely not the place to be.
My advice to anyone who lives in Nebraska, or Texas, or Illinois, or pretty much anywhere else that lacks California’s dramatic scenery, is to emphasize your skies (which are almost certainly more interesting than mine). Keep a mental database of interesting foregrounds (they don’t even need to be particularly photo-worthy by themselves)—a single tree, reflective lake, cascading stream, whatever—that you can get to fairly quickly when the sky shows potential.
When photographing your subject beneath an interesting sky, place it at the bottom of your frame, compose wide, and give 2/3 or more of the frame to the sky (the better the sky, the more real estate it deserves). Vertical compositions often work great when you want to emphasize the sky. Is it Yosemite or the Grand Canyon? No, but I could be a very happy photographer shooting nothing but great skies for the rest of my life.
I digress
So. As you might guess, on the rare occasion when it looks like something special might happen overhead, I’m all over it. Unfortunately, and despite my proximity to so many world-class locations, there’s not a lot I like to photograph within a few minutes of my home.
I got a frustrating reminder of that a few years ago when, during a heavy (for California), persistent rain, I looked out the west-facing window of my home on Sacramento’s west side and saw nothing but clear sky on the horizon. Hmmm. Knowing three things: 1) the sun sets in the west 2) weather in Northern California moves from west to east 3) a rainbow needs low sunlight and airborne water, inferring an imminent rainbow wasn’t rocket science. All I needed was an east-facing scene.
And therein lay the rub: It’s at least a 30 minute drive to any scene that would do the rainbow justice. Of course with more than an hour until sunset, I figured there was time if I hurried, so I tossed my gear in the car and headed east, toward a small tree that stands by itself atop a hill east of town. And sure enough, within ten minutes of my departure, the rainbow did indeed manifest as expected. What also manifested was rush hour traffic.
For the next hour, I (along with what seemed like ten million commuters) were treated to a vivid double rainbow framing all six lanes of US 50. Poking along at less than 10 miles per hour, we were also beneficiaries of ample opportunity to appreciate the spectral splendor. On the positive side, this rainbow was so beautiful that I couldn’t even muster much impatience—I just sat there in traffic and marveled. And as if its beauty weren’t enough, this rainbow persisted longer than any rainbow I’ve ever seen, lasting at least an hour—all the way up until I pulled my car to a stop in front of the tree. True story.
Deja vu
Fast-forward four years. A couple of months ago I looked out the very same window during on a rainy afternoon and saw the same clear horizon I’d seen four years earlier. Within minutes I was in my car and heading toward the same tree. This time the traffic cooperated and I made good time, arriving at “my” tree about 30 minutes before sunset.
Sadly, despite all the signs pointing in the right direction, the rainbow never happened. Waiting for the sun to appear, I photographed saturated clouds in a steady rain, at no point not believing its appearance was imminent. Just about the time the sun appeared, the rain stopped. And then, about the time the rain returned, the sun set. Oh well.
Am I complaining? Of course not. I didn’t get my rainbow, but I did get a rare opportunity to photograph Midwest skies right here in Northern California. And I hope this image illustrates my point—wasting energy longing for what’s over there obscures the beauty at your feet. Good photography doesn’t need a towering monolith or double rainbow, it just needs a creative eye and a little persistence.
A Gallery of Skies
Click an image for a closer look, and a slide show. Refresh the screen to reorder the display.


