Four sunsets, part four: Saving the best for last
Posted on February 23, 2014

Twilight Magic, Yosemite Valley from Tunnel View, Yosemite
Canon EOS-1Ds Mark III
3 2/3 seconds
F/11.0
ISO 400
45 mm
- Read the first in the series here: Four sunsets, part one: A Horsetail of a different color
- Read the second in the series here: Four sunsets, part two: Classic Horsetail
- Read the third in the series here: Four sunsets, part three: A marvelous night for a moondance
What I love most about photography is its ability to surprise me. Case in point: the final sunset of my recent Yosemite Horsetail Fall workshop, which delivered just one surprise after another.
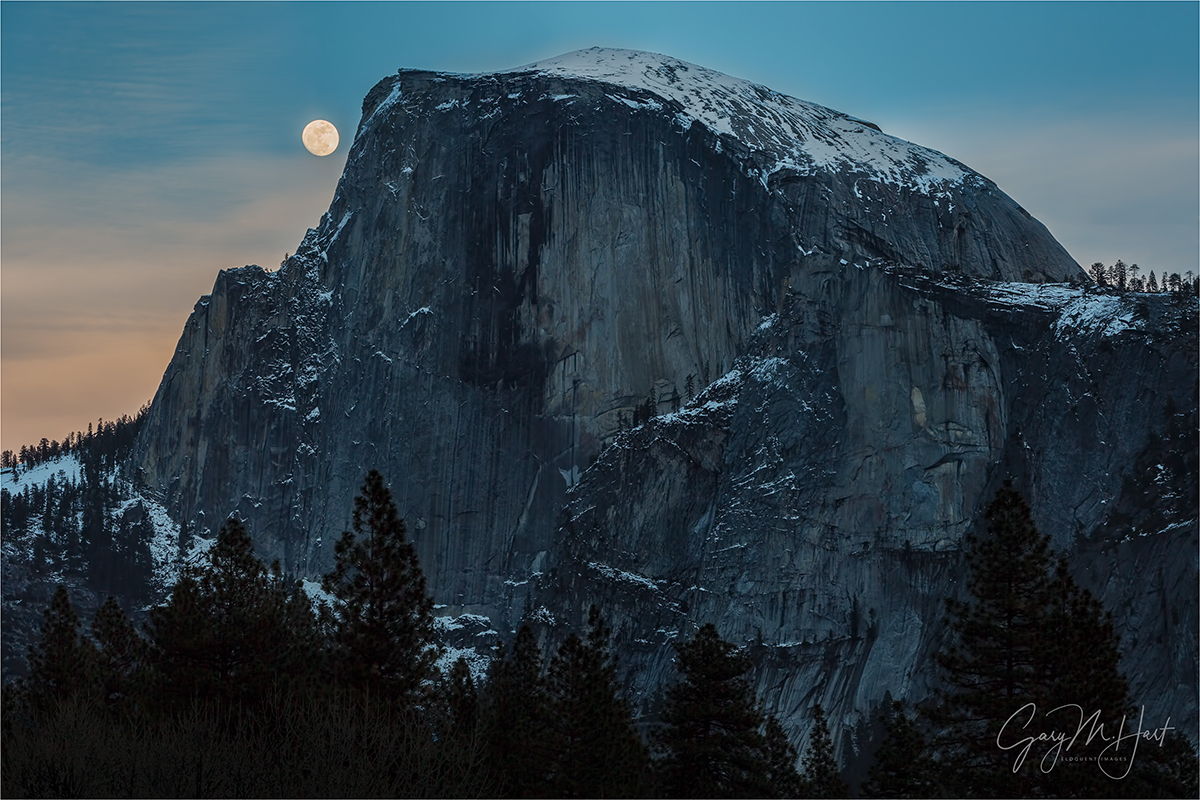
I’d told my group that we’d get to photograph another moonrise on our last evening, but only if the clouds cooperated. And as the afternoon wore on, it seemed that the clouds that had cooperated so wonderfully all week wouldn’t be on our side tonight. Assembling everyone on the sloped granite above Tunnel View, I eyed the thin (and shrinking) strip of blue sky on the horizon above Half Dome and checked my watch: 5:10—in about fifteen minutes (less than ten minutes before sunset), with no clouds we’d see a full moon poke into view between Half Dome and Sentinel Dome. But our vantage point gave me a clear view of the clouds racing in that direction and our prospects weren’t good. Rather than stress (much), I stayed philosophical: We’d already had three fantastic sunset shoots, expecting a fourth would be downright greedy.
Nevertheless, it was fun to watch the clouds sprint across the sky and pile up behind Half Dome, changing the scene by the minute. Waiting there, I had thoughts about the throngs gathered on the valley floor, hoping (praying) for Horsetail Fall to light up. My group had been lucky on our first two sunsets, but tonight there’d been no sign of sunlight for at least thirty minutes, and with the cloud machine working overtime behind us, I was pretty certain the Horsetail crowd was in for disappointment.
Anticipating a moonrise, I’d gone up our vantage point with just my tripod, 5DIII, and 100-400 lens. Knowing exactly where the moon would appear, my composition was set well in advance—tight, with Half Dome on the far left and the moonrise point on the far right. But without the moon, I realized that the best shots would likely be wide, so I zipped back to the car and returned with another tripod (doesn’t everyone carry two?), my 1DSIII, and my 24-105. Sitting on the (cold) granite, a tripod on my left and my right, I quickly composed a wide shot with my new setup and resumed my vigilance.
By 5:25 I’d stopped watching the incoming clouds, which were streaming in faster than ever, and turned my focus to the moon’s ground-zero, willing the clouds to part for its arrival. At exactly 5:27 and as if by magic, the white glow of moon’s leading edge burned through the trees downslope from Sentinel Dome. I did a double-take—it was as if the moon had pushed the cloud curtain up and slipped beneath. I shouted, “There it is!” and the furious clicking commenced. We ended with about sixty seconds of moonrise, just long enough for the moon to balance atop the trees, before the clouds settled back into place and snuffed it out.
But the surprises had only just begun. While the whole group still buzzed about the moon, I noticed a faint glow on El Capitan. Not quite believing it (and not wanting to jinx anything), I kept my mouth shut and looked closer. But when the glow persisted, I had to point it out, if for no other reason than confirmation that I wasn’t hallucinating. Within seconds all doubts were dispelled as El Capitan exploded with light from top to bottom. So sudden and intense was the light that I’m surprised we didn’t hear the roar from the Horsetail Fall contingent in the valley below us. And rather than fade, as it often does, the light intensified, warming over the next couple of minutes from amber to orange to red. Soon the color deepened to an electric magenta and spread across the sky and all those clouds I’d been silently cursing just a few minutes earlier became allies, catching the color and reflecting it back to the entire visible world.
Giddy about the show, and focused on my two cameras, I’d long given the moon up for dead. So imagine my surprise when, just as the color reached a crescendo, there the moon was, burning through a translucent veil of clouds. So expansive was the scene that a telephoto couldn’t do it justice, so all of my images following the moon’s resurrection were captured with my 5DIII and 24-105. Exposure became trickier by the minute in the advancing darkness, and eventually, pulling detail from the valley without completely blowing out the moon required a 2-stop hard graduated neutral density filter.
Honestly, this was one of those moments in nature that no camera can do justice. I did my best to come find compositions that captured the majesty of Yosemite Valley, the vivid sky and the way it tinted the entire scene, and that Lazarus moon. But take my word for it, you just had to be there….
* * * *
Four Sunsets
-

- Revelation, Horsetail Fall, Yosemite
-

- Fire on the Mountain, El Capitan and Horsetail Fall, Yosemite
-

- Twilight Magic, Yosemite Valley from Tunnel View, Yosemite
Four sunsets, part three: A marvelous night for a moondance
Posted on February 19, 2014
Moondance, Half Dome, Yosemite
Canon EOS 5D Mark III
1/5 second
125 mm
ISO 100
F11
How many Yosemite moonrise images are too many? I have no idea, but I’ll let you know as soon as I find out.
- Read the first in the series here: Four sunsets, part one: A Horsetail of a different color
- Read the second in the series here: Four sunsets, part two: Classic Horsetail
5:10 p.m.
I stand on the bank of the Merced River, eyes locked on the angled intersection of Half Dome’s sharp northeast edge and its adjacent, tree-lined ridge. If the clouds cooperate, and I’ve done my homework right, a nearly full moon (96%) will be poking above this intersection any minute. We’d been fortunate the first two sunsets of my workshop; dare I hope for one more?
If the moonrise happens as I plan (hoped), the sight could rival what we’d gotten from Horsetail Fall on the first two nights of our workshop. But right now the sky behind Half Dome is smeared with thin-ish clouds—how thin I won’t know until the moon appears (or doesn’t). Gazing heavenward, I find it odd that a moonrise, something that can be predicted with such absolute precision, is so subject to weather’s fickle whim. And the clouds aren’t my only concern—just a half-degree error in my plotting would put the moon behind Half Dome and out of sight.
Few things in nature thrill me more than a moonrise. Camera or not, crescent or full, I love everything about a it: the obsessive plotting and re-plotting that gets me out there in the first place; the hand-wringing anticipation while I await the moon’s appearance; the first white pinprick of moonlight on the horizon (Is that it? There it is!); the ridge-top evergreens silhouetted against the rising disk; the glowing sphere hovering above the darkening landscape; and finally, the moonlit landscape beneath a star-studded sky. Everything.
So it shouldn’t surprise that virtually all of my photo trips—workshops and personal—are scheduled around the moon’s phase and some condition of the night sky. Sometimes I target a full moon, sometimes a crescent, and sometimes I want no moon at all (for dark skies that reveal the most stars)—the choice depends on the kind of moonrise and/or night photography I think best suits the landscape I’m traveling to photograph. But because this workshop is timed to coincide with the few February days that Horsetail Fall might turn a molten red at sunset, a calendar window I shrink even further to avoid the crowds that flock a little later in February, the moon is rarely a priority when I schedule the Horsetail Fall workshop. But I still check. And when I started planning my 2013 Yosemite Horsetail Fall workshop a couple of years ago, I was thrilled to discover that not only could I could time this trip for a full moon, I’d also be able to align that moon with Half Dome at sunset. Twice.
5:13 p.m.
I check my watch: 5:13. Sunset is 5:35; the moon should appear almost adjacent to Half Dome at about 5:15, then slowly rise, like a ball rolling uphill along Half Dome’s left side. By 5:30 the disk will have almost reached Half Dome’s summit, less than its own width with from the granite face. That is, if I’ve done my homework right. 5:14.
Any minute now….
I’d done all my figuring months in advance, which of course didn’t stop me from double-, triple-, quadruple-, and so-on-checking my results in the days leading up to my waiting beside the Merced River with a dozen or so other photographers. Part of my anxiety is the particularly fortuitous alignment of location, moon, and time that put the moon appearance above Half Dome right in my “ideal” sunset window as viewed from one of my favorite Yosemite locations. Not only does this spot provide a clear, relatively close view of Half Dome, it also is at a nice, reflective bend in the Merced River. Even without the moon this is a nice spot, end everyone in the group seems to be finding things to photograph. But I want the moon tonight. Really, really want the moon.
(You really don’t need to read this section)
My moonrise/set workflow was in place long before smartphones apps and computer software laid it all out for any photographer willing to look it up. But those tools are new tricks and I’m an old dog. So here’s how I’ve done it for years:
- Use my topo map software to determine the latitude and longitude of the location I want to photograph.
- Give my location’s latitude and longitude to my Focalware app (or, if I need the data to be a little more granular, the US Naval Observatory website), which returns the moon and sun rise/set altitude (degrees above a flat horizon) and azimuth (the angular distance relative to due north, from 0 to 360 degrees—imagine a clock: 12 is 0 degrees; 3 is 90 degrees; 6 is 180 degrees and so on).
- Next I plug the moon’s altitude/azimuth for my location into the plotting tool of my computer’s mapping software. This draws a line from my location (where I’ll be with my camera) to the location of the moonrise (or set). Most importantly, the line shows the moon’s alignment with whatever landscape feature I’m interested in (such as Half Dome). It also gives me both the distance and the elevation change between my location and the point above which it will rise.
- Finally, I use the elevation and distance data with the trig functions of a scientific calculator to get the altitude to which the moon must rise before it’s visible from my vantage point.
If this all sounds convoluted, that’s probably because it is. I suggest that you try something like The Photographer’s Ephemeris or Photo Pills, which does all this for you. But like I say, that’s a new trick….
5:15 p.m.
I squint, hoping to engage my x-ray vision enough to make out the moon’s outline through the clouds. Nothing. With conditions fairly static, the group has gotten their shots and is chatting more than clicking. Moon or not, the photography will improve as the light warms toward sunset. I walk uphill, away from the river and slightly upstream to improve my angle of view. Still nothing. (Did Ansel Adams experience this angst?)
We’ve reached the time that I expect the moon to appear. I’ve been plotting the moon long enough to be fairly confident within about one moon’s width (a half degree in either direction) of where it will rise, and within plus/minus two minutes of when it will rise. But the whether of seeing a moonrise depends on, well, the weather. Will rain, snow, or even just a rouge cloud shut us out? There’s really no way to know until the day arrives. And sometimes, for example this very instant, I can’t tell whether the sky will cooperate until I actually see the moon.
I’ve learned that the best time to photograph a full moon (when I say “full,” I often mean almost full, generally between 95 and 100 percent of the complete disk illuminated) is during a ten minute window straddling sunset. Much earlier and the light isn’t particularly interesting, and there isn’t enough contrast between the moon and the sky for the moon to stand out dramatically; much later and there’s too much contrast between the moon and everything else in the scene for the camera to handle.
Choosing this location introduces another unknown. Remember when I said that I can pinpoint the moonrise within about its width? Well, in this case that margin of error is just enough to give me pause, because rising slightly to the right of where I think it will rise puts the moon behind Half Dome until about five minutes after sunset. Sentinel Bridge, just a short distance downstream, would have been safer, but the Sentinel Bridge Half Dome shot is far more common, the bridge is usually teaming with people at sunset, and the moon would have been a little higher in the sky during “prime time.” So here we stand.
5:17 p.m.
What’s that faint white blob in the clouds? Without saying anything I squint and look closer. Sure enough, there it is, barely visible, less than one degree above the ridge (its rise above the ridge a couple of minutes ago must have been obscured by the clouds), pretty much where I expect it. Phew. I announce the moon’s arrival to the rest the group, but need to guide their eyes to it. As everyone’s attention returns to their cameras, I cross my fingers for the clear sky in its path to hang in there until at least sunset.
5:25-5:45 p.m.
The moon finally climbs above the clouds and I exhale. Still daylight bright, it now makes a striking contrast against the darkening sky. For the next fifteen minutes we shoot continuously, pausing only to recompose and monitor the highlights. Compositions, which I’d had everyone practice before the moon arrived, range from wide reflections that reduce the moon to a tiny accent, to tight isolations of the moon and Half Dome’s face.
As sunset approaches, the biggest concern becomes those lunar highlights—too small to register on the camera’s histogram, the moon’s face is easily blown out as we try to give the darkening foreground more light. Before we started I made certain everyone has engaged their camera’s Highlight Alert (“blinking highlights”) feature. They all know that when the moon starts flashing, they’ve reached the exposure threshold and must back off on their exposure and lock it in (a few “blinkies” are recoverable in Lightroom or Photoshop, but if the entire disk is flashing, the moon’s detail is probably lost for good)—while the moon will remain the same brightness (can’t take any more exposure), from that point on the foreground will continue darkening until it becomes too dark to photograph. Then we go to dinner.
Like everyone else, I used a variety of compositions. I already have a wide reflection image from a prior shoot, so the image I share here is a moderate telephoto—any tighter (to enlarge the moon further) would have truncated some of Half Dome’s face, something I just cant bring myself to do.
We finally wrapped up at about 5:45, when long exposures to bring out detail in the dark landscape made capturing detail in the bright moon impossible. Everyone was pretty thrilled at dinner, and even though the clouds thickened and washed out our planned moonlight shoot, there were no complaints. And little did we know, Mother Nature had concocted a grand finale for our final sunset.
Join me in Yosemite
PURCHASE PRINTS || PHOTO WORKSHOPS
A Gallery of Yosemite Moons


Four sunsets, part two: Classic Horsetail
Posted on February 16, 2014

Molten Monolith, Horsetail Fall, Yosemite
Canon EOS 5D Mark III
1/5 second
122 mm
ISO 100
F11
- Read the first in the series here: Four sunsets, part one: A Horsetail of a different color
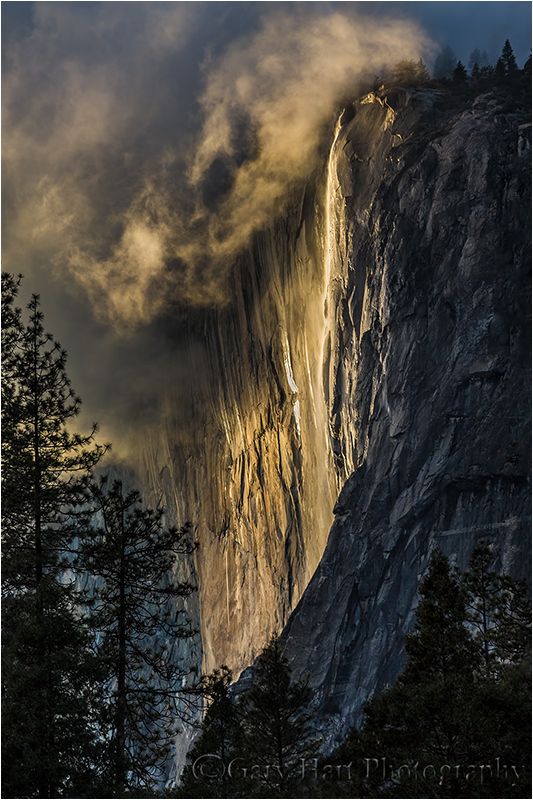
While we’d been incredibly fortunate with our Monday night Horsetail Fall shoot, we didn’t get the molten glow everyone covets (though I’d argue, and several agreed, we got something better). Nevertheless, based on the relatively clear skies, I decided to take everyone back for one more try on Tuesday.
On Monday we’d been able to photograph in relative peace from my favorite spot on Southside Drive, but given that the weekend storm had left us in its rearview mirror, and that word had no doubt gotten out that Horsetail Fall was once again flowing, I guessed that the Horsetail day-trippers (Bay Area, Los Angeles, Central Valley photographers who cherry-pick there Yosemite trips based on conditions) would begin crowding into Yosemite Valley. To be safe, I got my group out there a little after 4:00 (sunset was 5:35). Despite being earlier, both parking turnouts were already teeming cars (if everyone squeezes, there might be room for fourteen legally parked cars)—just a few minutes later and we’d not have found room for our three vehicles (all the late arriving cars that had attempted creative, shoulder parking solutions returned to find parking tickets decorating their windshields). With so many more cars, I wasn’t surprised to find my preferred spot down by the river was already starting to fill—but we spread out a bit and everyone managed to squeeze in.
Unlike Monday evening, the Tuesday sky started mostly clear, with only an occasional wisp of cloud floating by. While the scene lacked the drama of Monday, the clear skies boded well for the fiery show we were all there for. We watched the crisp, vertical line separating light and shadow advance unimpeded across El Capitan. The mood was optimistic—borderline festive. Then, a little after five, with no warning the light faded and El Capitan was instantly reduced to a homogeneous, dull gray. Many people reacted as if their team had fumbled on the two yard-line, but those of us who know Horsetail Fall’s fickle disposition just smiled.
In all the years I’ve been photographing Horsetail Fall, I’ve come to recognize how much it likes to tease—while this is more of a gut feeling, it has always seemed to me that the evenings when the shadow marches without pause toward sunset, the light is much more likely to extinguish right before the prime moment. On the other hand, my best success seems to come on the evenings when the light comes and goes, teasing viewers right up until it suddenly reappears in all its crimson glory just before sunset. So, until the light disappeared I was a little concerned that things were going too well. But when the light faded I was able to guide them away from the ledge and reassure them that there’s no reason to panic just yet. And sure enough, about ten minutes later the sunlight came flooding back and everyone exhaled.
As shadow advances from the west, the remaining light warms—by 5:25 it had reached a rich amber. Once it reaches that stage my advice to everyone was that, since the show will either get better (more red) or worse (the light snuffed), and there’s no way of telling which it will be, they should just keep shooting until the light’s gone. And that’s what we did. At first there were no clouds and my composition was fairly tight to eliminate the boring sky. Then, just a few minutes before the “official” 5:35 sunset (I should add that “sunset” when you see it published refers to the time the sun sets below a flat horizon—it set far earlier for those of us on the valley floor, and it wouldn’t set on elevated Horsetail Fall until nearly 5:45), a nice cloud wafted up from behind El Capitan and I quickly went wider to include it.
On the way to dinner with the group I breathed a sigh of relief knowing that my life had just become much easier. For many in the group, what we’d just photographed was their primary workshop objective—for some Horsetail Fall is a bucket-list item. But the nights Horsetail Fall doesn’t light up are far more frequent than the nights it does, and in fact I’ve seen Februarys when it’s only lit up like that once or twice (and I’m sure there have been years when it doesn’t happen at all). While I knew nobody would hold me accountable if Horsetail didn’t put on a show for us, the fact that it did (not to mention the fabulous Horsetail shoot of our first night), meant that I was free to focus the group’s final two sunsets two very special moonrises.
Next up, sunset number three: A marvelous night for a moondance
* * *
Four sunsets, part one: A Horsetail of a different color
Posted on February 14, 2014
Revelation, El Capitan and Horsetail Fall, Yosemite
Canon EOS 5D Mark III
1/20 second
154 mm
ISO 100
F11
If the National Weather Service website were human, it would have long ago slapped me with a restraining order. You see, California is in the throes of an unprecedented drought that has shriveled lakes, rivers, creeks, and reduced even the most robust waterfalls to a trickle. With my Yosemite Horsetail Fall (which on a good day is rarely more than a thin white stripe on El Capitan’s granite) workshop just around the corner, recent weeks have seen me behave more like an obsessed infatuee, as if constant monitoring will somehow make my weather dreams come true. But so far this winter, each time I thought Mother Nature had winked in my direction, I found my hopes quickly dashed as every promising storm made an abrupt left into the open arms of the already saturated Pacific Northwest.
So, imagine my excitement when, just in time for this week’s workshop, an atmospheric river (dubbed the “Pineapple Express” for its origins in the warm subtropical waters surrounding Hawaii) took aim at Northern California. During the four days immediately prior to my workshop, our mountains were drenched with up to ten inches of liquid—not nearly enough to quench our three-year-and-counting drought, but more than enough to recharge Yosemite’s parched waterfalls for the three-and-a-half days of the workshop. Phew.
Monday morning I arrived in Yosemite to find, as hoped, the waterfalls brimming and Horsetail Fall looking particularly healthy. Eying Horsetail from the El Capitan picnic area a few hours before the workshop started, I suddenly remembered the stress that comes with other photographers counting on me for the bucket-list shot they’d traveled so far to capture. It occurred to me that hen Horsetail Fall is dry I can concentrate without distraction on Yosemite’s other great sunset options; when Horsetail is flowing, I need to decide whether to go for the notoriously fickle sunset light and risk no photographable sunset at all if it doesn’t happen. That’s because, not only does Horsetail Fall need water, the red glow everyone covets also requires direct sunlight at the exact instant of sunset—never a sure thing, even on seemingly clear days. And if Horsetail doesn’t get sunset light, there’s little else to photograph from its prime vantage points. With the forecast for the workshop’s duration called for a disconcerting mix of clouds and blue sky, our odds were even longer than ordinary. Compounding my anxiety was the full moon that I’d promised for workshop sunsets three and four (of four total sunsets)—if we don’t get Horsetail on sunset one or two, I’d have to decide between going for Horsetail or the moon. (And woe betide the workshop leader whose group watches a fiery sky or ascending moon from an unsuitable location—tar and feathers, anyone?)
During the orientation I did my best to establish reasonable expectations. I told the group that we’ll go all-in on Horsetail for sunsets one and two, and that if it doesn’t happen, I’ll decide our priority for sunsets three and four based on the conditions. What I meant was, we’ll go all-in for Horsetail on sunsets one and two, and I’ll hope like crazy it that does happen and I won’t have to decide anything for sunsets three and four. What followed was four sunsets filled with anxiety, each culminating with a rousing success—two our our successes were of the exactly-what-I’d-hoped-for variety, while the other two were far beyond what I could have imagined.
Sunset number one, above, was in the more than I could have imagined category. After the orientation I took the group to Tunnel View, where we kicked off the workshop with Yosemite Valley beneath a nice mix of clouds and sky. From there we headed to the night’s sunset destination, my favorite Horsetail Fall view on Southside Drive. A few years ago I could pull in to this spot a few minutes before sunset and be relatively confident of finding enough room for my entire group. But this spot is no longer a secret; on the drive there I crossed my fingers that the storm had kept most of the day-trip photographers home—if not, Plan B was to loop over to the El Capitan picnic area where there’s more parking and ample room for many photographers. On this afternoon my concerns were unwarranted as we found only two other cars there, and nobody down by the river where I like to set up. And set up we did, with a little more than an hour to wait. From the time we arrived the clouds were nice, but with no sign of the sun the scene was a little flat, with gray the predominant color—nevertheless, I encouraged everyone to be ready because it can change in a heartbeat. Little did I know….
As we waited we watched Horsetail Fall, spilling more water than I’d seen in years, play peek-a-boo with the storm’s swirling vestiges. But without direct sunlight, the scene, while pretty, wasn’t spectacular. Then, shortly before 5:00, without warning the clouds lit up like they’d been plugged in and I (unnecessarily) told everyone to start shooting, that we have no idea how long this light will last. For the next ten minutes we were treated to a Horsetail Fall show the likes of which I’ve never seen. Suddenly the exposures, quite easy in the flat gray, became quite tricky and I spent lots of time bouncing between workshop participants struggling with exposure. I managed to get off a handful of frames, some fairly wide, and a few a little tighter like this one. When the light faded we were left with cards devoid the “classic” Horsetail image; instead, we had something both beautiful and unique, a difficult combination for such a heavily photographed phenomenon. From the conversations in the car, and from images shared later during image review, it was pretty clear that everyone else was as happy as I was. Nevertheless, I sensed most still wanted the red Horsetail image, and I was ready to give it one more try with sunset number two.
Next up, sunset number two: The “classic” Horsetail.
* * *
Some assembly required
Posted on February 10, 2014

Double Rainbow, Lipan Point, Grand Canyon
California Sunset, Sierra Foothills
Canon EOS 5D Mark III
1/5 second
32 mm
ISO 100
F14
Putting together material for the Grand Canyon Monsoon workshop that Don Smith and I do each August, I came across this image from the first shoot of our first workshop. With so many pictures in the two weeks we were there (for two workshops), and given the incredible events that followed, it’s amazing to me how well I remember the specifics of this early shoot (especially given how poorly I remember so many other things).
When Don and I pulled the group into Lipan Point that afternoon, a handful of puffy clouds floated overhead. But, as if on cue, within minutes of our arrival the clouds organized into a seething, dark gray tower; five minutes after that, a few drops fell—marble-size projectiles that landed with an audible splat at one- or two-second intervals. We ignored the rain and kept shooting, but when a lightning bolt struck a quarter mile away, we couldn’t get out of there quickly enough, retreating to the cars just as all hell broke loose. For the next we were assaulted with a pounding rain that obliterated the view and required shouting to be heard. As suddenly as it started, the rain stopped and the Canyon reappeared, bathed in sunlight. And with the sunlight came a full double rainbow. I mean, what could be more perfect, the Grand Canyon plus a rainbow? Unfortunately, from our vantage point on the rim, the rainbow beautifully framed nothing but sagebrush south of the canyon.
Understanding the physics of rainbows, I knew that there’s nothing random about their position—to get the rainbow above the canyon, I simply had to be on the other rim. With a choice between A: A four hour drive, and B: A twenty mile hike, I chose C: Get as far out into the canyon as the nearby terrain allows and hope for the best.
The “Point” part of Lipan Point refers to a rock protuberance that juts into the canyon. Scrambling onto the rock, I was able to change my angle of view enough to put the north-most end of the rainbow in the canyon before I ran out of point. Not the complete, rim-to-rim view I’d have liked, but at least something to work with. With the Grand Canyon as my background, a rainbow for the middle-ground, all I lacked was a foreground.
Scanning my surroundings, my eyes fell immediately on a group of shrubs side-lit by pristine, warm, late afternoon light. A horizontal composition would have given me too much foreground and too little rainbow, so I went vertical. At a focal length of 32mm, my depth of field app told me I could achieve the 8-foot hyperfocal distance I needed at f14. Spot metering on the brightest shrub, I dialed my shutter speed until the shrub was +2, and clicked.
These are a few of my favorite things
Posted on February 3, 2014

California Crescent, Sierra Foothills
Canon EOS 5D Mark III
2.5 seconds
82 mm
ISO 100
F11
Maria von Trapp had them, you have them, I have them. They’re the favorite places, moments, and subjects that provide comfort or coax a smile no matter what life has dealt. Not only do these “favorite things” improve our mood, they’re the muse that drives our best photography. Mine include the translucent glow of a California poppy, a black sky sprinkled with stars, a breathtaking sunrise duplicated in reverse by still water, and the vivid arc of a rainbow following a cleansing rain. Also on my list (as you may have guessed by now) are the rolling hills and stately oaks of the Sierra foothills, a delicate slice of moon hovering above the horizon, and the subtle band of shifting color separating day and night.
I do my best to put myself in position to photograph all of these moments—the more I can combine, the better. For example, on my calendar each month (among other things) are the best days to photograph the old moon before sunrise, and the new moon after sunset. And in my GPS is a collection of foothill locations (though by now I’m sure my car could navigate to these spots on its own) with hilltop oak trees that stand against the sky.
The best evenings for the new moon in the most recent lunar cycle were Friday and Saturday, January 31 and February 1. With plans for Friday, I blocked Saturday and made the drive up to the foothills, where I waited at a favorite spot for the sun to drop and the moon to appear. Over the years I’ve accumulated lots of pictures of these trees beneath a variety of skies, with and without the moon. My composition decisions on each visit were mostly determined by the conditions: clouds, color, the moon’s direction, and the moon’s elevation above the horizon.
Saturday night’s cloudless, unspectacular sky spread a simple canvas that emphasized the crescent moon floating above the day/night transition I love so much. As an added bonus, Mercury joined the party, leading the moon to the horizon (above the tree on the right). In the deepening darkness I moved up and down the road to change the moon’s position relative to the trees. With the moon fairly high, I found that moderately wide, vertical compositions worked best. I underexposed slightly to and emphasize the trees’ shape with a silhouette; with nothing else to balance my frame, I decided on the symmetry of an isosceles triangle connecting the trees and moon.
Same view, different day
-

- Oaks at Sunset, Sierra Foothills
-

- Goodnight Moon, Sierra Foothills, California
-

- Red Sky, Oak at Sunset, Sierra Foothills
-

- Crescent and Clouds, Sierra Foothills, California
If you’re following the rules, you’re not being creative
Posted on January 28, 2014

Stillness, South Tufa, Mono Lake
Canon EOS-1Ds Mark III
1 second
F/11.0
ISO 100
32 mm
What do you think would happen if I submitted this image a camera club photo competition? It might elicit a few oohs and ahhs at first, but I’m pretty sure it wouldn’t be long before somebody dismisses it because the primary subject is centered. And while “never center your subject” is standard camera-club advice for a beginner who automatically bullseyes every subject, reflexively reciting “Rules*” is a cop-out for faux critics who lack genuine insight. (Of course I’m not talking about you, I’m talking about that guy over there by the cookies.) Worse still, photographers who blindly follow Rules are leaning on a crutch that will only atrophy their creative muscles.
This is important
Rules are not inherently bad, but it should be the photographer controlling the Rules, not the other way around. In fact, if you’re following the Rules, you’re not being creative. One more time: If you’re following the Rules, you’re not being creative.
A couple of examples
One of the most oft-repeated Rules is the Rule of Thirds, which dictates that the primary subject be placed at the intersection points in an imaginary grid dividing the frame into horizontal and vertical thirds (think tic-tac-toe). Another RoT mandate is to never center the horizon, but to instead place it one third of the way up from the bottom or down from the top. Reasonable advice for people who like their images to look like everyone else’s, but it completely ignores the myriad reasons for doing otherwise.
For example, visual artists are often told to give their subjects more space in the frame in the direction they’re looking. In other words, if the subject is gazing rightward, place them on the left side of the frame so they’re looking across the frame and not directly into a virtual wall. But watching “12 Years a Slave” last weekend (one curse of being a photographer is the inability to turn off my internal critic) I noticed Solomon Northup longingly gazing directly into the left border of the frame, with a vast open sky behind him. It doesn’t take a rocket scientist to figure out that this framing symbolized Northup’s physical and emotional confinement (but who doesn’t know someone who’d ding this framing at the photo club competition?).
And centering a subject is an effective creative tool. Photographing the Mono Lake South Tufa sunset above, I was thrilled to find the kind of mirror reflection usually reserved for sunrise at this often windy location. Enjoying softer light than I’d get shooting toward the sun at sunrise, I tried many compositions before settling on this absolutely symmetrical version to create an equilibrium that conveys the utter stillness I experienced that evening.
Shed the crutch and go forth
Rules serve a beginning photographer in much the way training wheels serve a five-year-old learning to ride a bike: They’re great for getting you started, but soon get in the way. As valuable as these support mechanisms are, you wouldn’t do Tour de France with training wheels, or the Boston Marathon on crutches.
In my workshops I’m frequently exposed to creative damage done to people rendered gun-shy by well-intended but misguided Rule enforcers. Camera clubs and photo competitions are great for many reasons, but I’d love to see them declared no-Rule zones. And if your group can’t no nuclear on Rules, how about at least adding a no-Rule (“best image that breaks a Rule”) competition or category to acknowledge that the Rules are not the final word?
My suggestion to everyone trying to improve their photography is to learn the Rules, but rather than simply memorizing them, do your best to understand their purpose, and how that purpose might conflict with your objective. Then, armed with that wisdom, each time you peer through your viewfinder, set the Rules aside and simply trust your creative instincts.
*Capitalized throughout to mock the deference they’re given
Come break the rules with me in a photo workshop
Eastern Sierra Photo Workshops
Asking for trouble at the camera club
Click an image for a closer look and slide show. Refresh the screen to reorder the display.


Returning to the scene of the crime
Posted on January 24, 2014
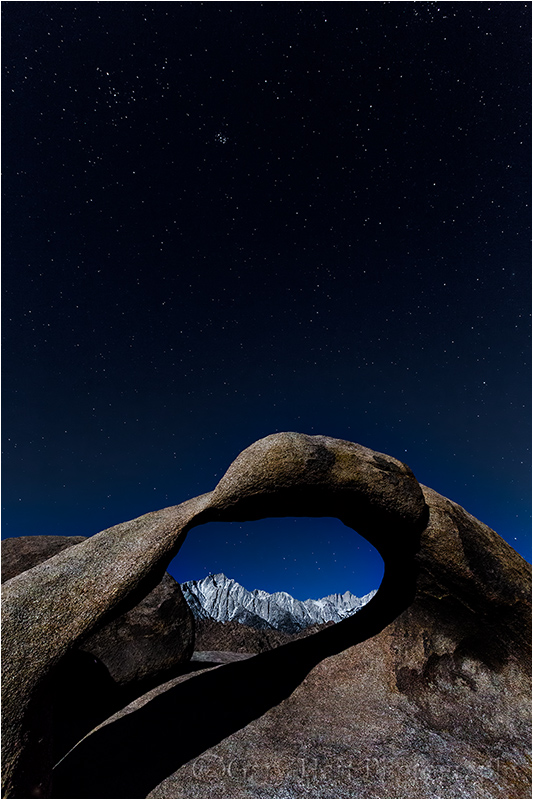
Moonlight, Whitney Arch, Alabama Hills, California
Canon EOS 5D Mark III
15 seconds
16 mm
ISO 3200
F8
* * *
Lone Pine Peak (12,944 feet) is on the left, Mt. Whitney (14,505 feet) is on the right. The small, dipper-shaped group of stars near the upper center is the Pleiades (a.k.a. the Seven Sisters) in Taurus, a cluster of new and still-forming stars about 400 light years distant.
Clueless. That’s one word that would describe my state the first time I attempted moonlight photography. It was about eight years ago, right here in the Alabama Hills. Though exposure and focus were more guesses than decisions, I ended up with a lucky shot of the Big Dipper suspended above moonlit granite boulders and an obsession was born.

Big Dipper, Alabama Hills, California
The other thing I remember about that visit was thinking it would be really cool to photograph a full moon setting behind Mt. Whitney (the tallest point in the 48 contiguous United States). That thought got me researching moonrise/set data, and software that would allow me to plot the view angles. I ended up tapping the wealth of tables on the U.S. Naval Observatory website, which, among other things, returned the azimuth (the number of degrees east of due-north) of the moon for any time and location on Earth, and the moon’s altitude (degrees above the flat horizon) at any specified time. Then I stumbled upon a tool in National Geographic Topo! software that allowed me to plot the azimuth and align my photo spot with my subject: I just pick my base point (the location from which I want to photograph) and click on a point on the map at the moon’s azimuth at the time I want to photograph it. The software conveniently draws a line connecting the two points—anything on the line aligns with the moon. Pretty cool (at least at the time—today there are tons of apps that make this much simpler).
Early one morning the following August, armed with ultimate confidence in my new-found knowledge, I embarked on a six hour drive to the Alabama Hills. My goals were two-fold: In addition to a sunrise moonset behind Mt. Whitney, I wanted to photograph the Whitney Arch by moonlight. I arrived late that afternoon, scouted a bit, photographed a rather boring sunset, then traipsed out to the arch in the dark (this was in the days before the trail that guides visitors right to it), about a quarter mile from the parking area, for a moonlight shoot. My continued cluelessness about moonlight photography was exacerbated this time by the fact that, following the lucky shot of my previous visit, I no longer knew I was clueless.
I had fun photographing in the perfect silence of absolute solitude, spent the night in the back of my truck, and woke to find the moon exactly where I’d plotted it. Phew. It turned out that my moonlight image from the previous night was okay, but the years have made me more aware of its flaws: Because focusing on the Sierra Crest was much easier than focusing on the arch, I ended up with just a little more foreground softness than I like. And my exposure was a little darker than ideal. (Flaws that become more apparent the larger the image.) For years I’ve wanted a do-over, and while I’ve been back many times, until last week circumstances have always prevented me from getting out to the arch in moonlight.
There’s really only room at the arch for three or four photographers to comfortably photograph Mt. Whitney through the opening. And when leading a workshop, my priority isn’t my own photography (one of the reasons I haven’t been able to manage a do-over). But this time only couple of others in my group decided to try their hand at the arch, so I squeezed in and clicked a few frames. I started horizontal, but quickly switched to vertical to maximize the sky (and eliminate a photographer on my left) and soon found a composition that worked. Drawing from experience, this time I focused on the arch, targeting the most distant moonlit spot in my frame. Focus, while difficult, was much easier than my first attempt as I found live-view magnified five times was just clear enough that I was pretty sure I’d found focus (10X was too muddled). But to be certain, I checked the resulting frame, magnified on my LCD, to verify. While the arch was indeed sharp, Whitney was slightly soft at f4, so I stopped down to f8 and bumped my ISO up to 3200. Bingo.
The cure for blue skies
Posted on January 20, 2014

Sunrise Moonset, Sierra Crest, Alabama Hills, California
Canon EOS 5D Mark III
1/8 second
29 mm
ISO 200
F11
* * *
The prominent mountain on the left is 12,944 foot Lone Pine Peak. At 14,495 feet, Mt. Whitney is the highest point in the 48 contiguous United States; it’s the shark-tooth peak left of center. The slightly concave mountain on the far right is 14,380 foot Mt. Williamson.
A good landscape image usually involves, well…, a good landscape. But that’s only half the equation—photographers also need photogenic conditions—soft light, interesting skies, dramatic weather, or anything else that elevates the scene to something special. While we have absolute control over the time and location of our photo outings, the conditions have a significant random (luck) component.
Despite being less than a day’s drive from many of the most treasured photo destinations in the world, most of my photo trips are planned months in advance. Workshops in particular require at least a year of advance planning on my part, and many months of schedule adjustment and travel arrangements for the participants. I think I’ve pretty much established that positive thinking, finger crossing, divine pleas, and ritual incantation (no virgin sacrifice yet) are of zero value where photography is concerned—sometimes conditions work out wonderfully, sometimes not so much. And while I’ve photographed my workshop locations many times, I know most of my workshop participants haven’t, which is why I do my best to schedule my workshops when the odds are best for interesting skies.
My annual Death Valley / Mt. Whitney photo workshop is a perfect example: Among the driest places on Earth, Death Valley gets only about an inch of rain each year and suffers from chronic blue skies. Ever the optimist, I schedule my DV/Whitney workshop from mid-January through early February, when the odds, though still low, are at least best for clouds. And while I’ve actually been pretty lucky with the clouds in past workshops, to hedge my bets further, I always schedule this workshop to coincide with a full moon—if we don’t get clouds, the moon always seems to save the day (and night).
This year’s DV/Whitney workshop wrapped up Saturday morning. Unfortunately, it landed in the midst of what is on its way to becoming an unprecedented drought in California. After two dry winters, this winter is worse—a persistent high pressure system has set up camp above California, creating an impenetrable force field that deflects clouds and and bathes the state weather that is absolutely beautiful for everything but photography. In this year’s DV/Whitney workshop’s four+ days, we enjoyed highs in the glorious 80s, and I don’t recall seeing a single cloud (though there were unconfirmed rumors of a cloud sighting on the distant horizon late in the workshop).
But cloudless skies don’t need to mean lousy photography—they just shrink the window of opportunity. Places like Mosaic Canyon and Artist’s Palette are nice in the early morning or late afternoon shade. And in general, when clouds aren’t in the picture, the best photography skies are on the horizon opposite the sun before sunrise and after sunset. Last week I made a point of getting my group on location at least 45 minutes before sunrise, and kept them out well past sunset to photograph Death Valley’s one-of-a-kind topography beneath twilight’s shadowless pink and blue pastels. Among other things, in this light the dunes were fantastic (I was able to find a relatively footprint free area) all the way from shadowless twilight through high contrast early morning light, and the first light on Telescope Peak from Badwater was wonderful.
But the workshop’s real highlight, the element that elevated our week into something special, was the moon. The real moon show didn’t begin until it showed up above the primary views on our final two sunrises, but we got a nice preview on our first sunset when the waxing gibbous disk rose into the twilight wedge above the mountains east of Hell’s Gate. The next evening I took the group to panoramic Dante’s View; while the prime objective was photographing Death Valley’s last light and the sun setting from 5,000 vertical feet above Badwater, I instructed everyone to walk across the parking lot after sunset to catch the nearly full moon rising above the equally expansive (though significantly less spectacular) panorama of distant peaks to the east. The moon arrived early enough to allow at least ten minutes of quality photography, then we just kind of hung out to watch it for a little while longer. Very nice.
Friday morning’s sunrise we found the moon glowing as promised in the predawn indigo above Zabriskie Point. As the morning brightened, we watched the nearly round disk slide through twilight’s throbbing pink before disappearing directly behind Manly Beacon just a few minutes after sunrise.
But as nice as the Zabriskie shoot was, I think my personal favorite was the workshop’s final sunrise from the Alabama Hills. The group, now expert at managing the difficult contrast between foreground shadows and brilliant moon, immediately spread out to find their own foreground. One or two headed straight for the Whitney Arch (aka, Mobius Arch), while the rest of us were quite content with the variety of boulders west and south of our the arch.
The thing that makes the Alabama Hills such a special location for sunrise is its position between towering peaks to the west, and relatively flat horizon to the east. At sunrise here, the Sierra crest juts into the blue and rose of the Earth’s receding shadow, then transitions to amber when the first rays of sunlight kiss its serrated peaks. You anticipate watch the sun’s arrival by watch the shadow descent the vertical granite until it bathes the weathered boulders with warm, ephemeral sunlight. Then, just like that, the show’s over.
I’ve shot this scene at sunrise so many times that I usually remain a spectator unless something special moves me to pull out my camera. Last Saturday, despite the absence of clouds, I just couldn’t resist the pull of the moon, which hovered like a mylar balloon in the night/day transition. At first there wasn’t enough light to photograph detail in the rocks and moon in a single frame, but eventually, with the help of a two-stop graduated neutral density filter, I was able to capture the image at the top of the blog.
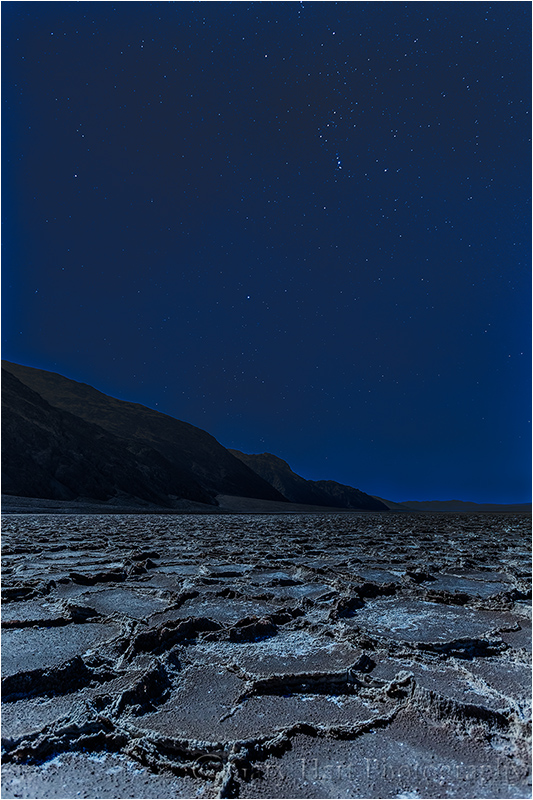
Orion, Badwater by Moonlight, Death Valley
Canon EOS 5D Mark III
15 seconds
17 mm
ISO 1600
F4
* * *
Another great thing about timing the Death Valley workshop to coincide with a full moon is our moonlight shoots. Of all the workshop moonlight shoots I do throughout the year, I think I look forward to the Death Valley Badwater shoot the most. This year’s didn’t disappoint—not only was the photography great, there’s just something about the playa’s warm temperatures and utter stillness that creates a genuinely festive atmosphere.

Moonset, Mt. Whitney and the Alabama Hills, California
* * *
Last year I photographed the same scene in different conditions. While this year’s capture highlights the Sierra crest and uses the blank sky and dark foreground to create a twilight feel, last year’s image was captured shortly after the sun lit the peaks and colored the clouds. I used a tighter composition to emphasize Mt. Whitney, the moon, and the pink clouds.
Stupid cold
Posted on January 12, 2014

Winter Glaze, Sunrise Point, Bryce Canyon
Canon EOS 5D Mark III
.5 seconds
22 mm
ISO 200
F16
We warm blooded humans have lots of ways to express the discomfort induced by low temperatures, ranging from brisk to chilly to freezing to frigid. But because I’ve always felt that we need something beyond frigid, something that adequately conveys the potential suffering, let me submit: stupid cold. At the risk of stating the obvious, “stupid cold” is when it’s so cold, the only people without a good reason to be outside (for example, the house is on fire) are, well….
Before I get into a recent personal encounter with stupid cold, let me offer a little background. Being California born and raised, I often find myself with a slightly higher cold threshold than many of my workshop participants. I’m not proud to say that pretty much when the temperature drops below 50, I’m breaking out the gloves and down jacket. Without shame. I get a lot of grief for this, but that’s fine because I’m comfortable. In fact, no matter how cold it gets in California, I’ve always been able to bundle up enough to stay comfortable. Viva la Mediterranean climate.
So imagine my chagrin when, while preparing for my recent trip to Bryce Canyon to co-lead Don Smith’s Bryce/Zion workshop, I saw overnight lows in the single digits (!) forecast. I know many people live places that get this cold, but how many of them actually go out specifically at the time when it’s coldest (sunrise)—and then just stand there? Unfortunately, when you’re a photographer, especially a photographer who is counted on by paying customers, staying in bed at sunrise is not an option.
So anyway, single digit lows. Surely, I rationalized, anyone who can endure night games at Candlestick Park in July, can, given enough layers, handle whatever Bryce can dish out. So, employing my tried and true Candlestick Park infinite layer approach, I sucked it up, cleared my closet of all cold weather gear, crammed it into my largest suitcase, then crossed my fingers when the Southwest ticket agent hefted the bulging cube onto the scale (49.8 pounds, thankyouverymuch). Off to Bryce.
So whatever happened to those days when the weather forecast was a crap-shoot, when you never really worried about the forecast too much because it was rarely right? We arrived at Bryce to find temperatures as cold as advertised. Windy too. And as if to rub salt in the wound, the coldest shoot we had was the workshop’s first sunrise, before anyone had a chance to acclimate: 10 degrees fahrenheit and 25 MPH winds (I know, I know, that’s nothing compared to your January Yellowstone bison shoot, or that time in Saskatchewan when you stayed up all night to photograph the northern lights, but you can’t say anything unless you sat through the last pitch of a night game at Candlestick Park).
I must say, my Candlestick more-is-better strategy almost worked. Two pairs of wool socks inside sub-zero rated boots kept my toes nice and toasty for the duration. Silk long-johns, flannel-lined jeans, insulated over-pants—my legs were happy too. And my torso did quite well inside a long sleeve wool undershirt, Pendleton (wool) shirt, Patagonia down shirt, and a down jacket. My ears were cold but tolerable beneath a wind-stop ear band and cozy wool cap. And my nose, cheeks, and mouth were a bit more exposed, but a wool gator took enough of the edge off to make it manageable.
But, despite all the preparation, what thirty years of Candlestick experience hadn’t prepared me for was cold hands. Oh. My. God. I thought I was ready with my thin poly running gloves as liners for thick wool gloves—not even close. The problem was, unless you’re keeping score, watching a baseball game doesn’t require hands unless there’s something to cheer for (a rare event for most of my Candlestick years)—at the ‘Stick I could sit on my (gloved) hands, bury them in pockets or beneath my wool blanket (never left home without one), or all of the above. But a camera, it turns out, requires hands. Fingers too. I quicky found that I could compose and click maybe three frames before the cold drove me to the nearby visitor’s shelter to pound life back into my fingers. Not a productive morning.
After this first sunrise, things improved. Temperatures warmed a bit, the wind abated, my body adjusted (slightly), and I was able to mitigate my hand problem with the purchase of silk liner gloves and thicker wool gloves. I also came away with a new found appreciation of my Hawaii workshops—sunrises in a tank-top, shorts, and flip-flops. Nothing stupid about that.
Compared to the cold we’d experienced at sunrise, at 20 degrees, the afternoon I took this picture was downright balmy. When we arrived at Sunrise Point, the snow that had been falling most of the afternoon was still falling, obscuring the view to the point where many in the group retreated to the car. But those of us who stayed out were treated to a twenty minute window between the lifting of the clouds and the fall of darkness. Not the spectacular color and warm light that generates so much excitement, but wonderful, even light that really allowed the pristine snow to stand out against the red sandstone.

