Eloquent Images by Gary Hart
Insight, information, and inspiration for the inquisitive nature photographer
Photography’s Creativity Triad: Depth
Posted on November 18, 2017
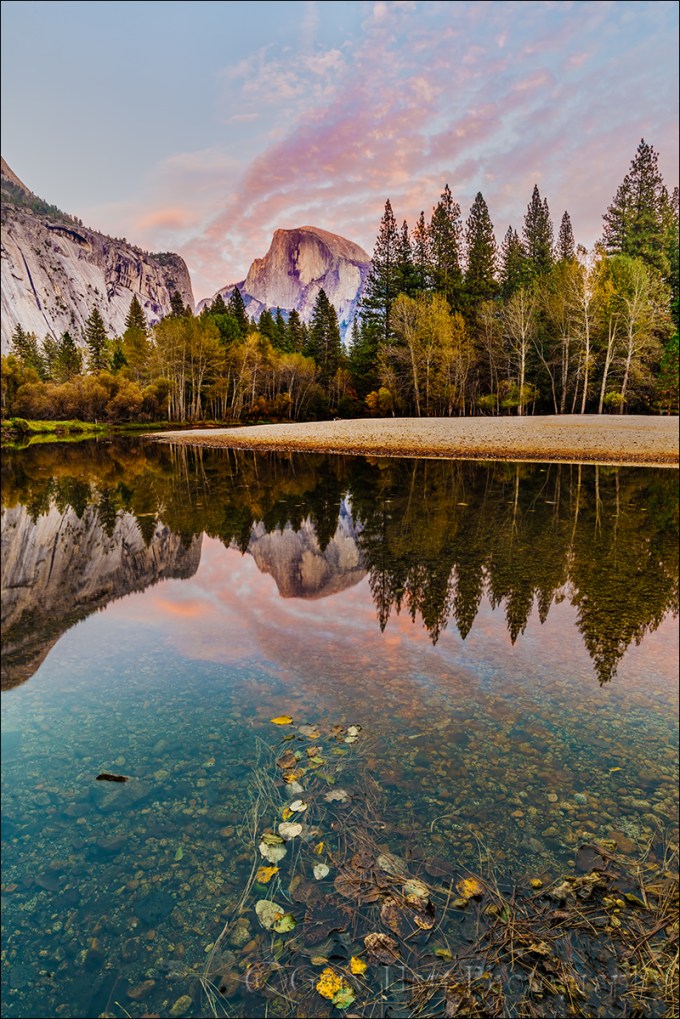
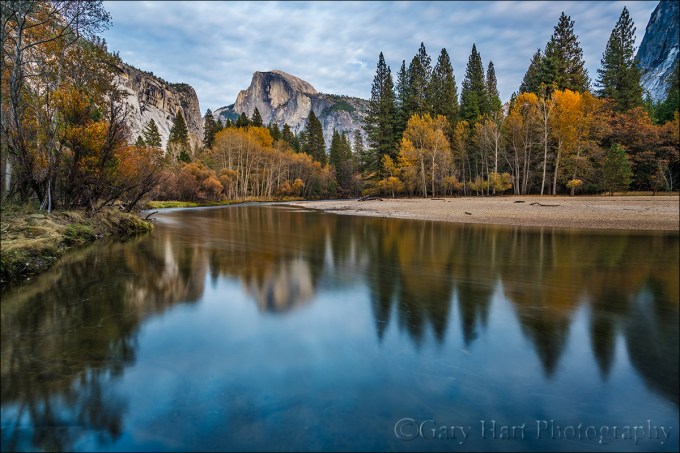
Autumn Reflection, Half Dome, Yosemite
Sony a7R II
Sony 16-35 f/2.8 GM
.8 second
F/16
ISO 200
Photography’s Creativity Triad
Enduring photographs don’t duplicate human reality, they reveal unseen aspects of our world. Capturing this hidden world requires mastery of photography’s “creativity triad” that distinguishes the camera’s vision from human vision: motion, light, and depth.
Photography is the futile attempt to squeeze a three-dimensional world into a two-dimensional medium. But just because it’s impossible to truly capture depth in a photograph, don’t think you shouldn’t consider the missing dimension when crafting an image. For the photographer with total control over his or her camera’s exposure variables (what exposure variable to change and when to change it), this missing dimension provides an opportunity to reveal the world in unique ways, or to create an illusion of depth that recreates much of the thrill of being there.
Creative Selective Focus

Poppy Pastel, Sierra Foothills, California (1oomm, f4, ISO 400, 1/125)
A personal favorite solution to the missing depth conundrum I call creative selective focus: An intentionally narrow depth of field with a carefully chosen focus point to flatten a scene’s myriad out-of-focus planes onto the same thin plane as the sharp subject. This technique softens distractions into a blur of color and shape, complementing and emphasizing the subject.
I especially enjoy using creative selective focus for isolation shots of colorful leaves each autumn, and for dogwood and poppy close-ups in spring. Looking for a striking subject that stands out from the surroundings, I position myself to create foreground and/or background relationships that complement my primary subject.
When composing the poppy scene depicted here, I tried to frame the foreground trio of poppies with distant poppies and other wildflowers that I knew would become soft splashes of color. Using a macro lens with extension tubes, a large aperture, and a very close focus point, I achieved a paper-thin range of sharpness that softened the busy background and helped my primary subjects stand out.
A couple of years ago I wrote an article on this very topic for “Outdoor Photographer” magazine. You can read a slightly updated version of this article in my Photo Tips section: Selective Focus.
The Illusion of Depth
Sometimes a scene holds so much near-to-far beauty that we want to capture every inch of it. While we can’t actually capture the depth our stereo vision enjoys, we can take steps to create the illusion of depth. Achieving this is largely about mindset—it’s about not simply settling for a primary subject no matter how striking it is. When you find a distant subject to feature in an image, scan the scene and position yourself to include a complementary fore-/middle-ground subjects. Likewise, when you want to feature a nearby object in an image, position yourself to include a complementary back-/middle-ground subjects.
Autumn Reflection, Half Dome, Yosemite
Guiding my workshop group to a placid bend in the Merced River on this year’s Yosemite Autumn Moon photo workshop, I was instantly drawn to the reflection of Half Dome. The cottonwoods lining the distant shoreline were at their peak autumn gold, and a collection of clouds above Half Dome caught the late afternoon sun, promising good odds for a colorful sunset. These features alone would have made a great image, but I looked around for something to add to the close foreground.
I didn’t need to look long, as just about fifty feet downstream I found a collection of colorful leaves jutting into the river, perpendicular to the shore. I shifted my position until the leaves appeared to point directly at Half Dome and dropped my tripod until my camera was about a foot above the water. With a half hour or so until sunset, I had plenty of time to play with the scene, familiarize myself with all the compositional variables, and refine my composition and focus point. Despite the relative closeness of the floating leaves, at 16mm I knew I had plenty depth of field to carry the entire scene if I was careful. Stopping my lens down to f/16, I focused on a leaf near the middle of the group, about two feet away. This gave me good sharpness from about a foot to infinity and I was in business.
Here’s my Photo Tips article on using hyperfocal focus techniques to enhance your images’ illusion of depth: Depth of Field.
Managing Depth


Yosemite Reflections
Posted on October 28, 2017

Spring Sunset, Leidig Meadow, Yosemite
Sony a7R II
Sony/Zeiss 16-35
3.2 seconds
F/9
ISO 200
Rather than attempt the impossible task of choosing a favorite season in Yosemite, I find it easier to identify the things I like most about each season. From colorful fall to white winter to saturated spring, Yosemite becomes a completely different place with each season. (FYI, summer is for tourists.) But regardless of the season, I think it’s Yosemite’s reflections that make me happiest.
Yosemite’s reflection locations vary with the season. After a storm, small reflective pools form in Yosemite’s ubiquitous granite, then disappear almost as quickly as they appeared. The Merced River, is a continuous ribbon of reflection in the late summer and autumn low-water months, and a churning torrent in spring. But even in those high snowmelt months, reliable pockets of calm can be found along the riverbank, and there are a handful of spots where the river widens and smooths enough to reflect color and shape.
I think my favorite Yosemite reflections may be the ones I find in the flooded meadows during a wet spring, not necessarily because they’re any more beautiful than the other reflections, but mostly because they’re much more rare. Many years we don’t get these vernal pools at all, and even when they do form, their lifetime is measured in days or weeks.
Following years of drought, a record winter snowfall earlier this year translated to a record spring snowmelt, sending the Merced River well over its banks and into many of Yosemite’s normally high-and-dry meadows. This wasn’t “run for your life!” flooding, it was a gradual rise that seeped into and eventually submerged meadows, trails, and even some Yosemite Valley roads.
Leidig Meadow west of Yosemite Lodge is one of those spots that doesn’t usually flood, but flooding here is far from unprecedented. This year when I parked in my usual spot west of the meadow and attempted the normally relaxing 1/4 mile stroll along the river, I had to wade through eight inches of water to make it to the meadow. When I returned a few days later with my workshop group, even after choosing another somewhat less treacherous parking spot, we still had to pick our steps carefully or risk a shoe-full of water.
Meadows are always fragile, but never more-so than when they’re wet, so rather than venture further into the meadow, we set our sights on the numerous reflections among the trees near the (mostly submerged) trail. Even still, we ended up with a number of wet shoes and pant legs, some accidental and some by design (to get the shot, of course).
When it appeared the sunset show was over, the group started to pack up and head back to the cars. About the time I was ready to call it myself, I noticed a little bounce-back pink in the thin clouds overhead and warned everyone that they might be packing it in a little too soon. Many were anxious to get dry and escape the mosquito feast, but those of us who stayed were rewarded with about ten minutes of post-sunset color that went from pale pink to electric magenta, one of those moments in nature that you think just can’t get any better until somehow it does.
Reflecting a bit on reflections
A reflection can turn an ordinary pretty picture into something special. Of course they aren’t always possible, but when the opportunity exists I pursue reflections aggressively, scanning the scene for potentially reflective water and positioning myself accordingly. Too often I see people walk up to a reflection, plop down their tripod, and make a picture of whatever happens to be bouncing off the water at their feet. But maximizing reflection opportunities starts with understanding that, just like a billiard ball striking a cushion, a reflection always bounces off the reflective surface at exactly the same angle at which it arrived.
Armed with this knowledge, when I encounter a reflective surface, I scan the area for something worthy of reflecting. Sometimes that’s easy (Half Dome, for example), sometimes it’s a little tougher (like a rapidly moving sunlit cloud). Knowing that all I need to do is position myself in the path of the reflection of my target subject, I move left/right, forward/backward, up/down until my object appears. I’ve observed that many people are pretty good about the left/right thing, not quite so good with the forward/backward part, and downright miserable at the up/down. But I’ve found that once I get the left/right position nailed, it’s the up/down that makes the most difference.
For example, in the spring reflection of Half Dome at the top of this post, it’s not an accident that the Half Dome and North Dome reflections are centered and uncluttered by all the grass and leaves scattered throughout the water. The centering part was pretty easy, but finding a large enough clean surface to reflect the two domes required a lot of forward/backward maneuvering, combined with frequent up/down dipping—I’m sure to the uninformed observer it appeared that I was trying out a new dance routine.
Read more about reflections
A Gallery of Yosemite Reflections


Yosemite game-changer
Posted on June 26, 2017

Evening Reflection, Mirror Lake, Yosemite
Sony a7R II
Sony 12-24 f4 G
12mm
1/15 second
F/9
ISO 100
“Game changer” is most certainly a cliché, but every once in a while I get to use the term without shame. I used it when I switched from film to digital; again when I discovered that the Sony a7R (and now the a7RII) gave me 2- to 3-stops more dynamic range than my Canon 5DIII; one more time when I first turned the Sony a7S (since replaced with the a7SII) toward the night sky. And I think I’ll trot it out once more for Sony’s new 12-24 f4 G lens.
Of course I can only speak for the 12-24’s change in my game—your results may vary. But as a landscape-only shooter who spends a lot of time in Yosemite, this lens allows me to capture images that were heretofore not possible with anything in my bag: Game changed.
Early last month, with only a few days to play with the new (and at the time, top secret) lens, I beelined to Yosemite. My first stop was Mirror Lake, a wide spot in Tenaya Creek that isn’t technically a lake (it’ll be dry by summer’s end), but each spring is most definitely a mirror. The coveted feature here is Half Dome, which towers more than 4,000 feet above the glassy water, close enough to require some serious neck craning. Many times at Mirror Lake I’ve visualized a composition that includes Half Dome and its reflection, only to be thwarted because even at its widest, a 16-35 lens isn’t wide enough.
Since my days with the lens were limited, I wasn’t able to time my visit for interesting weather or some celestial event. No worries, I rationalized, even on Yosemite’s standard blue-sky days, I can always count on warm, late afternoon light bathing Half Dome—not spectacular, but reliably nice.
I arrived at the lake about an hour before sunset and immediately started seeking out compositions to put the new lens to the test. I can’t tell you how thrilled I was to mount the 12-24 on my a7RII, put my eye to the viewfinder, and see all of Half Dome and its reflection with room to spare. It wasn’t long before I zeroed in on the scene you see here (that required me to balance atop a rock about three feet from the shore, tripod 10 inches deep in frigid snowmelt).
As luck would have it, just as the light started to warm, a few clouds drifted down from the north, so I quickly adjusted my composition and waited for them to slip into my composition. They were moving quite fast, leaving a window of just a few seconds when they filled the sky without being seriously truncated by the border. With composition, exposure, and focus set, I clicked a half dozen rapid-fire frames before the clouds started drifting out of the frame.
This was just my first stop with this lens. On the walk back to my car I stopped for a shot that I shared a few weeks ago; that night, and again the next morning, I tried it at a favorite El Capitan View with great success (to be shared in a future blog). And before returning home, I discovered a completely unexpected use at Yosemite Falls. Needless to say, I’ve already ordered this lens—I expect to see it next month.
Workshop Schedule || Purchase Prints
A Half Dome Gallery
Click an image for a closer look and slide show. Refresh the window to reorder the display.


Happy Father’s Day, Dad
Posted on June 18, 2017

Sunset Palette, Half Dome from Sentinel Dome, Yosemite
Canon EOS-1Ds Mark II
Canon 24-105L
2 seconds
F/20
ISO 100
June 2017
This summer it will be 13 years since I lost my dad to Alzheimer’s disease. He would have turned 87 next month, and I have no doubt that his body would still be going strong if the Alzheimer’s hadn’t taken over. Sadly, it’s difficult to fully appreciate a parent’s influence until they’re gone. We’re certainly aware of the love, wisdom, advice, discipline, tears, and laughs while we’re in the midst of growing up, but it takes being a parent to fully appreciate our parents’ influence on the adults we become.
Dad was a United Methodist minister who literally practiced what he preached. In 1965, when Martin Luther King issued a plea to clergy to join him, Dad borrowed money and flew across the country to march with Dr. King in Selma, Alabama (he was on national TV getting arrested). His was an inclusive theology that respected all religions: I can remember Dad preaching at the local synagogue on a Saturday, and reciprocating in our Sunday service by opening his pulpit to the rabbi. And I’ve lost track of the number of homeless people, including families with young children, we housed while they tried to get back on their feet.
More than the values he instilled, so many of the things that define me today are directly attributable to my dad’s influence. My love of sports and sense of humor for sure. And when asked how I became a photographer, I have to cite Dad. My standard answer has always been that Dad was a serious amateur photographer whose 80-hour work week offered too little time to pursue his passion, so he made up for lost time on our summer family vacations—I grew up believing that a camera was just a standard outdoor accessory. But I think his influence goes deeper than that. More than simply modeling camera use, Dad instilled his appreciation of nature’s beauty, and his longing for its soothing qualities.
Our vacations were, without exception, camping trips—always tent-camping, though in the later years we splurged on a used, very basic tent trailer (no kitchen, bathroom, or any of the other luxuries available in today’s tent trailers). A few times we (Dad, Mom, my two brothers, and I) hit the road for a longer camping trip, one summer taking a month to camp all the way across the country, another summer venturing into the Canadian Rockies. But usually we took advantage of the mountain scenery (always the mountains) closer to our California home.
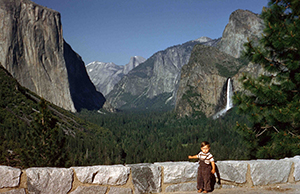
Me, on an early (but probably not my first) Yosemite trip
Of these locations, Yosemite was the clear favorite. Marveling at the Firefall from Camp Curry and Glacier Point, waiting in lawn chairs at the Yosemite dump for the bears to arrive for their evening meal (really), rising in the dark for a fishing expedition to Tuolumne Meadows, family hikes up the Mist Trail to Vernal and Nevada Falls, are just a few of the memories that I only realize in hindsight formed my Yosemite connection.

My father’s rainbow
My favorite Dad photography story happened when I was about ten. It involves an electrical storm atop Sentinel Dome, and his desire to get the shot that was so great that it trumped common sense. As his ignorant assistant, I stretched to hold an umbrella high above Dad’s head to keep his camera dry. (In his defense, as Californians, lightning was a true novelty that trumped full appreciation of its dangers.) We didn’t get the lightning, and more importantly, it didn’t get us. But what I remember more than anything about that day was Dad’s excitement when later that afternoon he was able to photograph a rainbow arcing across the face of Half Dome.
This story has achieved family legend status, and we’ve felt a special connection to Sentinel Dome as a result. When it came time to scatter Dad’s ashes, Sentinel Dome was the obvious choice.
One more thing
I have the reputation for being very lucky where photography conditions are concerned: The clouds that part just as the moon rises, the snowstorm that blankets Yosemite Valley just as the workshop begins, the rainbow arcing across the Grand Canyon. In our family we like to believe that Dad is somehow up there pulling some strings. It’s just the kind of thing he’d do.
I love you, Dad.
Workshop Schedule || Purchase Prints || Instagram
Sharing the Love: A Yosemite Gallery
Click any image to scroll through the gallery LARGE


Seeing the future
Posted on June 1, 2017

Rapids, Half Dome and Tenaya Creek, Yosemite
Sony a7R II
Sony 12-24 f4 G
12mm
.8 seconds
F/9
ISO 200
Ansel Adams and visualization
Most photographers know that Ansel Adams visualized his prints, and the darkroom work necessary to create them, before clicking the shutter. This ability to look into the future of each capture is part of what set Ansel Adams apart from his peers.
But Adams’ extensive darkroom work is often cited by digital photographers defending their over-processesed images. We’ve all heard (and perhaps even uttered ourselves) statements like, “Ansel Adams spent more time in the darkroom than he did in the field,” or “Ansel Adams would love Photoshop.” Perhaps true, but using Ansel Adams’ darkroom mastery to justify extreme Photoshop processing misses a significant point: Adams’ mental picture of the ultimate print was founded on a synergistic relationship between his vision and his camera’s vision, coupled with a master’s control of capture variables like composition, light, motion, and depth. In other words, Adams’ gift wasn’t merely his darkroom skills, it was an overarching vision that enabled him to make decisions now based on invisible realities he knew he’d encounter later.
I bring this up because I’m concerned about many photographers’ Photoshop-centric “fix it later” approach that seriously undervalues capture technique. This mindset ranges from simple over-reliance on the LCD for exposure with no real understanding of the histogram or how metering works (shoot-review-adjust, shoot-review-adjust, shoot-review-adjust, until the picture looks okay), to photographers who channel their disappointment with an image into an overzealous Photoshop session, pumping color, adding “effects,” or inserting/removing objects until they achieve the ooooh-factor they crave.
The better approach is to understand the potential in a scene, anticipate the processing that will be required to make the most of it, and shoot accordingly. In other words, Photoshop should inform capture decisions, not fix them.
Putting Photoshop in its place
Every image ever shot, film or digital, was processed. Just as the processing piece was easy to ignore when the exposed film you sent to a lab magically returned as prints or slides, many digital shooters, forgetting that a jpeg capture is processed by their camera, brag that their jpeg images are “Exactly the way I shot them.” Trust me, they’re not.
Whether you shoot monochrome film, Fuji Velvia slides, or low-compression jpeg, there’s nothing inherently “pure” about your image. On the other hand, digital landscape photographers who understand that processing is unavoidable, rather than relinquish control of their finished product to black-box processing algorithms in the camera, usually opt for the control provided by raw capture and hands-on processing.
Unfortunately, Photoshop’s power makes it difficult for many to know where to draw the processing line. And every photographer draws that line in a different place—one man’s “manipulation” is another’s “masterpiece.” Photoshop isn’t a panacea; its main function should be to complement the creativity already achieved in the camera, and not to fix problems created (or missed) at capture.
While I’m not a big Photoshop user, I readily acknowledge that it’s an amazing tool that’s an essential part of my workflow. I particularly appreciate that Photoshop gives the me ability to achieve things that are possible with black and white film and a decent darkroom, but difficult-to-impossible with the color transparencies I shot for over 25 years.
Creating an image, from start to finish
I was in Yosemite on a “secret mission” (my inner 10-year-old just loves saying that) for Sony, trying out the yet-to-be-announced (at the time) Sony 12-24 f4 G lens. Among the many places in Yosemite that are especially conducive to ultra-wide photography is Mirror Lake and its view of Half Dome from directly below, and that’s where I started.
Walking up the trail to Mirror Lake, I skirted Tenaya Creek in less than ideal light, scouting potential scenes for later. On the walk back after sunset, I returned to this scene that I’d found and mentally composed earlier. Despite already having an idea of how I wanted to shoot it, there’s quite a bit going on here, so it took some time and a bit of rock scrambling to get all the elements to work together: Half Dome, Tenaya Creek, the nearby evergreen, and the creekside boulders.
While most of the scene was in deep shade, the sky was still relatively bright. Capturing this much dynamic range in an unprocessed jpeg (or color transparency) would have been impossible—my highlights would have been too bright, the color in the sky would have been washed out, and the shadow detail would have been lost to blackness. And that’s exactly what I saw in the jpeg that popped onto my LCD. But despite the crappy looking jpeg on the back of my camera, my histogram told me all my color and detail was there in my raw file.
With a good histogram, I adjusted my ISO up and down, compensating with a corresponding shutter speed adjustment, to get different blur effects in the creek. Opening the raw file in Lightroom, I simply pulled the Highlights slider to the left and the Shadows slider to the right to confirm my successful exposure. While the exposure adjustment was essential, once that was done, there was very little processing left to do. And as much as he enjoyed the dark room, I suspect Ansel would have embraced any technology that gave him more time outdoors with his camera.
Workshop Schedule || Purchase Prints
Different Takes on Half Dome


Variations on a scene
Posted on March 14, 2017
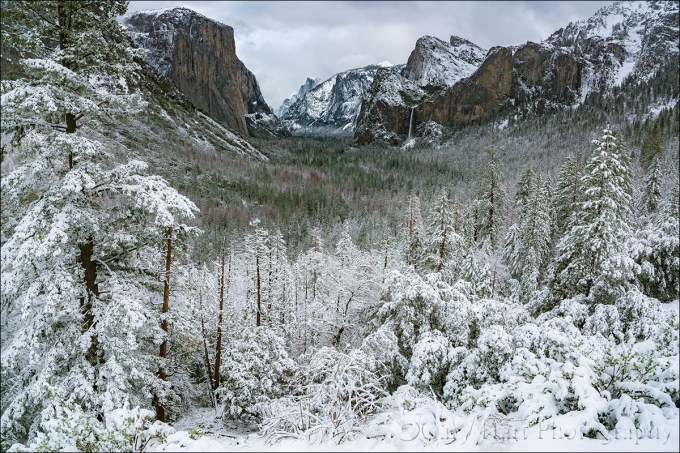
Snowfall, Tunnel View, Yosemite
Sony a7R II
Sony/Zeiss 16-35 f/4
1/250 second
F/9
ISO 100
A week or so ago I had the good fortune to be in Yosemite for the most recent snowfall there. All week the National Weather Service had been waffling a bit on the snow—based on the forecast, I probably wouldn’t have made the trip. But I was there anyway, guiding a fun couple from England for the weekend. Following a nice but unspectacular Saturday, we woke Sunday morning to find the world dipped in white.
The snow fell all day, at times so hard that that it was difficult to see more than a couple hundred yards, other times dwindling to a few flakes per minute. During one of the lulls we made our way to Tunnel View for the obligatory shot there. Despite hundreds (thousands?) of pictures of this view, after surveying the scene for a few minutes I couldn’t resist pulling out my camera and tripod.
My general feeling is that people tend to go too wide with their Tunnel View images, shrinking the main features (El Capitan, Half Dome, Bridalveil Fall) to include less exciting granite left of El Capitan and right right of Cathedral Rocks/Bridalveil Fall. That’s why I opt to tighten my horizontal Tunnel View compositions on the left and right, or isolate one or two of the three primary subjects with a telephoto. And when something exciting is happening in the sky (moon, clouds, or color) or foreground (fog, snow, rainbow), I’ll often compose vertically and bias my composition to favor the most compelling part of the scene.
With so many Tunnel View images in my portfolio, that afternoon I consciously set aside my long-held composition biases in favor of something I don’t already have. Of course the feature that most set the scene apart was the snow, so I set out to find the best way to emphasize it. Because the snow level that day was right around 4000 feet, also the elevation of Yosemite Valley, even the three hundred or so feet of elevation gain at Tunnel View resulted in much more snow virtually at my feet than on the distant valley floor. My Sony/Zeiss 16-35 f/4 lens, a great lens that I usually find too wide for Tunnel View, was perfect for highlighting the foreground snow.
Dialing my focal length to about 20mm allowed me to maximize the foreground snow while including minimal less-than-interesting gray sky. Of course going this wide meant shrinking the scene’s “big three” and adding lots of extraneous middle-ground on the left and right. To mitigate that problem I used the snowy pine on the left, often an obtrusive distraction to be dealt with, as a frame for that side of the scene. Not only did the tree block less interesting features, it actually enhanced the snowy effect I sought. On the right the diagonal ridge added a touch of visual motion (diagonal lines are so much stronger visually than horizontal and vertical lines), and it didn’t hurt that much of the bland granite there was covered with snow.
Workshop Schedule || Purchase Prints
A Tunnel View Gallery
Click an image for a closer look and slide show. Refresh the window to reorder the display.


The illusion of depth
Posted on February 4, 2017
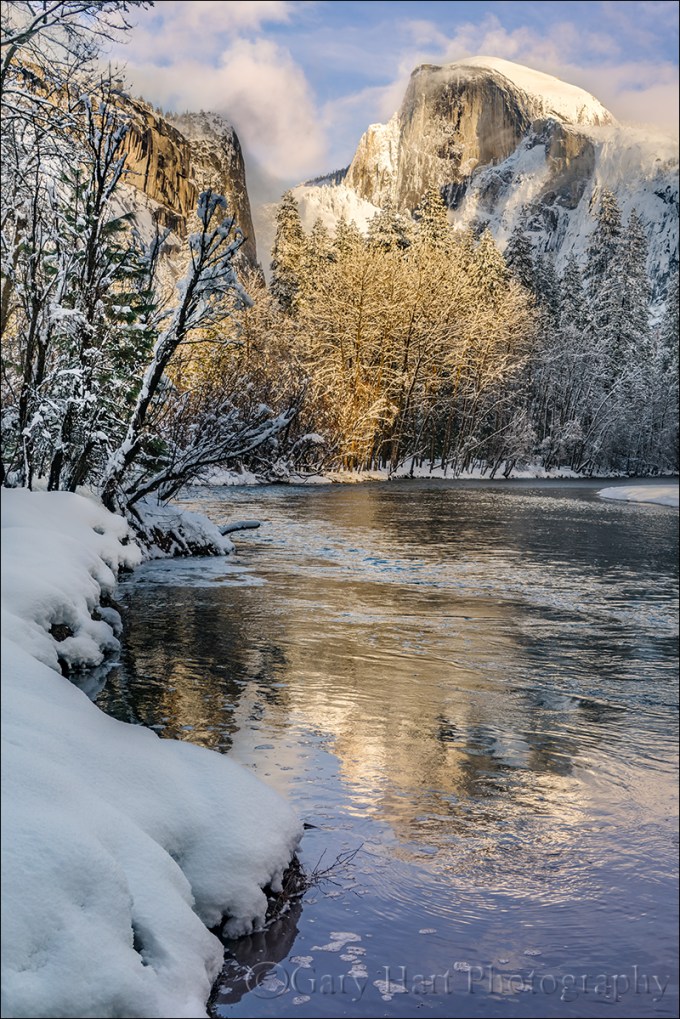
Frozen Reflection, Half Dome, Yosemite
Sony a7R II
Sony/Zeiss 24-70 f4
1/40 second
F/9
ISO 100
It seems too obvious to mention, but I’ll say it anyway: Photography is a futile attempt to render a three-dimensional world in a two-dimensional medium. Unfortunately, that reality doesn’t seem to keep people from putting their eye to their viewfinder and clicking without regard for their camera’s unique view of the world. But here’s a secret: Anyone with a camera can manage the lateral (left-to-right) aspect of a scene, but the photographers who distinguish themselves are those able to convey the illusion of depth by translating a scene’s actual depth to their camera’s virtual depth.
Creating the illusion of depth isn’t rocket science. It starts with seeking a foreground for your beautiful background, or a background for your beautiful foreground. Once you’ve figured out your foreground or background, do your best to ensure that the elements at varying depths don’t merge with each other—the more elements in your frame stand alone, the more you invite your viewers to move incrementally through the frame, hopping (subconsciously), front to back, from one visual point to the next. Getting elements to stand apart often requires some physical effort on your part (sorry): Moving left/right, up/down, foreword/backward changes the relationship between objects at varying depths, sometimes quite significantly.
With your foreground and background identified, decide whether you want the entire image in focus, or selective focus that guides your viewer to a particular point in the frame. With all your pieces in place, you’re ready to choose your f-stop and focus point. (Here’s some extra credit reading: hyperfocal focusing techniques.)
About this image
The primary subject here is Half Dome, but I had to work incorporate all the other wonderful things going on this afternoon: fresh snow, beautiful clouds, warm sunlight, and an abstract reflection.
With Half Dome as my centerpiece, my biggest concern was organizing the other visual elements into a coherent image. I started with the decision that a vertical orientation would make the most efficient use of the scene, allowing me to include the river at the bottom of my frame and Half Dome at the top without shrinking the scene and introducing less interesting elements on the left and right. I didn’t want too much sky, but I found a break in the clouds for the top of my frame.
I could have moved a little to the right and made the reflection my entire foreground, but I decided to use the snowy riverbank to convey an illusion of depth. Because there wasn’t too much visual interest in the snow, I included just enough snow to frame the left side of my scene. A focus point about 20 feet away gave me sharpness throughout my frame. Click.
Focus and depth of field simplified
Workshop Schedule || Purchase Prints
A Gallery of Depth
Click an image for a closer look and slide show. Refresh the window to reorder the display.


Seeing double
Posted on January 22, 2017
Autumn Mirror, Half Dome, Yosemite
Sony a7R II
Sony/Zeiss 16-35 f4
30 seconds
F/8
ISO 50
People stay away from Yosemite in autumn because that’s when the waterfalls are at their lowest. But believe it or not, Yosemite isn’t all about waterfalls. El Capitan, Half Dome, Cathedral Rocks, the Three Brothers (I could go on) are great subjects in their own right. Subtract the waterfalls but add the yellows, oranges, and reds of Yosemite Valley’s many deciduous trees and you have what I think is a pretty a fair trade. And when the water is low, the usually turbulent Merced River smooths to a reflecting ribbon of glass; suddenly, pretty much any scene can be doubled at your feet.
These reflections add layers of creative possibilities impossible the rest of the year. I usually try to photograph each reflection scene several ways—splitting it in the middle for a 50/50 mirror effect, isolating the reflection only, emphasizing the reflection with just enough of the primary scene to establish context, and using a partial reflection to accent to the primary scene—then decide later which I like best.

In this image I split the frame 50/50, but dialed down the reflection with my polarizer. Even polarized, the bright sky’s glare washed out much of the river surface, painting the outline of El Capitan like a negative that uses the trees with a jigsaw of submerged river rocks.

This one is all about the reflection, with the snow-covered forest used to frame El Capitan’s image in the Merced River. Here I dialed my polarizer to a mid-point, holding the reflection of El Capitan but dialing down the homogenous gray sky.

Here I used a more conventional composition, emphasizing El Capitan’s bulk against clouds that were spitting small, wet snowflakes.
About this image

I took another favorite approach for the featured image at the top of this post, using a long exposure in low light to smooth moving water and enhance the reflection. My workshop group had already had a nice shoot that evening—it started with warm, late light on Half Dome, some nice color at sunset, and rapping up with textured clouds above Half Dome as darkness fell.
By the time I captured this frame the scene was much darker than what you see here. With the reflection disturbed by slight ripples and floating bubbles, the darkness of post-sunset twilight enabled me to extend my shutter speed to 30 seconds, which smoothed the reflection and turned the bubbles into soft white streaks.
Workshop Schedule || Purchase Prints
A Gallery of Yosemite Reflections
Click an image for a closer look and slide show. Refresh the window to reorder the display.


Dressed for chill
Posted on January 17, 2017
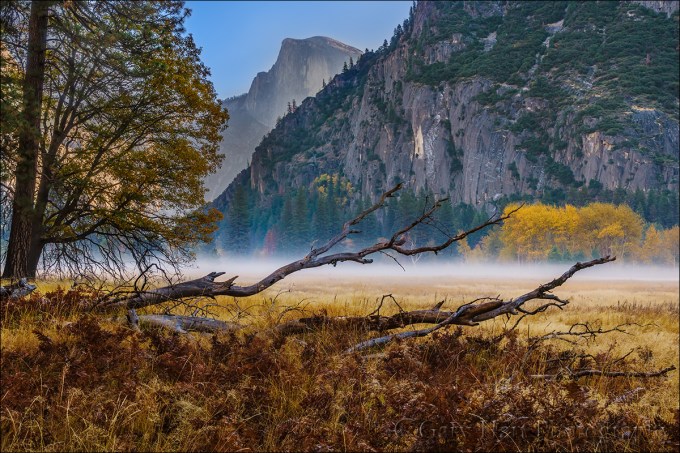
Autumn Morning, Leidig Meadow, Yosemite
Sony a7R II
Sony/Zeiss 24-70 f4
1/15 second
F/11
ISO 125
A regrettable reality of my life is that the best conditions for photography are usually the absolute worst conditions to be outside. Fortunately, I’ve been hardened by decades of San Francisco Giants games at Candlestick Park, the coldest place on Earth. As a photographer, I continue to embrace my mantra for warmth at the ‘Stick: Too much is always better than not enough.
For me it’s all about layers: silk, wool, down, and Gore-Tex. I start winter mornings with wool socks, waterproof boots, silk long-johns (if it’s extremely cold), flannel lined jeans, wool long-sleeve undershirt, wool Pendleton or lined cotton shirt, vest, down jacket, gloves (I have a variety from thin to thick), neck gaiter, and a hat or band that covers my ears. I add and remove layers as conditions dictate, and don’t always wear everything, but I’m never too far from this stuff in winter. And if it’s raining or snowing, I add waterproof pants, a waterproof parka, waterproof boots, and a wide-brim waterproof hat to keep myself dry, freeing my umbrella to keep my gear dry while shooting.
The basic clothes I pack in my suitcase before each trip, but the gloves/hats/umbrella etc. are in a gym bag that is always in my car. In the car I also keep an extra pair of shoes and socks, towel, and garbage bag (to cover my camera when it’s on the tripod). With all this paraphernalia, I’m nice and toasty in whatever extremes the winter throws at me, and I can never use weather as an excuse for missing a shot.
About this image
On a very chilly morning in late October, my workshop group had wrapped up the sunrise shoot and was heading to breakfast when we passed Leidig Meadow beneath a thin veneer of fog. Knowing that the group was cold and hungry, I kept going, but in the cafeteria parking I polled everyone and found that while about half were ready for warmth and a hot breakfast, the other half wanted to return to photograph the meadow. They got no argument from me. In normal conditions this wouldn’t have been possible because Yosemite’s primarily one-way traffic flow would have required a 20-minute loop to return to this spot, and the fog would likely have been long gone. But this year, extensive roadwork had caused the National Park Service to make every open road two-way, and we were back at Leidig Meadow in two minutes.
Yosemite’s radiation fog can come and go in seconds (I crossed my fingers that it hadn’t dissipated in the five minutes since our original drive-by), so as soon as we parked the group grabbed their gear and scattered. Wanting a foreground that was more than just meadow grass, I ran for this downed tree that I’d seen on an earlier visit.
We only got about five minutes of quality shooting in before the fog was gone. All of my shots were some variation on this composition using the log anchoring the bottom of scene, and Half Dome framed by the nearby trees on the left and distant yellow cottonwoods on the right. To maximize my focal length and make Half Dome larger, I moved back as far as I could without losing my framing. The horizontal trunk was far enough away that I was able to achieve depth of field all the way to infinity when I focused there.
Workshop Schedule || Purchase Prints
A Cold Weather Gallery
Click an image for a closer look and slide show. Refresh the window to reorder the display.


Sanity check
Posted on January 7, 2017

Nightfall, Half Dome and Sentinel Fall, Yosemite
Sony a7R II
Sony/Zeiss 24-70 f4
1/2 second
F/9
ISO 100
Are you insane?
Albert Einstein defined insanity as doing the same thing over and over again and expecting different results. Hmmm. For some reason this makes me think of the thousands of aspiring landscape photographers with portfolios brimming with beautiful images that they can’t sell.
Despite a great eye for composition, all the latest gear, insider knowledge of the best locations, and virtual guru status with Photoshop, somehow they haven’t managed to separate themselves from the large pack of other really good photographers. Their solution to anonymity is more: more locations, more equipment, more software. (Perhaps you even know such a photographer.) Compounding the problem, many photographers have become so mesmerized by technology that they turn over control of the most important aspects of their craft to their camera, completely discounting the most powerful tool at their disposal, the one on top of their shoulders.
Knowledge vs. understanding
Just as a new camera won’t make you a better photographer, neither will simply upgrading your knowledge of the latest gear, or accumulating . Knowledge is nothing more than information ingested and regurgitated. On the other hand, understanding is fundamental insight into the workings of a process. While knowledge might enable you to impress table-mates at a dinner party, understanding gives you the ability to use information to create new knowledge—solve problems.
Many photographers invest far too much energy accumulating knowledge, and far too little energy understanding what they just learned. For example, I see many photographers relying on a formula for determining the shutter speed that freezes star motion at a given focal length, oblivious to the fact that this formula doesn’t consider other equally important variables such as display size and the direction the camera is pointing (yes, that’s important). Similarly, simply knowing that a longer shutter speed, bigger aperture, or higher ISO means more light is of limited value if that knowledge doesn’t translate into an understanding of how to manage light, motion, and depth with your camera.
Take control
Pretty much anyone can pick up a camera, put it in auto exposure mode, and compose a nice image. While the automatic modes in most cameras “properly” (conventionally) expose most scenes, they struggle in the limited light, extreme dynamic range, and harsh conditions that artistic nature photographers seek. Worse than that, relying on the automatic exposure modes eliminates a photographer’s best opportunity for creativity—the ability to control a an image’s depth, motion, and light.
Too many aspiring photographers are stuck creatively because their unwavering faith in technology leaves them with a critical deficiency in two fundamental, related photographic principles:
- How a light meter determines the exposure information it gives you. This seems so basic, but auto-exposure and histograms have fooled many into thinking they understand metering and exposure. (Don’t get me wrong—the histogram is a wonderful tool for the photographer who truly understands it.)
- How to use the reciprocal relationship between aperture, shutter speed, and ISO to manage photography’s three variables: light, depth, and motion. This is the universal tool that enables photographers to handle the limiting factors of every scene.
Books and internet resources are a great place to start acquiring these principles, but the knowledge you gain there won’t turn to understanding until you get out with your camera and apply them. When these principles become second nature, you’ll be amazed at what you’ll be able to accomplish with your photography.
Insanity is in the mind of the beholder
If landscape photography already gives you everything you want, by all means continue doing what you’re doing. But if you’re having a hard time achieving a creative goal, I suggest that the solution is likely not doing more of what you’re already doing. Instead, start by reevaluating your comprehension of fundamental photographic principles that you might not have thought about for years. You’ll know you’re there when you have complete control of the light, motion, and depth for every scene you encounter, know how to get the result you want, or understand why it’s simply not possible.
Do I really think you’re insane for doing otherwise? Of course not. But I do think you’ll feel a little more sane if you learn to take more control of your camera.
About this image
The image at the top of the post is from a visit to Yosemite this past December. I’d guided my workshop group here for the rise of a nearly full moon, crossing my fingers that clouds wouldn’t obscure our view. The clouds exited just in the nick of time for us to enjoy a beautiful moonrise into the indigo twilight. I started with fairly tight compositions when the moon was close to Half Dome, but in the still, chilled air shortly after sunset, a thin radiation fog formed above Leidig Meadow and I started looking for a wider composition that would add the meadow to the moon and Half Dome.
Before thinking about the scene’s light, depth, and motion variables, I spent a lot of time just assembling the elements of my composition. I decided to frame the scene with Half Dome on the left and Sentinel Fall on the right, positioning myself so a group of tall foreground evergreens, mirrored by towering Sentinel Rock in the background, anchored the center of my frame. I knew that would require a wide composition that would render the moon very small, but I moved back as far as I could to allow the longest possible focal length to avoid shrinking the moon to pinhole size.
By far my biggest exposure concern was dynamic range—the moon is daylight bright, while the rest of my scene was deeply shaded. Normally I trust my histogram in these high dynamic range situations, but in this case the moon was so small that I knew it wouldn’t register. Instead I used my Sony a7RII’s pre-capture “zebra” highlight alert that indicates the parts of my scene that are overexposed.
At just a little wider than 24mm, with no significant detail in my immediate foreground, I stopped down to a fairly diffraction safe f/9. I’m always at ISO 100 unless I can’t achieve the amount of light I want at my ideal aperture and shutter speed, and in this case ISO 100 worked just fine. With my f-stop and ISO set, I increased my shutter speed slowly, checking the moon after each 1/3-stop click for the zebras (if you don’t shoot mirrorless, you can set blinking highlights and check the moon for “blinkies” when you review the image on your LCD). Since I know my camera well enough to know that I could push my exposure at least a full stop beyond the point where the zebras appeared, then recover the highlights in the Lightroom raw processor.
This image looked quite dark on my LCD, and the histogram was way to the left, but after loading it onto my computer and pulling the Lightroom Shadows slider to the right, I recovered an unbelievable amount of clean (low noise) detail, even in the darkest shadows. I just continue to be blown away by the dynamic range of this a7R Mark 2 sensor that enables me to capture scenes I’d never imagined possible in my previous (Canon) life. In this case I probably could have brightened the image further in processing, but I wanted a more moody, twilight feel.
Workshop Schedule || Purchase Prints
Yosemite Less Traveled


