He Ain’t Heavy,…
Posted on April 15, 2018
… He’s My Sony 12-24 f/4 G
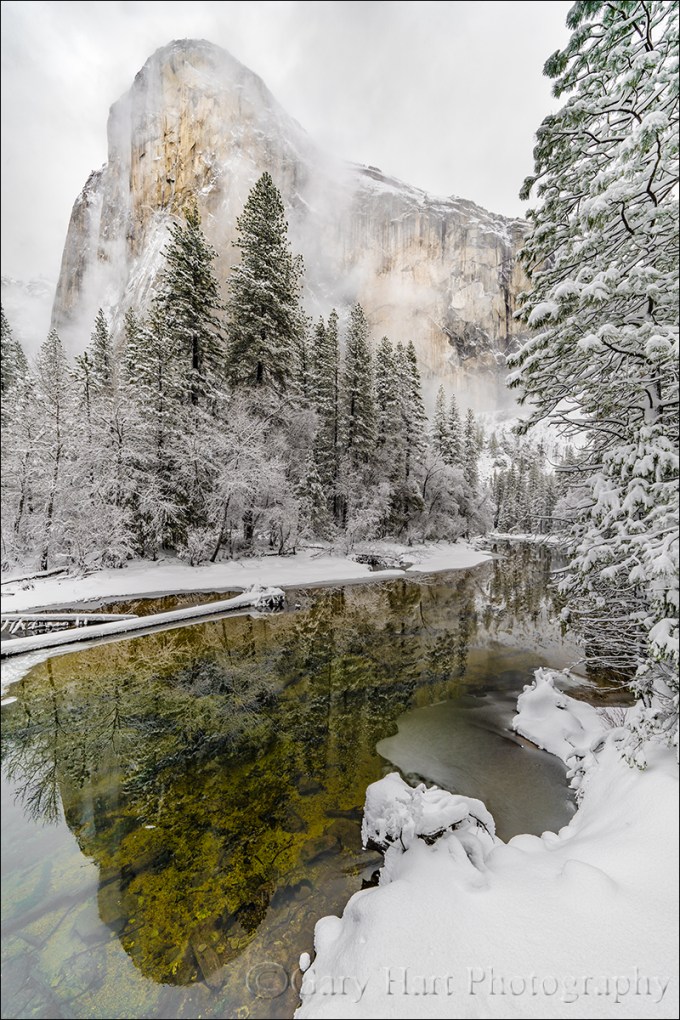
Snowstorm Reflection, El Capitan, Yosemite
Sony a7R III
Sony 12-24 f/4 G
1/50 second
F/10
ISO 100
(With apologies to The Hollies.)
The road is long, with many a winding turn…
But that’s no excuse to cut corners. Probably the question I am most asked on location is some variation of, “What lens should I use?” While I’m always happy to answer questions, this one always makes me cringe because the implicit question is, “Which lenses can I leave behind?”
What many photographers fail to realize is that the “proper” lens is determined by the photographer, not by the scene. While there is often a consensus on the primary composition at a location, that usually only means the first composition everyone sees. But if your goal is to capture something unique, those are just the compositions to avoid. And as every photographer knows, the best way to guarantee you’ll need a lens is to not pack it. I’m not suggesting that you lug Hermione’s purse to every shoot—just try to remember that your images will last far longer than your discomfort.
In my Canon life, my personal rule of thumb was to always carry lenses that cover 16-200mm, regardless of the scene, then add “specialty” lenses as my plans dictated: macro for wildflowers, fast and wide prime for night, and super telephoto for a moon. That meant the 16-35, 24-105, and 70-200 were permanent residents of my Canon bag, and my 100-400, 100 macro, or wide and fast prime came along when I needed them.
Shooting Sony mirrorless, with its more compact bodies and lenses, I now carry a much wider focal range in a lighter camera bag. My new baseline (always with me) lens lineup is the Sony 12-24 G, 24-105 G, and 100-400 GM, plus the Sony 2x teleconverter. My macro and night lenses still stay behind (but they’re usually in the car), but in my bag I always have lenses to cover 12-800mm, a significant advantage over my Canon 16-200 configuration.
It’s kind of a cliché in photography to say “It’s the photographer, not the equipment.” And as much as I agree in principle, sometimes the equipment does help. Wherever I am, I regularly find compositions beyond 200mm, compositions I never would have considered before. And the 12-24 lens has enabled me to approach familiar scenes with a completely fresh eye.
A recent example came on a snowy day in Yosemite early last month. Moving fast to keep up with the rapidly changing clouds and light, I stopped at El Capitan Bridge, directly beneath El Capitan. Having shot this scene for years (decades), I was quite familiar with the perspective. So wide is the top-to-bottom, left-to-right view of El Capitan here, even at 16mm I’ve always had to choose between all of El Capitan or all of the reflection, never both. I never dreamed I’d be able to get El Capitan and its reflection in a single frame. But guess what….
Standing above the river near the south side of the bridge, I framed up a vertical composition and saw that at 12mm I could indeed fit El Capitan and the reflection, top to bottom. Whoa. With very little margin for error on any side of the frame, I moved around a bit to get the scene balanced, eventually framing the right side with the snowy trees lining the Merced. My elevated perch above the river allowed me to shoot straight ahead (no up or down tilt of the camera) and avoid the extreme skewing of the trees that’s so common at wide focal lengths.
12mm provides so much depth of field that I could focus anywhere in the scene and get front-to-back sharpness; the flat light made exposure similarly simple. With composition, focus, and exposure set, all I had to do was watch the clouds and click the shutter, my heart filled with gladness….
A Sony 12-24 Gallery
Click an image for a closer look and slide show. Refresh the window to reorder the display.


Are you insane?
Posted on April 11, 2018

Cotton Candy Reflection, Half Dome, Yosemite
Sony a7R III
Sony 16-35 f/2.8 GM
2 seconds
F/16
ISO 50
Are you insane?
Albert Einstein defined insanity as doing the same thing over and over, but expecting different results. Hmmm. For some reason this reminds me of the thousands of good landscape photographers with hundreds of beautiful images they can’t sell. These photographers have a good eye for composition, own all the best equipment, know when to be at the great locations, and are virtual gurus with state-of-the-art processing software. Yet they haven’t achieved (their definition of) success.
Conducting photo workshops gives me pretty good insight into the mindset of serious amateur photographers, the photographers serious enough to spend time and money to rise before sunrise and stay out after dark to photograph the world’s most beautiful landscapes in frequently miserable conditions. I’m struck that many of these photographers have serious aspirations for their photography, but are so mesmerized by technology that they turned over control of the most important aspects of their craft to their camera. Their solution to photographic failure is to buy more equipment, visit more locations, and master more software. But the most overlooked tool is the one on top of their shoulders.
Knowledge vs. understanding
Just as a new camera won’t make you a better photographer, simply upgrading your photography knowledge won’t do it either—knowledge is nothing more than ingested and regurgitated information. Understanding, on the other hand, (among other things) gives you the ability to use information to create new knowledge and solve problems.
Many photographers invest far too much energy acquiring knowledge, and far too little energy understanding what they just learned. For example, it’s not enough to know that a longer shutter speed or bigger aperture means a brighter image if that knowledge doesn’t translate into an understanding of how to manage motion, depth, and light with your camera. It’s one thing to know you need more light on your sensor, but something altogether different to know whether to add it with a longer shutter speed, larger aperture, or higher ISO—a choice that makes a huge difference in the finished product.
Take control
Automatic modes in most cameras handle static, midday light beautifully, yet struggle in the limited light, extreme dynamic range, and harsh conditions that artistic photographers seek. The auto modes have become so good that they have created the illusion of control in the minds of many photographers. I see many excellent photographers whose profound faith in their technology has caused critical deficiency of two fundamental photographic principles:
- How a light meter determines the exposure information it gives you. This seems so basic, but auto-exposure success has fooled many into thinking they understand metering and exposure.
- How to use the zero-sum relationship between aperture, shutter speed, and ISO to manage photography’s three variables: depth, motion, and light. Proper metering and exposure is the universal tool that enables photographers to handle the limiting factors of every scene.
Books and internet resources are a great place to start learning these principles (here’s my Photo Tip article), but the knowledge you gain there won’t turn to understanding until you get out with your camera and learn to manage a scene’s motion, depth, and light in creative ways that set your photography apart.
For example
My metering philosophy is to approach every scene at ISO 100 (my Sony a7RIII’s best ISO) and f/11 (the best combination of lens sharpness and depth of field with minimal diffraction)—I control the light with my shutter speed and only deviate my baseline ISO and f-stop when the scene variables dictate. For example, when I want more or less depth of field, I’ll choose a different f-stop, or when I can’t get a proper exposure at the shutter speed that gives me the motion effect I want (blurred or sharp), I’ll adjust the ISO.
This Yosemite sunset from last February was about Half Dome, the clouds, the light, and the reflection in the Merced River. After finding my composition, the scene variables to consider when determining my exposure settings were:
- Motion in the river: I wanted to blur the flowing water enough to smooth some of the chop and ripples, and to turn the floating foam fragments into white blurs
- Depth of field: At 34mm, the closest foreground objects were far enough away that depth of field wasn’t a concern
- Light: The dynamic range separating the brilliant highlights in the sunlit clouds from the deep shade in the trees and river was extreme, with a very narrow margin for error
The blur effect I wanted would require at least a one second exposure time, so I dropped my ISO down to 50 (as low as it goes). Keeping my aperture at f/11, I dialed my shutter speed with an eye on the histogram—when the histogram indicated I’d pushed my highlights as far as I could without clipping, my shutter speed was 1 second. This gave me a the proper exposure with sufficient motion blur, but I decided a little more motion blur would be even better. To double the shutter speed to 2 seconds, I stopped down one stop to f-16 and tried one more frame. In this case the benefit of the extra motion blur far outweighed any diffraction and lost sharpness (which experience has shown e would have been minimal with my Sony 16-35 GM lens), so that’s the frame I selected.
Insanity is in the mind of the beholder
If landscape photography gives you what you want, then by all means, continue doing what you’re doing. But if you’re having a hard time achieving a photographic goal, the solution is likely not doing more of what you’re already doing. Instead, try reevaluating your comprehension of fundamental photographic principles that you might not have thought about for years (or ever). Get out of your camera’s auto exposure modes and take control of your scene’s variables. You’ll know you’re there when you know how to get the result you want, or know why it’s simply not possible.
Do I really think you’re insane for doing otherwise? Of course not. But I do think you’ll feel a little more sane if you learn to take more control of your camera.
Workshop Schedule || Purchase Prints
A World in Motion
Click an image for a closer look and slide show. Refresh the window to reorder the display.


Yosemite Moonbow
Posted on April 6, 2018

Moonbow and Big Dipper, Lower Yosemite Fall, Yosemite
Canon EOS 1DS Mark III
Canon 17-40 f/4L
30 seconds
F/4
ISO 800
Even though your spellcheck says it doesn’t exist, I promise you that a moonbow is a very real thing indeed (and I have the pictures to prove it). Some argue that “lunar rainbow” is more the technically correct designation, but since that moniker just doesn’t convey the visual magic, I’m sticking with moonbow.
This won’t be on the test
Because a moonbow is a rainbow, all the natural laws governing a rainbow apply. But all the moonbow’s physics can be summarized to:
1) Your shadow always points toward the center of the moonbow (put your back to the moon and note the direction your shadow points)
2) The higher the moon, the lower the moonbow and the less of it you’ll see
3) When the moon is above 42 degrees (assuming flat terrain), the moonbow disappears below the horizon
Yosemite’s moonbow
Each spring, Sierra snowmelt surges into Yosemite Creek, racing downhill and plunging 2,500 feet in three mist-churning steps as Yosemite Falls. Shortly after sunset on spring full moon nights, light from the rising moon catches the mist, which separates and bends it into a shimmering arc. John Muir called this phenomenon a “mist bow,” but it’s more commonly known today as a moonbow.
While a bright moonbow is visible to the naked eye as a shimmering silver band, it isn’t bright enough for the human eye to register color. But thanks to camera’s ability to accumulate light, the moonbow’s vivid color shines in a photograph.
I just returned from the first of two moonbow workshops scheduled for this spring, but haven’t had time to process this year’s moonbow images. The above image was captured a few years ago near the bridge at the base of Lower Yosemite Fall. Not only was it crowded (the moonbow is no longer much of a secret), wind and mist made the necessary 20- to 30-second exposures an exercise in persistence. Not only was I able to capture the moonbow, as you can see, I now have photographic proof that the Big Dipper is the true source of Yosemite Falls.
A Moonbow Gallery
Click any image to scroll through the gallery LARGE


Permanent Change
Posted on April 2, 2018

Gray and White, El Capitan Through the Clouds, Yosemite
Sony a7R III
Sony 12-24 f/4 G
1/40 second
F/8
ISO 800
Surrounded by towering granite walls that seem so permanent, Yosemite Valley is America’s poster-park for enduring beauty. But in the grand geological scheme, there’s nothing permanent about Yosemite. In my lifetime Yosemite has been visibly altered by drought, flood, and rockslides (not to mention human interference). Predating my arrival, Yosemite’s Anglo conquerors had a profound affect on the flora and fauna that prevailed in its prior centuries under Native care. And predating all human contact, glaciers performed their carve-and-polish magic on Yosemite’s granite.
But Yosemite’s history of change goes back much farther than that. Though it’s just a drop in the 4 1/2 billion-year bucket of Earth’s existence, let’s flip the calendar back to 100 million years before the glaciers scoured the area we call Yosemite, when layers of sediment deposited beneath a vast sea had been injected with magma that cooled to become granite. This subterranean granite was gradually uplifted by a slow-motion collision of tectonic plates that formed the mountains we call the Sierra Nevada. (Yes, I know this is a gross simplification of a very complex process.)
That’s a time-lapse I’d pay money to see, but lacking an actual 100-million-year time-lapse, I think Yosemite’s clouds make a wonderful metaphor for the park’s constant change. In fact, Yosemite storms are subject to the same the laws of nature that build and erode mountains. Each is the environment’s response to heat, moisture, pressure, and gravity—albeit on a different clock. Different in many ways, there’s also an interconnectedness to these natural processes: Just as the mountains have a profound affect on weather patterns, the weather is the prime force in the mountains’ erosion.
A month ago I got to watch the special choreography of Yosemite’s clouds and granite. Drawn by the promise of snow, I arrived as the storm built during daylight’s last couple of hours. Continuing to build under the cover of darkness, the storm was in full force by the morning’s first light. I woke to find snow covering every exposed surface, while overhead the mesmerizing dance of form and flow played out atop unseen air currents.
My first stop that morning was El Capitan Meadow. In summer, gawkers tailgate here to watch climbers monkey their way to the top of El Capitan. On this frigid morning El Capitan’s summit was a memory beneath a gray shroud, so I turned my camera to earthbound subjects within the small radius of my vision. In intense storms like this, ephemeral glimpses of Yosemite’s icons are a coveted reward that keeps experienced Yosemite photographers glancing skyward. Ever the optimist, despite a seemingly impenetrable low ceiling, I directed frequent glances in El Capitan’s direction as I worked.
The first suggestion of El Cap’s outline above the trees looked more like the faintest hint of a shadow in the clouds. I recognized what could be about to happen and quickly made my way to a better vantage point, watching until the shadow darkened and vague granitic detail appeared. Anticipating further clearing, I worked fast to beat the monolith’s inevitable reabsorption, switching lenses and framing a wide shot. To minimize tree-tilting perspective distortion, I raced across the road to increase my distance from the forest, raising my vantage point by scaling a snow mound piled atop a low fence by snowplows. With a breeze blowing the trees, I’d been shooting all morning at ISO 800, and the morning’s flat and constant light meant was no need to adjust my exposure. When the clouds parted just enough to frame El Capitan’s nose, I focused on the nearby trees and clicked several frames before the hole snapped shut.
An image like this is as much an opportunity to capture Yosemite’s snowy splendor as it is a revelation of something special about El Capitan. And that morning, my only thoughts about the clouds were wishes they’d disappear to show more granite. But as I started working on this image at home, I couldn’t help think about how clouds often provide the change Yosemite photographers seek in this (seemingly) unchanging place. That got me thinking about the nearby scar from last August’s tragic rockslide. On a clear day from the right vantage point, the scar is clearly visible on El Capitan’s east flank. another reminder that the only thing in Yosemite that’s permanent is change.
Yosemite’s Clouds


Snow Job
Posted on March 24, 2018

Winter Reflection, Bridalveil Fall and the Merced River, Yosemite
Sony a7R III
Sony 16-35 f/2.8 GM
1/4 second
F/14
ISO 50
I’m afraid that making a living as a photographer sometimes means exchanging time to take pictures for time to make money. On the other hand, my schedule is mine alone, which means when there’s something I really, really want to photograph, such as a moonrise or fresh snow in Yosemite, I can usually arrange my schedule to make it happen. The moon shoots I can plan a year or more in advance, but snow requires a little more vigilance and flexibility.
Early this month, with hints of snow coming to Yosemite Valley, I started clearing space in my schedule. At 4000 feet, Yosemite Valley is often right on the snow-line, so a swing of just a couple hundred feet in either direction can mean the difference between snow and soggy. After watching the weather reports vacillate between snow and rain all week (and adjusting plans more than once), my buddy Mark and I took a chance and made the drive to Yosemite, visions of snowflakes dancing in our heads.
Waiting at the traffic-light-controlled, one-lane detour around the Ferguson Slide on Highway 140, I watched dozens of westbound headlights file past the four or five eastbound taillights idling at the light in front of us. With a storm imminent, it occurred to me that we were participating in a kind of changing of the guard, where the evacuating tourists are replaced by a much smaller contingent of what could only be photographers.
We arrived in Yosemite Valley at about the same time as the rain, circled the valley, secured a cheap room at Yosemite Valley Lodge (in Yosemite, any night with plumbing and solid walls for $150 is in fact a steal), and went to dinner. When the rain continued through dinner and all the way until bedtime, I began to fear the weather report had vacillated once more in the wrong direction.
Peeking out the window at around 4:00 a.m. and seeing more rain, I grudgingly turned off the alarm I’d optimistically set for 6:00 a.m. and went back to sleep. The next thing I knew, Mark was waking me at 6:10 to report six inches of fresh snow, and it was still falling. By 6:15 we were bundled and searching for my car in a parking lot filled with identical white lumps.
The rest of the morning was a blur as Mark and I darted from pristine location to pristine location, marveling at how a few hours of snow can completely transform months of accumulated grime and a thirsty forest dotted with dead and dying trees. For those few hours, Yosemite was new again.
At our first stop, El Capitan Meadow, we photographed El Capitan and Cathedral rocks battling the clouds for dominance. Down the road at Valley View, the snow continued falling but the granite was winning and I soon found myself admiring the reflection of Cathedral Rocks and Bridalveil Fall just upriver from the parking area.
Normally the thin branches overhanging this vantage point are a distraction to avoid, but glazed with snow, they had the potential to make a perfect frame. The reflection was the easy part, but somehow I had to figure out how to feature it and the branches without the branches obliterating the rest of the scene.
To separate Bridalveil Fall and Cathedral Rocks from the glazed branches, I splayed my tripod’s legs and dropped it to the ground, then scooted up to the river’s edge. That still left a few branches dangling too low, so I pushed my camera out even farther by extending one tripod leg into the river. I was aided immensely by the articulating screen of my Sony a7RIII—while I still needed to sit in the snow to get low enough to compose and control my camera, I very much appreciated the ability to sit and look down at my LCD rather than sprawl on my stomach in the snow to get my eye to the viewfinder.
When photographing a scene that includes a reflection and nearby objects, it’s important to remember that the focus point of a reflection is the focus point of the reflective subject, not the reflective surface. (I’ll pause here for a few seconds to let you process this because it’s important.) In this case I was at 16mm; at f/11 that gave me a hyperfocal distance of less than four feet; with the branches about five feet away, front-to-back sharpness wouldn’t be a problem, even focused at infinity. Nevertheless, I chose f/14 for this shot, not for more depth of field, but to (along with ISO 50) stretch my shutter speed enough to smooth a few small ripples in the reflection.
Excitement about a scene can overwhelm good sense—we see something that moves us, and quickly point the camera and click with more enthusiasm than thought. While this approach may indeed record memories and impress friends, it almost certainly denies the scene the attention it deserves. I was indeed very excited about this scene, but between the depth of field, reflection, overhanging branches, moving water, dominant background subjects, not to mention the awkwardness of my position, I had many moving parts to consider.
Rather than attempt perfection on the first click, I addressed the obvious stuff (covered above) with a “rough draft” click. Draft image in hand, I popped my camera off the tripod, stood (ahhhhh), and evaluated my result. I immediately saw two things to address: first, I wanted Cathedral Rocks better framed by the branches; second, I wanted the mid-river, snow-capped rocks away from the right edge of my frame.
I returned my camera to live-view, dropped to ground-level, and replaced the camera on my tripod. Because I hadn’t touched the tripod, the scene on my live-view LCD was the very scene I’d just reviewed—making my prescribed adjustments was a simple matter of panning right a couple of inches and pushing the tripod a little farther into the river. Click.
I love my job.
Join me in Yosemite this winter
Workshop Schedule || Purchase Prints
Yosemite Winter


Mirrorless Metering
Posted on March 16, 2018

Morning Peace, Trillium Lake and Mt. Hood, Oregon
Sony a7R
Sony/Zeiss 16-35 f/4
.5 seconds
F/11
ISO 100
Because I don’t want my camera making any decisions for me, I’ve always metered in manual mode. For most of my photography life, my manual metering approach was to start with the best f-stop for my composition, spot-meter on the brightest part of the scene, and dial my shutter speed until the meter indicated the proper tone.
In my film days I sometimes hedged my bets by bracketing high dynamic range scenes; with a digital camera, rather than bracket, I check my histogram and re-shoot only if I missed the exposure on the first try. While this approach has served me well, my metering life became much easier with the advent of live-view (pre-capture) histograms, and easier still since my switch to mirrorless (Sony Alpha).
Trust your histogram
The histogram is a graph of the tones in an image (you can read more about it here). Instead of clicking and hoping as we did in the film days, the addition of a histogram on virtually every digital camera gives photographers instant feedback on the exposure of each image. Better still, live-view histograms give us that exposure feedback before we click the shutter.
While each camera manufacturer offers a variety of metering mode options and terminology to label them (spot, partial, center-weighted, evaluative, matrix, etc.), your metering mode doesn’t matter if you’re metering with your histogram. Using the pre-capture histogram, I start the metering process as I always have, using my camera’s best ISO (100 for my Sony a7RIV), and the best f-stop for my composition (unless motion, such as wind or star movement, forces me to compromise my ISO and/or f-stop). With ISO and f-stop set, I slowly adjust my shutter speed with my eye on the histogram in my viewfinder* (or LCD) until I’m satisfied with the histogram. Ideally I’ll have a little room on both sides of the histogram, but in a high dynamic range scene my histogram might not fit the boundaries, in which I usually add exposure until the histogram graph bumps against the right side.
Most mirrorless bodies offer highlight warnings in their pre-capture view (called “zebras” on my Sony bodies—your terminology may vary). While these alerts aren’t nearly as reliable as the histogram and should never be relied on for exposure decisions, I use them as a signal that it’s time to monitor my histogram more closely. The first time I meter a scene, my current exposure settings can be far off from where I’ll end up—in this case, I push my shutter speed fast until the zebras appear, then refine the exposure using the histogram.
Because I trust the post-capture histogram a little more than the pre-capture histogram, when there’s little margin for error in my exposure (high dynamic range), I verify it by checking the review (post-capture) histogram. While the luminosity (white) histogram reveals the detail you captured, it doesn’t tell you if you lost color. Washed out color is always a risk when you push the histogram all the way to the right, so it’s best to check the RGB (red, green, blue) histogram to ensure that none of the image’s color channels are clipped.
An often overlooked aspect of mastering in-camera metering is learning your camera. Not only does every camera interpret and report its exposure information a little differently, the histogram returned is based on a jpeg—raw shooters always have more information than their camera reports and it’s important to know how much more. For example, with my Sony a7R series bodies, I know I’m usually safe pushing my histogram’s exposure graph a full stop beyond the boundary, and I have no problem using every available photon when necessary.
For example

Dawn Reflection, Trillium Lake and Mt. Hood, Oregon
A few years ago I was photographing a sunrise at Trillium Lake, beneath Mt. Hood and just south of the Columbia River Gorge. Finding the open sky on Mt. Hood’s east side much brighter than the lake and (especially) trees, after composing and focusing, I cranked my shutter speed until the zebras appeared (they usually show up before the histogram reaches the right side), then clicked more deliberately until the histogram hit the right side.
At that point the left side of the histogram was still clipped slightly, but because I knew I still had one more stop to play with on the highlights side, I clicked one more time with my eye on the left (shadows) side of the histogram and saw that the shadows were still slightly clipped. Since each click adds (or subtracts) 1/3 stop, I had two more clicks before I reached my 1-stop-over highlight threshold. The second shutter-speed click moved the left side of the histogram just enough to eliminate the clipped shadows, and I was ready to shoot (with 1/3 stop to spare!).
After capture, I checked my RGB histogram to ensure that I’d captured all the scene’s detail and color. In Lightroom I was able to easily recover the highlights that my camera told me were clipped, and pull all the detail I needed from the shadows.
* Though these instructions are for mirrorless shooters, much of what I say also applies to DSLR shooters with access to a live-view histogram.
Workshop Schedule || Purchase Prints || Instagram
High Dynamic Range Mirrorless Metering Gallery


It’s All a Blur: Photographing Moving Water
Posted on March 9, 2018
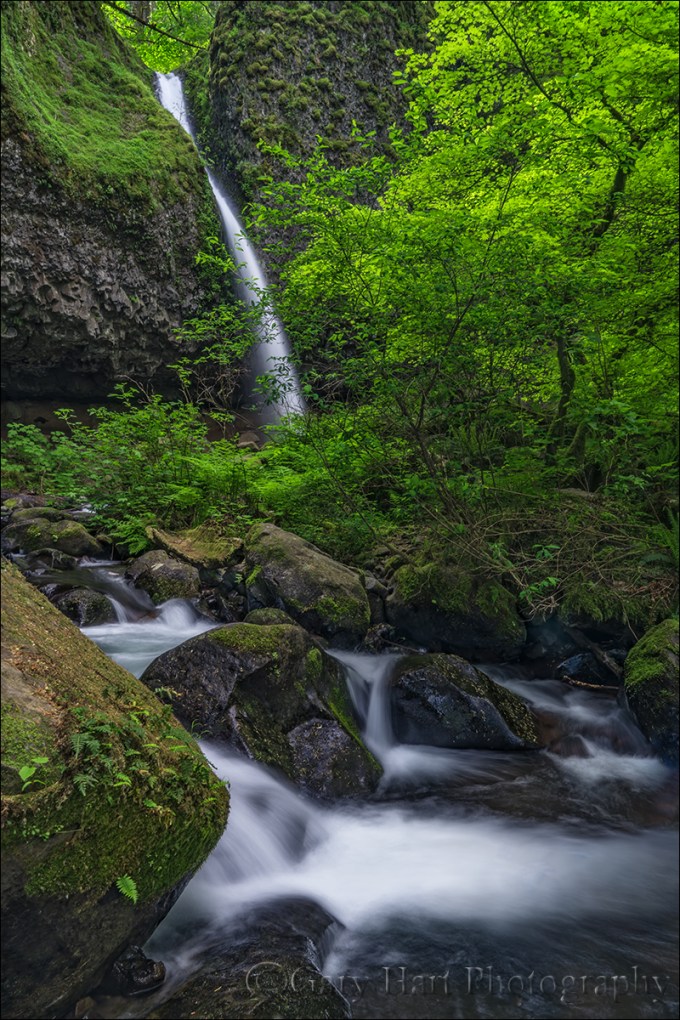
Downstream, Upper Horsetail Fall, Columbia River Gorge
Sony a7RII
Sony/Zeiss 24-70 f4
1 second
F/11
ISO 50
One of the questions I’m asked most is how to blur water. It’s really not that hard when you know how to control your exposure variables, and in fact if you’re photographing moving water in the right light, it’s easier to blur the water than it is to freeze it.
Here are the essential elements for blurred water:
- Sturdy tripod: The longer the shutter is open, the greater the blur effect; even with a stabilized lens and/or body, it’s pretty hard to hand-hold at a water-blurring shutter duration and avoid camera shake that blurs the rest of the scene.
- Camera with exposure control: Since motion blur is partially a function of shutter speed, you’ll need to be able to control your camera’s shutter speed. A mirrorless or DSLR camera will do the job for sure, but many of the more sophisticated point-and-shoot cameras will work as well.
- Whitewater: While it’s possible to smooth any moving water, the silky water effect most people want requires whitewater.
- Shade or overcast: Water in direct sunlight is so bright that, without a neutral density filter, a shutter duration long enough to blur it will completely and irrevocably overexpose it.
With these basic ingredients, and a little knowledge of exposure management, you’re ready to go. While motion blur requires the shutter remain open long enough for the water’s motion to blur, there’s no magic shutter speed that achieves this. The amount of blur will vary from a lot to none at all, depending on the following factors:
- Shutter speed: A digital sensor (or piece of film) records the position of everything in the scene throughout the duration of the exposure. If something moves while the shutter is open, it will blur—the more it moves, the more it blurs.
- The water’s speed: The faster the water moves while the shutter is open, the more of the frame it will span and the greater the blur. But it’s not just the water’s speed that determines the blur—other factors are…
- The water’s distance: It’s not actually the water’s speed that matters, it’s the distance across the frame that the water moves while the shutter is open. So the farther away the water is, for any given focal length, the less of the frame it will span (and the less blur you’ll see).
- Focal length: Increasing the focal length is the equivalent of moving closer. A longer focal length magnifies everything in the frame, including the distance across the frame the water travels while the shutter is open.
- The water’s direction of motion: Water moving across the frame will blur more than water moving away from or toward the camera.
Most of the above motion blur factors affect the composition too, so achieving motion blur without compromising the composition usually comes down to managing the shutter speed. Choosing a shady scene or overcast day is a good start, but here are a few other ways to keep the shutter open longer:
- Neutral density filter: An ND filter will darken the scene without changing anything else (such as the color cast)—typically by at least 3 stops, and usually more. I don’t often use an ND filter for whitewater because I only shoot water in shade or overcast and find I can achieve enough blur without it.
- Polarizer: A polarizer cuts light by 1 to 2 stops, but that’s secondary to the polarizer’s primary function, which is to reduce reflections. Whether it’s sheen on rocks and leaves, or light bouncing off darker water, reflections are everywhere, even in a shady or overcast scene. I never photograph moving water without a polarizer, and gladly accept its longer shutter speed side benefit.
- Low ISO: The lower the ISO, the less sensitive to light the sensor is, and the longer the shutter duration necessary to make up for that decreased sensitivity. Your camera probably has a native ISO of 100 (most likely) or 200—that’s the ISO that achieves the best image quality, and the ISO you should start at for your motion blur shots. Some digital cameras offer a lower, emulated ISO that, while not increasing the image quality (unlike film, where the lower the ISO or ASA, the better the image quality). Usually the ability to access this emulated ISO needs to be enabled in your camera’s menu system.
- Small aperture: Because I prefer basing my aperture choice on the depth of field I want, and by what will give me the sharpest results (less diffraction and most corner-to-corner sharpness), I usually go to my minimum ISO before choosing an aperture smaller than f/11 (remember, the bigger the f/ number, the smaller the aperture, so f/16 is smaller than f/11).
Armed with this knowledge, you’re ready to go. One important thing to keep in mind is that motion blur is never just blurred or not blurred. Rather, there are degrees of blur. That’s why, when possible, for any given scene I try different ISOs and f-stops, adjusting the shutter speed to compensate and vary the blur effect.
For example
In a region packed with waterfalls, Upper Horsetail Fall (sometimes called Ponytail Fall), is one of my favorites. After a short but steep hike from the road and (lower) Horsetail Fall, hikers round a bend for the first view of the source of the roar heard from several hundred yards down the trail. Most waterfall trails either cross the source river or creek upstream, above the fall, or down stream, below the fall. The Upper Horsetail Fall trail goes behind the fall.

Looking Out, Upper Horsetail Fall, Columbia River Gorge: The view from the trail under the ledge, behind Upper Horsetail Fall.
On this visit, before venturing behind the fall, I scrambled down the slope on the right and set up near creek level, in front of the whitewater and just downstream from the pool. After a little bit of visual exploration, I settled on the essence of my composition: the rushing water in the foreground, with the waterfall prominent in the background, balanced by the brilliant green of a freshly leafed-out tree. The compositional variations mostly centered around how much of the fern-infused rock on the left, and the angled tree trunk on the right, to include.
Another compositional choice to weigh was whether to allow the foreground rock to merge with the rock just behind it, in the center of the creek. Normally I try to avoid merging elements at different distances, but in this case the solution would have been to move a couple steps to the right, which would have put the fall more behind the tree. Since the waterfall is the scene’s most prominent element, I decided to maximize its presence.
The darkness of the surrounding forest was enhanced by a thick overcast, making motion blur virtually inevitable, so I just embraced it. Often the greatest difficultly with photographing motion blur surrounded by dense foliage is that a shutter open long enough to blur water is also open long enough to pick up wind motion in the leaves. On this morning I was fortunate to have virtually no breeze, and my 1-second exposure blurred the water and froze the leaves. Mission accomplished.
Columbia River Gorge Photo Workshops


Putting the Gorge in Gorgeous
Posted on March 2, 2018

Sunset Calm, Trout Lake and Mount Adams, Washington
Sony a7R
Sony/Zeiss 24-70 f4
1.3 seconds
F/11
ISO 100
I recently spent some time going through and processing a bunch of Columbia River Gorge images, from many years of visits, I haven’t had time to get to until now. This is the first of several I’ll be posting over the coming weeks.
The first time I visited the Columbia River Gorge, I couldn’t believe I’d lived my entire life without visiting here. For a landscape photographer, the Columbia River Gorge area has everything: lush forests, thundering waterfalls, majestic volcanoes, sparkling streams, and glassy lakes. It’s almost unfair that this year-round beauty is enhanced by the vivid colors of spring wildflowers and autumn foliage.
The Columbia River cuts a wide channel through lava flows that ended around 10 million years ago, leaving a layer of basalt that’s more than a mile thick. Basalt’s hardness is responsible for the gorge’s proliferation of waterfalls. Rather than eroding into gently sloping terrain as softer rock does, the basalt cliffs carved by the Columbia River maintain their verticality, creating resilient platforms that launch the numerous rivers and creeks that drain this saturated region. The result is waterfalls, lots and lots of waterfalls: Tall waterfalls, short waterfalls, wide waterfalls, skinny waterfalls, single waterfalls, multiple waterfalls, plummeting waterfalls, cascading waterfalls….
But it would be a mistake to assume that the Columbia River Gorge experience is all about waterfalls. Bookended by majestic volcanoes, the area surrounding the Gorge is a pastiche of rivers, streams, and lakes that are beautiful subjects by themselves, and as wonderful foreground material for whatever mountain happens to be in view.
On the Oregon (south) side of the Columbia River, Mount Hood towers over the picturesque orchards of the Hood River Valley. Across the river is Washington and its seemingly endless evergreen forests that unfold in the shadows of Mount Hood and Mount St. Helens.
Trout Lake is about a half hour north of the river on the Washington side. Technically not part of the Columbia River Gorge, Trout Lake is nevertheless part of the broader Columbia River Gorge experience. And while I wouldn’t call Trout Lake hidden, or particularly unknown, it’s far enough off the beaten path to avoid trampling by ogling tourists.
Filling with sediments that started their journey on or near Mount Adams, Trout Lake is on its way to becoming a meadow. Its relative shallowness makes it less likely to be disturbed by waves that spoil reflections reflections. While a reflection like the one in this image is far from a sure thing, neither is it a rare occurrence. They’re more common here in the calm air around sunrise, but as this picture illustrates, I’ve found reflections on Trout Lake at sunset too.
Filtered by thin clouds, the light this afternoon had been rather subdued—nice, but unspectacular. Sunset was similarly forgettable. But as I started to pack up, a whisper of pink in the previously bland clouds above Mount Adams gave me pause. Hmmm. Often this kind of color is just there to mess with me (you know what I’m talking about), but I paused to watch the color intensify, until finally I could no longer resist.
Without a lot of foreground options, and not much time to go hunting, I simply centered Mount Adams in the top third of the frame and used a solitary protruding rock to create a diagonal with a cinder cone to Mount Adams’ right. While perhaps not my most creative composition, the mountain, color, and reflection make this one of those moments in nature when it’s best for the photographer to get out of the way and just let the scene speak for itself.
Columbia River Gorge Photo Workshops
Workshop Schedule || Purchase Prints
Celebrating the Columbia River Gorge


Should I or shouldn’t I?
Posted on February 25, 2018

Nature’s Prism, Rainbow Above Marble Canyon, Roosevelt Point, Grand Canyon
Sony a7R II
Sony/Zeiss 16-35
1/60 seconds
F/11
ISO 100
I get a lot of questions in the field during a photo workshop, but about 80% of them are some version of, “Should I do it this way or that way?”:
- “Should I use a polarizer (or not)?”
- “Should I shoot this horizontal or vertical?”
- “Should I shoot this wide or telephoto?”
- “Should I include that rock or leave it out?”
- “Should I…?”
Sometimes people seem so paralyzed by these choices, it seems they’d rather do nothing than make a mistake. Or maybe they’re inhibited by the subconscious belief that we must conserve resources at all costs. From our earliest years, we were admonished to not waste things: don’t leave the water running, turn of the light when you leave the room, clean your plate, and a host of other waste-related rules. Adding to our formative-years stress, when we recovering film shooters got our first adult cameras, already rendered destitute by the new equipment, we were suddenly punched in the wallet by the cost of film and processing. It’s no wonder we try to spare every frame.
Of course conserving resources is important, today more than ever. But my question for digital photographers is, exactly what resources are you conserving? Here’s a revolutionary thought: While every click with a film camera costs money, every click with a digital camera increases the return on your investment. That’s right: every time you take a picture with your digital camera, your cost per click drops.
I’m not suggesting that you put your camera in continuous shooting mode and fire away*. But I am encouraging you to shoot liberally, with a purpose. And there’s no law that says that purpose must be a successful image.
For example, a click can just be a way to get in the mood, or to determine whether there really is a shot there (I don’t always know whether a scene is worth working until I’ve clicked a couple of frames). And I frequently play “what-if?” games with my camera (“I wonder what would happen if I do this…”). I’d be mortified if people saw some of these what-if? images, but I often learn from them. Sometimes I simply learn what not to do, but often I see enough to understand why it didn’t work, and end up with ideas for how it might work the next time.
I usually use my first click the way I use a draft when I’m writing: rather than a completed masterpiece, my goal for the first few clicks of a scene is a foundation to incrementally refine until I reach the finished product. Or when I’m not sure of the best way to handle a scene, I shoot it multiple ways to defer the decision until I view the image on a large monitor.
At the very least, especially when photographing a scene that especially thrills you, shoot it with as much variety as time permits: horizontal/vertical, wide/tight, and as many perspectives as you can come up with. I mean, you never know when a magazine might want a vertical version of the horizontal Grand Canyon rainbow image you just installed on the wall of the local bank.
Photography often requires instantaneous choices, and Nature doesn’t always wait until you’re ready. So because you can’t always have a pro photographer whispering in your ear every time you’re out with your camera, any time you find yourself wondering whether you should or shouldn’t shoot a scene one way or another (or another, or another, or…), just shoot it both ways and rest easy.
* True story: I once had a woman in a workshop put her Nikon D4 in continuous shooting mode, hold the camera in front of her, depress the shutter button, and spin. When I asked her what in the world she was doing, she replied, “It’s Yosemite—there’s bound to be something good in there.”
About this image
I captured this rainbow about 15 minutes after capturing the rainbow in my February 18 post. Pulling into Roosevelt Point a few miles down the road from Vista Encantada (and the earlier rainbow), we were still very much in rush mode. I didn’t have a lot of opportunity to apply my deliberate, what-if?, multiple draft approach. But I did have time to flip my camera and shoot a variety of compositions before the rainbow faded. I started with the wider vertical and horizontal frames you see here, then moved on to tighter compositions.
Grand Canyon Photo Workshops
Grand Canyon Rainbows
Click an image for a closer look and slide show. Refresh the window to reorder the display.


Under the Influence
Posted on February 20, 2018

Winter Light, Yosemite Valley
Sony a7RIII
Sony 100-400 GM
ISO 100
f/10
1/20 seconds
Happy Birthday, Ansel Adams
Ansel Adams’ influence on photography is impossible to measure. Not only Adams’ influence on photographers, but his influence on the viewers of photography as well. Ask 100 people to name a photographer and 99 will name Ansel Adams; ask them to name a second photographer and you’ll get 99 different names.
Through his use of relationships, perspective, and tones, Adams’ images masterfully emphasized light and shape to guide viewers’ eyes and emphasize aspects of his scenes that he found most compelling. An entire generation’s relationship with nature was unconsciously shaped by the prints of Ansel Adams, not because they showed the world as we already knew it, but because they showed us the world in new and exciting ways.
Now that I’m a photographer, Adams’ influence manifests most in the freedom to render the natural world as my camera sees it, liberating me from the impossible task of duplicating human vision. The camera and the eye experience the world differently; rather than fight that difference, Adams’ photography celebrated it.
Today’s photographers perpetuate Adams’ vision with the help of far more advanced tools, tools so advanced that it’s easy to overlook the foundation he laid for us. On blogs and forums I see some rolling their online eyes at all the Ansel Adams adulation, discounting his influence and labeling his photography pedestrian and prosaic when compared to current efforts: “What’s the big deal?” they say. To those dubious photographers I respond, criticizing Ansel Adams’ by comparing his monochrome masterpieces to the striking, vivid, blended, and stitched images captured today is like criticizing Lewis and Clark for toiling more than two years on a route that can now be traveled in a few days.
About this image
Last week’s Yosemite Horsetail Fall workshop wrapped up at one of my favorite spots in Yosemite Valley, a spot I’ve photographed so many times that it’s an enjoyable challenge to find something unique. The light on Half Dome that evening was beautiful, but nothing I hadn’t seen before. Rather than settle for the beautiful but conventional shots of Half Dome and its reflection, I scanned the scene for quality light elsewhere.
It wasn’t long before my gaze landed on a small stand of deciduous trees, stripped bare by winter cold, basking in the warm rays of the day’s last sunlight. As I pondered the scene, a rogue beam slipped through to illuminate the crown of a single evergreen, punctuating the otherwise monochrome scene with a splash of color.
Though my eyes could see a confusion of textured granite and tangled branches in the dark background shadows, I knew that detail would be nothing but a distraction in an image. But as Ansel Adams so magnificently demonstrated, an image’s full potential isn’t realized unless the finished product, and the processing required to get there, is visualized and executed at capture.
Well aware of late afternoon light’s ephemeral nature, I quickly mounted my Sony 100-400 GM lens to my tripod, attached my camera, and framed my composition. Taking advantage of the camera’s limited dynamic range (when compared to human vision), I gave the scene just enough light to reveal the sunlit trees. Given my a7RIII’s extreme dynamic range, I knew I could pull detail from the shadows in Photoshop if I wanted to, but in this case I went the other way. Processing the image in Lightroom on my computer, I enhanced the contrast, banishing the distracting background to virtually black shadows, leaving only the shape and light that drew my eye in the first place.
Workshop Schedule || Purchase Prints
Influenced by Ansel Adams


, California")


