Eloquent Images by Gary Hart
Insight, information, and inspiration for the inquisitive nature photographer
It’s the People
Posted on November 22, 2018

Floating Color, El Capitan, Yosemite
The ability to earn my living visiting the most beautiful places in the world is plenty of reason for gratitude, but that’s not what I’m thinking about today. Today I’m thinking about all of the people my workshops have connected me with, and all the laughter and learning they have added to my life.
I’d be lying if I said I wasn’t looking forward to the people part of photo workshops when I started, but I had no idea how much of the joy I get from leading photo workshops comes from the people. Over the last dozen or so years, my workshop students have taught me about their countries, professions, hobbies, religions,… I could go on. I’ve watched workshop participants from virtually every continent on Earth (no penguins yet), with wildly diverse values and world views, blend seamlessly and enthusiastically. Observing this, I’ve learned that despite the exterior tensions that seem to divide our world today, humans have far more in common than we imagine.
Like most people, I have my share of strong opinions about the way things in the world should be. But the people I’ve met in my workshops have shown me that a person’s “goodness” is not determined by his or her political views or any other category that we so conveniently like to slot people into. I’ve seen firsthand that no political affiliation, religious preference, gender, sexual orientation, or ethnicity has a monopoly on warmth, passion, generosity, empathy, patience, or humor. Even more encouraging, I don’t think these workshop epiphanies are mine alone. Workshop after workshop, I get to observe a dozen of the most diverse people imaginable not just set aside differences and work side-by-side, but actually form friendships that transcend conventional boundaries, deep friendships that often continue long after the workshop ends.
I went into the photo workshop business fully prepared to teach others, but completely unprepared for the learning others would offer me.
About this image
With the fall color for this year’s Yosemite Fall Color and Reflections workshop peaking, I had to work overtime to balance the need for quality photo time at each stop with my desire to get my group to all the photo spots. On the workshop’s final day we finally made it to Cathedral Beach, a great up-close view of El Capitan that’s always good for reflections in the fall.
With El Capitan in full sunlight, the river in shade, and nothing stirring the water, all the ingredients were in place for a nice reflection. We’d been photographing reflections all week, but I didn’t get the sense that anyone was tiring of them. Drifting cottonwood leaves added to the beauty and the group quickly spread along a hundred yards or so in search of a composition to make their own.
Often shooting a scene like this I start wide, but this afternoon I started with my Sony 100-400 GM lens, playing with close-ups of the leaves and reflection. After wringing every possibility from this approach, I went to the other extreme and switched to my Sony 12-24 G lens. A wide composition needs a strong foreground, usually the closer the better, so I dropped down to river level and started working on variations of this scene.
While the water was calm, I was close enough to the leaves that even the slightest ripples risked motion blur, so to increase my shutter speed I dialed my Sony a7RIII to ISO 400. At 12mm I have a tremendous amount of depth of field, but the leaves were so close that I decided to play it safe and use f/16. After a check check of my hyperfocal app, I focused on a leaf about 18 inches from my camera knowing that would give me sharpness from the closest leave all the way out to El Capitan.
Yosemite Fall Color and Reflections Photo Workshop
Workshop Schedule || Purchase Prints
An El Capitan Gallery
Click an image for a closer look and slide show. Refresh the window to reorder the display.


That Didn’t Suck
Posted on November 5, 2018
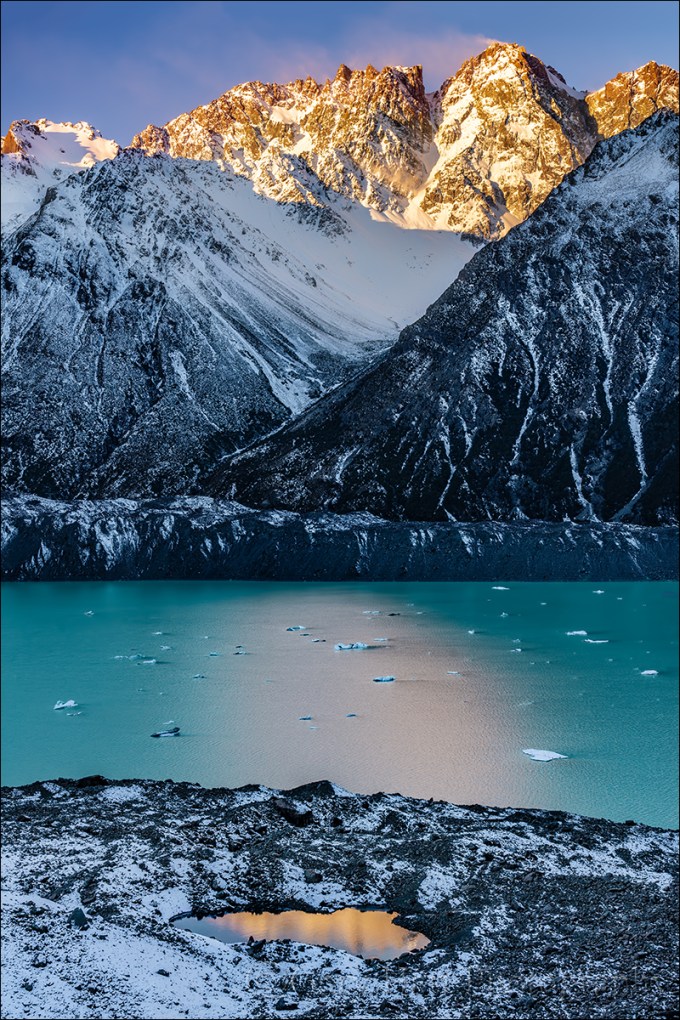
Reflection on the Rocks, Nun’s Veil and Tasman Lake, New Zealand
Sony a7RIII
Sony 24-105 f/4 G
1/13 second
F/11
ISO 100
One evening in New Zealand
I get to a lot of locations and see so many spectacular sights that they sometimes run together. But every once in a while I experience a shoot I know I’ll never forget.
One of (many) highlights of the New Zealand workshop is the hike to Tasman Lake in Aoraki / Mt. Cook National Park. The reward for this short, steep (335 stairs) hike is a 270 degree view that includes 12,000 foot Mt. Cook, icebergs drifting atop turquoise Tasman Lake, Nun’s Veil (pictured here), and the Tasman Valley.
At the trailhead most of the workshop group decided the trail was too icy and opted for a beautiful but less treacherous view a couple miles back down the road. As Don led them to the alternate spot, I guided four members who wanted to brave the icy trail. It turns out the ice wasn’t a big problem, and in fact was completely gone from the trail within a couple hundred yards, and we made it to the vista short of breath but otherwise unscathed.
I’d been up here a few times, but it was the first time for the others, so it was fun to watch their reaction as they summited. Because the trail ends here and the viewing platform is fairly compact, we were able to work in close proximity all evening—having others to share our awe with enhanced the experience even more.
The Tasman Lake view is one of those vistas that’s far too broad to capture with a single frame; any attempt to do so shrinks every feature to the point of insignificance. Opting to divide and conquer by identifying and isolating the scene’s most compelling features, my eye instantly landed on the reflection of Nun’s Veil’s in a small pool down the slope. I soon hopped the vista’s small retaining wall to better center the reflection in the pool, then spent much of the evening here working on compositions that included the reflection. My clicking intensified as light on Nun’s Veil warmed, coloring the wind-whipped snow encircling the peak.
As if all that wasn’t enough, a few minutes after the light left Nun’s Veil, a full moon appeared just to the right of the peak. Despite the advancing night, we were able to photograph the moonrise for a few minutes before the scene became too dark to capture detail in the foreground and moon. But even facing a walk down the icy trail in the dark, we lingered in the moonlight just to marvel at the majesty. As we donned our headlamps for the walk back down the trail, I heard one of the members of the group call my name. “Gary,” long pause. “That didn’t suck.”
New Zealand Photo Workshop
Like reflections? Here’s an article on reflections I wrote a few years ago.
Reflections
Who doesn’t love the soothing tranquility of a good reflection? And like a metaphor in writing, a reflection is an indirect representation that can be more powerful than its literal double by virtue of its ability to engage the brain in different ways than we’re accustomed. Rather than processing the scene directly, we first must mentally reassemble the reflection’s reverse world, and in the process perhaps see the scene a little differently.
Reflections are a powerful photographic tool as well. Water’s universal familiarity makes it an ideal subject for photographers frustrated by their camera’s static representation of our dynamic world. Just as we freeze or blur a waterfall to express turbulent motion, we can include a reflection to convey serenity.
Water reflections come in many forms, from a mirror-sharp reverse of a mountain atop a still pool, to an abstract shuffle of color and texture on a choppy lake. Without getting too far into the physics of light, it’s important to understand that every object we see and photograph (that doesn’t generate its own light) comes to us courtesy of reflected light.
Mirror reflection recipe
The ingredients for a crisp, mirror reflection like the El Capitan image at the top of the page is pretty simple: still water, a reflection subject that’s much brighter than the water’s surface (the greater the contrast the better), and a view angle that matches the angle from the water’s surface to the reflection subject. (The best reflections are usually found on shaded water because there are fewer photons to compete with the photons bouncing from the reflected subject.)
The El Capitan reflection above was a perfect confluence of reflection conditions. Clean, still air, dense shade on the river, and El Capitan’s fully exposed, reflective granite, make early morning the best time for El Capitan reflections. On this April morning I made my way down to the Merced River hoping to photograph the first light on El Capitan reflected in the Merced River. Finding my route down to the river blocked by spring flooding, I was forced to improvise. The morning air was clean and calm, and the ephemeral lake was mirror-still.
Circling the flooded meadow, I found a gap in the trees that opened onto the most complete view and reflection of El Capitan and the Three Brothers I’ve ever seen. So complete in fact, that I couldn’t include it all with my 16-35mm lens at its widest focal length. Fortunately, I was able to borrow a Canon 11-24 lens and Metabones IV adapter from a friend (thanks, Curt!), just wide enough to fit the entire scene at the lens’s shortest focal length.
Playing the angles

Understanding that reflected photons leave the water’s surface at the same angle at which they arrive—imagine the way a tennis ball bounces (if it weren’t affected by spin, wind resistance, or gravity)—helps us get in position for the reflection we want.
A few years ago I found myself atop Sentinel Dome right after an intense rain shower had turned indentations in the granite into small, glistening pools. Rather than simply settle for the vivid sunset coloring the clouds above, I decided to include the sunset reflected in the pools as well. At eye-level the pools reflected blue sky, so I dropped my tripod as low as it would go, almost to granite level, positioning my lens at the same angle to the pools that the red light leaving the clouds struck the water.
When the water’s in motion

On the Rocks, El Capitan and the Merced River, Yosemite
As spectacular as a crisp, mirror reflection in still water is, it’s easy to overlook the visual potential in a reflection that’s not crisp, or to forget your camera’s ability to render a soft or abstract reflection much better than your eyes view it. While a crisp reflection often dominates the primary subject in an image, a splash of reflected color or shape can provide a striking accent to a dominant primary subject. And a reflection disturbed by the continuously varying angles of rippled or choppy water magically appears when a long exposure smoothes the water’s surface.
In the image on the right, the El Capitan reflection undulating atop the Merced River was barely perceptible to my eyes. But the reflection came to in a 25 second exposure achieved with the help of 2-stop hard graduated neutral density filter that subdued the day’s last rays on the clouds and El Capitan, and a neutral polarizer (with the reflection dialed up) that cut the light on the entire scene by a couple of stops. And since a reflection is never as bright as the actual scene, using a GND meant I need to do a little dodging and burning in Photoshop.
Where to focus
An often misunderstood aspect of reflection photography is where to focus. Though it seems counterintuitive, the focus point of a reflection is the reflection subject, not the reflection surface. This isn’t such a big deal in a scene like the El Capitan reflection at the top of the post, where the focus point of everything of visual significance is infinity, but it’s a very big deal when you want both your reflection and rocks or leaves on the nearby water surface sharp.

Autumn Reflection, El Capitan, Yosemite
The El Capitan reflection on the right is very different from the El Capitan reflection above, where the extreme depth of field ensured sharpness had I focused on anything in the scene or the reflection. But here the leaves that were my scene’s primary emphasis were just a couple of feet from my camera, while El Capitan was several thousand feet distant. Even though the leaves floated atop the El Capitan reflection, focusing on El Capitan would have softened the leaves. To increase my depth of field, I stopped down to f/18 and focused several feet into the foreground leaves, then magnified the image on my LCD to verify that all of the leaves were sharp. Though El Capitan is slightly soft, a soft reflection is far more forgivable than a soft fore
Think ahead
It seems that reflections often feel like a fortuitous gift that we just stumbled upon. But given that reflections are entirely beholden to the laws of physics, they’re far more predictable than many of the natural elements we photograph. Taking a little time to understand the nature of reflections, and how they’re revealed by a camera, enables photographers to anticipate their appearance.
For example, in Yosemite I know that low flow makes autumn the best time for reflections in the Merced River. On the other hand, when the Merced is rushing with spring runoff, Yosemite’s meadows often shimmer beneath tranquil vernal pools. I plan many trips (and workshops) to take advantage of these opportunities.
Workshop Schedule || Purchase Prints
A Reflection Gallery
Click an image for a closer look and slide show.


A Fall Color Primer
Posted on September 23, 2018
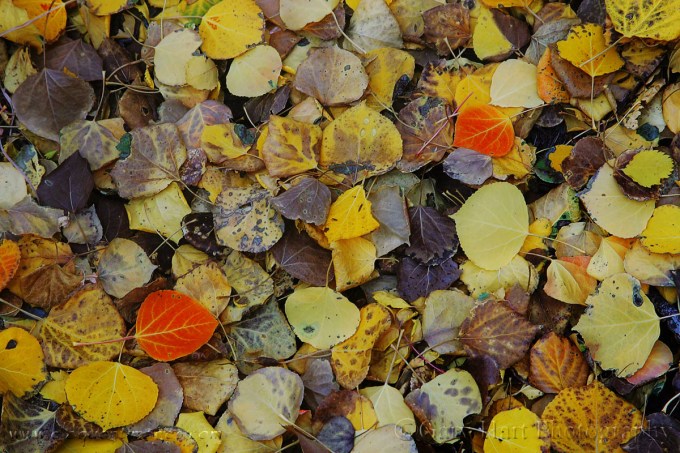
Fallen Color, Rock Creek Canyon, Eastern Sierra
Canon EOS-1D Mark II
1/3 second
F/9.0
ISO 100
85 mm
Autumn has arrived, my favorite season for creative photography. To kick off the festivities, I’m sharing an updated version of a post I wrote a few years ago explaining the often misunderstood process responsible for it all.
Few things get a photographer’s heart racing more than the vivid yellows, oranges, and reds of autumn. And the excitement isn’t limited to photographers—to appreciate that reality, just try navigating the Smoky Mountains backroads on a Sunday afternoon in October.
Innkeeper logic
But despite all the attention, the annual autumn extravaganza is fraught with mystery and misconception. Showing up at the spot that guy in your camera club told you was peaking at this time last year, you might find the very same trees displaying lime green mixed with just hints of yellow and orange, and hear the old guy behind the counter at the inn shake his head and tell you, “It hasn’t gotten cold enough yet—the color’s late this year.” Then, the next year, when you check into the same inn on the same weekend, you find just a handful of leaves clinging to exposed branches—this time as the old guy hands you the key he utters, “That freeze a few weeks ago got the color started early this year—you should have been here last week.”
While these explanations may sound reasonable, they’re not quite accurate. Because the why and when of fall color is complicated, observers resort to memory, anecdote, and lore to fill knowledge voids with partial truth and downright myth. Fortunately, science has given us a pretty good understanding of the fall color process.
It’s all about the sunlight
The leaves of deciduous trees contain a mix of green, yellow, and orange pigments. During the spring and summer growing season, the green chlorophyl pigment overpowers the orange and yellow pigments and the tree stays green. Even though this chlorophyl is quickly broken down by sunlight, it is continuously replaced in the process of photosynthesis that sustains the tree during the long days of summer.
As the days shrink toward autumn, things begin to change. Cells at the abscission layer at the base of the leaves’ stem (the knot where the leaf connects to the branch) start to thicken, blocking the transfer of carbohydrates from the leaves to the branches, and the movement of minerals to the leaves, that had kept the tree thriving all summer. Without these minerals, the leaves’ production of chlorophyl dwindles and finally stops, leaving just the yellow and orange pigments. Voila—color!
Sunlight and weather
Contrary to popular belief, the timing of the onset of this fall color chain reaction is much more daylight-dependent than temperature- and weather-dependent—triggered by a genetically programmed day/night-duration threshold, and contrary to innkeeper-logic, the trees in any given region will commence their transition from green to color at about the same time each year (when the day length drops to a certain point).
Nevertheless, though it doesn’t trigger the process, weather does play a significant part in the intensity, duration, and demise of the color season. Because sunlight breaks down the green chlorophyl, cloudy days after the suspension of chlorophyl creation will slow the coloring process. And while the yellow and orange pigments are present and pretty much just hanging out, waiting all summer for the chlorophyl to relinquish control of the tree’s color, the red and purple pigments are manufactured from sugar stored in the leaves—the more sugar, the more vivid the red. Ample moisture, warm days, and cool (but not freezing) nights after the chlorophyl replacement has stopped are most conducive to the creation and retention of the sugars that form the red and purple pigments.
On the other hand, freezing temperatures destroy the color pigments, bringing a premature end to the color display. Drought can stress trees so much that they drop their leaves before the color has a chance to manifest. And wind and rain can wreak havoc with the fall display—go to bed one night beneath a canopy of red and gold, wake the next morning to find the trees bare and the ground blanketed with color. And of course all these weather factors come in an infinite number of variations, which makes each year’s color timing and intensity a little different from the last.
Despite our understanding of the fall color process, Mother Nature still holds some secrets pretty close to her vest—just when we think we’ve got it all figured out, she’ll surprise us. For example, last year’s Eastern Sierra fall color featured lots of black leaves that I attributed to California’s extreme drought conditions. With the drought persisting, and in fact intensifying, this year, I feared this fall would be even worse. So I was quite pleased to find everything going along right on schedule, with lots of yellow, more red than usual, and hardly a black leaf to be seen. Go figure.
About this image
Driving Rock Creek Canyon north and east of Bishop, I pulled my car over at a random spot and wandered over to the creek. I found trees beyond peak and the creek bank blanketed with yellow aspen leaves, by far the predominant color in the Eastern Sierra. As I turned to return to my car my eyes caught a rare flash of orange. Moving in that direction, I found matching red-orange leaf less than a foot away.
I’m sometimes accused of placing or arranging leaves in my scenes, something I never do, but I understand why people might think that. I very consciously look for leaves that stand out from their surroundings that I can isolate in my frame.
Circling this scene, I didn’t have to work to hard to decide that a symmetrical diagonal arrangement was the way to go. A thin overcast made exposure easy.
Workshop Schedule || Purchase Prints
A Fall Color Gallery


Sony 24mm f/1.4 GM Lens: First thoughts
Posted on September 20, 2018

Moonlight, Sierra Foothills, California
Sony a7R III
Sony 24 f/1.4 GM
10 seconds
F/1.4
ISO 1600
Today Sony announced the lens I’ve been waiting for: the Sony 24, f/1.4 GM. I got a sneak preview of this lens on Maui last week, and again once I got home home. Hurricane Olivia, my workshop (no one was supposed to see me using the lens), and food poisoning significantly limited my use of it, but I did get to play with it enough to share a few thoughts.
Night photography is all about capturing light, the more the better. We bump our ISO as high as the image quality permits, dial in our lens’s widest aperture, and open our shutter as long as we can without obvious star streaks, pushing each exposure variable as far as possible squeeze out every last photon. The shortcomings of each of these compromises is mitigated by an improvement in the others, which is why night photography with the fastest possible lens means I can get the same exposure with a little less star motion and/or noise. So f/1.4 is great, currently pretty much as good as it gets for a lens wide enough for night photography.
Of course fast and wide isn’t much good if the lens is lousy, or difficult to use. I haven’t used the 24 GM a lot, but I’ve used it enough to know that lousy and difficult won’t be a concern.
First Impression
My very first impression, and I suspect this will be everyone’s first impression, is how small this lens is. When I knew it was coming my way I started strategizing how I’d rearrange my bag to accommodate it, but it turns out all I needed to do was empty the slot with a couple of extension tubes and my 2X teleconverter. Contrast that with the Sigma 20mm f/1.4, which is an absolute beast of a lens, both in weight and volume, that could never just live in my bag. But I flew home with the Sony in my bag and was completely unaware of the extra weight. Well done, Sony!

Two Galaxies, West Maui
I only got one night to use the on Maui before I had to return to the real world, and my location options had been severely limited by the recent passage Tropical Storm Olivia (downgraded from a hurricane shortly before landfall), so I drove about half-hour from my condo in Napili to the ultra-dark skies on the northern-most tip of West Maui, where I stumbled in the dark down to the edge of a cliff above the Nakalele Blowhole and shot into a 30-MPH headwind. Not the most ideal conditions, but I made it work for my purposes.
The benefit of a fast lens like this is not just the amount of light it allows into an image, it starts with the simple ability to see enough to simply compose and focus. And as I expected, both composition and manual focus were a piece of cake with Sony 24 1.4. For the Maui night shoot I composed, then magnified the viewfinder of my Sony a7SII and twisted the focus ring until the stars were the finest possible points of light—it took all of about 3 seconds. After my first exposure I magnified the image to verify that it was indeed sharp, then didn’t worry about focus again.
The image on the right features the dimmest part of the Milky Way, opposite the brilliant galactic core we all love to photograph. As a bonus, I also captured M-31, the Andromeda Galaxy—its fuzzy glow in the upper right has traveled over 2 million lightyears and is the farthest we can see with the unaided eye.
About this image
I’d have liked to have done more starlight photography after getting home from Maui, but by the time I recovered enough from a most unwelcome bout of food poisoning that showed up the day I returned, the moon was too prominent in the night sky. Nevertheless, a couple of days ago I sucked it up and drove out to the foothills about an hour from my home and put the lens through its paces beneath a 70 percent gibbous moon.
With the moon high over my right shoulder I looked for scenes facing northeast, where the skies were the least polluted by city glow. I eventually settled on a nearby hillside dotted with oaks fortuitously punctuated by an organized formation of the only clouds in the sky. With so much moonlight present I went with the Sony a7RIII instead of the Sony a7SII. Shooting moonlight at f/1.4 enabled me to get away with a 10-second exposure at ISO 1600.
In the past I’ve usually auto-focused on the moon for my moonlight scenes, but for laughs this night I tried autofocusing on the trees and was shocked to hear my focus indicator beep. Wow, I’ve never been able to autofocus on anything by moonlight, even when the moon was completely full. Next I tried autofocusing on a random star and again heard the confirmation beep—another first. And finally I magnified the view and manually focused on the tree: 3-for-3. Admittedly, with the recent ability to do starlight photography (moonless nights), I don’t do as much moonlight photography as I once did, and I’ve never done it with an f/1.4 lens (because it really isn’t necessary). Nevertheless, I think night focus struggles will be a thing of the past with this lens.
Processing my night images, the first thing I checked was the stars in the corners. In many years of night photography I used three dedicated “night” lenses (lenses that I only use for night photography): Zeiss 28mm f/2, Rokinon 24mm f/1.4, and Sigma 20mm f/1.4. In quest of more light I’ve shot all of them wide open, but I’ve had to live with a fair amount of coma (comatic aberration). My first reaction is that is that this lens is cleaner wide open than any of them.
The bottom line
I haven’t had tons of time to spend with my images, but my first impression is that I’m blown away by this lens. I’ve grown to accept that if I want quality in a lens I need to accept bulk along with it. Apparently that’s not the case, because this lens gave me crazy sharp images wide open, yet felt not much larger than a baseball in my hand.
A Sony 24mm f/1.4 GM Samples
A Maui Memory
Posted on September 14, 2018
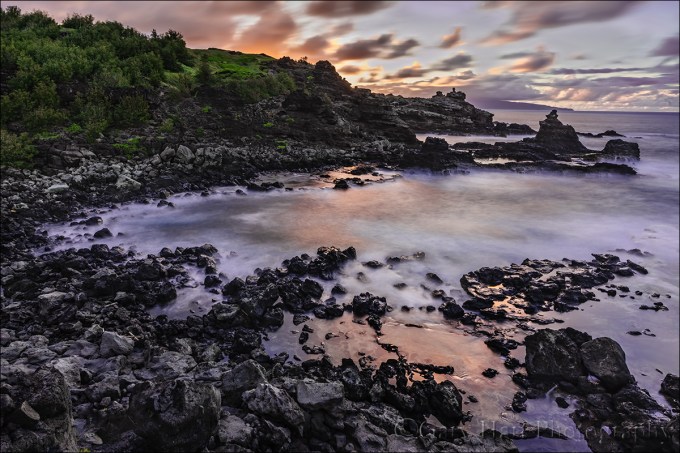
West Maui Tide Pool Sunset, Hawaii
Sony a7R III
Sony 16-35 f/2.8 GM
Breakthrough 6-stop ND filter
20 seconds
F/16
ISO 50
March 2018
Each year I do back-to-back workshops in Hawaii, one on the Big Island and one on Maui (it’s a tough job, but…, well, you know…). This year’s Big Island workshop was complicated first by the recent Kilauea eruption, and then by Hurricane Lane, which deposited 50 inches of rain on our host city Hilo just days before the workshop.
To get my eyes on the damage wrought by Mother Nature, and to scout more alternate locations, I flew to the Big Island five days early (see “tough job” reference above). Despite the complications, the workshop turned out great, with a fantastic group and a few new locations (including a beautiful sunset and Milky Way shoot atop Mauna Kea) added to my tried and true favorites, and I breathed a sigh of relief.
But my dreams of a stress-free Maui workshop were dashed when Hurricane Olivia took laser aim at Maui. Each day I’d check the forecast hoping to see that she had changed course, and each day I was disappointed. Finally, with just a couple days to go, I completely overhauled the workshop, switching lodging and itinerary to avoid the worst of the storm and get the most the island had to offer. I’m happy to say that despite Olivia, we only missed one morning of the workshop and managed to get our Haleakala sunrise in, plus spend a nice day on the Hana road.
My first location adjustment was switching one of my favorite Maui sunset locations, usually a second day destination, to the workshop’s first night because I wasn’t sure we’d be able to get out there the rest of the week. Between dense rainforest and steep, uneven lava, even the walk down here is a bit harrowing, so when I told the group that a few years ago I tried to drive down to this spot, they couldn’t quite believe it. Returning to this spot made me think that it might be time to share the story of my self-inflicted misadventure again. So I dusted off a blog post from five years ago (can’t believe it’s been that long!):
March 2013
On my September scouting trip for my upcoming Maui workshop I hiked cross-country down the rugged flank of West Maui, searching for lava-rock tide pools I’d read about. Scrambling down a steep hill and over sharp rocks, I found the beach I was looking for but decided it was too dangerous for a group. Rather than return the way I came, I continued picking my way along the shore and eventually found another spot I liked better. At first I thought this wouldn’t be suitable for a group either, but climbing out I found an overgrown dirt road/trail leading back to the highway (“highway” in this case is the one-and-a-half lane, mostly-paved, rental-agreement-voiding Highway 340 circling West Maui). But fearing I’d miss this obscure spur from the main road, I saved the trailhead on my GPS.
Last Sunday, the day before my Maui workshop started, I picked up Don Smith (Don assisted this workshop; I’ll return the favor in one of Don’s workshops) at the airport and was excited to share with him the spot I’d “discovered” (it’s not as if I’m the Lewis and Clark of landscape photography—there’s enough debris down there to indicate the spot is known to locals) and off we went. The steady rain that had been falling for most of the afternoon increased with the road’s remoteness and soon we were slaloming around boulders dislodged from the surrounding cliffs by the downpour—at one point we passed a car waylaid by a grapefruit-size rock embedded in its windshield.
Undeterred, we soldiered on through the intensifying rain. This was Don’s first Maui visit, so I narrated the tour with vigor, enthusiastically pointing out the island’s scenic highlights as we passed them, pausing only occasionally to reassure Don that the highway was navigable despite increasing evidence to the contrary, punctuating my confidence with, “And just wait until you see the scene at the end of this ‘secret’ road I discovered.”
Closely monitoring my GPS, at the prescribed location and without hesitation (for dramatic effect) I veered left into a barely distinguishable gap in the trees almost as if I had a brain. The narrow track unfolded between rapidly oscillating wipers, immediately plummeting the steep hill and twisting right. Dense foliage brushed both sides of the car, which by now was clearly losing purchase in the mud. Don hadn’t quite finished a sentence that started, “Are you sure…,” when it began to dawn on me that I’d never intended to actually drive this road, that my plan when I marked it six months earlier was to park at the top and walk down. Oops.
Propelled by momentum and without the benefit of traction put us completely at gravity’s mercy, careening downward (picture the jungle mudslide scene from “Romancing the Stone”). Steering seemed to have more influence on the direction the car faced than it did on its direction of travel and I quickly gave that up. Were it not for the deep ruts that occasionally nudged us back on course, I’m sure we’d have bounced into the jungle. I held my breath as we approached a boulder jutting from the roadbed and exhaled when the undercarriage passed above unscathed. Shortly thereafter the slope moderated somewhat and we slid to a stop, miraculously still on the “road” (more or less).
After a few seconds of cathartic expletives, I scanned our surroundings. Backing up the slippery road was out of the question, but a little farther down the slope we spotted a flat, clear space with a small Y-spur that might enable us to at least turn around. I scrutinized the dash for the switch that would engage the 4-wheel drive (I swear) the guy at rental agency promised my SUV had. When we didn’t find it Don dug the manual from the glovebox—apparently 4WD is an option the powers-that-be at Alamo deem unnecessary on Maui. Uh-oh.
With crossed fingers I gave the car some gas and felt the wheels spin with no effect. More expletives. Don and I exited into the rain to survey our predicament: the road was fast graduating to creek status, and where rubber tires were supposed to be, instead were four mud disks. Scraping the tires clean had little value because the next revolution simply reapplied a fresh layer.
Back in the car I found that cranking the steering wheel hard in both directions gained just enough traction to un-mire the tires and I gingerly rolled the car downhill, away from safety, but at least into a relatively flat, open space. Yay! Once on level ground, and with only a little bit of slip/slide drama, I gingerly pivoted the car into the adjacent spur and nudged back around to face the direction we’d just come. Progress!
Now for the hard part. Looking for the first time toward freedom, we came to grips with the chute that had deposited us: Not only was it steep, at the steepest (and muddiest) point it curved hard-left, but banked hard-right—not exactly an arrangement that would be embraced at Daytona.
I inhaled and goosed the gas and we shot upward, fishtailing like a hooked marlin before losing momentum before coming to a stop a mere fifty feet closer to freedom. This maneuver had also managed to skew the car at a 45-degree angle to the road, its left-front fender in the jungle on one side, its right-rear fender in the jungle on the other. When I gave the car gas the tires spun hopelessly.
Facing defeat we started strategizing Plan B: With an hour of daylight remaining and no cell service, we’d need to walk up to the highway and hope to flag down, in the rain, a good samaritan willing to drive two disheveled, mud-caked strangers back to civilization (about 45 minutes away), then hope to summon a tow truck that would extricate us.
While Don trudged through the rain up to the main road to get help, I stayed with the car, licking my wounds and feeling pretty foolish. It occurred to me that since the road was too narrow for a tow truck, and the distance and tight curve would make winching difficult, even a tow truck wouldn’t guarantee freedom.
Watching Don head back up the hill to seek help, I decided to give extraction one more shot. I shifted the car into reverse, gave it some gas, and cranked the steering wheel back and forth violently until the tires broke free and the car rolled out of the jungle and back onto the muddy trail and back down to the clearing below. So far so good. Once there, I gave the pedal a gentle nudge and reversed slowly all the way to the clearing’s back side (another 20 feet), where I hoped there might be a little more gravel and less mud—and most importantly, a little more room to gather momentum.
With a small prayer I slipped the transmission into in first and floored the accelerator, rocketing ahead with enough forward speed to avoid much of the fishtailing I’d experienced earlier. Peering through flailing wipers I aimed for the small opening that had deposited us, shooting past crumpled shrubs and protruding rocks until the road steepened. With the steepened incline the energy of my forward momentum was replaced by spinning wheels that spewed mud like a dirty firehose, but I just kept my foot to the floor.
Approaching the curve I felt the car start to tilt right and slow almost to 0, but somehow the tires maintained just enough grip to avoid a complete stop. The fishtailing had returned, now exceeded the forward motion but I didn’t care as long as I still had forward motion. I rounded the curve and surprised Don, who dove into the jungle just up the road and turned to cheer me forward. Just as my forward motion was about to to hopelessly be completely transformed into spinning wheels the road leveled, my rear tires grabbed something solid, and I shot forward. Not wanting to slow until the tires kissed pavement I lowered my window and high-fived Don as I flew past and onto the highway. At the top we just couldn’t stop laughing, both at the foolish predicament I’d created, and our utter disbelief that we’d made it out.
March 2018
This year’s visit was far less eventful. We parked at the top and entire group made it down to the water on foot, without incident. After receiving a brief summary of the scene and a return time, the group quickly scattered in search of one of the seemingly infinite number of great photos here. I kept my camera in the bag as I moved around to work with everyone, eventually finding myself atop a jagged rock ridge about 20 feet above pounding surf.
When I saw the sunset color reflecting in the water, I pulled out my Sony a7RIII and added my Breakthrough 6-stop neutral density filter to my Sony 16-35 f/2.8 GM lens. Carefully monitoring my histogram, I dialed in a long exposure that smoothed the surf and blurred the streaking clouds. In my Canon days I’d have needed a graduated neutral density filter (or multiple images) to capture the entire dynamic range in this scene, but the a7RIII has about 3-stops more dynamic range (an entire GND worth!) than my Canon DSLRs did, enabling me to capture this scene’s entire range of light with one click.
A Hawaii Gallery
Click an image for a closer look and slide show. Refresh the window to reorder the display.


Better than a Pot of Gold
Posted on September 2, 2018
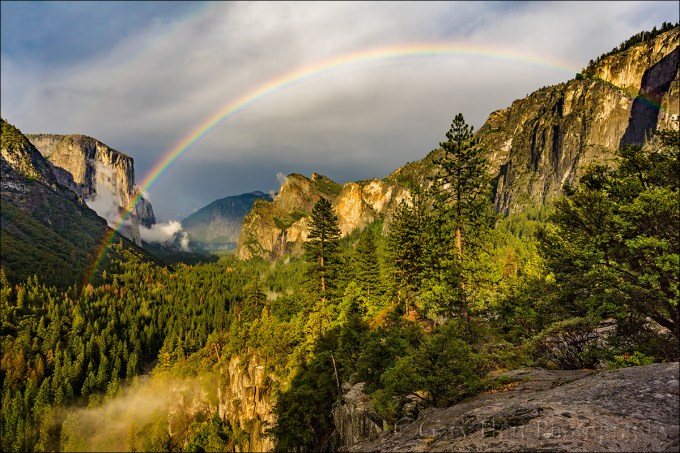
Summer Rainbow, Yosemite Valley
Sony a7R
Sony/Zeiss 16-35 f/4
1/250 second
F/9
ISO 100
My relationship with Yosemite rainbows goes all the way back to my childhood, when a rainbow arcing across the face of Half Dome made my father more excited than I believed possible for an adult. I look back on that experience as the foundation of my interest in photography, my relationship with Yosemite, and my love for rainbows. So, needless to say, photographing a rainbow in Yosemite is a pretty big deal for me.
A few years ago the promise (hope) of lightning drove me to Yosemite to wait in the rain on a warm July afternoon. But after sitting for hours on hard granite, all I got was wet. It became pretty clear that the storm wasn’t producing any lightning, but as the sky behind me started to brighten while the rain continued falling over Yosemite Valley, I realized that conditions were ripe for a rainbow. Sure enough, long after I would have packed up and headed home had I been focused solely on lightning, this rainbow was my reward.
The moral if my story is that despite all appearances to the contrary, rainbows are not random—when sunlight strikes raindrops, a rainbow occurs, every time. The reason we don’t always see the rainbow not because it isn’t happening, it’s because we’re not in the right place. And that place, geometrically speaking, is always the same. Of course sometimes seeing the rainbow requires superhero ability like levitation or teleportation, but when we’re armed with a little knowledge and anticipation, we can put ourselves in position for moments like this.
I can’t help with the anticipation part, but here’s a little knowledge infusion (excerpted from the Rainbow article in my Photo Tips section).
LET THERE BE LIGHT
Energy generated by the sun bathes Earth in continuous electromagnetic radiation, its wavelengths ranging from extremely short to extremely long (and every wavelength in between). Among the broad spectrum of electromagnetic solar energy we receive are ultra-violet rays that burn our skin and longer infrared waves that warm our atmosphere. These wavelengths bookend a very narrow range of wavelengths the human eye sees.
Visible wavelengths are captured by our eyes and interpreted by our brain. When the our eyes take in light consisting of the full range of visible wavelengths, we perceive it as white (colorless) light. We perceive color when some wavelengths are more prevalent than others. For example, when light strikes an opaque (solid) object such as a tree or rock, some of its wavelengths are absorbed; the wavelengths not absorbed are scattered. Our eyes capture this scattered light, send the information to our brains, which interprets it as a color. When light strikes water, some is absorbed and scattered by the surface, enabling us to see the water; some light passes through the water’s surface, enabling us to see what’s in the water; and some light is reflected by the surface, enabling us to see reflections.
(From this point on, for simplicity’s sake, it might help to visualize what happens when water strikes a single drop.)
 Light traveling from one medium to another (e.g., from air into water) refracts (bends). Different wavelengths refract different amounts, causing the light to split into its component colors. Light that passes through a water refracts (bends). Different wavelengths are refracted different amounts by water; this separates the originally homogeneous white light into the multiple colors of the spectrum.
But simply separating the light into its component colors isn’t enough to create a rainbow–if it were, we’d see a rainbow whenever light strikes water. Seeing the rainbow spectrum caused by refracted light requires that the refracted light be returned to our eyes somehow.
A raindrop isn’t flat like a sheet of paper, it’s spherical, like a ball. Light that was refracted (and separated into multiple colors) as it entered the front of the raindrop, continues through to the back of the raindrop, where some is reflected. Red light reflects back at about 42 degrees, violet light reflects back at about 40 degrees, and the other spectral colors reflect back between 42 and 40 degrees. What we perceive as a rainbow is this reflection of the refracted light–notice how the top color of the primary rainbow is always red, and the bottom color is always violet.
FOLLOW YOUR SHADOW
Every raindrop struck by sunlight creates a rainbow. But just as the reflection of a mountain peak on the surface of a lake is visible only when viewed from the angle the reflection bounces off the lake’s surface, a rainbow is visible only when you’re aligned with the 40-42 degree angle at which the raindrop reflects the spectrum of rainbow colors.
Fortunately, viewing a rainbow requires no knowledge of advanced geometry. To locate or anticipate a rainbow, picture an imaginary straight line originating at the sun, entering the back of your head, exiting between your eyes, and continuing down into the landscape in front of you–this line points to the “anti-solar point,” an imaginary point exactly opposite the sun. With no interference, a rainbow would form a complete circle, skewed 42 degrees from the line connecting the sun and the anti-solar point–with you at the center. (We don’t see the entire circle because the horizon gets in the way.)
Because the anti-solar point is always at the center of the rainbow’s arc, a rainbow will always appear exactly opposite the sun (the sun will always be at your back). It’s sometimes helpful to remember that your shadow always points toward the anti-solar point. So when you find yourself in direct sunlight and rain, locating a rainbow is as simple as following your shadow and looking skyward–if there’s no rainbow, the sun’s probably too high.
HIGH OR LOW
Sometimes a rainbow appears as a majestic half-circle, arcing high above the distant terrain; other times it’s merely a small circle segment hugging the horizon. As with the direction of the rainbow, there’s nothing mysterious about its varying height. Remember, every rainbow would form a full circle if the horizon didn’t get in the way, so the amount of the rainbow’s circle you see (and therefore its height) depends on where the rainbow’s arc intersects the horizon.
While the center of the rainbow is always in the direction of the anti-solar point, the height of the rainbow is determined by the height of the anti-solar point, which will always be exactly the same number of degrees below the horizon as the sun is above the horizon. It helps to imagine the line connecting the sun and the anti-solar point as a fulcrum, with you as the pivot–picture yourself in the center of a teeter-totter: as one seat rises above you, the other drops below you. That means the lower the sun, the more of its circle you see and the higher it appears above the horizon; conversely, the higher the sun, the less of its circle is above the horizon and the flatter (and lower) the rainbow will appear.

Assuming a flat, unobstructed scene (such as the ocean), when the sun is on the horizon, so is the anti-solar point (in the opposite direction), and half of the rainbow’s 360 degree circumference will be visible. But as the sun rises, the anti-solar point drops–when the sun is more than 42 degrees above the horizon, the anti-solar point is more than 42 degrees belowthe horizon, and the only way you’ll see a rainbow is from a perspective above the surrounding landscape (such as on a mountaintop or on a canyon rim).
Of course landscapes are rarely flat. Viewing a scene from above, such as from atop Mauna Kea in Hawaii or from the rim of the Grand Canyon, can reveal more than half of the rainbow’s circle. From an airplane, with the sun directly overhead, all of the rainbow’s circle can be seen, with the plane’s shadow in the middle.
DOUBLE YOUR PLEASURE
Not all of the light careening about a raindrop goes into forming the primary rainbow. Some of the light slips out the back of the raindrop to illuminate the sky, and some is reflected inside the raindrop a second time. The refracted light that reflects a second time before exiting creates a secondary, fainter rainbow skewed 50 degrees from the anti-solar point. Since this is a reflection, the order of the colors is the secondary rainbow is reversed.
And if the sky between the primary and secondary rainbows appears darker than the surrounding sky, you’ve found “Alexander’s band.” It’s caused by all the light machinations I just described–instead of all the sunlight simply passing through the raindrops to illuminate the sky, some of the light was intercepted, refracted, and reflected by the raindrops to form our two rainbows, leaving less light for the sky between the rainbows.
Rainbows
Click an image for a closer look and slide show. Refresh the window to reorder the display.


Stop Being So Negative!
Posted on August 18, 2018

Sunset Lightning, Grand Canyon
Sony a7R III
Sony 24-105 f/4 G
1/5 second
F/9
ISO 400
Lightning (at a safe distance) is pretty cool. It has always fascinated me, partly for the ephemeral power that can explode a tree and disappear before my brain can register its existence, but also because lightning is a rare sight for these California eyes. What what exactly is going on in a lightning bolt? I thought you’d never ask….
The shocking truth about lightning
Lightning is an electrostatic discharge that equalizes negative/positive polarization between two objects. For example, when you get shocked touching the doorknob in your bedroom, you’ve been struck by your own personal lightning bolt. You got zapped because, courtesy of that carpet you just dragged your fuzzy slippers across, you picked up a few extra electrons that the doorknob was more than happy to relieve you of.
While the polarization process that happens in an electrical storm isn’t as thoroughly understood as the one in your bedroom, it’s generally accepted that a thunderstorm’s vertical, convective air motion shuffles electrons in the atmosphere. To jar your high school science memories, convection occurs when a fluid substance heats, becomes less dense, and rises until it cools and becomes dense enough to sink. (You initiate convection when you boil water.)
The is up/down circular flow of atmospheric convection happens when air near the ground warms, expands, and rises. The rising air carries water vapor; since cooler air can’t hold as much moisture as warm air, the ascending water vapor eventually condenses into clouds. The convective motion jostling the water and ice molecules inside the clouds strips the molecules of electrons. Electrons are negatively charged and more dense than the surrounding air; freed of their conventional bonds, these electrons fall earthward. Overhead, the clouds relieved of many electrons are suddenly positively charged, while the ground below has been rendered negatively charged by virtue of its new electron surplus.
Because nature abhors any imbalance, these opposite charges attract each other. The extreme polarization in a thunderstorm—positive charge at the top of the cloud, negative charge near the ground—is quickly (and violently) equalized: lightning! So I guess you could say that lightning is God’s way of telling Earth, “Stop being so negative!”
With lightning comes other atmospheric changes. The sudden infusion of a 50,000 degree electric charge displaces the surrounding air very suddenly, creating an audible compression wave that we know as thunder.
The visual component of the lightning bolt that caused the thunder travels to you at the speed of light, over 186,000 miles per second. But lightning’s aural component, thunder, only travels at the speed of sound, a mere 750 miles per hour (or so)—a million times slower than light.
Because lightning and its thunder are simultaneous, and we know how fast each travels, we can compute the lightning’s approximate distance. (Thunder’s speed varies slightly with atmospheric conditions; light’s speed is non-negotiable.) From our human perspective the lightning arrives instantaneously, but moving at 750 miles per hour, thunder takes around five seconds to travel a mile. So, dividing by five the number of seconds to elapse between the lightning’s flash and its thunder’s crash gives you the lightning’s distance in miles (divide the interval by three for the approximate distance in kilometers). For example, if ten seconds pass between the lightning and the thunder, the lightning struck about two miles away, fifteen seconds elapsed means it’s about three miles away, and so on.
This speed difference also explains why lightning comes and goes in milliseconds, while its thunder can rumble and roll for several seconds. Because a lightning bolt can travel many miles, the thunder from its nearest portions reaches you much sooner than its most distant components.
About this image
Each summer moisture from the Gulf of Mexico makes its way up into the American Southwest. The combination of moist air and extreme heat (to kick off convection) makes August ripe for thunderstorms at the Grand Canyon. For the last six years, Don Smith and I have scheduled two photo workshops hoping to photograph these thunderstorms and their effects (clouds, rainbows, and especially lightning).
Bit with unseasonably dry air in place, the forecast at the start of this year’s first Grand Canyon Monsoon workshop wasn’t especially favorable for lightning. I told the group during the orientation that I wasn’t concerned, that I’ve often seen forecasts like this change suddenly—then anxiously monitored every subsequent NWS forecast update with crossed fingers. In the meantime, we were all quite content photographing incredible smoke effects, courtesy of three nearby wildfires.
By the end of our second day I started seeing hints of moisture returning to the forecast toward the end of the workshop, with each forecast looking a little more promising than the one prior. By day four, the workshop’s final full day, I was downright optimistic.
We’ve always had better lightning success on the North Rim. Partly because the view faces south, the direction from which the storms tend to arrive, and partly because our cabins at Grand Canyon Lodge are right on the rim. Grand Canyon Lodge also has a pair of view decks, shielded by lightning rods, that are ideal for photographing lightning.
The lightning started firing early on our final evening. We all rushed to the rim, attached our Lightning Triggers, and pointed toward the most promising clouds. Much to my relief, it wasn’t long before everyone in the group had at least one lightning image, and most had many more than just one.
But feeling a bit greedy, with nice clouds overhead, and the smoke that had set up camp in the canyon for most of the week suddenly scoured by heavy rain, I realized that all we needed to ignite a sunset lightshow was a little sunlight. I glanced westward and saw signs of clearing. Dare I hope for a sunset to go with this lightning? As if by divine intervention, the sun emerged from the clouds just a few minutes before sunset, infusing the canyon and its diaphanous rain bands with light that started amber and reddened with each passing minute.
When the choice is between a (relatively) bland scene most likely to get lightning, and better a composition with just a slight chance for lighting, I usually take my chances and opt for the better composition. In this case the lightning had shifted a little north of the canyon, but I pointed my camera toward the better light over the canyon and crossed my fingers. So irresistible was the light that while waiting (and not wanting to change my composition and miss a lightning strike), I pulled my a7RII from my bag and clicked a couple of handheld frames due south, where no lightning was possible but the light was especially sweet. (Anyone who knows me will be shocked to hear that I took a picture without a tripod.)
Though several bolts fired during the five or so minutes before the sun disappeared, the one in this image was the only lightning I captured with the great sunset light. But all I wanted was one sunset strike, and I felt extremely lucky that it arrived just as the magenta glow reached its crescendo.
The lightning waxed and waned for several more hours. With the sun down the sky soon darkened enough for me to remove my Lightning Trigger and switch to long exposures in Bulb mode. I stayed until after 10:00, wrapping up with a couple of 20+ minute exposures that captured more than a dozen strikes each.
Grand Canyon Photo Workshops
A Lightning Gallery


Anchor Management
Posted on August 5, 2018
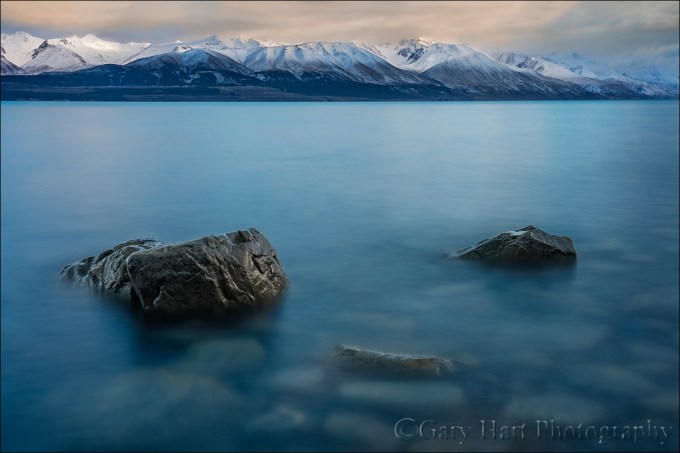
Dawn on the Rocks, Lake Pukaki, New Zealand
Sony a7R III
Sony 24-105 f/4 G
15 seconds
F/18
ISO 50
Virtually every scene I approach with a camera is beautiful, but a beautiful scene is rarely enough for a great image. Human experience of the world differs greatly from what the camera captures—the photographer’s job is to understand and use those differences.
I’ve always felt that viewers of an image are more comfortable exploring the frame—and therefore tend to linger longer with the image—when they have a starting and return place. So the first thing I do when trying to turn a beautiful scene into a beautiful picture is create that place by finding something to anchor my frame. Sometimes this anchor is an object that’s beautiful in its own right (such as a reflection, a flower, or the moon), but often it’s just a grounding element that aligns with the scene’s more striking features.
When I approached this scene on the shore of Lake Pukaki in New Zealand, I was struck first by the rich glacial turquoise water (I’ve seen a few lakes with similar color, but none that were nearly as big as Lake Pukaki), and second by the snowcapped peaks lining the distant shore. And in the pre-sunrise gloaming I could see that the sky was very nice too—maybe not spectacular, but with lots of character in the clouds plus the potential for soft, warm light when the sun finally arrived. Given all the scene had going for it, I probably could have raised my camera and composed something decent from any spot with a view of the lake, but a scene like this deserves something more than decent.
So before advancing any further, I performed my standard scan for something to anchor my frame, a visual element to surround with the scene’s inherent beauty. I was instantly drawn to an area of the beach where a few rocks protruded from the lake and quickly made my way down to the water. At the shore, in addition to the rocks that drew me I found a striking mosaic of rocks submerged beneath the clear water. A bonus for sure, but as beautiful as these submerged rocks were, as I tried to get all the visual pieces to fit together I quickly realized that they introduced a layer of complication as well.
For the next 10 or 15 minutes I wandered the lakeshore experimenting with compositions that used a variety of foreground rock combinations, but couldn’t really find anything that thrilled me. I’d click a frame or two, evaluate the result, but just couldn’t seem to organize all the foreground rocks with the mountains and sky to form something coherent.
But this wasn’t the time to become discouraged. I knew something was here and continued experimenting, hoping to find it before the light changed. As the sky brightened, I settled on the trio of rocks you see in this image. They aligned nicely with the mountains, better than anything else I’d found so far. But they were also orbited by a disorganized arrangement of satellite rocks that competed with the simple foreground I sought. I moved closer, extending my tripod as far into the water as I could, then dropped low and composed a fairly tight frame.
Eliminating the superfluous rocks made my foreground all about the rock trio, and with a few tweaks (preliminary frames followed by adjustments) arrived at the composition you see here. At this point the rocks were just a few feet from my camera, making depth of field a concern. Assisted by my hyperfocal app, I stopped down to f/18 and focused at the back of the farthest rock, taking only a couple of frames before I was confident my hyperfocal distance was dialed in.
The final piece of the puzzle was dealing with the chop in the water. Sometimes water motion can be a feature and I try to find a middle ground that softens it while retaining a bit of shape or texture. In this case I wanted simplicity, and felt that anything that wasn’t mountains, rocks, or color would be a distraction. The solution was to smooth the water as much as possible with a 15-second shutter speed.
There’s nothing inherently special about the rocks I used to anchor this image. The scene’s true beauty lies in the water and mountains, but if I’d have settled for an image that was just water and mountains, there would have been nowhere for your eye to land. Adding a simple foreground element to anchor my frame serves as a visual launching pad from which you’re free to explore the rest of this beautiful scene.
Join Don Smith and Me in New Zealand
Visual Anchors
Click an image for a closer look and slide show. Refresh the window to reorder the display.


Off to a great start
Posted on July 10, 2018
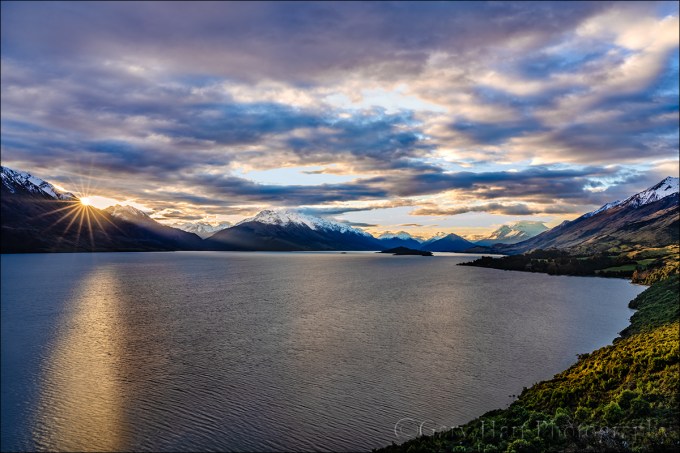
Last Light, Lake Wakatipu, New Zealand
Sony a7R III
Sony 24-105 f/4 G
.8 seconds
F/18
ISO 50
It’s a little ironic that on my first day back from New Zealand, I’m (finally) starting a blog post about the start of my winter workshops there. When I departed for New Zealand about a month ago, I had the best intentions to post several times per week, but soon realized there was going to be precious little time for that. I’ve processed a few images from the trip, but have only just scratched the surface of what I’m certain will turn out to be the most photographically rewarding four weeks of my life. But the rewards of this trip turned out to be so much more than photographic, and I have some great stories to share.
First, a little background
I’ve been leading photo workshops for a dozen years. From the outset my friend and fellow pro photographer Don Smith and I have had a reciprocal workshop relationship: he assists a few of my workshops, and I assist a like number of his workshops. In 2013 Don and I added a collaborative workshop at the Grand Canyon during the monsoon season (lightning photography)—instead of the workshop being owned by one and assisted by the other, we share the planning, marketing, and leading responsibilities 50/50. The Grand Canyon workshop became so successful (and enjoyable for both of us) that we’ve since added collaborative workshops at the Columbia River Gorge and on the Oregon Coast.
The next frontier
The New Zealand workshops take our collaborative workshop model to a new level. Not only are they our first international workshops, they’re much longer and more immersive. We’ve always provided lodging, but for New Zealand we added transportation (including a driver) and many meals.
Organizing a 10-day, 5 town workshop half-way around the world adds unprecedented layers of complications. Not just finding the best photo locations with good backups for weather closures, but also arranging lodging, meals, and permits. Though we’d scouted our locations thoroughly, had the permits, lodging, meals, and transportation arranged, we had no idea what it would be like photographing, eating, and traveling with a group for many consecutive hours, every day for 10 days. It turns out that our anxiety was completely unfounded.
It’s a sign
After the workshop orientation we hit Glenorchy Road on the shores of Lake Wakatipu for our first sunset shoot. Following a preliminary stop at Wilson Bay, where we were treated to beautiful light on the peaks across the lake, we headed farther down the road to our sunset destination—a spectacular view of the Humboldt Mountains (among others) above the lake. The sky looked especially promising for something special, so as we drove I gave everyone a quick primer on photographing a sunstar.
We pulled up to the vista just before the sun dropped out of the clouds. With just a few minutes until it disappeared behind the mountains, everyone scrambled out of the Sprinter (the 16-passenger Mercedes van that would be our chariot for the next 10 days) and set up. The sunstar window opened and closed quickly, but it was followed by a show of color and light that turned out to be a harbinger of upcoming good fortune.
I haven’t processed those images yet, so I’m sharing this one from the previous sunset, when I photographed a sunstar from the same location. (Honestly, the group got a much better sunset than this one.)
Why winter?
Ever since Don and I scheduled this workshop, I’ve had to answer the “Why winter?” question. Most photographers get it—not only does the lower sun angle make the light better, the mountains are covered with snow, and I’ve always felt that winter weather makes great skies. And a New Zealand South Island winter isn’t much different from the kinds of winters we get in Northern California and Oregon. During the four weeks we were in New Zealand, we dealt with lows in the 20s and 30s, and highs in the 40s and 50s—cold, but unlike the summer heat most of you endured while I was in New Zealand, nothing that couldn’t be easily handled with the right clothing.
Over the next few weeks I hope to share enough New Zealand winter images that I hope will further prove my point. Until then, below you’ll find a collection of winter images, from a variety of locations, for a little vicarious cooling on a hot summer day.
New Zealand 2019
A Winter Gallery
Click an image for a closer look and slide show. Refresh the window to reorder the display.


Escaping Summer
Posted on July 2, 2018

Dawn on the Rocks, Lake Wakatipu, New Zealand
Sony a7R III
Sony 16-35 f/2.8 GM
Breakthrough 6-stop ND filter
15 seconds
F/16
ISO 50
(If you subscribe to my Image of the Month e-mail and this post seems familiar, it’s because I borrowed the text from my June message.)
I just checked the date of my last post, I couldn’t believe how long it’s been. But I have a good excuse, I swear: I’ve been busy. Busy taking pictures, busy leading workshops, busy checking in and out of hotels, busy staying warm (really)….
But I’m not complaining—not even close. For the last three weeks I’ve been in New Zealand. The day I left home, the high temperature in Sacramento was 100 degrees. Less than twenty-four hours later I deplaned in Queenstown, New Zealand to a refreshing 40 degrees (or, as we say Down Under, 5 degrees). While this winter chill is a nice bonus, I’m here on New Zealand’s South Island mostly because winter is hands-down the best time to photograph this spectacular country. Last Thursday (or, as you say Up Over, Wednesday) Don Smith and I wrapped up our first ever New Zealand Winter workshop, but after two weeks of down jackets and wool hats, I’m not ready to return to summer, not even close.
It’s impossible to pick my favorite thing about this trip. I could cite the all-day cruises on Doubtful Sound (though we learned it should really be named Doubtful Fjord), plowing through glassy water framed by towering cliffs and plunging waterfalls, and shadowed by leaping dolphins. Or the breathtaking helicopter ride onto Fox Glacier, where we explored blue ice-caves, climbed through gaping crevices, and observed firsthand that a glacier is so much more than a featureless sheet of ice.
But it’s not just about the big stuff here in “Lord of the Rings” land. Something else that’s starting to sink in about New Zealand is the routine beauty that’s pretty much everywhere I look. Snow-capped peaks in all directions, daily sunrises and sunsets that become almost monotonous in their beauty, and pristine glacial lakes and streams with blues and greens that rival anything in the Canadian Rockies.
This image is from last Thursday’s sunrise, our first workshop’s final shoot. Carved thousands of years ago by massive glaciers, Lake Wakatipu is one of New Zealand’s largest lakes. Arriving just as the first hints of dawn touched the clouds, we watched the scene slowly materialize out of the darkness like a developing Polaroid. The snowy peaks appeared first, followed soon by textured clouds above the turquoise lake. As the sky brightened further, the opaque lakebed transformed into an intricate mosaic of colorful stones.
I moved along the lakeshore until I found a group of protruding rocks to anchor my frame. To emphasize the foreground, I dropped low and framed the scene with a wide lens. I used a neutral density filter to enable an exposure long enough to smooth the gentle waves rippling the lake surface. The long exposure also gave me the opportunity to savor the sublime scene and say a small prayer of gratitude that my trip is not over yet…
Join Don Smith and Me in New Zealand in 2019
New Zealand So Far (believe me, I’m just scratching the surface)
Click an image for a closer look and slide show. Refresh the window to reorder the display.


