Eloquent Images by Gary Hart
Insight, information, and inspiration for the inquisitive nature photographer
There’s no “never” in photography
Posted on July 4, 2016

Hawaiian Daybreak, Lydgate Beach, Kauai, Hawaii
Sony a7R II
Sony/Zeiss 16-35 f4
5 seconds
F/16
ISO 50
One question that comes up in just about every workshop is, where do I put the horizon (or in more general terms, where do I break my frame)? Behind these questions seems to be a feeling (fear?) that there’s one “best” way to treat a scene. And I’ve noticed that many beginning photographers are constrained by two “rules” they’ve heard at their camera club or online:
Never put the horizon in the middleAlways put the horizon 1/3 of the way down from the top of the frame, or 1/3 of the way up from the bottom
In general, when someone tells you that you should “always” do this, or “never” do that, run (don’t walk) to the nearest exit: If you’re not breaking rules, you’re not being creative. While well-intended advice like this might benefit the person who automatically puts everything in the center, most people who have owned a camera for more than a day are way beyond that point. And this 1/3 from the top or bottom of the frame thing? Forget about it. I have no problem giving 80 percent, 90 percent, or even more of my frame to my sky or foreground, and neither should you.
Here’s my (comprehensive) list of guidelines for how to split your frame:
- Give the area with the most visual interest the most room.
That’s it. If your scene is all about the clouds, put the horizon in the bottom half and celebrate the clouds—the better the sky (or the less interesting the foreground), the lower the horizon can go. Conversely, if the sky is boring, by all means, minimize it. And if you’re lucky enough to have a sky and foreground of equal beauty, feel free to split the frame.
It’s important not to overthink these creative choices. Freeing yourself from rules creates more room for your instincts to take over. (And by all means, feel free to deviate from my frame splitting guideline to.) We all the see the world a little differently, and where I choose to put my horizon may be completely different from where you put yours. Just trust your instincts (and if you’re not sure, shoot it different ways and decide later).
About this image
I just returned from Kauai, where I helped my friend Don Smith with his workshop there. For our penultimate sunrise we were at Lydgate Beach, between Lihue and Kapaa. I like to find relationships between the elements in my frame and often struggle at Lydgate because there’s just so much going on here: rocks in the surf, driftwood on the beach, and a point of land that juts in on the left (I have a thing about stuff sticking into my frame). But the sky this morning was so beautiful that I forced myself to find something that worked.
Avoiding the driftwood because it was just a pile of logs to my eye (though others in the group found nice images there), I set up in front of a group of rocks protruding from the surf just up the beach. Orienting my camera vertically, I was able to avoid the intruding point on the left, and the heap of logs on the right.
The clouds that morning wouldn’t stay still, but just as the color started to kick in a large cumulus cloud aligned perfectly with my foreground. Wanting to smooth the surf, I dialed my ISO to 50 and stopped down to f/16, then used my Singh-Ray 2-stop hard graduated neutral density filter to subdue the bright sky and brighten the surf with a 5-second shutter speed. I oriented my polarizer to maximize the color reflecting on the water.
Just as I avoid having objects intrude from outside my frame, I avoid (as much as possible) cutting objects off at the borders as well. To include all of my cumulus cloud and as much colorful sky and surf as possible, I went as wide as possible (16mm) and put the horizon in the middle. Over the next minute or so I clicked about a half dozen frames before recomposing, monitoring the waves and timing my clicks to capture a variety of wave action. I chose this frame for the way the diagonal line of spreading surf (more or less) mirrors the clouds.
I offer workshops on Hawaii’s Big Island and Maui
Eye on the Horizon
(Note how many of these scenes break the “rule” of thirds)


The Power of Reflections
Posted on July 1, 2016

Spring Reflection, El Capitan and Three Brothers, Yosemite
Sony a7R II
Canon 11-24 f/4L with Metabones IV adapter @11mm
1/60 second
F/8
ISO 100
Reflection
Dictionary.com: The return of light, heat, sound, etc., after striking a surface.
Okay, so that’s pretty basic. How about this one?
Wikipedia: The change in direction of a wavefront at an interface between two different media so that the wavefront returns into the medium from which it originated
Whoa, I hope that’s not on the test.
Who doesn’t love the soothing tranquility of a good reflection? And like a metaphor in writing, a reflection is an indirect representation that can be more powerful than its literal double by virtue of its ability to engage the brain in different ways than we’re accustomed. Rather than processing the scene directly, we first must mentally reassemble the reflection’s reverse world, and in the process perhaps see the scene a little differently.
Reflections are a powerful photographic tool as well. Water’s universal familiarity makes it an ideal subject for photographers frustrated by their camera’s static representation of our dynamic world. Just as we freeze in space or blur a waterfall to express turbulent motion, we can include a reflection to convey serene peace.
Water reflections come in many forms, from a mirror-sharp reverse of a mountain atop a still pool, to an abstract shuffle of color and texture on a choppy lake. Without getting too far into the physics of light, it’s important to understand that every object we see (and photograph) comes to us courtesy of reflected light. For example, when sunlight strikes El Capitan, some of the sun’s photons bounce straight back into our eyes, and there it is: El Capitan!
But other photons striking El Capitan head off in different directions—some are captured by other sets of eyes, and others land on the surface of the Merced River. Some of these photons pass beneath the river’s surface to reveal the submerged riverbed, while others bounce off. The ricocheting photons that travel from El Capitan and bounce off the river, reach our eyes as a reflection. In other words, what we call a reflection is in fact re-reflected light (reflected first from El Capitan, then by the river).
Mirror reflection recipe
The ingredients for a crisp, mirror reflection like the El Capitan image at the top of the page is pretty simple: still water, a reflection subject that’s much brighter than the water’s surface (the greater the contrast the better), and a view angle that matches the angle from the water’s surface to the reflection subject. (The best reflections are usually found on shaded water because there are fewer photons to compete with the photons bouncing from the reflected subject.)
The El Capitan reflection above was a perfect confluence of reflection conditions. Clean, still air, dense shade on the river, and El Capitan’s fully exposed, reflective granite, make early morning the best time for El Capitan reflections. On this April morning I made my way down to the Merced River hoping to photograph the first light on El Capitan reflected in the Merced River. Finding my route down to the river blocked by spring flooding, I was forced to improvise. The morning air was clean and calm, and the ephemeral lake was mirror-still.
Circling the flooded meadow, I found a gap in the trees that opened onto the most complete view and reflection of El Capitan and the Three Brothers I’ve ever seen. So complete in fact, that I couldn’t include it all with my 16-35mm lens at its widest focal length. Fortunately, I was able to borrow a Canon 11-24 lens and Metabones IV adapter from a friend (thanks, Curt!), just wide enough to fit the entire scene at the lens’s shortest focal length.

Sunset Palette, Half Dome from Sentinel Dome, Yosemite
Playing the angles
Understanding that reflected photons leave the water’s surface at the same angle at which they arrive—imagine the way a tennis ball bounces (if it weren’t affected by spin, wind resistance, or gravity)—helps us get in position for the reflection we want.
A few years ago I found myself atop Sentinel Dome right after an intense rain shower had turned indentations in the granite into small, glistening pools. Rather than simply settle for the vivid sunset coloring the clouds above, I decided to include the sunset reflected in the pools as well. At eye-level the pools reflected blue sky, so I dropped my tripod as low as it would go, almost to granite level, positioning my lens at the same angle to the pools that the red light leaving the clouds struck the water.
When the water’s in motion

On the Rocks, El Capitan and the Merced River, Yosemite
As spectacular as a crisp, mirror reflection in still water is, it’s easy to overlook the visual potential in a reflection that’s not crisp, or to forget your camera’s ability to render a soft or abstract reflection much better than your eyes view it. While a crisp reflection often dominates the primary subject in an image, a splash of reflected color or shape can provide a striking accent to a dominant primary subject. And a reflection disturbed by the continuously varying angles of rippled or choppy water magically appears when a long exposure smoothes the water’s surface.
In the image on the right, the El Capitan reflection undulating atop the Merced River was barely perceptible to my eyes. But the reflection came to in a 25 second exposure achieved with the help of 2-stop hard graduated neutral density filter that subdued the day’s last rays on the clouds and El Capitan, and a neutral polarizer (with the reflection dialed up) that cut the light on the entire scene by a couple of stops. And since a reflection is never as bright as the actual scene, using a GND meant I need to do a little dodging and burning in Photoshop.
Where to focus
Another often misunderstood aspect of reflection photography is where to focus. Though it seems counterintuitive, the focus point of a reflection is the reflection subject, not the reflection surface. This isn’t such a big deal in a scene like the El Capitan reflection at the top of the post, where the focus point of everything of visual significance is infinity, but it’s a very big deal when you want both your reflection and rocks or leaves on the nearby water surface sharp.

Autumn Reflection, El Capitan, Yosemite
The El Capitan reflection on the right is very different from the El Capitan reflection above, where the extreme depth of field ensured sharpness had I focused on anything in the scene or the reflection. But here the leaves that were my scene’s primary emphasis were just a couple of feet from my camera, while El Capitan was several thousand feet distant. Even though the leaves floated atop the El Capitan reflection, focusing on El Capitan would have softened the leaves. To increase my depth of field, I stopped down to f/18 and focused several feet into the foreground leaves, then magnified the image on my LCD to verify that all of the leaves were sharp. Though El Capitan is slightly soft, a soft reflection is far more forgivable than a soft foreground.
Think ahead
It seems that reflections often feel like a fortuitous gift that we just stumbled upon. But given that reflections are entirely beholden to the laws of physics, they’re far more predictable than many of the natural elements we photograph. Taking a little time to understand the nature of reflections, and how they’re revealed by a camera, enables photographers to anticipate their appearance.
For example, in Yosemite I know that low flow makes autumn the best time for reflections in the Merced River. On the other hand, when the Merced is rushing with spring runoff, Yosemite’s meadows often shimmer beneath tranquil vernal pools. I plan many trips (and workshops) to take advantage of these opportunities.
Photo Workshop Schedule
A Reflection Gallery
Click an image for a closer look and slide show. Refresh the screen to reorder the display.


The limitations of human vision
Posted on June 21, 2016
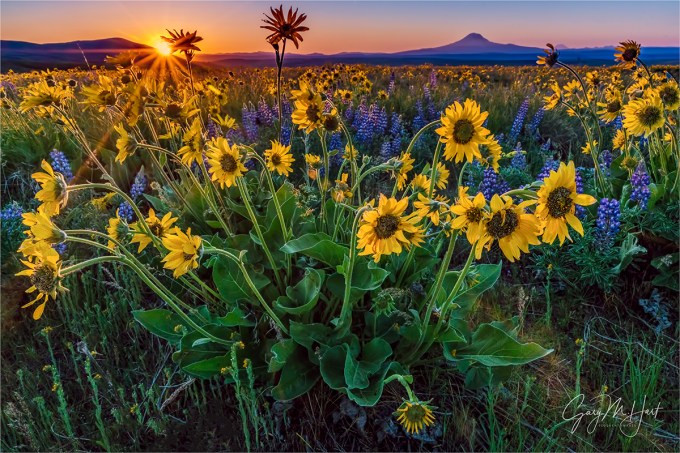
Wildflowers and Sunstar, Mt. Adams, Columbia River Gorge
Sony a7R II
Sony/Zeiss 16-35 f4
1/125 second
F/20
ISO 800
Read the story of my “discovery” of this location
Visual “Truth” is more relative than real
“Is that the way it really looked?” What photographer hasn’t heard that question by skeptical viewers? For years I used to feel slightly defensive when answering, as if my honesty was in question. Now I simply try to educate the skeptic.
Without getting too philosophical, it’s important to understand that, like the camera’s, the human view of the universe is both limited and interpreted. In other words, there’s no such thing as absolute visual truth. Instead, we (you, me, and our cameras) each have our own view of the world that’s based on many factors, some we can control, others we can’t. When you look through a viewfinder, the more you turn off your visual biases and understand your camera’s, the more successful your photography will be.
Limited vision
Complaining about the camera’s limitations—its dynamic range, low-light sensitivity, distorted perspectives—is a popular pastime among photographers who feel obligated to reproduce the world as “it really looks.” But before wasting too much time lamenting your camera’s limitations, pause to consider that what you and I see is incredibly limited as well. And while the camera can’t do some things our eyes can, it can do other things our eyes can’t.
Every square inch of the Universe is continuously bathed in an infinite range of electromagnetic frequencies. We humans, and our cameras, are completely oblivious to the vast majority of this radiation. For example, X-ray machines “see” waves in the one nanometer (one billionth of a meter) range, far too small for our eyes to register; TVs and radios “see” waves that are measured in centimeters—much too long for our eyes; we humans (and our cameras) can only see electromagnetic waves that fall between (about) 400 and 750 nanometers.
Knowledge of these “missing” wavelengths enables astronomers to peer into space using tools designed to see objects at wave lengths invisible to us, doctors to harness X-rays to view bones hidden beneath opaque skin, and military and law enforcement to see in the dark by detecting infrared radiation (heat). In other words, in the grand scheme of things, there’s no single absolute visual standard—it’s all relative to your frame of reference.
Recording more or less the same visible spectrum our eyes do, the camera is sometimes mistakenly assumed to duplicate human vision. But the camera has its own view of the world. For starters, it’s missing an entire dimension. And not only does it not record depth, a still camera only returns a frozen snap of a single instant. And we all know about our camera’s limited dynamic range and depth of field. Yet despite these differences, photographers often go to great lengths to force their camera to record what their eyes see. Not only is this impossible, it ignores camera’s potential to see things in ways we don’t.
About this image
Several things about this Columbia River Gorge wildflower image are different from what my eyes saw. First, this scene was a little brighter to my eyes than what I captured—I chose to slightly underexpose the majority of the scene to avoid completely overexposing the extremely bright sun and sky, and to keep the color from washing out. Another benefit of underexposure in this case is the way the nearly black shadows enhance the scene’s rich color.
(In the simplest possible terms) a sunstar is caused when sunlight’s path is disturbed as it passes by the intersection of a lens’s aperture blades—the smaller the aperture, the greater the angle of the intersection, and the more distinct the sunstar. (In this case, the scene’s extreme depth of field required a small aperture anyway.) The sunstar was a perfect counterweight on the left side of my frame for the visual weight of Mt. Adams on the right. And finally, going with an extremely wide focal length exaggerated the size of the flowers that were just inches away, and significantly diminished the size of the distant Mt. Adams.
What is real?
Is this image real? While I couldn’t see the sunstar with my unaided eyes, this image is a very accurate rendering of my camera’s reality. Understanding how my camera’s vision differs from mine, and how to leverage that difference by controlling the available focal length, exposure, and compositional options enabled me to capture a perspective that surpassed my limited vision to transcend human reality. Pretty cool.
Workshop Schedule || Purchase Prints || Instagram
Not what my eyes saw


Some advice for President Obama
Posted on June 17, 2016

Sunset Storm, Half Dome from Sentinel Dome, Yosemite
Canon EOS-1Ds Mark II
6 seconds
F/16
ISO 100
Canon 24-105 f/4L
President Obama and family visit Yosemite this weekend, and rather than wait by my phone for him to call with questions, I thought I’d just share my suggestions here
Dear Mr. President,
I just heard that you’re coming to Yosemite this weekend. Bravo! I’m sure by the time you leave you’ll agree that Yosemite is worthy of its reputation as the most beautiful place on Earth. But that said, I am a little concerned about the wisdom of your decision to visit in summer. Of course Yosemite is beautiful any time, but boring skies and shrinking waterfalls make summer Yosemite’s least desirable season for photography. Photography notwithstanding, the biggest reason to avoid Yosemite in summer is the crowds—much as I’m sure you would avoid invading Canada on Canada Day.
Had you checked with me first (as pretty much every other person who visits Yosemite seems to do), I’d have told you that any other season in Yosemite is less crowded than summer, and each has its own charm: Yosemite in autumn is decorated with red and gold leaves that reflect in the Merced River; winter, with its clearing storms and fresh snow, can be Yosemite’s most visually spectacular season; and spring, when the waterfalls boom and the dogwood bloom, is Yosemite’s postcard season. But summer? It’s all about the people. So unless you have an armed security brigade to clear a path through the crowds…. Oh, wait a minute—never mind.
Secret Service or not, you’ll need to brace yourself this weekend—if you think Congress is difficult, just try squeezing your tripod into the scrum on Sentinel Bridge for a summer sunset. Fortunately, despite the mayhem, there are a few things that will enhance your summer visit to Yosemite. Here are a few suggestions:
- Since you’ve brought your family, I strongly suggest that you leave your tripod in the room and be content with a couple of quick snaps at each stop. Trust me on this—nothing ruins a vacation faster than planning everything around your photography. (And given all that you have to deal with at work, the last thing you need is tension with Michelle and the girls.)
- No matter how crowded Yosemite is, if you get up and out at sunrise, you’ll have a couple of hours to wander Yosemite Valley in genuine peace. Before 8 a.m. is definitely the best time to hit Yosemite’s most popular landmarks and vistas.
- Avoid Yosemite Valley as much as possible in summer, so once the tourists start streaming from their tents and hotel rooms, it’s time to head for the high country. Though Glacier Point and Tuolumne Meadows will be crowded too, they’ll certainly be more tolerable than Yosemite Valley.
- Yosemite’s hiking trails will be more packed than a Rednecks for Trump rally, but at least on a hike you won’t need to be looking for a place to squeeze that limo. It seems like every Yosemite visitor does the Vernal Fall Mist Trail hike, or the hike to the top Yosemite Falls—they’re nice, but if I had only one hike to do in Yosemite, it would be the Four Mile Trail to Glacier Point (actually 4.8 miles). It’s a lot of work, but unlike the other hikes I mentioned, there are spectacular views along the entire route, so you can go as far as you want and turn around without feeling like you’ve wasted your time.
- If you do manage to get out with your camera and tripod (surely if you can negotiate a nuclear deal with Iran, or convince teenagers to join the family summer vacation, you can arrange some quality photography time while the rest of the family rents bikes or something), here’s some knowledge to help you make the most of the photo opportunity:
- Any view of Half Dome is best at sunset.
- El Capitan gets really nice light in the early morning, starting about fifteen minutes after sunrise (the “official,” flat horizon sunrise).
- In summer, Yosemite Falls doesn’t get good light until mid-morning.
- Bridalveil Fall and Cathedral Rocks get their best light in late afternoon (though the east side of Cathedral Rocks gets good morning light too).
- Mid-morning rainbows are possible in the mist beneath Lower Yosemite Fall from the pedestrian bridge. Bridalveil Fall gets rainbows in late afternoon (time varies with the date and viewing location).
- I’ve got a lot more information on Yosemite throughout my blog—feel free to browse. Or if you don’t want to spring for the WiFi at the Ahwahnee, you could just pull it off the NSA servers. In the meantime, here’s a link that will help you plan: Yosemite locations.
Mr. President, I’m sure you and your family will enjoy your visit, but I encourage you to return in Yosemite’s other seasons. Come January you’re going to have lots of free time on your hands, so once you get settled in your new place and have made a dent in the honey-do list, let me suggest that there are far worse things to do in your retirement than a photo workshop. Check out my workshop schedule—and don’t forget to ask about my “Past President” discount.
Best regards,
Gary M. Hart
A Yosemite Gallery


, Yosemite")


Happy Nature Photography Day!
Posted on June 15, 2016

Aspen, Bishop Creek Canyon, Eastern Sierra
Canon EOS-1Ds Mark III
1/13 second
F/7.1
ISO 400
36 mm
Today is Nature Photography Day. Of course every day is Nature Photography Day in my world, but if designating a day to remind everyone the joys of photographing nature helps drive people outdoors with their cameras, I’m all for it.
Nature photography can be enjoyed in many forms. For some it’s simply the passive act of viewing images that inspire vicarious travel or that rekindle happy memories; for others nature photography takes a more active as an excuse to get outside or an opportunity to explore.
The stakes are higher for those of us who make our living with our images. Our ability to get outside and explore is tied to our ability to create images that touch others. For me that starts with finding scenes that touch me, then trying to find ways to convey them that will resonate with others.
My process is rarely a simple click. Once I’ve identified a scene, I devise a plan for the best way to organize and emphasize the significant elements, then get to work with a series of clicks that continue until I’m satisfied (or decide there’s no image to be had). The first click is like a writer’s draft, and subsequent clicks are revisions. After each click, I stand back and evaluate the image on my LCD, refine the variables (exposure, relationships, focal length, depth of field, focus point), click again, then repeat as necessary.
I find this approach particularly valuable in macro and close-focus images, intimate scenes where even the slightest adjustment in composition, depth of field, and focus point can dramatically alter the result. It’s the primary reason I’m such a strong tripod advocate (evangelist)—when I’m done evaluating, the shot I just evaluated is sitting right there on my tripod, waiting for me to apply the adjustments I deem necessary.
I often look for a leaf, a flower, a rock, a place for my viewer’s eye to land, and try to isolate it from the rest of the scene. In the above image, captured several years ago in an aspen stand in the Eastern Sierra west of Bishop, I had a pretty good idea what I wanted to do and was quite content just exploring in the peace of a solitary autumn morning. When I found this collection of four vertically stacked leaves knew immediately I’d found what I was looking for. Starting with my 70-200 lens and a 25 mm extension tube, I set up my tripod with the leaves suspended in front of a receding line of bleached aspen (they’d have been lost against the background foliage) and played with the framing until I was satisfied—vertical orientation, fairly tightly composed.
Exposure was straightforward in the soft overcast, and a neutral polarizer helped the color come through the leaves’ waxy sheen. Though I settled on the general framing pretty quickly, an intermittent breeze meant I still had some decisions to make. The breeze ranged from light to apparently nonexistent, but I increased my ISO to 400 to enable a faster shutter speed and prevent my camera from picking up micro-movement I couldn’t see. I timed my clicks for pauses in the breeze.
Though I don’t always catch compositional balance, relationship, and border problems immediately, after several click/evaluate/refine cycles I felt I had the composition nailed. But that was only the first step. I wanted the leaves sharp, with the receding trunks soft but recognizable. I don’t trust critical depth of field decisions made in camera, so when an important composition (one I really like) relies heavily on DOF and focus point, I always take a series of frames, bracketing my f-stop around the DOF I think is best. Sometimes I’ll range all the way from f2.8 to f22. In this case I tried frames ranging from f4 (my 70-200’s fastest aperture) to f16 (at f16 I increased my ISO to 800), in one-stop increments. Since I thought f8 would give me about the right combination of sharp foreground and soft background, I even took a couple of extra frames in 1/3 stop increments around f8. Back home on my large monitor I scrutinized each frame closely and ended up choosing this one at f7.1.
In Lightroom I warmed the image slightly to remove a blue cast on the white trunks. Because I intentionally underexposed the scene a little at capture (to ensure that I didn’t clip any of the red channel, where most of the yellow is), in Photoshop I dodged the trunks to remove the dinginess introduced by my underexposure. Otherwise my processing was pretty much standard stuff—a subtle wiggle in Curves to add contrast, Topaz noise reduction, and selective sharpening of everything in focus with Unsharp Mask.
I’m pretty happy with this image, probably happier with it than the attention it generates. But that’s okay because every time I look at it I remember how much fun I had out there in the woods that chilly autumn morning.
Photo Workshop Schedule
A gallery of my favorite nature images
Click an image for a closer look, and a slide show. Refresh the screen to reorder the display.


Secret locations (and why they should stay that way)
Posted on June 9, 2016
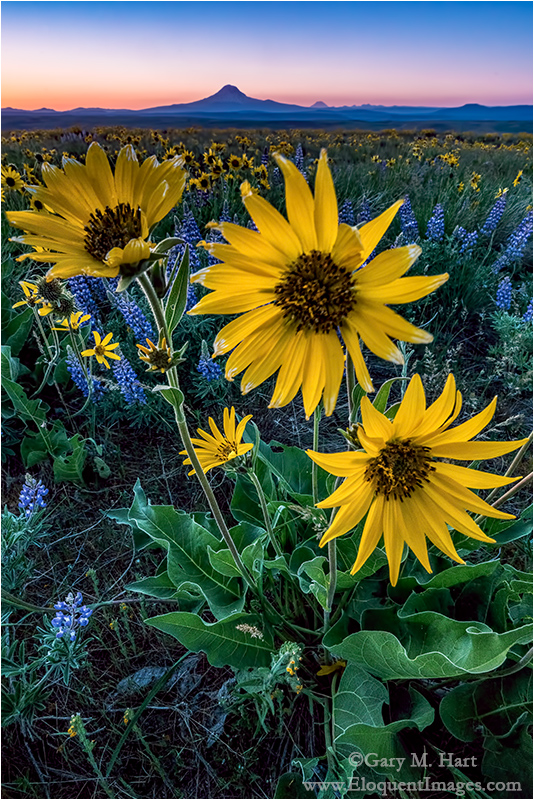
Wildflowers and Mt. Adams, Columbia River Gorge
Sony a7R II
Sony/Zeiss 16-35 f4
1/25 second
F/18
ISO 3200
As a professional photographer with a pretty large social media following, I get a lot of questions from complete strangers. What camera (or lens, or tripod, or whatever) should I buy? What were your settings for this picture? Did you use a filter? What’s the best time to photograph such-and-such a location? Because I don’t believe there should be secrets in photography, I do my best to answer these questions as quickly and completely as my time permits (though it seems that the time I have to answer questions decreases at about the rate the volume of questions increases).
Among the most frequently asked questions is, “Where did you take this picture, and how do I get there?” But, despite my “no secrets” policy, I’m no longer as free with location information as I once was. I can cite (at least) three reasons, none of which is a desire to prevent others from duplicating my shot (the best photography requires far more than location knowledge anyway).
First
I’m disappointed by the laziness of many photographers who simply want to duplicate an image they’ve admired. (No, I don’t think that simply asking for a location automatically makes you lazy, and in fact have been known to ask for location details when something about a spot interests me—but identifying a location should be the photographer’s starting point, not the goal.) I’ve seen enough duplicate images to know that I don’t want to perpetuate the epidemic.
Second
Sadly, the quickest way to ruin a location is to invite photographers. It seems that as soon as the word is out about a new spot, it becomes impossible to visit in peace, and even worse, to enjoy it without having to face the damage done by photographers who preceded you. You’d think that people who photograph nature would take better care of it, but that doesn’t appear to be the case, at least not for everyone.
It’s unfortunate that the actions of a few can ruin things for everyone, but these disrespectful few are far more visible than the respectful majority. The more photographers try to squeeze into spaces too small to accommodate them, spilling into fragile areas, crowding out tourists with just as much right to be there (“Hey, you’re in my shot!”), the more fences and rules are installed to keep us out.
And finally
I’d love to be wealthy enough to make myself available as a fount of photography information to all who ask. But because photography is my livelihood, I have to balance the time I spend against the income it generates.
When people pay me for a photo workshop, not only do I like to guide them to all the locations they’ve seen in the pictures, I also like to be able to give them perspectives a little off the beaten path and less heavily photographed. For that reason (and the fact that I just plain enjoy doing it), I spend a lot of time researching: Scouring maps, studying books, and googling before I visit for sure, but more importantly, polling locals and exploring independently (Hmmm, this road looks interesting…) once I arrive. This takes time, sometimes a lot of time.
About this image
I bring all this up because the image today was captured at a location that Don Smith and I “discovered” (it’s not as if we’re Lewis and Clark, but you get the point) while scouting before this year’s Columbia River Gorge workshops (back-to-back, collaborative workshops organized by Don and me). Despite our familiarity with any location, Don and I always allow time to explore for more spots on every visit. Which is how we found ourselves bouncing along dirt roads and traipsing up and down remote hillsides on both sides of the gorge earlier this spring.
When we found this spot, Don and I immediately agreed on two points: 1) We have to take the workshop groups here 2) Too many photographers would destroy this place. And since the surest way to invite a trampling horde of photographers is to share directions to a location, I won’t do that. But here’s a tip: some of my favorite photo spots have been found while searching for other spots.
So, after cautioning our groups to treat each destination with care, we did take them to this new spot. The first group had to contend with 30 MPH winds—we made those shots work by bumping our ISOs and concentrating more on views wide and distant enough to minimize motion blur. The second group landed here in a gentle breeze that ranged from slight to nonexistent, allowing us to get up close and personal with the flowers.
The image I’m sharing today came right at the end of the second group’s visit. The sun had been down for about ten minutes, but because the light was so nice, and the color seemed to linger in the sky above Mt. Adams, I just couldn’t bring myself to leave. With my lens just inches from the flowers, even at 16mm and f18, complete front-to-back sharpness was impossible. Forced to choose between foreground or background sharpness, I opted to make the trio of yellow balsam root in my foreground sharp, and let the background go a little soft. By this time it was dark enough that I bumped my ISO to 3200 to ensure a shutter speed fast enough to avoid motion blur.
Off the beaten path (20 feet to 20 miles from the crowd)


Chance and the prepared mind
Posted on June 3, 2016

Under the Rainbow, Colorado River, Grand Canyon
Sony a7R II
Sony/Zeiss 16-35 f4
1/60 second
F/11
ISO 100
“Chance favors only the prepared mind.” ~ Louis Pasteur
A few days ago someone on Facebook commented on my previous Grand Canyon rainbow image that getting “the” shot is more about luck than anything else. I had a good chuckle, but once I fully comprehended that this person was in fact serious, I actually felt a little sad for him. Since we tend to make choices that validate our version of reality, imagine going through life with that philosophy.
No one can deny that photography involves a great deal of luck, but each of us chooses our relationship with the fickle whims of chance, and I choose to embrace Louis Pasteur’s belief that chance favors the prepared mind. Ansel Adams was quite fond of repeating Pasteur’s quote; later Galen Rowell, and I’m sure many other photographers, embraced it to great success.

Double Rainbow, Yosemite Valley
As nature photographers, we must acknowledge the tremendous role chance plays in the conditions that rule the scenes we photograph, then do our best to maximize our odds for witnessing, in the best possible circumstances, whatever special something Mother Nature might toss in our direction. A rainbow over Safeway or the sewage treatment plant is still beautiful, but a rainbow above Yosemite Valley or the Grand Canyon is a lifetime memory (not to mention a beautiful photograph).
A few years ago, on a drive to Yosemite to meet clients for dinner (and to plan the next day’s tour), I saw conditions that told me a rainbow was possible. When I met the clients at the cafeteria, I suggested that we forget dinner and take a shot at a rainbow instead. With no guarantee, we raced our empty stomachs across Yosemite Valley, scaled some rocks behind Tunnel View, and sat in a downpour for about twenty minutes. Our reward? A double rainbow arcing across Yosemite Valley. Were we lucky? Absolutely. But it was no fluke that my clients and I were the only “lucky” ones out there that evening.
Before sunrise on a chilly May morning in 2011, my workshop group and I had the good fortune photograph a crescent moon splitting El Capitan and Half Dome from an often overlooked vista on the north side of the Merced River. Luck? What do you think? Well, I guess you could say that we were lucky that our alarms went off, and that the clouds stayed away that morning. But I knew at least a year in advance that a crescent moon would be rising in this part of the sky on this very morning, scheduled my spring workshop to include this date, then spent hours plotting all the location and timing options to determine where we should be for the moonrise.

Rising Crescent, El Capitan and Half Dome, Yosemite
I’d love to say that I sensed the potential for a rainbow over the Grand Canyon when I scheduled last month’s raft trip over a year ago, then hustled my group down the river for three days to be in this very position for the event. But I’m not quite that prescient. On the other hand, I did anticipate the potential for a rainbow a few hours earlier, scouted and planned my composition as soon as we arrived at camp, then called the rainbow’s arrival far enough in advance to allow people to get their gear, find a scene of their own, and set up before it arrived.
As I tried to make it clear in my previous post, anticipating these special moments in nature doesn’t require any real gifts—just a basic understanding of the natural phenomena you’d like to photograph, and a little effort to match your anticipated natural event (a rainbow, a moonrise, the Milky Way, or whatever) with your location of choice.
But to decide that photographing nature’s most special moments is mostly about luck is to pretty much limit your rainbows to the Safeways and sewage treatment plants of your everyday world. I’ve lost track of the number of times I’ve prepared for a special moment in nature, changed plans, lost sleep, driven many miles, skipped meals, and suffered in miserable conditions, all with nothing to show for my sacrifice. But just one success like a rainbow above the Grand Canyon is more than enough compensation for a thousand miserable failures. And here’s another secret: no matter how miserable I am getting to and waiting for my goal event, whether it happens or not, I absolutely love the anticipation, the just sitting out there fueled by the thought that it just might happen.
I do photo workshops
When chance meets preparation
(When the planning payed off)


The illusion of genius
Posted on May 30, 2016

Rainbow Bridge, Colorado River, Grand Canyon
Sony a7R II
Sony/Zeiss 16-35 f4
1/80 second
F/11
ISO 100
Perhaps you’ve noticed that many popular nature photographers have a “hook,” a persona they’ve created to distinguish themselves from the competition (it saddens me to think that photography can be viewed as a competition, but that’s a thought for another day). This hook can be as simple (and annoying) as flamboyant self-promotion, or an inherent gift that enables the photographer to get the shot no one else would have gotten, something like superhuman courage or endurance. Some photographers actually credit a divine connection or disembodied voices that guide them to the shot.
Clearly I’m going to need to come up with a hook of my own if I’m to succeed. Flamboyant self-promotion just isn’t my style, and my marathon days are in the distant past. Courage? I think my poor relationship with heights would rule that out. And the only disembodied voice I hear is my GPS telling me she’s “recalculating.”
Just when I thought I’d reached an impasse that threatened to keep me mired in photographic anonymity, a little word percolated up from my memory, a word that I’d heard uttered behind my back a few times after I’d successfully called a rainbow or moonrise: “Genius.” That’s it! I could position myself as the Sherlock of shutter speed, the Franklin of f-stop, the Einstein of ISO. That’s…, well, genius!
And just as the fact that none of these other photographers are quite as special as their press clippings imply, the fact that I’m not actually a genius would not be a limiting factor.
But seriously
Okay, the truth is that photography is not rocket science, and nature photographers are rarely called to pave the road to scientific or spiritual truth. Not only is genius not a requirement for great photography, for the photographer who thinks too much, genius can be a hindrance. On the other hand, a little bit of thought doesn’t hurt.
It’s true that I’ve photographed more than my share of vivid rainbows and breathtaking celestial phenomena—moonrises and moonsets, moonbows, the Milky Way, and even a comet—from many iconic locations, but that’s mostly due to just a little research and planning combined with a basic understanding of the natural world. An understanding basic enough for most people who apply themselves.
For example, this rainbow. It was clearly the highlight of this year’s Grand Canyon raft trip, and while I did call it about fifteen minutes in advance, I can’t claim genius. Like most aspects of nature photography, photographing a rainbow is mostly a matter of being in the right place at the right time. Of course there are thing you can do to increase your chances of being in the right place at the right time. Whether it’s an understanding of rainbows that enables me to position myself and wait, or simply knowing when and where to look, when I do get it right, I can appear more prescient than I really am.
The essentials for a rainbow are simple: sunlight (or moonlight, or any other source of bright, white light) at 42 degrees or lower, and airborne water droplets. Combine these two elements with the correct angle of view and you’ll get a rainbow. The lower the sun, the higher (and more full) the rainbow. And the center of the rainbow will always be exactly opposite the sun—in other words, your shadow will always point toward the rainbow’s center. There are a few other complicating factors, but this is really all you need to know to be a rainbow “genius.”
In this case it had been raining on and off all day, and while rain is indeed half of the ingredients in our rainbow recipe, as is often the case, this afternoon the sunlight half was blocked by the clouds delivering the rain. Not only do rain clouds block sunlight, so do towering canyon walls. Complicating things further, the window when the sun is low enough to create a rainbow is much smaller in the longer daylight months near the summer solstice (because the sun spends much of its day above 42 degrees). So, there at the bottom of the Grand Canyon on this May afternoon, the rainbow odds weren’t in our favor.
But despite the poor odds, because this afternoon’s rain fell from clouds ventilated by lots of blue gaps, I gave my group a brief rainbow alert, telling them when (according to my Focalware iPhone app, the sun would drop below 42 degrees at 3:45) and where to look (follow your shadow), and encouraging them to be ready. Being ready means figuring out where the rainbow will appear and finding a composition in that direction, then regularly checking the heavens—not just for what’s happening now, but especially for what might happen soon.
We arrived at our campsite with a light rain falling. The sun was completely obscured by clouds, but knowing that the sun would eventually drop into a large patch of blue on the western horizon, I went scouting for possible rainbow views as soon as my camp was set up. When the rain intensified an hour or so later, I reflexively looked skyward and realized that the sun was about to pop out. I quickly sounded the alarm (“The rainbow is coming! The rainbow is coming!”), grabbed my gear, and beelined to the spot I’d found earlier.
A few followed my lead and set up with me, but the skeptics (who couldn’t see beyond the heavy rain and no sunlight at that moment) continued with whatever they were doing. After about fifteen minutes standing in the rain, a few splashes of sunlight lit the ridge above us on our side of the river; less than a minute later, a small fragment of rainbow appeared upstream above the right bank, then before our eyes spread across the river to connect with the other side. Soon we had a double rainbow, as vivid as any I’ve ever seen.
Fortunate for the skeptics, this rainbow lasted so long, everyone had a chance to photograph it. Our four guides (with an average of 15 years Grand Canyon guiding experience), said it was the most vivid and longest (duration) rainbow they’d ever seen. (I actually toned it down a little in Photoshop.)
Genius? Hardly. Just a little knowledge and preparation mixed with a large dose of good fortune.
One more thing (May 31, 2016)
The vast majority of photographers whose work I enjoy viewing achieved their success the old fashioned way, by simply taking pictures and sharing them (rather than blatant self-promotion or exaggerated stories of personal sacrifice). In no particular order, here’s a short, incomplete list of photographers I admire for doing things the right way: Charles Cramer, Galen Rowell, David Muench, William Neill, and Michael Frye. In addition to great images, one thing these photographers have in common is an emphasis on sharing their wisdom and experience instead of hyperbolic tales of their photographic exploits.
Grand Canyon Workshops || Upcoming Workshops
A gallery of rainbows


Grand Canyon drive-by shooting
Posted on May 25, 2016
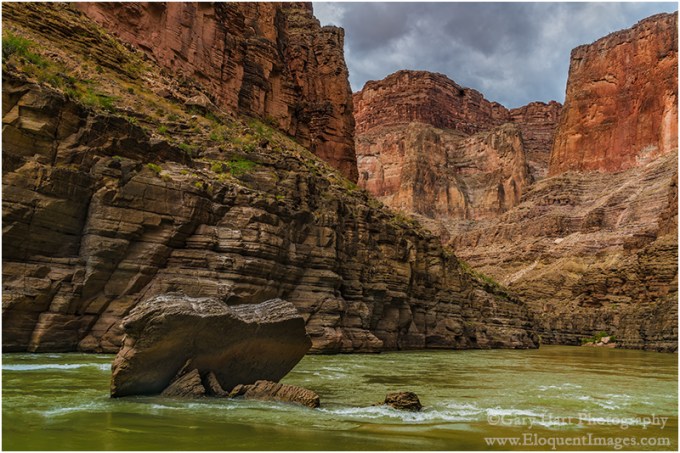
River Rock, Colorado River, Grand Canyon
Sony a7R II
Sony/Zeiss 24-70 f4
1/80 second
F/9
ISO 200
A couple of weeks ago I blogged about shooting sans tripod on my recent Grand Canyon raft trip. My rationale for this sacrilege was that any shot without a tripod is better than no shot at all. I have no regrets, partly because I ended up with Grand Canyon perspectives I’d have never captured otherwise, but also because shooting hand-held reinforced for me all the reasons I’m so committed to tripod shooting.
Much of my tripod-centric approach is simply a product of the way I’m wired—I’m pretty deliberate in my approach to most things, relying on anticipation and careful consideration rather than cat-like reflexes as my path to action. That would probably explain why my sport of choice is baseball, I actually enjoy golf on TV, and would take chess or Scrabble over any video game (I’m pretty sure the last video game I played was Pong). It also explains, despite being an avid sports fan, my preference for photographing stationary landscapes.
Despite this preference, for the last three years my camera and I have embarked on a one week raft trip through Grand Canyon, where the scenery is almost always in motion (relatively speaking, of course). And after three years, I’ve grown to appreciate how much floating Grand Canyon is like reading a great novel, with every bend a new page that offers potential for sublime reflection or heart pounding action. And just as I prefer savoring a novel, lingering on or returning to passages that resonate with me, I’d love to navigate Grand Canyon at my own pace. But alas….
The rock in this image was a random obstacle separated from the surrounding cliffs at some time in the distant past, falling victim to millennia of dogged assault by rain, wind, heat, cold, and ultimately, gravity. Understanding that the river is about 50 feet deep here makes it easier to appreciate the size of this rock, and the magnitude of the explosion its demise must have set off.
Unfortunately, viewing my subject at eight miles per hour precludes the realtime analysis and consideration its story merits, and I was forced to act now and think later. In this case I barely had time to rise, wobble toward the front of the raft, balance, brace, meter, compose, focus, and click. One click. Then the rock was behind me and it was time to turn the page.
Grand Canyon Photo Workshops
Rivers Front and Center


Grand Canyon garden spot
Posted on May 23, 2016

Nature’s Garden, Deer Creek Fall, Grand Canyon
Sony a7R II
Sony/Zeiss 24-70 f4
1/3 second
F/20
ISO 400
Who knew there could be so much intimate beauty in a location known for its horizon stretching panoramas? In fact, there are so many of these little gems that I run out of unique adjectives to describe them. Springing from a narrow slot in the red sandstone to plummet 180 feet to river level, Deer Creek Fall is probably the most dramatic of the many waterfalls we see on the raft trip.
Last year we stayed at Deer Creek Fall long enough to photograph it, but not long enough to explore. The prior year, on my first trip, we spent a couple of hours here; with temperatures in the 90s, most of the group photographed from the bottom, then cooled off in the emerald pool at its base. But a few of us took the relatively short, fairly grueling, completely unnerving trail to the top. Grueling because the route is carved into the sun-exposed sheer wall just downstream from the fall; unnerving because just as you’re catching your breath atop the slot canyon feeding the fall, you realize that continuing requires navigating about 20 feet of 18 inch wide ledge in the otherwise vertical sandstone. With no handhold and a 75 foot drop to the creek that may as well be 750 or 7500 feet (the outcome would be the same), I studied it for about five minutes. Watching the guides stride boldly across without hesitation, in flip-flops, did little to quell my anxiety. I finally sucked it up and made it to the other side, but once was enough.
This year, thanks to some deft planning by our lead guide, we scored the campsite directly across the river from the fall. He deposited the group at the fall, then motored across the river with another guide to get the camp started. The two other guides led a hearty group up the trail to the top, while the rest of us explored with our cameras at river level.
Already familiar with scenes down there, I scaled a boulder-strewn notch in the rocks just upstream to an elevated platform with great top-to-bottom view of the fall. Up here I found enough foreground options to keep me happy for the duration of our stay, and was so engrossed that I was completely unfazed by the verticality of my surroundings.
As I worked the scene, I eventually honed in on a vivid green shrub that stood out against the red sandstone, ultimately landing on variations of the composition you see here. Working this scene I dealt with intermittent showers, a fickle wind that ranged from nearly calm to frustratingly persistent, and a real desire for depth of field throughout my frame. After a number of frames at f16, I magnified an image on my LCD enough to see that the shrub was sharp, but the background was just nearly sharp. As much as I try to avoid anything smaller than f16, I stopped down to f20 and refocused a little farther back, about three feet behind my shrub. Another check of my LCD confirmed that everything from the nearby rocks to the background plants was sharp.
Our campsite that night was less than spacious (think compact condo living as opposed to sprawling suburban subdivisions), but definitely worth the close confines for the view alone. This stay across from Deer Creek Fall turned out to be memorable for one other event that happened later that evening, but that’s a story for another day….
Grand Canyon Photo Workshops
A Gallery of Waterfalls


, California")


")


