Eloquent Images by Gary Hart
Insight, information, and inspiration for the inquisitive nature photographer
Image Building
Posted on November 29, 2020
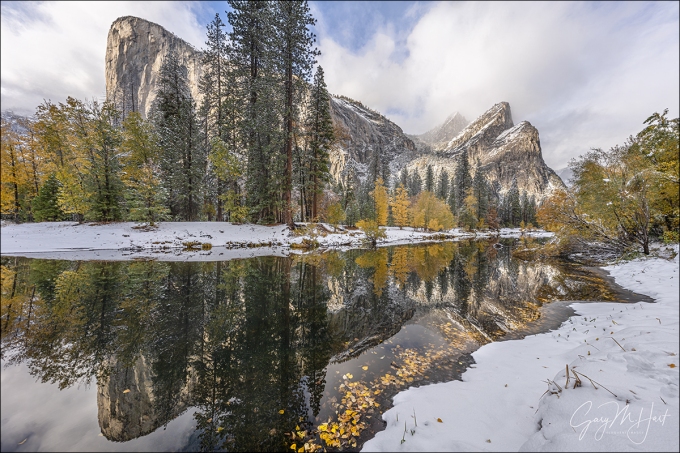
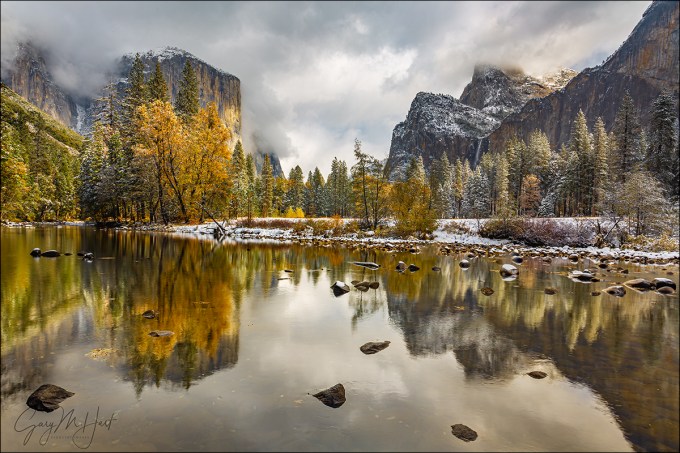
Autumn Snow, El Capitan and Three Brothers Reflection, Yosemite
Sony a7RIV
Sony 12-24 f/2.8 GM
1/100 second
F/10
ISO 100
I warned you that you’ll be seeing images from this month’s Yosemite snow day a while. …
As I may have mentioned, the conditions this day were so off-the-charts-spectacular that I probably could have closed my eyes and still had a good chance for a useable image with any click. But I knew I had an opportunity capture something truly special, so I forced myself to slow down and work with purpose at every stop.
Lots of variables go into creating a successful landscape image. Many people struggle with the scene variables—light, depth, and motion—that are managed by their camera’s exposure settings: shutter speed, f-stop, ISO. Others struggle more with the composition variables: recognizing, isolating, and framing a subject. And then there’s the overlap between these two sides of image creation that requires simultaneous, synergistic mastery. So I thought I’d use this image to demonstrate my image creation process.
What was I thinking?
Glassy reflections and the ability to include the Three Brothers makes this location beside the Merced River one of my favorite El Capitan views. But, as much as I love this spot, for years it also frustrated me because my widest lens was only 16mm, forcing me to choose between El Capitan and Three Brothers, or their reflection, but never both. My frustration vanished a few years ago when I added the Sony 12-24 f/4 G lens to my arsenal.
But now I was armed with the brand new Sony 12-24 f/2.8 GM lens. Though I’d used it some in my Yosemite Fall Color photo workshop a week earlier, my own photography isn’t a priority during a workshop, so this would be my first chance to give my new lens the undivided attention it deserved. And what better spot to do that?
Exposure
I approach every scene starting with my camera at its best ISO (100) and the lens’s “ideal” f-stop (generally f/8 – f/11, where lenses tend to be sharpest, the depth of field is good, with minimal diffraction). Given that motion wasn’t a factor in this scene (I was on a tripod, the wind was calm, and the river’s slow motion didn’t concern me), I stuck with ISO 100. And while the snow and floating leaves were an essential part of my immediate foreground, the 12mm focal length this scene required provided more than enough depth of field at f/10, no matter where in my frame I focused. (At 12mm and f/10, the hyperfocal distance is less than two feet.) In this case I just focused on the leaves and didn’t think about DOF again.
With my ISO and f/stop established, I simply put my eye to the viewfinder of my Sony a7RIV and dialed my shutter speed until the histogram looked right. Since this was a fairly high dynamic range scene (big difference between the darkest shadows and brightest highlights), I knew the exposure wouldn’t look great on my LCD image preview—my highlights would be a little too bright, my shadows a little too dark, but since the histogram looked good, I knew I’d be able to fix the highlights and shadows with a couple of easy Lightroom adjustments.
Composition
Some scenes you can walk up to and plant your tripod pretty much anywhere without much thought. But the variety of foreground and middle-ground elements here made the simple decision of where to set up my tripod very important. Normally I use the tall trees cut off near the center of this image as framing elements, and to block empty sky just left of El Capitan. But with clouds in what is all too often blank blue sky, and unable to find a foreground that worked from that position, I moved downstream and found a ribbon of autumn leaves hugging the riverbank that would make a great foreground.
I was pretty pleased so far, but I still had be careful to position myself so the floating leaves framed the reflection rather than blocked it. Try as I might, I wasn’t able to avoid blocking some of the Three Brothers reflection, but overall I was satisfied to include the leaves and all of the El Capitan reflection without blocking the nose of El Capitan.
Next I started working on the left/right aspect of the scene. The things that get left out of an image can be as important as what’s included. This is especially true on an image’s perimeter frequently, where distractions are easy overlooked by photographers too focused on their primary subject. This framing can managed by some combination of position, focal length, and aim (where my camera is pointed). In this scene I’d already worked out my position, focal length was non-negotiable because I had to be at 12mm (my lens couldn’t go any wider than 12mm, and composing longer than 12mm would have cut off the top and/or bottom of El Capitan). That left only framing option the direction my camera is aimed. Not wanting to cut of any of the riverbank, I shifted my view right until the bank formed a continuous line from the bottom of my frame until it disappeared into the mass of autumn tinted shrubbery on the middle-right.
When I thought I had things just right, I clicked a frame, stood back, and reviewed my composition on my LCD, made a small tweak to add a little more on the right and subtract a little from the left, then waited with my eyes on the rapidly shifting clouds and light. Each time I liked what I saw, I’d click another frame until I was satisfied I had something worth keeping.
The Many Faces of El Capitan
Click an image for a closer look, and to view a slide show.


Snow Falling on Autumn
Posted on November 22, 2020

Autumn Snow, Half Dome Reflection, Yosemite
Sony a7RIV
Sony 12-24 f/2.8 GM
1/100 second
F/16
ISO 200
Between peak fall color dancing on reflections everywhere, and a sky that oscillated all day between heavy snowfall and dramatic clearing, this November day was just one of those days when it was best to keep moving. In these conditions that’s easier said than done because whatever I’m photographing is so beautiful, it’s hard to leave. The result is a memory card full of spectacular, but similar, images. So, after a lifetime of photographing Yosemite in spectacular conditions, I’ve learned not to forget that it’s just as beautiful somewhere else.
By the time I made it out to this Half Dome view just a couple of Merced River bends upstream from Sentinel Bridge, I’d circled the valley so many times I was almost dizzy. My usual lens here is my Sony 24-105 f/4 G because I don’t usually think the surrounding scenery justifies shrinking Half Dome and its reflection with a wide lens. But with snow draping towering evergreens and golden cottonwoods, and a mosaic of autumn leaves lining the riverbank, this was no ordinary day.
Though I’d just gotten the Sony 12-24 f/2.8 GM in August, this was only the second time I’d gotten to use it (thank-you-very-much coronavirus), so I figured what the heck and twisted it onto my Sony a7RIV. Then I moved up and down the riverbank looking for the best foreground to put with the rest of this glorious scene. I eventually settled on this spot, drawn by the way the colorful leaves arced and seemed to frame Half Dome’s reflection.
To shrink the empty area between the leaves and reflection, I splayed my tripod legs and dropped it as low as possible, then plopped down in the snow to compose (grateful for my camera’s articulating LCD). The closest leaves were just a couple of feet away, but I really, really wanted the scene to be completely sharp throughout my frame. I was pretty sure that at 12mm and f/11 I had enough depth of field to safely focus anywhere, but why take a chance? I opened my hyperfocal app and confirmed that my hyperfocal distance was just one foot. Nevertheless, since the databases these apps use don’t take into account the extreme resolving power of a GM lens on 61 megapixel sensor, I bumped to f/16 (diffraction be damned) and went to work.
At first I was annoyed by the constant drips from overhead branches that kept disturbing my reflection, but quickly discovered that by timing my clicks, I could use the concentric waves as an accent, without losing the reflection. The single leaf that floated in just below (above?) Half Dome’s reflection was a bonus.
I just updated the Reflections article in my Photo Tips section, but am sharing it below as well
(and check out the Reflections Around the World gallery at the bottom)
Reflections
-

- Spring Reflection, El Capitan and Three Brothers, Yosemite
-
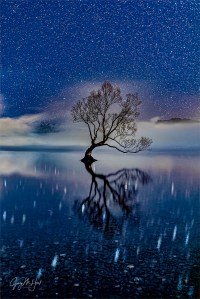
- Starry Night, Lake Wanaka, New Zealand
-
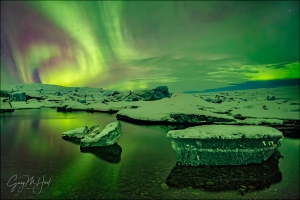
- Aurora Reflection, Glacier Lagoon, Iceland
Reflection
Dictionary.com: The return of light, heat, sound, etc., after striking a surface.
Okay, so that’s pretty basic. How about this one?
Wikipedia: The change in direction of a wavefront at an interface between two different media so that the wavefront returns into the medium from which it originated
Whoa, I hope that’s not on the test.
Who doesn’t love the soothing tranquility of a crisp reflection? And like a metaphor in writing, a reflection is an indirect representation that can be more powerful than its literal double thanks to its ability to engage the brain in different ways than we’re accustomed. Rather than processing the scene directly, we first must mentally reassemble the reflection’s reverse world, and in the process perhaps see the scene a little differently.
Reflections are a powerful photographic tool as well. Water’s universal familiarity makes it an ideal subject for photographers frustrated by their camera’s static representation of our dynamic world. Just as we freeze or blur a waterfall to express turbulent motion, we can include a reflection to convey serenity.
Water reflections come in many forms, from a mirror-sharp inverted mountain shimmering atop a still pool, to an abstract shuffle of color and texture on an undulating lake. Without getting too far into the physics of light, it’s important to understand that every object we see and photograph (that doesn’t generate its own light) comes to us courtesy of reflected light. For example, when sunlight strikes Half Dome in Yosemite, some of the sun’s photons bounce straight back into our eyes, and there it is.
But other photons head off in different directions—some are captured by other sets of eyes, while others land on the surface of the Merced River. Some of these photons penetrate the water to reveal the submerged riverbed, while others carom off at the same angle at which they struck the water, like a pool ball striking the cushion, or a hockey puck off the boards. The ricocheting photons that travel from Half Dome and bounce off the river, reach our eyes as a reflection. In other words, what we call a reflection is in fact re-reflected light (reflected first from El Capitan, then by the river).
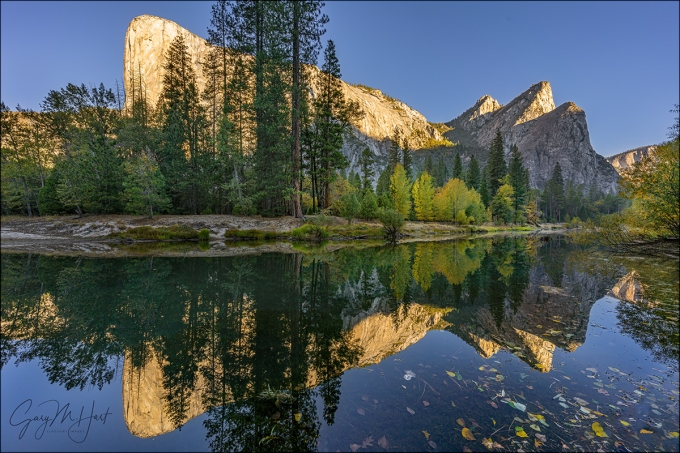
Mirror reflection recipe

Autumn Reflection, El Capitan and Three Brothers, Yosemite
The ingredients for a crisp, mirror reflection is pretty simple: still water, a sunlit subject that’s much brighter than the water’s surface (the greater the contrast the better), and a view angle that matches the angle from the water’s surface to the reflection subject. (The best reflections are usually found on shaded water because there are fewer photons to compete with the photons bouncing from the reflected subject.)
In the image on the left, with El Capitan in direct sunlight but the slow moving Merced River still shaded, my biggest challenge was finding floating fall leaves to include with my reflection. Once I found this spot, my only option was to use my Sony 12-24 f/2.8 GM lens (on my Sony a7RIV body), which gave me a field of view just wide enough to fit El Capitan, Three Brothers, the reflection, and the floating leaves into my frame.

Sunset Palette, Half Dome from Sentinel Dome, Yosemite
Playing the angles
Understanding that reflected photons leave the water’s surface at the same angle at which they arrive—imagine the way a tennis ball bounces (if it weren’t affected by spin, wind resistance, or gravity)—helps us get in position for the reflection we want.
A few years ago I found myself atop Sentinel Dome right after an intense rain shower had turned indentations in the granite into small, glistening pools. Rather than simply settle for the vivid sunset coloring the clouds above, I decided to include the sunset reflected in the pools as well. At eye-level the pools reflected blue sky, so I dropped my tripod as low as it would go, almost to granite level, positioning my lens at the same angle to the pools that the red light leaving the clouds struck the water.
When the water’s in motion

Red Sunset, Lake Wanaka, New Zealand
As spectacular as a crisp, mirror reflection in still water is, it’s easy to overlook the visual potential of a reflection that’s not crisp, or to forget your camera’s ability to render a soft or abstract reflection much better than your eyes view it. While a crisp reflection often dominates the primary subject in an image, a splash of reflected color or shape can provide a striking accent to a dominant primary subject. And a reflection that’s lost to the continuously varying angles of rippled or choppy water, magically appears when a long exposure smoothes the water’s surface.
In this image from Lake Wanaka on the South Island of New Zealand, all the ingredients were in place for a special sunset reflection until a light breeze disturbed the lake’s surface with gentle undulations. By attaching a Breakthrough 6-stop neutral density filter to my Sony 24-105 f/4 G lens (Sony a7RIII camera), I was able to achieve a 30-second exposure that complete smoothed the lake’s surface. While not a perfect mirror, the resulting reflection has a very pleasing soft, gauzy look. The long exposure smoothed the distant clouds as well.
Where to focus

Autumn Reflection, El Capitan, Yosemite
An often misunderstood aspect of reflection photography is where to focus. Though it seems counterintuitive, the focus point of a reflection is the reflection subject, not the reflection surface. This isn’t such a big deal in a scene like the Half Dome reflection at the top of the post, where the focus point of everything of visual significance is infinity, but it’s a very big deal when you want both your reflection and rocks or leaves on the nearby water surface sharp.
The El Capitan reflection on the right is very different from the Half Dome reflection above, where the extreme depth of field ensured sharpness whether I’d focused on anything in the scene or on the reflection. But here the leaves that were my scene’s primary emphasis were just a couple of feet from my camera, while El Capitan was several thousand feet distant. Even though the leaves floated atop the El Capitan reflection, focusing on El Capitan would have softened the leaves. To increase my depth of field, I stopped down to f/18 and focused several feet into the foreground leaves, then magnified the image on my LCD to verify that all of the leaves were sharp. Though El Capitan is slightly soft, a soft reflection is far more forgivable than a soft foreground.
Think ahead
It seems that reflections often feel like a fortuitous gift that we just stumbled upon. But given that reflections are entirely beholden to the laws of physics, they’re far more predictable than many of the natural elements we photograph. Taking a little time to understand the nature of reflections, and how they’re revealed by a camera, enables photographers to anticipate their appearance.
Workshop Schedule || Purchase Prints || Instagram
Reflections Around the World
Click an image for a closer look, and to view a slide show.


Don’t Knock Opportunity
Posted on November 15, 2020

Fall Into Winter, Bridalveil Fall Reflection, Yosemite
Sony a7RIV
Sony 16-35 f/2.8 GM
1/13 second
F/16
ISO 100
A lot of factors go into creating a nice image. Much of the emphasis is on composition, and the craft of metering and focusing a scene, but this week I’ve been thinking about an often overlooked (or taken for granted) component: Opportunity.
This has been on my mind because a week ago I got the rare opportunity to be in Yosemite for the convergence of my two favorite conditions for photography there: peak fall color and fresh snow. Toss in multiple clearing storms and ubiquitous reflections, I have a hard time imagining anything topping that day (okay, maybe if there’d been a full moon…).
Every photographer who has shared a beautiful image has probably had to endure some version of, “Wow, you were sure lucky that happened.” And indeed, I can’t tell you the number of times I’ve received a gift from nature—most recently, last Sunday in Yosemite. But as I think about the blessings of this day, I’m reminded of Louis Pasteur’s oft repeated observation that chance favors the prepared mind. In other words, opportunity is great, but it’s not completely random, and you have to be ready for it.
A favorite quote of Ansel Adams and the generation of photographers who succeeded him, Pasteur’s (translated) words have been repeated and paraphrased to the point that they verge on cliché. But like most clichés, Pasteur’s words achieved this status for a reason. (In this case I can substitute “opportunity” for “chance” without really changing the meaning.)
Granted, I did indeed feel extremely lucky that the weather gods decided to drop snow on Yosemite Valley, a location that doesn’t get tons of snow anyway, just as the valley’s fall color peaked. But to simplify that opportunity down to a lucky convergence that I just happened to be present for, completely discounts the fact that my being in Yosemite that particular day was no accident. I’d been monitoring the Yosemite Valley forecast all week, cleared my schedule when it looked like snow might fall, then made the nearly 4-hour drive with no guarantees.
This does not make me a genius—I wasn’t the only photographer there, far from it. And I wasn’t granted inside information, or motivated by divine intervention—I just checked the weather forecast and acted. And while it was chilly (around 30 degrees), and wet, I didn’t really endure what I’d call extreme hardship (unless you consider spending 24 hours with my brother extreme hardship). 😬
So the first part of the preparation->opportunity equation is simply the ability to recognize the potential for good photography, combined with the willingness to act (and maybe to endure a little inconvenience and discomfort). The second part of the equation is the ability to take maximize the opportunities that manifest, whether they be the product of your proactive initiative (like monitoring the forecast and getting yourself on location), or simply a fortuitous (unexpected) happenstance (right place, right time).
At the very least, taking full advantage of photographic good fortune requires the basic ability to manage exposure and focus variables to control photography’s creative triad: motion, depth, and light. (Seriously, you cannot tap a scene’s potential without these skills, I promise.) But bolstered by this foundation, the next step is a little more subtle because it’s so easy to be overwhelmed by the beauty before you, and to just start clicking because the conditions pretty much guarantee a nice image, regardless of the effort.
True story: A few years ago I was guiding a workshop group at a location with a beautiful view of El Capitan. When the beauty is off the charts like this, rather than insert myself, I often just stand back and observe. And while doing this, I watched one member of the group approach the riverbank and survey the scene—so far, so good. But… Suddenly she popped the camera off her tripod, switched it into continuous mode, pointed downstream, and pressed the shutter and slowly swept the camera in a 180 degree arc—in 5 seconds she’d probably captured at least 50 images. Stunned, it was over before I could intervene. When I regained my composure, I asked her what in the world she was doing. She just smiled and said, “It’s Yosemite, there’s bound to be something good in there.” I couldn’t argue. (This was actually a lighthearted moment that we all had fun with for the rest of the workshop.)
Which brings me to this image from last Sunday. When I pulled up to Valley View, the snow had just stopped (temporarily), glazing every exposed surface pristine white. If any scene qualified for my workshop student’s machine gun, spray and pray, approach, this was it.
The main event at Valley View is El Capitan, but my eye was drawn to the amber trees across the Merced River, their glassy reflection, and the endless assortment of yellow leaves drifting through the scene. I also liked the way Bridalveil Fall, though definitely not gushing, etched a white stripe on the granite beneath Cathedral Rocks. Rather than settle for the easy scene, I made my way about 50 feet upstream from the parking lot to a spot where El Capitan is mostly blocked by trees, but Bridalveil Fall, Cathedral Rocks, the colorful trees, and the reflection, are front and center.
Framing this scene, I dropped as low as possible to emphasize the reflection and eliminate some spindly branches dangling overhead (and said a prayer of thanks for the articulating LCD on my Sony a7RIV). After one frame, I decided the bright gray clouds reflecting on the nearest water to be distracting, so with my eye on my LCD, I dialed my polarizer until the the reflection was off the immediate foreground without erasing the reflection of the scene across the river. This darkened the bland part of the river and helped the rest of the reflection stand out.
I also realized the darker foreground could use some sprucing up. While I could say that I was lucky that a pair of leaves drifted by just beneath the Cathedral Rocks reflection, their inclusion (and position) in this image was no accident. The river was dotted with fairly continuous stream of drifting leaves, so with my composition in place, I simply waited for them to drift into my scening. I took several frames with different leaves in different positions, but liked this one because this pair so nicely framed Bridalveil Fall.
The moral of this story
I think too many photographers are limited by their own mindset. Make your own opportunities and prepare to take full advantage of them when they happen. Learn the basics of exposure and focus technique (it’s not hard). You have enough access to weather forecasts, celestial (sun, moon, stars) data, and nearby beauty (no matter where you live) to anticipate a special event and plot a trip. And once you’re there, take in your surroundings (ideally, before the action starts), avoid the obvious, and challenge yourself to not settle for the first beautiful scene to grace your viewfinder. And no matter how beautiful that image looks on your LCD, ask yourself how it could be better.
Join me in Yosemite
Workshop Schedule || Purchase Prints || Instagram
Yosemite Reflections
Click an image for a closer look, and to view a slide show.


, Yosemite")


Yosemite Autumn Reflection
Posted on November 8, 2020
Autumn Reflection, El Capitan and Three Brothers, Yosemite
Sony a7RIV
Sony 12-24 f/2.8 GM
1/60 seconds
F/10
ISO 100
There’s something to love about each season in Yosemite. In winter it’s snow—never a sure thing, but when it happens, it feels like hitting the jackpot. Come spring the waterfalls have filled, the valley is green, and the dogwood are popping. And while the crowds keep me away from Yosemite Valley in summer, this is the season to explore the exposed granite and pristine water of Yosemite’s high country.
And then comes autumn, when Vernal and Nevada Falls are a shadow of their spring selves, and Bridalveil Fall is a mere trickle. Even booming Yosemite Falls, the valley’s spring centerpiece and instrument of it’s continuous soundtrack, has vanished by September, its existence reduced to a dark outline on the light granite, like the negative of a crime scene chalkline.
Enter autumn (which in California doesn’t really start until the end of October). The vacation crowds have returned to work and school, Yosemite mornings are infused with a biting chill, and the perpetual blue skies of summer are brushed with clouds that hint of the coming winter. Almost overnight the oak, cottonwood, maple, and dogwood trees have fired up, warming Yosemite Valley with vivid yellows and reds.
Perhaps my favorite part of autumn in Yosemite is the now relaxed Merced River. Starved of the same snowmelt the feeds its iconic waterfalls, the Merced River forms a glassy ribbon that twists through the center of Yosemite Valley like the center line on a mountain highway. Framing the river, yellow cottonwoods and their deciduous cousin reflect their hues, creating spectacular complements to Yosemite’s icons.
Last week’s Yosemite Fall Color and Reflections workshop group got to enjoy the Merced River at its reflective best. Following a particularly dry winter and summer without a drop of rain, the river was so low that in places it would have been possible to walk across without getting your knees wet. On our penultimate morning I guided the group to one of my favorite riverside views to photograph the first light on El Capitan and the Three Brothers.
This is one of those spots that’s so close to El Capitan that there’s no such thing as a lens that’s too wide here. After years of trying to fit in using the 16-35 glass, a few years ago I got the Sony 12-24 f/4 G and a whole new world opened. But a couple a months ago I got I’ve the Sony 12-24 f/2.8 GM lens, but haven’t been able to use it (thank-you-very-much COVID). That was about to change. I twisted on to my Sony a7RIV, attached the combo to my tripod, and started moving up and down the riverbank, working with my well-scattered workshop group and sneaking in a frame or two between students.
I was looking for scenes that would allow me to juxtapose floating leaves, El Capitan and the Three Brothers, and of course the magnificent reflection. After about an hour of finding stuff that was close but not quite right, I found this scene just a few minutes before it was time to head to our next location (because the light waits for no one). Including everything wouldn’t have been possible with my 16-35 lens, but the 12-24 was exactly what the doctor ordered. I quickly framed it up at 12mm, making sure to include colorful leaves floating at my feet, and to avoid cutting off El Capitan and its reflection. At 12mm depth of field wasn’t a concern, so I just set my aperture to f/10 and focused on one of the foreground leaves (with so much DOF, I would have been fine focusing on anything in my frame).
Between the sunlit granite and densely shaded trees, dynamic range was extreme, but I monitored the histogram in my viewfinder as I increased my shutter speed, stopping just as the it nudged the graph’s right edge. This resulted in a scene that looked quite dark in the shadows, but a glance at the left side of this histogram told me what I later confirmed in Lightroom—I had all the shadow detail I needed.
BTW, I love my Sony 12-24 f/4 G, but the Sony 12-24 GM is ridiculously good—incredible detail (at 61 MP!) without distortion. I’m a convert. (Can’t wait to try it for astro.)
Workshop Schedule || Purchase Prints || Instagram
Yosemite in Autumn


Starstruck
Posted on November 1, 2020

Autumn Morning, Half Dome and Sunstar from Sentinel Bridge, Yosemite
Sony a7RIV
Sony 24-105 G
1/15 seconds
F/20
ISO 100
I just wrapped up my Yosemite Fall Color and Reflections photo workshop, my first workshop since February. And as you can see from this image taken on our final morning, this year’s workshop absolutely lived up to its name. We enjoyed lots of fall color, and reflections at virtually every twist and turn of the Merced River. We also got to photograph a nearly full moon rising above Yosemite Valley at sunset, and saw more bears than I’ve seen in years (maybe even since my childhood).
All the great photography more than compensated for COVID-related and other difficulties that tried to mess with our mojo. We started with the threat of a fire-danger-induced PG&E power outage and a missing (essential) computer cable. The power shutoff never manifested (phew), but I have no one to blame but myself for the missing HDMI cable that allows me to connect my computer to a TV or projector, and that always lives in my computer bag, I swear (I’ll use the 8-month hiatus as an excuse). Apparently HDMI technology hasn’t made it to Yosemite yet, but a 90-minute round-trip drive to a hardware store Mariposa set things right and we were off and running. Everyone was onboard with the COVID protocol that included masks for group gatherings, outdoor meetings (which worked surprisingly well once I ditched my not-quite-bright-enough projector and moved the TV outside), and suspension of ride-sharing. The no ride-sharing thing is what concerned me most, but a few people volunteered to partner up (completely optional—anyone who wanted to drive alone, could), and we ended up with “only” six cars in our caravan. By pulling over regularly to reassemble, and proactively coordinating our parking strategy, not a single car got separated or missed a shoot.
One of the workshop’s highlights came on our final morning, when we photographed Half Dome from Sentinel Bridge. Because Half Dome’s face stays shaded until late in the day, Sentinel Bridge is normally a late afternoon to sunset location, but in autumn the first sunlight to reach the valley floor pours down the river to illuminate cottonwoods lining the far riverbank. I’d taken very few pictures during this workshop (I’ve been to Yosemite once or twice before), but when I saw the opportunity to add a sunstar to this already beautiful scene, I raced back to my car and grabbed my tripod, Sony a7RIV, and Sony 24-105.
Sunstars have become ubiquitous to the point of cliché, but they can be cool when done right. And sometimes they create a lemonade-from-lemons opportunity to add visual interest to a blank sky, high-contrast scene that has little else going for it. In this case the backlit trees made the Half Dome reflection scene pretty nice anyway, but I thought the sunstar gave it a little punch that took it to the next level. And getting a second sunstar from the reflection was a bonus.
Sunstars happen when light spreads out as it passes through the intersection of the lens’s aperture blades, with the number of blades determining the number of points in the star effect. The lens opening (a.k.a., the aperture, which we measure in f-stops), that is made larger or smaller to allow more or less light to reach the sensor, is not a perfect circle that expands and shrinks uniformly. Rather, it’s a circular(-ish), symetrical polygon of overlapping blades that expands or contracts depending on the f-stop setting. While never a perfect circle, the larger the aperture is, the closer to round the opening becomes, and the less the light is spread out by the blades and the less pronounced the sunstar will be. Conversely, the smaller the aperture, the more the blades are closed down, and the more extreme the angles at the intersection of each overlapping blade. Therefore, the general rule for photographing a sunstar is to stop down to a small aperture (high f-stop number). I resist closing all the way down because that can create other problems, like diffraction and soft edges, and find f/16-f/20 to be absolutely fine.
As appealing as a sunstar can be, adding one also creates problems that include lens flare and extreme dynamic range, not to mention a brilliant sunstar can be a distracting eye magnet that risks overpowering the rest of the scene. The good news is, despite the difficulties, creating a sunstar is relatively straightforward, and most of the potential problems can be minimized if you’re careful. Here’s a quick recipe:
- Start with a brilliant, fine point of light: The sun is the most logical, and easiest, candidate, but you can do it with the moon, stars, and pretty much any bright artificial light (lighthouse, headlights, and so on). The smaller the light source, the smaller and more precise the star effect will be, and the less lens flare and blown highlights you’ll have—but also the smaller the sunstar will be. If you use the sun, rather than include the entire sun ( which will work, albeit often to the point of overpowering the scene), it’s usually best to only expose only a small sliver of sun. The most common way to achieve this is to wait until the sun is just barely above the horizon, but you can also also use any terrestrial object: a rock, a tree, a building, and so on. If you use a relatively nearby object rather than the horizon, just position yourself directly on the shadow line—often you can move as the sun moves, staying on the shadow line to extend the sunstar time-window and control the size of the sunstar.
- The smaller your aperture, the better your sunstar will look: I generally use f16 or smaller (larger f-number).
- Remove any filters: I usually have a polarizer on each of my lenses, but I take mine off when photographing a sunstar. A polarizer doesn’t make a difference when you’re pointing into the sun, and the extra glass just adds to the lens flare potential by creating more reflections.
- Watch the highlights: When the sun is actually in your frame, you have highlights that are much brighter than the much of the scene, requiring care to avoid hopelessly white highlights or black shadows. If you have a distinctive foreground shape against the sky, you could turn it into a silhouette, but usually I want more than that in my image. In my Canon days (10D through 5DIII), I used a graduated neutral density filter to subdue the brilliant sun; since switching to Sony, I just monitor my histogram and push the highlights as far to the right as possible without clipping anything more than the center of the sun itself. The result is an image that, except for the sun, looks very dark to almost black on my LCD. But I take comfort in the histogram, which, while bunched up on the left (with a thin spike on the right edge), confirms that most of the shadows are intact. The very first thing I do after importing the image into Lightroom is drag the Highlights slider all the way to the left, and the Shadows slider all the way to the right, and voilà, there’s my scene.
- Different lenses will yield different results: Experiment with your lenses to see which one gives the most pleasing sunstar effect. Generally wider focal lengths render the best sunstars, as do the higher quality lenses.
- Practice: You can practice sunstars any time the sun’s out. Just go outside with your camera, dial in a small aperture, and hide the sun behind whatever object is convenient (a tree, your house, etc.).
Armed with this knowledge, I planted myself in an opening along the Sentinel Bridge rail, dialed my lens to f/20, framed up my composition, and waited for the sun to peek from behind a tree. Sunstars with a mirrorless camera are easy because you can see exactly what you’ll get before clicking—with my eye shifting between the sunstar and my histogram, I started clicking, adjusting my shutter speed by 1/3 to 2/3 of a stop with each click to maximize my options later (more/less light, larger/smaller sunstar). When the sun disappeared behind another tree I stopped shooting, pretty pleased with my initial results. But standing there, waiting for the sun, I realized that when it rose enough for its reflection to bounce off the river, we’d have a chance for a double sunstar—one through the trees, the other off of the reflection. (Technically this isn’t a sunstar reflection because the sunstar happens in the lens, not on the water.)
Since we were all standing in a slightly different spot, the sun appeared and disappeared at a different time for each of us, but I alerted everyone of the double sunstar opportunity so they wouldn’t stop as soon as the sun disappeared behind a tree. While waiting for the sun to return to my position, I enjoyed the reactions as others in the group started having success. I gotta say, as much as I missed my workshop locations during the pandemic “break” (I did!), it’s this group experience that I missed the most. It’s great to be back.
Join me in Yosemite
Workshop Schedule || Purchase Prints || Instagram
A Galaxy of Sunstars
Click an image for a closer look, and to view a slide show.


")


Letting the Scene Speak for Itself
Posted on October 11, 2020
(Or, Channeling My Inner Oz)
Two Seasons, Valley View, Yosemite
Canon EOS 5D Mark III
Canon 17-40 f/4L
1/4 second
F/20
ISO 800
100 mm
With virtually every still camera now equipped with video capability, the last few years have brought an explosion of nature videos. When done well, videos can be extremely powerful, conveying motion and engaging both eyes and ears to reveal the world in a manner that’s closer to the human experience than a still image is. But like other sensory media whose demise has been anticipated following the arrival of something “better,” (with apologies to Mark Twain) let me say that the rumors of still photography’s death have been greatly exaggerated.
Just as I enjoy reading the book more than watching the movie, I prefer the unique perspective of a still image. Though motion in a video may feel more like being there, a still image gives me the freedom to linger and explore a scene’s nooks and crannies, to savor its nuances at my own pace.
In a video my eyes are essentially fixed as the scene moves before them. In a still image, my eyes do the moving, drawn instantly to a dominant subject, or perhaps following lines, real or implied, in the scene the way a hiker follows a trail. But also like a hiker, I can choose to venture cross-country through a still image and more closely scrutinize whatever looks interesting.
The photographer needs to be aware of a still image’s inherent lack of motion, and more importantly, how to overcome that missing component by moving the viewer’s eyes with compositional choices. With this in mind, I usually like my images to have an anchor point, a place for the viewer’s eye to start and/or finish. To do this, I identify the scene’s anchor and other potential elements that might draw the eye, then position myself and frame the scene so those secondary elements guide the eye to (or frame) the primary subject.
 But sometimes a scene stands by itself, as if every square inch fits together like a like a masterful tapestry. When nature gifts a scene like this, rather than imposing myself by offering visual clues to move my viewer’s eye, I like to step back and channel the Wizard of Oz. Specifically, what Dorothy must have felt when she first opened the door of her ramshackle, monochrome world onto the color and wonder of Oz. That’s how these scenes make me feel, and that’s the feeling I want my images to convey.
In a scene filled edge to edge with the awe and wonder of discovery, the last thing the viewer wants is to be told where to go and what to do. (And just look at all the trouble Dorothy got into when she started following the Yellow Brick Road.)
By getting out of the way and letting the scene speak for itself, my viewer has the freedom to explore the entire frame. Of course that’s easier said than done, but in the simplest terms possible, my sole job is to find balance and avoid distractions.
As much as aspiring photographers would love a composition formula that dictates where to locate each element in their frame, moving the eye, finding balance, and avoiding distractions ultimately comes down to feel. Please bear with me as I try to put into words how this inherently intuitive process manifest for me.
Visual weight
To explain the concept of balance and motion in a still image, I use what I call “visual weight (I’ll just shorten it to VW),” which I define as any object’s ability to pull the viewer’s eye—think of it as gravity for the eye.

Nightfall, Full Moon and Yosemite Valley, Yosemite
An object’s VW is subjective, based on a variety of moving targets that include (to a greater or lesser degree) an object’s size, brightness, color, shape, and position in the frame. VW can also be affected by each viewer’s personal connection to the elements in the scene.
Take a wide angle moon for example. The moon is small and colorless (not much VW), but also bright with lots of contrast (high VW). Then factor in the viewer’s personal connection to the moon. If I’m more drawn to the moon than someone else, the moon’s visual weight would be greater to me. Since I can’t worry about what others think when I compose a shot, what you see in my images reflects the VW that a scene’s elements hold for me, and probably explains why I have so many moon images.
Visual Balance
After many years (decades) of doing this, visual balance usually happens intuitively, without conscious thought. But until you reach this point, I have a mental exercise you can apply to your own images, preferably as they appear in your camera’s viewfinder or on its LCD.
Imagine a flat board perfectly balanced horizontally on a fulcrum (like the tip of a pen)—to maintain its equilibrium, any added weight must be counterbalanced by a corresponding weight elsewhere on the board. Visual weight is the virtual equivalent: think of your frame as a print (a stiff, metal print rather than a floppy, paper print) balanced on a fulcrum. Any visible element that pulls the eye tips the frame from horizontal (makes it out of balance) and must be counterbalanced by an element with corresponding visual weight.
Because of the subjective nature of visual weight, your choices might differ from mine. That’s okay—it’s important to be true to your own instincts, which will in fact improve with practice.
Distractions
The VW concept applies to eliminating distractions too. Without getting too deep into the weeds (there are lots of potential distractions in a scene, and ways to deal with them, but that’s a blog for a different day), the idea is to avoid objects that pull the eye away from the essence of the scene (as you see it), or that simply overpower the scene. In the image at the top of this post, flying monkeys emerging from the Merced River might be pretty cool (and could even gain me some notoriety), but they would not serve my goal to convey a sense of wonder and awe and would in fact be a distraction.
Other potential distractions besides flying monkeys are things like branches and rocks that jut into the scene, creating the sense that they’re part of a different scene, just outside the frame. Another common distraction is objects that are mostly in the scene, but trimmed by the edge of the frame. Since it’s virtually impossible to avoid cutting something off on the edge of most frames in nature, I just try to minimize the damage by being very conscious of what’s cut off and how it’s cut, usually trying to cut boldly, down the middle, when possible. I’ve always felt that objects jutting into a scene, or slightly trimmed by the edge, feel like mistakes, while something cut strongly down the middle feels more intentional.
For example

Two Seasons, Valley View, Yosemite
Yosemite seems to be filled with more than its share of scenes that that don’t need my help assembling a composition. At most scenes I start with the simplest composition and work my way to something more complex. I can usually tell when a scene stands by itself when I end up deciding my early compositions are the way to go.
I’d driven to Yosemite on this November morning chasing a fortuitously timed storm that was forecast to drop snow on peak fall color. The day started gray and cold, the valley floor white with wet snow beneath dark clouds that blanketed all of Yosemite’s distinctive features. But by late morning the clouds brightened and started to lift, slowly unpeeling Yosemite Valley’s soaring granite walls and monoliths.
I happened to be at Valley View when the show started in earnest. Because the scene contained everything I was there to photograph—Yosemite icons (El Capitan, Cathedral Rocks, Bridalveil Fall) decorated with snow, fall color, reflection—I started with this composition that took it all in in a pretty straightforward manner. Standing right at river’s edge, I chose horizontal framing because it was the best way to include the icons without diluting them with too much sky and water. Though I didn’t want to go too wide, because there was so much happening top-to-bottom, from clouds to reflection, I went a little wider than I usually do.
The lower half the scene had lots of rocks that I worked to avoid cutting off, finally finding framing that kept my edges completely clean (not always possible). The small rock in the lower left was a little closer to the edge than I’d have liked, but if I’d have gone any wider I’d have introduced spindly branches along the left edge—I chose the lesser of two evils. Likewise, the small rock on the bottom right was also closer to the edge than I preferred, but an entire herd of disorganized rocks massed just beneath my frame prevented me from composing lower. The top of my frame I set just below a distracting (bright) hole in the clouds. I’d have cut the rock on the middle right if I’d have had to, but was fortunate that there was a small break between it and another gang of rocks just off the frame on the right.
The visual balance was more by feel (as it often is). Looking at the image now, I see that offsetting the gap separating El Capitan and Cathedral Rocks, placing it a little left of center, makes the frame feel more balance than if I’d have centered it, but I don’t remember consciously deciding this. To my eye, the balance works for me because El Capitan, the brilliant color, and striking reflection hold more visual weight than the granite, waterfall, and reflection on the other side, so having more of this on the right compensates for this (slightly) lacking VW.
I wish I could defend my decision to use f/20, but I can’t. I only use f/20 when I absolutely have to—or when I was using it for an earlier scene and forgot to set it back to my default f/8 to f/11 range (which is no doubt what happened here).
One more thing
Even though this image is from 2012, it’s brand new, discovered yesterday while mining my raw file archives. The amazing thing to me is that the scene is quite similar, and the composition virtually identical, to an image taken the following year. When I see similar compositions in scenes from entirely different shoots, it tells me that my instincts are guiding me. In both situations these images were my starting point, and I went on to play with more creative compositions later in the shoot. But it just goes to show that sometimes it’s best to let the scene speak for itself.
-

- Autumn Snow, El Capitan, Yosemite
-
- Two Seasons, Valley View, Yosemite
Workshop Schedule || Purchase Prints || Instagram
Letting Nature Speak for Itself
Click an image for a closer look, and to view a slide show


New Zealand Sunset
Posted on October 4, 2020

Sony a7RIII
Sony 24-105 G
30 seconds
F/9
ISO 200
This morning, while going through unprocessed images looking for something to blog about, I came across this image from last June in New Zealand. I realize the world probably doesn’t need any more pictures of this tree (which is why I’d never processed it), but after nearly two months of smoky skies that have robbed California of anything close to a normal sunset, sunrise/sunset color seemed to be a worthy topic, and this image definitely got my juices flowing.
Following a morning that had started with a beautiful sunrise reflection at Mirror Lakes in Milford Sound National Park, Don Smith and I (well, technically it was our driver) pulled the van carrying our New Zealand workshop group into Wanaka a couple of hours before sunset. We had a sunset spot in mind, but with a little time to spare we decided to give the group a quick preview of our sunrise subject, the iconic lone willow tree of Lake Wanaka. We never left.
It was pretty apparent from the instant of our arrival that the ingredients for a spectacular sunset were in place: clouds, clean air, and a clear spot on the western horizon to let sunlight through. Of course nothing in nature is guaranteed, but based on what we saw, Don and I made a calculated decision to alter our plan. Even though our original sunset spot would benefit from the same conditions, we decided that, because the opportunity to photograph this tree was one of the prime reasons most of the group signed up for the workshop in the first place, and sunrise conditions are never a sure thing, staying would give our group the best opportunity for a memorable experience here. Boy did we make the right call.
For this image I used my Breakthrough 6-stop neutral-density polarizer (X4 Dark CPL) to smooth a slight chop rippling the lake. Not only did the resulting 30-second exposure soften the lake surface, it added an ethereal blur to the distant clouds and fog.
Epiloge
Sunrise was in fact completely washed out by fog, but that didn’t mean it was a failure, just different….

Join Don Smith and me in our next New Zealand photo workshop
And speaking of sunrise/sunset color, I’ve revised my Photo Tips article on that very topic and added it below. So if you want to know why the sky is blue and sunsets are red, read on.
Sunset Color
A sunset myth
If your goal is a colorful sunset/sunrise and you have to choose between pristine or hazy air, which would you choose? If you said clean air, you’re in the minority. You’re also right. Despite some pretty obvious evidence to the contrary, it seems that the myth that a colorful sunset requires lots of particles in the air persists. But if particles in the air were necessary for sunset color, Los Angeles would be known for its vivid sunsets and Hawaii’s main claim to fame would be its beaches. (Okay, and maybe its luaus. And waterfalls. And pineapples. And Mai Tais. And…. Well, maybe lots of great stuff, but not its sunsets.)
So what is the secret to a great sunset? Granted, a cool breeze, warm surf, and a Mai Tai are a good start, but I’m thinking more photographically than recreationally. I look for a mix of clouds (to catch the color) with an opening for the sun to pass through and light the clouds. But even with a nice mix of clouds and sky, sometimes the color fizzles. Often the missing ingredient, contrary to common belief, is clean air—the cleaner the better.
Light and color
Understanding sunset color starts with understanding how sunlight and the atmosphere interact to color the sky. Visible light reaches our eyes in waves of varying length. The color we perceive is a function of wavelength, ranging from short to long: violet, indigo, blue, green, yellow, orange, and red. (These color names are arbitrary labels we’ve assigned to the colors we perceive at various wavelength points along the visible portion of the electromagnetic spectrum—there are an infinite number of wavelength-depenedent colors between each of these colors.)
Because a beam of sunlight passing in a vacuum (such as space) moves in a straight line (we won’t get into relativity and the effect of gravity on a beam of light), all its wavelengths reach our eyes simultaneously and we perceive the light as white. When a beam of sunlight encounters something (like Earth’s atmosphere), its light can be absorbed or scattered, depending on the wavelength and the properties of the interfering medium, and we see as color the remaining wavelength that reach our eyes.
For example, when sunlight strikes a leaf, all of its wavelengths except those that we perceive as green are absorbed, while the green wavelengths bounce to our eyes.
Color my world
Since our atmosphere is not a vacuum, sunlight is changed simply by passing through it. In an atmosphere without impurities (such as smoke and dust), light interacts only with air molecules. Air molecules are so small that they scatter only a very narrow range of wavelengths. This atmospheric scattering acts like a filter that scatters the violet and blue wavelengths first, allowing the longer wavelengths to pass through. When our sunlight has traveled through a relatively small amount of atmosphere (as it does when the sun is overhead), the wavelengths that reach our eyes are the just-scattered violet and blue wavelengths, and our sky looks blue (the sky appears more blue than violet because our eyes are more sensitive to blue light).
On the other hand, because the longer orange and red wavelengths are less easily scattered, they travel a much greater distance through the atmosphere. When the sun is on the horizon, its light has passed through much more atmosphere than it did when it was directly overhead, so the only light reaching our eyes at sunrise or sunset has been stripped of its shorter (blue and violet) wavelengths by its lengthy journey, leaving only the longer, orange and red wavelengths to color our sky. Sunset! (Or sunrise.)
Pollution dampens the filtering process. Rather than only scattering specific colors, light that encounters a molecule larger than its wavelength is more completely scattered—in other words, instead of scattering only the blue and violet wavelengths, polluted air catches some orange and reds too. Anyone who has blended a smoothie consisting of a variety of brightly colored ingredients (such as strawberries, blueberries, cantaloupe, and kale—uhh, yum?) knows the smoothie’s color won’t be nearly as vivid as any of its ingredients, not even close. Instead you’ll end up with a brownish or grayish muck that might at best be slightly tinted with the color of the predominant ingredient. Midday light that interacts with large particles in the atmosphere is similarly muddied, while polluted sunrise and sunset light has already had much of its red stripped out.
Verify this for yourself the next time a storm clears as the sun sets, and compare the color you see to the color on a hazy, summer evening in the city.
Tips for maximizing sunset color in a photograph
Any time rain has cleared the atmosphere and the remaining clouds are mixed with sunlight, there’s a good chance for vivid sunrise or sunset color. I have a few go-to locations near home, and at my frequently visited photo locations (Yosemite, Grand Canyon, Death Valley, Hawaii, and so on) that I beeline to when there’s a chance for color in the sky.
When I’m on location and preparing my shot before the sunset show begins, I look for clouds receiving direct sunlight. This is the light that will most likely color up at sunset, starting with an amber glow that transitions to pink, red, and eventually a deep orange.
An often overlooked color opportunity when the air is clean is the horizon opposite the sun after sunset or before sunrise. When the sun is below the horizon, the opposite horizon reveals the transition between the blues of night and the pinks of the sun’s first or last rays the best color of the day. This is especially true when there are no clouds in the direction of the sun. Photographing this twilight color with your back to the sun’s horizon has the added advantage of being much less contrasty and easier to manage with a camera.
Maximizing sunset color in your images requires careful exposure and composition decisions. By far the most frequent problem is overexposure—giving the scene more light than necessary. In scenes of such extreme contrast, your camera can’t capture the entire range of light your eyes see. And of course your camera has no idea what you’re photographing, so if you leave the exposure decision up to automatic metering, you’ll likely end up with a compromise exposure that tries to pull detail out of the shadows at the expense of color in the sky.
Since it’s the color you’re most interested in capturing, it’s usually best to spare the color in the highlights and let your shadows darken. This usually requires some planning—finding striking finding foreground subjects that stand out against the brighter sky, or water to reflect the sky’s color.
When you’ve found your sunset subject and are ready to shoot, base your exposure decisions on your camera’s histogram, not the way the picture looks on the LCD (never a reliable gauge of actual exposure). Remember, since your camera can’t capture what your eyes see anyway, the amount of light you give your scene is a creative decision. After you’ve exposed, make sure you check your RGB histogram to ensure that you haven’t clipped one of your color channels (most likely the red channel).
You can read more about metering in my Manual Exposure article.
For example: Sentinel Dome, Yosemite

Sunset Storm, Half Dome from Sentinel Dome, Yosemite
Sentinel Dome in Yosemite provides a 360 degree view of Yosemite and surrounding Sierra peaks. Among the many reasons it’s such a great sunset spot is that from atop Sentinel Dome you can see what’s happening on the western horizon and plan your shoot long before sunset arrives. On this summer evening I was up there shortly after an afternoon rain shower. Though air was crystal clear, lots of clouds remained—and there was an opening on the western horizon for the sun to slip through just before disappearing for the night.
Rather than settle for a more standard Half Dome composition, I wandered around a bit in search of an interesting foreground. I ended up targeting this group of dead pines on Sentinel’s northeast slope, a couple of hundred feet down from the summit. It was no coincidence that sunset that night, one of the most vivid I’ve ever seen, came shortly after a storm had cleansed the atmosphere. Not only did the clouds fire up, the color was so intense that its reflection colored the granite, trees, and pretty much every other exposed surface.
For example: Hilltop Oaks, Sierra Foothills

Oaks on Fire, Sierra Foothills, California
I was driving the Sierra foothills east of Sacramento looking for the right subject to put with this fiery sunset. Earlier in the sunset it had simply been a been a matter of finding a photogenic tree (or trees), but with the sun more than 15 minutes below the horizon, the foreground was so dark I needed a subject to silhouette against the sky—anything else would have been lost in the rapidly blackening shadows. These trees showed up just in the nick of time.
Color like this comes late (or, at sunrise, early), in the direction of the sun long after most people have gone to dinner (or while they’re still in bed). Everything in this scene that’s not sky is black, which is why my subject needed to stand out against the sky. I was so happy with my discovery that these trees have become go-to subjects for me—browse my galleries and count how many times you see one or both of them (often with a crescent moon).
For example: South Tufa, Mono Lake

Before the Sun, South Tufa, Mono Lake
The air on Sierra’s east side is much cleaner than air on the more populated west side, and the clouds formed as the prevailing westerly wind descends the Sierra’s precipitous east side are both unique and dramatic. Mono Lake makes a particularly nice subject for the Eastern Sierra’s brilliant sunrise/sunset shows. Not only does it benefit from the clean air and photogenic clouds, Mono Lake’s tufa formations and often glassy surface make a wonderful foreground. The openness of the terrain surrounding Mono Lake allows you to watch the entire sunrise or sunset unfold. Many times over the course of a sunrise or sunset I’ve photographed in every direction.
The image here was captured at the start of a particularly vivid sunrise. The air was clean, with just the right mix of clouds and clear sky; perfectly calm air allowed the lake’s surface to smooth to glass. I find that the more I can anticipate skies like this, the better prepared I am when something spectacular happens. In this case I was at the lake well before the color started, but because it looked like all the sunrise stars were aligning, I was able to plan my composition and settings well before the color started.
WORKSHOP SCHEDULE || PURCHASE PRINTS || INSTAGRAM
Sunrise, Sunset…


Blue Hour
Posted on May 20, 2020

Blue Hour, Vestrahorn, Iceland
Sony a7RIV
Sony 12-24 G
8 seconds
F/16
ISO 50
“Many of us would probably be better fishermen if we did not spend so much time watching and waiting for the world to become perfect.”
― Norman Maclean, A River Runs Through It
I haven’t fished in years (decades), but of course Norman Maclean’s words really aren’t about fishing anyway. Nevertheless, I’m reminded of this quote every time I find myself frozen by minutia, mired in the moment by small distractions that matter very little, or looking for excuses not to take pictures.
There are a lot of reasons not to take a picture—tell me if any of these sound familiar: “The light was better yesterday”; “The light will be better tomorrow”; “It’s too cold”; “It’s too hot”; “It’s too wet”; “I’m hungry”; “there’s dust on my sensor”; “This lens is soft,” and on, and on….
This Vestrahorn shoot came toward the end of the 10-day Iceland workshop Don Smith and I led in January of this year (was that really only 4 months ago?!). As the sun disappeared on this chilly winter evening, there were a lot of reasons not to stay out photographing: it was cold, I was wet, the clouds, it was getting dark, and there was a 90-minute drive separating us from dinner. It had been a nice shoot, but I was a little disappointed that the sky that had looked quite promising all afternoon, never really delivered the color I’d been waiting for. But before heading back to the van, I wandered up the beach a bit and found this rocky section that was different from the waves, and the reflections left in their wake, I’d been concentrating on all afternoon. As I reconsidered whether to call it a day, I came upon a lone shell embedded in the sand. With the light fading fast, I quickly dropped my tripod as low as it would go and set up with my Sony 12-24 G lens on my Sony a7RIV, and went to work.
Before I knew it, the “blue hour,” that magnificent transition from day to night (and back) that always looks better on an image than it does to the eye, had taken over. If you’ve ever stayed out to photograph after your eyes tell you it’s time to go in (or started shooting a little early while waiting for sunrise), you know what I’m talking about. What we humans perceive as darkness is really just our eyes’ relatively limited ability to gather light at any given instant. But a camera’s sensor (or a rectangle of unexposed film) can patiently accumulate all the light striking it for whatever duration we prescribe, thereby stretching its “instant” of perception indefinitely. Advantage camera.
On a clear night, you can actually watch the Earth’s shadow descend and engulf the landscape in deepening blue light. And unlike daylight (and moonlight) photography, when a discrete light source casts high-contrast shadows that test a camera’s dynamic range, and starlight photography, when the light is so faint that extremely long exposures are required to register any foreground detail at all, in the pre-sunrise/post-sunset gloaming, a camera can still “see” these diminishing vestiges of daylight. Given enough exposure, the image’s world is rendered blue, and because the entire sky is the light source, this blue hour light is spread so evenly that most shadows disappear.
When I can, I’ll stay out at least long enough for the first stars to pop out. On this evening, because I didn’t want the rest of the group to have to wait for me, I wrapped up before the stars appeared, but still stay out long enough to capture this 8-second exposure—my very last image of the evening. The perfection I’d been watching and waiting for never made it to my eyes, but fortunately my camera revealed that it was there all along.
Workshop Schedule || Purchase Prints
Blue Hour


Garbage in, garbage out
Posted on April 29, 2020

Magenta Moonrise, Half Dome and the Merced River, Yosemite
Sony a7RIV
Sony 24-105 G
1/13 second
F/11
ISO 100
True story: I once saw a guy taking 10-second exposures of the moonbow at the base of Yosemite Falls, hand-held. When I gently suggested that his image might be a little soft, he assured me that he would just sharpen it in Photoshop.
I won’t deny that digital capture and processing has given photographers more flexibility and control than ever, and processing can indeed correct a number of problems, but processing is not a panacea—if the image was garbage going in, it’ll be garbage going out. Processing software and skills are an essential part of good photography, but the best images are still created in the camera.
Just as Ansel Adams visualized the finished print before clicking the shutter, success in digital photography still starts with understanding how the camera’s vision differs from your own, and taking the steps necessary to leverage those differences at capture. While Adams was indeed a master in the darkroom, that skill would have been wasted without his intimate knowledge of his camera and film, combined with his understanding of exposure, that ensured the best possible negative and print once he got into the darkroom.
Of course (spoiler alert) photography has come a long way since Ansel Adams’ roamed the earth. Digital photographers now have more control than ever, and incredible capture tools that allow us to correct problems instantly. But I fear all this power has intimidated some photographers, and made others lazy. Fortunately, like many things that seem scary-complex going in, just scratching the surface a little starts to reveal a foundation of very simple principles.
One of the simplest things you can do is learn how to read a histogram, then train yourself to rely on it. It’s the relying on the histogram part where most photographers fall short. One of the most frequent mistakes I see inexperienced photographers make is basing their exposure decision on the way the picture looks on the back of their camera. The LCD is great for composition, but trusting it for exposure is a huge mistake.
Additionally, and here’s another thing that’s often overlooked: take the time to learn how your camera’s actual capture differs from what its histogram tells you. The histogram is based on a jpeg preview, but if you’re shooting raw, you almost always have more information than the histogram shows you. Each camera model is different, so you need to do a little observing or testing to determine how far you can push your camera’s histogram beyond its boundaries and still get usable data. Shooting this way, the jpeg that comes out of the camera may indeed show blown highlights or unrecoverable shadows, but they’ll come back like magic in Lightroom/Photoshop (or whatever your processing paradigm).
When I photographed this moon rising above Yosemite Valley last February, even though the color and exposure of the finished image you see here is pretty close to what my eyes saw, the image that appeared on my camera’s LCD screen looked nothing like this. The sky was washed out, and the reflection was lost in the shadows. But a quick check of my luminosity histogram told me that I’d captured all the scene’s detail, and verifying with the RGB histogram confirmed that I’d gotten all the color as well.
Usually a perfect histogram is all you need to get the exposure right, but in this case I also had make sure I had detail in the moon, which was by far the brightest thing in the scene. Normally I only use my camera’s highlight alert features (“zebras” pre-capture, blinking highlights post-capture) as a reminder to check my (nearly always more reliable) histogram, but here the moon was too small to register on the histogram. So as I added light, I closely monitored my highlight alert, bumping the exposure in 1/3-stop increments until the flashing appeared. But wait, there’s more! Just seeing the highlight alert wasn’t enough to tell me the moon was blown out. I know my Sony a7RIV well enough to know that I can push my exposure at least a stop beyond where the moon starts blinking and still recover the lunar details in post. This little piece of knowledge enables me to give my moon images the most light possible, ensuring less noise when I pull up the shadows.
In Lightroom I pulled down the highlights, pulled up the shadows, tweaked a few other things (color temperature, vibrance, clarity), then moved the image to Photoshop, where I did some noise reduction (Topaz DeNoise AI), dodging and burning, and (finally) sharpening. Voilà.
More Twilight Magic
Click an image for a closer look, and to view a slide show.


")


Groundhog Day
Posted on April 5, 2020

Winter Reflection, El Capitan and Three Brothers, Yosemite
Sony a7RIII
Sony 12-24 G
1/20 second
F/11
ISO 100
Sitting down to write this blog, I looked at my watch and realized that if the world were normal, I’d be about an hour from starting my Yosemite Moonbow and Wildflowers photo workshop. In that alternate reality, I’d probably be just wrapping up my pre-workshop reconnaissance, circumnavigating Yosemite Valley to check the status of variables such as the amount of water in the falls and access to roads and vistas that sometimes (and seemingly randomly) close. And I know I’d be excited by the Yosemite weather forecast, which calls for rain and maybe even snow, a rare treat for Yosemite in April.
Instead, I’m reclined by the fire at home, laptop right where its name suggests it should be, watching the rain, listening to latin jazz (Azymuth, if you must know), and trying to figure out what to blog about. I don’t know about you, but this whole shelter-in-place thing is getting old. I have no quarrels with the SIP mandate, but days have started to blend seamlessly from one to the next with so little variation that I’m starting to wonder if we’re all immersed in a real-life “Groundhog Day,” where we’re doomed to repeat each day until we learn to treat each other better.
So far I’ve lost five workshops to Coronavirus, and have a sixth on life-support, but really, when I stop to consider the big picture, I have nothing to complain about. I’m healthy, as are all the people who matter most to me. I have a roof over my head and food in the fridge (and toilet paper on the shelf!), and I’m doing things I’d never have done had I not been forced to break the routine of my former, “normal” life.
I’ve written recently about returning to unprocessed images from past shoots, like this one, but there’s been other cool stuff happening in my life as a direct result of imposed solitude. For example, much as Phil (Bill Murray) (eventually) used his recycled Groundhog Day to to learn the piano, I’ve taken it upon myself to do something that I always said I was going to do but never seemed to find the time: learn video.
For years I’ve felt like I’m the only person on Earth with a digital camera who doesn’t do video, and for just about as long have vowed to fix that, but now it’s actually happening. Yay me. I doubt you’ll ever see me accepting an Oscar, but an unexpected benefit of this whole I-have-no-idea-what-I’m-doing experience has been the opportunity to walk a mile (or two) in the shoes of the people who pay me to teach them photography in my photo workshops.
Learning new stuff can be intimidating, frustrating, and humbling. But like anything worth doing, I know the reward will far outweigh the pain, and I can’t help but feel that my world will be just a little better on the other side of this mess.
Next, maybe a little ice sculpting….
About this image
This image of El Capitan is another new one from that great Yosemite snow day with my brother last February. You can read about the day here: Escape From Yosemite. To get out to this spot, I had to trudge through so much hip-deep fresh snow, that I was sweating profusely, despite the cold. I love being the first person at a spot after a snow, but it also makes me feel a little guilty to spoil the pristine powder (but not so guilty that I won’t do it).
To get all of the reflection I needed to get a little closer to the edge of the (4-foot or so) snowbank than made me comfortable. If it had collapsed I’d have gone into the river for sure—I wouldn’t have been swept to my death, but I’d have had a pretty miserable drive home. (Plus my brother would have laughed at me.) But I managed to stay upright long enough to capture this frame.
One more thought: This is another one of those shots that I couldn’t have gotten without my Sony 12-24mm G lens. Before getting this lens I’d have used my Sony 16-35 GM lens, but I wouldn’t have been able to get El Capitan, the Three Brothers, and the reflection. As I mentioned in my It’s In the Bag post, I don’t use this lens a lot, but I sure love having it for times just like this.
A Reflection Collection
Click an image for a closer look, and to view a slide show.


