Eloquent Images by Gary Hart
Insight, information, and inspiration for the inquisitive nature photographer
You’re Gonna Need a Bigger Moon
Posted on February 13, 2020
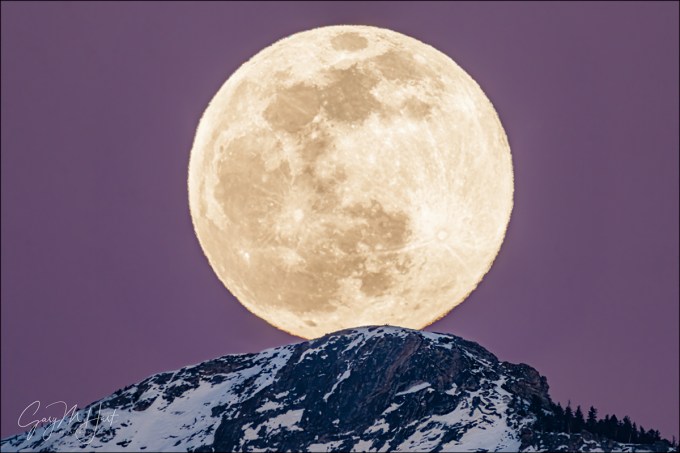
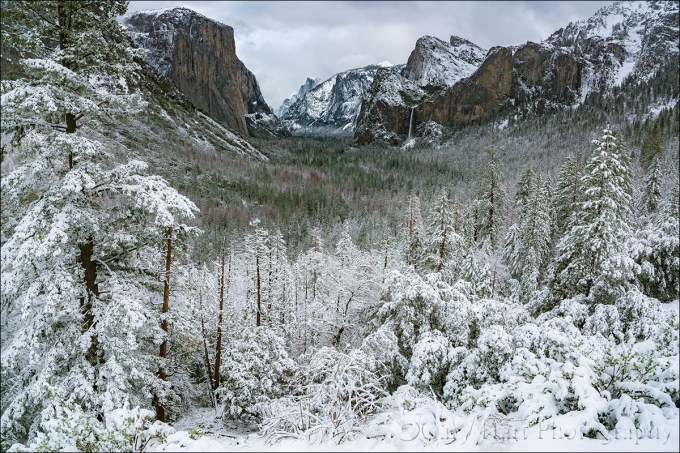
Moon’s Rest, Cloud’s Rest, Yosemite
Sony a7RIV
Sony 200-600 G (APS-C crop)
Sony 2x teleconverter
1800mm focal length equivalent
ISO 200
f/13
1/20 second
Size matters
About 15 years ago I pitched a moon photography article to a national photography magazine. I was declined because, according to the editor, “No one likes to photograph the moon because it looks too small in a picture.” While I respectfully disagree and in fact love using a small moon as an accent to my landscape scenes, that felt like a challenge to prove that it is possible to capture the moon BIG.
Then…
When I started plotting and photographing moonrises (long before The Photographer’s Ephemeris and PhotoPills), my longest lens was 200mm—adding a 100-400 to my bag was just a dream. When I finally got a good deal on a slightly used Canon 100-400 lens, I thought I was set for big-moon photography for life—until my friend Don Smith’s 150-600 lens gave me feelings of inadequacy. Soon I was packing a Tamron 150-600 lens. I liked the extra size my Tamron 150-600 gave my moons, and while found the images sharp enough to continue using the lens with an adapter after switching to Sony, when got my hands on the Sony 100-400 GM lens, I was so excited about that len’s sharpness with the Sony 2X Teleconverter, that I jettisoned the Tamron for good.
For a couple of years my standard big-moon setup was a Sony a7RIII and Sony 100-400 with the 2X Teleconverter, giving me 42 megapixel images and 800mm for the biggest, sharpest moon I’d ever photographed. Better still, putting the Sony 100-400 and 2X Teleconverter on my 1.5-crop Sony a6300, I was able to capture 24 megapixel files at a 1200mm equivalent. Wow, 1200 megapixels: Surely I’d achieved the zenith of my lunar supersizing aspirations. Nope.
… and now
Last year Sony released its 200-600 lens and the 61 megapixel a7RIV body. Since the APS-C (1.5x) crop on the a7RIV is 26 megapixels (2 megapixels more than the a6300), I dropped the a6300 from my moon shooting arsenal. In October I played with my new setup a little using a crescent moon in the Eastern Sierra, but I couldn’t wait to try it out on my favorite moon shoot of all: the Yosemite Tunnel View full moon.
Last Saturday night I assembled my Yosemite Winter Moon photo workshop group on the granite above Tunnel View to wait for the moonrise I’d timed the workshop for. Sunset was 5:30, and I expected the moon to appear directly behind Cloud’s Rest between a little before 5:35, which meant the sky and landscape would already be starting to darken. The exposure for a post-sunset full moon is trickier than many people realize because capturing detail in both the daylight-bright moon and the rapidly fading landscape requires vigilant scrutiny of the camera’s histogram and highlight alert (blinking highlights). To get everyone up to speed, I used nearly full rising moons on the workshop’s first two nights to teach them to trust their camera’s exposure aids and ignore the image on the LCD (kind of like flying a plane on instruments). With two moonrises under their belts, by Saturday evening I was confident everyone was ready.
I was ready too. In my never-ending quest to photograph the moon as large as possible, I went nuclear—none of that wimpy-ass 200mm glass for me, for this moonrise I used every resource in my bag. I set up two tripods: mounted on one was my Sony a7RIII and 100-400 GM lens; on the other tripod was my Sony a7RIV and 200-600, doubled by the 2X teleconverter: 1200mm. But I wasn’t done. Normally I shoot full frame and crop later (for more compositional flexibility), but just for fun, on this night I decided to put my camera in APS-C mode so I could compose the scene at a truly ridiculous 1800mm—I just couldn’t resist seeing what 1800mm looked like in my viewfinder.
While waiting for the moon the group enjoyed experimenting with different compositions using the warm sunset light illuminating Half Dome and El Capitan. I used the time to test the focus at this unprecedented focal length. Waiting for an event like this with a group is one of my favorite things about photo workshops, and this evening was no exception. Between questions and clicks, we traded stories, laughed, and just enjoyed the spectacular view.
The brilliant sliver of the moon’s leading edge peaked above Cloud’s Rest at 5:33. It is truly startling to realize how quickly the moon moves through the frame at 1800mm, so everything after that was kind of a blur. Adjusting compositions and tweaking exposure and focus on two bodies, I felt like the percussionist in a jazz band, but I somehow managed to track the moon well enough to keep it framed in both cameras.
By the time the moon was about to clear Cloud’s Rest, the darkening sky had started to pink-up nicely—underexposing slightly to avoid blowing out the moon’s highlights enriched the color further. The image you see here is exactly what I saw in my viewfinder (not cropped in post-processing), a full 1800mm equivalent that nearly fills the frame top-to-bottom. After years of thinking I’ll never need a bigger lens, I know enough now not make that claim again, but I’m definitely satisfied (for now).
Learn how to photograph a big moon
Workshop Schedule || Purchase Prints
Fifteen Years of Supersized Moons
Click an image for a closer look and to view a slide show.


")


")


Yosemite for the First Time—Again
Posted on June 2, 2019
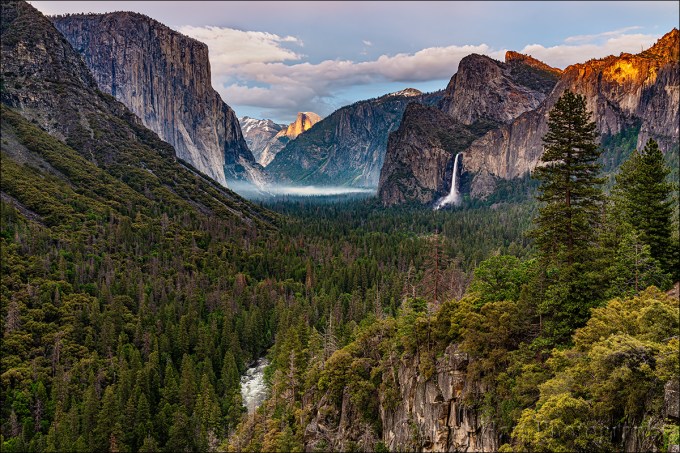
Last Light on Half Dome, Yosemite Valley
Sony a7R III
Sony 24-105 f/4 G
1/9 second
F/9
ISO 100
On Wednesday I made a quick trip to Yosemite to meet my (old and new) friends and fellow photography pros Don Smith and Ron Modra, plus Ron’s wife MB. Since I’d never met Ron and MB in person (though from conversations with Don I felt like I already knew them), and Ron had never been to Yosemite, I broke my personal rule to stay clear of Yosemite from Memorial Day through September (summer is for the tourists). Plus, after a lifetime of visiting Yosemite, there are few Yosemite firsts remaining, so I live vicariously through the first Yosemite experiences of others.
We met in El Portal, where I deposited my car and hopped in the back of Don’s car with MB. With Don driving and Ron riding shotgun, we headed up the hill discussing a strategy to make the most of our time. The plan we crafted was quickly discarded when we learned at the Arch Rock entrance station that Glacier Point, which had been closed since Saturday night, had just opened.
After a quick stop at Tunnel View to give Ron what should be everyone’s first Yosemite view, we zipped up to Glacier Point. Getting out of the car at Glacier Point, I immediately discovered that the beautiful spring day I’d dressed for had turned to winter. But cold is no match for the enthusiasm of the first time witnessing any of Yosemite’s spectacular views. Not only were the clouds spectacular, they did us the courtesy of parting just enough to illuminate Half Dome for a few minutes.
Our successful Glacier Point detour foreshadowed a spectacular day pinballing about Yosemite Valley, hitting all the spots a first-timer needs to see. Even the weather gods smiled on us, delivering thunderstorms filled the sky with billowing clouds and spread beautiful diffuse light across the park, without much rain.
I’m usually the driver for others’ first time Yosemite experiences, so riding in the back seat allowed me to rubberneck like an actual first-timer. There’s El Capitan! there’s Bridalveil Fall! there’s Sentinel Rock! And on down the list of Yosemite celebrities wearing their spring best. We were a little late for the dogwood, and the blooms that remained were in tatters, but everything else was green and the waterfalls were thundering, even for May. At each stop Ron’s excitement reminded me of a kid on Christmas morning, and seeing it all through his eyes, I totally got it. (Ron shot for Sports Illustrated for many decades—I imagine his reaction was no more enthusiastic than mine would be my first time in a Major League clubhouse.)
By 6:30 or so we’d worn Ron and MB out (well, Ron at least). With the rain starting to fall again, they declared their mission accomplished. With little sign of an impending sunset, and against the advice from Don and me, they decided to call it a day so Ron could get back and open the presents he’d so enthusiastically collected all day.
Our last stop was Valley View, where I realized that despite the beautiful conditions, I’d been so caught up in the view that hadn’t taken my camera from my bag all day. Chatting with MB while Don and Ron worked the beautiful scene, we agreed that sometimes it’s nice to enjoy nature without a camera. I know I missed some gorgeous photography, but I felt enriched by the conversation and laughter, and the sublime surroundings I often miss behind a camera.
But…
Saying our goodbyes in El Portal, I noticed breaks in the clouds. Hmmm. Instead of returning to my home in Sacramento, my destination that night was a heretofore undermined hotel between Yosemite and my Thursday destination in Southern California. But with an hour to go until sunset, I did a quick calculation and decided to forego the quickest route (down 140 to Mariposa) and detour back through Yosemite.
Back in the park I found the clouds still hanging in there, delivering the same nice but unspectacular light we’d enjoyed all day. But encouraged by my preview of the sky approaching from the west, I parked at Tunnel View for a few minutes, just to see what happened. I chose Tunnel View for its proximity to my (revised) route, and because when good stuff happens in Yosemite, it usually starts at Tunnel View. Plus, it’s pretty hard to mess up this classic view. And given that my long day was still several hours from ending, I simply wanted to take a pretty picture and Tunnel View was just the low hanging fruit I needed.
So there I waited in my car, one eye on the view, the other on my watch—30 minutes until sunset, 25 minutes, 20 minutes…. About 30 seconds after deciding nothing was going to happen, the granite next to Leaning Tower (the flat granite face just right of Bridalveil Fall) lit up like it had been hit with a spotlight. I was in business.
To get away from the photographers and tourists teeming about the standard vista, I climbed the granite behind the parking lot until I felt alone. I started wide, with my Sony a7RIII and Sony 24-105 lens (I’ve always felt 16-35 is too wide for Tunnel View). When a second spotlight hit Half Dome, I reached into my bag for my Sony a7RII and Sony 100-400 GM. I spent the rest of the shoot switching between the two bodies, trying all the compositions I’ve become so familiar with over the years. My goal this evening wasn’t an artistic masterpiece or some never seen Yosemite perspective, I simply wanted a low-stress shoot that captured this iconic Yosemite scene at its very best. Mission accomplished.
Workshop Schedule || Purchase Prints
A Yosemite Spring Gallery


Get Out of the Way
Posted on March 3, 2019
(And Let the Scene Speak for Itself)
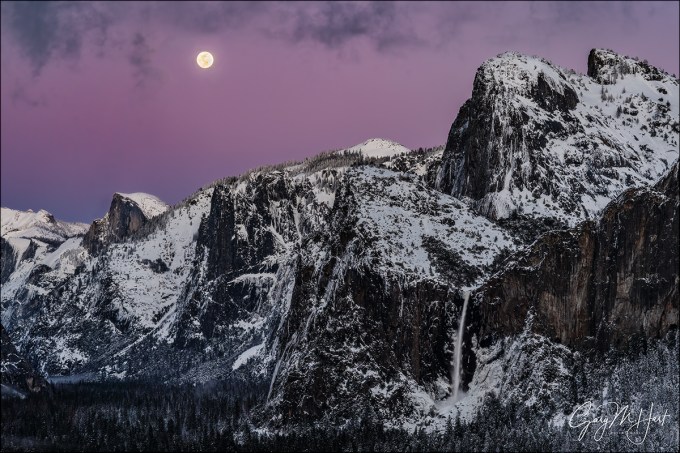
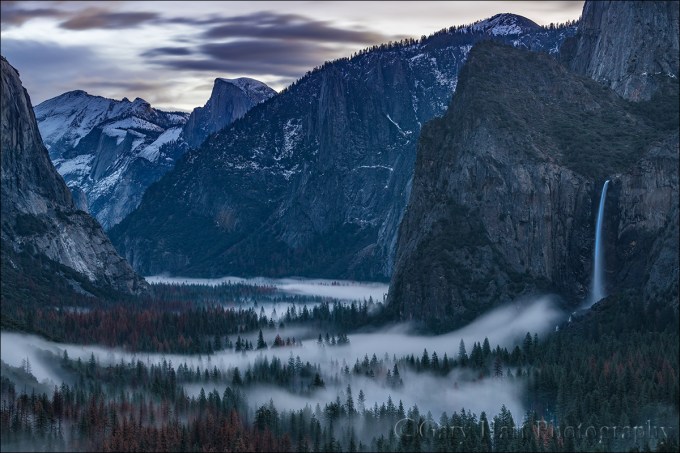
Nightfall, Full Moon and Yosemite Valley, Yosemite
Sony a7R III
Sony 24-105 f/4 G
1/6 second
F/10
ISO 100
As aggressively as I seek creative ways to express nature with my camera, and as important as I think that is, sometimes a scene is so beautiful that it’s best to just get out of the way and let the scene speak for itself. I had one of those experiences last month at Tunnel View in Yosemite.
There’s a reason Tunnel View is one of the most photographed vistas in the world: El Capitan, Half Dome, Cathedral Rocks, Bridalveil Fall—each would be a landscape icon by itself; put them all together in one view and, well…. But the view this evening was truly transcendent, even by Yosemite standards. In Yosemite Valley below, trees and granite still glazed with the snowy vestiges of a departing storm seemed to throb with their own luminance. And above Half Dome a full moon rose through a sky that had been cleansed of all impurities by the departing storm, an otherworldly canvas of indigo, violet, and magenta.
On these crystal-clear, winter-twilight moonrises, the beauty rises with the moon, reaching a crescendo about 20 minutes after sunset, after which the color quickly fades and the landscape darkens. Unfortunately, a some point before the crescendo, the dynamic range becomes so extreme that no camera (not even the dynamic range monster Sony a7RIII) can simultaneously extract usable detail from a daylight-bright moon and dark landscape.
I’d driven to Yosemite solely to photograph this moonrise, an eight hour roundtrip for 40-minutes of photography. Starting with the moon’s arrival about 20 minutes before sunset, I’d juggled three camera bodies and two tripods, first shooting ultra long, then gradually widening to include more of the snowy landscape. Already my captures had more than justified the time and miles the trip would cost me, but watching the moon traverse the deepening hues of Earth’s shadow, I wasn’t ready to stop.
I’ve learned that with a scene this spectacular, conveying the majesty doesn’t require me to pursue the ideal foreground, or do creative things with motion, light, or depth of field. In fact, I’ve come to realize that sometimes a scene can be so beautiful that creative interpretations can dilute or distract from the very beauty that moves me. On this evening in particular, I didn’t want to inject myself into that breathtaking moment, I just wanted to share it.
To simply my images, I opted for a series of frames that used tried-and-true compositions that I’d accumulated after years (decades) of photographing here, the compositions I suggest as “starters” for people who are new to Yosemite, or use myself to jump-start my inspiration: relatively tight horizontal and vertical frames of El Capitan, Half Dome, Bridalveil Fall; El Capitan and Half Dome; or Half Dome and Bridalveil Fall. In the image I share above I concentrated on Half Dome and Bridalveil Fall, capping my frame with the wispy fringes of a large cloud that hovered above Yosemite Valley.
Simplifying my compositions had the added benefit of freeing all of my (limited) brain cells to concentrate on the very difficult exposure. The margin for error when photographing a moon this far after sunset is minuscule—if you don’t get the exposure just right, there’s no fixing it in Photoshop later: too dark and there’s too much noise in the shadows; too bright and lunar detail is permanently erased. The problem starts with the understandable inclination to expose the scene to make the landscape look good on the LCD, pretty much guaranteeing that the moon will be toast. Compounding this problem is the histogram, which most of us have justifiably come to trust as the final arbiter for all exposures. But when a twilight moon (bright moon, dark sky) is involved, even the histogram will fail you because the moon is such a small part of the scene, it barely (if at all) registers on the histogram.
Rather than the histogram, for these dark sky moon images I monitor my LCD’s highlight alert (“blinking highlights”), which is usually the only way to to tell that the moon has been overexposed. If the moon is flashing, I know I’ve given the scene too much light and need to back off until the flashing stops—no matter how dark the foreground looks. This is where it’s essential to know your camera, and how far you can push its exposure beyond where the histogram and highlight alert warn you that you’ve gone too far.
When I’m photographing a full moon rising into a darkening sky, I push the exposure to the point where my highlight alert just starts blinking (only the brightest parts of the moon, not the entire disk, are flashing), then I give it just a little more exposure. I know my Sony a7RIII well enough to know that I can still give it a full stop of light beyond this initial flash point and still recover the highlights later. The shadows? In a scene like this they’ll look nearly black, a reality my histogram will confirm, but I never cease to be amazed by how much detail I can pull out of my a7RIII’s shadows in Lightroom and Photoshop.
I continued shooting for several minutes after this frame, and discovered later that even my final capture contained usable highlights and shadows. I chose this image, captured nearly five minutes before I quit, because it contained the best combination of color, lunar detail, and clean (relatively noise-free) Yosemite Valley.
Photograph the full moon above Half Dome with me this December
Workshop Schedule || Purchase Prints
Letting Nature Speak for Itself
Click an image for a closer look, and a slide show


Better than a Pot of Gold
Posted on September 2, 2018
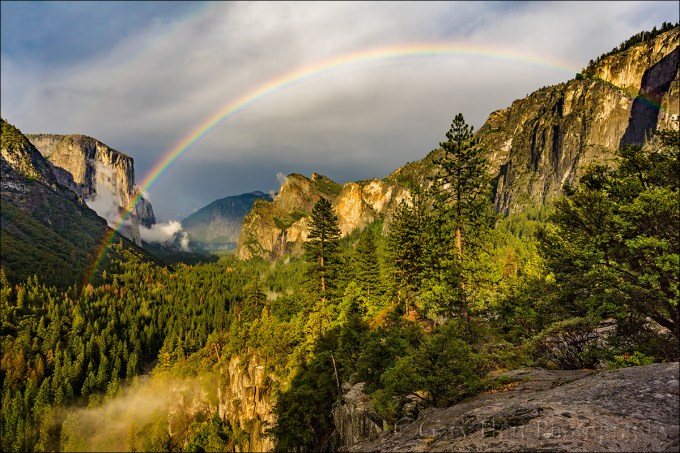
Summer Rainbow, Yosemite Valley
Sony a7R
Sony/Zeiss 16-35 f/4
1/250 second
F/9
ISO 100
My relationship with Yosemite rainbows goes all the way back to my childhood, when a rainbow arcing across the face of Half Dome made my father more excited than I believed possible for an adult. I look back on that experience as the foundation of my interest in photography, my relationship with Yosemite, and my love for rainbows. So, needless to say, photographing a rainbow in Yosemite is a pretty big deal for me.
A few years ago the promise (hope) of lightning drove me to Yosemite to wait in the rain on a warm July afternoon. But after sitting for hours on hard granite, all I got was wet. It became pretty clear that the storm wasn’t producing any lightning, but as the sky behind me started to brighten while the rain continued falling over Yosemite Valley, I realized that conditions were ripe for a rainbow. Sure enough, long after I would have packed up and headed home had I been focused solely on lightning, this rainbow was my reward.
The moral if my story is that despite all appearances to the contrary, rainbows are not random—when sunlight strikes raindrops, a rainbow occurs, every time. The reason we don’t always see the rainbow not because it isn’t happening, it’s because we’re not in the right place. And that place, geometrically speaking, is always the same. Of course sometimes seeing the rainbow requires superhero ability like levitation or teleportation, but when we’re armed with a little knowledge and anticipation, we can put ourselves in position for moments like this.
I can’t help with the anticipation part, but here’s a little knowledge infusion (excerpted from the Rainbow article in my Photo Tips section).
LET THERE BE LIGHT
Energy generated by the sun bathes Earth in continuous electromagnetic radiation, its wavelengths ranging from extremely short to extremely long (and every wavelength in between). Among the broad spectrum of electromagnetic solar energy we receive are ultra-violet rays that burn our skin and longer infrared waves that warm our atmosphere. These wavelengths bookend a very narrow range of wavelengths the human eye sees.
Visible wavelengths are captured by our eyes and interpreted by our brain. When the our eyes take in light consisting of the full range of visible wavelengths, we perceive it as white (colorless) light. We perceive color when some wavelengths are more prevalent than others. For example, when light strikes an opaque (solid) object such as a tree or rock, some of its wavelengths are absorbed; the wavelengths not absorbed are scattered. Our eyes capture this scattered light, send the information to our brains, which interprets it as a color. When light strikes water, some is absorbed and scattered by the surface, enabling us to see the water; some light passes through the water’s surface, enabling us to see what’s in the water; and some light is reflected by the surface, enabling us to see reflections.
(From this point on, for simplicity’s sake, it might help to visualize what happens when water strikes a single drop.)
 Light traveling from one medium to another (e.g., from air into water) refracts (bends). Different wavelengths refract different amounts, causing the light to split into its component colors. Light that passes through a water refracts (bends). Different wavelengths are refracted different amounts by water; this separates the originally homogeneous white light into the multiple colors of the spectrum.
But simply separating the light into its component colors isn’t enough to create a rainbow–if it were, we’d see a rainbow whenever light strikes water. Seeing the rainbow spectrum caused by refracted light requires that the refracted light be returned to our eyes somehow.
A raindrop isn’t flat like a sheet of paper, it’s spherical, like a ball. Light that was refracted (and separated into multiple colors) as it entered the front of the raindrop, continues through to the back of the raindrop, where some is reflected. Red light reflects back at about 42 degrees, violet light reflects back at about 40 degrees, and the other spectral colors reflect back between 42 and 40 degrees. What we perceive as a rainbow is this reflection of the refracted light–notice how the top color of the primary rainbow is always red, and the bottom color is always violet.
FOLLOW YOUR SHADOW
Every raindrop struck by sunlight creates a rainbow. But just as the reflection of a mountain peak on the surface of a lake is visible only when viewed from the angle the reflection bounces off the lake’s surface, a rainbow is visible only when you’re aligned with the 40-42 degree angle at which the raindrop reflects the spectrum of rainbow colors.
Fortunately, viewing a rainbow requires no knowledge of advanced geometry. To locate or anticipate a rainbow, picture an imaginary straight line originating at the sun, entering the back of your head, exiting between your eyes, and continuing down into the landscape in front of you–this line points to the “anti-solar point,” an imaginary point exactly opposite the sun. With no interference, a rainbow would form a complete circle, skewed 42 degrees from the line connecting the sun and the anti-solar point–with you at the center. (We don’t see the entire circle because the horizon gets in the way.)
Because the anti-solar point is always at the center of the rainbow’s arc, a rainbow will always appear exactly opposite the sun (the sun will always be at your back). It’s sometimes helpful to remember that your shadow always points toward the anti-solar point. So when you find yourself in direct sunlight and rain, locating a rainbow is as simple as following your shadow and looking skyward–if there’s no rainbow, the sun’s probably too high.
HIGH OR LOW
Sometimes a rainbow appears as a majestic half-circle, arcing high above the distant terrain; other times it’s merely a small circle segment hugging the horizon. As with the direction of the rainbow, there’s nothing mysterious about its varying height. Remember, every rainbow would form a full circle if the horizon didn’t get in the way, so the amount of the rainbow’s circle you see (and therefore its height) depends on where the rainbow’s arc intersects the horizon.
While the center of the rainbow is always in the direction of the anti-solar point, the height of the rainbow is determined by the height of the anti-solar point, which will always be exactly the same number of degrees below the horizon as the sun is above the horizon. It helps to imagine the line connecting the sun and the anti-solar point as a fulcrum, with you as the pivot–picture yourself in the center of a teeter-totter: as one seat rises above you, the other drops below you. That means the lower the sun, the more of its circle you see and the higher it appears above the horizon; conversely, the higher the sun, the less of its circle is above the horizon and the flatter (and lower) the rainbow will appear.

Assuming a flat, unobstructed scene (such as the ocean), when the sun is on the horizon, so is the anti-solar point (in the opposite direction), and half of the rainbow’s 360 degree circumference will be visible. But as the sun rises, the anti-solar point drops–when the sun is more than 42 degrees above the horizon, the anti-solar point is more than 42 degrees belowthe horizon, and the only way you’ll see a rainbow is from a perspective above the surrounding landscape (such as on a mountaintop or on a canyon rim).
Of course landscapes are rarely flat. Viewing a scene from above, such as from atop Mauna Kea in Hawaii or from the rim of the Grand Canyon, can reveal more than half of the rainbow’s circle. From an airplane, with the sun directly overhead, all of the rainbow’s circle can be seen, with the plane’s shadow in the middle.
DOUBLE YOUR PLEASURE
Not all of the light careening about a raindrop goes into forming the primary rainbow. Some of the light slips out the back of the raindrop to illuminate the sky, and some is reflected inside the raindrop a second time. The refracted light that reflects a second time before exiting creates a secondary, fainter rainbow skewed 50 degrees from the anti-solar point. Since this is a reflection, the order of the colors is the secondary rainbow is reversed.
And if the sky between the primary and secondary rainbows appears darker than the surrounding sky, you’ve found “Alexander’s band.” It’s caused by all the light machinations I just described–instead of all the sunlight simply passing through the raindrops to illuminate the sky, some of the light was intercepted, refracted, and reflected by the raindrops to form our two rainbows, leaving less light for the sky between the rainbows.
Rainbows
Click an image for a closer look and slide show. Refresh the window to reorder the display.


Silent Night
Posted on March 21, 2017

Silent Night, Yosemite Valley from Tunnel View
Sony a7R II
Sony/Zeiss 16-35 f/4
20 seconds
F/5.6
ISO 1250
One perk of being a photographer is the opportunity to experience normally crowded locations in relative peace. That’s because the best nature photography usually happens at most people’s least favorite time to be outside: crazy weather and after dark. A couple of weeks ago in Yosemite I got the opportunity to enjoy both.
After spending a snowy Sunday guiding a couple around Yosemite Valley in a snowstorm, I dropped them back at (the hotel formerly known as) The Ahwahnee with nothing but the drive home on my mind. But winding through the valley in the fading twilight I saw signs of clearing skies and made a snap decision to check out the scene at Tunnel View.
I found the vista at Tunnel View gloriously empty. By the time I’d set up my camera and tripod the darkness was nearly complete, but as my eyes adjusted I could make out large, black holes in the once solid clouds overhead. Soon stars dotted the blackness above El Capitan and the white stripe of Bridalveil Fall. Each time light from the waxing gibbous moon slipped through the shifting clouds, the entire landscape lit up as if someone had flipped a switch.
Because the best parts of the view were in a narrow strip starting with the snow-glazed trees beneath me and continuing through the scene and up into the star-studded sky, I opted for a vertical composition. To include as much foreground and sky as possible, I went nearly as wide as my 16-35 lens would allow, more or less centering El Capitan and Bridalveil Fall to give the snow and stars equal billing.
Being completely comfortable with my a7RII’s high ISO performance, I didn’t stress the 1250 ISO that allowed me to stop down to a slightly sharper f/5.6 (virtually every lens is a little sharper stopped down from its largest aperture). Night focus with the Sony a7RII is extremely easy, easier than any camera I’ve ever used that isn’t an a7S/a7SII. Often I manually focus on the stars and use focus peaking* to tell me I’m sharp; in this case I back-button auto-focused on the contrast between the moonlit snow and dark granite near Bridalveil Fall. I chose a long enough shutter speed to capture motion blur in the rapidly moving clouds, knowing the potential for visible star streaking was minimized by my extremely wide focal length.
My favorite thing about that evening? The 20 seconds my shutter was open, when I didn’t have anything to do but stand there and enjoy the view in glorious silence.
* Focus peaking is a mirrorless feature that highlights in the viewfinder the in-focus areas of your scene.
Workshop Schedule || Purchase Prints
Yosemite After Dark
Click an image for a closer look and slide show.


Variations on a scene
Posted on March 14, 2017
Snowfall, Tunnel View, Yosemite
Sony a7R II
Sony/Zeiss 16-35 f/4
1/250 second
F/9
ISO 100
A week or so ago I had the good fortune to be in Yosemite for the most recent snowfall there. All week the National Weather Service had been waffling a bit on the snow—based on the forecast, I probably wouldn’t have made the trip. But I was there anyway, guiding a fun couple from England for the weekend. Following a nice but unspectacular Saturday, we woke Sunday morning to find the world dipped in white.
The snow fell all day, at times so hard that that it was difficult to see more than a couple hundred yards, other times dwindling to a few flakes per minute. During one of the lulls we made our way to Tunnel View for the obligatory shot there. Despite hundreds (thousands?) of pictures of this view, after surveying the scene for a few minutes I couldn’t resist pulling out my camera and tripod.
My general feeling is that people tend to go too wide with their Tunnel View images, shrinking the main features (El Capitan, Half Dome, Bridalveil Fall) to include less exciting granite left of El Capitan and right right of Cathedral Rocks/Bridalveil Fall. That’s why I opt to tighten my horizontal Tunnel View compositions on the left and right, or isolate one or two of the three primary subjects with a telephoto. And when something exciting is happening in the sky (moon, clouds, or color) or foreground (fog, snow, rainbow), I’ll often compose vertically and bias my composition to favor the most compelling part of the scene.
With so many Tunnel View images in my portfolio, that afternoon I consciously set aside my long-held composition biases in favor of something I don’t already have. Of course the feature that most set the scene apart was the snow, so I set out to find the best way to emphasize it. Because the snow level that day was right around 4000 feet, also the elevation of Yosemite Valley, even the three hundred or so feet of elevation gain at Tunnel View resulted in much more snow virtually at my feet than on the distant valley floor. My Sony/Zeiss 16-35 f/4 lens, a great lens that I usually find too wide for Tunnel View, was perfect for highlighting the foreground snow.
Dialing my focal length to about 20mm allowed me to maximize the foreground snow while including minimal less-than-interesting gray sky. Of course going this wide meant shrinking the scene’s “big three” and adding lots of extraneous middle-ground on the left and right. To mitigate that problem I used the snowy pine on the left, often an obtrusive distraction to be dealt with, as a frame for that side of the scene. Not only did the tree block less interesting features, it actually enhanced the snowy effect I sought. On the right the diagonal ridge added a touch of visual motion (diagonal lines are so much stronger visually than horizontal and vertical lines), and it didn’t hurt that much of the bland granite there was covered with snow.
Workshop Schedule || Purchase Prints
A Tunnel View Gallery
Click an image for a closer look and slide show. Refresh the window to reorder the display.


The best lens for the job
Posted on December 28, 2016
Dawn, Tunnel View, Yosemite
Sony a7R II
Sony 70-200 f/4
25 seconds
F/8
ISO 200
Probably the workshop question I am asked most is some variation on, “What lens should I use?” While I’m happy to answer any question, this one always makes me cringe because the implicit question is, “Which lenses can I leave behind?”
What many photographers fail to realize is that the “proper” lens isn’t some absolute determined by the scene, a secret known only by the best photographers, it’s a creative choice made by each photographer who visits. While prior captures often imply a general consensus on a scene’s primary composition, that pretty much turns out to be the first composition everyone sees—just the compositions creative photographers should avoid. When I tell you the lens to use, I’m imposing my creative instincts rather than cultivating yours. “Okay, right, I get it. But seriously—what lens should I use?” Sigh.
Suck it up
The best landscape images usually require some sacrifice, so if you’re making lens choices based on what’s most convenient, maybe landscape photography isn’t for you. I’m not talking about risking your life to get the shot, or exceeding your physical limitations, but I am talking about a willingness to experience a little discomfort for your craft. That means venturing out in miserable weather, rising well before the sun, or (gulp) skipping dinner. And yes, it even means lugging a little heavier camera bag than you might prefer.
My general rule is to, at the very least, carry lenses that cover the full-frame focal range from 20mm-200mm. There are some trade-offs in the number of lenses you choose to achieve this. Some carry just one or two zoom lenses, sacrificing speed and image quality for comfort, convenience, and mobility; others go hardcore, lugging an assortment of fast, ultra-sharp primes. I’m in the middle, extremely happy with the combination of quality and compactness I get with my three Sony f/4 zoom lenses: the 16-35, 24-70, and 70-200.
In addition to my three primary lenses, I never go out without my full frame Sony a7RII and 1.5 crop Sony a6300 bodies. Because a 1.5 crop body increases the effective focal length of each lens by 50 percent, with these two bodies I can cover the focal range from 16mm-300mm. I also have a few specialty lenses that may or may not stay in the car (but never at home), depending on the scene, the room in my bag, and how much hiking/climbing/scrambling I’ll be doing: a Tamron 150-600 for extra reach; a Rokinon 24mm f/1.4 lens for starlight; and a Sony 90mm macro.
So seriously, the lens you choose for a scene is part of the creative process that defines you as a photographer, a personal decision that I’m happy to assist, but reluctant to dictate. In fact, it’s a rare scene that’s worthy of capture with one lens that’s not worthy of capture with another. And another. (And I promise that the surest way to need a particular lens is to leave it behind.) I’m not suggesting that you lug Hermione’s purse to every shoot; just try to remember that your images will last far longer than your discomfort.
Case in point
I do a half dozen or so workshops in Yosemite each year, plus a number of private tours. That means I spend a lot of time at Tunnel View. A lot. But I don’t photograph there much anymore unless I think I can get something I don’t already have, which means I do lots of watching other photographers. One thing I notice is how few photographers use a telephoto lens here. Given the breadth of the view, and the volume of existing wide angle Tunnel View images we’ve been conditioned by, reflexively reaching for the wide angle lens at Tunnel View is understandable. But approaching any scene with a preconceived idea of the best lens limits the array of creative opportunities the scene provides.
One chilly morning at Tunnel View earlier this month, my winter workshop group enjoyed the snowy granite, wispy fog, and pristine air only possible after a winter storm. Of course we had all of the standard wide angle compositions at our disposal, but when the fog and pastel sky moved me to pull out my camera, it was my 70-200 that I chose to pair with it. I tried a few compositions, before settling on this one that was just wide enough to include Half Dome, Bridalveil Fall, most of the fog, and the only clouds remaining from the storm. Not only would a wide angle lens have shrunk what I felt were the scene’s most significant features, my telephoto lens was able to exclude from my image the bright, empty sky above Half Dome, and most of the dead, brown trees scarring Yosemite Valley.
Because this image was captured 20 minutes before sunrise, the scene my eyes saw was much darker than what my camera captured. Photographers able to see with their camera’s vision rather than their own love photographing in the sweet light only possible at twilight. In this case not only did I benefit from a shadowless foreground, the 25-second exposure smoothed the clouds, fog, and waterfall ethereal quality.
I won’t pretend that this is a groundbreaking capture (far from it), but if I’d have walked up to the scene with a wide angle already mounted instead taking it all in before choosing my lens, I don’t think I’d have been nearly as happy with my results.
Workshop Schedule || Purchase Prints
A Tunnel View Gallery
Click an image for a closer look and slide show. Refresh the window to reorder the display.


Let’s get vertical
Posted on February 2, 2016
Yosemite Sky, Tunnel View, Yosemite
Sony a7R II
Sony/Zeiss 24-70 f4
.8 seconds
F/8
ISO 100
Who had the bright idea to label horizontal images “landscape,” and vertical images “portrait”? To that person let me just say, “Huh?” As a landscape-only photographer, about half of my images use “portrait” orientation. I wonder if this arbitrary naming bias subconsciously encourages photographers to default to a horizontal orientation for their landscape images, even when a vertical orientation might be best.
Every image contains implicit visual motion that’s independent of the eyes’ movement between the image’s elements. Following the frame’s long side, this flow provides photographers a tool not only for guiding viewers’ eyes, but also for conveying a mood.
For example, orienting a waterfall image vertically complements the water’s motion, instilling a feeling of calm. Conversely, a waterfall image that’s oriented horizontally often contains more visual tension. While there’s no absolute best way to orient a waterfall (or any other scene), you need to understand that there is a choice, and that choice matters.
By moving the eye from front to back, vertical images often enhance the illusion of depth so important in a two-dimensional photo. I find that a foreground element that adds depth to whatever striking background has caught my attention is often lost in a horizontal image.
More than just guiding the eye through the frame, vertical orientation narrows the frame, enabling us to eliminate distractions or less compelling objects left and right of the prime subject(s). Vertical is also my preferred orientation when I want to emphasize a sky full of stars, or dramatic clouds and color.
Want to emphasize a beautiful sky? Go with a vertical image, putting the horizon near the bottom of the frame. When the sky is dull and all the visual action is in the landscape, put the horizon at the top of your frame. When the landscape and sky are equally compelling, go ahead and split the frame across the middle (regardless of what the “experts” at the photo club might say).

Double Rainbow, Yosemite Valley
While a horizontally oriented scene is often the best way to convey the sweeping majesty of a broad landscape, I particularly enjoy guiding and focusing the eye with vertical compositions of traditionally horizontal scenes. Tunnel View in Yosemite, where I think photographers tend to compose too wide, is a great example. The scene left of El Capitan and right of Cathedral Rocks can’t compete with the El Capitan, Half Dome, Bridalveil Fall triumvirate, yet the world is full of Tunnel View images that shrink this trio to include (relatively) nondescript granite.
When the foreground and sky aren’t particularly interesting, I tend to shoot fairly tight horizontal compositions at Tunnel View. But when a spectacular Yosemite sky, snow-laden trees, or cloud-filled valley demand inclusion, vertical is my go-to orientation because it frees me to celebrate the drama without diluting it.
About this image

Yosemite Sky, Tunnel View, Yosemite
I captured this image last week, at the end of a one-day private tour. Leaving home at 6 a.m., my plan was to enjoy Yosemite Valley and save my photography for the next two days, when I’d be by myself and a storm was forecast. Indeed, my students and I spent the day beneath a layer of gray clouds that, while great for photography, were decidedly unspectacular. With occasional sprinkles to remind us of the looming storm, I was just happy that the serious rain held off until we finished, and that the ceiling never dropped far enough to obscure Yosemite’s icons.
Since my students had left their car at our Tunnel View meeting place, my plan was to wrap up with a “sunset” there. Of course, given the thickening clouds, we had no illusion that we’d be photographing an actual sunset, and were in no hurry to get there.
So imagine my surprise when, while photographing Bridalveil Fall from the turnout on Northside Drive, I saw hints of warmth on Leaning Tower—not direct sunlight, but indirect light that indicated there was sunlight somewhere nearby. I turned and peered through the trees behind me, and saw small patch of direct sunlight on El Capitan. “We need to go!” I barked this so suddenly that I’m surprised I didn’t frighten them. To their credit, we were packed, loaded, and back on the road in 30 seconds, and at Tunnel View in less than ten minutes.
For the next 30 minutes we enjoyed a lesson in Yosemite weather, one more chapter in my as yet unwritten book, “You Can’t Predict What Yosemite Will Be Like in Five Minutes Based On What It’s Like Right Now.” The sunlight started on El Capitan, pouring through an unseen hole in the clouds somewhere down the Merced River Canyon behind us. Once El Capitan was fully illuminated, the light went to work on Half Dome. Soon a formation of broken clouds moved into view overhead, then continued sliding above Yosemite Valley until the entire scene was more sky than cloud.
This image was captured toward the end of the show, after the clouds had moved well into the scene and just before the fading vestiges of warm light left El Capitan and Half Dome. It’s a real treat when the sky at Tunnel View can compete with the scene below, but in this case the sky deserved all the attention I gave it.
Tip of the day
I can think of no single piece of equipment that will make vertical compositions easier than a Really Right Stuff L-plate (there are less expensive options, but I agree with the consensus that Really Right Stuff plates the best). An L-plate is, as its name implies, and L-shaped piece of metal that attaches to your camera’s tripod mount, replacing the standard quick-release plate. Unlike a flat quick-release plate, an L-plate wraps around one side of the body.
Each side fits the standard Arca-Swiss quick-release mount: for a horizontal image, the camera is mounted to the tripod head by part of the plate attached to the camera’s underside; for a vertical composition, you release the camera, rotate it 90 degrees, and attached the part of the plate that wraps the camera’s side. This detach/rotate/reattach can be done in about one second, even in complete darkness.
In addition to speed and convenience, and L-plate ensures maximum stability by keeping your center of gravity directly above the intersection of the tripod’s legs. It also keeps your eye-piece in nearly the same position regardless of the orientation, eliminating the need for you to dip your head or raise your center-post each time you go vertical.
Due to each camera’s unique dimensions, configuration of memory card and battery bays, and electronics ports, L-plates are camera-specific. That means when you get new camera, you’ll likely be getting a new L-plate—a small price to pay for the benefit you’ll get.
Workshop schedule
A vertical gallery
Click an image for a closer look, and a slide show. Refresh the screen to reorder the display.


Yosemite and me
Posted on January 19, 2016

Double Rainbow, Yosemite Valley
Canon EOS-1Ds Mark III
1/5 second
F/16.0
ISO 100
38 mm
My relationship with Yosemite doesn’t have a beginning or end. Rather, it’s a collection of asynchronous memories that are still forming. In fact, some of my Yosemite experience actually predates my memory. The earliest memories, like following bobbing flashlights to Camp Curry to watch the Firefall spring from Glacier Point, or warm evenings in lawn chairs at the garbage dump, waiting for the bears to come to dinner, are part of the glue that bonds my family.
My father was a serious amateur photographer who shared his own relationship with Yosemite. One of my most vivid Yosemite memories is (foolishly) standing atop Sentinel Dome in an electrical storm, extending an umbrella to shield his camera while he tried to photograph lightning.

Lecturing my first workshop group on the virtues of tripod use
As I grew older, I started creating my own memories. While exploring Yosemite’s backcountry I reclined beside gem-like lakes cradled in granite basins, sipped from streams that started the day as snow, and slept beneath an infinite canopy of stars—all to a continuous soundtrack of wind and water.
Given this history, it’s no surprise that I became a nature photographer, using my camera to try to convey the essence of this magic world. In the last 35 years my camera and I have returned more times than I can count, sometimes leaving home in the morning and returning that night, eight hours of driving for a six hour fix. Other trips span multiple days, each one starting before sunrise and lasting through sunset, and sometimes well into the night. But despite the fact this is my livelihood, it’s never work.
About ten years ago I started guiding photographers through Yosemite. Now I get to live vicariously through others’ excitement as they experience firsthand the beauty they’ve previously seen only in pictures. Many of these people return many times themselves, sometimes in other workshops, sometimes on their own. Either way, I’m proud to be a catalyst for their nascent relationship with this special place, and know that they’ll spread the love to others in their lives.
Of course I’ve seen lots of change while accumulating my Yosemite memories. Gridlock is a summer staple, the bears have been separated (with moderate success), the Firefall has been extinguished, and backpacking requires permits, water purifiers, and bear canisters. And now there are rumblings that some of the park’s cherished names—The Ahwahnee, Curry Village, the Wawona Hotel, Yosemite Lodge—will be lost to corporate greed. But despite human interference, Yosemite’s soaring granite and plummeting waterfalls are magnificent constants, a vertical canvas for Nature’s infinite cycle of season, weather, and light.
(An earlier version of this essay appears on my website)
Join me in Yosemite
My Yosemite
Click an image for a closer look, and a slide show. Refresh the screen to reorder the display.


Anticipating the exceptional
Posted on July 11, 2015

Morning Glory, Sunrise Clearing Storm, Yosemite Valley
Sony a7R
Sony/Zeiss 24-70
1/50 second
F/16
ISO 100
No one denies that an image records a single, unrepeatable instant. But just as each instant is the culmination of a series of connected preceding events, most images have their own history that can be traced backward, often months or years before the shutter clicked. The moon didn’t just materialize above Half Dome that evening, and a moonbow isn’t just some random event at the base of Lower Yosemite Fall—their appearance can be directly connected to celestial dance that was set in motion with the birth of our Solar System, and can be predicted with surgical precision (minus a few wild card variables like weather and water flow to keep photographers from getting too cocky).
Photographers spend a great deal of time trying to anticipate instants like these. We start with the common-knowledge stuff, things like the February sunset light on Horsetail Fall, a shaft of summer light slanting in Upper Antelope Canyon, or a moonbow in the spring mist billowing beneath Lower Yosemite Fall. But the precision of the celestial choreography that delivers light shafts to slot canyons and moonbows to waterfalls is just as predictable for anonymous hidden trees, lakes, and peaks. Iconic or undiscovered, each of these spectacles are the convergence of location and predictable natural processes just waiting to be appreciated (and photographed!).
Image planning isn’t limited to the sun, moon, and stars. Understanding and monitoring a favorite location’s weather can put you in the right place, with the best chance to add a rainbow, lightning bolt, or fresh snow. And simply finding a complementary foreground/background alignment that connects two or more terrestrial subjects can elevate an image to the next level.
Rather than a fortuitous right-place, right-time convergence, the creative aspect of many images starts long before capture. When I find a new location, or identify a potential subject, my brain immediately starts spinning on the ways I can make it better. Can I align it with another foreground or background subject? What natural phenomena will take the scene to the next level, and how I can be there when it happens?
For example…

Bridalveil Dogwood, Valley View, Yosemite
Before capturing my image of a raindrop-festooned dogwood flower with Bridalveil Fall in the background, I had long visualized a scene somewhere in Yosemite that featured a dogwood bloom aligned with a soft-focus but recognizable Yosemite landmark. I knew I’d need overcast skies that would illuminate the entire scene with diffuse, soft light, then filed my vision away until the next time the forecast predicted clouds during the short window the dogwood bloom in Yosemite.
On my drive to the park, I started mentally working on locations where I might be able to align a dogwood with a recognizable Yosemite subject, the lens I’d use, the amount of background sharpness I wanted, and so on. Once I was in the valley, I was able to conduct a pretty orderly search that eventually led me to this flower near Valley View.
Sometimes bringing my ideas to fruition requires a lot more research, planning, and patience. I’ll start with a scene that appeals to me, then mentally add something that I think will take it to the next level. A moon? Stars? A rainbow? Lightning? Fresh snow? Maybe all of the above (so far not at the same time, sadly).
The moon and stars are a relatively straightforward matter of plotting angles and timing (and hoping the weather cooperates). On the other hand, weather phenomena, such as rainbows, lightning, and snow, require an understanding of the processes behind them, careful and persistent monitoring of long- and short-term weather forecasts (only the National Weather Service for me), and a lot patience while waiting for the moment to arrive. Then, when the moment does arrive, I need to move quickly and not allow myself to be swayed by fear of failure (always a distinct possibility).
For example…

Double Rainbow, Tunnel View, Yosemite
I’d long fantasized about adding a rainbow arcing over Yosemite Valley to the already breathtaking Tunnel View scene. And being a lover of rainbows and a photographer, I’d long ago taken the time to become extremely aware of the why, where, and when of rainbows. Which is how, on a spring afternoon a few years ago, I was in perfect position when my rainbow fantasy came true.
I was in Yosemite to meet customers for dinner, and to plan the next day’s guided tour of the park. But when my mostly sunny drive up the Merced River Canyon turned to rain as I entered Yosemite Valley, my mental wheels started turning—Yosemite weather almost always moves west-to-east, which meant soon Yosemite Valley would have rain on the east side and sunlight low on the western horizon. It wasn’t hard to rearrange my customers’ priorities, and this was our reward.
Celestial phenomena are wonderfully predictable, so much so that I make very few non-spontaneous photo trips without factoring in the moon and/or Milky Way. (My spontaneous trips are usually spurred by the weather forecast.) And there are few locations I photograph that I can’t tell you the altitude and azimuth necessary to align a the sun, moon, or Milky Way with the location’s most prominent feature.
Hawaii, Death Valley, Mono Lake, Alabama Hills (Mt. Whitney), plus many personal favorite subjects near home—I know exactly where I want to be and when I want to be there, and do my best to make it happen, sometimes planning several years in advance. In Yosemite my terrestrial subject is usually Half Dome, and and my celestial subject is usually a rising moon. And depending the direction of the moon’s arrival, I have an array of locations that I know will align with the moon’s appearance.
For example…

Rising Crescent, El Capitan and Half Dome, Yosemite
Tunnel View is my favorite location for photographing a Yosemite moonrise, but it’s not my only location. Across the Merced River Canyon on Big Oak Flat Road is Half Dome View, a turnout vista with a slightly different, less popular view of Half Dome and El Capitan.
From Half Dome View, the visual distance separating the two monoliths is quite narrow, meaning an extremely small margin of error for a photographer hoping to catch the moon splitting the gap. But the idea had always intrigued me, so I went to work with my plotting method (I do it manually using topo maps, moonrise tables, and an HP-11C scientific calculator that does trig functions).
When I discovered that a crescent moon would indeed split this gap before sunrise on a certain May morning in about a year, I started a plan of attack. Despite the fact that I’d never photographed a moonrise from this location, and even the slightest error in computation would foil the attempt, I went ahead and scheduled a workshop for this date. Try to imagine my anxiety as the day approached and the realization that failure wouldn’t just impact me, it would impact my entire group, really started to sink in. And imagine my euphoria (not to mention everyone with me) that morning when the moon slid into the gap, right on schedule.
When photography’s less than ideal, I might leave the camera in my bag, but I don’t stop being a photographer. I spend a lot of non-camera time scouting locations, looking for complementary subjects that I can align with the grand scene. If my primary subject is in the foreground, I add move around until I can align it with a complementary background. And when my subject is in the distance (like Mt. Whitney from the Alabama Hills, or Yosemite Valley from Tunnel View), I spend a lot of time exploring the nearby terrain in search of subjects I can align with the grand primary scene.
When I find a subject that merits something exceptional, I try to wait until I can enhance it with similarly exceptional natural phenomenon.
For example…
Morning Glory, Sunrise Clearing Storm, Yosemite Valley
When I “discovered” this tree, it was love at first sight. But rather than photograph it in the more conventional quality light conditions that are fairly easy to anticipate, or wait for one of Yosemite’s inevitable exceptional but fairly regular moments, I saved my discovery for something truly extraordinary. And, after about ten years of waiting for location, light, conditions, and circumstances (this spot is too small and dangerous for a group), extraordinary finally happened this April.
Anticipating snow, I’d traveled to Yosemite the previous afternoon. A little snow had fallen earlier that day, and while the storm had passed, its cloudy vestiges lingered overhead and in the valley below. While not the winter wonderland I’d hoped for, there was enough snow still hugging the trees that I found some very nice images. Nice enough, in fact, that I’d have been completely satisfied with my captures if my trip had ended right then. But I wasn’t done.
Because more snow was promised overnight, I got a room nearby and returned the next morning. I wasn’t too far into my drive back into the park before it became clear that I was in for something special. The snow had just stopped, and while there wasn’t a lot of snow, the air was cold enough that I knew until the morning sunlight made it all the way down into Yosemite Valley, everything would remain in a state of suspended animation. And the clouds that had deposited the snow were doing their typical slow-clear dance on the valley floor.
I first stopped at a spot along the Merced River and photographed dogwood and El Capitan. I got so caught up in that scene that I lost track of the time and didn’t give myself a lot of time for my next stop, up the hill at “my” tree (that I often check but rarely photograph). I also realized that given the light snowfall on the valley floor, I’d severely underestimated the amount of snow that had fallen just a few hundred feet up the hill from Yosemite Valley.
I found an entire world covered with white, and the sun about ready to pop up over Sentinel Dome—once the sun arrived, I’d only have about 60 seconds of quality photography before the sun overpowered the scene. I quickly grabbed my gear and scrambled up to the tree. Fortunately, I’d photographed here the previous afternoon, so I didn’t really have to hunt for a composition (generally a fairly painstaking, trial-and-error process). With the sun about to appear, I knew I’d need to do a sunstar and set my aperture accordingly. Without a lot of time to play with the exposure, I made the snap judgement to spare the highlights and hope I could recover the shadows laters, and click.
This image was literally the first click I made of the scene this morning—subsequent captures showed increasingly blown highlights as the sun rose into the scene. On my LCD this image looked severely underexposed, but I trusted the histogram on my a7R, which indicated there was indeed detail in the shadows. (Yes, I know I could have accomplished it by bracketing and blending multiple exposures, but I’m a one-click guy.) And when I finally found the courage to process the image, I held my breath as I grabbed the Lightroom Shadows slider and watched my scene appear.
A gallery of “planned” images
Click an image for a closer look, and a slide show. Refresh the screen to reorder the display.


