Eloquent Images by Gary Hart
Insight, information, and inspiration for the inquisitive nature photographer
These Are Two of My Favorite Things
Posted on December 19, 2021

Winter Twilight Moonrise, El Capitan and Half Dome, Yosemite
Sony a7RIV
Sony 24-105 G
1/25 second
F/8
ISO 100
Camera or not, two of my very favorite things in nature are a rising moon, and the rich pink and blue twilight sky opposite the sun after sunset*. Once a month, in the days around the full moon, these phenomena converge, and I get an opportunity to photograph the moon actually in the best part of the sky. I spend a lot of time trying to identify the scenes above which to photograph these celestial displays, and the best time to be there.
As a one-click photographer, for years the primary obstacle to photographing these scenes has been capturing (in a single frame) detail in the daylight-bright moon and a rapidly darkening landscape. In my early digital years, I found that the window of exposure opportunity—the time from sunset until the foreground became too dark to capture with one click—ended about 5-10 minutes after sunset (this can vary somewhat with several factors, such as longitude and terrain), just as the best color was ramping up. I could extend that window by 5 minutes or so by using a graduated neutral density filter to subdue the moon’s brightness by 2 or 3 stops, but GNDs come with their own set of problems—especially when the scene doesn’t have a homogenous, horizontal space near the horizon to disguise the GND boundary.
Technology to the rescue
One of the main reasons I switched to Sony in 2014 was the dynamic range of the Sony Alpha sensors, and few situations underscore that advantage better than these twilight moonrises. With my new cameras, suddenly my post-sunset threshold jumped by at least 50%—an advantage that continued progressing with each Sony sensor iteration.
Along with improved sensor technology, advances in processing software enabled me to get even more out of each image. Probably biggest processing improvement is in the noise reduction software that reduces blotchy, image softening, detail robbing noise that’s the prime limiting factor when you pull up the shadows of a twilight moonrise. Noise reduction software doesn’t restore lost image data, but it can bring out the best of what you did capture, allowing you to push back the twilight moonrise window just a little more. (I use and recommend Topaz DeNoise AI.)
Time for an Ansel Adams quote
Ansel Adams famously said, “The single most important component of a camera is the twelve inches behind it.” Put in today’s terms (and far more prosaically), all the technology in the world doesn’t do much good if you don’t know how to use it. For example, me: I know now that I probably packed up too early, mistakenly thinking the twilight moonrise photography window had closed—simply because I didn’t know how to get the most from my camera.
In fact, proper exposure is probably the single biggest struggle most photographers have when photographing a twilight moon. The most frequent mistake is trying to make the picture look good on their LCD, which invariably results in a preview image with gorgeous foreground beneath a brilliant white lunar disk—a disk that, on closer scrutiny, is hopelessly stripped of detail.
Photographing both a full moon and the landscape, with detail, starts by understanding that, in a high dynamic range scene, an ideal exposure rarely looks good on the LCD. I repeat: In a high dynamic range scene, an ideal exposure rarely looks good on the LCD. The key is making the image as bright as possible without blowing the highlights, providing the best opportunity to restore the highlights and shadows in post-processing.
While it’s usually best to trust the image’s histogram in extreme dynamic range situations, since the moon is such a small part of most images, it rarely registers on the histogram. This small but important detail makes it possible to capture a histogram that looks great, while ending up with a moon that’s hopelessly blown (detail-less white).
So if you can’t trust the image or the histogram, what can you trust? I thought you’d never ask. While the histogram is helpful for the landscape part of the scene, when I photograph a full moon, I monitor the moon’s exposure with my camera’s highlight alert feature—on my Sony Alpha mirrorless bodies that the “zebras” (pre-capture highlight warning stripes on all mirrorless and some DSLR cameras), but DSLR shooters can use the post-capture blinking highlights.
My twilight moonrise recipe
My process for a post-sunset moon starts with metering in manual mode (because I want complete control of my exposure). I set the ISO to 100 (my Sony a7RIV’s native/best ISO), and the f-stop to whatever I think will give me the sharpest image. The exposure is controlled with the shutter speed.
While the moon’s brightness doesn’t change, with a rising full moon, the landscape will continue to darken, making a foreground exposure that was perfect a minute or two ago not quite so perfect now. As the scene darkens, I add light by deliberately increasing my shutter speed in 1/3 stop increments (that is, one click at a time), with my eye on the moon.
When the zebras appear, I use my knowledge of my a7RIV to squeeze the most possible light from the scene. Raw shooters almost always have more detail than their histogram or highlight alerts indicate (different cameras’ highlight alerts engage at different points). This means you can add still light after the first alerts appear in the moon. When I first detect the zebras on my a7RIV, I know I can push my highlights 2/3 to 1 full stop brighter and still recover detail later.
If you’re shooting with a DSLR that doesn’t offer pre-capture zebras in your viewfinder, you may still be able to get them on the live-view LCD (some DSLRs offer them, some don’t). If not, you’ll need to check the post-capture blinking highlights after you click. Camera familiarity is no less essential when reading the blinking highlights of post-capture DSLR image preview highlight alerts than it is with the pre-capture zebras on a mirrorless camera.
Another thing I’ve started doing to get the most light out of the scene is pushing my highlights beyond the point where I’m certain I haven’t blown them out, then magnifying the moon in the preview image—if I see detail, I know not only am I still good to go, I may even be able to squeeze another 1/ or 2/3 of a stop more light out.
Still learning

Straight from the camera, the shadows in this image were nearly black. But I’m constantly amazed by the amount of usable data I can pull from the darkest shadows of my Sony a7RIV.

Winter Twilight Moonrise, El Capitan and Half Dome, Yosemite
What I’m starting to realize now is how much usable detail I have in the shadows of my a7RIV. This image was captured just Friday night, on the final night of my Yosemite Winter Moon workshop. It was more than 20 minutes after sunset and my foreground looked so black on the LCD that I figured it was unusable. But the scene was so beautiful, I just couldn’t make myself stop shooting. (A friend who happened to be standing next to me for most of the evening had left about 10 minutes earlier, despite my protests that he was leaving too soon.)
So imagine my surprise when I opened it in Lightroom, pulled up the Blacks (to about 30), Shadows (all the way), and Exposure (about two stops) sliders and saw plenty of detail and very fixable noise. A quick treatment from Topaz DeNoise AI confirmed what what I’d just seen—my twilight moon window is now open until at 20 minutes after sunset. Amazing.
(I’ll have more on this fantastic finale to a fantastic workshop in a future post. Spoiler alert: This isn’t the only image from this shoot.)
* When I say sunset, you can infer that I mean sunrise as well, with everything happening in reverse, on the other side of the sky.
Workshop Schedule || Purchase Prints || Instagram
Twilight Moon
Click an image for a closer look, and to view a slide show.


Shooting the Light Fantastic
Posted on December 5, 2021
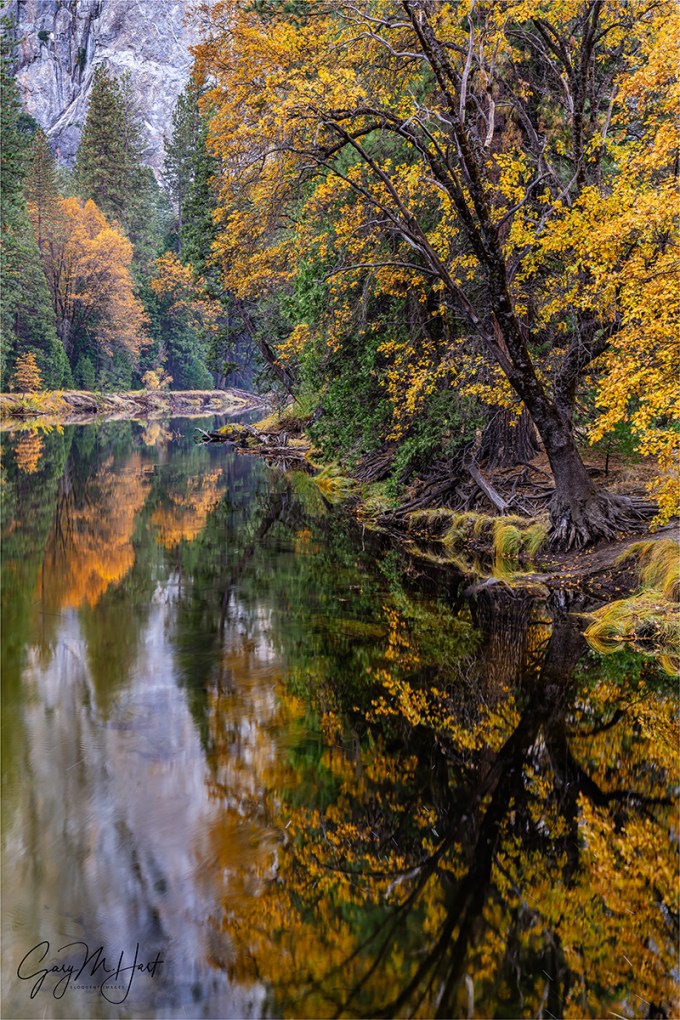
Autumn Reflection, Cathedral Rocks, Yosemite
Sony a7RIV
Sony 24-105 G
2 seconds
F/11
ISO 100
Blue sky may be great for picnics and outdoor weddings, but it makes for lousy photography. To avoid boring blue skies, flat midday light, and extreme highlight/shadow contrast, landscape photographers usually go for the color of sunrise and sunset, and low-angle sunlight of early morning and late afternoon.
Of course the great light equalizer is clouds, which can soften harsh light and add enough texture and character to the sky, making almost any subject photographable—any time of day. Sadly, clouds are never guaranteed, especially here in California. Fortunately, all is not lost when the great clouds and light we hope for don’t manifest.
Spending a large part of my photography time in Yosemite, over the years I’ve created a mental list for when to find the “best” cloudless-sky light on Yosemite’s icons: for Half Dome, Bridalveil Fall, and Cathedral Rocks it’s late afternoon through sunset; El Capitan is good early morning, while Yosemite Falls is best a little later in the morning. And then there are seasonal considerations: Half Dome at the end of the day is good year-round, but Bridalveil Fall and Cathedral Rocks are much better from April through September; while El Capitan gets nice morning light year-round, it also gets good late light from October through February; and while the best light on Yosemite Falls happens in winter, that doesn’t usually coincide with the best water, which comes in spring (unless you’re lucky enough to get a lot of early rain, like we got this autumn).
But even when the sun’s up and the sky is blank, all is not lost. In those situations I head to locations I can photograph in full shade. Yosemite Valley’s steep walls help a lot, especially from November through February, when much of the valley never gets direct sun.
Following our sunrise shoot on the first morning of last month’s Yosemite Fall Color photo workshop, I took my group to El Capitan Bridge to photograph the first light on El Capitan. But as nice as that El Capitan first light was, on this morning I couldn’t help notice the downstream view of Cathedral Rocks across the bridge. With everything on that side in full shade, this downstream scene wasn’t as dramatic as the sun-warmed El Capitan, but the soft, shadowless light was ideal for the colorful trees reflecting in the Merced River.
After encouraging everyone in the group not to check out this downstream view, I went to work on the scene. If the sky had been more interesting, I’d have opted for my Sony 16-35 GM lens to include all of Cathedral Rocks, more trees, lots of reflection, and an ample slice of sky. But the sky this morning was both bright and blue (yuck), so I chose the Sony 24-105G lens for my Sony a7RIV to tighten the composition.
Before shooting, I actually walked up and down at the railing quite a bit, framing up both horizontal and vertical sample compositions, until I found the right balance of granite, trees, and reflection. Because the air was perfectly still, I didn’t need to worry about movement in the leaves, which enabled me to add my Breakthrough 6-stop Dark Circular Polarizer for a shutter speed long enough the smooth some of the ripples in the water.
I guess the lesson here is the importance of understanding and leveraging light. And all this talk about light inspired me to dust off my Light Photo Tips article—I’ve added the updated and clarified version below (with a gallery of images beneath it).
Light

Three Strikes, Lightning and Rainbow from Bright Angel Point, Grand Canyon
Good light, bad light
Photograph: “Photo” comes from phos, the Greek word for light; “graph” is from graphos, the Greek word for write. And that’s pretty much what photographers do: Write with light.
Because we have no control over the sun, nature photographers spend a lot of time hoping for “good” light and cursing “bad” light—despite the fact that there is no universal definition of “good” and “bad” light. Before embracing someone else’s good/bad light labels, let me offer that I (and most other serious photographers) could probably show you images that defy any good/bad label you’ve heard. The best definition of good light is light that allows us to do what we want to do; bad light is light that prevents us from doing what we want to do.
Studio photographers’ complete control of the light that illuminates their subjects, a true art, allows them to define and create their own “good” light. On the other hand, nature photographers, rely on sunlight and don’t have that kind of control. But knowledge is power: The better we understand light—what it is, what it does, and why/how it does it—the better we can anticipate and be present for the light we seek, and deal with the light we encounter.
The qualities of light
Energy generated by the sun bathes Earth in continuous electromagnetic radiation, its wavelengths ranging from extremely short to extremely long (how’s that for specific?). Among the broad spectrum of electromagnetic solar wavelengths we receive are ultraviolet rays that burn our skin (10-400 nanometers), infrared waves that warm our atmosphere (700 nanometers to 1 millimeter), and the visible spectrum that we (and our cameras) use to view the world—a narrow range of wavelengths between ultraviolet and infrared with wavelengths that range between 400 and 700 nanometers.
When all visible wavelengths are present, we perceive the light as white (colorless). But when light interacts with an object, the object absorbs or scatters some of the light’s wavelengths. The amount of scattering and absorption is determined by the interfering object’s properties. For example, when light strikes a tree, characteristics of the tree determine which of its wavelengths are absorbed, and the wavelengths not absorbed are scattered. Our eyes capture these scattered wavelengths and send that information to our brains, which translates it into a color.
When light strikes a mountain lake, some is absorbed by the water, allowing us to see the water. Some light bounces back to the atmosphere to create a reflection. The light that isn’t absorbed or reflected by the water light passes through to the lakebed and we see whatever is on the lake’s bottom.
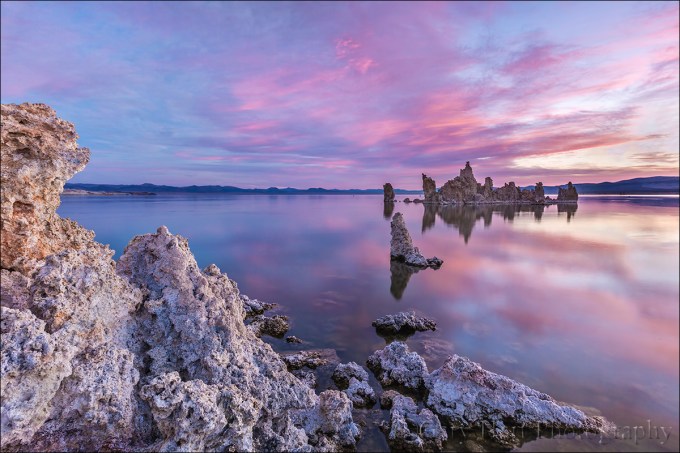
This vivid sunrise was reflected by the glassy surface of Mono Lake, but just enough light made it through to reveal the outline of submerged tufa fragments on the lake bed.
Let’s get specific
Rainbows
For evidence of light’s colors, look no farther than the rainbow. Because light slows when it passes through water, but shorter wavelengths slow more than longer wavelengths, water refracts (bends) light. A single beam of white light (light with an evenly distributed array of the entire visible spectrum) entering a raindrop separates and spreads into a full range of visible wavelengths that we perceive a range of colors. When this separated light strikes the back of the raindrop, some of it reflects: A rainbow!

Under the Rainbow, Colorado River, Grand Canyon
Blue sky
When sunlight reaches Earth, the relatively small nitrogen and oxygen molecules that are most prevalent in our atmosphere scatter its shorter wavelengths (violet and blue) first, turning the sky overhead (the most direct path to our eyes) blue. The longer wavelengths (orange and red) don’t scatter as easily continue traveling through more atmosphere—while our midday sky is blue, these long wavelengths are coloring the sunset sky of someone to the east.
In the mountains, sunlight has passed through even less atmosphere and the sky appears even more blue than it does at sea level. On the other hand, when relatively large pollution and dust molecules are present, all the wavelengths (colors) scatter, resulting in a murky, less colorful sky (picture what happens when your toddler mixes all the paints in her watercolor set).
Most photographers (myself included) don’t like blank blue sky. Clouds are interesting, and their absence is boring. Additionally, when the sun is overhead, bright highlights and deep shadows create contrast that cameras struggle to handle. That means even a sky completely obscured by a homogeneous gray stratus layer, while nearly as boring as blue sky, is generally preferred because it reduces contrast and softens the light (more below).
Sunrise, sunset
Remember the blue light that scattered to color our midday sky? The longer orange and red wavelengths that didn’t scatter overhead, continued on. As the Earth rotates, eventually our location reaches the point where the sun is low and the sunlight that reaches us has had to fight its way through so much atmosphere that it’s been stripped of all blueness, leaving only its longest wavelengths to paint our sunrise/sunset sky shades of orange and red.
When I evaluate a scene for vivid sunrise/sunset color potential, I look for an opening on the horizon for the sunlight to pass through, pristine air (such as the clean air immediately after a rain) that won’t muddy the color, and clouds overhead and opposite the sun, to catch the color.
Overcast and shade
Sunny days are generally no fun for nature photographers. In full sunlight, direct light mixed with dark shadows often forces nature photographers to choose between exposing for the highlights or the shadows (or to resort to multi-image blending). So when the sun is high, I generally hope for clouds or look for shade.
Clouds diffuse the omni-directional sunlight—instead of originating from a single point, overcast light is spread evenly across the sky, filling shadows and painting the entire landscape in diffuse light. Similarly, whether caused by a single tree or a towering mountain, all shadow light is indirect. While the entire scene may be darker, the range of tones in shade very easily handled by a camera.
Flat gray sky or deep shade may appear dull and boring, but it’s usually the best light for midday photography. When skies are overcast, I can photograph all day—rather than seeking sweeping landscapes, in this light I tend to look for more intimate scenes that minimize or completely exclude the sky. And when the midday sun shines bright, I look for subjects in full shade. Overcast and shade is also the best light for blurring water because it requires longer shutter speeds.
Another option for midday light is high-key photography that uses the overexposed sky as a brilliant background. Putting a backlit subject against the bright sky, I simply meter on my subject and blow out the sky.
Leveraging light
Whether I’m traveling to a photo shoot, or looking for something near home, my decisions are always based on getting myself to my locations when the conditions are best. For example, in Yosemite I generally prefer sunset because that’s when Yosemite Valley’s most photogenic features get late, warm light. Mt. Whitney, on the other side of the Sierra, gets its best light at sunrise, and I prefer photographing the lush redwood forests along the California coast in rain or fog. Though I plan obsessively to get myself in the right place, in the best light, sometimes Nature throws a curve, just to remind me (it seems) not to get so locked in on my subject and the general tendencies of its light that I fail to recognize the best light at that moment.
The Light Fantastic
Click an image for a closer look, and a slide show.


Stop the Car!
Posted on November 21, 2021
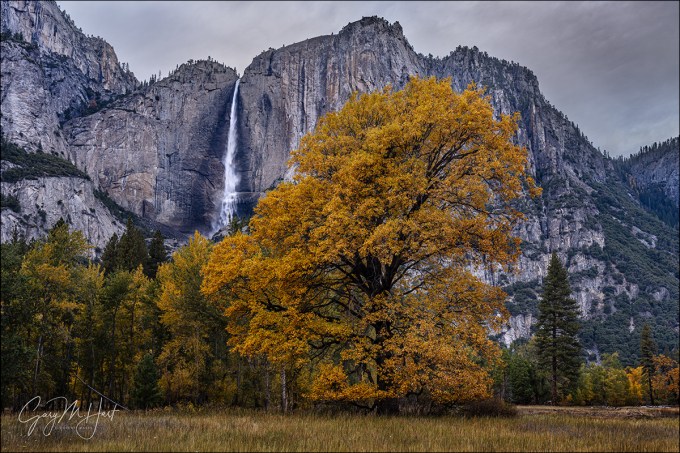
Autumn Surprise, Upper Yosemite Fall, Yosemite
Sony a7RIV
Sony 24-105 G
1/5 second
F/11
ISO 100
Nature photography is all about identifying and creating relationships—between subjects, or between subjects and their environment. The relationships in some of my images require meticulous planning to align a predetermined foreground subject with a celestial feature like the Milky Way or a rising/setting moon. Other relationships happen when I travel to combine a beloved location like Yosemite with natural phenomena like fresh snow or fall color. And then there are those fortuitous “stop the car!” moments, convergences of time and place that are the product of alert scrutiny and quick reaction.
This image falls into the third, “stop the car!”, category, with maybe a little of the second, location/natural-phenomena thing—because I did definitely schedule my Yosemite Fall Color and Reflections photo workshop to coincide with the moving target of Yosemite’s fall color peak, and this year it worked out perfectly. But what I couldn’t have anticipated was a historic storm dowsing Yosemite with over six inches of rain one week before the workshop, creating spring flow in the falls that just begged to be photographed with the ubiquitous autumn foliage.
My group found this scene on the workshop’s first evening. Driving toward our sunset destination, we popped out of the forest and were treated with our first views of Yosemite Falls. I’d timed our departure from our prior shoot at Tunnel View to allow sufficient time at our sunset destination, but when I saw this towering oak covered crown-to-base with golden leaves, I slowed instantly, driving slowly with one eye on the tree until it aligned with Upper Yosemite Fall. I told everyone this was a bonus stop, and every minute we spent here would be a minute we couldn’t spend at the sunset spot, but got no complaints. And a quick look at the thick clouds told me sunset color was unlikely this evening anyway.
There was also a stand of yellow cottonwoods just left of this tree, providing even more compositional possibilities. Feeling a little less rushed, I encouraged everyone to move around, reminding them that they had complete control of the trees relationship with the fall. A couple of people wandered up the boardwalk over the meadow to the river, but most of the group stayed right on the sidewalk and worked on some version of what you see here.
I grabbed my tripod and Sony a7RIV with the Sony 24-105 (I have two a7RIVs and keep each loaded with one of my two most frequently used lenses, the aforementioned 24-105 and the Sony 16-35 GM) and started with a wider composition that framed Upper Yosemite Fall with the colorful cottonwoods and oak. But going that wide meant more sky and meadow than I wanted, so I soon whittled my composition down to just the oak and waterfall. My first frames had the fall to the left of the tree, but later I moved a little bit up the road for some frames with their positions reversed. This is one of the earlier ones.
For this shot I was careful to position myself so the fall dropped into a notch in the tree’s crown, moving back enough to ensure separation between the two. I also made sure the tree didn’t jut into the sky—I find it jarring when a foreground subject is cut by the horizon and try to avoid it when possible. Other compositional considerations were how much sky and meadow to include. While I liked the brooding clouds, I decided that they didn’t offer enough character to merit a lot of frame real estate. Similarly, I thought the texture in the meadow was fine (it wasn’t a negative), but didn’t think it deserved any more of my frame than the sky. So I composed to minimize the sky and meadow, using them as more of a frame for the top and bottom of the scene. And finally, I took care to keep the brilliant yellow tree on the distant right away from the edge of my frame. With low contrast and an entire scene at infinity for my focal length and f-stop, exposure and focus were easy.
Relationships
Click an image for a closer look, and to view a slide show.


Every Picture Tells a Story
Posted on November 14, 2021

Autumn Evening, El Capitan, Yosemite
Sony a7RIV
Sony 24-105 G
1/15 seconds
F/10
ISO 100
Let’s have a show of hands: How many of you have been advised at some point in the course of your photographic journey to “tell a story with your images”? Okay, now how many of you actually know what that means? That’s what I thought. As good as the “tell a story” advice is (it is indeed), many photographers, with the best of intentions, parrot the advice simply because it sounded good when they heard it. But when pressed for details, are unable to elaborate.
Telling a story with a photo is probably easier when photographers can physically stage subjects and light to suit their objective (an art in itself), or in journalistic photography intended to distill the the essence of an instant by connecting it to an easily inferred chronology: a homeless man feeding his dog, dead fish floating in the shadow of belching smokestacks, or a wide-receiver spiking a football in the end zone.
This isn’t to say that we landscape photographers can’t tell stories with our images, or that we shouldn’t try. Nor does it mean that any one photographic form is inherently more or less creative than another. It just means that the rules, objectives, advantages, and limitations differ from form to form. Nevertheless, simply advising a landscape photographer to tell a story with her images is kind of like a baseball coach telling a pitcher to throw strikes, or a teacher instructing a student to spell better. Okay, fine—now what?
Finding the narrative
First, let’s agree on a definition of “story.” A quick dictionary check reveals that a story is “a narrative, either true or fictitious … designed to interest, amuse, or instruct….” Okay, that works.
The narrative part is motion. Your pictures need it. Narrative motion starts with a connection that grabs a viewers, pulling them into the frame, then compelling them to stay with visual motion that moves their eyes through the frame, providing a path to follow and/or a place to land. Put simply, the viewer needs to know what they’re supposed to do in the image.
While narrative motion happens organically in media consumed over time, such as a novel (in the mind’s eye), movie, or video, it can only be implied in a still photograph. And unlike the staged or journalistic photography mentioned above, landscape photographers are tasked with reproducing the world as we find it, in a static medium—another straitjacket on our narrative options. But without some form of narrative motion, we’re at a dead end story-wise. What’s a photographer to do?
Photography as art
Every art form succeeds more for what happens in its consumer’s mind than for what it delivers to the consumer’s senses. Again: Every art form succeeds more for what happens in its consumer’s mind than for what it delivers to the consumer’s senses. A song that doesn’t evoke emotion, or a novel that doesn’t paint mental pictures, may entertain but is soon forgotten.
Just as readers of fiction unconsciously fill-in the visual blanks with a mental visualization of a scene on the page, viewers of a landscape image will fill-in the narrative blanks with the personal stories the image inspires. In other words, an image should offer a place for the viewer’s own story to unfold.
Of course the story we’re creating isn’t a literal, “Once upon a time” or (with all due respect to Snoopy) “It was a dark and stormy night” story. Instead, the image we make must connect with our viewers’ stories to touch an aspect of their world: revive a fond memory, provide fresh insight into a familiar subject, inspire vicarious travel, to name just a few possible connections. If we offer images that tap these connections, we’ve given our image’s viewers a reason to enter, a reason to stay, and a reason to return. And most important, we’ve given them a catalyst for their internal narrative. Bingo.
Shoot what you love (not what you think your audience will love)
Think about your favorite novels. While they might be quite different, I suspect one common denominator is a protagonist with whom you relate. I’m not suggesting that immediately upon finishing that book you hopped on a raft down the Mississippi River, or ran downtown to have a dragon tattooed on your back, but in some way you likely found some personal connection to Huck Finn or Lisbeth Salander that kept you engaged. And the better that connection, the faster the pages turned.
And so it is with photography: Our viewers are looking for a connection, a sense that there’s a piece of the photographer in the frame. Because we can’t possibly know what personal strings our images might tug in others, and because those strings will vary from viewer to viewer, our best opportunity for igniting their story comes when we share our own relationship with a scene and let viewers find their own connection.
What? Didn’t I just say that it’s the viewer’s story we’re after? Well, yes—but really what needs to happen is the viewers’ sense of connection between our story and theirs. If you focus on photographing the scenes that most move you, those scenes (large or small) that might prompt you to nudge a loved-one and say, “Oooh, look at that!,” the more you’ll see and the greater your chance of establishing each viewer’s feeling of connection. Whether you’re moved by towering mountains, crashing surf, delicate wildflowers, or prickly cactus, that’s where you’ll find your best images.
Where did you get those shoes?
The cool thing is that your viewer doesn’t need to understand your story; she just needs to be confident that there is indeed a story. That’s usually accomplished by avoiding cliché and offering something fresh (I know, easier said than done).
For some reason this makes me think of Steely Dan lyrics, which rarely make sense to me, but were always fresh and I never for a second doubted that they did indeed (somehow) make sense to Donald Fagen. In other words, rather than becoming a distraction, Steely Dan’s lyrics were a source of intrigue that pulled me in and held me. So when I hear:
I stepped up on the platform
The man gave me the news
He said, You must be joking son
Where did you get those shoes?
I’m not bewildered, I’m intrigued.
These lyrics aren’t trying to tap my truth, they simply reflect Donald Fagen’s and Walter Becker’s truth (whatever that might be).
Even though I usually have no idea what Steely Dan is talking about, the vivid mental picture their lyrics conjure (which may be entirely different, though no more or less valid, than your or their mental picture) allows me to feel a connection. You, on the other hand, may feel absolutely nothing listening to “Pretzel Logic,” while “I Want To Put On My My My My My Boogie Shoes” gives you goosebumps for KC and the Sunshine Band. Different strokes….
Returning from the abstract to put all this into photographic terms, the more your images are true to the world as it resonates with you, and the less you pander to what you think others want to see, the greater the chance your viewer’s story will connect with yours.
About this image

Autumn Evening, El Capitan, Yosemite
One of the things I’ve tried to do during the pandemic is make my workshop groups a little smaller, dropping down from 12 participants plus me and the photographer assisting me, to more like 8-10 participants plus me and my second photographer. Not great for my bottom line, but safer and easier to manage in this time of social distancing.
In my Yosemite Fall Color and Reflections photo workshop that wrapped up a little more than a week ago, not only did I enroll fewer students, I also had a couple of last minute cancellations that I chose not to fill after my assistant photographer had to bail too. The result was a group of 6 photographers plus me, exactly half my normal group size.
One big advantage of this downsized group was that I was able to take them to some views that I think are too small for a normal-size group—I show them where these spots are so they can go on their own, but that means I don’t get to visit.
One of these locations is the view of El Capitan in today’s image. I’ve always liked this spot for the way the Merced River guides the eye right to El Capitan, and for the trees that frame the scene. The result is a clear path for the viewer’s eye to follow, and an obvious destination for they eye to land.
This scene is nice in any season, but I find it especially nice in autumn, when the nearby dogwood flashes its extreme red, and splashes of yellow accent the towering evergreens upstream. We hit the jackpot on this visit, with the dogwood at its crimson best, and the late afternoon light warming the granite and reflecting gold in the river.
The view here is elevated about 15 (very) vertical feet above the river. Armed with my Sony a7RIV and 24-105 G lens, I planted my tripod right on the edge to eliminate a few foreground distractions, and used the dogwood to frame the right side of my scene, moving as far to the right as I could with merging the red leaves with El Capitan. Though the rich blue sky nicely complemented the sunlit granite, and I was grateful for a few wisps of clouds, I wasn’t particularly excited about the sky and decided to put the top of my frame just a little above El Capitan.
With my composition set up, I shot several frames, some with my polarizer oriented for maximum reflection, some for minimum reflections. When it was time to review and process my images from this shoot, I chose this one with the reflection dialed down because the fall color is more vivid (less affected by glare), and the subdued El Capitan reflection was bright enough, and stood out better against the polarizer-blackened water.
Workshop Schedule || Purchase Prints || Instagram
Every Picture Tells a Story
Click an image for a closer look, and to view a slide show.


")


")


Motion in Nature
Posted on November 7, 2021

Autumn Swirl, Half Dome, Yosemite
Sony a7RIV
Sony 24-105 G
20 seconds
F/16
ISO 50
As a landscape photographer, I often joke that I don’t photograph anything that moves—no wildlife, no pets, no portraits, no sports. And don’t even think about asking me to do your wedding. I’ve always been a deliberate shooter who likes to anticipate and prepare my frame with the confidence my shot will still be there when I’m ready—landscape photography suits me just fine (thankyouverymuch).
But as much as I appreciate the comfortable pace of a static landscape, the reality is that nature is in constant motion. Earth’s rotation spins the moon and stars across our night sky, and continuously changes the direction, intensity, and color of the sunlight that rules our day. Rivers cascade toward sea level, clouds scoot and transform overhead, ocean waves curl and explode against sand and rock, then vanish and repeat. And even a moderate breeze can send the most firmly rooted plants into a dancing frenzy.
Photographing motion is frustrating because a still image can’t duplicate the human experience (not to mention the technical skill required to subdue it without compromising exposure and depth). But motion also presents a creative opportunity for the photographer who knows how to create a motion-implying illusion that conveys power, flow, pattern, and direction.
While a camera can’t do what the human eye/brain do, it can accumulate seconds, minutes, or hours of light, recording a scene’s complete history in a single image. Or, a camera can freeze an instant, an ephemeral splash of water or bolt of lightning that’s gone so fast it’s merely a memory by the time a viewer’s conscious mind processes it. This is powerful stuff—accumulating motion in a long frame reveals hidden patterns; freezing motion saves an instant for eternal scrutiny.
For example
-

- Starry Night, Lake Wanaka, New Zealand
-

- Bristlecone Star Trails, Schulman Grove, White Mountains, California
When I photograph the night sky, I have to decide how to handle the motion of the stars (yes, I know it’s not really the stars that are moving). Freezing celestial motion is a balancing act that combines a high ISO and large aperture with a shutter speed long enough to squeeze every possible photon from a dark sky, but that stops before discernible streaks form. Or, I can emphasize celestial motion by holding my shutter open for many minutes, stretching the stars into parallel arcs.
-

- Electric Night, Grand Canyon Lodge, North Rim, Grand Canyon
-

- Lightning Explosion, Oza Butte, Grand Canyon North Rim
Lightning comes and goes faster than human reflexes can respond. At night, a long exposure can be initiated when and where lighting might strike, recording any bolt that occurs during the exposure. But in daylight I need a lightning sensing device like a Lightning Trigger, that detects the lightning and fires the shutter faster than I can. If I succeed, I can reveal intricate filaments of electricity my eyes missed.
Moving water is probably the most frequently photographed example of motion in nature, with options that range from suspended water droplets to an ethereal gauze. I’m always amused when I hear someone say they don’t like blurred water images because they’re not “natural.”
Ignoring the fact that it’s usually impossible to achieve a shutter speed fast enough to freeze airborne water in the best light for photographing it (shade or overcast), I don’t find blurred water any less natural than a water drop suspended in midair (when was the last time you saw that in the real world). Blurred water isn’t unnatural, it’s different.
Sometimes a long exposure can smooth distracting ripples to enhance a reflection. I often add a neutral density filter and employ this technique when I arrived at a lake or river hoping for a reflection, only to find my plan thwarted by a waves or a wind-whipped surface.

Autumn Swirl, Half Dome, Yosemite
A long exposure can also reveal patterns of motion that are too slow to discern. Which brings me to today’s image from the penultimate night of last week’s Yosemite Fall Color photo workshop
I’d guided my group through the woods to bend in the Merced River that’s usually a glassy reflection in the still autumn flow. But just a week before the workshop, a 6-inch rainfall filled the waterfalls and accelerated the normally languid Merced into a more spring-like flow. Great conditions for most of our photography, but not so much for reflections.
This Half Dome view, known to photographers but just far enough off the beaten path to discourage most tourists, is always a highlight of my Yosemite workshops. I especially like it autumn, for the colorful cottonwood just upstream, and the (usually reliable) glassy surface. This year the cottonwood delivered, but the rapid flow disturbed the mirror reflection I’m accustomed to.
No problem. I suggested to my group that an ND filter would enable an exposure long enough to flatten the water—the result wouldn’t be a mirror reflection, but the gauzy effect would create an ethereal reflection that would be both striking and distinctive.
Working individually with photographers in my group, I soon noticed small patches of foam drifting by in the flow—not just occasionally, but pretty much continuously. I knew from experience that a long exposure would blur them into parallel streaks (like star trails), especially in the darker water, and got a few people started adding this effect to their images.
Then I noticed a collection of foam patches trapped in a small zone of sheltered, (apparently) static water just a few feet upstream. While helping one of the members of the group find a composition here, it soon became obvious that this water was in fact moving, albeit too slow to see.
Once I was confident that everyone was successfully engaged with the scene, I went upstream about 20 feet and looked downstream, searching for something different than the standard view here. I ended up having a blast photographing the slow motion swirl patterns in the foam (and occasional leaf) that clearly wasn’t static, using a few trees and their reflections downstream as my background.
Finally, after shooting that scene to within an inch of its life (each frame was completely different from the previous), I returned to the more conventional upstream composition to see if I could use these swirls to create something a little different.
This was probably 10 minutes after sunset, just possibly my favorite light for photography, and now dark enough to forego the ND filter. The biggest trick here was finding a position with a view of Half Dome, the fall color, the reflection, and with enough swirls to occupy a significant part of the frame.
First, I moved upstream as far as I could move without losing Half Dome and the golden cottonwood behind the nearby trees. Next, to maximize the foreground swirls, I dropped my tripod as near to the ground as I could.
But, from this new perspective, dialing my polarizer to maximize the reflection also enhanced the sky reflection enough to nearly obliterate the foam swirls. So, with my eye on the Half Dome reflection in my viewfinder, I dialed my polarizer just far enough for Half Dome to stand out, but not so much that the water with the swirling foam and leaves lost its blackness.
Setting my Sony a7RIV to ISO 50, and dialing my Sony 24-105 G lens to f/16, enable me to keep my shutter open for 20 seconds—plenty of time to reveal the patterns of motion. A bonus was the leaves and foam flowing much faster in the main river channel, creating linear streaks that I didn’t notice until I processed the image.
Read more about photographing motion
Workshop Schedule || Purchase Prints || Instagram
Motion in Nature
Click an image for a closer look, and to view a slide show.


I Love Trees
Posted on October 31, 2021

Redwood in Autumn, Tuolumne Grove, Yosemite
Sony a7RIV
Sony 24-105 G
1/5 second
F/16
ISO 400
I love trees, and try to feature them in my images as much as possible. When I say “feature,” I don’t mean simply including trees in an image (pretty hard to avoid as a landscape photographer with an affinity for California’s foothills and mountains), I mean actually using a tree or trees as the basis for my composition.
Given my love for trees, I’m blessed to live in California, where we have many beautiful arboreal specimens, in all shapes and sizes. Sadly, when most people think about California trees, their mind usually jumps to palm trees (one of my least favorite trees and not nearly as ubiquitous in most of the state as most people believe). But when I think about California trees, I go to our foothill oaks, gnarled bristlecones, and regal redwoods.
In fact, in a state with more than its share of unique natural features, California’s giant sequoia trees stand out—both figuratively and literally. It’s no exaggeration to say that the first sight of these massive giants will drop even the most immutable jaw.
Many outside the state don’t that we have two very distinct versions of redwood in California: there’s the coastal redwood, which is also quite massive and sometimes even slightly taller than its Sierra cousin. A coastal redwood can grow up 370 feet, while the giant redwoods top out at around 300 feet. And though a mature coastal redwood’s trunk might grow to more than 20 feet wide, that’s dwarfed by the 36-foot diameter of the General Sherman giant sequoia tree in Sequoia National Park. The giant redwoods also win the longevity battle, with some living more than 3000 years, while the coastal redwoods top out at around 2500 years.
Unfortunately, many people visit California with redwoods on their must-see check list, drive up or down the coast to the nearest redwood grove, check the been-there box, and return home without even realizing they missed the even larger trees farther east. (I won’t get into the debate of which redwood experience is “better,” except to say that in my mind, the coast redwood experience is more about the mystical stillness of the grove, while the giant redwood experience is more about the mind boggling mass of individual trees.)
In my previous blog post, I wrote about my recent visit to Tuolumne Grove in Yosemite. With clouds and occasional sprinkles, conditions for photography were ideal. But on my hike down, I was so struck by the electric fall color of the dogwood (also on my list of favorite trees) and other deciduous trees, I almost didn’t make it down to the redwoods.
Thankfully, I did make it. But getting there was only half the battle because redwoods’ size makes them really hard to photograph—capturing a redwood from top to bottom requires a combination of distance and wide angle that diminishes its unprecedented mass in a photo. And to me the most impressive part of a giant redwood is that massive girth.
On this visit I concentrated on finding large trees surrounded by fall color, meandering along the half-mile loop through the grove, enjoying the peaceful ambiance while keeping my eyes peeled for a suitable composition. Every once in a while I’d set up my tripod and click a frame, but whether it was a distracting trail or fence (nothing manmade in my images), or just a less than ideal vantage point (you can’t just wander haphazardly among these shallow-rooted giants), I started heading out of the grove without feeling like I had any real keepers.
Trudging back up the hill and about to exit the grove, I came across a striking redwood, one of the largest I’d seen that day. I realized that by standing in just the right spot and pressing tightly against the low wood fence, I could frame the broad trunk with an assortment of red and yellow dogwood, ferns, and other fall foliage. I stayed here for at least 20 minutes, trying a variety of perspectives and focal lengths before finally landing on this one. (This is also about the time I discovered an especially stupid and embarrassing mistake that I promise to share in a future “Photographers are Stupid” post.)
This shoot was gratifying for many reasons, but especially because, despite my love for trees and the relatively close proximity of the giant sequoias, I have none in my portfolio. Now I do.
Bonus tip
If you love trees (especially redwoods), or just think your world might be made a little better by improving your relationship with trees (spoiler alert: it will be), drop everything you’re reading and pick up The Overstory, by Richard Powers. You’re welcome.
Workshop Schedule || Purchase Prints || Instagram
Trees (including a palm tree!)


Yosemite’s Intimate (and Underrated) Beauty
Posted on October 24, 2021

Dogwood in Autumn, Tuolumne Grove, Yosemite
Sony a7RIV
Sony 24-105 G
1/6 second
F/16
ISO 400
Yesterday I got to spend a day in Yosemite. On my drive to Yosemite, In the back of my mind I was thinking that the day’s forecast of clouds with a chance of rain would be perfect for the intimate scenes I love so much. One of my go-to spots for this kind of photography is Bridalveil Creek, but it’s closed while NPS overhauls parking and access (how much longer will this take?!). As I started considering other options, it occurred to me that a long overdue visit to Tuolumne Grove might be in order.
In Yosemite, Mariposa Grove gets most of the attention from those who want to marvel at massive redwood, and with good reason—it’s by far the largest of Yosemite’s three sequoia groves, and has the largest trees. Mariposa Grove also has the most tourist-friendly infrastructure (a “feature” partially mitigated by a recent NPS overhaul designed to reduce human impact on the sequoias and their surroundings).
Of Yosemite’s two smaller sequoia groves, Merced and Tuolumne, I’ve always been partial to Tuolumne Grove—partly because of familiarity (it’s the grove I grew up visiting because it was closer to home), but also for its intimacy, and the abundance of photogenic dogwood lining the trail to-and-from and mingling among the big trees. In fact, I’ve had better luck photographing the grove’s dogwoods than its redwoods because, well, redwoods are hard (a topic for another day).
One “problem” with photographing Tuolumne Grove (and any other redwood grove) is that it requires clouds to prevent a distracting hodgepodge of highlights and shadows that test any camera’s comfort zone, and clouds in California are relatively rare. And the difficulty of doing justice to the size of a redwood tree in a still photo probably makes me guilty of not prioritizing Tuolumne Grove. With limited time and a surplus of more heralded subjects, most of my time in Yosemite is spent elsewhere.
With the clouds really starting to settle in, after lunch I decided to make the drive up to Tuolumne Grove. While I had no illusions of great success with the redwoods themselves (but who knows?), I looked forward to exploring the forest lit by nature’s softbox and dressed in fall color.
I knew the dogwood in Tuolumne Grove would be turning its autumn red, but I had no idea that I’d find entire hillsides saturated with a kaleidoscope of peak reds, oranges, and yellows, mixed with a few shades leftover green. In fact, the trail to the grove was so beautiful, it took me more than an hour to make the one mile hike down to the redwoods.
As much I love the grand views and dramatic skies that seem to attract a lot of attention, photographing intimate views of nature is probably my favorite kind of photography. Even in Yosemite, with its collection of iconic waterfalls and granite monoliths, I’m never happier than when I’m photographing the smaller scenes that aren’t recognizable as Yosemite.
But as beautiful as the surroundings on the were trail this afternoon, I really struggled to find a composition that did it justice. Instead of insisting on a composition with the elements I consider essential to a good image (a path for the eye to follow, strong visual anchor, no distracting elements), I just pointed in the direction of anything pretty (pretty much everywhere I looked) and started clicking.
Eventually this approach led me to a large dead tree in an area scarred by a recent fire. Scrutinizing my frame, I instantly realized I’d found my visual anchor. After that, my task became mostly a matter of moving around to eliminate all signs of the nearby trail, maximize the color behind the tree, juxtapose the foreground logs into something that wasn’t a disorganized (distracting) jumble, and eliminate the bright sky visible through the trees up the hill. (Even though it was cloudy, including sky that was much brighter than the forest would have pulled my viewers’ eye away from the colorful scene that was the whole point of the image, and reminded them of the world outside my frame.)
One more thing
In my previous post I sung praises of my (Breakthrough) polarizer, but I can’t emphasize too much what a difference removing the wet sheen from the leaves in this scene did for the color. If you think a polarizer is just to darken blue sky, please do yourself a favor and try it for your next fall color shoot.
Intimate Yosemite
Click an image for a closer look, and to view a slide show.


Ion the Prize
Posted on July 18, 2021
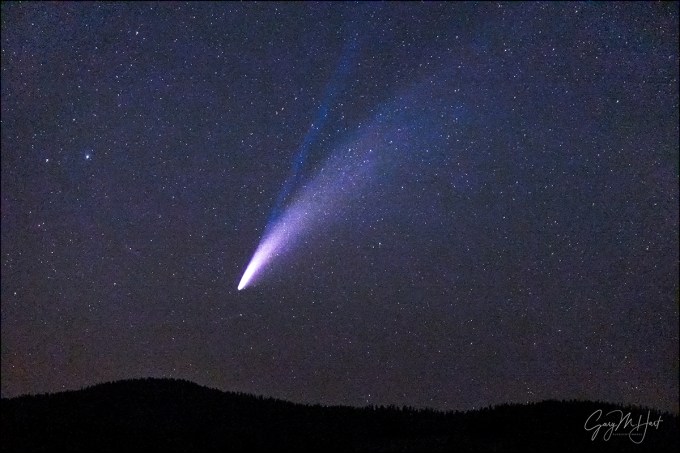
Comet NEOWISE With Ion Tail, Taft Point, Yosemite
Sony a7RIV
Sony 100-400 GM
6 seconds
F/5
ISO 12800
Comets were once harbingers of doom, so it’s likely that in times past the appearance of a bright comet coincident with a worldwide pandemic would have stoked great fear. Instead, (thanks to knowledge gained through centuries of scientific discovery) Comet NEOWISE infused a kernel of joy into an otherwise bleak year.
Spurred by the first NEOWISE anniversary earlier this month, over the previous week or two I revisited the images from last July’s four NEOWISE shoots (two in Yosemite, two at Grand Canyon) to see if I’d overlooked anything. It was great to mentally revisit those nights, which were each in their own way among the most memorable night sky experiences of my life:
- July 10, 2020: “I never dreamed it would be this bright”
- July 16, 2020: That ion tail!
- July 23, 2020: Hello Grand Canyon
- July 24, 2020: Farewell NEOWISE
On my search I found many process-worthy images, but most were fairly similar to what I already had. One exception is the image I share here. Rather than casting the magnificent comet in a costarring role with landscape and/or celestial icons (Half Dome, El Capitan, Grand Canyon, Big Dipper, Venus), NEOWISE is the one and only star of this image. And more than my other NEOWISE images, what sets this one apart is the spectacular ion tail.
Of my four NEOWISE shoots, the comet was probably at its most striking for my two in Yosemite—each for a different reason. My first NEOWISE experience came during a pre-sunrise visit to Glacier Point that coincided with the comet’s peak visibility.
While it had brightened to somewhere between magnitude 0 and 1 (the lower the magnitude, the brighter) shortly after its July 3 perihelion (closest approach to the sun), NEOWISE was too close to the sun to stand out in the against the brightening sky. But by the time of my Yosemite trip on July 10, NEOWISE had climbed out of the sun’s glow, while still shining in the magnitude 1 to 2 range—somewhere between the brightness of Spica and Polaris—making it easily the most prominent object in that part of the sky.
Six days later I returned to Yosemite, this time taking the one mile hike out to Taft Point to photograph NEOWISE above El Capitan after sunset. When the sky darkened, NEOWISE was clearly visible to the naked eye, but noticeably dimmer. But what made this night’s show special was the development of a spectacular ion tail. Faintly visible to the unaided eye, this new addition was a thing of beauty in my viewfinder and images.
I digress
I’m going to digress briefly to mention an important aspect of my photography that I’m not sure everyone shares. In the simplest possible terms, I can’t imagine photographing subjects—celestial, terrestrial, atmospheric—that I don’t understand. Rather than a personal “rule,” this need to understand my subjects is so ingrained in my personality that I didn’t fully appreciate its significance until recently.
My proclivity manifests in many ways, from obsessively buying geology books on every new location, to pouring over scientific articles explaining an obscure cloud formation, to mentally running orbital geometry in my head as I go to sleep (really). And sometimes understanding is the catalyst, inspiring me to pursue with my camera subjects that have fascinated me for years: lightning, solar eclipse, the aurora. (Still dreaming about that first tornado.)
My own internal connection between visual beauty and the natural phenomena that beauty represents probably explains why my blog is such an integral part of my photography. While I can capture nature’s visual gifts with my camera, I need my blog to connect it to the underlying processes. Another, no less important, component of blogging about my subjects is that researching and writing it often becomes as much of a learning experience for me as it is for my readers. (So thank you.)
But anyway…
If you follow me at all, you know my love of astronomy in general, and of comets in particular. So when I saw NEOWISE’s ion tail, I knew what it was, but wanted to more completely understand things like why a comet’s ion tail is always separated from its brighter dust tail, and why the ion tail appears blue in my images (is this real, a color temperature thing, or maybe some color artifact introduced in-camera?).
At risk of repeating myself, a comet is a lump of dust and ice in an extreme elliptical (it’ll be back) or parabolic (one-and-done) orbit of the sun. Most of the comet’s journey is pretty ordinary, but as it approaches the sun, things start to happen—its speed increases, and the sun’s heat starts melting the ice, freeing gas and dust molecules to form a fuzzy coma surrounding the frozen nucleus.
As the comet accelerates toward the sun, the temperature continues rising and the rate of liberated molecules increases. The mass and momentum of the comet’s nucleus allows it to continue on its orbital path, but the freed dust molecules, now under the influence of the solar wind, are nudged back, away from the sun: a tail is born.
Over time this dust tail grows and spreads, becoming the signature feature of most comets. Like most of the comet, the dust tail doesn’t create its own light, but rather is illuminated solely reflected sunlight. Varying somewhat with the composition of its molecules, the dust tail will appear yellow-white to our eyes.
But I’ve saved the best for last. Gas molecules shed by the comet’s nucleus, being lighter than dust molecules, are whisked straight back by the solar wind. Instead of fanning out like the dust tail, these gas molecules form a narrow ion tail that points directly away from the sun. Some of these gas molecules are ionized (stripped of an electron). Unlike the dust tail that shines by reflected light, the ion tail shines by fluorescence, taking on a blue color courtesy of the predominant CO (carbon monoxide) ion.
Of course there’s a time for pondering the marvels of nature, and a time for simply basking in its beauty. So as I was photographing this scene, I wasn’t thinking about all the physics and chemistry unfolding before me, I was focused on capturing the product of the underlying processes (the comet) and its relationship with the surrounding landscape. On this night most of my images were variations of NEOWISE with El Capitan and/or the nearby Big Dipper. But I’m glad I took the time to include a few frames that put this magnificent comet itself front-and-center.
Sign-up to receive my Image of the Month e-mail
Workshop Schedule || Purchase Prints || Instagram
A Comet NEOWISE Retrospective


Expect the Unexpected
Posted on June 20, 2021

High Sierra Nightfall, Crescent Moon and Venus, Yosemite
Sony a7RIV
Sony 100-400 GM
1/2 second
F/16
ISO 400
With so many natural variables beyond our control, and no matter how creatively we visualize, thoroughly we plan, and precisely we execute, landscape photographers go into every shoot uncertain of success. But making consistently successful images depends not only on our ability to visualize, plan, and execute, but also on our ability to recognize and respond to unexpected opportunities.
The truth is, your creativity’s greatest limitation is probably your own biases. Put in more practical terms, don’t allow yourself to be swayed by preconceived notions of what “the shot” is, what equipment you’ll need, and whether the opportunities are exhausted.
We cover this kind of stuff in my workshops, where one of my most frequently asked questions is, what lens should I bring? I’ve been doing this long enough to know that the underlying essence of this question is, what lens can I leave behind? And since it’s a photography truism that the lens you need is the one you left at home, I’m usually reluctant to give an absolute answer. In fact, I usually encourage people to bring all they can carry.
A couple of weeks ago my brother Jay and I made a quick trip to Olmsted Point in Yosemite to photograph the Milky Way. I’d chosen Olmsted because I think it’s the best easily accessible (with a car) place to photograph Half Dome with the Milky Way; I chose this night because clear skies were forecast, and a brand new moon meant the darkest possible sky. Though I knew a small sliver of one-percent moon would be visible for an hour or so after sunset, as soon as I realized the moon would be nowhere near Half Dome, I didn’t give it another thought—this trip was all about the Milky Way and Half Dome. Period. Nevertheless, I packed all my gear because…. Well, why not?
I’m afraid that for me, “all I can carry” requires at least two camera bags, which of course isn’t usually practical when flying, given the space and weight constraints. But when I drive to a location from home, I forgo the Sophie’s Choice equipment decisions and just pack everything. Everything. Which is why, for a trip on which I’d only planned to use my Sony a7SIII and (brand new!) Sony 14mm f/1.8 GM lens, the back of my Outback contained (among many other things) my Sony a7RIV and Sony 100-400 GM.
The other part of being prepared is to no be so locked onto your objective that you fail to recognize other opportunities. This is a problem I’m frequently reminded of in my workshop image review sessions, when everyone shares one of their images from the workshop for my feedback. We’re all going to the same locations at the same time, but it’s a rare session that at least one person doesn’t share something that causes others, myself included, to exclaim, “Wow, I didn’t see that!” The lesson here is, the instant you think you know “the” shot is the instant your creative door slams shut.
This lesson also applies to the belief that the show is over, or that the show isn’t going to happen. Some of my most unforgettable photography experiences have happened because I stayed just a little longer after it seemed pretty obvious that Mother Nature was done, or decided to go out when there was every indication that nothing was going to happen.
We pulled into Olmsted Point a little after sunset. Job-one was changing out of my Sacramento-summer T-shirt and shorts, and into my High-Sierra-night long-johns, flannel-lined jeans, wool shirt, and down jacket. But while changing, I couldn’t keep my eyes off the wisp of crescent moon setting behind a granite ridge far north of the scene I’d come to photograph. And joining the moon on its journey to the horizon was Venus, a visual bonus I hadn’t anticipated.
Sufficiently fortified against the elements and unable to take my mind off the moon and Venus, I discarded my plan to make the 1/4 mile hike up to Olmsted Point before the darkness was complete (rationalizing that I could probably do this hike blindfolded anyway). Standing at the car I mentally framed a shot, then extracted my tripod, a7RIV, and 100-400. While setting up in the parking lot would have worked, I decided to scramble up the adjacent granite slope for an elevated vantage point that reduced some of the foreground clutter.
It was pretty dark by the time I was in position and had everything assembled, but since I was only interested in creating silhouetted shapes to go with the moon, the darkness wasn’t a big problem. I shot until the moon dropped out of sight. Because I had to move around a bit to adjust the relationships between the trees and the descending moon and Venus, I only managed nine frames before the moon was gone
The Milky Way delivered as expected, but I found extra pleasure thinking about this moon shoot that kicked off the night and delivered something as satisfying as it was unexpected.
Workshop Schedule || Purchase Prints || Instagram
A Gallery of the Unexpected


Sleep is Overrated
Posted on June 13, 2021

Summer Night, Milky Way Over Yosemite, Olmsted Point
Sony a7SIII
Sony 14mm f/1.8 GM
ISO 8000
f/1.8
15 seconds
It’s a Saturday afternoon (Sunday evening by the time you read this) and I’m working on less than 4 hours sleep. I’m not complaining, but before I pass out, I want to share the story of my latest shoot, and the reason I’m so sleep deprived.
If you follow my blog, you might know that in April Don Smith and I got an unexpected opportunity to preview Sony’s brand new 14mm f/1.8 GM lens in Oregon, before its announcement a week or so later. (Read more here.) But that experience was just a tease, because just as I started to fully appreciate the new lens’s potential for night photography (and other stuff, but I’m especially excited by night photography), we had to send it back.
When I finally got my own copy of the lens early this month, I couldn’t wait to try it out on the Milky Way (which wasn’t possible in Oregon because of the direction the Bandon views faced, and a waning moon). June is primetime for Milky Way photography because the brilliant galactic core is up all night—all you need is a dark sky far from city lights, and without the moon.
With a waxing moon invading the sky starting this week, the June dark sky window was quickly closing when I accepted an invitation to join a couple of photographer friends on their night photography trip to Joshua Tree NP this weekend. Then, just two days before we were supposed to leave, my friends decided to go to Denmark instead (a likely story—who else remembers the “Friends” episode where Chandler ditched Janice by telling her he was going to Yemen? Oh. My. God.), leaving me to fend for myself.
I could have stuck with the Joshua Tree plan, but a solo, 16+ hour roundtrip to spend a couple of nights photographing a spot I don’t really know didn’t sound like the best use of my time. Instead, I decided to recruit my brother Jay for a quick trip to more familiar environs.
Yosemite Valley’s towering walls and east/west orientation make it less than ideal for Milky Way photography. And while Yosemite’s high country has potential, accessibility (no roads, backcountry permit requirements) make it next to impossible for a last-minute trip. But…, at 8000 feet, Olmsted Point certainly qualifies as Yosemite high country. And because it’s right on Tioga Road (Highway 120), no backcountry permit is required. There’s still the problem of this summer’s COVID-induced Yosemite reservation system, but photo workshop permit gives me an exemption from (I do still have to get approval first).
Another nice thing about Olmsted Point is that it offers a view of Half Dome that’s quite a bit different than what we’re used to seeing from Yosemite Valley. While the Yosemite Valley views of Half Dome face east, from Olmsted Point Half Dome rises in the southwest, at the end of Tenaya Canyon.
Jay and I pulled into the Olmsted Point parking area at about 8:30 Friday night. The sun had just set, but we still had at least an hour until the sky darkened enough for the Milky Way to appear. With time to kill, after bundling into my cold weather clothes and organizing my gear, I twisted my Sony 100-400 onto my Sony a7RIV and scaled a nearby granite ridge to photograph the thin sliver of new moon disappearing in the west. An impromptu bonus that set the tone for the night.
We made the 5-minute walk out to Olmsted Point’s granite dome at around 9 p.m. I’ve been up here more times than I can count, so even in the dwindling light I was able to quickly identify the scene I wanted to start with, set up my camera (Sony a7SIII and Sony 14mm f/1.8 GM), and frame up a composition. Then I just kicked back on the granite and watched the stars pop out.
Viewed from the Northern Hemisphere, in June the Milky Way’s core rises nearly horizontal in the southeast sky shortly after sunset. As our planetary viewing platform rotates, the glowing core appears to pivot on an unseen point below the south-southwest horizon, moving up and southward (to the right) until it stands vertical in the southwest. The northern hemisphere nights are so short in June that the Milky Way fades from view before setting.
By 9:30 we could see the Milky Way peeking just above the granite ridge that leads to Clouds Rest. It was well east of Half Dome, so for these early frames I was very thankful to have a 14mm lens that allowed me to include the Milky Way in the same frame as Half Dome. I spent those early moments tweaking my exposure, refining my composition, and verifying that my focus was good.
Once I’d gotten everything just as I wanted it, I told myself that there was no reason to rush because with each passing minute, the Milky Way was a little higher in the sky and closer to Half Dome—that meant every click I took would be just a little better than the one preceding it. So after the initial exhilaration passed, I just sat on a nearby rock and appreciated the view. Few things are more humbling than reclining beneath a dark sky on a still night (especially when you’re sufficiently bundled against the high elevation chill).
We stayed until nearly 1:00 a.m. As I photographed (and gazed), I kept mentally pushing back our planned departure time, mentally subtracting hours of sleep by rationalizing that sometimes sleep is overrated. This was definitely one of those times.
A few words about my night photography
All of the night scenes you see on my website, in my blog, or anywhere else my images appear, were captured with one click. I don’t blend, composite, or in any other way combine multiple captures to create a single image. I’m not saying I think there’s anything wrong with blending images (there isn’t)—I just don’t get any pleasure from that kind of photography. So, while my night images may not look as dazzling as some of the other (truly beautiful) night composites being created today, you can at least be confident that you’re looking only at the photons that struck my sensor in one contiguous span of time.
Workshop Schedule || Purchase Prints || Instagram
A Night Sky Gallery
Click an image for a closer look, and to view a slide show.


")


