Eloquent Images by Gary Hart
Insight, information, and inspiration for the inquisitive nature photographer
Eye on the sky
Posted on April 27, 2016

High Sierra Moonrise, Glacier Point, Yosemite
Sony a7R II
Sony/Zeiss 24-70 f4
2.5 seconds
F/10
ISO 200
I spend much of my photography time chasing the moon. Most of my trips factor in the moon’s phase and location—usually to catch a full or crescent moon rising or setting above a particular landmark, and often to photograph a landscape by moonlight (full moon) or starlight (no moon). But sometimes the moon catches me less than fully prepared, and I need to improvise.
For example
I enjoyed the January full moon with my workshop group in Death Valley and the Alabama Hills; in February my Horsetail Fall workshop group photographed a full moon rising above Yosemite Valley; in March I was in Sedona with Don Smith to photograph the full moon as it rose above Cathedral Rock and Oak Creek; and last week my Yosemite Moonbow and Wildflowers workshop group photographed the April full moon above Bridalveil Fall and the Merced River Canyon, then headed off to catch a moonbow in the mist at the base of Lower Yosemite Fall. And chasing the moon isn’t all about the full moon—already this year I’ve photographed several thin crescents in the Sierra foothills, and next week I raft Grand Canyon, where my group will (fingers crossed) witness a waning crescent moon just after sunset, and later that night photograph the canyon illuminated by nothing but the Milky Way and thousands of stars only visible in a moonless sky.
All this planning around the moon does indeed get me to many beautiful locations at just the right time, but sometimes the moon catches me in situations where, without the necessary knowledge at hand, I’m forced to think on my feet (and smartphone). Most recently was the unplanned moonrise added to last week’s Yosemite workshop. When the National Park Service opened Glacier Point about a month earlier than expected, I quickly inserted a Glacier Point sunset into the workshop but didn’t have time for anything more than a cursory moonrise check.
Beautiful clouds and light made our Glacier Point sunset a success, but as we were about ready to return to the warmth of the cars, the moon’s imminent arrival crept into the back of my mind. What I knew was that this night, from Glacier point the moon would be rising far to the right of Half Dome (out of the primary view), and probably just slightly too late to photograph effectively (not enough light to capture both landscape and lunar detail). Nevertheless, before packing up my gear I pulled out my iPhone to be certain we weren’t making the classic photographer’s mistake of leaving too early.
This won’t be on the test
Without a strong cell signal, I had to resort to apps that function offline. I started with Focalware, my go-to app for the sun’s and moon’s altitude and azimuth from any location on Earth. Next, now armed with the moon’s azimuth, I opened MotionX-GPS (with the map pre-downloaded) to plot its location relative to the current landscape, determining that it would emerge from behind Mt. Clark.
The final (and most difficult) piece of the puzzle was determining when the moon would appear. This is tricky because published moonrise times always assume a flat horizon—great if you’re on a ship at sea, but not so much anywhere else, and especially not in the mountains.
Using the topo info in the MotionX app, I determined that Mt. Clark’s elevation was around 11,500 feet. Knowing the Glacier Point is at 7,200 feet, I subtracted 7,200 from 11,500 and got 4,300 feet, the vertical distance between my location and the point where the moon would appear. Because the MotionX app also gave me the horizontal (as the crow flies) distance between me and Mt. Clark (about 8.2 miles, or around 43,300 feet), I had everything I needed to plug into my HP-11C (scientific calculator) app and compute the altitude, in degrees, that the moon would need to achieve before cresting the peak (thank God I stayed awake in trigonometry). With that information, it was a simple matter of returning to Focalware to see what time the moon would ascend to that altitude (appear above Mt. Clark).
There are apps that will do all this for me (PhotoPills and The Photographer’s Ephemeris are the ones I recommend), but they require connectivity, and the foresight to do the work when my signal is strong enough to download the maps. (Plus, I just like doing it my way.)
I never tire of this stuff
So, after less than five minutes of figuring, I was confident enough to tell everyone the moon would appear from behind Mt. Clark at 7:57 p.m., plus or minus two minutes. That gave us a couple of minutes to prepare a composition, and sure enough, right around 7:55, the clouds behind Mt. Clark started to glow; at 7:58, there it was and we were in business. In this case the thin clouds on the horizon subdued the moon’s brilliance just enough that I could give the foreground enough light without turning the moon to a white disk.
As often as I do this (sometimes I plot the moon just for fun, even though I know I can’t be there to enjoy it), few things thrill me more than my eyes on the exact point on the horizon at the moment the moon first nudges into view.
Understanding vs. knowledge
I know my process sounds complicated, but it really isn’t—in fact, plotting the moon this way doesn’t require any special insight beyond what most of us learned in high school. But it does illustrate something I constantly stress: the advantage of understanding over knowledge. When we know something, we can respond to a finite set of circumstances; when we understand something, we can reason our way to knowledge beyond our training.
One more quick example: A couple of days ago, I was scouting a potential sunrise location in the Columbia River Gorge. Because I’m reluctant to trust compass apps that point an arrow (or whatever) in a general direction, I pulled out Focalware and saw that tomorrow’s sunrise azimuth would be 70 degrees. Focalware also told me that the sun’s current azimuth was 253 degrees. Since I know that a (solar) shadow always points exactly 180 degrees from the sun’s current azimuth, I knew that my shadow was pointing directly at the 73 degree azimuth (253 minus 180), more than close enough to figure out where the sun would appear (in this case, farther north than ideal).
Whether it’s lunar geometry, exposure settings, depth of field, or whatever, understanding (and visualizing) a system’s underlying principles is always superior to memorizing its facts. And amazingly, it’s almost always simpler than we imagine. Since the position of the sun, moon, and stars are important to me, I try to visualize the celestial choreography.
Likewise, the more you can understand what’s happening when you adjust your shutter speed, f-stop, and ISO, the better prepared you’ll be to reason your way through difficult exposure puzzles, such as, I really need a lot of depth of field to get this tree and that mountain sharp, but the breeze is really blowing the leaves?, or, The exposure is perfect for this 20-second pinpoint stars image, but how can I do a 30-minute star trail shot of the same scene without changing the exposure?.
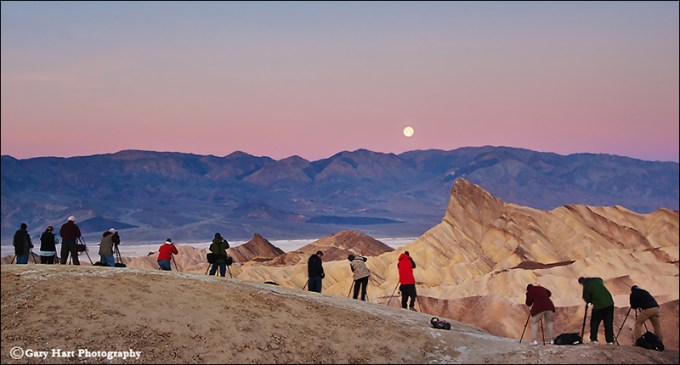
Photo Workshop Schedule
A gallery of celestial wonders


My Technology Can Beat Up Your Technology
Posted on April 18, 2016

Skylight, Lower Antelope Canyon, Arizona
Sony a7R II
Sony/Zeiss 24-70 f4
1/100 second
F/11
ISO 200
For some reason, the technology choices of others seem to be the source of profound angst to many (self appointed) online “experts.” Whether it’s vinyl vs. digital music, Windows vs. Mac OS, Android vs. iOS, Nikon vs. Canon vs. Sony, mirrorless vs. DSLR, nothing seems to incite in-your-face rancor like someone else’s technology choice. While I’ve been quite content to remain on the sidelines during these pointless battles, I must confess to being an occasional (amused) observer.
One thing I’ve observed during these skirmishes is that most desperate attacks seem to come from the side playing catch-up—the underdog. I mean, was there anyone more annoying than an Apple user in the nineties?
On the other side, it seems that the job of the front-running users who are under attack, those users with the technology embraced by the masses, is to respond with smug condescension. Which of course only further inflames the underdog. I mean, is there anyone more smug than an Apple user today?
(Before you accuse me of Apple-user bashing, let me assure you that I’m a committed Apple zealot who long ago lost track of the number of iDevices within arm’s reach. In place of Apple you could plug in Nikon/Canon/Sony, vinyl/digital, and so on and easily find the same attack/condescend cycle repeating.)
But given all this, imagine my concern since exiting the Canon vs. Nikon battle zone for the relative peace of Sony in 2014—suddenly I was photographing with gear that seemed too anonymous to incite emotion from pretty much anyone. Where had I gone wrong? Which is why it was with great excitement that I recently read a blog post disparaging Sony mirrorless shooters—to be more specific, Sony full-frame mirrorless shooters, a fraternity of which I’m a card carrying member. It was like the new phone book had arrived and suddenly, “I’m somebody!”
According to this self-proclaimed authority, as a Sony shooter I’m an ignorant lemming with dubious lineage and poor bathing habits. (Okay, so maybe I’m reading between the lines a bit, but I have no doubt the argument would have gotten there soon enough.) Rather than take offense, I viewed this blogger’s anti-Sony rant as a badge of honor, a sign that my Sony mirrorless gear has achieved enough status to stir the juices of the insecure. Not only that, I’m now in a position to respond with condescending smugness—a significant milestone indeed.
But seriously
Okay, but seriously, who cares? Who? Cares? Are people really that insecure about their technology choices that they feel threatened by mine? I have my own very specific photography needs, as I’m sure you do as well. You can’t pretend to know my needs, I can’t pretend to know yours. I find no offense (or, I must confess, interest) in the equipment you choose, and certainly hope that you find none in mine.
On the other hand, I’ve reached the point in my career that my equipment choices do affect the decisions of others. People who like my pictures ask what equipment I use, and for my opinion on the equipment they should purchase. While I’m happy to answer these questions (as time permits), the real answer is that the equipment matters very little in relation to the person operating it. Today’s technology is pretty much across-the-board amazing compared to what used to be considered state-of-the-art. The limiting factor in your photography will almost certainly not be your equipment.
For anyone looking to upgrade their equipment, my advice is to filter out all the noise, target the few features that are most important to you, and try to identify the system that best suits you. It almost certainly won’t be exactly the same as the system that best suits the online “experts,” no matter how loudly they make their case.
And beware, often the people most willing to share their opinions are far more ignorant than they realize. Before taking the word of any stranger, especially when it comes to how and where to spend your own hard-earned money, at the very least you should review their images to confirm that: 1) they actually have an idea of what they’re doing, and 2) what they’re doing actually resonates with you.
All that said, I’d like to explain why I’m confident that I’ve found the best camera system for my photography. It comes down to the realization over the year-and-a-half I’ve been shooting Sony full-frame mirrorless, that I’m getting images that I never could have gotten with my Canon DSLRs. For me, that means ridiculous dynamic range from my a7RII, and similarly ridiculous high ISO performance from my a7SII. It also means more room in my bag, enabling me to carry more gear, which helps me be more prepared for whatever Mother Nature delivers.
The most recent validation of my Sony system was captured late last month, on bright afternoon visit to Lower Antelope Canyon near Page, Arizona. Upper and Lower Antelope Canyons are narrow slot canyons carved in red sandstone by millennia of extreme drought punctuated by brief flash-floods. I’ve photographed these canyons many times in the last ten or so years; while I’ve always loved photographing there, I’ve also been frustrated by the extreme dynamic range that forces me (and pretty much everyone else) to decide between the scene’s highlights or shadows.
Since I don’t blend images (if I can’t capture it in one click, I don’t shoot it), dynamic range is a huge deal for me. Our cameras just can’t capture in one click the range of light—from darkest shadows to brightest highlights—that our eyes see. But that doesn’t prevent me from trying to squeeze out as much dynamic range as my camera will allow (and always hoping for more).
Already aware that my Sony a7RII (and the a7R before it) has more dynamic range than any camera I’ve ever used, on this year’s Antelope Canyon visit (helping good friend Don Smith with his Northern Arizona workshop), I decided to put the camera to the test with an extreme dynamic range scene that has always overwhelmed any camera I’ve thrown at it: in one frame, attempting to capture detail in the red rock buried in Antelope Canyon’s deepest shade, and the brilliant, sunlit blue sky outside.
On this visit, for most of the walk through Lower Antelope, a thin layer of clouds obscured the blue sky overhead. But as we were heading toward the exit, I looked up and saw a break in the clouds through the narrow slit overhead. I quickly metered the scene, targeting the brightest part of the remaining clouds and pushing the highlights as far I could without clipping (overexposing) them beyond recovery. On my LCD the image looked like a failure, with blinking (overexposed) highlights and black shadows, but the histogram told me I’d gotten the exposure as close to correct as possible—it showed a little clipping on both sides, but maybe (fingers crossed), there’d be enough in the highlights and shadows to salvage the image.
Despite the unusable appearance on the camera, and my previous (Canon) experience trying to photograph Antelope Canyon with sky, on my computer a small miracle happened: Tugging Lightroom’s Highlights slider to the left restored all the detail to the clouds and blue to the sky. So far so good, but on previous attempts, capturing blue sky in an Antelope Canyon image was always a death knell for the shadows. So imagine my surprise when I started pulling Lightroom’s Shadows slider to the right and rich red sandstone magically appeared, even in the darkest shadows. It was all there!
Does this mean that my new Sony mirrorless bodies are better than my Canon DSLR bodies? I can’t say, nor will I try to say—we each make the choice that best suits our style and needs, and all the online ranting from experts shouldn’t sway us. But for me, regardless of what others might say, or how loudly they might say it, I know I’m getting images that I never could have gotten before. And that’s really all that matters.
Workshop Schedule || Purchase Prints || Instagram
Previously Impossible (shots I wouldn’t have gotten with “lesser” technology)


Your camera is not an Etch A Sketch
Posted on April 11, 2016
(In defense of the tripod)

Grand Morning, Yavapai Point, Grand Canyon
Sony a6300
Sony/Zeiss 16-35 f4
.6 seconds
F/10
ISO 200
Who remembers the Etch A Sketch? For those who didn’t have a childhood, an Etch A Sketch is a mechanical drawing device that’s erased by turning it upside-down and shaking vigorously.
When I come across a scene I deem photo-worthy, my first click is a rough draft, a starting point upon which to build the final image. After each click I stand back with the latest frame on my LCD and scrutinize my effort, refine it, click again, evaluate, refine, and so on. On a tripod, each frame is an improvement of the preceding frame.
Taking this approach without a tripod, I feel like I’m erasing an Etch A Sketch after each click. That’s because every time I click, I have to drop the camera from my eye and extend it in front of me to review the image, essentially wiping clean my previous composition. Before I can make the inevitable adjustments to my most recent capture, I must return the camera to my eye and completely recreate the composition I want to refine.
I bring this up because a week or so ago, on another landscape photographer’s blog I read that she rarely uses a tripod anymore because image stabilization is so good—and anyway, even when stabilization won’t be enough to prevent camera shake, she can just increase her ISO. Reading comments like this reminds me how many landscape photographers don’t get that the tripod’s greatest value isn’t its ability to prevent hand-held camera shake, its the ability the tripod provides for making incremental improvements to a static scene (such as a landscape).
Before I continue, let me just acknowledge that there are indeed many valid reasons to not use a tripod. For example, you get a tripod pass if your subject is in motion (sports, wildlife, kids, etc.), you photograph events or in venues that don’t allow tripods, you have physical challenges prevent you from carrying a tripod, or even if you just plain don’t want to (after all, photography must ultimately be a source of pleasure). But if you’re a landscape shooter who wants the best possible images, “Because now I can get a sharp enough image hand-holding” is not a valid reason for jettisoning the tripod.
Technology certainly has changed the tripod equation. There was a time—way back in the film days, when ISO was ASA and anything above 400 was really pushing the limit, before instant LCD review and image stabilization—when the tripod’s prime function was preventing hand-held camera shake. But today, probably 80 percent of my images could be acceptably free of camera shake without a tripod. Yet the tripod survives….
For example
Last month I was at the Grand Canyon to help my friend Don Smith with his Northern Arizona workshop. A week earlier I’d added the brand new Sony a6300 to my camera bag, but a ridiculously busy schedule had kept it there. Sony had requested a sample image for their Sony Alpha Universe page, and I was down to just one day to deliver.
Our first morning on the rim was my only chance to meet Sony’s deadline before the workshop started. Landing at Mather Point about 45 minutes before sunrise, I beelined along the rim to Yavapai Point (about a mile), straight to a tree I’d been eyeing for years. On all previous attempts, something had foiled me: either the light was wrong, the sky was boring, or there were too many people. One sunrise a few years ago, I found the tree and canyon bathed in beautiful warm light, and the sky filled with dramatic, billowing clouds—perfect, except for the young couple dangling their legs over the edge and making goo-goo eyes beneath “my” tree. They looked so content, I just didn’t have the heart to nudge them over the edge (I know, you don’t have to say it, I’m a saint).
But this morning, everything finally aligned for me: nice clouds, beautiful sunrise color, and not a soul in sight. I went to work immediately, trying compositions, evaluating, refining—well, you know the drill. As I worked, I started honing in on the proper balance of foreground and sky, alignment of the tree with the background, depth of field, focus point, framing—I was in the zone.
When I thought I had everything exactly right, I stood back for a final critique and realized I’d missed one thing: The tree intersected the horizon. While not a deal-breaker, it’s something I try to avoid whenever possible. To rectify the problem, my camera needed to be about eight inches higher. I made the adjustment, and when the color reached its crescendo about two minutes later, I was ready.
Raising the camera would have been no simple task if I’d been hand-holding, but (since my Really Right Stuff TVC-24L tripod, with head and camera, elevates to about six inches above my head) it was no problem with my tripod (though I wish the a6300 LCD articulated for vertical compositions). But the extra tripod height was just a bonus. The true moral of this story, the thing that so perfectly illustrates the tripod’s value, is that there is no way I’d have gotten all the moving parts just right with a hand-held point and click approach.
Of course your results may vary, and as I say, photography must ultimately be a source of pleasure. So if using a tripod truly saps pleasure from your photography, by all means leave it home (and enjoy your $3,000 Etch A Sketch). But if your pleasure from photography derives from getting the absolute best possible images, the tripod is your friend.
Grand Canyon Photo Workshops
A Grand Canyon Gallery


Look Behind You
Posted on April 3, 2016

Painted Dunes, Mesquite Flat Dunes, Death Valley
Sony a7R II
Sony/Zeiss 16-35 f4
.4 seconds
F/11
ISO 100
Every once in a while we find ourselves at just the right place when Mother Nature delivers something special. When that happens, the best thing to do is stay calm and keep your head on a swivel.
In January my Death Valley workshop group had one of those moments. We’d walked almost a mile to get out to dunes that hadn’t been trampled, then waited while a sky that was solid overcast broke up just as the sun dipped below the horizon. The result was about ten minutes of horizon-to-horizon red that at its peak painted the dunes as well.
We’d been watching a hole in the clouds to our north shift in our direction, and I started to get an inkling that the ingredients were there for a vivid sunset about fifteen minutes earlier, when peaks in the northeast, then the clouds overhead, started to glow with warm, late light. I’d been using my 70-200 telephoto lens to isolate areas of the dunes, but realized that if the sky did indeed light up, I’d almost certainly want something wider and switched to my 16-35. I also encouraged everyone to do the same, and to anticipate the color and identify sunset compositions now, before it happened. Shortly thereafter we got our first hints of pink and the show was on.
That evening was a great example of something I preach in my workshops: No matter how great the scene you’re photographing, every once in a while take a few seconds to look around. On this evening I was excitedly photographing in one direction when I realized everyone in the group was photographing in the opposite direction. Turning to admonish them, I saw what they were photographing and shut up, quickly aiming my camera in that direction instead.
Read more about that evening, and see a picture of the other direction, here: Finding a new sandbox.
Sunset color
As I’ve written before, the ingredients for sunset (or sunrise) color are clouds, direct sunlight, and clean air (the cleaner the better). The idea that polluted or dusty air is good for sunset is a myth. (If that were true, Los Angeles and Beijing would be know for their sunsets, not Hawaii or the Caribbean.)
The red you see at sunset is the only color remaining after the white sunlight we see at midday has been stripped of all other wavelengths. It’s actually a rather interesting process (to me at least) that you can read more about here: Sunset Color.
Join Me in Death Valley
A gallery of sunset magic
Click an image for a closer look, and a slide show. Refresh the screen to reorder the display.


")
Wild about wildflowers
Posted on March 29, 2016

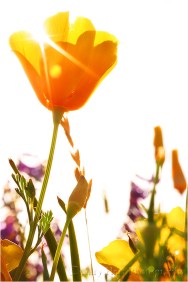
Dancing Poppy, Sierra Foothills, California
Sony a7R II
Sony FE 90mm f2.8 Macro
1/800 second
F/4
ISO 1600
I’ve given up trying to predict California’s wildflower bloom. There are a lot of theories about the conditions that cause a great wildflower bloom: wet winter, early rain, late rain, warm spring, wet spring, and so on. For each condition correlation you can cite, I can cite an exception. So now I just cross my fingers and wait to see what spring delivers.
Well, it turns out this is a great year for wildflowers in California. Death Valley is winding down its “super bloom,” the best since 2005, my Facebook feed is suddenly saturated with California wildflower images, and it seems like every day I’m hearing about another don’t-miss poppy location.
While Death Valley’s bloom was dominated by yellow, daisy-like desert gold, with a few other varieties and colors sprinkled in, for most of California it’s the poppy that takes center stage each spring. The highlight of Sunday my drive from Phoenix to Sacramento (I know, not a lot of competition for highlights on this route) was top-to-bottom orange hillsides flanking the usually maligned Grapevine (if you’ve lived in California, you know what the Grapevine is; if you haven’t, just ask a Californian. But be prepared to endure a lengthy “that time my car broke down” story).
My close-focus technique
There are many ways to photograph poppies, ranging from wide panoramas that highlight poppies’ propensity to dominate vast expanses of the landscape, to tight macro views that emphasize their elegant curves and translucent gold and orange. Likewise, there are depth decisions to be made with each poppy composition, from complete front-to-back sharpness to a single, minuscule point of sharpness.
While I’ll employ whatever approach I think best serves the scene, my poppy images tend toward close focus and limited depth of field captures that use a paper-thin sharpness range to blur all but the most essential aspect(s) of my scene. With this approach, I can highlight my subject, blur away distractions, and create a complementary background of color and shape.
I start by identifying a flower or flowers that I can isolate from the surroundings. Finding the right background is as essential finding the right subject—without my subject and background working in unison, the image will almost certainly fail. What’s the right background? Other flowers, sparking water, deep shade (that I can turn dark green or black)—use your imagination, and experiment.
Given my desire for minimal depth of field, my lens choice is usually a function of the background’s distance from my subject—there’s an inverse correlation between focal length and depth of field, so the farther away the background, generally the longer the focal length I choose. Since a narrow depth of field is my goal, I usually start wide open (my lens’s widest aperture). To focus closer than the lens permits and further reduce the depth of field, I sometimes add one or more extention tubes.
With my subject, background, lens, and f-stop determined, I set up my tripod as close to the subject as I can focus and get to work. Because of the amount of review and refine I do, a tripod is an essential part of my approach—I can’t imagine doing close focus photography without one. With each click I scrutinize the result for adjustments, large or small—when I’m ready for the next click, having the scene I just reviewed waiting there for me on my tripod allows me to apply my refinements without having to recreate the image as I would if I had been hand-holding.
In the world of close focus photography, the scene looks completely different to the camera than it does to the eye, even more than most other types of photography. So I usually don’t identify my ultimate composition, focal length, and f-stop until I’ve worked the scene awhile. When I get the composition the way I want it, I usually run through a series of f-stops to give me a variety of subject sharpness and background blur effects to choose between when I review my images later on my large monitor.
At the kind of magnification I normally use for these close focus images, even the slightest breeze can introduce motion blur that ruins an image. I’ve become so comfortable shooting at high ISO with my Sony a7RII that my default close-focus ISO for shade or overcast is now 800. If there’s a breeze, I’ll go all the way to ISO 6400—sometimes higher. Whatever your camera’s high ISO capability, it’s very helpful to familiarize yourself with your ISO comfort zone for your camera.
Because your eyes see a close-focus scene so differently than the camera sees it, your close-focus photography will improve with experience. When you start, some of your best images may be accidents, blurred background effects that you didn’t anticipate. But soon you’ll come to learn what to look for, and how to achieve it.
Now go enjoy spring!
A Poppy Gallery
Click any image to scroll through the gallery LARGE


Tips to improve your full moon photography
Posted on March 24, 2016

Winter Moon, Zabriskie Point, Death Valley
Sony a7R II
Sony/Zeiss 24-70 f4
1/6 second
F/8
ISO 100
Have you ever seen a glowing full moon suspended above a beautiful landscape and been moved enough to grab your camera? And how many times have those pictures actually matched your memory of the moment? Not too many, I’d guess. Either your landscape was completely black, or (more likely) the moon was an ugly white blob. You’ve just experienced an example of the human eye’s vastly superior dynamic range—while you could see detail in the landscape and the moon, your camera could only see one or the other.
Lot’s of scouting and plotting goes into aligning a full moon with a terrestrial subject, as close to the horizon as possible, when the light’s just right. For me, just right means a sky dark enough for the moon to stand out (the darker the better), but not so dark that I lose foreground detail in the twilight shadow. Since I don’t blend images, I need to get the landscape and lunar detail with a single click.
I’ve found that the “right-time” sweet spot for single-click full moon photography is a window about 10 minutes on either side of sunrise/sunset. Since the published sun/moon rise/set times assume a flat-horizon—unless you’re on a boat at sea, the sun and moon will probably be below the horizon when they’re advertised to be rising and setting.
It helps to know that as the moon goes through its 29-day cycle from new to full and back, it rises a little less than an hour later each day (that’s an average that varies with several factors, but it’s a good rule-of-thumb). This generally makes the moon visible in my 20-minute exposure sweet spot the day before it’s full for a sunset moonrise, and the day after it’s full for a sunrise moonset, because there’s more foreground light to work with. But even then the landscape will be bathed in shadow, while the moon remains daylight bright, so getting myself on location in this 20 minute window is only half the battle.
In general, digital cameras have made exposure easier. Shooting film, difficult exposures meant a lot of guessing, bracketing, and (especially) hoping. Shooting digitally, not only can we instantly eyeball each image, the histogram shows us exactly how our exposure worked. Unfortunately, the histogram isn’t much help when the moon’s involved, because the moon doesn’t usually occupy enough image real estate to register on the histogram. If you’re not careful, you might find yourself reveiwing an evening’s worth of images with beautiful histograms and a hopelessly blown moon. What’s a photographer to do?
The key to exposing any high dynamic range scene is pushing the highlights as far as you can without blowning them out. For most scenes the histogram is sufficient, but exposing for the moon requires help from your camera’s Highlight Alert (blinking highlights) feature. And since most cameras allow you to view images in multiple modes (e.g., with the luminosity histogram, RGB histogram, no histogram, full capture information, no capture information, and so on), it’s also important to determine which view or views actually show the blinking highlights (not all do)—if you’re not sure, I suggest intentionally overexposing a scene and reviewing the image in the camera’s various display modes.
Moonrise
When photographing a rising full moon at sunset, simply metering for the landscape works at the outset because there’s still plenty of light to capture foreground detail without overexposing the moon. At this point the histogram tells me everything I need to know. But as the sky darkens, so does the foreground, while the moon remains unchanged.
To keep my histogram in the ideal range as twilight deepens, I add light to my image by bumping the shutter speed in 1/3 stop increments. Each time I increase the shutter speed, I check the image to ensure that the moon’s not blinking. As soon as my exposure causes the moon to blink, I know I’ve reached my highlight threshold and I’m pretty much done adding light.
Once I’ve pushed the moon to my camera’s highlight threshold, I continue shooting until the shadows are so dark that no useable data can be recovered. Because highlight and shadow recovery varies with the camera, I strongly encourage you to familiarize yourself with your camera’s shadow and highlight threshold (how far to the left and right can push the histogram and still get usable detail).
If you’re shooting raw, you can probably push your exposure until part of the moon is blinking, but if the entire lunar disk blinks, you almost certainly will need to back down your exposure. Adding a graduated neutral density filter will hold back the moon enough to buy you five or ten minutes of shooting before the moon blows out.
Moonset (an example)
Photographing a setting full moon at sunrise is the sunset process in reverse—we start with the moon glowing above a landscape much too dark to get detail without hopelessly blowing out the moon, and finish when the moon sets, or when the sky brightens to the point that the moon starts to wash out.
In January, I got my Death Valley Winter Moon workshop group out to Zabriskie Point about 45 minutes before sunrise. The moon was indeed beautiful, but far too bright to photograph with the dark foreground. But it was high enough that I was able to do long exposures without the moon while I waited for the scene to brighten.
About 20 minutes before sunrise I pulled out a 3-stop hard-transition graduated neutral density filter and started including the moon, dialing my exposure down until the moon stopped blinking—the most light I could give the scene without losing the moon. At first the foreground was still far too dark to contain usable detail, but within 5 minutes I started to feel like the scene had brightened enough to allow usable detail (albeit with a fair amount of Lightroom Shadow/Highlight work later).
From that point on, I just worked on a variety of compositions that included the moon. Monitoring my histogram, I shortened my shutter speed to reduce the exposure as the foreground brightened. Eventually the foreground brightened enough that I didn’t need the GND filter.
In a perfect world the moon reaches the horizon while it’s in the sunrise/sunset 20(-ish) minute exposure sweet-spot (sky dark enough that the moon stands out, but not so dark that I can’t get landscape and lunar detail), but this morning the moon was high enough that the contrast flattened before it set.
The above image I captured early in the sweet spot—the foreground looked quite dark on my LCD, while the moon was mostly intact, with a couple of blinking specks. But I knew my Sony a7R II well enough to be confident that simple highlight and shadow adjustments in Lightroom would recover all the necessary detail.
Photo Workshop Schedule
A Full Moon Gallery (Large and Small)


The Art of Subtraction
Posted on March 16, 2016
Golden Elegance, California Poppy, Sierra Foothills
Sony a7R II
Sony FE 90mm f2.8 Macro
1/200 seconds
F/4
ISO 3200
Photography is an art of subtraction—presented with a complex world, we identify and organize objects of visual interest and (ideally) do our best to eliminate everything else. It’s this last point that’s often overlooked. The best pictures often work as much for what’s not in them as for what’s in them. Most photographers have no problem seeing what to put in their images, but many struggle with what to leave out. Or how to do it.
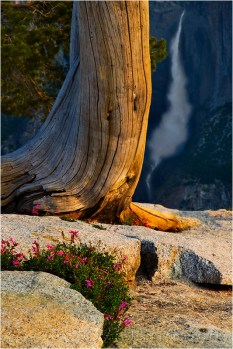
Morning Light, Upper Yosemite Fall from Sentinel Dome, Yosemite
Anything in your frame that doesn’t enhance it is a potential distraction. Removing distractions is often as simple as tightening the composition, or repositioning the camera.
For example, admiring a dramatic waterfall in the distance, you might walk around until you find a colorful bouquet of wildflowers for your foreground—so far so good. With your camera at eye level, you frame the scene with the flowers at the bottom and the waterfall at the top. Click.
The problem is that you also included a vast empty region in the middle of the frame, a region that does nothing more for your image than occupy space. The solution is as simple as dropping your camera to ground level, allowing you to subtract the empty space and replace it with larger flowers and waterfall (because with the flowers and waterfall more aligned, you can increase the focal length).
But compositional adjustments are only the beginning. Where most people stumble is when they have an opportunity to further simplify an image by incorporating the areas of their camera’s vision that differs most significantly from their own vision: light, focus depth, and motion.
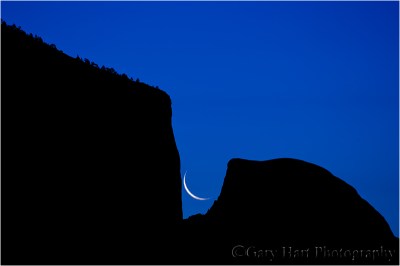
Captive Crescent, El Capitan and Half Dome, Yosemite
Read the story of this image
Light
Photographers frequently lament their camera’s limited dynamic range. And while extra dynamic range in a camera is great, limited dynamic range creates great opportunities to remove distractions and emphasize shape over detail.
Brilliant Poppy, American River Parkway, Sacramento
Metering and underexposing the highlights in a backlit scene can saturate color and hide distracting details in blackness. I try to find striking subjects that stand out against the sky. Hilltop oak trees work well for this, but I can think of no subject in nature more suitable to silhouette photography than El Capitan and Half Dome in Yosemite. And since a crescent moon is always in the brightest part of the sky just before sunrise or after sunset, I always look for an opportunity to pair a waning crescent against Yosemite’s striking skyline.
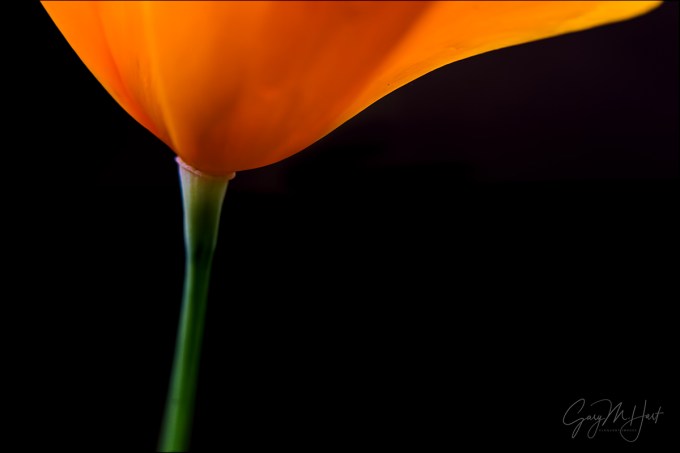
But this approach isn’t limited to silhouettes. In the image at the top of this post, I didn’t want anything to distract from the poppy’s graceful curves, so I positioned the poppy against deep shade and underexposed the scene. This saturated the rich color and blackened everything that wasn’t poppy.
And using dynamic range to subtract distractions isn’t just about turning shadows black. Don’t like a blank blue sky? Metering on a shaded subject against a blue sky can completely blow out the highlights, creating a striking white background for your primary subject.
Focus depth

Poppy Lanterns, Merced River Canyon
One of my favorite techniques for photographing colorful wildflowers and fall foliage is to narrow the range of focus until just a select part of my subject is sharp, softening the rest of the scene to an appealing blur of color and shape. This blur effect improves as depth of focus shrinks, and depth of focus shrinks with:
- Subject distance—the closer the better
- Focal length—the longer the better
- F-stop—small f-stop means large aperture
While I’ve used pretty much every lens in my bag to blur my backgrounds (and foregrounds), I most frequently use telephoto and macro lenses, often with extension tubes.
Not only does this approach help the primary subject—or specific aspects of the primary subject—stand out, when executed properly it can eliminate virtually any background distraction. The most important thing to remember is that even when it will be blurred beyond recognition, the background matters.
Motion
Blurred water often gets labeled as “unnatural” or “cliché.” The unnatural part I’ll dismiss as misinformed—it’s no less natural than water droplets suspended in midair. While I’ll acknowledge that reflexively reaching for a neutral density filter at the slightest hint
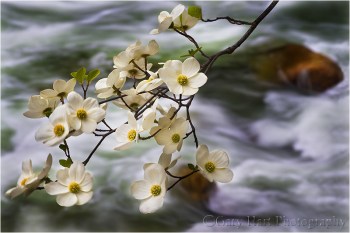
Dogwood and Rapids, Merced River, Yosemite
of whitewater might be overdoing it a bit, the cliché label ignores the fact that blurred is often the only way to render moving water (ever try freezing a waterfall or churning cascade in shade or overcast?).
Regardless of your position on blurred water, detail in moving water can create a distraction that competes with your primary subject for attention. Smoothing moving water to one degree or another subtracts this distracting busyness.
Motion blur isn’t just about water—pretty much anything that moves can be softened or eliminated with motion: clouds, blowing leaves and flowers, stars, and so on. While it’s not landscape photography, a device employed by architectural (and other) photographers is adding many stops of neutral density to slow the shutter speed so much that people and vehicles moving in the scene completely disappear.
Regardless of the object that’s moving, as with narrow focus depth, softening the secondary areas of a scene also helps the primary subject stand out by allowing your viewers to focus all their attention where it belongs.
It’s all about control
Because of the zero-sum relationship between photography’s exposure variables—changing one variable requires a complementary change in another—controlling light, depth, and motion is difficult-to-impossible unless you get out of the full auto exposure modes and start making your own exposure decisions. While it can be done in Aperture or Shutter Priority modes, I find Manual metering works best for this level of control. So, if you don’t have enough understanding of metering to shoot in Manual mode, that’s the place to start.
Here are some links from my Photo Tips tab that will help:
Workshop schedule
A gallery of subtraction


Among the wildflowers
Posted on March 9, 2016

Foothill Gold, Mokelumne River, California
Sony a7R II
Sony FE 90mm f2.8 Macro
1/125 seconds
F/4
ISO 4000
Last year, a busy spring schedule and mediocre wildflower bloom conspired to thwart the wildflower photography I love so much. Vowing not to let that happen again this year, a few days ago I packed my gear and headed for the hills with fingers crossed. My goal was a familiar canyon off of Highway 49 in the foothill Gold Country south and east of Sacramento.
This would be the maiden voyage for my brand new Sony 90mm f2.8 macro, and I was really looking forward to seeing if it’s as good as everyone says it is. Not only that, this would be my first wildflower shoot since switch from Canon DSLR to Sony mirrorless nearly a year and a half ago (!).
It’s a sign
On the drive I’d been streaming a Giants Spring Training game, but turning up the canyon I lost my signal, so I opened the Music app on my iPhone, put it in Random mode, and was immediately distracted by an entire hillside of poppies unfolding before me. Each bend in the road seemed to be trying to outdo the one before it, and I was several curves up the road before my ears caught up with my eyes. Of the 5000 or so possibilities on my phone, what I heard was Tom Petty telling me, “You belong among the wildflowers….” (true story). A sign, definitely a sign.
But anyway…
I followed the road to the end to identify the places I wanted to return to. On the drive back I stopped at my first choice and stayed until darkness and rain (not necessarily in that order) drove me out. I started with the macro, but before I was done I’d used every other lens in my bag too: 16-35, 24-70, and 70-200 (and would have used the 150-600 if I hadn’t loaned it to my brother a couple of days earlier)—with and without extension tubes.
With the sun already behind the hills and rain on the way, light was limited, and fading. There wasn’t much wind, but there was just enough flower-swaying breeze to concern me. My f-stop choice was completely tied to the creative side of my composition (selective depth of field), leaving ISO as the only exposure variable for controlling my shutter speed. Rather than guessing before each shot exactly how fast the shutter needed to be and dial in just enough ISO to get there (and remember to adjust each time my f-stop changed or I added extension), I just cranked the ISO to 4000 and went to work. Problem solved.
I found lots of things to photograph, from entire hillsides to individual poppies like this one. Regardless of my depth of field, I took extreme care to ensure that my background complemented my subject. In this case I maneuvered my tripod until my subject was framed by background poppies. It took several frames to get the composition just right; once I was satisfied, I tried it with a variety of f-stops and focus points. (I can’t imagine even attempting this without a tripod.)
More love for Sony
The Sony 90mm macro was as good as advertised. And I can’t tell you how pleased I am with the high ISO capability of the Sony a7RII. Putting my wildflower images up on my large monitor at home confirmed that everything that was supposed to be sharp was indeed sharp, and the noise at 4000 ISO was minimal and easily managed without detail loss—even the images I shot toward the end, in a light rain and fading light, at 6400 ISO were just ridiculously clean.
This ability to push my ISO threshold allows me to shoot scenes I’d never have considered before. Along with the dynamic range and night photography capability, it’s another Sony game changer for me. The a7RII is exceptional, but regardless of the camera you use, I encourage you to test its high ISO capabilities before you find yourself in a situation where ISO matters—you may be surprised by its capabilities.
Another thing I enjoyed about shooting macro with the a7RII was the ease of achieving precise focus. With depths of field measured in millimeters, sometimes fractions of millimeters, identifying the focus point and getting it perfectly sharp is imperative. With my recent Canon DSLRs (1Ds Mark III and 5D Mark III) I’d become a real convert to live-view focus, but glare on the LCD can sometimes make seeing well enough to get precise focus difficult. That problem disappears completely with the ability to view the scene in the viewfinder.
I’m not done
I had so much fun last week, I’ll be going back as often as possible, until the hills brown and the wildflowers fade. With all the rain promised for the next couple of weeks, that might be quite a while—maybe all the way until dogwood season in Yosemite. Life’s good.
Blooming hillsides
Click an image for a closer look, and a slide show. Refresh the screen to reorder the display.


Beware the “expert”
Posted on March 4, 2016
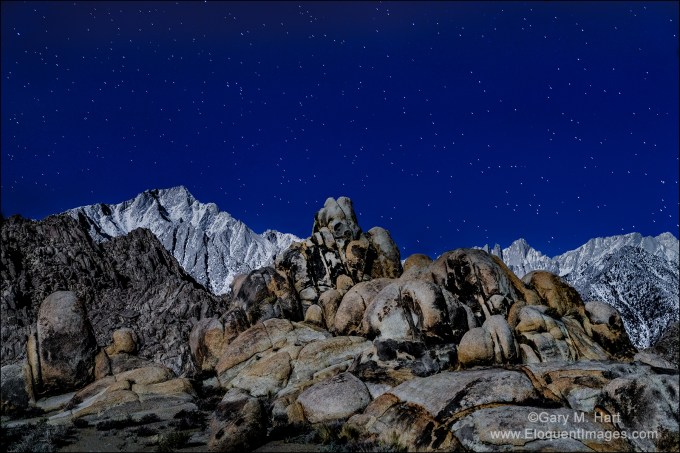
Sierra Moonlight, Mt. Whitney and Lone Pine Peak, Alabama Hills, California
Sony a7R II
Sony/Zeiss 24-70 f4
15 seconds
F/5.6
ISO 3200
Rules are important. The glue of civilization. And after a childhood constrained by bedtimes, homework, and curfews, it’s no wonder that as adults we honor rules simply because, well, simply because. (I mean, who doesn’t wait for however long it takes and with no car or cop in sight, for a light to change?)
As much as civil society relies on universal obedience, not all “rules” are created equal. And our reluctance to question authority inhibits growth. One example would be blind adherence to the (usually) well-intended photography “experts” proliferating in print, online, and (especially) in your local camera club. These self-proclaimed authorities have figured out that people who are just learning are less confident, and tend to respond more to authority than substance.
The camera club paradox
I think camera clubs are great for many reasons: they connect people with a common interest, facilitate the exchange of information and ideas, and provide a forum for sharing our photographic creations. Camera clubs spur us to get out and shoot when we otherwise might stay home, and offer the beginner rules that provide a stable foundation upon which to build her craft.
But camera clubs can also be a breeding ground for self-proclaimed experts, a status often not conferred to the person most qualified, but to the person who spews photographic dogma with the most authority. The result is well-intended but misinformed knowledge that infects a camera club like a mutated virus.
I’m especially troubled when I hear of images shared in a camera club photo competition that were dismissed without consideration because they violated the local “expert’s” idea of an unbreakable photographic rule. Some camera club capital “violations” I’ve seen firsthand or heard about (by no means a comprehensive list):
- Centered subject
- Centered horizon
- Blown highlights
- No detail in the shadows
- Not sharp from front to back (this one really bothers me)
Each of these things can be a problem, but they can be a refreshing expression of creativity as well. And even if they are a problem, refusing to consider an image because it violates someone’s definition of “perfect” discounts all that’s potentially good about it.
If you’re an aspiring photographer and someone dismisses an image for a technical violation, take a step back, inhale, and remind yourself that there are very, very few absolutes in photography. In general, it’s helpful to remember that no matter how strongly it’s stated, advice that doesn’t feel right (even if you can’t articulate why) doesn’t need to be heeded. In fact, the next time someone starts feeding you photography advice in absolutes, run (don’t walk) to the nearest exit.
About this image
I jumped on my anti-expert soapbox after observing several recent workshop participants who were clearly constrained by “rules” enforced by their local camera club. And looking at this image, I realized that there are camera clubs that probably wouldn’t even consider it because I centered the horizon and the teddy-bear shaped rock in the foreground. I also captured a little more star motion than is ideal. But deal breakers? Not to me.
I’d taken my January Death Valley workshop group out to the Alabama Hills for a moonlight shoot on the workshop’s last night. A few in the group walked out to the arch, but most gravitated to this group of boulders a little south of the parking area. As I worked to get the group up to speed with moonlight photography, I tried a few frames of my own.
Most of my moonlight images are fairly wide, and even the closest focus point is far enough away to be at infinity, even wide open. But the rocks here were close enough, and my focal length was long enough (57mm), that I stopped down from f4 to f5.6 to increase my margin for error. And rather than autofocusing on the moon as I normally do, I focused toward the back of the foreground rocks. As I hope you can see in this low-res web version, I made the right focus choices.
The other problem I had to contend with was motion blur in the stars. At the 16mm to 24mm I typically use for night photography (to maximize the number of stars), motion blur isn’t much of a problem, even at 30 seconds. But at nearly 60mm, I didn’t think I could get away with 30 seconds. This is the first time I’d tried my Sony a7RII at night—I usually use my a7S, but I’d heard such good things about the a7RII’s high ISO capability that I thought I’d try it.
Bumping the ISO to 3200 (from my moonlight standard of 800), I was able to drop my shutter speed to 15 seconds. This image is so clean at 3200, and the star motion is visible enough, that I regret now that I didn’t go to ISO 6400 and cut my shutter speed to 8 seconds. Next time….
Workshop schedule
A gallery of potential rejects
(Images that might not make the cut at a camera club competition)
Click an image for a closer look, and a slide show. Refresh the screen to reorder the display.


Stop the madness
Posted on February 25, 2016
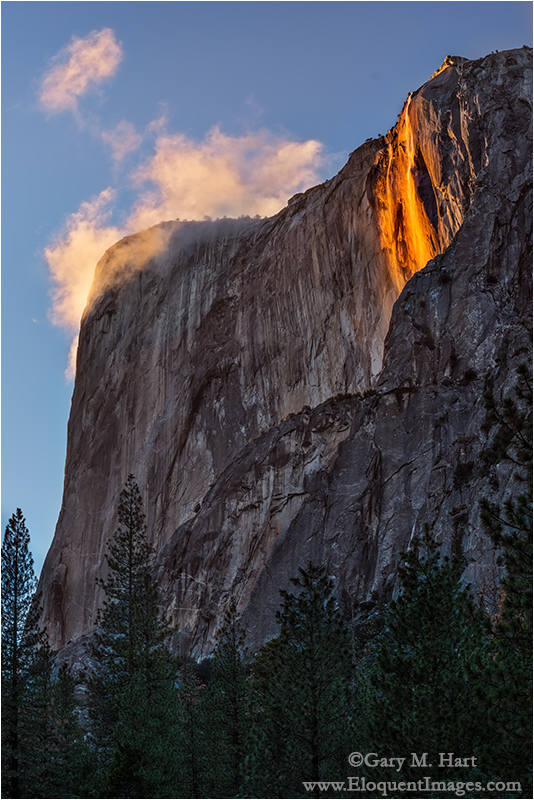
Horsetail Fall and Clouds, El Capitan, Yosemite
Sony a7R II
Sony/Zeiss 24-70 f4
1/40 seconds
F/8
ISO 160
For some background, read about photographing Horsetail Fall
Anyone who doesn’t understand what all the Horsetail hubbub’s about hasn’t seen it. When all the conditions align—ample water (rain and/or snowmelt), sun position, and unobstructed sunset light—there’s nothing in the world that compares. And while these convergences are rare, that doesn’t seem to deter the gawkers who show up to witness it.
Conventional wisdom says that the end of February is the best time to photograph Horsetail Fall. And if there’s one thing many years of photography has taught me, it’s that trophy-hunting photographers rarely deviate from conventional wisdom. Because Yosemite’s proximity to San Francisco, Los Angeles, and all the Central Valley cities makes it an easy target for photographers with only enough time for a quick trip, I usually avoid February’s final two weekends when I schedule my Yosemite Horsetail Fall workshop. But this year I couldn’t resist the full moon, which I knew I could align with Half Dome on multiple workshop nights.
For a workshop leader, another Horsetail Fall dilemma is that when the sunset light isn’t just right, there are many much better photo options elsewhere in the park. Spending an afternoon waiting for Horsetail Fall to do its thing on a day when the light decides to take the day off (always a distinct possibility) means pretty much wasting the best time of day for photography in Yosemite. That problem is compounded by the fact that the western horizon isn’t visible from the valley floor, making it impossible to anticipate what the sunset light is going to do until it’s doing it. For each time I’ve been surprised when a shaft of light slips beneath overcast skies to illuminate El Capitan at the very last minute, I can cite a clear sky sunset that was snuffed by an unseen cloud just as the light started to get good.
My plan for this workshop was to go for Horsetail Thursday evening, and again Friday if Thursday didn’t work out, then concentrate on the moon for the final two sunsets. I figured by the time Saturday came, anyone whose life depended on photographing Horsetail Fall would have enough experience to do it on their own.
The workshop started Thursday afternoon, and because it had snowed earlier that day, I postponed the orientation until after dinner so we could go straight out and start shooting. After an hour or so photographing light-catching clouds and waterfall rainbows (Horsetail and Bridalveil Falls) from Tunnel View, we beelined to the picnic area beneath El Capitan. Despite the fact that we were far from the first photographers there, my group managed to score the last three legal spaces in the parking lot (that’s not to say others arriving after us weren’t able to employ creative parking strategies), and we found plenty of room to set up and wait with fingers crossed for the Horsetail show.
Aside from a handful of for-the-record images (to remind myself of the conditions for each year), I rarely photograph Horsetail anymore. But conditions that evening were so nice that at one point I actually had both tripods set up, one with my a7RII and 24-70 for wider images, the other with my a6000 and 70-200 for tighter compositions. Rather than the standard stand-around-and-wait-for-the-light-to-get-good experience that’s the hallmark of a Horsetail shoot, lots of water in the fall and clouds swirling on and around El Capitan made our entire 90-minute wait photographable.
While I’ve seen Horsetail get more red than what we saw, everyone was so thrilled that I was able to declare Horsetail Fall captured for 2016, freeing my group to spend the rest of the workshop’s sunsets concentrating on other things. Phew.
It wasn’t until we tried to navigate Yosemite Valley during the workshop’s final three days that I fully appreciated how fortunate we were to be done with Horsetail Fall. I’ll spare you the gory details and instead just give you the bullet points of what we witnessed Friday, Saturday, and Sunday:
- The Southside Drive parking area (with room for a dozen or so cars) closest to the most popular Horsetail View on that side of the river was full by 9 a.m. So were all the prime views of the fall at that location.
- By 3 p.m. (sunset was about 5:45) the parked cars, crammed bumper-to-bumper in Southside Drive’s coned-off left lane, stretched two miles, from just past the Cathedral Beach to Sentinel Meadow (I clocked it on my odometer).
- Many of the early arriving, legally parked cars were completely blocked by a second row of late-arriving cars whose drivers apparently decided that merely being able to fit into an area made it parking spot. The pinned first-arriving drivers would be stuck until the late-arriving drivers moved their cars.
- Many cars had simply gone off-road and parked in the forest, apparently deciding that paying towing and/or ticket charges was preferred to parking legally and walking a mile or two.
- Several times traffic in the lane that was supposed to be moving (not designated for parking) stopped long enough that drivers got out to find out what the holdup was. The only time I saw the cause, it was a driver using the driving lane to turn around and squeeze perpendicularly between two parallel-parked cars.
- On both sides of the road, every possible square inch of forest containing even a partial view of Horsetail Fall was crammed full of tripods, sometimes stacked 100 photographers deep (I didn’t actually count, but I think that’s a pretty good estimate). I heard through the grapevine that the general mood at these scrums was testy.
- I personally redirected many photographers poised to photograph the wrong waterfall—some were clustered around Bridalveil Fall, others had targeted Ribbon Fall.
- We saw man getting handcuffed and arrested by rangers. It may have been a routine DUI arrest, but I wouldn’t be surprised if it was some kind of Horsetail-view real estate violence. Interestingly, that was the only time I saw rangers all weekend—it was almost as if they’d thrown up their hands in defeat.
- After sunset, the lines at the Yosemite Lodge cafeteria stretched out the door, and we heard from others that the cafeteria actually closed for the night while there were still hundreds outside, waiting to get in.
- Gridlock exiting the park after sunset was so bad that some drivers just gave up.
While I can’t fix the crowds, I do believe the Horsetail Fall experience can be both rewarding and enjoyable. Despite the crowds, I still enjoy it after all these years, and I never cease to be awed by the beauty. Here my suggestions for anyone considering joining the fray next year:
- Avoid the weekends. Period.
- While I think the best views on Southside Drive are better than the views from (and near) the El Capitan picnic area, the dense forest near the river means far fewer good views on Southside Drive. Also, the proximity to the river means photographers will to include the river in their frame—they tend to be less than thrilled when someone encroaches on their frame. This all adds up to more tension on Southside Drive.
- Conversely, the mood at the El Capitan picnic is generally more like a tailgate party, with people mingling and barbecuing. That’s because the view of Horsetail Fall is much more open than on Southside Drive, and poor foreground options make it almost exclusively a telephoto location. In other words, everyone is point up with a telephoto lens and no one is in anyone else’s way.
- Arrive early, or be prepared to walk a mile or more.
- If I weren’t leading a group and really wanted to maximize my mobility, I’d bring a bike and just park wherever it’s convenient.
And don’t forget that you have options. If the crowds become too much for you, you could simply forget Horsetail Fall and concentrate on the other great winter scenes that are everywhere in Yosemite.
Avoid the mayhem in my
2017 Yosemite Horsetail Fall and Winter Moon photo workshop
Winter in Yosemite


