Eloquent Images by Gary Hart
Insight, information, and inspiration for the inquisitive nature photographer
Fall Color Photography Tips
Posted on September 13, 2020
Autumn Yin and Yang, Bridalveil Creek, Yosemite
Canon EOS-1Ds Mark II
Canon 70-200 f/4 L
10 seconds
F/13
ISO 100
This is the second of my two-part fall color series
Read part one: The Why, How, and When of Fall Color
Vivid color and crisp reflections make autumn my favorite season for creative photography. While most landscape scenes require showing up at the right time and hoping for the sun and clouds to cooperate, photographing fall color can be as simple as circling your subject until the light’s right. For photographers armed with an understanding of light and visual relationships, and the ability to control exposure, depth, and motion with their camera’s exposure variables, fall color possibilities are virtually unlimited.
Backlight, backlight, backlight
The difference between the front-lit and backlit sides of fall foliage is the difference between dull and vivid color. Glare and reflection make the side of a leaf facing its light source, whether that leaf is in direct sunlight or simply faces an overcast sky, appears flat. But the other side of the same leaf, the side that’s opposite the light from the sun or sky, glows with color.
In the image below (Autumn Reflection, Merced River, Yosemite), my camera has captured the sky-facing side of most of the leaves. But I’ve captured the underside of the leaves on the top-right of the branch—even though it’s an overcast day, can you see how these backlit leaves glow compared to the others?

Autumn Reflection, Merced River, Yosemite
The moral of this story? If you ever find yourself disappointed that the fall color seems washed out, check the other side of the tree.
Isolate elements for a more intimate fall color image
Big fall color scenes are great, but isolating your subject with a telephoto, and/or by moving closer, enables you to highlight and emphasize specific elements and relationships.
- Train your eye to find leaves, groups of leaves, or branches that stand alone from the rest of the tree or scene, or that stand out against a contrasting background.
- Zoom close, using the edges of the frame to eliminate distractions and frame subjects.
- Don’t concentrate so much on your primary subject that you miss complementary background or foreground elements that can balance the frame and provide an appealing canvas for your primary subject.
Selective depth of field is a great way to emphasize/deemphasize elements in a scene
Limiting depth of field by composing close with a large aperture and/or telephoto lens can soften a potentially distracting background into a complementary canvas of color and shape. Parallel tree trunks, other colorful leaves, and reflective water make particularly effective soft background subjects. For an extremely soft background, reduce your depth of field further by adding an extension tube to focus even closer.
Underexpose sunlit leaves to maximize color
Contrary to what many believe, fall foliage in bright sunlight is still photographable if you isolate backlit leaves against a darker background and slightly underexpose them. The key here is making sure the foliage is the brightest thing in the frame, and to avoid including bright sky in the frame. Photographing sunlit leaves, especially with a large aperture to limit DOF, has the added advantage of an extremely fast shutter speed that will freeze wind-blown foliage.
Slightly underexposing brightly lit leaves not only emphasizes their color, it turns everything that’s in shade to a dark background. And if your depth of field is narrow enough, points of light sneaking between the leaves and branches to reach your camera will blur to glowing jewels.


A sunstar is a great way to liven up an image in extreme light
If you’re going to be shooting backlit leaves, you’ll often find yourself fighting the sun. Rather than trying to overcome it, turn the sun into an ally by hiding it behind a tree. A small aperture (f16 or smaller is my general rule) with a small sliver of the sun’s disk visible creates a brilliant sunstar that becomes the focal-point of your scene. Unlike photographing a sunstar on the horizon, hiding the sun behind a terrestrial object like a tree or rock enables you to move with the sun.
When you get a composition you like, try several frames, varying the amount of sun visible in each. The smaller the sliver of sun, the more delicate the sunstar; the more sun you include, the more bold the sunstar. You’ll also find that different lenses render sunstars differently, so experiment to see which lenses and apertures work best for you.


Motion blur
When photographing in overcast or shade, it’s virtually impossible to freeze the motion of rapid water at any kind of reasonable ISO. Rather than fight it, use this opportunity to add silky water to your fall color scenes. There’s no magic shutter speed for blurring water—in addition to the shutter speed, the amount of blur will depend on the speed of the water, your distance from the water, your focal length, and your angle of view relative to the water’s motion.
All blurs aren’t created equal. When you find a composition you like, don’t stop with one click. Experiment with different shutter speeds by varying the ISO (or aperture as long as you don’t compromise the desired depth of field).
Reflections make fantastic complements to any fall color scene
By autumn, rivers and streams that rushed over rocks in spring and summer, meander at a leisurely, reflective pace. Adding a reflection to your autumn scene can double the color, and also add a sense of tranquility. The recipe for a reflection is still water, sunlit reflection subjects, and shaded reflective surface.
When photographing leaves floating atop a reflection, it’s important to know that the focus point for the reflection is the focus point of the reflective subject, not the reflective surface. This is seems counterintuitive, but try it yourself—focus on the leaves with a wide aperture and watch the reflection go soft; then focus on the reflection and watch the leaves go soft.
A wide focal length often provides sharpness from the nearby leaves to the infinite reflection, but sometimes achieving sharpness in your floating leaves and the reflection requires careful hyperfocal focus. And sometimes the necessary depth of field exceeds the camera’s ability to capture it—in this case, I almost always bias my focus toward the leaves and let the reflection go a little soft.
Don’t forget the polarizer
I can’t imagine photographing fall color without a polarizer. Fall foliage has a reflective sheen that dulls its natural color, so a properly oriented polarizer can erase that sheen and bring the underlying natural color into prominence. Not are reflections on the foliage a problem, reflections on nearby water and rocks can pull the eye and distract from your primary subject.
To minimize the scene’s reflection, slowly turn the polarizer until the scene is darkest (the more you try this, the easier it will be to see). If you have a hard time seeing the difference, concentrate your gaze on a single leaf, rock, or wet surface.

Fallen Color, Rock Creek Canyon, Eastern Sierra
A polarizer isn’t an all-on or all-off proposition. When photographing a scene with still water, it’s often possible to maximize a reflection in the water without dialing up the reflection on the leaves. To achieve this, dial the polarizer’s ring and watch the reflection change until you achieve the effect you desire. This technique is particularly effective when you want your reflection to share the frame with submerged feature such as rocks, leaves, and grass. In the image below, I turned my polarizer just enough to reveal the nearby submerged rocks without removing the mountain a trees reflection.

Morning Reflection, North Lake, Eastern Sierra
Nothing communicates the change of seasons like fall color with snow
Don’t think the first snow means your fall photography is finished for the year. Hardy autumn leaves often cling to branches, and even retain their color on the ground through the first few storms of winter. An early snowfall is an opportunity to catch fall leaves etched in white, an opportunity not to be missed. And even after the snow has been falling for a while, it’s possible to find a colorful rogue leaf to accent an otherwise stark winter scene.
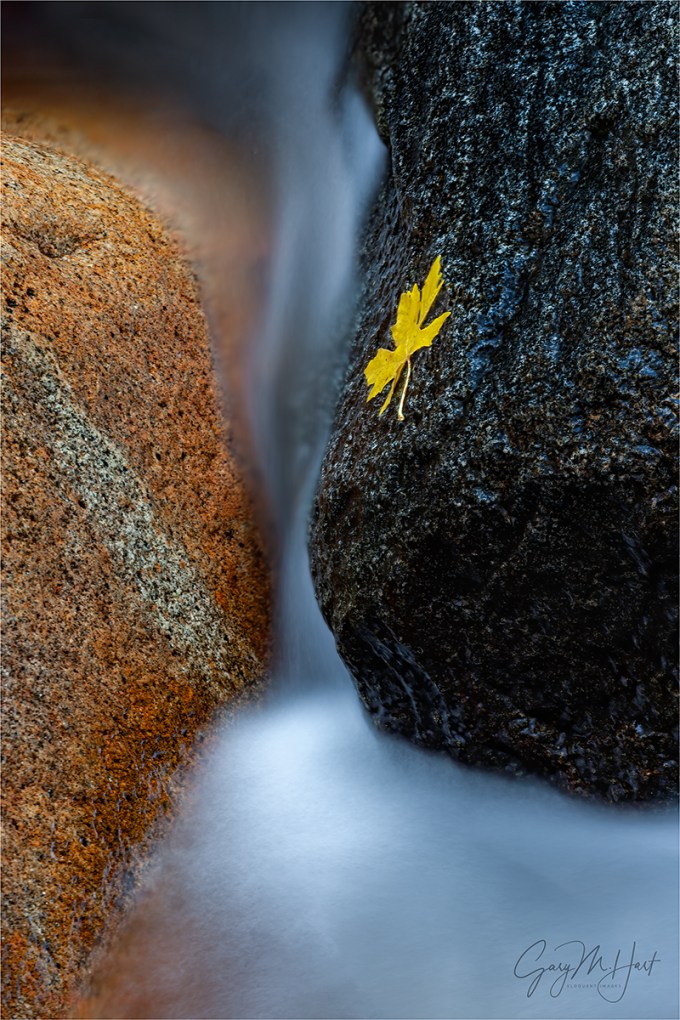
About this image

Autumn Yin and Yang, Bridalveil Creek, Yosemite
People sometimes accuse me of adding or positioning leaves in my frame. Those who know me know I don’t do that, but that doesn’t protect me from their (good natured) abuse. For those who don’t know me and who don’t believe I found this leaf like that, I don’t really know what to say, except to explain that the joy I get from photography comes from discovering natural beauty, and a manufactured scene that isn’t natural has zero appeal to me. (I think this is also why I don’t do composites.) I don’t think it’s wrong to place elements in a frame (or to blend multiple images), as long as it’s done honestly—it’s just not something that interests me. But anyway…
I don’t really understand why people think it’s so unusual to find a leaf (or two, or three…) isolated from its surroundings. I aggressively look for small scenes like this, so it should be no surprise that I have a lot of them in my portfolio. While the position of the leaves in my images is randomly determined by nature (or maybe by the unscrupulous photographer who preceded me at the scene), there’s nothing random about my position when I capture these scenes.
Probably my favorite place to photograph isolated leaves is Bridalveil Creek, just beneath Bridalveil Fall in Yosemite. The entire area is decorated with an assortment of deciduous trees that deposit their leaves liberally among the rocks and cascades each fall. And unlike Yosemite’s other waterfalls, Bridalveil Fall runs year-round. Even in autumn, when it’s often barely more than a trickle, there’s enough water to cascade, splash, and pool among the rocks.
Another great thing about Bridalveil Creek is that its location just beneath Cathedral Rocks and Leaning Tower means it gets very little direct sunlight in autumn. So even when the sun’s out, I can spend hours photographing here in the full shade that’s ideal for this type of photography.
On this cloudy October morning I was doing my usual thing, bounding about on the rocks upstream from the trail looking for single leaves to isolate in my frame. My of the cascades here are active enough to splash and wet the rocks, so when a descending leaf hits a wet rock just right, it sticks like glue. I didn’t see this leaf land and stick, but I’ve seen it happen enough to know this isn’t that unusual.
This cascade was about 20 feet away, above a pool that was deeper than I wanted to wade, so I went to my 70-200 lens. I spent a little time casually working this scene, circling, framing it from a variety of positions using different focal lengths. But when I got to this spot and saw the smooth curves and dark flowing into light, my mind immediately went to the Yin and Yang symbol (okay, so maybe you need use your imagination a bit). I dropped down a bit and refined my composition, then started working on the exposure.
Not only was this spot in full shade, the morning was overcast. With my polarizer on to cut the sheen on the rocks and leaves, I knew that slowing the water enough to capture any detail was virtually impossible, so I went all-in on the motion blur and just turned the water a homogenous white. It turns out this decision actually enhanced the yin/yang effect I was going for.
Workshop Schedule || Purchase Prints || Instagram
To better understand the science and timing of fall color, read
The Why, How, and When of Fall Color
A Gallery of Fall Color


, Yosemite")


:: More photography tips ::
The Why, How, and When of Fall Color
Posted on September 6, 2020
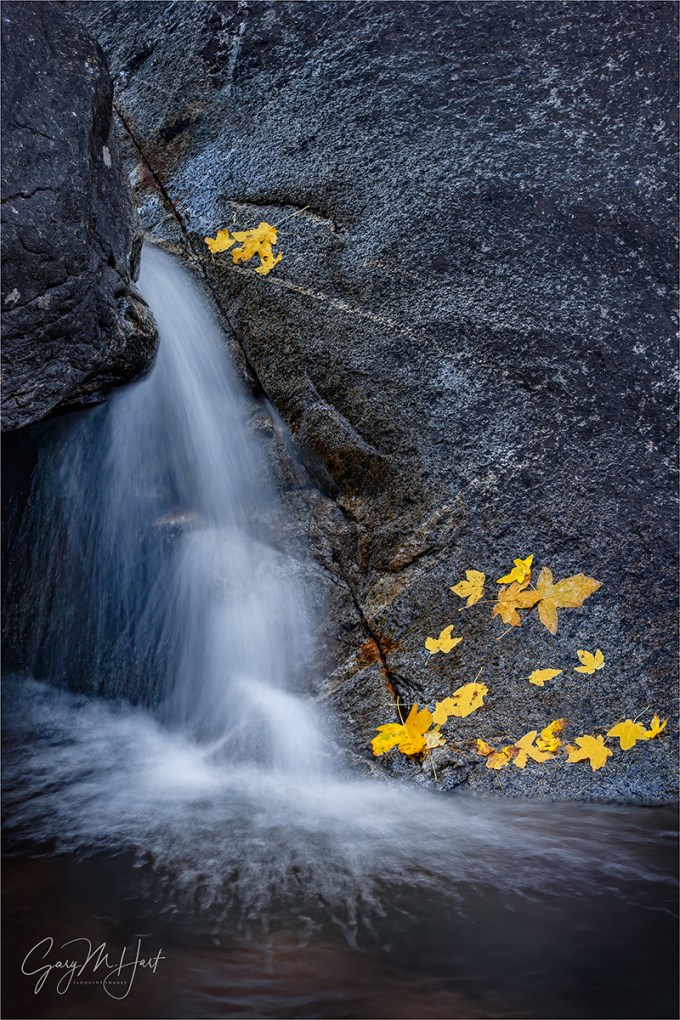
Autumn Cascade, Bridalveil Creek, Yosemite (2005)
Canon EOS-1Ds Mark II
Canon 70 – 200 f/4 L
1 second
F/10
ISO 160
Autumn is right around the corner. To get things started, I’ve updated a previous post that demystifies why, how, and when of fall color.
Few things get a photographer’s heart racing more than the vivid yellows, oranges, and reds of autumn. And the excitement isn’t limited to photographers—to appreciate that reality, just try navigating New England backroads on a Sunday afternoon in the fall.
Innkeeper logic
Despite all the attention, the annual autumn extravaganza is fraught with mystery and misconception. Showing up at at the spot that guy in your camera club told you was peaking at this time last year, you might find the very same trees displaying lime green mixed with just hints of yellow and orange, and hear the old guy behind the counter at the inn shake his head and tell you, “It hasn’t gotten cold enough yet—the color’s late this year.” Then, the next year, when you check into the same inn on the same weekend, you find just a handful of leaves clinging to exposed branches—this time as the old guy hands you the key to your room he utters, “That freeze a couple of weeks ago got the color started early this year—you should have been here last week.”
While these explanations may sound reasonable, they’re not quite accurate. Because the why and when of fall color is complicated, observers resort to memory, anecdote, and lore to fill knowledge voids with partial truth and downright myth. And while we still can’t predict fall color the way we do the whether, science has provided a pretty good understanding of the fall color process.
A tree’s color
The leaves of deciduous trees contain a mix of green, yellow, and orange pigments. During the spring and summer growing season, the volume and intensity of the green chlorophyl pigment overpowers the orange and yellow pigments and the tree stays green. Even though chlorophyl is quickly broken down by sunlight, the process of photosynthesis that turns sunlight into nutrients during the long days of summer continuously replaces the spent chlorophyl.
As the days shrink toward autumn, things begin to change. Cells at the abscission layer at the base of the leaves’ stem (the knot where the leaf connects to the branch) begin the process that will eventually lead to the leaf dropping from the tree: Thickening of cells in the abscission layer blocks the transfer of carbohydrates from the leaves to the branches, and the movement of minerals to the leaves. Without these minerals, the leaves’ production of chlorophyl dwindles and finally stops, leaving just the yellow and orange pigments. Voilà—fall color!
The role of sunlight and weather
Contrary to popular belief, the timing of the onset of this fall color chain reaction depends much more on daylight than it does on temperature and weather. Triggered by a genetically programmed day/night-duration threshold (and contrary to innkeeper-logic), the trees in any given region will commence their transition from green to color at about the same time each year, when the day length drops to a certain point.
Nevertheless, though it doesn’t trigger the process, weather does play a significant part in the intensity, duration, and demise of the color season. Because sunlight breaks down the green chlorophyl, cloudy days after the suspension of chlorophyl creation will slow the chlorophyl’s demise and the coloring process that follows. And while the yellow and orange pigments are present and pretty much just hanging out while they wait all summer for the chlorophyl to relinquish control of the tree’s color, a tree’s red and purple pigments are manufactured from sugar stored in the leaves—the more sugar, the more vivid a tree’s red. Ample moisture, warm days, and cool (but not freezing) nights after the chlorophyl replacement has stopped are most conducive to the creation and retention of the sugars that form the red and purple pigments.
On the other hand, freezing temperatures destroy the color pigments, bringing a premature end to the color display. Drought can stress trees so much that they drop their leaves before the color has a chance to manifest. And wind and rain can wreak havoc with the fall display—go to bed one night beneath a canopy of red and gold, wake the next morning to find the trees bare and the ground blanketed with color.
Since the fall color factors come in a virtually infinite number of possible variations and combinations, the color timing and intensity can vary a lot from year to year. Despite expert advice that seems promise precise timing for the fall color, when planning a fall color trip, your best bet is to try to get there as close as possible to the middle of the color window, then cross your fingers.
About this image
Looking for something to do in this COVID-constrained world, I dialed my way-back machine all the way back to 2005 and landed on this image. I wish I could tell you I have a memory of its capture, but I don’t. I do, however, have lots of general memories of photographing fall color at Bridalveil Creek in Yosemite, just below Bridalveil Fall. Since I’ve never visited Yosemite in autumn without shooting here, when I set out find a fall color image in my archives, I specifically targeted my Bridalveil Creek shoots.
I started by digging up another image from this trip that I’ve always liked, but felt was too soft to share. Given that I virtually never take a single frame of a nice scene, I was pretty confident that I’d find something similar, and crossed my fingers that the sharpness problem was a one-off that I quickly corrected. This is actually the very next image I clicked, and I was very pleased to confirm that it is indeed sharp.
This image is a perfect example of my approach to intimate fall color scenes: Look for color to juxtapose with another feature in the scene. Often that’s a single leaf (no, I do not place leaves, ever), but in this case I accented a nice little cascade with a group of fallen leaves that were plastered against water-soaked granite. And when there’s water motion in the scene, I usually shoot it at a variety of shutter speeds to give myself multiple motion effects to choose between. Looking through my captures from this shoot, I can tell that’s exactly what I did. This image is a 1-second exposure, long enough to blur the cascade, but not so long that I obliterated all detail. And though I have no memory of it, I know I used a polarizer because I always use a polarizer when photographing fall color, and I can tell that the sheen has been removed from the rocks, leaves, and water.
Autumn Intimates
Click an image for a closer look, and to view a slide show.


Vive la Différence
Posted on August 30, 2020
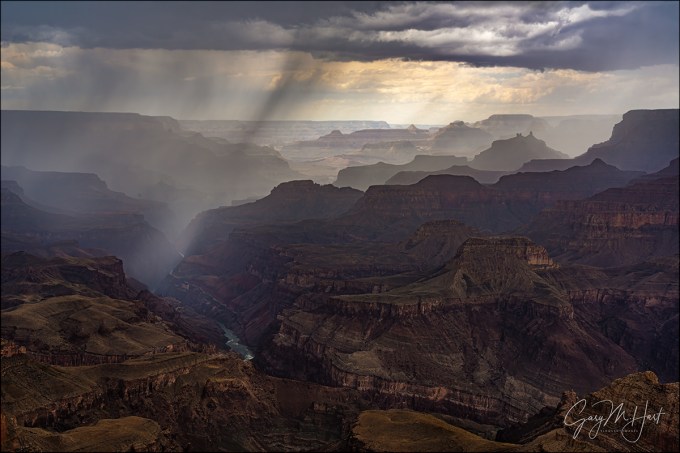
Summer Storm, Lipan Point, Grand Canyon
Sony a7RIV
Sony 24-105 G
1/8 second
F/16
ISO 50
Distinct Perspectives
The feel at the Grand Canyon is expansive, while standing amidst Yosemite’s towering monoliths, the feel is more intimate
I love photographing weather, and because Yosemite’s and the Grand Canyon’s distinctions affect the way their weather is experienced, their weather very much factors into the way I photograph them. In Yosemite Valley I feel like I’m actually in the weather, which is why, for better or worse, when a storm rages in Yosemite, I like to venture out into it. From swirling clouds to fresh snow, these adventures are the source of many of my favorite Yosemite images
At the Grand Canyon, on the other hand, the best photography happens when I feel like I’m photographing someone else’s weather, so when a storm approaches, I try to retreat to a place where I can observe it from a distance. Even when lightning doesn’t make this a safety choice, I like to stand back and observe the weather. Standing on the rim, I can be high and dry beneath bland skies while photographing some of the most exquisite beauty I’ve ever seen. Often that’s lightning, rainbows, or a vivid sunrise/sunset, but sometimes it’s just the play of clouds and light in and around the layered red rocks and tributary canyons.

Summer Storm, Lipan Point, Grand Canyon
Last month my brother and I traveled to the Grand Canyon, primarily to photograph lightning and Comet NEOWISE. NEOWISE came through wonderfully, but the lightning not so much. I lost track of the number of times I trained my camera on a promising cell that didn’t deliver, but thankfully lightning is not a prerequisite for great Grand Canyon photography.
This image is the product of one such disappointing lightning shoot. I’d watched the cell move toward the rim from the south and would have bet money that it was bringing lightning with it. I set up my tripod, mounted my Sony a7RIV and Lightning Trigger, and waited with my eyes locked on the rain curtain, willing with all the effort I could muster the lightning to manifest. But alas, as happened far too frequently on this trip, the lightning fizzled. But lightning or not, I couldn’t help appreciate the drama unfolding when a band of heavy rain sped across the canyon. It only took about four minutes for this rain band to span the width of my frame and fizzle as it approached Wotan’s Throne on the North Rim (just out of the frame on the right).
I’d be lying if I said I rushed back to my room and instantly downloaded and processed this image, but working on the images from this trip, this moment stuck in the back of my mind. After I’d gone through the lightning images (exactly one worthy of processing), and the NEOWISE shoots (far more productive), I did another pass looking for some of the beautiful clouds and light that had blessed us, including this wet cell’s brief sprint across the canyon. When I found it I was pleased to see that the moment was indeed as dramatic as my memory.
Workshop Schedule || Purchase Prints || Instagram
Vive la différence
Click an image for a closer look, and to view a slide show.


California Burning
Posted on August 23, 2020

Oaks and Smoke, Sierra Foothills, California
Sony a7RIV
Sony 100-400 GM
1/30 seconds
F/6
ISO 100
That my hometown topped 110 degrees several days last week isn’t especially newsworthy—100+ degrees happens maybe 20 times in an average Sacramento summer, and we hit 110 for a day or two every two or three years. But adding thunderstorms to the extreme temperatures is indeed unprecedented for California. And with the thunderstorms came the fires that have filled the sky with thick smoke and given the state an end of days vibe.
The fires are still burning, torching our forests and hills to the tune of 1,000,000+ acres burned, with no end in sight. I’m fortunate to live near the Sacramento–San Joaquin River Delta, where we don’t really need to worry about fire (but you might want to check on me if you hear about floods in Sacramento). Even though the closest fire is about 30 miles away, the smoke here is oppressive, at times so thick that it’s not safe to go outside.
To say this year has been a challenge for all of us would be an understatement. We each have our own way of coping, and one thing that has helped me maintain my sanity during the pandemic is getting out and walking the neighborhood several times each day. I’ll start a typical day with a pretty brisk 3 to 5 mile walk, then throughout the day, whenever I start to feel a little cabin fever setting in, I’ll take a more leisurely 1 or 2 mile walk—by the end of most days I’ve logged 8 to 10 miles, then I go to bed, wake up, and do it again.
But with the heat and smoke driving me inside 24×7, by the middle of last week I was beginning to feel a little crazy. So on one particularly smoky day (they all run together), I loaded my camera gear into the car, put the AC on recirculate, and headed to the hills. I had no illusions that I’d escape the smoke, but I just needed to see something different. The plan was to find some oaks against the sky and make some pictures of the orange sun.
I’d hoped to find trees far enough from the road that I could supersize the sun with my Sony 200-600, but after driving around a bit searching for elevated trees that I could align with the sun, I settled for this pair that was maybe 100 yards away. There was no parking here, and the rutted shoulder dipped steeply and only offered about a foot more than a car-width between the pavement and barbed-wire fence, but I squeezed in, thankful for my Outback’s AWD.
The smell of smoke hit me the second I opened my door, but I ignored the burning in my eyes and throat and got to work (I’m blessed to be in good health, with no respiratory problems). I grabbed my tripod from the back of the car, attached my Sony a7RIV, mounted my Sony 100-400, and crossed the road to set up as far from the trees as possible. It was about 45 minutes before sunset, but already the light felt like twilight. I thought I’d have about 30 minutes of shooting before the sun dipped below the hill, but framing up my first shot I realized that the sun was being swallowed by the smoke. Less than three minutes after I took this picture the sun was gone without a trace, not even a bright patch in the smoke, and I was done.
Workshop Schedule || Purchase Prints || Instagram
California feels like ground-zero for climate change, so when I hear people’s indefensible explanations for why it’s not real (or why humans aren’t responsible), I get a little irritated. From many of the comments I’ve heard, it’s pretty clear that some people just don’t understand it well enough to have an opinion, so a couple of years ago I wrote a blog explaining climate change in the simplest terms possible. I updated and re-shared this blog on my Facebook page a few days ago, and while the response was largely positive, I did get some pushback from a couple of people who still don’t realize that the debate is over. So I’ve appended it to the bottom of this post (beneath the Sun and Smoke gallery). If you have doubts about climate change, please take the time to read it. And if you still have doubts, before you push back, please be prepared to answer two questions:
- Do you not believe the greenhouse effect is real?
- Or do you not believe that humans are adding enough greenhouse gases to our atmosphere to make a difference?
Sun and Smoke
Click an image for a closer look, and to view a slide show.


Sun and Smoke, Sierra Foothills, California
Sony a6300
Sony 100-400 GM
Sony 2x teleconverter
ISO 100
f/16
1/8 second
Humans, we have a problem
Earth’s climate is changing, and the smoking gun belongs to us. Sadly, in the United States policy lags insight and reason, and the world is suffering.
Climate change science is complex, with many moving parts that make it difficult to communicate to the general public. Climate change also represents a significant reset for some of the world’s most profitable corporations. Those colliding realities created a perfect storm for fostering the doubt and confusion that persists among people who don’t understand climate science and the principles that underpin it.
I’m not a scientist, but I do have enough science background (majors in astronomy and geology before ultimately earning my degree in economics) to trust the experts and respect the scientific method. I also spent 20 years doing technical communication in the tech industry (tech writing, training, and support) for companies large and small. So I know that the fundamentals of climate change don’t need to intimidate, and the more accessible they can be to the general public, the better off we’ll all be.
It’s personal
Recently it feels like I’ve been living on the climate change front lines. On each visit to Yosemite, more dead and dying trees stain forests that were green as recently as five years ago. And throughout the Sierra (among other places), thirsty evergreens, weakened by drought, are under siege by insects that now thrive in mountain winters that once froze them into submission. More dead trees means more fuel, making wildfires not just more frequent, but bigger and hotter.
Speaking of wildfires, for a week last month I couldn’t go outside without a mask thanks to smoke from the Camp Fire that annihilated Paradise (70 miles away). I have friends who evacuated from each of this November’s three major California wildfires (Camp, Hill, and Woolsey), and last December the Thomas Fire forced a two-week evacuation of Ojai, where my wife and I rent a small place (to be near the grandkids). Our cleanup from the Thomas fire took months, and we still find ash in the most unexpected places (and we were among the lucky who had a home to clean).
The debate is dead
Despite its inevitable (and long overdue) death, the climate change debate continues to stagger on like a mindless zombie. We used to have to listen to the skeptics claim that our climate wasn’t changing at all, so I guess hearing them acknowledge that okay-well-maybe-the-climate-is-changing-but-humans-aren’t-responsible can be considered progress.
Despite what you might read on social media or fringe websites, climate change alternative “explanations” like “natural variability” and “solar energy fluctuations” have been irrefutably debunked by rigorously gathered, thoroughly analyzed, and closely scrutinized data. (And don’t get me started on the whole “scientists motivated by grant money” conspiracy theory.)
Science we all can agree on
One thing that everyone does agree on is the existence of the greenhouse effect, which has been used for centuries to grow plants in otherwise hostile environments.
As you may already know, a greenhouse’s transparent exterior allows sunlight to penetrate and warm its interior. The heated interior radiates at longer wavelengths (infrared) that don’t escape as easily through the greenhouse’s ceiling and walls. That means more heat is added to a greenhouse than exits it, so the interior is warmer than the environment outside.
There’s something in the air
Perhaps the most common misperception about human induced climate change is that it’s driven by all the heat we create when we burn stuff. But that’s not what’s going on, not even close.
Our atmosphere behaves like a greenhouse, albeit with far more complexity. The sun bathes Earth with continuous electromagnetic radiation that includes infrared, visible light, and ultraviolet. Solar radiation not reflected back to space reaches Earth’s surface to heat water, land, and air. Some of this heat makes it back to space, but much is absorbed by molecules in Earth’s atmosphere, forming a virtual blanket that makes Earth warmer than it would be without an atmosphere. In a word, inhabitable.
Because a molecule’s ability to absorb heat depends on its structure, some molecules absorb heat better than others. The two most common molecules in Earth’s atmosphere, nitrogen (N2: two nitrogen atoms) and oxygen (O2: two oxygen atoms), are bound so tightly that they don’t absorb heat. Our atmospheric blanket relies on other molecules to absorb heat: the greenhouse gases.
Also not open for debate is that Earth warms when greenhouse gases in the atmosphere rise, and cools when they fall. The rise and fall of greenhouse gases has been happening for as long as Earth has had an atmosphere. So our climate problem isn’t that our atmosphere contains greenhouse gases, it’s that human activity changes our atmosphere’s natural balance of greenhouse gases.
Earth’s most prevalent greenhouse gas is water vapor. But water vapor responds quickly to temperature changes, leaving the atmosphere relatively fast as rain or snow, while other greenhouse gases hold their heat far longer.
The two most problematic greenhouse gases are carbon dioxide (CO2: one carbon atom bonded with two oxygen atoms) and methane (CH4: one carbon atom bonded with four hydrogen atoms). The common denominator in these “problem” gases is carbon. (There are other, non-carbon-based, greenhouse gases, but for simplicity I’m focusing on the most significant ones.)
Carbon exists in many forms: as a solo act like graphite and diamond, and in collaboration with other elements to form more complex molecules, like carbon dioxide and methane. When it’s not floating around the atmosphere as a greenhouse gas, carbon in its many forms is sequestered in a variety of natural reservoirs called a “carbon sink,” where it does nothing to warm the planet.
Oceans are Earth’s largest carbon sink. And since carbon is the fundamental building block of life on Earth, all living organisms, from plants to plankton to people, are carbon sinks as well. The carbon necessary to form greenhouse gases has always fluctuated naturally between the atmosphere and natural sinks like oceans and plants.
For example, a growing tree absorbs carbon dioxide from the atmosphere, keeping the carbon and expelling oxygen (another simplification of a very complex process)—a process that stops when the tree dies. As the dead tree decomposes, some of its carbon is returned to the atmosphere as methane, but much of it returns to the land where it is eventually buried beneath sediments. Over tens or hundreds of millions of years, some of that sequestered carbon is transformed by pressure and heat to become coal.
Another important example is oil. For billions of years, Earth’s oceans have been host to simple-but-nevertheless-carbon-based organisms like algae and plankton. When these organisms die they drop to the ocean floor, where they’re eventually buried beneath sediment and other dead organisms. Millions of years of pressure and heat transforms these ancient deposits into…: oil.
Coal and oil (hydrocarbons), as significant long-term carbon sinks, were quite content to lounge in comfortable anonymity as continents drifted, mountains lifted and eroded, and glaciers advanced and retreated. Through all this slow motion activity on its surface, Earth’s temperatures ebbed and flowed and life evolved accordingly.
Enter humans. We have evolved, migrated, and built civilizations based on a relatively stable climate. And since the discovery of fire we humans have burned plants for warmth and food preparation. Burning organic material creates carbon dioxide, thereby releasing sequestered carbon into the atmosphere. Who knew that such a significant advance was the first crack in the climate-change Pandora’s Box?
For thousands of years the demand for fuel was met simply by harvesting dead plants strewn about on the ground and the reintroduction of carbon to the atmosphere was minimal. But as populations expanded and technology advanced, so did humans’ thirst for fuel to burn.
We nearly killed off the whales for their oil before someone figured out that those ancient, subterranean metamorphosed dead plants burn really nicely. With an ample supply of coal and oil and a seemingly boundless opportunity for profit, coal and oil soon became the driving force in the world’s economy. Suddenly, hundreds of millions of years worth of sequestered carbon was being reintroduced to our atmosphere as fast as it could be produced—with a corresponding acceleration in greenhouse gases (remember, when we burn hydrocarbons, we create carbon dioxide).
Compounding the fossil-fuel-as-energy problem is the extreme deforestation taking place throughout the world. Not only does burning millions of forest and jungle acres each year instantly reintroduce sequestered carbon to the atmosphere, it destroys a significant sink for present and future carbon.
Scientists have many ways to confirm humans’ climate change culpability. The most direct is probably the undeniable data showing that for millennia carbon dioxide in Earth’s atmosphere hovered rather steadily around 280 parts per million (ppm). Then, corresponding to the onset of the Industrial Revolution in the late 18th century, atmospheric carbon dioxide has risen steadily and today sits somewhere north of 400 ppm, with a bullet.
Humans don’t get a pass on atmospheric methane either. While not nearly as abundant in Earth’s atmosphere as carbon dioxide, methane is an even more powerful greenhouse gas, trapping about 30 times more heat than its more plentiful cousin. Methane is liberated to the atmosphere by a variety of human activities, from the decomposition of waste (sewage and landfill) to agricultural practices that include rice cultivation and bovine digestive exhaust (yes, that would be cow farts).
While the methane cycle is less completely understood than the carbon dioxide cycle, the increase of atmospheric methane also correlates to fossil fuel consumption. Of particular concern (and debate) is the cause of the steeper methane increase since the mid-2000s. Stay tuned while scientists work on that….
Balancing act
For humans, the most essential component of Earth’s habitability is the precarious balance between water’s three primary states: gas (water vapor), ice, and liquid. Since the dawn of time, water’s varied states have engaged in a complex, self-correcting choreography of land, sea, and air inputs—tweak one climate variable here, and another one over there compensates.
Earth’s climate remains relatively stable until the equilibrium is upset by external input like solar energy change, volcanic eruption, or (heaven forbid) a visit from a rogue asteroid. Unfortunately, humans incremented the list of climate catalysts by one with the onset of the Industrial Revolution, and our thirst for fossil fuels.
As we’re learning firsthand in realtime, even the smallest geospheric tweak can initiate a self-reinforcing chain reaction with potentially catastrophic consequences for humanity’s long-term wellbeing. For example, a warmer planet means a warmer ocean and less ice, which means more liquid water and water vapor. Adding carbon dioxide to water vapor kicks off a feedback loop that magnifies atmospheric heat: More carbon dioxide raises the temperature of the air—>warmer air holds more water vapor—>more water vapor warms the air more—>and so on.
But that’s just the beginning. More liquid water swallows coastlines; increased water vapor means more clouds, precipitation, and warmer temperatures (remember, water vapor is a greenhouse gas). Wind patterns and ocean currents shift, changing global weather patterns. Oh yeah, and ice’s extreme albedo (reflectivity) bounces solar energy back to space, so shrinking our icecaps and glaciers means less solar energy returned to space even more solar energy to warm our atmosphere, which only compounds the problems.
Comparing direct measurements of current conditions to data inferred from tree rings, ice and sediment cores, and many other proven methods, makes it clear that human activity has indeed upset the climate balance: our planet is warming. What we’re still working on is how much we’ve upset it (so far), what’s coming, and where the tipping point is (or whether the tipping point is already in our rearview mirror).
We do know that we’re already experiencing the effects of these changes, though it’s impossible to pinpoint a single hurricane, fire, or flood and say this one wouldn’t have happened without climate change. And contrary to the belief of many, everyone will not be warmer. Some places are getting warmer, others are getting cooler; some are wetter, others are drier. The frequency and intensity of storms is changing, growing seasons are changing, animal habitats are shifting or shrinking, and the list goes on….
We won’t fix the problem by simply adjusting the thermostat, building dikes and levees, and raking forests. Until we actually reduce greenhouse gases in our atmosphere, things will get worse faster than we can adjust. But the first step to fixing a problem is acknowledging we have one.
About this image

Sun and Smoke, Sierra Foothills, California
The Camp Fire had been burning for ten days, devouring Paradise and filling the air in Sacramento with brown smoke so thick that at times not only could we not see the sun, we couldn’t see the end of the block. But on this afternoon, when an orange ball of sun burned through the smoke I donned a mask, grabbed my camera bag, and headed for the hills.
I have a collection of go-to foothill oak trees for sun and moonsets, but most of these trees are too close to my shooting position for the extreme telephoto image I had in mind. Too close because at this kind of focal length, the hyperfocal distance is over a mile. So I made my way to a quiet country road near Plymouth where I thought the trees might just be distant enough to work. But I’m less familiar with this location than many of my others, so I didn’t know exactly how the trees and sun would align. Turning onto the road, I drove slowly, glancing at the sun and trees until they lined up. Because there wasn’t a lot of room to park on either side, I was pleased that the shoulder at the location that worked best was just wide enough for my car.
Envisioning a maximum telephoto shot, I added my Sony 2X teleconverter to my Sony 100-400 GM lens. While my plan was to use my 1.5-crop Sony a6300, when I arrived the sun was high enough that that combination provided too much magnification, so I started with my full frame Sony a7RIII. But soon as the sun dropped to tree level I switched to the a6300 and zoomed as tight as possible.
When I started the sun was still bright enough that capturing its color made the trees complete silhouettes, with no detail or color in the foreground. But as the setting sun sank into increasingly thick smoke, it became redder and redder and my exposure became easier. It always surprises me how fast the sun and moon move relative to the nearby horizon, so found myself running around to different positions to get the right sun and tree juxtaposition as the sun fell. The smoke near the horizon was so thick that it swallowed the sun before it actually set.
Later I plotted my location and the sun’s position on a map and realized that I was pointing right at San Francisco, about 100 miles away, with a large swath of the Bay Area in between. Then I thought about this air that was thick enough to completely obscure the sun, and the millions of people who had been breathing that air for weeks.
I’d be lying if I said I don’t like this image—it’s exactly what I was going for. But I’d be very happy if I never got another opportunity to photograph something like this.
Learn more
- https://climate.nasa.gov/causes/
- https://grist.org/article/we-broke-down-what-climate-change-will-do-region-by-region/
- https://www.ncdc.noaa.gov/monitoring-references/faq/greenhouse-gases.php
Workshop Schedule || Purchase Prints
Solar Energy
Click an image for a closer look and slide show. Refresh the window to reorder the display.


Your camera is stupid (but you’re not)
Posted on August 16, 2020

New Moon and Oak, Sierra Foothills, California
Sony a6300
Tamron 150-600 (Canon-mount with Metabones IV adapter)
.4 seconds
F/8
ISO 400
In a previous life I spent a dozen or so years doing technical support. In this job a key role was convincing people that, despite all failures and error messages to the contrary, they are in fact smarter than their computers. Most errors occur because the computer just didn’t understand: If I misspel a wurd, you still know what I meen (rite?). Not so with a computer. A computer can’t anticipate, reason, or create; assigned a task, it will blithely continue repeating a mistake, no matter how egregious, until it is instructed otherwise, fails, or destroys itself.
All this applies equally to today’s “smart” cameras, which are essentially computers at their core. But no matter how advanced its technology, a camera just can’t compete with your brain. Really.
For example, if I’d allowed my camera to decide the exposure for this crescent moon scene from 2016, I’d have ended up with a useless mess: While this image is all about color and shape, automatic exposure, deciding that the foreground hillside is important, would have brightened the scene enough to expose distracting detail and completely wash out the color in the sky. But I knew better. Wanting to simplify the scene, I manually metered and banished the extraneous foreground detail to the black shadows, capturing only the moon’s delicate shape and a solitary oak silhouetted against the indigo twilight.
Digital cameras become more technologically advanced each year, and their auto-exposure and -focus capabilities are quite good, good enough that nobody should feel they must switch to manual if they fear it will diminish the pleasure they get from photography. But if your photographic pleasure comes from getting the best possible images, it would benefit you to spend a little time mastering manual metering (and hyperfocal focus), then using that knowledge to override your camera’s programmed inclinations. It might help to know that in my photo workshops I teach (but never require) manual metering to all who are interested, and most who try it are surprised by how easy and rewarding it is to take control of their camera.
Trust your histogram
Exposure control starts by learning to use a histogram, a graph of the tones in an image (read more about histograms). Not only does every digital camera show us a histogram of the scene we just photographed, modern cameras (all mirrorless for sure, and all of the latest DSLRs that I know of) display the histogram for the scene we’re currently metering, before the shutter is clicked.
With a histogram, instead of clicking and hoping as we did in the film days, or clicking, checking, and adjusting as we did in the pre-live-view histogram days, the addition of a histogram before we shoot provides advance knowledge of the image’s exposure. For those who know how to read a histogram, manual exposure has never been easier—just monitor the histogram as you prepare your shot and dial the exposure until the histogram looks right. Click.
Setting up your live-view histogram
To ensure a valid pre-capture histogram (on your DSLR’s live-view screen, or your mirrorless camera’s live-view or viewfinder screen), make sure you are in whatever your camera manufacturer calls exposure simulation. When the camera simulates exposure, rather than always showing the ideal exposure on the live-view screen, it attempts to emulate the exposure settings you’re using. Here is a far from comprehensive guide to the exposure simulation designation used by the major camera manufacturers (though I can’t guarantee that all cameras from the same manufacturer do it the same way):
- Canon: Exposure Simulation (enabled)
- Fuji: Preview Exp. in Manual Mode (off)
- Olympus: Live-view Boost (off)
- Nikon: Exposure Preview (selected in the Info menu)
- Sony: Setting Effect (on)
On most camera’s the metering mode (the way the camera’s meter views the scene—not to be confused with exposure mode, which is the way the camera sets the exposure) doesn’t affect the pre-capture histogram, but to be safe, instead of spot or partial metering, I choose a metering mode that uses the entire frame. (With my Sony mirrorless bodies, I set my metering mode to Entire Screen Average.)
Once you’ve turned on exposure simulation, you need to figure out how to display the histogram. Most cameras, mirrorless or DSLR, offer multiple live-view screen options that display a variety of information about the scene you’re photographing. On most cameras, only one or two of these screens displays the histogram—finding it is usually a simple matter of cycling through the various displays until the histogram appears. To minimize the number of screens I need to scroll through to get to the information I need (such as the histogram or level), I always go into my camera’s menu system and disable the live-view screens I don’t use.
Using your live-view histogram
Using my pre-capture histogram, I start the metering process as I always have. In manual exposure mode, I start in my camera’s best ISO (100 for my Sony a7RIV), and the best f-stop for my composition (unless motion, such as wind or star motion, forces me to compromise my ISO and/or f-stop). With ISO and f-stop set, I slowly adjust my shutter speed with my eye on the histogram in my viewfinder (or LCD).
Most mirrorless bodies offer highlight warnings in their pre-capture view (often called “zebras”). While these alerts aren’t nearly as reliable as the histogram and should never be relied on for final exposure decisions, I use their appearance as a reminder to check my histogram. The first time I meter a scene, my current exposure settings (based on my prior scene) can be far from what the current scene requires—in this case, I push my shutter speed fast until the zebras appear (if my prior exposure was too dark) or disappear (if my prior exposure was too bright), then refine the exposure more slowly while watching the histogram.
In a low or moderate contrast scene, I’ll have room on both the shadows and highlights sides of the histogram—a pretty easy scene to expose. But in a high dynamic range scene (dark shadows and bright highlights), the difference between the darkest shadows and brightest highlights might stretch the histogram beyond its boundaries. When the high dynamic range is so great that I have to choose between saving the highlights or the shadows, I almost always bias my exposure choice toward sparing the highlights, carefully dialing the exposure until the histogram bumps against the right side—at that point I stop adding exposure, even if my shadows are cut off (black).
Because the post-capture histogram is more reliable than the pre-capture histogram, when high dynamic range gives me little margin for error, I verify my exposure by checking the post-capture histogram. Here’s where the RGB (red, green, blue) histogram becomes important. While the luminosity (white) histogram gives you the detail you captured, it doesn’t tell you if you lost color. Washed out color is always a risk when you push the histogram all the way to the right, so it’s best to check the post-capture RGB histogram to ensure that none of the image’s color channels are clipped.
An often overlooked aspect of mastering in-camera metering is simply learning how your camera reports exposure. Not only does every camera interpret and display its exposure information differently, the histogram returned is based on the jpeg, so raw shooters always have more information than their camera reports—it’s important to know how much more. With my Sony a7Rx bodies, I know I’m usually safe pushing my histogram’s exposure graph up to a full stop beyond the left or right (highlights and shadows) boundary—I have no problem using every available photon.
A few more words about this image
In addition to taking control of the exposure for this image, roaming a hilly cow pasture in the foothills east of Sacramento gave me full freedom of movement to control the new moon’s position relative to the tree. As the sky darkened and the moon dropped, I literally ran up and down the hill to capture as many moon/tree/frame relationships as possible before the moon disappeared.
This is the week (August 16-21, 2020) to photograph a crescent moon. My recommendation is Monday morning on the eastern horizon before sunrise, and Wednesday or Thursday low in the west after sunset.
A Crescent Moon Gallery


")


The Megapixel Myth
Posted on August 9, 2020
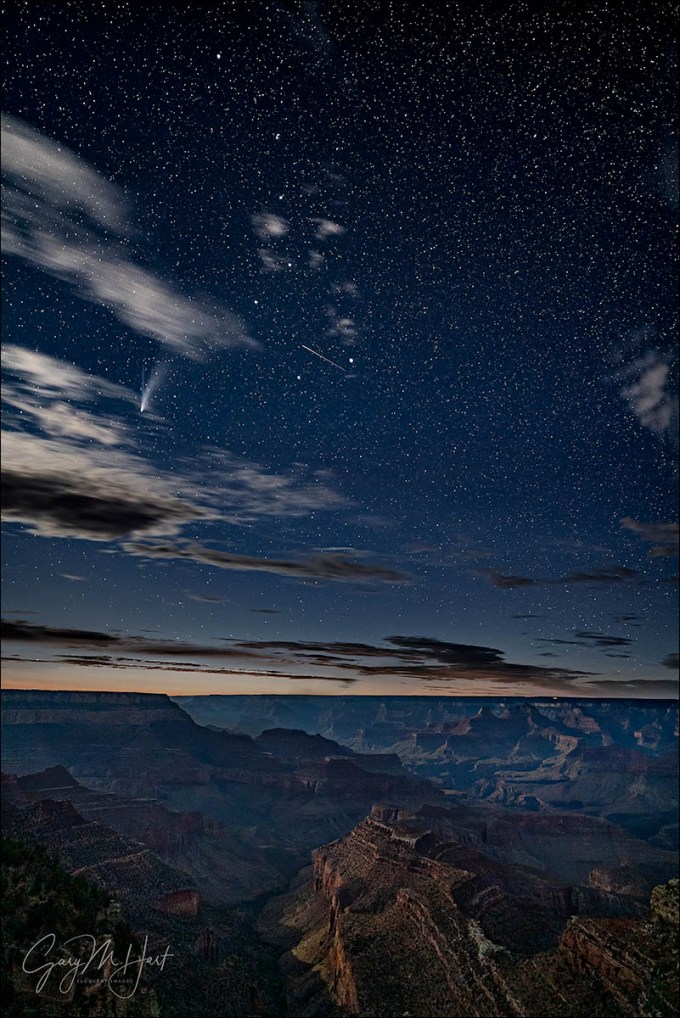
Comet NEOWISE and the Big Dipper, Grandview Point, Grand Canyon
Sony a7SII
Sony 20mm f/1.8 G
20 seconds
F/1.8
ISO 3200
I kind of have a thing for comets
As soon as I announced that I’d purchased the just-announced Sony a7SIII, people started asking why I wanted a 12 megapixel camera when I already have a 61 megapixel Sony a7RIV (two, actually). When I hear these questions, I realize the myth that megapixels are a measure of image quality is still alive. The truth is, megapixels are a reflection of image size, not image quality. In fact, for any given technology, the fewer the megapixels, the better the image quality.
Without getting too deep into the weeds of noise and clarity in a digital image, it’s safe to say the the more efficient a sensor is at capturing light, and the less heat the sensor generates, the better it will perform in these areas. How do you make a sensor more efficient? Well, you start with bigger photosites to catch more light. And how to keep the sensor cool? Give your photosites more room to breathe. But how do you make your photosites both bigger and farther apart without increasing the size of the sensor? It doesn’t take a rocket scientist to conclude that reducing the number of photosites is the only way to achieve both of these objectives.
So why do the manufacturers keep giving us more photosites? (My last rhetorical question, I promise.) Well first, advances in technology make it possible to cram more photosites onto a fixed-size sensor without compromising image quality (and in fact, often while still improving image quality). But more important that is the sad, simple truth that megapixels sell cameras.

Bridalveil Dogwood, Valley View, Yosemite
Don’t get me wrong, I think megapixel count is great and am all for as many megapixels as I can have—as long as they don’t come at the expense of image quality. The more megapixels you have, the more you can crop, and the larger you can print. While cropping is a nice safety net, goal should be to get the composition right at capture. And before chasing more megapixels, you should ask yourself how large you need to print, and how many megapixels you need to do it. Whenever this question comes up, I think about an image that I have printed 24×36 and hanging in my home. It’s an extreme close-up of a raindrop festooned dogwood flower, with Bridalveil Fall in the background. I can stand six inches from this 24×36 print and not feel like it’s missing any detail, from its delicate spider web filaments to the small dust particles suspended in the raindrops. All this was captured as a jpeg on my first DSLR, a 6 megapixel Canon 10D.
So given all this, you may be wondering why my primary camera is a 61 megapixel Sony a7RIV, with a second a7RIV as my backup. Well, like I said, all things equal, more megapixels are better than fewer megapixels, and for the vast majority of the natural light landscapes, on a tripod, that I photograph, my a7RIV bodies give me cleaner, higher resolution images than I ever dreamed possible. The dynamic range is the best I’ve ever seen, and my high ISO images are as good as any primary body I’ve ever owned. They’re so good, in fact, that last year I set aside my dedicated night camera, my 12 megapixel Sony a7SII, in favor of the a7RIV. I was getting such good results after dark with the a7RIV, I figured I could sacrifice a little low light performance to lighten my bag.
And for the most part I was satisfied—I’ve now used it enough at night to know the a7RIV is hands down the best night camera I’ve used that’s that not an a7S (original, or a7SII). But photographing Comet NEOWISE last month in Yosemite, I started to wonder if I might have been too quick to jettison the a7SII. My images were clean enough, but if I could get even less noise…
If you follow me regularly you know that I’m a one-click shooter—if I can’t get an image with one click, I don’t shoot it. That doesn’t mean I think it’s wrong to composite night images, but that approach doesn’t give me satisfaction, and I don’t like the artificial look of images that have clearly been blended. The analogy I like to use is the difference between applying a little make-up (dodging/burning and noise reduction in Photoshop), and submitting to cosmetic surgery (blending multiple exposures captured at different times, or with completely different focus and exposure settings). (There’s also a third option that’s more of a Frankenstein solution that involves assembling images from two different scenes, that I don’t even consider real photography.) My one-click approach means I have to live with more noise in my night images, but anyone viewing them knows that that truly is what my camera saw.
So anyway… For my Grand Canyon trip a couple of weeks ago, I decided to dust off the a7SII and give it a shot at Comet NEOWISE. My plan was to concentrate on the park’s east vistas to get away from the lights of Grand Canyon Village. Desert View was closed, but all the other vistas—west to east: Grandview, Moran, Lipan, and Navajo Points—were open for business. So during the day, while chased lightning out on the east end, at each stop I made a point of firing up my astronomy apps to figure out where the comet would be after dark.
Knowing that at about an hour after sunset, NEOWISE would be the northwest sky just a few degrees west of the Big Dipper (which would be dropping and rotating closer to due north as the night wore on), I decided that Grandview Point would be the best place to get it above the canyon. After it rotated farther north, I liked the way NEOWISE aligned with the canyon from the more eastern vistas. On that first night I got about 45 minutes of clear enough skies before the clouds returned.
For this trip I’d brought two tripods so I could simultaneously shoot with both the a7SII and a7RIV. On the a7SII I mounted my Sony 20mm f/1.8 G lens; on the a7RIV was the Sony 24mm f/1.4 GM lens. For both cameras I had long exposure noise reduction turned on (because with the Sonys it does make a difference for exposures measured in seconds). LENR doubles the capture time, which gave me at least 30 seconds between each shot, making it really easy to switch back and forth between cameras.
Having both cameras set up side-by-side like this, I was reminded what a nighttime monster the a7SII is—even though the a7RIV had a slightly faster lens, I could see the dark scene much better with the a7SII. I wouldn’t know how much cleaner the a7SII files would be until looked at them on my computer, but what a joy that camera is to work with in the dark.
I went with relatively few compositions, but varied my exposures for each for more processing options later. To focus, I just picked a star in my viewfinder, magnified it to the maximum, and dialed my focus ring until the star became the smallest dot possible. And even though that’s usually enough to ensure a sharp image, each time I focused I verified sharpness by magnifying the captured image in my viewfinder and checking the detail in the canyon.
I was thrilled by how much light the 20% waxing crescent moon cast on the scene. While the moonlight wasn’t noticeable to my eye, and didn’t seem to wash out the stars at all, it did cast enough light to bring out more canyon detail in my images. The small meteor that scooted through the Big Dipper during this frame was a welcome bonus that surprised me when I reviewed the image later.
When I finally got back to the room and looked at my images from that night a little more closely, the a7SII images were noticeably cleaner, so much so that when I went back out to photograph the comet the next night, I didn’t even set up the a7RIV. Is the a7RIV bad for night photography? Absolutely not. In fact, to capture 61 megapixel, high ISO, long exposure images as clean as the a7RIV does feels like cheating. But given my one-shot paradigm, and the fact that 12 megapixels is more than enough resolution for pretty much any use I can think of (for me—you need to decide for yourself how much resolution you need), for dark sky night photography, my vote goes the a7SII’s cleaner files and ease of use.
Some of my fellow Sony Artisans got to preview the a7SIII, but since it’s primarily billed as a video camera and I don’t really do video (yet), I’ll have to wait until mine arrives at the end of September (fingers crossed). But the reports from my colleagues about the a7SIII’s high ISO performance have me salivating.
Workshop Schedule || Purchase Prints
An a7S/a7SII Gallery


")


Chasing Lightning at the Grand Canyon (Again)
Posted on August 2, 2020

Rain and Lightning, Lipan Point, Grand Canyon
Sony a7RIV
Sony 24-105 G
1/8 second
F/18
ISO 50
Ten days ago my brother and I drove to the Grand Canyon to photograph the monsoon—you can read the story of our trip in my previous blog post.
I don’t get tired of photographing lightning. My brother Jay and I timed last month’s trip because the forecast promised lots of lightning, and though we did indeed see a lot of lightning, most of it was actually too close to photograph. Each day Jay and I headed out right after breakfast, stayed out most of the day, and returned to our room around dinnertime with lots of nice images, but no lighting to show for our effort.
I like to stand on the rim of the Grand Canyon and photograph lightning up, down, or across the canyon, but most of the lightning we saw was either coming up behind us, or right on top of us. The frustrating reality of lightning photography is that when there’s too much, it’s usually too close. How close? Fixing dinner one evening, we saw a bolt hit about 50 yards from our room. And one afternoon on the rim, while watching a storm approach from the south and hoping it would hold together long enough to make it over the canyon, I reached to adjust my camera and got a shock—we were back in the car within five seconds.
Given all the lightning we dodged on the South Rim, had we been on the North Rim, we’d have had a field day—but on the South Rim, all we got was wet. Despite our frustration, on our last day the forecast was again promising, so we went back out filled with optimism. As we had on our previous days, we pointed our cameras at lots of promising cells with no success. Lots of dry frames—shutter clicks when the Lightning Trigger detects lightning that wasn’t visible or in my frame (I could have turned down the sensitivity, but don’t usually do that until I’ve had some success)—but just one meh lightning strike I knew I’d never process. That’s just the way lighting photography goes.
But I’m nothing if not persistent, which is how we found ourselves out near Lipan Point late that final afternoon. Despite our lack of lightning success, we’d had a lot of the otherwise spectacular photography that the monsoon often delivers—billowing clouds, dark curtains of rain, light shafts, dappled light, and gorgeous sunset color—and this afternoon was no exception. I was composed on a broad area of falling rain that looked moderately promising, resigned to the fact that it too would probably fizzle (but nevertheless appreciating the gorgeous light and clouds), when a single bolt fired across the canyon. It caught me so off guard that I almost didn’t believe it, but I heard my camera click and Jay exclaim, so I marked the frame (took a picture of my hand to make it easier to find among the hundreds of empty frames) and crossed my fingers.
We saw two more lightning bolts that afternoon, but this turned out to be the only one I deemed worthy of processing. On the drive home Jay and I agreed that our trip was a great success—while we didn’t get as much lightning as we’d have liked, we got lots (and lots) of beautiful storm images, photographed a vivid sunset, and had two great Comet NEOWISE shoots. This lighting strike on our final afternoon was simply icing on the cake.
Lightning photography isn’t hard, but it does take a little education and preparation
Below is the just updated (August 2, 2020) Lightning article from my Photo Tips section
How To Photograph Lightning

Forked Lightning, Point Imperial, Grand Canyon
Sony a7RIII
Sony 100-400 GM
Lightning Trigger LT-IV
ISO 400
f/7.1
.4 seconds
Few things in nature are more dramatic than lightning. Or more dangerous. And if “safety first” is a criterion for intelligence, photographers are stupid. Because lightning is both dangerous and unpredictable, the more you understand lightning, how to anticipate it and stay safe in its presence, the greater your odds of surviving to take more pictures.
The shocking truth about lightning
A lightning bolt is an atmospheric manifestation of the truism that opposites attract. In nature, we get a spark when two oppositely charged objects come in close proximity. For example, when you get shocked touching a doorknob, on a very small scale, you’ve been struck by lightning.
In a thunderstorm, the up/down flow of atmospheric convection creates turbulence that knocks together airborne molecules, stripping their (negatively charged) electrons. Lighter, positively charged molecules are carried upward in the convection’s updrafts, while the heavier negatively charged molecules remain near the bottom of the cloud. Soon the cloud is electrically polarized, more positively charged at the top than at the base.
Nature always takes the easiest path—if the easiest path to electrical equilibrium is between the cloud top and bottom, we get intracloud lightning; if it’s between two different clouds, we get intercloud lightning. Less frequent cloud-to-ground strikes occur when the easiest path to equilibrium is between the cloud and ground.
With lightning comes thunder, the sound of air expanding explosively when heated by a 50,000-degree jolt of electricity. Thunder travels at the speed of sound, a pedestrian 750 miles per hour, while lightning’s flash zips along at the speed of light, more than 186,000 miles per second—nearly a million times faster than sound.
Knowing that the thunder occurred at the same time as the lightning flash, and the speed both travel, we can calculate the approximate distance of the lightning strike. While we see the lightning instantaneously, thunder takes about five seconds to cover a mile: Dividing by 5 the number of seconds between the lightning’s flash and the thunder’s crash gives you the lightning’s distance in miles (divide by three for kilometers).
Lightning safety
The 30 (or so) people killed by lightning in the United States each year had one thing in common with you and me: they didn’t believe they’d be struck by lightning when they started whatever it was they were doing when they were struck. The only sure way to be safe in an electrical storm is to be in a fully enclosed structure or metal-framed vehicle, away from open windows, plumbing, wiring, and electronics.
Unfortunately, photographing lightning usually requires being outside. And though there’s no completely safe way to photograph lightning, it doesn’t hurt to improve your odds of surviving enough to enjoy the fruits of your labor.
Most lightning strikes within a ten-mile radius of the previous strike. So, if less than thirty seconds elapses between the flash and bang, you’re too close. And since “most” doesn’t mean “all,” it’s even better to allow a little margin for error. Thunder isn’t usually audible beyond ten miles—if you can hear the thunder, it’s safe to assume that you’re in lightning range.
But if you absolutely, positively must be outside with the lightning firing about you, or you simply find yourself caught outside with no available shelter, there are few things you can do to reduce the chance you’ll be struck:
The thousands of humans killed by lightning each year had one thing in common with you and me: none believed they’d be struck by lightning. The safest place in an electrical storm is a fully enclosed structure or metal-framed vehicle (it has nothing to do with the tires), windows closed, away from windows, plumbing, wiring, and electronics.
The surest way to be struck by lightning is to be outside in an electrical storm, but photographing lightning usually requires being outside. And while there’s no completely safe way to photograph lightning, it doesn’t hurt to improve your odds of surviving.
Most lightning strikes within a six-mile radius of the previous strike, but strikes have been known to happen much farther from the storm. Since thunder isn’t usually audible beyond ten miles, if you hear thunder, you should go inside and stay there until at least 30 minutes after the thunder stops.
If you absolutely must be outside with lightning nearby, or you simply find yourself caught outside with no available shelter, there are things you should know and do to be safer:
- A lightning strike is often preceded by static electricity that makes your hair stand on end
- Avoid high ground
- Avoid exposed areas
- Avoid metal and electronics
- Avoid concrete, which is often reinforced with metal
- Avoid tall isolated objects such as trees and open structures (and tripods)
- Avoid water
- Stay at least fifteen feet from other people
- Do not lie down
- If you’re surrounded by trees, position yourself near shorter trees, as far from trunks as possible
- Rubber soled shoes provide no protection
- As a last resort, crouch on the balls of your feet, with your feet together and your hands covering your ears

Three Strikes, Bright Angel Point, North Rim, Grand Canyon
Lightning How-to
If, after factoring in all the risks, you still like the idea of photographing lightning, you need to gear up. The extreme contrast between darkness and brilliant lightning means photographing lightning at night is mostly a matter of pointing your camera in the right direction with a multi-second shutter speed and hoping the lightning fires while your shutter’s open—pretty straightforward.
Photographing daylight lightning is more problematic. It’s usually over before you can react, so any success just watching and clicking is probably dumb luck. And using a neutral density filter to stretch the exposure time out to multiple seconds sounds great in theory, but in daylight, a lightning bolt with a life measured in milliseconds, captured in an exposure measured in seconds, will almost certainly lack the contrast necessary to show up in an image.
Lightning Trigger: The best tool for the job
Most lightning sensors (all?) attach to your camera’s hot shoe and connect via a special cable to the camera’s remote-release port. When engaged, the sensor fires the shutter (virtually) immediately upon detecting lightning, whether or not the lightning is visible to the eye or camera. With so many lightning sensors from which to choose, I did lots of research before buying my first one. I ended up choosing the sensor that was the consensus choice among photographers I know and trust: Lightning Trigger from Stepping Stone Products in Dolores, CO. At around $350 (including the cable), the Lightning Trigger is not the cheapest option, but after many years leading lightning-oriented photo workshops, I can say with lots of confidence that lightning sensors are not generic products, and the internal technology matters a lot. Based on my own results and observations, the Lightning Trigger is the only one I’d use and recommend (I get no kickback for this). On the other hand, if you already have a lightning sensor you’re happy with, there’s no reason to switch.
I won’t get into lots of specifics about how to set up the Lightning Trigger because it’s simple and covered fairly well in the included documentation. But you should know that of the things that sets the Lightning Trigger apart from many others is its ability to put your camera in the “shutter half pressed” mode, which greatly reduces shutter lag (see below). But that also means that connecting the Trigger will probably disable your LCD replay, so you won’t be able to review your captures without disconnecting—a simple but sometimes inconvenient task. You also probably won’t be able to adjust your exposure with the Lightning Trigger connected.
The Lightning Trigger documentation promises a range of at least a 20 mile, and after using mine at the Grand Canyon for years, I’ve seen nothing that causes me to question that—if anything, without actually testing it, I’d guess that its range is at least 30 miles. The LT documentation also says you can expect the sensor to fire at lightning that’s not necessarily in front of you, or lightning you can’t see at all, which I will definitely confirm. For every click with lightning in my camera’s field of view, I get many clicks caused by lightning I didn’t see, or that were outside my camera’s field of view. But when visible lightning does fire somewhere in my composition, I estimate that the Lightning Trigger clicked the shutter at least 95 percent of the time (that is, even though I got lots of false positives, the Lightning Trigger missed very few bolts it should have detected). Of these successful clicks, I actually captured lightning in at least 2/3 of the frames.
The misses are a function of the timing between lightning and camera—sometimes the lightning is just too fast for the camera’s shutter lag. In general, the more violent the storm, the greater the likelihood of bolts of longer duration, and multiple strokes that are easier to capture. And my success rate has increased significantly since switching from a Canon 5DIII to the much faster Sony Alpha bodies (more on this in the Shutter Lag section).
The Lightning Trigger documentation recommends shutter speeds between 1/4 and 1/20 second—shutter speeds faster than 1/20 second risk completing the exposure before all of the secondary strokes fire; slower shutter speeds tend to wash out the lightning. To achieve daylight shutter speeds between 1/4 and 1/20 second, I use a polarizer and usually set my ISO to 50 and aperture to f/16 or smaller. Of course exposure values will vary with the amount of light available, and you may not need such extreme settings when shooting into an extremely dark sky. The two stops of light lost to a polarizer helps a lot, and 4- or 6-stop neutral density filter is even better with fairly bright skies (but if you’re using a neutral density filter, try to avoid shutter speeds longer than 1/4 second).
Shutter lag
Lightning is fast, really, really fast, so the faster your camera’s shutter responds after getting the command to fire, the more success you’ll have. The delay between the click instruction (whether from your finger pressing the shutter button, a remote release, or a lightning sensor) and the shutter firing is called “shutter lag.”
In general, interchangeable lens cameras (mirrorless and DSLR) have the fastest shutter lag. But even with an ILC, it’s surprising how much shutter lag varies from manufacturer to manufacturer, and even between models from the same manufacturer.
Ideally, your camera’s shutter lag should be 60 milliseconds (.06 seconds) or faster, but 120 milliseconds (.12 seconds) is usually fast enough. Most of the top cameras from Sony, Nikon, and Canon are fast enough—currently, Sonys are fastest, Nikon is a close second, and Canon is third.
And shutter lag can vary with the manufacturer’s model: While my Sony a7RIV may be the fastest camera out there, my original a7R was unusably slow, so you need to check your model’s shutter lag.
Unfortunately, shutter lag isn’t usually in the manufacturers’ specifications. The best source I’ve found is the “Pre-focused” time in the Performance tab of the camera reviews at Imaging Resource.
Other equipment
In addition to a lightning sensor and fast camera, you’ll need:
- Solid tripod and head: Don’t even think about trying to photograph lightning hand-held. And contrary to popular belief, a carbon fiber tripod is no safer than an aluminum tripod.
- Rain gear that keeps you dry from head-to-toe
- Umbrella (a.k.a., Wile E. Coyote Lightning Rod) to shield your camera and lightning sensor (many sensors, including the Lightning Trigger, aren’t waterproof) while you compose and wait in the rain. The umbrella is for when you’re photographing storm cells at a great distance, such as on the rim of the Grand Canyon and the lighting is across the canyon. Obviously, when the lightning gets within 10 miles, put the umbrella down and run for cover.)
- Lens hood to shield some of the raindrops that could mar the front element of your lenses
- Neutral density filter and/or polarizer to slow shutter speed into the ideal range (1/4 – 1/20 second)
- Garbage bag (my choice) or rainproof camera jacket (haven’t found one I like) to keep your camera and sensor dry during a downpour
- Extra lightning sensor batteries: Better safe than sorry
- Extra memory cards: When a storm is very close or active, your lightning sensor could detect 20 or 30 strikes per minute (even when little or no lightning is visible to the eye)
- Infrared remote to test your Lightning Trigger; I sometimes borrow the remote from my hotel room, but the Apple TV remote works great and is extremely compact (fits nicely into the Lightning Trigger pouch)
- Towel
Lightning app
I’ve used a few lightning apps, but I finally think I’ve found one worthy of recommending: My Lightning Tracker. I have the “pro” version, which just means I paid a few dollars so I don’t have to see ads. This app has too many useful features to list here, but the most important thing it does is give me a good idea where the lightning is firing now (as long as I have a cellular or wifi connection), and how far away it is. It will also alert me of any strikes within a user-specified radius. It’s easy to use and seems to be reliable.
Getting the shot
Even if you can photograph lightning from your front porch, it’s usually best to pick a nice scene, then monitor the weather so you can be there to capture lightning with a great foreground. I strongly recommend that you scout these lightning scenes in advance, not just for possible compositions, but for safe places to set up, escape routes, and a place to retreat to if the lightning gets too close. I try never to shoot more than a quick sprint from my car.
Once you’re there, don’t wait until you see lightning before setting up your gear. If the sky looks even a little promising, get everything ready: tripod out, camera and lens mounted, lightning sensor attached. Then test your lightning sensor to make sure it fires your camera—I can’t tell you how easy it is to overlook one little thing and wonder why the lightning is firing but your camera isn’t. I test my Lightning Triggers, with a TV remote, or with the flash from my iPhone camera.
As I said earlier, the trickiest part of lightning photography is getting the right shutter speed. Too fast and you risk missing all of the strokes; too long and you risk washing out the lightning. My target shutter speed is usually 1/8 second, +/- 1/8 second—long enough to include multiple pulses, but not so long that I risk washing out the lightning.
When the sky is relatively bright, dropping to 1/20 second can help the lightning stand out better than 1/8 second, but risks losing secondary strikes. Conversely, when the sky is extremely dark and the lightning is firing like crazy, extending to 1/4 second might increase your chances for capturing multiple pulses.
Even with a polarizer on, getting the shutter speed to my sweet spot usually requires dropping to ISO 50 and stopping down to f/16 or smaller. In these situations, a neutral density filter is a big help, but take care not to let the shutter speed go longer than necessary.
Lightning is most likely to strike in or near the gray curtains that hang beneath dark clouds (clearly recognizable as distant rain)—not only near the center, but often on the fringe or just outside. And the darkest and tallest clouds are usually the most likely to fire lightning. If you’re in the storm that you’re photographing, you’re too close.
The best lens for lightning is usually a midrange zoom, such as a 24-70 or 24-105. If you find yourself reaching for your 16-35 (or wider), you’re too close.
I generally start fairly wide to increase my margin for error (to avoid missing a bolt just outside my frame), but once I’m sure I’ve captured some good strikes, I often tighten my composition. While this narrower field of view can reduce the number of frames with lightning, the ones I get are much larger in the frame.
Here are a few more composition points to consider:
- Identify the most likely lightning cell and find the best composition that includes it.
- The more resolution you have, the looser you can compose, then crop to the best composition later.
- Don’t include too much room above the lightning—the most frequent rookie mistake I see is too much sky/clouds in the frame. I like my lightning bolts to originate just below the top of my frame.
- The second most frequent rookie mistake I see is lightning cut off at the top. Note the height from which the lightning originates and try to include enough cloud to get the stroke’s origin point. And if you’re really wide and still can’t get all the lightning, run! (Like I did after the image below.)
- Don’t forget to try some vertical compositions.

Lightning Explosion, Oza Butte, Grand Canyon North Rim
There’s a lot of standing around while photographing lightning, but storms move, so the more you can keep your eyes on the sky (instead of your phone), the better you’ll be at keeping lightning in your frame as the storm moves, and knowing when the activity is picking up or winding down. The light can change by several stops as the storm moves, intensifies, or winds down, so check your exposure frequently. And monitor your surroundings for active cells moving up behind you.
Be aware that electrical storms can move quite quickly, and more than one cell can be active in a given area, so monitor the sky closely—not just the storm you’re photographing, but scan for potential cells that could be sneaking up on you. Sometimes this simply means adjusting your composition to account for shifting lightning; other times it means retreating to the car if the cell threatens your location. No shot is worth your life.

One final note: If you check my exposure settings, you’ll see that my shutter speed here was .4 seconds, well outside the 1/20-1/4 second range I suggest. But if you look at the other settings, you’ll see that I’d opened up to f/7.1, and had cranked my ISO to 400, an indication that twilight was settling in. Successful lightning photograph is all about contrast, and the darker the sky, the better the bolt stands out, even in a longer exposure. Had we stayed past dark (and lived), we could have jettisoned the Lighting Triggers and used multi-second exposures.
Join and me in my next Grand Canyon Monsoon Photo Workshop
Workshop Schedule || Purchase Prints
A Lightning Gallery
Click an image for a closer look and slide show. Refresh the window to reorder the display.


Road Trip (in the Time of Coronavirus)
Posted on July 26, 2020

Painted Sunset, Mather Point, Grand Canyon
Sony a7RIV
Sony 12-24 G
1.3 seconds
F/11
ISO 100
With the exception of a couple of recent up-and-back trips to photograph Comet NEOWISE (8 hours of driving for 1-2 hours of photography), photography-wise I have been pretty much homebound since March. I’d been keeping my fingers crossed that things would stabilize enough for me to do my Grand Canyon Monsoon photo workshops in August, but two weeks ago circumstances forced me to reschedule them to next year. After losing my Grand Canyon raft trip to COVID-19 in May, I suddenly faced the prospect of a year without my Grand Canyon fix. Could that really happen?
Nope. Since my August Grand Canyon workshops count on the Southwest summer monsoon to deliver the lightning and rainbows everyone signs up for, I always monitor the monsoon conditions in Arizona—not just in the week leading up to my workshops, but all summer and quite obsessively (I know I can’t control the weather, but I can’t help rooting for ideal conditions, not unlike a sports fan rooting for my favorite team). So I knew that the monsoon was really late this year—it still hadn’t arrived by mid-July. But a few days after losing this year’s workshops, I saw signs of monsoon activity at the Grand Canyon, and within two days I was on the road.
The negative impact of the coronavirus pandemic is undeniable and extreme. But I can also say that it’s also not without its small perks—after losing 8 workshops to the pandemic, I am happy to take whatever consolations COVID wants to offer. In this case, with two days’ notice, I was able to snag four nights at a hotel about 300 yards from the South Rim for a ridiculously small sum.
My brother Jay and I hit the road for the South Rim Wednesday morning (Mom still makes me bring my little brother wherever I go*), visions of lightning and comets dancing in our heads. Thirteen hours later, we were pulling into our hotel in the dark.
Travel in the time of Coronavirus is not without its challenges—some beyond our control, others self-imposed (to avoid being a CDC statistic). Masks are mandatory in public (it’s the law, but also just plain common sense), and bathroom breaks need to be strategized because most roadside dining options are drive-thru only—I’ve learned never to pass a roadside rest area. (Note: The person who invents public restroom technology that can be operated entirely with elbows will make a fortune.) And at the hotel, there’s no daily maid service—they do a thorough cleaning after each guest leaves, and keep the room empty for a couple of days before the next person checks in.
There are also a lot dining changes here at the Grand Canyon. Unlike California, which is take-out only, there are restaurants open here at the park, including at our hotel. But Jay and I made a conscious decision to avoid eating out, and brought everything we need to prepare all over our meals. Breakfast and dinner are in the room, and lunch is at whatever spectacular Grand Canyon vista we find ourselves at when we get hungry.
I’ve visited the Grand Canyon in every season, but I’ve never seen it this empty. That doesn’t mean that it’s empty-empty, but there’s plenty of parking at every vista point, and social distancing is never a problem. Nevertheless, even when outside, we have masks with us at all times and don them when people are nearby. And with just a few exceptions, our fellow visitors have been similarly respectful of the situation.
The bottom line is, I feel like we’ve been able to pull this trip off with minimal risk to our health and others’. But what about the photography? I thought you’d never ask.
We’ve seen lots of clouds and lightning, and had two beautiful Comet NEOWISE shoots, but the image I’m sharing here is from Friday night’s sunset. We’d ended up at Mather Point because we were beat after a day of chasing lightning and Mather is easy, but also because when I saw clear western horizon and these clouds to the east, I wanted a spot with a view opposite the sun. Sometimes things just work out.
Photographing sunset is a different mindset than lightning photography because with lightning, the lightning bolt is the focal point and too much foreground and sky can be a distraction. For a nice sunset, I like to feature a strong foreground with lots of sky.
The canyon walls were already starting to catch fire when we arrived, so I took the first foreground subject I found. What drew me was the tree, but I was soon drawn to the pocked limestone and small pool of rainwater.I started with a Sony 16-35 GM lens on my Sony a7RIV, but to really emphasize the foreground and what looked like it was going to be a spectacular sky, I switched to my Sony 12-24 G lens.
Often when the light and color is changing fast I pick a single composition and work small variations until the show is over. But this evening I was a little more active, moving all around my perch to change up foreground/background relationships (when the foreground is this close, shifting just a few feet can make a big difference), and never spending more than one or two clicks on a single composition. For example, by moving from one side of the tree to the other, I was able to put it on the left or right side of my frame, and I did it both ways.
Here I put the tree on the right, taking care not to block Wotan’s Throne and Vishnu Temple in the distance. Balancing the tree and monuments were the limestone, pool, and canyon on the left. The sky just speaks for itself. At 14mm and f/11, depth of field wasn’t a huge concern—for this frame I focused about 1/3 of the way along the cliff edge on the left.
One final observation: The serpentine scar angling across the center of the frame is the inner gorge of the Grand Canyon, home of the canyon’s best (biggest) rapids, and some of my very best Grand Canyon memories.
Monsoon Madness (Images of Monsoons Past)
Click an image for a closer look, and to view a slide show.


Remembering my Dad
Posted on July 19, 2020

Comet NEOWISE and the Big Dipper Above El Capitan, Taft Point, Yosemite
Sony a7RIV
Sony 20mm f/1.8 G
20 seconds
F/1.8
ISO 12800
My dad would have turned 90 today. We lost him 16 years ago, but I have no doubt that he would still be going strong if Alzheimer’s hadn’t taken over. I have always been grateful for Dad’s love, gentle discipline, wisdom, advice, and laughs (especially the laughs), but it takes being a parent to fully appreciate our own parents’ love, and their influence on the adults we become.
Dad was a United Methodist minister who literally practiced what he preached. In 1965, when Martin Luther King issued a plea for clergy to join him on his voting rights march to Montgomery, Dad borrowed money and flew across the country to join Dr. King in Selma, Alabama (where he was on national TV getting arrested).
His was an inclusive, Jesus-centric theology that respected all religions and people: I remember him opening his pulpit to the local rabbi one Sunday morning, then reciprocating the following Saturday with a sermon of his own at the synagogue. Dad welcomed everyone into his churches, and became an outspoken advocate for LGBT rights (before the acronym made it into popular culture). He frequently provided odd-jobs around the church to people who were down on their luck, and I lost track of the number of homeless people, including families with young children, we housed while they tried to get back on their feet.
In addition to the values he instilled, so many of the things that define my personality are directly attributable to my dad’s influence. My positive spirit, sense of humor, and love for sports were absolutely modeled by Dad. And when asked how I became a photographer, the instant answer has always been that my dad was a serious amateur photographer whose 80-hour work week offered too little time to pursue his passion, so he made up for lost time on our summer family vacations. So frequent were the photo stops, I grew up believing that a camera was just a standard outdoor accessory.
But I think his influence on my photography goes deeper than that. More than simply modeling camera use, Dad instilled in me his appreciation of nature’s beauty, and his longing for its soothing qualities. I realize now, because I see it in myself, that it’s not simply photography that dad loved, he was motivated by an insatiable desire to record and share the people and places he loved.
On a minister’s budget, our family summer vacations were, without exception, camping trips—always tent-camping, though in the later years we splurged on a used, very basic tent trailer (no kitchen, bathroom, or any of the other luxuries available in today’s tent trailers). These vacations usually took advantage of the mountain scenery within a few hours of our California home (we were just as close to the ocean, but our vacations were always in the mountains), but every few years we (Dad, Mom, my two brothers, and I) hit the road for a longer camping trip. Especially memorable were the full month we camped all the way across the United States and back, and a multi-week camping adventure into and around the Canadian Rockies.
Of our more frequently visited destinations, Yosemite was the clear favorite. Marveling at the Firefall from Camp Curry and Glacier Point, waiting in lawn chairs with hundreds of fellow tourists at the Yosemite garbage dump for the bears to arrive for their evening meal (really), rising in the dark for a fishing expedition to Tuolumne Meadows, family hikes up the Mist Trail to Vernal and Nevada Falls, are just a few of the memories that I realize in hindsight formed the bedrock of my Yosemite connection.

Here’s my dad’s Half Dome Rainbow, captured on a summer afternoon in the mid-sixties.
My favorite Dad photography story happened when I was about ten. It involves an electrical storm atop Sentinel Dome, and his desire to photograph a lightning bolt, a desire so great that it trumped common sense. As his ignorant but trusting assistant, to keep his camera dry I stretched high to extend an umbrella above Dad’s head. (In his defense, as Californians, the novelty of lightning obscured a full comprehension of its dangers.) We didn’t get the lightning, and more importantly, it didn’t get us. But that’s not the end of the story.
After risking our lives on Sentinel Dome, the family ended up at Glacier Point, just down the road. Dad had returned to tourist mode as we browsed the shop at Glacier Point Lodge, no doubt seeking souvenirs that would fit our meager budget. But when a vivid rainbow appeared out of nowhere to arc across the face of Half Dome, Dad was ready with his camera still draped around his neck. Watching Dad’s excitement, better than any souvenir, this felt as if God was giving him a much deserved, “I got your back.”
I love you, Dad.
About this image

Comet NEOWISE and the Big Dipper Over El Capitan, Taft Point, Yosemite
I’ve written recently about my love of astronomy that dates back to when I was 10 years old. While my memory isn’t complete, I do know that not long after I expressed an interest in something astronomical (which could have been as simple as asking a question at dinner), my dad presented me with a used telescope gifted to him by a Kiwanis friend who was a serious amateur astronomer. I have no knowledge of the specifics, but I know my dad well enough to know that my simple query was enough to prod him to ask his astronomer friend for guidance that might fuel my interest, which no doubt led to the gift of this mothballed telescope that became the catalyst for my relationship with the night sky.
Of course photographing celestial objects requires some cooperation from Mother Nature. But one of the things photographer friends seem to resent me for is my good photography luck: the clouds that part just as the moon rises, the snowstorm that arrives just as a workshop starts (that’s good if you’re a photographer), the rainbow that appears out of nowhere.
My brother Jay and I take many photo trips together, and he seems blessed with similar luck. On our photo trips, sometimes we talk about Dad, and sometimes we don’t, but he’s always with us. Often it feels to Jay and I that Dad is watching over us, pulling whatever strings he can to deliver something special.
In the last ten days, Jay and I have made two trips to Yosemite to photograph Comet NEOWISE. On the first trip we were surprised by how visible NEOWISE was to the naked eye, as if its brightness had been cranked up a couple of magnitudes for our visit to Glacier Point. And Venus’s proximity to Half Dome was another an unexpected gift.
On our trip to Yosemite last Thursday afternoon, I had one eye on the road and another eye on the clouds obscuring the entire Sierra range. Would we be shut out entirely? I needn’t have worried. When we pulled into the trailhead parking area the clouds had started to clear, and by the time we’d finished the one-mile hike out to Taft Point, they had all but vanished.
Like the proverbial elephant that can’t be fully seen up close, El Capitan is so massive that from Yosemite Valley it looks completely different depending on where you view it from. One of the things I like most about Taft Point is its elevated, more distant view that offers a more complete perspective of the world’s largest granite monolith. So as I waited for the darkness to reveal the comet, I took some time to drink in the view and appreciate El Capitan.
About 30 minutes after sunset I started getting serious about locating Comet NEOWISE. I knew this shoot would pose some problems I hadn’t had to deal with for the Glacier Point NEOWISE shoot a week earlier. First, the comet was more faint, but I didn’t know how much: would we still be able to see it without aid, or would it only appear in our images? And second, there would be no moon to illuminate El Capitan and Yosemite Valley.
Again, there was no need to worry because things always seem to work out for me (thanks, Dad). NEOWISE, though noticeably fainter, was still clearly visible. Not only that, it had developed a magnificent ion tail (the faint spike above the fanned out primary tail). And the extra darkness? The several stops of exposure it forced me to add, while introducing a fair amount of noise, only made the comet stand out more against the dark sky.
As with the Glacier Point shoot, I worked two bodies. I quickly found that a vertical composition with my new Sony 20mm f/1.8 G lens was wide enough to include all of El Capitan, Comet NEOWISE, and the Big Dipper. Pretty cool. By the time the night was over, I’d used every one of the five lenses I packed.
Jay and I stayed until about 11 p.m., then made the walk back in the moonless darkness, most grateful for bright flashlights and perfectly spaced reflectors mounted on trees lining the trail. After a four hour drive, I finally made it to bed at about 4:30 a.m. and managed to sleep for five hours, visions of comets dancing in my head.
Such a spectacular night. Thanks, Dad.
Workshop Schedule || Purchase Prints
The Many Views of El Capitan
Click an image for a closer look, and to view a slide show.


Breathtaking Comet NEOWISE
Posted on July 12, 2020

Comet NEOWISE and Venus, Half Dome from Glacier Point, Yosemite
Sony a7RIV
Sony 24-105 G
10 seconds
F/5.6
ISO 3200
When I was ten, my best friend Rob and I spent most of our daylight hours preparing for our spy careers—crafting and exchanging coded messages, surreptitiously monitoring classmates, and identifying “secret passages” that would allow us to navigate our neighborhood without being observed. But after dark our attention turned skyward. That’s when we’d set up my telescope (a castoff generously gifted by an astronomer friend of my dad) on Rob’s front lawn to scan the heavens in the hope that we might discover something: a supernova, comet, black hole, UFO—it didn’t really matter.
Our celestial discoveries, while not Earth-changing, were personally significant. Through that telescope we saw Jupiter’s moons, Saturn’s rings, and the changing phases of Venus. We also learned to appreciate the vastness of the universe with the insight that, despite their immense size, stars never appeared larger than a pinpoint, no matter how much magnification we threw at them.

Here I am with the fifth grade science project that started it all. (This is only half of the creative team—somewhere there’s a picture that includes Rob.)
To better understand what we saw, Rob and I turned to astronomy books. Pictures of planets, galaxies, and nebula amazed us, but we were particularly drawn to the comets: Arend-Roland, Ikeya–Seki, and of course the patriarch of comets, Halley’s Comet (which wouldn’t return until 1986, an impossible wait that might as well have been infinity). With their brilliant comas and sweeping tails, it was difficult to imagine that anything that beautiful could be real. When the opportunity came to do a project to enter in our school’s Science Fair, comets were an easy choice. And while we didn’t set the world on fire with our project presentation, Rob and I were awarded a yellow ribbon, good enough to land us a spot in the San Joaquin County Fair.
The next milestone in my comet obsession occurred a few years later, after my family had moved to Berkeley and baseball had taken over my life. One chilly winter morning my dad woke me and urged me outside to view what I now know was Comet Bennett. Mesmerized, my smoldering comet fascination flamed instantly, expanding to include all things celestial, and stayed with me through high school (when I wasn’t playing baseball).
I can trace my decision to enter college with an astronomy major all the way back to my early interest in the night sky in general, and comets in particular. I stuck with the astronomy major for several semesters, until the (unavoidable) quantification of magnificent concepts sapped the joy from me.
Though I went on to pursue other interests, my affinity for astronomy hadn’t been dashed, and comets in particular remained special. Of course with affection comes disappointment: In 1973 Comet Kohoutek broke my heart, a failure that somewhat prepared me for Halley’s anticlimax in 1986. By the time Halley’s arrived, word had come down that it was poorly positioned for its typical display (“the worst viewing conditions in 2,000 years”), that it would be barely visible this time around (but just wait until 2061!). Nevertheless, venturing far from the city lights one moonless January night, I found great pleasure locating (with much effort) Halley’s faint smudge in Aquarius.
After many years with no naked-eye comets of note, 1996 arrived with the promise of two great comets. While cautiously optimistic, Kohoutek’s scars prevented me from getting sucked in by the media frenzy. So imagine my excitement when, in early 1996, Comet Hyakutake briefly approached the brightness of Saturn, with a tail stretching more than twenty degrees (forty times the apparent width of a full moon). But as beautiful as it was, Hyakutake proved to be a mere warm-up for Comet Hale-Bopp, which became visible to the naked eye in mid-1996 and remained visible until December 1997—an unprecedented eighteen months. By spring of 1997 Hale-Bopp had become brighter than Sirius (the brightest star in the sky), its tail approaching 50 degrees. I was in comet heaven.
Things quieted considerably comet-wise after Hale-Bopp. Then, in 2007, Comet McNaught caught everyone off-guard, intensifying unexpectedly to briefly outshine Sirius, trailing a thirty-five degree, fan-shaped tail. But because of its proximity to the sun, Comet McNaught had a very small window of visibility in the Northern Hemisphere and was easily lost in the bright twilight—it didn’t become anywhere near the media event Hale-Bopp did. I only learned about it on the last day it would be easily visible in the Northern Hemisphere. With little time to prepare, I grabbed my camera and headed to the foothills east of Sacramento, where I managed to capture a few faint images and barely pick the comet out of the twilight with my unaided eyes. McNaught saved its best show for the Southern Hemisphere, where it became one of the most beautiful comets ever to grace our skies (google Comet McNaught and you’ll see what I mean).
After several years of comet crickets, in 2013 we were promised two spectacular comets, PanSTARRS and ISON. A fortuitous convergence of circumstances allowed me to photograph PanSTARRS from the summit of Haleakala on Maui—just 3 degrees from a setting crescent moon, it was invisible to my eye, but beautiful to my camera. Comet ISON on the other hand, heralded as the most promising comet since Hale-Bopp, pulled an Icarus and and disintegrated after flying too close to the sun.


Since 2013 Earth has been in a naked-eye comet slump. Every once in a while one will tease us, then fizzle. In fact, 2020 has already seen two promising comets flop: Comets Atlas and Swan. So when Comet NEOWISE was discovered in March of this year, no one got too excited. But by June I started hearing rumblings that NEOWISE might just sneak into the the naked-eye realm. Then we all held our breath while it passed behind the sun on July 2.
Shortly after NEOWISE’s perihelion, astronomers confirmed that it had survived, and images started popping up online. The first reports were that NEOWISE was around magnitude 2 (about as bright as Polaris, the North Star) and showing up nicely in binoculars and photos. Unfortunately, NEOWISE was so close to the horizon that it was washed-out to the naked eye by the pre-sunrise twilight glow.
Based on my experience with PanSTARRS, a comet I’d captured wonderfully when I couldn’t see it in the twilight glow, I started making plans to photograph Comet NEOWISE. But I needed to find a vantage point with a good view of the northeast horizon, not real easy in Sacramento, where we’re in the shadow of the Sierra just east of town. After doing a little plotting, I decided my best bet would be to break my stay-away-from-Yosemite-in-summer vow and try it from Glacier Point. Glacier Point is elevated enough to offer a pretty clear view of the northeast horizon, and from there Half Dome and the comet would align well enough to easily include both in my frame.
While Yosemite is currently under COVID restrictions that require reservations (sold out weeks in advance) to enter, I have a CUA (Commercial Use Authorization that allows me to guide photo workshops) that gives me access to the park if I follow certain guidelines. So, after checking with my NPS Yosemite CUA contact to make sure all my permit boxes were checked, my brother Jay and I drove to the park on Thursday afternoon, got a room just outside the park, and went to bed early.
The alarm went off at 2:45 the next morning, and by 2:55 we were on the road to Glacier Point. After narrowly averting one self-inflicted catastrophe (in the absolute darkness, I missed a turn I’ve been taking for more than 40 years), by 4:00 we were less than a mile from Glacier Point and approaching Washburn Point, the first view of Half Dome on Glacier Point Road. Unable to resist the urge to peek (but with no expectation of success), I quickly glanced in that direction and instantly saw through my windshield Comet NEOWISE hanging above Mt. Watkins, directly opposite Tenaya Canyon from Half Dome. I knew there’d be a chance NEOWISE would be naked-eye visible, but I never dreamed it would be this bright.
Everything after that is a blur (except my images, thankfully). Jay and I rushed out to the railed vista at the far end of Glacier Point and were thrilled to find it completely empty. We found Half Dome beautifully bookended by Comet NEOWISE on the left, and brilliant Venus on the right. I set up two tripods, one for my Sony a7RIV and 24-105 G lens, and one for my Sony a7RIII and Sony 100-400 GM lens. Shut out of all the locations I love to photograph by COVID-19, I hadn’t taken a serious picture since March, so I composed and focused carefully to avoid screwing something up. The image I share here is one of the first of the morning, taken with my a7RIV and 24-105.
By 4:30 or so (about 80 minutes before sunrise) the horizon was starting to brighten, but the comet stayed very prominent and photogenic until at about 4:50 (about an hour before sunrise). When we wrapped up at around 5:00, NEOWISE was nearly washed out to the unaided eye; while our cameras were still picking it up, we knew that the best part of the show was over.
It’s these experiences that so clearly define for me the reason I’m a photographer. Because I’ve always felt that photography, more than anything else, needs to make the photographer happy (however he or she defines happiness), many years ago I promised myself that I’d only photograph what I want to photograph, that I’d never take a picture just because I thought it would earn me money or acclaim. My own photographic happiness comes from nature because I grew up outdoors (okay, not literally, but outdoors is where my best memories have been made) and have always been drawn to the natural world—not merely its sights, but the natural processes and forces that, completely independent of human intervention and influence, shape our physical world.
I think that explains why, rather than settle for pretty scenes, I try to capture the interaction of dynamic natural processes with those scenes. The moon and stars, the northern lights, sunrise and sunset color, weather events like rainbows and lightning—all of these phenomena absolutely fascinate me, and the images I capture are just a small part of my relationship with them. I can’t imagine photographing something that doesn’t move me enough to understand it as thoroughly as I can, and enjoy learning about my subjects as much as I enjoy photographing them.
The converse of that need to know my subjects is a need to photograph those things that drive me to understand them. Most of the subjects that draw me are relatively easy to capture with basic preparation, some effort, and a little patience. But the relative rarity of a few phenomena make photographing them a challenge. This is especially true of certain astronomical events. I’m thinking specifically about the total solar eclipse that I finally managed to photograph in 2017, and the northern lights, which finally found my sensor last year. But comets have proven even more elusive, and while I’ve seen a few in my life, and even photographed a couple, I’ve never had what I’d label an “epic” comet experience that allowed me to combine a beautiful comet with a worthy foreground. Until this week. And I’m one happy dude.
Comet Class
Comets in General
I want to tell you how to photograph Comet NEOWISE, but first I’m going to impose my personal paradigm and explain comets.
A comet is a ball of ice and dust a few miles across (more or less), typically orbiting the sun in an eccentric elliptical orbit: Imagine a circle stretched way out of shape by grabbing one end and pulling–that’s what a comet’s orbit looks like. Looking down on the entire orbit, you’d see the sun tucked just inside one extreme end of the ellipse. (Actually, some comets’ orbits are parabolic, which means they pass by once and then move on to ultimately exit our solar system.)
The farther a comet is from the sun the slower it moves, so a comet spends the vast majority of its life in the frozen extremities of the solar system. Some periodic comets take thousands or millions of years to complete a single orbit; others complete their trip in just a few years.
As a comet approaches the sun, stuff starts happening. It accelerates in response to the sun’s increased gravitational pull (but just like the planets, the moon, or the hour hand on a clock, a comet will never move so fast that we’re able to visually discern its motion). And more significantly, increasing solar heat starts melting the comet’s frozen nucleus. Initially this just-released material expands to create a mini-atmosphere surrounding the nucleus; at this point the comet looks like a fuzzy ball when viewed from Earth. As the heat increases, some of the shedding material is set free and dragged away by the solar wind (charged particles) to form a tail that glows with reflected sunlight (a comet doesn’t emit its own light) and always points away from the sun. The composition and amount of material freed by the sun, combined with the comet’s proximity to Earth, determines the brilliance of the display we see. While a comet’s tail gives the impression to some that it’s visibly moving across the sky, a comet is actually about as stationary against the stellar background as the moon and planets—it will remain in one place relative to the stars all night, then appear in a slightly different place the next night.
With millions of comets in our Solar System, it would be natural to wonder why they’re not regular visitors to our night sky. Actually, they are, though most comets are so small, and/or have made so many passes by the sun, that their nucleus has been stripped of reflective material and they just don’t have enough material left to put on much of a show. And many comets don’t get close enough to the sun to be profoundly affected by its heat, or close enough to Earth to stand out.
Most of the periodic comets that are already well known to astronomers have lost so much of their material that they’re too faint to be seen without a telescope. One notable exception is Halley’s Comet, perhaps the most famous comet of all. Halley’s Comet returns every 75 years or so and usually puts on a memorable display. Unfortunately, Halley’s last visit, in 1986, was kind of a dud; not because it didn’t perform, but because it passed so far from Earth that we didn’t have a good view of its performance on that pass.
Comet NEOWISE in particular (and some tips for photographing it)
Comet NEOWISE is a periodic comet with an elliptical orbit that will send it back our way in about 6700+ years. On it’s current iteration, NEOWISE zipped by the sun on July 2 and is on its way back out to the nether reaches of our solar system. The good news is that NEOWISE survived the most dangerous part of its visit, its encounter with the sun. The bad news is that NEOWISE’s intrinsic brightness decreases as it moves away from the sun. But if all goes well, we’ll be able to see it without a telescope, camera, or binoculars for at least a few more weeks. And it doesn’t hurt that until perigee on July 22, NEOWISE is still moving closer to Earth.
Because a comet’s tail always points away from the sun, and NEOWISE is now moving away from the sun, it’s actually following its tail. If you track the comet’s position each night, you’ll see that it rises in the northeast sky before sunrise, which makes it a Northern Hemisphere object (the Southern Hemisphere has gotten the best 21st century comets, so it’s definitely our turn). Each morning NEOWISE will rise a little earlier, placing it farther from the advancing daylight than the prior day, so even if its intrinsic brightness is waning, it should stand out better because it’s in a darker part of the sky. And as a bonus, the moon is waning, so until the new moon on July 21, there will be no moonlight to compete with NEOWISE.
Until now, Comet NEOWISE has been an exclusively early morning object, but that’s about to change as it climbs a little higher each day. Starting tonight (July 12), you might be able to see it shortly after sunset near the northwest horizon, and each night thereafter it will be a little higher in the northwest sky. Your best chance to view Comet NEOWISE in the evening is to find an open view of the northwest sky, far from city lights.
Photographing Comet NEOWISE will require some night photography skill. Since the moon is waning, you won’t have the benefit of moonlight that I had when I photographed the comet in Yosemite on the morning of July 10, when the moon was about 75% full. This won’t be a huge problem if you just want to photograph NEOWISE against the stars, but if you want to include some landscape with it, your best bet may be to stick to silhouettes, or stack multiple exposures, one for the comet and one or more for the foreground.
To photograph it against the starry sky, I recommend a long telephoto to fill the frame as much as possible. If you want to include some landscape, go as wide as necessary, but don’t forget that the wider you go, the smaller the comet becomes. Whatever method you use to focus (even if you autofocus on the comet itself), I strongly recommend that you verify your focus each time you change your focal length. If you choose the multi-exposure blend approach, please, please, please, whatever you do, don’t blend a telephoto NEOWISE image with a wide angle image of the landscape (because I’ll know and will judge you for it).
Camera or not, I strongly encourage you to make an effort to see this rare and beautiful object, because you just don’t know when the next opportunity will arise—it could be next month, or it might not happen again in your lifetime.
Workshop Schedule || Purchase Prints
Gifts From Heaven


