Eloquent Images by Gary Hart
Insight, information, and inspiration for the inquisitive nature photographer
Assembly Required
Posted on February 23, 2020

Dune Patterns, Mesquite Dunes, Death Valley
Sony a7RIV
Sony 100-400 GM
1/30 second
F/5.6
ISO 100
Some images are so obvious that all you need to do is frame the scene and click; others require a little assembly.
For example
There was a lot going on visually in this January sunrise at Mesquite Flat Dunes in Death Valley—some of it good, some of it not so good. The not-so-good was the sky, which was clear and infinitely blue—great for being outside, but lousy for photography. The good was the parallel arcs etched in the pristine sand, and the play of light on the dunes’ clean lines and sweeping curves.
My problem this morning was assembling all of this good stuff into a coherent photo. I usually start by finding something to anchor my scene, then construct an image around that anchor using positioning, focal length, and framing. But out on the dunes I couldn’t find a satisfying anchor and my muse was floundering without it. Compounding the difficulty, because I was out there with my Death Valley workshop group, my mobility was limited because when you move through someone’s frame, your footprints become a permanent stain in their scene.
Rather than concede defeat and settle for something not worthy of the morning’s beauty, I switched to my Sony 100-400 GM lens (on my Sony a7RIV), zoomed to 400mm, and slowly panned the dunes in long, sweeping, horizontal arcs, hoping to find the composition that had eluded me so far. The secret to this approach is to pan slowly and disengage conscious thought, allowing my unconscious to guide my eye until something stops it (easier said than done, but surprisingly effective when I can clear my mind). The element in this scene that stopped me was the large sunlit dune at least a mile away.
I started with compositions that emphasized the large dune at the expense of foreground sharpness. That was okay, but when I briefly focused on wind-etched ridges of nearby sand about 100 yards away, the spectacular patterns and intricate detail grabbed my eye and didn’t let go. Reluctant to give up the distant dune that had drawn me in the first place, I stopped all the way down to f/22, computed the hyperfocal distance with a hyperfocal app on my phone, and tried a variety of focus points before finally surrendering to the fact that I couldn’t get both the foreground and background sharp in one frame.
Today, most photographers would simply shoot two frames and blend them in post, a perfectly valid and ridiculously simple solution that (sadly) gives me no satisfaction. So I went the other way and used the limited depth of field to my advantage. Realizing that it was the distant dune’s shape that most appealed to me, not its detail, I went instead for a soft background that focused the frame’s primary attention on the exquisite detail in the nearby sand while retaining the background’s soft shapes and shadows.
I opened my lens to f/5.6, its widest aperture at 400mm, and focused near the middle of the nearby slope. This gave me a front-to-back range of sharpness of nearly 60 feet (according to my hyperfocal app)—enough to keep the entire slope sharp, a fact I later confirmed by magnifying my capture in my mirrorless viewfinder and moving the view around. I also confirmed that the softness of background dunes was sufficient to be clearly intentional (rather than a just-missed focus error).
In addition to using a soft background to emphasize detail on the closest dune slope, I slightly underexposed the entire scene to render the shaded mountainside in the extreme distance extremely dark. The nearly black background created contrast contrast that helped the dunes stand out even better, and virtually eliminated unattractive ruts and ravines in the barren brown slope.
A Death Valley Gallery
Click an image for a closer look and to view a slide show.


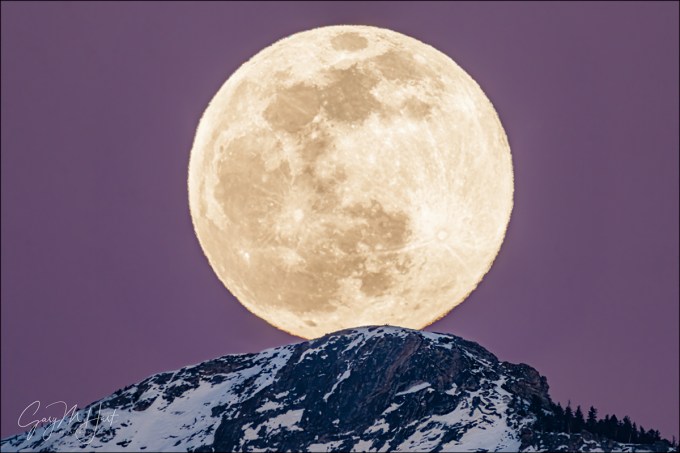
You’re Gonna Need a Bigger Moon
Posted on February 13, 2020
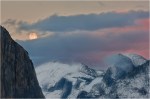
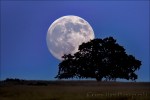
Moon’s Rest, Cloud’s Rest, Yosemite
Sony a7RIV
Sony 200-600 G (APS-C crop)
Sony 2x teleconverter
1800mm focal length equivalent
ISO 200
f/13
1/20 second
Size matters
About 15 years ago I pitched a moon photography article to a national photography magazine. I was declined because, according to the editor, “No one likes to photograph the moon because it looks too small in a picture.” While I respectfully disagree and in fact love using a small moon as an accent to my landscape scenes, that felt like a challenge to prove that it is possible to capture the moon BIG.
Then…
When I started plotting and photographing moonrises (long before The Photographer’s Ephemeris and PhotoPills), my longest lens was 200mm—adding a 100-400 to my bag was just a dream. When I finally got a good deal on a slightly used Canon 100-400 lens, I thought I was set for big-moon photography for life—until my friend Don Smith’s 150-600 lens gave me feelings of inadequacy. Soon I was packing a Tamron 150-600 lens. I liked the extra size my Tamron 150-600 gave my moons, and while found the images sharp enough to continue using the lens with an adapter after switching to Sony, when got my hands on the Sony 100-400 GM lens, I was so excited about that len’s sharpness with the Sony 2X Teleconverter, that I jettisoned the Tamron for good.
For a couple of years my standard big-moon setup was a Sony a7RIII and Sony 100-400 with the 2X Teleconverter, giving me 42 megapixel images and 800mm for the biggest, sharpest moon I’d ever photographed. Better still, putting the Sony 100-400 and 2X Teleconverter on my 1.5-crop Sony a6300, I was able to capture 24 megapixel files at a 1200mm equivalent. Wow, 1200 megapixels: Surely I’d achieved the zenith of my lunar supersizing aspirations. Nope.
… and now
Last year Sony released its 200-600 lens and the 61 megapixel a7RIV body. Since the APS-C (1.5x) crop on the a7RIV is 26 megapixels (2 megapixels more than the a6300), I dropped the a6300 from my moon shooting arsenal. In October I played with my new setup a little using a crescent moon in the Eastern Sierra, but I couldn’t wait to try it out on my favorite moon shoot of all: the Yosemite Tunnel View full moon.
Last Saturday night I assembled my Yosemite Winter Moon photo workshop group on the granite above Tunnel View to wait for the moonrise I’d timed the workshop for. Sunset was 5:30, and I expected the moon to appear directly behind Cloud’s Rest between a little before 5:35, which meant the sky and landscape would already be starting to darken. The exposure for a post-sunset full moon is trickier than many people realize because capturing detail in both the daylight-bright moon and the rapidly fading landscape requires vigilant scrutiny of the camera’s histogram and highlight alert (blinking highlights). To get everyone up to speed, I used nearly full rising moons on the workshop’s first two nights to teach them to trust their camera’s exposure aids and ignore the image on the LCD (kind of like flying a plane on instruments). With two moonrises under their belts, by Saturday evening I was confident everyone was ready.
I was ready too. In my never-ending quest to photograph the moon as large as possible, I went nuclear—none of that wimpy-ass 200mm glass for me, for this moonrise I used every resource in my bag. I set up two tripods: mounted on one was my Sony a7RIII and 100-400 GM lens; on the other tripod was my Sony a7RIV and 200-600, doubled by the 2X teleconverter: 1200mm. But I wasn’t done. Normally I shoot full frame and crop later (for more compositional flexibility), but just for fun, on this night I decided to put my camera in APS-C mode so I could compose the scene at a truly ridiculous 1800mm—I just couldn’t resist seeing what 1800mm looked like in my viewfinder.
While waiting for the moon the group enjoyed experimenting with different compositions using the warm sunset light illuminating Half Dome and El Capitan. I used the time to test the focus at this unprecedented focal length. Waiting for an event like this with a group is one of my favorite things about photo workshops, and this evening was no exception. Between questions and clicks, we traded stories, laughed, and just enjoyed the spectacular view.
The brilliant sliver of the moon’s leading edge peaked above Cloud’s Rest at 5:33. It is truly startling to realize how quickly the moon moves through the frame at 1800mm, so everything after that was kind of a blur. Adjusting compositions and tweaking exposure and focus on two bodies, I felt like the percussionist in a jazz band, but I somehow managed to track the moon well enough to keep it framed in both cameras.
By the time the moon was about to clear Cloud’s Rest, the darkening sky had started to pink-up nicely—underexposing slightly to avoid blowing out the moon’s highlights enriched the color further. The image you see here is exactly what I saw in my viewfinder (not cropped in post-processing), a full 1800mm equivalent that nearly fills the frame top-to-bottom. After years of thinking I’ll never need a bigger lens, I know enough now not make that claim again, but I’m definitely satisfied (for now).
Learn how to photograph a big moon
Workshop Schedule || Purchase Prints
Fifteen Years of Supersized Moons
Click an image for a closer look and to view a slide show.

")


")


Near and Far: Thinking in Three Dimensions
Posted on January 27, 2020

Prickly Sunset, Hell’s Gate, Death Valley
Sony a7RIV
Sony 12-24 G
.4 seconds
F/11
ISO 100
Photography is the futile attempt to render a three dimensional world in a two dimensional medium. It’s “futile” because including actual depth in a photograph is literally impossible—but impossible doesn’t mean hopeless. One of the simplest things photographers can do to elevate their images is to think about their scene in three dimensions, specifically how to create the illusion of depth by composing elements at multiple distances from the camera.
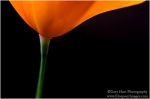
Many photographers miss opportunities by simply settling for the beautiful scene before them instead of looking for ways to make it even better. A more productive approach is to start with the beautiful aspect of the scene you want to emphasize (brilliant sunset, backlit flower, towering peak, vivid rainbow, plunging waterfall, whatever), then aggressively seek an object or objects nearer or farther to complement it (this is one reason I love including the moon in my images). Of course it’s sometimes easier said than done, but this near/far mindset should drive every capture.
Thinking foreground and background is a great start, but merely having objects at varying distances usually isn’t enough—you also need to be aware of how those objects guide your viewer’s eye through the frame. We hear a lot of photographers talk about using “leading lines” to move the eye, but a line doesn’t need to be a literal (visible) line to move the eye because viewers will subconsciously connect certain elements to create virtual lines.
To help me achieve virtual leading lines, a term I like to use is “visual weight”: a quality in an object that tugs the eye like gravity, subconsciously pulling the viewer’s gaze in its direction. Qualities in an object that can create visual weight include mass, shape, brightness, contrast, color, texture, and sometimes just position in the frame. A single one of these qualities can give an object visual weight, but usually a combination of more than one is more effective.
Additionally, an object’s emotional power can boost its visual weight. For example, a small moon will pull the eye more than a larger bright cloud, and Half Dome has more visual weight than a random rock occupying the same amount of frame real estate.
With my primary subject and complementary (eye moving) objects identified, I still need to consider the linear connection between these visual components. I usually prefer diagonal relationships because I like the visual tension created by moving the eye along multiple planes. Creating these virtual diagonals requires careful positioning, but it’s surprising how many photographers just remain planted with their tripod as if it has grown roots—either they don’t see the benefit of repositioning, or don’t think moving is worth the effort.
Whatever the reason, it’s important for photographers to understand the power of shifting position to control foreground and background relationships: move left and your foreground shifts right relative to the background; move right and the foreground shifts left relative to the background. Either way, the closer the foreground is relative to the background, the more dramatic the shift. And contrary to what you might believe, it’s impossible to change foreground/background perspective with focal length—to change perspective, you must change position: forward/backward, left/right, up/down.
An often overlooked shift that can be quite powerful is the up/down shift. Often I’m able to un-merge objects at different distances by simply raising my tripod or climbing atop a nearby rock. And when my frame has a large and boring empty space (such as a field of weeds or dirt) between the foreground and background, I drop lower to shrink that gap.
For example
On the first evening of my Death Valley Winter Moon workshop earlier this month, I took my group to Hell’s Gate. At Hell’s Gate the view south is straight down the valley toward Furnace Creek and Badwater; in the east are rutted hills that turn gold with the sun’s last light; the view west takes in nearby Death Valley Buttes, with the Panamint Range in the distance. While I like this spot for these grand vistas, it’s the assortment of cacti, rocks, and shrubs to include with the vistas that especially appeal to me.
Of the many barrel cacti that dotting the hillside at Hell’s Gate, I’m especially drawn to a large specimen above the trail and about halfway up the steep slope. But because I’m leading a group and this barrel cactus usually taken by someone else, I rarely get to photograph it at prime time. This year, however, the rest of the group was occupied with other foreground subjects, so when the sky started to turn pink with sunset, I scrambled up the talus and went to work.
The color was best in the direction of the pyramid-shaped Death Valley Buttes, so I started working on a composition in that direction. I knew my foreground would be the barrel cactus, and the background subject would be the buttes, but I still needed to turn the scene into a picture. Using my Sony a7R IV, I started with my Sony 12-24 G lens to allow me to get as close as possible to the photogenic barrel cactus. Scanning the scene, I quickly recognized the visual weight potential in the bare shrub—not for its inherent beauty, but for the its contrast (against the dark rock) and flame-like shape. These qualities gave it enough visual weight to balance the right half of the frame and move the viewer’s eye diagonally toward the buttes.
I positioned myself so the cactus was closest to the frame and left of center, and the shrub was right of center, with the Death Valley Buttes right down the middle. With my camera at eye level the empty plain in the middle distance occupied too much of the frame, so I dropped down to near cactus level. Doing this had the added advantage of increasing the prominence of the interesting jumble of rocks in the near-right—they don’t stand out enough to pull the eye from the cactus-shrub-buttes path I’d laid out, but their texture added some secondary visual interest in that part of the frame.
At 12mm I had a ridiculous amount of depth of field to play with, but I still took care with my focus choices. My rule of thumb for these extreme front-to-back scenes is to identify the closest thing that must be sharp (the cactus), and focus a little behind it—if I focus on the cactus, I get near sharpness I don’t need, at the potential risk of essential distant sharpness. I probably could have gotten away with f/8, but since the light was changing fast, I didn’t want to take the time to check my hyperfocal app. I stopped down to f/11, focused on a rock a foot or so behind the cactus, metered, and clicked.
Near and Far
Click an image for a closer look and to view a slide show.


Dawn’s Early Light
Posted on January 19, 2020

Dawn’s Early Light, Mt. Whitney, Alabama Hills, California
Sony a7RIV
Sony 100-400 GM
30 seconds
F/8
ISO 100
Imagine a world that’s so quiet you can hear nature’s every stirring, a place where each breath holds a pristine bouquet of subtle fragrances and the sky is a continuously shifting kaleidoscope of indigo, blue, yellow, orange, and pink. Maybe you’ve already figured out that I’m describing the very world we live in, before the sun’s light and warmth entice the dirty, noisy, oblivious masses.
The morning magic begins long before the human eye can register detail and color, while a few stars still burn overhead and nearby objects loom as vague shapes. Lacking enough light for the eyes to do their thing, the human experience pre-sunrise is biased toward the non-visual senses, as the sounds of a gentle breeze, flowing water, and stirring creatures mingle with the smells of dew and plants.
For the next 30 minutes, the eastern horizon seems to brighten faster than the rest of the scene. Pushed by the approaching sun, the earth’s shadow hovers in the west, swallowing stars with its steely blue. Following the earth’s shadow is the belt of Venus, as the sun’s longest wavelengths battle through the atmosphere to color the sky pink.
Photographing this pre-sunrise show can begin earlier than your eyes might tell you. Experienced photographers understand that what we perceive as darkness is just our eyes’ relatively limited ability to gather light, combined with the brain’s insistence on processing this limited input instantaneously. But a camera’s sensor accumulates all the light that strikes it for whatever duration we prescribe, thereby stretching the “instant” of perception indefinitely and allowing us to use every possible photon.
Another advantage a digital sensor has over the human eye is its ability to extract color from this apparent darkness. The human eye uses rods and cones to collect light, with the rods doing the heavy lifting in low light, pulling enough monochrome information to discern shapes, but providing little help with color and depth. The cones that complete the scene with color and depth information don’t kick in until there’s much more light. But a digital sensor, though blind to depth, captures photons without discrimination, allowing it to “see” color in very low light.
The ability to capture aspects of the natural world that differ from the human perspective might just be my favorite thing about photography, and these sunrise moments provide a great opportunity to engage the camera’s strength. When the scene is in the same direction as the rising sun, I look for shapes to isolate against the sky, then underexpose enough to turn the shapes into silhouettes, and to prevent the color from being washed out by the sun’s brilliance. When the sun is rising at my back, I take the opposite approach, giving the scene extra light to extract invisible detail from the virtually shadowless light and reveal hidden color in the sky and landscape.
About this image
On the penultimate day of each Death Valley Winter Moon workshop, my group makes the scenic, 90 minute drive from Death Valley to Lone Pine for the workshop’s final sunset and sunrise. The view in the Alabama Hills faces west, so at sunset we’re photographing shaded mountains beneath the brightest part of the sky—not ideal conditions for photography. If we’re lucky enough to get clouds, these Alabama Hills sunsets can still be special, but really it’s the sunrise that we’re here for. At sunrise in the Alabama Hills, we face the Sierra as the sun rises at our back, first coloring the sky with the blue hues of Earth’s shadow, followed by the magenta and pinks of twilight wedge.
Another special aspect of an Alabama Hills sunrise is the Sierra Crest. Towering 10,000 feet above the surrounding terrain, Mt. Whitney and its neighbors jut into the twilight wedge, and for a few sweet seconds take on its pink pastels that photographers call alpenglow.
This year’s sunset was nothing spectacular, but we walked out to the famous Mobius Arch, checked out a couple of other less noteworthy arches nearby, and I pointed out some of the area’s many movie-shoot spots. I was also able to show everyone where the morning sun would rise, and where the moon would set, and introduce them to the most prominent peaks on display: Lone Pine Peak on the left, Mt. Whitney in the middle, and Mt. Williamson on the right.
The forecast for the next morning was clear skies—maybe not dramatic, but good for the planned moonset and ideal for alpenglow on the crest. My general rule for any location is to arrive at least 30 minutes before the “official” (flat horizon) sunrise time, but in the Alabama Hills in winter, I like to get out there even earlier because the warm light from the eastern horizon light reflects off the snow and granite makes the peaks appear to glow in the dark.
The next morning, loading up in the dark at the hotel I glance toward Mt. Whitney and saw a bank of clouds fringing the crest. At first I was concerned that these clouds would obliterate Mt. Whitney, but arriving at our spot in the Alabama Hills, I realized the peak was indeed out, its tip just barely poking into the clouds. We’d arrived about 45 minutes before sunrise, but I barked (gently) at everyone not to delay, that despite what their eyes told them, this light (that still required headlamps to navigate) makes for great photography. Most beelined to the arch, but I saw a telephoto opportunity and quickly set up right next to the car.
White with snow, Mt. Whitney stood in dramatic contrast to the dark sky and foreground. Using the thin strip of clouds to frame the crest, I started by including some of the sky above the clouds, but quickly tightened my composition to simplify the composition. My 30-second exposure to brightened the image far beyond what my eyes saw, and smoothed all detail from the shifting clouds.
The eastern horizon was already gold from the approaching sun, and while I couldn’t really tell that by looking at Whitney, it was apparent with my very first frame. The sun was more than a half-hour from rising, so the light you see on the clouds and Whitney is reflected from the horizon glow, while the darker terrain below Whitney was too low for a direct view of the horizon light.
Workshop Schedule || Purchase Prints
Before the Sun
Click an image for a closer look and to view a slide show.


Horsetail Fall: Let the Mayhem Begin
Posted on January 13, 2020
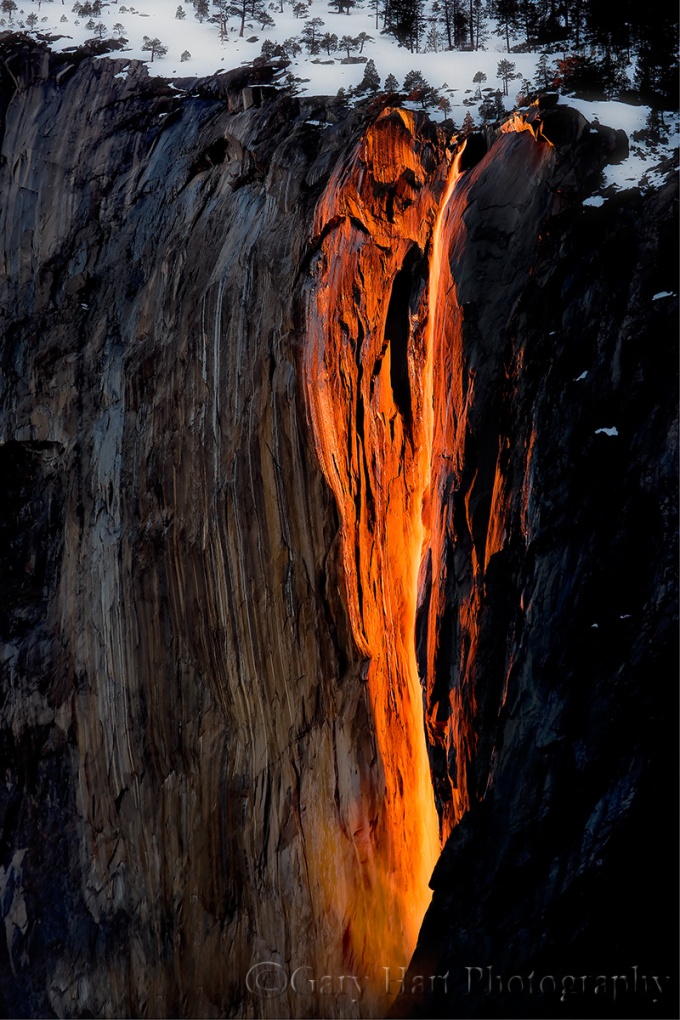
Horsetail Fall, El Capitan, Yosemite (from the Merced River south bank)
Canon EOS-1Ds Mark III
1/4 second
F/8.0
ISO 100
220 mm
Later this week I hope to have a new blog post featuring something from the fantastic Death Valley Winter Moon workshop that just wrapped up yesterday. In the meantime, with Horsetail Fall season just a month away, I’ve dusted off and polished my Horsetail Fall photo tips article.
For eleven-plus months each year, Horsetail Fall may just be Yosemite’s most anonymous waterfall. Usually dry or (at best) a wet stain, even when flowing strong this ephemeral cataract is barely visible as a thin white thread descending El Capitan’s east flank. When it’s flowing, my workshop groups can be standing directly beneath Horsetail and I still have to guide their eyes to it: “See that tall tree there? Follow it all the way to the top of El Capitan; now run your eye to the left until you get to the first tree…”. But for a couple of weeks in February, the possibility that a fortuitous confluence of snowmelt, shadow, and sunset light might, for a few minutes, turn this unassuming trickle into a molten stripe draws photographers like cats to a can-opener.
The curtain rises in the second week of February, a couple of hours before sunset, when a vertical shadow begins its eastward march across El Capitan’s south face. As the shadow advances, the sunlight warms; when the unseen sun (direct sunlight is gone from the valley floor long before it leaves towering El Capitan) reaches the horizon, the only part of El Capitan not in shadow is a narrow strip of granite that includes Horsetail Fall, and for a few minutes, when all the photography stars align, the fall is bathed in a red glow resembling flowing lava framed by dark shadow. (Some people mistakenly call the Horsetail spectacle the “Firefall,” but that altogether different, but no less breathtaking, manmade Yosemite phenomenon was terminated by the National Park Service in 1968.)
Some years Horsetail delivers sunset after sunset in February, while other years administer daily doses of February frustration. Unfortunately, it’s impossible to predict when all the tumblers will click into place: I know photographers who nailed Horsetail on their first attempt, and others who have been chasing it for years.
Don’t call it Firefall
One important thing before I continue. To avoid outing yourself as a Yosemite rookie, don’t make the mistake of calling Horsetail Fall “Firefall.” Yosemite’s Firefall was a very real fall of burning embers pushed each summer night from Glacier Point—it was as spectacular as it sounds. The phenomenon started in 1872 and continued until the National Park Service, concerned about the crowds it drew, terminated the Firefall in 1968.
Anyone who has witnessed or seen pictures of Horsetail Fall would agree that “Firefall” would be a great name for it, but those of us fortunate (and old) enough to have witnessed the actual Firefall know the difference between Horsetail Fall and the Firefall, and will never confuse one for the other.
When to photograph Horsetail Fall
The “when” of Horsetail Fall depends on the convergence of three independent conditions:
- The sun’s angle is refreshingly predictable, lining up perfectly only in February (and October, when the fall is almost always dry). Common wisdom says the shadow on El Capitan most precisely targets Horsetail Fall at sunset during the third week of February, from around the 15th through the 22nd (or a little later). While I won’t dispute this, I’ve had some of my best success a week earlier, and my favorite Horsetail shot (at the top of the page) was captured February 9. I’ve also had success photographing it right up until the end of February. But the stripe of sunset light on El Capitan is thinnest (and therefore most tightly focused and photogenic) in the third week of February—the benefit of doing it a week earlier is fewer people.
- Water in the fall varies greatly from year to year, depending on how much show has fallen on the fall’s extremely small watershed, and how much of that snow is currently melting. A large snowpack and warm daytime temperatures are ideal. Sometimes Horsetail can be frozen solid in the morning, but afternoon warmth can be enough to get it flowing in time for the show. And a heavy rain can get it going strong for a few hours or even a day or so.
- Direct sunlight at sunset is the most fickle aspect of the Horsetail experience—for every tale of a seemingly perfect evening when the sunset light was doused by an unseen cloud on the western horizon mere seconds before showtime, there’s another story about a cloudy evening when the setting sun somehow threaded a gap in the clouds just as tripods were being collapsed.
The problem with targeting February’s third week is that it isn’t a secret: I generally prefer sacrificing Horsetail perfection in favor of Horsetail near perfection and far fewer photographers. But I’ll leave that decision up to you.
Where to photograph Horsetail Fall
It’s fun to circle Yosemite Valley on pretty much any mid- to late-February afternoon just to watch the hordes of single-minded photographers setting up camp like iPhone users on Release Day. In fact, one non-scientific way to find a spot to photograph Horsetail is to simply park where everyone else parks and follow the crowd. Unfortunately, as Horsetail’s popularity grows, so does the distance you’ll need to walk.
If Horsetail Fall is on the top of your bucket list, it’s best to pick your spot and show up early. Really early. Really, really early. The downside of this approach is that, because the best locations for Horsetail aren’t especially good for anything else, you’ll sacrifice a lot of quality Yosemite photography time waiting for something that might not happen.
And no one has commanded that you worship with the rest of the Horsetail congregation: Experienced Yosemite photographers know that any west-facing location with a view of the fall will do. If you find yourself in Yosemite with time to kill, try walking the Merced River between Cathedral and Sentinel Beaches—any place with a view to Horsetail will work. But because of their open space and relative ease of access, two spots have become the go-to Horsetail spots for most photographers.
From the National Park Service, February 2019
– Stopping or parking on Southside Dr between El Cap Cross and Swinging Bridge is prohibited.
– All pullouts along Southside Dr between El Cap Cross and Swinging Bridge are closed.
– Roadside parking along Southside Dr between El Cap Cross and Swinging Bridge is prohibited.
– Southside Dr between El Cap Cross and Swinging Bridge is closed to pedestrians.
– The Cathedral Beach Picnic Area is closed.
– The Sentinel Beach Picnic Area is closed.
– Stopping or parking on El Cap Cross is prohibited.
– Roadside parking along El Cap Cross is prohibited.
– The number 2 lane (right, northern lane) of Northside Dr between Camp 4 and El Cap Cross is closed to all vehicles.
– Stopping or parking on Northside Dr between Camp 4 and El Cap Cross is prohibited.
– All pullouts along Northside Dr between Camp 4 and El Cap Cross are closed.
– Roadside parking along Northside Dr between Camp 4 and El Cap Cross is prohibited.
– El Cap Picnic Area is closed to all vehicles except vehicles displaying an ADA placard.
– The speed limit along Northside Dr between Camp 4 to El Cap Cross is 25 MPH unless posted otherwise.
2020 Update
– The NPS has closed the a significant section of the area between Southside Drive and the river to all access from February 14 – 27. This means that during that period, you can ignore my instructions for photographing Horsetail Fall from the Merced River south bank bend location on Southside Drive (mentioned below). Read the details here.
El Capitan Picnic Area
El Capitan Picnic Area, GPS: 37.72782N 119.61844W
The El Capitan Picnic Area, highlighted by Galen Rowell, remains the most popular Horsetail Fall vantage point. The picnic area’s advantages are that it is the closest view of Horsetail Fall, has the most parking, has the most room for photographers (by far), and has a bathroom (plug your nose). The downside is there really isn’t a lot of composition variety here, and thousands of others will have already captured something as good as or better than what you’ll get.

Horsetail Fall from the picnic area
If you like people, the El Capitan Picnic Area is the place to be—more than any other Horsetail vantage point, this one has a festive, tailgate atmosphere that can be a lot of fun. I suspect that’s because people arrive so early and there’s little else to do before the show starts. And since everyone is pointing up with a telephoto, it’s pretty much impossible for anyone to be in anyone else’s way, which eases much of the tension that often exists when shooting among large crowds.
You’ll find the parking lot, with room for twenty or so cars, on Northside Drive, about two miles west of Yosemite Lodge. In recent years the NPS has blocked a lane of Northside Drive to allow more parking (but don’t park illegally because you will be cited). You can shoot right from the parking lot, or wander a bit east to find several clearings with views of the fall.
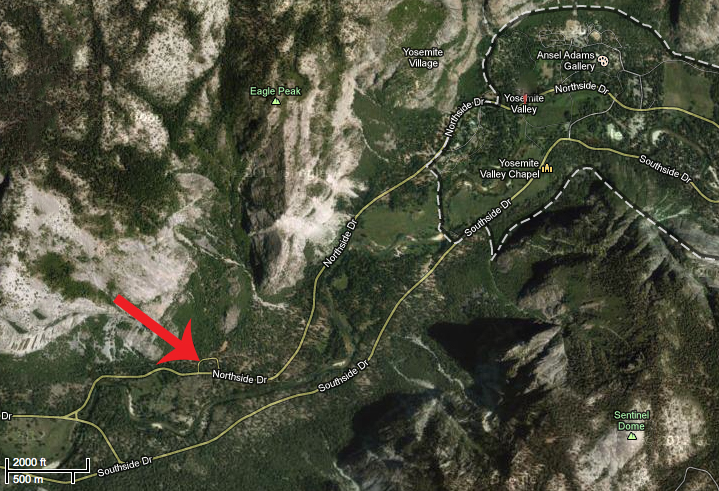
Merced River south bank bend
Merced River south bank bend, GPS: 37.72885N 119.60743W
Photographed from a bend on the Merced River’s south bank, El Capitan’s extreme sloping summit creates the illusion that you’re somewhere above Yosemite Valley, eye-to-eye with the top of Horsetail Fall—it’s a great perspective.
I like this location because the river greatly increases the variety of possible compositions, and also because you can pivot your view upstream to photograph Upper Yosemite Fall, and behind you toward Sentinel Rock (which also gets fantastic late light), almost directly above while you wait for Horsetail to light up. The downside to photographing here is that there’s precious little room, both to park and to photograph. This requires getting there a couple of hours early, and also can lead to a bit more tension as people jockey for position.

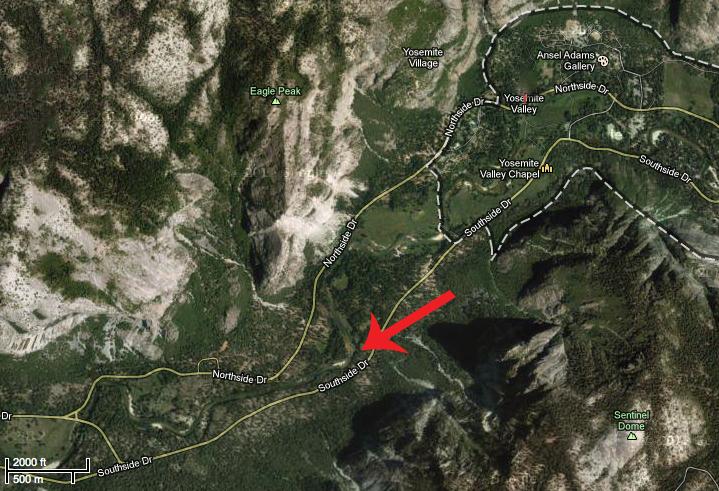
Horsetail Fall reflection from the Southside Drive Merced River view
Driving east on one-way Southside Drive, you’ll parallel the Merced River for most of 1.2 miles beyond the turn for Cathedral Beach. The Horsetail Fall spot is right where the road and river diverge. Parallel park right there in one of two narrow but paved parking areas on opposite sides of the road, where you’ll find room for about a dozen cars. In recent years, all parking on Southside Drive between El Capitan Crossover and Swinging Bridge has been banned, if you plan to shoot here, prepare to walk a mile or more.
Since there’s so little parking here, and Southside Drive is one-way eastbound, if you find no parking (don’t try to squeeze in where there’s no room—I’ve seen rangers doing traffic control and ticketing cars that don’t fit), it also helps to know that the spot is about a ½ mile from the 4-Mile Trail parking area and ¾ miles west of the Swinging Bridge parking area—an easy, flat walk.
Because of the potential for crowds, the best strategy here is to arrive early and forego what may be a great view from the elevated riverbank (that is sure to be blocked by late-arrivers trying to cram their way in), in favor of getting as close to the river as possible. Standing at river level gives you many more compositional choices, and nobody else can block your wide shots. (But if there are other photographers already set up on the elevated riverbank when you arrive, please don’t be the one who sets up in front of them.)
How to photograph Horsetail Fall
Regardless of where you set up to photograph Horsetail Fall, it’s pretty difficult to find something that nobody else has done. But that doesn’t mean you shouldn’t try. There are definitely other places in Yosemite Valley with view of Horsetail Fall, they just take a little hunting—I suggest walking the south bank of the Merced River, and ascending the 4 Mile Trail. And since you’ll likely be doing lots of waiting, take advantage of the downtime to experiment with compositions.
Strategy
When the light begins to warm, it’s time to shoot. Because you never know when the light will shut off, don’t wait until the light is perfect—it’s best to start early and photograph often. Until the light goes away completely, my rule of thumb is that the light now is better than the light a minute ago—just keep shooting . I’m not suggesting you hold your shutter down in burst mode until your card fills; I usually tell my workshop groups to fire a frame every minute or two until the fall turns amber, then pick up the pace as it goes (fingers crossed) pink and (if you’re lucky) red. The best light is in the final five minutes before sunset.
Composition
Viewed from the picnic area, there’s not a lot of visual interest surrounding Horsetail; your most obvious compositions will be moderate telephotos, up to 300mm or full frame. I use my Sony 24-105 and 70-200 (or more recently, my 100-400) lenses almost exclusively here. Use the trees to frame your shots and let them go black; with a telephoto you can isolate aspects of the fall and eliminate the sky and some or all of the trees.
The Merced River bend near Southside Drive is farther away from the fall, with more foreground possibilities, including the river and reflections, so you’ll be able to use a greater range of focal lengths here. Don’t get so caught up in photographing the fall that you overlook wider possibilities that include the river.
From either location I think vertical compositions work best (there’s a reason you don’t see lots of horizontal Horsetail Fall images), but that doesn’t mean there aren’t horizontal opportunities too. I like to identify a go-to composition based on the conditions, then vary between wide/tight and horizontal/vertical. If the sky is boring (cloudless), minimize or eliminate it from your composition. If there are clouds that make the sky interesting, by all means include them.
A frequent rookie mistake is cutting the waterfall off at the bottom. I’m not saying there’s never a reason to do that, but unless you consciously decide to truncate the fall because you think it’s the way to compose your frame, make sure you include the diagonal ridge that Horsetail disappears behind.
Filters
If your camera struggles with dynamic range, a graduated neutral density filter will help any shot that includes the sky—a two-stop hard GND angled across El Capitan parallel to the tree line should do the trick. This usually requires some Photoshop dodging and burning to hide the transition, but it’s the only way to darken the brightest part of the sky, which is usually in front of (not above) El Capitan. Since switching from Canon to Sony, I have no problem with the dynamic range and no longer use a GND for Horsetail Fall.
A polarizer will alter your results, so if you have one on, make sure you orient it properly. I often have a difficult time deciding between maximizing and minimizing the reflections with my polarizer, so I hedge my bets and shoot both ways. I’ve found that when Horsetail is flowing strongly, minimizing the reflection is best; when Horsetail is more of a wet or icy stain, maximizing the reflection works better. Either way, it’s best to just shoot it both ways and decide later.
Exposure
Automatic metering can be problematic in extreme dynamic range scenes when color is paramount, so I always recommend manual exposure, spot metering on Horsetail Fall or the adjacent sunlit granite. To maximize the color on the fall and El Capitan, I usually underexpose slightly. Because the trees rarely add value beyond framing, they usually work better when very dark green to black, a fact that’s completely lost on your meter (which thinks everything should be a middle tone). And monitor your RGB histogram to ensure that you haven’t washed out the red (Horsetail and El Capitan) or blue (sky) channels.
Highlight Alert (blinking highlights) is your friend. While you should never make your final exposure decision based on the highlight alert, when you see the highlights flashing, check your histogram and adjust if necessary.
And finally
And perhaps most important of all, don’t get so caught up in the photography that you forget to appreciate what you’re viewing. Just take a couple of seconds to stand back and allow yourself to appreciate the amazing spectacle unfolding before your eyes.
Join me in a Yosemite Photo Workshop
A Horsetail Fall Gallery
Click an image for a closer look and to view a slide show.


Another Decade in the Mirror
Posted on December 30, 2019
The change of a decade is the perfect time to reflect and marvel at the changes. So here goes…
Y2K
Who remembers Y2K, when computers were going to meltdown and airliners were doomed to fall from the sky? At the time I was an enthusiastic amateur photographer with a solid career in technical communications (tech writing, training, and support) for tech companies small and large. On New Year’s Eve 1999 my wife and I each went to bed with a pager on the bedside table, ready to spring into action when a customer reported a problem. At some point in the night a pager buzzed, I don’t remember who’s, and we each bolted up in the dark and collided like Keystone Cops at the foot of the bed. Just 20 years later pagers are virtually forgotten, replaced by ubiquitous smartphones that also happen to take pictures that are arguably better than my first DSLR could capture.
It’s 2000 and my camera is the same Olympus OM-2 (remember film?) I’d been clicking since the mid-70s. My photo locations are usually dictated by family priorities, almost always within easy driving distance of my home in Sacramento—infrequently augmented by a family vacation to points more distant. On one of those vacations in 2000, I acquire a 1 megapixel, fixed focal-length, hand-me-down digital camera from my brother-in-law and I am somewhat baffled and very much intrigued by digital photography. Little did I know….
2010
Where did the years go? It’s 2010 and I’m seven years into a complete transition to digital photography; five years into a new career as a professional landscape photographer. I make my living providing photo workshops in locations I’ve spent my life visiting and photographing: Yosemite, Death Valley, and the Eastern Sierra. Each year I augment that workshop income with a half dozen or so weekend art shows that are equal parts lucrative and exhausting.
After three decades of service, my trusty Olympus retired in 2003—by 2010 I am already on my fifth DSLR, a 21-megapixel Canon 1DS Mark III. I find 21 megapixels both ridiculous and thrilling. The only other option available to pro photographers is Nikon, but I’m satisfied with Canon. As a digital photographer I have the control over my color images that I used to dream about in my film days. Digital capture has also enabled me to pursue night photography, but extreme noise at any ISO beyond 800 limit me to moonlight on full moon nights. The ISOs necessary to even consider Milky Way photography remain a distant dream.
With the kids out of the house and no more 9-5 commitments (and blessed with a supportive wife), I am free to explore far and wide with my camera. 2010 marks my first ever visit to Hawaii and I start considering workshops outside my California wheelhouse.
2020
Here on the eve of another new decade, my bread-and-butter remains photo workshops, but I’ve replaced the art show income with writing for “Outdoor Photographer” magazine and other publications. My blog has taken off (thanks for reading!), and for better or worse, several hours each day are dedicated to social media (a relationship that ranges from mild entertainment to a necessary evil). I’ve become a Sony Artisan of Imagery, and have had many magazine covers. Life is good.
While I won’t argue with the photography cliché that says, “It’s the photographer, not the camera,” in 2014 I jettisoned Canon in favor of Sony mirrorless. Of course there’s no universal “best” camera, but Sony’s dynamic range and low light capabilities make it the best camera for me. The Sony sensor allows me to capture scenes that would not have been possible with Canon or any other camera for that matter after a longer than expected adjustment period, I’ve grown to love mirrorless shooting and can’t imagine returning to a DSLR. My Sony a7RIV has a truly ridiculous 61 megapixels and more dynamic range than I’d dreamed possible ten years ago.
Another big change in the last 10 years is my workshop locations. As my existing California workshops continued to thrive through the decade, so did my experience and confidence. Both on my own and with my good friend Don Smith, I started adding workshops in many locations I’d been exploring: Hawaii (the Big Island and Maui), Grand Canyon (an annual raft trip and a summer monsoon workshop), the Columbia River Gorge, and the spectacular Oregon Coast. And in 2018 Don and I added New Zealand, with Iceland to follow in 2020.
I have no plans to stop and can’t wait to see what the coming decade brings.
The decade in pictures
I’m sharing a series of galleries with a few highlights of the last decade, broken down by year. I can’t begin to express how much fun I had compiling these images, reliving moments, and never ceasing to be stunned by how long it’s been since this memory or that.
2010
(Click an image for a closer look and slideshow)
-

- Morning Reflection, North Lake, Eastern Sierra
-

- Day’s End, Ke’e Beach, Hawaii
-

- Emergence, Half Dome from Olmsted Point, Yosemite
-

- Alone Together, Oak and Crescent Moon, Sierra Foothills, California
-

- Whitney Arch Moonset, Alabama Hills, California
-
- Snowy November Moonrise, El Capitan and Half Dome, Yosemite
2011
(Click an image for a closer look and slideshow)
-

- Fall into Winter, Dogwood and Bridalveil Fall in Snow, Yosemite
-

- Sunset, McWay Fall, Big Sur, California
-

- Captive Crescent, Yosemite
-

- Fresh Snow, Cook’s Meadow, Yosemite
-

- Winter Cascade, Cascade Creek, Yosemite
-

- Sunrise Trio, Crescent Moon Above El Capitan and Half Dome, Yosemite
2012
(Click an image for a closer look and slideshow)
-
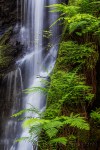
- Fern Cascade, Russian Gulch Fall, Russian Gulch State Park (Mendocino), California
-
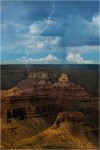
- Lightning Strike, Zoroaster Temple and Brahma Temple, Grand Canyon
-

- Moonlight, Garrapata Beach, Big Sur
-

- Winter Reflection, El Capitan, Yosemite
-

- First Snow, El Capitan, Yosemite
-
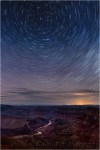
- Star Trails, Desert View, Grand Canyon
2013
(Click an image for a closer look and slideshow)
-

- Sky on Fire, Hopi Point, Grand Canyon
-

- Poppy Pastel, Sierra Foothills, California
-

- Moonset, Mt. Whitney and the Alabama Hills, California
-

- Moon!, Half Dome, Yosemite
-

- Before the Sun, South Tufa, Mono Lake
-
- Autumn Snow, Valley View, Yosemite
-

- Death Valley Winter Moon photo workshop
-

- Autumn Moonrise, Half Dome and the Merced River, Yosemite
-
- Three Strikes, Bright Angel Point, North Rim, Grand Canyon
2014
(Click an image for a closer look and slideshow)
-

- Tropical Sunrise, Hawaii Big Island
-

- Big Moon, Valley View, Yosemite
-
- Forest Dogwood, Yosemite Valley
-
- Foothill Moonrise, Sierra Foothills, California
-

- Electric Night, Grand Canyon Lodge, North Rim, Grand Canyon
-

- Moon and Mist, Half Dome and Bridalveil Fall, Yosemite
2015
(Click an image for a closer look and slideshow)
-

- Fire and Mist, Halemaumau Crater, Kilauea, Hawaii
-

- Winter Blue Hour Reflection, Half Dome, Yosemite
-

- Bristlecone Night, Milky Way from the White Mountains, California
-

- Spring Moon Reflection, Half Dome, Yosemite
-

- Spring Reflection, El Capitan and Three Brothers, Yosemite
-

- Direct Hit, Half Dome Lightning Strike, Yosemite
2016
(Click an image for a closer look and slideshow)
-

- Supermoon, Half Dome and El Capitan, Yosemite
-

- Under the Rainbow, Colorado River, Grand Canyon
-

- Dancing Poppy, Sierra Foothills, California
-

- Cradled Crescent, Sierra Foothills
-
- Golden Elegance, California Poppy, Sierra Foothills
-

- Raindrops on Orchid, Lava Tree State Park, Hawaii
2017
(Click an image for a closer look and slideshow)
-

- Sunstar, Horseshoe Bend, Arizona
-

- Lightning Shadow, Grand Canyon Lodge, North Rim
-

- Autumn Snow, El Capitan, Yosemite
-

- Spring Sunset, Leidig Meadow, Yosemite
-

- Rainbow Reflection, Queen’s Bath, Kauai, Hawaii
-
- Nature’s Prism, Rainbow Above Marble Canyon, Roosevelt Point, Grand Canyon
-
- Here Comes the Sun, Idaho, Earth, Solar System, Milky Way
-

- Winter Supermoon, Half Dome, Yosemite
-

- Magenta Moonrise, Yosemite Valley, Yosemite
-

- Heaven Sent, Monsoon Rainbow, Vista Encantada, Grand Canyon North Rim
-

- Autumn Reflection, Half Dome, Yosemite
-

- Snowcap, El Capitan, Yosemite
2018
(Click an image for a closer look and slideshow)
-

- Winter Reflection, Cathedral Rocks and Bridalveil Fall, Yosemite
-

- Winter Moon, Half Dome, Yosemite
-
- Winter Glaze, Valley View, Yosemite
-

- Milky Way Reflection, Colorado River, Grand Canyon
-

- Sun and Smoke, Sierra Foothills, California
-

- Forked Lightning, Point Imperial, Grand Canyon
-

- Last Light, Half Dome, Yosemite
-

- Wanaka Reflection, New Zealand
-

- Breaking Light, El Capitan and Three Brothers Reflection, Yosemite
2019
(Click an image for a closer look and slideshow)
-

- Aurora Reflection, Glacier Lagoon, Iceland
-

- Surprise Rainbow, Point Imperial, Grand Canyon
-

- Glisten, Diamond Beach, Iceland
-

- Starry Night, Lake Wanaka, New Zealand
-

- Lightning Explosion, Oza Butte, Grand Canyon North Rim
-

- Gray Dawn, Lake Wanaka, New Zealand
-

- Winter Moonrise, Full Moon and Half Dome, Yosemite
-

- Neon Night, Aurora and Glacier Lagoon, Iceland
-

- Winter Night, Milky Way Above Tasman Lake, New Zealand
Workshop Schedule || Purchase Prints
2019 Highlights
Posted on December 23, 2019
We’ve reached that time of year where everyone is compiling their Top 10 lists. I like retrospectives as much as the next person, but I’ve always resisted assembling these “top-whatever” end-of-year countdowns of my own images. Then last week Sony asked me to provide my favorite image of 2019 and I struggled mightily because it felt like they were asking me to pick a favorite child—which, as we all know, can vary on a daily basis. (Just kidding—I love you girls!) But seriously, I did hesitate because I wasn’t sure Sony and I aren’t defining “favorite” the same, and in fact favorite for me can mean many things that are easily skewed by mood and memory.
So instead of attempting to rate and rank my images at year’s end, I prefer using them as a catalyst for reflection. Each December I go through the images I’ve processed from the waning year and reflect on the circumstances of their capture. Rather than focus on individual images, I’ll start by reflecting more on the experience surrounding three memorable shoots that stand out from in a year filled with too many individual highlights to detail here (but feel free to go through my 2019 blog posts). And if you’re just here for the pictures, jump to the bottom to see a gallery of 2019 images that make me happy (including some new images that I’ve never shared).
Iceland northern lights
I can think of no better way to start a year than the opportunity to photograph something I’ve fantasized about seeing for my entire life. When Don Smith and I traveled to Iceland last January, I had two goals in mind: scout for our upcoming photo workshop, and see the northern lights. The scouting trip was a great success, but with just a couple of days to go, and not for lack of trying, we still hadn’t seen the northern lights.
On our penultimate night we finally witnessed a nice aurora display that spread ebbing and flowing veils of green, coloring the sky above Glacier Lagoon from the horizon to about 45 degrees—I was thrilled and felt like my aurora dreams had been fulfilled. Then came our final night, when I learned what a real northern lights display is.
There really are no words to describe this experience, so I’ll just let my images speak for me. I will say that two-dimensional, still images don’t fully convey the experience of witnessing the aurora in person, but they do at least least give you an idea of the drama and magnitude: for one thing, the foreground was darker than what I captured (though it was bright enough that I walked around without a flashlight); the aurora moves, maybe at about the speed of the minute hand on a clock. And while the previous night’s display was only in the northwest and covered no more than a quarter of the sky, the display this night at times spread across the entire sky and needed to constantly spin around to make sure I wasn’t missing something.
Read more about this night of a lifetime: Chasing the Northern Lights
New Zealand winter night
Don and I did two winter photo workshops on New Zealand’s South Island in 2019. The first was our regularly scheduled New Zealand winter workshop, the second was a workshop we put together to guide a group from the Sony Alpha Imaging Collective. Though night photography was a priority for both groups, the moon and clouds hindered the first group’s efforts (until our final night, but that’s another story).
The second group fared better in the night photography department in general, one day in particular stood out. We started with a 3 a.m. starlight shoot at Lake Wanaka, then made the 3-hour drive to Aoraki National Park, where we spent a day photographing spectacular fog and hoarfrost along the way, and glaciers, lakes, and mountains once we arrived. Following our beautiful sunset on the shore of Tasman Lake, we bundled up to wait for dark and were rewarded with one of the most breathtaking Milky Way shoots in my life (which has been filled with many Milky Way shoots).
All I could think about on the foggy 3-hour drive back from Aoraki was curling up in my warm bed and getting some much needed sleep. But when we pulled into our hotel a little before midnight and I looked up and saw stars, it felt like someone had flipped the switch on my reserve generator and I just had to go back out and shoot some more. So while everyone else headed to their rooms to process images or sleep, I grabbed my camera gear and raced to the lake. For the entire 10-minute walk to Wanaka’s iconic willow tree, I kept an eye on a bank of fog massing on the far shore and willed it to hold off long to allow me a few frames.
Finding the view of the tree completely devoid of people (a personal first), I photographed for nearly an hour in glorious solitude. While waiting for each exposure to complete, and with nothing in my world but me, my camera, and a sky full of stars, I reflected on the last 21 hours realize this was the perfect cap to what was no doubt one of the most memorable photography days of my life.
Read more about this day seemed to last forever: The Longest Day
Grand Canyon electrical storm
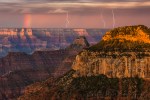
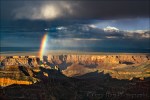
Each year starting in 2013, Don and I have guided two photo workshop groups around both rims of the Grand Canyon, chasing the lightning, towering clouds, and dramatic light of the Southwest’s summer monsoon. This year’s Grand Canyon monsoon trip was filled with lots of great memories and photography that included rainbows and more lightning strikes than I can count, but one experience in particular stands out above the rest.
The best vantage point for an electrical storm on the Grand Canyon North Rim is probably the twin view decks at Grand Canyon Lodge. Not only do these open-air decks provide a beautiful, sweeping view of the canyon, they’re shielded from lightning by a network of lightning rods, and anchored by an enclosed viewing area for retreat when the action gets too close.
We’d been watching a storm build in the distant west, but unlike most storms here, this one moved toward us and didn’t veer or fade as it approached. The storm arrived so quickly, and so mesmerized were we by its power, that it was almost on top of us before we could react. The rain was just starting to pelt us when Oza Butte, about a mile away, was stabbed with multiple strokes that made everyone jump and gasp. That was our signal to grab our gear and race for cover.
Safe inside as the storm raged around us, everyone in the group buzzed about “the big one.” I moved around the room and confirmed that nearly everyone had some version of this spectacular strike, then scrolled through my own frames holding my breath until I came across this one. Many in the group only had the bolt on the right because that’s the direction the lighting had been firing. I was silently patted myself on the back for having the foresight (good luck) to have widened and shifted my composition to the left shortly before this bolt hit. First, because it seemed like the storm was moving in that direction, and also because I wanted my composition to include more canyon.
Read more about this hair raising experience: I Just Have to Share This

Lightning Explosion, Oza Butte, Grand Canyon North Rim
2019 Highlights
Click an image for a closer look and to view a slide show.


")


On the other hand…
Posted on December 15, 2019

Winter Chill, Bridalveil Fall Reflection, Yosemite
Sony a7RIV
Sony 24-105 G
1/8 seconds
F/10
ISO 100
On Wednesday I wrote about featuring the sky in my images, and how my love for all things astronomical and meteorological reflects in my photography. On the other hand…
As much as I love photographing the moon, stars, rainbows, and lightning to my images, there are many photo-worthy subjects right here on terra firma. And usually the best way to feature them is to minimize or exclude the sky. Which is why many of my favorite images have little or no sky. To sky, or not to sky? That really comes down to playing the hand I’m dealt, and understanding that there’s no law that says you need to include the sky in your image.
One thing I won’t do is include a boring sky, a sky that’s nothing but a homogenous, horizon-to-horizon sheet of blue or gray. While everyone who’s not a vampire loves being outside on a sunny day, given a choice between photographing a sky that’s all blue or all gray, I actually prefer gray because clouds cast diffuse light that cuts contrast, creating a natural softbox that’s ideal for photographing pretty much anything in the landscape.
On the other hand, when there’s sunlight on the landscape, I either search for subjects in full shade, or try to find creative ways to use the sunlight.
Sunlight solutions
One popular sunlight technique (some would argue too popular) is a sunstar. Not only can you create a sunstar when the sun is on the horizon, it can also be achieved by positioning yourself in the shade of any terrestrial object, such as a nearby tree or rock, and letting the sun move into your frame.
The smaller your aperture, the sharper, more clearly defined the sunstar will be. I recommend f/16 or smaller, and usually go with f/18 or f/20. Sunstar quality also varies from lens to lens, with higher quality wide lenses generally delivering the best results.
__________________________________
Another sunlight solution is overexposing a large part of the frame to create a high-key image with darker subjects that standout against washed out or completely white surroundings. For these images, I usually look for something backlit, such as a flower or leaves, and position myself so the leaf or flower is against the bright sky. I then meter on my darker, backlit subject and push the exposure until the sky is severely or completely overexposed, creating a brilliant canvas for my subject.
__________________________________
When I find myself in a forested area with dark shade punctuated with splashes of light, I often look for a primary subject in direct light, and juxtapose it against a darker background. Sometimes some of those splashes of light poke through, creating a jeweled effect in the background.
Searching for shade
As fun as it is to try to find ways to work the sun into my images, probably my favorite boring sky solution is to work on subjects in full shade. Everything is in the same light, making exposure easy, colors saturate, and providing the opportunity to feature any subject that catches my eye. While images that use direct sunlight can be quite dramatic, images in overcast or shade often have a more soothing feel.
I almost always wait until I can find water in shade or overcast before photographing it. Not only does shade subdue contrast, it gives me more flexibility to control the amount of motion blur in the water.
About this image
I returned Wednesday from my Yosemite Winter Moon photo workshop. While the moon received top billing in this workshop, there are a lot of reasons to love photographing Yosemite in winter. This week’s group hit most of them: snow (though none fell during the workshop), fog, beautiful clouds, and even enough water in Yosemite Falls to make it worth photographing.
Despite the great conditions, I had to make a few on-the-fly adjustments, as is often the case in Yosemite’s fickle winter. For example, when Tuesday’s forecast called for cloudy skies that threatened to wipe out the evening’s sunset moonrise plan, I decided to take advantage of the clouds to photograph scenes that are normally sunlit scenes (while secretly wishing for clear sky so the moon would come out).
When the clouds failed to materialize as promised, I adjusted my plans again and took the group to Valley View. With its riverside views and reflections of El Capitan, Cathedral Rocks, and Bridalveil Fall, Valley View is one of the most photographed scenes in Yosemite. Even better, in winter Valley View never gets sunlight, making a good spot for blue sky photography.
With El Capitan in full sun and the Merced River in shade, the El Cap reflection was spectacular, but I was drawn more to the low fog hovering in shady Bridalveil Meadow. While some of the group concentrated on the El Capitan view, I worked with a few just upstream from the parking lot, where the view of Bridalveil Fall was best—and the reflection wasn’t too shabby either.
I moved along the riverbank until I could juxtapose the diagonal tree trunk against Bridalveil Fall, and quickly settled on this composition because it completely excluded the very boring sky. The reflection became an essential element of this composition, especially for the way it forms the bottom half of V with the diagonal trunk.
Once I was satisfied with my composition, I played with a range of shutter speeds for a variety of water blur effects, both in the fall and in the bubbles drifting by atop the river. I also had to monitor the ebb and flow of the fog and time my exposures for when it was high enough to stand out, but not so high that it obscured the row of trees beneath the fall.
Workshop Schedule || Purchase Prints
Without Sky


Eyes on the Sky
Posted on December 11, 2019

Goodnight Moon, Olmsted Point, Yosemite
Sony a7RIV
Sony 200-600 G
ISO 800
f/13
1/25 second
We tend to photograph the things we love most, but I don’t think that necessarily happens consciously. For example, I never appreciated the role the sky plays in my photography until someone pointed it out a few years ago. Browsing my galleries to verify, I was amazed at the percentage of my images that include at least one of the following: the sun, the moon, stars, a rainbow, lightning, or dramatic clouds. (And, as of last January, the northern lights.)
While I never set out to be a “skyscape” photographer, given my background, I guess it makes sense. (Or more succinctly, “Duh.”) As an astronomy enthusiast since I was a child, and an armchair meteorologist since my late teens, I spent most of my formative years with my eyes and mind on the sky. I continued these childhood interests into adulthood, studying both astronomy and meteorology in college (I even majored in astronomy for a few semesters), and to this day can’t pass up a book or article on either topic. Even without a camera, I can spend hours watching clouds form and dissipate, or gazing at the stars.
Despite a parallel interest in photography, as a film shooter I was frustrated by limitations that prevented me from photographing many of my favorite sky phenomena. While daylight sights like clouds and rainbows were doable, but daylight lightning was out of reach. Narrow dynamic range, a lack of exposure feedback, and inability to process a color image made photographing simultaneous detail in the landscape and the moon frustrating. But switching to digital photography finally provided the control over my color captures, control that had previously only been available to monochrome film shooters with access to a darkroom.
With my first DSLR, purchased more than 15 years ago (!), I suddenly had the exposure feedback and processing control I lacked. That camera struggled with ISOs above 400, but that was enough to handle moonlight and I was hooked on night photography. Nevertheless, for many years photographing the Milky Way and landscape detail with a single click (my own personal rule) seemed like a pipe dream. But unlike the film days, advancement in digital sensors seemed happen with each passing year, and for the last few years I’ve been able to add Milky Way photography to my night repertoire.
The same goes for daylight lightning—with my Lightning Trigger, I’m able to freeze bolts that come and go so fast they’re memories before my brain registers them. Not only that, we now have computers in our pockets that can tell us where lightning is firing almost in realtime.
My evolution to skyscape photography was gradual, paced mostly by the evolution of technology, but in hindsight, I feel a little foolish for taking so long to recognize the personal synergy created by combining these three lifelong interests. Now if I could only figure out a way to add baseball to the mix…
A few tips for good sky photography
- The amount of sky and landscape a frame gets is pretty much a function of the visual appeal of each: the better the sky relative to the landscape, the more frame real-estate it gets. Both nice? I have no problem splitting the frame in the middle.
- Clear sky? Use the absolute minimum sky possible—sometimes that’s a thin strip at the top of the frame, other times it’s no sky at all.
- Rules for compositional elements in the sky are no different than they are for elements in the landscape. And I’m afraid clouds are frequently overlooked, leading to things like a towering thunderhead with its top cropped, or a cloudy ceiling with a small patch of blue that juts up and out of the top of the frame (and pulling the eye with it). Sometimes these things can’t be avoided, but you should always make the edges of your frame a conscious choice, even in the sky.
- Clouds are great, and for photography almost always better than a blank blue sky, but I especially enjoy including special elements that can be subjects in themselves (like a rainbow, lightning, the Milky Way, the moon, and so on). Rather than showing up and benignly accepting whatever the scene delivers, I aggressively pursue sky subjects by planning my visits to coincide with the best chance for something interesting in the sky. I start with a landscape scene I like, then figure out what sky feature or features I might be able to put with it. How can I get this scene with the Milky Way? What about a full or crescent moon? A rainbow? Lightning? ( (And before you ask, I refuse to add a sky in post—like everything else I photograph, all of my images that include the sky need to happen with one click.)
- Weather phenomena require a little knowledge and planning, and a lot of luck. For example, whenever I shoot in rain, or with the potential for rain, I figure out where a rainbow would appear if the sun were to break through. And don’t think you can just go out and photograph lightning because you’re in an electrical storm and have a camera. Not only is capturing lightning very difficult without knowledge, experience, and the right equipment, it’s just plain dangerous. Read my tips for photographing lightning.
- Night photography is about the stars, so make sure you give enough of your frame to the sky to highlight the stars. My rule of thumb is 2/3 sky, but sometimes I’ll do even more, and if the foreground is spectacular (like the Grand Canyon), I might split the frame evenly between the sky and landscape.
- The moon is predictable, requiring only clear skies, a sturdy tripod, and maybe some warm clothes. Before any photo trip, I make a point of knowing the moon’s phase and rise/set times and position. Read my tips for photographing the moon.
- While photographing the Milky Way’s isn’t as dangerous as photographing lightning (unless you walk off a cliff in the dark), like lightning photography, including the Milky Way (the right way) also requires a lot of knowledge and experience, as well as the right equipment. Read my tips on photographing the Milky Way.
About this image
I found this scene in October’s Yosemite Fall Color and Reflections workshop, on our last-minute (not part of the original plan) trip to Olmsted Point to photograph sunset and the Milky Way. The crescent moon wasn’t the prime prime goal of this shoot, but I knew it would be here when we arrived and had every intention of photographing it as big as possible. (Had I not known there’d be a chance to photograph the moon, I’d likely have left my Sony 200-600 lens behind.)
The challenges I dealt with composing this scene were extreme dynamic range and a (freezing) wind. Since a waxing crescent moon always sets shortly after the sun, which puts it in the brightest part of the sky above a fairly dark landscape, capturing the moon, sky color, and landscape detail is difficult to impossible. I solved this problem by positioning myself so the moon set behind a ridge lined with distinctive trees against the sky. With my Sony 200-600 G lens on my Sony a7RIV, I zoomed tight to enlarge the moon and exposed to make the trees a silhouette.
To mitigate vibration imposed by the breeze and magnified by my 600mm focal length, I bumped my ISO to 800, which allowed me to use a 1/25 second shutter speed. And just to be sure, I magnified the image in my viewfinder and checked its sharpness.
Skyscapes
Click an image for a closer look and to view a slide show.


")


")


")


It’s About Time
Posted on December 1, 2019
Winter Glaze, Valley View, Yosemite
Sony a7RIII
Sony/Zeiss 24-70 f4
.6 seconds
F/16
ISO 50
Among the many things I’m giving thanks for this Thanksgiving weekend is the return of rain and snow to California. Normally I’d have rearranged my schedule to be in Yosemite for the season’s first snow, but because family trumps photography, I had more important things to do. So Yosemite will just have to be beautiful without me.
As much as I love photographing Yosemite with fresh snow, spending quality time family this weekend was a no-brainer for me. I can’t say that foregoing a photo opportunity has always been so easy (and I’ve been blessed with a family that would have understood had I abandoned them for a day or two to chase the snow), but never let it be said that I’ve learned nothing from my photography career.
In general, being self-employed has time challenges that I’m still learning to manage, but I’m getting better. I do have to admit that sometimes the idea of a 9-5 job with weekends and paid vacations sounds mighty good (I realize I’m speaking in very general terms and don’t mean to offend anyone pinned a cubicle 12 hours per day just to pay the bills), but the bottom line is that I love the flexibility of having complete control of my schedule.
When I left the 9-5 world 15 years ago to pursue this crazy passion, the missing safety net was a great motivator—I was only as successful as the next art show (which I no longer do) or photo workshop. Weekends? Holidays? Irrelevant. And the closest thing I got to a vacation was when my wife and I would travel to a new location to scout for a new workshop.
But as the years go by (is it me, or is time moving faster?), I’ve come to appreciate the autonomy of self employment. I can look at my calendar, whether the day be tomorrow or two years from now, and if nothing’s there, I can do whatever I want. Of course that might mean cramming the things that need to be done into times when others might be watching Netflix from their recliner or body-surfing at the beach, but it’s 100 percent my choice and I love it.
I often tell people that photography must be a source of pleasure, but there’s a difference between happiness and pleasure, and I know now that what I really mean is that photography must make you happy. I probably would have gotten great pleasure from my images had I gone to Yosemite this Thanksgiving weekend, but I know in the long run I’m much happier for my choice to stay home.
A few words about this image
I’d love to give you a detailed description of the entire process that went into photographing this beautiful scene, but I have no specific memory of its capture. I took it at the beginning of a March visit to Yosemite, one of those semi-spontaneous up and back trips I do when the Yosemite forecast calls for snow. I can infer from my exposure settings (specifically, because I was at ISO 50 and f/16) that I was going for a little motion blur to smooth the ripples in the Merced River. But since my shutter speed was .6 seconds, I must have decided that adding a neutral density filter would have robbed the river of some of its texture. (Or maybe I was just too lazy to fish my ND from my bag.) I can also tell by looking at the clouds and the snow on the trees that the snow had just stopped, but not necessarily for good (this is confirmed by the images preceding this one on the card).
The real lesson in this image is the reminder that we all have a lot of unmined gems on our hard drives. I found this one a few weeks ago by employing an approach I often use when I have extra time between trips: picking a previously processed image taken in particularly nice conditions, and revisiting other images from that shoot.
Here are a few other images from that March snow trip
When you make your living from photography, often (usually) the business part of it has to take priority over the photography part, and there just aren’t enough hours in the day for everything. In a perfect world I’d identify and process every single keeper the day after returning from a trip, but that’s simply not possible because of that whole time thing. So possible keepers slip through the cracks and languish on my hard drive(s). But that’s okay, because I never delete anything, and I get comfort from the knowledge that whenever I need a new image, I don’t need to run out with my camera and make one right now.
Not only is this retro photography exercise productive, it’s far more fun than it should be—kind of like finding money on the sidewalk (with none of the guilt about benefiting from someone else’s misfortune).
I still have a couple of spaces in next week’s Yosemite Winter Moon photo workshop
Winter in Yosemite
Click an image for a closer look and to view a slide show.


