Eloquent Images by Gary Hart
Insight, information, and inspiration for the inquisitive nature photographer
Garbage in, garbage out
Posted on April 29, 2020
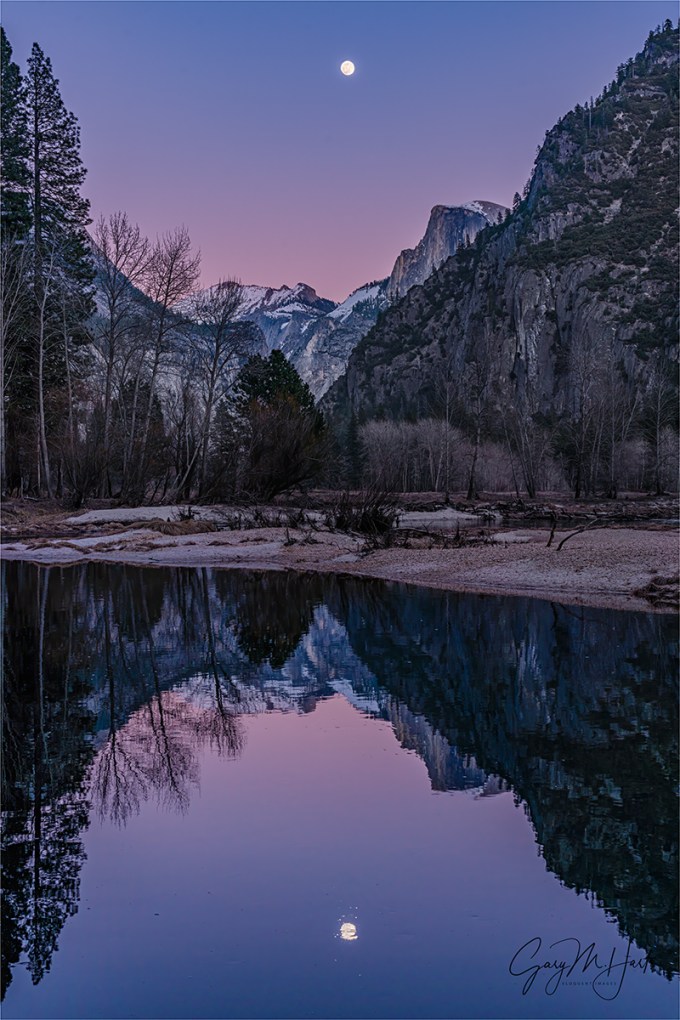
Magenta Moonrise, Half Dome and the Merced River, Yosemite
Sony a7RIV
Sony 24-105 G
1/13 second
F/11
ISO 100
True story: I once saw a guy taking 10-second exposures of the moonbow at the base of Yosemite Falls, hand-held. When I gently suggested that his image might be a little soft, he assured me that he would just sharpen it in Photoshop.
I won’t deny that digital capture and processing has given photographers more flexibility and control than ever, and processing can indeed correct a number of problems, but processing is not a panacea—if the image was garbage going in, it’ll be garbage going out. Processing software and skills are an essential part of good photography, but the best images are still created in the camera.
Just as Ansel Adams visualized the finished print before clicking the shutter, success in digital photography still starts with understanding how the camera’s vision differs from your own, and taking the steps necessary to leverage those differences at capture. While Adams was indeed a master in the darkroom, that skill would have been wasted without his intimate knowledge of his camera and film, combined with his understanding of exposure, that ensured the best possible negative and print once he got into the darkroom.
Of course (spoiler alert) photography has come a long way since Ansel Adams’ roamed the earth. Digital photographers now have more control than ever, and incredible capture tools that allow us to correct problems instantly. But I fear all this power has intimidated some photographers, and made others lazy. Fortunately, like many things that seem scary-complex going in, just scratching the surface a little starts to reveal a foundation of very simple principles.
One of the simplest things you can do is learn how to read a histogram, then train yourself to rely on it. It’s the relying on the histogram part where most photographers fall short. One of the most frequent mistakes I see inexperienced photographers make is basing their exposure decision on the way the picture looks on the back of their camera. The LCD is great for composition, but trusting it for exposure is a huge mistake.
Additionally, and here’s another thing that’s often overlooked: take the time to learn how your camera’s actual capture differs from what its histogram tells you. The histogram is based on a jpeg preview, but if you’re shooting raw, you almost always have more information than the histogram shows you. Each camera model is different, so you need to do a little observing or testing to determine how far you can push your camera’s histogram beyond its boundaries and still get usable data. Shooting this way, the jpeg that comes out of the camera may indeed show blown highlights or unrecoverable shadows, but they’ll come back like magic in Lightroom/Photoshop (or whatever your processing paradigm).
When I photographed this moon rising above Yosemite Valley last February, even though the color and exposure of the finished image you see here is pretty close to what my eyes saw, the image that appeared on my camera’s LCD screen looked nothing like this. The sky was washed out, and the reflection was lost in the shadows. But a quick check of my luminosity histogram told me that I’d captured all the scene’s detail, and verifying with the RGB histogram confirmed that I’d gotten all the color as well.
Usually a perfect histogram is all you need to get the exposure right, but in this case I also had make sure I had detail in the moon, which was by far the brightest thing in the scene. Normally I only use my camera’s highlight alert features (“zebras” pre-capture, blinking highlights post-capture) as a reminder to check my (nearly always more reliable) histogram, but here the moon was too small to register on the histogram. So as I added light, I closely monitored my highlight alert, bumping the exposure in 1/3-stop increments until the flashing appeared. But wait, there’s more! Just seeing the highlight alert wasn’t enough to tell me the moon was blown out. I know my Sony a7RIV well enough to know that I can push my exposure at least a stop beyond where the moon starts blinking and still recover the lunar details in post. This little piece of knowledge enables me to give my moon images the most light possible, ensuring less noise when I pull up the shadows.
In Lightroom I pulled down the highlights, pulled up the shadows, tweaked a few other things (color temperature, vibrance, clarity), then moved the image to Photoshop, where I did some noise reduction (Topaz DeNoise AI), dodging and burning, and (finally) sharpening. Voilà.
More Twilight Magic
Click an image for a closer look, and to view a slide show.


")


Inside a Glacier
Posted on April 26, 2020

Blue Cathedral, Vatnajokull Glacier Crystal Ice Cave, Iceland
Sony a7RIII
Sony 12-24 G
1.3 seconds
F/8
ISO 800
When I was a kid, my family took a camping vacation to the Pacific Northwest. We packed our Ford Country Squire station wagon so full that it almost felt as if my brothers and I were an afterthought, hooked up the tent trailer, and pointed north. As with all of these Hart-family summer vacations, we covered ridiculous miles and saw a mind numbing selection of diverse natural wonders, but my strongest memory from that trip is a warm afternoon hike on Mt. Rainier that ended at an ice cave. Gazing upward inside the cave, I rotated slowly, mesmerized by the diaphanous blue ceiling and its intricate curves. Not quite believing my eyes, I did my best to lock the scene in my brain. Over the years that memory remained as vivid as ever, but the more time passed, the less I trusted it—could something really have been that beautiful? On a snowy January morning in Iceland, I found out.
One of the highlights of the winter workshop Don Smith and I do in Iceland is a trip to an ice cave. But like most things in nature, ice caves are ephemeral, never a sure thing. On last year’s scouting trip, Crystal Ice Cave on Vatnajokull Glacier was closed, so we got to tour what I’d call more of an “ice crevasse” instead—pretty cool, but nothing like my childhood ice cave memory. But this year the glacier gods smiled on us, and on a snowy morning about half-way through the trip Don and I piled our group into a large van (small bus?) with the biggest tires I’d ever seen, and headed onto Vatnajokull Glacier. There were a dozen photographers in our workshop group, plus Don, me, Óli (our Icelandic guide), and the local glacier guide/driver we’d hired for that morning. To beat the crowds, Óli had gotten us out well before sunrise (not as taxing as it sounds when you factor in the 10 a.m. Iceland January sunrise). Our adventure started on a regular highway, but soon detoured off-road across undulating snow and ice that bore very little resemblance to an actual road. After 20 or 30 minutes of jostling, our vehicle had gone as far as the terrain allowed, so we parked and tumbled into the frigid air. Our glacier guide issued helmets and crampons, delivered a brief orientation, then led us into the darkness across more snow and ice.
Following an uneventful, nearly 2-mile hike, we rounded a corner and got our first glance at a gaping opening at the base of the glacier just as the day started to brighten. From the outside, Crystal Ice Cave was an unimpressive black void beneath a massive chunk of ice, but the instant I stepped inside, my childhood ice cave memory came surging back. Only this time, I had a camera.
Not only were we the only ones in the cave (two hikers who had arrived before us had quickly moved on to less accessible parts of the glacier), an overnight snowfall had completely erased all signs of any previous visitors’ tramplings in the patchwork snow that accumulates on the floor beneath small, natural skylights in the cave’s ceiling. Though we had the cave to ourselves, sharing such a wide composition with a dozen other photographers makes taking a picture without someone in it pretty difficult, but the whole group worked well together, sticking to the perimeter, taking turns, and avoiding leaving footprints in the pristine snow.
Awaiting my turn to photograph, I craned my neck and gaped at nature’s masterwork. An ice cave forms when glacial runoff finds, or makes its own, path through the glacial ice. Flowing water is always warmer than the surrounding ice, so with time the channels the water creates expand as more ice melts. When the runoff finds a different path, or diminishes in the winter months, the channels in the ice remain and an ice cave is born (or reborn). Ice caves are blue because centuries of pressure from above compresses opaque, accumulating snow, forcing out air and leaving translucent ice crystals that light can pass through. As sunlight from the surface travels through the ice, all but the shortest visible wavelengths are absorbed, leaving only the blue wavelengths to reach fortunate eyes.
When my turn came to photograph this marvel, I was ready with my Sony a7RIII (my a7RIV and had a small mishap with the Iceland surf and was drying back in my room) and 12-24 G lens. I lowered my tripod to about 18 inches above the ground and composed this 12mm frame to emphasize the faceted ceiling. At 12mm, I was wide enough to also include some of the polished black rocks framing the nearby snow.
I know what you’re thinking: This picture needs a person “for scale.” First, let me say that, because I always try to capture the world devoid of human influence (that is, as if humans don’t exist) I don’t put people in my images. But I acknowledge that adding a person often gives a scene a focal point that a creates a more personal connection with the viewer. So even though the shot of a single person standing in an ice cave has become something of a cliché, compositions become cliché for a reason, and I won’t deny that many (most?) people would like this image better if there were a person somewhere in it. But because leading workshops means my income doesn’t depend a lot on image sales, I’m blessed to be able to photograph the world in the ways that make me happiest, without having to worry about pleasing others.
But let me get back to the scale thing for a second. Despite what others may tell you, adding a person to a scene like this rarely conveys true scale when you try to take in as much of the scene as possible with a wide angle lens. Rather than conveying scale, adding a relatively distant subject (rock, tree, person) to a wide angle scene will exaggerate the expanse of the scene, and shrink the subject. There’s nothing wrong with this—I do it all the time in my landscape images—just don’t say you’re doing it for scale. (Real estate photographers know that a wide angle lens will make even the smallest room look spacious.)

Yours Truly, for scale, in my “spacious” 10’x10′ office. (12mm, 6 feet from the camera)
But anyway… I spent a long time in the ice cave making all kind of wide compositions, but as often happens, I switched to a longer lens and started trying to isolate elements of the scene, getting progressively closer as time passed. Shortly before we left, I must have spent at least 20 minutes working on a single water drop dripping from the ceiling every 10 seconds or so. I have no idea if I got anything worth sharing, but I was sure happing a blast.
We packed up when the cave started to fill with selfie-stick toting gawkers. It wasn’t until the hike back that I fully appreciated how fortunate we were to have the ice cave virtually to ourselves for so long. Based on the virtually uninterrupted string of people heading toward the glacier as we headed out, I’d wager that the ice cave experience for anyone arriving after we left wouldn’t be too different from Upper Antelope Canyon at midday (or the New York City subway at rush hour).
One more thing
Ice caves are one of the canaries in Earth’s climate coal mine. As our planet warms, glaciers recede and their ice caves disappear. I know now that the Rainier ice cave of my youth was part of Paradise Ice Caves. Sadly, Paradise Ice Caves disappeared in the late 20th century, so you, your kids, their kids, and so on will never be able to pile into the family car like we did, and create a memory that lasts a lifetime. Sadly, Crystal Ice Cave probably won’t survive this century, and the clock is ticking on all the world’s ice caves.
Feeling Blue?
Click an image for a closer look, and to view a slide show.


My Favorite Planet
Posted on April 22, 2020
Happy Earth Day, everyone! (The irony of celebrating Earth Day cooped up at home isn’t lost on me.)
If nothing else, COVID-19 has taught all of us that, as much humankind constantly tries to test the boundaries, Mother Nature is still very much in charge. I’m so fortunate to be able to make my living photographing this wonderful planet, but isolating in my office with nothing but memories and a few images of the marvels I’ve witnessed has opened my eyes. Having experienced the northern lights in Iceland, rainbows in Yosemite, lightning at Grand Canyon, and the Milky Way above the bristlecones (among many other natural marvels), puts me in a pretty good position to say that no picture can top being there. But after a lifetime of being there, and returning year after year and seeing firsthand how much damage is done by humans’ constant push for “progress,” I’m starting to wonder how much longer we’ll have a there to be.
But there’s nothing like a crisis to crystalize priorities. The whole point of Earth Day is to remind our planet’s inhabitants to care for our home, and never has that message felt so important. Ironically, as we humans suffer through this pandemic, Earth is thriving in our absence: Air quality is up, hydrocarbons are down, sea life is recovering, and by all accounts, wildlife is partying in our shuttered national parks. One lesson here is that the less humans interact with it, the healthier our planet becomes. That doesn’t mean that saving Earth requires never venturing out into nature. But here’s an analogy to try on: Your carpet will last decades if you never walk on it, but that’s probably not practical. But if you simply take your shoes off indoors and vacuum pretty regularly, you’ll extend that carpet’s life many times. So perhaps from now, as each of us uses Earth’s resources, whether that be consuming or just experiencing, let’s make an extra effort to tread just a little more lightly, and leave things just a little better than we found them.
Workshop Schedule || Purchase Prints
Earth: These are a Few of My Favorite Scenes


To the Pain
Posted on April 12, 2020

Winter Storm, Londrangar, Snaefellsnes Peninsula, Iceland
Sony a7RIV
Sony 24-105 G
Breakthrough 6-stop polarizing ND
30 seconds
F/11
ISO 100
Wherever you are, whatever you’re doing, I hope you’re safe and well.
As nice as it is to stroll up to a scene and find the image of my dreams just sitting there, waiting for me to click the shutter, the most memorable photography usually comes from the shots I have to work for. That “work” can take many forms, but the bottom line is, I prefer feeling like I earned an image. And honestly, photographers can’t afford to just sit around, waiting for a gift from heaven to land on their sensors.
Many years ago I broke down the work that consistently good photography requires into a mnemonic I call, “The 3 P’s of Nature Photography”:

1: Preparation is your foundation, the vision and mastery of your craft that allows you to wring the most from any moment in nature. It’s the experience you’ve earned, the homework you’ve done, and the research that puts you in the right place at the right time. Preparation can take many forms, from laying the foundation of exposure and hyperfocal focus, to researching subjects to learn when the light is best or the waterfall is full. The moon’s appearance above Yosemite Valley on this snowy February evening was no fluke—while (from all appearances) most of the photography world was in Yosemite Valley with their cameras trained on Horsetail Fall, I waited with just a few other photographers at Tunnel View for the moon to appear. The Horsetail Fall crowd was disappointed this evening; we were not.

2: Persistence is patience—with a dash of stubbornness. It’s what keeps you going back when the first, second, or hundredth attempt has been thwarted by unexpected light, weather, or a host of other frustrations, and keeps you out there long after any sane person would have given up. Many years ago I was holed up for several days beneath a solid gray deck of low clouds in Lone Pine, waiting for the clouds to lift enough for Mt. Whitney to come out to play. Every morning I’d drive up into the Alabama Hills to wait for for a sunrise that never happened. But I kept going up, and was finally rewarded when the clouds cleared just as the sun crested the Inyo Mountains to the east.

3: Pain is the willingness to suffer for your craft. I’m not suggesting that you risk injury or death for the sake of a coveted capture, but you do need to be able to experience a little discomfort, and to ignore the tug of a warm fire, full stomach, sound sleep, and dry clothes, because the unfortunate truth is that the best photographs usually seem to happen when most of the world would rather be inside. Pain is definitely what I felt as I sprawled on the hard ground to get the best angle for a face-to-face with these poppies. No, my life wasn’t in danger, but have you ever tried micro-focusing on the thin edge of a poppy petal with a sharp rock jabbing your ribs?
To the pain
So which of my 3 P’s do I credit for this one?
Perched on a cliff above the frigid, churning Atlantic felt a little insane, especially given my less than comfortable relationship with heights. But I had found the only place I could get the angle I wanted. Adding to my discomfort was the numbing cold that made me feel like I’d lost my feet below my ankles, amplified by a piercing wind that turned tiny snowflakes into stinging projectiles. But when you schedule a photo workshop for January, as Don Smith and I now do each year, you had better be prepared to suffer a little. And while it has been said that life is pain, my life would have been far less painful had I opted to wait in the idling bus. But to consider missing the opportunity to photograph Londrangar in a snowstorm was, well, inconceivable.
This was our group’s first full day in Iceland, and so far the weather had ping-ponged between miserable and almost miserable. When we arrived at Londrangar, it wasn’t snowing and was merely almost miserable; within 30 minutes a snow-bearing squall blew in and quickly turned things miserable. When wind increased and the visibility decreased, some retreated to the bus, but when the snow started frosting the rocks, I decided to venture out onto the insane cliffs. Was I in danger? I considered the rocky terrain and decided I’d be fine if I watched my step and made no sudden moves. Once I found my composition, I experimented with motion blur and eventually went extreme, employing my Breakthrough 6-stop polarizing ND for a 30-second shutter speed.
Experiences like this remind me that no matter how miserable conditions are, when the photography is good, even when I’m very aware of the cold, I just don’t feel the pain.
Skip to the end
Most of us are probably looking for distractions as the pandemic shutdown enters its second month. The next time you find yourself with a little extra time, or even when you’re crazy-busy but just need a mental break, try picking one of your favorite images and try to identify which (or how many) of the 3 P’s you invested in its capture. Unless I am wrong (and I am never wrong), your shrinking world will feel just slightly better.
Workshop Schedule || Purchase Prints
To the Pain


Lenses: The Long and Short of it
Posted on March 30, 2020

Howling Dog at Sunset, Bandon Beach, Oregon
Sony a7RIII
Sony 24-105 G
1/50 seconds
F/11
ISO 100
I hope everyone is doing well. I’ve been sequestered at home since returning from Anchorage two weeks ago (visiting my daughter, a trip that seemed okay when I left, but really stressed me when it came time to fly home). Social distancing, shelter in place, quarantine, or whatever you want to call it, we’re all coming to terms with our new reality in different ways. With my wife stuck in Southern California and no kids at home to entertain or educate, I’ve been left to my own devices as I try to fill my days productively: processing images, learning new skills, cleaning up my website and social media pages, and rescheduling workshops. I hope you’re staying safe and happy.
My previous blog post detailed my current equipment lineup and got thinking about me lens choices, specifically about how much I use each lens. Much as a golfers try to identify the ideal club for the unique location and lie of their ball, photographers have to identify the lens that creates the shot they’re going for. Every scene has many variables requiring a seemingly endless number of decisions, from the exposure settings that manage the scene’s motion, depth, and light, to the focus point, to framing.
Prime lenses are undeniably sharper and more compact than zooms, but sharpness gap has narrowed so much in the best lenses that, for me at least, the convenience of being able to refine my framing in my viewfinder justifies whatever small (and often imperceptible) quality they sacrifice. (But zoom versus prime is a personal choice, and a debate I refuse to have with anyone.)
Framing is the most obvious reason to select one lens over another, but it’s certainly not the only reason. As a general rule, the more I want to emphasize my foreground, the wider I’ll go, sometimes filling my frame with a nearby subject and significantly shrinking the background. Telephoto lenses are great for isolation shots that highlight a single aspect of the distant landscape, and also to compress the apparent distance between near and far subjects.
The lens choices we make say a lot about our vision in the field—what we see and how we chose to express it. So, to get a better idea of my own lens choices and maybe identify potential creativity-limiting biases, I created a 2019 lens-use report in Lightroom. Here’s a screenshot for that report detailing the number of frames I shot with each lens in my bag in 2019:

2019 lens use breakdown
And here’s the breakdown:
- — (3 images): This is (was) my 24mm f/1.4 Rokinon (its name is unlisted here because this lens doesn’t communicate any information to the Sony bodies) that used to be my dedicated night lens—until I sold it after getting the…
- Sigma 20mm f/1.4 (10 images): I bought this lens about a month before Sony announced their 24mm f/1.4 GM lens (I hope this will silence the people who assume my Sony Artisan status provides inside knowledge, and who think I’m holding out when I say I don’t know of any new Sony equipment on the horizon). This is a very good lens, but it’s also massive. I bought it to become my dedicated night lens, a status it held for about a month—until it was replaced by my 24mm Sony f/1.4 (more below). I only used the Sigma once, side-by-side with the new 24mm Sony, and decided the Sony was slightly (but noticeably) sharper (and much, much smaller and lighter).
- Sony FE 12-24mm (388 images): Not a high volume lens, but the 12-24 has become essential because it allows me to do things I once believed to be impossible (see my previous blog post). Even though I like to have a polarizer on all of my lenses, I don’t mind too much that this lens doesn’t take filters, because it’s so wide that I’d get differential polarization (which I hate) in the sky anyway.
- Sony 16-35mm f/2.8 GM (1609 images): Since part of this lens’s focal range is covered by the 12-24, and the rest is covered by my 24-105, you could argue that it’s redundant. But this may just be the sharpest non-prime lens I own, (unlike the 12-24) it takes filters, and f/2.8, while not as fast as I’d like for night photography, is in fact fast enough. And sometimes when I’m photographing the Milky Way, I want more sky than my 24mm f/1.4 lens gives me—this is especially true in New Zealand, where the Milky Way is higher in the sky than it is in North America. Plus, as a general rule, the extreme ends of a lens’s focal range are not usually its best, so when find myself shooting the 12-24 or 24-105 at or near 24mm, (and I’m not being lazy) I’ll switch to the 16-35. One other reason I love this lens is that it delivers the sweetest sunstar of all my lenses.
- Sony 24-105mm f/4 G (3322 images): My most heavily used lens and it’s not even close. I actually took more pictures with this lens than I did with all my other lenses combined. These numbers are skewed slightly by the fact that this is my primary lightning lens, because in an active electrical storm my Lightning Trigger might fire hundreds of times with only a handful of visible strikes (it rarely misses the visible strikes, but also catches many strikes that I or my camera didn’t see). But even accounting for that, my 24-105 is the volume winner by such a wide margin for the simple reason that it has a broad focal range that covers both the moderate wide and telephoto zones. It’s also really sharp, and relatively compact. That said, seeing these numbers makes my think maybe I’ve gotten a little lazy and should think more about the possibilities with the other lenses in my bag.
- Sony 24mm f1.4 GM (208 images): My latest dedicated night lens, I haven’t a single picture with this lens when the sun was out. Super sharp, and so compact I don’t even know I’m carrying it (it actually squeezes into the front pocket of my Levis. I just got the 20mm f/1.8 G lens, which is even smaller, but haven’t used it—I’ll probably use both at night (only) rather than try to decide between the two.
- Sony 70-200mm f/4 G (83 images): I love this lens, but it has been replaced by the 100-400 and I rarely carry it anymore. To save weight in my camera bag, I did take the 70-200 to New Zealand last June instead of the 100-400, and really appreciated having a lighter bag (especially since NZ is very tight on carry-on weight).
- Sony 90mm f/2.8 G (6 images): Wow, only 6 images with this crazy sharp lens. Part of that low number is because I only carry this lens when macro is my primary objective, and part of it is because I’ve really gotten into using my extreme telephotos with extension tubes for my close-focus work. But maybe I need to dust this lens off and use it more in 2020.
- Sony 100-400 f/4.5-5.6 GM (603 images, including teleconverter): The majority of my 100-400 images are of the moon, but I use it for other stuff too. In spring and fall I add extension tubes and do creative selective focus, and sometimes it’s fun to just put it up to my eye and slowly pan a landscape to identify subjects to isolate. Adding the Sony 2X teleconverter is like putting this lens on steroids, essentially doubling all the things I like about it. The teleconverter costs two stops, but I see no appreciable degradation of image quality—it’s definitely the sharpest telephoto/teleconverter pair I’ve ever used.
- Sony 200-600 f/5.6-6.3 G (114 images, including teleconverter): Since lens is pretty new, so far I’ve only used it for the moon. But wow, if you want to make your moon big, try this lens with the 2X teleconverter and APS-C (1.5) crop. I’m looking forward to trying it for the selective focus work I use the 100-400 for.
About this image
The sea stacks at Bandon Beach on the Oregon Coast make a great starting point for an image, but because there’s so much else going on here, I try to avoid making the sea stacks my ultimate goal. Since the scene at Bandon varies quite a bit with the tide and sky, when I photograph here I like to wander at the water line and identify features that I can assemble into a composition: sea stacks, reflections, surf, sun, and (fingers crossed) clouds.
The reflections following waves receding on the very gently sloping beach are better at Bandon than most beaches because the water doesn’t recede as quickly, and there’s more surface area for them to form. The best reflections happen when there are clouds and or color in the sky, so I like to arrive early enough to pick my composition, then wait for the magic.
On this April evening I found a little creek, fed by runoff from recent rain, leading right into Howling Dog (often misidentified as Wizard’s Hat, which is a short distance south). The sun was behind the clouds as I worked on my composition, but the clouds were moving so fast, I knew the sun would appear soon. But I’d found my shot early enough that when the clouds parted, I was ready. A film of thin clouds subdued the sun’s brightness, making exposure easier. All I had to do was wait for a wave to wash up and recede, then click.
A Collection of Images, from Long to Short
Select an image for a closer look, exposure info, and a slide show


")


It’s in the Bag
Posted on March 25, 2020

Winter Storm, El Capitan in the Snow, Yosemite
Sony a7RIII
Sony 12-24 G
1/20 seconds
F/16
ISO 50
Ready for some irony? One reason I switched from a Canon DSLR system to Sony Alpha mirrorless (about 5 1/2 years ago) was that Sony’s bodies and lenses are smaller and lighter, yet today I’m probably carrying the heaviest bag I’ve ever carried. What I hadn’t counted on when I made the switch was that smaller gear meant more room in my camera bag, which gave me two options: a smaller camera bag, or more gear. Guess which option I chose. Since people ask all the time about my gear, and it’s been a couple of years since I actually shared it all in one place…
Let’s peek in my camera bag
The contents of my camera bag has evolved over the years, from the vanilla 16-35, 24-105, 70-200 lens lineup that most landscape photographer carry, to my current setup that allows covers 12mm to 800mm (1200mm if you factor in the APS-C crop option) at all times—plus the option to go up to 1800mm (factoring in the APS-C crop factor) if I need it.
Here’s what’s I carry today:
Always in my bag
- Sony a7R IV camera body: My primary body—61 amazing megapixels.
- Sony a7R III camera body: My backup/second body—peace of mind in case I break/lose my primary body; or if I want to have two cameras going at the same time (because you’ll never hear me say 42 megapixels isn’t enough).
- Sony 12-24 f/4 G lens: Though I don’t use it a lot, this lens has allowed me to photograph things I never could, and I love that it’s compact enough to keep with me at all times.
- Sony 16-35 f/2.8 GM lens*: This focal range is covered by other lenses in my bag, but I love the lens too much to leave it behind—crazy sharp, and f/2.8 means it’s fast enough for night photography in a pinch. Plus, it’s a whole lot easier to use with polarizing and neutral density filters than the 12-24.
- Sony 24-105 G lens*: This is my workhorse—what a fantastic focal range! Really sharp, too.
- Sony 100-400 GM lens*: Replacing my 70-200 with this slightly bigger lens doubled my focal range—and it’s a fantastic match with the Sony 2X teleconverter.
- Sony 2X teleconverter
- Filters (in a Mindshift filter bag attached to my tripod): 72mm and 77mm Breakthrough 6-stop polarizing ND filters, Breakthrough 2-stop hard graduated neutral density filter
- Other stuff: Several lens cloths, headlamp, insulated water bottle, extension tubes, Giotto Rocket Blower, and a couple of RX Bars (because photography always trumps meals).
* Plus a Breakthrough polarizer

Mindshift Backlight 26L bag fully loaded
Notice how the compactness of the Sony bodies and lenses allows me to pack almost everything on its end? This is the primary reason I’m able to get so much gear in my bag.
Specialty Equipment (not in the picture—stays behind until I need it)
- Sony a7S II camera body: For Milky Way and other moonless night photography—it’s “only” 12 megapixels (remember when 12 megapixels was huge?), but this camera sees in the dark.
- Sony 24mm f/1.4 GM lens: For Milky Way and other moonless night photography—I can’t believe how compact this lens is.
- Sony 28mm f/1.8 G lens: For Milky Way and other moonless night photography—this one’s even more compact than the 24mm.
- Sony 90mm Macro: I use this lens a lot with extension tubes to get super close for my creative selective focus work (wildflowers, fall color).
- Sony 200-600 G lens: When I want to go big on a moonrise/moonset—sometimes I’ll pare it with the 2X teleconverter and really go crazy. I also use this lens with extension tubes for selective focus fall color.
Support
- Really Right Stuff 24L Tripod with a RRS BH-55 ball head: Sturdy enough for whatever I put on it, in pretty much any conditions. I also like that, fully extended with the head and camera, it’s several inches taller than I am—without a centerpost.
- Colorado Tripod Company Centennial 2-Series (Breakthrough Filters affiliate) with a RRS BH-40 ballhead: This recent addition is my new travel/hiking tripod. Without extending the centerpost it’s not quite as tall as I like, but it’s a couple of inches taller than the RRS TQC-14 I’d been using before, and just as sturdy.
About this image
In my Canon days, and my first couple of years with Sony, the focal-length range I carried at all times was 16mm – 200mm. With Canon it was mostly a size thing—I just didn’t have enough room for much more than my DSLR body and 16-35, 24-105, and 70-200 lenses. When I switched to Sony, even though Yosemite has some scenes that are too wide for a 16mm lens, I figured Sony lenses covering the same focal range would be sufficient.
Then one spring morning in Yosemite, I was photographing a flooded meadow when a friend loaned me his Canon 11-24 f/4 lens (which I adapted to my Sony a7RII body with a Metabones adapter), and I was in love (with the lens, not my friend). Wow! Even though I knew I wouldn’t use an ultra-wide lens very much, the ability to go wide when the situation calls for it suddenly opened up a whole new world. But as much as I’d have loved a Canon 11-24 of my own, it was just too big and heavy (not to mention expensive) to live full-time in my bag.

Spring Reflection, El Capitan and Three Brothers, Yosemite
This 11mm image with a Canon 11-24 lens, adapted to my Sony a7RII, is my first ultra-wide image.
Just a year after that ultra-wide epiphany, Sony released its very own ultra-wide lens. Not only is the Sony 12-24 f/4 G lens just as sharp as its Canon counterpart (at about half the price), the Sony 12-24 is less than half the Canon’s size and weight. I was so excited when I realized how compact it is that I instantly reconfigured a few partitions in my camera bag and voila, it fit —without having to jettison anything.
That’s a long-winded way of explaining how I happened to be able to capture this image at a spot in Yosemite that for most of my photography life was too close to photograph El Capitan and its reflection, top to bottom, in a single frame. My brother and I had arrived in the park the previous afternoon, got a room at the lodge, and hunkered down against the incoming storm. What had been forecast to be 3-5 inches of overnight snow had just been upgraded to 12-16 inches, so we knew we’d wake Tuesday morning to something exceptional. A peek through the curtains in the predawn darkness confirmed a world of white with the snow still falling hard. Checking the Yosemite road conditions hotline, I learned that not only were all park entrances closed, all roads in Yosemite Valley were closed.
I dressed and trudged through the snow in the twilight to survey the photography potential near the lodge and found the view of Yosemite Falls completely obscured by clouds. The cafeteria was open, but serving nothing because the employees couldn’t make it to work. At the adjacent Starbucks I found only two people had been able to negotiate the snowy darkness to get to work—it turned out to be the Starbucks manager and his wife, a non-employee drafted into action and put on the front line.
On my way back to my room, I swung by the parking lot and checked my car. About the time I identified the white lump that was mine, Yosemite Falls made an appearance and I hustled back to the room for my gear, but within a couple of minutes it had been re-swallowed. My brother and I spent most of the rest of the morning watching the skies, waiting for the views of Yosemite Falls or Half Dome to clear enough to photograph, or simply for the snow to slow enough to allow us to photograph some of the closer views. We the snowfall finally abated, we ventured out into the elements and forged a trail through the snow to the bridge beneath Lower Yosemite Fall, because any photography is better than no photography.
Shortly after returning to the room we got a call from the front desk telling us outbound Highway 140 had reopened. We had no plans to evacuate, but I took this as a signal that the valley roads would be open too (otherwise, what use would there be to open 140). So we dug out my Outback (no small feat) and hit the road. With snow still falling, we spent the next few hours circling Yosemite Valley, stopping occasionally when a view appeared, waiting for the storm to clear.
We were at El Capitan Bridge when blue sky appeared. Being here in the snow reminded me of an image I’d captured here a year earlier using my 12-24. I’d been blown away that I could get that entire scene in a single vertical frame, but wished there had be more blue sky. But here was a second chance, this time with blue sky, and I set up real fast to reprise that composition.
As I had the first time, I was able to keep my camera level (my lens exactly parallel to the ground) to avoid distorting the trees on edge of the frame. Focus was easy because at 12mm, depth of field feels nearly infinite. Metering was a little trickier than the first time because El Capitan was brighter, but I knew my Sony a7RIII could handle it. Not sure of the best way to handle the falling snow, I tried a few ISO and f-stop combinations, and ended up going with the one that gave me a shutter speed that turned the snow into small streaks of white (the snow showed up better this way).
-

- Winter Storm, El Capitan in the Snow, Yosemite
-

- Storm Clouds, El Capitan, Yosemite
It’s pretty amazing (and a little disconcerting) how close I came to duplicating that earlier composition. The biggest difference is the trees that have been removed in the last year, victims of the drought and pine bark beetle.
An Ultra-Wide Gallery
Click an image for a closer look, and to view a slide show.


, Yosemite")


2019 Highlights: Social Distancing Edition
Posted on March 22, 2020
What have you been doing with your spring “vacation.” Sequestered here in the Gary Hart Photography World Headquarters, I’ve been spending a lot of time going through my 2019 images and have already uncovered a half dozen or so that qualify for my 2019 Highlights post. It’s a welcome relief from coronavirus news and the stress of rescheduling workshops. As I work, I’m starting to realize that the coolest thing about going through past images isn’t finding new images to process and share, it’s reviving the faded memories of wonderful moments in nature.
Here’s the “new” stuff I’ve found so far

Sand Like Glass, Bandon Beach Sunset, Oregon
I blogged about this image last week, but I like it so much that I’m sharing it again. One of my favorite thing about photographing a beach sunset is the sand reflections that appear as a wave recedes. I was so taken by the reflections this evening that I wasn’t even aware that two Bandon Beach icons were in my frame: Howling Dog (the pointy rock in the distant left) and Face Rock (the large, most distant rock near the center).

Island in the Sand, Bandon Beach, Oregon
Farther down the beach later that evening, the light had started to warm when I found a couple of rocks that formed virtual islands in a reflective pool. These pools only last for a few seconds, so you have to be fast (or just wait for the next wave).
Howling Dog at Sunset, Bandon Beach, Oregon
This is also Bandon Beach, but it’s three months later. Unlike my earlier image that reduced Howling Dog (no, this is not Wizard’s Hat) to a bit part, this composition features Howling Dog front and center (I must admit, from this angle, it does look more like a wizard’s hat than a howling dog). I like the way the little stream picks up the sunset light and guides my eye into the frame.

Lightning Strike, Grand Canyon
This was the first shoot of last year’s first Grand Canyon Monsoon workshop. The forecast said mostly sunny and no rain. The forecast was wrong.
Winter Reflection, El Capitan and Three Brothers, Yosemite
Heavy snow had closed Yosemite Valley to incoming visitors, but my brother and I had arrived the day before (as most of the current visitors were heading for the exits), so it felt like we had the park to ourselves. We trudged about 100 yards through four foot drifts to get out to this spot.

Gary Hart Photography: Winter Reflection, El Capitan and Cathedral Rocks, Yosemite
This is looking west from the same location as the previous image. Maybe there’s something on Earth more beautiful than watching a Yosemite snowstorm clear, but I haven’t seen it.
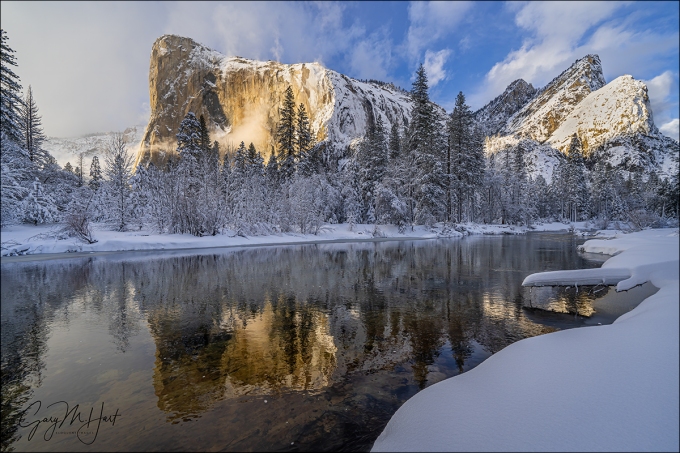
Winter Storm, El Capitan in the Snow, Yosemite
This was one of our first stops that morning. The snow was still falling when we stopped at El Capitan Bridge (you can see it streaking in the lower left), but the blue sky told us we needed to work fast.
Here’s my original 2019 Highlights post
We’ve reached that time of year where everyone is compiling their Top 10 lists. I like retrospectives as much as the next person, but I’ve always resisted assembling these “top-whatever” end-of-year countdowns of my own images. Then last week Sony asked me to provide my favorite image of 2019 and I struggled mightily because it felt like they were asking me to pick a favorite child—which, as we all know, can vary on a daily basis. (Just kidding—I love you girls!) But seriously, I did hesitate because I wasn’t sure Sony and I aren’t defining “favorite” the same, and in fact favorite for me can mean many things that are easily skewed by mood and memory.
So instead of attempting to rate and rank my images at year’s end, I prefer using them as a catalyst for reflection. Each December I go through the images I’ve processed from the waning year and reflect on the circumstances of their capture. Rather than focus on individual images, I’ll start by reflecting more on the experience surrounding three memorable shoots that stand out from in a year filled with too many individual highlights to detail here (but feel free to go through my 2019 blog posts). And if you’re just here for the pictures, jump to the bottom to see a gallery of 2019 images that make me happy (including some new images that I’ve never shared).
Iceland northern lights
I can think of no better way to start a year than the opportunity to photograph something I’ve fantasized about seeing for my entire life. When Don Smith and I traveled to Iceland last January, I had two goals in mind: scout for our upcoming photo workshop, and see the northern lights. The scouting trip was a great success, but with just a couple of days to go, and not for lack of trying, we still hadn’t seen the northern lights.
On our penultimate night we finally witnessed a nice aurora display that spread ebbing and flowing veils of green, coloring the sky above Glacier Lagoon from the horizon to about 45 degrees—I was thrilled and felt like my aurora dreams had been fulfilled. Then came our final night, when I learned what a real northern lights display is.
There really are no words to describe this experience, so I’ll just let my images speak for me. I will say that two-dimensional, still images don’t fully convey the experience of witnessing the aurora in person, but they do at least least give you an idea of the drama and magnitude: for one thing, the foreground was darker than what I captured (though it was bright enough that I walked around without a flashlight); the aurora moves, maybe at about the speed of the minute hand on a clock. And while the previous night’s display was only in the northwest and covered no more than a quarter of the sky, the display this night at times spread across the entire sky and needed to constantly spin around to make sure I wasn’t missing something.
Read more about this night of a lifetime: Chasing the Northern Lights
New Zealand winter night
Don and I did two winter photo workshops on New Zealand’s South Island in 2019. The first was our regularly scheduled New Zealand winter workshop, the second was a workshop we put together to guide a group from the Sony Alpha Imaging Collective. Though night photography was a priority for both groups, the moon and clouds hindered the first group’s efforts (until our final night, but that’s another story).
The second group fared better in the night photography department in general, one day in particular stood out. We started with a 3 a.m. starlight shoot at Lake Wanaka, then made the 3-hour drive to Aoraki National Park, where we spent a day photographing spectacular fog and hoarfrost along the way, and glaciers, lakes, and mountains once we arrived. Following our beautiful sunset on the shore of Tasman Lake, we bundled up to wait for dark and were rewarded with one of the most breathtaking Milky Way shoots in my life (which has been filled with many Milky Way shoots).
All I could think about on the foggy 3-hour drive back from Aoraki was curling up in my warm bed and getting some much needed sleep. But when we pulled into our hotel a little before midnight and I looked up and saw stars, it felt like someone had flipped the switch on my reserve generator and I just had to go back out and shoot some more. So while everyone else headed to their rooms to process images or sleep, I grabbed my camera gear and raced to the lake. For the entire 10-minute walk to Wanaka’s iconic willow tree, I kept an eye on a bank of fog massing on the far shore and willed it to hold off long to allow me a few frames.
Finding the view of the tree completely devoid of people (a personal first), I photographed for nearly an hour in glorious solitude. While waiting for each exposure to complete, and with nothing in my world but me, my camera, and a sky full of stars, I reflected on the last 21 hours realize this was the perfect cap to what was no doubt one of the most memorable photography days of my life.
Read more about this day seemed to last forever: The Longest Day
Grand Canyon electrical storm
Each year starting in 2013, Don and I have guided two photo workshop groups around both rims of the Grand Canyon, chasing the lightning, towering clouds, and dramatic light of the Southwest’s summer monsoon. This year’s Grand Canyon monsoon trip was filled with lots of great memories and photography that included rainbows and more lightning strikes than I can count, but one experience in particular stands out above the rest.
The best vantage point for an electrical storm on the Grand Canyon North Rim is probably the twin view decks at Grand Canyon Lodge. Not only do these open-air decks provide a beautiful, sweeping view of the canyon, they’re shielded from lightning by a network of lightning rods, and anchored by an enclosed viewing area for retreat when the action gets too close.
We’d been watching a storm build in the distant west, but unlike most storms here, this one moved toward us and didn’t veer or fade as it approached. The storm arrived so quickly, and so mesmerized were we by its power, that it was almost on top of us before we could react. The rain was just starting to pelt us when Oza Butte, about a mile away, was stabbed with multiple strokes that made everyone jump and gasp. That was our signal to grab our gear and race for cover.
Safe inside as the storm raged around us, everyone in the group buzzed about “the big one.” I moved around the room and confirmed that nearly everyone had some version of this spectacular strike, then scrolled through my own frames holding my breath until I came across this one. Many in the group only had the bolt on the right because that’s the direction the lighting had been firing. I was silently patted myself on the back for having the foresight (good luck) to have widened and shifted my composition to the left shortly before this bolt hit. First, because it seemed like the storm was moving in that direction, and also because I wanted my composition to include more canyon.
Read more about this hair raising experience: I Just Have to Share This

Lightning Explosion, Oza Butte, Grand Canyon North Rim
2019 Highlights (Updated March 2020)
Click an image for a closer look and to view a slide show.


")


Hunkered Down
Posted on March 17, 2020
Sand Like Glass, Bandon Beach Sunset, Oregon
Sony a7RIII
Sony 16-35 GM
1/30 second
F/18
ISO 100
So how has your world been upended by the coronavirus? Fortunate for me, mine so far has been firmly pegged on the inconvenience side of the coronavirus inconvenience-tragedy continuum. I’ve had to reschedule a couple of workshops, answer lots of concerned e-mails, and abandon some firmly established routines, but (as far as I know) no one in my circle has even gotten sick. So you won’t hear me complaining.
One thing this shelter-in-place time has provided is the opportunity to mine my image folders for forgotten gems that my (formerly) busy schedule never allowed me to process. And you know what? It’s actually kind of fun. I have some shoots that I’ve mentally bookmarked as “sure things,” but the coolest thing is that I’m finding stuff I’d completely forgotten about. I started with this image from January 2019 at Bandon Beach (for no other reason than it was in the oldest folder on the hard drive that happened to be in closest reach), and it turns out this is the first image I’ve processed from this scouting trip Don Smith and I took fourteen months ago—one of the shoots I’d completely forgotten.
In addition to going through old images, and to prevent myself from going completely stir crazy, I plan to take this opportunity to spend more quality time with my camera. One of the nice things about landscape photography is that it can be both a group or a solitary endeavor, and both are pretty great The group aspect I’ve covered pretty thoroughly with my workshops, but the solitary part has suffered in recent years. Spring is one of the best times to photograph the foothills near my Sacramento home, and with everyone’s travel so restricted, I plan to take full advantage of the reduced crowds during what’s normally one of Yosemite’s busiest seasons.
I also think I’ll try to do some of that education and skill refreshing that I always say I need to get to, but never do. And who knows—maybe I’ll even find more time for my blog….
About this image
Don and I were in Bandon scouting locations for our shared Oregon Coast photo workshops that were scheduled to kick off a couple of months later. We’d been to Bandon a number of times before, so the goal this evening wasn’t so much to identify photo spots as it was to become more familiar with the light, tide, and surf here.
I started this evening way up at the north end of the beach and slowly made my way south. The tide was out, exposing lots of sand and rocks that had been submerged on previous visits, and the thing that most drew my eye was the reflections on the sand left by receding waves. In most places the reflections faded as the water percolated downward into the sand, but in the spots where extra water was funneled by rocks embedded in the beach, deeper indentations created pools. At first I was just content to look and mentally compose, but when the sun approached the horizon I got my camera out and went to work. I started with a few sunstars as the sun dropped into the clouds, but the best stuff didn’t come until after the sun disappeared.
I don’t have any specific memories of composing this shot, but I can tell by looking at it that my mindset was to pair the foreground rocks and reflection with the background sea stacks. To emphasize the rocks and reflection, I went wide and got very close, allowing them to nearly fill my frame. Then I waited for a wave to flood the scene, and recede to reveal a reflection.
Hang in there everybody (and wash your hands!).
Workshop Schedule || Purchase Prints
Life’s a Beach
Click an image for a closer look, and to view a slide show.


I Laughed, I Cried…
Posted on March 9, 2020

Heaven Sent, Aurora Above Glacier Lagoon, Iceland
Sony a7RIV
Sony 16-35 GM
20 seconds
F/2.8
ISO 3200
To photograph the northern lights, lots of things need to go right. It starts with picking the right time of year, and finding a location far from city lights—the best months and locations can be determined with research and scouting, but far more problematic are the factors beyond my control: solar activity and weather. And unfortunately, when people sign up for a January Iceland workshop, no matter how clear you make it to them the northern lights are not guaranteed, they really, really, really expect to see the northern lights.
Before Don Smith and I scheduled our 2020 Iceland photo workshop, we did our best to maximize our group’s photography opportunities in general, and northern lights chances in particular: we researched Iceland’s prime northern lights months, identified the best guiding service, and in January 2019 spent 10 days with our guide scouting the spectacular Iceland landscape. On this advance trip we even were treated to a breathtaking northern lights show that enabled us to hone our aurora photography skills, and fill our websites with images.
When we announced the 2020 trip we did all the right stuff, providing preparation and educational material that emphasized the disclaimer that we can’t guarantee the northern lights. But as the trip approached and I started receiving good natured (I think) threats (“You better get us the northern lights or I’ll…”), I couldn’t help feeling a little anxious. As early as 10 days before the workshop, I started checking the long-range forecasts, but no matter which resource I chose, and how many times I checked, things weren’t turning out the way I’d hoped. Not only did the weather look pretty bleak (rain, snow, fog), the KP forecast of solar activity was pegged in the 0-2 range (on a scale that goes all the way up to 9). Gulp.
Throughout the workshop Óli (our guide), Don, and I obsessively monitored the forecasts and tried to stay as positive as possible, but with two nights to go, we hadn’t had a hint of northern lights opportunity, and the natives were getting restless. I suspect that the only thing preventing an all-out coup was that the locations and frequent clouds and snow made the rest of the workshop’s photography pretty fantastic. (Okay, seriously, this group was tons of fun and very understanding about our impossible aurora conditions, but I really wanted to deliver for them.)
In the back of my mind was the experience Óli, Don, and I had last year, when the forecasts were bleak until an unexpected uptick in the KP index coincided with a clearing of the sky at Glacier Lagoon on the trip’s last two nights. Throughout this year’s trip, I told myself (and all who would listen) that if it happened once, it could happen again. And guess what…
By the time we wrapped up our sunset shoot at Glacier Lagoon on the workshop’s penultimate day, we all knew that tonight could be the night—the weather forecast had improved to “partly cloudy,” and the KP index had bumped up into the 2-3 range. Far from a sure thing, but definitely worth bundling up and giving it a shot. So after dinner we piled back onto our bus and returned to Glacier Lagoon.
At the lagoon I hopped from the bus to scan the dark northern sky and saw a mix of clouds and stars. There was the Big Dipper and Cassiopeia. And once my eyes adjusted, I found the faint section of the Milky Way overhead and traced its path downward until it disappeared into a mass of clouds—not ideal, but there were enough stars to know we’d be okay. Unlike the previous year’s shoot, the northern lights weren’t visible to the naked eye, so I quickly set up my tripod and camera to take a test exposure, and there it was in my LCD, a faint but distinct green glow hovering above the northern horizon, partially obscured by clouds but unquestionably the northern lights. We were in business.
The darkness made keeping track of people pretty difficult, but since we’d already photographed here, everyone had their own idea of where they wanted to be and quickly scattered. I, and many others, started along the lagoon’s shoreline, but within an hour or so almost everyone had ascended the hillside overlooking the lagoon for a much more expansive view of the horizon.
Even though the aurora had brightened and was now visible to the naked eye, it remained just a green and (occasionally) red glow that lacked definition. Nevertheless, I could sense everyone’s relief—despite maintaining a positive facade, until this night I think most of us had become silently resigned to the fact that the northern lights weren’t in our future. At least they could all now say they’d seen the beauty of the northern lights. And then something amazing happened.
As if someone had suddenly cranked the intensity knob, a visible green shaft climbed skyward from behind the mountains, and within five minutes half the sky was alive with dancing light. The display was so beautiful and unexpected that we all just couldn’t help laughing at our good fortune. This great group that had spent more than a week bouncing around the Iceland countryside, marveling, eating, sharing, shivering, and (especially) dreaming of northern lights, was having a blast photographing together above Glacier Lagoon.
I can’t begin to express the joy I felt that night. It’s always wonderful to witness nature’s marvels firsthand, but sharing a first time with an infinitely deserving group of friends is truly special. After a while I stopped shooting to just watch the show and listen to the joy and felt tears welling in my eyes.
Epilogue
I spent more time this shoot moving around in the dark, helping people in the group with focus and exposure, than I did taking pictures. And it turns out that at some point in these travels, my camera lost focus and more than half of my images, including those from the peak of the aurora activity, are unusably soft. This is only mildly disappointing because 1) in a workshop it really isn’t about my photography anyway, and 2) I already have plenty spectacular Glacier Lagoon northern lights images from last year’s trip.
And despite that setback, I did get enough images to confirm that my Sony a7RIV is an excellent night photography camera. Until this trip I’ve always used my Sony a7SII (or the a7S that preceded it) for my night work, but I decided to save weight by leaving the a7SII home. While the low-light vision of the a7SII makes its viewfinder second to none for night composition and focus, the a7RIV proved good enough for that, and the image quality difference isn’t discernible.
My Aurora Bounty So Far (mostly from 2019)
Click an image for a closer look and to view a slide show.


To Polarize, or Not to Polarize
Posted on March 3, 2020
One of my most frequently asked questions during a workshop shoot is, “Should I use my polarizer here?” Of course that’s an impossible question to answer absolutely because as a creative choice, the polarizer decision is rarely absolute.
While many people believe the sole purpose of a polarizer is to make the sky darker (deeper blue), blue sky is just a byproduct of the polarizer’s function: to cut reflections. In fact, if someone could design a polarizer that only worked on the landscape and did nothing to the sky, that’s the one I’d be using because: 1) I generally don’t care for blue sky in my images, and 2) a polarizer doesn’t usually darken the sky uniformly.
Before going any farther, I should probably explain a little about what a polarizer does, and how it does it.
Put simply
A polarizer cuts reflections. It’s a piece of glass mounted on a threaded ring—the threaded ring screws onto a lens, while the glass part of the polarizer rotates independently, allowing the photographer to rotate the glass 360 degrees on the front of the lens. (Contrary to popular belief, a polarizer is a single piece of rotating glass, not one piece of glass rotating atop a second stationary piece of glass.) The polarizer is designed to rotate because its greatest (reflection cutting) effect is at 90 degrees to the light source; at all other angles polarization decreases as the angle moves away from 90 degrees; it becomes nonexistent at 0 and 180 degrees. By watching the scene through the viewfinder as you rotate the glass, you can see the polarization effect change.
On the surface, cutting reflections might not seem so desirable for someone who likes photographing reflections as much as I do, but reflections are a much bigger part of our visual experience than most people realize. Virtually every object reflects at least a little, and many things reflect a lot more than we’re aware. Worse still, these reflections often hide the very surface features and color we most want to photograph.
When reflections hide an object’s underlying beauty, a polarizer can restore some of that beauty. I use a polarizer when I want to capture the submerged rocks or sand hidden by the reflection atop a river or lake, the rich color overwhelmed by glare reflecting from foliage, and sometimes even the sky’s deep blue that has been washed out by light scattered by atmospheric molecules.
Put a little less simply…
In reality, reflections are merely collateral damage to your polarizer. What a polarizer really does is eliminate light that’s already been polarized. To understand what’s really going on with a polarizer, read on….
Essential terminology
- Oscillation is motion relative to a fixed point. For example, when you snap a whip, the whip “oscillates” along its length. Without external interference (e.g., friction from the atmosphere or other objects), motion in one direction along the whip will have an identical motion in the opposite direction (e.g., up=down, left right, and so on), and that motion will move forward along the whip.
- A wave is oscillation along or through a medium (such as air, water, or space). The bulge that moves up and down (oscillates) along a cracked whip is a wave. For the liberal arts folks, (in this context) wave is a noun, oscillate is a verb. A wave is measured by its wavelength and frequency—the higher the frequency, the shorter the wavelength.
- Frequency is the number of times a wave peak passes a discrete point in a given unit of time (usually one second: “per second”).
- Wavelength is the distance from one wave peak to the next at any instant frozen in time.
- A transverse wave oscillates perpendicular (90°) to its direction of motion. To imagine the motion of a transverse wave, picture an ocean wave, which oscillates up and down as it advances through the water. Now think about a bottle floating in the open ocean—bobbing up and down with each wave, its up/down motion is perpendicular to the wave’s forward motion, but when that wave has passed, the bottle is in the same place it was before the wave arrived. (Waves don’t move bobbing bottles across the ocean, wind and currents do.)
- Visible light is electromagnetic radiation that reaches our eyes as a transverse wave somewhere in the wavelength range the human eye can register, about 380 to 740 nanometers (really small).
- Sunlight (or more accurately, solar energy) reaches earth as a transverse wave with a very broad and continuous spectrum of wavelengths that include, among others, the visible spectrum (lucky for photographers), infrared (lucky for everyone), and ultraviolet (lucky for sunscreen vendors). The oscillation of solar energy’s transverse wave is infinitely more complicated than an ocean wave because light oscillates in an infinite number of directions perpendicular to its direction of motion. Huh? Think about the blades of a propeller—each is perpendicular to the shaft upon which the propeller rotates, so in theory you can have an infinite number of propeller blades pointing in an infinite number of directions, each perpendicular to the shaft. So a light wave oscillates not just up/down, but also left/right, and every other (perpendicular) angle in between.
Polarization
While an unpolarized light wave oscillates on every plane perpendicular to the wave’s motion, polarized light only oscillates on one perpendicular plane (up/down or left/right or 45°/225° and so on).
Polarization can be induced many ways, but photographers are most interested in light that has already been polarized by reflection from a nonmetallic surface (such as water or foliage), or light that has been scattered by molecules in our atmosphere. Light scattered by a reflective surface is polarized parallel to the reflective surface; light scattered by molecules in the atmosphere is polarized perpendicular to the direction of the light.
Polarization can also be induced artificially with a polarizing filter (“polarizer”), a filter coated with a material whose molecular structure allows most light to pass, but blocks light waves oscillating in a specific direction. When unpolarized light (most of the light that illuminates our lives) passes through a polarizer, the light that enters the lens to which it’s attached has been stripped of the waves oscillating in a certain direction and we (through the viewfinder) see a uniform darkening of the entire scene (usually one to two stops).
But that uniform darkening is not usually what we use a polarizer for. (I say usually because sometimes we use a polarizer to reduce light and stretch the shutter speed in lieu of a neutral density filter.) Photographers are most interested in their polarizers’ ability to eliminate reflective glare and darken the sky, which occurs when their polarizer’s rotating glass element matches the oscillation direction of light that has already been polarized by reflection or scattering, cancelling that light. By watching the scene as we rotate the filter’s polarizing element, photographers know that we’ve achieved maximum polarization (reflection reduction) when we rotate the polarizer until maximum darkening is achieved—voila!
The exception that proves the rule
Most photographers know that a polarizer has its greatest effect on the sky when it’s at right angles (90°) to the sun, and least effective when pointed directly into or away from the sun (0º or 180°). We also know that a rainbow, which is always centered on the “anti-solar point” (a line drawn from the sun through the back of your head and out between your eyes points to the anti-solar point) exactly 180° from the sun, can be erased by a polarizer. But how can it be that a polarizer is most effective at 90° to the sun, and a rainbow is 180° from the sun? To test your understanding of polarization, try to reason out why a rainbow is eliminated by a polarizer.
Did you figure it out? I won’t keep you in suspense: light entering a raindrop is split into its component colors by refraction; that light is reflected off the back of the raindrop and back to your eyes (there’s a little more bouncing around going on inside the raindrop, but this is the end result). Because a rainbow is reflected light, it’s polarized, which means that it can be eliminated by a properly oriented polarizer.
But back to the original question
Should I use a polarizer? I’m still not going to answer. What I will tell you is that I carry a polarizer for every lens in my bag, and when the sun’s out I virtually always have a polarizer on my lens. But my approach comes with some caveats:
- A polarizer cuts the amount of light reaching your sensor by 1 to 2 stops, which means if don’t use a tripod (shame on you), a polarizer requires a faster shutter speed.
- You must get in the habit of orienting the polarizer with each composition, or risk doing more harm than good to your image
While I use a polarizer on pretty much all of my daylight images, there are times I remove it:
- At night (duh), or whenever the scene is so dark that the polarizer’s cost to my exposure settings exceeds its benefit.
- On a wide lens with lots of blue sky, the polarizer’s effect on different areas of the sky can be both obvious and uncorrectable (I can dodge/burn minor differences). On the other hand, I almost always avoid wide shots with lots of blue sky, so this is rarely a consideration.
- When the sun is in my frame—for example, when I’m going for a sunstar—the extra glass a polarizer adds increases the likelihood of unsightly reflections.
- Photographing a full rainbow with a wide lens, a polarizer can eliminate or diminish part of the rainbow.
- When I put on a neutral density filter, my polarizer comes off because stacking filters causes vignetting, the less glass between my subject and sensor the better, and nature abhors stacked filters (every time you stack filters, the photography gods fuse them until you’ve learned your lesson).
- Any time I absolutely need the fastest shutter speed possible without increasing my ISO further, the polarizer comes off.
- I should probably add that I don’t have a polarizer for my Sony 12-24 lens because ultra-wide lenses like this aren’t threaded for filters. Using a polarizer on an ultra-wide lens requires an awkward, expensive system that provides minimal benefit due to the wide field of view.
One time when I absolutely, without exception, always (have I made my point?) use a polarizer is when there’s no sky in my frame. These are the times I’m using diffuse light to capture the color and texture of leaves, flowers, water, and rocks. All of these things reflect, sometimes subtly and sometimes not so subtly, and that reflection is rarely beneficial.
And finally, a common misconception about polarizers is that their use is either all or nothing (full polarization or minimal polarization). The amount of polarization I dial in depends on the effect I’m going for. For example, each of the four images at the top of this post was captured with the polarizer oriented at a point between maximum and minimum effect by watching the scene as I turned the polarizer, then waiting until I had the combination of reflection/no-reflection I wanted. This allowed me to reveal submerged nearby features while saving the reflection of the more distant subject.
So, when should you use a polarizer? I still can’t tell you, but at least now you have the knowledge to make the decision for yourself.
Managing Reflections With a Polarizer
Click an image for a closer look and to view a slide show.


