Eloquent Images by Gary Hart
Insight, information, and inspiration for the inquisitive nature photographer
New Zealand Beauty
Posted on June 30, 2019

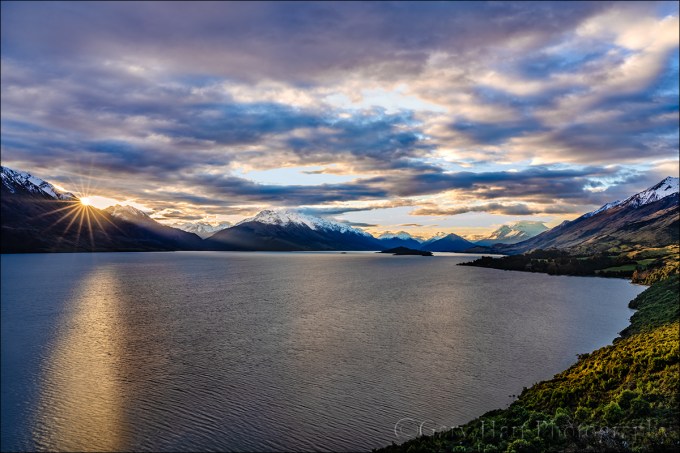
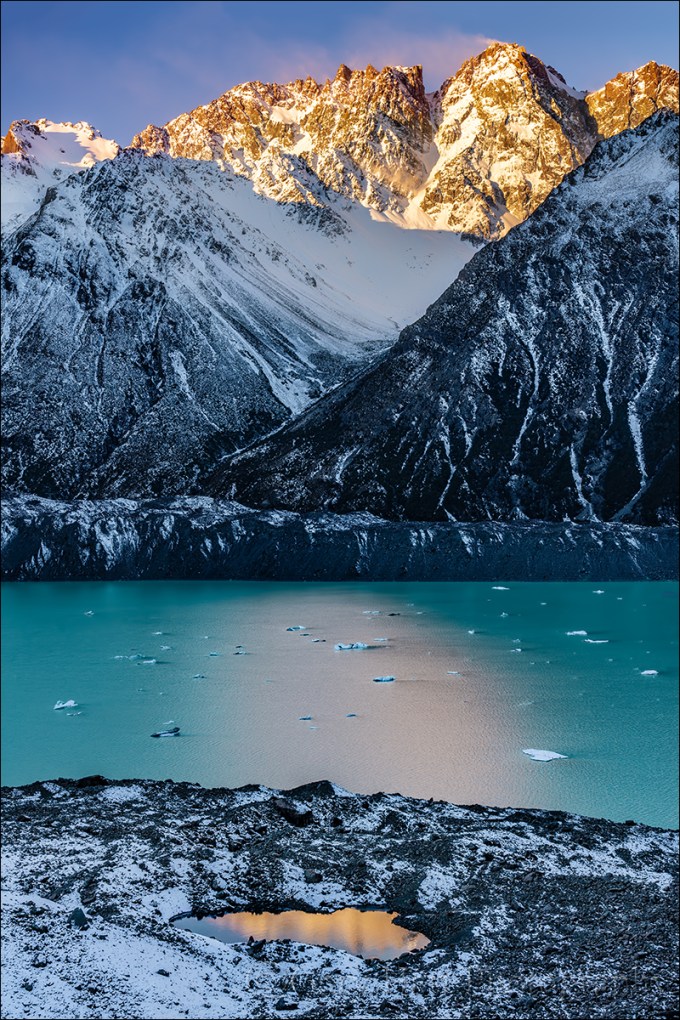
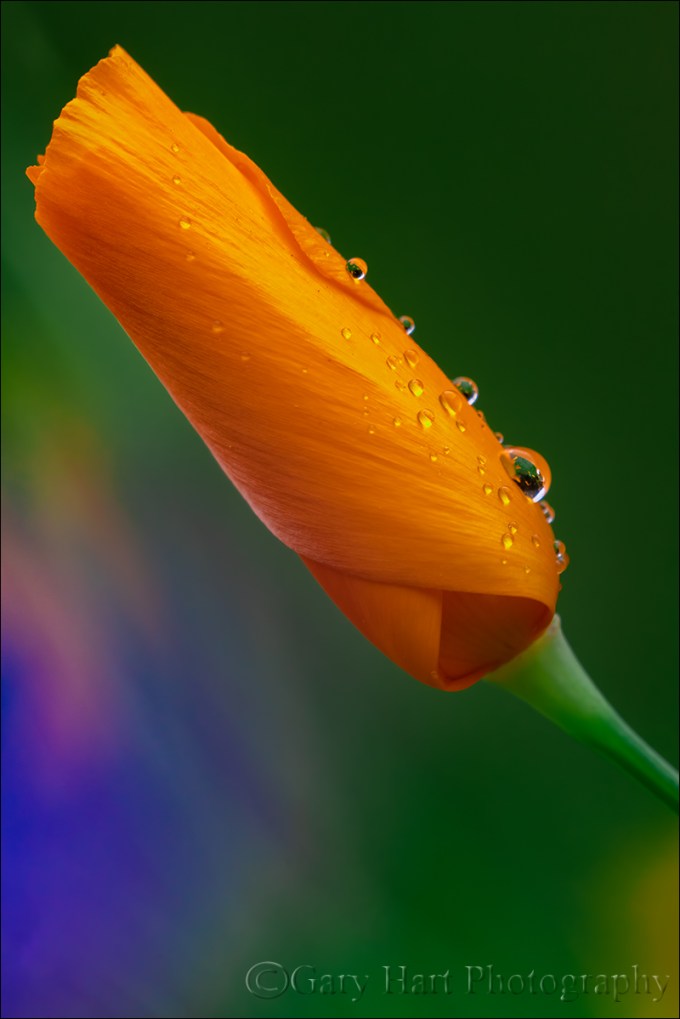
Water Like Glass, Lake Wakatipu, New Zealand
Sony a7RIII
Sony 16-35 f/2.8 GM
Breakthrough neutral polarizer
5 seconds
F/16
ISO 50
I just returned from New Zealand, that remarkable upside-down world where water is clear, summer is winter, and today is yesterday (or maybe it’s the other way around). I’ve been visiting there for a few years, ostensibly to lead photo workshops, but at least as much for my own joy. Each visit focuses on the same region of the South Island, all within 100 kilometers of Queenstown, the area that Don Smith and I determined would give us the most bang for our (and our customers’) photography bucks.
New Zealand’s South Island is a land of rain forests and glaciers, where snow-capped peaks reflect in water clear enough to drink from. Lake Wakatipu is one of these lakes, narrow and S-shaped, with about the same surface area as Lake Tahoe. Wakatipu’s north and east sides are skirted by a road; the south and west sides are accessible only by boat or off-road vehicle.
This image is from the final shoot of this year’s first workshop, just before the fleeting vestiges of a spectacular sunrise disappeared above Lake Wakatipu. I have lots of pictures with more dramatic color, but as I scanned through my thumbnails in Lightroom, the serenity of this one stopped me.
While this scene is from Bob’s Cove, about a 15-minute drive west of Queenstown on the Glenorchy Road, it could be pretty much anywhere along Lake Wakatipu—or for that matter, from any of the dozens of other large and glacial lakes decorating the South Island. For this one I stood in a few inches of water and dropped to just a couple of feet above lake level. With my eye on the viewfinder, I dialed my polarizer just enough to reveal the nearby submerged lakebed without erasing the reflection of the distant peaks.
New Zealand Photo Workshop
Here is a (partial) list of favorite New Zealand features in alphabetical order, plus a brief description of each.
Aoraki (Mt. Cook)

First Light, Aoraki, New Zealand || Rising 12,349 feet above sea level, Aoraki dominates views on both sides of the Southern Alps. Paired with Mt. Tasman, Aoraki forms the cornerstone of the Lake Matheson reflection near Fox Glacier on the island’s east coast, but it makes an even more prominent anchor above many Aoraki / Mt. Cook National Park lake and glacier views.
Doubtful Sound

Reflection, Doubtful Sound, New Zealand || The most spectacular of New Zealand’s many fiords, Doubtful Sound is a narrow, 31-mile, mountain-framed passage that opens to the Tasman Sea. Accessible only by boat, the sound and its many sheltered arms reward visitors with crisp reflections, waterfalls that plunge hundreds of feet into pristine water, and (if you’re lucky) an escort by leaping dolphins.
Glenorchy/Paradise Road
Lake Light, Lake Wakatipu from the Glenorchy Road, New Zealand || Skirting the shore Lake Wakatipu north of Queenstown, the Glenorchy road winds to a quaint village of the same name at the very top of the lake. But the road’s payoff is as much the journey as the destination. On the way to Glenorchy you’ll enjoy views of scenic coves beneath rugged peaks, and expansive panoramas of the Southern Alps that doubled as the Misty Mountains in the Lord of the Rings and Hobbit movies. Beyond Glenorchy, an unpaved but navigable road continues into Paradise and the remote, dense forests of Middle Earth beyond.
Haast Pass
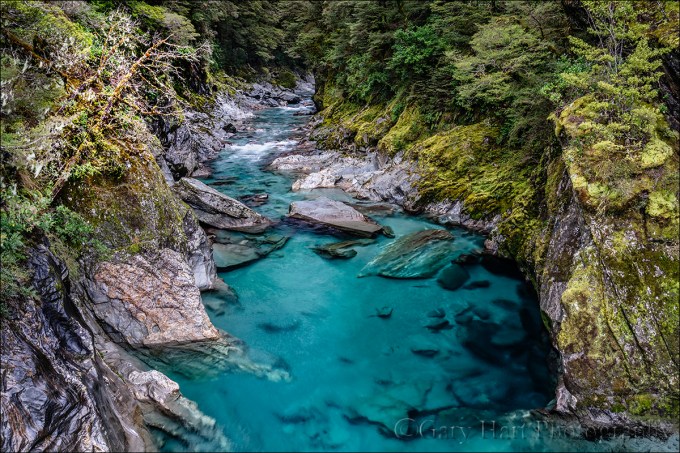
Blue Pools, Haast Pass, New Zealand || Connecting the glacial lakes and rolling hills on east side of the South Island to the wet and rugged west coast, the road through Haast Pass is a scenic treat by itself. Despite an array of waterfalls to choose from, my favorite stop on this route is the Blue Pools, where glacial runoff has colored the water otherworldly shades of blue and green.
Hooker Valley

Sunset, Hooker Valley, New Zealand || The Hooker Valley climbs gradually to iceberg-studded Hooker Lake beneath Aoraki (Mt. Cook), New Zealand’s highest peak. As spectacular as the destination is, this entire hike is a visual feast of turquoise glacial lakes and streams framed by towering mountain peaks.
Lake Matheson
Dark Sky Dreams, Lake Matheson, New Zealand || A reflective jewell set in a emerald rainforest, Lake Matheson provides the perfect foreground for Mt. Cook and Mt. Tasman, New Zealand’s two highest peaks.
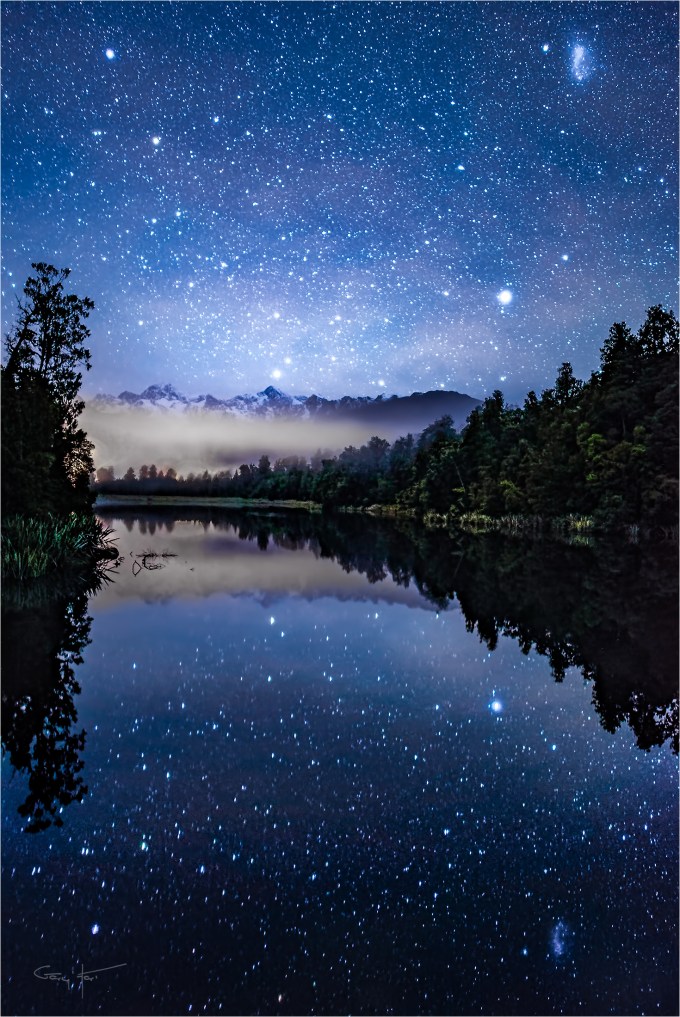
Milky Way views

Moonlight and Milky Way, Lake Wakatipu, New Zealand || In the Northern Hemisphere prime time for the Milky Way’s brilliant core is limited by the short nights of summer. But summer solstice in the north is winter solstice on New Zealand’s South Island, and the Milky Way is visible for nearly all of the 14 hours separating dusk and dawn. Combine that with New Zealand’s spectacular scenery and inherently clean air and dark night skies, and it’s easy to understand why New Zealand features some of the best Milky Way photography in the world.
Mirror Lakes
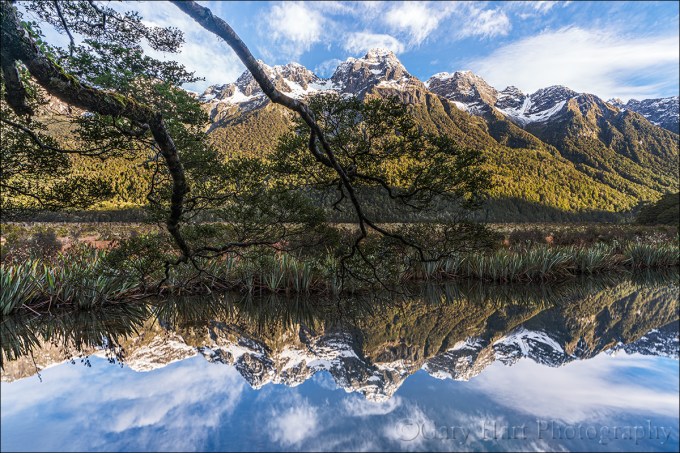
Reflection, Mirror Lakes, New Zealand || Nestled in the shadow of statuesque Mt. Eglinton, aptly named Mirror Lakes provide mountain reflections perfect enough to make you believe the world has turned upside down. The best time to visit these tiny gems is in the quiet air of early morning, before the warm sunlight bathing the mountain has reached the lake.
Lake Wanaka

Wanaka Reflection, New Zealand || The lone willow tree on the shore of Lake Wanaka is one of the most photographed trees in the world. When the lake fills with snowmelt, it encircles the willow with reflections against a backdrop of snowy peaks.
Tasman Lake
Reflection on the Rocks, Nun’s Veil and Tasman Lake, New Zealand || Short and steep, the half-mile hike to the Tasman Lake vista includes 335 stairs, but the view will help you completely forget the leg-burn. At trail’s end you’ll be treated to turquoise water dotted with chunks of ice calved from Tasman Glacier. Look up-lake to see the glacier itself. And directly below the vista is a small lakeside pool that perfectly reflects the serrated summit of 9,000-foot Nun’s Veil peak. And if you don’t want to climb the stairs, you can take the longer but much less steep trail to the shore at the end of the lake.
A New Zealand Gallery
Click an image for a closer look and to view a slide show.


A Milky Way Success Story (Phew)
Posted on June 23, 2019
Moonlight and Milky Way, Lake Wakatipu, New Zealand
Sony a7SII
Sony 16-35 f/2.8 GM
30 seconds
F/2.8
ISO 8000
Several people in this month’s New Zealand workshop had stated pretty emphatically that the Milky Way was a prime reason for attending—one guy even said his wife had told him not to come home without a Milky Way picture (we think she was joking). So no pressure. I reassured everyone in the orientation that I had multiple Milky Way shoots planned, but as the workshop’s nights ticked off, each Milky Way plan was doused—first by clouds, later by moonlight. And with the moon brightening and closer in the sky to the Milky Way each night, the we’d about run out of time.
I’d known all along that a waxing moon meant that our best Milky Way chances would come in the first half of the workshop. And I’d decided long before the workshop started that our final night would be especially problematic for the Milky Way not just because of the moon, but because of our location. But desperate times call for desperate measures, so with just a couple of days to go, I decided to recheck my calculations for about the millionth time (maybe a slight exaggeration, but you get the point). The two nights in Twizel were out of the question—the moon would be pretty much in the Milky Way. But our last night, in Queenstown…. Hmmm, maybe, just maybe, we’d have a 30-45 minute window between sunset and moonrise when the sky might be dark enough for the Milky Way to shine.
But the moon wasn’t the only obstacle. The forecast called for “high clouds,” a frustratingly vague forecast. And even if the sky darkened enough and the clouds cleared, we were in Queenstown, where I’d long ago decided that city lights and the orientation of Lake Wakatipu made finding Milky Way vantage point with a dark enough sky (no light pollution) and a nice enough foreground (lake and mountains) impossible. The moonlight and clouds risk were irrelevant if I couldn’t find a Milky Way location. But I had to give it a shot. Zooming in on the map, my eyes landed on one small tiny of lakeshore with enough of a twist that might work, though I’d never photographed there or even considered its Milky Way potential. But that was enough for me to circle the date and location and tell the group that we were going to give the Milky Way one more shot. All that was left to do was monitor the forecast and wait.
Wanting to be certain (and to avoid hunting blindly in the dark), on the way to our final sunset shoot I asked the driver to swing by my potential spot. I was relieved to confirm that the angle was good, and that there was an open, easily accessible stretch of beach. Yay. Down the road at our sunset location I just watched the clouds and hoped. The sky seemed clear enough there, but looked a little less promising back in the direction of my Milky Way location.
Arriving in twilight I hopped out of the van and checked the twilight sky—In addition to the promised high clouds, an accumulation of thicker clouds sat on the horizon more or less where the brightest part of the galactic center would be. And there were indeed a few high clouds, but Jupiter’s appearance was a relief because I knew Jupiter was on the leading edge of the Milky Way that night. Waiting for darkness, I prepared the group and just tried to stay positive. Every few minutes I’d return to my camera and fire a test frame to see if the sky was dark enough and look for any hint of moonlight.
You can’t imagine my excitement the first time my LCD displayed the faint glow of the Milky Way angling above 6000 foot Cecil Peak—we were in business. As the sky darkened, the Milky Way unfurled overhead in all its Southern Hemisphere glory, flanked by Jupiter and thousands of other stars in completely unfamiliar arrangements.
I started with my dedicated night photography setup, my Sony a7SII body and Sony 24 f/1.4 GM lens, trying a variety of horizontal and vertical compositions. After about 15 minutes I switched to my Sony 16-35 f/2.8 GM, sacrificing two stops of light for a wider field of view (more Milky Way). I liked the extra sky and stuck with that lens for the rest of the shoot.
After about 30 minutes of happy shooting we started to detect a brightening that signaled the moon’s approach behind The Remarkables (my hands-down favorite mountain range name). But rather than being a show stopper, the moonlight added a diaphanous sheen to the previously dark clouds and we kept going. As we wound down, the entire group was giddy with excitement, and I was giddy with relief. Just as we were started to pack up, I detected the faint reflection of Cecil Peak on the lake’s surface and adjusted my composition to include it.
To say that this night exceeded my expectations would be an understatement. In fact, my expectations almost dashed the entire shoot. It was a good a reminder not to get too locked in to preconceived notions. Had I stuck with my original belief that our final night in Queenstown wouldn’t work, I’d never have found a great Milky Way location—and one of the best shoots of an already great workshop would never have happened.
My tutorial on photographing the Milky Way
A Gallery of Stars
Click an image for a closer look and to view a slide show.


New Zealand Reflection
Posted on June 16, 2019

Reflection, Mirror Lakes, New Zealand
Sony a7RIII
Sony 16-35 f/2.8 GM
.4 seconds
F/8
ISO 50
What a crazy life this is. Last month I was rafting the Grand Canyon in short pants and flip-flops, this month I’m bouncing around the New Zealand countryside in my warmest wool and down. Between timezone shock and temperature whiplash, my body isn’t quite sure whether it’s coming or going, but the relentless beauty down here seems to transcend all that difficulty enough to keep me going.
Mirror Lakes is a must-stop on the road to Milford Sound in Fiordland National Park. It’s a popular stop even in mid-winter, but with the help of our New Zealand-based driver, Don Smith and I have figured out how to thread the needle between the tour buses originating in nearby Te Anau, and the tour buses originating in distant Queenstown, and still make it just before the morning sun reaches the water and washes out the reflection.
When our van pulled up here on Friday morning, I was surprised to see a large tour bus right out front, but Steve (our driver) said don’t worry, they’ll be loading up any second—sure enough, within five minutes we had this gorgeous view to ourselves with at least 45 minutes of shade remaining on the water. As pretty as the scene is, limited views through the surrounding foliage make it a little tricky to photograph, so I’m usually content to stand back and let the group work with the prime photography real estate. But on this morning chilly morning last week, I found the clouds and reflection so irresistible that I went looking for a way to photograph the scene without getting in anyone’s way.
I soon found myself over in one the far corner of the most popular railed viewing deck, a zone where the patient (and not-so-patient) wait behind thick overhanging branches for better views to open up. My first thought as I eyed the scene was how cool the branches look—too bad they block the view. But then I realized that by lowering my camera almost all the way to the deck, I could completely eliminate the most dense set of branches at the very top of the frame, and use the lower branches as diagonal compositional elements—without blocking the snowy peaks, or their reflection.
The problem with this idea was that I needed my camera to be on the other side of the deck’s protective railing, and the vertical bars in the railing were too closely spaced to fit my lens through. But just for laughs I pulled the lens out anyway and tested its width against the bars. Sure enough, every opening was too narrow—well, every opening except one. For some reason, the gap separating one, and only one, pair of bars was about an inch wider than all the others, making a gap just wide enough to slip my lens through.
The technical part of the scene was pretty straightforward, though potentially quite awkward with my camera about eight inches off the ground (it’s not the getting down to ground level that’s a problem, it’s the getting up). These are the very situations where I’ve grown to love the articulating LCD on my Sony a7RIII. In this case I was able to compose, level, focus, and meter from the (relative) comfort of my knees.
After centering Mt. Eglinton, I focused on the branches knowing that at f/16 and 18mm, I’d be sharp all the way to infinity. The dynamic range was pretty extreme, but my histogram told me that it was workable if I was careful. With all that out of the way, the biggest problem remaining was the ducks that insisted on swimming through the reflection—fortunately, I’m nothing if not patient (stubborn), and was able to out-wait them long enough to click this frame.
Join me in New Zealand
More Reflections
Click an image for a closer look and to view a slide show.


What’s the Story?
Posted on June 9, 2019
Moonrise Through the Trees, Yosemite
Sony a6300
Sony 100-400 GM
Sony 2x teleconverter
Breakthrough neutral polarizer
ISO 400
f/16
1/200 second
Let’s have a show of hands: How many of you have been advised at some point in the course of your photographic journey to “tell a story with your images”? Okay, now how many of you actually have a clue as to what that actually means? That’s what I thought. Many photographers, with the best of intentions, parrot the “tell a story” advice simply because it sounded good when they heard it, but when pressed further, are unable tell you what they mean.
Telling a story with a photo is easier when photographers can physically stage subjects and light to suit their objective (an art in itself), or in journalistic photography intended to distill the the essence of an instant with a connection to an easily inferred chronology: a homeless man feeding his dog, dead fish floating in the shadow of belching smokestacks, or a wide-receiver spiking a football in the end zone.
This isn’t to say that we landscape photographers can’t tell stories with our images, or that we shouldn’t try. Nor does it mean that one photographic form is inherently more or less creative than another. It just means that the rules, objectives, advantages, and limitations differ from form to form. Nevertheless, simply advising a landscape photographer to tell a story with her images is kind of like a coach telling a pitcher to throw strikes, or a teacher instructing a student to spell better. Okay, fine—now what?
Finding the narrative
First, let’s agree on a definition of “story.” A quick dictionary check reveals that a story is “a narrative, either true or fictitious … designed to interest, amuse, or instruct….” Okay, that works.
The narrative part is motion. Your pictures need it. Narrative motion isn’t simply the motion of the eyes through the frame (also important), it’s a connection that pulls a viewer into and through a frame, and compels him to stay. While narrative motion happens organically in media consumed over time, such as a song, novel, movie, or even a YouTube video, it can only be implied in a still photograph. And unlike the arranged or journalistic photography mentioned above, landscape photographers are tasked with reproducing a static world as we find it—another straightjacket on our narrative options. But without some form of narrative motion, we’re at a dead end story-wise. What’s a photographer to do?
Photography as art
Every art form succeeds more for what happens in the mind of its consumer’s (the viewer or listener) than for the literal experience it delivers to the consumer’s five senses. Again: Every art form succeeds more for what happens in the mind of its consumer’s (the viewer or listener) than for the literal experience it delivers to the consumer’s five senses. A song that doesn’t evoke emotion, or a novel that doesn’t paint mental pictures, it’s soon forgotten. And just as readers of fiction unconsciously fill-in the visual blanks with their own interpretation of a scene, viewers of a landscape image will fill-in the narrative blanks with the personal stories the image inspires. In other words, an image should offer a place for the viewer’s own story to unfold.
Of course the story we’re creating isn’t a literal, “Once upon a time” or “It was a dark and stormy night” (much more appealing in photography than literature, I might add) story. Instead, the image we make must connect with our viewers’ stories to touch an aspect of their world (real or imagined): revive a fond memory; generate fresh insight into a familiar subject; vicarious living—to name just a few possible connections. If we offer images that complete these connections, we’ve given our image’s viewers a reason to enter, a reason to stay, and a reason to return. And most important, we’ve given them a catalyst for their internal narrative.
Shoot what you love (not what you think your audience will love)
Think about your favorite novels. While they might be quite different, I suspect one common denominator is a protagonist with whom you relate. I’m not suggesting that immediately upon finishing that book you hopped on a raft down the Mississippi River, or ran downtown to have a dragon tattooed on your back, but in some way you likely found some personal connection to Huck Finn or Lisbeth Salander that kept you engaged. And the better that connection, the faster the pages turned.
And so it is with photography: Our viewers are looking for a connection, a sense that there’s a piece of the photographer in the frame. Because we can’t possibly know what personal strings our images might tug in others, and because those strings will vary from viewer to viewer, our best opportunity for igniting their story comes when we share our own relationship with a scene and let viewers find their own connection.
What? Didn’t I just say that it’s the viewer’s story we’re after? Well, yes—but really what needs to happen is the viewers’ sense of connection between our story and theirs. If you focus on photographing the scenes that most move you, those scenes (large or small) that might prompt you to nudge a loved-one and say, “Oooh, look at that!,” the more you’ll see and the greater your chance of establishing each viewer’s feeling of connection. Whether you’re drawn to towering mountains, crashing surf, delicate wildflowers, or prickly cactus, that’s where you’ll find your best images.
Where did you get those shoes?
The cool thing is that your viewer doesn’t need to understand your story; she just needs to be confident that there is indeed a story. That’s usually accomplished by avoiding cliché and offering something fresh (I know, easier said than done). For some reason this makes me think of Steely Dan lyrics, which rarely made sense to me, but always felt fresh and I never for a second doubted that they did indeed (somehow) make sense to Donald Fagen and Walter Becker. In other words, rather than becoming a distraction, Steely Dan’s lyrics were a source of intrigue that pulled me in and held me. So when I hear:
I stepped up on the platform
The man gave me the news
He said, You must be joking son
Where did you get those shoes?
I’m not bewildered, I’m intrigued. Steely Dan’s lyrics aren’t trying to tap my truth, they simply reflect their truth (whatever it might be). And even though I have no idea what he’s talking about, the vivid mental picture those lyrics conjure (which may be entirely different, though no more or less valid, than your or his mental picture) allows me to feel a connection. You, on the other hand, may feel absolutely nothing listening to “Pretzel Logic,” while “I Want To Put On My My My My My Boogie Shoes” gives you goosebumps for KC and the Sunshine Band. Different strokes….
Returning from the abstract to put all this into photographic terms, the more your images are true to the world as it resonates with you, and the less you pander to what you think others want to see, the greater the chance your viewer’s story will connect with yours.
For example

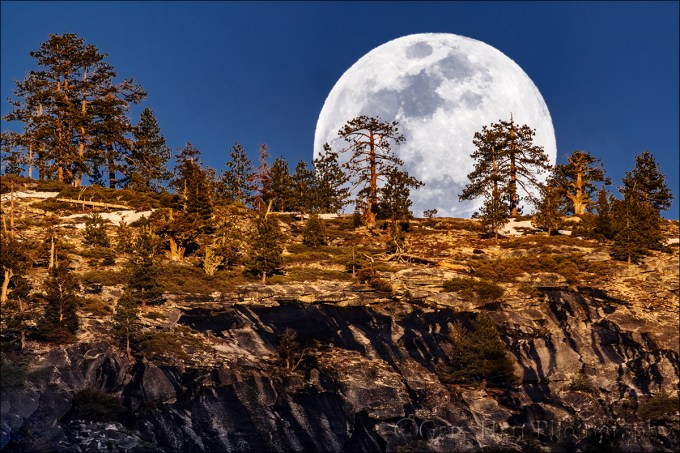
Moonrise Through the Trees, Yosemite
Few things in Nature get my heart racing more than the first sliver of silver light heralding the moon’s arrival. With the moon’s appearance comes a sudden release of building anticipation and the frantic
On this evening last March I knew about where the moon would appear, and about when that would be, but with the time approaching and my eyes locked on the anticipated spot, the doubts started to rise. Did I get the angle right? Is that ridgeline higher than I figured? Where did those clouds come from? (It goes like this every time.)
And then there it was. I’d pointed my Sony a6300 (1.5 crop sensor for extra magnification), mounted my Sony 100-400 GM lens and Sony 2x teleconverter, at the spot on the ridge I thought most likely for the moon to appear. I was pretty close, but this was not time for self congratulation. To juxtapose the moon with the two trees I’d picked for my foreground I had to shift about 20. My favorite big moon shots are when some part of the moon still touches some part of the horizon, so my window of opportunity was shrinking fast. And you ever want to appreciate how fast the moon moves across the sky, try photographing it with an extreme telephoto lens. By the time I was moved and recomposed, the moon was already half exposed and rising fast. I managed just a handful of frames before it crested the trees and I switched to a wider lens for a completely different shot.

About 15 minutes later, after the clouds had moved in

Tree at Sunset, McGee Creek Canyon, Eastern Sierra
My own story of this solitary, ridge-top tree involved a frantic rush to capture a beautiful but rapidly fading sunset. I was with my brother on a dirt road in the Eastern Sierra. I’d been on this road many times and knew this tree well. Despite its rather ordinary appearance, the tree’s solitary perch atop a barren, rocky ridge had always intrigued me. For as long as I can remember, I’ve dreamed of a home with a sweeping view, and envied this tree’s perpetual 360 view of the Sierra crest to the west, the White Mountains to the east, and Crowley Lake below.
As the sunset started to materialize that evening, I realized that we were close enough that I might be able to include the tree in the sunset shoot. We hustled my truck back down the road, pulling into to a wide spot beneath the ridge several minutes after the best color had faded. Jay, who had no personal connection to “my” tree, stayed in the truck while I sprinted along the road with my camera and tripod until my position aligned the tree with the final, rippled vestiges of sunset. I only clicked a couple of frames, slightly underexposed to hold the color. (The slight blue cast is the color of the twilight light.)

Sunset, McWay Fall, Big Sur
The humorous events leading up to this sunset at McWay Fall in Big Sur are nowhere to be found in the frame. Nevertheless, even after visiting this spot more times than I can count, I have a very personal connection to this moment in particular. There’s power in a plunging waterfall and crashing surf, and promise in the sun’s appearance above an infinite horizon.
An early arrival allowed lots of time to connect with the scene, enabling me to anticipate the moment the sun burst from the clouds and balance it in the frame with McWay Fall. The position of the leading wave is no accident either—had I allowed it to reach the bottom of the frame before I clicked my shutter, it would have created a white line exiting the frame, taking your eyes right with it. That small strip of sand at the bottom of the image becomes a virtual frame that holds you in the scene. The rest is up to you.
* * * *
Those are my stories, and while they’re personally satisfying, I have no illusions that all of that comes across to the viewer. I’ve displayed these prints in many shows and watched people walk right by without breaking stride. But I’ve also been delighted each time someone stops, peers closer, lingers, and ersometimes returns lat. While I have no idea what “story” my images tap in those people, I don’t believe it really matters.
Workshop Schedule || Purchase Prints
A gallery of personal favorites (each with its own story)
Click an image for a closer look, and a slide show. Refresh the screen to reorder the display.


Yosemite for the First Time—Again
Posted on June 2, 2019
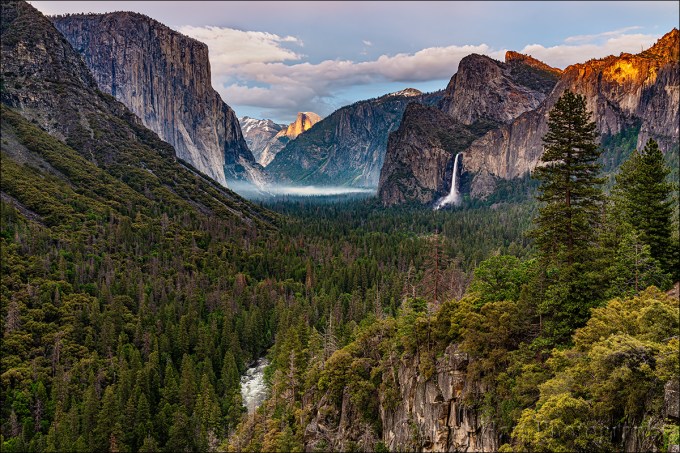
Last Light on Half Dome, Yosemite Valley
Sony a7R III
Sony 24-105 f/4 G
1/9 second
F/9
ISO 100
On Wednesday I made a quick trip to Yosemite to meet my (old and new) friends and fellow photography pros Don Smith and Ron Modra, plus Ron’s wife MB. Since I’d never met Ron and MB in person (though from conversations with Don I felt like I already knew them), and Ron had never been to Yosemite, I broke my personal rule to stay clear of Yosemite from Memorial Day through September (summer is for the tourists). Plus, after a lifetime of visiting Yosemite, there are few Yosemite firsts remaining, so I live vicariously through the first Yosemite experiences of others.
We met in El Portal, where I deposited my car and hopped in the back of Don’s car with MB. With Don driving and Ron riding shotgun, we headed up the hill discussing a strategy to make the most of our time. The plan we crafted was quickly discarded when we learned at the Arch Rock entrance station that Glacier Point, which had been closed since Saturday night, had just opened.
After a quick stop at Tunnel View to give Ron what should be everyone’s first Yosemite view, we zipped up to Glacier Point. Getting out of the car at Glacier Point, I immediately discovered that the beautiful spring day I’d dressed for had turned to winter. But cold is no match for the enthusiasm of the first time witnessing any of Yosemite’s spectacular views. Not only were the clouds spectacular, they did us the courtesy of parting just enough to illuminate Half Dome for a few minutes.
Our successful Glacier Point detour foreshadowed a spectacular day pinballing about Yosemite Valley, hitting all the spots a first-timer needs to see. Even the weather gods smiled on us, delivering thunderstorms filled the sky with billowing clouds and spread beautiful diffuse light across the park, without much rain.
I’m usually the driver for others’ first time Yosemite experiences, so riding in the back seat allowed me to rubberneck like an actual first-timer. There’s El Capitan! there’s Bridalveil Fall! there’s Sentinel Rock! And on down the list of Yosemite celebrities wearing their spring best. We were a little late for the dogwood, and the blooms that remained were in tatters, but everything else was green and the waterfalls were thundering, even for May. At each stop Ron’s excitement reminded me of a kid on Christmas morning, and seeing it all through his eyes, I totally got it. (Ron shot for Sports Illustrated for many decades—I imagine his reaction was no more enthusiastic than mine would be my first time in a Major League clubhouse.)
By 6:30 or so we’d worn Ron and MB out (well, Ron at least). With the rain starting to fall again, they declared their mission accomplished. With little sign of an impending sunset, and against the advice from Don and me, they decided to call it a day so Ron could get back and open the presents he’d so enthusiastically collected all day.
Our last stop was Valley View, where I realized that despite the beautiful conditions, I’d been so caught up in the view that hadn’t taken my camera from my bag all day. Chatting with MB while Don and Ron worked the beautiful scene, we agreed that sometimes it’s nice to enjoy nature without a camera. I know I missed some gorgeous photography, but I felt enriched by the conversation and laughter, and the sublime surroundings I often miss behind a camera.
But…
Saying our goodbyes in El Portal, I noticed breaks in the clouds. Hmmm. Instead of returning to my home in Sacramento, my destination that night was a heretofore undermined hotel between Yosemite and my Thursday destination in Southern California. But with an hour to go until sunset, I did a quick calculation and decided to forego the quickest route (down 140 to Mariposa) and detour back through Yosemite.
Back in the park I found the clouds still hanging in there, delivering the same nice but unspectacular light we’d enjoyed all day. But encouraged by my preview of the sky approaching from the west, I parked at Tunnel View for a few minutes, just to see what happened. I chose Tunnel View for its proximity to my (revised) route, and because when good stuff happens in Yosemite, it usually starts at Tunnel View. Plus, it’s pretty hard to mess up this classic view. And given that my long day was still several hours from ending, I simply wanted to take a pretty picture and Tunnel View was just the low hanging fruit I needed.
So there I waited in my car, one eye on the view, the other on my watch—30 minutes until sunset, 25 minutes, 20 minutes…. About 30 seconds after deciding nothing was going to happen, the granite next to Leaning Tower (the flat granite face just right of Bridalveil Fall) lit up like it had been hit with a spotlight. I was in business.
To get away from the photographers and tourists teeming about the standard vista, I climbed the granite behind the parking lot until I felt alone. I started wide, with my Sony a7RIII and Sony 24-105 lens (I’ve always felt 16-35 is too wide for Tunnel View). When a second spotlight hit Half Dome, I reached into my bag for my Sony a7RII and Sony 100-400 GM. I spent the rest of the shoot switching between the two bodies, trying all the compositions I’ve become so familiar with over the years. My goal this evening wasn’t an artistic masterpiece or some never seen Yosemite perspective, I simply wanted a low-stress shoot that captured this iconic Yosemite scene at its very best. Mission accomplished.
Workshop Schedule || Purchase Prints
A Yosemite Spring Gallery


Chasing Rainbows
Posted on April 17, 2019
Heaven Sent, Grand Canyon Rainbow
The annual Grand Canyon monsoon is known for its spectacular electrical storms, but let’s not forget the rainbows that often punctuate these storms. A rainbow requires rain, sunlight, and the right viewing angle—given the ephemeral nature of a monsoon thunderstorm, it’s usually safe to assume that the sun probably isn’t far behind. To experience a rainbow after a Grand Canyon monsoon storm, all it takes is some basic knowledge, a little faith, and some good fortune.
To help with the knowledge part, I’m sharing the how-and-why of rainbows, excerpted from my just updated Rainbow article in my Photo Tips section. For the faith and good fortune part, read “The story of this image” at the bottom of this post.
Rainbows Demystified
Most people understand that a rainbow is light spread into various colors by airborne water drops. Though a rainbow can seem like a random, unpredictable phenomenon, the natural laws governing rainbow are actually quite specific and predictable, and understanding these laws can help photographers anticipate a rainbow and enhance its capture.
Let there be light
Energy generated by the sun bathes Earth in continuous electromagnetic radiation, its wavelengths ranging from extremely short to extremely long (and every wavelength in between). Among the broad spectrum of electromagnetic solar energy we receive are ultra-violet rays that burn our skin, infrared waves that warm our atmosphere, and a very narrow range of wavelengths the human eye sees.
These visible wavelengths are captured by our eyes and interpreted by our brain. When our eyes take in light comprised of the full range of visible wavelengths, we perceive it as white (colorless) light. Color registers when some wavelengths are more prevalent than others. For example, when light strikes an opaque (solid) object such as a tree or rock, some of its wavelengths are absorbed; the wavelengths not absorbed are scattered (reflected). Our eyes capture this scattered light, send the information to our brains, which interprets it as a color. When light strikes water, some is absorbed, some passes through to reveal the submerged world, and some light is reflected by the surface as a reflection.

Light traveling from one medium to another (e.g., from air into water) refracts (bends). Different wavelengths refract different amounts, causing the light to split into its component colors.
To understand the interaction of water and light that creates a rainbow, it’s simplest to visualize what happens when sunlight strikes a single drop. Light entering a water drop refracts (bends), with different wavelengths refracting different amounts, which separates the originally homogeneous white light into the myriad colors of the spectrum.
But simply separating the light into its component colors isn’t enough to create a rainbow—if it were, we’d see a rainbow whenever light strikes water. Seeing the rainbow spectrum caused by refracted light requires that the refracted light be returned to our eyes somehow.
A raindrop isn’t flat like a sheet of paper, it’s spherical, like a ball. Light that was refracted (and separated into multiple colors) as it entered the front of the raindrop, continues through to the back of the raindrop, where some is reflected. Red light reflects back at about 42 degrees, violet light reflects back at about 40 degrees, and the other spectral colors reflect back between 42 and 40 degrees. What we perceive as a rainbow is this reflection of the refracted light—notice how the top color of the primary rainbow is always red, the longest visible wavelength; the bottom color is always violet, the shortest visible wavelength.
Follow your shadow
Every raindrop struck by sunlight creates a rainbow. But just as the reflection of a mountain peak on the surface of a lake is visible only when viewed from the angle the reflection bounces off the lake’s surface, a rainbow is visible only when you’re aligned with the 40-42 degree angle at which the raindrop reflects the spectrum of rainbow colors.
Fortunately, viewing a rainbow requires no knowledge of advanced geometry. To locate or anticipate a rainbow, picture an imaginary straight line originating at the sun, entering the back of your head, exiting between your eyes, and continuing down into the landscape in front of you—this line points to the “anti-solar point,” an imaginary point exactly opposite the sun. With no interference, a rainbow would form a complete circle, skewed 42 degrees from the line connecting the sun and the anti-solar point—with you at the center. (We don’t see the entire circle because the horizon usually gets in the way.)
Because the anti-solar point is always at the center of the rainbow’s arc, a rainbow will always appear exactly opposite the sun (the sun will always be at your back). It helps to remember that your shadow always points toward the anti-solar point. So when you find yourself in direct sunlight and rain, locating a rainbow is as simple as following your shadow and looking skyward—if there’s no rainbow, the sun’s probably too high.
High or low
Sometimes a rainbow appears as a majestic half-circle, arcing high above the distant terrain; other times it’s merely a small circle segment hugging the horizon. As with the direction of the rainbow, there’s nothing mysterious about its varying height. Remember, every rainbow would form a full circle if the horizon didn’t get in the way, so the amount of the rainbow’s circle you see (and therefore its height) depends on where the rainbow’s arc intersects the horizon.
While the center of the rainbow is always in the direction of the anti-solar point, the height of the rainbow is determined by the height of the anti-solar point, which will always be exactly the same number of degrees below the horizon as the sun is above the horizon. It helps to imagine the line connecting the sun and the anti-solar point as a fulcrum, with you as the pivot—picture yourself in the center of a teeter-totter: as one seat rises above you, the other drops below you. That means the lower the sun, the more of its circle you see and the higher it appears above the horizon; conversely, the higher the sun, the less of its circle is above the horizon and the flatter (and lower) the rainbow will appear.

Assuming a flat, unobstructed scene (such as the ocean), when the sun is on the horizon, so is the anti-solar point (in the opposite direction), and half of the rainbow’s 360 degree circumference will be visible. But as the sun rises, the anti-solar point drops—when the sun is more than 42 degrees above the horizon, the anti-solar point is more than 42 degrees below the horizon, and the only way you’ll see a rainbow is from a perspective above the surrounding landscape (such as on a mountaintop or on a canyon rim).
Of course landscapes are rarely flat. Viewing a scene from above, such as from atop Mauna Kea or from the rim of the Grand Canyon, can reveal more than half of the rainbow’s circle. From an airplane, with the sun directly overhead, all of the rainbow’s circle can be seen, with the plane’s shadow in the middle.
Double Your pleasure
Not all of the light careening about a raindrop goes into forming the primary rainbow. Some of the light slips out the back of the raindrop to illuminate the sky, and some is reflected inside the raindrop a second time. The refracted light that reflects a second time before exiting creates a secondary, fainter rainbow skewed 50 degrees from the anti-solar point. Since this is a reflection, the colors of the secondary rainbow are reversed from the primary rainbow.
And if the sky between the primary and secondary rainbows appears darker than the surrounding sky, you’ve found “Alexander’s band.” It’s caused by all the light machinations I just described—instead of all the sunlight simply passing through the raindrops to illuminate the sky, some of the light was intercepted, refracted, and reflected by the raindrops to form our two rainbows, leaving less light for the sky between the rainbows.
Waterfalls are easy

From Yosemite’s Tunnel View each spring afternoon, a rainbow can be viewed at the base of Bridalveil Fall. As the sun drops, the rainbow climbs, taking about 30 minutes to complete its ascent.
Understanding the optics of a rainbow has practical applications for photographers. Not only does it help you anticipate a rainbow before it happens, it also enables you to find rainbows in waterfalls.
Unlike a rainbow caused by rain, which requires you to be in exactly the right position to capture the incongruous convergence of rainfall and sunshine, a waterfall rainbow can be predicted with clock-like precision—just add sunshine.
Yosemite is my location of choice, but there’s probably a waterfall or two near you that will deliver. Just figure out when the waterfall gets direct sunlight early or late in the day, then put yourself somewhere on the line connecting the sun and the waterfall. And if you have an elevated vantage point, you’ll find that the sun doesn’t even need to be that low in the sky.
Moonbows
Understanding rainbow optics can even help you locate rainbows that aren’t even visible to the naked eye. A “moonbow” (lunar rainbow) is a rarely witnessed and wonderful phenomenon that follows all the natural rules of a daylight rainbow. But instead of resulting from direct sunlight, a moonbow is caused by sunlight reflected by the moon.
Moonlight isn’t bright enough to fully engage the cones in your eyes that reveal color, though in bright moonlight you can see the moonbow as an arcing monochrome band. But a camera on a sturdy tripod can use its virtually unlimited shutter duration to accumulate enough light to bring out a moonbow in full living color. Armed with this knowledge, all you need to do is put yourself in the right location at the right time.

Moonbow and Big Dipper, Lower Yosemite Fall, Yosemite :: Each spring the full moon and Yosemite Falls conspire to deliver a breathtaking moonbow display. And as if that’s not enough, the Big Dipper is suspended above as if it’s the source of Yosemite Falls.

Rainbow, Lipan Point, Grand Canyon :: Sometimes the rainbow doesn’t appear exactly where you want it to. In a perfect world this rainbow would have connected the rims of the Grand Canyon, but there was no vantage point on the rim that gave me that view. Nevertheless, I was able to use the canyon’s red rock as a foreground, and balance its exquisite depth with the rainbow.
The story of this image

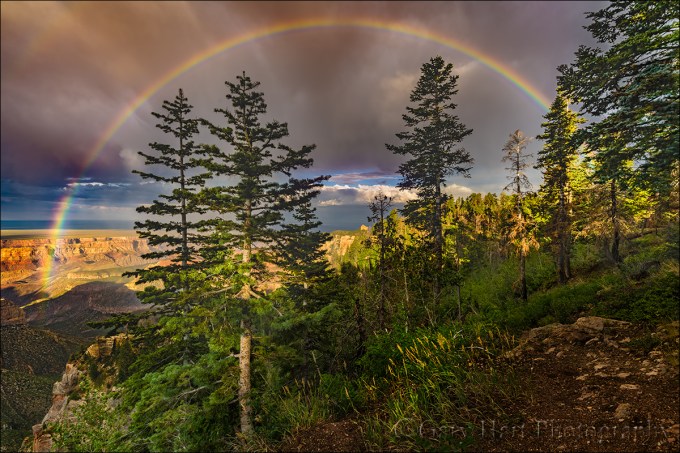
Heaven Sent, Monsoon Rainbow, Vista Encantada, Grand Canyon North Rim
Following a nice sunrise at the always beautiful Point Imperial, the Grand Canyon Monsoon photo workshop group spent two hours near Bright Angel Point photographing a spectacular electrical storm that delivered multiple lightning captures to everyone in the group. When the storm moved too close and drove us to safety (we’re resilient and adventuresome, not stupid), it would have been easy call it a day and tally our bounty. I mean, who likes getting rained on? Photographers, that’s who.
Don Smith and I herded our group into the cars and headed to Cape Royal Road, where we could follow the Grand Canyon’s East Rim above Marble Canyon all the way to Cape Royal. Knowing that monsoon showers are fairly localized, the plan was to drive out of the cell that was dumping on us at the lodge and either shoot back at it, or (more likely) find another cell firing out over the canyon. In the back of my mind though was the hope for a rainbow above the canyon—dropping in the west, the sun was perfectly positioned for rainbows in the east.
The rainbow appeared just after we passed the Point Imperial Road junction, arcing high above the forest. Climbing through the trees toward the rim (and its views of Marble Canyon), my urgency intensified with the rainbow’s vivid color, but we were stuck behind a meandering tourist who clearly had different priorities. As tempted as I was to pass him, I knew that would be a mistake with three more cars following me. So we poked along at a glacial pace. After what felt like hours, screeched to a halt at the Vista Encantada parking area with the rainbow hanging in there—I swear everyone was out of the car and scrambling for their gear before I came to a complete stop.
With a full rainbow above an expansive view, I opted for my Sony 12-24 lens on my a7RII, but immediately began to question that choice. While Vista Encantada offers a very pretty view, it’s not my favorite scene to photograph because of the less-than-photogenic shrubbery in the foreground—a telephoto lens definitely would have worked better to eliminate the foreground, but I wanted more rainbow. So after a few failed attempts to find a composition at the conventional vista, I sprinted into the woods to find something better. This turned out to be a wise choice, as the shrubs here were replaced with (much more photogenic) mature evergreens.
In a perfect world I’d have found an unobstructed view into the Grand Canyon, but as photographers know, the world is rarely perfect. Committed to my wide lens, I decided to use the nearby evergreens as my foreground, moving back just far enough for the rainbow to clear their crowns. Composing wide enough to include the trees top-to-bottom also allowed me to include all of the rainbow—suddenly my 12-24 lens choice was genius!
After finishing at Vista Encantada we continued down the road and photographed another rainbow from Roosevelt Point, then wrapped up the day with a sunset for the ages at Cape Royal. A great day indeed, all thanks to monsoon weather that would have kept most tourists indoors.
Join Me in a Grand Canyon Photo Workshop
Workshop Schedule || Purchase Prints
A Gallery of Rainbows
Click an image for a closer look and to view slide show.


Natural Order
Posted on April 14, 2019
Raindrops on Poppy, Sierra Foothills, California
I’m often asked if I placed a leaf, moved a rock, or “Photoshopped” a moon into an image. Usually the tone is friendly curiosity, but sometimes it’s tinged with hints of suspicion that can border on accusation. While these questions are an inevitable part of being a photographer today, I suspect that I get more than my share because I aggressively seek out naturally occurring subjects to isolate and emphasize in my frame. But regardless of the questioner’s tone, my answer is always a cheerful and unapologetic, “No.”
We all know photographers who have no qualms about staging their scenes to suit their personal aesthetics. The rights and wrongs of that are an ongoing debate I won’t get into, other than to say that I have no problem when photographers arrange their scenes openly, with no intent to deceive. But photography must be a source of pleasure, and my own photographic pleasure derives from discovering and revealing nature, not manufacturing it. I don’t like arranging scenes because I have no illusions that I can improve nature’s order, and am confident that there’s enough naturally occurring beauty to keep me occupied for the rest of my life.
Order vs. chaos
As far as I’m concerned, nature is inherently ordered. In fact, in the grand scheme, “nature” and “order” are synonyms. But humans go to such lengths to control, contain, and manage the natural world that we’ve created a label for our failure to control nature: Chaos. Despite its negative connotation, what humans perceive as “chaos” is actually just a manifestation of the universe’s inexorable push toward natural order.
Let’s take a trip
Imagine all humans leave Earth for a scenic tour of the Milky Way. While we’re gone, no lawns are mowed, no buildings maintained, no fires extinguished, no floods controlled, no Starbucks built. Let’s say we return in 100 Earth years*. While the state of things would no doubt be perceived as chaotic, the reality is that our planet would in fact be closer to its natural state. And the longer we’re away, the more human-imposed “order” would be replaced by natural order.
* Since this is my fantasy, I’ve chartered a spaceship that accommodates all of humankind and travels at 90 percent of the speed of light. While Earth has indeed aged 100 years during our holiday, we travelers return only a year older. (Dubious? Don’t take my word for it, ask Albert Einstein.)
What does all this have to do with raindrops on a poppy?
Read the story of this saturated shoot in my All Wet blog post
Venturing outdoors with a camera and the mindset that nature is inherently ordered makes me feel like a treasure hunter—I know the treasure is there, I just have to find it. Patterns and relationships hidden by human interference and the din of 360 degree multi-sensory input, further obscured by human bias, snap into coherence when I find the right perspective.
Finding water droplets to photograph can be as simple as picking a subject and squirting it with a spray bottle of water or (better still) glycerin. But what fun is that? If I’d have been staging this, I probably would have insisted on an open poppy, maybe with more and bigger drops. But that’s not what Nature gave me this soggy afternoon. So I photographed this raindrop festooned poppy (and many others) the old fashioned way—within minutes I was as wet as the poppy, and (to quote the immortal Cosmo Kramer) lovin’ every minute of it.
Finding Natural Order
Click an image for a closer look and to view slide show.


The Shocking Truth About Lightning
Posted on April 7, 2019
Forked Lightning, Point Imperial, Grand Canyon
Sony a7RIII
Sony 100-400 GM
Lightning Trigger LT-IV
ISO 400
f/7.1
.4 seconds
Every year for the last 10 (or so) years I’ve traveled to the Grand Canyon during the Southwest summer monsoon to photograph lightning. Not only have I captured hundreds of lightning strikes and lived to tell about it (yay), I’ve learned a lot. A couple of years ago I added an article sharing my insights on photographing lightning to my photo tips section. With lightning season upon (or almost upon) us here in the United States, I’ve updated my article with new images and additional info. You can still find the article (with updates) in my Photo Tips section, but I’m re-posting it here in my regular blog feed as well.
Read the story of this image at the bottom of this post, just above the gallery of lightning images.
How to Photograph Daylight Lightning Without Getting Killed (Probably)
Let’s start with the given that lightning is dangerous, and if “safety first” is a criterion for intelligence, photographers are stupid. So combining photographers and lightning is a recipe for disaster.
Okay, seriously, because lightning is both dangerous and unpredictable, before attempting anything that requires you to be outside during an electrical storm, it behooves you to do your homework. And the more you understand lightning, how to avoid it and stay safe in its presence, the greater your odds of living to take more pictures. Not only will understanding lightning improve your safety, a healthy respect for lightning’s fickle power will also help you anticipate and photograph lightning.
Lightning enlightenment
Lightning is an electrostatic discharge that equalizes the negative/positive polarization between two objects. In fact, when you get shocked touching a doorknob, you’ve been struck by lightning. The cause of polarization during electrical storms isn’t completely understood, but it’s generally accepted that the extreme vertical convective air motion (convection is up/down circular flow caused when less-dense warm air rises, becomes more dense as it cools with elevation, and ultimately becomes cool/dense enough to fall. Convection is also what causes bubbling in boiling water. Convection in a thunderstorm carries positively charged molecules upward and negatively charged molecules downward. Because opposite charges attract each other, the extreme polarization (positive charge at the top of the cloud, negative charge near the ground) is quickly (and violently) equalized: lightning.
With lightning comes thunder, the sound of air expanding explosively when heated by a 50,000 degree jolt of electricy. The visual component of the lightning bolt that caused the thunder travels to you at the speed of light, over 186,000 miles per second (virtually instantaneous regardless of your distance on Earth). But lightning’s aural component, thunder, only travels at the speed of sound, a little more than 750 miles per hour—a million times slower than light. Knowing that the thunder occurred at the same time as the lightning flash, and how fast both travel, we can compute the approximate distance of the lightning strike. At 750 miles per hour, thunder will travel about a mile in about five seconds: Dividing the time between the lightning’s flash and the thunder’s crash by five gives you the lightning’s distance in miles; divide the interval by three for the distance in kilometers. If five seconds pass between the lightning and the thunder, the lightning struck about one mile away; fifteen seconds elapsed means it’s about three miles away.
Lightning safety
The 30 (or so) people killed by lightning in the United States each year had one thing in common with the rest of us: they didn’t believe they’d be struck by lightning when they started whatever it was they were doing when they were struck. The only sure way to be safe in an electrical storm is to be in a fully enclosed structure or metal-framed vehicle, away from open windows, plumbing, wiring, and electronics.
While there’s no completely safe way to photograph lightning, it doesn’t hurt to improve your odds of surviving to enjoy the fruits of your labor. (Unfortunately, photographing lightning usually requires being outside.) Most lightning strikes within a six mile radius of the previous strike. So, if less than thirty seconds elapses between the flash and bang, you’re too close. And since “most” doesn’t mean “all,” it’s even better to allow a little margin for error. Thunder isn’t usually audible beyond ten miles—if you can hear the thunder, it’s safe to assume that you’re in lightning range.
But if you absolutely, positively must be outside with the lightning crashing about you, or you simply find yourself caught outside with no available shelter, there are few things you can do to reduce the chance you’ll be struck:
- Avoid water
- Avoid high ground
- Avoid exposed areas
- Avoid metal or electronic objects
- Avoid tall objects such as trees and open structures (and tripods)
- Stay at least fifteen feet from other people
- Do not lie down
- If you’re surrounded by trees, position yourself near shorter trees, as far from trunks as possible
- Crouch with your feet together and your hands covering your ears
- A lightning strike is often preceded by static electricity that makes your hair stand on end and an ozone smell (best described as the smell of electricity—I think of bumper cars at the amusement park, or the smell of my electric slot cars when I was a kid)—if your hair starts to stand up and/or you notice a distinct odor that could be ozone, follow as many of the above steps as you can, as quickly as possible (often you’ll only have time to crouch)
 Three Strikes, Bright Angel Point, North Rim, Grand Canyon
Lightning How-to
Photographing lightning at night is mostly a matter of pointing your camera in the right direction with a multi-second shutter speed and hoping the lightning fires while your shutter’s open—pretty straightforward. Photographing daylight lightning is a little more problematic. It’s usually over before you can react, so without a lightning sensor to recognize lightning and click your shutter, success is largely dumb luck (few people are quick enough see it and click). And using a neutral density filter to stretch the exposure time out to 20 or 30 seconds sounds great in theory, but a lightning bolt with a life measured in milliseconds, captured in an exposure measured in multiple seconds, will almost certainly lack the contrast necessary to be be even slightly visible.
Lightning Trigger: The best tool for the job
Most lightning sensors (all?) attach to your camera’s hot shoe and connect via a special cable to the camera’s remote-release port. When engaged, the sensor fires the shutter (virtually) immediately upon detecting lightning, whether or not the lightning is visible to the eye or camera. With many lightning sensors from which to choose, before I bought my first one I did lots of research. I ended up choosing the sensor that was the consensus choice among photographers I know and trust: Lightning Trigger from Stepping Stone Products in Dolores, CO. At around $350 (including the cable), the Lightning Trigger is not the cheapest option, but after many leading lightning-oriented photo workshops, I can say with lots of confidence that lightning sensors are not generic products, and the internal technology matters a lot. Base on my own results and observations, the Lightning Trigger is the only one I’d use and recommend (I get no kickback for this). On the other hand, if you already have a lightning sensor you’re happy with, there’s no reason to switch.
I won’t get into lots of specifics about how to set up the Lightning Trigger because it’s simple and covered fairly well in the included documentation. But you should know that of the things that sets the Lightning Trigger apart from many others is its ability to put your camera in the “shutter half pressed” mode, which greatly reduces shutter lag (see below). But that also means that connecting the Trigger will probably disable your LCD replay, so you won’t be able to review your captures without disconnecting—a simple but sometimes inconvenient task. You also probably won’t be able to adjust your exposure with the Lightning Trigger connected.
The Lightning Trigger documentation promises at least a 20 mile range, and after many years using mine at the Grand Canyon, I’ve seen nothing that causes me to question that. It also says you can expect the sensor to fire at lightning that’s not necessarily in front of you, or lightning you can’t see at all, which I will definitely confirm. For every click with lightning in my camera’s field of view, I get many clicks caused by lightning I didn’t see, or that were outside my camera’s field of view. But when visible lightning does fire somewhere in my composition, I estimate that the Lightning Trigger clicked the shutter at least 95 percent of the time (that is, even though I got lots of false positives, the Lightning Trigger missed very few bolts it should have detected). Of these successful clicks, I actually captured lightning in at least 2/3 of the frames.
The misses are a function of the timing between lightning and camera—sometimes the lightning is just too fast for the camera’s shutter lag. In general, the more violent the storm, the greater the likelihood of bolts of longer duration, and multiple strokes that are easier to capture. And my success rate has increased significantly beyond 2/3 since switching from a Canon 5DIII to Sony mirrorless (more on this in the Shutter Lag section).
The Lightning Trigger documentation recommends shutter speeds between 1/4 and 1/20 second—shutter speeds faster than 1/20 second risk completing the exposure before all of the secondary strokes fire; slower shutter speeds tend to wash out the lightning. To achieve daylight shutter speeds between 1/4 and 1/20 second, I use a polarizer, with my camera at ISO 50 and aperture at f/16 (and sometimes smaller). Of course exposure values will vary with the amount of light available, and you may not need such extreme settings when shooting into an extremely dark sky. The two stops of light lost to a polarizer helps a lot, and 4- or 6-stop neutral density filter is even better with fairly bright skies (but if you’re using a neutral density filter, try to avoid shutter speeds longer than 1/4 second).
Shutter lag
Lightning is fast, really, really fast, so the faster your camera’s shutter responds after getting the command from the trigger device, the more success you’ll have. The delay between the click instruction (whether from your finger pressing the shutter button, a remote release, or a lightning sensor) and the shutter firing is called “shutter lag.”
The less shutter lag you have, the better your results will be. The two most important shutter lag factors are:
- Camera model: It’s surprising how much shutter lag can vary from manufacturer to manufacturer and model to model. In a perfect world, for lightning photography your camera’s shutter lag will be 60 milliseconds (.006 seconds) or faster (the lower the number the better), but 120 milliseconds (.012 seconds) or faster can give you some success. The top cameras from Sony, Nikon, and Canon are all fast enough, but the latest Sonys are the definite shutter lag winner (fastest), with Nikon a not too distant second, and Canon third. And shutter lag can vary with the manufacturer’s model: While my Sony a7RII is one of the fastest cameras out there, my a7R was unusably slow, so you need to check your model. Since I don’t check every camera released, it’s possible this ranking will change well before I update this article, so I recommend that you research shutter lag for your camera model. Unfortunately, shutter lag isn’t usually in the manufacturers specifications, so it’s hard to find. The best source I’ve found is the “Pre-focused” time in the Performance tab of the camera reviews at Imaging Resource.
- Camera settings: Basically, to minimize the “thinking” the camera needs to before firing, you want to be in manual everything mode—metering and focus. If your camera offers an electronic front curtain option (as my Sonys do), use it. If you must autofocus, go ahead and do it each time you recompose, then turn autofocus off as soon as you’re focused. Though the Lightning Trigger documentation suggests Aperture Priority metering, I use and recommend Manual metering mode to eliminate any camera-slowing metering (but Aperture Priority is fine if you have a strong preference). And, also despite what the Lightning Trigger documentation suggests, noise reduction is a post-capture function that might slightly delay continuous frames, but it won’t increase shutter lag.
Other equipment
In addition to a lightning sensor and fast camera, you’ll need:
- A solid tripod and head: Don’t even think about trying to photograph lightning hand-held
- Rain gear that keeps you dry from head-to-toe
- Umbrella (a.k.a., Wile E. Coyote Lightning Rod) to shield your camera and lightning sensor (many sensors, including the Lightning Trigger, aren’t waterproof) while you compose and wait in the rain. The umbrella is for when you’re photographing storm cells at a great distance, such as on the rim of the Grand Canyon and the lighting is across the canyon. Obviously, when the lightning gets within 10 miles, put the umbrella down and run for cover.)
- Lens hood to shield some of the raindrops that could mar the front element of your lenses
- Neutral density filter and/or polarizer to slow shutter speed into the ideal range (1/4 – 1/20 second)
- A garbage bag (my choice) or rainproof camera jacket (haven’t found one) to keep your camera and sensor dry during a downpour
- Extra lightning sensor batteries (better safe than sorry)
- Extra memory cards: When a storm is very close or active, your lightning sensor could detect 20 or 30 strikes per minute (even when little or no lightning is visible to the eye)
- Infrared remote to test your Lightning Trigger; I sometimes borrow the remote from my hotel room, but the Apple TV remote works great and is extremely compact (fits nicely into the Lightning Trigger pouch)
- A towel
Getting the shot
Lightning is most likely to strike in or near the gray curtains (clearly recognizable as distant rain) that hang beneath dark clouds. In addition to visible rain curtains, the darkest and tallest clouds are usually the most likely to fire lightning. Here are a few more points to consider:
- The wider your composition, the greater your odds of capturing lightning, but the smaller the lightning will appear in your image.
- Identify the most likely lightning cell and find the best composition that includes it. I tend to start with wider compositions to ensure success, then tighten my composition once I’m fairly confident I captured something.
- Note the height from which the lightning originates and be sure to include enough cloud to get all of the stroke. On the other hand, don’t include too much room above the lightning—the most frequent rookie mistake I see is too much sky/clouds in the frame. The second most frequent is lightning cut off at the top. Unless the storm is too close for safety, for any given cell, most lightning will originate from about the same height above the ground.
- The best lens is usually a midrange zoom such as a 24-70 or 24-105—if you find yourself reaching for the 16-35 (or wider), you’re too close.
- On the other hand, once you’re sure you’ve captured some good strikes, try putting on a 70-200. The narrow field of view can significantly reduce the number of frames with lightning, but the ones you get will be much larger in the frame and therefore more spectacular.
- Don’t forget to try some vertical compositions. I usually wait until after I know I’ve captured some in a horizontal frame because vertical narrows the horizontal field of view and lowers the odds of success a little.
- Lightning stands out better in a slightly underexposed image. My target shutter speed is usually 1/8 second (slow enough to include multiple pulses, but not so slow that I risk washing out the lightning). When the sky is relatively bright, dropping to 1/15 or even 1/20 second can make the lightning stand out better than 1/8 (but risks losing secondary strikes). Conversely, when the sky is extremely dark and the lightning is firing like crazy, extending to 1/4 second might increase your chances for multiple pulses.
- Just because you’re standing around waiting for things to happen, doesn’t mean there’s nothing to do. Keep your eyes glued to the sky and adjust your composition as the lightning shifts, or as new activity starts elsewhere. If you wait until you hear your shutter click or someone else exclaim before looking up, you won’t see the lightning. And monitor the light—your exposure can change by several stops as the storm moves, intensifies, or winds down.
- Try not to check your captures on your LCD until you’re done (or better yet, until you upload your images to your computer). With the Lightning Trigger (and some other sensors), viewing the LCD requires turning off the sensor, which risks missing a shot (I’m pretty sure lightning waits for me to turn off my sensor), and you’ll also find that many successful captures, especially wide compositions with a relatively bright sky, just aren’t that visible on an LCD viewed in daylight anyway.
Do as I say (not as I do)
Be aware that electrical storms can move quite quickly, so you need to monitor them closely. Sometimes this simply means adjusting your composition to account for shifting lightning; other times it means retreating to the car if the cell threatens your location. No shot is worth your life.
About this image

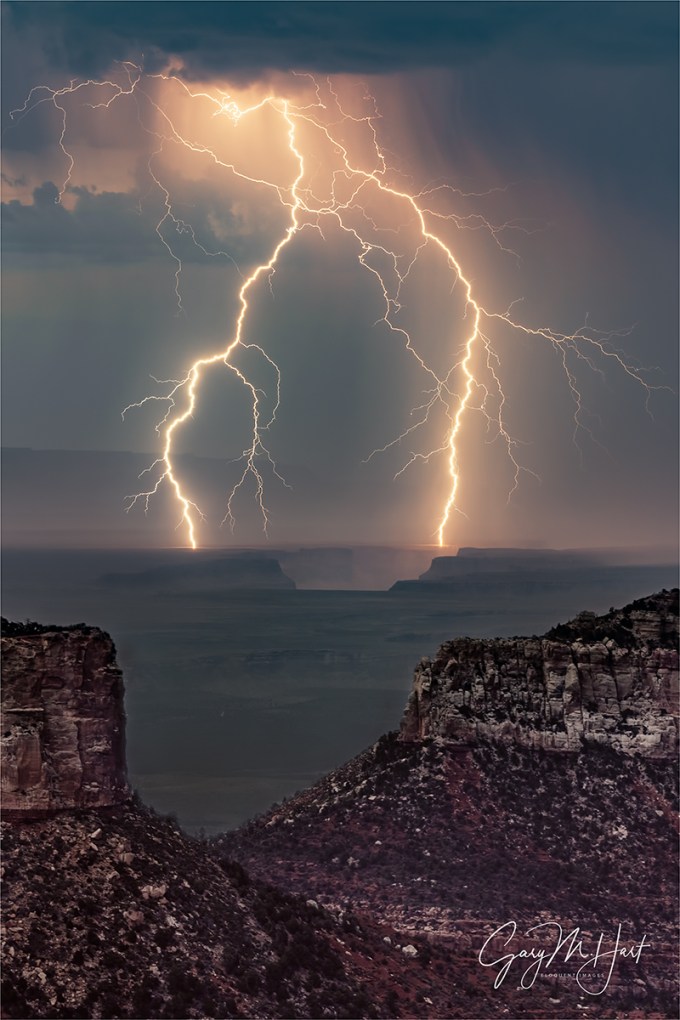
Forked Lightning, Point Imperial, Grand Canyon
On the first evening of last year’s second Grand Canyon Monsoon photo workshop, Don Smith and I took the group to Point Imperial for a sunset shoot. Based on the forecast we had little hope for lightning, but one thing I’ve learned over the many years of photographing the monsoon here is that the forecast isn’t the final word. We got another reminder of this that evening.
The view from Point Imperial is both expansive and different from other Grand Canyon vistas, stretching east across the Painted Desert and north to the Vermillion Cliffs. As the group made their way down to the vista platform, in the corner of my I thought I a lighting strike far to the north. A second bolt confirmed my discovery and soon we had the entire group lined up with cameras pointed and triggers ready.
With everyone in business, I set up my tripod and attached my Lightning Trigger to my Sony a7RIII. Since this lightning was close to 30 miles away, maybe farther than any lightning I’ve tried to photograph, so I hauled out my Sony 100-400 GM lens and zoomed in as tight as I could. I didn’t have to wait long to confirm that my Lightning Trigger would catch strikes this distant—it didn’t hurt that these were massive bolts, many with multiple pulses and forks.
Everyone was thrilled, so thrilled that it didn’t immediately register that the storm was moving our direction. I started at 400mm, but by the time I captured this frame I was just a little more than 100mm. That’s still a pretty safe distance, but with night almost on us and another cell moving in from the east, we decided to take our winnings and go home.
One final note: If you check my exposure settings, you’ll see that my shutter speed here was .4 seconds, well outside the 1/20-1/4 second range I suggest. But if you look at the other settings, you’ll see that I’d opened up to f/7.1, and had cranked my ISO to 400, an indication that twilight was settling in. Successful lightning photograph is all about contrast, and the darker the sky, the better the bolt stands out, even in a longer exposure. Had we stayed past dark (and lived), we could have jettisoned the Lighting Triggers and used multi-second exposures.
Join Don Smith and me in our next Grand Canyon Monsoon Photo Workshop
Read my article in Outdoor Photographer magazine, Shooting the Monsoon
Workshop Schedule || Purchase Prints
A Lightning Gallery
Click an image for a closer look and slide show. Refresh the window to reorder the display.


All Wet
Posted on April 5, 2019
Raindrops on Poppy, Sierra Foothills
Last Monday seemed like the perfect day for a poppy shoot in the foothills. I had the afternoon wide open—with the California media buzzing about this year’s “superbloom,” plus a forecast promising ideal conditions (calm wind and thin clouds), I couldn’t help dreaming about my own images of poppy-saturated fields. What could possibly go wrong?
Getting on the road proved a little more problematic than anticipated, but by 2 p.m. I was on my way, encouraged forward by an occasional poppy beside the freeway. Adding to my optimism, the aforementioned clouds were just right: thick enough to diffuse the sunlight, but not so dark that they’d close the sun-loving poppies. I exited the freeway as soon as possible, opting to drive the 2-lane roads that follow the hills’ natural contours. While my preferred my route isn’t the most direct, it is the most scenic, winding me through oak-studded hills deeply greened by this year’s copious winter rain. Though this drive takes a little more than an hour, the time passes quickly with so much pastoral beauty filling my windshield.
I knew the poppies in Northern California were starting late due to our relatively late winter, but was fairly confident I’d allowed enough time for the golden hillsides to kick in. In a good spring, poppies dot the entire route, but by the time I was southbound on scenic Highway 49, I started realizing I hadn’t seen any poppies since leaving Sacramento. Soon I was pretty resigned to the fact that this year’s superbloom was limited Southern California, and wondered if I’d find any poppies at all. Then it started to rain.

Yosemite in a Raindrop, Valley View, Yosemite
As easy as it would have been easy to cut my losses and turn around, I simply changed my expectations. With fresh memories of a brief but rewarding raindrop experience in Yosemite, I realized I didn’t need to find entire hillsides covered with poppies, that even a single poppy could be nice. So, rather than zipping along Highway 49 at 50 MPH (-ish) looking for golden slopes, I started exploring some of the quieter tributary roads and quickly realized that there were a sprinkling of poppies out.
I ended up spending two hours photographing a small patch of poppies I found on a dead-end road near Jackson. It rained the entire time, but with rain gear in my car for just these situations, I stayed warm and dry. My camera? Not so much. I tried working with an umbrella, but after a few minutes realized I was one arm short and just decided to test the water resistance of my Sony a7RIII. I’m happy to say that it passed with flying colors, as did the Sony 100-400 GM.
In the two weeks since I shot those raindrops in Yosemite, I’ve been plotting how to get even closer. On the Yosemite shoot I added extension tubes to my 100-400; this afternoon I returned to the extension tubes, but added my 2X teleconverter (which, I might add, handled the rain perfectly as well). I thought I’d try a few lens/extension-tube/teleconverter configurations, but I was having so much fun that I ended up shooting this way the entire time.
On a rainy day, light is already limited. But adding a teleconverter and extension tubes compounds the light problem. Because f/stop is a ratio with focal length as the numerator and lens opening as the denominator, adding a teleconverter and extension increases the focal length, resulting in less light reaching the sensor. A 2x teleconverter cuts two stops of light, which means my 100-400 that’s normally wide upon f/5.6 at 400mm becomes f/11 at (the teleconverted) 800mm (400mm x 2). And adding extension tubes also extends the lens’s effective focal length, further reducing the light reaching the sensor. To compensate for all this missing light, I shot everything this afternoon at either ISO 1600 or ISO 3200.
One of the cool things about this kind of photography is how different the world looks through the viewfinder. I love putting my eye to the viewfinder, moving the lens around, and changing focus slowly to see what snaps into view. In this case I was looking for a poppy to isolate from its nearby surroundings, but that also has something nearby (usually another flower) that I could soften enough to complement without competing. Sometimes I had a general idea of a subject before looking through my camera, other times I’d just explore with my lens until something stopped me.
Because depth of field shrinks not only with focal length, but also with focus distance, every frame I clicked this afternoon had a paper-thin range of sharpness. With such a shallow depth of field, none of these images would have been possible without a tripod. With my composition set, I’d pick a focus point (usually, but not always, a prominent raindrop), focus in my viewfinder until I was “certain” it was sharp, then instantly debunk my that “certainty” by magnifying the image in my viewfinder. This little exercise quickly taught me that with such a small margin for error, the best I could reliably achieve without magnifying the view was almost sharp enough, making pre-click magnification an essential part of my focus workflow (instead of just a cursory focus-check).
Each time I do this kind of photography I learn something. In this case it was how far away I could be and still fill my frame with a poppy. All of the images I captured this afternoon were from four to six feet away.
I wrapped up when the sky darkened further and the rain started coming down pretty hard. I couldn’t believe I’d been out there two hours, and spent most of the drive strategizing new ideas for the next time.
Getting the Drop on Nature
Click an image for a closer look and to view slide show.


Expose yourself
Posted on March 10, 2019
Glisten, Diamond Beach, Iceland
Sony a7R III
Sony 12-24 f/4 G
1/25 second
F/18
ISO 100
With advanced exposure and metering capabilities, cameras seem to be getting “smarter” every year. So smart, in fact, that for most scenes, getting the exposure right is a simple matter of pointing your camera and clicking the shutter button. That’s fine if all you care about is recording a memory, but not only is there more to your exposure decision than getting the amount of light in your picture, there are many reasons to over- or underexpose a pictures. For the creative control that elevates your images above the millions of clicks being cranked out every day, giving control of one of its most important responsibilities to your camera overlooks an undeniable truth…
Your camera is stupid
Sorry—so is mine. And while I can easily cite many examples, right now it’s just important that you understand that your camera thinks the entire world is a middle tone. Regardless of what its meter sees, without intervention your camera will do everything in its power to make your picture a middle tone. Sunlit snowman? Lump of coal at the bottom of your Christmas stocking? It doesn’t matter—if you let your camera decide the exposure, it will turn out gray.
Modern technology offers faux-intelligence to help overcome this limitation. Usually called something like “matrix” or “evaluative” metering, this solution compares a scene to a large but finite internal database of choices, returning a metering decision based on the closest match. It works pretty well for conventional, “tourist” snaps, but often struggles in the warm or dramatic light artistic photographers prefer, and knows nothing of creativity. If you want to capture more than documentary “I was here” pictures, you’re much better off taking full control of your camera’s metering and exposure. Fortunately, this isn’t nearly as difficult as most people fear.
Laying the foundation
The amount of light captured for any given scene varies with the camera’s shutter speed, f-stop, and ISO settings. Photographers measure captured light in “stops,” much as a a cook uses a cup (of sugar or flour or almonds or whatever) to measure ingredients in a recipe. Adding or subtracting “stops” of light by increasing or decreasing the shutter speed, f-stop, or ISO makes a scene brighter or darker.
The beauty of metering is that a stop of light is a stop of light is a stop of light, whether you control it with the:
- Aperture: The opening light passes through when the shutter opens, measured in f-stops
- Shutter speed: The time the shutter is open, allowing light to pass through the aperture to reach the sensor—slower shutter speeds mean more light; faster shutter speeds mean less light
- ISO: The sensitivity of the sensor (or film) to light
But while an aperture stop adds/subtracts the same amount of light as a shutter speed or ISO stop, the resulting picture can vary significantly based on which exposure variable combination you choose. Your shutter speed choice determines whether motion in the frame is blurred or frozen, while the aperture choice determines the picture’s depth of field. And while an ISO stop also adds/subtracts the same amount of light as shutter speed and aperture without affecting motion and depth, image quality decreases as the ISO increases. So getting the light right is only part of the exposure objective—you also need to consider how you want to handle any motion in the scene, and how much depth of field to capture.
For example, let’s say you’re photographing autumn leaves in a light breeze. You got the exposure right, but the leaves are blurred. To freeze that blur, you halve the time the shutter is open (faster shutter speed) to freeze the motion, but also reducing the light reaching the sensor by one stop. To replace that lost light, you could open your aperture by a stop (change the f-stop), double the ISO, or make a combination of fractional f-stop and ISO adjustments that total one stop. That’s a creative choice your camera isn’t capable of.
Metering modes
Today’s cameras have the ability to measure, or “meter” the light in a scene before the shutter clicks. In fact, most cameras have many different ways of evaluating a scene’s light. Your camera’s metering mode determines the amount of the frame the meter “sees.” The larger the area your meter measures, the greater the potential for a wide range of tones. Since most scenes have a range of tones from dark shadows to bright highlights, the meter will take an average of the tones it finds in its metering zone.
Metering mode options range from “spot” metering a very small part of the scene, to “matrix” (also know as “evaluative”), which looks at the entire scene and actually tries to guess at what it sees. Each camera manufacturer offers a variety of modes and there’s no consensus on name and function (different function for the same name, same function for different names) among manufacturers, so it’s best to read your camera’s manual to familiarize yourself with its metering modes.
Since I want as much control as possible, I prefer spot metering because it’s the most precise, covering the smallest area of the frame possible, an imaginary circle in the center three (or so) percent (depending on the camera) of what’s visible in the viewfinder. Spot metering, I can target the part of the frame I deem most important and base my exposure decision on the reading there.
Spot metering isn’t available in all cameras. In some cameras, the most precise (smallest metering area) metering mode available is “partial,” which covers a little more of the scene, somewhere around ten percent.
Exposure modes
Don’t confuse the metering mode with the exposure mode. While the metering mode determines what the meter sees, the exposure mode determines the way the camera handles that information. Most DSLR (digital single lens reflex) and mirrorless cameras offer manual, aperture priority, shutter priority, and a variety of program or automatic exposure modes. Serious landscape photographers usually forego the full automatic/program modes in favor of manual (my preference) or aperture/shutter priority modes that offer more control.
If you select aperture or shutter priority mode, you specify the aperture (f-stop) or shutter speed, and the camera sets the shutter speed or aperture that delivers a middle tone based on what the meter sees. But you’re not done. Unless you really do want the middle tone result the camera desires (possible but far from certain), you then need to adjust the exposure compensation (usually a button with a +/- symbol) to specify the amount you want your subject to be above or below a middle tone.
For example, if you point your spot meter at a bright, sunlit cloud, the camera will only give your picture enough light make the cloud a middle tone—but if you’ve only given your scene enough light to make a white cloud gray, it stands to reason that the rest of your picture will be too dark. To avoid this, you would adjust exposure compensation to instruct your camera to make the cloud brighter than a middle tone by adding two stops of light (or however much light you want to give the cloud to make it whatever tone you think it should be).
Rather than aperture priority, I prefer manual mode because I never want my camera making decisions for me. And once it’s mastered (a simple task), I think manual metering is easier. In manual mode, after setting my aperture (based on the depth of field I want), I point my spot-meter zone (the center 3% of the scene in my viewfinder) at the area I want to meter on and dial in whatever shutter speed gives me the amount of light I think will make that subject (where my meter points) the tone I want. That’s it. (In manual mode you can ignore the exposure compensation button.)
Trust your histogram
I see many people people base exposure decisions on the brightness of the image on the LCD. The typical approach is some variation of: 1) Guess at the exposure settings 2) Click 3) Look at the picture on the LCD 4) Adjust 5) Repeat. Not only is this approach lazy, it’s a waste of time and woefully inaccurate.
I call it lazy because these photographers (but of course I don’t mean you) don’t care enough about their craft to apply a skill that only takes minutes to learn (see above), a skill that will serve them best in the most difficult exposure situations. But that’s not the real problem—the real problem is the inaccuracy introduced by trusting the image on your LCD.
LCDs vary in brightness because viewing conditions change. With a brightness adjustment in every camera’s menu, many photographers simply turn their brightness to maximum because it’s easier to see, especially in sunlight, and a bright picture usually looks better. Other photographers use an auto-brightness setting that adjusts with ambient light—the more light it detects, the brighter the display.
Regardless of your LCD’s brightness setting, the variation in brightness of the screen and/or the ambient light make the image on the LCD a very unreliable exposure indicator. When people tell me their images are usually too dark on their computer or in prints, the first thing I do is check the brightness of their camera’s LCD—if it’s set to maximum, they’re likely fooled into thinking the exposure was brighter than it actually was.
How do you fix this? Simple: Learn to read a histogram, and never use your camera’s LCD for exposure decisions again. The histogram is as simple as it is useful.

Day’s End, Ke’e Beach, Hawaii

A histogram is a plot of the tones in an image. I’ll save a more complex explanation for another day, but all you really need to know is that the graph starts with black on the left and brightens to white on the right. Every pixel in the image is sampled for its brightness—the brighter it is, the farther to the right it falls on the histogram. Anything in the image that’s too dark to display detail (black) is “clipped” (cut off) on the left side; anything in the image that’s too bright too display detail is clipped on the right. Ideally, nothing will be clipped on either side. If your scene contains a greater range of light (dynamic range) than will fit in the histogram, one side or the other will clip and you have exposure decisions too make—HDR (blending multiple exposures), graduated neutral density filters, or deciding that it’s okay to lose one side or the other (shadows or highlights). For example, the Ke’e Beach image above is predominantly middle tones, with just a few extremely bright and extremely dark pixels.
One more time
So let’s review. Start by selecting your metering mode (the way your meters”sees” the scene: spot, partial, matrix, and so on), then take your camera out of auto exposure mode and put it in manual (my recommendation) or aperture priority (if you prefer) mode. (Remember, I’m a landscape photographer so I never use shutter priority; if you’re shooting action, to better control the motion in your frame, you probably want to consider shutter priority if you don’t like manual exposure.)
Before metering, set your camera to whatever aperture you decide your composition calls for. Then meter, remembering that your camera isn’t telling you what the exposure should be, it’s telling you the exposure that will make what it sees a middle tone. Finally, correct the meter’s middle-tone bias by dialing in the shutter speed (in manual mode) or exposure compensation (in aperture priority) that gives the correct exposure.
After you click, check your histogram to be sure you got the exposure right.
What’s the correct exposure? That’s a creative choice that’s entirely up to you—feel free to play until you’re comfortable with your results. And the more you do it, the easier it gets.
For example
Below are some sample images and the thought process I followed to get the exposure.

Winter Reflection, El Capitan, Yosemite After choosing the aperture that gave me the depth of field I wanted, I spot-metered on the sunlit portion of El Capitan’s reflect (because it was the brightest thing in my frame and dialed my shutter speed until the meter indicated +2. That setting gave me enough light to resolve details in the shadows, but not so much light that the El Capitan highlights were blown out. If I’d have followed my meter’s “suggestion” to make El Capitan’s highlights a middle tone, the entire scene would have been too dark.

Here’s one matrix/evaluative metering would have made a mess of. The dynamic range (range of light between the darkest shadows and brightest highlights) was off the charts. Rather than compromise, I exposed to hold the color in the sky and let the foreground go to silhouette. I metered on the brightest (goldish) part of the sky next to Half Dome and dialed my exposure to +.3 (1/3 stop above middle tone). The sky was brighter than what you see here, but underexposing like this allowed me to emphasize the sky’s rich blue and the very Yosemite outline of Half Dome and Sentinel Dome. The highlights in the thin lunar crescent were clipped, but I didn’t care about the moon’s detail, only it’s shape.

Who says you should never blow your highlights? Here I metered on the brightest part of the poppy (near the top), setting my exposure to .7 (2/3 stop above middle tone). Everything you see that’s white is blown blue sky (except the “star,” which is a sliver of the sun).
Now get to work
Don’t wait to apply all this for the first time until you really, really want the shot. Instead, find a time when the results don’t matter and play with your camera to find out how much control you have over exposure. In fact, you can do this right now in your backyard or even sitting right there in your recliner. Meter something nearby, set an exposure, and click. Look at the result, adjust the exposure, and click again. Watch your histogram, and watch how its shape shifts right as you increase the exposure, or left as you decrease it. Continue doing this until you’re confident in your ability to make a scene brighter or darker, and can consistently achieve the exposure you expect.
About this image

Glisten, Diamond Beach, Iceland
It not too difficult to figure out how Iceland’s Diamond Beach got its name. A black sand beach on Iceland’s south coast, just down stream from Glacier Lagoon, Diamond Beach is dotted with glistening blocks of ice ranging in size from a refrigerator ice cube, to an entire refrigerator.
As spectacular as Diamond Beach was on my first visit, it was also unlike anything I’d ever seen, so it took me a little while to figure out how I wanted to shoot it. I tried a few frames that used long shutter speeds to blur the motion of the waves around the ice, but when the sun appeared, I saw another opportunity.
With my Sony 12-24 G lens on my Sony a7RIII, I set up just a couple of feet from one of the larger icebergs, went all the way out to 12mm, and waited for the sun to peek above the ice, hoping to capture a sunstar. As I waited, I tweaked my exposure settings, dialing my aperture to f/18 to maximize my depth of field and to enhance the sunstar effect. When the sun appeared I was in business; as it rose, I dropped my camera lower to keep just a small sliver of sun visible above the ice.
Any frame that includes the sun is frame with lots of dynamic range. To get my exposure right for this image, I relied entirely on the histogram and ignored the image on the LCD, with its nearly black shadows and white sky. Despite the way histogram told me I’d captured all the tones, and I confirmed that as soon as I started processing in Lightroom.
Workshop Schedule || Purchase Prints
Taking Control in Difficult Light
Click an image for a closer look, and a slide show.


